Frozen bananas blended into creamy, ice-cream-like perfection — that’s nice cream, and it’s become the go-to dessert for anyone who wants something indulgent-tasting but actually wholesome. If you’ve been scrolling past recipes online wondering what the fuss is about, here’s the honest truth: nice cream is ridiculously simple to make, tastes genuinely delicious, and works for nearly every dietary restriction you can name. The base is always the same — frozen bananas, a splash of milk, maybe a touch of sweetener — but the variations are what make it endlessly exciting.
What makes nice cream so appealing is that it requires zero cooking skills and zero special equipment. No ice cream maker needed. No churning. Just a blender or food processor, some patience while your bananas freeze, and about five minutes of active time. The texture is naturally creamy thanks to the bananas themselves, and you can adapt the flavor to literally anything you’re craving that day. Want chocolate? Add cocoa powder. Craving fresh fruit? Blend in some berries. Need more protein? Stir in some nut butter. This is dessert that feels indulgent but actually contains real food.
Throughout this guide, I’m walking you through not just one nice cream recipe but four completely different flavor routes, each with specific techniques and ingredient ratios that make it shine. Whether you’re making plain vanilla, rich chocolate, bright strawberry, or creamy peanut butter nice cream, you’ll have everything you need to nail the texture and flavor every single time.
Why Nice Cream Is the Perfect Dessert
Nice cream sits in this magical sweet spot where it satisfies a serious ice cream craving without the processed ingredients, artificial flavors, or excessive sugar you get with conventional frozen desserts. A single serving contains maybe two ingredients and can be ready in less than ten minutes if you plan ahead by keeping frozen bananas on hand. It’s that rare dessert that’s both genuinely good for you and genuinely delicious.
The nutritional profile is surprisingly clean. Bananas bring natural sweetness, fiber, potassium, and B vitamins. When you add a splash of milk — whether dairy or plant-based — you’re introducing protein and creaminess without thickeners or gums. Fresh fruit additions like berries or citrus bring vibrant flavor and antioxidants. Even when you add indulgent mix-ins like cocoa powder or nut butters, you’re still looking at a dessert that’s far more nutrient-dense than traditional ice cream.
Beyond the health angle, nice cream has a practical advantage: it’s endlessly customizable. The same basic method works whether you’re making a simple vanilla version or going wild with flavor combinations. Once you understand the core technique — how to freeze bananas, blend them to the right consistency, and balance the liquid and mix-ins — you can create dozens of variations without learning new skills.
What You Need to Make Nice Cream
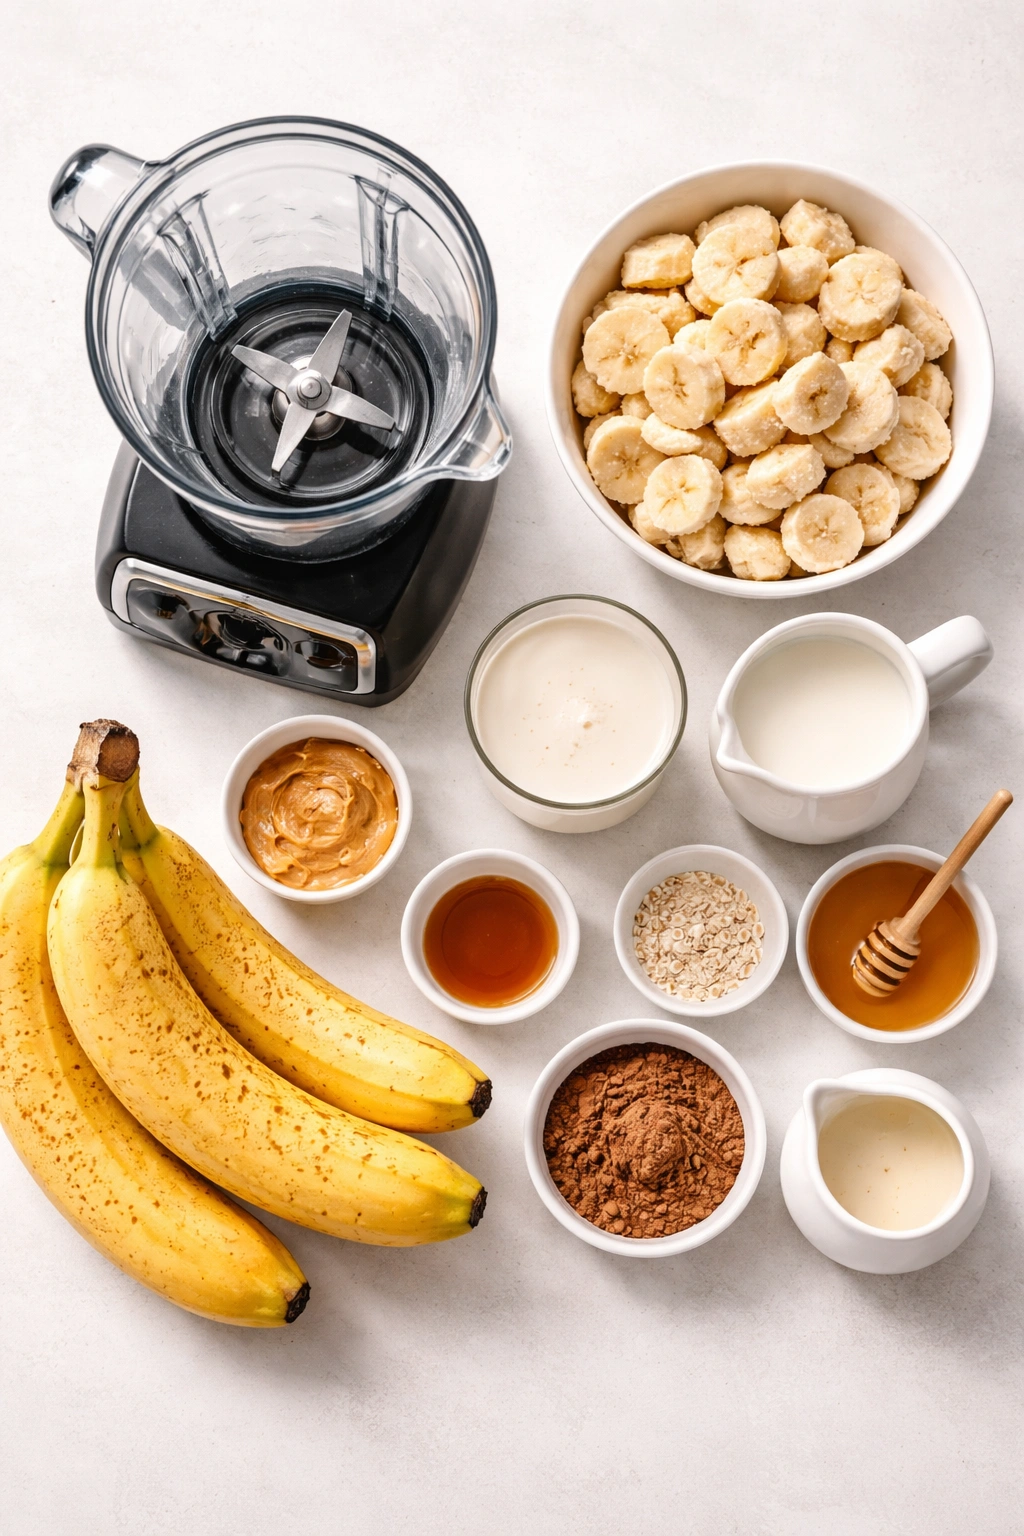
You’ll need far less equipment and fewer ingredients than you might expect. A blender or food processor is your main tool — a high-powered blender like a Vitamix or Ninja will give you the silkiest texture, but any standard blender works fine. Some people use an immersion blender for smaller batches, though it requires a bit more elbow work and patience. A food processor is an excellent alternative and actually gives you more control over the final texture than a regular blender sometimes does.
Ingredient essentials are simple: ripe bananas, which you’ll freeze yourself, and a liquid to help the blender do its job without making the nice cream too thin. Whole milk creates the richest texture, but any milk works — oat milk has become a popular choice because it’s naturally creamy and doesn’t have a strong flavor that competes with delicate fruit notes. Almond milk works fine too, though it’s thinner and less forgiving if you make blending mistakes.
Beyond those basics, you’ll want sweetener on hand (though bananas are already sweet, a touch of honey or maple syrup deepens the flavor), vanilla extract for flavor building, and cocoa powder or fruit puree for your variations. Having a good vanilla extract makes a genuine difference — pure vanilla beat imitation extract every single time in both flavor and mouthfeel.
The Classic Vanilla Nice Cream
Yield: Serves 2 to 3 | Makes about 2 cups
Prep Time: 10 minutes active time (plus 2-4 hours for banana freezing)
Cook Time: 0 minutes
Total Time: 10 minutes active + 2-4 hours freezing
Difficulty: Beginner — this requires only a blender and three ingredients; freezing the bananas ahead is the only step that takes planning.
Ingredients for Classic Vanilla Nice Cream
- 3 large ripe bananas, peeled and sliced into ½-inch rounds, frozen solid (at least 2-4 hours or preferably overnight)
- 3-4 tablespoons whole milk (or oat milk, almond milk, or coconut milk)
- 1 teaspoon pure vanilla extract
- 1 tablespoon honey or maple syrup (optional, adds depth and prevents icy texture)
- Pinch of fine sea salt
Instructions for Making Vanilla Nice Cream
Prepare Your Bananas (Done in Advance):
-
Choose bananas that are mostly yellow with some brown flecks — they’re sweeter and more flavorful than pure yellow ones, but not so ripe they’re brown all over. Peel them, then slice each banana crosswise into ½-inch thick rounds.
-
Spread the banana slices in a single layer on a parchment-lined baking sheet, making sure they don’t touch each other. Freeze for at least 2 to 4 hours, but overnight is ideal — the longer they freeze, the creamier your nice cream will be because the frozen banana will blend more smoothly.
Make the Nice Cream:
-
Add the frozen banana slices to a food processor or high-powered blender. Do not skip the food processor option — it gives you more control over texture than a regular blender sometimes does, and you’ll have better success with less liquid.
-
Pour in 3 tablespoons of milk, then add the vanilla extract, honey (if using), and a tiny pinch of salt. The salt is crucial — it brightens the vanilla and makes the sweetness taste more rounded and sophisticated.
Advertisements -
Process or blend on medium speed for about 30 seconds. Stop and scrape down the sides with a spatula. At this point, the mixture will look broken and crumbly, almost like wet sand — this is completely normal and exactly what you want to see.
-
Return the blender or processor to medium speed and process for another 30 to 60 seconds. Scrape down the sides again. The mixture should now start to come together and look creamy. This is the critical moment. If the mixture is too thick and not moving, add 1 tablespoon more milk at a time until it’s blendable — but add less rather than more, because too much liquid makes watery nice cream.
-
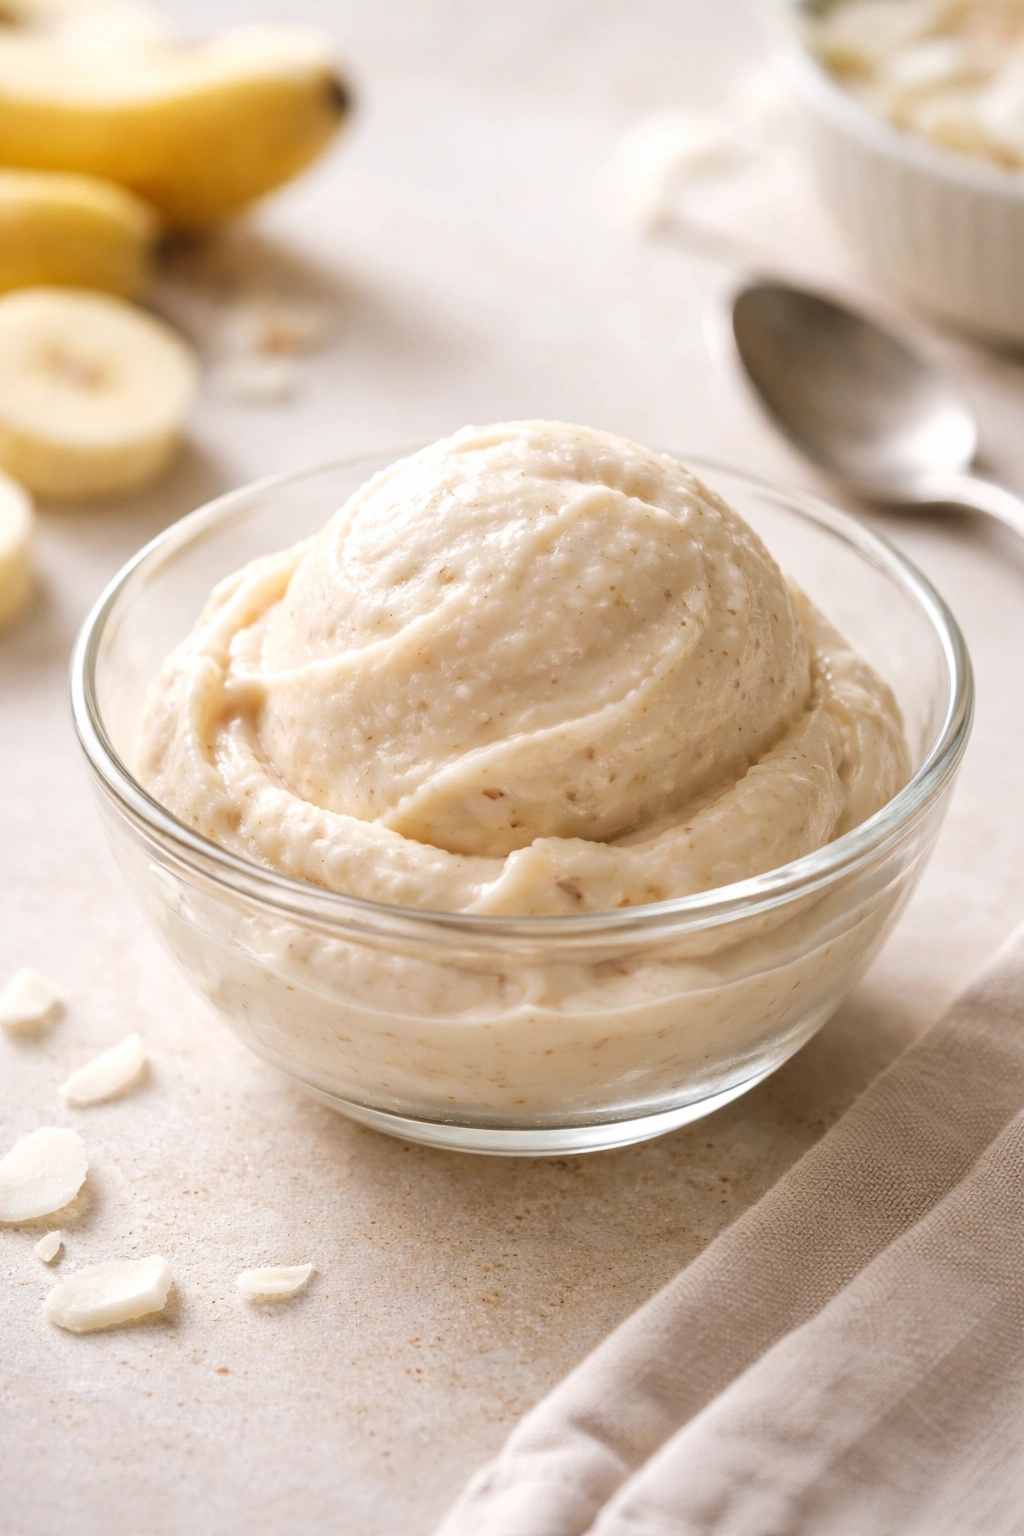
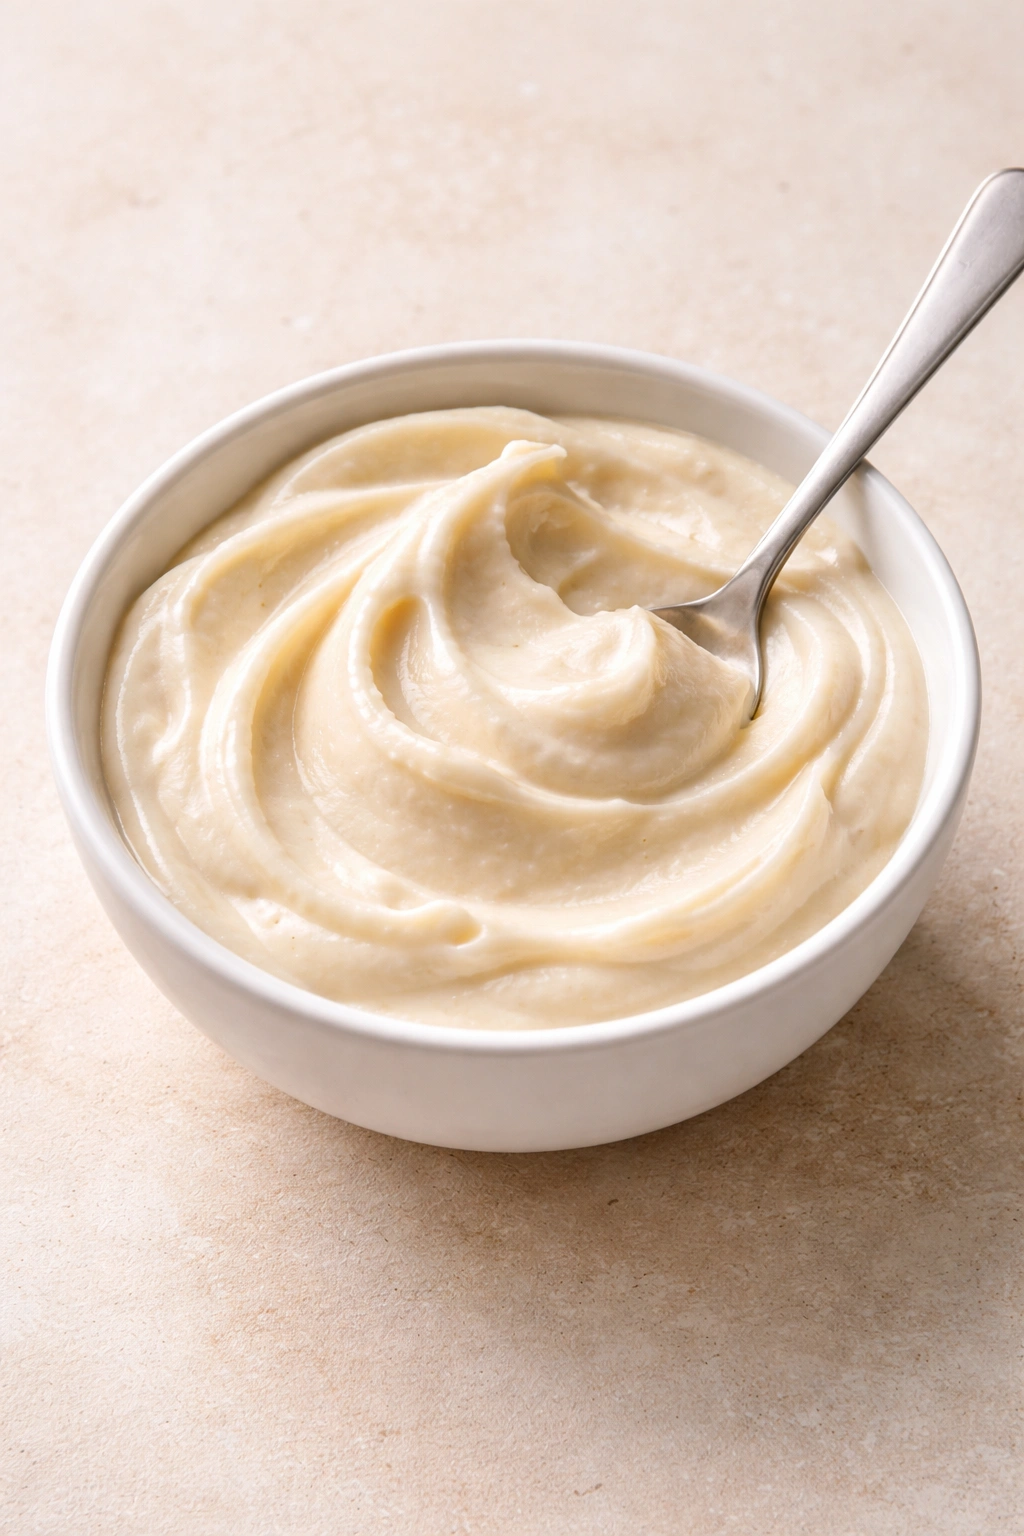
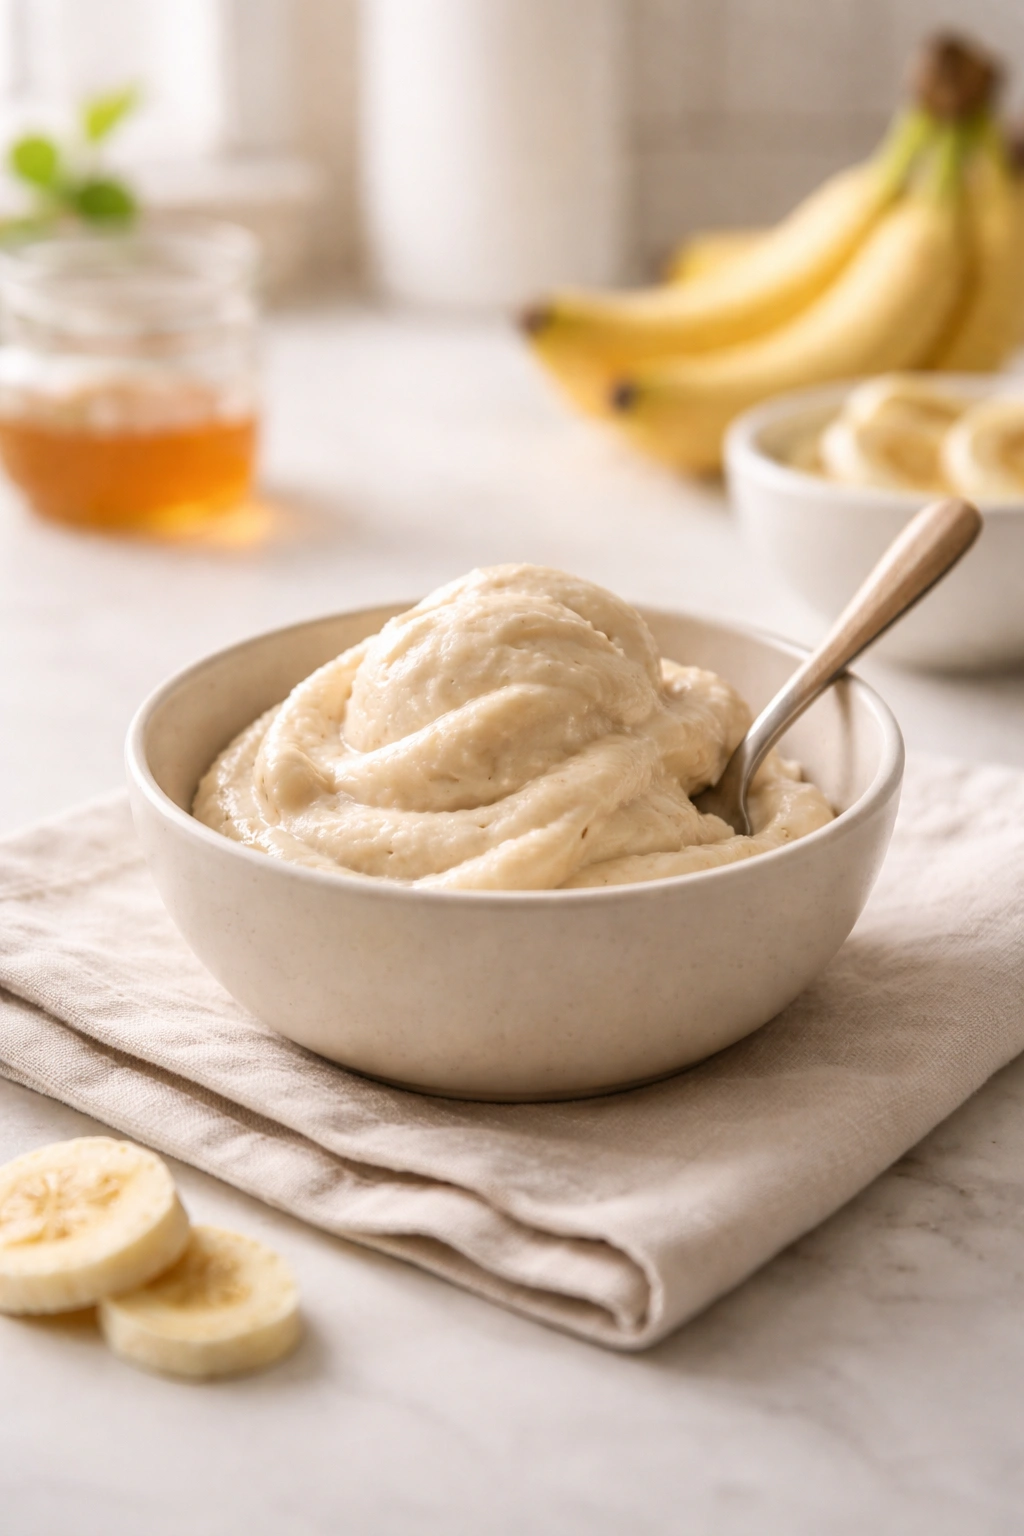
Process for another 15 to 30 seconds until the texture is smooth, creamy, and resembles soft-serve ice cream. It should look pale, thick, and scoopable — not chunky, not runny. You’re aiming for the texture of really high-quality soft-serve that just came out of the machine.
-
Serve immediately for soft-serve consistency, or transfer to an airtight container and freeze for 30 to 45 minutes if you prefer a firmer scoop. You can freeze nice cream for up to 3 days, though it tastes best within 24 hours.
Chocolate Nice Cream: Rich and Indulgent
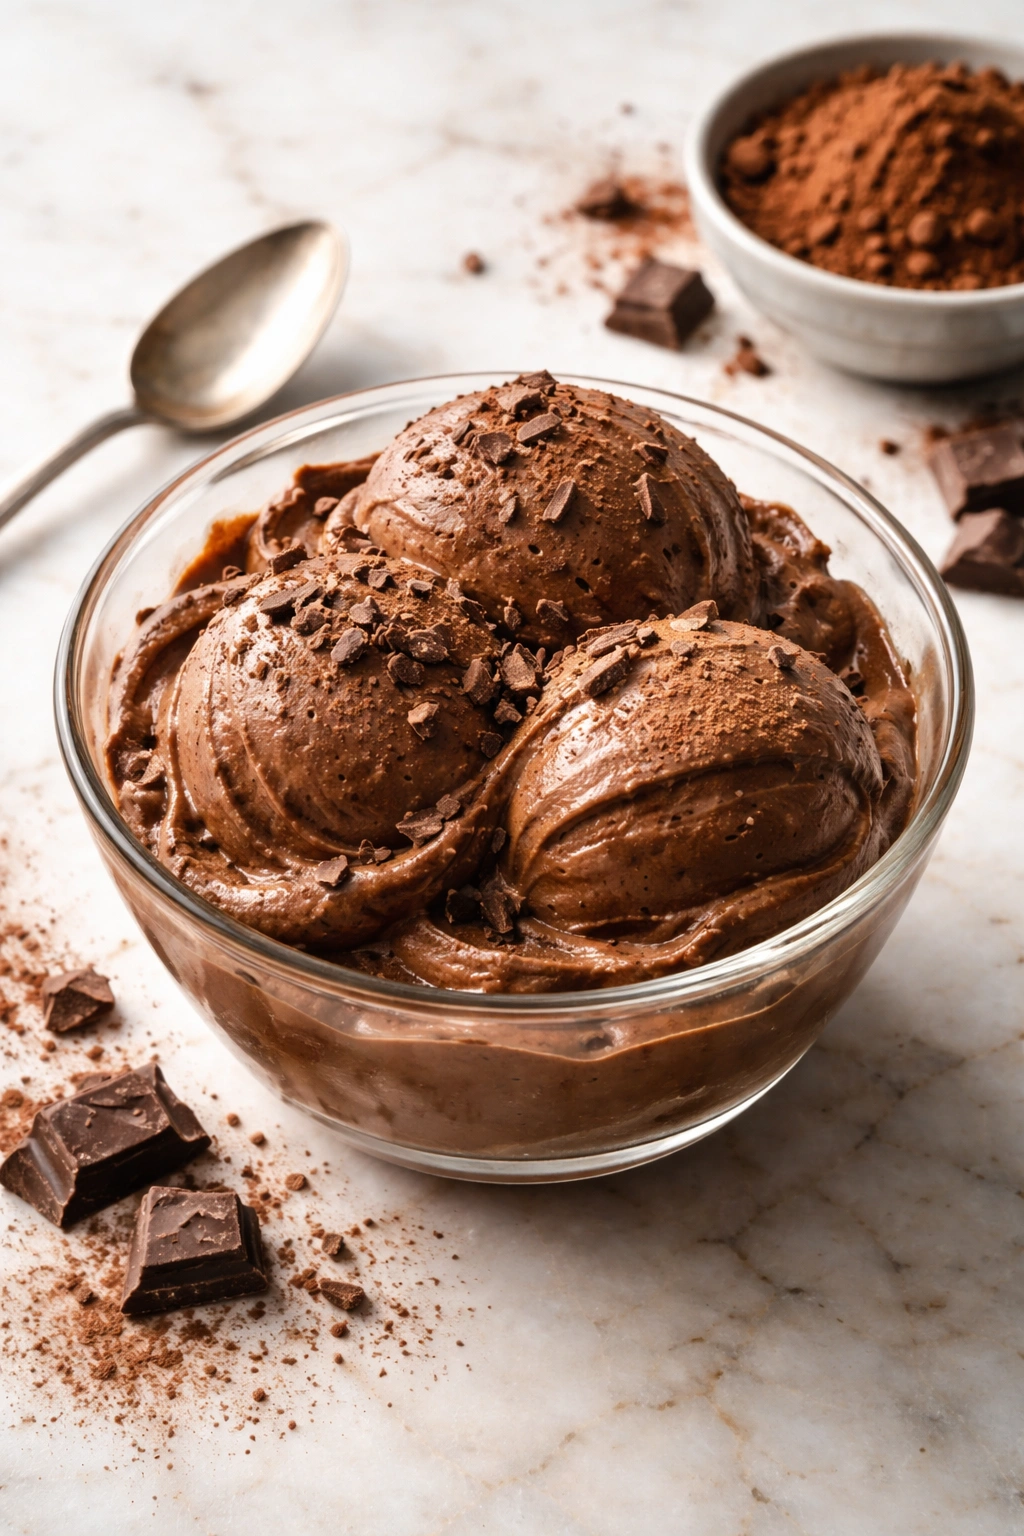
Chocolate nice cream is where things get exciting. This version leans rich and fudgy — it’s the one you make when you want something that genuinely tastes like dessert, not a health food. The key is using good cocoa powder and not overdoing it, because cocoa can make nice cream bitter if you’re too heavy-handed.
For chocolate nice cream, start with the same base — frozen bananas, milk, vanilla, salt — then add 2 to 2.5 tablespoons unsweetened cocoa powder sifted directly into the blender with the other ingredients. Sifting matters here because cocoa powder clumps easily and you don’t want chocolate bits suspended in your nice cream. If you don’t have a sifter, whisk the cocoa powder with the milk before adding it to the blender, which breaks up the clumps.
The blending process is slightly different for chocolate because cocoa powder is drier than banana and requires a touch more patience. After the initial 30-second blend and scrape, you’ll probably need to add one more tablespoon of milk. The cocoa powder absorbs liquid, so don’t be surprised if your mixture looks dryer than the vanilla version. Keep scraping and blending in 15-second intervals until you reach that perfect soft-serve texture.
For extra richness, replace 1 tablespoon of regular milk with 1 tablespoon of full-fat coconut milk. The coconut fat creates an incredibly luxurious mouthfeel and pairs beautifully with chocolate. If you want an even deeper chocolate flavor, add ½ teaspoon of instant espresso powder — it won’t make the nice cream taste like coffee, but it will amplify the chocolate notes and make them taste more mature and sophisticated.
Optional additions for chocolate nice cream: A swirl of almond butter or peanut butter stirred in at the very end creates a flavor similar to Reese’s peanut butter cups. A sprinkle of sea salt on top contrasts beautifully with the sweetness. A handful of chocolate chips folded in after blending, while the nice cream is still soft, gives you little chocolate shards as you eat.
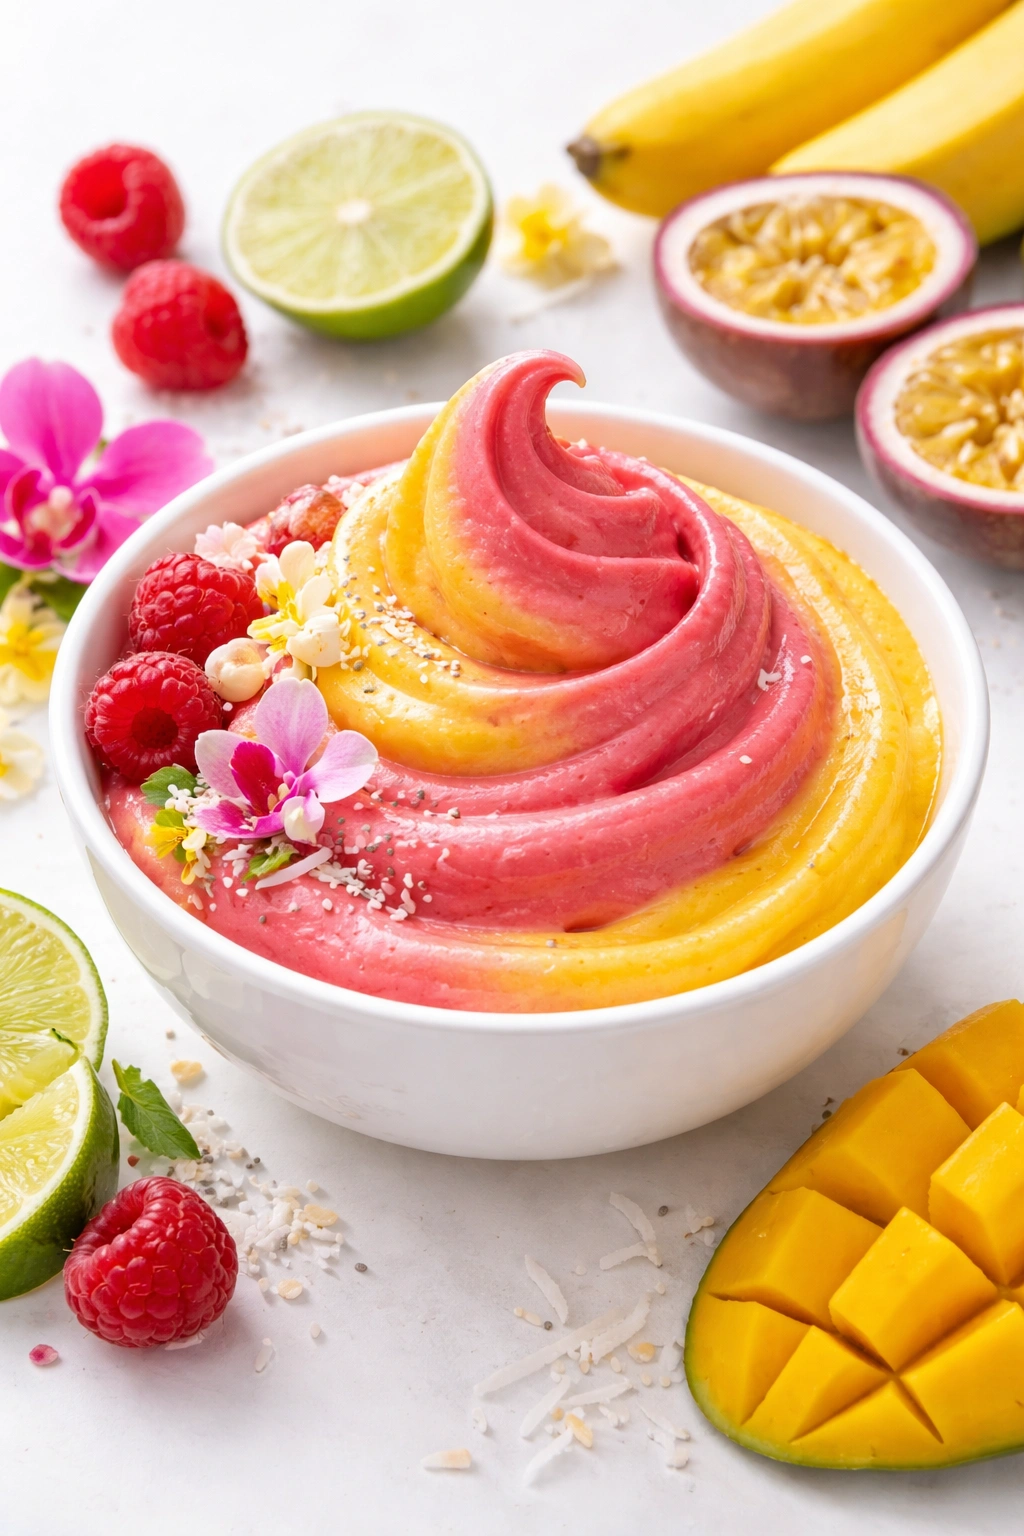
Strawberry Nice Cream: Fresh and Fruity
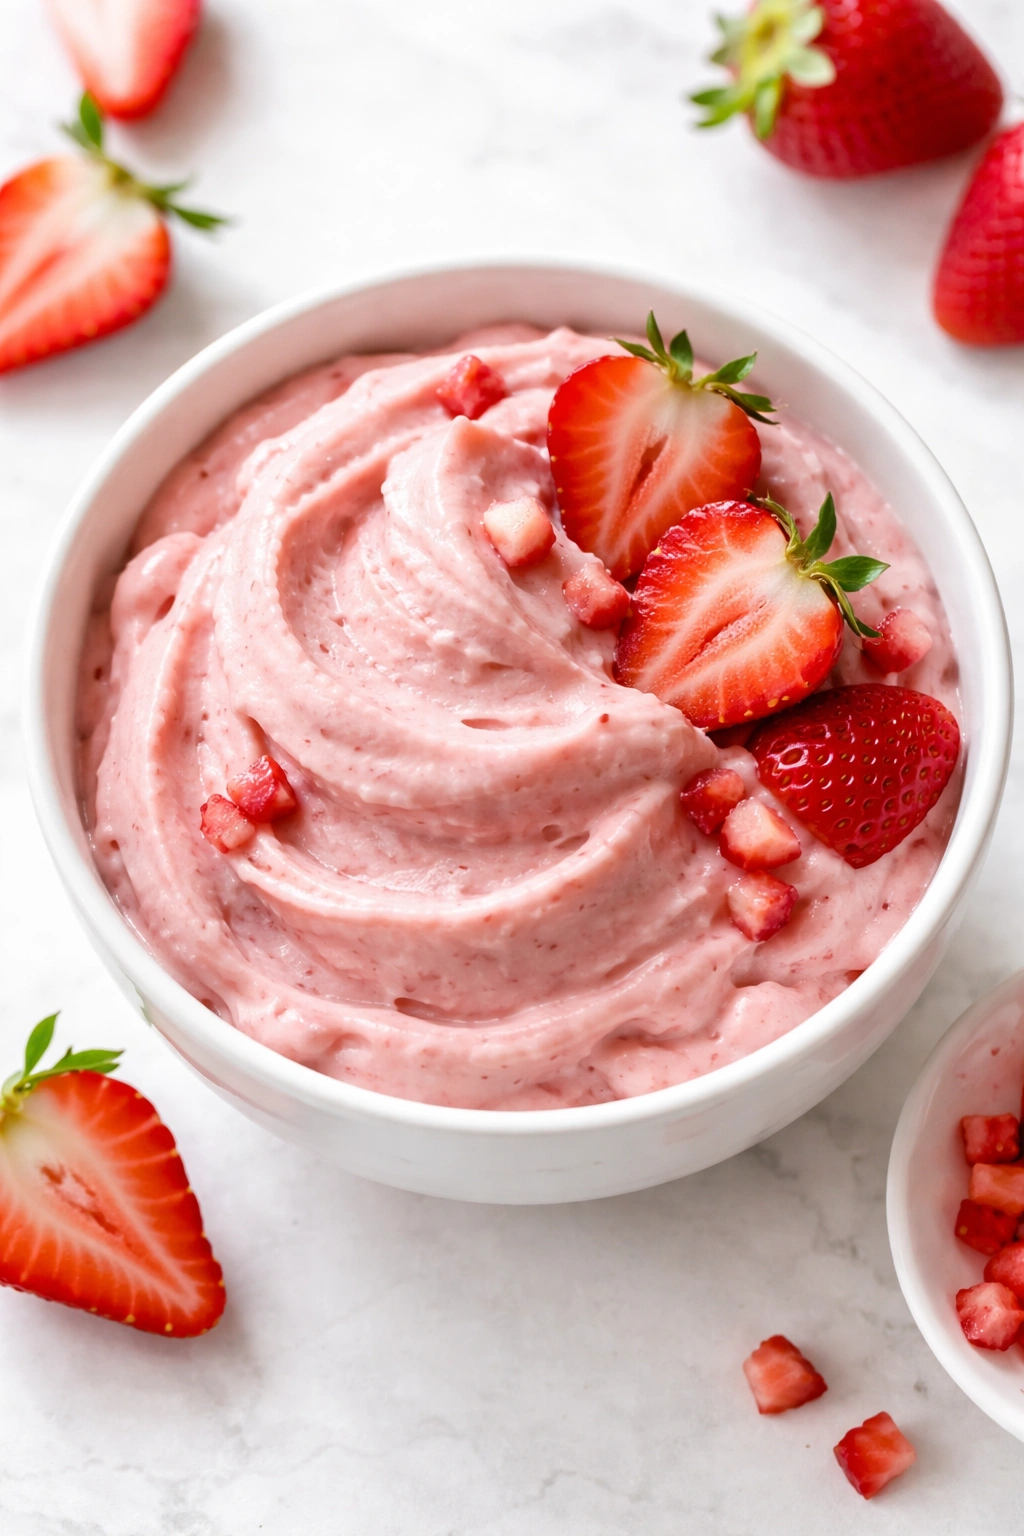
Strawberry nice cream has a completely different energy than chocolate — it’s lighter, brighter, and genuinely refreshing. This is the version you make in warm weather or when you want something fruity and summery that still feels indulgent.
Fresh strawberries work better than frozen for this variation because they blend more smoothly and create a more intense flavor. Use 1 to 1.25 cups fresh strawberries (hulled and halved) along with your 3 frozen banana slices. The strawberries aren’t frozen, which changes your blending strategy — they’ll make the mixture looser than the vanilla or chocolate versions, so you’ll actually use less milk than usual, starting with just 2 tablespoons.
The technique is the same as vanilla nice cream: blend everything together, scraping as you go, until you reach that soft-serve texture. Because you’re starting with fresh (unfrozen) fruit, the total blending time might be slightly shorter — maybe 45 to 60 seconds total instead of 90 seconds. The strawberry will release liquid as it blends, which is why you start with less milk.
If you can only find strawberries that are less sweet than ideal, add 1 tablespoon of honey or 1 tablespoon of strawberry jam to deepen the strawberry flavor. Fresh lemon juice — just a tiny squeeze, about ¼ teaspoon — makes the strawberry flavor pop without making it taste citrusy. This is a secret trick that works for any berry-based nice cream.
Taking strawberry nice cream further: Layer a spoonful of vanilla nice cream with a spoonful of strawberry for a ripple effect that looks restaurant-quality. Swirl a tablespoon of Greek yogurt through the strawberry nice cream just before serving for extra creaminess and tanginess. Top with a small handful of fresh strawberry pieces and a drizzle of honey for a dessert that actually feels special.
Peanut Butter Nice Cream: Creamy and Protein-Packed
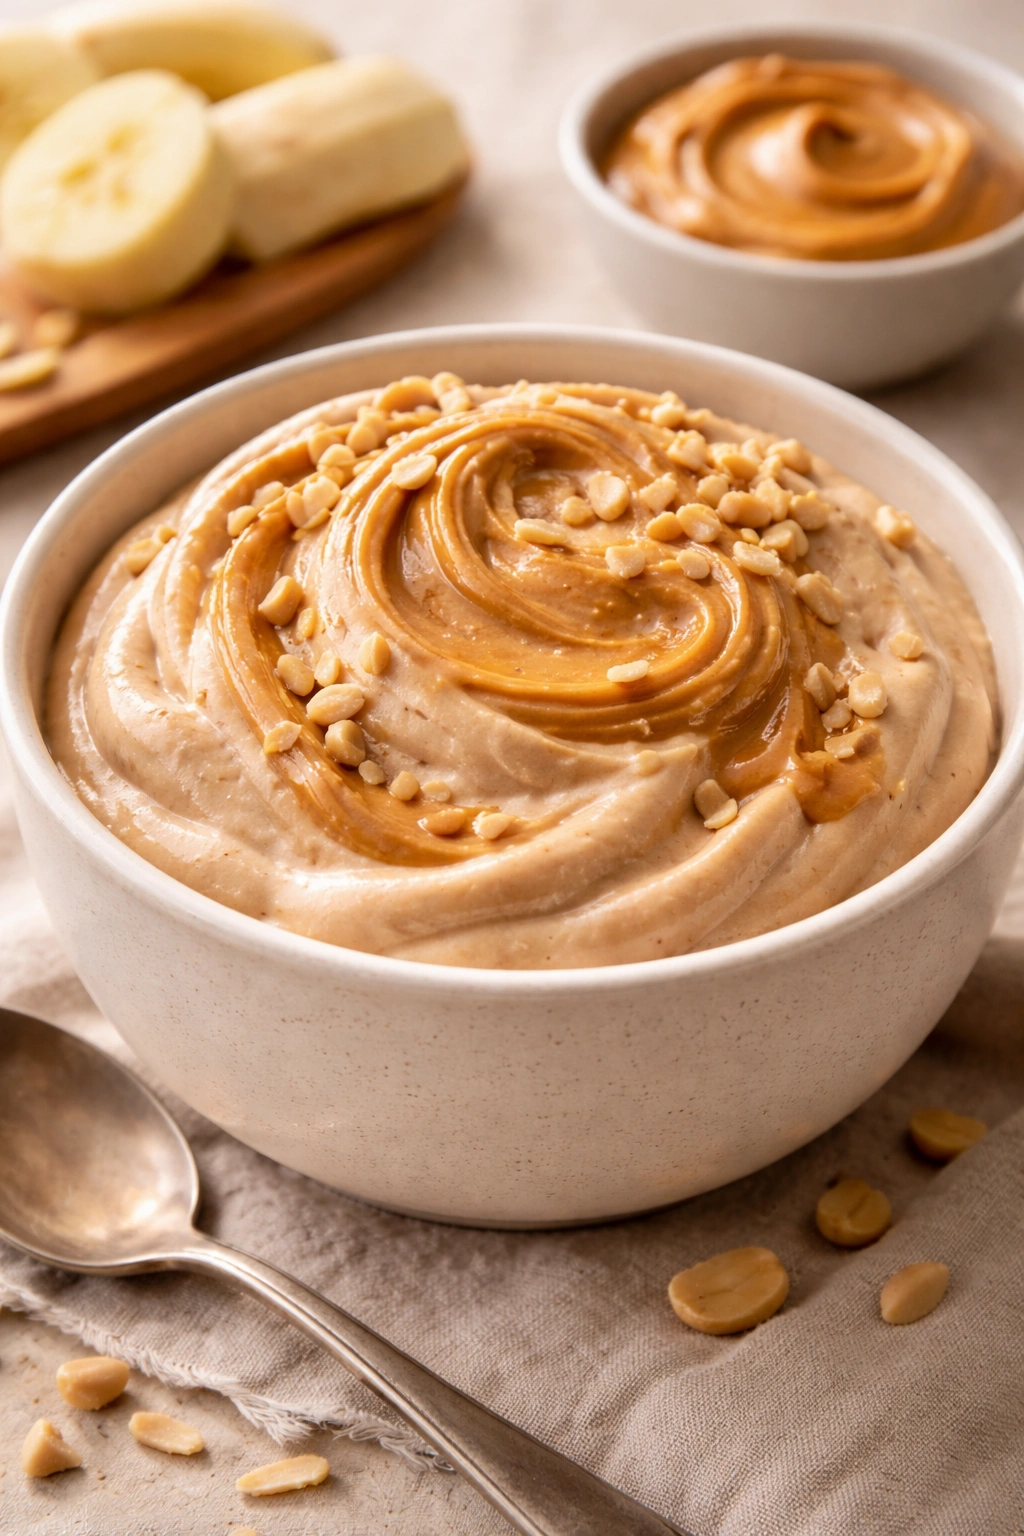
Peanut butter nice cream is thick, satisfying, and hits that sweet spot between indulgent dessert and genuinely nutritious snack. This is the version that works perfectly post-workout or as a quick breakfast when you’re in a rush.
Use 3 tablespoons of natural peanut butter (no added sugar) blended with your 3 frozen banana slices and 4 tablespoons of milk. You need slightly more milk with peanut butter than with plain vanilla because nut butters are denser and don’t incorporate as easily. Add 1 teaspoon vanilla extract, ½ tablespoon honey (peanut butter is savory enough that it needs a touch more sweetness than banana alone), and your salt pinch.
The blending process requires a bit of extra patience. Peanut butter can be stubborn, so after your initial 30-second blend and scrape, you might see chunks of peanut butter still not fully incorporated. Don’t add more milk yet — instead, blend for another 20 to 30 seconds, scrape, and check again. Sometimes you need 2 to 3 scrape-and-blend cycles to get the peanut butter fully incorporated.
If your blender seems to be struggling and the mixture isn’t moving smoothly, warm the peanut butter slightly before adding it — a microwave for 10-15 seconds makes it less thick and more blendable. Or soften it to room temperature before blending rather than pulling it cold from the pantry.
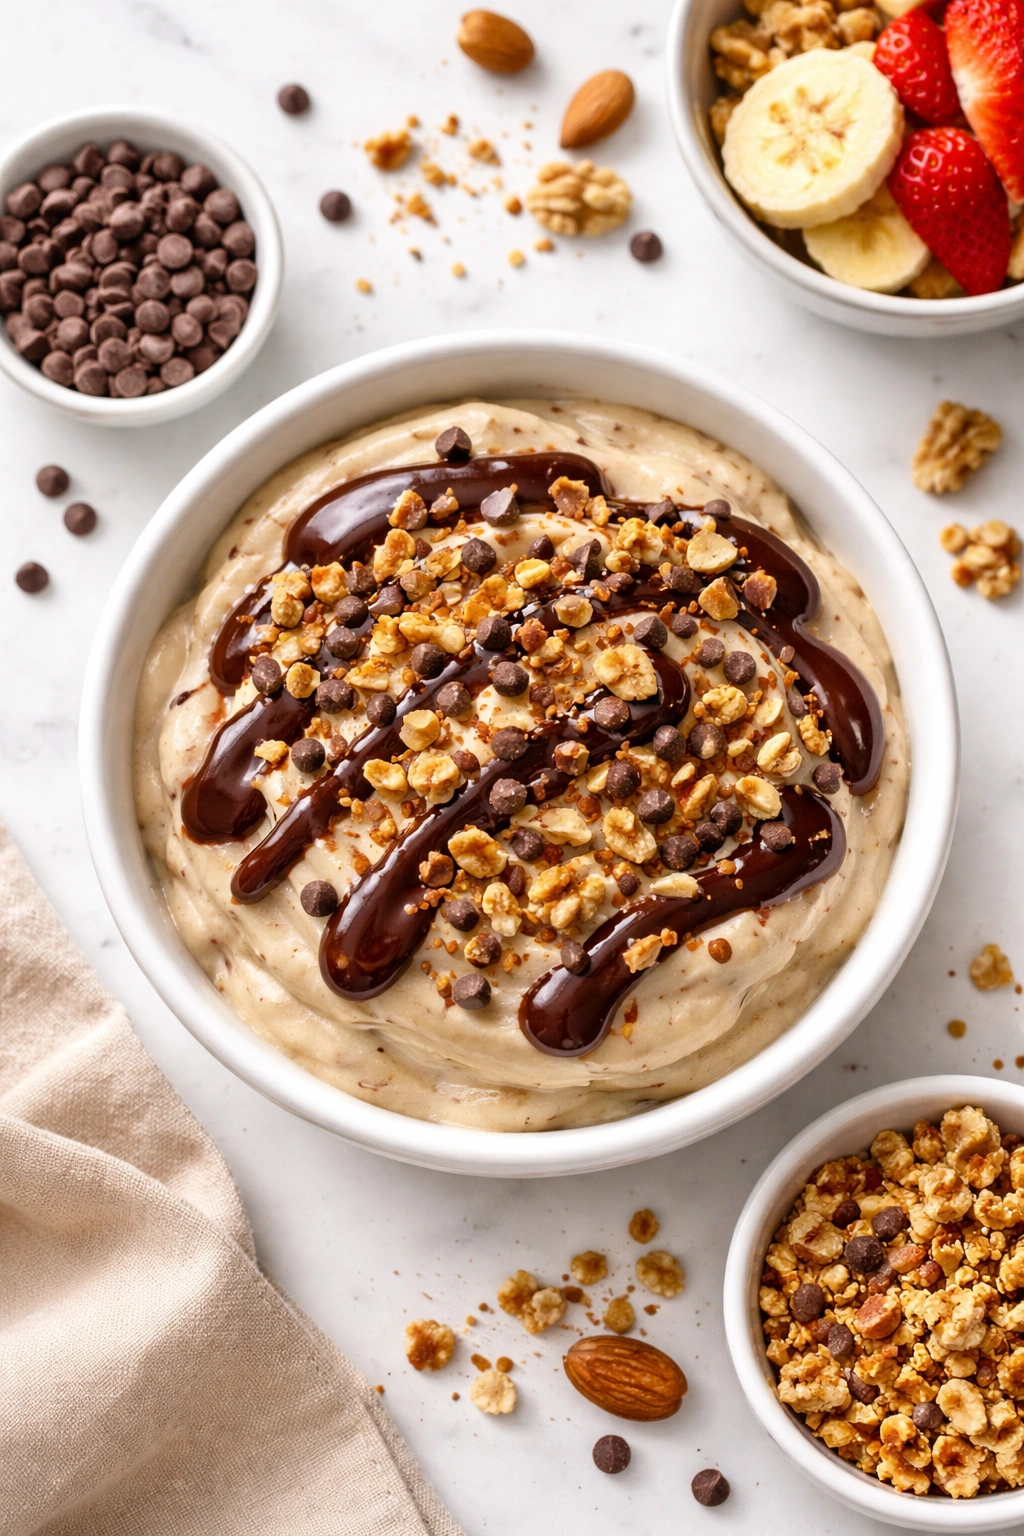
Taking peanut butter nice cream to another level: Add ½ tablespoon of cocoa powder to create a peanut butter chocolate hybrid. Top with a drizzle of chocolate sauce that hardens on contact (like magic shell). Add a small handful of pretzel pieces folded in at the end for sweet-and-salty contrast. Swirl a tablespoon of honey through the finished nice cream for visual appeal and extra sweetness.
Common Mistakes When Making Nice Cream
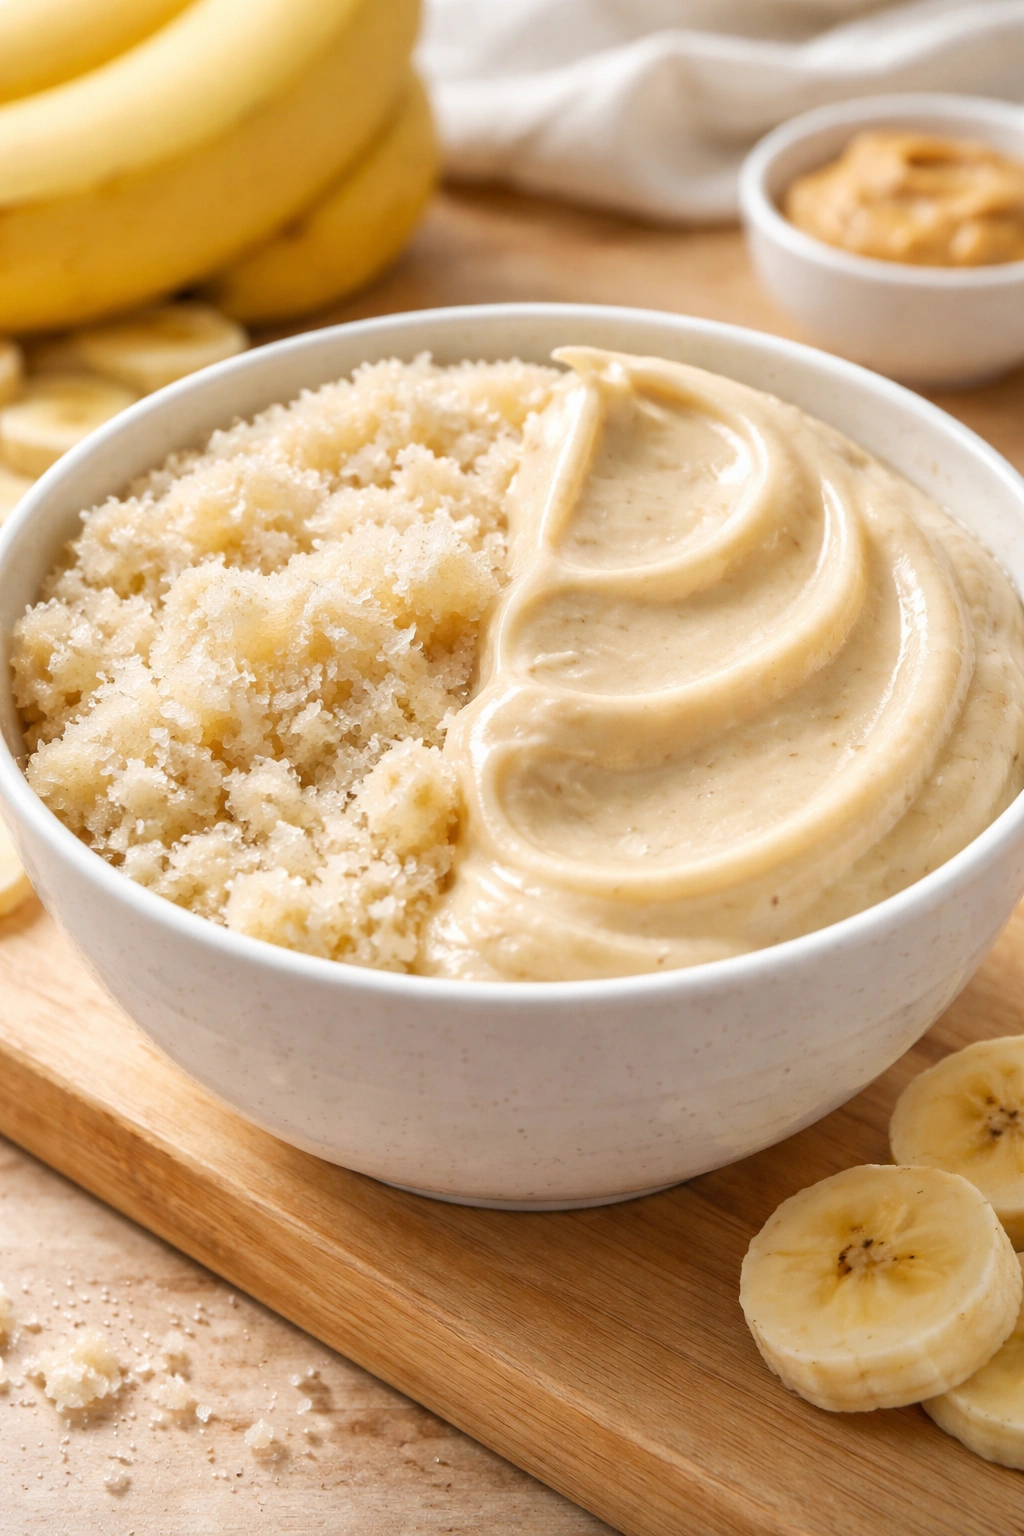
The most frequent mistake people make is using bananas that aren’t frozen solid enough. If your bananas are partially thawed or only lightly frozen, they won’t blend into that creamy texture — you’ll end up with something grainy or icy instead. Frozen solid means leaving them in the freezer for at least 2 to 4 hours minimum, and overnight is genuinely better. If you’re in a hurry, cut your bananas into smaller pieces, which freeze faster.
Another common error is adding too much liquid upfront. Nice cream is delicate — a quarter teaspoon too much milk can turn the whole batch from creamy to thin and mushy. Always start with less liquid than you think you need. You can add more milk one tablespoon at a time, but you can’t take it back out. The banana itself contains moisture, and as you blend, it releases liquid, so patience during the blending process is essential.
Some people make the mistake of blending on high speed for too long. A food processor or blender on high for more than 90-120 seconds can warm the bananas enough that they start to melt and become watery rather than remaining frozen and creamy. Medium speed is your friend here — it’s fast enough to break down the banana but not so fast that friction heat becomes a problem.
Choosing the wrong milk can also throw off your results. Very thin liquids like unsweetened almond milk or skim milk don’t create as creamy a final texture, while full-fat varieties and oat milk give you much better results. Coconut milk (the full-fat kind in a can, not the lighter beverage) creates incredible richness if you’re using it as a 1:3 ratio with regular milk rather than replacing milk entirely.
Tips for Getting the Perfect Texture Every Time

The texture of nice cream is where perfection lives, and getting it right every time comes down to understanding a few key principles. First, accept that banana ripeness matters slightly, but not as much as people claim. Yellow bananas with some brown flecks are ideal because they’re sweet, but even mostly yellow bananas make good nice cream. Very green bananas are less sweet and blend less smoothly, so avoid those. Once-brown bananas that are mostly brown throughout are actually fine — they’re very sweet and very soft when frozen, which blends beautifully.
The thickness of your banana slices affects how quickly they freeze. Slices that are ½-inch thick are the sweet spot — thick enough to freeze quickly and evenly throughout, but thin enough that they blend smoothly without requiring excessive liquid. If you slice them too thick (¾ inch or more), they might have a frozen exterior and slightly softer interior when you’re ready to blend, which creates uneven texture.
The scrape-and-check method is non-negotiable for nice cream success. Don’t just blend continuously and hope for the best — instead, blend for 30 seconds, stop and scrape the bottom and sides with a spatula, then blend again. This ensures that all the banana gets evenly processed and prevents little chunks from hiding at the bottom of your blender. Repeat this cycle until you reach that soft-serve texture.
Temperature matters. If your kitchen is very warm, your nice cream will start to soften more quickly once you stop blending. A cold bowl can help — run your blender bowl or food processor bowl under cold water and dry it just before blending. Some people even chill their milk in the refrigerator before adding it to the blender. These small steps prevent melting during the brief blending time.
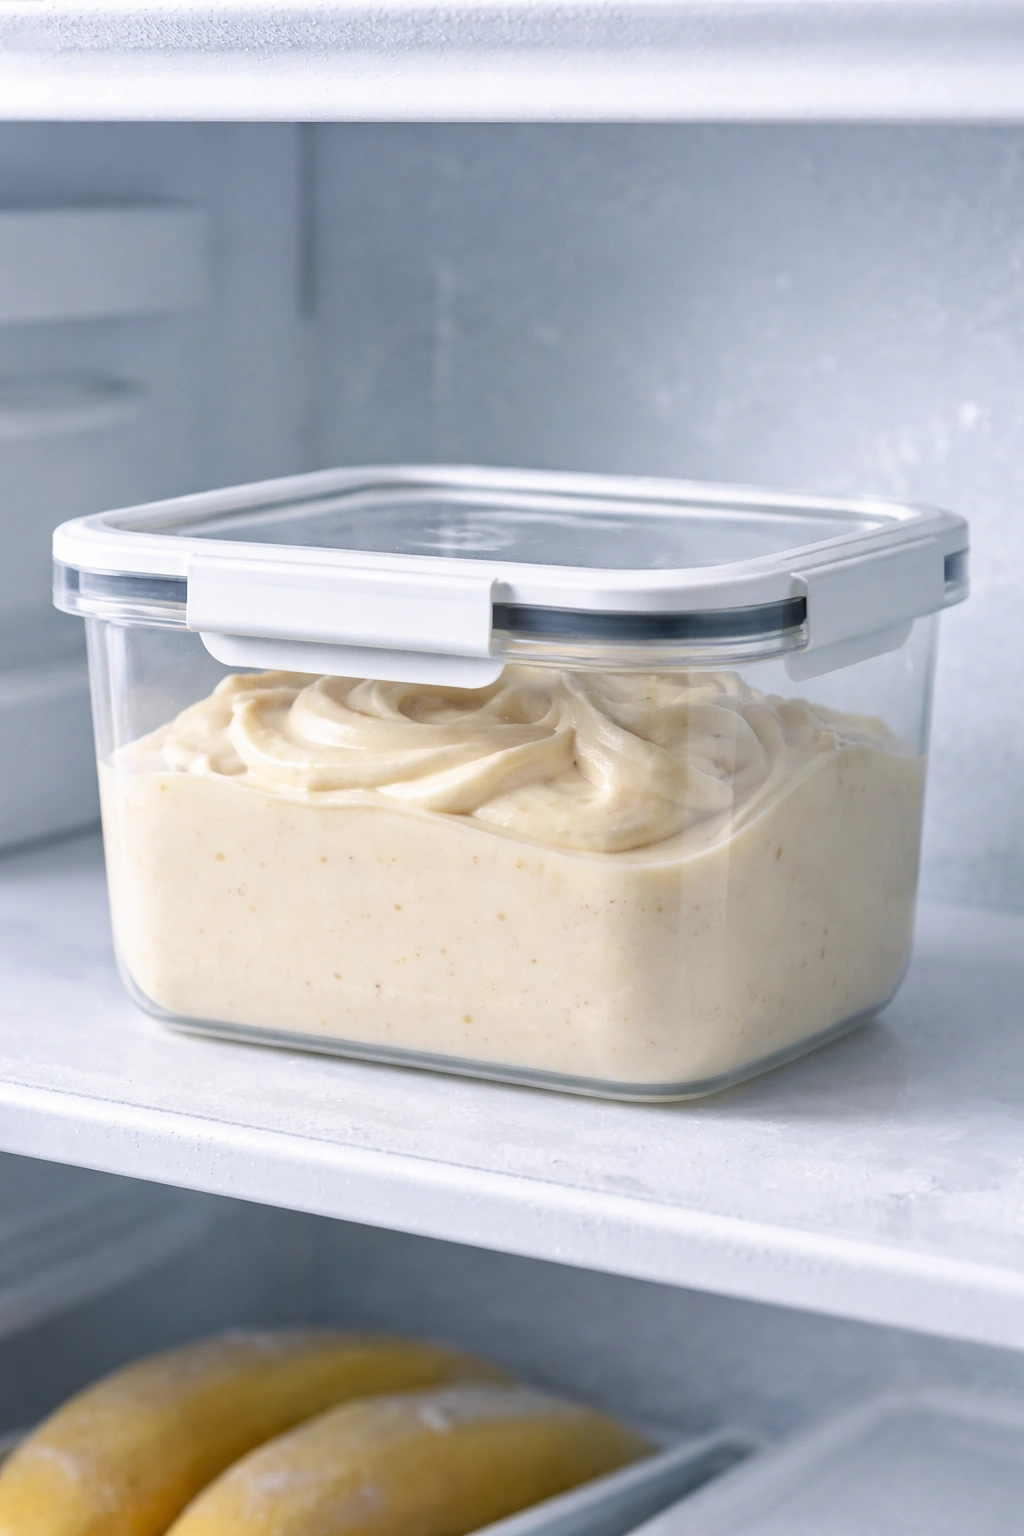
How to Store Nice Cream for Maximum Freshness
Nice cream is best eaten immediately after blending, when it has that perfect soft-serve texture. But if you want to save some or make a batch ahead, proper storage keeps it good for several days.
For the first 30 to 45 minutes, you can keep nice cream in the freezer in an airtight container for a firm-scoop consistency. The texture will be a bit more solid than fresh soft-serve, closer to traditional ice cream scoops, but still creamy. After 2-3 hours, it becomes quite hard and requires a moment at room temperature to soften enough to scoop.
Nice cream keeps well in the freezer for up to 3 days in an airtight container, though honestly the flavor and texture are best within 24 hours. After that, ice crystals can form if the nice cream thaws and refreezes, and the texture becomes a bit icy. The flavors also meld slightly in a way that’s not always positive — vanilla becomes less bright, fruit flavors mute slightly.
If you want to make ahead, freeze your banana slices up to 2 weeks in advance in a freezer bag, which buys you all the time planning you need. Then you’re never more than 5 minutes away from fresh nice cream. This is genuinely the best strategy if nice cream is a regular snack in your house.
For storage containers, airtight is important to prevent freezer burn and flavor absorption from other foods. A plastic container with a tight-fitting lid works fine, or if you prefer a more eco-friendly option, a glass container with a snap-on lid works beautifully. Parchment paper between the nice cream and the lid can prevent ice crystal formation that happens when condensation freezes on top.
Flavor Combinations and Creative Additions
Once you’ve mastered the four core versions, the real fun begins. Nice cream is incredibly forgiving of additions and variations, so you can experiment with confidence.
Berry combinations work beautifully together. Strawberry-raspberry is classic and complex. Blueberry-lemon creates something bright and sophisticated. Mixed berries — a handful of strawberries, raspberries, and blueberries blended together — give you jammy, complex flavor.
Tropical twists open up entirely different flavor worlds. Add ½ cup of fresh pineapple chunks and a squeeze of lime juice for something that tastes like a pina colada. Mango nice cream with a touch of lime juice and a pinch of chili powder is genuinely addictive. Half a frozen banana plus ¾ cup frozen mango chunks creates something closer to a mango sorbet.
Spiced nice creams work if you’re careful with measurements. A quarter teaspoon of cinnamon added to vanilla nice cream creates warmth without being obvious. An eighth of a teaspoon of cardamom in vanilla nice cream tastes sophisticated and slightly mysterious. A pinch of nutmeg works beautifully in chocolate or cinnamon versions. Start with less spice than seems right — you can always add a pinch more, but overseasoned nice cream is hard to fix.
Nutty variations expand your options. Almond butter instead of peanut butter creates a slightly more refined, less sweet version. Tahini mixed with cocoa powder creates something that tastes almost like a Middle Eastern chocolate experience. Crushed pistachios folded in at the very end (not blended throughout) add unexpected flavor and texture.
Coffee nice cream uses ½ teaspoon of instant espresso powder dissolved in 1 tablespoon of hot water, cooled slightly, then blended with vanilla nice cream. It tastes like coffee ice cream without any coffee bitterness.
Serving Ideas and Toppings That Pair Perfectly
Nice cream deserves toppings. Unlike a simple bowl of yogurt, nice cream is already a legitimate dessert, so dressing it up makes it feel even more special and restaurant-worthy.
Chocolate is always a good choice. A drizzle of warm chocolate sauce, a handful of chocolate chips, or shaved dark chocolate all work beautifully. Chocolate sauce that hardens on contact (the magic shell kind) creates a crackly shell that’s genuinely fun to eat.
Fresh fruit adds color and freshness. Sliced strawberries, fresh raspberries, blueberries, or even thin slices of fresh kiwi brighten a bowl visually and add textural contrast. For chocolate nice cream, thin orange slices or a tiny squeeze of orange juice adds unexpected complexity.
Nuts add satisfying crunch. Crushed pistachios, sliced almonds, chopped pecans, or even crushed pretzels create textural contrast with the smooth nice cream. Toast your nuts lightly before using them — even 2-3 minutes in a dry pan brings out their flavor and makes them taste fresher.
Granola and texture components work really well. A sprinkle of granola on top, a drizzle of honey, or even a crumble of graham crackers adds the kind of textural complexity that makes nice cream feel more substantial.
Sauces and drizzles matter. A drizzle of honey, a swirl of jam, a spoonful of nut butter, or even a tiny splash of flavored syrup transforms a plain bowl into something more intentional.
The beauty of nice cream is that it works hot and cold. Some people warm their toppings or sauces slightly — chocolate sauce that’s just barely warm against cold nice cream is genuinely luxurious. Others prefer everything cold and creamy. Play with temperature contrast because it genuinely enhances the eating experience.
Final Thoughts
Nice cream is the kind of dessert that lives in that magical space between healthy and indulgent — it genuinely tastes like a treat, but you’re not eating processed ingredients or excess refined sugar. Once you understand the basic technique and the critical importance of frozen-solid bananas and proper liquid ratios, you can make dozens of variations without learning anything new. A batch of nice cream takes less than ten minutes of actual work and uses ingredients most people have around their kitchen already.
The real skill with nice cream isn’t in the blending — it’s in understanding your blender’s quirks and learning to judge texture visually rather than by time. One person’s 90-second blend might be another person’s over-blended batch, depending on their equipment and the exact consistency of their bananas. That means the first time you make nice cream, pay close attention to what happens at each stage. Watch the texture transform from crumbly to creamy. Learn what soft-serve consistency looks like in your specific blender. After one or two batches, you’ll have the instincts to make perfect nice cream every single time, in any flavor combination you dream up.