Chicken thighs are the secret weapon of meal-prep champions. Unlike breasts, which dry out after a few days in the refrigerator, thighs stay moist and flavorful throughout the week. They’re also more forgiving during cooking—a couple minutes over on heat won’t turn them into shoe leather. And here’s the real draw for meal prep: thighs cost less per pound, cook faster than many cuts, and become more flavorful as they sit overnight while sauces meld and spices deepen.
If you’ve been grinding through the same rotisserie-chicken-shredded routine or defaulting to bland grilled breasts, these recipes are about to change your meal-prep game. Each one is designed not just to taste exceptional on day one, but to actually improve by day three or four as the flavors settle. You’ll get variety through the week without getting bored, and each recipe yields enough to cover 4-6 servings depending on your portions and what you’re pairing them with.
What makes these recipes meal-prep gold is that they’re all hands-off or nearly hands-off once they go in the oven. No constant tending, no precise timing windows—just set it and move on to prepping your sides. Most require just one pan or dish, which means less cleanup on the weekend. Every single one rehashes beautifully and stays tender because of the high fat content in thighs. Let’s build your meal-prep rotation.
1. Honey Garlic Sheet Pan Chicken Thighs
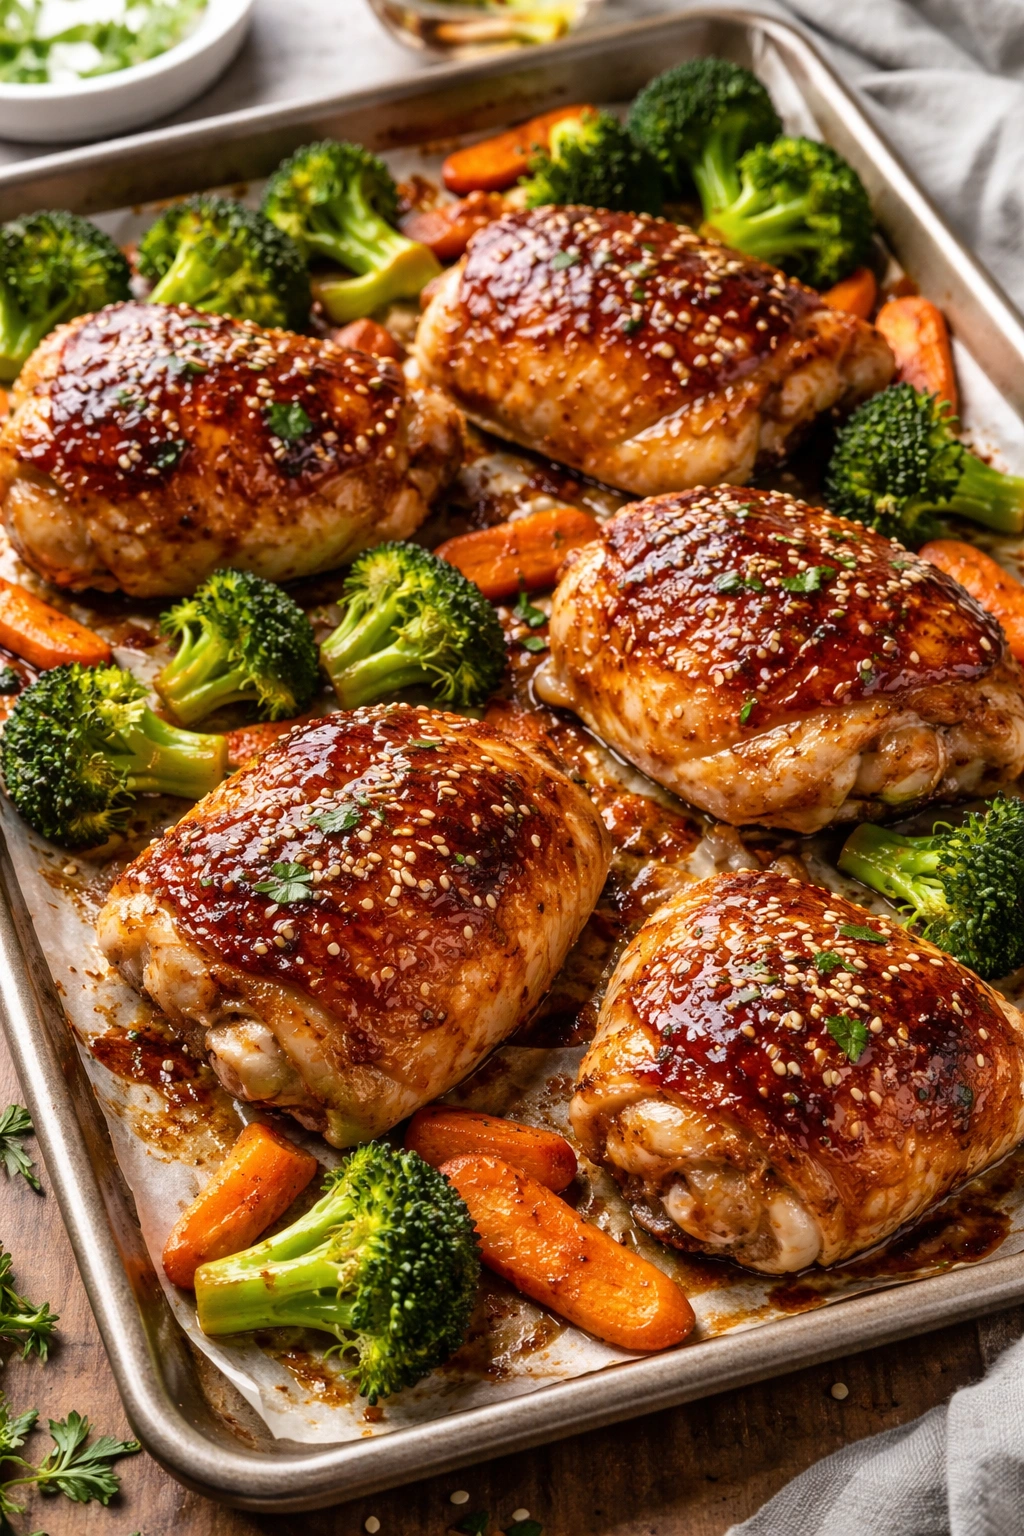
This is the recipe that converts skeptics. Honey and garlic are a proven pairing, and when they caramelize around juicy chicken thighs, something almost magical happens. The pan gets a silky glaze that coats both the chicken and whatever vegetables you add alongside it. It’s sweet enough that even people who claim they don’t like chicken thighs will ask for seconds. The beauty of this version is its simplicity—just a handful of pantry ingredients, and it comes together in under 10 minutes of hands-on work.
The honey melts into a glaze as the thighs cook, while the garlic softens and becomes almost candy-like on the edges. It’s the kind of meal that looks like you’ve spent an hour in the kitchen but actually took about 15 minutes to prep. Serve it with roasted broccoli, cauliflower, carrots, or potatoes, and whatever vegetable goes on the same pan gets coated in that incredible glaze too.
Yield: Serves 4 | Prep Time: 15 minutes | Cook Time: 35 minutes | Total Time: 50 minutes | Difficulty: Beginner — just mixing, patting dry, and roasting; no advanced techniques required.
For the Chicken and Glaze:
- 8 bone-in, skin-on chicken thighs (about 3 pounds)
- 6 tablespoons honey, divided into 3 tablespoons + 3 tablespoons
- 8 cloves garlic, minced (or 2 tablespoons pre-minced)
- 3 tablespoons soy sauce
- 2 tablespoons balsamic vinegar
- 2 tablespoons olive oil
- 1 teaspoon Dijon mustard
- ½ teaspoon kosher salt
- ¼ teaspoon freshly ground black pepper
- ½ teaspoon dried thyme or Italian seasoning
- ¼ teaspoon red pepper flakes (optional, for a whisper of heat)
For Serving (Optional):
- 1 pound baby potatoes, halved (or broccoli florets, carrot chunks)
- Fresh parsley or basil for garnish
- Lemon wedges
Prepare and Preheat:
- Preheat the oven to 425°F (220°C) and position the rack in the upper-middle portion of the oven — this helps the skin crisp beautifully.
- Pat the chicken thighs completely dry with paper towels, paying special attention to the skin. Moisture on the surface prevents browning and crisping. If the skin is soggy, you won’t get that caramelized exterior that makes this dish special.
- In a small bowl, whisk together 3 tablespoons of honey, the minced garlic, soy sauce, balsamic vinegar, olive oil, Dijon mustard, salt, pepper, thyme, and red pepper flakes. Stir until completely combined. This is your glaze base.
Prepare the Pan and Thighs:
- Arrange the chicken thighs skin-side up on a large sheet pan (17×12 inches or similar), spacing them so they’re not touching. Leave room in the corners and between thighs for air circulation.
- Spoon the glaze mixture evenly over each thigh, making sure some of the garlic and liquid lands on the skin of each piece. Don’t be shy — coat them generously but don’t drown them. Reserve any extra glaze to drizzle halfway through cooking.
Roast:
- Place the sheet pan in the preheated oven and roast for 25 to 28 minutes. At the halfway point (around 14 minutes), drizzle the remaining 3 tablespoons of honey over the thighs and use a spoon to baste them with any pan juices that have accumulated. This second honey addition ensures a glossy, deeply caramelized finish.
- Continue roasting until the internal temperature at the thickest part of the thigh (without touching bone) reads 165°F (74°C) on an instant-read thermometer, and the skin is dark golden-brown and crispy. Do not skip the temperature check — undercooked chicken is not an option.
Rest and Serve:
- Remove the pan from the oven and let the chicken rest for 5 minutes before serving. This allows the juices to redistribute and keeps the meat moist when you bite into it.
- Spoon any pan drippings over the chicken before plating. The glaze is the best part — don’t leave it behind.
Why This Works for Meal Prep
Honey garlic chicken doesn’t dry out in storage because the thighs are naturally moist and the glaze adds an extra layer of moisture that actually keeps everything tender. After the first day, the flavors deepen even more as the garlic infuses throughout and the honey caramelizes further. It reheats beautifully—either in a 350°F oven for about 12 minutes or in a microwave-safe container for 2-3 minutes, depending on your rush level.
Storage and Make-Ahead
Store the cooled chicken in an airtight container in the refrigerator for up to 5 days. The glaze acts as a protective seal, keeping the meat moist. You can also freeze it for up to 3 months; thaw overnight in the fridge before reheating. Reheat in a 350°F oven until warmed through, about 10-12 minutes, to restore some of the skin’s crispness.
Variations Worth Trying
Swap the honey for maple syrup for a deeper, earthier flavor. Add 1 tablespoon of Sriracha to the glaze for a sweet-heat version. Include diced pineapple on the pan around the chicken for the last 10 minutes of cooking—the acidity cuts the richness and adds brightness. Toss in whole garlic cloves instead of minced for milder, sweeter garlic pockets.
2. Mediterranean Lemon Herb Chicken Thighs
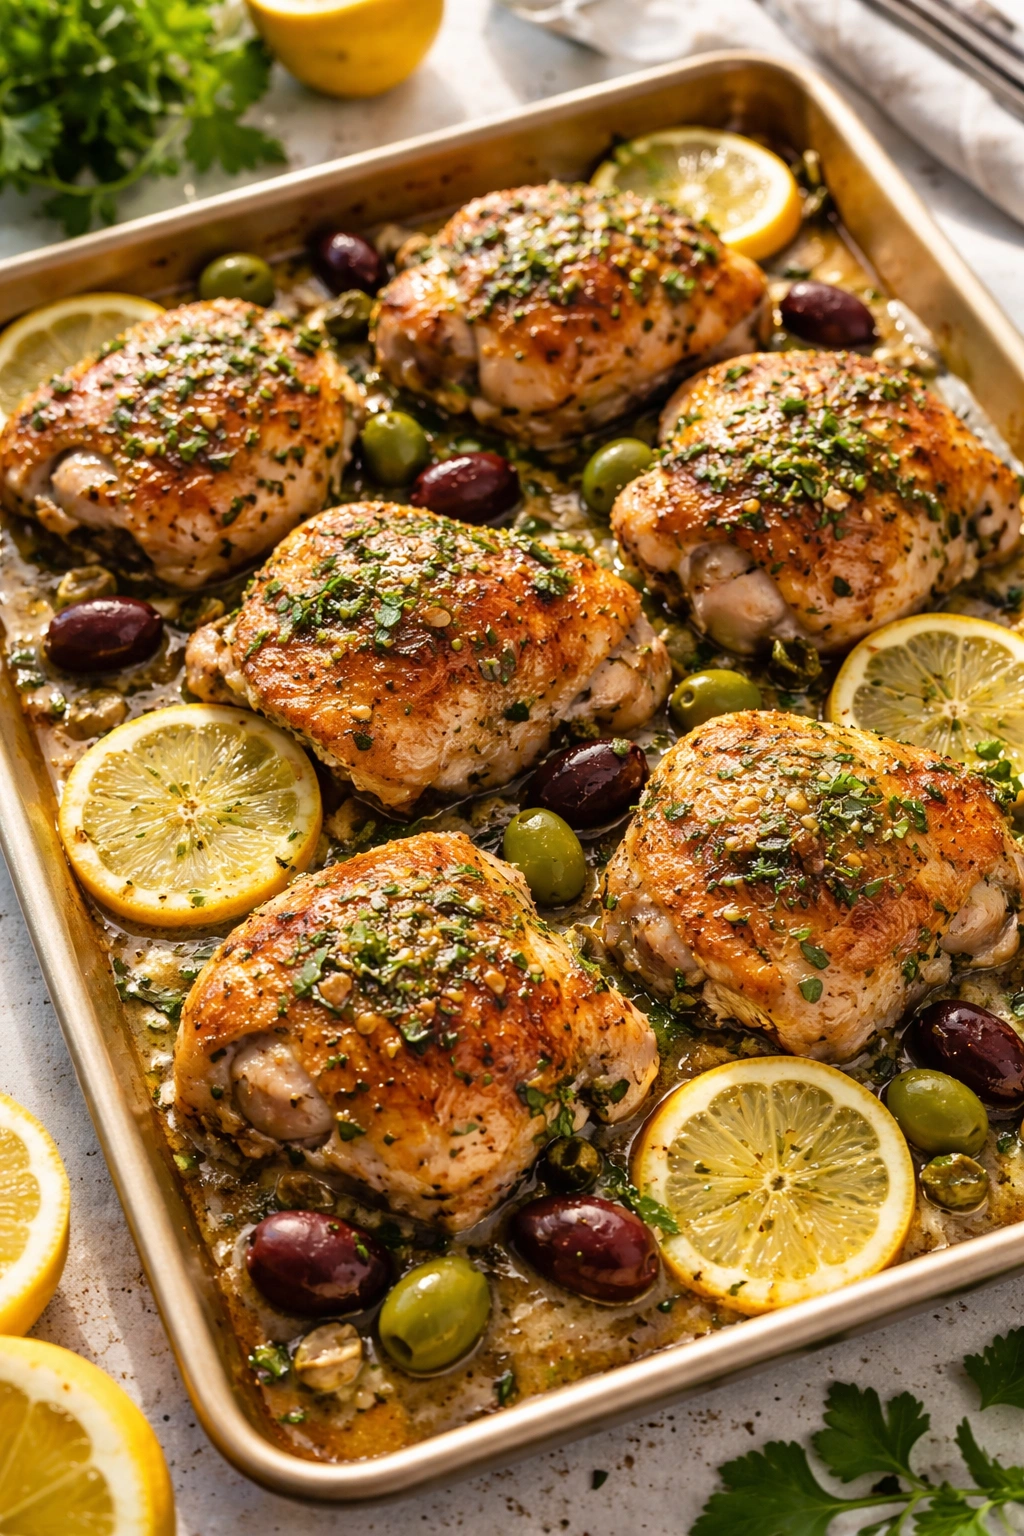
Mediterranean flavors are the opposite of boring, and they’re perfect for meal prep because they’re naturally light yet satisfying. This recipe leans on lemon, olives, and herbs—ingredients that brighten everything they touch and actually taste better after a day or two in the fridge as the flavors marry. The chicken comes out tender and juicy, coated in a pan sauce that’s tangy, herbaceous, and deeply flavorful without being heavy.
This is the recipe you reach for when you want to feel like you’re eating something clean and nourishing but don’t want to sacrifice taste. Serve it with jasmine rice, farro, or alongside a big Mediterranean salad, and you’ve got a complete meal that tastes far more complicated than it actually is.
Yield: Serves 4 to 5 | Prep Time: 20 minutes | Cook Time: 40 minutes | Total Time: 60 minutes | Difficulty: Beginner — the steps are straightforward, and there’s minimal active cooking; the oven does most of the work.
For the Chicken:
- 8 bone-in, skin-on chicken thighs (about 3 pounds)
- ¼ cup fresh lemon juice (about 2 large lemons; use bottled if fresh isn’t available, but fresh is noticeably better)
- 3 tablespoons olive oil
- 6 cloves garlic, minced (about 2 tablespoons)
- 2 tablespoons fresh oregano leaves, chopped (or 2 teaspoons dried oregano)
- 1 tablespoon fresh thyme leaves, chopped (or 1 teaspoon dried thyme)
- 1 teaspoon kosher salt
- ½ teaspoon freshly ground black pepper
- ½ cup low-sodium chicken broth
- Zest of 1 large lemon (about 2 teaspoons)
For the Pan Components:
- ¾ cup green or Kalamata olives, pitted and halved
- ½ cup sun-dried tomatoes (oil-packed), chopped
- ¼ cup fresh parsley, chopped (for garnish)
- ¼ cup fresh basil, chopped (for garnish; optional but highly recommended)
- Red pepper flakes (for serving, optional)
Prepare and Preheat:
- Preheat the oven to 400°F (205°C) with the rack positioned in the center.
- Pat the chicken thighs dry with paper towels. Dry skin is critical for getting them to brown properly and crisp up.
- In a small bowl, whisk together the lemon juice, olive oil, minced garlic, fresh oregano, fresh thyme, salt, pepper, and lemon zest until combined. This is your marinade base and will become part of the pan sauce.
Sear the Chicken:
- Heat an oven-safe skillet (10 to 12 inches) over medium-high heat until it’s quite hot — you should see a shimmer in the pan. This takes about 2 minutes.
- Working in two batches if necessary to avoid crowding (crowded pans steam instead of sear), place the chicken thighs skin-side down in the hot pan. Do not move them for 4 to 5 minutes — you want the skin to make full contact and brown deeply, which creates flavor and helps them crisp up later in the oven.
- Flip the thighs to the bone side and sear for another 2 to 3 minutes, just until the underside gets some color. Transfer the seared thighs to a plate.
Build the Pan Sauce:
- Pour off most of the accumulated fat from the pan, leaving about 1 tablespoon behind. Add the lemon juice mixture to the pan and scrape the bottom with a wooden spoon to release all the browned bits (called deglazing) — these are pure flavor.
- Return the chicken thighs to the pan, skin-side up. Pour the chicken broth around the thighs. Scatter the olives and sun-dried tomatoes around and between the chicken pieces.
Roast:
- Transfer the skillet to the preheated oven and roast, uncovered, for 25 to 30 minutes, until the internal temperature at the thickest part of a thigh (away from bone) reaches 165°F (74°C). The skin should be bronzed and crispy.
- Remove from the oven and let rest for 5 minutes. This resting period allows the juices to settle, keeping the meat incredibly moist.
Finish and Serve:
- Transfer the chicken to a serving platter or divide among meal-prep containers. Spoon the pan sauce, olives, and sun-dried tomatoes over top.
- Garnish with the fresh parsley and basil, and add red pepper flakes if you like a whisper of heat.
Why This Works for Meal Prep
The Mediterranean flavor profile is naturally bold, which means it stands up beautifully to a few days in the fridge. The acidity from the lemon actually preserves the chicken and keeps it tasting fresh. The olives and sun-dried tomatoes add texture and flavor even after days of storage, unlike some pan sauces that become watery or bland. This is one of those rare meal-prep dishes that honestly tastes better on day two or three as the lemon and herbs deepen.
Storage and Reheating
Store in an airtight container in the refrigerator for up to 4 days. The pan sauce keeps everything moist during storage. Reheat gently in a 325°F oven for about 12 minutes, or microwave in a covered container for 2-3 minutes. If reheating in the microwave, stir the pan sauce over the chicken halfway through to ensure even warming.
Variations and Swaps
Add diced red onion or thinly sliced shallots to the pan before roasting for a sweet, slightly sharp edge. Stir in a can of white beans (drained and rinsed) during the last 5 minutes of cooking for extra protein and substance. Use half olives and half capers for a briny, more intense flavor. Swap fresh rosemary for the thyme if you prefer a more woodsy profile.
3. Buffalo Ranch Chicken Thighs
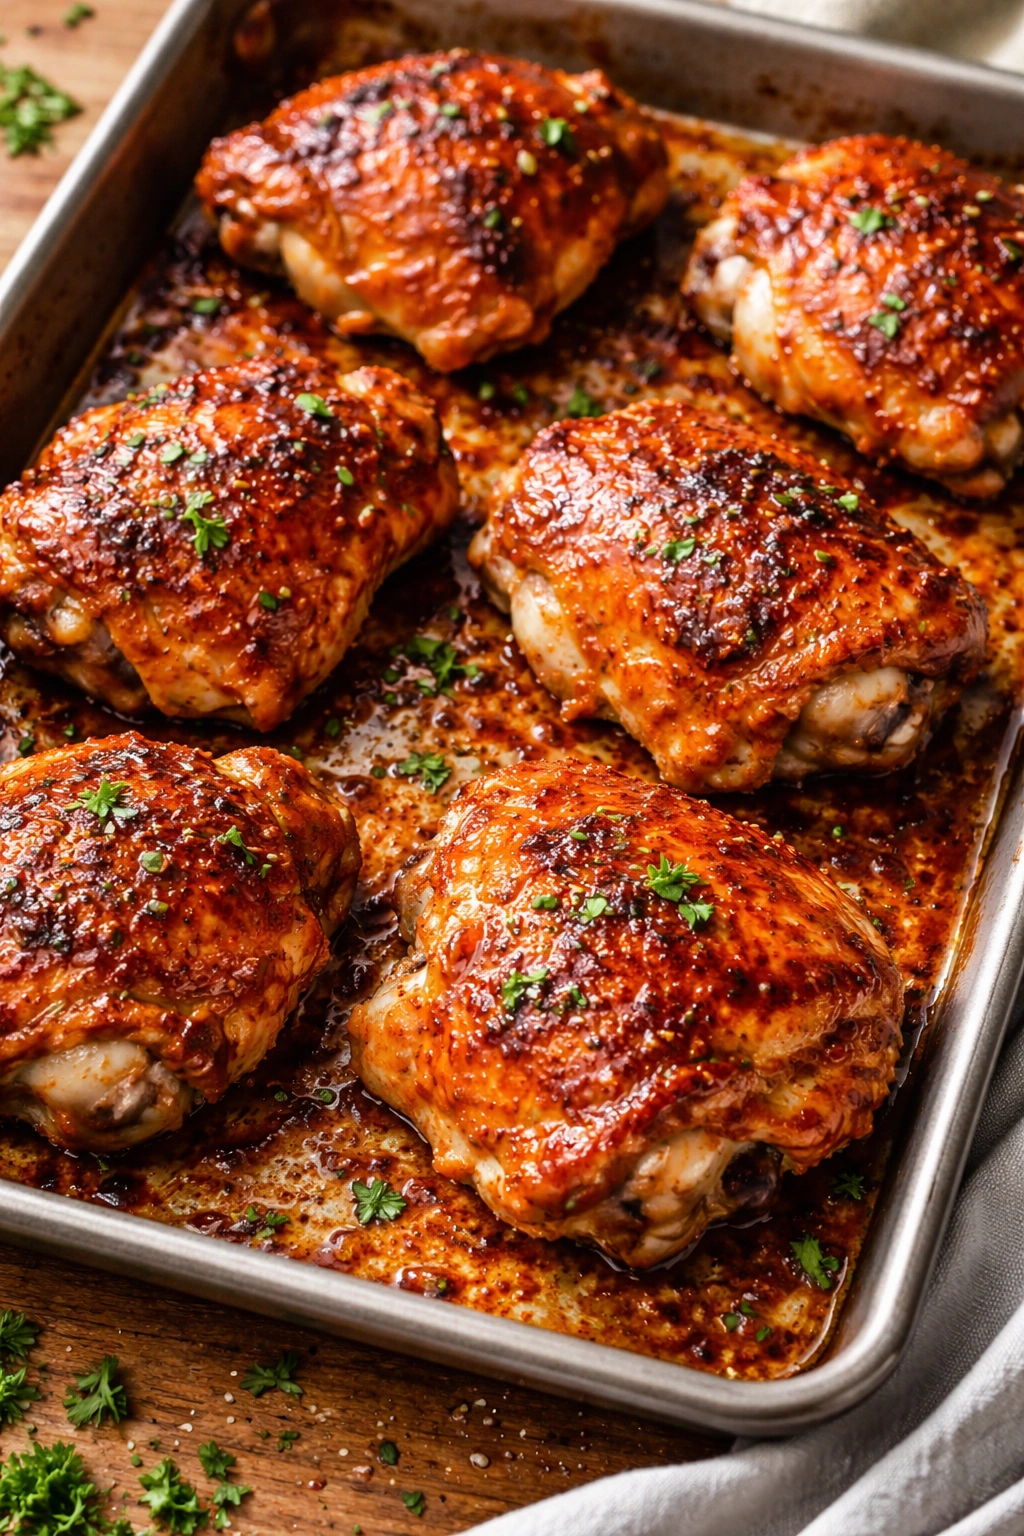
If you’re tired of plain meal-prep chicken and want something with actual excitement, buffalo ranch is the answer. It combines spicy, tangy hot sauce with cooling ranch seasoning, and the result is addictive, shareable, and the kind of thing people actually look forward to eating all week. The sauce caramelizes slightly during cooking, creating crispy, sticky edges on the chicken while keeping the inside juicy. Serve it with blue cheese dressing for dipping, or pair it with rice, roasted vegetables, or a loaded salad.
This recipe is proof that meal-prep food doesn’t have to be boring or virtuous-tasting. It tastes like restaurant wings but is way easier to make at home in bulk.
Yield: Serves 4 to 5 | Prep Time: 10 minutes | Cook Time: 38 minutes | Total Time: 48 minutes | Difficulty: Beginner — just whisking a sauce and roasting; no special skills needed.
For the Sauce:
- ¾ cup hot sauce (Frank’s RedHot or similar, medium heat; adjust based on your heat tolerance)
- 4 tablespoons unsalted butter
- 2 tablespoons ranch seasoning mix (store-bought, or make your own: 1 tablespoon dried parsley, ½ tablespoon dried dill, ½ tablespoon garlic powder, ½ tablespoon onion powder, ¼ tablespoon black pepper)
- 1 tablespoon Worcestershire sauce
- 1 tablespoon apple cider vinegar
- ½ teaspoon garlic powder
- ¼ teaspoon smoked paprika
For the Chicken:
- 8 bone-in, skin-on chicken thighs (about 3 pounds)
- ½ teaspoon kosher salt
- ¼ teaspoon black pepper
For Serving:
- Blue cheese dressing (store-bought or homemade)
- Sliced celery and carrot sticks (optional but traditional)
- Fresh chives or green onions, chopped (for garnish)
- Crumbled blue cheese (for garnish; optional)
Make the Sauce and Prepare:
- In a small saucepan over low heat, melt the butter with the hot sauce, ranch seasoning, Worcestershire sauce, apple cider vinegar, garlic powder, and smoked paprika. Stir constantly until fully combined and slightly thickened, about 2 to 3 minutes. The sauce should be pourable but coat a spoon. Taste it — if you want more heat, add another splash of hot sauce. Set aside and let cool slightly.
- Preheat the oven to 425°F (220°C) with the rack in the upper-middle position. This higher heat helps the sauce caramelize and the skin crisp beautifully.
Prepare the Chicken:
- Pat the chicken thighs dry with paper towels. Season all sides with salt and pepper.
- Arrange the thighs skin-side up on a large rimmed sheet pan, spacing them so they don’t touch. Pour about two-thirds of the buffalo-ranch sauce over the thighs, using a spoon or brush to coat the skin thoroughly. Reserve the remaining sauce for brushing halfway through cooking. The sauce will burn and blacken if it sits on the bottom of a dry pan, so don’t skip coating the thighs themselves.
Roast:
- Place the sheet pan in the preheated oven and roast for 20 minutes.
- Remove the pan from the oven and brush the remaining sauce over the chicken. If any sauce has pooled on the pan, spoon some of it over the thighs too. Return to the oven.
- Roast for an additional 15 to 18 minutes, until the internal temperature at the thickest part of the thigh (without touching bone) reads 165°F (74°C). The skin should be burnished, slightly darkened, and crispy around the edges — the sauce will have caramelized into a glaze.
- Remove from the oven and let rest for 5 minutes. The residual heat will continue cooking through the thighs, and this rest ensures tender, juicy meat.
Serve:
- Transfer the chicken to a serving platter or meal-prep containers. Pour any pan drippings over top.
- Garnish with chopped fresh chives or green onions, and crumbled blue cheese if desired. Serve alongside blue cheese dressing for dipping or drizzling.
Why This Works for Meal Prep
Buffalo sauce actually acts as a preservative and flavor protector because of its acidity and salt content. The chicken doesn’t dry out even after several days in the fridge — if anything, the flavors become even more integrated. The spice doesn’t fade; it lingers pleasantly without becoming overwhelming. This is one of those meals that genuinely tastes good cold straight from the container, which makes it perfect for grab-and-go lunches.
Storage and Reheating
Store in an airtight container for up to 5 days. The sauce keeps the chicken moist, so you don’t have to worry about it drying out. Reheat in a 350°F oven for about 10 minutes, or microwave covered for 2-3 minutes. If you like some of the sauce fresher, you can make a quick hot sauce drizzle to add when reheating.
Variations and Customizations
For less heat, use half hot sauce and half barbecue sauce. Add a tablespoon of honey to the sauce for a sweet-spicy version (similar to honey sriracha wings). Mix in ½ teaspoon of dry mustard powder for a sharper tang. Try a combination of buffalo sauce and Thai chili sauce for a completely different flavor profile.
4. Thai-Inspired Coconut Curry Chicken Thighs
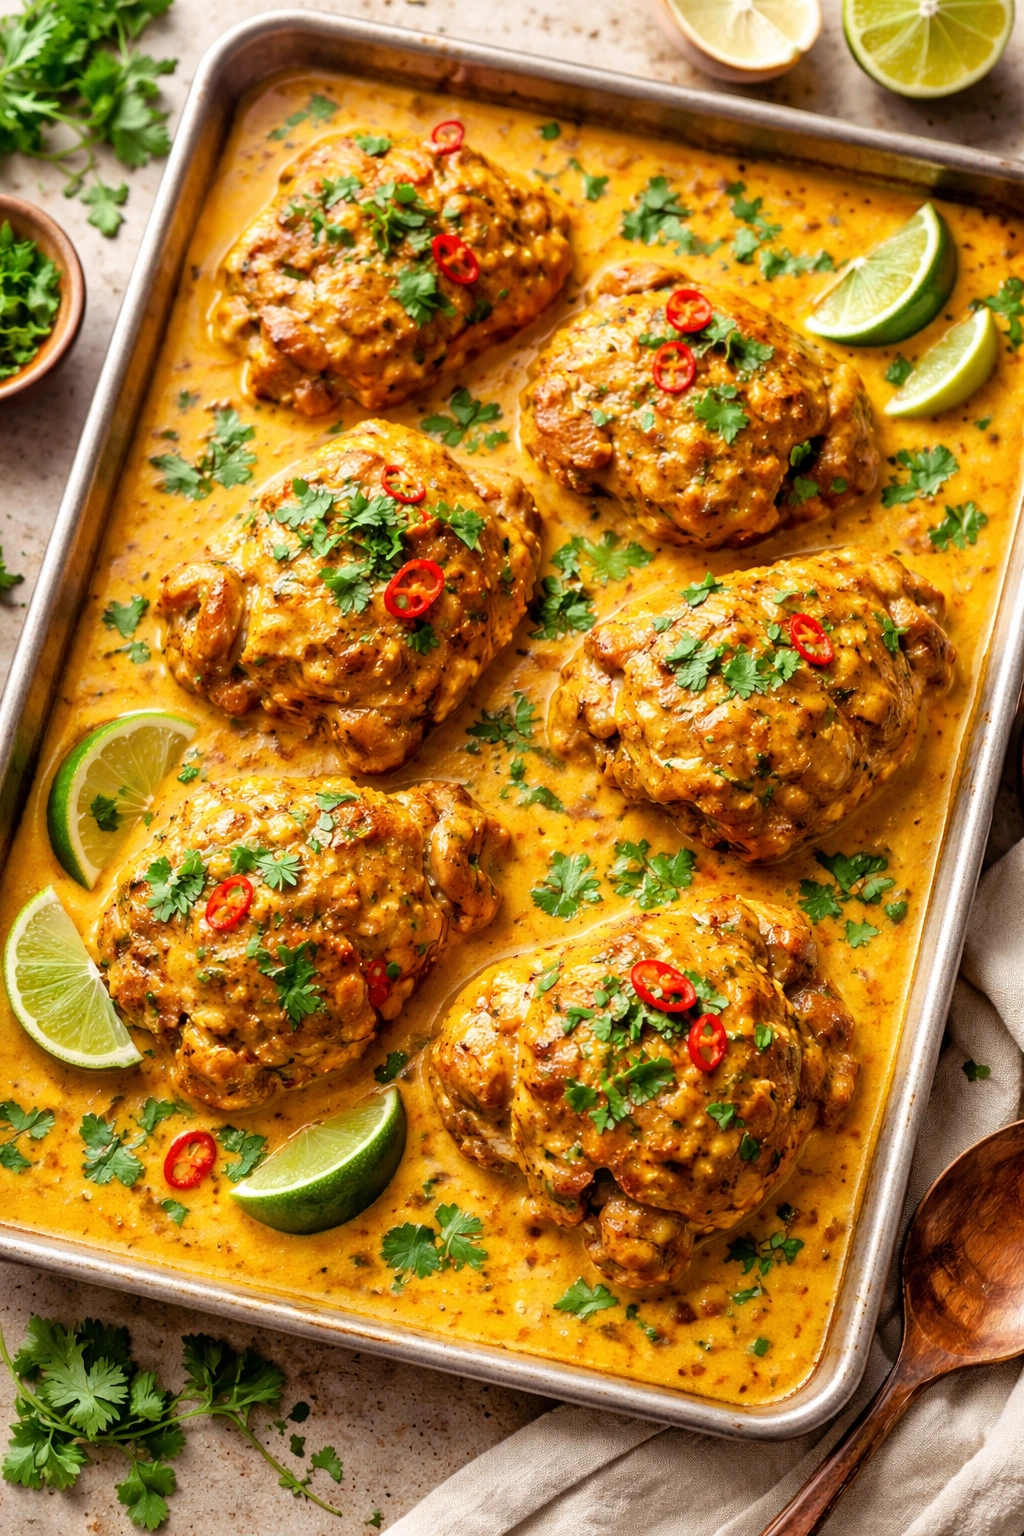
This recipe tastes like you’ve spent the afternoon at a Thai cooking class, but it comes together in about an hour with minimal actual effort. Coconut milk, curry paste, and fresh lime create a sauce that’s creamy, aromatic, and seriously crave-worthy. The chicken absorbs all those flavors and becomes impossibly tender. It pairs beautifully with jasmine rice, quinoa, or served over a bed of leafy greens. The best part? It’s naturally dairy-free and gluten-free if your curry paste is certified, making it one of the most universally friendly meal-prep recipes.
The sauce itself is worth making this recipe — it’s rich enough to feel indulgent but bright enough to feel clean. Leftover sauce can go into soups, drizzle over rice bowls, or coat roasted vegetables.
Yield: Serves 4 to 6 | Prep Time: 15 minutes | Cook Time: 35 minutes | Total Time: 50 minutes | Difficulty: Intermediate — requires opening and working with a few Asian ingredients, but the actual cooking is very straightforward.
For the Curry Sauce:
- 1 can (13.5 oz) unsweetened coconut milk (full-fat gives the best flavor and richness)
- 3 tablespoons red curry paste (or Thai curry paste of your choice; adjust based on heat preference)
- 2 tablespoons fish sauce (or soy sauce for a vegetarian swap)
- 2 tablespoons lime juice (about 1 large lime; fresh is essential here)
- 1 tablespoon palm sugar or honey (or light brown sugar in a pinch)
- 2 cloves garlic, minced
- 1 tablespoon ginger, minced (about a 1-inch piece; fresh ginger is worth the effort)
- ½ teaspoon kosher salt
For the Chicken:
- 8 bone-in, skin-on chicken thighs (about 3 pounds)
- 1 tablespoon coconut oil or neutral oil
- ½ teaspoon kosher salt
- ¼ teaspoon black pepper
For Finishing:
- 1 cup cherry tomatoes, halved
- ½ cup red bell pepper, sliced into thin strips
- ½ cup snap peas or green beans
- ¼ cup fresh Thai basil or cilantro, chopped
- Lime wedges
- Fresh red chili slices (optional, for garnish)
Prepare the Curry Sauce:
- In a small bowl, whisk together the coconut milk, curry paste, fish sauce, lime juice, palm sugar, minced garlic, minced ginger, and salt until smooth. The mixture should be relatively uniform with no visible paste chunks. Taste it — this is your chance to adjust the flavor. Too salty? Add more coconut milk. Too spicy? Add a splash more lime juice. Set aside.
Prepare and Sear the Chicken:
- Pat the chicken thighs dry and season both sides with salt and pepper.
- Heat an oven-safe skillet or Dutch oven over medium-high heat. Add the coconut oil, letting it shimmer for about 30 seconds.
- Working in batches if needed, sear the chicken skin-side down for 4 to 5 minutes without moving it — you want deep browning on the skin. Flip and sear the other side for 2 to 3 minutes. This browning adds tremendous flavor through the Maillard reaction (the chemical reaction that creates delicious browned flavors).
- Remove the seared chicken to a plate. You don’t need to clean the pan.
Assemble and Braise:
- Pour the curry sauce into the hot pan, scraping the bottom with a wooden spoon to release any browned bits. Bring to a gentle simmer, stirring occasionally, for about 1 minute.
- Return the seared chicken thighs to the pan, skin-side up, nestling them into the sauce. The sauce should come halfway up the sides of the thighs — some skin can peek above the sauce, which allows it to brown further in the oven.
- Add the cherry tomatoes, bell pepper strips, and snap peas, scattering them around the chicken in the sauce.
Finish in the Oven:
- Transfer the skillet to a preheated 375°F (190°C) oven. Braise, uncovered, for 25 to 30 minutes, until the internal temperature at the thickest part of a thigh (not touching bone) reaches 165°F (74°C).
- Remove from the oven and let rest for 3 minutes. The flavors will continue to meld slightly.
Serve:
- Divide the chicken and vegetables among serving dishes or meal-prep containers. Spoon plenty of the creamy curry sauce over top.
- Garnish generously with fresh Thai basil or cilantro, and add lime wedges and fresh chili slices if desired.
Why This Works for Meal Prep
Curry-based meals are actually ideal for meal prep because the sauce protects the chicken and the flavors deepen tremendously over time. Unlike some dishes that taste best fresh, this one genuinely tastes better on day two or three as the spices have time to infuse into the meat and the sauce reduces slightly, becoming more concentrated. The coconut milk keeps everything incredibly moist, and there’s no risk of drying out even after 4-5 days of storage.
Storage and Reheating
Store in an airtight container in the refrigerator for up to 5 days. The sauce keeps beautifully and the vegetables soften slightly, which some people prefer. Reheat gently in a saucepan over medium-low heat, stirring occasionally, until warmed through. Alternatively, microwave in a covered container for 2-3 minutes, stirring halfway through. If the sauce has thickened significantly during storage, thin it with a splash of coconut milk or broth.
Variations to Explore
Add a diced potato or sweet potato in the initial searing step for more substance and a creamy texture as it breaks down. Swap the vegetables entirely — cauliflower, zucchini, and carrots all work beautifully. Use green curry paste instead of red for a slightly different flavor profile (green tends to be a bit more herbaceous and slightly less creamy). Add a can of white beans in the last 10 minutes of cooking for extra protein and substance.
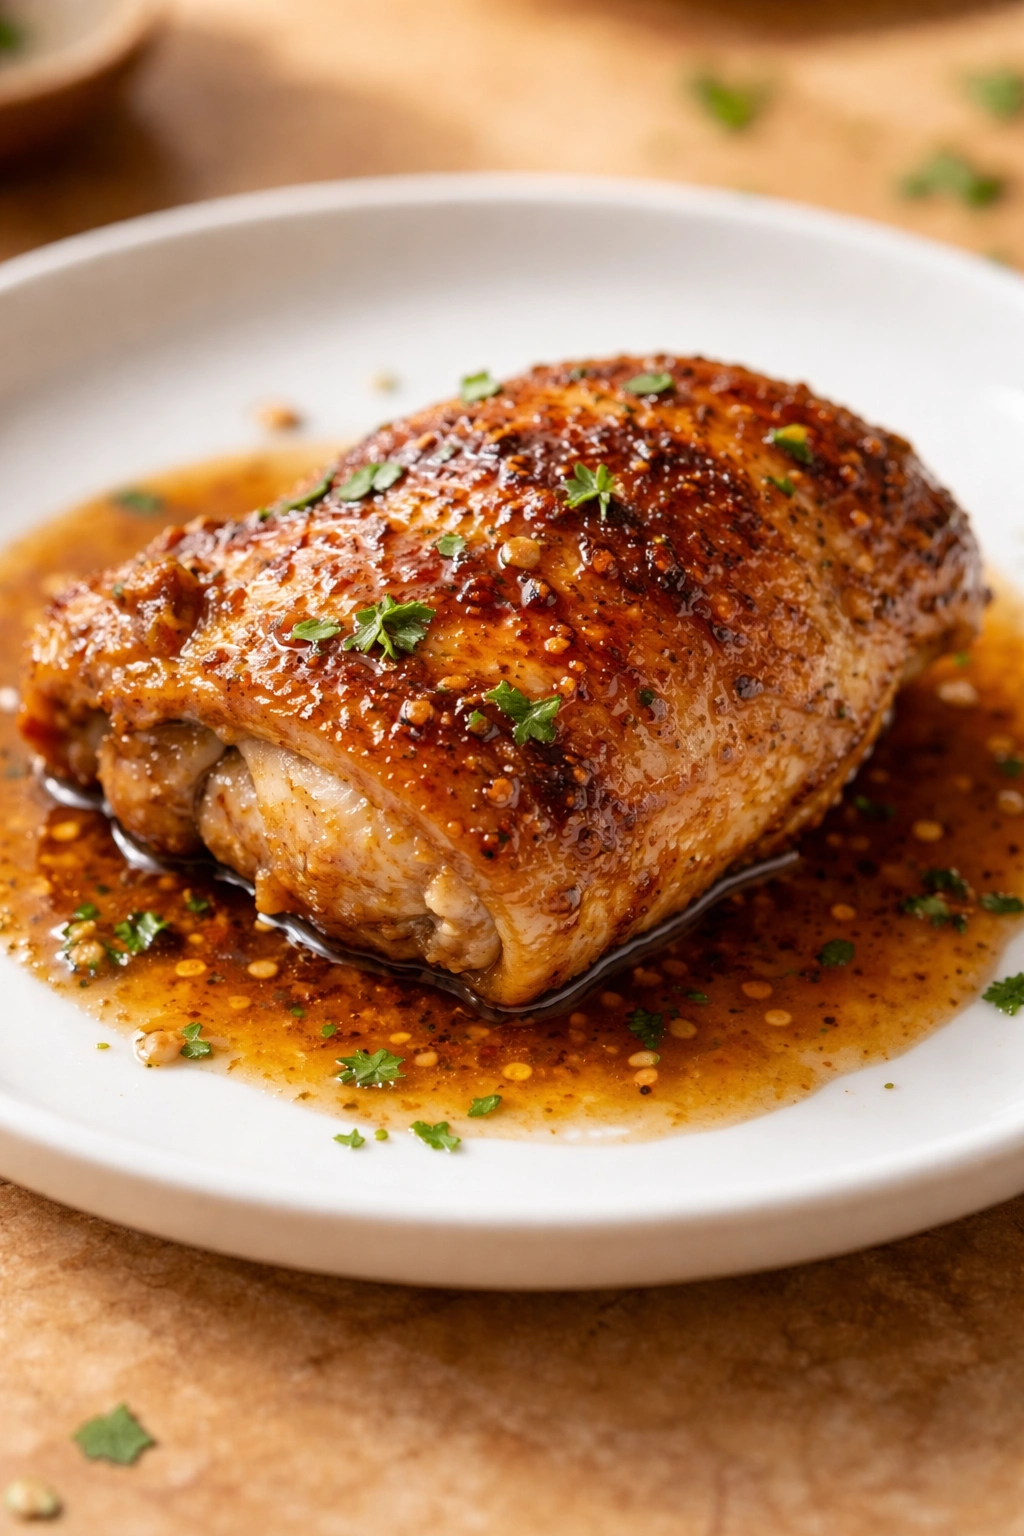
5. Italian Sausage-Style Chicken Thighs
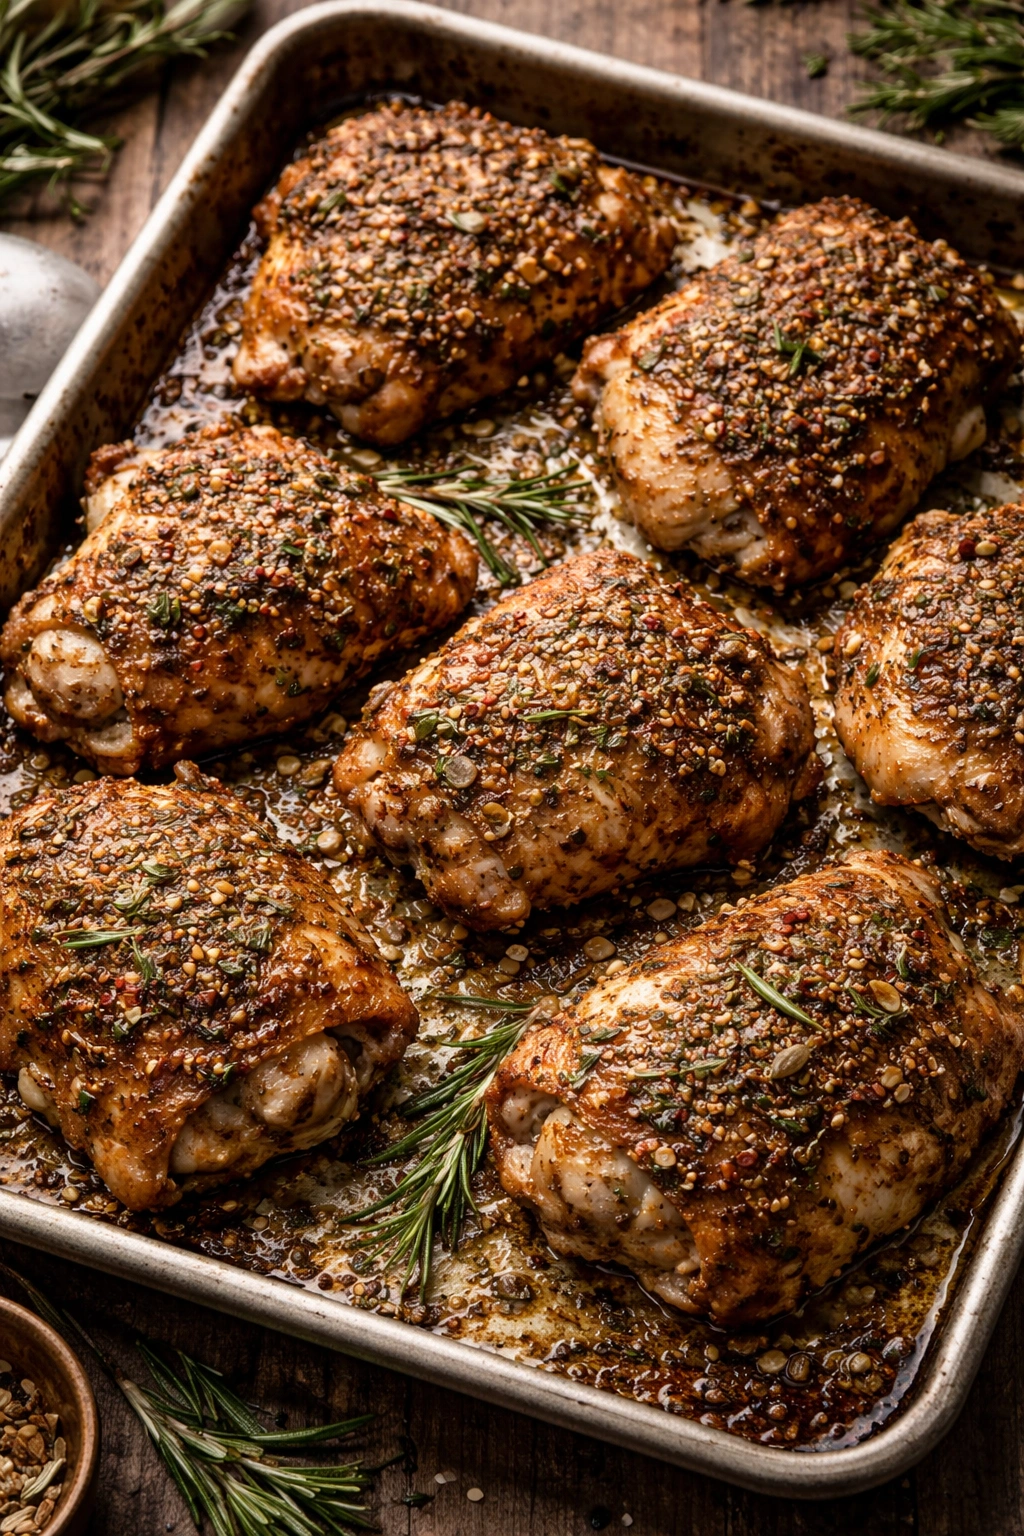
Here’s an interesting angle: what if you seasoned chicken like Italian sausage? The result is savory, herbaceous, and deeply satisfying — with the juiciness of thighs instead of ground meat. This recipe uses fennel seeds, garlic, and Italian herbs to create that distinctive sausage flavor, but with a completely different texture and a thigh’s superior ability to stay moist during storage and reheating.
It’s an unexpected flavor profile that makes people pause at the first bite and then ask what’s in it. Serve it alongside pasta, toss it with roasted peppers and onions for a simple grain bowl, or shred it cold for chopped salads.
Yield: Serves 4 to 5 | Prep Time: 10 minutes | Cook Time: 35 minutes | Total Time: 45 minutes | Difficulty: Beginner — just applying a seasoning paste and roasting.
For the Spice Paste:
- 3 tablespoons olive oil
- 4 cloves garlic, minced (about 1½ tablespoons)
- 1 tablespoon fennel seeds (essential for that sausage flavor; don’t skip this)
- 1 teaspoon dried oregano
- 1 teaspoon dried thyme
- ½ teaspoon dried rosemary, crushed between your fingers to release oils
- ½ teaspoon kosher salt
- ¼ teaspoon red pepper flakes (adjust based on heat preference)
- ¼ teaspoon black pepper
- ¼ teaspoon fennel pollen or additional fennel seeds, finely crushed (optional but adds authentic sausage depth)
For the Chicken:
- 8 bone-in, skin-on chicken thighs (about 3 pounds)
- ½ cup dry white wine or low-sodium chicken broth (or water in a pinch)
- 1 tablespoon balsamic vinegar
For Serving:
- 1 pound sweet or red bell peppers, sliced (for roasting alongside)
- 1 large red onion, sliced (for roasting alongside)
- Fresh parsley, chopped (for garnish)
- Lemon wedges
Make the Paste and Prepare:
- In a small bowl, combine the olive oil, minced garlic, fennel seeds, oregano, thyme, rosemary, salt, red pepper flakes, black pepper, and fennel pollen (if using). Stir until it forms a thick paste with visible herb and seed pieces. This paste will adhere to the chicken as it roasts, creating incredible flavor.
- Pat the chicken thighs dry with paper towels. Season the skin side lightly with a pinch of salt.
- Preheat the oven to 425°F (220°C) with the rack in the center.
Apply the Paste and Prepare the Pan:
- Rub the spice paste all over the chicken thighs, working it into the skin and coating the bone side too. Use all the paste — don’t be conservative. The herbs and spices will toast and intensify in the oven.
- Arrange the thighs skin-side up on a large rimmed sheet pan. Scatter the sliced peppers and onions around the chicken, tossing them lightly with a pinch of salt. These vegetables will roast alongside the chicken, absorbing flavors and becoming soft and caramelized.
- Pour the white wine and balsamic vinegar around the chicken (not on top, as you want the seasoning paste to stay on the skin). The liquid will keep the pan from scorching and create a light pan sauce.
Roast:
- Place the pan in the preheated oven and roast, uncovered, for 30 to 35 minutes. The chicken should reach an internal temperature of 165°F (74°C) at the thickest part of the thigh. The skin should be bronzed and the herbs darkened but not burned.
- Remove from the oven and let rest for 5 minutes. The pan will smell like an Italian butcher shop — that’s exactly what you want.
Finish and Serve:
- Transfer the chicken and vegetables to serving plates or meal-prep containers. Drizzle with any pan drippings.
- Garnish with fresh parsley and serve with lemon wedges for squeezing over top.
Why This Works for Meal Prep
The dry rub paste actually intensifies as it sits, so this meal tastes even better on day two or three. The fennel and herbs are potent enough that the chicken never feels bland, even as it cools and after days in the fridge. The roasted vegetables add volume and keep the meal from feeling meat-heavy, and they also protect the chicken from drying out by maintaining moisture in the surrounding pan.
Storage and Make-Ahead
Store in an airtight container for up to 4 days. The herbs create a protective layer that keeps the chicken moist and flavorful. You can make the spice paste 1-2 days ahead and store it in the fridge, then apply it to the chicken right before roasting. Reheat in a 350°F oven for about 10 minutes.
Flavor Tweaks and Variations
Add a squeeze of fresh lemon juice or white wine vinegar to the pan drippings for extra brightness. Include sliced fennel bulb alongside the peppers and onions — it becomes very mild and sweet when roasted. Brush the skin with a little more olive oil mixed with minced fresh rosemary halfway through cooking for deeper herb flavors. Toss in whole olives or roasted garlic cloves during the last 10 minutes if you want additional savory elements.
6. Asian Ginger Soy Chicken Thighs
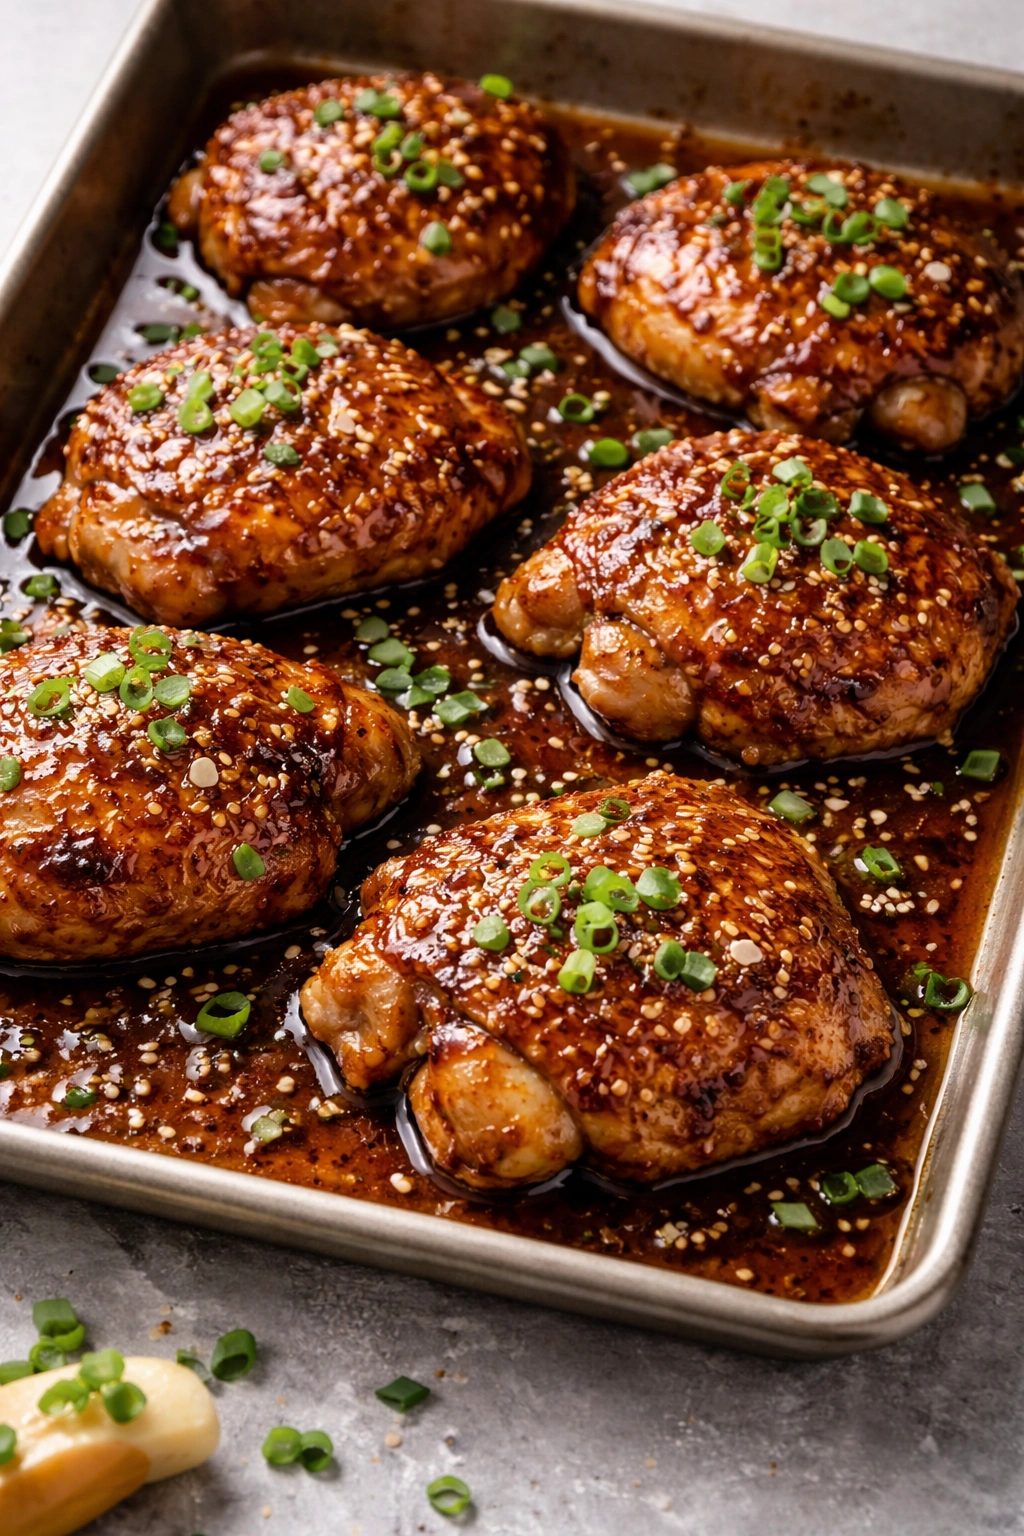
This is the recipe for when you want something bold and savory that tastes like takeout but is infinitely easier than calling a restaurant. Fresh ginger, soy sauce, and a touch of sesame oil create a sauce that’s complex and deeply satisfying. The thighs soak up all those flavors, and because they’re so inherently juicy, they stay tender and flavorful all week. This is the kind of meal that makes you feel good about your meal-prep choices.
Serve it over steamed rice, with stir-fried vegetables on the side, or over a quick salad with crispy noodles. The sauce is so good you’ll want extra to drizzle over rice or vegetables.
Yield: Serves 4 to 6 | Prep Time: 15 minutes | Cook Time: 40 minutes | Total Time: 55 minutes | Difficulty: Beginner — just mixing a sauce and braising; the flavors do the heavy lifting.
For the Sauce:
- ½ cup low-sodium soy sauce
- ¼ cup rice vinegar (white vinegar works too, but rice vinegar is more mellow)
- 3 tablespoons honey or light brown sugar
- 2 tablespoons sesame oil (use toasted sesame oil for deeper flavor)
- ¼ cup fresh ginger, minced (about a 2-inch piece; don’t hold back here — ginger is the star)
- 6 cloves garlic, minced (about 2 tablespoons)
- 1 tablespoon Dijon mustard (adds subtle depth without a spicy kick)
- 1 teaspoon kosher salt
- ½ teaspoon white pepper or black pepper
- ¼ teaspoon red pepper flakes (or to taste)
- 2 tablespoons water (to thin the sauce slightly)
For the Chicken:
- 8 bone-in, skin-on chicken thighs (about 3 pounds)
- 1 tablespoon neutral oil (vegetable, canola, or peanut)
- ½ teaspoon kosher salt
- ¼ teaspoon black pepper
For Serving:
- 2 cups broccoli florets (or bok choy, snow peas, or carrots)
- 4 green onions, sliced (white and green parts separated)
- 2 tablespoons sesame seeds (black, white, or a mix)
- Fresh cilantro, chopped (optional)
- Lime wedges
Prepare the Sauce:
- In a medium bowl, whisk together the soy sauce, rice vinegar, honey, sesame oil, minced ginger, minced garlic, Dijon mustard, salt, pepper, red pepper flakes, and water until completely combined. The mixture should be smooth and well-incorporated. Taste it — this is your chance to adjust. Too salty? Add a splash more water. Not enough ginger depth? Add more minced fresh ginger. Set aside.
Sear the Chicken:
- Pat the chicken thighs dry. Season both sides with salt and pepper.
- Heat an oven-safe skillet or Dutch oven over medium-high heat. Add the neutral oil and let it shimmer for about 30 seconds until it’s quite hot.
- Sear the chicken skin-side down for 5 minutes without moving it — you want deep browning and crisping on the skin. Flip and sear the bone side for 2 to 3 minutes. Transfer the seared chicken to a plate.
Braise:
- Pour the ginger-soy sauce into the hot pan, scraping the bottom with a wooden spoon to release the browned bits. Bring to a simmer, stirring occasionally, for about 1 minute.
- Return the seared chicken to the pan, skin-side up. Add the broccoli florets around the chicken, tucking them into the sauce. The broccoli will soften as everything braises and add a nice textural contrast.
- Transfer the skillet to a preheated 375°F (190°C) oven. Braise, uncovered, for 25 to 30 minutes, until the internal temperature at the thickest part of the thigh (without touching bone) reaches 165°F (74°C).
- Remove from the oven. Let rest for 3 to 4 minutes — the sauce will reduce slightly and become slightly glossier.
Finish and Serve:
- Divide the chicken, broccoli, and sauce among serving plates or meal-prep containers.
- Scatter the sliced green onions (white parts) over top, then sprinkle with sesame seeds. Add a pinch of fresh cilantro if using, and serve with lime wedges for squeezing over.
Why This Works for Meal Prep
Ginger and soy are natural flavor intensifiers and preservatives — this meal actually tastes better after a day or two as the ginger infuses into the chicken and the soy deepens. The sauce keeps everything moist and flavorful, and there’s no risk of the chicken drying out. This is one of those meals that’s good hot from the oven and just as good cold straight from the fridge if you’re in a rush.
Storage and Reheating
Store in an airtight container for up to 5 days. The sauce actually improves over time. Reheat gently in a saucepan over medium heat, or microwave in a covered container for 2-3 minutes, stirring halfway through. If the sauce has thickened significantly, thin it with a splash of water or broth.
Flavor Riffs and Adaptations
Add a tablespoon of miso paste to the sauce for deeper umami — whisk it in with the other ingredients. Use orange juice instead of half the rice vinegar for a sweeter, brighter version. Include sliced shiitake mushrooms alongside the broccoli for a more restaurant-like dish. Stir in a tablespoon of Sriracha at the very end for a spicy kick without changing the fundamental flavor profile.
How to Structure Your Week Around These Recipes
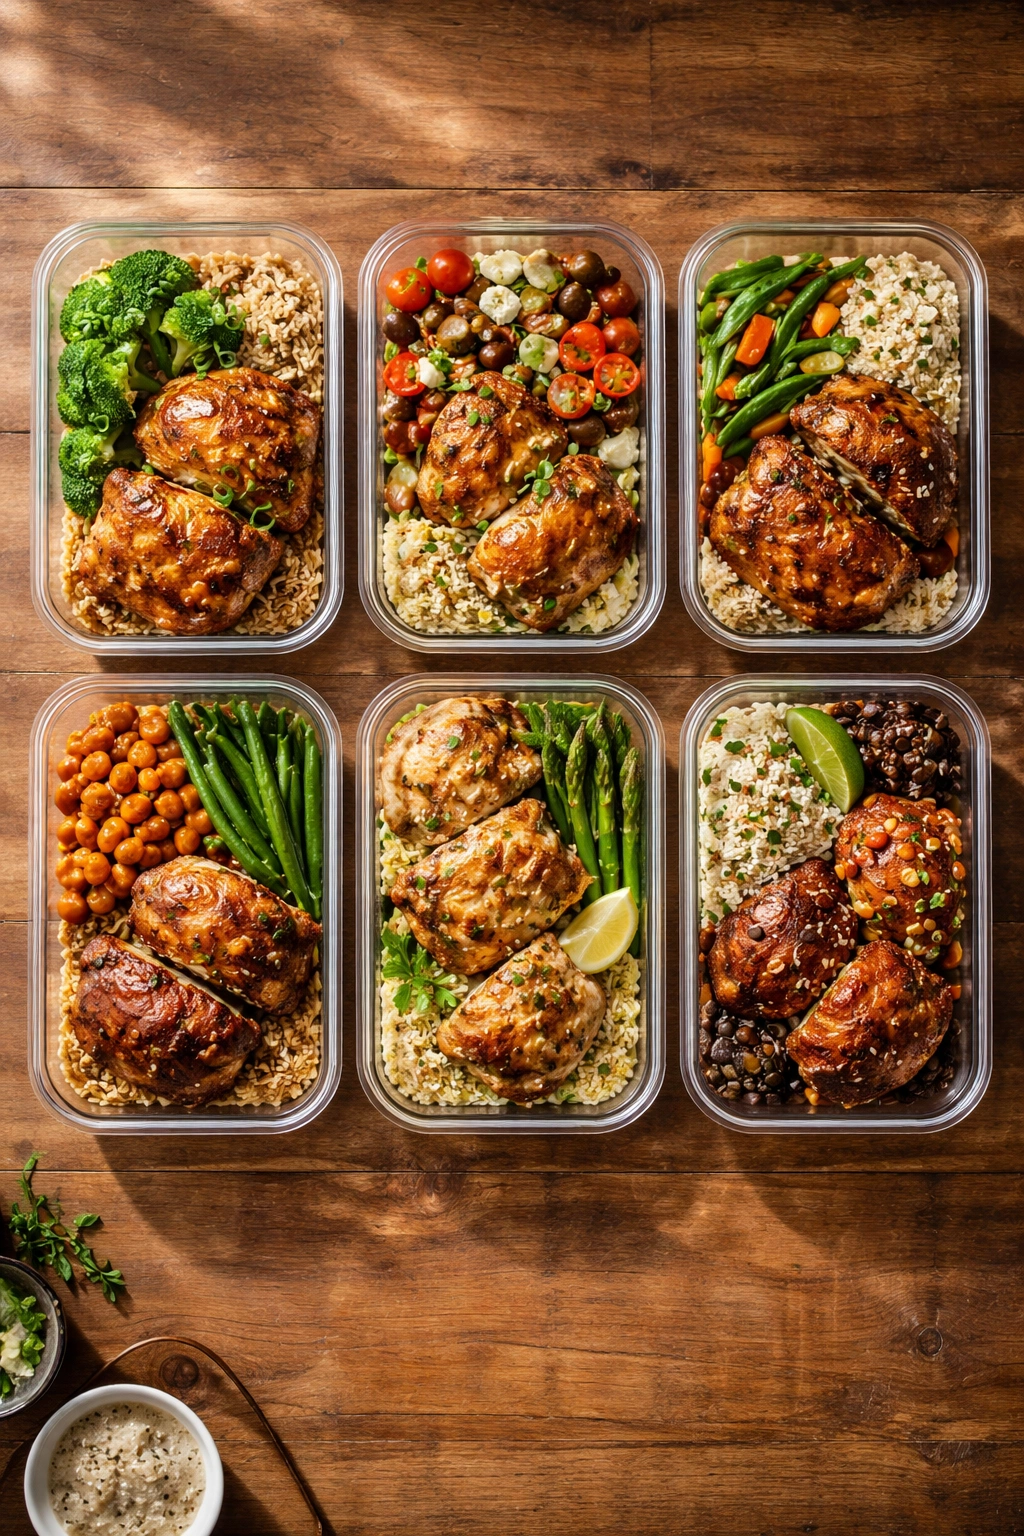
The beauty of these six recipes is that they’re distinct enough that you won’t get bored, but they all share the same core protein — chicken thighs — so your shopping is efficient. Pick three recipes and make a double batch of each, rotating them throughout the week. Monday and Tuesday might be Mediterranean, Wednesday and Thursday could be Thai curry, and Friday through Sunday brings buffalo ranch. You stay excited about your meals without overcomplicating your prep day.
Each recipe makes 4-6 servings, so if you’re meal prepping for one person, you’ll have lunch sorted for nearly a week. If you’re prepping for a family or couple, you can make all six recipes and have variety without anyone eating the same thing twice. The flavors are bold enough that they pair well with simple sides like white rice, brown rice, quinoa, or roasted vegetables, or they can stand alone with just a side salad.
Practical Tips for Successful Chicken Thigh Meal Prep
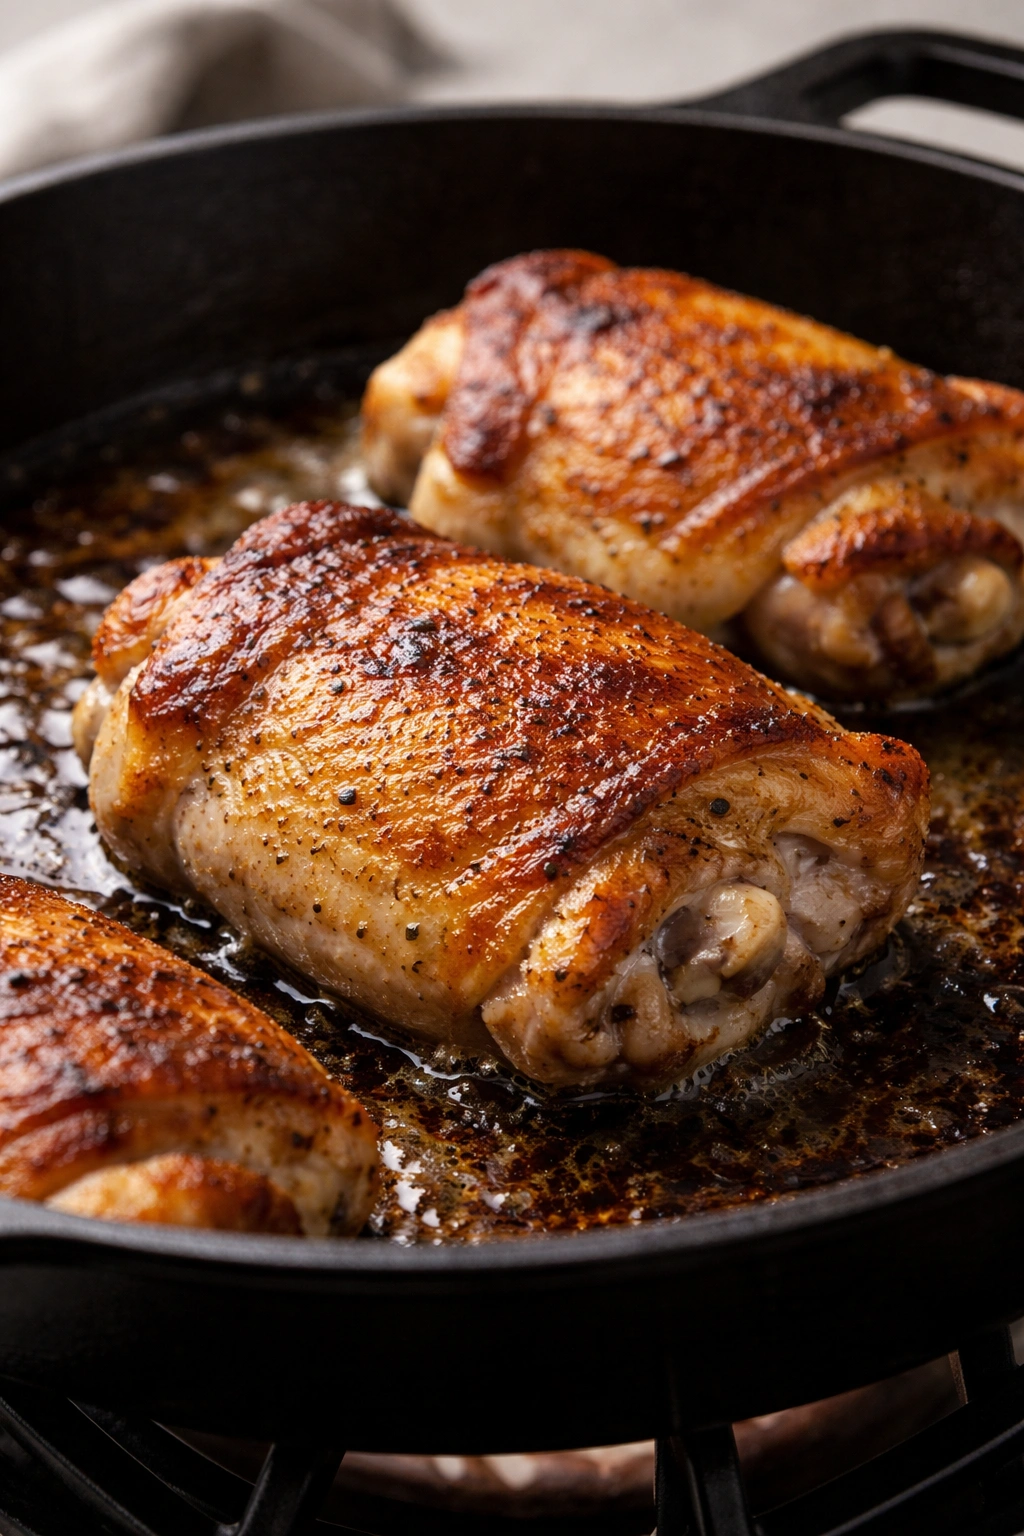
Pat your thighs completely dry before cooking. This is the single most important step for getting crispy, golden skin and flavor through browning. Use paper towels and don’t rush it — wet skin will steam and never crisp up, and you’ll miss out on incredible caramelized flavor.
Don’t skip the searing step. When a recipe includes searing before roasting, do it. The browning creates flavor through the Maillard reaction that you literally cannot get any other way. It’s 5 minutes of active time that changes everything about the final result.
Use bone-in, skin-on thighs specifically. They have more flavor than boneless, skinless thighs (which are closer to breasts in dryness), and the bone adds richness to any pan sauce. The bone also keeps the meat from shrinking and bunching as it cooks.
Buy thighs in bulk. If your regular grocery store is expensive, check warehouse stores like Costco or Sam’s Club — thighs are significantly cheaper there, which makes meal prepping them economical. Buy them on sale, freeze them, and thaw overnight before cooking.
Don’t crowd the pan. Whether you’re searing or roasting, give each thigh space. Crowding creates steam instead of browning, and you lose that essential crust and flavor.
Invest in an instant-read thermometer. Checking doneness with the thermometer at 165°F is the only reliable way to ensure you’re not over- or undercooking. The thighs are done when they hit that temperature; any longer and you risk them becoming tough.
Storing and Reheating for Maximum Freshness
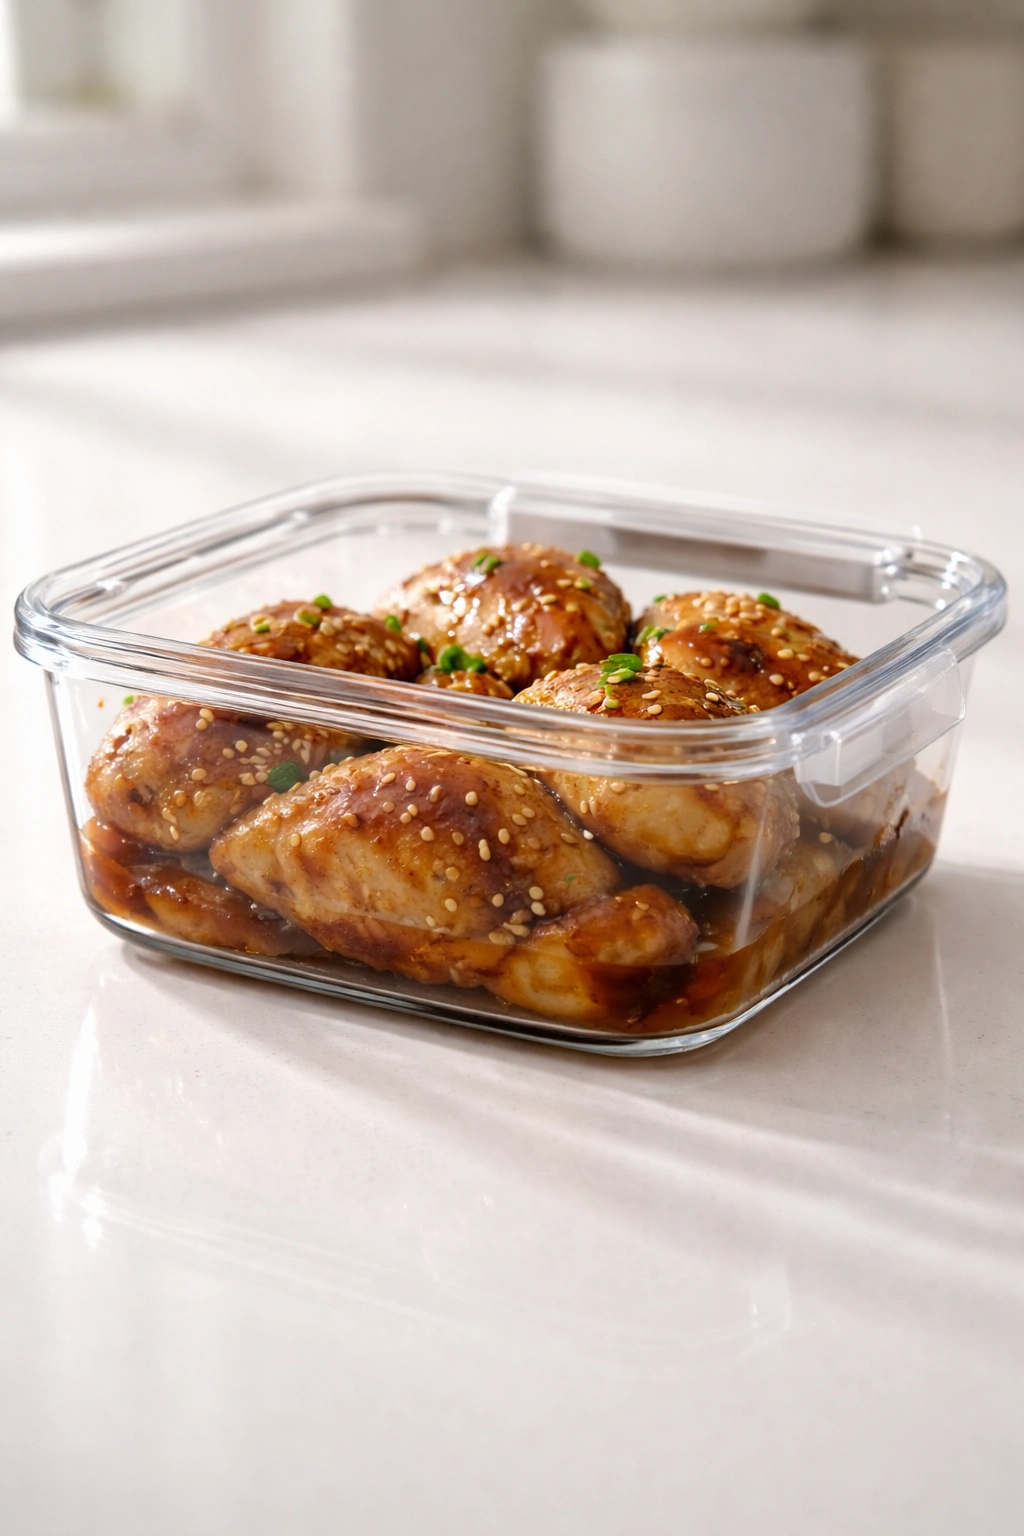
Store all cooked chicken in airtight containers — glass or heavy-duty plastic both work, but glass doesn’t retain odors and stains like plastic can. Place the thighs with their sauce directly in the container, and store any vegetables separately if you prefer them crisper. Most of these recipes stay fresh for 4-5 days; the exact timeline depends on how quickly you chill them after cooking (cool to room temperature, then refrigerate immediately).
To reheat, your best bet is a low oven — 325-350°F for 10-12 minutes depending on portion size — which helps restore the skin’s crispness and allows the sauce to warm gently without becoming watery or separating. If you’re in a true time crunch, the microwave works fine for 2-3 minutes covered, though the skin won’t be quite as crispy. Either way, the chicken itself will still be tender and flavorful because thighs are naturally forgiving.
Final Thoughts
Chicken thighs are genuinely the unsung heroes of meal prep. They’re forgiving, flavorful, and affordable — they handle being cooked ahead and reheated beautifully, and they taste better after a day or two as flavors settle and deepen. These six recipes give you completely different flavor profiles throughout the week, so you’re never stuck in a rut eating the same seasoning combination on repeat.
Start with whichever recipe appeals to you most, then rotate through the others. Once you’ve made a few, you’ll see how adaptable they all are — you can swap vegetables, adjust heat levels, and make them your own. The framework stays the same: crispy-skinned thighs in a well-seasoned sauce, ready to partner with whatever sides you’ve got on hand.
Your Sunday meal-prep sessions are about to get a lot more exciting.