Venison is a lean, flavorful protein that transforms into exceptional dishes when you approach it with the right technique. Unlike beef, venison’s lower fat content means it benefits from marinades, braises, and cooking methods that add richness and prevent the meat from drying out. If you’ve just brought home a harvest or picked up fresh venison from a local source, these six recipes deliver restaurant-quality results without complicated procedures or hard-to-find ingredients.
The recipes below range from slow-cooked comfort food to quick weeknight dinners, so whether you have three hours or thirty minutes, there’s something here that fits your schedule. Each one plays to venison’s naturally rich, slightly gamey flavor profile—leaning into it with bold seasonings, acid, and complementary ingredients rather than trying to mask it. You’ll find that properly prepared venison rivals any premium beef in tenderness and taste.
1. Rich and Hearty Venison Chili
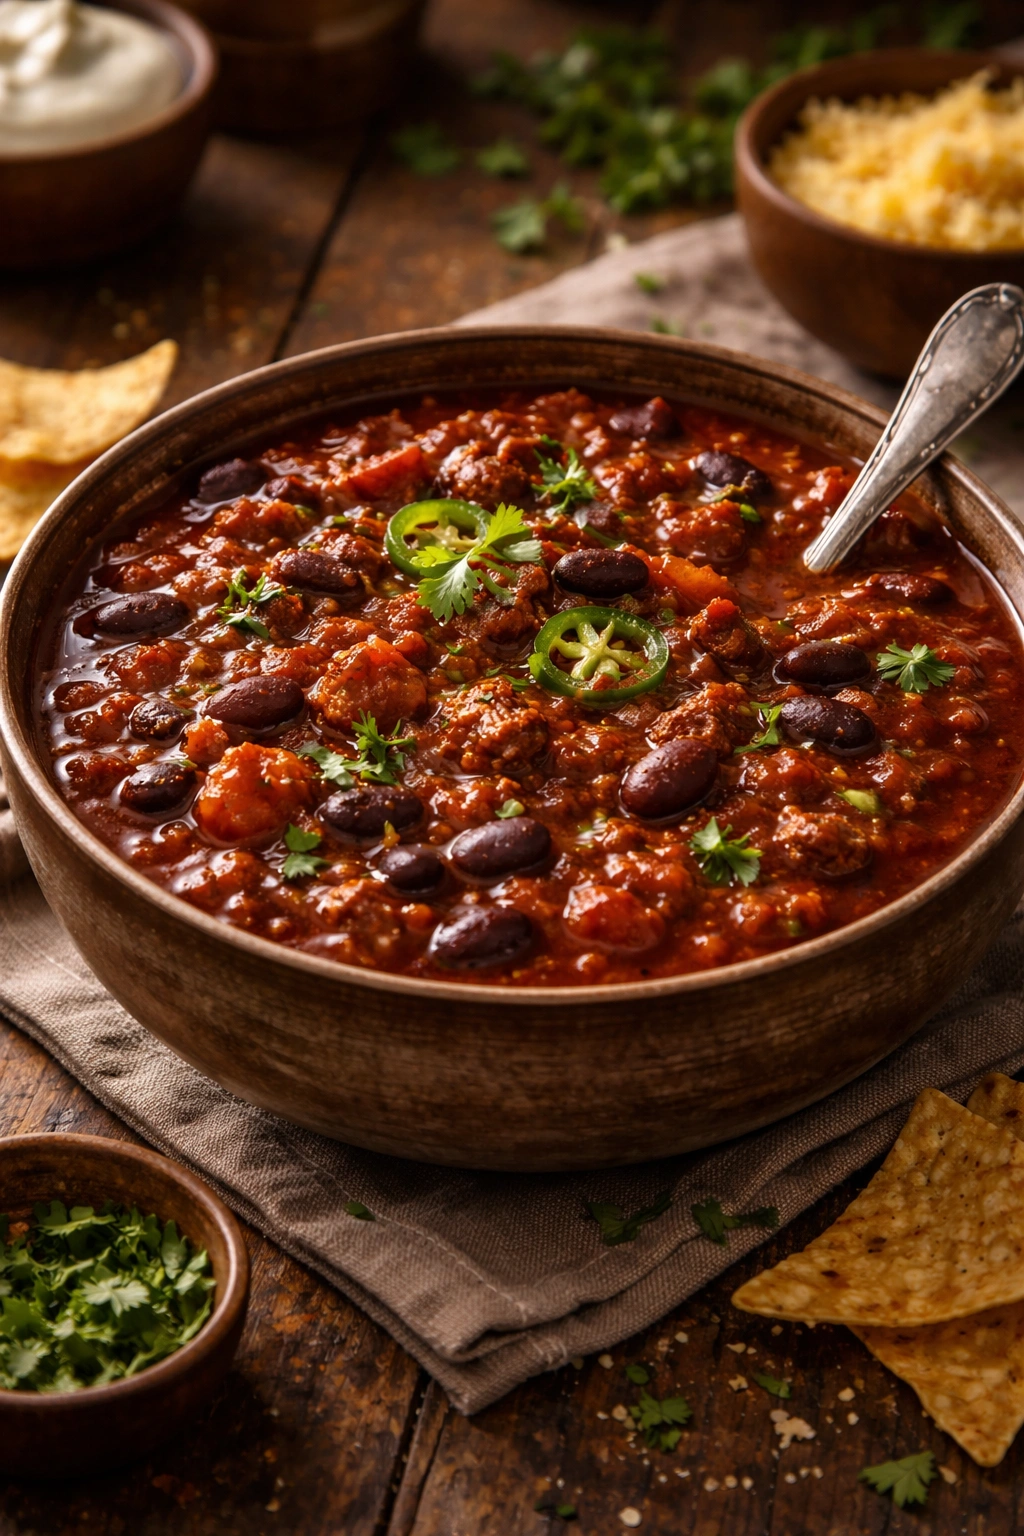
Venison chili delivers the best possible introduction to cooking game meat at home. Ground venison simmers with tomatoes, beans, and warming spices, creating a deep, complex dish that tastes like it’s been simmering all day—even though it comes together in under two hours. The long cooking time breaks down the meat’s fibers, making it exceptionally tender, and the acidity from tomato products and a splash of coffee balance venison’s earthiness perfectly.
Yield: Serves 6 to 8 | Prep Time: 20 minutes | Cook Time: 90 minutes | Total Time: 2 hours | Difficulty: Beginner — simply brown the meat and simmer everything together in one pot.
For the Chili:
- 2 pounds ground venison
- 3 tablespoons olive oil
- 1 large yellow onion, diced (about 1½ cups)
- 4 cloves garlic, minced
- 3 tablespoons chili powder (or adjust to your heat preference)
- 2 tablespoons ground cumin
- 1 tablespoon smoked paprika
- 1 teaspoon dried oregano
- 2 cans (28 ounces each) crushed tomatoes (San Marzano preferred)
- 1 can (15 ounces) tomato sauce
- 2 cans (15 ounces each) kidney beans, drained and rinsed
- 1 can (15 ounces) black beans, drained and rinsed
- 1 tablespoon unsweetened cocoa powder
- 1 tablespoon strong brewed coffee or espresso powder mixed with 1 tablespoon water
- 1 teaspoon fine sea salt (start here; adjust after cooking)
- ½ teaspoon freshly ground black pepper
- 2 bay leaves
- 1 teaspoon hot sauce or to taste (optional)
For Serving:
- Fresh cilantro, chopped
- Diced white onion
- Shredded cheddar or sharp provolone
- Sour cream
- Cornbread or tortilla chips
Cook the Base:
-
Heat olive oil in a large, heavy-bottomed pot or Dutch oven over medium-high heat. When the oil shimmers, add the ground venison in small pieces (don’t crowd the pot). Cook for 8 to 10 minutes, breaking it apart with a wooden spoon as it browns, until no pink remains and the meat has developed a rich caramelized crust on the bottom of the pot. Do not rush this step or skip browning — this is where the chili’s depth comes from.
-
Add the diced onion and a pinch of salt to the pot. Stir well, scraping up any browned bits stuck to the bottom (these bits, called fond, are pure flavor). Cook for 4 to 5 minutes, until the onion softens and becomes translucent at the edges.
-
Add the minced garlic and cook for exactly 1 minute, stirring constantly, until fragrant. The garlic should smell intense and sweet, not burnt.
Advertisements -
Stir in the chili powder, cumin, smoked paprika, and oregano. Mix thoroughly until the spices coat all the meat. Cook for 1 to 2 minutes, stirring constantly, until the spices bloom and the pot smells deeply aromatic. This toasting step develops the spices’ full flavor potential.
Build the Chili:
-
Pour in both cans of crushed tomatoes and the tomato sauce. Stir well, ensuring all the spices are fully incorporated and no dry spice remains on the bottom of the pot. Add the bay leaves.
-
Stir in both cans of beans. Add the cocoa powder and the coffee mixture, stirring until everything is evenly combined. The cocoa powder will seem like an odd choice, but it doesn’t make the chili taste like chocolate — instead, it deepens the savory notes and adds a subtle richness that rounds out all the spices.
-
Bring the mixture to a gentle simmer, then reduce heat to low. Simmer uncovered for 60 to 75 minutes, stirring occasionally. The chili should bubble lazily at the edges, not boil aggressively. This extended simmer allows the flavors to meld and the sauce to thicken slightly. After about 45 minutes, taste and adjust salt and heat level with hot sauce if desired.
-
Remove the bay leaves. The chili is ready when the sauce has reduced slightly and clings to the venison, and the flavors have deepened and mellowed together. It should taste rich and complex, not sharp or one-dimensional.
Why Venison Chili Works So Well
Venison’s lean structure means it absorbs the spices and sauce flavors more readily than fattier beef. The long simmer time is essential for venison — it transforms the meat’s firm texture into something silky. The cocoa, coffee, and cumin work together to round out venison’s naturally sharp, gamey notes, creating a finished dish that tastes balanced and sophisticated rather than “wild.”
Make-Ahead and Storage Tips
Venison chili actually improves overnight as flavors continue to blend and meld. Make it a full day ahead if your schedule allows. Store in an airtight container in the refrigerator for up to 5 days, or freeze in portion-sized containers for up to 3 months. Thaw overnight in the refrigerator before reheating gently over low heat on the stovetop, adding a splash of water or broth if the chili has thickened too much.
Serving Suggestions
Serve with cornbread for a classic pairing, or use as a filling for baked potatoes, nachos, or chili dogs. Top with sharp cheddar, diced white onion, sour cream, and fresh cilantro. A cold beer or spiced apple cider pairs beautifully with the rich, warming spices.
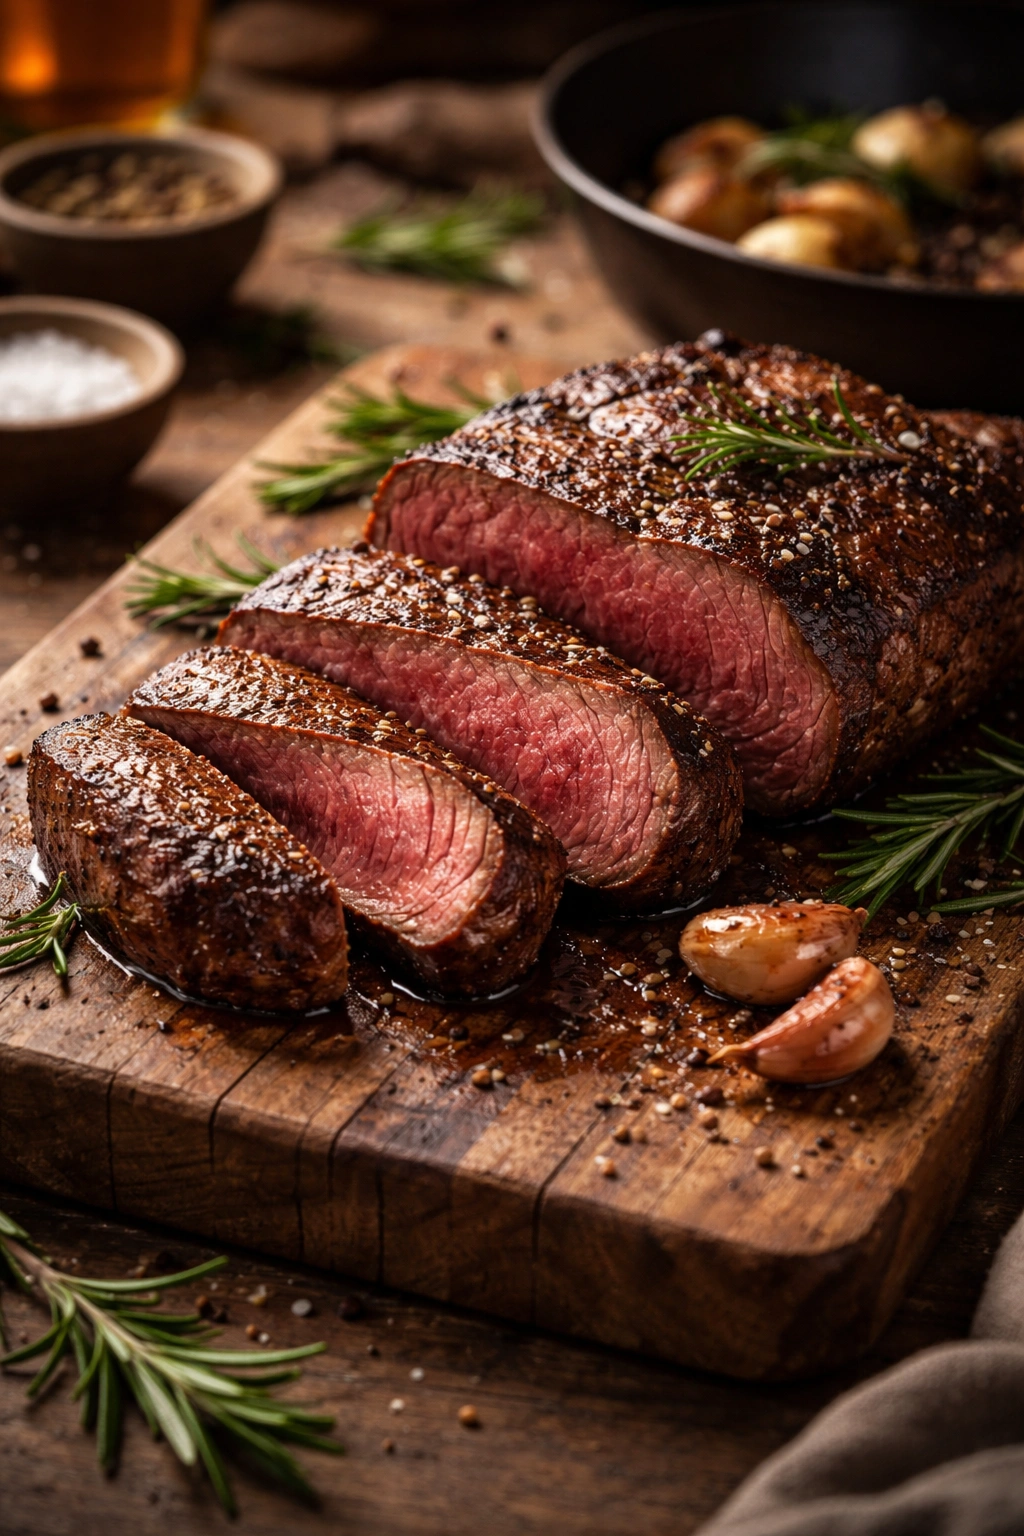
2. Pan-Seared Venison Steaks with Herb Butter
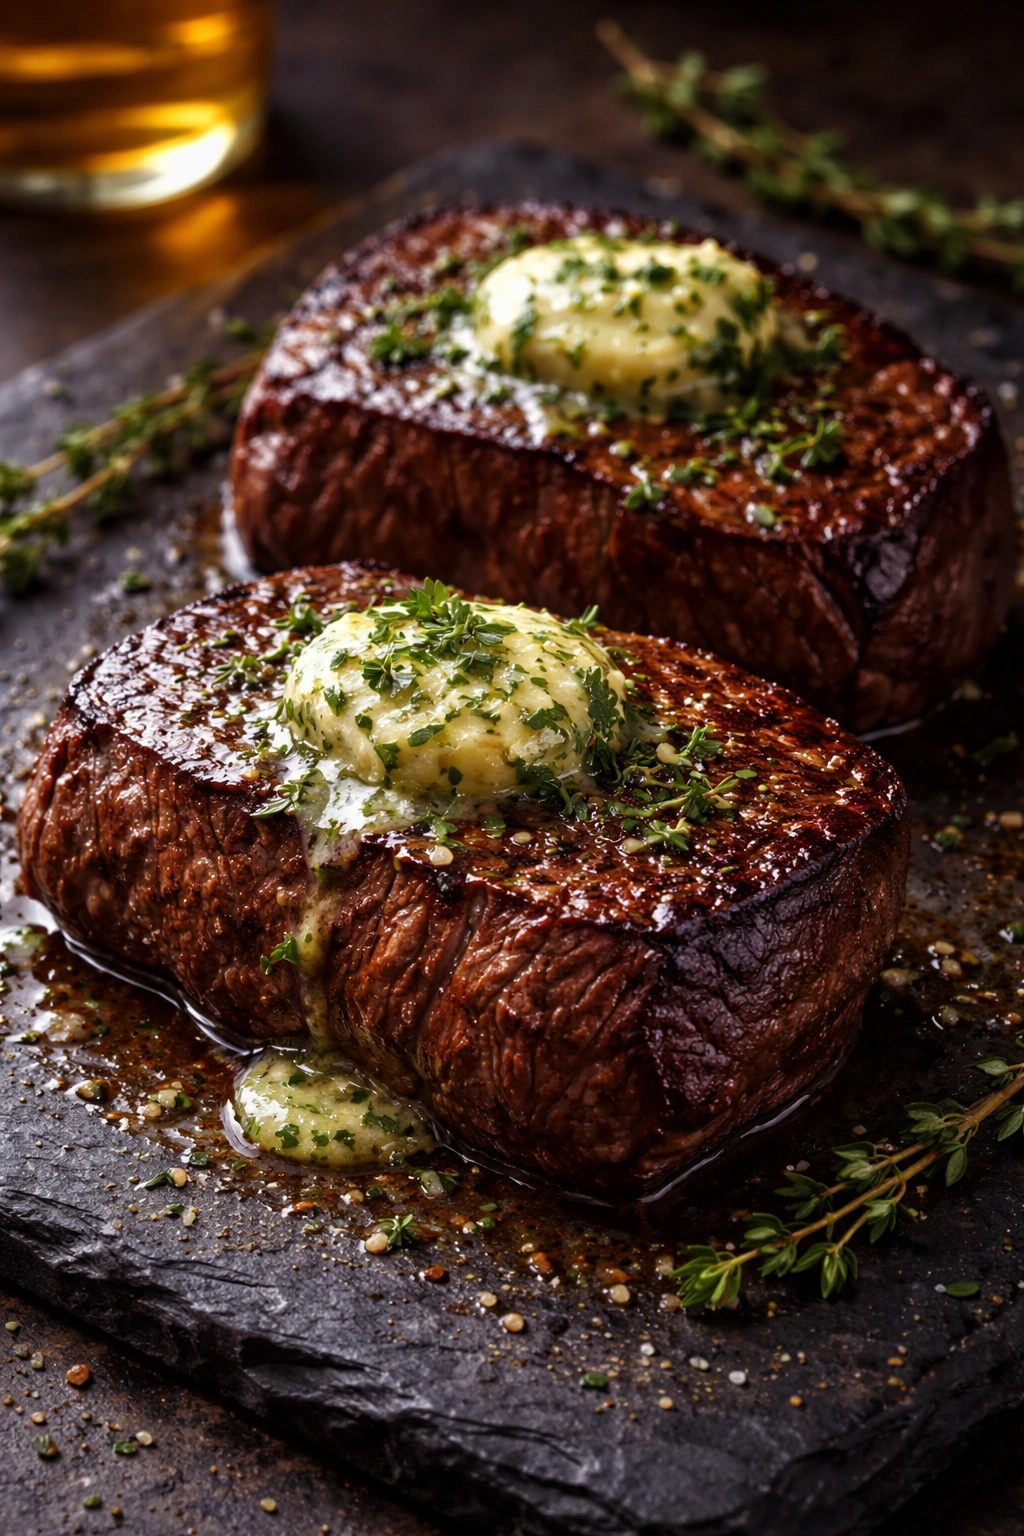
Venison steaks demand confidence and a hot pan — undercooking slightly is the goal, as the lean meat toughens dramatically if pushed past medium-rare. This straightforward preparation respects the meat’s quality, adding nothing but salt, pepper, and a finishing swipe of herb butter. The result is restaurant-caliber in thirty minutes flat, with a caramelized exterior and a juicy, tender interior that showcases why venison steaks are worth seeking out.
Yield: Serves 4 | Prep Time: 15 minutes | Cook Time: 12 minutes | Total Time: 27 minutes | Difficulty: Intermediate — timing the pan heat and doneness requires attention, but the technique itself is straightforward.
For the Steaks and Herb Butter:
- 4 venison loin steaks or backstrap steaks, each 1¼ to 1½ inches thick (about 6 ounces each)
- Fine sea salt and freshly ground black pepper
- 3 tablespoons unsalted butter, divided (2 tablespoons softened for the herb butter, plus 1 tablespoon for the pan)
- 1 tablespoon fresh rosemary, finely minced
- 1 tablespoon fresh thyme leaves, finely minced
- 2 cloves garlic, minced very fine
- ½ teaspoon fleur de sel or finishing salt (for seasoning the herb butter)
- 2 tablespoons neutral oil (vegetable, canola, or light olive oil — NOT extra virgin)
- Fresh lemon juice (about 1 tablespoon)
Prepare the Steaks and Herb Butter:
-
Remove the venison steaks from the refrigerator 20 to 30 minutes before cooking. Pat them completely dry with paper towels. Moisture on the surface prevents browning, so this step is essential. Season both sides generously with fine sea salt and black pepper — do not be shy here. The seasoning should coat the surface visibly.
-
While the steaks come to room temperature, make the herb butter. In a small bowl, combine the softened butter, minced rosemary, thyme, minced garlic, and fleur de sel. Stir until the herbs and garlic are evenly distributed throughout. The butter will be fragrant and studded with green herbs. Do not skip the herbs — they’re what transform simple butter into something special.
Cook the Steaks:
-
Place a heavy-bottomed skillet (cast iron or stainless steel) over medium-high heat. Let it heat for 3 to 4 minutes — you want it properly hot, not just warm. You’ll know it’s ready when a drop of water flicked onto the surface instantly sizzles and evaporates.
-
Add the neutral oil to the pan. Let it heat for exactly 1 minute, until it shimmers and moves easily across the surface. If the oil starts to smoke, reduce heat very slightly.
-
Carefully place the steaks in the pan, laying them away from you so the hot oil doesn’t splash toward you. Do not move the steaks for 3 to 4 minutes. They need this time to develop a golden-brown crust. The pan should sizzle loudly and continuously — if it doesn’t, your pan wasn’t hot enough. Let it be; this is the Maillard reaction happening, the chemical process that creates depth and richness in the meat’s surface.
-
After 3 to 4 minutes, flip the steaks. The underside should be deep golden brown. If it’s pale, the pan wasn’t hot enough for the first side — this will affect the final texture. Add the 1 tablespoon of butter to the pan along with a few sprigs of fresh thyme (not the minced thyme from the herb butter). Tilt the pan so the melted butter pools to one side, then use a spoon to continuously baste the steaks with the hot butter for the remaining 2 to 3 minutes of cooking.
Advertisements -
Cook the second side for 2 to 3 minutes total. The steaks should feel just slightly less firm than the side of your thumb when pressed — this indicates a perfect medium-rare. Venison is extremely lean, so overcooking by even a few degrees will noticeably toughen the meat. If you prefer medium, cook for one additional minute per side, but understand the texture will be firmer.
-
Transfer the steaks to a warm plate and top each one with a generous spoonful of the herb butter. The residual heat will soften it into a silky, fragrant sauce. Rest the steaks for 3 to 5 minutes before serving — this allows the juices to redistribute throughout the meat rather than running out onto the plate when you cut into it.
Why This Method Succeeds with Venison
Venison steaks are beautifully tender when cooked quickly and served rare to medium-rare. The high-heat pan searing creates a flavorful crust without heating the interior beyond its ideal doneness. The herb butter finishes the dish with richness and aromatic depth, compensating for venison’s lean structure. This is the approach that restaurant chefs use, adapted for home cooking.
Adjusting for Your Preferences
If your steaks are thicker than 1½ inches, increase the searing time by 1 minute per side and reduce heat to medium after the initial sear, allowing them to cook through more gently. If you prefer steaks cooked toward medium, the steaks will require approximately 4 to 5 minutes per side depending on thickness.
Side Dish Pairings
Serve with roasted root vegetables (carrots, parsnips, and potatoes roasted with oil and thyme), creamed spinach, or a simple arugula salad with lemon and olive oil. Mashed potatoes or polenta work beautifully to catch the herb butter and meat juices.
3. Slow-Cooked Venison Stew with Root Vegetables
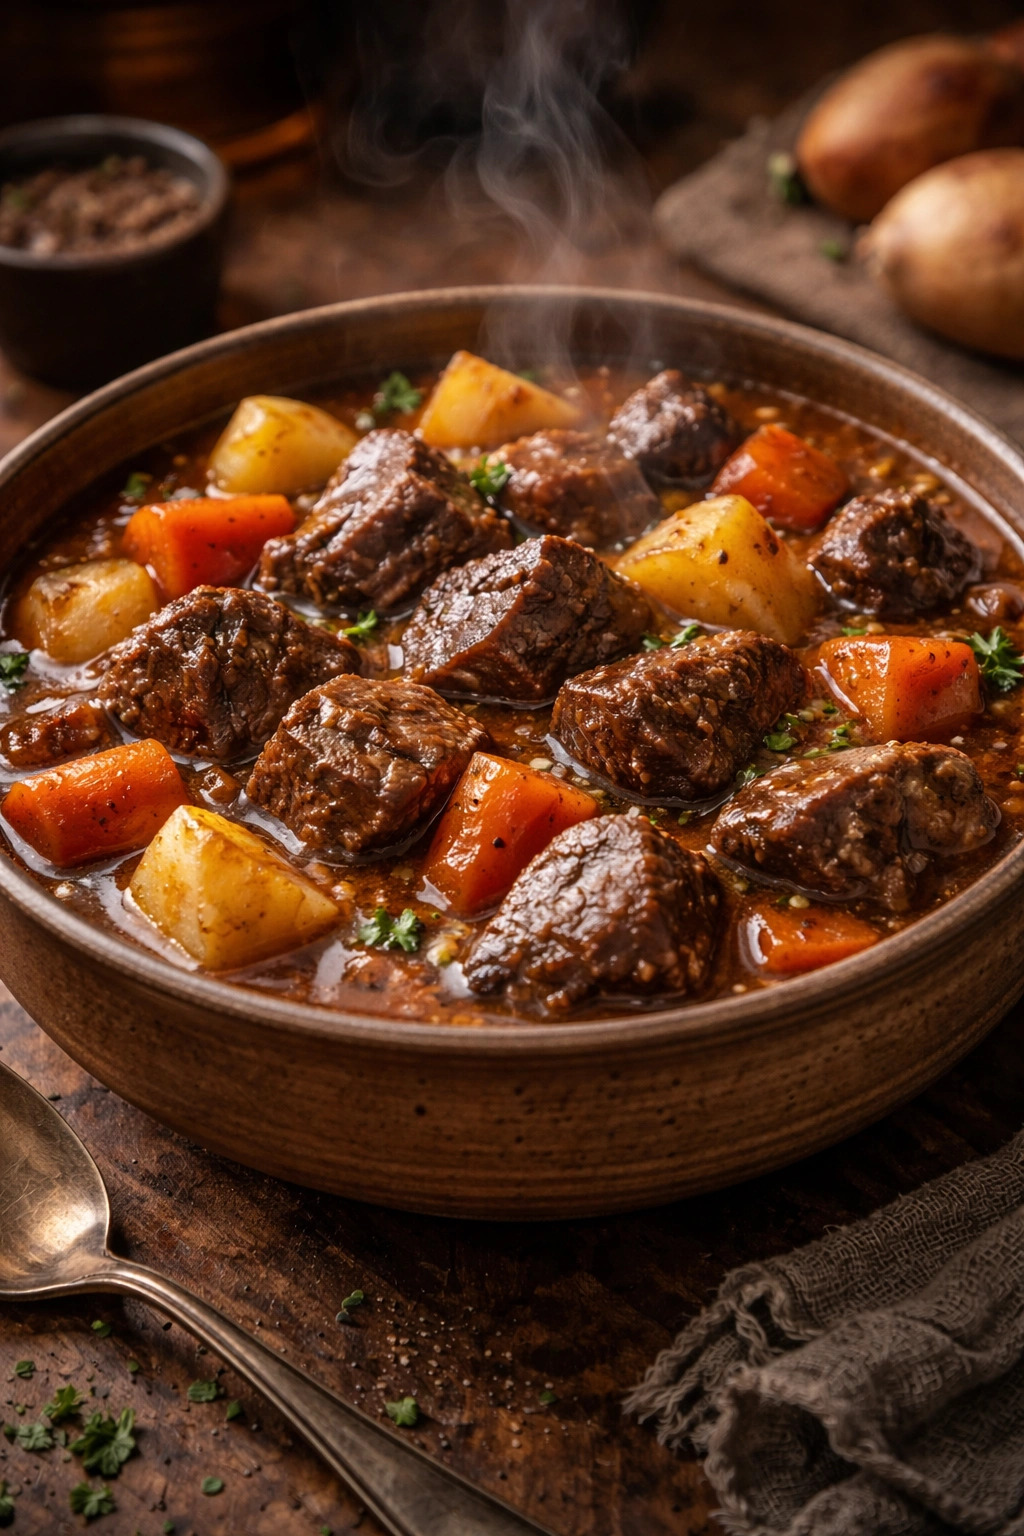
This is the recipe for a cool evening when you want comfort food that fills the kitchen with aroma for hours. Chunks of venison braise gently in red wine and broth alongside carrots, potatoes, and pearl onions, becoming fork-tender while the vegetables absorb the rich sauce. The slow cooking mellows venison’s gamey intensity and allows it to become something almost luxurious — the kind of stew that tastes like it took all day to make, even though the hands-on time is minimal.
Yield: Serves 6 | Prep Time: 25 minutes | Cook Time: 2 hours 30 minutes | Total Time: 3 hours (mostly unattended) | Difficulty: Beginner — prepare ingredients, then the oven does the work.
For the Stew:
- 2.5 pounds venison chuck or shoulder, cut into 1½-inch cubes
- 4 tablespoons olive oil, divided
- Fine sea salt and freshly ground black pepper
- 2 medium yellow onions, cut into chunks (about 1½-inch pieces)
- 4 cloves garlic, minced
- 3 tablespoons tomato paste
- 1½ cups dry red wine (something you’d drink, not cooking wine)
- 3 cups beef broth or venison broth (homemade if possible)
- 2 tablespoons red wine vinegar or apple cider vinegar
- 2 tablespoons balsamic vinegar (adds subtle sweetness to round the flavors)
- 4 medium carrots, cut into ¾-inch coins (about 2 cups)
- 1 pound waxy potatoes (Yukon Gold or red potatoes), cut into 1-inch cubes
- 12 ounces pearl onions, peeled (frozen works well and saves time)
- 3 tablespoons tomato paste (yes, this appears twice — one for developing flavor, one for deepening the sauce)
- 2 bay leaves
- 3 sprigs fresh thyme
- 1 sprig fresh rosemary
- 2 tablespoons cornstarch mixed with 2 tablespoons cold water (if a thicker sauce is desired at the end)
- Fresh parsley for garnish
Sear and Build:
-
Preheat your oven to 325°F (165°C). Pat the venison cubes dry with paper towels. Season generously with salt and pepper on all sides.
Advertisements -
Heat 2 tablespoons of olive oil in a large Dutch oven or heavy-bottomed pot over medium-high heat. Working in two batches (do not overcrowd the pot), sear the venison for 2 to 3 minutes per side, developing a golden-brown crust without fully cooking through. The goal is color, not doneness. Transfer seared venison to a plate. This searing step is crucial — it develops flavors that won’t exist if you skip it.
-
Add the remaining 2 tablespoons of oil to the pot. Add the diced onions and a pinch of salt. Cook for 5 to 6 minutes, stirring occasionally, until the onions are softened and lightly caramelized at the edges. Add the minced garlic and cook for 1 minute more.
-
Add the tomato paste and stir well, coating all the onions. Cook for 2 minutes, allowing the tomato paste to deepen in color and caramelize slightly against the hot pot. This development step concentrates its flavor.
-
Pour in the red wine, using a wooden spoon to scrape up any browned bits from the bottom of the pot. Let the wine bubble gently for 2 minutes, allowing some of the alcohol to cook off and the wine’s acidity to balance the dish.
-
Return the seared venison to the pot. Add the broth, vinegars, bay leaves, thyme sprigs, and rosemary. Bring to a simmer, then cover with a lid and transfer to the preheated oven.
Braise and Finish:
-
Braise in the oven for 90 minutes. At this point, the venison should be tender but not falling apart. Remove the pot from the oven (it will be very hot — use thick oven mitts), and add the carrots, potatoes, and pearl onions.
-
Stir well, return the lid, and braise for an additional 45 minutes to 1 hour, until the vegetables are completely tender and the venison is fork-tender.
-
Remove the bay leaves, thyme, and rosemary. Taste the stew and adjust seasoning with additional salt and pepper as needed. If you prefer a thicker sauce, whisk the cornstarch slurry and stir it into the stew. Bring to a bare simmer on the stovetop for 2 to 3 minutes, stirring gently, until the sauce thickens slightly and becomes more glossy.
-
Ladle into bowls and garnish generously with fresh parsley.
Advertisements
How Braising Transforms Venison
Braising in moist heat breaks down the connective tissues in tougher cuts (like shoulder and chuck), making them extraordinarily tender while the long, slow cooking melds venison’s flavors into something rich and savory rather than intensely gamey. The wine, broth, and aromatic vegetables become a sauce rather than a gravy, coating each piece of meat and vegetable with layered, developed flavors.
Make-Ahead Excellence
This stew genuinely improves when made a day or two in advance. The flavors continue to develop and integrate as it sits. Prepare it fully, cool completely, and refrigerate in an airtight container for up to 4 days, or freeze for up to 3 months. Thaw overnight in the refrigerator and reheat gently over medium-low heat on the stovetop, adding a splash of broth or water if the sauce has reduced further.
Vegetable Variations
This stew is forgiving with vegetables. Celery root, parsnips, and turnips all work beautifully alongside or in place of the potatoes and carrots. Pearl onions can be replaced with larger onion chunks if you prefer. Add mushrooms (cremini, button, or wild) in the final 45 minutes if desired.
4. Quick Pan-Fried Ground Venison Tacos
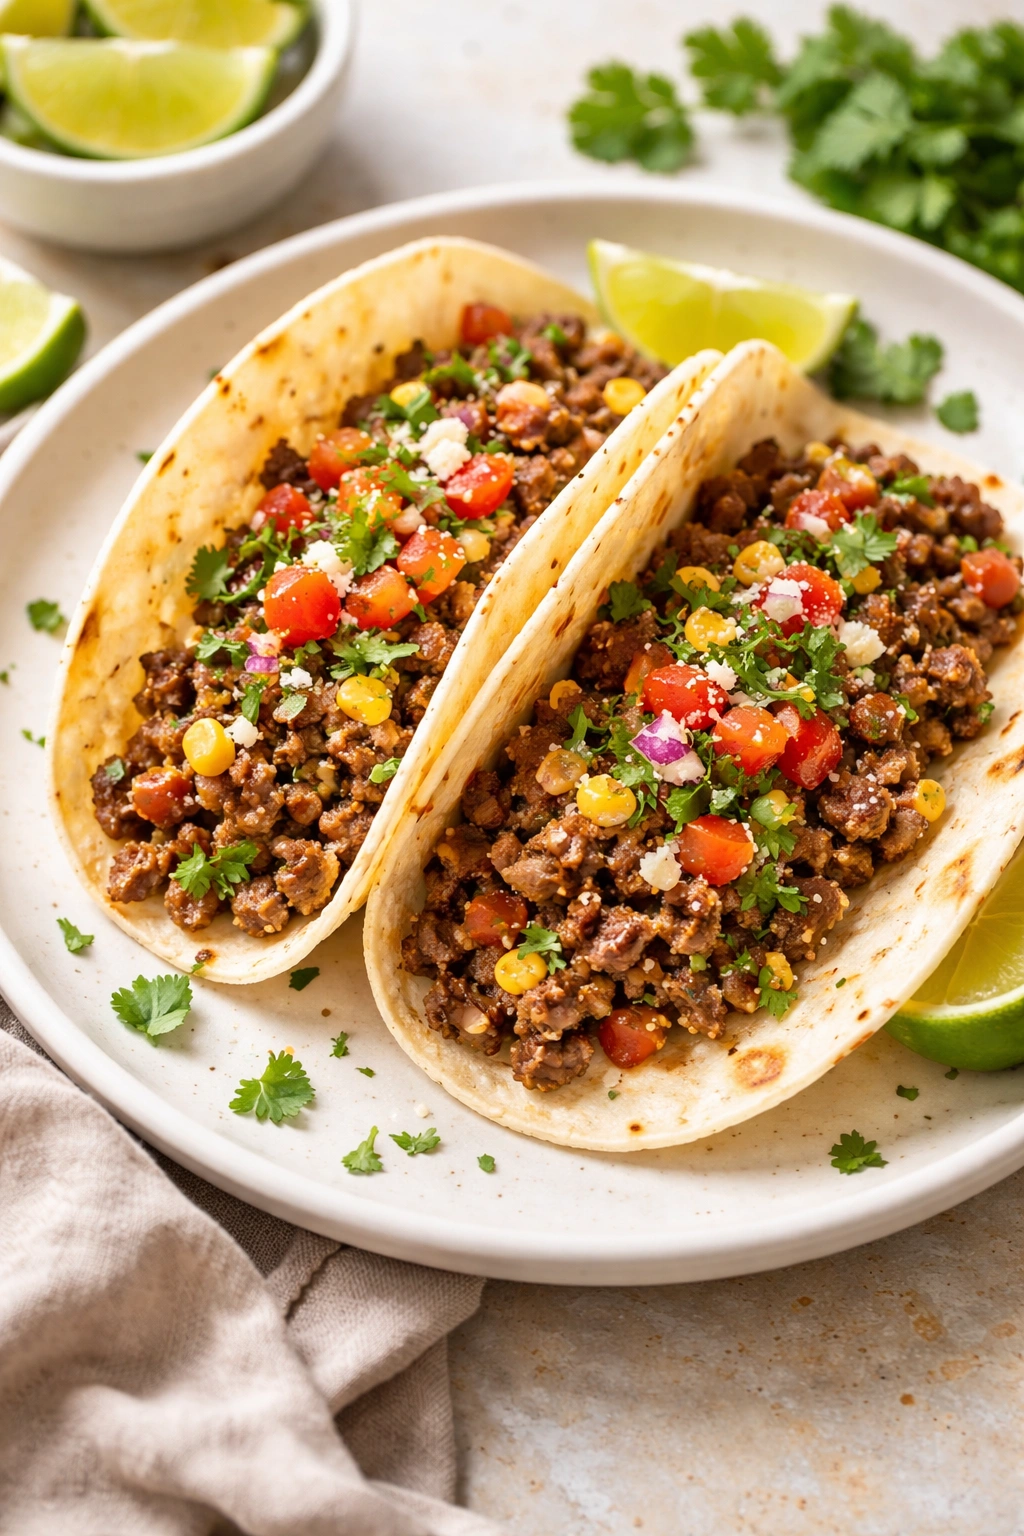
Ground venison tacos come together faster than traditional beef versions and deliver a cleaner, more refined flavor. The key is not to overcook the meat — it should remain slightly pink and juicy, never gray and dense. A punchy spice blend and bright toppings balance venison’s earthiness, creating tacos that feel light and fresh rather than heavy.
Yield: Serves 4 (makes 8 to 10 tacos) | Prep Time: 15 minutes | Cook Time: 10 minutes | Total Time: 25 minutes | Difficulty: Beginner — simple stovetop cooking with no special techniques required.
For the Venison and Seasoning:
- 1.5 pounds ground venison
- 2 tablespoons olive oil
- ½ medium yellow onion, diced fine
- 3 cloves garlic, minced
- 2 tablespoons chili powder (adjust for heat preference)
- 1.5 teaspoons ground cumin
- ¾ teaspoon smoked paprika
- ½ teaspoon dried oregano
- ¼ teaspoon cayenne pepper (optional, for heat)
- ¾ teaspoon fine sea salt (start here; adjust after cooking)
- ¼ teaspoon black pepper
- 1 tablespoon tomato paste
- 3 tablespoons water or beef broth
- 1 tablespoon fresh lime juice
- Hot sauce to taste (optional)
For Assembly:
- 8 to 10 warm corn or flour tortillas
- Fresh cilantro, coarsely chopped
- Diced white onion
- Sliced jalapeños
- Lime wedges
- Shredded cheddar or cotija cheese (optional)
- Sour cream or crema (optional)
- Diced tomatoes or pico de gallo
- Shredded lettuce or cabbage
Cook the Filling:
-
Heat olive oil in a large skillet over medium-high heat. Add the diced onion and a pinch of salt. Cook for 2 to 3 minutes, stirring occasionally, until the onion softens and becomes fragrant. Add the garlic and cook for 30 seconds.
-
Add the ground venison in small pieces. Cook for 5 to 7 minutes, breaking it apart with a wooden spoon as it cooks. Here’s the critical point: venison should not be cooked until it’s completely gray and compacted. Stop cooking when the meat is mostly broken apart and no longer raw-looking on the outside, even if some pink remains visible in the broken pieces. The residual heat will finish cooking the meat, and this undercooking ensures the tacos remain moist and tender rather than dense.
Advertisements -
Stir in the chili powder, cumin, smoked paprika, oregano, cayenne (if using), salt, and black pepper. Mix thoroughly until the spices coat all the meat. Cook for 1 to 2 minutes, stirring constantly, until the spices bloom and smell fragrant and toasted.
-
Add the tomato paste and stir well, coating the meat. Cook for 1 minute. Pour in the water or broth, stirring to combine everything evenly.
-
Simmer for 2 to 3 minutes, until the liquid reduces slightly and the mixture becomes thick and saucy. Remove from heat and stir in the fresh lime juice. Taste and adjust salt, heat level, and lime juice to your preference.
Assemble the Tacos:
-
Warm the tortillas directly over a gas flame (if you have one) for a few seconds per side, or wrap them in a damp towel and microwave for 30 seconds to soften. Slightly charred, warm tortillas make an enormous difference in the final result.
-
Spoon the venison mixture into each tortilla. Top with cilantro, diced onion, jalapeños, cheese if using, sour cream, and pico de gallo. Serve with lime wedges.
Why This Method Works for Venison
Ground venison cooks much faster than beef and dries out more easily because of its low fat content. Stopping slightly before full doneness, when the meat still has a whisper of pink, results in juicier tacos. The spices, lime, and bright, cool toppings distract from any gamey intensity and create a balanced, crave-worthy final bite.
Building Your Taco Bar
Set out all toppings in separate bowls and let people build their own tacos. This is especially good for families with varying spice tolerances. Cold, fresh toppings (cilantro, onion, pico, lettuce) contrast beautifully with the warm, spiced meat.
Leftover Venison Possibilities
Extra venison filling keeps in an airtight container in the refrigerator for 3 days. Use it to stuff nachos, top baked potatoes, stuff poblano peppers, or layer into enchiladas. It also freezes well for up to 2 months.
5. Venison Meatballs in Tomato Sauce
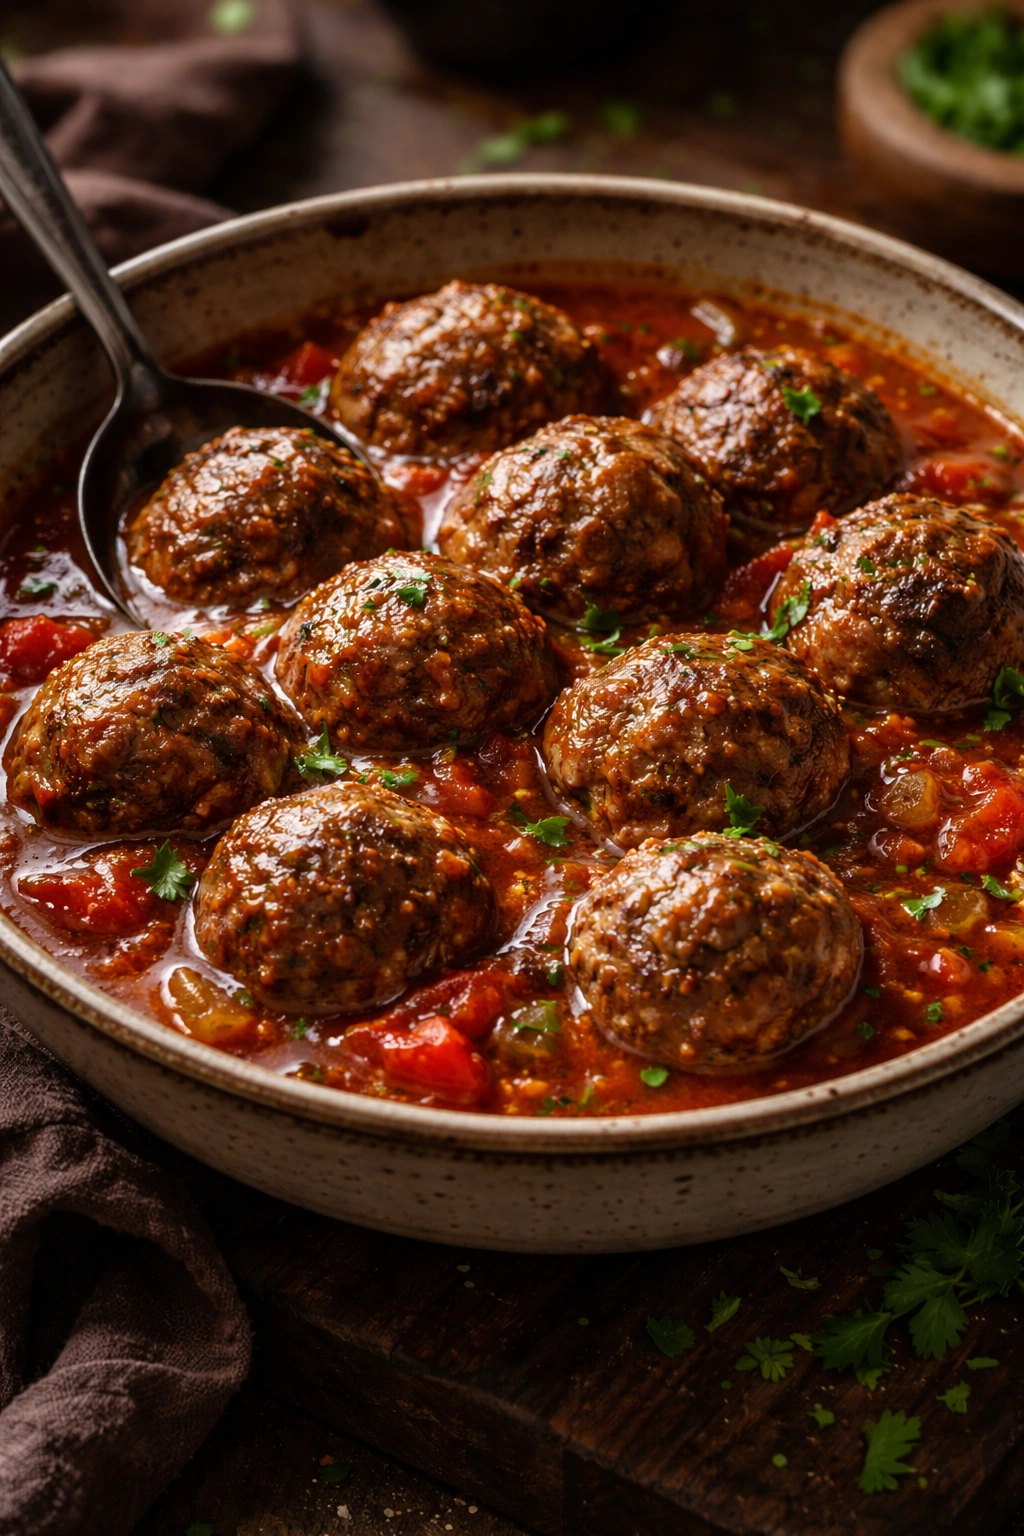
Venison meatballs are tender, flavorful, and far more interesting than beef versions. The key is adding enough binder and fat to prevent the lean meat from becoming dense. Serve them over pasta, with crusty bread for sauce-soaking, or alongside creamy polenta. The meatballs braise gently in a silky tomato sauce, becoming increasingly tender the longer they cook.
Yield: Serves 4 to 6 (makes about 24 meatballs) | Prep Time: 20 minutes | Cook Time: 35 minutes | Total Time: 55 minutes | Difficulty: Beginner — mixing, shaping, and simmering are all straightforward.
For the Meatballs:
- 1.5 pounds ground venison
- ½ cup freshly grated Parmesan cheese
- ½ cup panko breadcrumbs (or regular breadcrumbs)
- 1 large egg, beaten
- ¼ cup whole milk
- 3 cloves garlic, minced very fine
- ½ teaspoon dried Italian seasoning (or a mix of dried basil, oregano, and thyme)
- ¼ teaspoon red pepper flakes (optional, for subtle heat)
- ¾ teaspoon fine sea salt
- ¼ teaspoon black pepper
- 2 tablespoons olive oil (for browning)
- 2 tablespoons butter (for browning)
For the Sauce:
- 1 tablespoon olive oil
- 4 cloves garlic, minced
- 1 can (28 ounces) crushed San Marzano tomatoes
- 1 can (15 ounces) tomato sauce
- 1 tablespoon balsamic vinegar
- 1 teaspoon sugar (helps balance acidity)
- ½ teaspoon fine sea salt (adjust after tasting)
- ¼ teaspoon black pepper
- ½ teaspoon dried oregano
- 3 to 4 fresh basil leaves (or ½ teaspoon dried basil)
- 2 bay leaves
Make the Meatballs:
-
In a large bowl, combine the ground venison, Parmesan, breadcrumbs, beaten egg, milk, minced garlic, Italian seasoning, red pepper flakes (if using), salt, and pepper. Mix gently with your hands until just combined — do not overmix. Overworking ground meat makes meatballs dense and tough. The mixture should just hold together when squeezed; it will be soft and slightly sticky.
-
Using a small cookie scoop or your hands (dampen your hands slightly to prevent sticking), form the mixture into 1½-inch balls. You should have approximately 24 meatballs. Place them on a parchment-lined baking sheet as you shape them.
-
Heat 1 tablespoon of olive oil and 1 tablespoon of butter in a large skillet over medium-high heat. When the butter is foaming, carefully add 12 meatballs to the pan. They should sizzle immediately. Do not move them for 2 to 3 minutes — let them develop a golden-brown crust. Then gently roll them with a spoon to brown the other sides, another 2 to 3 minutes total. The meatballs don’t need to be fully cooked through at this stage; they’ll finish cooking in the sauce.
-
Transfer the browned meatballs to a plate. Repeat with the remaining oil, butter, and meatballs.
Make the Sauce:
-
In the same skillet (don’t wash it — the browned bits add flavor), heat 1 tablespoon of olive oil over medium heat. Add the minced garlic and cook for 30 seconds until fragrant.
Advertisements -
Pour in both cans of tomatoes, the tomato sauce, balsamic vinegar, and sugar. Stir well. Add salt, pepper, oregano, fresh basil (if using dried, add it now along with the oregano), and the bay leaves. Stir to combine.
-
Bring the sauce to a simmer. Carefully add all the browned meatballs back to the pan, nestling them gently into the sauce. The sauce should come about halfway up the sides of the meatballs.
-
Reduce heat to medium-low and simmer gently, uncovered, for 20 to 25 minutes. The sauce will reduce slightly and thicken, and the meatballs will finish cooking through. Stir gently every 5 minutes or so, ensuring the meatballs cook evenly and don’t stick to the bottom. The meatballs are done when a fork passes through one easily and the interior is no longer pink.
-
Remove the bay leaves. Taste the sauce and adjust salt, pepper, and acidity (if it tastes flat, add a splash more balsamic or a squeeze of lemon juice). If using dried basil, taste again — it should add subtle herbal depth, not overpower the tomato.
Why This Ratio Works for Venison Meatballs
The breadcrumbs, egg, and milk provide binding and moisture that keep lean venison from becoming dense and dry. The Parmesan adds richness and prevents the meatballs from tasting “thin” or underseasoned. The gentle simmering in sauce allows the meat to stay tender rather than becoming compacted from aggressive cooking.
Serving Ideas
Toss meatballs and sauce with freshly cooked pasta and finish with fresh Parmesan and basil. Serve over creamy polenta for a luxurious, wine-friendly meal. Build a meatball sub by placing warm meatballs in a crusty roll with sauce and melted mozzarella. Use them as an appetizer with toothpicks for dipping.
Make-Ahead and Freezing
The fully cooked meatballs and sauce freeze beautifully for up to 3 months. Cool completely, then transfer to a freezer container. Thaw overnight in the refrigerator and reheat gently over medium-low heat on the stovetop, adding a splash of water or broth if needed. The meatballs actually improve slightly after freezing and thawing as flavors integrate.
6. Herb-Crusted Venison Roast with Red Wine Reduction
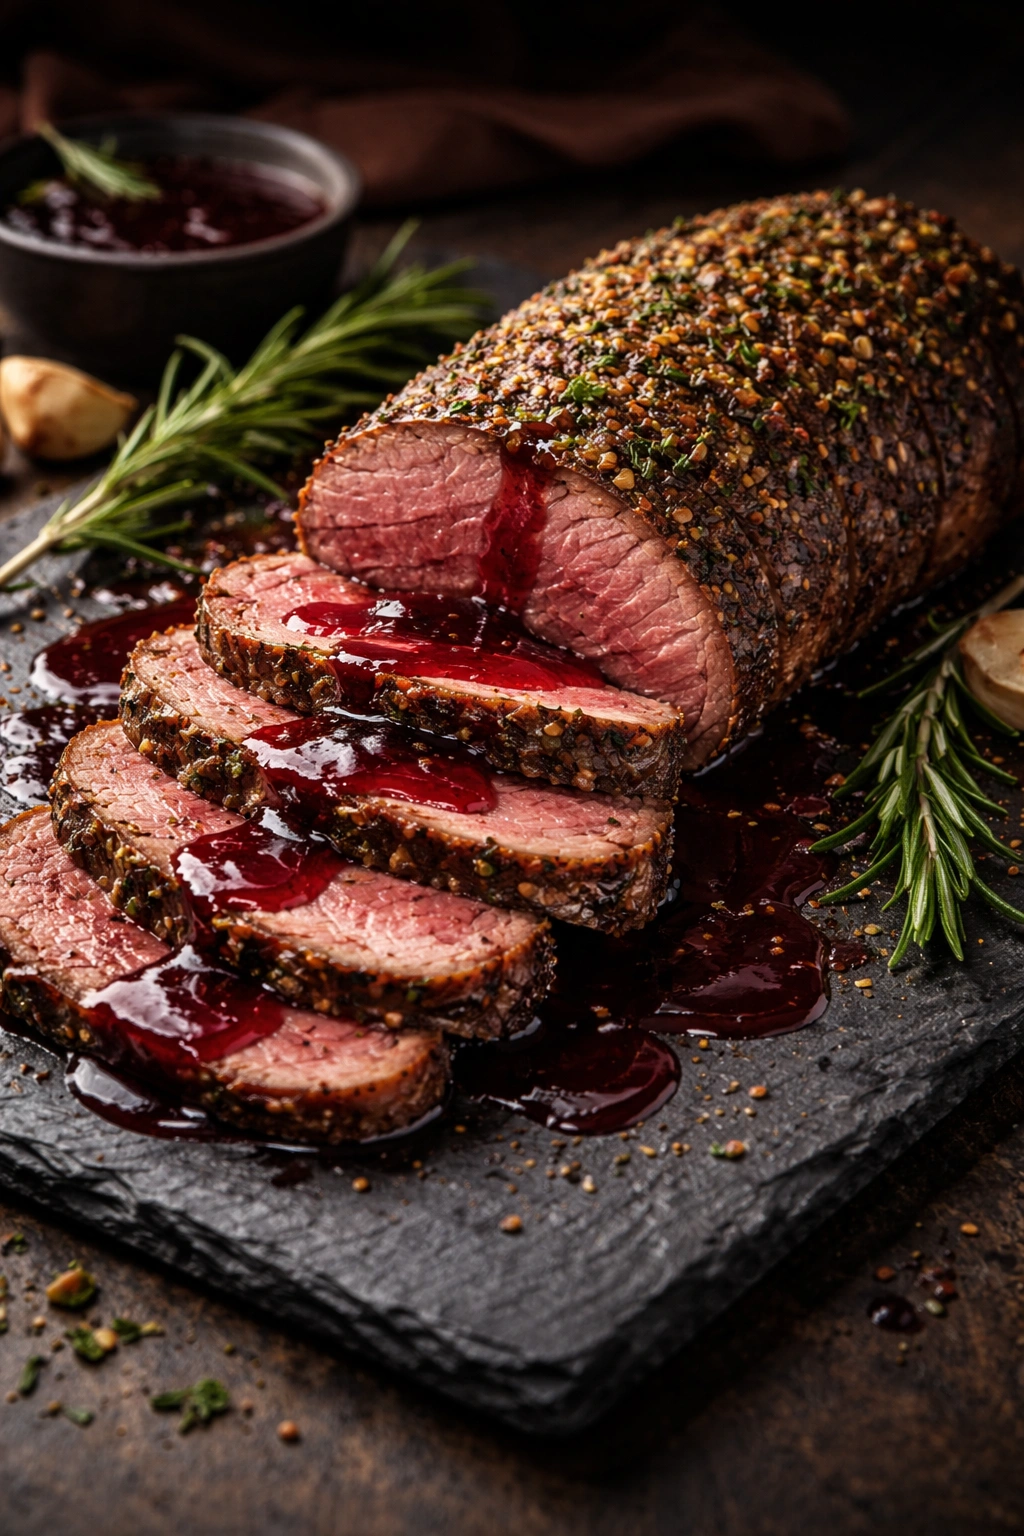
A whole venison loin or backstrap, seared until golden and roasted until perfectly pink, is an elegant centerpiece that rivals any prime beef tenderloin. The herb crust adds texture and aromatic depth, while a red wine reduction glazes the sliced meat with glossy richness. This is the recipe for when you want to impress — it looks and tastes far more complicated than it actually is.
Yield: Serves 6 to 8 | Prep Time: 20 minutes | Cook Time: 35 minutes | Total Time: 1 hour (includes resting) | Difficulty: Intermediate — requires pan searing, oven roasting, and monitoring internal temperature, but no complex techniques.
For the Roast:
- 1 venison loin or backstrap (3 to 4 pounds), trimmed of any silvery connective tissue
- 4 tablespoons olive oil, divided (2 for searing, 2 for the herb crust)
- Fine sea salt and freshly ground black pepper
- 3 tablespoons fresh breadcrumbs (or panko)
- 2 tablespoons finely minced fresh rosemary
- 1 tablespoon finely minced fresh thyme
- 2 cloves garlic, minced extremely fine
- 1 tablespoon Dijon mustard (acts as a binder for the herb crust)
- Zest of 1 lemon, finely grated
For the Red Wine Reduction:
- 1½ cups dry red wine (quality matters here)
- 1 cup beef or venison broth
- 2 tablespoons balsamic vinegar
- 2 tablespoons cold butter, cut into small pieces
- 2 shallots, sliced thin
- 3 sprigs fresh thyme
- 1 bay leaf
- Fine sea salt and black pepper to taste
Prepare and Sear the Roast:
-
Remove the venison from the refrigerator 30 minutes before cooking. Pat it completely dry with paper towels. Season generously on all sides with salt and pepper.
-
Heat 2 tablespoons of olive oil in a large, oven-safe skillet over medium-high heat. When the oil shimmers, carefully place the venison in the pan. Sear for 2 to 3 minutes per side without moving it, allowing a deep golden-brown crust to develop on all sides. You’re aiming for 4 to 5 sides seared (the top, bottom, and three long sides). This searing step is essential — it develops flavor and creates the backdrop for the herb crust. Transfer to a plate and let cool for about 5 minutes.
Apply the Herb Crust:
-
In a small bowl, combine the breadcrumbs, minced rosemary, thyme, minced garlic, and lemon zest. In another small bowl, whisk together the Dijon mustard with the remaining 2 tablespoons of olive oil until you have a paste.
-
Brush the mustard-oil mixture evenly over the top and sides of the cooled roast (reserve the bottom for contact with the pan). Press the herb mixture firmly onto the mustard-coated sides and top, using your hands or the back of a spoon. The herbs should adhere well. The roast should be visibly coated with an herb crust.
Roast and Monitor:
-
Preheat your oven to 400°F (200°C). Place the herb-crusted roast back in the seared skillet, herb side facing up. Insert an instant-read meat thermometer into the thickest part of the roast, not touching bone (if there is any).
-
Roast for 18 to 25 minutes. Here’s where attention matters: venison’s lean structure means the difference between rare, medium-rare, and medium happens in just a few minutes. For rare to medium-rare (the ideal for venison), remove the roast when the internal temperature reaches 128°F to 132°F (53°C to 56°C). For medium, cook to 135°F to 140°F (57°C to 60°C). Do not cook beyond medium — venison becomes noticeably tough and dry.
Advertisements -
Transfer the roast to a cutting board and tent loosely with foil. Let rest for 10 minutes — this is crucial. The resting period allows carryover cooking to bring the internal temperature up a few degrees while the meat’s fibers relax, reabsorbing juices. Skip this step and the meat will be dry.
Make the Red Wine Reduction:
-
While the roast rests, place the skillet (still containing the browned bits) over medium heat. Add the sliced shallots and cook for 2 minutes until fragrant. Pour in the red wine, using a wooden spoon to scrape up the fond. Let the wine bubble for 2 to 3 minutes, allowing it to reduce slightly and some of the alcohol to cook off.
-
Add the broth, balsamic vinegar, thyme sprigs, and bay leaf. Bring to a simmer and cook for 8 to 10 minutes, until the liquid has reduced by about half and become more concentrated and glossy in appearance.
-
Remove from heat and fish out the thyme and bay leaf. Whisk in the cold butter pieces one at a time. Each piece of butter will melt and emulsify into the sauce, creating a silky, luxurious consistency. Taste and adjust seasoning with salt and pepper.
Slice and Serve:
- Slice the roast against the grain into ¼-inch thick slices. The herb crust will stay attached to some slices — this is desirable. Arrange the slices on a warm plate and drizzle generously with the red wine reduction. Garnish with fresh thyme sprigs if desired.
Why Venison Roast Demands Precision
Unlike beef tenderloin, which forgives slight overcooking due to its fat content, venison’s leanness means overdone meat becomes noticeably tough and dry. The herb crust protects the exterior from drying while the interior cooks, and the brief roasting time prevents the outside from becoming tough. This combination creates an exceptional result when executed with attention to temperature.
Serving Suggestions
Serve alongside creamed spinach or sautéed mushrooms. Roasted root vegetables (carrots, turnips, parsnips) work beautifully and can roast alongside the venison. Mashed potatoes or polenta catch the red wine reduction magnificently. A full-bodied red wine (Pinot Noir, Côtes du Rhône, or Burgundy) is the perfect pairing.
Do-Ahead Preparation
The herb crust mixture can be prepared up to 2 hours ahead and stored covered at room temperature. The roast can be seared and refrigerated for up to 2 hours before the herb crust is applied and the roasting begins. This flexibility makes it an excellent choice for entertaining.
Cooking Venison with Confidence
Venison is not difficult to cook — it simply rewards knowledge and attention. The recipes above succeed because they respect venison’s leanness, work with its natural flavors rather than against them, and avoid common pitfalls like overcooking and drying out. Whether you’re braising it gently in wine, searing it quickly in a hot pan, or grinding it for tacos, the principle remains the same: treat venison as the premium protein it is, use bright, bold flavors to complement its earthiness, and cook just to the point of doneness rather than beyond it.
The best part about cooking with venison is the flavor depth that comes from using wild game. A well-prepared venison stew or perfectly seared venison steak offers complexity and sophistication that domestic meats simply can’t match. These six recipes provide a solid foundation — once you’ve made them, you’ll feel confident adapting them with your own variations and favorite seasonings.
Final Thoughts

Venison deserves a place at your dinner table far more often than it typically gets. These recipes prove that cooking with game is not intimidating or exotic — it’s straightforward, delicious, and accessible when you understand a few key principles. Start with whichever recipe appeals to your schedule and ingredient availability, then work your way through the collection. Each one will expand your confidence and understanding of how to bring out venison’s best qualities.
The slow-cooked preparations reward patience and unattended time in the oven, while the quick-seared options fit busy weeknights. Spend time on the recipes that excite you most, and don’t hesitate to make substitutions based on what you have on hand. Venison’s adaptability means these recipes work beautifully with minor adjustments, and the foundation you build from trying them will give you the skills to improvise with confidence. Your next venison meal is just one recipe away.