There’s something genuinely magical about the moment when pillowy-soft gnocchi meets a silky cream sauce, pools of richness coating every tender piece of chicken, and suddenly the whole family is asking for seconds before they’ve even finished their first bite. This one-pan chicken gnocchi dish has quietly become one of the most reliably crowd-pleasing dinners you can make on a busy weeknight—the kind of meal that tastes restaurant-quality but comes together in your everyday skillet in about thirty minutes. It’s not fancy. It doesn’t require skills you don’t have. But it delivers the kind of comforting, deeply satisfying food that makes people remember why they love eating together.
The beauty of this dish lies in its elegant simplicity. Everything cooks in a single pan—the chicken browns and releases its flavorful fat, the aromatics soften and build a fragrant base, and then the gnocchi finishes cooking right in the creamy sauce without needing a separate pot of boiling water. That’s not just convenient; it fundamentally changes how the dish tastes. The starch released from the gnocchi as it cooks thickens the sauce naturally, creating a luxurious, silky coating that clings to every piece. Your family gets a complete, nourishing meal. Your kitchen stays clean. And you actually enjoy cooking dinner instead of standing at the stove, watching multiple pots boil and steam.
Why This One-Pan Chicken Gnocchi Becomes a Family Favorite

The first time you make this, you’ll understand instantly why parents and home cooks everywhere keep coming back to it. It’s the rare dinner that satisfies everyone at the table—the kids who want something creamy and comforting, the adults seeking real flavor depth, and honestly, your own craving for a meal that doesn’t require you to be a short-order cook with three different requests.
The secret is that this dish tastes indulgent but uses simple, accessible ingredients. Heavy cream, chicken broth, garlic, and Parmesan cheese are staples most people keep on hand. Store-bought gnocchi (the shelf-stable kind you find next to the pasta) needs no special treatment or advance planning. And chicken—whether you use thighs for richness or breasts for lightness—is something you likely already have in your freezer. There’s no exotic ingredient hunting. There’s no complicated technique. Just straightforward cooking that somehow produces something that feels special enough to serve to guests or special enough to feel like a treat on an ordinary Tuesday.
What makes families return to this recipe repeatedly is the texture contrast. You get the tender, juicy protein of well-cooked chicken. You get the distinctive soft, almost cloud-like texture of properly cooked gnocchi—dense enough to hold the sauce but tender enough to practically melt on your tongue. Then there’s the sauce itself, creamy and rich but brightened by garlic and herbs, clinging to everything and pooling at the bottom of the bowl in a way that makes you want to soak it up with bread.
What Exactly Is Gnocchi and Why It’s Perfect for Quick Dinners

If you’ve never cooked with gnocchi before, it’s worth understanding what you’re working with so you can cook it with confidence and avoid the pitfalls that trip up first-timers. Gnocchi (pronounced “nyo-kee”) originated in Italy as a distinctive pasta alternative. Rather than being rolled and cut like traditional pasta, gnocchi are made from a dough of mashed potatoes, flour, eggs, and seasonings, then shaped into small, rounded dumplings. You’ll find them in the dry pasta aisle of most grocery stores, usually in boxes labeled “shelf-stable potato gnocchi.”
The texture of gnocchi is what makes it so appealing—it’s noticeably softer and more delicate than dried pasta, with an almost pillowy quality that appeals instantly to people who might find regular pasta boring. Because gnocchi are made with potato, they have a subtle, naturally comforting flavor that pairs beautifully with cream-based sauces. When you cook gnocchi in boiling water alone, they’ll bob to the surface when done, and traditionally you’d drain them before tossing with sauce. But here’s where this one-pan method becomes brilliant: cooking gnocchi directly in the cream sauce means they release their starch as they cook, and that starch naturally thickens the sauce without needing cream cheese, cornstarch, or any other thickening agent. The result is silkier, more cohesive, and genuinely more delicious than when you cook them separately.
The quality of store-bought gnocchi varies, but most mainstream brands work beautifully here. Look for brands made with a high percentage of potato—the ingredient list should start with potatoes, not wheat flour. If you’ve had frozen gnocchi before (the fresh kind in the refrigerated section), those work too, though they cook slightly faster and can become mushy if you’re not careful. Avoid making your own gnocchi for this particular recipe unless you’re already a practiced hand at it—homemade gnocchi are more delicate and tend to break down in the sauce during cooking.
Choosing the Right Chicken for Tender, Juicy Results
The chicken you use matters more than you might think, especially in a one-pan dish where it’s cooking alongside other ingredients and won’t get a chance to rest properly before serving. You have two main options: boneless, skinless chicken thighs or boneless, skinless chicken breasts, and each has advantages depending on your priorities.
Chicken thighs are the more forgiving choice. Dark meat has a higher fat content, which means it stays juicy even if you slightly overcook it. Thighs are inherently more flavorful than breasts, bringing a deeper, richer taste to the sauce. They’re also less likely to dry out during the browning process, which means you can achieve that beautiful golden crust without worrying that the meat inside is turning tough. If you have family members who prefer one cut over another, thighs are the safe bet that satisfies the most palates.
Chicken breasts work beautifully here if that’s what you prefer. They’re leaner, which some people appreciate, and they’re usually what people have on hand. The key is to watch your cooking time carefully—breasts cook faster than thighs, and they dry out quickly if overcooked. Cut breasts into bite-sized pieces or pound them to even thickness before cooking so they cook through quickly and evenly. If you’re using whole breasts, keep them longer than called for in the recipe and watch until they’re just cooked through at the thickest point (165°F on a meat thermometer).
A practical hack many experienced cooks use: pat your chicken dry with paper towels before seasoning and cooking. Wet chicken steams rather than browns, and browning is what builds the flavorful fond—those caramelized, sticky bits on the bottom of the pan that contain deep, savory flavors. The fond gets scraped up into the sauce and is part of why this dish tastes so good. If you skip this step and your chicken releases a lot of steam, the surface never browns properly, and you lose that foundational flavor layer.
Why One-Pan Cooking Creates Even Better Flavor
Understanding why cooking everything in a single pan actually improves the final dish helps you make better choices while cooking and appreciate the technique more. It’s not just about convenience, though that’s certainly part of the appeal. The real magic happens in the layering of flavors and in the interaction between the different components.
When you brown the chicken in the skillet, fat renders out and the meat develops a golden crust through the Maillard reaction—that chemical process where proteins and sugars combine under heat to create complex, savory flavors. You leave that flavorful fat in the pan. Next, when you add aromatics like garlic and shallots (or just onion—whatever you have), they soften and release their own compounds into that existing fat, building flavor depth with each step. Then the wine (if you’re using it) or the broth goes in, and you scrape that fond off the bottom of the pan with a wooden spoon—it dissolves into the liquid, distributing all that concentrated, caramelized flavor throughout your sauce.
By the time you add the cream and gnocchi, you’ve built multiple layers of flavor that will permeate everything. Each element influences the next. Nothing gets washed away in a separate cooking vessel. Nothing gets strained out. The gnocchi themselves become flavor-carrying vessels, absorbing all that depth as they cook. This is why one-pan dishes often taste better than their component parts suggest they should.
The other practical advantage: as the gnocchi cook in the sauce, they release starch that helps thicken and emulsify everything. You end up with a sauce that’s naturally creamy and clings beautifully to the gnocchi without feeling heavy or requiring additional thickening agents. It’s genuinely elegant in its simplicity.
The Creamy Sauce That Makes Everything Magical
The sauce is where this dish earns its reputation. It’s not complicated—just a few pantry staples that combine into something luxurious and deeply satisfying. Understanding what each component contributes helps you understand the balance and gives you confidence to adjust it to your taste.
Butter and olive oil form the fat base for sautéing. Butter brings richness and a slightly sweet, nutty flavor (especially if you let it brown a bit), while olive oil adds savory depth. Together, they create the foundation for building flavor when you cook your aromatics and brown your chicken.
Garlic and shallots (or onion) are the aromatic backbone. Garlic adds pungent, savory notes that deepen when cooked slowly. Shallots bring a mild, slightly sweet onion flavor that’s less aggressive than raw garlic or harsh onions. If you only have regular onion, absolutely use it—just sauté it a bit longer until it’s fully softened and starting to turn golden, about five to seven minutes.
Chicken broth provides the flavorful liquid base for cooking the gnocchi and forms the body of the sauce. Use low-sodium broth so you can control the salt level yourself—salty broth can quickly make the whole dish overly salty, especially since you’re also adding Parmesan cheese, which is inherently salty.
Heavy cream is what makes the sauce creamy, obviously, but it also acts as a buffer. It mellows aggressive flavors, adds richness and mouthfeel, and creates that luxurious texture people crave. Don’t skip it or swap it for milk in an attempt to make the dish lighter—the results won’t be the same. Heavy cream has enough fat to hold together and create that silky mouthfeel. Half-and-half works if that’s what you have, though the sauce will be slightly thinner.
Parmesan cheese is essential. Freshly grated Parmesan melts into the sauce, adding umami depth, a subtle nuttiness, and natural thickening power. Pre-shredded Parmesan has additives that help it not clump, but those same additives prevent it from melting smoothly into the sauce. If you only have pre-shredded, it will still work, but freshly grated tastes noticeably better and melts more elegantly.
Herbs—Italian seasoning, thyme, oregano, or basil—add complexity and freshness that prevent the dish from tasting one-note. Dried herbs work fine here since you’re cooking them in liquid. Fresh herbs stirred in at the end brighten everything. A pinch of red pepper flakes adds subtle heat and makes all the other flavors taste sharper and more defined.
Serving and Timing Information
Yield: Serves 4 people | Makes approximately 6 cups of finished dish
Prep Time: 15 minutes (includes cutting chicken and vegetables, gathering ingredients)
Cook Time: 25 minutes (browning chicken, making sauce, cooking gnocchi)
Total Time: 40 minutes active cooking
Difficulty: Beginner — no special equipment required beyond a large skillet with a lid, and the steps follow a straightforward sequence that’s nearly impossible to mess up even if you’ve never made this before.
This timing assumes you’re using boneless, skinless chicken and shelf-stable gnocchi. If you’re using fresh gnocchi or chicken that needs trimming, add a few minutes to prep time. If you’re using chicken thighs that need to be cut into pieces, add another five to ten minutes.
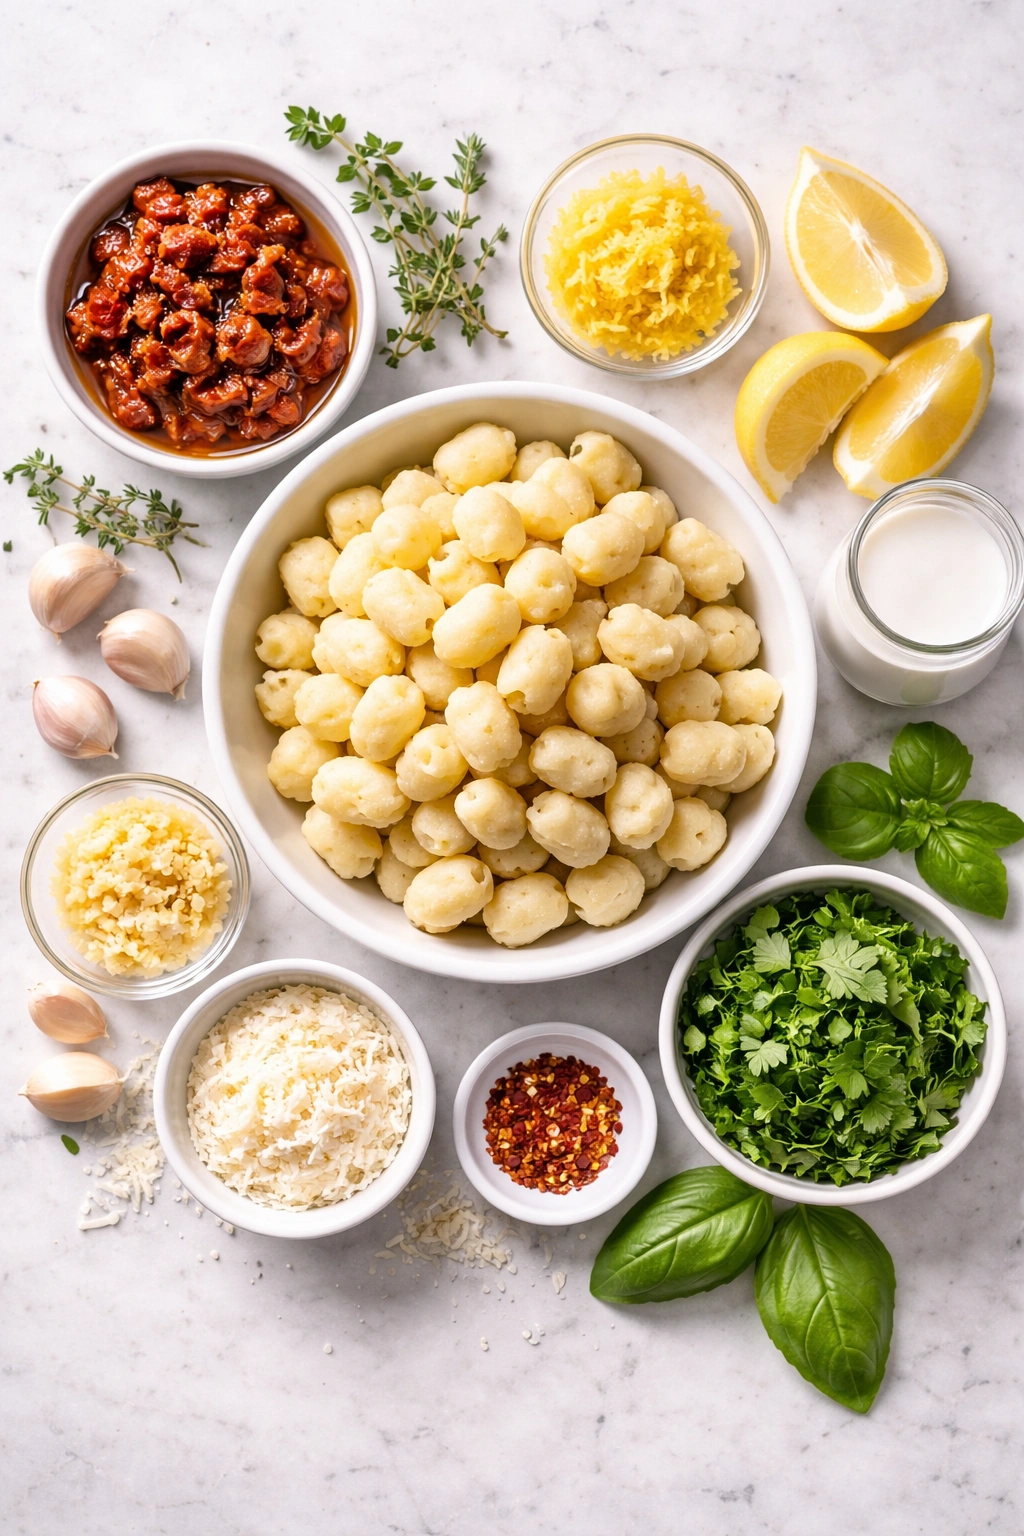
Complete Ingredient List
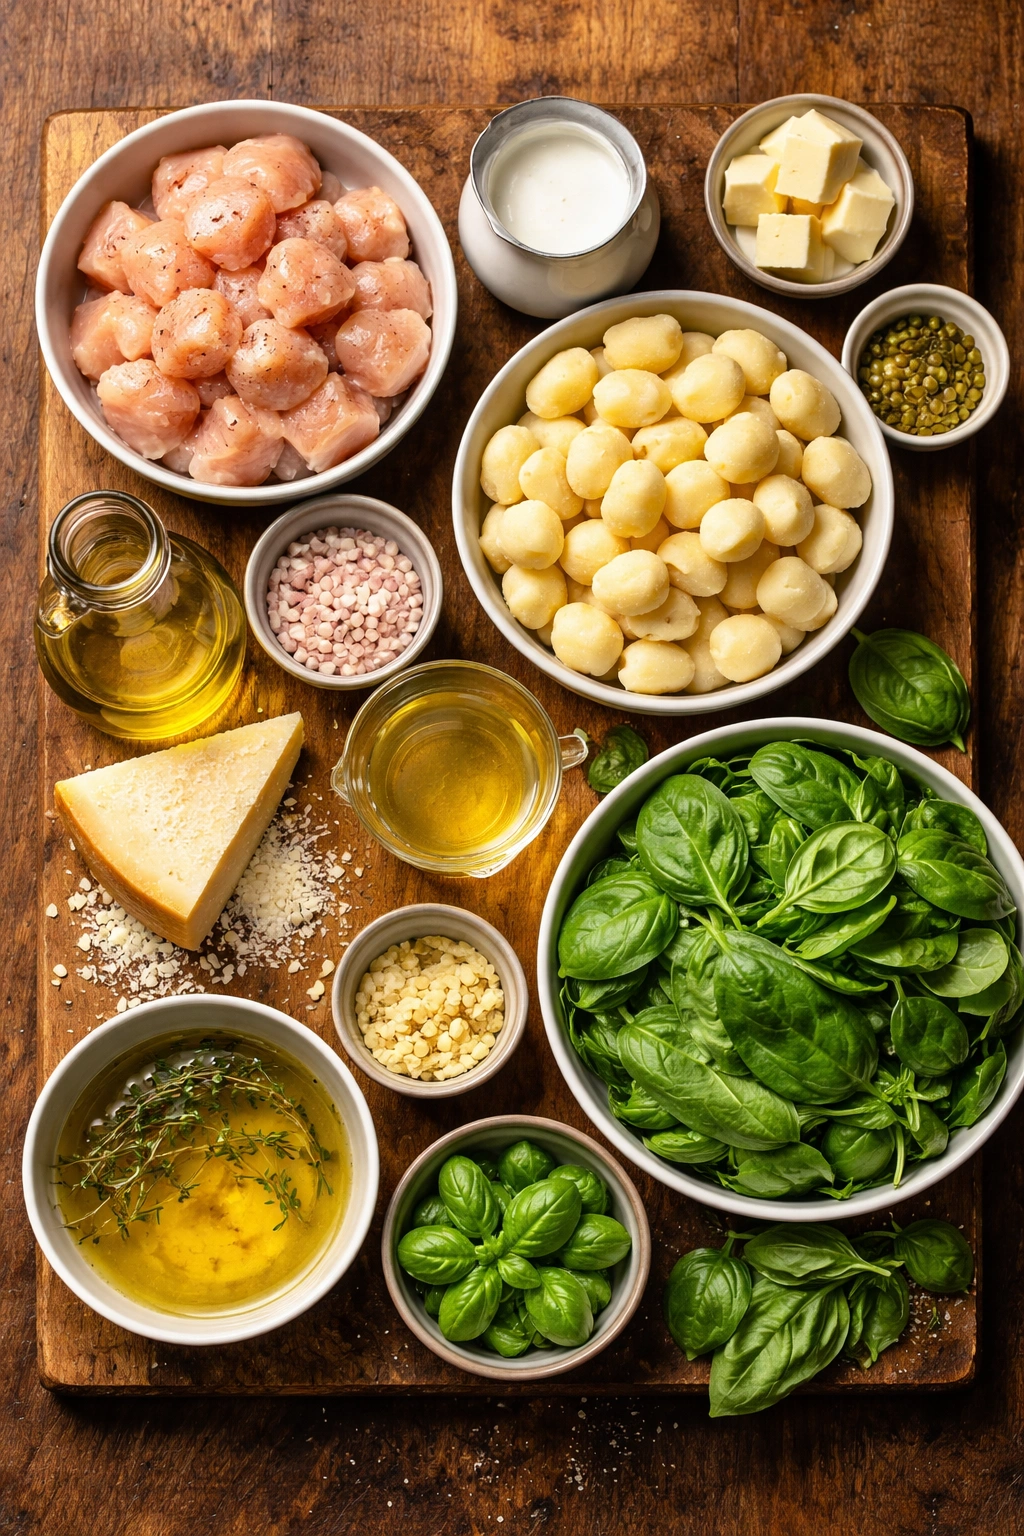
For the Chicken:
- 1.25 to 1.5 pounds boneless, skinless chicken thighs or chicken breasts, cut into bite-sized pieces (or left whole if using breasts)
- 1 teaspoon salt
- ½ teaspoon freshly ground black pepper
- 1 teaspoon Italian seasoning (or a mixture of dried oregano, thyme, and basil)
- ½ teaspoon smoked paprika
For the Sauce and Gnocchi:
- 2 tablespoons olive oil
- 2 tablespoons unsalted butter
- 1 medium shallot, minced (approximately 3 tablespoons), or ½ small onion, finely diced
- 4 cloves fresh garlic, minced (approximately 1 tablespoon)
- ¼ cup dry white wine (optional but recommended—you can substitute with an additional ¼ cup chicken broth if preferred)
- 1 cup low-sodium chicken broth
- 1 cup heavy cream (do not substitute with milk or half-and-half for best results)
- 1 pound shelf-stable potato gnocchi, uncooked
- ½ teaspoon dried thyme (or Italian seasoning)
- ¼ teaspoon crushed red pepper flakes (adjust to taste)
- ½ cup freshly grated Parmesan cheese (not pre-shredded)
- 2 cups fresh baby spinach, loosely packed (optional but recommended for color and nutrition)
- Salt and freshly ground black pepper to taste
- ¼ cup fresh basil or fresh parsley, chopped (for garnish—optional but recommended)
Step-by-Step Cooking Instructions
Prepare and Season the Chicken:
-
Pat the chicken pieces dry with paper towels to remove surface moisture—this ensures they’ll brown rather than steam. Season the chicken generously with salt, pepper, Italian seasoning, and paprika on all sides. If you’re using whole chicken breasts, you can season them whole before cooking, though it’s easier to season cut pieces.
-
Set a large skillet (10 to 12 inches is ideal) over medium-high heat. You want a skillet with a lid or one you can cover with foil or a baking sheet. Let it heat for one full minute so the bottom is evenly hot.
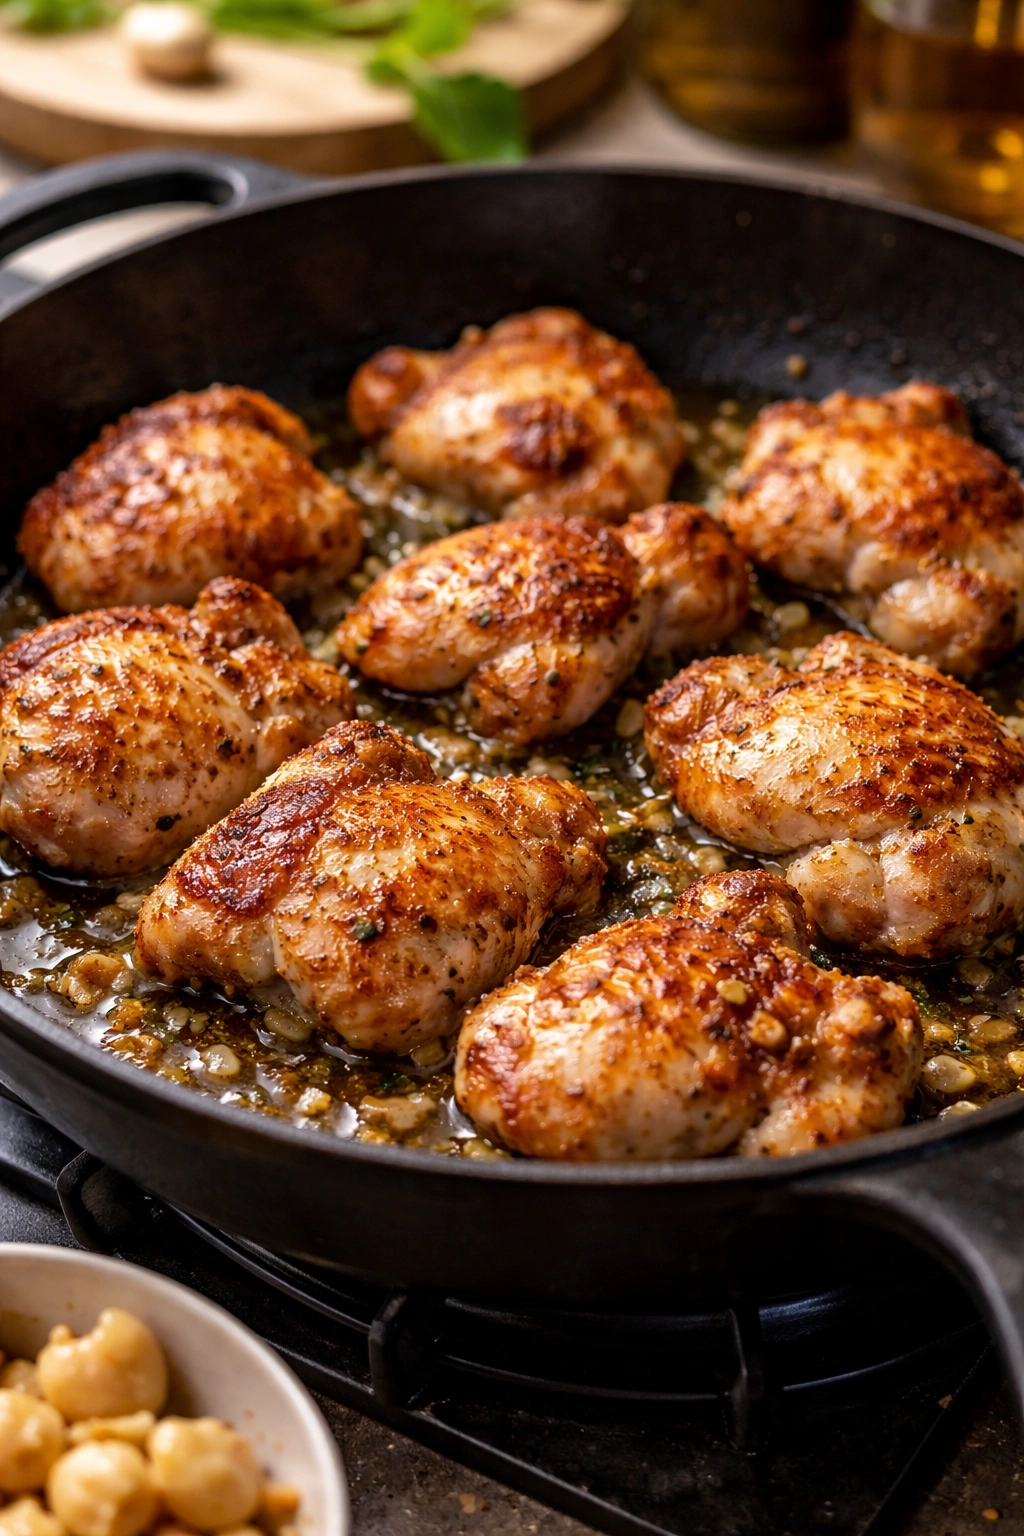
Brown the Chicken:
-
Add the olive oil to the hot skillet. When it shimmers and moves easily across the pan (about 30 seconds), carefully add the chicken pieces in a single layer. Don’t crowd the pan—if your pieces are overlapping significantly, work in batches rather than steaming them. The goal is a golden-brown crust on all sides.
-
Leave the chicken undisturbed for three to four minutes. Resist the urge to move it around—this is how the crust develops. You’ll see the edges start to turn golden and opaque as the exterior cooks.
-
Stir the chicken and cook for another three to four minutes until most pieces are golden brown on at least two sides and the chicken is mostly cooked through (though it doesn’t need to be entirely cooked at this stage—it will finish cooking in the sauce). Transfer the cooked chicken to a clean plate, making sure to leave all the fat and flavorful brown bits in the skillet.
Build the Sauce Base:
-
Add the butter to the same skillet, allowing it to melt and foam (about one minute). Then add the minced shallot and a pinch of salt. Cook, stirring frequently, until the shallot is softened and starting to turn translucent and golden at the edges, about four to five minutes. You’re building sweetness and depth here—don’t rush this step.
Advertisements -
Add the minced garlic and cook, stirring constantly, for one minute until fragrant. Be careful not to let it brown too much, or it will become bitter.
-
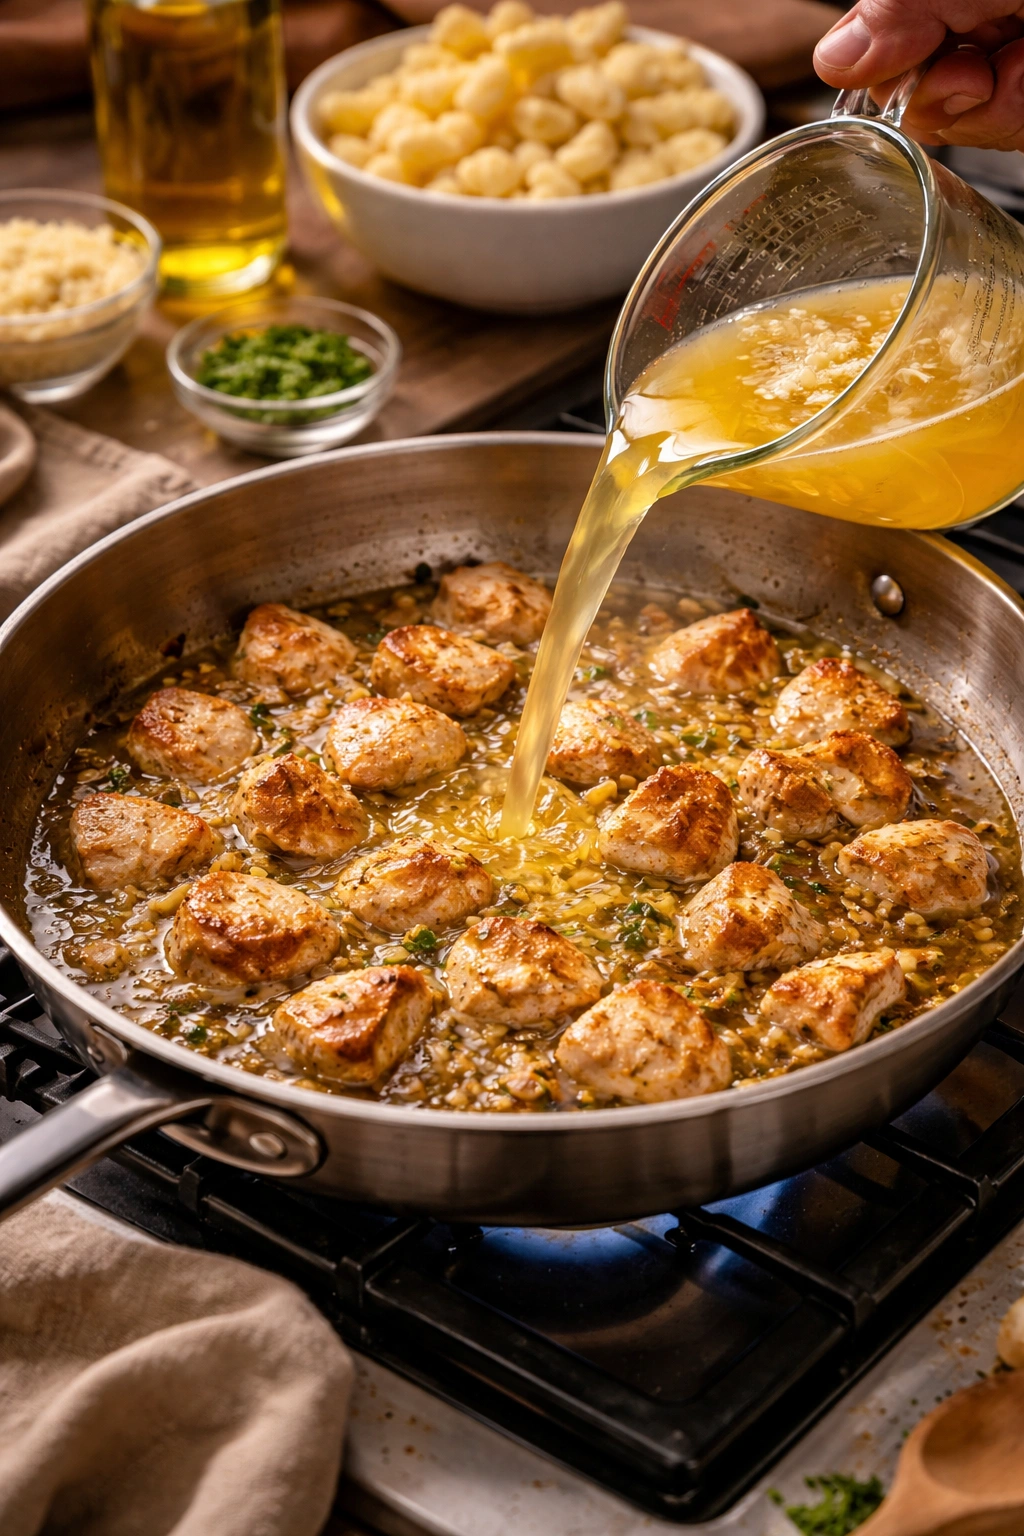
If you’re using white wine, add it now and let it bubble gently for two to three minutes, stirring occasionally. Watch as the wine reduces by about half—you’ll see the volume decrease noticeably. This concentrates the flavor and burns off the sharp alcohol notes. Use a wooden spoon to scrape any brown bits stuck to the bottom of the pan, incorporating all that fond into the sauce. If you’re not using wine, skip this step.
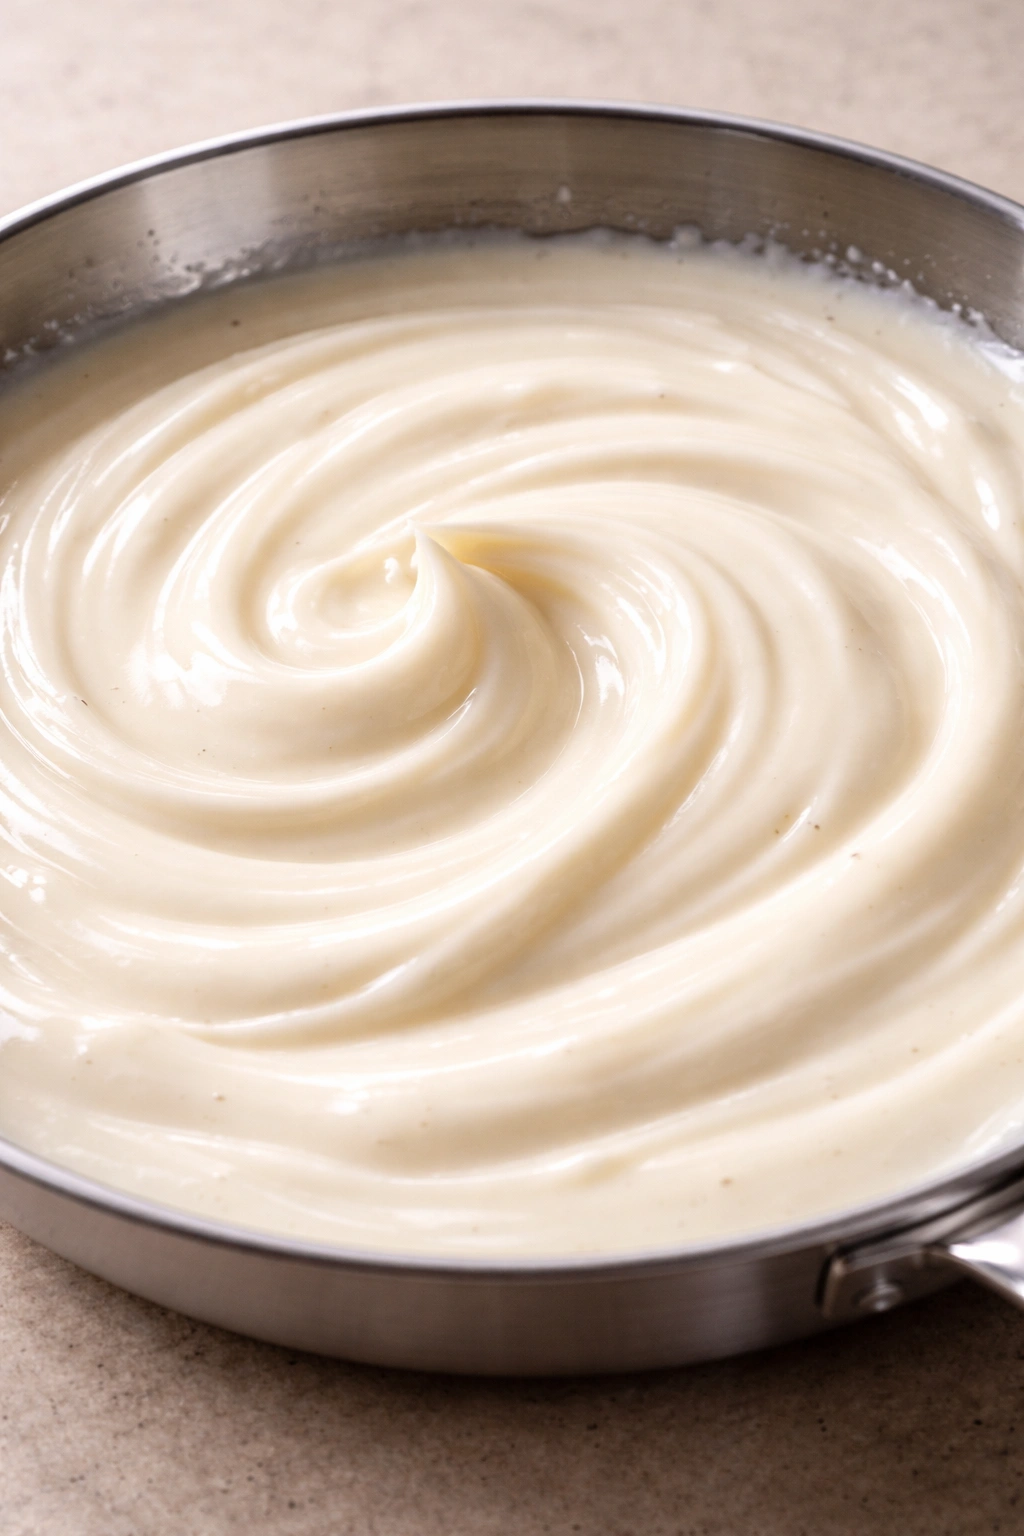
Create the Creamy Sauce:
-
Add the chicken broth to the skillet, stirring to combine with the shallot mixture. Scrape the bottom of the pan thoroughly with a wooden spoon to dislodge any remaining flavorful brown bits. Bring the broth to a gentle simmer—you should see small bubbles breaking the surface steadily but not a rolling, vigorous boil.
-
Reduce the heat to medium. Pour in the heavy cream slowly while stirring constantly. This helps it incorporate smoothly into the broth without separating or becoming grainy. Stir until you have a uniform, light cream-colored sauce.
-
Add the thyme, red pepper flakes, and a small pinch of salt and black pepper. Taste the sauce at this point—it should taste savory and slightly herbal, not overseasoned yet. You’ll adjust the seasoning at the very end after all components are cooked.
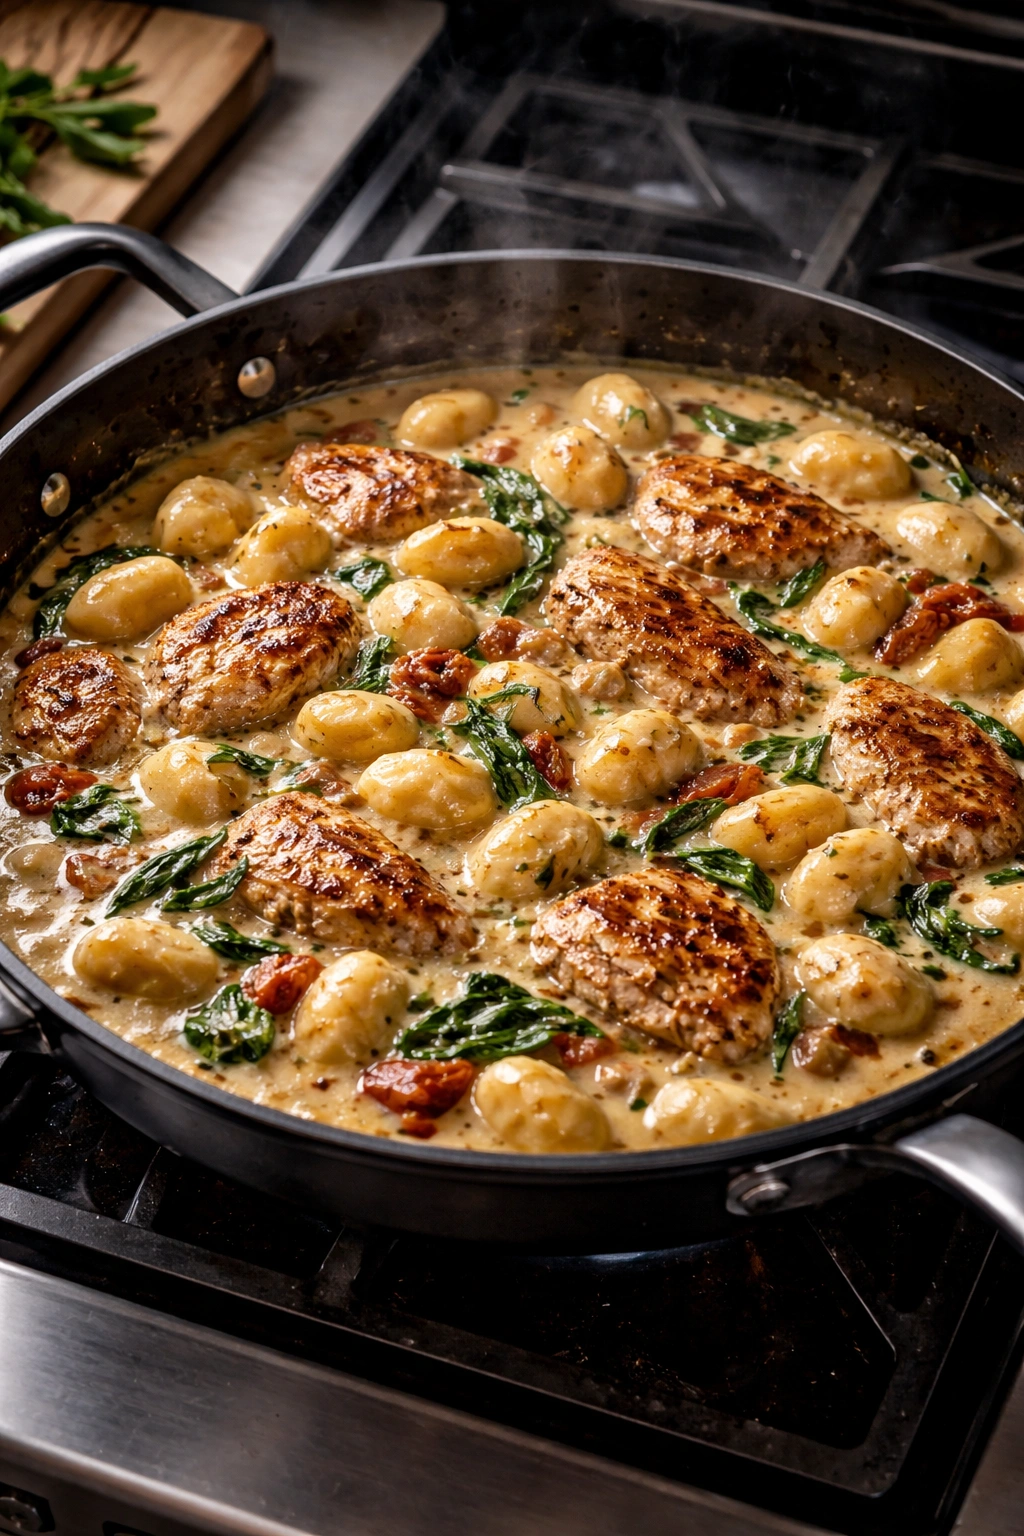
Cook the Gnocchi:
-
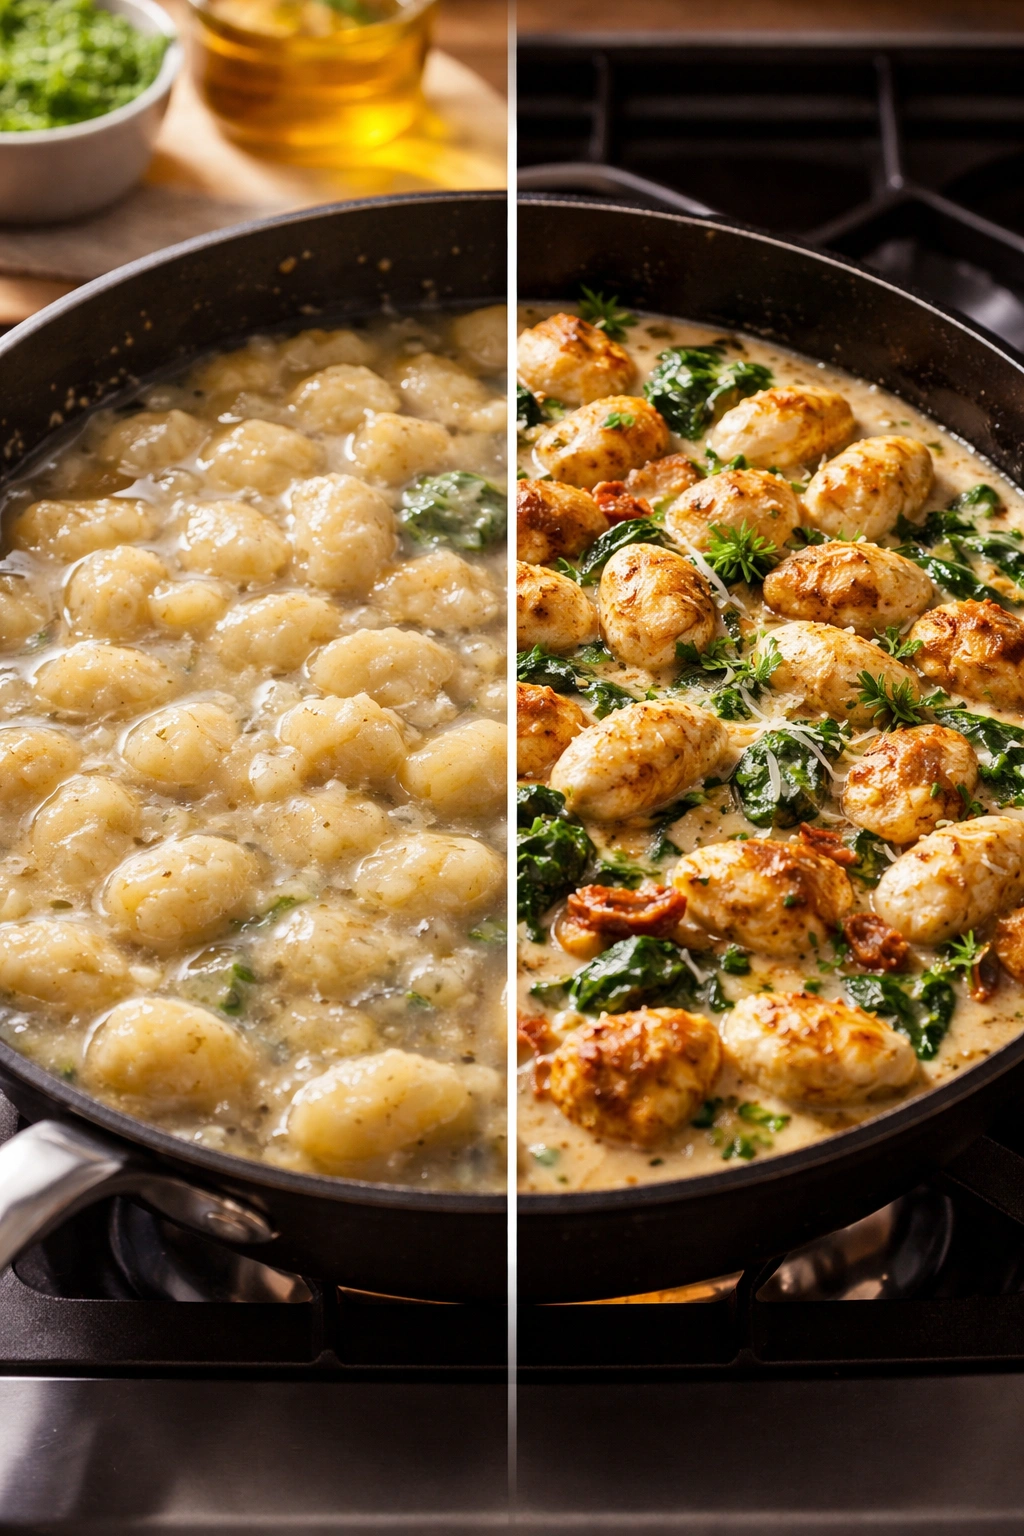
Add the uncooked gnocchi to the sauce, stirring gently with a wooden spoon to coat them evenly. Break apart any pieces that are stuck together so each piece can absorb the sauce evenly. The gnocchi will sink initially, and that’s completely fine—they’ll float as they cook.
-
Bring the sauce back to a gentle simmer, then reduce the heat to medium-low. Cover the skillet with the lid (or a baking sheet or large piece of foil if your skillet doesn’t have a lid). The cover traps steam, which helps cook the gnocchi through and prevents the sauce from reducing too quickly.
-
Cook for five to seven minutes, stirring gently every two minutes or so. The gnocchi will gradually float to the surface as they cook through. They’re done when they’re tender enough that you can easily break one with a wooden spoon, and the sauce has thickened noticeably from the starch the gnocchi release.
Advertisements
Finish the Dish:
-
Remove the skillet from heat. Take the lid off carefully to avoid the hot steam. Stir in the freshly grated Parmesan cheese until completely melted and incorporated into the sauce. The sauce will thicken further as it cools slightly.
-
Return the chicken to the skillet, along with any juices accumulated on the plate. Gently stir to distribute the chicken evenly throughout the sauce and gnocchi.
-
If you’re using spinach, add it now and stir gently until it wilts into the warm sauce, about one to two minutes. The residual heat will soften it without making it mushy.
-
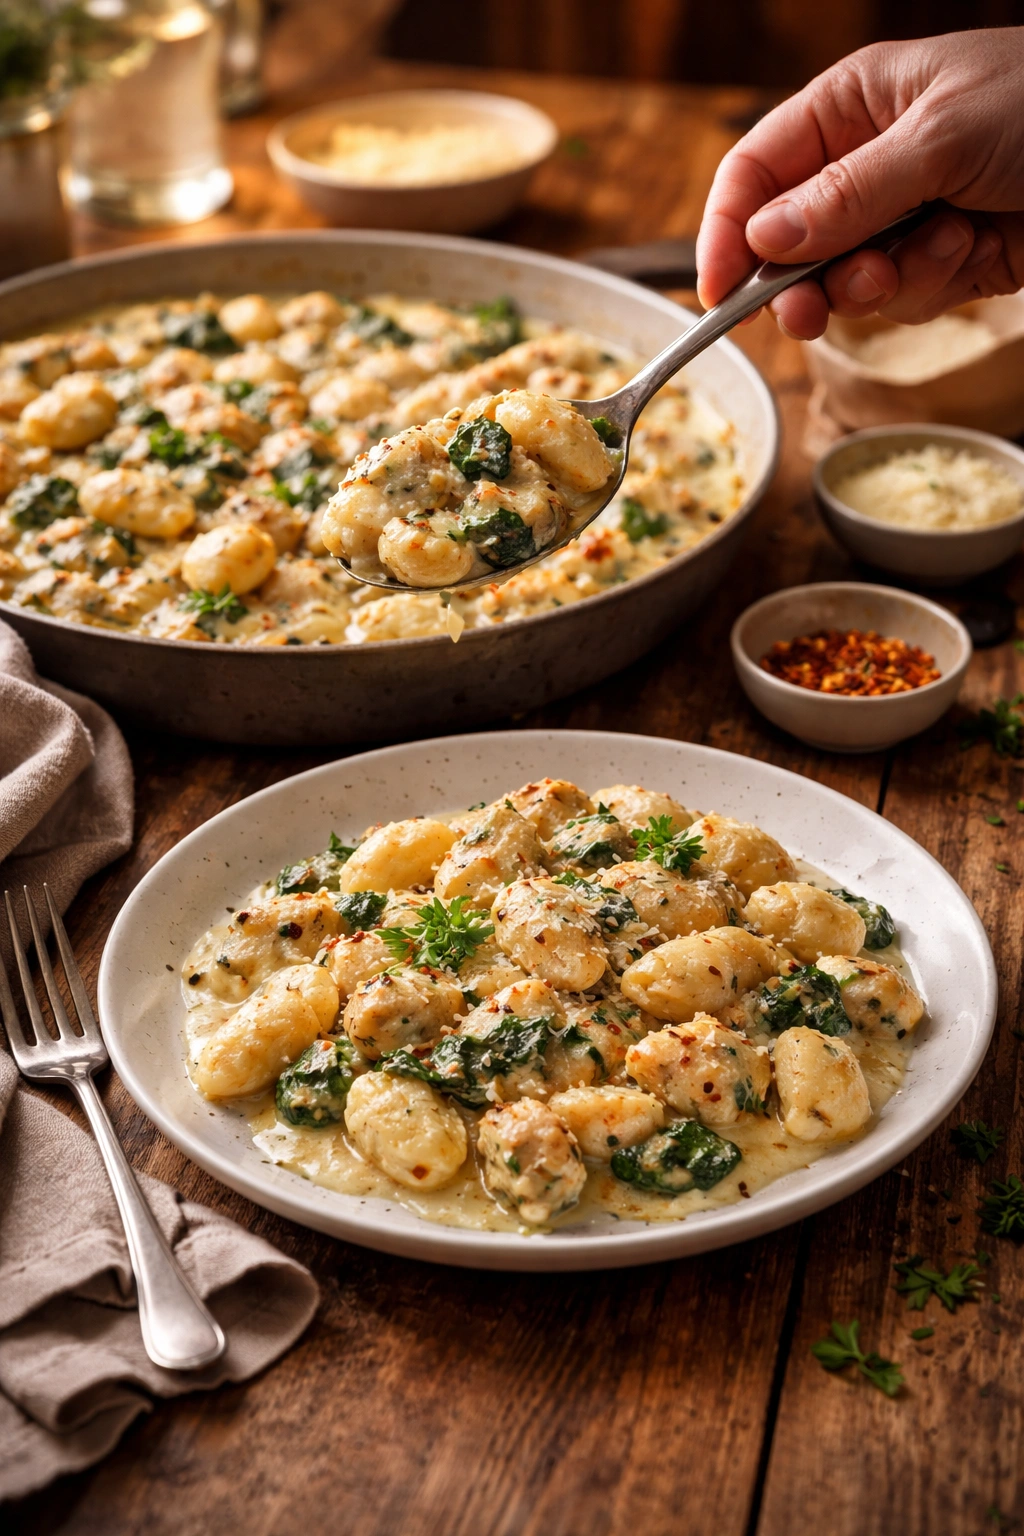
Taste the entire dish and adjust the seasoning with salt, pepper, and red pepper flakes to your preference. Remember that Parmesan adds saltiness, so taste before adding more salt.
-
Divide among bowls or plates, making sure each serving gets a good portion of gnocchi, chicken, and creamy sauce. Garnish with fresh basil or parsley if you have it, and a light sprinkle of additional Parmesan cheese.
Kitchen Techniques That Guarantee Success
There are several specific techniques that dramatically improve your chances of making this dish beautifully, and they’re all intuitive once you understand why they matter.
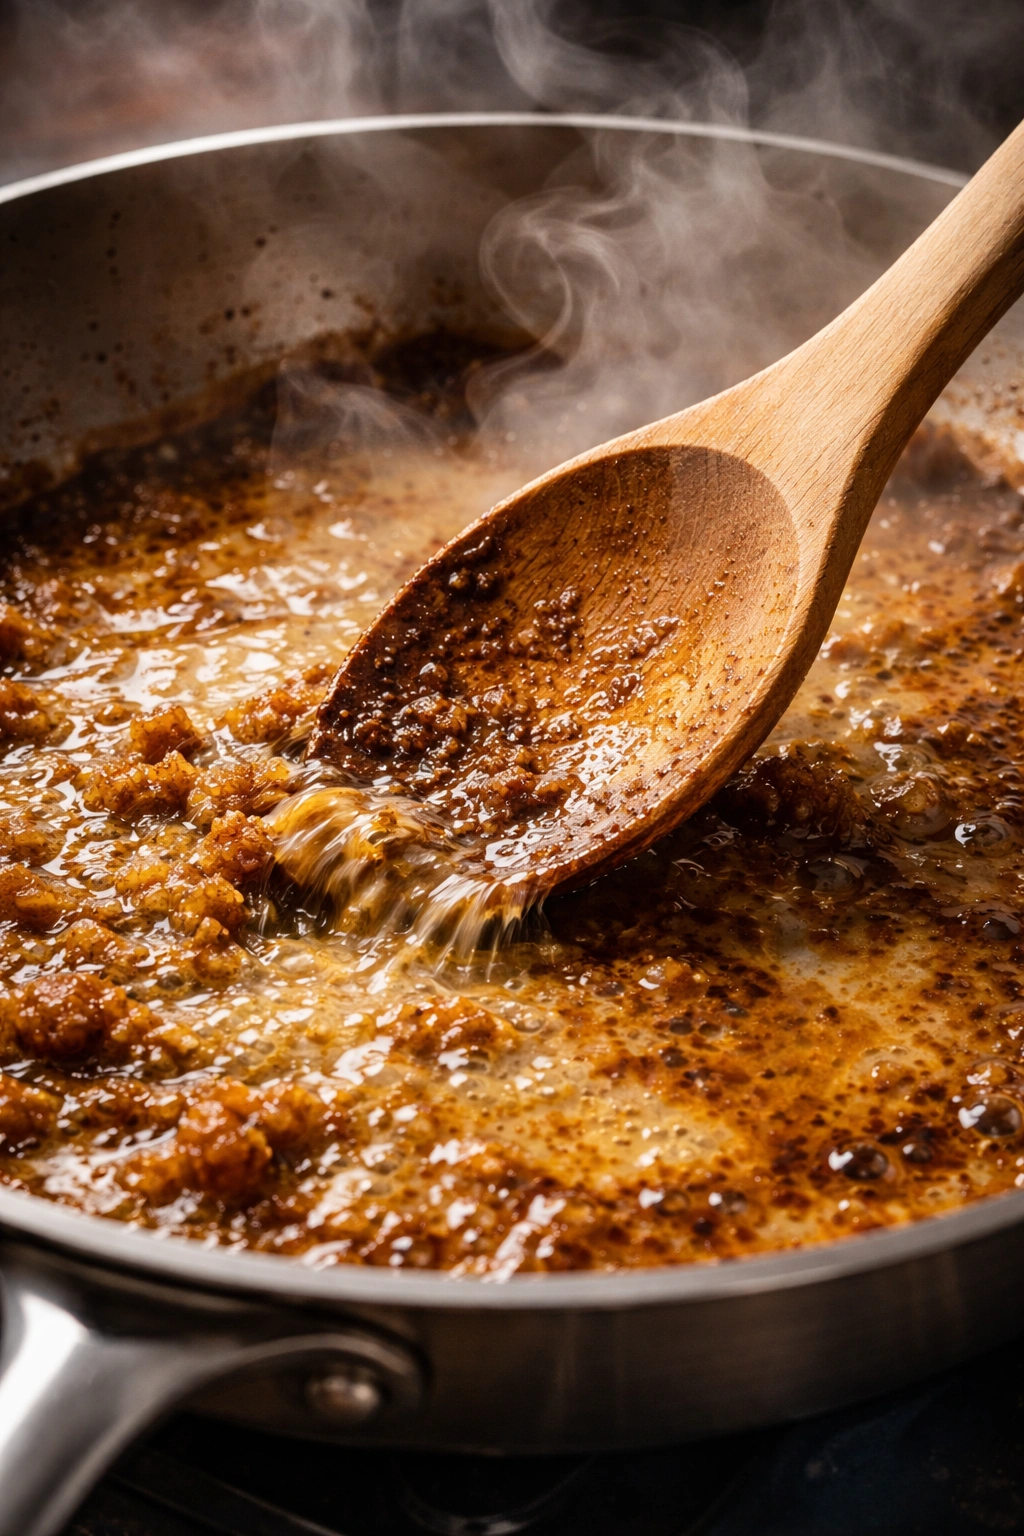
The fond scraping method deserves its own explanation. That brown, sticky layer on the bottom of the pan after you brown the chicken isn’t burnt—it’s concentrated flavor. This fond comes from proteins and sugars in the chicken caramelizing under high heat. When you add liquid (broth or wine) and scrape vigorously with a wooden spoon, this fond dissolves into the liquid, distributing deep, savory, umami-rich flavor throughout your entire sauce. If you skip this step by not scraping, your sauce will taste thinner and less flavorful. It’s one of the single most important techniques in cooking, and it’s simple enough that everyone can do it immediately.
Constant stirring while adding cream prevents the cream from curdling or creating grainy, separated sauce. When you pour cold cream into hot liquid, the proteins in the cream can seize up and separate. By stirring constantly as you add the cream slowly rather than dumping it all in at once, you gradually bring it up to temperature, preventing that separation. It takes literally one extra minute and makes a noticeable difference.
Gentle gnocchi handling prevents them from breaking apart. Gnocchi are delicate compared to regular pasta. Use a wooden spoon and gentle stirring motions rather than aggressive mixing. When you remove the cooked chicken, do it carefully rather than aggressively lifting and dropping it back into the pan. This is a small detail, but it means your finished dish has beautiful, intact gnocchi rather than broken bits.
Covering the skillet while the gnocchi cooks is more important than you’d think. The cover traps steam, which maintains the right temperature for cooking the gnocchi through without the sauce reducing too much. If you leave it uncovered, the sauce reduces and becomes too thick, and the gnocchi don’t cook evenly. If you don’t have a lid, a baking sheet or large sheet of foil works just fine.
Tasting and adjusting at the end rather than throughout prevents over-seasoning. Taste the final dish right before serving, when all components are cooked. This is when you get an accurate sense of whether you need more salt, pepper, or herbs. If you taste and season earlier, you might over-season as the sauce reduces during cooking.
Common Mistakes That Ruin Gnocchi and How to Avoid Them
Most problems that people encounter with this dish stem from common misunderstandings about how gnocchi cook or how to handle the sauce.
Overcooking gnocchi is the most frequent mistake. Overcooked gnocchi become mushy, bloated, and lose their appealing tender-but-distinct texture. The remedy is simple: start checking them around the five-minute mark. They should be soft enough to break easily with a wooden spoon but still maintain their shape. As soon as they reach that point, remove the skillet from heat. They’ll continue to soften slightly as the sauce cools.
Pre-boiling gnocchi is unnecessary here and actually works against you. Some recipes suggest boiling gnocchi separately in salted water, then draining and adding them to the sauce. That’s a perfectly fine technique for other dishes, but it defeats the purpose of this one-pan method and loses the starch that naturally thickens the sauce. Cook them directly in the sauce—that’s the whole point.
Using pre-shredded Parmesan instead of freshly grated creates a grainy, separated sauce that never quite becomes silky. Pre-shredded cheese has anti-caking agents that prevent it from melting smoothly. Freshly grated cheese melts completely into the sauce, creating that gorgeous creamy texture. It’s a small difference in effort (a box grater takes literally thirty seconds), and the result is noticeably better.
Adding heavy cream all at once instead of slowly can create a grainy or separated sauce. Always add it gradually while stirring constantly. Even if you’re in a hurry, this step shouldn’t be rushed. It takes one extra minute and prevents frustration.
Not browning the chicken properly before adding sauce means you miss out on flavorful fond and end up with pale, less flavorful meat. Take time to get a golden crust on the chicken. If your skillet isn’t hot enough or you’re crowding too much chicken in at once, you’ll get steaming rather than browning. Work in batches if necessary. The extra five minutes is worth it.
Skipping the fond scraping step leaves concentrated flavor behind instead of incorporating it into the sauce. Always scrape the bottom of the pan thoroughly with a wooden spoon, especially after browning the chicken and before adding the broth. This single step is partly why this dish tastes restaurant-quality.
Using the wrong gnocchi type causes texture problems. Use shelf-stable potato gnocchi from the dry pasta aisle, not fresh gnocchi in the refrigerated section (those have different cooking times and break down more easily), and definitely not cauliflower gnocchi (which releases different starches and won’t thicken the sauce). Read the package to make sure you’re getting regular potato gnocchi.
Flavor Variations You Can Make Anytime
The beauty of this foundation is that it takes beautifully to different flavor directions. Once you’ve made it the basic way a few times and understand the technique, you can play with variations that suit your family’s preferences or what you have on hand.
Sun-Dried Tomato Version adds sweet, concentrated tomato flavor and a Mediterranean feel. Add ½ cup chopped sun-dried tomatoes (oil-packed if possible, as they’re more flavorful) along with the garlic. Let them cook for one minute to warm through and release their flavor. Some recipes suggest using the oil from the sun-dried tomato jar instead of regular olive oil for browning the chicken—if you do, use slightly less since it’s already rich. Finish the dish with fresh basil instead of parsley for maximum flavor harmony.
Lemon-Garlic Version brings brightness and cuts through the richness beautifully. Increase the minced garlic to 5 or 6 cloves for more pronounced garlic flavor. Instead of wine, use an additional ¼ cup broth. Add the zest of one lemon along with the herbs, and add the juice of one lemon after the Parmesan cheese is melted, stirring constantly as you do. The acidity brightens everything and prevents the dish from tasting heavy. Finish with fresh dill instead of basil. This variation is especially good if you like bright, clean flavors or if you’re serving it to people who find overly rich sauces cloying.
Mushroom Addition adds earthy richness and textural interest. Slice 8 ounces of mushrooms (cremini, baby bella, or shiitake all work beautifully). After you remove the browned chicken, add a tablespoon of olive oil to the skillet and cook the sliced mushrooms over medium-high heat for three to four minutes until they release their moisture and start to brown. Remove them to a plate, then continue with the shallot and garlic steps. Add the mushrooms back in along with the chicken in the final assembly. The umami from mushrooms deepens the overall flavor profile.
Spinach or Kale Addition boosts nutrition and adds color without changing the flavor significantly. Stir in two cups of fresh baby spinach or roughly chopped kale during the final minute of cooking—the residual heat will wilt it. If you’re using kale, you might want to add it a minute or two earlier so it has time to soften completely. This is one of the easiest ways to sneak vegetables into the dish for families who are particular about greens.
Bacon Version adds smoky, salty depth that appeals to bacon lovers. Cook four slices of bacon until crispy, chop it, and set aside. Use the bacon fat (along with a bit of olive oil if needed) to brown the chicken. Proceed with the recipe as written, adding the crispy bacon back in along with the chicken during final assembly. It’s a small change that creates a noticeably different flavor profile.
Tuscan Herbs Version uses thyme and oregano more heavily, creating a more distinctly Italian character. Use 1 teaspoon of dried oregano and 1 teaspoon of fresh thyme (or ½ teaspoon dried thyme) as your base herbs instead of Italian seasoning. Consider adding ¼ teaspoon of crushed dried rosemary as well, though use a light hand—rosemary can easily become overpowering. This version pairs beautifully with fresh basil stirred in at the end.
White Wine Alternative if you don’t drink or keep wine on hand. Simply use an additional ¼ cup of chicken broth instead of the wine. You’ll lose a bit of complexity and acidity, but the dish still tastes delicious. Some people add a squeeze of fresh lemon juice to replicate that acidic note the wine provides.
Storage, Reheating, and Make-Ahead Tips
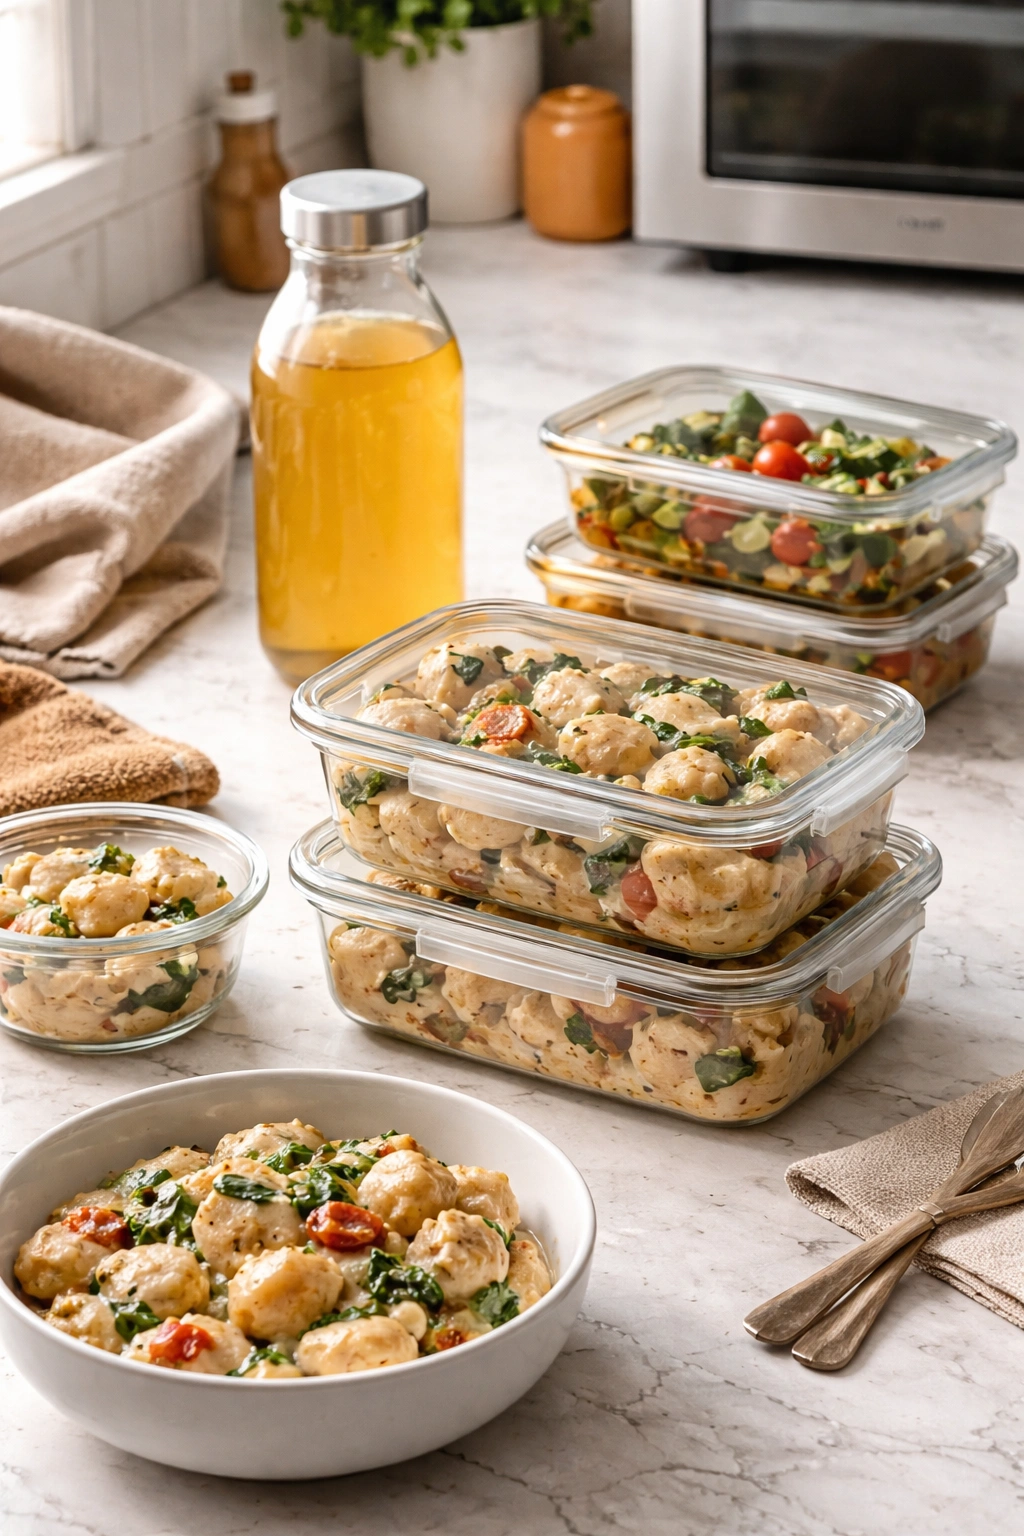
This is one of the few dishes that’s genuinely better eaten fresh rather than made ahead, but life happens, and sometimes you need to store or reheat leftovers.
Storage: Refrigerate leftovers in an airtight container for up to two days, though the dish is best consumed the same day or within 24 hours. Gnocchi absorb sauce as they sit, so the texture changes—they become softer and the sauce becomes thicker. This isn’t bad necessarily, just different from the freshly made version.
Reheating on the stovetop is gentler on the texture than microwaving. Place the leftover chicken and gnocchi in a skillet or saucepan over low to medium-low heat. Add a splash of heavy cream, half-and-half, or even chicken broth to loosen the sauce as it reheats. Stir gently and heat for five to ten minutes until warmed through. Don’t use high heat, which can cause the cream to break or separate.
Reheating in the microwave works if you’re in a hurry. Transfer leftovers to a microwave-safe bowl, add a splash of cream or broth, and microwave in 30-second intervals, stirring between each interval, until warmed through. The texture won’t be quite as good as stovetop reheating, but it’s convenient.
Freezing is not recommended. Gnocchi develop an unpleasant mushy texture when frozen and thawed, and cream sauces can separate and become grainy. If you do freeze it, store in an airtight, freezer-safe container for up to one month. Thaw overnight in the refrigerator and reheat gently on the stovetop with added cream to restore some sauce structure. The results won’t be as good as fresh, but it’s better than throwing food away.
Make-ahead option: You can prep all your ingredients in advance—chop the shallots, mince the garlic, measure out the broth and cream. This takes five minutes and means you can literally start cooking and have dinner on the table in 25 minutes when you get home. Store prepped ingredients in separate containers in the refrigerator for up to one day.
Perfect Sides and Serving Suggestions
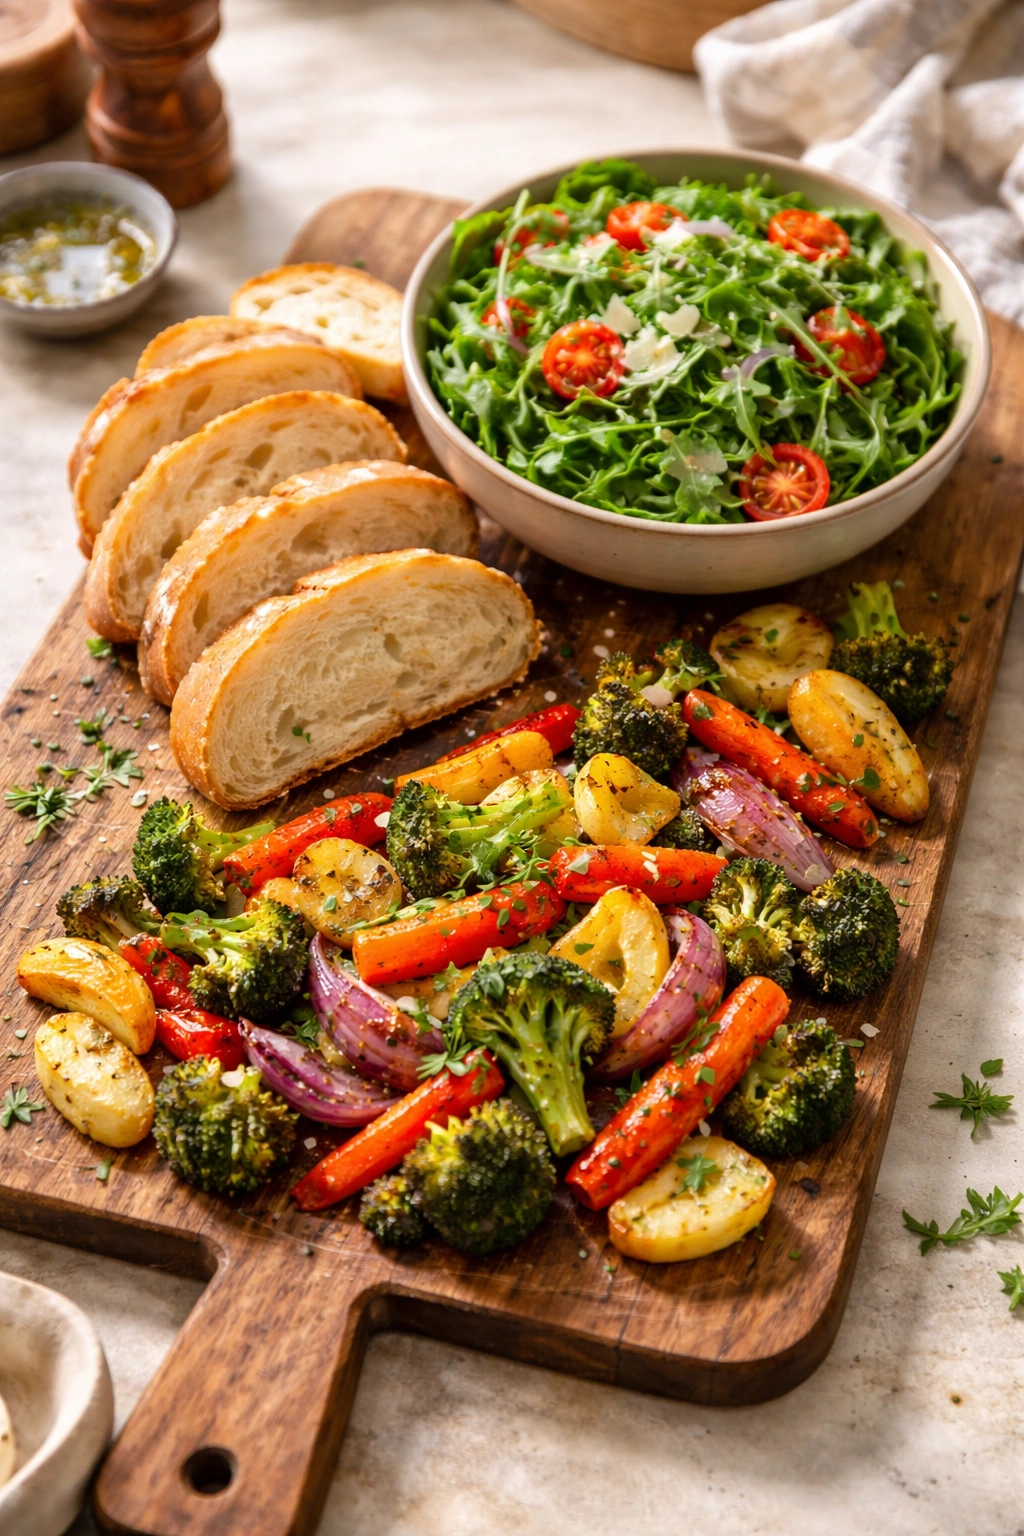
This is genuinely a one-dish meal that doesn’t require sides, but if you want to round out the plate or add freshness to balance the richness, here are options that work beautifully.
Salad is the most popular choice—a crisp, acidic salad provides textural contrast and prevents the meal from feeling heavy. A simple arugula salad with lemon vinaigrette works perfectly. A fresh green salad with a sharp vinaigrette cuts through the richness beautifully. A spinach salad with a tangy dressing balances creamy dishes. Even a simple tomato and cucumber salad provides refreshing contrast.
Bread is perfect for soaking up every last drop of that creamy sauce. Fresh Italian bread, garlic bread, focaccia, or crusty sourdough all work. Some people make quick garlic butter toasts by brushing bread slices with olive oil, sprinkling minced garlic and a bit of salt, then toasting until golden and crispy.
Roasted vegetables add color and nutrition without being heavy. Roasted asparagus, green beans, or broccoli complement the creamy main course. Halved Brussels sprouts roasted with olive oil and salt take on a nutty, caramelized flavor that pairs beautifully. Even simple roasted cherry tomatoes work.
Wine pairing if you’re making this for company: the richness of the cream sauce pairs well with crisp white wines like Pinot Grigio or Sauvignon Blanc. If you used white wine in the recipe, serve the same wine with dinner. The acidity in the wine helps cut through the richness and cleanses your palate between bites.
Plating tip: Serve this dish in shallow bowls rather than flat plates so the creamy sauce pools nicely. Make sure each serving has a good balance of gnocchi, chicken, and sauce. A small handful of fresh herbs or a light sprinkle of additional Parmesan on top adds visual appeal and freshness.
Frequently Asked Questions

Can I use chicken breasts instead of thighs? Absolutely. Breasts are leaner but can dry out if overcooked. Cut them into bite-sized pieces for even, quick cooking. Cook for just three to four minutes per side in the browning step—you want them mostly cooked through but not completely cooked, since they’ll finish cooking in the sauce. Watch carefully during the sauce-simmering phase and don’t let the total cooking time exceed 10-15 minutes or the breasts will become tough.
What if I don’t have heavy cream? Half-and-half works, though the sauce will be slightly less rich and creamy. Whole milk will make the sauce thinner and less luxurious, though it’s still edible—if you use milk, add a tablespoon of cream cheese or sour cream to help thicken and enrich it. Don’t use low-fat milk or skim milk—the sauce won’t have the right texture or mouthfeel.
Can I make this gluten-free? Yes, by using gluten-free potato gnocchi, which you can usually find in the pasta aisle of most grocery stores. Check that all other ingredients are labeled gluten-free (some broths and seasonings may contain gluten). Everything else in the recipe is naturally gluten-free.
Do I have to use wine? No. Simply use an additional ¼ cup of chicken broth instead. You’ll lose a slight bit of complexity and acidity, but the dish is still delicious. If you want that brightness the wine provides, add a squeeze of fresh lemon juice to the finished sauce.
Can I add other vegetables? Absolutely. Mushrooms, peas, broccoli, sun-dried tomatoes, artichoke hearts, roasted red peppers, and fresh spinach all work beautifully. Add heartier vegetables early (like mushrooms, which you sauté alongside the chicken). Add delicate vegetables late (like fresh spinach, which wilts in the residual heat).
How do I know when it’s done? The gnocchi should be tender enough to break easily with a wooden spoon but still maintaining their shape. The sauce should be creamy and coat a spoon. The chicken should register 165°F on a meat thermometer in the thickest piece.
Can I make this in advance? Not really for the best results. This is a dish best enjoyed fresh, within 30 minutes of cooking. You can prep all your ingredients in advance, which makes the actual cooking fast, but the finished dish doesn’t keep or reheat well due to the gnocchi continuing to absorb sauce.
Final Thoughts
This one-pan chicken gnocchi has earned its place as a family favorite because it hits every mark that makes cooking worth doing: it’s quick enough for a busy weeknight, flavorful enough to feel special, easy enough for anyone to make successfully, and comforting enough that people ask for it repeatedly. There’s no pretense here. It doesn’t pretend to be fancy or require skills you don’t have. It’s just straightforward cooking that produces genuinely delicious food.
The technique of cooking gnocchi directly in the sauce rather than in separate boiling water gives you a significant advantage. That released starch naturally thickens everything into a silky, cohesive dish. The one-pan method means you’re building flavor sequentially—each step adding depth to the next rather than cooking components separately and hoping they work together. By the time everything finishes cooking, the flavors have melded and matured into something greater than the sum of its parts.
Keep this recipe handy for those nights when you need dinner on the table quickly but don’t want to sacrifice taste or comfort. Build confidence by making it exactly as written a couple of times first. Then explore the variations—lemon-garlic, sun-dried tomato, mushroom—based on what you’re craving or what you have on hand. Once you understand the foundation, you’ll naturally start adapting it to your family’s preferences and what’s in your pantry. That’s when the real magic happens—when a recipe stops being something you follow and becomes something you own.