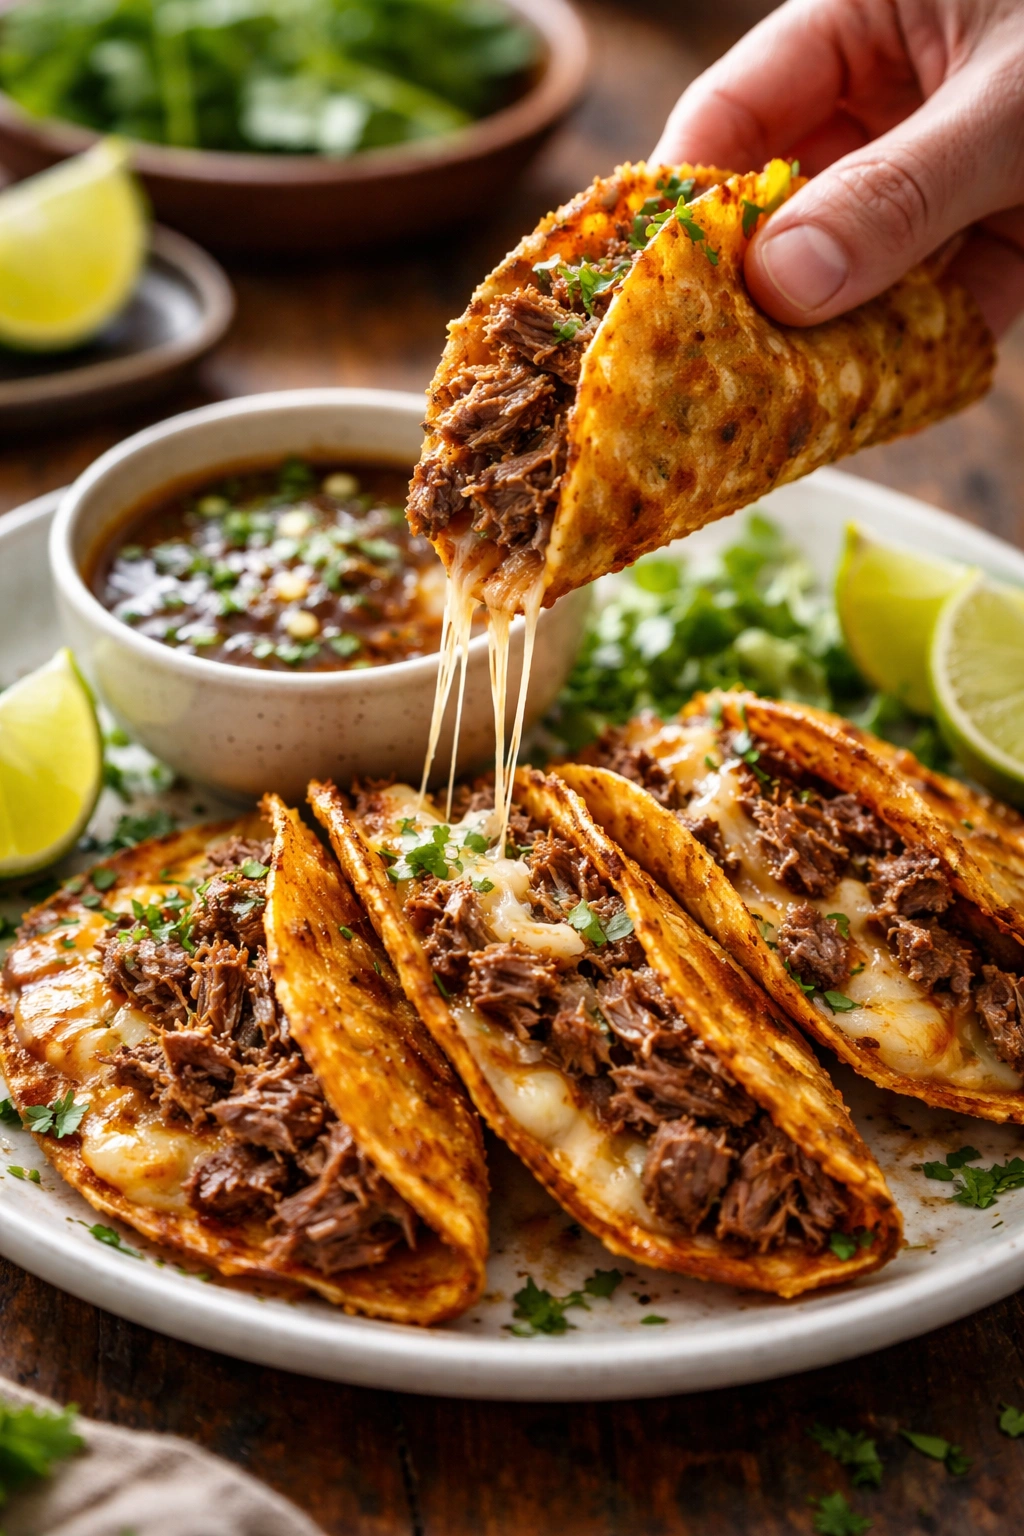
There’s a moment that happens when you bite into a perfectly made birria taco—the crispy tortilla shell gives way, the melted cheese stretches, the tender shredded beef practically dissolves on your tongue, and then you dip that beautiful mess into the rich consomé broth. It’s simultaneously elegant and gloriously messy, restaurant-quality yet completely achievable at home. What makes birria tacos so special isn’t their complexity—it’s the thoughtfulness behind every element. This is street food elevated through technique, tradition, and care, and once you’ve made them from scratch, you’ll understand why people line up at taco trucks just for this one dish.
Birria tacos exploded into popularity through social media and food culture over the years, but their roots run deep in authentic Mexican cuisine. They originated from the Jalisco region of Mexico as a way to repurpose leftover birria stew into something hand-held and exciting. Someone had a brilliant idea: dip that crispy taco shell into the braising liquid and serve it alongside the consomé for dipping. That simple innovation transformed an already delicious stew into an iconic street food that’s equal parts texture and drama. The beauty of making them at home is that you control every variable—the spice level, the quality of the beef, how crispy or tender each element becomes. You’re not just cooking dinner; you’re creating an experience.
Making birria tacos from scratch takes time, but it’s rarely hands-on. Most of that time is passive braising while your oven does the work. What you’ll find is that the effort pays dividends—the depth of flavor you achieve with properly toasted dried chiles, carefully braised meat, and the concentrated consomé broth rivals any taqueria. Plus, birria freezes beautifully, meaning you can make a large batch and have restaurant-quality tacos ready whenever the craving strikes. Let me walk you through exactly how to build these from the ground up, with all the nuance and insider knowledge that separates good birria from truly exceptional birria.
What Is Birria and Why It Matters
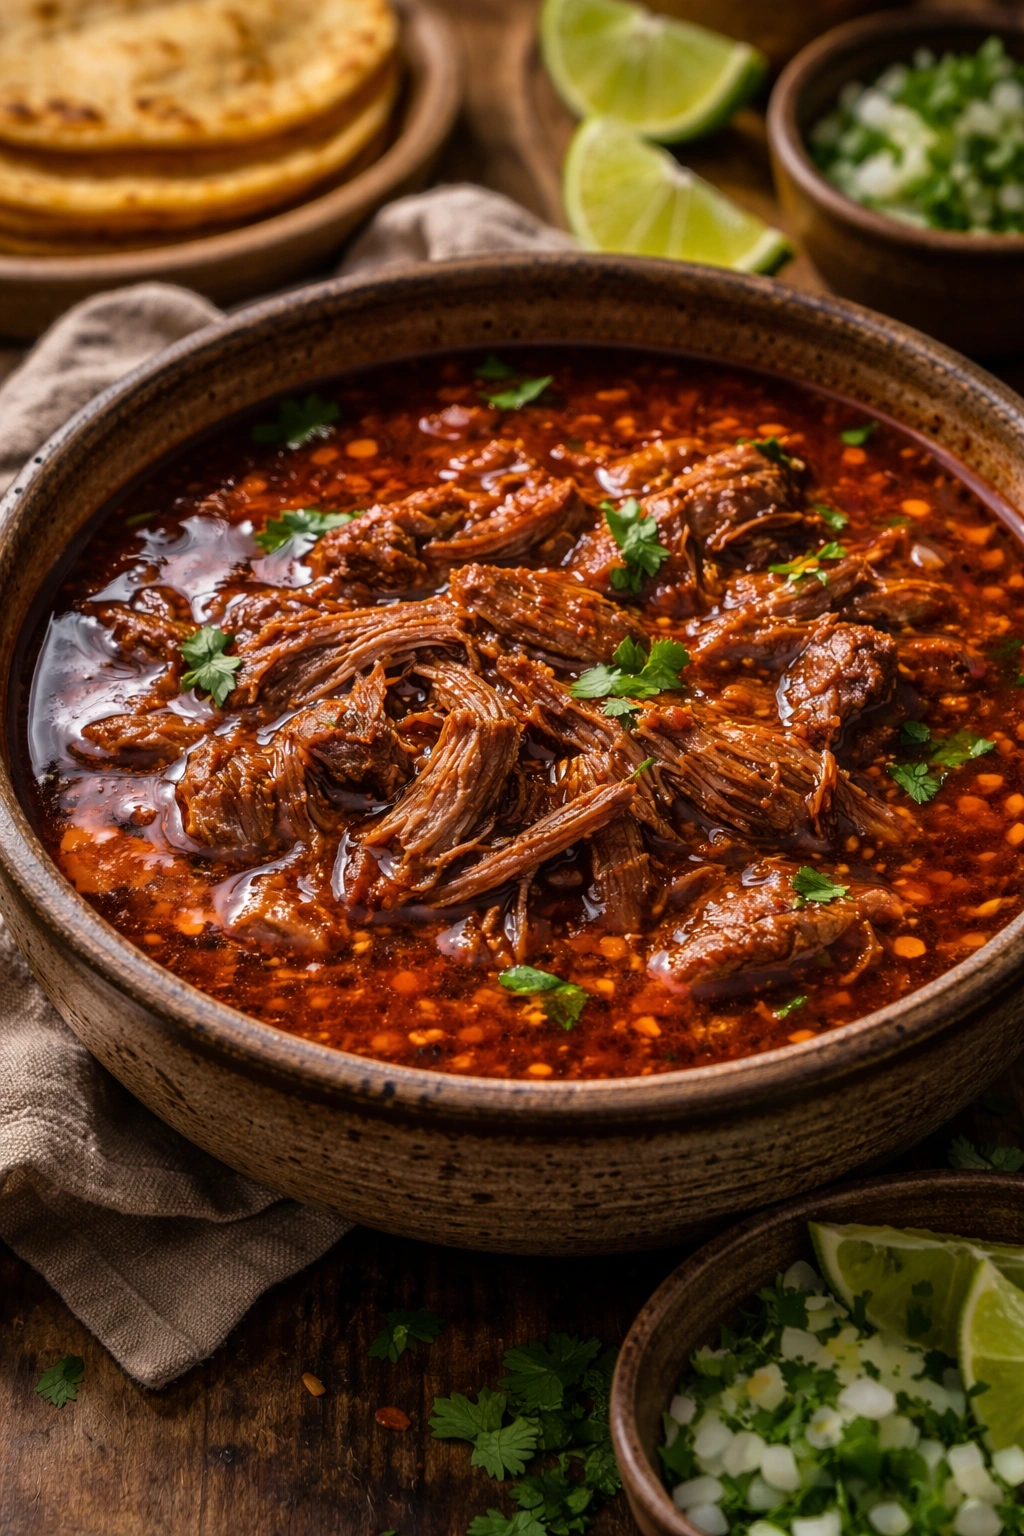
Birria, or more specifically birria de res, is a traditional Mexican stew that originated in Jalisco centuries ago. It’s traditionally made with goat or lamb, though beef has become far more common and accessible. This isn’t a quick weeknight dinner—it’s a labor of love that rewards patience with incredibly tender meat and a sauce layered with complex spice and heat. The stew itself is served in rich consomé broth alongside the shredded meat, cilantro, and white onion.
The magic of birria comes from its sauce. Rather than being a simple tomato-based gravy, the sauce starts with whole dried chiles—usually a combination of guajillo peppers for earthiness and subtle berry notes, ancho chiles for chocolate and raisin undertones, and sometimes arbol chiles for heat. These are reconstituted in hot water, then blended with tomatoes, onion, garlic, and a careful blend of warm spices like cumin, cinnamon, cloves, and oregano. That sauce becomes both the braising liquid for the beef and, later, the consomé that accompanies the finished tacos.
What makes birria tacos different from the stew is the presentation and the preparation. You take the shredded meat from the birria stew, nestle it into a corn tortilla along with cheese and toppings, dip that tortilla in the fat-enriched consomé, and pan-fry it until the outside becomes crispy while the inside stays tender and juicy. It’s a texture contrast that shouldn’t work but absolutely does—crispy shell, melting cheese, succulent beef, all working together. The consomé becomes a dipping sauce that complements every bite, adding moisture and deepening the flavor experience.
Why These Tacos Deserve Your Time and Effort
There’s a difference between eating tacos and experiencing them. Commercial birria tacos, while often delicious, are made in volume with shortcuts that are necessary for profit margins. When you make them at home, you can use better beef, toast your own dried chiles for maximum flavor development, control the spice level precisely, and make the tacos to order at peak quality. You’re eating them warm and crispy, not sitting in a container waiting to be eaten.
The investment of time also teaches you something valuable about Mexican cooking. This isn’t trendy fusion food or internet-famous hype—birria represents generations of knowledge about flavor development through slow cooking, the importance of building a sauce correctly, and how to transform tougher, cheaper cuts of meat into something transcendent. Making it from scratch means you understand the “why” behind each step, not just following instructions.
Beyond the eating experience, homemade birria is economical. You can make a large batch for the same cost as buying a few tacos from a truck, then freeze it for weeks. It gets better after sitting overnight as flavors continue to meld and deepen. The consomé can be frozen in ice cube trays and used to boost other dishes—rice, soups, or braised vegetables. One pot of birria becomes multiple meals.
Understanding the Essential Ingredients
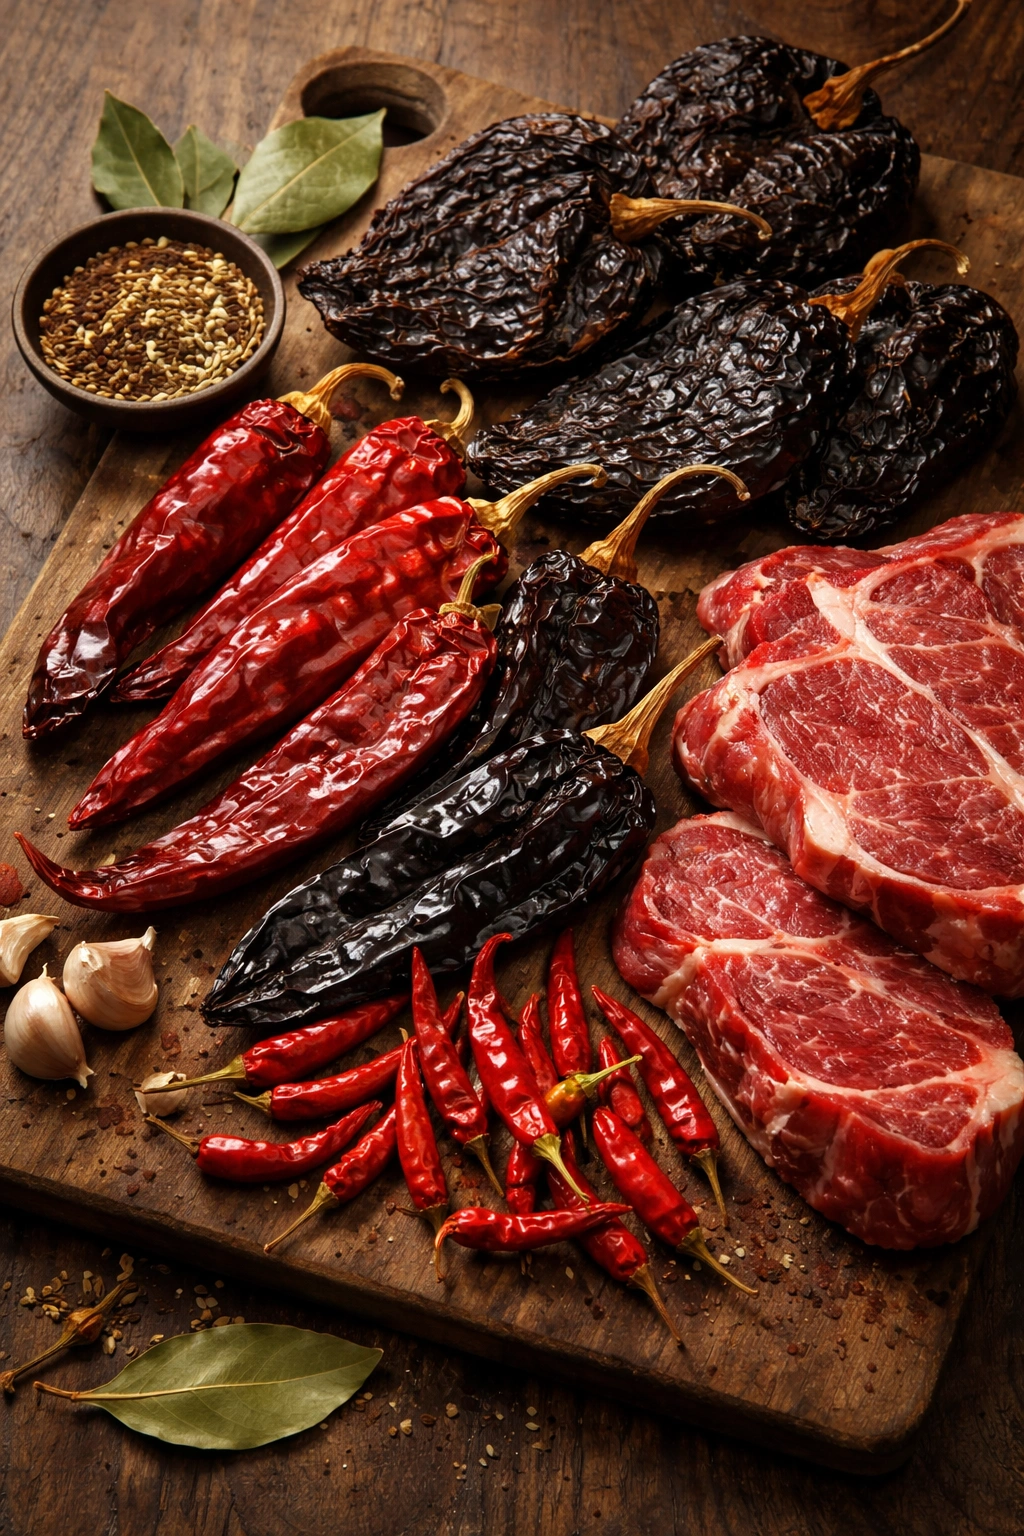
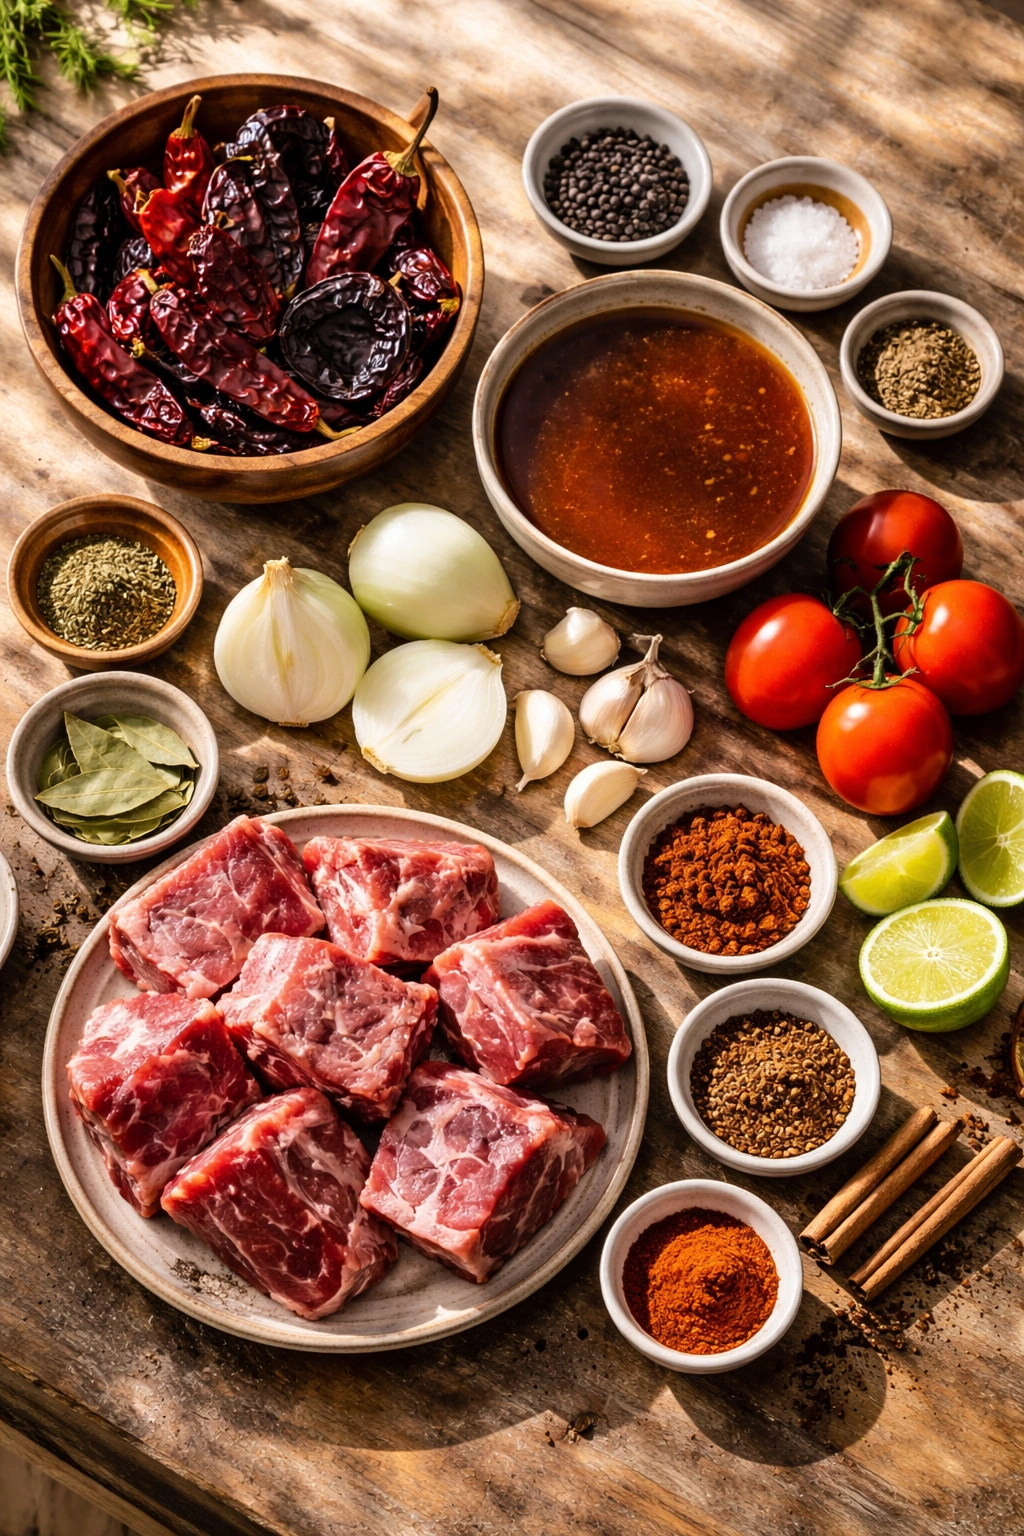
Building authentic birria starts with sourcing quality dried chiles. This is non-negotiable if you want real depth of flavor. You’ll need guajillo chiles for their mild, fruity profile—they should be pliable and leathery when you buy them, never brittle or hard. Ancho chiles add sweetness and chocolate notes. If you can find them, arbol chiles provide clean heat. These dried chiles are available at any Latin market and increasingly at mainstream grocery stores. Don’t skip them trying to substitute fresh chiles or chile powder—the flavor profile is completely different.
For the beef, you have flexibility in cuts. Chuck roast is the most economical and readily available choice. Short ribs add extra collagen and richness. Beef shank contributes deep, savory flavor. Many recipes use a combination of two or three cuts to achieve complexity. What matters most is buying meat with good marbling—you want fat throughout because it renders during the long braise and carries flavor throughout the stew. A 3-4 pound total weight of beef should yield enough meat for 16-20 tacos depending on how generously you fill them.
Mexican oregano is essential and different from the oregano you probably have in your spice cabinet. Italian oregano tastes herbaceous and bright. Mexican oregano has a more complex, earthy quality that complements the warm spices in birria. You’ll find it at Latin markets for usually under a dollar and it’s worth seeking out. Similarly, Mexican cinnamon (also called Ceylon cinnamon) is more brittle and has a brighter, spicier quality than cassia cinnamon. If you can only find standard cinnamon, use ground cinnamon and skip blending the stick.
Additional aromatics—white onion, garlic, tomato—are straightforward. Some recipes use fresh tomatoes, others use tomato paste for more concentrated flavor. Tomato paste works well because you control the intensity. For the braising liquid, beef broth adds body and richness to the sauce. Apple cider vinegar or white vinegar brightens everything at the end. Whole spices like cumin seeds, coriander seeds, black peppercorns, cloves, and bay leaves create more nuanced flavor than pre-ground versions.
For the tacos themselves, you’ll need corn tortillas—small street-style ones are traditional and ideal for frying. Oaxaca cheese is the authentic choice because it has a high melting point and creates gorgeous stretchy strands, but mozzarella works nicely if you can’t find it. Some people use Monterey Jack or even fresh queso fresco. White onion and fresh cilantro for garnish, plus limes for brightness, round out the essentials. That’s really all you need—the beauty of birria tacos is their simplicity once the base is made.
How to Make the Rich Adobo Sauce
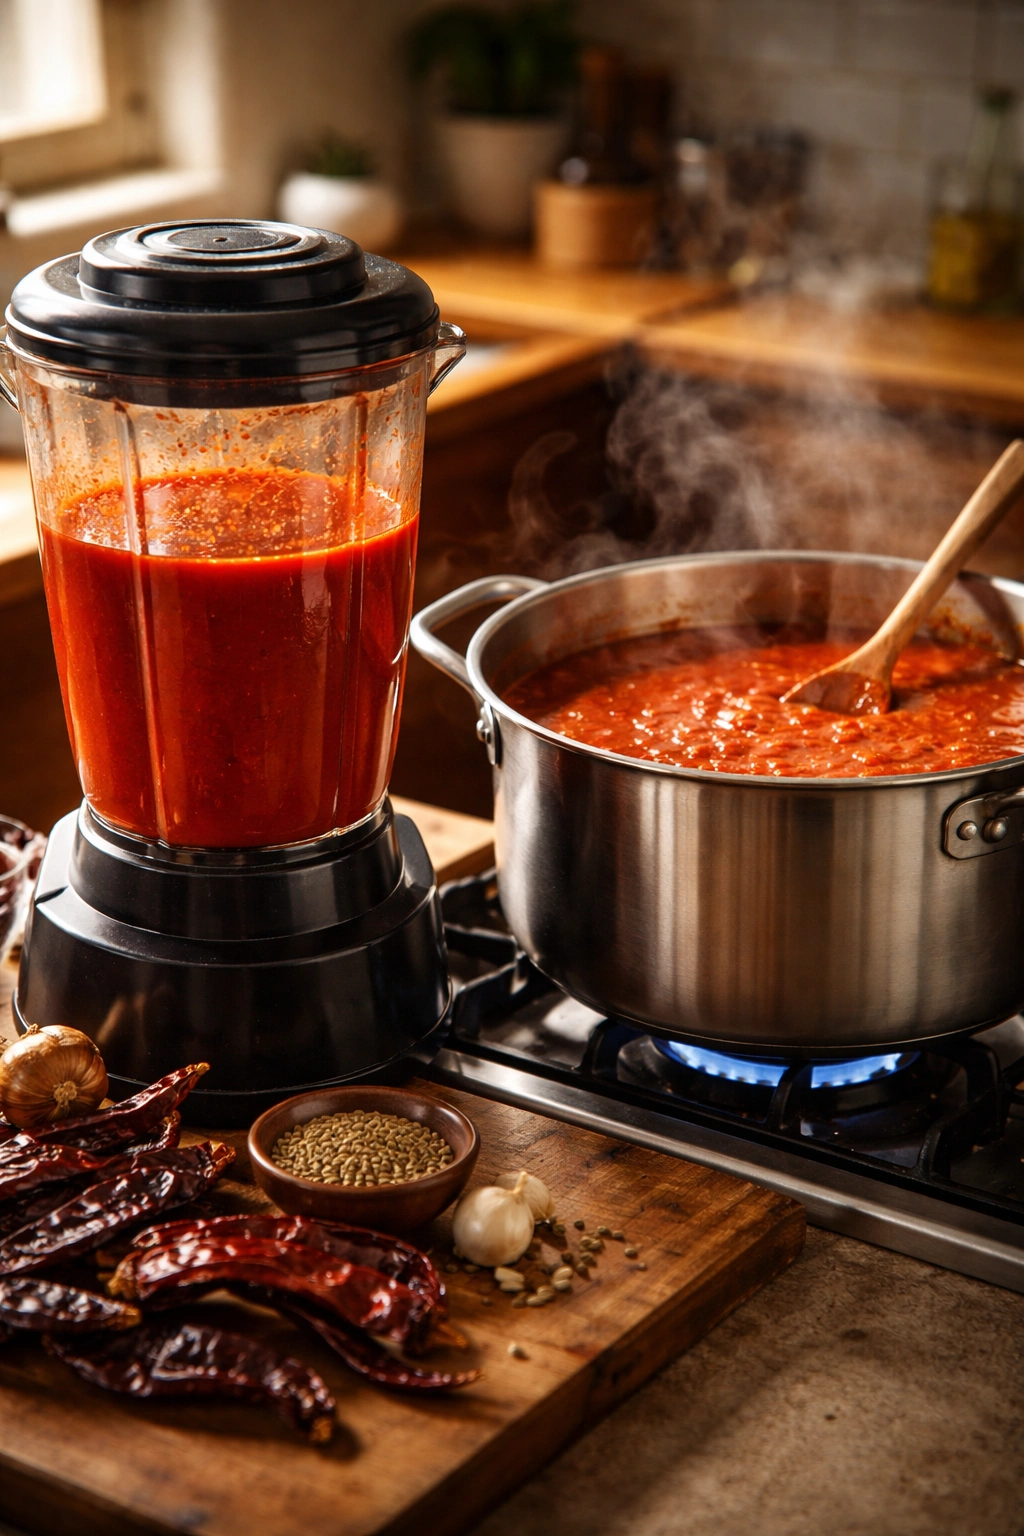
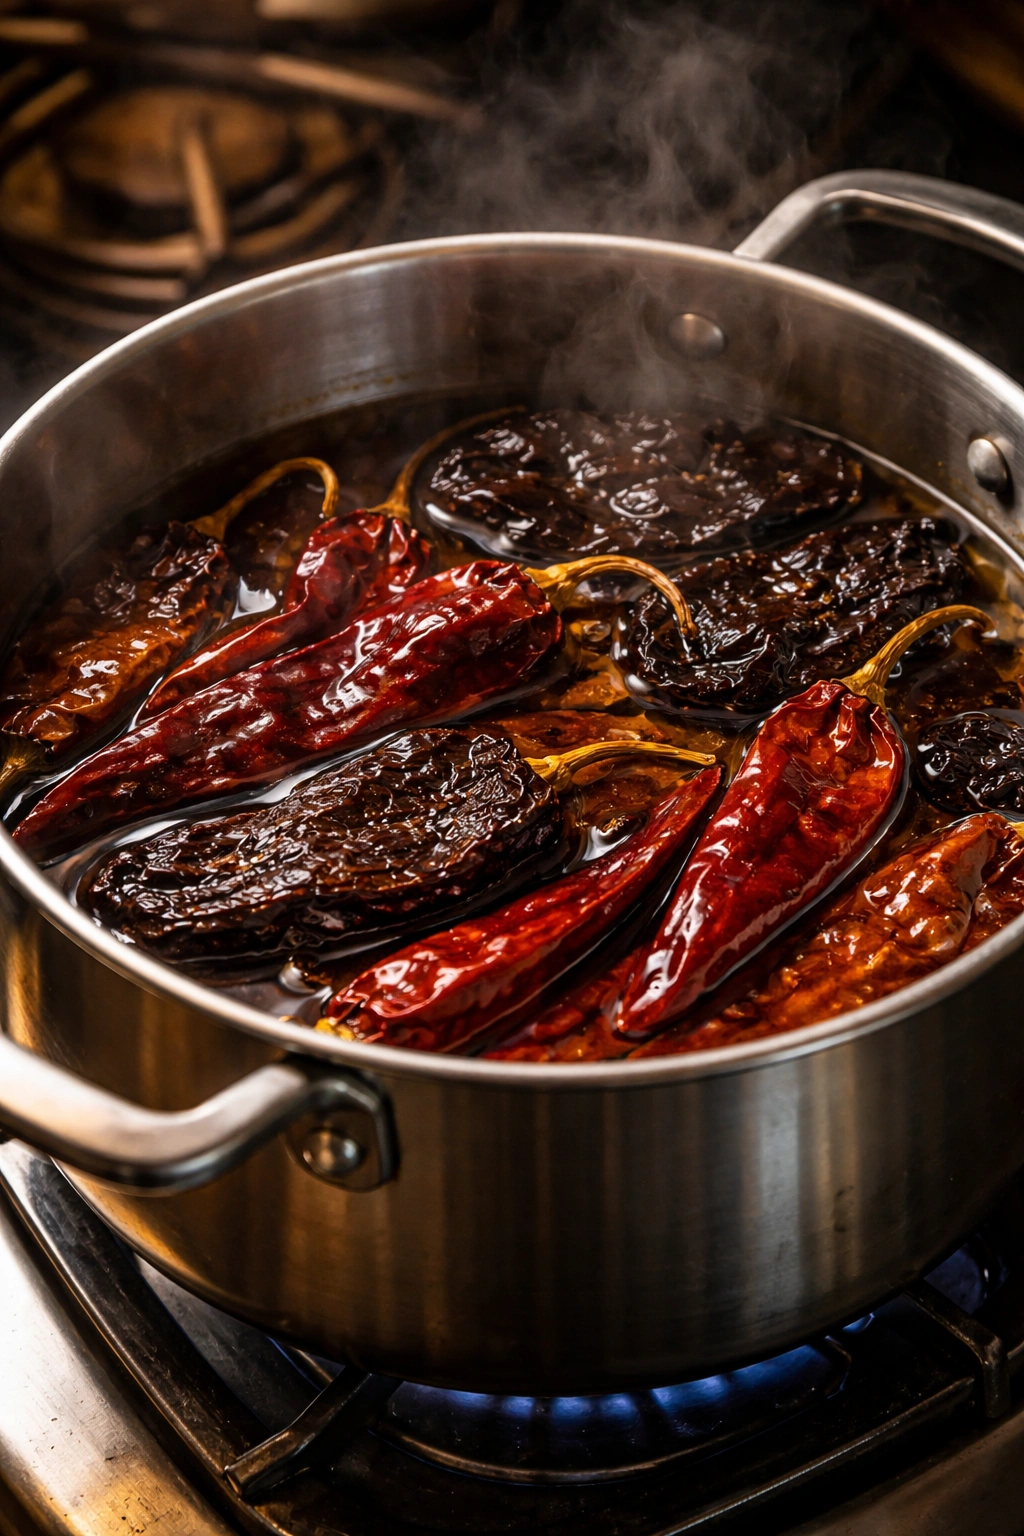
The sauce is where birria’s personality lives. Start by bringing a large pot of water to a boil, then remove it from heat. Add your dried guajillo and ancho chiles, letting them soak for about 15 minutes until they’re soft and pliable. While they soak, prep your aromatics—roughly chop your white onion, peel garlic cloves, and quarter your tomatoes. The chiles should cool enough to handle, at which point you can trim the stems and shake out the seeds over the sink. Leave some seeds if you want more heat, remove them all for a milder sauce.
Drain the chiles, reserving about 1.5 cups of the soaking liquid. Transfer the softened chiles to a blender along with that reserved liquid, your onion, garlic, tomatoes, and any chipotle peppers you’re using. Add about 1 cup of beef broth, then blend on high until the mixture is completely smooth. This takes a few minutes—you want no visible chile skin or chunks. A higher-powered blender will give you a silkier sauce, but a standard blender works fine. If you notice big particles remaining, you can strain the sauce through a fine-mesh sieve afterward, though it’s not necessary.
Transfer your blended sauce to a medium saucepan and add your whole spices: cumin seeds, coriander seeds, black peppercorns, cloves, a bay leaf, and your cinnamon stick or ground cinnamon. Add apple cider vinegar and bring the mixture to a boil, then reduce to a gentle simmer. Let it cook uncovered for about 15-20 minutes, stirring occasionally to prevent scorching. The sauce should smell deeply fragrant—warm and slightly spicy, with fruity and earthy undertones coming through. Taste and adjust salt and any other seasonings. This is your moment to fine-tune—if it’s too spicy, you can add a touch of brown sugar to balance. If it tastes flat, a pinch more salt or vinegar wakes it up.
At this point, you can make the sauce ahead and store it in the fridge for several days or freeze it for up to three months. Having sauce already made is a game-changer when you want to make birria tacos without the full commitment of a 3+ hour cooking session. When you’re ready to move forward, you have your foundation.
Preparing and Braising the Beef
Pat your beef dry with paper towels and season it generously all over with kosher salt and freshly ground black pepper. The salt helps the meat retain moisture during braising and seasons it throughout. If you have time, let the seasoned meat come to room temperature for about 30 minutes—this helps it brown more effectively and cook more evenly.
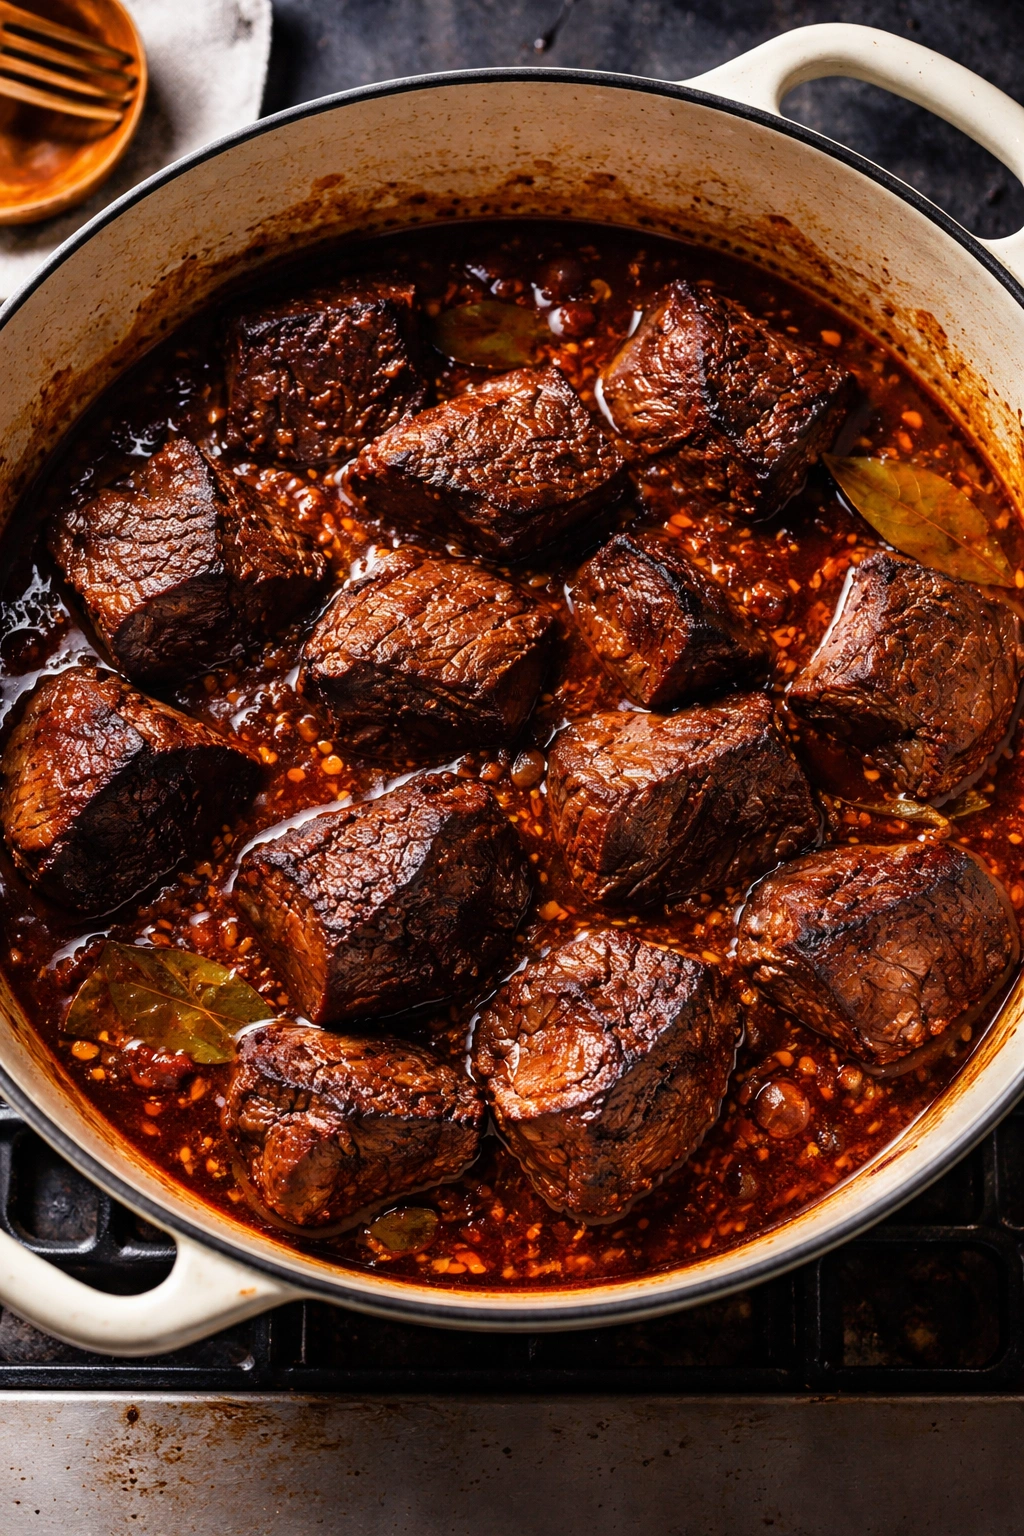
Heat a large Dutch oven or heavy pot with an oven-safe lid over medium-high heat. Add a small amount of neutral oil (avocado or vegetable oil works well). When it’s shimmering, begin searing your meat in batches, working in a single layer and not crowding the pot. You want a deep brown crust on all sides—this develops flavor through the Maillard reaction. Each batch takes about 3 minutes per side depending on the thickness of your pieces. Transfer finished meat to a bowl and repeat with remaining pieces. Don’t rush this step; the browning matters.
Once all meat is seared, pour your prepared adobo sauce over it in the pot. Add another cup of beef broth to the blender and swish it around to pick up any sauce that stuck to the blender walls, then add that to the pot as well. The liquid should come about halfway to three-quarters up the meat—you want enough to braise properly but you’re not making a soup.
Bring the mixture to a gentle simmer over medium heat, then cover the pot and transfer it to a preheated 300°F (150°C) oven. Let it braise for about 3 to 3.5 hours. After about an hour and a half, you might peek in and give it a stir, breaking up any meat that’s clumped together. The meat is ready when it shreds easily with a fork—there should be virtually no resistance. If you’re using a slow cooker instead, cook on low for 8-9 hours or high for 4-5 hours until the meat is fall-apart tender. The oven method gives you more control and tends to produce slightly deeper flavor, but slow cookers work perfectly well and are wonderful if you want hands-off cooking.
Creating the Perfect Consomé for Dipping
Once your meat is tender, carefully remove it from the pot and transfer it to a cutting board. Working with two forks—one to hold the meat and one to shred—tear the meat into bite-sized pieces. Discard any large bones or excess fat pieces, though some fat left in the meat is desirable for flavor and texture.
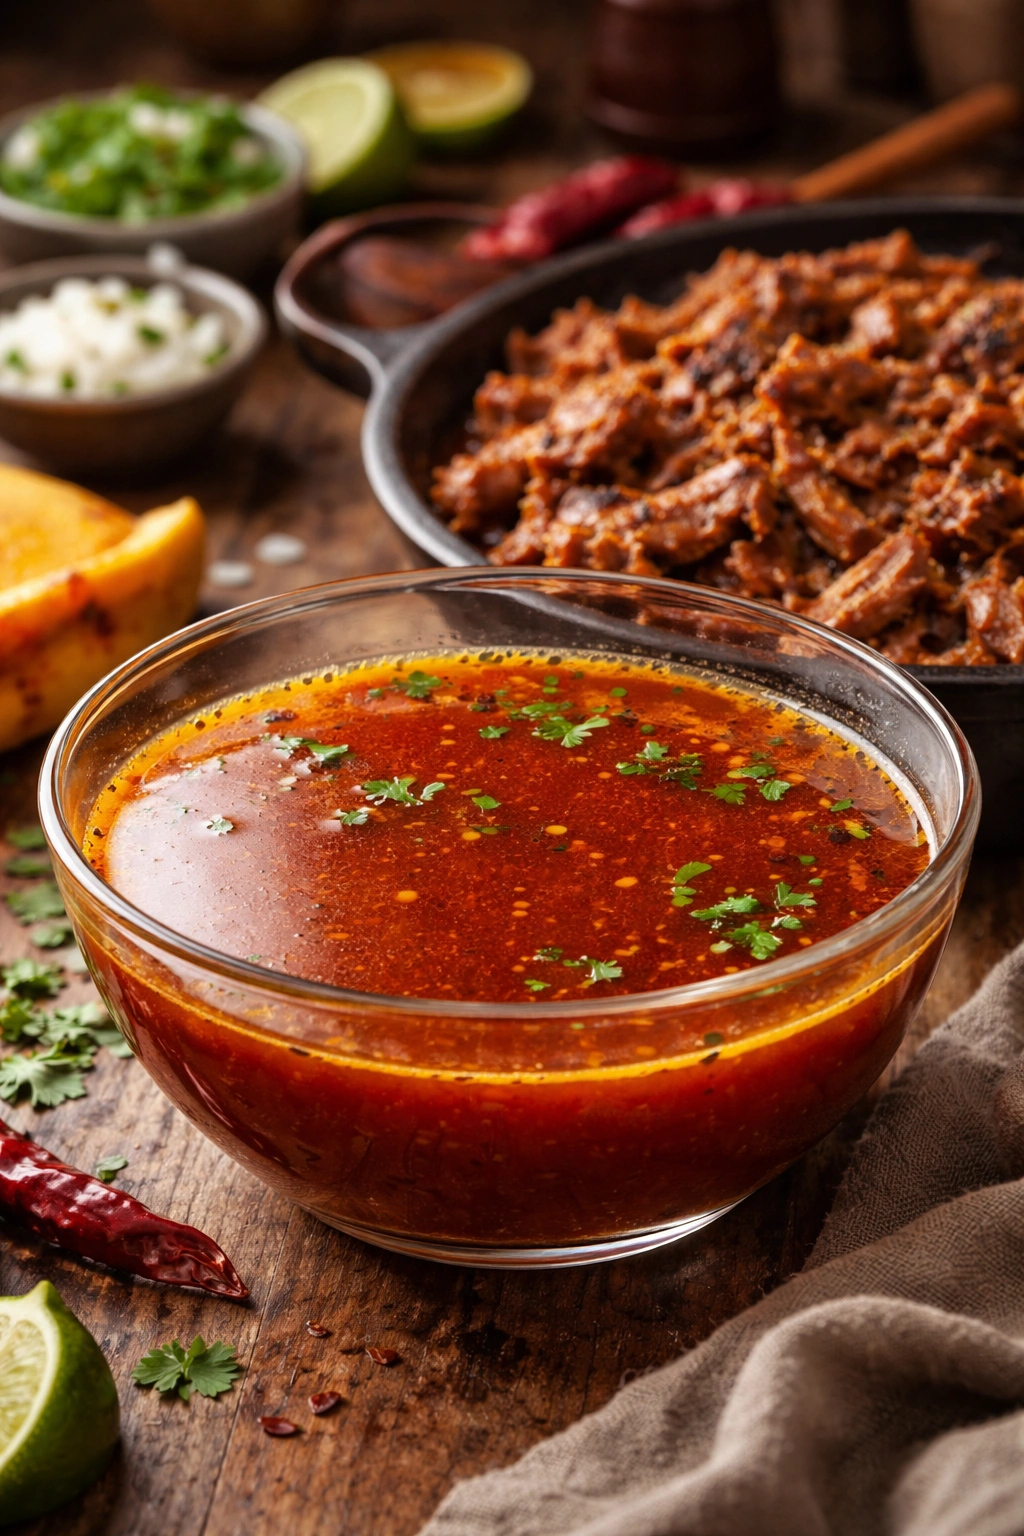
Now you have the braising liquid left in the pot, which will become your consomé. This liquid has absorbed all the flavors from the meat and spices during cooking, and it’s thinner and brothier than the original sauce. The top layer will have fat that has rendered from the meat—this is exactly what you want for dipping the tortillas. Don’t skim it off.
Ladle some of the consomé into a separate bowl or container—this will be your dipping broth. If it seems too thick, thin it slightly with additional beef broth. You want it pourable but flavorful. Some people like to add fresh cilantro and diced white onion to the consomé at this point, mixing in lime juice and salt to create a more complete seasoning. This is optional but adds nice freshness against the rich meat and melted cheese.
The consomé improves with time. If you made your birria a day or two ahead, refrigerate it as is—the fat will solidify on top, making it easy to remove for frying if you prefer a cleaner dip. Or you can reheat everything together when you’re ready to make tacos. The consomé freezes beautifully in ice cube trays, giving you little flavor bombs to add to soups, rice, or braised vegetables later.
Dipping and Assembling Your Tacos
Before you start the taco assembly, warm your tortillas so they’re pliable and won’t tear. Wrap a stack of them in a damp paper towel and microwave for about 10-30 seconds depending on how many you’re warming. Let them rest for another 10-30 seconds to distribute the heat evenly. Warm tortillas are soft and flexible; cold tortillas are brittle and will crack when you try to fold them.
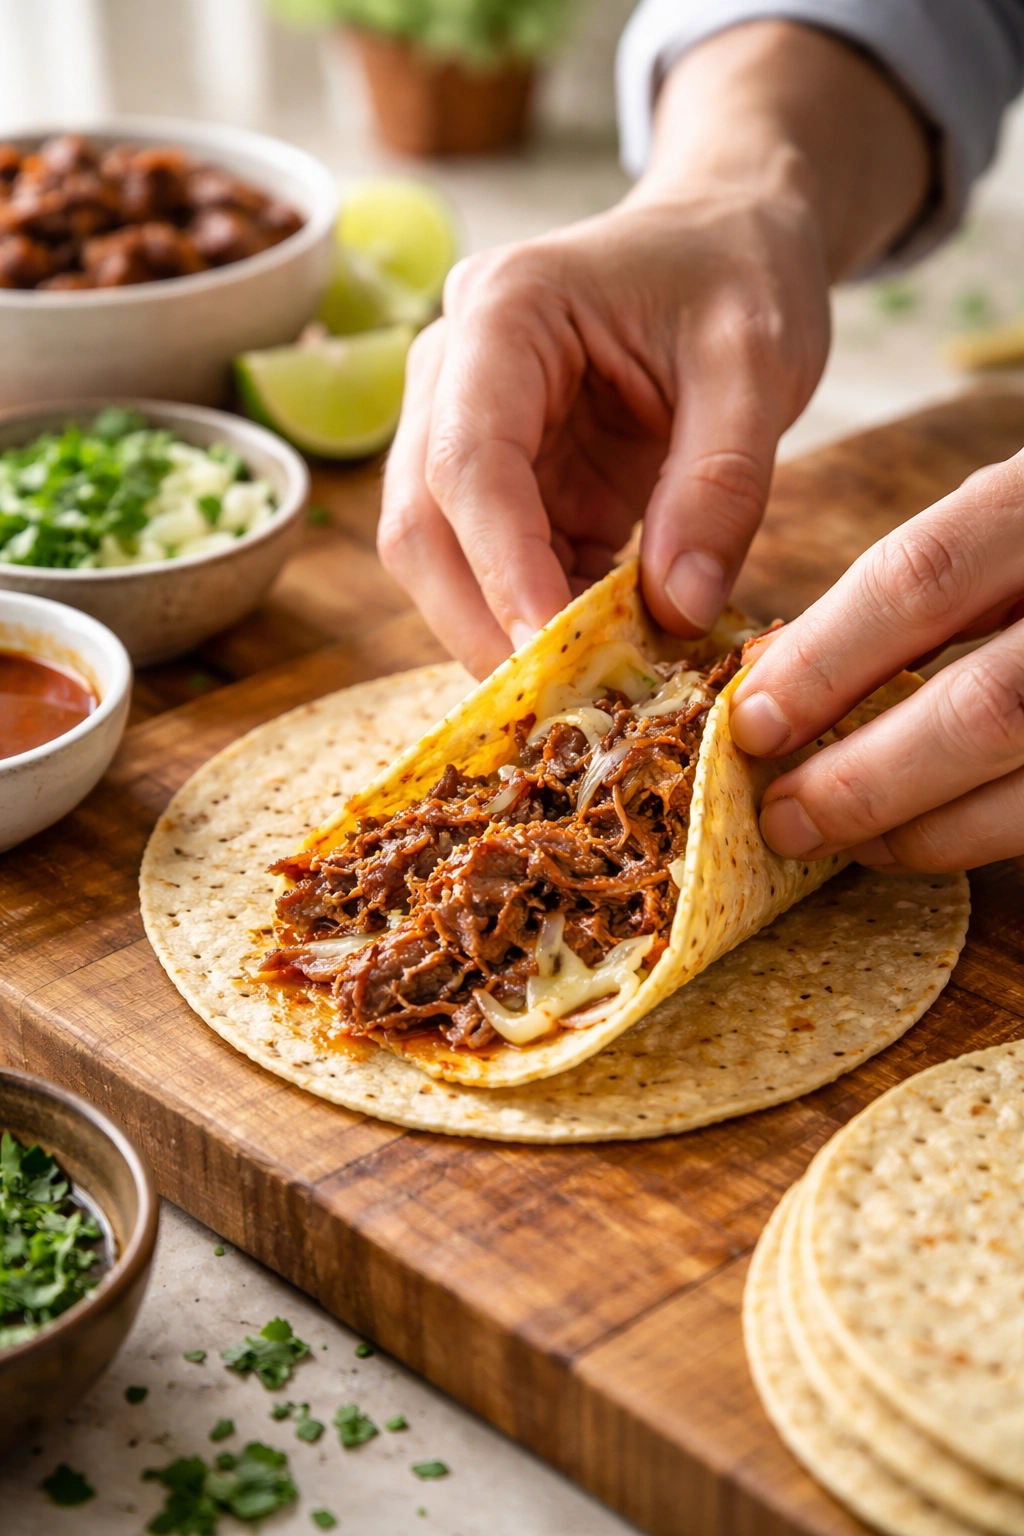
Pour your consomé into a shallow bowl or wide dish—something that gives you easy access to dip tortillas in. Have your shredded beef, shredded cheese, minced white onion, and chopped cilantro all prepped and in separate bowls nearby. Set up your workspace so everything is within arm’s reach. Frying tacos is a rhythm, and you want to move efficiently.
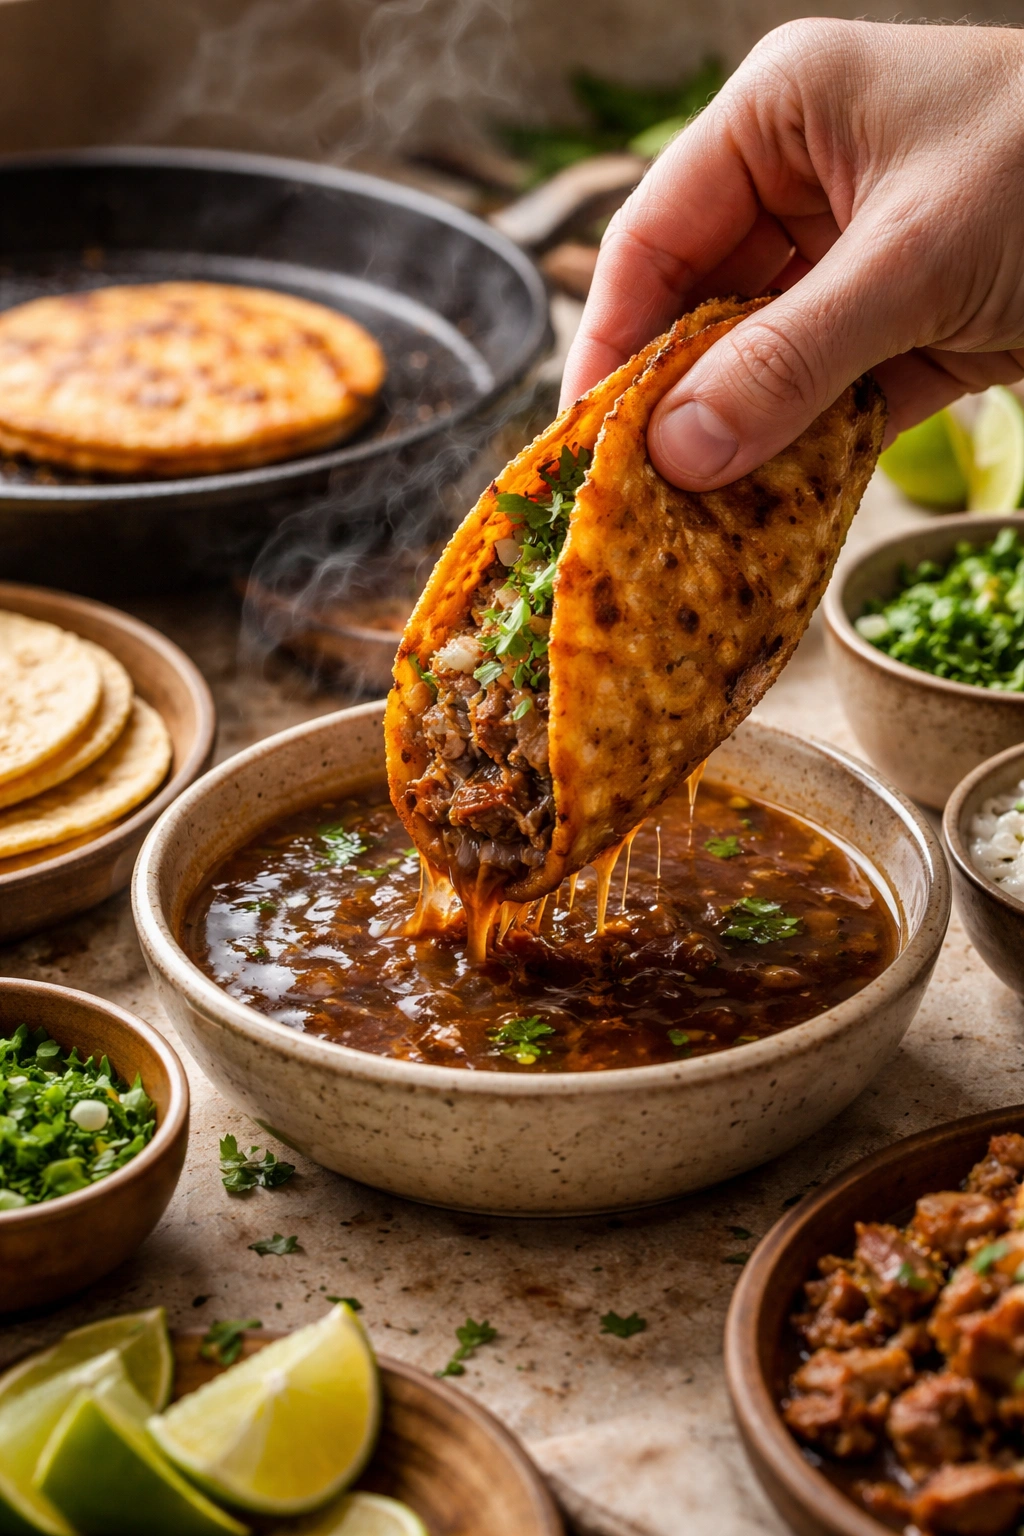
Get a large non-stick skillet or griddle heating over medium heat. You don’t need to add oil if you’re going to dip the tortillas in the consomé because there’s enough fat in the broth to cook with. Take one warm tortilla and quickly dip both sides into the consomé—you want them wet but not dripping. Place the dampened tortilla in the skillet and let it cook for about 30 seconds, then flip it. Now, on one half of the tortilla, add a small handful of shredded beef, a pinch of cheese, a little onion, and a few cilantro leaves. Fold the tortilla in half to create a half-moon shape. Cook for another minute or so, pressing gently with a spatula so the cheese melts and both sides of the tortilla get golden and crispy.
The timing is crucial here. Too short and the cheese won’t melt and the tortilla won’t crisp. Too long and the tortilla becomes brittle and breaks. You’re looking for golden-brown color and a crispy texture with a slight give when you bite in. The exterior should be crunchy, the interior tender.
Frying the Tacos to Crispy Perfection
As each taco finishes cooking, transfer it to a serving plate or a baking sheet in a warm oven (about 200°F) to keep it warm while you work through the rest. The residual heat keeps everything at the perfect temperature without drying anything out. Keep your rhythm going—dip, lay down, flip, fill, fold, cook. It becomes almost meditative once you get into the flow.
The magic moment is the one right when you pull a taco out of the skillet. The tortilla is steaming, the cheese is melting, and if any filled it overflowed during cooking, you’ve got those beautiful crispy, melted bits on the outside that add textural interest. Don’t worry if they look slightly messy—that’s actually the sign you’ve nailed it.
The number of tacos you can make from your birria depends on how generously you fill them. Typically, a batch using 3-4 pounds of raw beef yields about 16-20 finished tacos. Plan for 3-4 tacos per person as an entree, or 2-3 if you’re serving sides.
Common Mistakes and How to Avoid Them
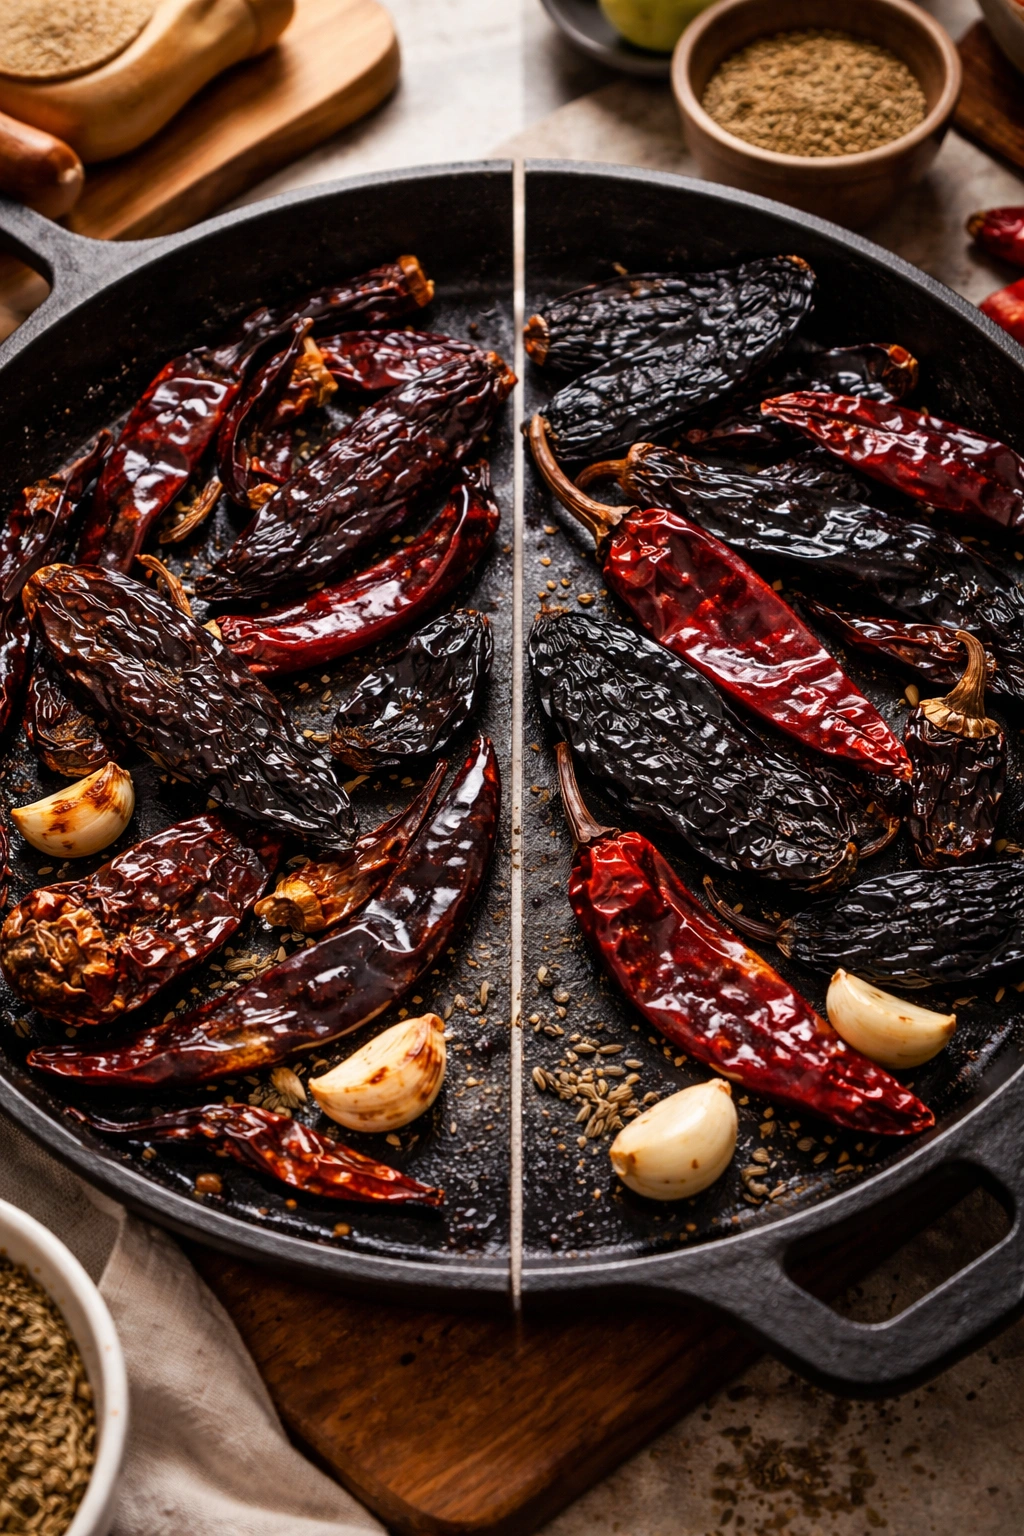
The most frequent error is not toasting the dried chiles before blending. Raw dried chiles make decent sauce, but toasted chiles make exceptional sauce. If your dried chiles are a bit stale, you can quickly toast them in a dry skillet over medium heat for just 30 seconds per side before soaking—this wakes up the flavors. Don’t let them burn though; you want warm and fragrant, not charred.
Another mistake is under-seasoning the initial adobo sauce. The sauce tastes like it might be too salty when you taste it alone, but remember it’s about to braise meat for hours. The meat absorbs and dilutes the salt, so you need to start with confident seasoning. Always taste and adjust after the initial cooking is done.
Skipping the searing step on the beef is tempting since it requires extra dishes, but those browned bits add huge flavor. Even if you’re using a slow cooker method, consider searing the meat in a separate skillet first. The time investment is small compared to the flavor payoff.
Over-filling the tacos is another common trap. It’s tempting to load them up, but too much filling makes them impossible to handle and hard to eat. A small handful of meat, just enough cheese to coat, and a sprinkle of toppings gives you the ideal ratio of crispy shell to juicy filling.
Not warming the tortillas before dipping causes them to tear. Cold tortillas are rigid; warm tortillas are cooperative. Spend 30 seconds warming them and you save yourself frustration later. If you’re still having tearing issues, you can double up tortillas—dip two together as one—and nobody will complain about extra tortilla.
Using cheese that doesn’t melt well creates disappointment. Pre-shredded supermarket cheese often contains additives that prevent proper melting. Buy a block and shred it yourself if you can, or at least check the ingredients and choose a brand made for melting. Oaxaca cheese is ideal because it’s specifically designed for this purpose.
Delicious Variations Worth Trying

Chicken birria tacos are a lighter alternative that cooks much faster. Use bone-in, skin-on chicken thighs instead of beef and reduce the braising time to 45 minutes to an hour. Chicken absorbs the adobo sauce beautifully and shreds even easier than beef. The flavor is lighter but still deeply satisfying, making it great for lunch or if you’re cooking for people who prefer poultry.
Pork birria tacos are another excellent direction. A pork shoulder or Boston butt develops wonderful flavor when braised in the same adobo sauce. Pork is naturally fatty, which means the finished consomé will be rich and flavorful. Cook for about 7-8 hours on low in a slow cooker since pork takes slightly longer than beef to reach ideal tenderness.
For those who want to skip the frying entirely, you can make soft birria tacos by simply filling warm tortillas with shredded meat and cheese without dipping and cooking them. Serve these alongside bowls of warm consomé for dipping. It’s simpler, less hands-on, and lets the pure flavors of the filling shine without the crispy textural element. It’s birria tacos’ elegant sister.
Birria ramen is a brilliant use of leftover birria. Prepare your favorite instant or fresh ramen noodles according to package directions, but use your consomé instead of the broth packet or use a combination of the two. Top with shredded birria, a soft-boiled egg, fresh cilantro, diced onion, and whatever vegetables you like. The crispy fried tortilla shell topping this bowl somehow works perfectly. It’s comfort food elevated.
A “quesabirria” version adds even more cheese—extra Oaxaca or mozzarella shredded inside the tortilla with the meat before frying. The cheese that melts out and crisps on the exterior becomes almost crackly and delicious. If you love cheese, this is your variation.
Storage, Freezing, and Make-Ahead Tips
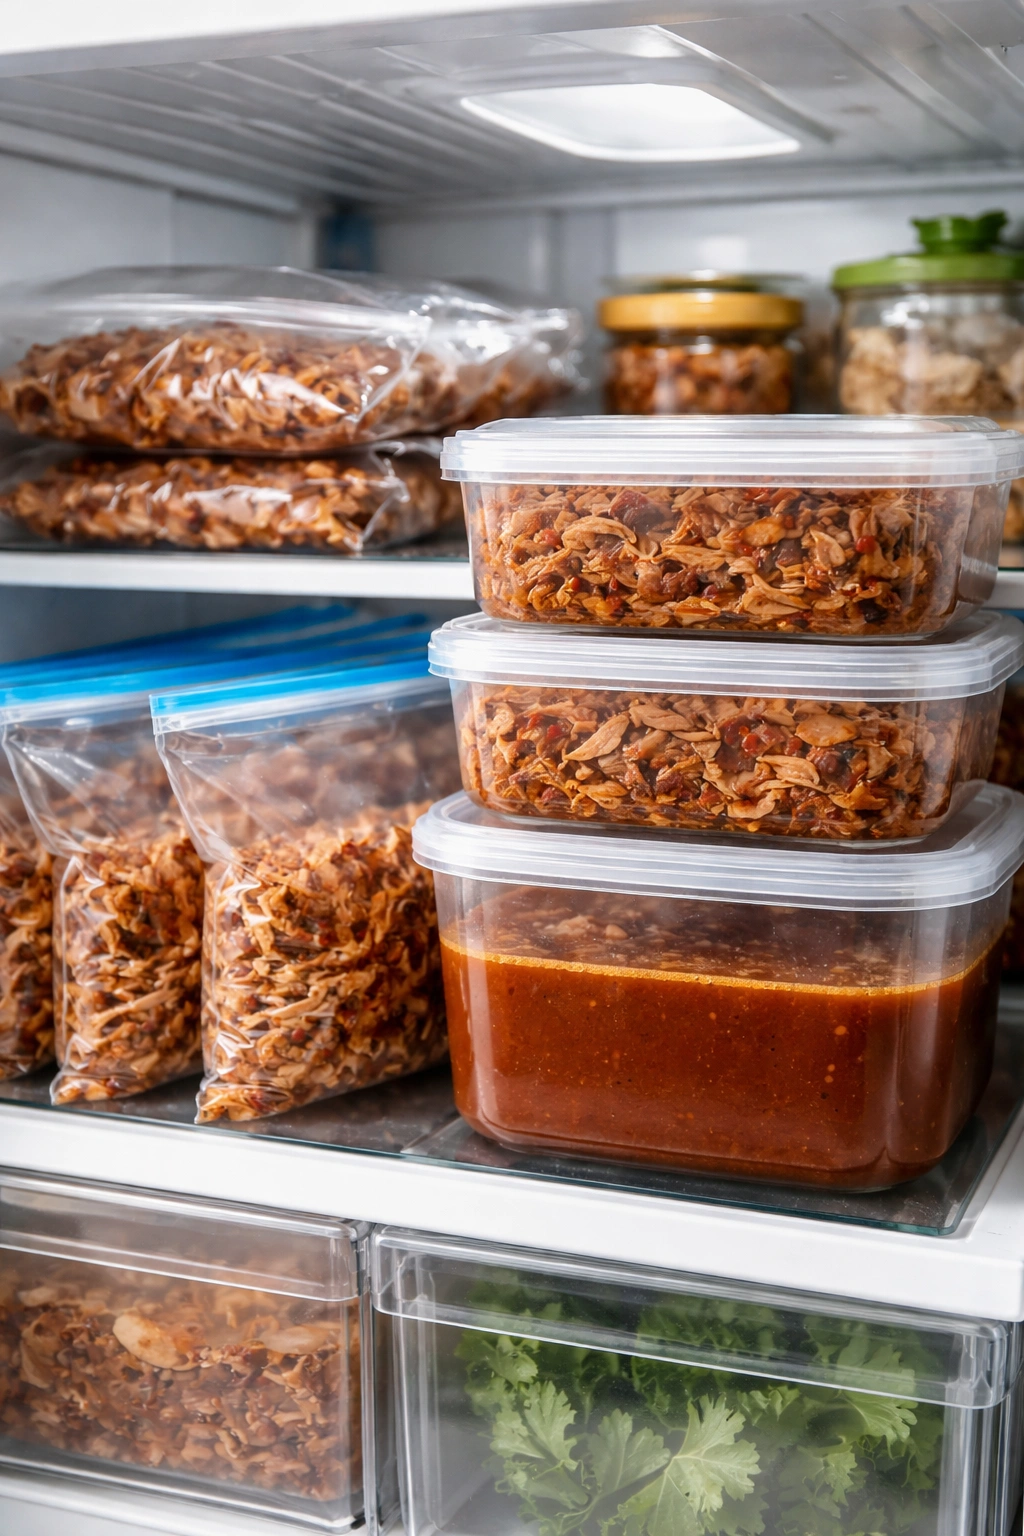
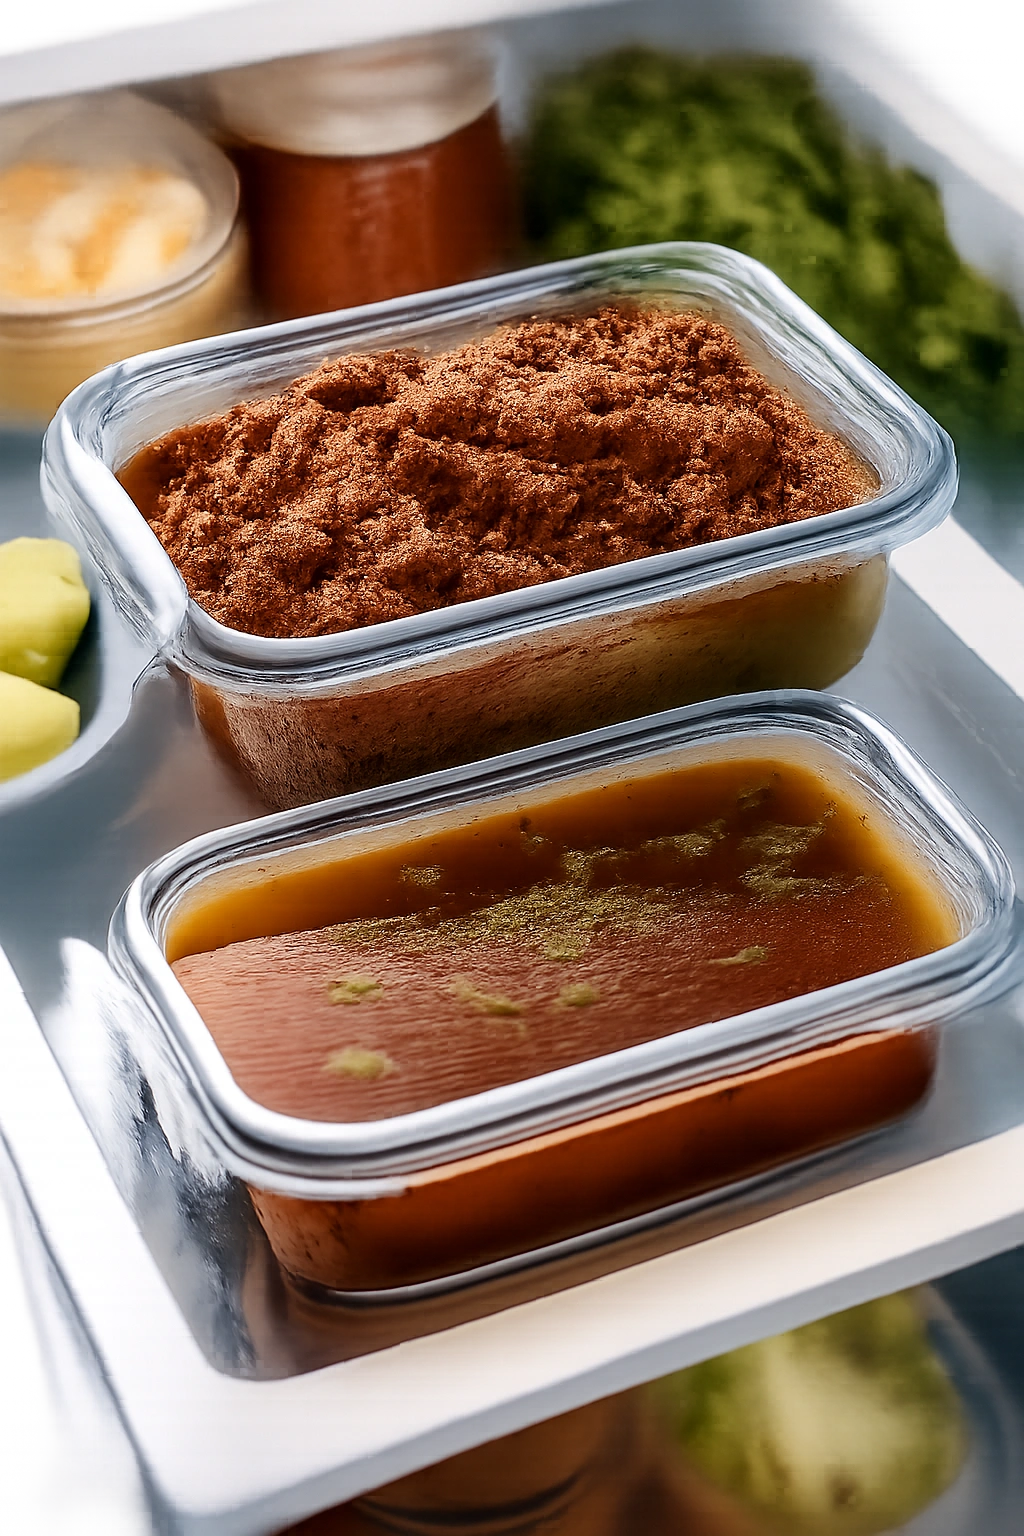
The beauty of birria is how well it keeps and freezes. You can make the entire thing several days ahead, store it in the fridge, and assemble tacos whenever you want them. The flavors actually deepen over time as everything melds together. Store the shredded meat and consomé together in an airtight container in the fridge for up to four days. The fat will solidify on top when cold—you can scoop some of this off to use for frying the tortillas if you prefer, or just reheat everything together.
For longer storage, freeze the birria in freezer-safe containers or heavy-duty freezer bags for up to three months. You can freeze the meat and consomé together or separately. When you’re ready to use it, thaw overnight in the fridge and reheat gently on the stovetop over low heat, stirring occasionally. Don’t blast it with high heat or the meat can become tough.
The consomé also freezes beautifully in ice cube trays. Once frozen, pop the cubes into a freezer bag and label them. These are wonderful for adding instant depth to soups, bean dishes, rice, or braised vegetables. One little cube adds so much flavor to an otherwise plain side dish.
For maximum convenience, make the adobo sauce on one day and store it in the fridge or freezer. On another day when you have a few hours, braise the meat in that sauce. On yet another day when you want fresh tacos, pull everything out and assemble. Breaking the process into chunks makes a seemingly large project feel very manageable.
What to Serve Alongside Your Birria Tacos
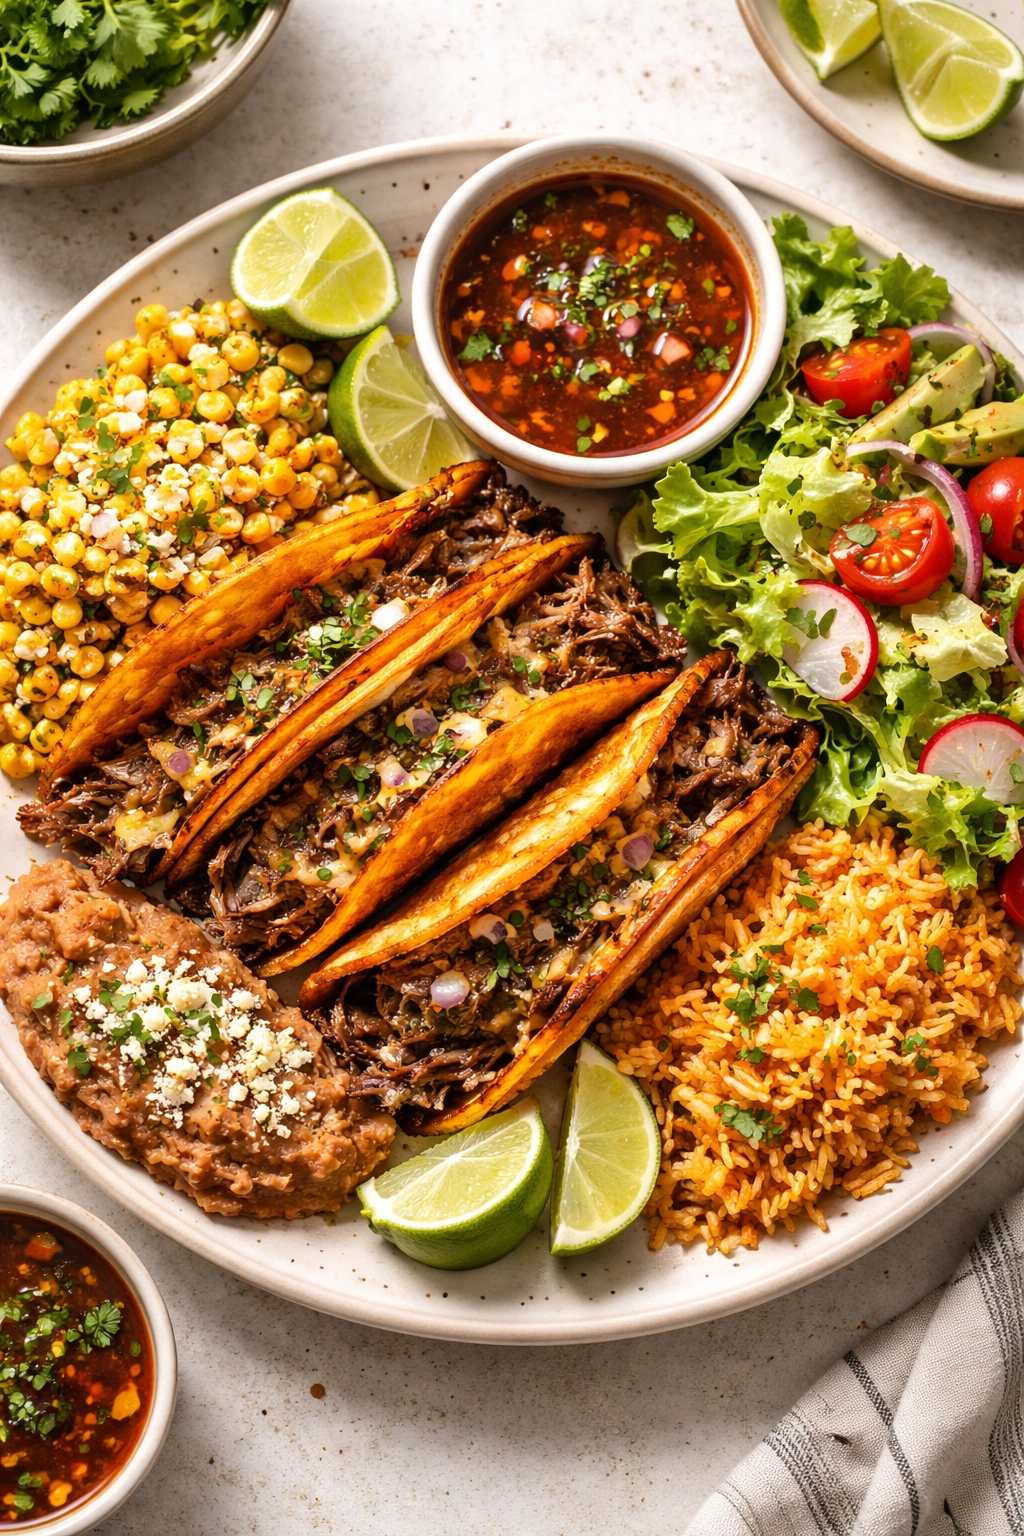
Birria tacos are rich and flavorful, so sides should be bright, fresh, and lighter. Mexican street corn is a classic pairing—charred corn tossed with Mexican crema, cotija cheese, lime, and chili powder. The richness of the corn and the spicy kick complement the deep, savory tacos perfectly.
Mexican rice made with tomato and chicken broth adds substance without heaviness. Keep it simple so it doesn’t compete with the main event. Refried beans are traditional—creamy and earthy, they provide a textural contrast to the crispy tacos.
Fresh salsa—either pico de gallo or a more liquid salsa made from blended tomatoes, onion, cilantro, lime, and chiles—adds brightness and cuts through the richness. Pickled onions and pickled jalapeños are excellent for adding acidity and extra spice.
A simple green salad with lime vinaigrette works beautifully if you want something cold and refreshing. Jicama slaw with lime and chiles adds crunch. Fresh lime wedges should always be available—squeezing lime over tacos right before eating brightens everything.
For beverages, cold Mexican beer is traditional and pairs beautifully. Agua fresca—a refreshing drink made from fruit, water, and a touch of sugar—balances the rich, spicy flavors. Watermelon agua fresca is particularly good.
Final Thoughts

Making birria tacos from scratch isn’t difficult—it’s just a matter of time and attention. The actual hands-on work comes down to browning meat, blending sauce, and frying tacos. Everything in between is your oven or slow cooker doing the heavy lifting while you go about your day. By the time those crispy, cheesy, beef-filled tacos are hitting your skillet and filling your kitchen with their amazing aroma, you’ve already done most of the work.
What you get in return is restaurant-quality food that costs a fraction of what you’d pay for store-bought or food truck versions. More importantly, you get to taste birria made exactly the way you like it—with as much spice as you want, with the quality of beef you choose, and with cheese melting into every crevice. Once you’ve made them, those frozen containers of birria in your freezer become some of your most valuable kitchen resources, ready to transform into tacos, ramen, or rice bowls anytime the mood strikes.
The tradition of birria stretches back centuries, and the innovation of putting it in a taco is relatively recent. Yet something about that combination—braised meat, spiced sauce, crispy shell, melted cheese—feels timeless. When you make it yourself, you’re not just preparing dinner. You’re participating in a food tradition that’s evolved and adapted based on what people in different times and places had available. Your version, with your choices and your care, is just as valid and worthwhile as any that came before it.
Yield: Makes 16-20 tacos | Serves 4-5 as a main course
Prep Time: 20 minutes (plus time for chiles to soak)
Cook Time: 3 to 3.5 hours (oven method) or 8-9 hours low (slow cooker method)
Assembly Time: 15-20 minutes
Total Time: 3.5-4 hours active (or 8.5-9.5 hours if using slow cooker)
Difficulty: Intermediate — The process involves several steps and requires patience for braising, but each step is straightforward and requires no special culinary skills. The most important factor is not rushing the braising time and taking care to sear the meat properly.
Ingredients
For the Adobo Sauce:
- 6 dried guajillo chile peppers, rinsed, stems and seeds removed
- 4 dried ancho chile peppers, rinsed, stems and seeds removed
- 2-3 dried arbol chiles, rinsed, seeds removed (optional, for extra heat)
- 1 white or yellow onion, peeled and roughly chopped
- 6 garlic cloves, peeled
- 4 Roma tomatoes, quartered (or 3 tablespoons tomato paste)
- 1 tablespoon whole black peppercorns
- 1 teaspoon cumin seeds
- 1 teaspoon coriander seeds
- ¼ teaspoon whole cloves
- ½ inch piece of Mexican cinnamon stick (or ⅛ teaspoon ground cinnamon)
- 1 teaspoon dried Mexican oregano
- 2 bay leaves
- 2 tablespoons apple cider vinegar or white vinegar
- 1 cup beef broth (in addition to braising liquid)
- 1 teaspoon kosher salt (adjust to taste)
- ½ teaspoon brown sugar (optional, to balance spice)
For the Beef Birria:
- 2-3 pounds beef chuck roast, cut into 3-inch pieces
- 1-2 pounds beef short ribs or beef shank (optional, for depth of flavor)
- 3 cups beef broth (additional to sauce)
- 2 tablespoons neutral oil (avocado or vegetable)
- Kosher salt and freshly ground black pepper for seasoning
For Assembling the Tacos:
- 16-20 small corn tortillas (street-style taco size)
- 2 to 3 cups shredded Oaxaca cheese (or fresh mozzarella, Monterey Jack, or queso fresco)
- ½ white onion, finely minced, for garnish
- 1 cup fresh cilantro, chopped
- 2 limes, cut into wedges
- Additional consomé broth for dipping (see instructions)
Optional Garnishes and Accompaniments:
- Mexican crema or sour cream
- Pickled onions
- Pickled jalapeños
- Fresh salsa or pico de gallo
- Guacamole
Instructions
Prepare the Dried Chiles:
-
Bring a large pot of water to a boil and remove from heat. Add the guajillo and ancho chile peppers, fully submerging them. Let them soak for 12-15 minutes until soft and pliable. If using arbol chiles, add them to the soaking water as well.
-
Once the chiles have cooled enough to handle (still warm), carefully trim the stem end with kitchen shears and gently shake out the seeds over the sink. Reserve approximately 1½ cups of the soaking liquid and discard the remainder. Set the softened chiles aside.
Make the Adobo Sauce:
-
In a separate medium pot, combine the tomatoes (or tomato paste), roughly chopped onion, garlic cloves, the soaked chiles, whole black peppercorns, cumin seeds, coriander seeds, cloves, Mexican cinnamon stick, Mexican oregano, and bay leaves. Cover everything with cold water until just submerged.
-
Place the pot over medium heat and bring to a gentle simmer. Cook uncovered for 12-15 minutes, stirring occasionally, until the tomatoes and chiles are very soft and the spices become fragrant. You’re looking for deep aroma and visible softening of all the solids.
-
Drain through a fine-mesh strainer, reserving about 1½ cups of the cooking liquid. Transfer all the solids (chiles, tomatoes, spices, garlic, onion) to a blender. Add the reserved soaking liquid, 1 cup of beef broth, and the apple cider vinegar.
-
Blend on high speed for 2-3 minutes until the mixture is completely smooth. You should see no visible chile skin or spice particles—the texture should resemble a thick tomato sauce. If your blender is struggling or the sauce seems gritty, you can pass it through a fine-mesh strainer afterward, though this is optional if you have a high-powered blender.
-
Pour the blended adobo sauce into a medium saucepan. Bring to a boil over medium-high heat, then immediately reduce to a low simmer. Simmer uncovered for about 15 minutes, stirring occasionally to prevent sticking on the bottom. The sauce should smell deeply aromatic—warm, slightly spicy, with fruity and earthy undertones. Taste and adjust salt to your preference. If the sauce tastes too spicy, add ½ teaspoon of brown sugar. If it tastes flat, add a pinch more salt or vinegar. Set aside.
Prepare and Sear the Beef:
-
Pat all the beef pieces dry with paper towels. Season them generously on all sides with kosher salt and freshly ground black pepper. If you have time, let the seasoned beef come to room temperature for about 30 minutes before searing—this helps develop a better crust.
-
Place a large Dutch oven or heavy pot with an oven-safe lid over medium-high heat. Add the neutral oil and let it heat until it shimmers and just begins to smoke slightly.
-
Working in batches to avoid crowding the pot, place the beef pieces in a single layer and let them brown undisturbed for about 3 minutes. Flip each piece and brown the other side for another 3 minutes. Do not move the meat around—let it develop a deep brown crust. Transfer the seared meat to a bowl and repeat with remaining pieces until all beef is browned.
Combine and Braise the Meat:
-
Once all the beef is seared, return it to the Dutch oven. Pour the prepared adobo sauce over the meat. Add 1 cup of beef broth to the now-empty blender, swirl it around to pick up any sauce clinging to the sides, and pour this liquid back into the pot with the meat.
-
The braising liquid should come about halfway to three-quarters of the way up the sides of the meat. Add a bit more beef broth if needed to achieve this level—you’re making a braise, not a soup, so don’t submerge everything completely.
-
Place the pot over medium heat and bring the contents to a gentle simmer. Do not boil; a gentle simmer is essential. Cover with the lid and transfer to a preheated 300°F (150°C) oven.
-
Braise for 3 to 3½ hours until the beef shreds easily with a fork and shows virtually no resistance. After about 1½ hours of cooking, you can open the oven and give everything a gentle stir, making sure nothing is sticking to the bottom. The meat should be completely fall-apart tender by the end, and the braising liquid should have deepened in color and developed incredible aroma.
Shred the Meat and Prepare Consomé:
-
Carefully remove the pot from the oven (use heat-safe mitts—it’s extremely hot). Transfer the shredded beef to a large cutting board. Working with two forks—one to hold the meat and one to shred—tear the beef into bite-sized pieces. Discard large bones, but leave some of the rendered fat mixed with the meat for flavor.
-
The remaining braising liquid in the pot is your consomé. You should notice fat separated on the top—this is exactly what you want for dipping the tortillas and adds essential richness. The liquid should be thinner and more brothy than the original sauce due to the meat juices and collagen that have rendered into it.
-
Carefully ladle some of the consomé into a separate serving bowl, making sure to include some of the fat from the top. This becomes your dipping broth. If the consomé seems too thick, thin it slightly with additional warm beef broth until it reaches a pourable consistency. Taste and adjust seasoning. You can add fresh minced cilantro, diced white onion, and a squeeze of lime juice to the dipping consomé if desired.
Prepare for Assembly:
-
Set up your assembly station: shredded beef, shredded cheese, minced white onion, chopped cilantro, and lime wedges each in their own bowl. Pour consomé into a shallow wide dish for easy tortilla dipping. Have a large non-stick skillet or griddle ready to use.
Advertisements -
Wrap corn tortillas in a damp paper towel and microwave for 10-30 seconds depending on how many you’re warming. Let them rest for another 10-30 seconds for heat to distribute evenly. Warm tortillas are pliable and flexible; cold tortillas will crack and tear.
Fry the Tacos:
-
Heat a large non-stick skillet over medium heat. You do not need to add oil since the consomé has enough fat, but you can add a small amount if desired.
-
Take one warm tortilla and quickly dip both sides into the consomé—just a quick dip, not a long soak. The tortilla should be moistened but not dripping or falling apart.
-
Place the dipped tortilla in the hot skillet and let it cook undisturbed for about 30 seconds, watching as it begins to crisp slightly and develop a light golden color on the bottom.
-
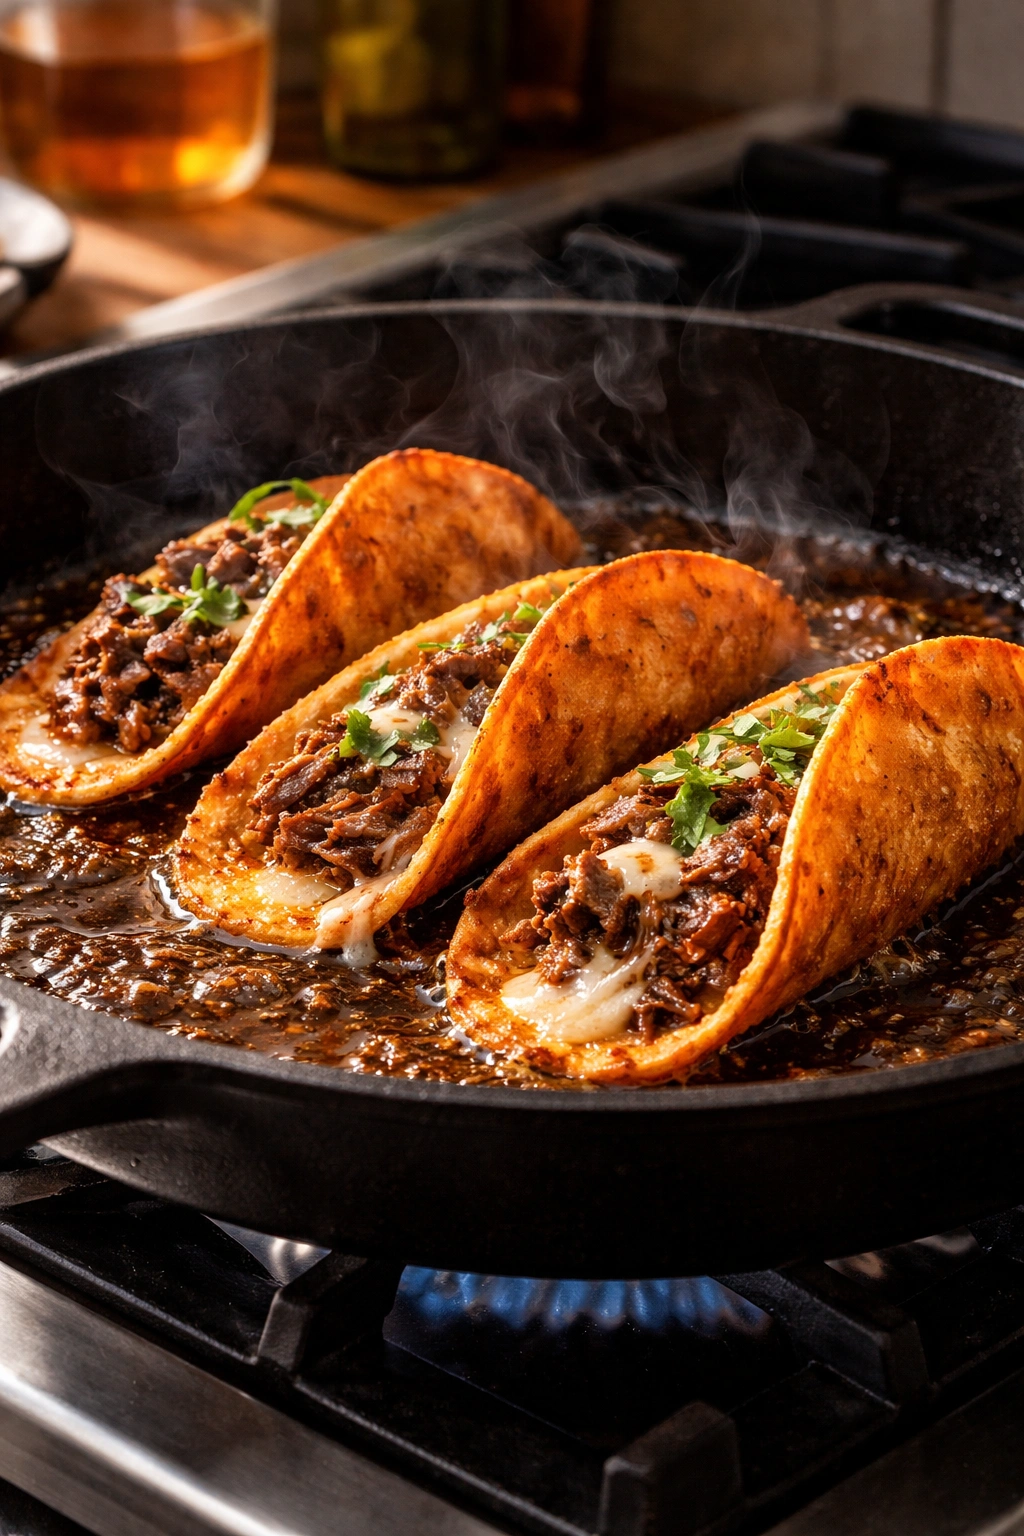
Flip the tortilla over and immediately add to one half: a small handful of shredded beef (about 1.5 ounces), a pinch of shredded cheese, a small pinch of minced white onion, and a few cilantro leaves. Do not over-fill—restraint creates better texture and prevents the taco from breaking apart.
-
Fold the tortilla in half over the filling to create a half-moon taco shape. Press down gently with a spatula to help compress everything and promote even cooking and melting.
-
Cook for 1-2 minutes until the bottom of the taco is golden and crispy, then flip carefully and cook the other side for another 1-2 minutes until that side is also golden and the cheese has visibly melted.
-
Transfer the finished taco to a serving plate or a baking sheet in a 200°F (95°C) oven to keep warm while you continue with remaining tacos.
-
Repeat the dipping, filling, and frying process with remaining tortillas. This rhythm—dip, lay, flip, fill, fold, cook—becomes nearly meditative once you find your pace.
Advertisements
Serve:
- Arrange the warm crispy tacos on a serving platter. Sprinkle additional minced white onion and fresh cilantro on top of each taco if desired. Serve immediately alongside small bowls of the warm consomé for dipping and lime wedges for squeezing over each bite.
Tips for Success
For the best flavor development: Don’t skip the searing step on the beef, even if you’re planning to use a slow cooker. Those browned bits are where incredible savory flavor lives. If your slow cooker has a sauté function, use it. Otherwise, brown the meat in a separate skillet first, then transfer to the slow cooker.
Tortilla temperature matters immensely: Cold, stiff tortillas will tear and frustrate you. Five minutes spent warming them saves you 10 minutes of wrangling. If you’re still experiencing tearing, try doubling up tortillas—dip and use two together as one.
Watch your filling ratio: It’s tempting to load tacos heavily, but restraint creates better tacos that are actually enjoyable to eat without falling apart. A small handful of meat, a sprinkle of cheese, and minimal toppings is the formula.
Taste and adjust the sauce: The adobo sauce tastes intensely flavored when you first make it—this is correct. It will balance out once it braises with the meat. However, after the meat is cooked, taste the finished consomé and adjust salt, spice, or acidity to your preference.
Use quality cheese that actually melts: Pre-shredded supermarket cheese contains anti-caking agents that prevent proper melting. Buy a block and shred it yourself, or choose a brand specifically labeled for melting and quesadillas.
The consomé’s fat is a feature, not a bug: That separated fat on top of the cooled consomé contains incredible flavor. Don’t skim it off—use it for dipping the tortillas. It’s essential to the final product.
Make it ahead: This recipe gets better after sitting overnight. The flavors meld and deepen. Make it on day one, refrigerate, and make tacos on day two for even more incredible results.
Freeze in portions: Portion leftover birria and consomé into meal-sized containers or freezer bags before freezing. This way you’re not thawing more than you need.
Common Mistakes to Avoid

Forgetting to toast stale dried chiles before soaking them is a missed opportunity for deeper flavor. If your dried chiles seem old or brittle, toast them in a dry skillet for 30 seconds per side before soaking.
Under-seasoning the initial adobo sauce is surprisingly common. The sauce tastes quite salty in isolation, but it’s about to braise bland meat for hours. Be confident with your salt. You can always adjust down later, but you can’t fully correct under-seasoning.
Over-filling the tacos makes them impossible to eat and prone to falling apart. A small handful of beef, a pinch of cheese, and minimal toppings is the professional formula.
Skipping the searing step saves dishes but costs flavor. Those browned bits are non-negotiable for depth.
Not warming tortillas before dipping makes everything harder. Cold tortillas crack. Warm tortillas are cooperative.
Trying to use cheese that doesn’t melt properly creates disappointment. Cheese matters here.
Boiling instead of gently simmering during braising can make meat tough. Low, slow heat is your friend.
Storage and Reheating
Finished birria tacos are best eaten fresh, with the tortilla still warm and crispy. However, if you have leftovers, they’ll keep refrigerated for one day. To reheat, place them in a skillet over medium heat for a minute or two per side to re-crisp the tortilla shell.
The shredded beef and consomé can be refrigerated separately in airtight containers for up to four days. The fat will solidify on top of the cold consomé—this is normal and desirable. You can reheat everything together gently on the stovetop over low heat, stirring occasionally, or reheat the meat in the microwave and the consomé on the stove.
For freezing, you can freeze the beef and consomé together in the same container or separately. Frozen birria keeps for up to three months. Thaw overnight in the refrigerator and reheat gently. The consomé also freezes beautifully in ice cube trays—once frozen solid, transfer the cubes to a freezer bag and label them. These little flavor bombs are wonderful additions to soups, rice, or braised dishes.