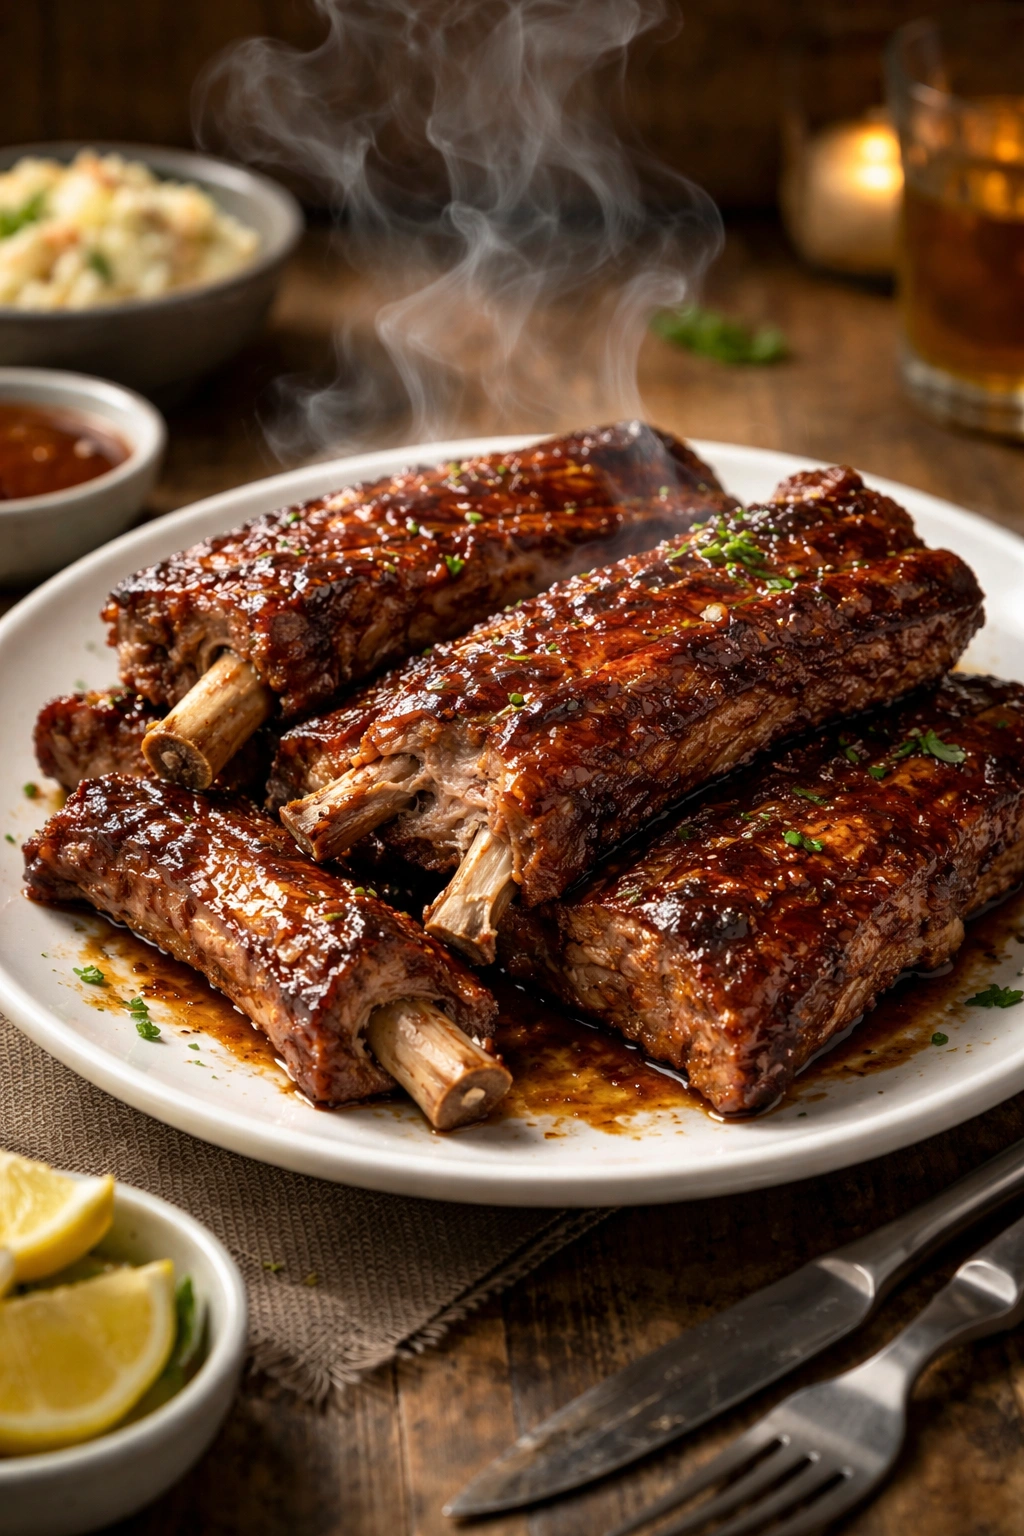
The most tender ribs you’ll ever make are waiting for you in your oven right now. Forget the grill, ignore the smoker, and put away your tongs—because the secret to fall-off-the-bone ribs that make people lose their minds isn’t complicated timing or expensive equipment. It’s low and slow baking wrapped in foil, and it works every single time. You’re looking at about three hours of mostly hands-off cooking, which means you can prep dinner in the morning and have restaurant-quality ribs ready when you want them. The meat pulls away from the bones with barely any resistance, the seasoning penetrates deeply into every layer, and the collagen and fat break down into a silky, yielding texture that deserves standing ovation.
This is the method that gets passed down between friends, the one that makes relatives ask for the recipe, the approach that transforms someone who’s terrified of cooking meat into a confident rib master. Real talk—people genuinely believe they need a smoker or a pit to make incredible ribs, but that’s just not true. Your regular kitchen oven, a simple dry rub, some good pork, and time do all the heavy lifting. The beauty of oven-baking is consistency. Your oven temperature doesn’t fluctuate like an outdoor grill, the foil traps steam to keep everything juicy, and there’s absolutely no guesswork involved once you understand the method.
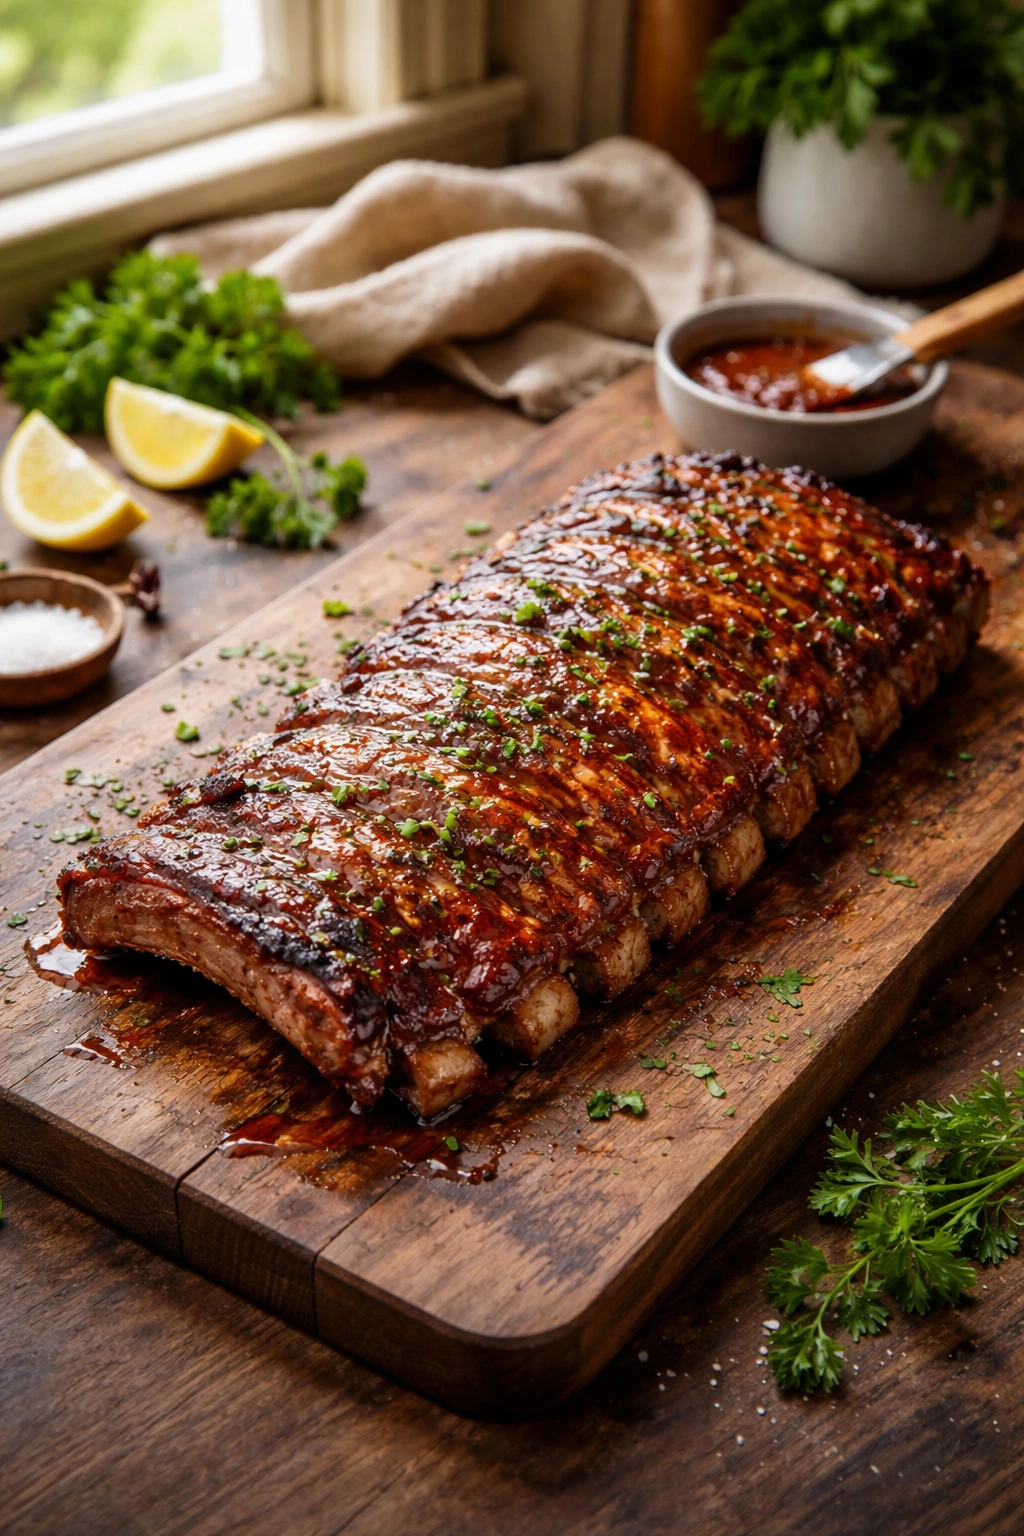
The ribs featured here are meatier, more forgiving, and less expensive than you’d expect. Baby back ribs are smaller and lean, making them a crowd-pleaser and a weeknight staple. Spare ribs carry more fat between the bones, which means they emerge even more tender and juicy—and they’re usually cheaper, too. Either one works beautifully with this technique. Once they’re baked and fall-apart tender, a quick broil with your favorite barbecue sauce caramelizes the exterior into a sticky, glazed finish that’s impossibly good. You’ll never think about ribs the same way again.
The Secret to Fall-Off-the-Bone Oven-Baked Pork Ribs
The magic happens at 275°F over several hours. This low, controlled temperature gives you two critical things: time for the collagen in the ribs to convert to gelatin (which creates that melt-in-your-mouth texture), and slow enough cooking that the moisture stays locked inside rather than evaporating. Most people assume that higher heat and shorter cooking times would work better, but ribs aren’t like a steak. They need time and gentle heat to reach that perfect texture where the meat practically falls off the bone without you even touching it.
The foil wrap is non-negotiable. When you seal the ribs tightly in aluminum foil before baking, you’re creating a steam environment that braises the meat from inside out. This trapped moisture keeps the ribs impossibly juicy while the seasoning soaks deeper into the flesh. Without the foil, you’d end up with dried-out edges and a completely different (and inferior) result. The foil is what separates “these are pretty good” from “oh my god, I’m never leaving your house.”
What makes this method even better is that it’s almost entirely hands-off. You’re not standing over a grill for hours, you’re not managing a smoker temperature, you’re not spraying ribs every twenty minutes. Season them, wrap them, bake them, and you’re done. You can meal prep, watch a movie, or handle other dinner components while the oven does the work. It’s one of the easiest ways to look like a backyard barbecue hero without any of the stress.
Understanding Rib Types and Which Ones Work Best
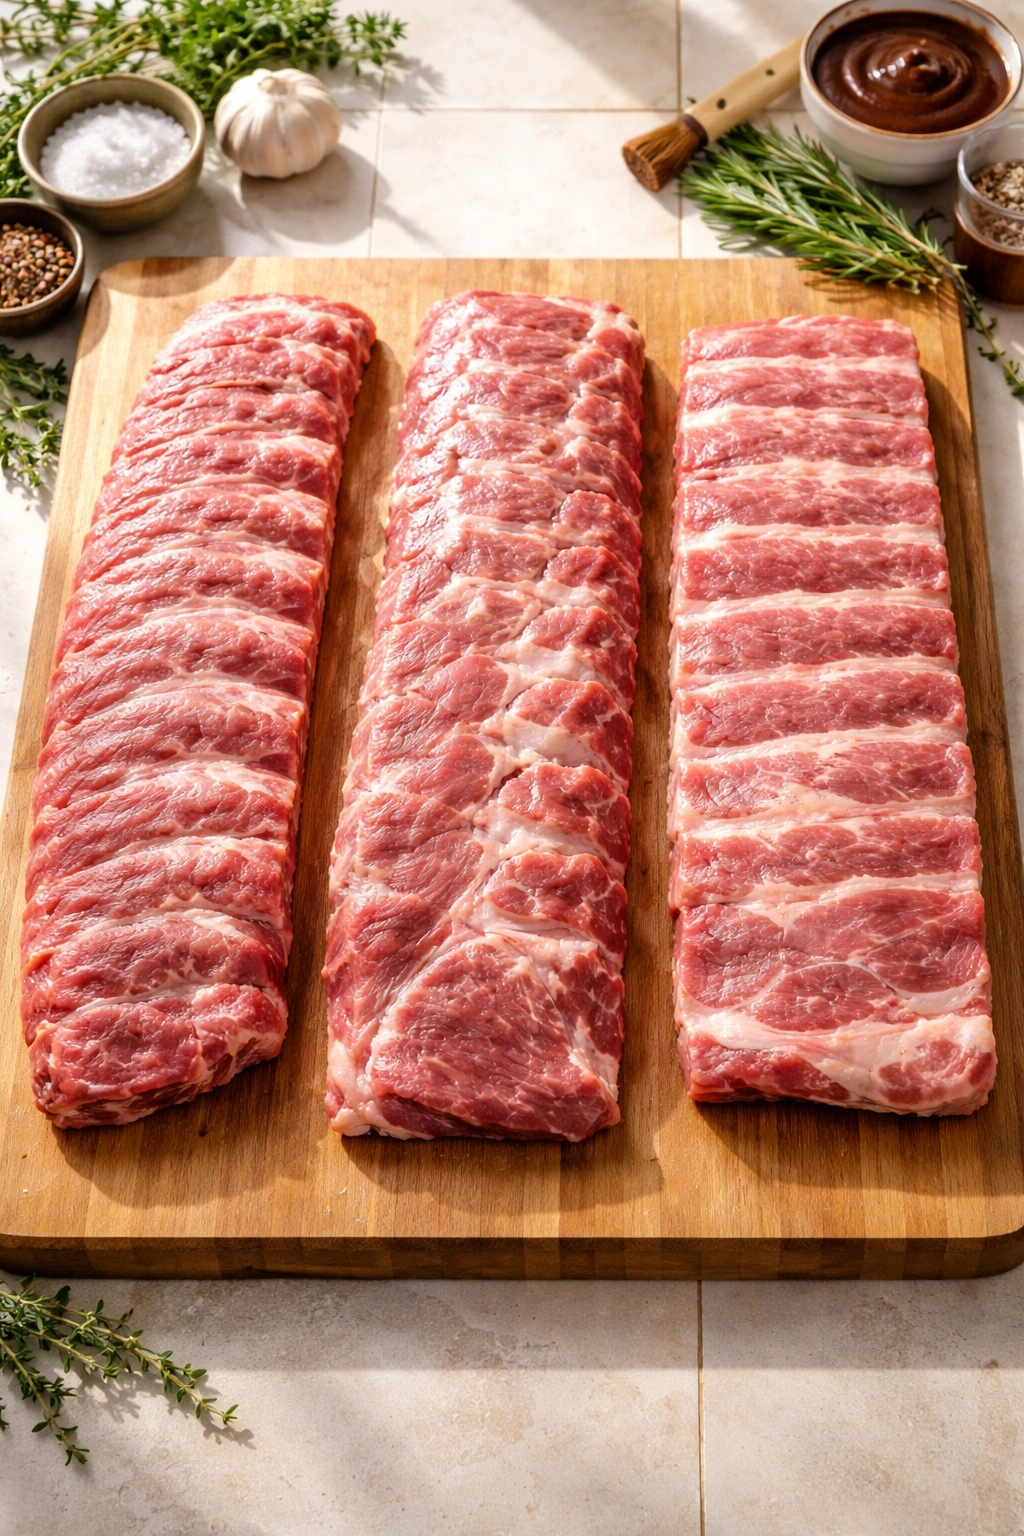
Baby back ribs come from the upper portion of the ribcage and are smaller, with less meat between the bones but more tender natural texture. They cook faster—usually ready in about 2 to 2.5 hours—and appeal to people who want a leaner cut. They’re elegant plated individually and don’t require as much commitment in terms of time or appetite. If you’re feeding a smaller group or want something less heavy, baby backs are your answer.
Spare ribs come from the belly side of the pig and carry significantly more fat marbling and meat between each bone. They’re larger, meatier, and honestly more forgiving if you accidentally overcook them slightly. The extra fat means extra flavor and juiciness—they emerge from the oven incredibly tender and succulent. Spare ribs take closer to 3 hours, but they’re usually less expensive and feed more people per rack. If I’m choosing one type for everyday cooking, spare ribs win every single time.
St. Louis-style ribs are just spare ribs that have been trimmed into a rectangular shape, removing the loose meat and cartilage. They’re somewhere in the middle texture-wise, cook in about the same timeframe as spare ribs, and look nice when plated. Country-style ribs are actually cut from the shoulder and have more bone-to-meat ratio, requiring slightly longer cooking but delivering incredible flavor from their fattier composition.
All of these varieties work beautifully with the baking method, so honestly—buy whatever looks best at your butcher or grocery store. The most important thing is that the ribs are fresh and the membrane is intact (so you can remove it yourself, which we’ll get to). One rack typically serves 2 to 4 people depending on appetite and what else you’re serving.
Serving and Timing Information
Yield: Serves 4 to 6 people | Makes 1 to 2 racks of ribs
Prep Time: 15 minutes (removing membrane, mixing rub, seasoning)
Cook Time: 2.5 to 3.5 hours (depending on rib type and thickness)
Total Time: 2 hours 45 minutes to 3 hours 50 minutes active cooking time
Difficulty: Beginner — This recipe requires minimal skills, no special equipment beyond what you likely already own, and the steps are straightforward. The most challenging part is simply waiting for the timer, and even that’s easier than it sounds once you experience the results.
Additional Notes: Total time does not include resting (ribs should rest 10 minutes before cutting) or optional overnight seasoning (which improves flavor but isn’t required). Ribs can be made several hours ahead and reheated gently, making them ideal for entertaining or meal prepping.
Ingredients for Perfectly Tender Oven-Baked Ribs
For the Ribs:
- 2 to 2.5 pounds pork ribs (1 to 2 racks of baby back, spare, or St. Louis-style—or any combination)
- 1 tablespoon olive oil (or avocado oil)
For the Dry Rub:
- 3 tablespoons paprika (sweet or smoked paprika both work beautifully)
- 2 tablespoons brown sugar, packed
- 1 tablespoon black pepper, freshly ground
- 1 tablespoon kosher salt (or 1.5 teaspoons fine sea salt)
- 2 teaspoons garlic powder
- 1.5 teaspoons onion powder
- 1 teaspoon chili powder
- 1 teaspoon ground cumin
- 1/2 teaspoon ground mustard
- Pinch of cayenne pepper (optional, for gentle heat)
For Finishing:
- 1 to 1.5 cups barbecue sauce of your choice (store-bought or homemade)
- Additional barbecue sauce for serving
Substitutions and Notes:
If you don’t have all the spices for the dry rub, simply use what you have on hand—salt, pepper, paprika, and garlic powder create delicious results. You can absolutely use a store-bought rib rub or even your favorite BBQ spice blend; the point is to season generously so the flavor develops during the long bake. For the barbecue sauce, choose your favorite brand or style. Sweet and tangy sauces balance well with smoky spices, but honestly, any sauce you love will work. Spicy sriracha-based sauces, honey-forward glazes, and mustard-based Carolina-style sauces all pair beautifully with oven-baked ribs.
Step-by-Step Instructions for Fall-Off-the-Bone Ribs
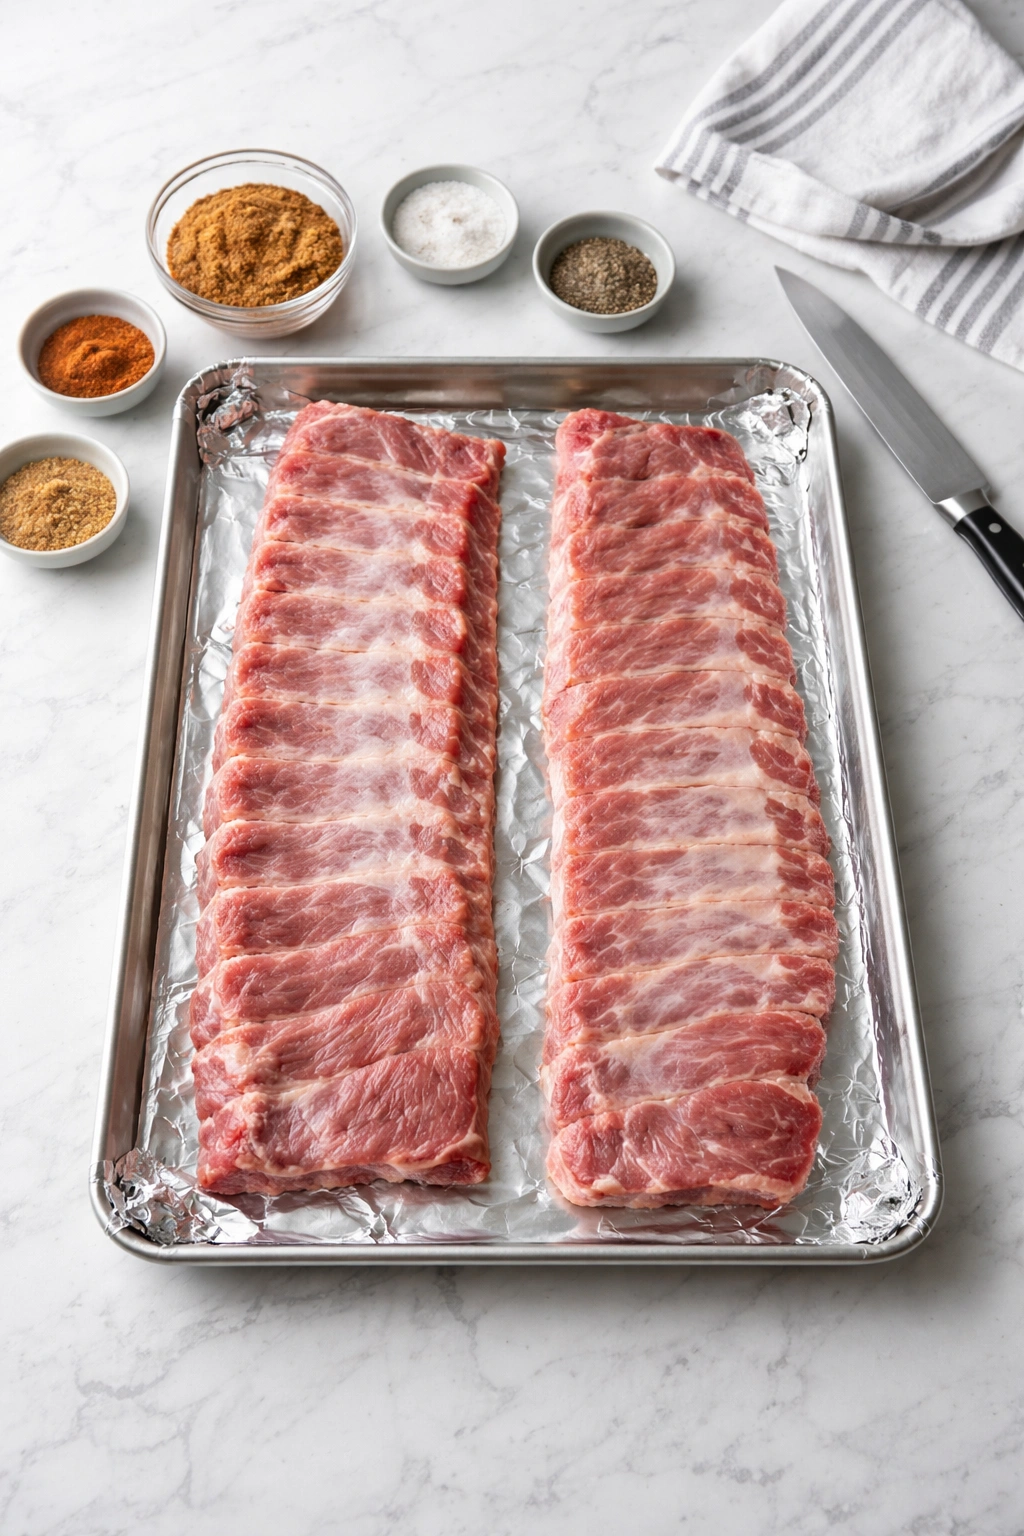
Prepare the Pan and Preheat:
-
Preheat your oven to 275°F (135°C) and position the rack in the center of the oven. Line a large rimmed baking sheet or roasting pan with aluminum foil, dull side down. If you’re cooking multiple racks, you may need a larger pan or two separate pans—make sure they fit in your oven without blocking air circulation.
-
If your ribs are still cold from the refrigerator, remove them and let them sit at room temperature for about 10 minutes while you prepare everything else. This helps them cook more evenly.
Prepare the Ribs:
-
Carefully examine the back of the ribs (the bone side). You’ll see a thin, papery white or silver membrane covering the entire back. This membrane becomes tough when cooked and acts as a barrier that prevents seasonings from soaking into the meat. Remove this membrane completely. Place the ribs on a cutting board with the bone side facing up. Use a sharp paring knife to gently slide underneath the membrane at one corner, creating just enough space to grip it. Use your fingers or a paper towel (it’s slippery) to pull the membrane away from the bones. It should come off in one large piece—don’t worry if it tears into a few pieces, just keep pulling until it’s completely removed.
-
Pat the ribs completely dry with paper towels. This helps the oil and dry rub adhere better and promotes better browning during the broil step.
-
Place the dried ribs on the foil-lined baking sheet. If they’re too long to fit flat, you can cut them in half crosswise, but the less you disturb them, the better. Arrange them so the meaty side is facing up.
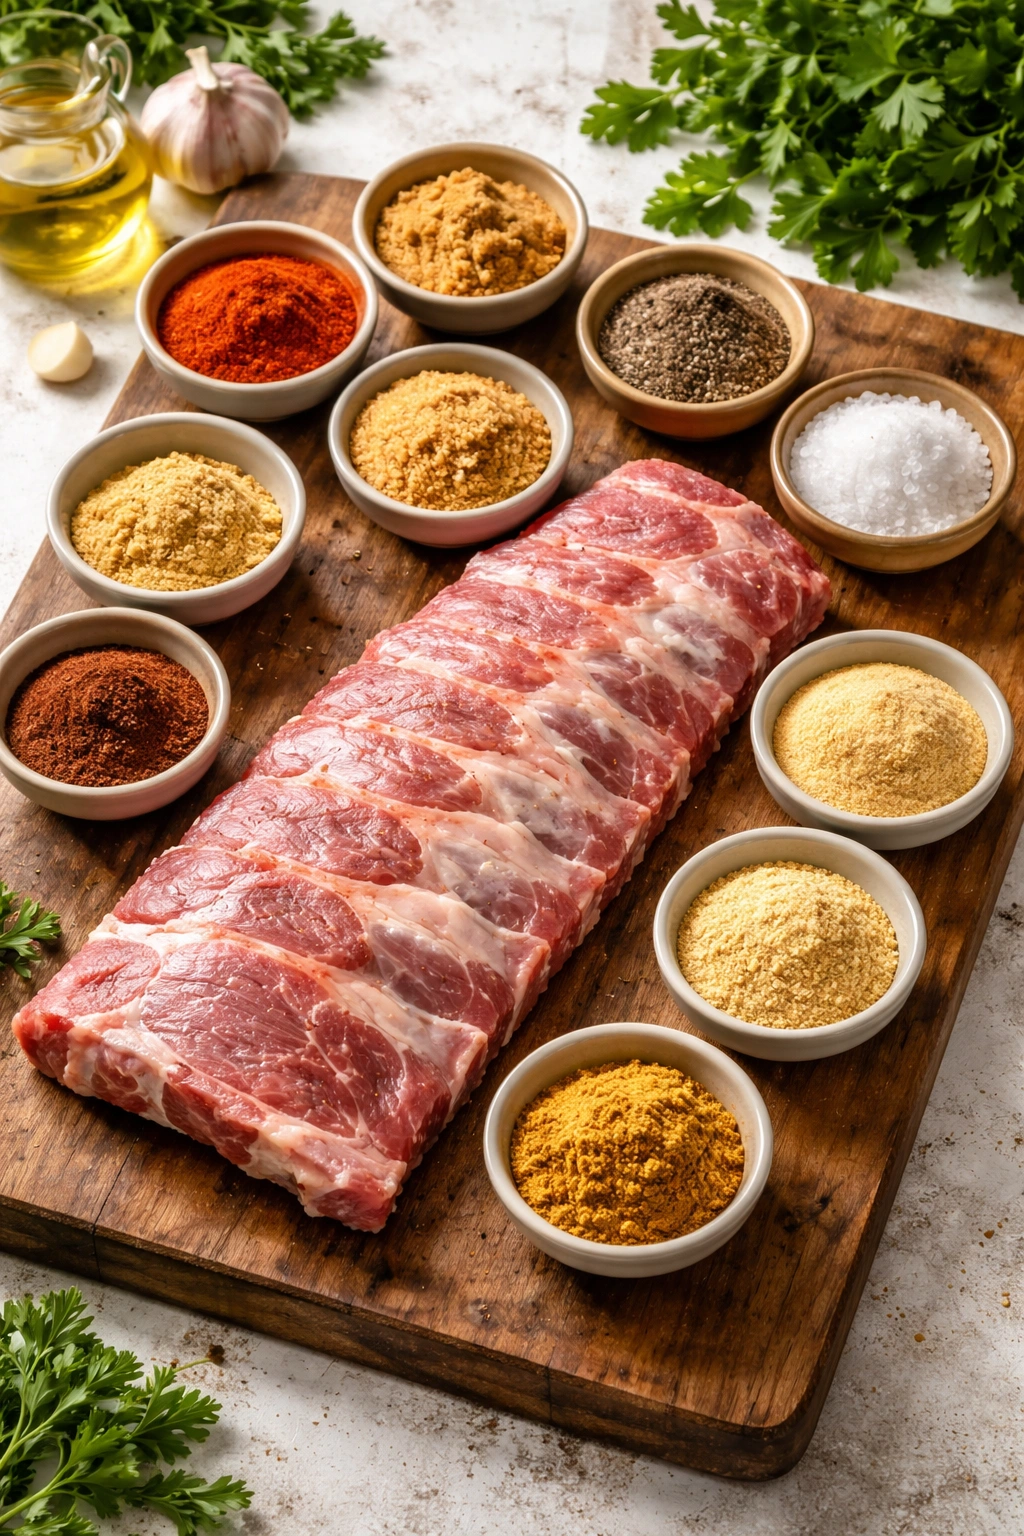
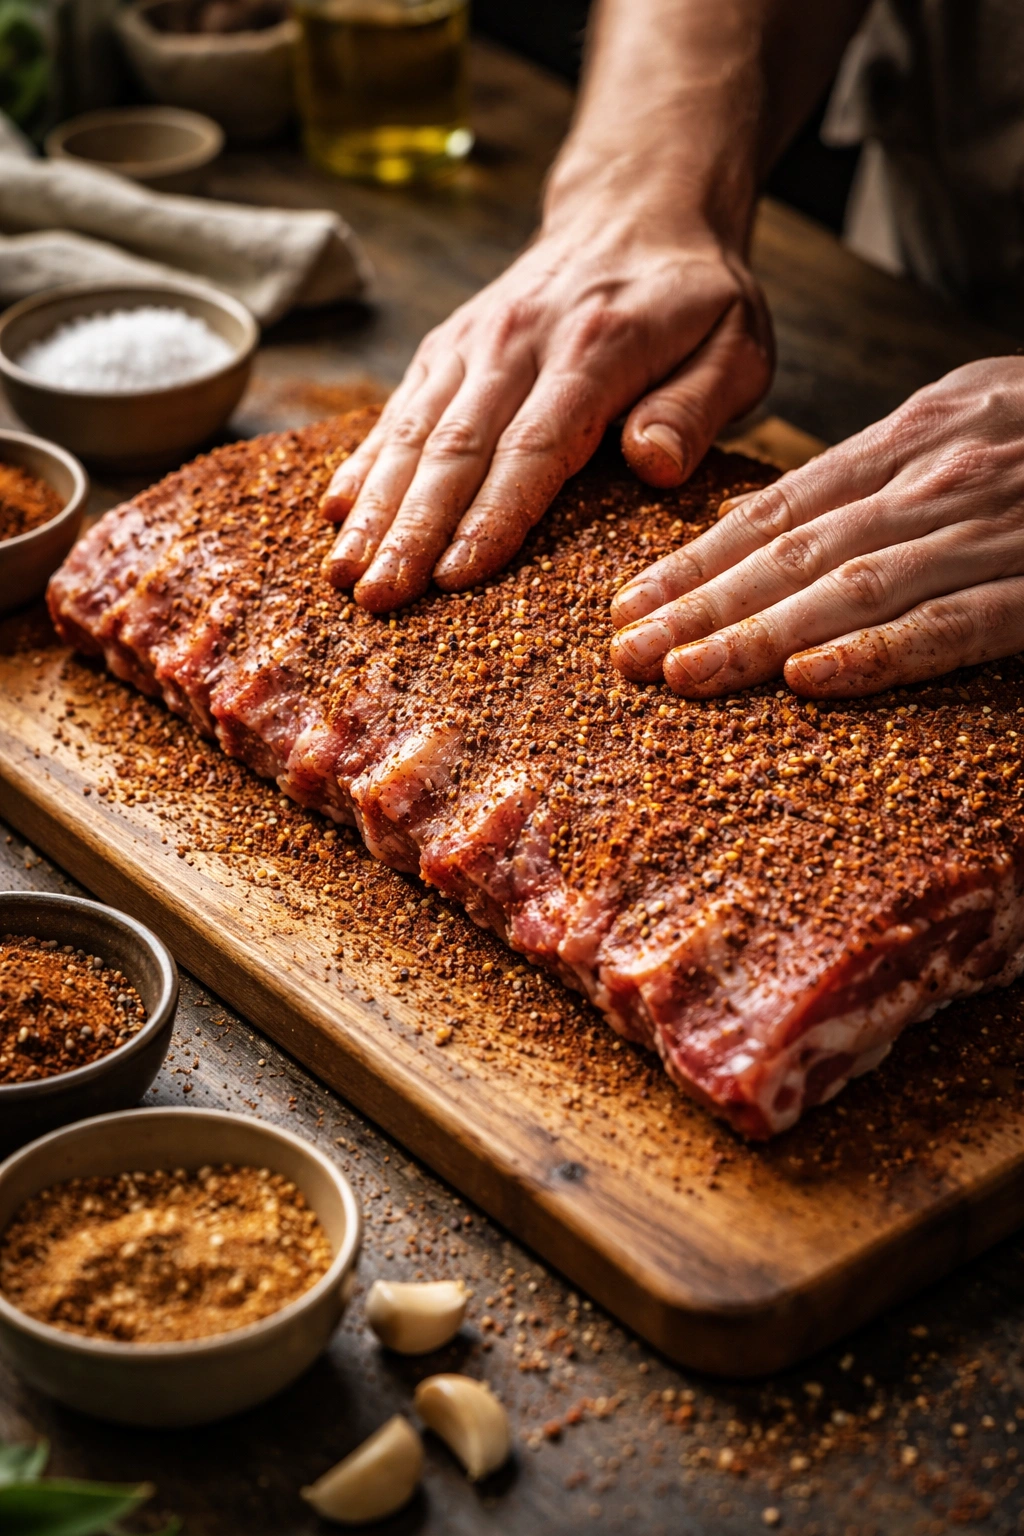
Make and Apply the Dry Rub:
-
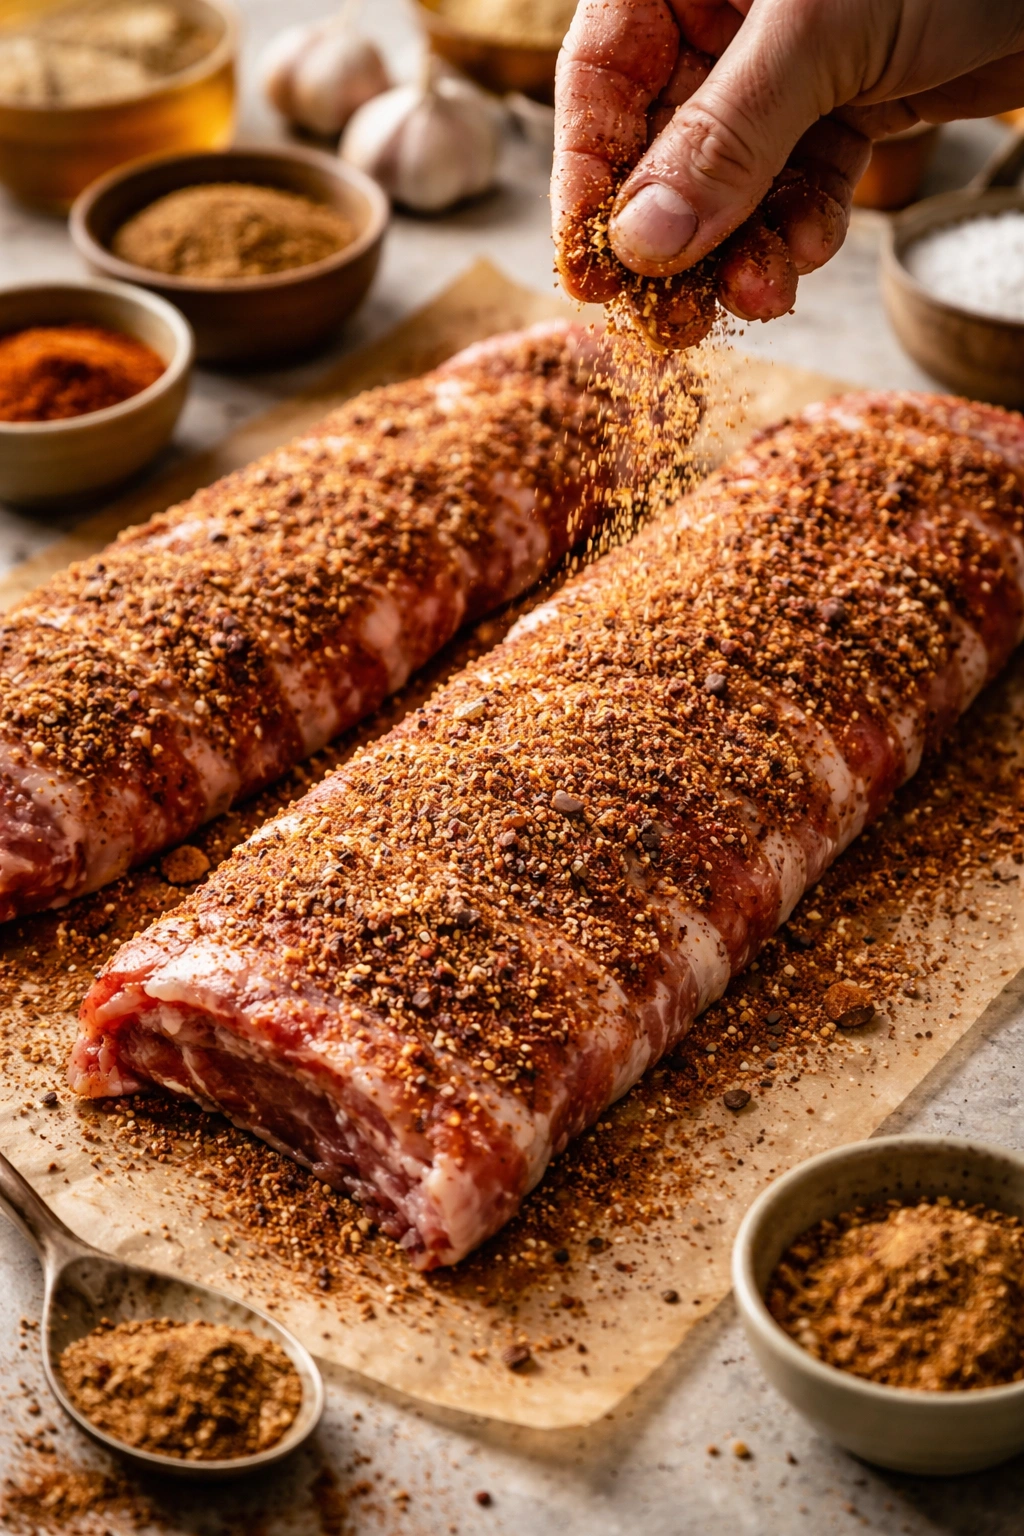
In a small bowl, combine all the dry rub ingredients: paprika, brown sugar, black pepper, salt, garlic powder, onion powder, chili powder, cumin, ground mustard, and cayenne if using. Give it a good stir until everything is evenly mixed. There should be no clumps of brown sugar—break them up with the back of a spoon or your fingers if needed.
Advertisements -
Lightly brush both sides of the ribs with olive oil. The oil helps the dry rub stick and creates a nice surface for browning.
-
Generously sprinkle the dry rub over the entire top and sides of the ribs, pressing it gently into the meat so it adheres. Don’t be shy—you want a visible coating on every inch. Flip the ribs over and rub the underside as well, though the top (meaty side) is what matters most. You may have a little rub left over, which is fine.
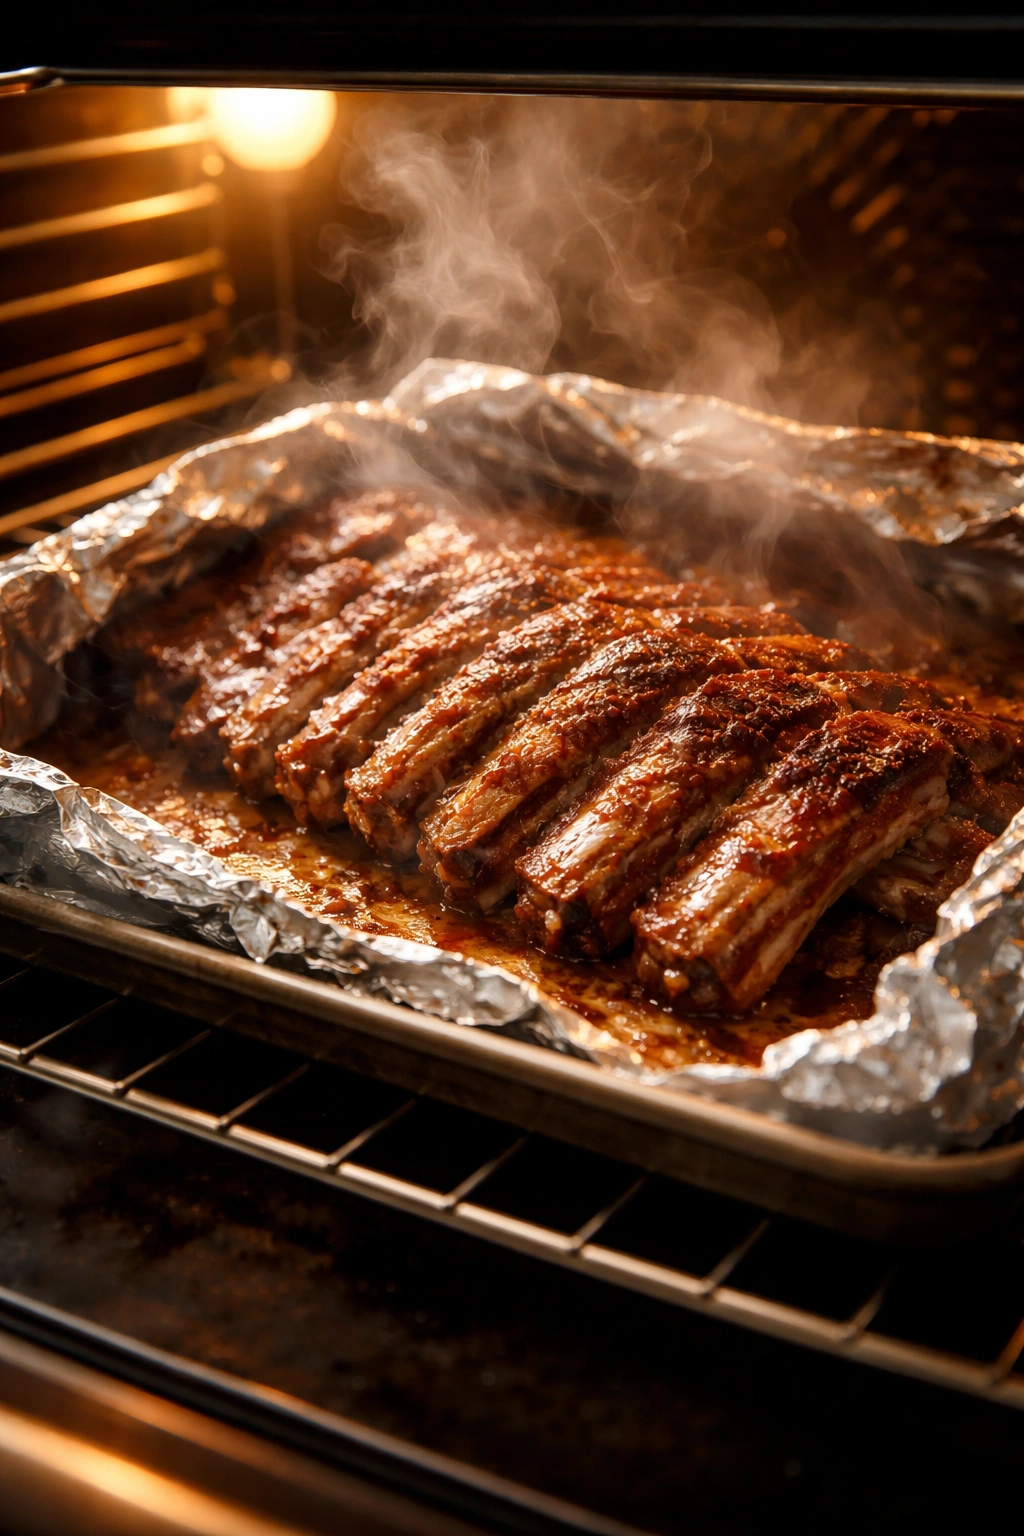
Wrap and Bake:
-
Tear off additional pieces of aluminum foil and place them over the ribs to create a complete seal. Make sure the foil covers the entire pan and is tucked down around the edges so steam can’t escape. The seal should be tight enough that you can pick up the foil without it sliding around. This airtight seal is critical—it’s what keeps your ribs incredibly moist and tender.
-
Carefully place the pan in the preheated 275°F oven. Set a timer for 2 hours and 15 minutes if you’re cooking baby back ribs, or 2 hours 45 minutes if you’re cooking spare ribs or country-style ribs.
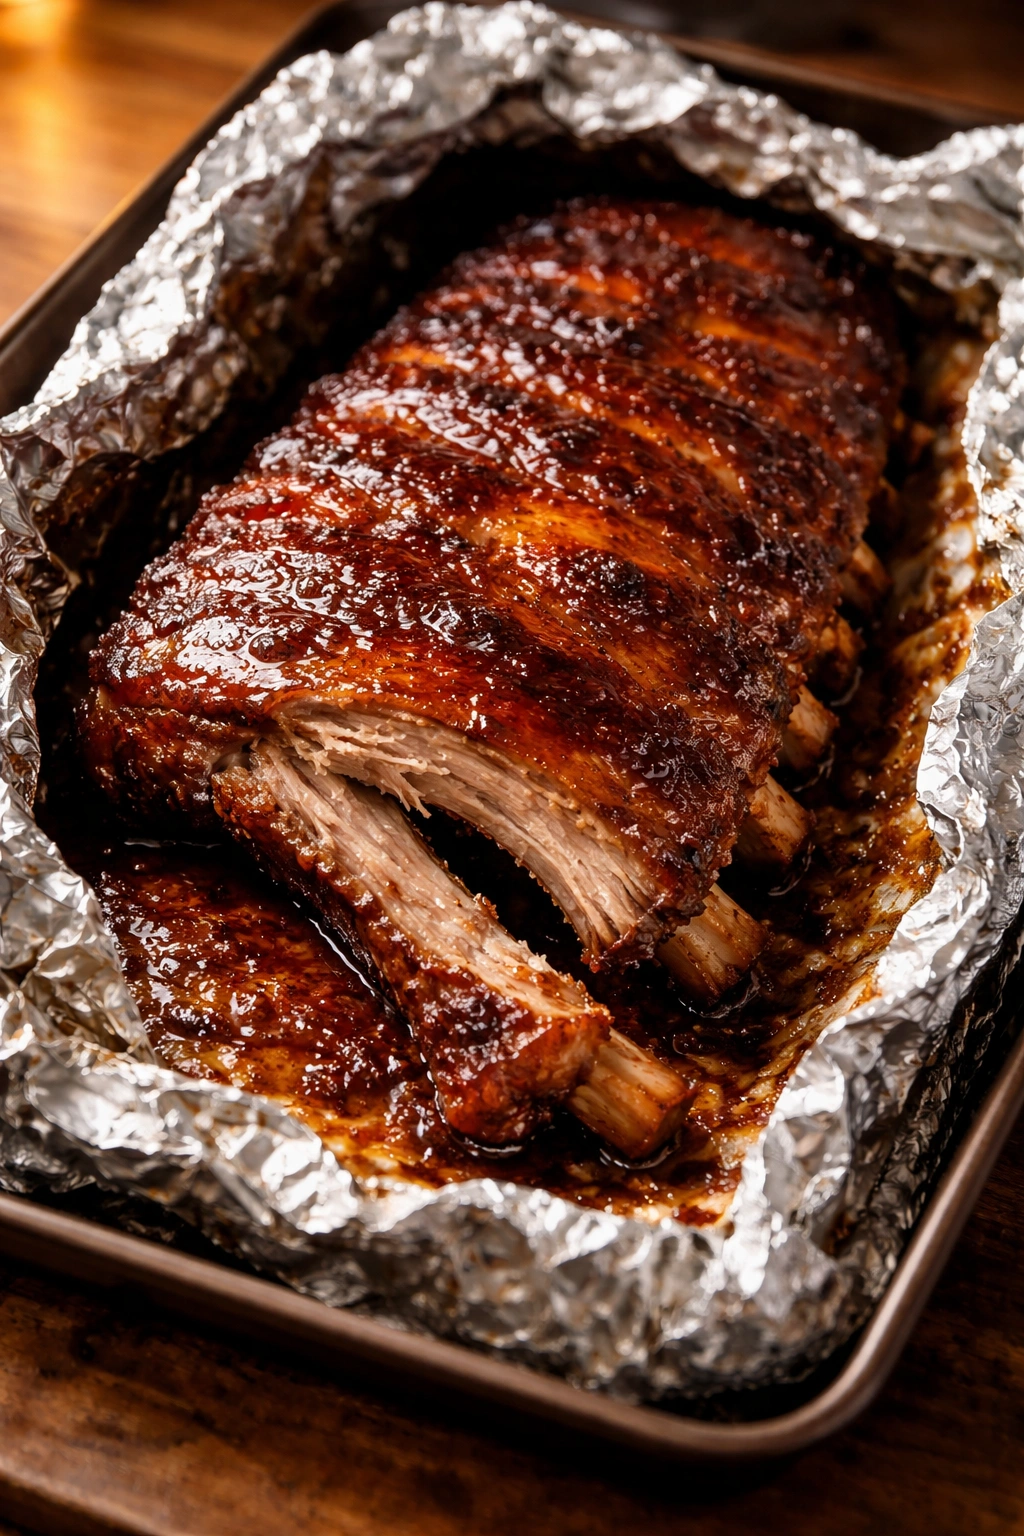
Check for Doneness:
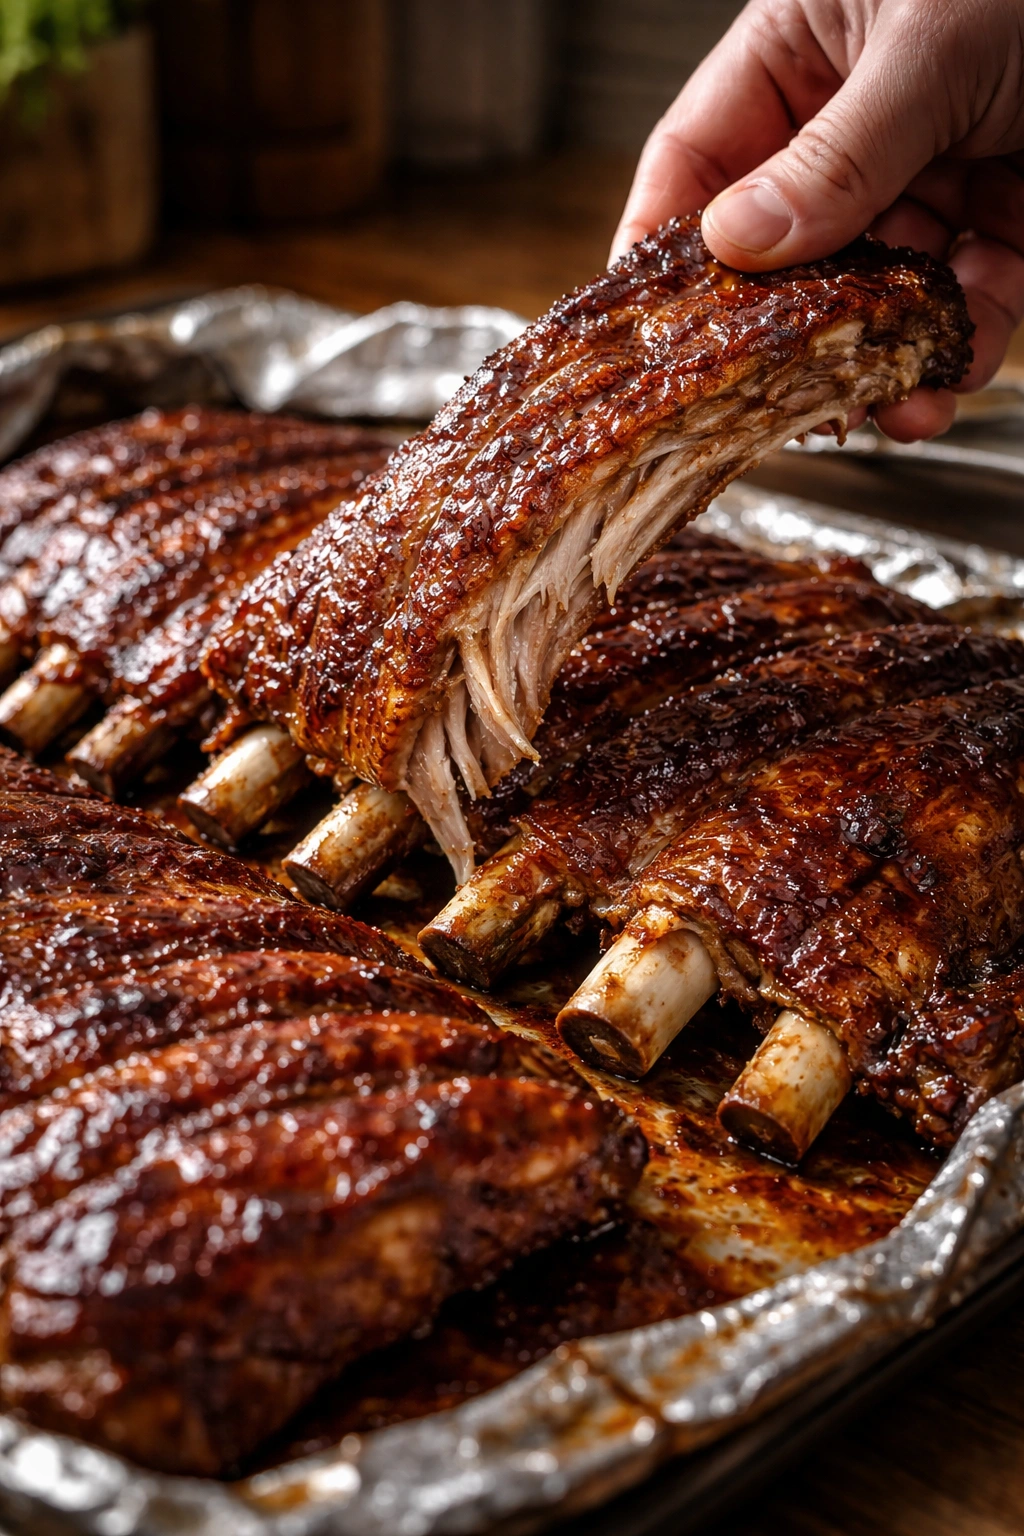
- When the timer goes off, carefully (the steam is hot) peel back one corner of the foil and check the ribs. They’re done when the meat has pulled back noticeably from the ends of the bones—you should see about a quarter-inch to half-inch of exposed bone at the tips. Use a sharp knife or fork to test the meat; it should pierce easily without resistance. If you bend one rib gently, the meat should nearly break off on its own. If they still feel tough, recover them and bake for another 15 to 20 minutes, checking again.
Add Sauce and Finish:
-
Once the ribs are tender, carefully remove the pan from the oven. Increase your oven temperature to 400°F (200°C) and move one oven rack to the highest position, closer to the broiler.
-
Discard the foil covering the ribs, being careful of the hot steam. Using a pastry brush or the back of a spoon, generously brush both sides of the ribs with your chosen barbecue sauce. Make sure every inch is coated—the sauce should be thick and visible, not just a light glaze.
-
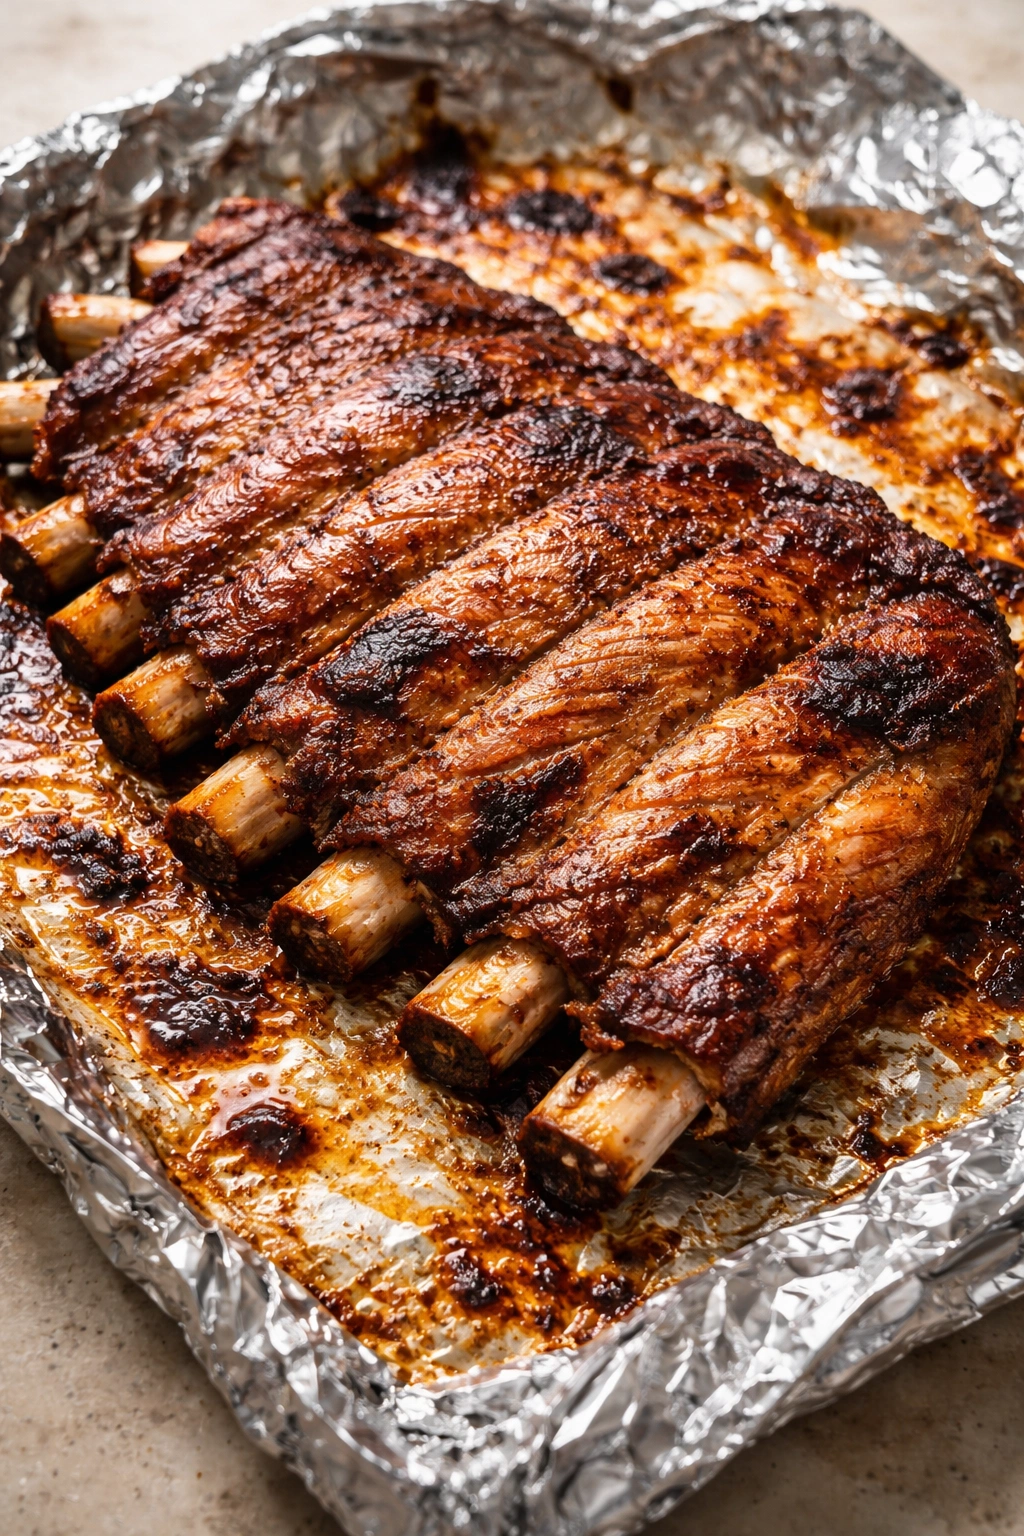
Return the uncovered ribs to the oven (still at the standard baking level, not the broiler yet) for 15 to 20 minutes, until the sauce bubbles gently and starts to caramelize at the edges. This develops flavor and creates a delicious glaze without burning.
Advertisements -
After the initial bake, move the ribs to the highest oven rack and turn on the broiler to high heat. Broil for 2 to 4 minutes, watching very carefully—the sauce can go from caramelized to charred in seconds. You’re looking for the sauce to bubble and turn a deeper, slightly darker color without blackening. Remove the ribs immediately once the sauce is caramelized.
Rest and Serve:
-
Place the pan on a heatproof surface and let the ribs rest for 10 minutes. This allows the juices to redistribute throughout the meat, making every bite juicier.
-
Using a sharp knife and the bones as your guide, cut the ribs into individual pieces between each bone, or serve them in sections of 2 to 3 bones. Transfer to a serving platter and drizzle with any extra barbecue sauce from the pan.
Why This Low-and-Slow Method Works So Well
The science behind fall-off-the-bone ribs is actually pretty straightforward. Ribs are technically “cooked” and safe to eat at an internal temperature of 145°F, but that temperature doesn’t break down all the connective tissue and fat. The magic happens between 190°F and 205°F—that’s when the collagen (the main structural protein in connective tissue) converts to gelatin, which is what gives ribs that luxurious, buttery texture where they practically dissolve on your tongue.
This transformation takes time. You can’t rush it by cranking up the heat; high temperature would dry out the meat before the collagen had time to properly break down. At 275°F, you’re cooking gently enough that the meat stays moist while the hours pass. The foil traps the steam from the ribs’ own moisture, creating a humid environment that further prevents drying and essentially braises the ribs in their own juices.
The dry rub contributes more than just flavor—it also helps create a protective layer on the surface that keeps moisture locked in. The brown sugar caramelizes slightly during cooking, adding depth. The spices develop and intensify as they heat, so what starts as a measured tablespoon of paprika becomes a rich, complex backbone for the entire dish. By the time the broiler step happens, you’ve got an already incredibly flavorful rib that just needs a caramelized glaze on top.
Preparing Your Ribs for Perfect Results
Start with the best ribs you can find or afford. Visit your butcher if possible—they can show you fresh ribs and might even remove the membrane for you if you ask nicely. If you’re buying from a supermarket, check the packaging date and choose ribs that are still quite pink (not gray or brown) with a good amount of visible marbling. Ask the butcher counter if they’ll trim them or suggest the best ribs for baking rather than grilling.
When you get the ribs home, keep them in the coldest part of your fridge until you’re ready to cook them. If you want to prep them a day ahead, remove the membrane, season them generously with the dry rub, wrap them tightly, and refrigerate overnight. The seasoning will penetrate deeper and actually improve the flavor. Just remove them from the fridge 10 to 15 minutes before putting them in the oven so they’re not ice cold when baking begins.
Some people like to give their ribs a quick rinse with cool water and pat them dry, while others skip this step. It’s entirely your preference. A quick rinse removes any bone dust or packaging debris, but ribs are already fresh when packaged, so you’re not missing out if you skip it. Either way, pat them completely dry—wet ribs won’t accept the rub as well, and the dry surface helps with that gorgeous caramelization during the broil step.
The Importance of Removing the Membrane
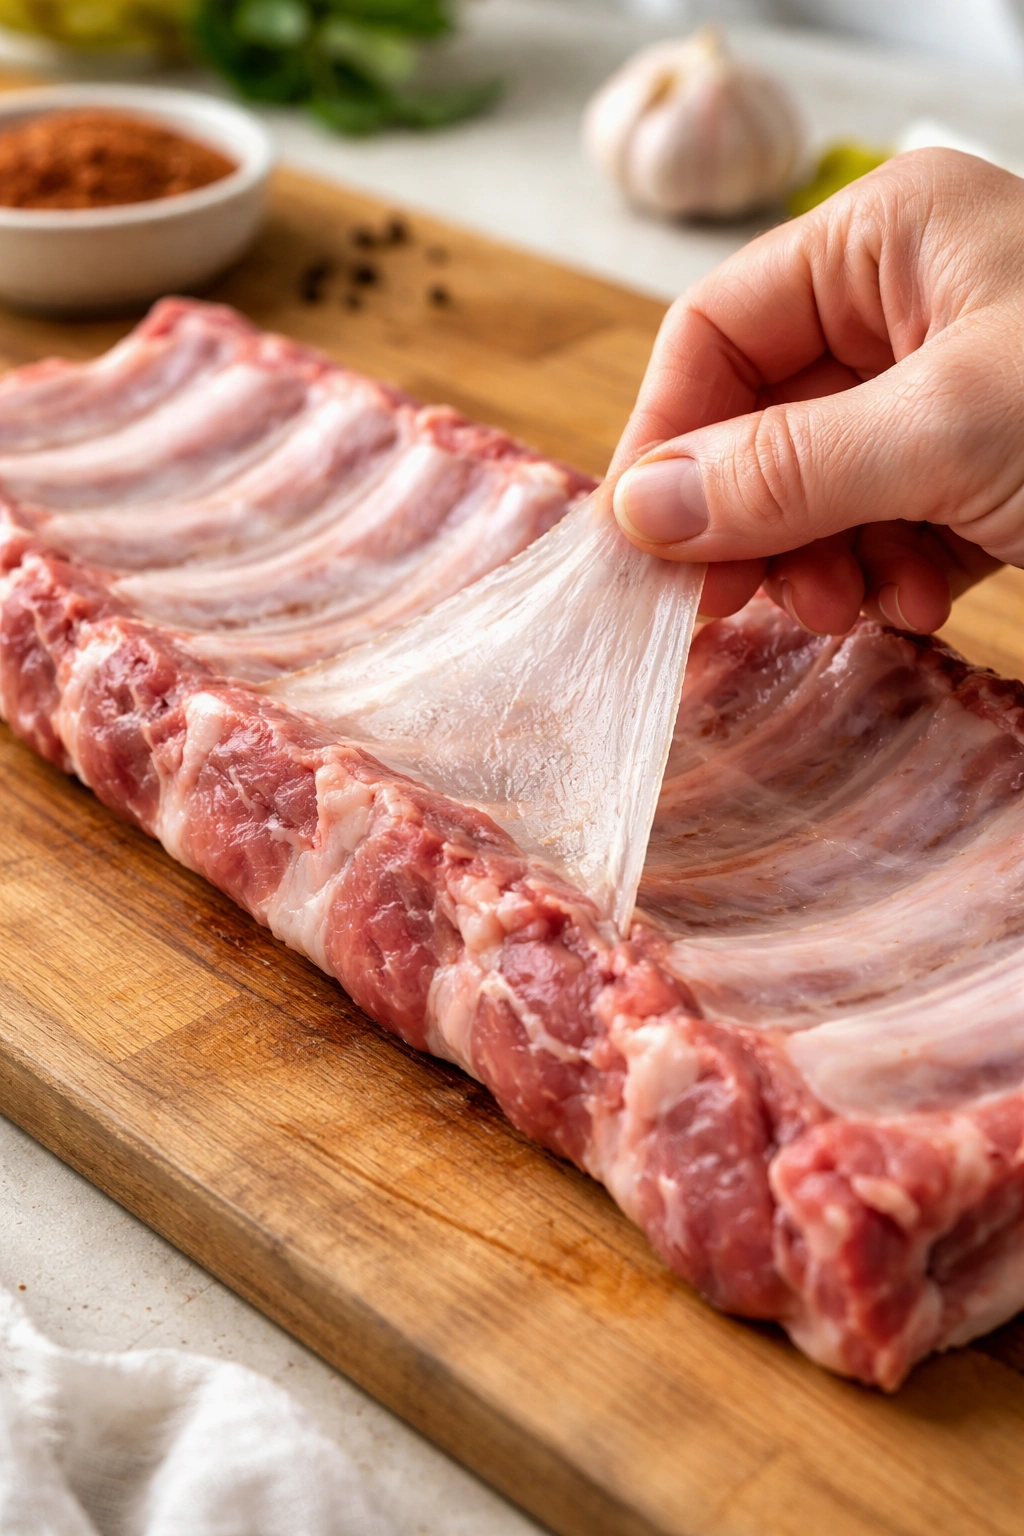
This single step is what separates good ribs from incredible ribs. The membrane is a thin layer of connective tissue that covers the bone side of the ribs—it serves a purpose for the pig, but it doesn’t break down properly when you cook it. It becomes chewy and tough, and even worse, it creates a barrier that prevents your dry rub and the meat’s own seasonings from soaking into that side of the ribs.
Removing it takes about thirty seconds. Place the ribs on a cutting board with the bone side facing up. Look for where the membrane starts to separate (usually on the concave side). Use a sharp paring knife to gently slide underneath the membrane and create a small opening large enough for your fingers. Grip the edge with your fingers or a paper towel (because it’s genuinely slippery), and slowly pull. It should come off in one continuous piece. If it tears, just keep pulling the remaining pieces until it’s completely gone.
Some people use kitchen scissors to start the separation or a butter knife instead of a paring knife. Whatever tool gives you the confidence to get underneath that membrane and remove it completely. Once you’ve done it a couple times, it becomes second nature. And the difference in the finished ribs—in how easy they are to eat, how thoroughly they’re seasoned, and how tender they become—makes it absolutely worth those thirty seconds of effort.
Creating the Perfect Dry Rub
A good dry rub doesn’t need to be complicated. You need something sweet (brown sugar), something savory and umami-rich (salt, garlic, onion), something smoky or warm-tasting (paprika, chili powder, cumin), and something to round out the flavor (mustard, black pepper). Everything else is customization based on your personal taste.
The rub suggested here is balanced: the brown sugar isn’t overpowering, the spices complement rather than dominate, and the result is a sophisticated seasoning that enhances the natural pork flavor rather than masking it. Some people prefer more heat (add extra cayenne or even a pinch of black garlic powder for intensity), while others prefer sweeter ribs (increase the brown sugar slightly). You can’t really go wrong as long as you’re generous with the seasoning.
If you’re using smoked paprika instead of regular paprika, you’ll add a subtle smoky note that mimics some of that grilled flavor without an actual grill. If you love BBQ flavor and have liquid smoke on hand, you could add a quarter teaspoon to your dry rub—it’s strong, so use restraint. Fresh ground black pepper makes a real difference in the final flavor, so if you have a grinder, use it. Pre-ground pepper loses its aromatics and intensity over time.
One pro move: make this rub in bulk and store it in an airtight container. You’ll find yourself using it on chicken, pork chops, beef brisket, and even roasted vegetables. Most dry rubs keep for months in a cool, dry place. Just give the container a shake before using, since the heavier spices sometimes settle to the bottom.
How to Know When Your Ribs Are Done
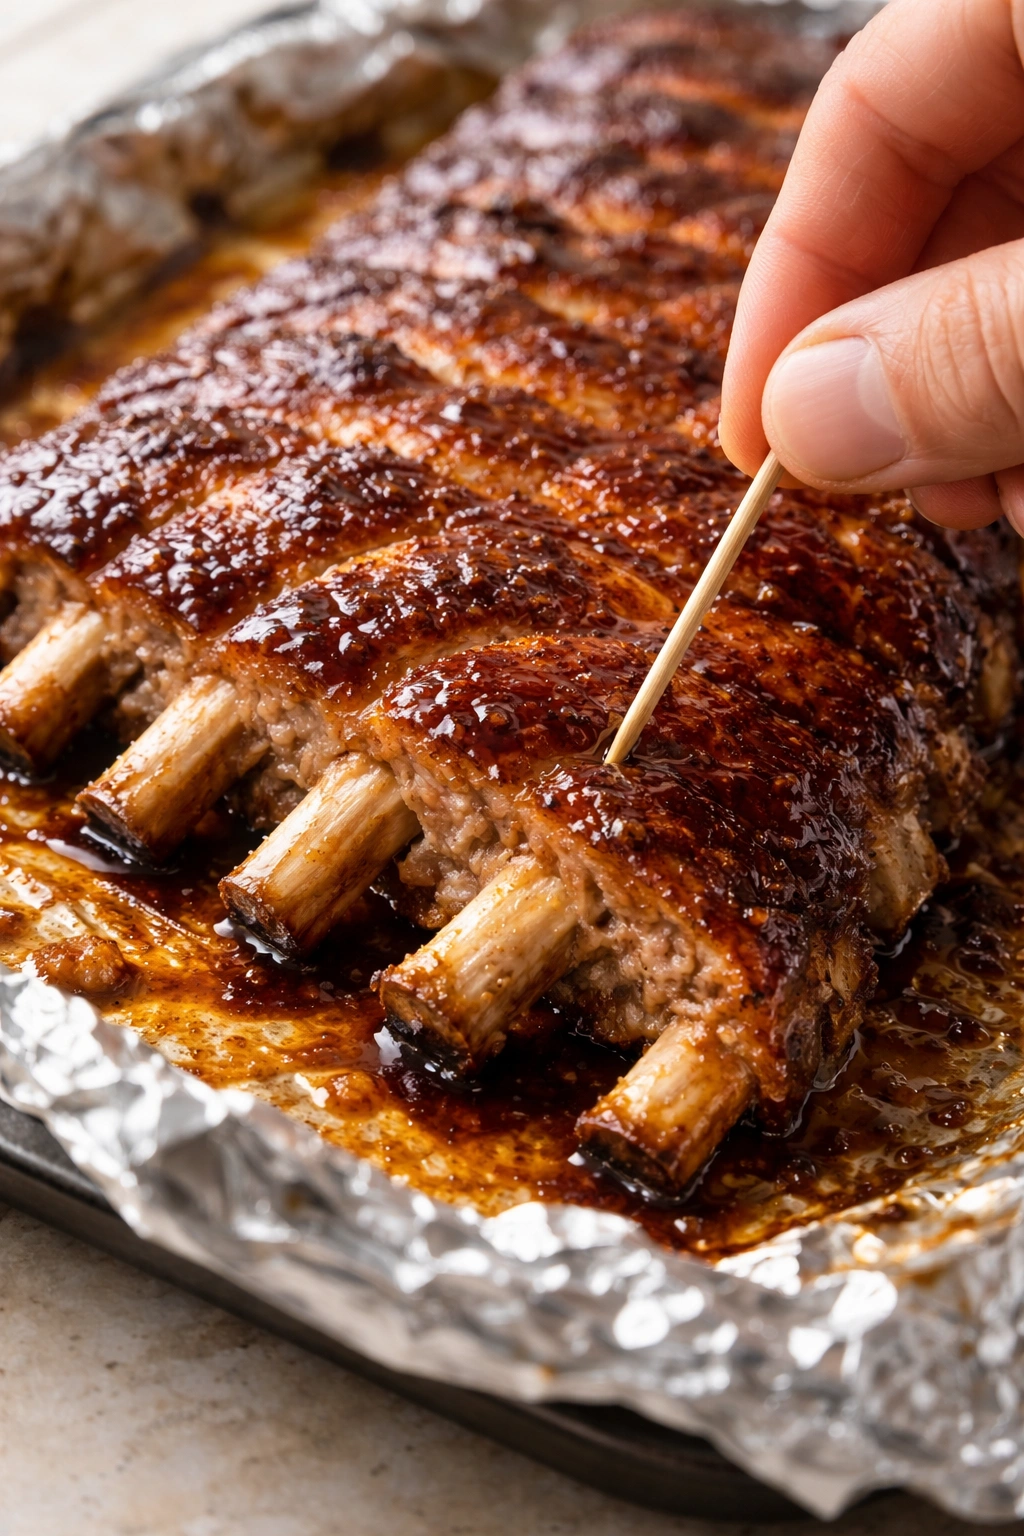
The toothpick test is your friend. When you’ve removed the foil and think your ribs might be done, insert a sharp paring knife or even a toothpick between the bones, sliding it down toward the meat. If it slides in with barely any resistance, the ribs are ready. If you feel any toughness or have to push hard, they need more time.
Another way to check: grab one end of the ribs with tongs and give it a gentle lift. If the rack is so tender that it’s starting to sag in the middle or you can bend it significantly without resistance, it’s done. Overcooked ribs become mushy and fall apart when you try to serve them, which isn’t necessarily bad (some people love that texture), but they’re harder to plate and less visually impressive.
The internal temperature method works too: insert an instant-read thermometer into the thickest part of the meat (without touching bone), and you’re aiming for somewhere between 190°F and 205°F. That’s the sweet spot for maximum tenderness. Below 190°F, they’ll still be slightly tough. Above 205°F, they’ve lost some juiciness, though they’ll still taste good.
Cooking times vary based on the thickness of your ribs, how cold they were when they went into the oven, and individual oven variations. That’s why checking for doneness is important rather than just setting a timer and assuming they’re done. Start checking at 2 hours 15 minutes for baby backs, and 2 hours 45 minutes for spare ribs. If they need more time, 15-minute intervals from there.
Tips for Fall-Off-the-Bone Tenderness Every Single Time
Don’t skip the membrane removal. I mentioned this earlier, but I’m emphasizing it again because it’s genuinely that important. Yes, it makes a difference.
Use a tight foil seal. If steam escapes, moisture evaporates, and you’ll end up with drier ribs. Make sure the foil completely covers the pan and is tucked down around all the edges. Some people even double-wrap to ensure a complete seal.
Let the ribs come to room temperature before baking. If they go straight from the fridge into a 275°F oven, the outside will start cooking before the inside has a chance to heat through evenly. Fifteen minutes at room temperature makes a measurable difference in how consistently they cook.
Resist opening the oven during cooking. Every time you open the door, heat escapes and the cooking time extends. Trust the process and only open it to check doneness when the timer tells you to.
Brush sauce on generously but don’t oversaturate. You want a visible layer of BBQ sauce coating the ribs during the final bake, not so much that it pools in the pan and steams rather than caramelizes. A thick brush layer is perfect.
Watch the broiler step carefully. This is where ribs go from great to burned if you’re not paying attention. Stay in the kitchen. Don’t start a dishwasher or step outside. Broilers work differently in every oven, and three minutes in one might be thirty seconds too long in another. Keep your eyes on those ribs.
Let them rest after cooking. Ten minutes allows the juices to redistribute throughout the meat. If you cut into them immediately after removing from the heat, the juices run out onto the plate instead of staying in the ribs. That ten minutes makes them significantly juicier.
Use ribs that are similar in thickness. If you’re putting both a very thick rack and a thin rack on the same pan, the thin one will overcook before the thick one is ready. If possible, trim them to similar sizes or cook them on separate pans staggered by a few minutes.
Common Mistakes That Ruin Baked Ribs
The too-high temperature trap: Cooking at 325°F or higher will speed up the process, but you’ll sacrifice tenderness. The collagen hasn’t had enough time to break down, and the high heat dries out the outer meat before the inside is done. Stick with 275°F even if it means waiting longer.
Insufficient seasoning: Be generous with the dry rub. Ribs are large, the meat is relatively mild, and the rub is your primary flavoring before the sauce hits. A light dusting of seasoning gets lost in all that meat. You want to visibly see the rub coating the entire surface.
Covering the ribs with foil but not sealing it tightly: If there are any gaps or if the foil doesn’t go all the way down the sides of the pan, steam escapes and you lose moisture. Spend an extra thirty seconds making sure that foil is tight.
Forgetting to brush sauce on both sides: The underside of the ribs (the bone side) gets sauce too. Flip them briefly to reach the bottom, or brush it on as best you can. All that exposed bone-side meat deserves seasoning.
Cooking them wrapped in foil the entire time: Some recipes suggest leaving the foil on and serving them wrapped. That works fine, but you miss out on the gorgeous caramelized exterior that the broil step creates. Remove the foil, apply sauce, and broil. It’s the difference between good and show-stopping.
Skipping the rest time: Just don’t. Ten minutes. Let them sit. The ribs will be demonstrably juicier.
Using a thin or perforated foil: Heavy-duty aluminum foil is worth it. Regular foil might tear, and perforated foil defeats the entire purpose of creating a steam environment. Spend the extra dollar on the heavy-duty option.
Variations on Classic Oven-Baked Ribs
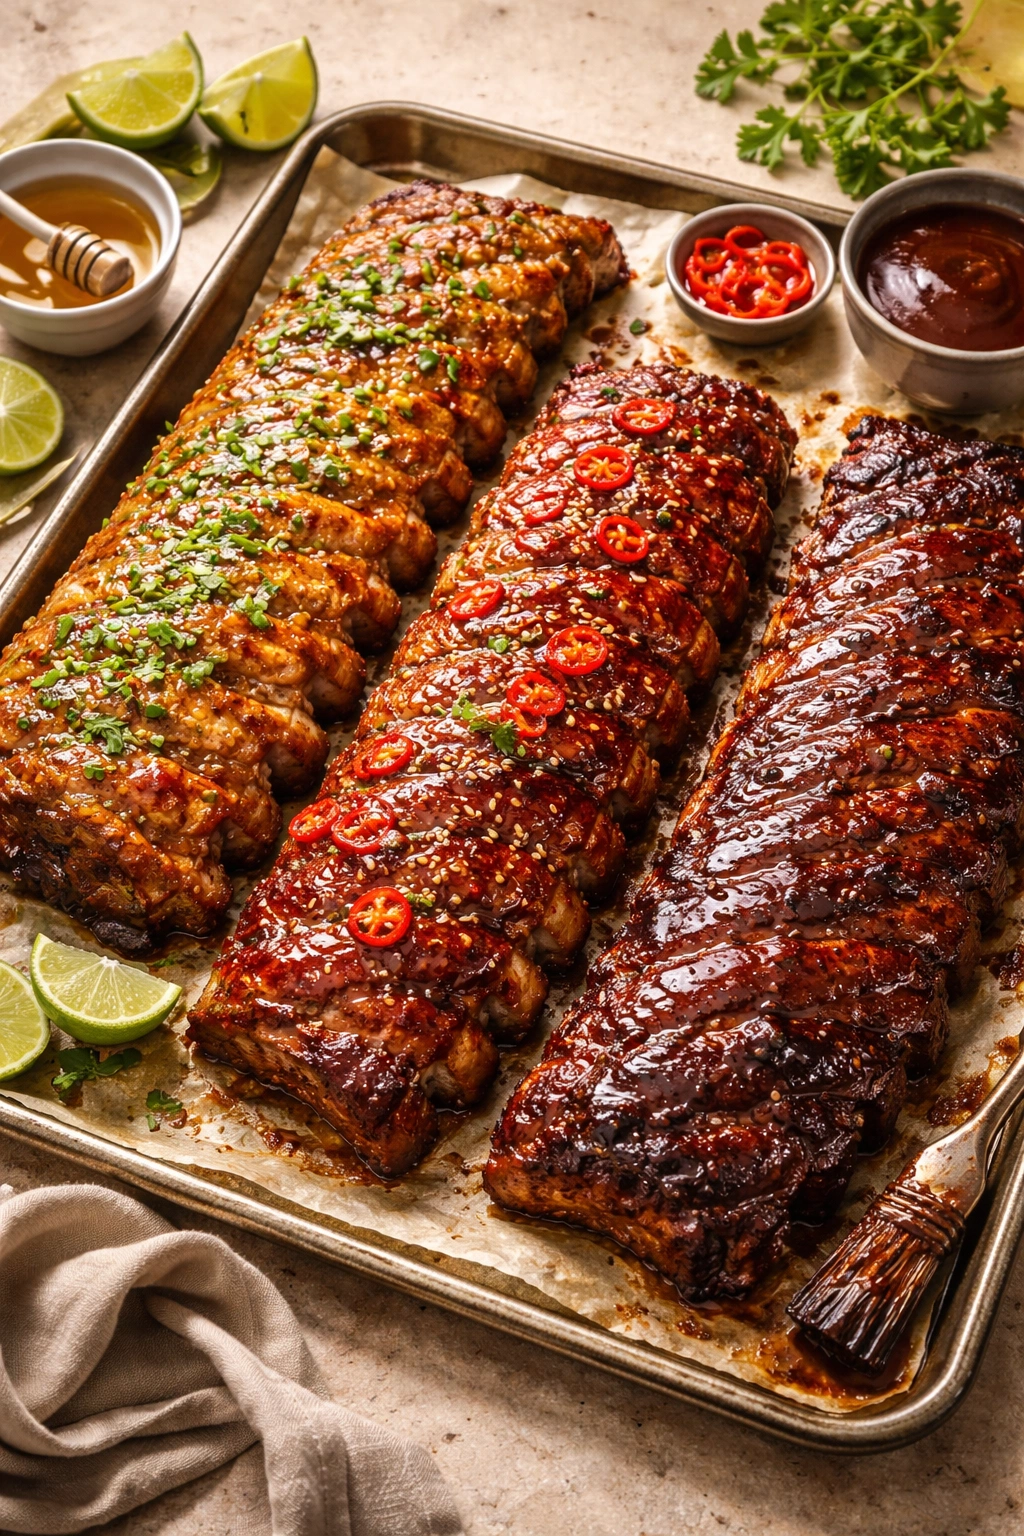
Honey and Lime: Mix your favorite barbecue sauce with a couple tablespoons of honey and a teaspoon or two of fresh lime juice. The lime adds brightness, the honey adds sweetness, and together they create an addictive tropical-sweet glaze that’s slightly different from straight BBQ sauce. This is particularly good with spare ribs.
Spicy Sriracha: Add sriracha (about a tablespoon per half cup of sauce) to your barbecue sauce for heat and a slightly sweet-spicy complexity. You can amp it up or dial it back based on how much you like spice. This version pairs beautifully with Asian-inspired side dishes like a crunchy coleslaw.
Bourbon BBQ: Brown some butter in a pan, add diced onions and let them soften, then add your favorite barbecue sauce and a quarter cup of bourbon. Simmer for a couple minutes to cook off some of the alcohol, then brush it on the ribs during the final bake. The bourbon adds depth and a subtle oak-smoke flavor.
Mustard-Based Carolina Style: Skip the traditional sweet sauce and use a mustard-based BBQ sauce (if you can find one) or make your own by mixing yellow mustard, vinegar, a tiny bit of brown sugar, and spices. Brush this on instead of the sweet sauce during the final stages. It’s tangy, unexpected, and absolutely delicious if you like that vinegary BBQ style.
Maple and Dijon: Whisk together a quarter cup of maple syrup, three tablespoons of Dijon mustard, and a tablespoon of apple cider vinegar. This creates a sophisticated, less-sweet glaze that tastes like fall. The mustard and vinegar cut the sweetness of the maple perfectly.
Coffee-Rubbed Ribs: Add a tablespoon of instant coffee powder (or finely ground espresso) to your dry rub. It might sound odd, but coffee adds richness and depth to pork ribs without making them taste like coffee. It’s a secret weapon that makes the overall flavor more sophisticated.
Pineapple BBQ: Add a half cup of pineapple juice to your barbecue sauce and brush it on during the final bake. The tropical sweetness and acidity create a Hawaiian-inspired glaze that’s surprisingly elegant. Some people add a tablespoon of teriyaki sauce to this version too.
All of these variations use the exact same base method—just customize the sauce or seasoning to match your mood and what else you’re serving.
Storage and Make-Ahead Options
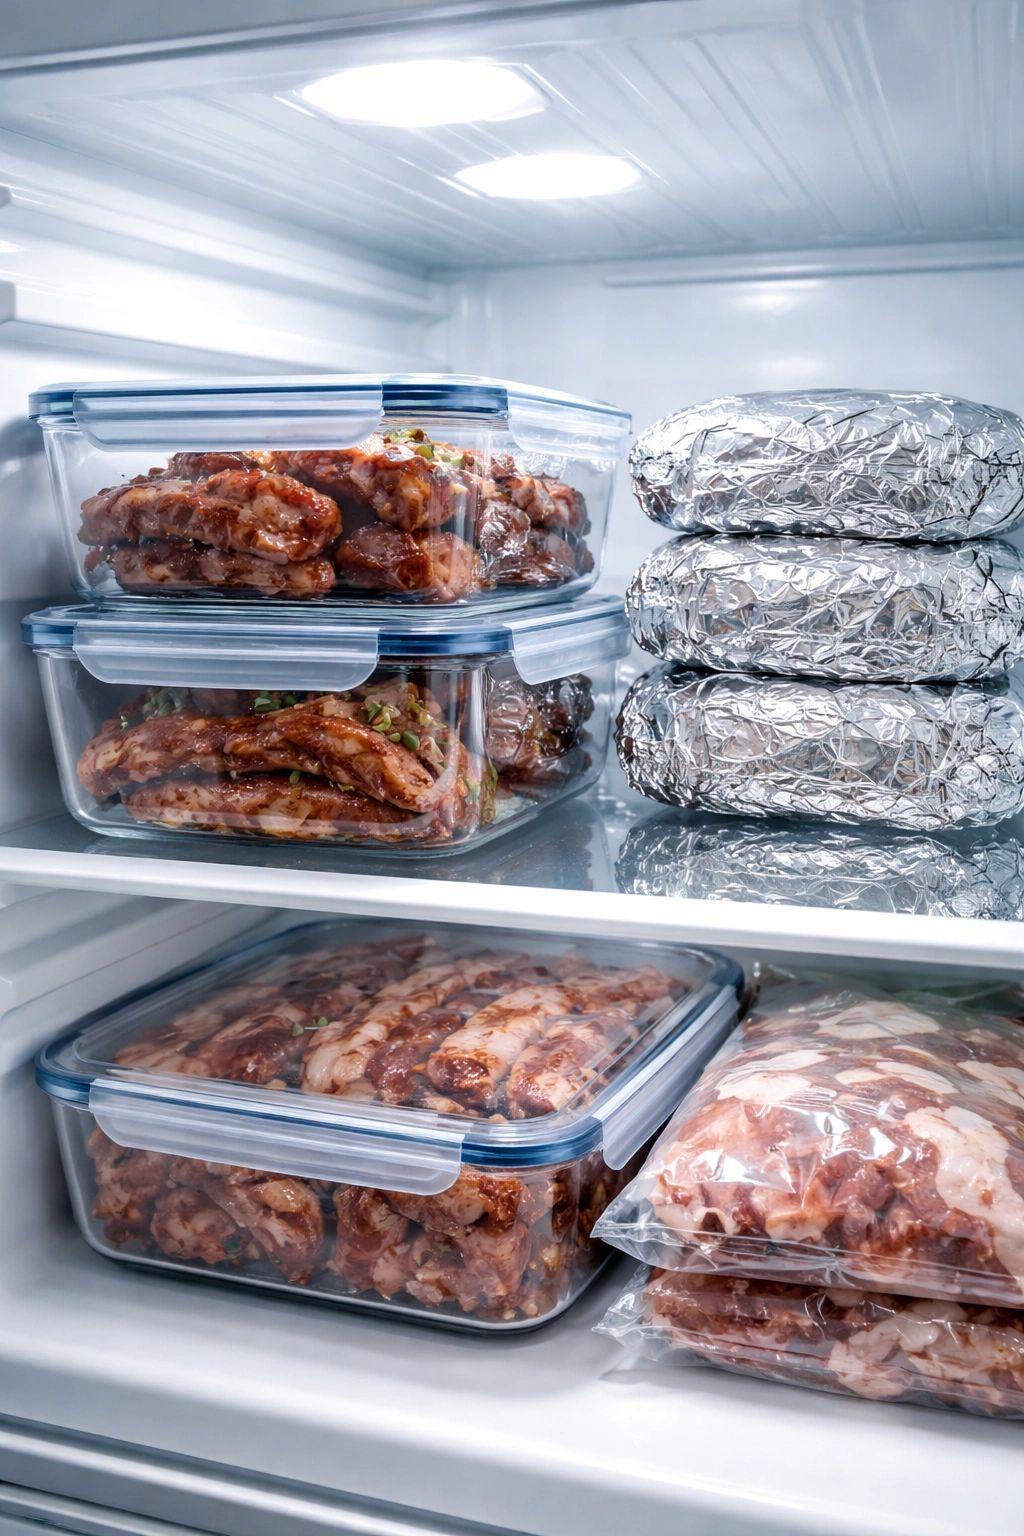
Oven-baked ribs keep beautifully in the refrigerator for up to 4 days in an airtight container or tightly wrapped in foil. The flavor actually improves slightly as everything melds together, so leftovers are genuinely good. To reheat, wrap the ribs loosely in foil and warm them in a 275°F oven for about 20 to 30 minutes until they’re heated through. The gentle heat prevents them from drying out.
If you’re meal prepping or want to cook them ahead for an event, you can prepare them through the foil-wrapping stage and refrigerate overnight before baking. This doesn’t add any cooking time—just pop them in the oven cold from the fridge, but add 10 to 15 minutes to the total baking time since they’ll be starting cold.
You can also freeze cooked ribs for up to 3 months. Wrap them tightly in plastic wrap first (to prevent freezer burn), then wrap that in foil, and place them in a labeled freezer bag. Thaw them overnight in the refrigerator, then reheat as directed above. The texture remains excellent through freezing if you wrap them carefully.
For entertaining, you can cook the ribs completely several hours ahead, wrap them loosely in foil to keep them warm, and hold them in a 200°F oven for up to 2 hours. They’ll stay warm without overcooking, and you can add fresh sauce right before serving if you want that just-made appearance.
If you’re serving them at a party and want to avoid the sauce-on-hands situation, consider pulling the meat off the bones and serving it as a warm appetizer or sandwich filling instead of full racks. The meat stays incredibly moist and tender, and you get the bonus of people being able to eat without needing a napkin the size of a small blanket.
Best Side Dishes to Serve with Ribs
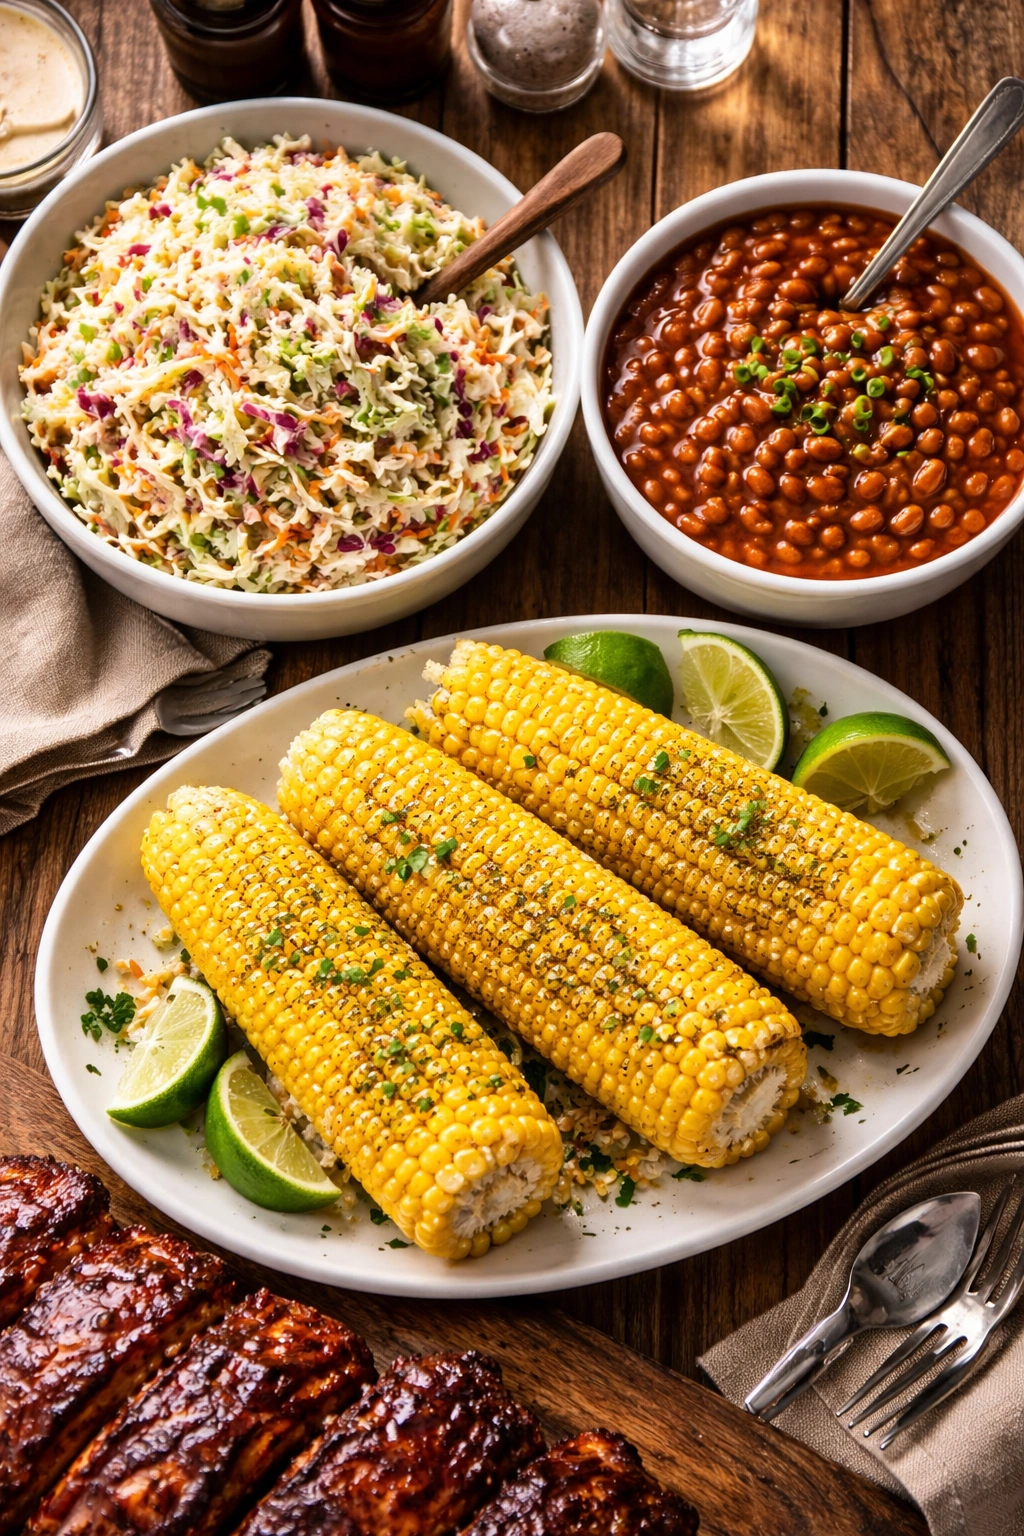
Ribs are rich and savory-sweet, so sides should either balance that richness with acidity and freshness, or complement it with creamy comfort. Coleslaw is the classic for a reason—the vinegary crunch cuts through the richness of the meat perfectly. A simple creamy or vinegar-based slaw, topped with fresh herbs, is ideal.
Baked beans are practically mandatory. The sweetness and the soft texture balance perfectly with ribs. Homemade baked beans with brown sugar, mustard, and bacon are incredible, but even canned beans heated up with a bit of butter and a splash of vinegar work beautifully.
Corn on the cob adds sweetness and freshness. Wrap it in foil with butter, salt, and pepper, and bake it alongside your sides. Or grill it if you have a grill running, which adds another layer of flavor.
Potato salad (especially creamy versions with mayonnaise and celery) is the ultimate comfort side. The cool, tangy potatoes contrast beautifully with warm, sticky ribs. Make it ahead of time; it’s even better the next day as flavors meld.
Mashed potatoes or sweet potatoes add richness and creaminess. Serve them plain or loaded with butter and herbs. They soak up extra sauce nicely too.
Grilled or roasted vegetables—such as asparagus, zucchini, or bell peppers—add color and a lighter element. You can grill them while the ribs broil in the oven, or roast them alongside other sides.
Mac and cheese (homemade or elevated box versions) is pure comfort. It’s rich enough to stand up to the ribs while still feeling like a celebration meal.
A big, fresh salad with a tangy dressing (vinaigrette, ranch, or blue cheese) provides a crisp contrast to the savory-sweet ribs. Spinach or mixed greens work better than iceberg since they hold up to heavier dressings.
Cornbread is the bread of choice here. It’s slightly sweet and substantial enough to soak up sauce, and it pairs perfectly with both the ribs and the beans.
Honestly, you really can’t go wrong—just pick one starchy element, one vegetable or salad for freshness, and serve with plenty of napkins and maybe a wet-wipe station because these ribs are wonderfully messy to eat.
Final Thoughts
Fall-off-the-bone oven-baked ribs prove that the best cooking doesn’t require expensive equipment, complicated techniques, or hours of active work. It requires patience, a good seal, the right temperature, and trust in the process. Once you’ve made them this way, you’ll never doubt it again. You’ll find yourself planning rib dinners just to have an excuse to make them, and your friends and family will start requesting them before you even offer.
The beauty of this method is how forgiving it is. Ribs are naturally tough, which means they’re nearly impossible to overcook past the point of being delicious (though very overdone ones become mushy). They’re cheap, they’re impressive, and they taste like you spent way more effort than you actually did. That’s the hallmark of a really good recipe—it looks like you’re a genius in the kitchen when really, you just let time and proper technique do the work.
Start with good ribs, be generous with the seasoning, seal that foil properly, and let your oven work its magic. In less than four hours total time (with only fifteen minutes of actual hands-on work), you’ll have ribs that taste like they came from a professional pit master, made right in your own kitchen. That’s not luck or magic—it’s just knowing the method that works.