There’s something almost magical about biting into a muffin that tastes like it came straight from an upscale bakery—that tender, moist crumb with a perfectly domed top that’s slightly crispy on the outside and impossibly soft inside. The problem is that most homemade muffins turn out dense, flat, or disappointingly bland compared to the real thing. You probably assume that bakery muffins require some kind of professional secret or special equipment that home cooks simply don’t have access to.
Here’s the truth: bakery-quality muffins aren’t actually that difficult to make at home once you understand exactly what separates them from ordinary muffins. It’s not magic—it’s chemistry, technique, and a few specific decisions about ingredients and method. Professional bakers aren’t hoarding exclusive tools or rare ingredients. They’re just being intentional about things that most home recipes gloss over: the ratio of fat to flour, the mixing method, how you handle the batter, and crucially, what happens during those final moments in the oven.
The difference between a muffin that tastes homemade and a muffin that tastes bakery-made comes down to understanding a few core principles and being willing to pay attention to the small details that compound into outstanding results. This isn’t about complicated techniques or obscure ingredients—it’s about doing the fundamentals right and understanding why each step matters.
What Sets Bakery Muffins Apart
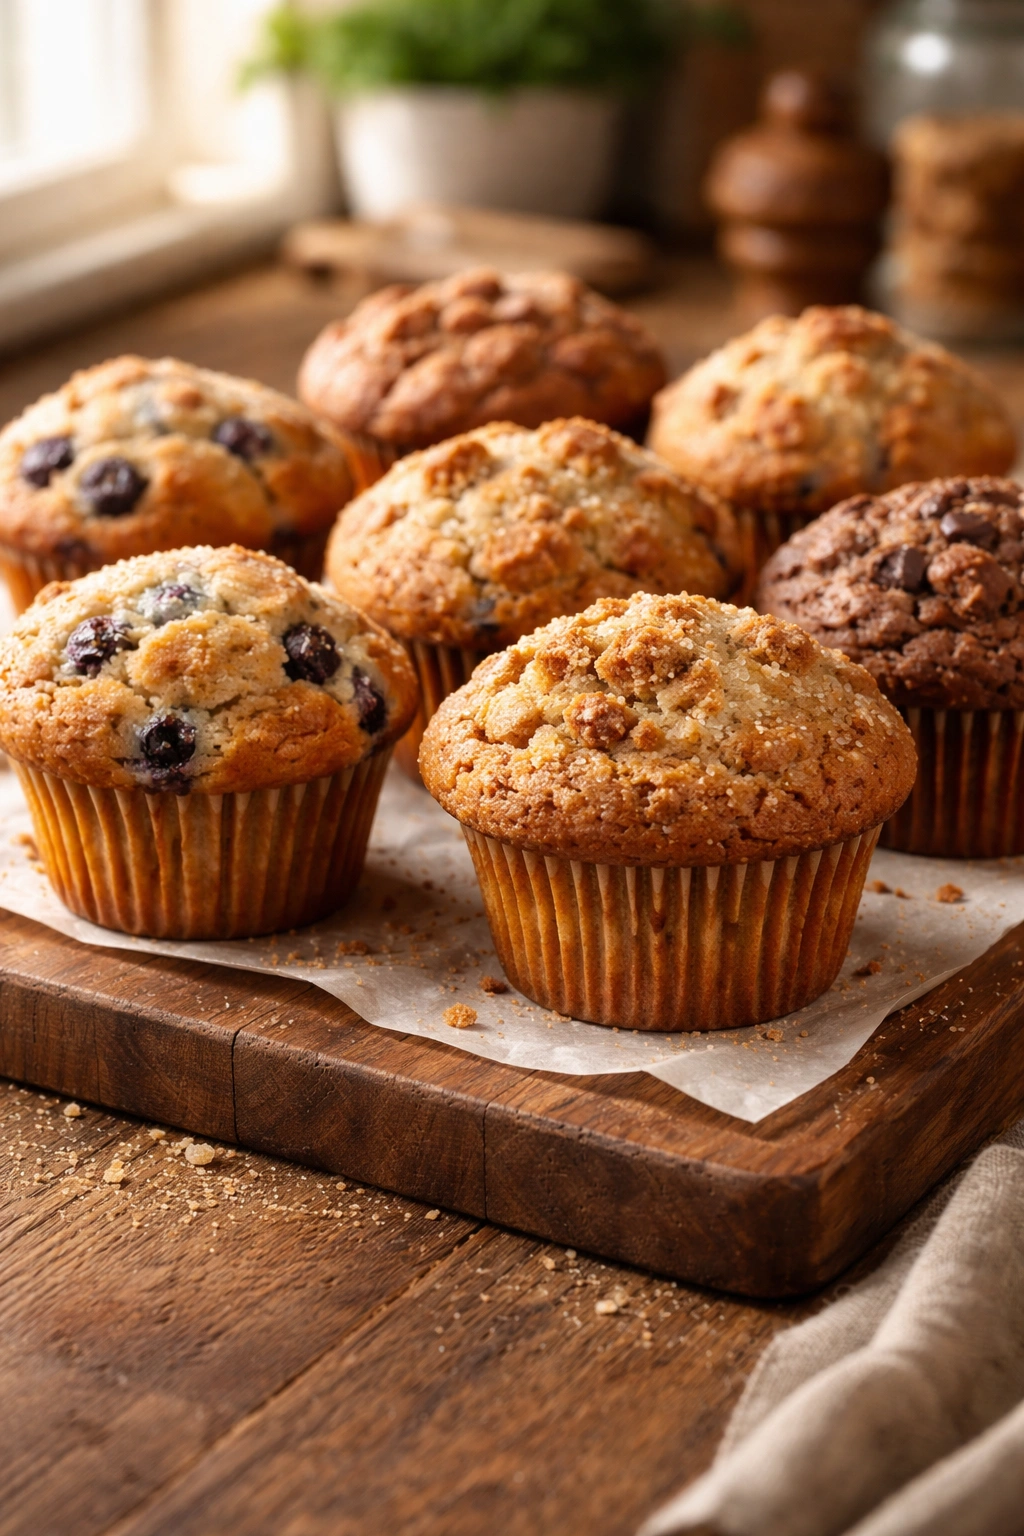
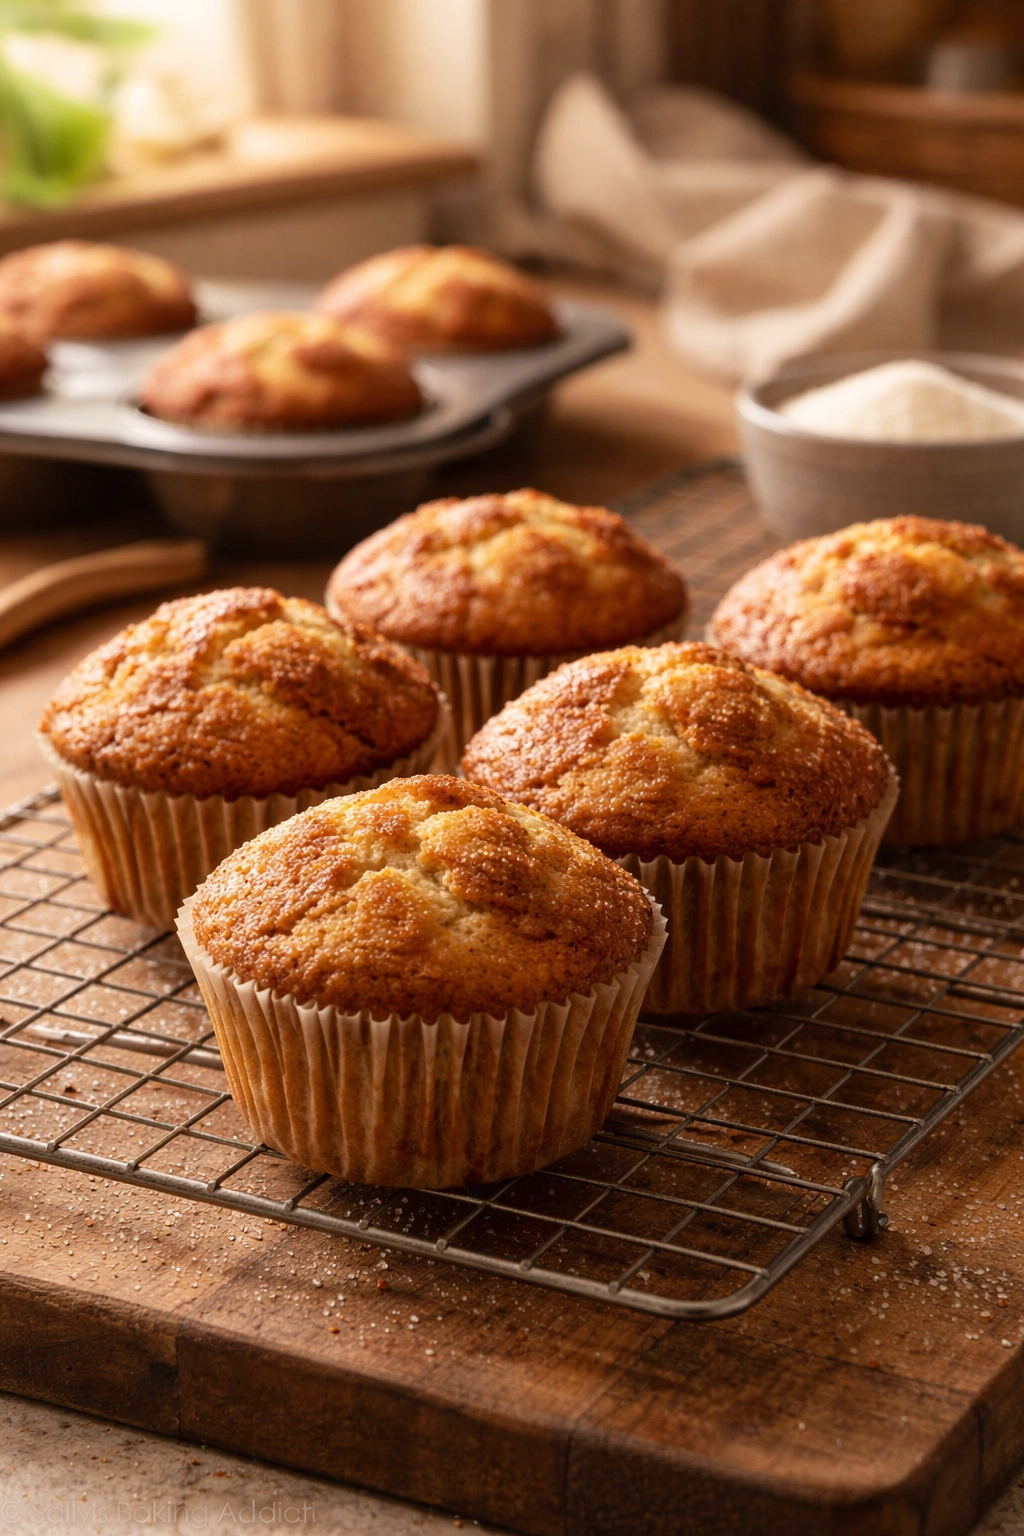
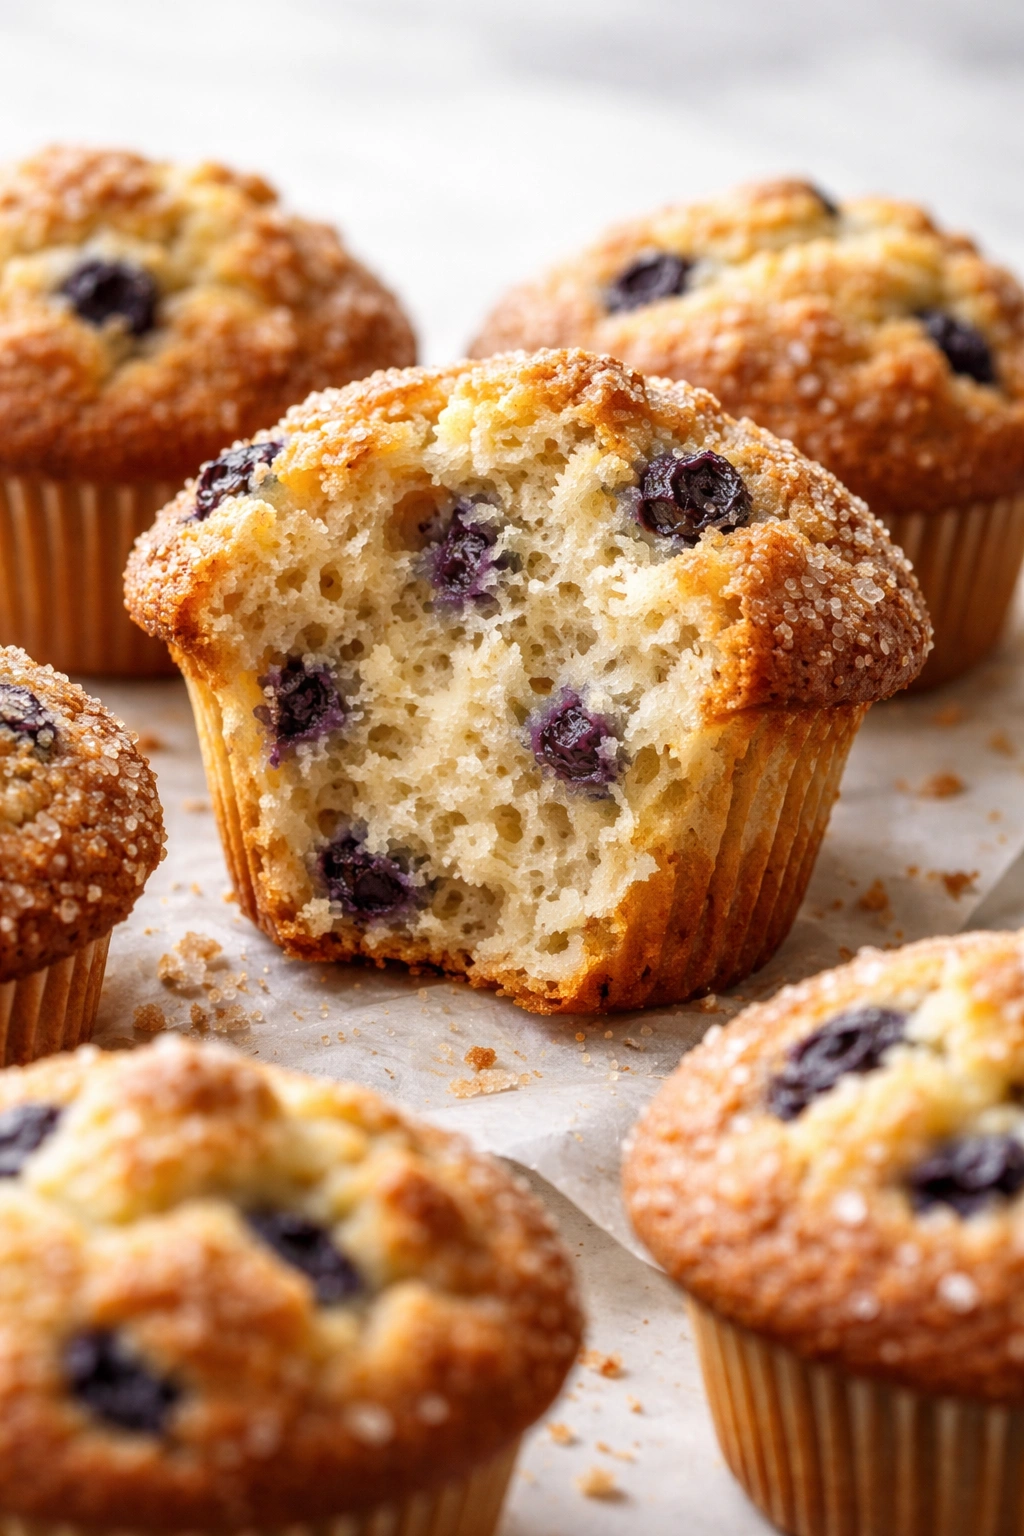
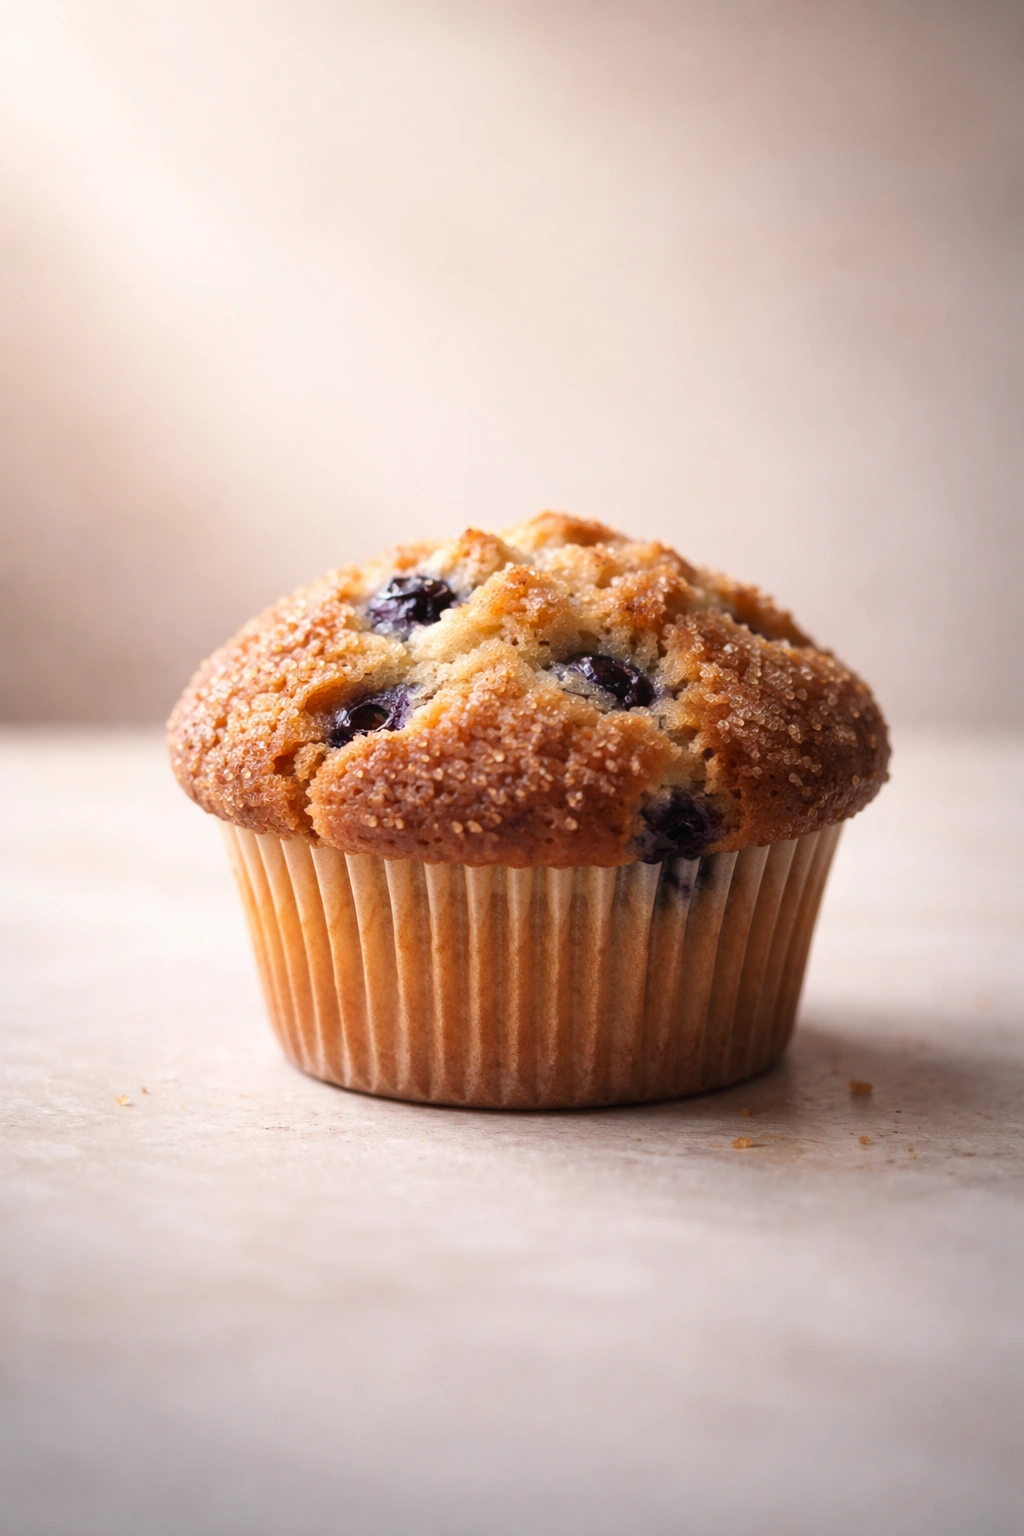
Commercial bakeries produce muffins that are noticeably different from what most home recipes deliver. They have a taller, more dramatic dome. The crumb is more tender and consistently moist, not dry or crumbly. The flavor is more pronounced, with that rich, almost vanilla-forward taste that makes you want another one immediately. The texture has subtle complexity—it’s soft and delicate, but not so fragile that it falls apart when you pick it up.
A significant part of this difference comes from fat content. Bakery muffins contain more butter and sometimes oil than you might expect, which creates a moister, more luxurious crumb that stays fresher for longer. This isn’t about making them unhealthy—it’s about creating the structure that allows a muffin to be soft and pleasant to eat rather than dry and cake-like.
The other major advantage is precision in mixing. Bakery recipes follow the creaming method religiously, which means butter and sugar are beaten together first until they’re pale, fluffy, and noticeably increased in volume. This aerates the batter and creates tiny air pockets throughout. When the muffins bake, those air pockets expand, creating a tender structure with excellent rise. Home bakers often skip this step or do it halfheartedly, mixing everything quickly and wondering why their muffins never rise properly.
The Ingredient Quality Factor
Bakeries typically use higher-quality ingredients across the board. Their vanilla extract is genuine—not imitation—which makes a remarkable difference in the final flavor. Their butter is usually higher quality and kept at a consistent temperature for optimal mixing. Their baking powder and baking soda are fresh, not the containers that have been sitting in your pantry for three years.
You don’t need to buy expensive specialty ingredients, but you do need to pay attention to freshness. Baking soda and baking powder lose potency over time and will directly impact rise and dome formation. Check your leavening agents—if you haven’t replaced them in over a year, that’s likely part of the problem.
The Science of a Perfectly Domed Muffin
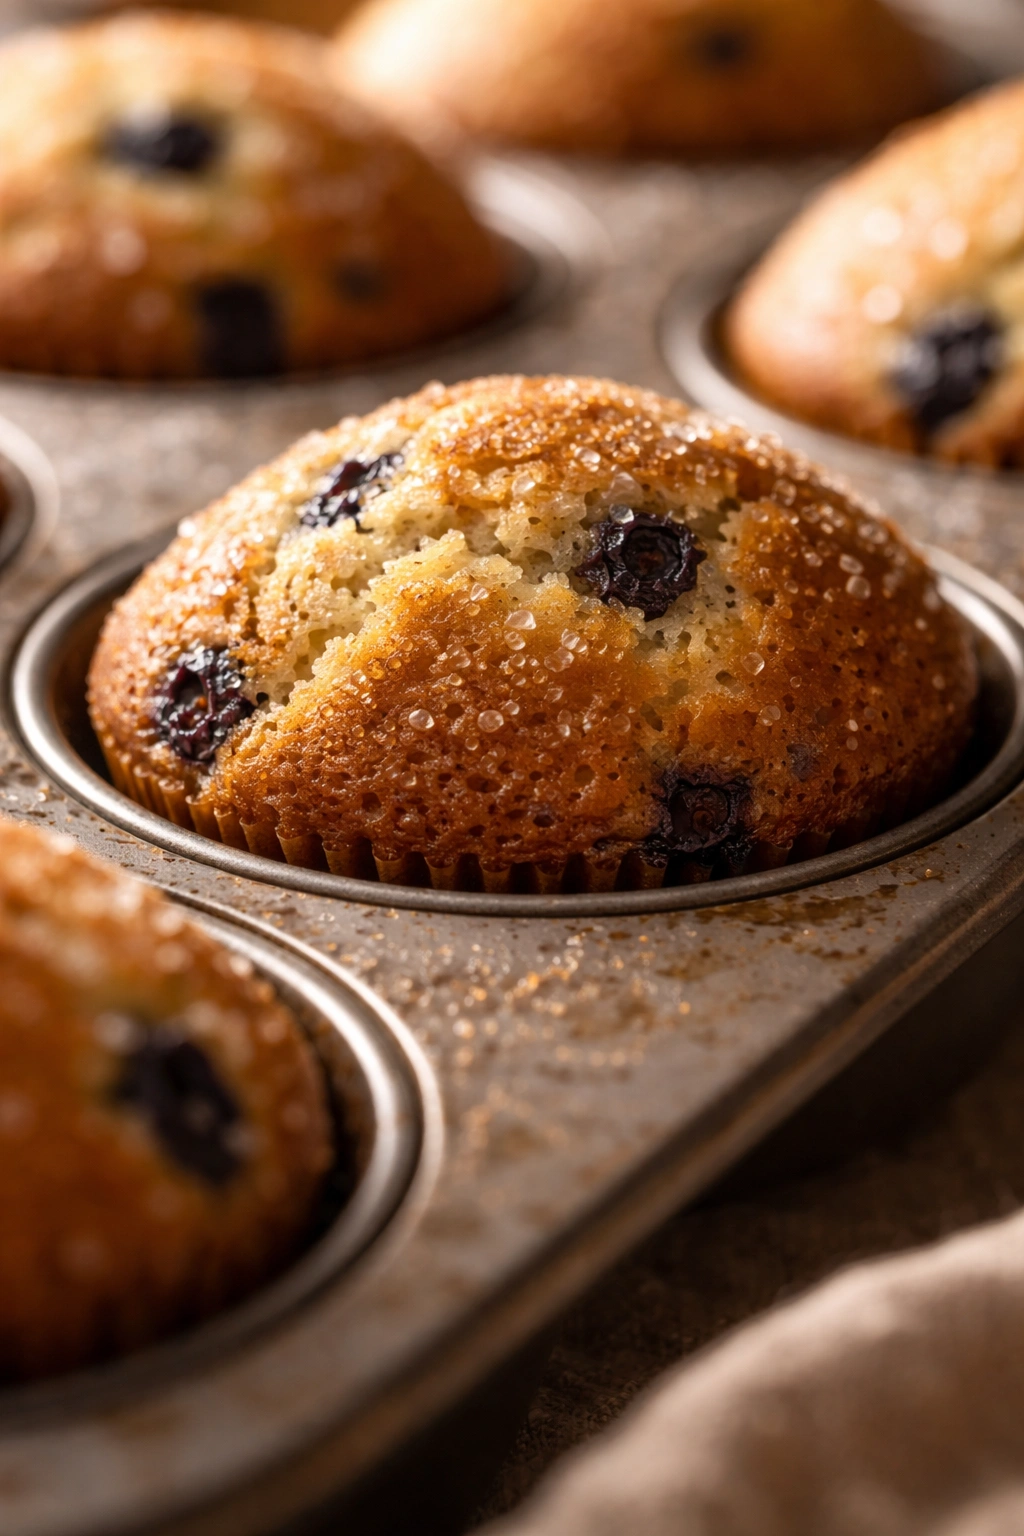
The signature dome that sits on top of every bakery muffin isn’t just for looks. It’s the result of understanding how muffin batter behaves during baking. When you pour batter into a muffin tin, the top crust sets first (within about the first 5-7 minutes of baking). If the center is still rising and expanding after the top has set, pressure builds beneath that crust, and it forms a dome or even splits slightly at the top.
This process requires three things working together: enough leavening power to create strong, sustained rise; the right oven temperature to set the outside without cooking the inside too quickly; and critical timing—getting the muffins into a truly preheated oven so that rising happens consistently across all of them at the same rate.
The oven temperature is more important than most recipes suggest. A 375°F oven is standard for muffins, but the oven must reach that temperature and hold it steadily. If your oven runs cool (which many do), your muffins won’t rise as aggressively and won’t develop that dramatic dome. The solution is either to verify your oven temperature with an oven thermometer (a $5-10 investment that pays for itself) or to accept that you might need to bake at 400°F or even 425°F to compensate.
The batter consistency also plays a role. Muffin batter should be thick but pourable—it should slowly pour from a spoon rather than running off immediately like pancake batter, but it shouldn’t be so thick that you need to scrape it out with a spatula. If it’s too thin, the batter spreads in the pan and doesn’t rise as dramatically. If it’s too thick, you have inadequate rise and a dense crumb.
How Crumb Structure Forms
A muffin’s crumb structure—how tender or dense, how moist or dry—comes down to the proportion of fat, sugar, eggs, and the type of mixing method used. Creaming butter and sugar together incorporates air into the fat, which becomes the foundation for the leavening gases that produce a tender crumb. When you fold in flour gently instead of overmixing, you preserve those tiny air pockets rather than deflating them.
Overmixing is the biggest culprit behind dense muffins. Once flour hits the batter, you’re activating gluten development. Gluten makes dough stretchy and chewy—great for bread, terrible for muffins. Quick, gentle folding keeps gluten development minimal and preserves the tender structure you built during the creaming phase.
Essential Equipment and Ingredients
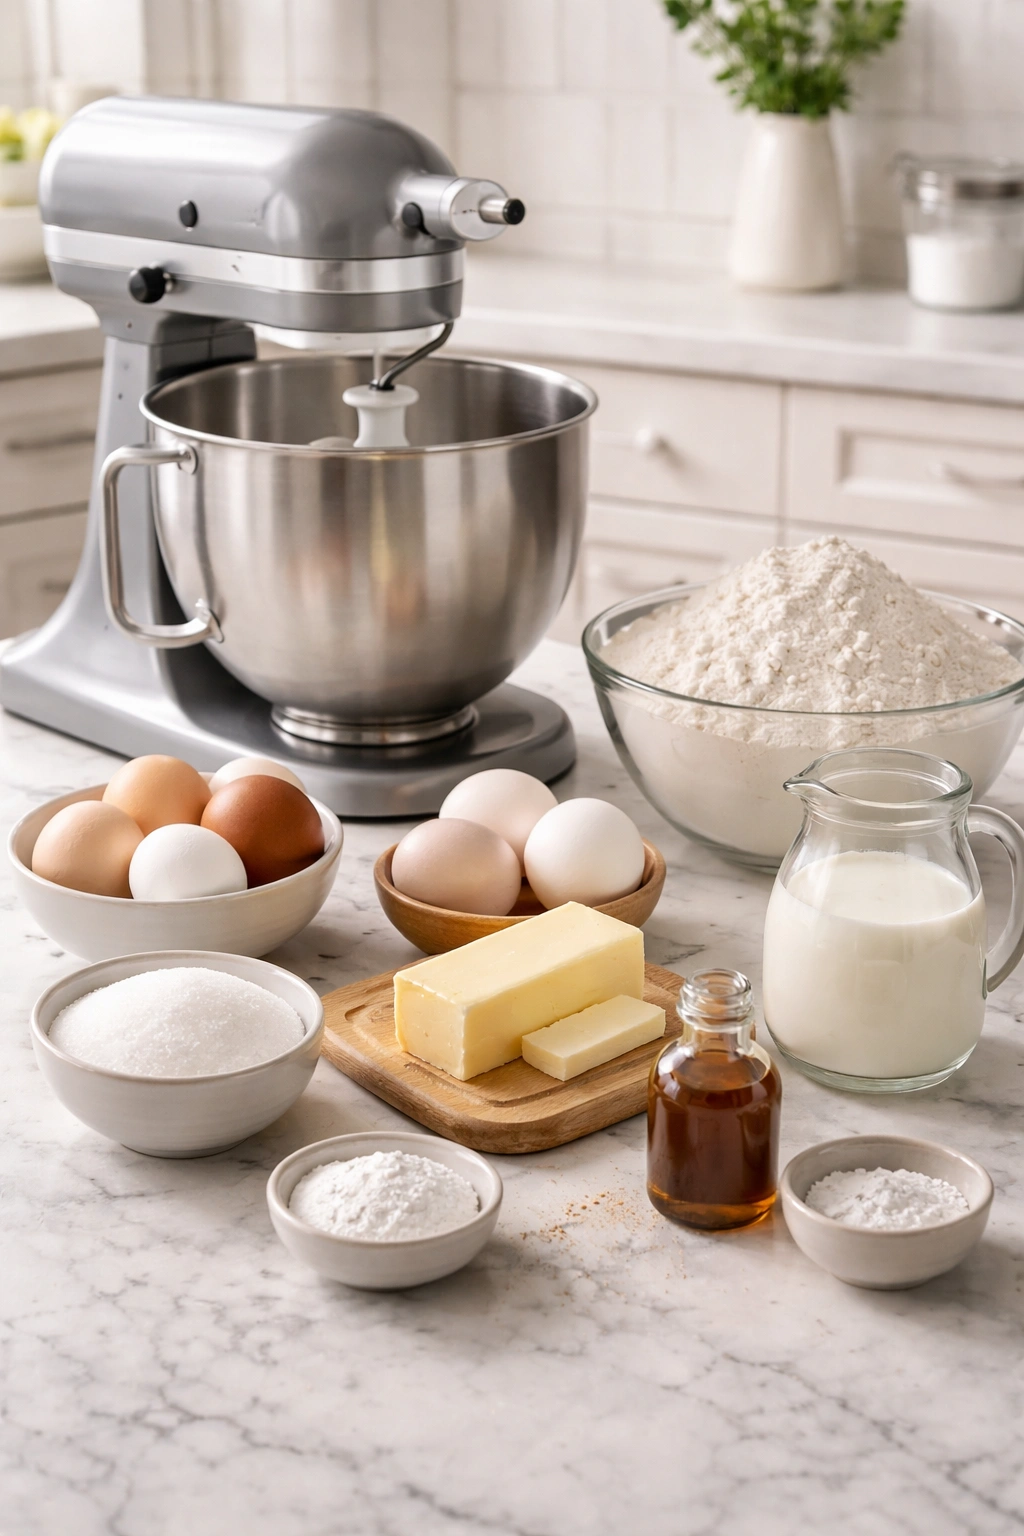
You don’t need fancy or expensive equipment, but you do need a few items to work properly. A stand mixer with a paddle attachment makes creaming incredibly fast and consistent—you can do it by hand, but it takes longer and requires more attention. A good measuring technique matters more than the specific tools; using a kitchen scale for flour is ideal, but properly spooning and leveling flour in measuring cups works fine if you’re careful.
For ingredients, start with unsalted butter so you control the salt content. All-purpose flour works perfectly for muffins. Use fresh baking powder and baking soda that you haven’t had open for more than six months. Granulated sugar is essential—never substitute brown sugar in the creaming phase, as it has a different moisture content and will change your results. Use large eggs at room temperature so they incorporate smoothly into the creamed mixture.
For vanilla, genuine vanilla extract makes a noticeable difference—imitation tastes artificial and flat in comparison. If you’ve never tried real vanilla, you’ll be surprised how much depth it adds. Whole milk works better than low-fat or non-fat milk because it creates a richer, more tender crumb. If all you have is low-fat milk, add an extra tablespoon or two of butter to compensate.
Classic Vanilla Muffins with Perfect Rise
This is the foundation recipe—once you master this, you can create any flavored variation you want. These muffins are tall, tender, and deeply vanilla-flavored, with that signature bakery dome and moist crumb that keeps for days.
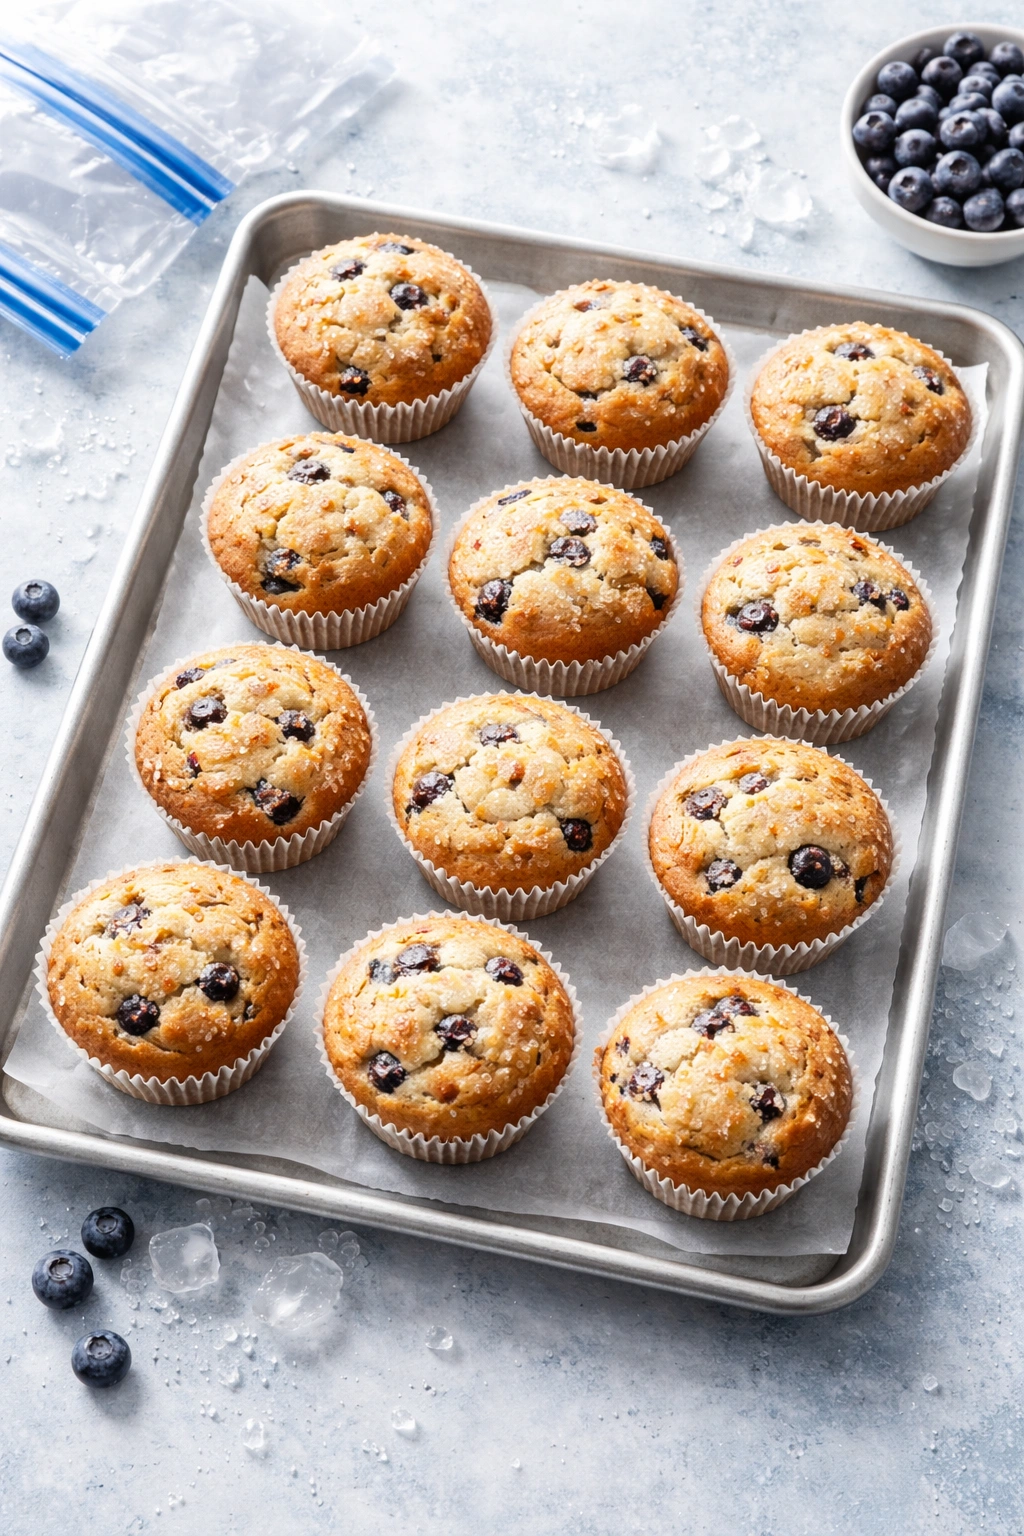
Yield: Makes 12 standard-sized muffins
Prep Time: 15 minutes
Cook Time: 22-25 minutes
Total Time: 40 minutes
Difficulty: Beginner — the steps are straightforward, and you don’t need any special equipment beyond a standard muffin tin.
For the Muffins:
- 2 cups all-purpose flour
- 1¾ teaspoons baking powder
- ½ teaspoon fine sea salt
- ¾ cup (1½ sticks) unsalted butter, softened to room temperature
- 1 cup granulated sugar
- 2 large eggs, at room temperature
- 2 teaspoons pure vanilla extract
- ½ cup whole milk, at room temperature
- ¼ cup plain yogurt or sour cream (optional but highly recommended)
Prepare the Pan and Preheat:
-
Preheat your oven to 375°F (190°C) and position the rack in the center. Line a 12-cup muffin tin with paper liners or grease each cup thoroughly with butter or non-stick spray.
-
If you’re using a stand mixer, this is the moment to turn it on briefly and let the bowl warm slightly—this isn’t necessary, but it helps the cold bowl not cool down your softened butter.
Make the Dry Mix:
- In a medium bowl, whisk together the flour, baking powder, and salt until everything is evenly distributed and there are no tiny pockets of baking powder hiding in the flour. Set aside.
Cream the Butter and Sugar:
-
Using a stand mixer fitted with the paddle attachment (or a hand mixer), add the softened butter and sugar to a large mixing bowl. Beat on medium speed for 4 to 5 minutes, until the mixture transforms from grainy and sandy into something pale, noticeably fluffy, and increased in volume by about 50%. You should see a color shift from yellow to almost pale cream—this is the signal that you’ve incorporated enough air. Scrape down the sides of the bowl halfway through.
Advertisements -
Add the eggs one at a time, beating for about 30 seconds after each addition and scraping down the sides of the bowl after the second egg. The batter may look slightly broken or curdled at this stage—this is completely normal and will come together in the next step.
-
Reduce the mixer speed to low and add the vanilla extract. Mix for just 10 seconds until combined.
Fold in the Remaining Ingredients:
-
Add the flour mixture in three additions, alternating with the milk and yogurt in two additions. The sequence is: one-third of the flour, then half of the milk mixture, then another third of the flour, then the remaining milk mixture, then the final third of the flour. Mix on low speed after each addition, just until the previous addition disappears into the batter. Do not overmix—once there are no visible streaks of flour, stop. Overmixing develops gluten and results in dense, tough muffins.
-
After the final bit of flour has been folded in, stop the mixer. The batter should be thick but pourable—it should slowly move when you tilt the bowl, and it should fall off a spoon in a few seconds, not run immediately.
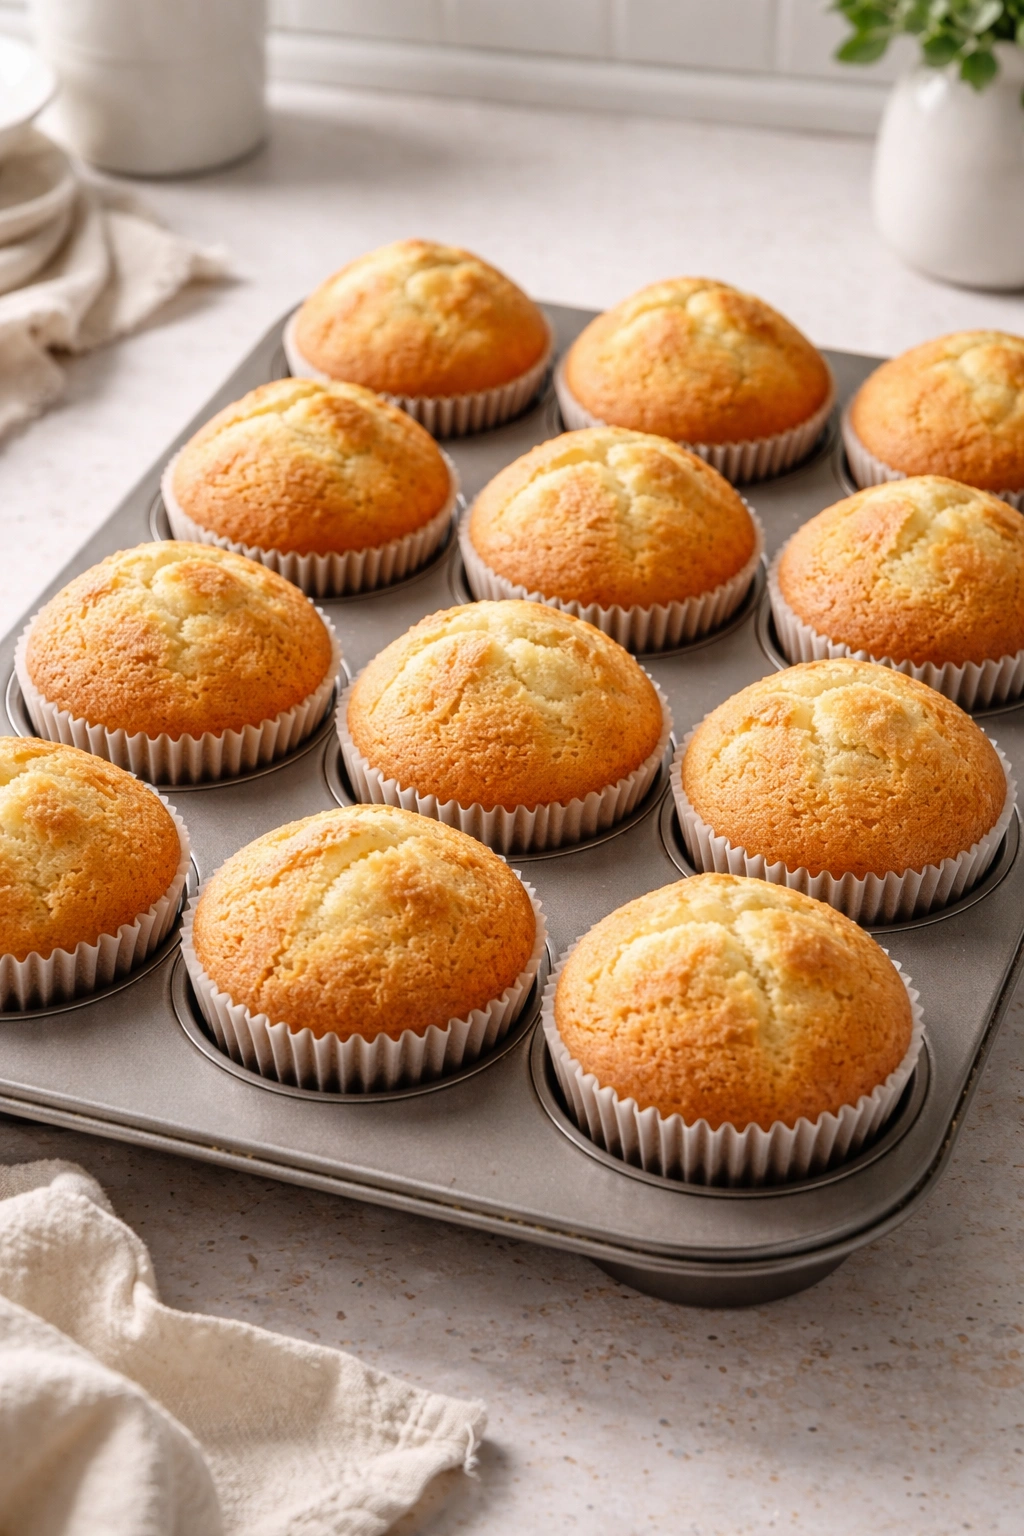
Fill the Tin and Bake:
-
Divide the batter evenly among the prepared muffin cups, filling each one just over three-quarters full. The key is consistency—if some cups get more batter than others, they’ll bake at different rates. A standard muffin scoop makes this easier and faster.
-
Bake for 22 to 25 minutes, rotating the tin halfway through baking (around the 12-minute mark). The muffins are done when the tops are golden brown and a toothpick inserted into the very center of a muffin comes out clean or with just one or two moist crumbs clinging to it. If the toothpick comes out with wet batter, they need another 2 to 3 minutes—check again soon.
Cool and Store:
-
Remove the muffin tin from the oven and set it on a wire cooling rack. Let the muffins rest in the tin for 5 minutes—this allows the structure to set slightly so they don’t fall apart when you remove them. After 5 minutes, turn each muffin out of the tin onto the cooling rack and let them cool completely, about 1 hour.
Advertisements -
Once completely cool, muffins can be stored in an airtight container at room temperature for up to 3 days. They do not need to be refrigerated.
The Creaming Method Explained
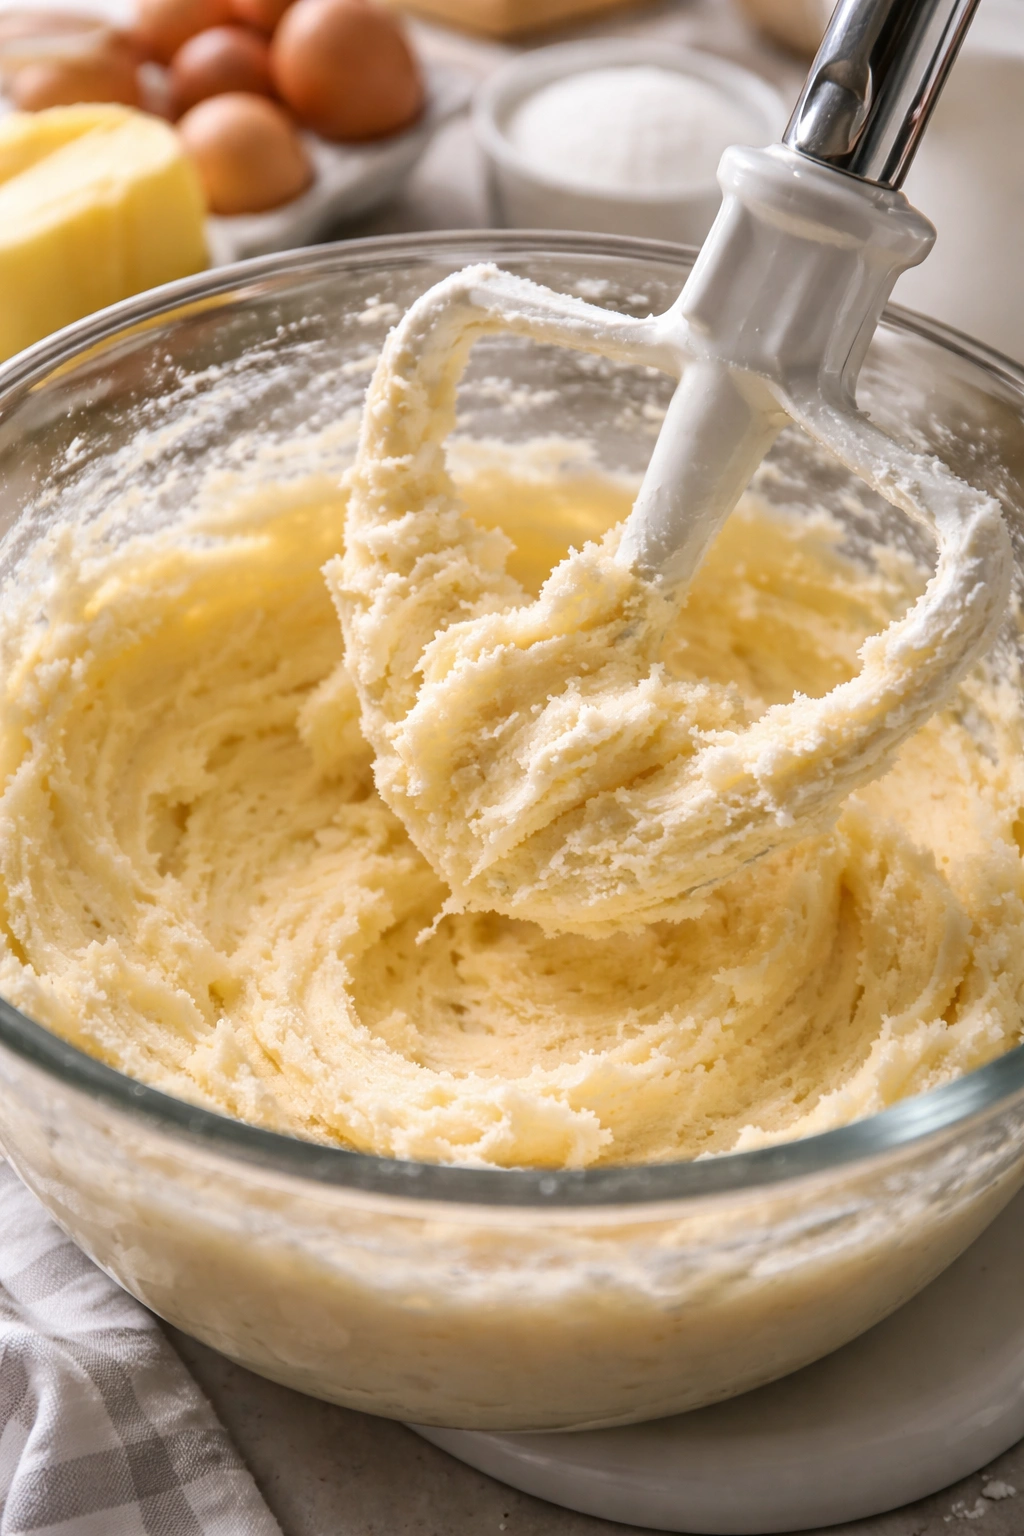
Understanding why the creaming method works will help you understand why it’s non-negotiable for bakery-style muffins. When you beat softened butter with granulated sugar for several minutes, something remarkable happens: the sugar crystals cut into the butter, breaking it into smaller and smaller particles and incorporating thousands of tiny air bubbles into the fat.
These air bubbles don’t just disappear—they become the foundation for leavening. When leavening agents (baking powder and baking soda) activate during baking, they release carbon dioxide gas, which fills and expands those tiny air bubbles you created during creaming. More air bubbles incorporated during creaming means more places for leavening gas to expand, which equals a lighter, more tender crumb.
If you skip the creaming step or rush through it in just 30 seconds, you don’t get enough air incorporation. The batter leavens less effectively, and you end up with a denser, flatter muffin. This is why recipes that mix everything at once in a bowl produce disappointing results compared to the creaming method.
The color change is visible and important. When butter and sugar are first combined, they’re pale yellow and grainy. As you cream them, they get progressively lighter and fluffier. When they reach a pale cream color and have noticeably increased in volume, you’ve done it right. This typically takes 4 to 5 minutes with a stand mixer or 7 to 10 minutes with a hand mixer.
How to Achieve That Signature Golden-Brown Top
The dome and the color are what make a muffin look and feel like it came from a bakery. Getting both requires attention to the oven environment and understanding what’s happening as the muffins bake. A truly preheated oven is essential—let it preheat for at least 15 minutes (not just the 5-10 minutes most ovens indicate with a beep).
The golden-brown color comes from the Maillard reaction, the chemical process where proteins and sugars react under heat and create new flavor compounds and brown color. This reaction happens around 300-330°F and accelerates as the temperature rises. To get that deep golden color without burning, you want the muffin tops to be directly exposed to the oven’s heat at a moderate temperature for the right amount of time.
Many ovens have hot spots—areas that bake faster or slower than others. Rotating the muffin tin halfway through baking (around 12 minutes for a 22-25 minute bake) helps equalize the browning. If your oven has a bottom shelf that’s much hotter than the middle shelf, move the rack up slightly. If the tops brown too quickly but the insides aren’t done, lower the oven temperature by 25°F and add a few minutes to the bake time.
The Dutch Oven Trick
Some bakers place a shallow Dutch oven or inverted baking sheet on a higher rack while muffins bake on the middle rack. This creates a two-tier baking environment that prevents the tops from browning too quickly while the insides cook. If your muffin tops are consistently getting dark brown before the interiors are cooked through, this technique is worth trying.
Another approach is to cover the muffin tin loosely with aluminum foil for the first 12-15 minutes of baking, then remove it for the final 7-10 minutes so the tops can brown. This slows down the browning on top while allowing the insides to cook through, then finishes with direct heat to develop color.
Chocolate Chip Muffins with Maximum Flavor
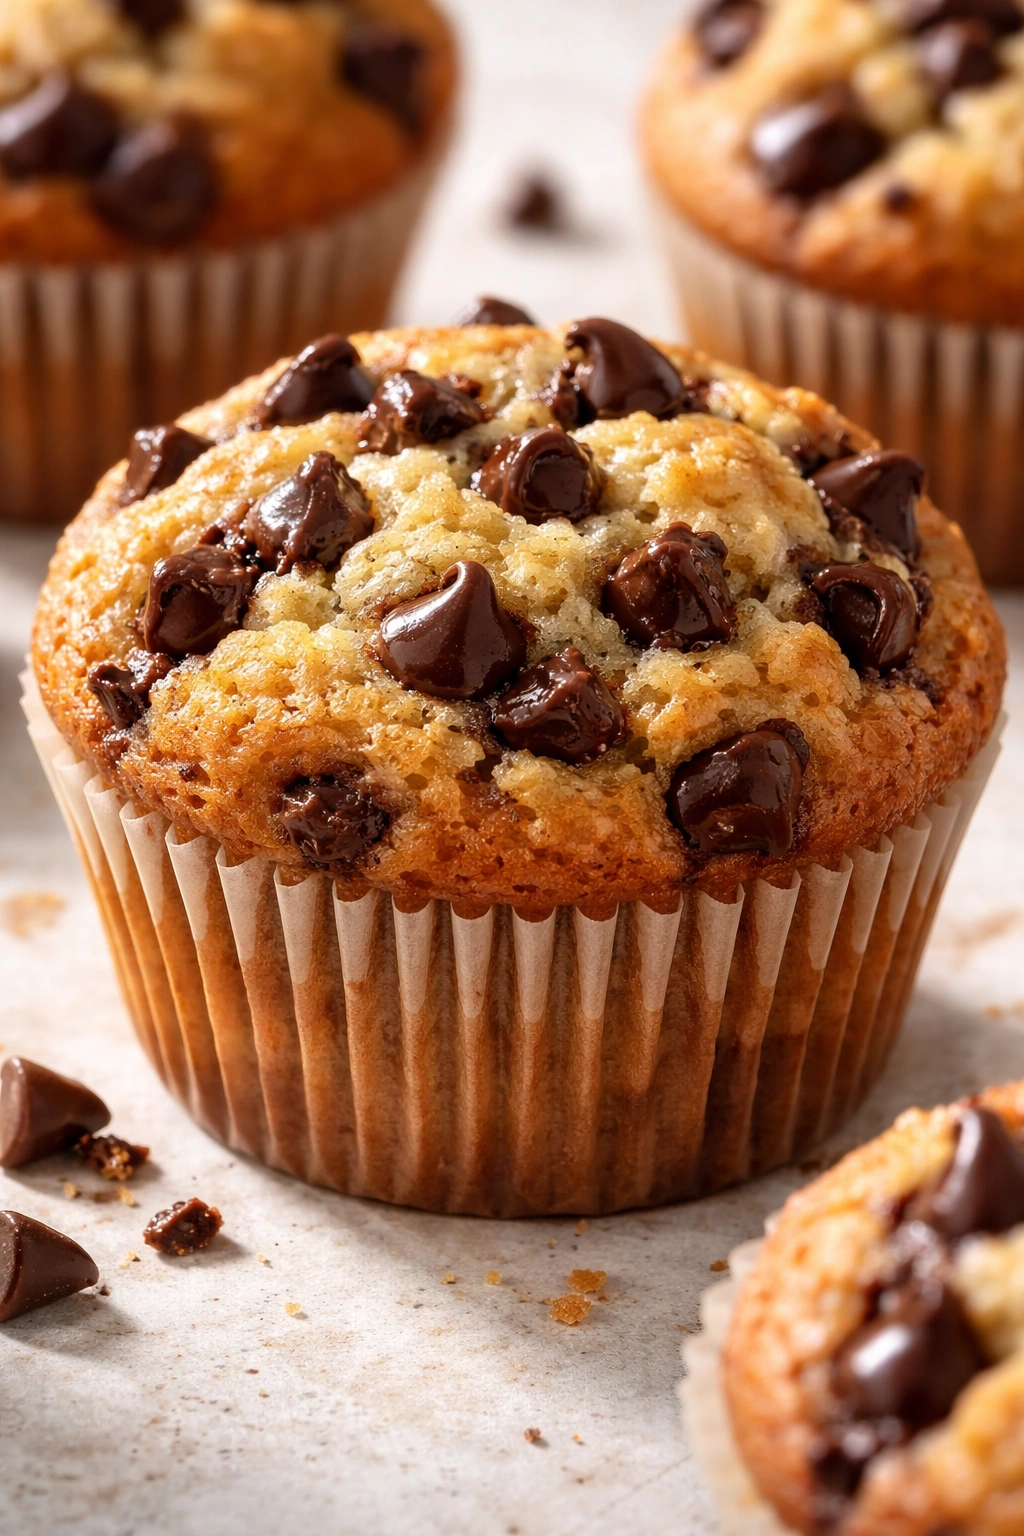
Chocolate chip muffins are the most popular flavor variation, but many recipes produce muffins where the chocolate flavor is barely noticeable. The solution is using more chocolate, using higher-quality chocolate, and combining it with complementary flavors that amplify the chocolate taste.
Start with the classic vanilla muffin recipe above and make these modifications: reduce the vanilla extract to 1½ teaspoons and add ¼ teaspoon of almond extract, which rounds out and deepens chocolate flavor. Fold 1½ cups of chocolate chips (use good-quality semi-sweet or dark chocolate) into the finished batter just before filling the tin.
For maximum chocolate impact, use a combination of milk chocolate chips and dark chocolate chips—this gives you complexity that single-origin chocolate can’t match. If the chocolate chips are cold from the fridge, let them sit out for 15 minutes before folding them in so they don’t shock the batter with their temperature difference.
Some bakers add a tablespoon of cocoa powder to the flour mixture—this intensifies the chocolate flavor without making the muffins taste like chocolate cake. Start with a teaspoon and increase it to your preference. Be mindful that cocoa powder is slightly drying, so you might need to increase the milk by a tablespoon or two to maintain the right batter consistency.
The Ripple Variation
For a bakery-style twist, layer the batter: fill muffin cups halfway, drop a few chocolate chips into the center, then top with more batter. This creates a surprise pocket of chocolate in the very center of each muffin—exactly what you find in premium bakery versions.
Another variation worth trying is adding ½ teaspoon of instant espresso powder to the dry ingredients. It won’t make the muffins taste like coffee—instead, it deepens the chocolate flavor and makes it more complex. Many people won’t be able to identify what’s different, just that the chocolate tastes richer than usual.
Blueberry Muffins with Berry-Packed Results
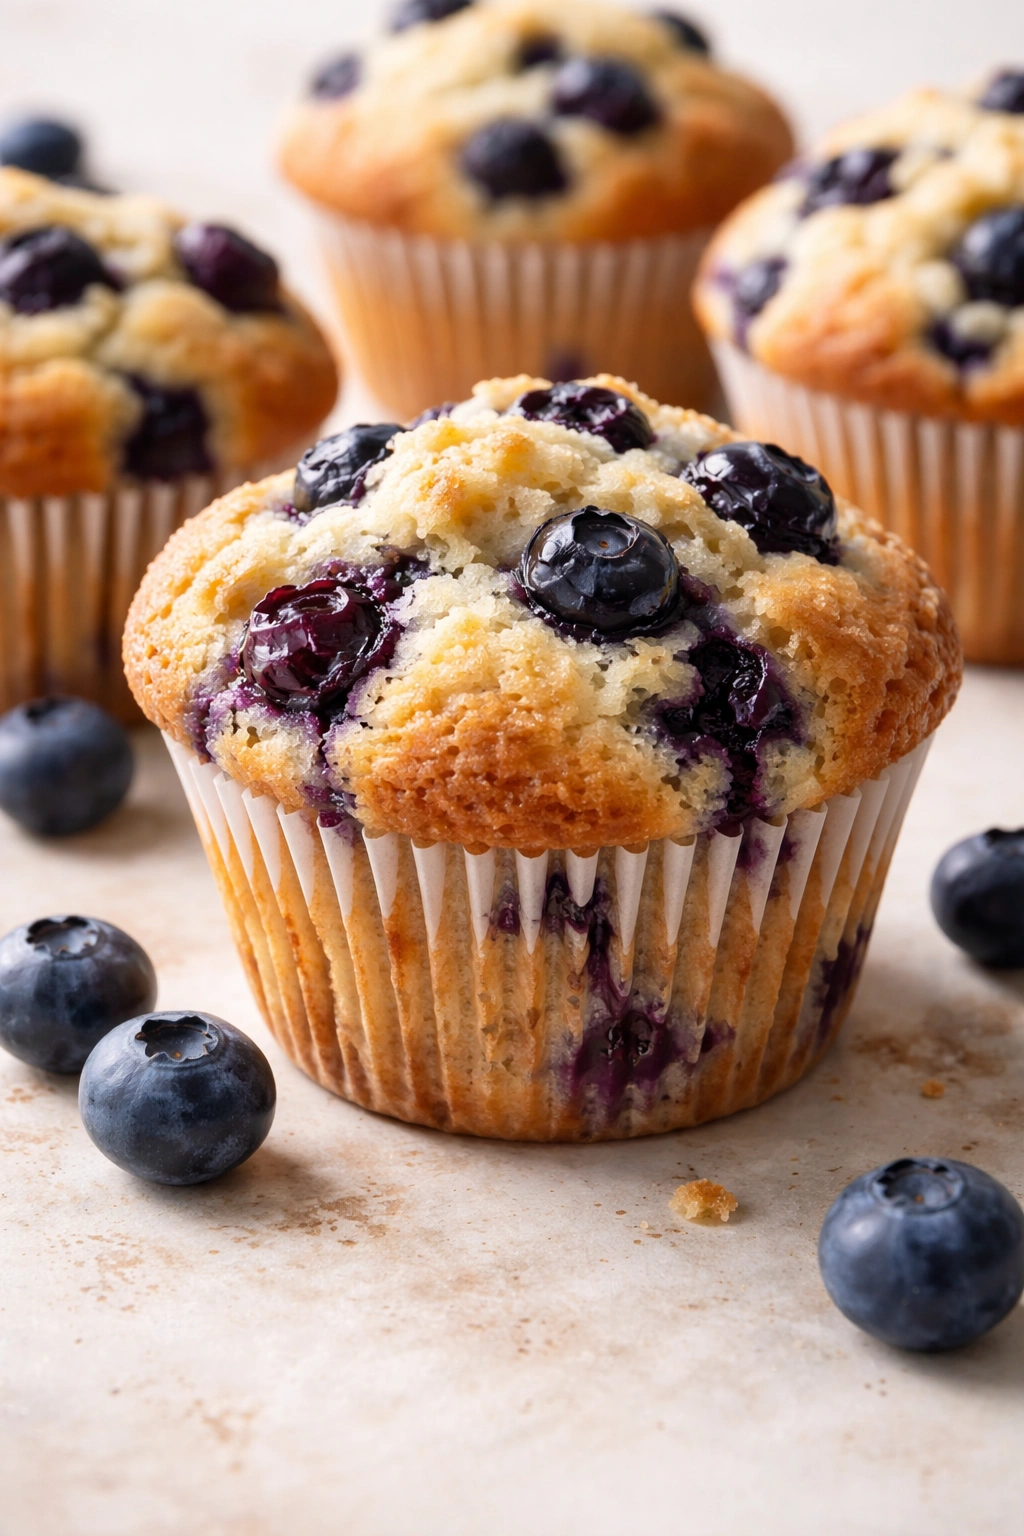
Blueberry muffins present a specific challenge: the berries can sink to the bottom of the pan during baking instead of distributing throughout. They also release their juice during baking, which can stain the surrounding crumb and sometimes give it a greenish hue if the pH is off.
Start with the classic vanilla recipe and add 1½ cups of fresh blueberries (frozen blueberries work too, though fresh taste better). The secret to keeping berries distributed is coating them lightly with flour before folding them into the batter. In a small bowl, toss the berries with about a tablespoon of the flour from your dry mix. This reduces their density slightly and helps them stay suspended rather than sinking.
Pro tip: If you’re using frozen blueberries, don’t thaw them—fold them in while they’re still frozen. Thawed berries release juice too quickly and soak into the batter. Frozen berries thaw gradually during baking and release their juice more slowly, distributing flavor throughout the muffin instead of creating wet pockets.
For enhanced blueberry flavor, add the zest of one lemon to the creamed butter and sugar, and reduce the vanilla to 1½ teaspoons. Lemon and blueberry is a classic combination that brightens the berry flavor without making the muffin taste lemony. Some bakers add ¼ teaspoon of ground cardamom, which adds a subtle spice note that deepens berry flavor in a way most people can’t quite identify.
If you’re dealing with berries that consistently stain the batter blue-green, it’s a pH issue. Add a pinch of baking soda (just an additional ⅛ teaspoon beyond what the recipe calls for) to neutralize the acidity from the berries. This shifts the pH slightly and prevents that greenish color that some people find unappealing.
Avoiding Dense and Flat Muffins
Dense muffins are the most common complaint from home bakers, and they usually trace back to one of these five issues. Understanding what causes density helps you diagnose the problem and fix it on your next bake.
The first culprit is inadequate creaming. If you’re not beating butter and sugar long enough, you don’t incorporate enough air, and the muffins don’t rise properly. The solution is simple: set a timer for 4-5 minutes with a stand mixer, and don’t stop early just because they look mixed. The volume increase and color change are what matter—stop when you see them, not when you think you’ve done enough.
The second is overmixing the batter. As soon as you start mixing flour into the batter, gluten development begins. Every second you mix develops more gluten, making the final muffin tougher and denser. Once you can’t see white streaks of flour, stop mixing. If some flour is still visible, give it one more fold with a spatula, then stop completely.
The third is old leavening agents. If your baking powder or baking soda has been open for more than six months, it’s losing potency. Test it by mixing a small amount with water or vinegar—it should fizz vigorously. If it barely reacts, it’s too old and needs replacing. Keep leavening agents in a cool, dry place, not in a steamy bathroom or above the stove.
The fourth is oven temperature. If your oven is running cooler than 375°F (which many home ovens do), muffins won’t rise as aggressively and will be denser. Verify your oven temperature with an oven thermometer. If it’s running cool, increase the temperature accordingly or invest in an oven thermometer and compensate.
The fifth is overfilling the muffin cups. It’s tempting to fill them to the brim because more batter seems like it should mean bigger muffins, but overfilled muffins don’t have room to rise upward—they spread outward and bake into dense, flat discs. Fill only three-quarters of the way, and let the rise create the dome, not the amount of batter.
Making Muffins Ahead and Freezing
One of the best things about bakery-style muffins is that they freeze beautifully and taste fresh when thawed. The structure you’ve built through proper creaming and careful mixing actually benefits from cold storage—the muffins taste even more moist and tender after they’ve been refrigerated or frozen.
Bake muffins completely and let them cool to room temperature. Once cool, you can store them at room temperature in an airtight container for 3 days, refrigerate them for up to 5 days, or freeze them for up to 3 months. For freezing, place cooled muffins in a single layer on a baking sheet and freeze until solid (about 2 hours), then transfer to a freezer bag, pressing out as much air as possible.
To thaw, let muffins come to room temperature (about 1-2 hours), or reheat them in a 300°F oven for 8-10 minutes if you want them warm. Don’t reheat in the microwave—it makes them tough and rubbery. The oven gently reheats and revives the texture better than any other method.
You can also prepare the batter the night before and refrigerate it overnight. Some bakers swear that letting the batter rest in the fridge improves the flavor and texture. The only catch is that baking powder’s leavening power weakens over time, so batter that sits overnight will rise slightly less than freshly made batter. To compensate, add an extra ¼ teaspoon of baking powder to the dry mix if you’re planning to refrigerate the batter overnight.
Assembling Muffins from Components
You can also bake muffins completely a day or two ahead, and then serve them fresh by reheating. Make a simple glaze or streusel topping to warm muffins just before serving—a drizzle of maple glaze or a sprinkling of cinnamon sugar transforms already-baked muffins into something that tastes freshly made. Store the toppings separately from the muffins and add them right before eating.
Some bakeries freeze batter in portions (by scooping it into an ice-cube tray, freezing, then transferring to freezer bags). Then in the morning, they thaw the batter to room temperature, fill muffin tins, and bake. This works, but thawed batter behaves slightly differently than fresh batter—it leavens less aggressively, so expect slightly less rise than you’d get from fresh batter.
Serving and Pairing Ideas
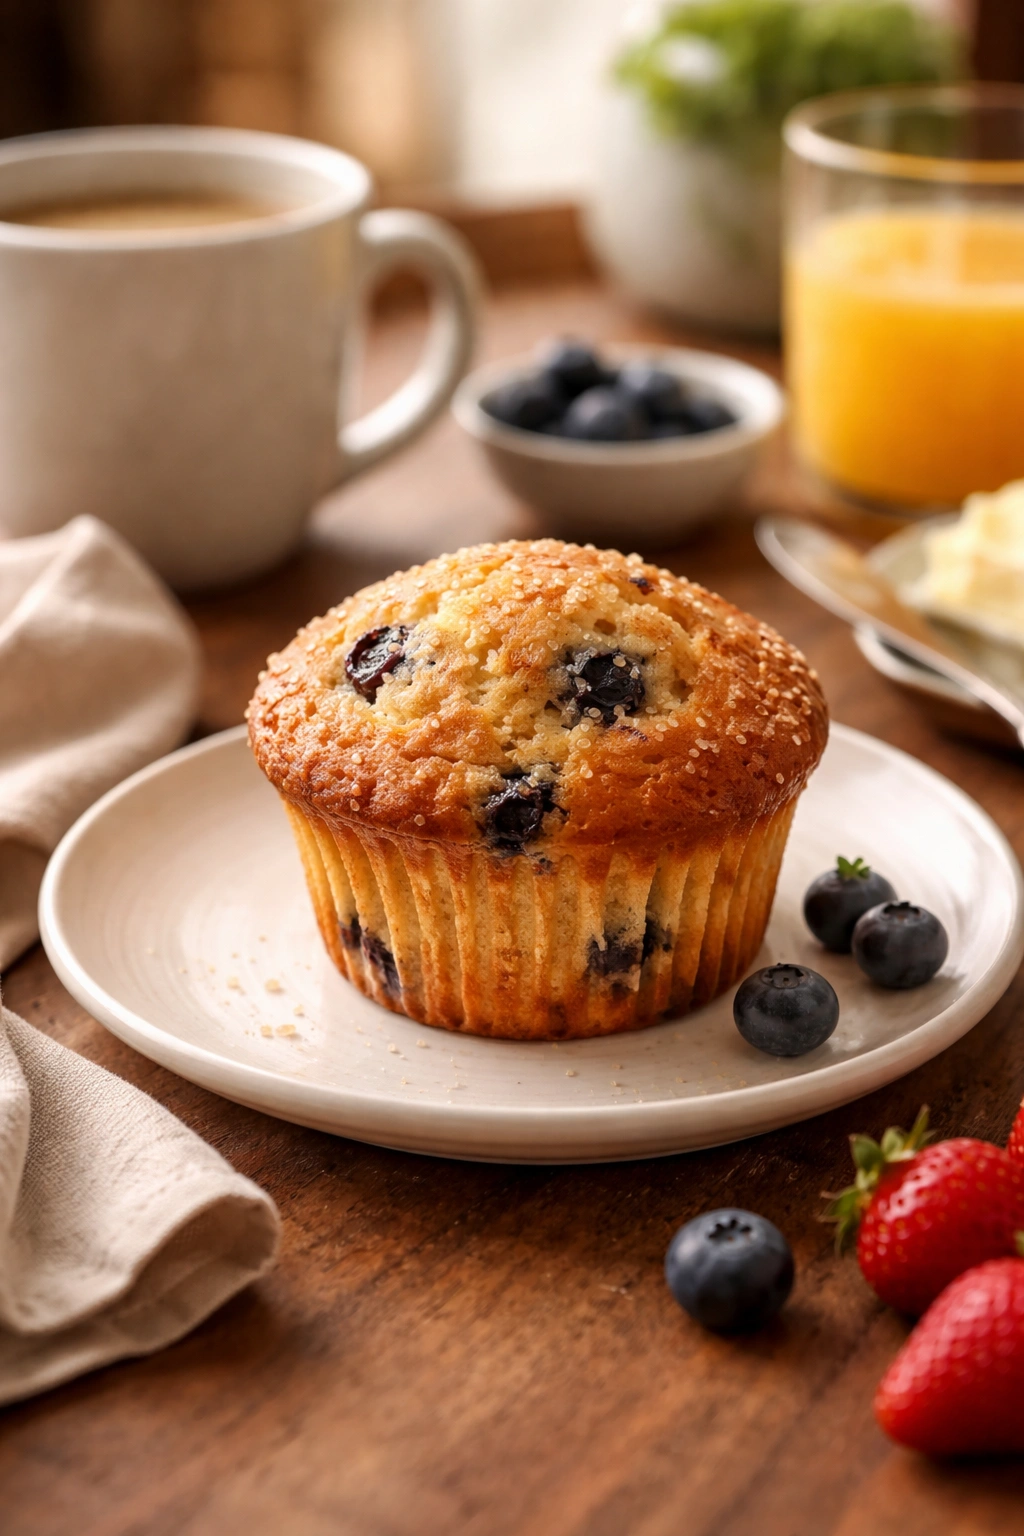
Bakery-style muffins are breakfast superstars, but they’re also incredible as an afternoon snack or dessert. The tender crumb and rich flavor mean they pair beautifully with coffee, tea, or milk. Serve them warm and slightly broken apart so people can see the tender crumb inside—that’s part of the appeal.
For breakfast, pair muffins with Greek yogurt and berries, or with scrambled eggs and crispy bacon. The richness of the muffin means you don’t need additional butter or jam—they stand on their own. For a morning pairing, set out a selection of different muffins (vanilla, chocolate chip, blueberry) and let people choose based on their mood.
Muffins also work beautifully as a gift. Wrap them individually in parchment paper and pack them in a bakery box—they look and feel like a professional bakery gift. Most people are delighted to receive homemade muffins that taste as good as a professional bakery version.
Flavor Pairings and Accompaniments
Coffee is the classic pairing, but strong black tea, herbal tea, or even hot chocolate all work wonderfully. For a simple upgrade, serve muffins with a small pot of softened butter and a selection of jams or honey—let people add their own if they want extra richness.
For evening or dessert serving, pair muffins with vanilla ice cream. Chocolate chip muffins are particularly good this way—serve warm with a scoop of ice cream melting on top. You could also pair them with flavored whipped cream (cinnamon whipped cream with blueberry muffins, or chocolate whipped cream with vanilla muffins).
Consider seasonal pairings: blueberry muffins during berry season paired with fresh berries and whipped cream; pumpkin spice muffins in fall with hot apple cider; chocolate muffins during winter with hot chocolate topped with whipped cream.
Final Thoughts
The difference between a muffin that tastes homemade and one that tastes bakery-made comes down to understanding a few core principles and executing them with care. The creaming method isn’t complicated—it just requires a few extra minutes of beating butter and sugar. Gentle mixing takes discipline but protects the tender structure you’ve built. A properly preheated oven and the right temperature make a measurable difference in rise and browning.
Start with the classic vanilla recipe and master that first. Once you understand how the recipe behaves in your oven and your kitchen, creating flavor variations becomes straightforward. The fundamentals—quality ingredients, proper mixing technique, careful attention to baking time and temperature—work for every variation.
The beautiful part is that once you’ve made bakery-style muffins once, you’ll never go back to the other kind. They’re not actually harder to make than ordinary muffins; they just require a bit more attention to the details that separate good from excellent. That extra care is exactly what transforms a weekend breakfast into something that tastes as good as what you’d pay for at a professional bakery, and tastes even better because you made it yourself.