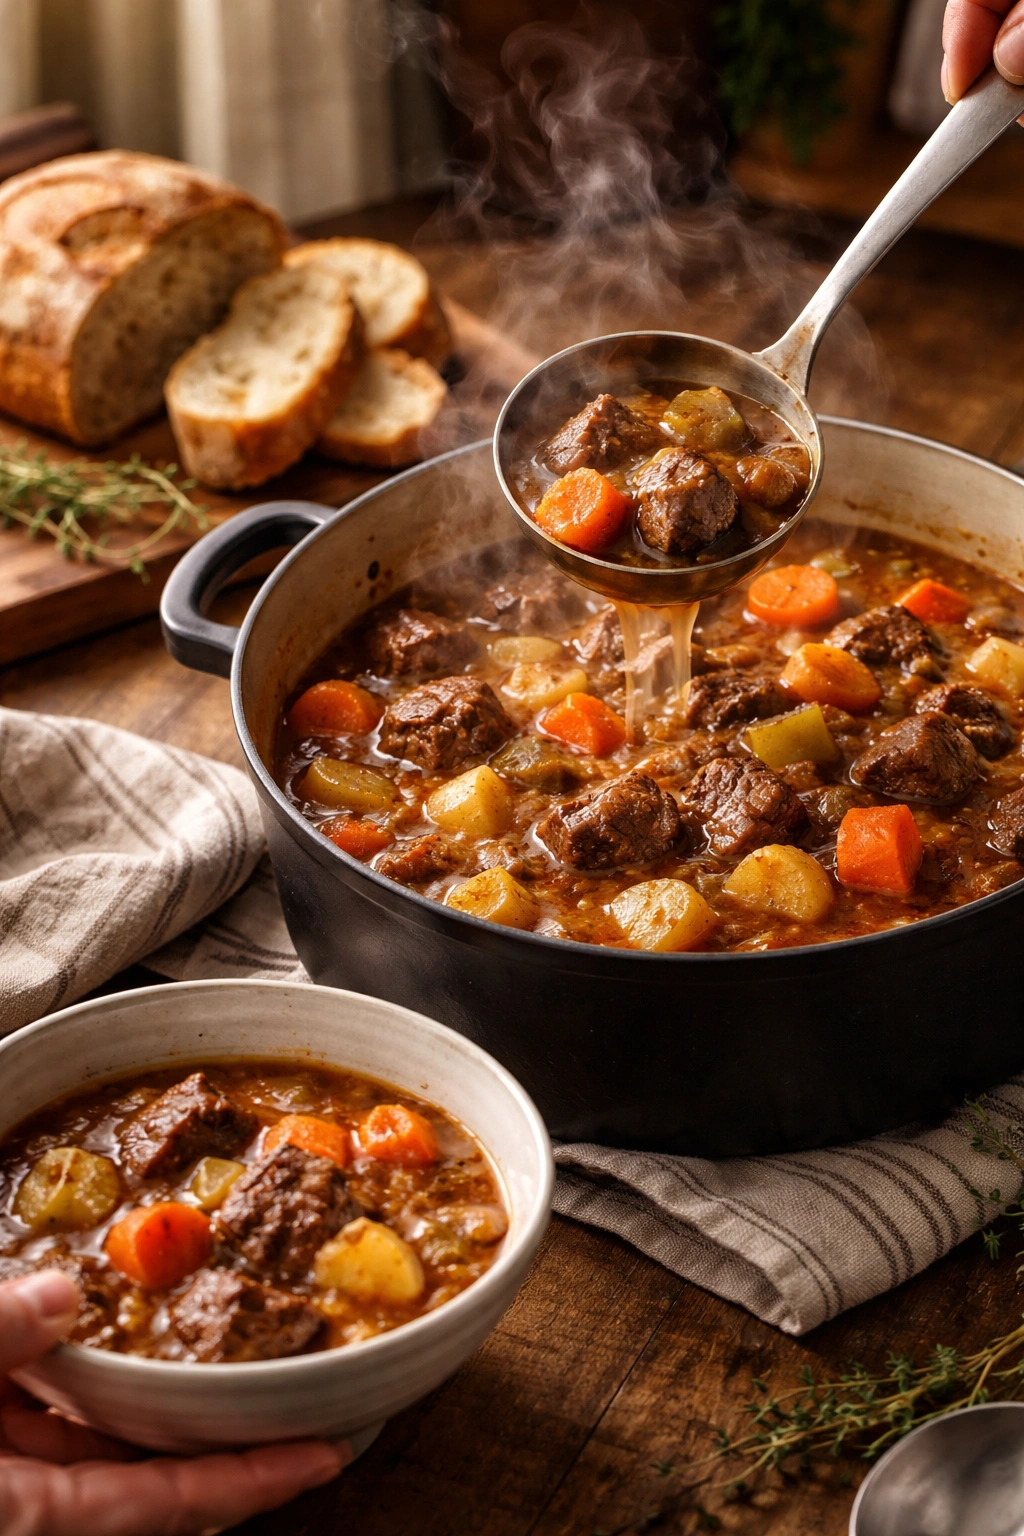
There’s something almost magical about a pot of beef stew simmering on the stove—the aroma alone pulls families to the kitchen, even if dinner isn’t for hours. This isn’t fancy cooking. It’s honest, unfussy food that tastes like someone spent all day making it just for you, even though the hands-on time is minimal. The secret is knowing what actually matters: choosing the right beef, taking five minutes to sear it properly, layering flavors with wine and tomato paste, and then letting time and gentle heat do the heavy lifting. Once you nail the technique, you’ll understand why this dish appears on dinner tables everywhere, from Irish cottages to American kitchens, and why people request it again and again. It’s comfort food that feels like coming home.
Why Beef Stew is a Family Favorite
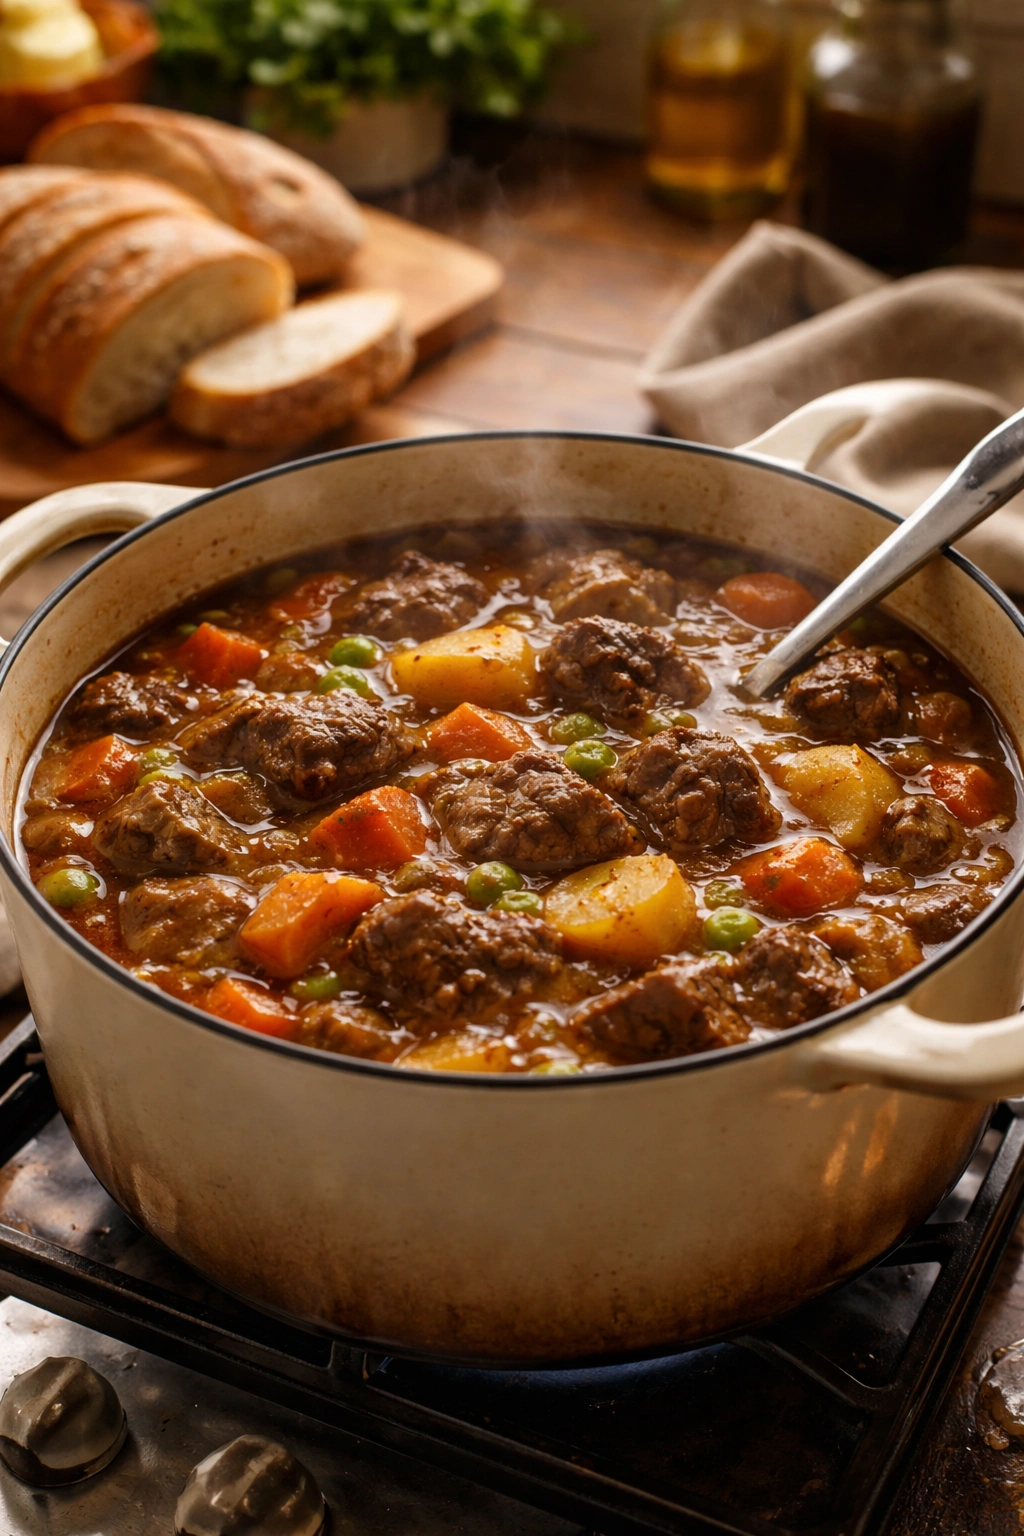
Beef stew holds a special place in home cooking because it checks every box: it’s hearty enough to satisfy hungry teenagers, impressive enough to serve to guests, budget-friendly enough to make regularly, and flexible enough to adapt to whatever vegetables you have on hand. The beauty is that it actually improves as it sits in the fridge—the flavors deepen, the meat gets more tender, and the broth becomes richer. This means you can make it a day ahead, which takes pressure off dinner time.
The reason families request it over and over isn’t nostalgia alone (though that helps). It’s because a truly good beef stew is so satisfying that one bowl feels like a complete, nourishing meal. There’s nothing to add, nothing to fuss with. The beef, the vegetables, the rich broth—it’s all there. Serve it with crusty bread to soak up every drop, and you’ve created something memorable.
Choosing the Right Cut of Beef
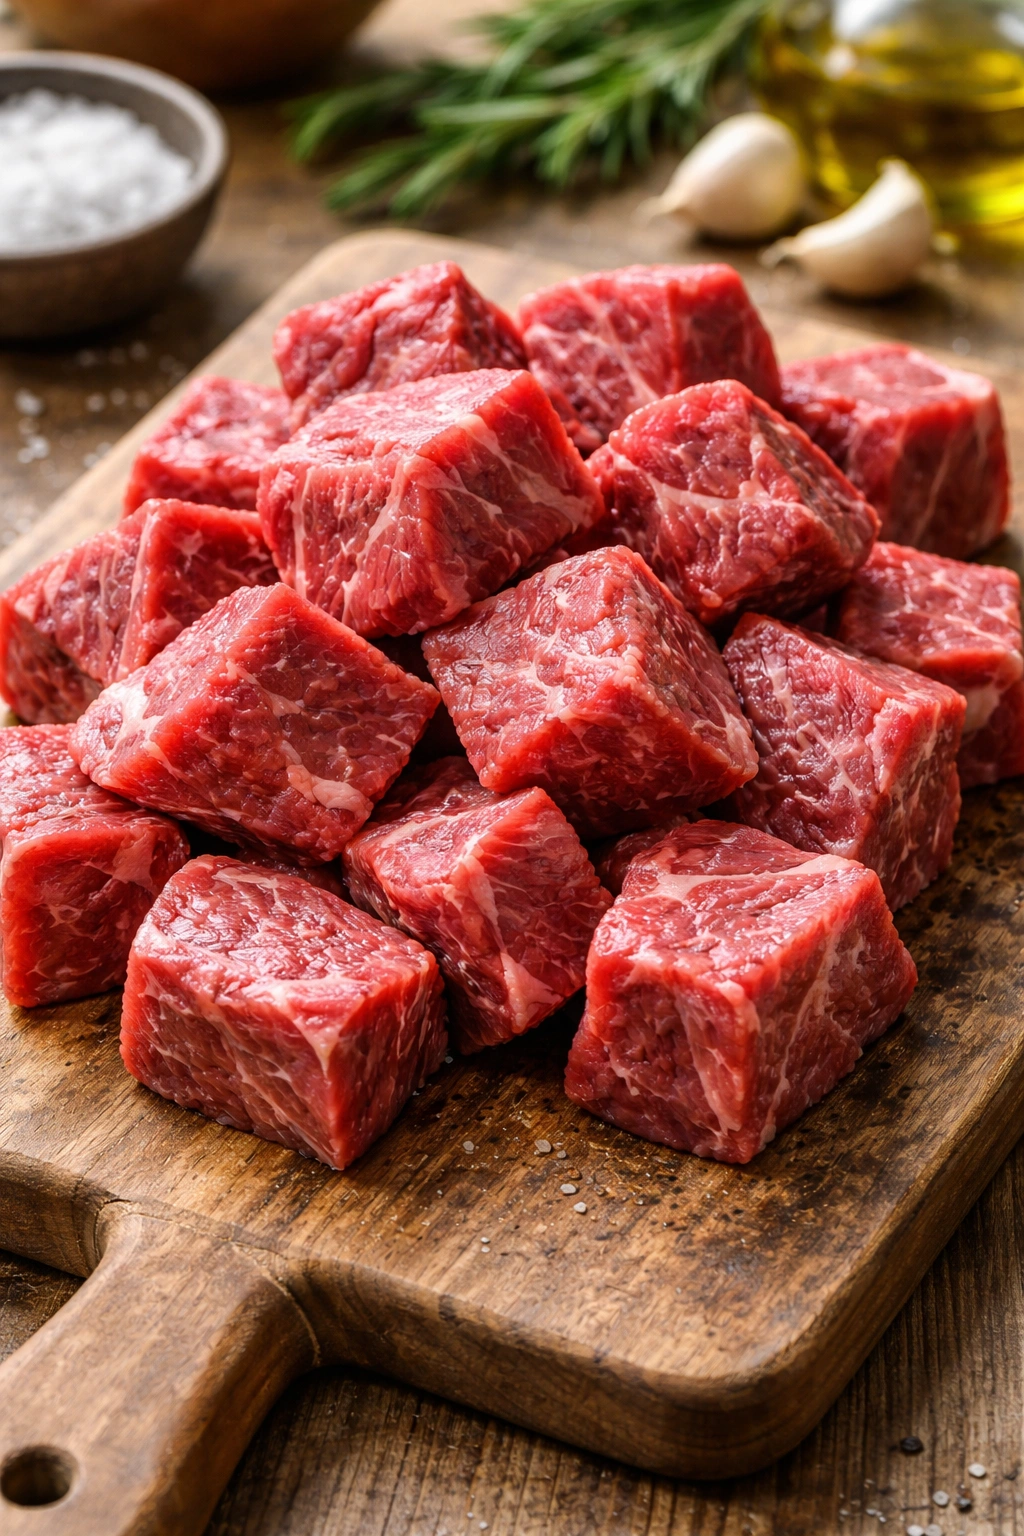
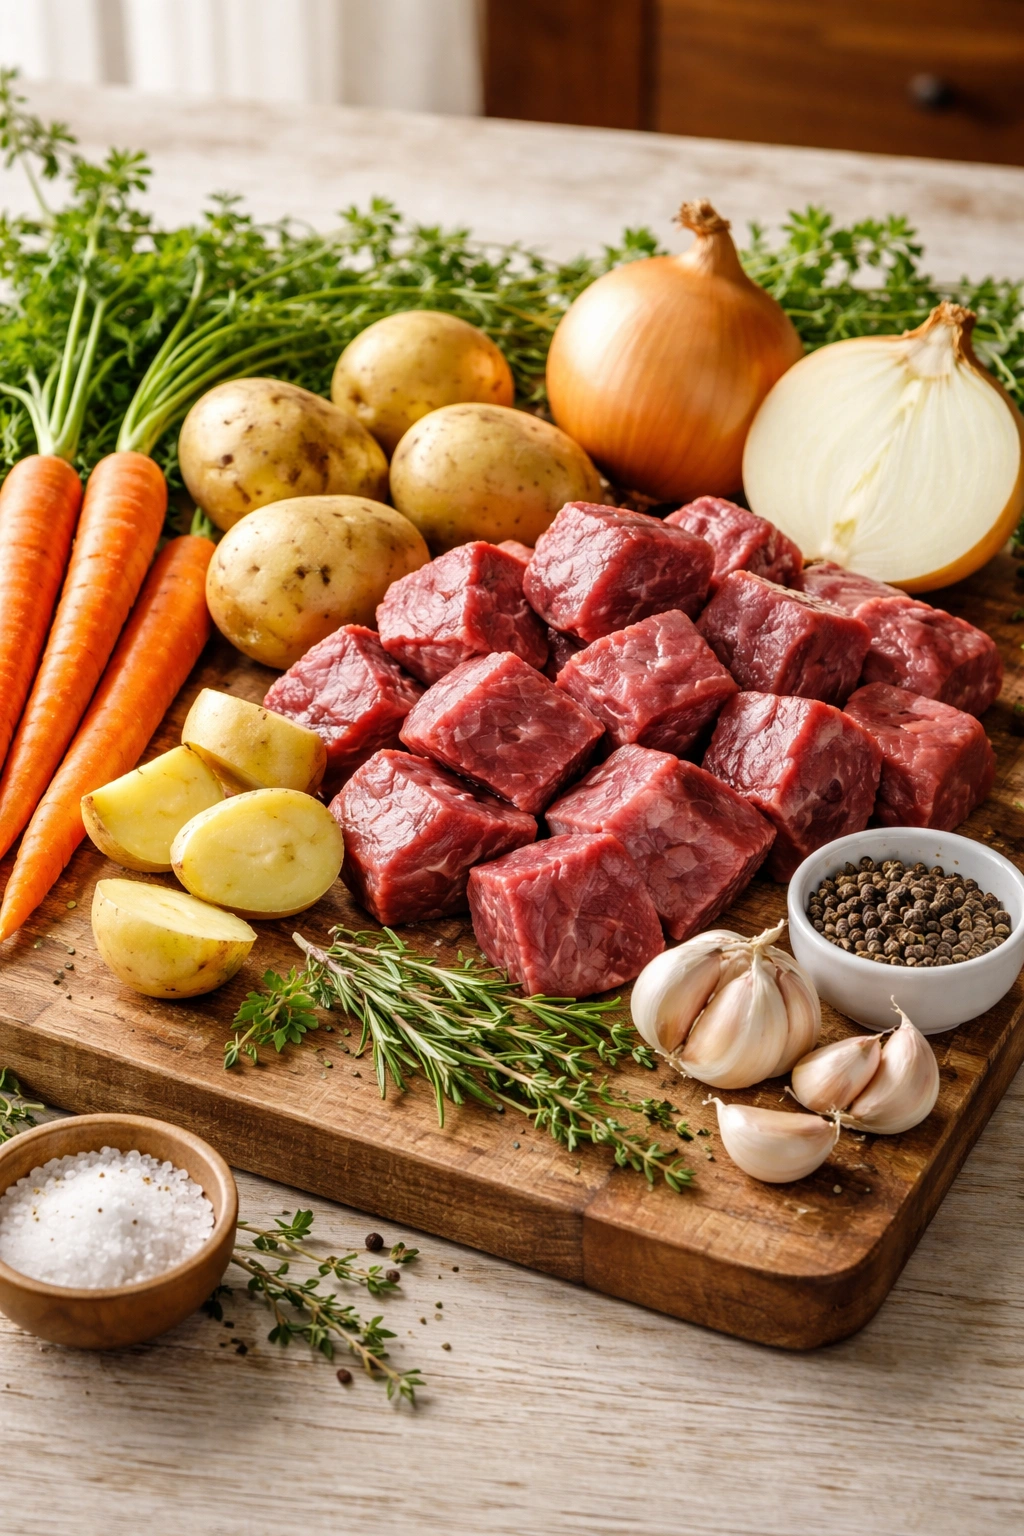
Not all beef is created equal for stew, and picking the wrong cut will lead to disappointment. You need beef chuck, which comes from the shoulder and upper neck area—the muscular parts that do a lot of work. This meat is laced with fat and connective tissue, which sounds like a drawback but it’s exactly what you want. As chuck braises slowly in the stew, that collagen converts to gelatin, which makes the beef incredibly tender and gives the broth body and richness.
Avoid lean cuts like sirloin or tenderloin, which dry out and become tough with long cooking. The fat in chuck isn’t a burden you’re tolerating—it’s the secret to incredible flavor and texture. You can buy packaged stew meat that’s already cubed, but I prefer buying a chuck roast and cutting it myself into rough 1½- to 2-inch chunks. This gives you control over the size and lets you trim away truly excessive fat while leaving in the marbling that matters.
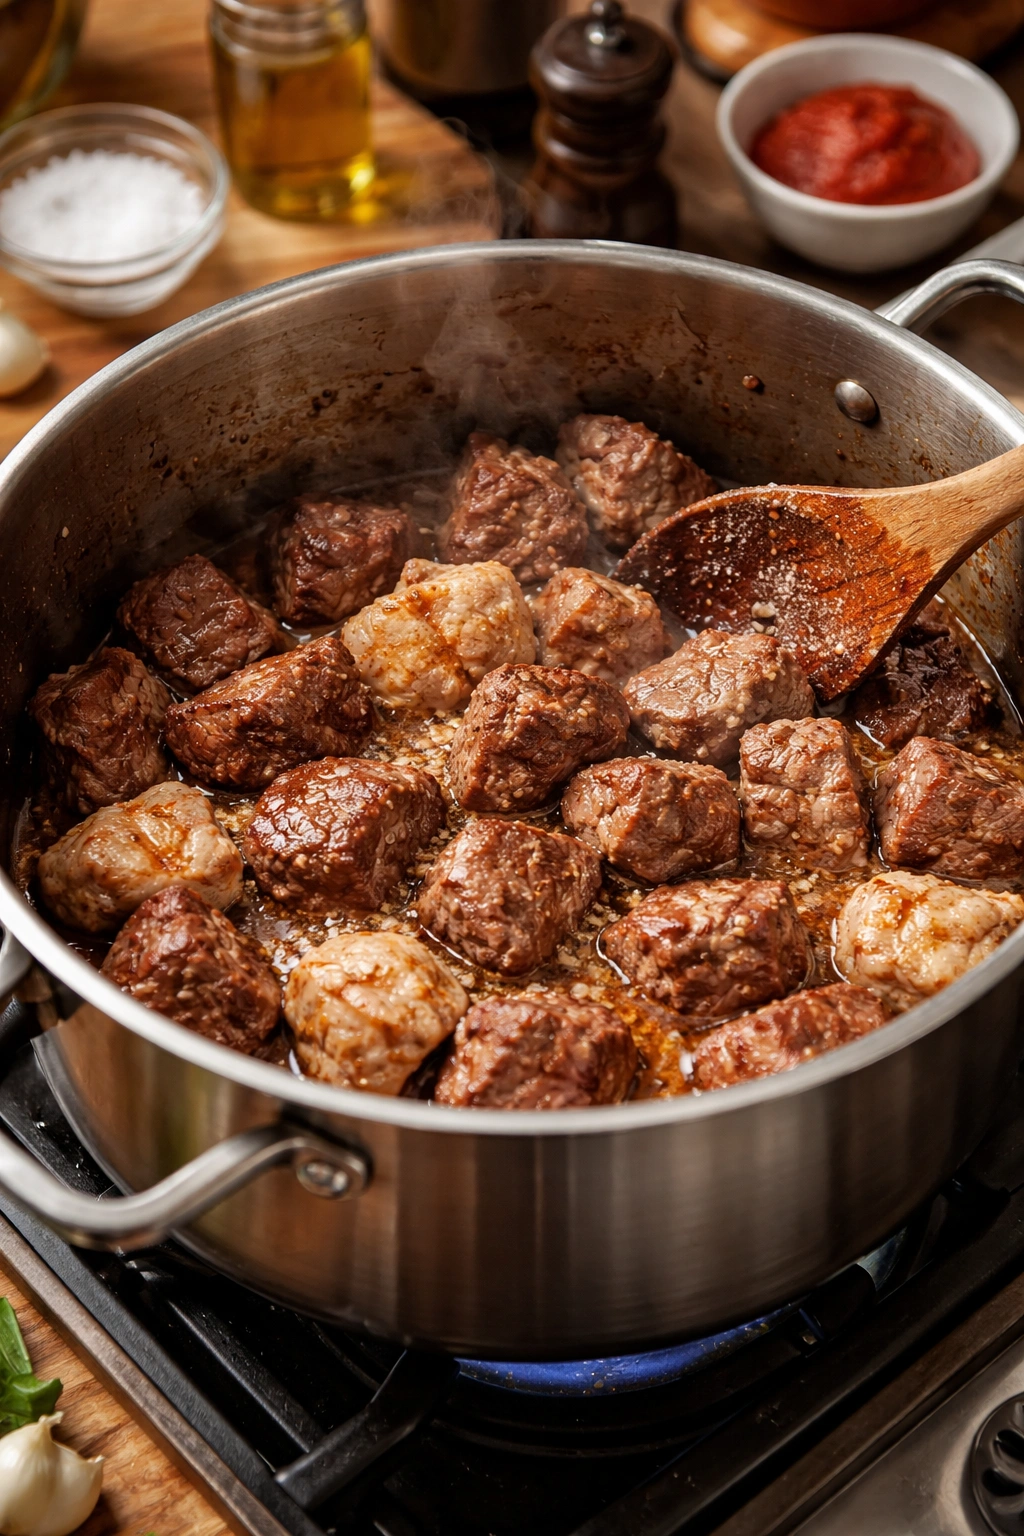
The Magic of Searing Your Meat First
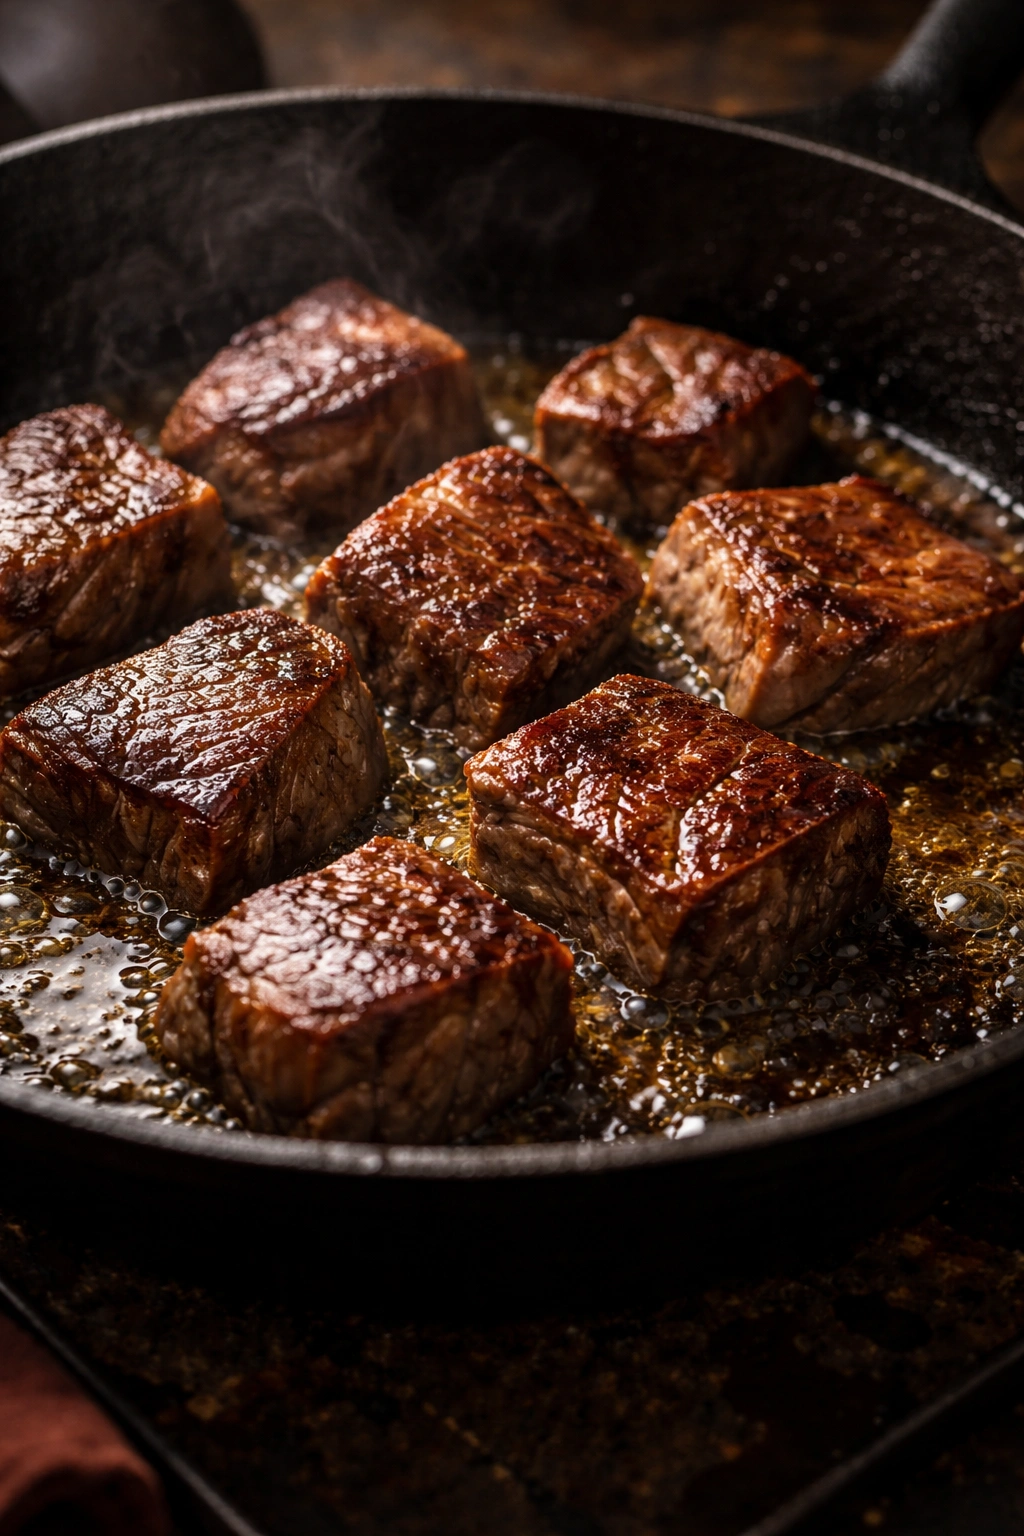
This step is non-negotiable, and here’s why: when you sear beef at high heat, the proteins and sugars on the surface react together in what’s called the Maillard reaction. This creates hundreds of new flavor compounds that simply don’t exist if you skip searing. You get that deep, caramelized flavor that makes people say “wow” when they taste the broth—they’re tasting the benefit of that five-minute step.
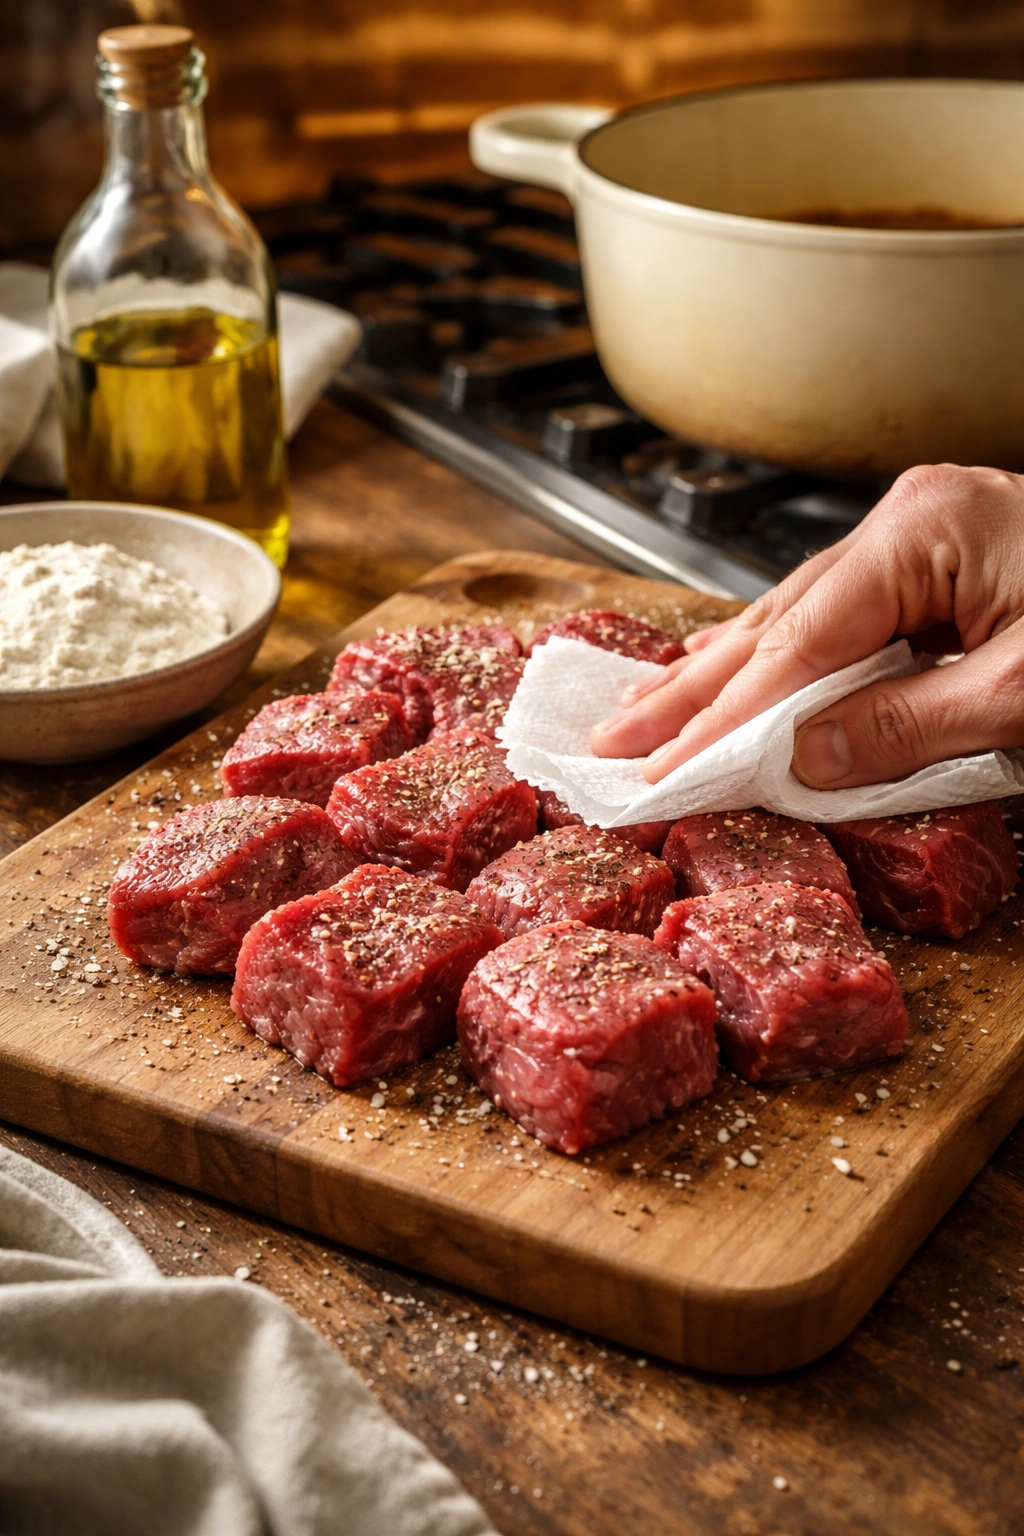
Pat your beef pieces completely dry before seasoning and searing. Moisture on the surface steams rather than browns, which prevents that crucial crust from forming. Heat your oil until it’s shimmering—this usually takes about two minutes on medium-high heat in a large Dutch oven. Working in batches so you don’t overcrowd the pot, brown the beef on all sides for about three minutes per side. You’re not trying to cook it through; you just want that golden crust. This is the foundation of everything that follows.
Building Flavor with Aromatics and Wine
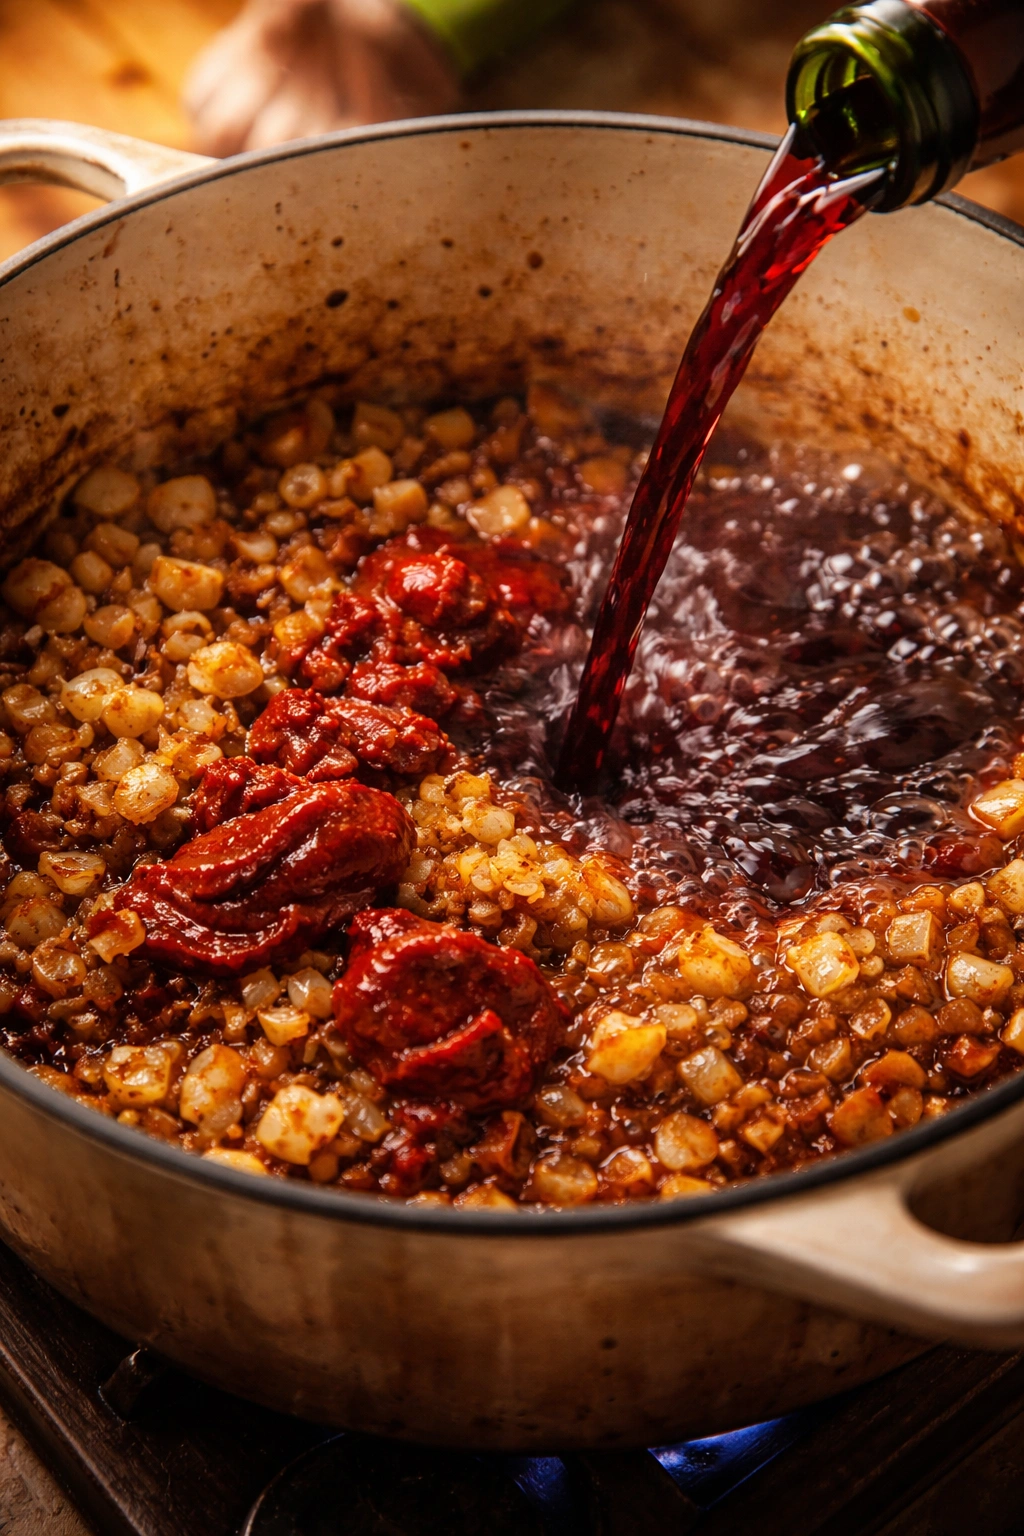
After you’ve seared the beef and set it aside, the pot isn’t empty—it’s lined with flavorful browned bits called fond. Don’t clean it. Instead, add your diced onion and cook it for a few minutes until it starts to soften and pick up some color. Then add minced garlic and cook for another minute or two—the aromatics will dissolve and distribute throughout the pot. Add tomato paste at this point and let it cook for about 60 seconds, which takes the raw edge off and deepens its flavor.
If you’re using red wine (which I strongly recommend), add it now to deglaze the pan—the wine’s acidity lifts all that fond and turns it into sauce base. Use something you’d actually drink. You don’t need an expensive wine, but avoid anything you wouldn’t drink from a glass. As the stew cooks, most of the alcohol evaporates, but the complex, slightly tart flavor remains. Beef broth comes next, followed by herbs like thyme or rosemary and a bay leaf. This combination of wine, broth, aromatics, and herbs creates a savory, complex base that tastes like it took hours to develop.
Serving and Timing Information
Yield: Serves 6 to 8 | Makes approximately 8 cups of stew
Prep Time: 25 minutes (chopping vegetables and searing meat)
Cook Time: 1 hour 30 minutes to 2 hours on stovetop (or 7 to 8 hours on low in a slow cooker)
Total Time: 2 hours active (or 8 hours for slow cooker)
Difficulty: Beginner to Intermediate — The steps are straightforward, but it requires patience and basic knife skills for vegetable prep.
Best Served: Warm, either the day it’s made or the next day after flavors have deepened in the refrigerator.
Beef Stew Ingredients
For the Stew:
- 2 to 3 pounds beef chuck roast, trimmed of excess fat and cut into 1½- to 2-inch chunks
- 1½ teaspoons kosher salt, plus more to taste
- ½ teaspoon freshly ground black pepper, plus more to taste
- 2 tablespoons all-purpose flour or gluten-free all-purpose flour
- 2 tablespoons olive oil or avocado oil, plus more if needed
- 1 large yellow onion, roughly chopped
- 4 to 5 garlic cloves, minced
- 2 tablespoons tomato paste
- 1 cup dry red wine (such as Cabernet Sauvignon, Merlot, or Pinot Noir)
- 4 cups low-sodium beef broth
- 1 tablespoon Worcestershire sauce
- 1 tablespoon balsamic vinegar or red wine vinegar
- 1 teaspoon dried thyme (or 2 teaspoons fresh thyme)
- 1 to 2 bay leaves
- 1 pound baby yellow potatoes, halved or quartered (or Yukon Gold potatoes, cut into 2-inch pieces)
- 4 to 5 medium carrots, peeled and cut into 1-inch diagonal slices
- 2 to 3 celery ribs, cut into 1-inch pieces (optional but recommended)
- 2 tablespoons cornstarch or arrowroot powder (for thickening, if needed)
- 2 tablespoons water or beef broth (for slurry, if needed)
- ¾ cup fresh or frozen peas, added near the end of cooking
Step-by-Step Instructions
Prepare and Sear the Beef:
-
Pat the beef chunks completely dry with paper towels—this is crucial for good browning. Season generously on all sides with the kosher salt and black pepper.
-
Sprinkle the flour over the seasoned beef and toss gently until all pieces are lightly coated on all sides. The flour helps thicken the broth and creates a more flavorful crust during searing.
-
Heat the olive oil in a large Dutch oven or heavy-bottomed pot over medium-high heat for about 2 minutes, until the oil shimmers and moves easily around the pan. Do not skip the searing step—this is where the deep, caramelized flavor comes from.
Advertisements -
Working in batches to avoid crowding the pot, add the beef in a single layer and sear without stirring for 2 to 3 minutes on each side until a golden-brown crust forms on all surfaces. You’re aiming for color on all sides; the meat doesn’t need to be cooked through at this stage.
-
Transfer the seared beef to a clean plate and set aside. If the bottom of the pot looks dry or excessively charred, add a tiny splash more oil.
Build the Flavor Base:
-
Add the chopped onion to the same pot and cook, stirring occasionally, for 3 to 4 minutes until it begins to soften and pick up light golden color at the edges. The onion will deglaze the pan and lift up all the flavorful browned bits.
-
Stir in the minced garlic and cook for another 30 to 60 seconds, just until fragrant. Do not let garlic brown or burn, as this makes it bitter.
-
Add the tomato paste and stir constantly for about 1 minute. This cooks out the raw flavor and concentrates the paste’s natural sweetness and umami.
-
Pour in the red wine, using a wooden spoon to scrape up all the fond from the bottom of the pot. Let the wine simmer for 1 to 2 minutes so a bit of the sharpness cooks off.
Combine and Simmer:
-
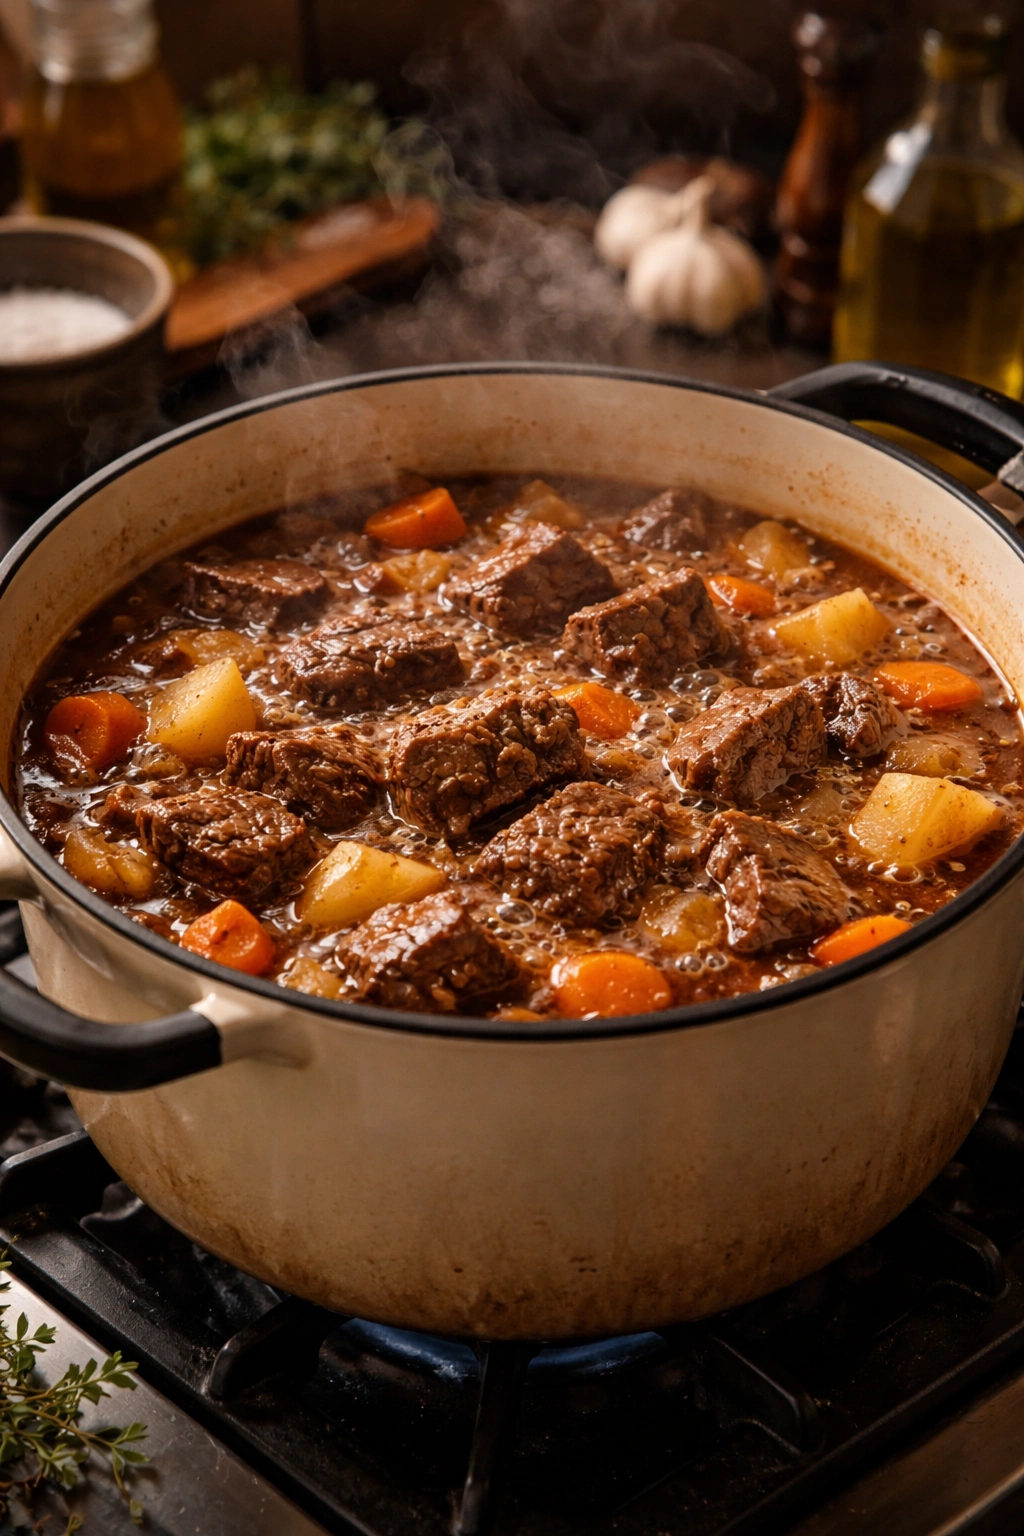
Add the beef broth, Worcestershire sauce, balsamic vinegar, thyme, and bay leaves, stirring to combine everything thoroughly. Return the seared beef to the pot along with any accumulated juices from the plate.
-
Bring the mixture to a gentle boil over medium heat, then immediately reduce the heat to medium-low. The liquid should barely simmer—you want lazy bubbles breaking the surface occasionally, not a rolling boil. Cover the pot partially (leave the lid slightly ajar) and simmer for 45 minutes to 1 hour.
Advertisements -
After the initial hour, add the potatoes, carrots, and celery. These vegetables will take about 20 to 30 minutes to become tender. Stir the stew gently to distribute the vegetables evenly.
-
Continue simmering uncovered or partially covered for another 20 to 30 minutes, until a fork pierces the beef with no resistance and the vegetables are tender. The beef should be easily pulled apart with a spoon. If the beef is still tough, give it another 15 to 20 minutes—it will get there.
Thicken and Finish:
-
If you’d like a thicker broth, remove about 1 cup of the stew liquid and pour it into a small bowl. Whisk in 2 tablespoons cornstarch until completely smooth with no lumps remaining. Pour this mixture back into the pot and stir gently to combine. Bring the stew back to a gentle simmer for 1 to 2 minutes to thicken, stirring occasionally. Do not add flour directly to the hot stew—it will clump.
-
Stir in the peas and simmer for another 5 to 10 minutes, just long enough for them to heat through.
-
Taste carefully and adjust the seasoning with additional salt and pepper as needed. Remove and discard the bay leaves. The flavor should be savory, slightly tangy from the wine and vinegar, and deeply satisfying.
-
Serve immediately in bowls while hot, or allow to cool to room temperature and refrigerate for later reheating.
Tips for the Most Tender Beef
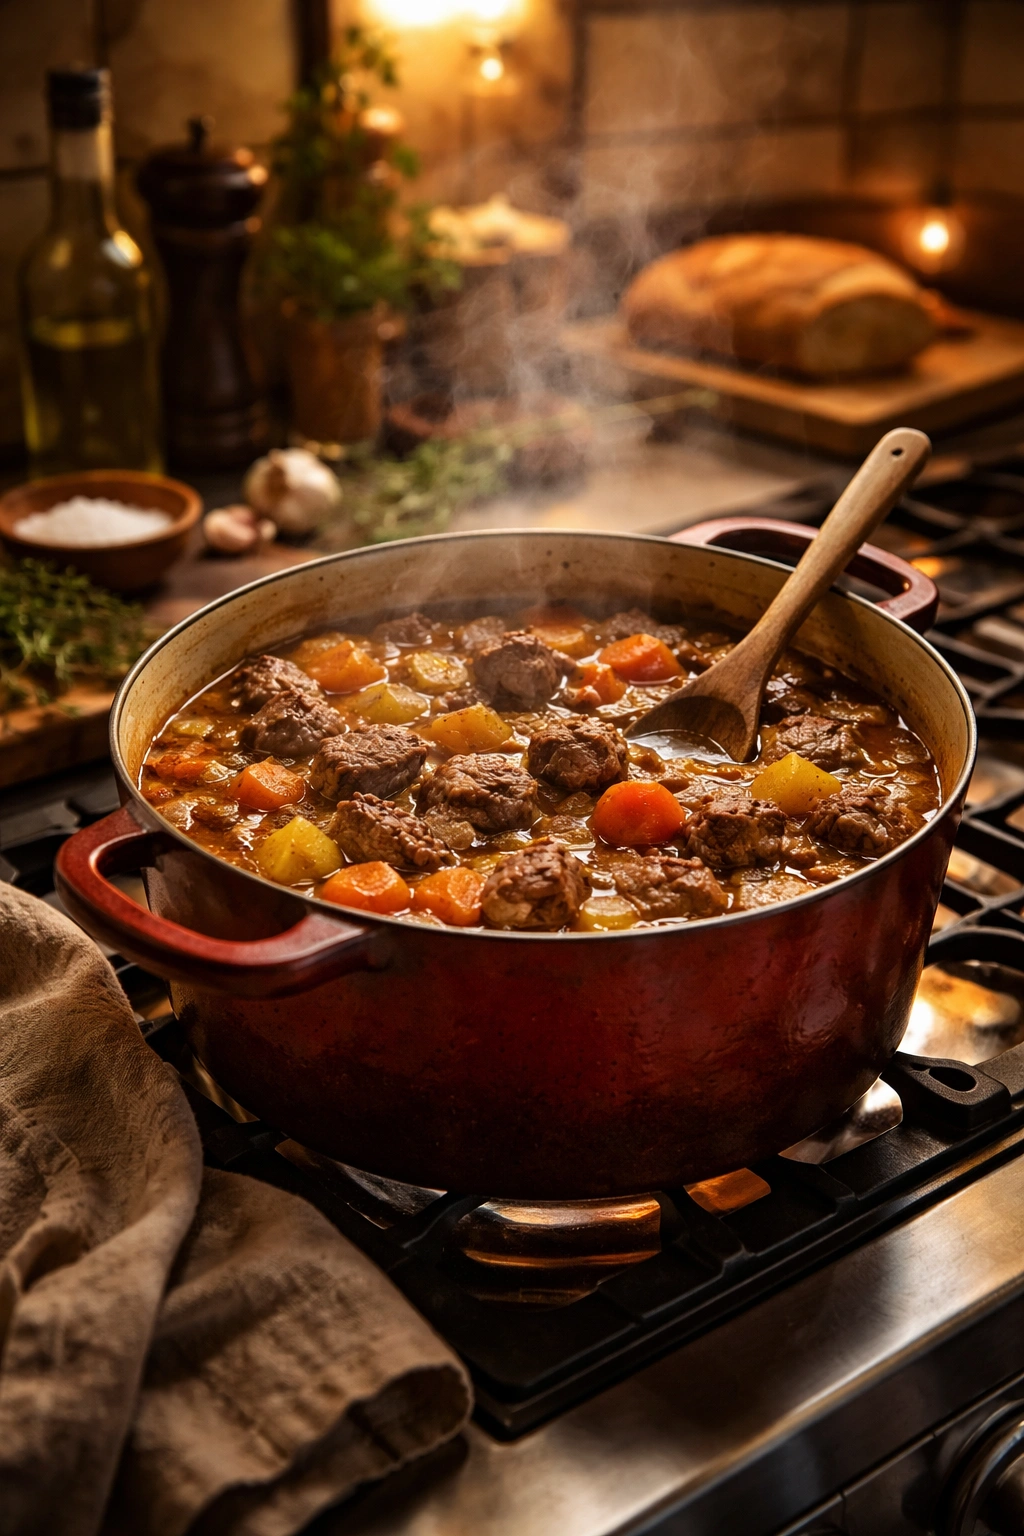
The most common reason stew beef turns out tough is rushing the cooking. Low and slow is not just a saying—it’s the method that works. The collagen in beef chuck needs time to convert to gelatin, and that takes at least 90 minutes of gentle simmering. If your beef still feels resistant to a fork after an hour and a half, don’t panic. Give it another 20 to 30 minutes. Tougher pieces of meat sometimes need closer to two and a half hours to fully break down.
The type of pot matters too. A heavy Dutch oven distributes heat evenly and holds temperature beautifully. If you don’t have one, a large, heavy-bottomed pot with a well-fitting lid works fine. The lid (or partial lid) traps steam and keeps the meat from drying out. Never cook stew at a rolling boil—the aggressive bubbling breaks down the beef fibers too quickly, making them tough and stringy rather than creamy and tender.
One often-overlooked detail: don’t skip the initial searing. Beef that goes straight into broth without browning stays gray and pale, both in color and in flavor. The Maillard reaction that creates those brown, caramelized flavors simply doesn’t happen without that high heat. Those few minutes of searing are an investment that pays back in every spoonful.
Common Mistakes That Make Stew Tough or Bland
The biggest mistake is using the wrong cut. Lean beef like sirloin or tenderloin will never become tender and melting, no matter how long you cook it. These cuts are meant for quick, high-heat cooking, not braising. Chuck has the fat and connective tissue that transform during long, slow cooking. If you can’t find chuck, look for bottom round, rump roast, or oxtail—these are also forgiving cuts for stew.
Another frequent misstep is overcrowding the pot during searing. When beef pieces touch each other, they steam instead of sear. This means gray meat and none of that crucial crust. Brown your beef in batches, even if it takes a few extra minutes. Your final dish will thank you.
Under-seasoning is surprisingly common, probably because people are worried about salt. Taste as you go and season generously—a stew that tastes bland was likely under-seasoned at some point. The salt should enhance all the other flavors, not make it taste salty. If you’re concerned about sodium, use low-sodium broth and taste before adding extra salt at the end, but don’t be timid about seasoning.
Too much flour for thickening creates a stew that tastes floury and thick rather than silky. Start with just the small amount tossed on the raw beef, then add a cornstarch slurry only if you want it thicker. The starches from the potatoes naturally thicken the broth as they cook, so you might not need the slurry at all.
Finally, skipping the wine is a mistake. The acidity and complex flavor it brings can’t really be replaced. If you don’t drink alcohol, you can omit it and use all beef broth, but the stew will taste flatter and less sophisticated. The same applies to the tomato paste and Worcestershire sauce—these aren’t optional ingredients. They create the savory depth that makes people ask for the recipe.
Perfect Vegetables and Timing
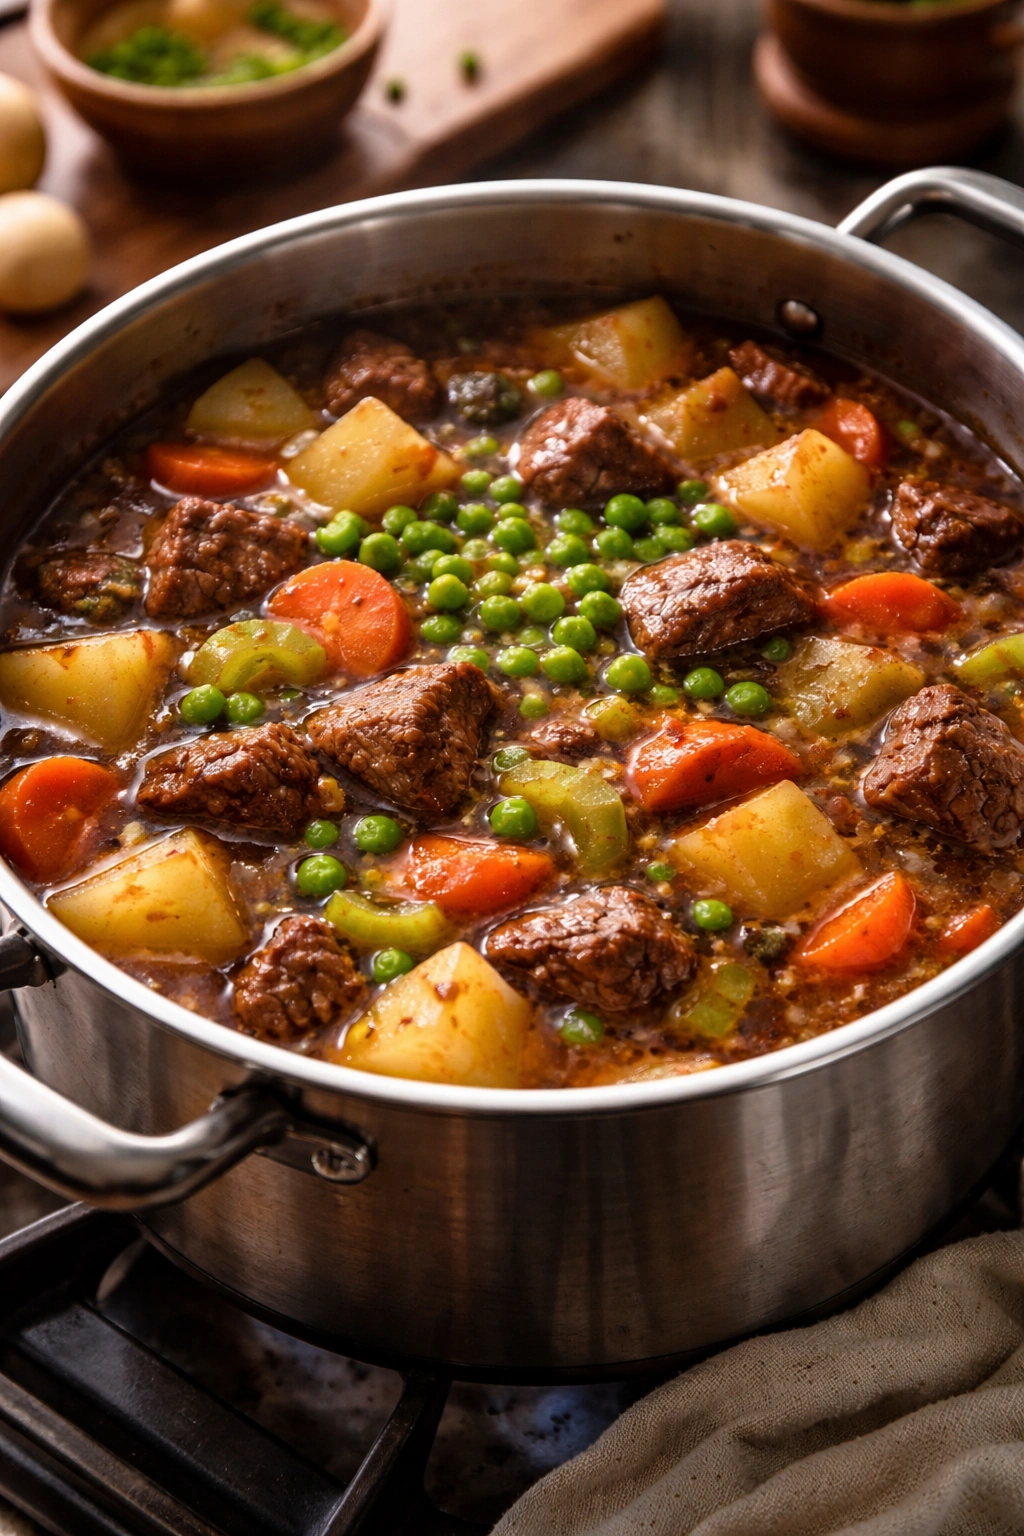
Root vegetables are your best friend in stew because they hold their shape and flavor through long cooking. Potatoes, carrots, and celery are the holy trinity, but they go in at different times. Potatoes and carrots take about 25 to 30 minutes to become fork-tender, so they go in during the last half hour. Celery, when included, also goes in with them.
Peas are different. They cook in minutes and turn mushy if they’re in the pot too long. Add them in the last few minutes, just long enough to warm through and release their sweetness into the broth. This timing detail keeps them bright green and firm rather than gray and soft.
If you’re adapting with other vegetables, think about how long they need. Mushrooms, once sautéed separately and added near the end, add wonderful earthiness. Turnips and parsnips work beautifully if you prefer something slightly sweeter or earthier than potatoes. Pearl onions, if you can find them, are charming and add sweetness. The key is respecting cooking times—mushrooms last 5 to 10 minutes, root vegetables 25 to 30 minutes, delicate vegetables like peas just 2 to 3 minutes.
Cut your vegetables into similar-sized pieces so they cook evenly. Rough chopping is fine—you want rustic, hearty chunks, not precise uniformity. This isn’t a refined soup; it’s comfort food, and irregular vegetable sizes add to that honest aesthetic.
How to Thicken Your Stew
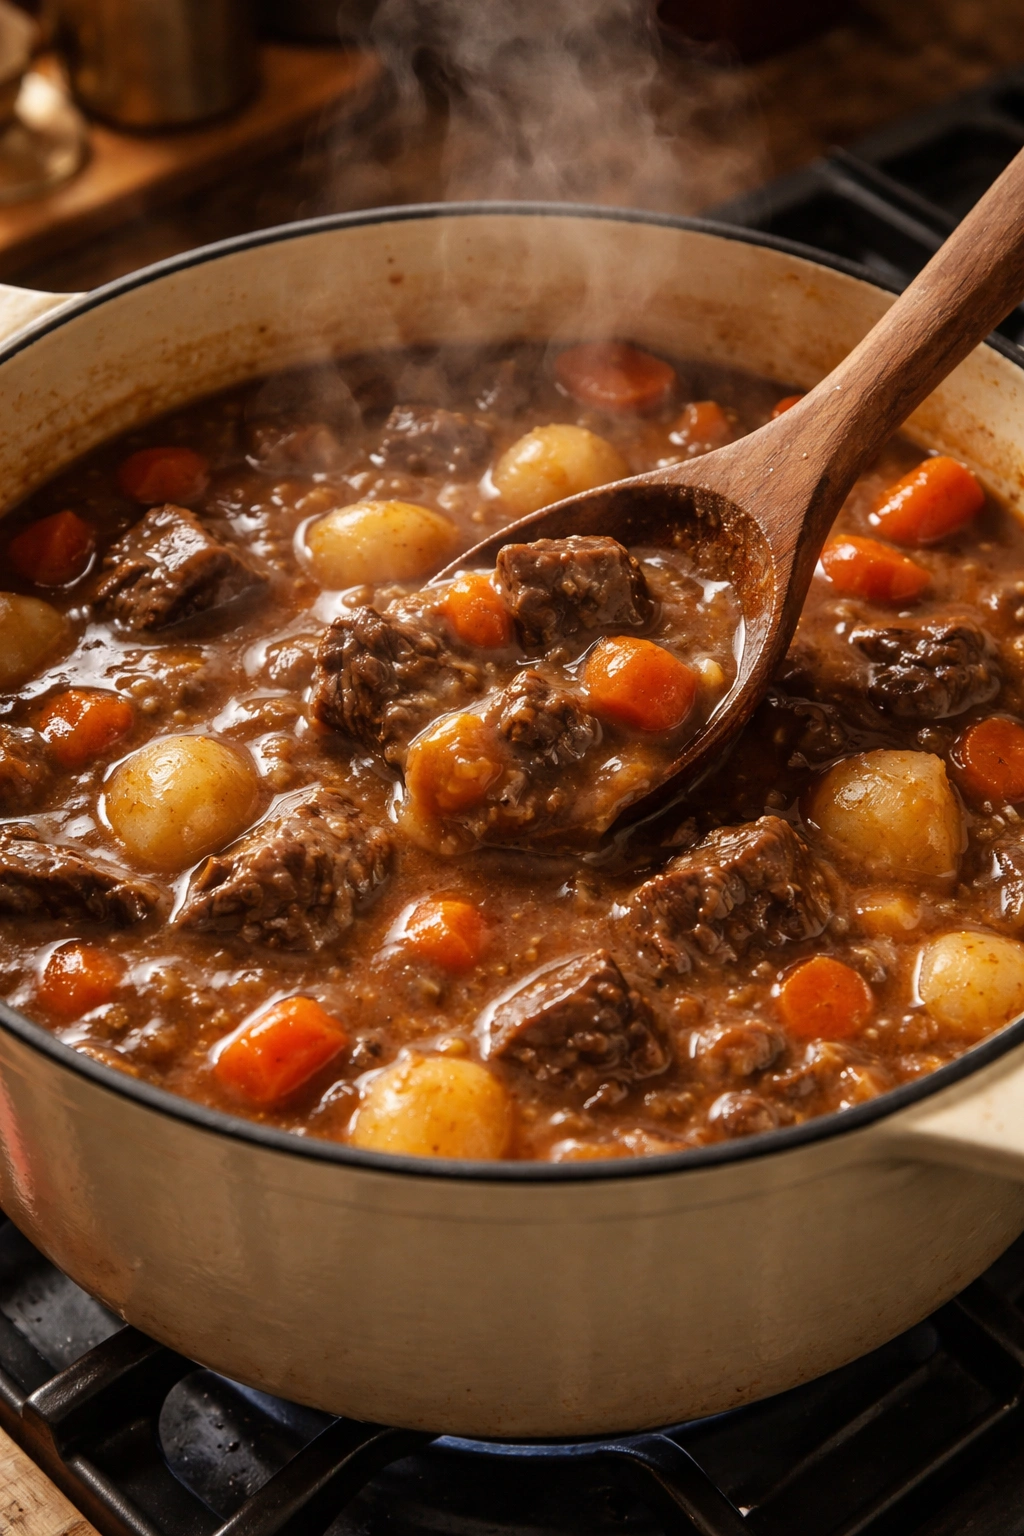
The broth thickens naturally as potatoes release their starch and as the collagen from the beef converts to gelatin. Sometimes this is enough, and you end up with a stew that’s savory and slightly thickened without any additional effort. If you prefer a thicker, gravy-like consistency, you have options.
The cornstarch slurry method is my preference. Mix 2 tablespoons cornstarch with 2 tablespoons cold water or beef broth, stirring until completely smooth. Pour this into the simmering stew while stirring gently. Within a minute or two, the stew will thicken noticeably. The key is mixing the cornstarch with cold liquid first—if you dump dry cornstarch into hot broth, it clumps and stays grainy.
If you prefer not to use cornstarch, you can use flour the same way, though it’s slightly less predictable. Mashing some of the cooked potatoes against the side of the pot and stirring them back in also works—you’re creating a rustic thickener from the vegetables themselves. This method adds body and keeps the stew tasting wholesome.
Don’t add thickener early in the cooking process. Wait until the beef is tender and the vegetables are cooked through, then thicken at the very end. This gives you control over the final consistency and prevents the stew from getting too thick as it reduces during cooking.
Variations and Adaptations
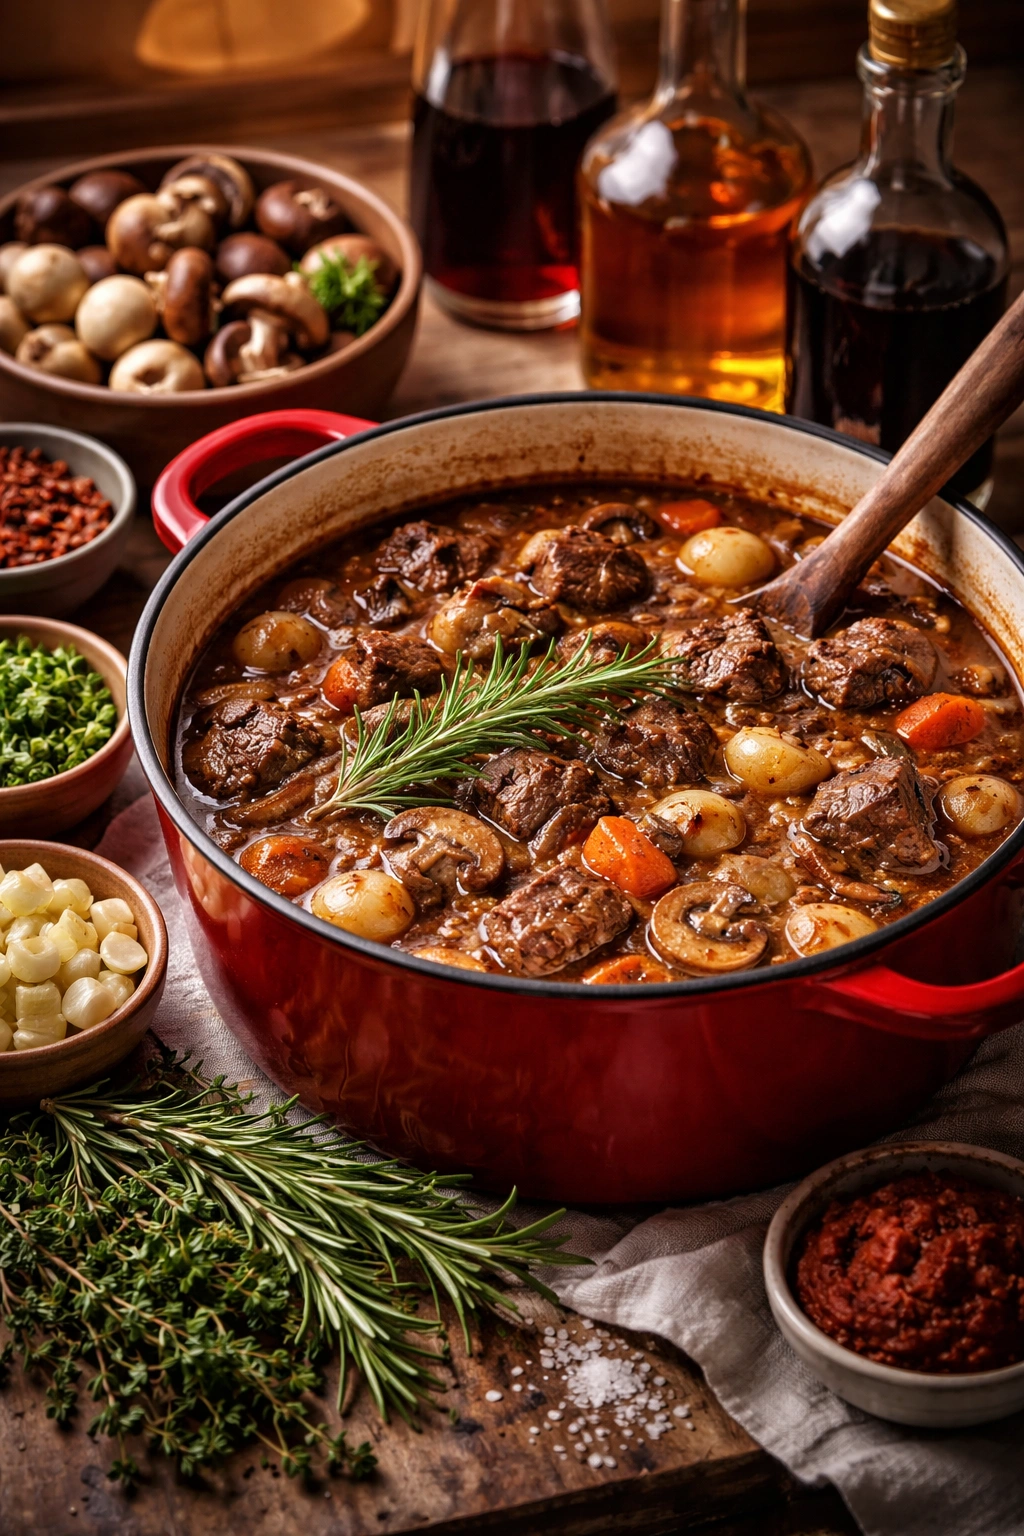
Once you’ve made the classic version a few times, you’ll want to experiment. The beauty of stew is its flexibility. Add 4 to 6 ounces of sliced mushrooms (cremini, cremini, or shiitake) by sautéing them separately in a skillet with a bit of oil and butter, then stirring them in during the last 20 minutes of cooking. They add an earthy depth that’s absolutely wonderful.
For a slightly different flavor profile, swap half the beef broth for red wine—this makes it richer and more wine-forward, almost like beef bourguignon. Add a splash of brandy along with the wine if you want to get fancy. Fresh rosemary instead of thyme gives it a more Mediterranean feel, while a small pinch of cayenne pepper adds subtle heat.
If potatoes aren’t your thing (or you want to reduce carbs), replace them with turnips, parsnips, or celeriac, which have similar cooking times and heartiness. If you prefer things saucier and less vegetable-heavy, reduce the vegetables and add an extra cup of broth. If you like it more stew-like with loads of vegetables, throw in green beans near the end, add more carrots, or include diced zucchini (though zucchini breaks down faster, so add it only in the last 10 minutes).
For a slow cooker version, sear your beef first as directed, then add all ingredients except the peas to your slow cooker. Cook on low for 7 to 8 hours, then add the peas and thicken with a cornstarch slurry in the last 15 minutes if desired. This method works beautifully and fills your home with an incredible aroma all day.
An Instant Pot version also works well: use the sauté function to brown the beef and aromatics, then seal the lid and cook on high pressure for 35 to 40 minutes, with a natural release afterward. The texture and tenderness rival stovetop cooking, though you trade the long, slow simmer for speed.
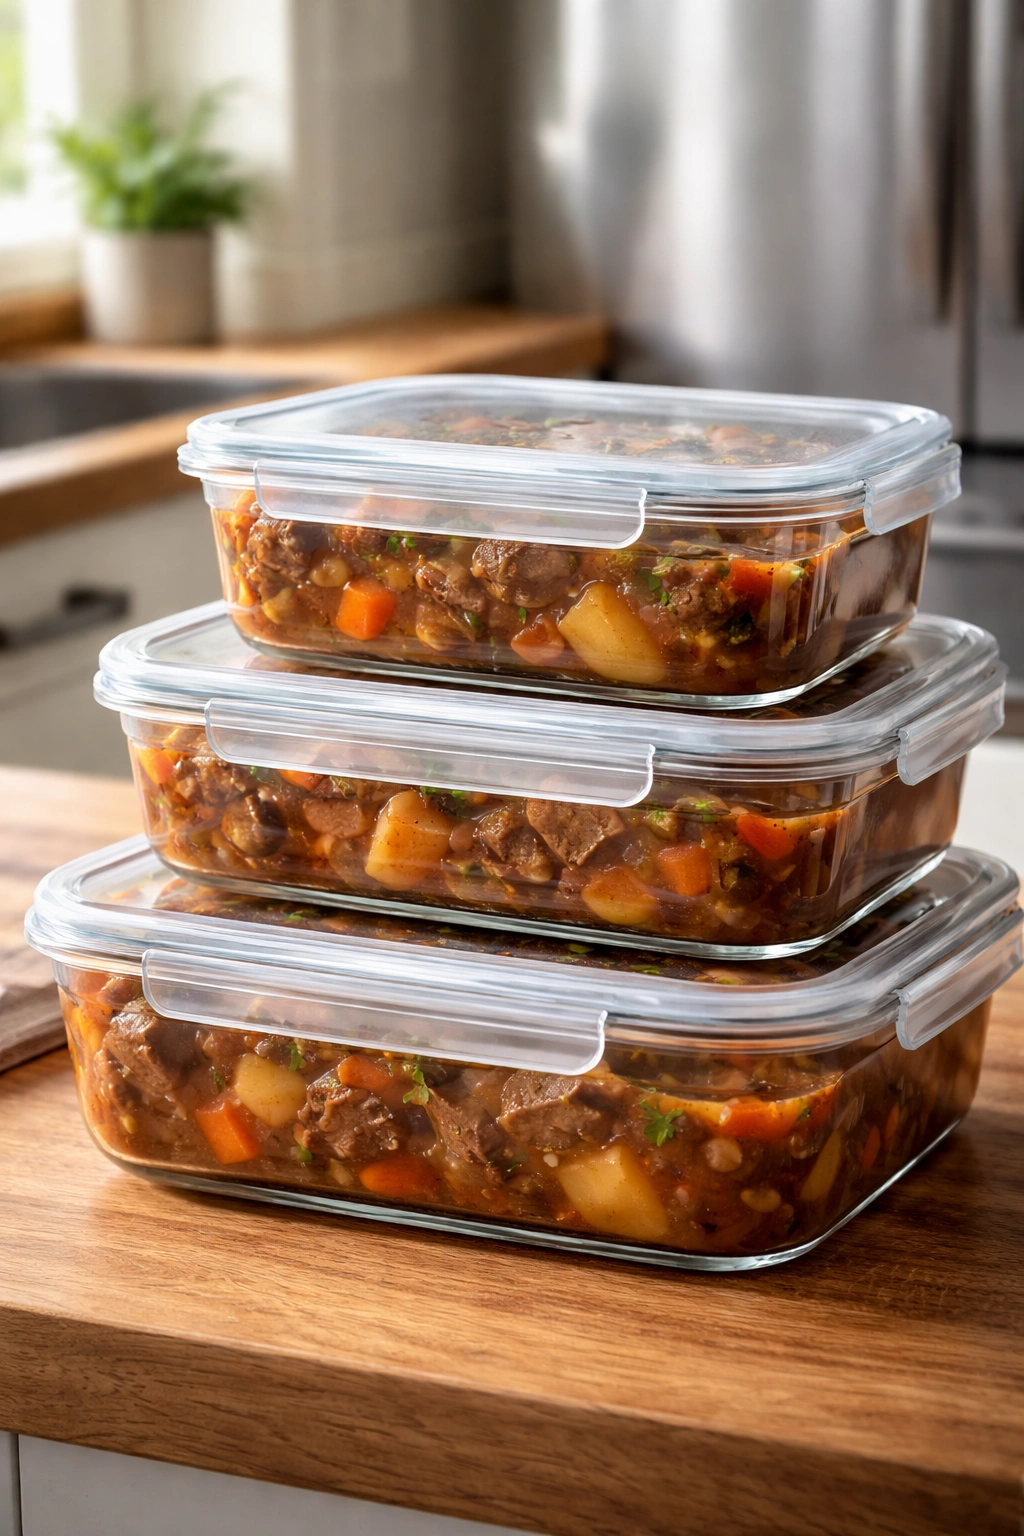
Storage and Make-Ahead Guide
Beef stew is one of those rare dishes that actually tastes better the next day. The flavors continue to meld, the beef gets even more tender, and the broth becomes richer. Make it on Sunday for a comforting family dinner, then reheat it on Tuesday and everyone will say it tastes even better than the first time.
Store leftovers in an airtight container in the refrigerator for up to 4 days. When reheating, warm it gently on the stovetop over medium-low heat, stirring occasionally. You can also reheat it in the microwave in a covered bowl, stirring halfway through. If the stew seems too thick after refrigeration, add a splash of beef broth or water when reheating—the starches and gelatin make it thicken as it cools.
Freezing works beautifully. Let the stew cool completely to room temperature, then transfer it to freezer-safe containers or bags. It keeps for up to 3 months. Thaw overnight in the refrigerator, then reheat gently on the stovetop. One caveat: potatoes can become slightly grainy after freezing, but most people don’t notice. If you’re freezing specifically to keep potato texture optimal, freeze the broth and beef separately, then add freshly cooked potatoes when you reheat.
You can also make this a freezer meal from the start. Prep all your ingredients, layer them in a freezer bag (beef on bottom, vegetables on top, liquids last), label it with the date and cooking instructions, and freeze. When you’re ready to cook, thaw overnight, then follow the regular cooking directions. This is brilliant for busy weeks or for giving as a gift to someone who could use a home-cooked meal.
What to Serve with Beef Stew
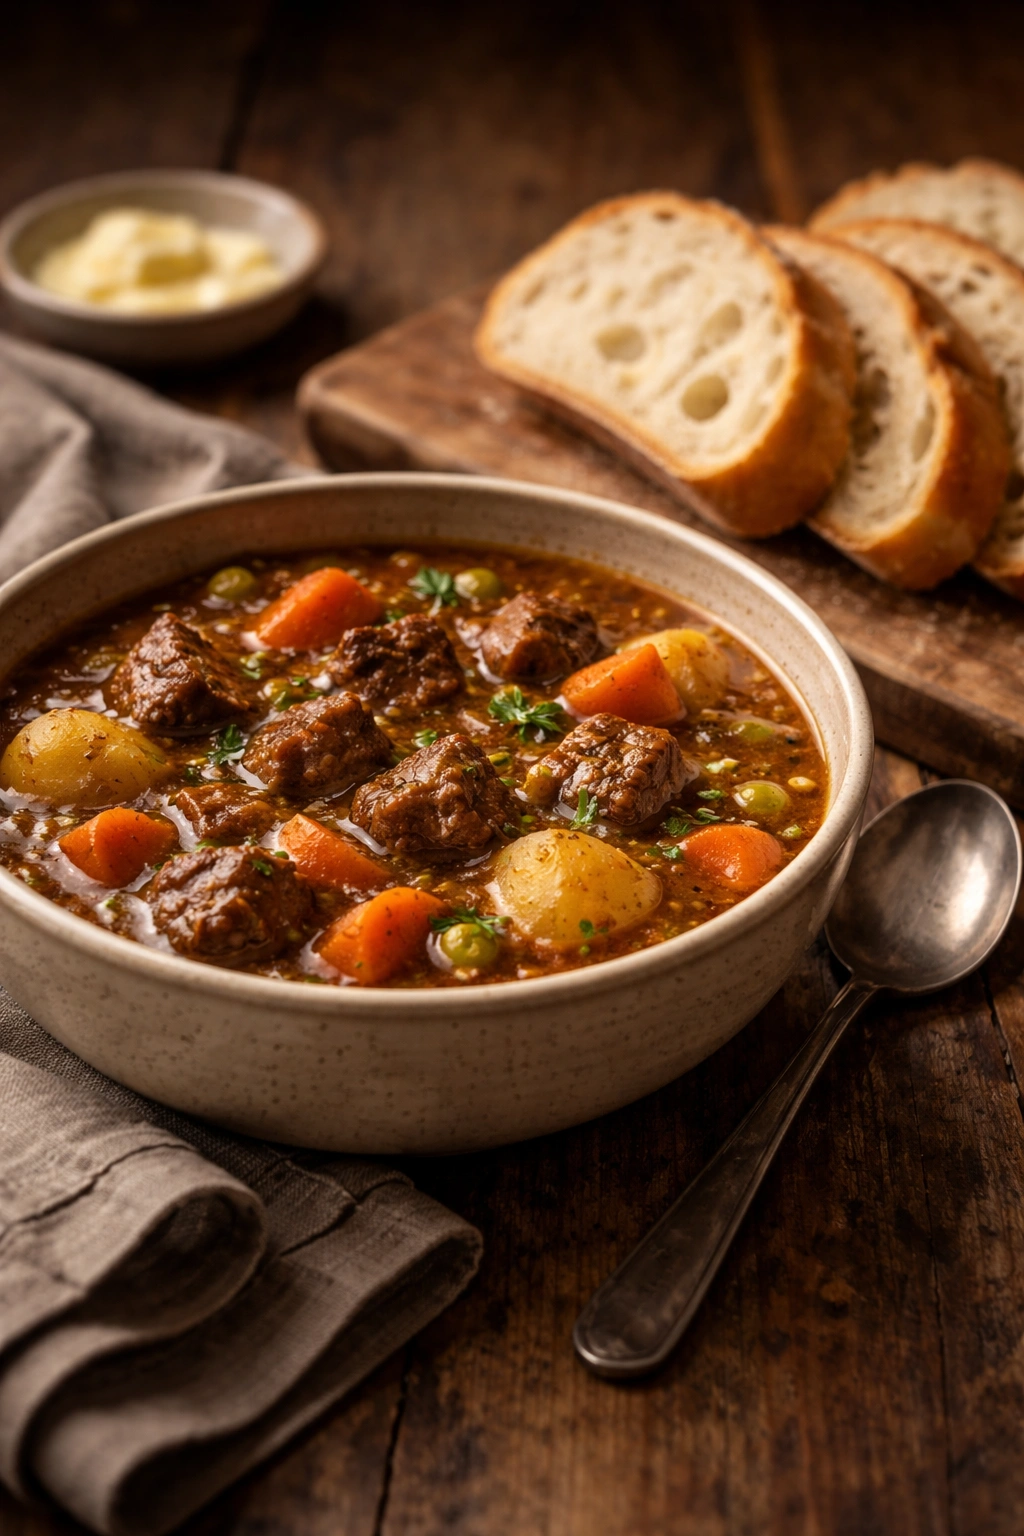
Beef stew is technically a complete meal on its own, but a few simple sides make it feel like a feast. Crusty bread is non-negotiable—sourdough, a sturdy ciabatta, or French bread all work beautifully for soaking up every bit of broth. Toast thick slices and rub them with a cut garlic clove for extra flavor, or simply butter them warm.
Cornbread, especially honey cornbread, is a classic pairing. The slight sweetness and rich, crumbly texture balance the savory stew perfectly. Buttermilk biscuits are equally wonderful—homemade or from a good bakery, they’re hearty and forgiving of heavy sopping.
If you want something lighter, a simple green salad with a sharp vinaigrette cuts through the richness. Crisp greens, thinly sliced red onion, and a mustard-based dressing all work. A warm Brussels sprouts salad with bacon and a tangy dressing is also beautiful, as is a simple roasted vegetable side like carrots with herbs or green beans with garlic.
Mashed potatoes feel indulgent served alongside stew, which might seem redundant until you realize that creamy, buttery potatoes are actually quite different from the stew potatoes, and people love the combination. Egg noodles are another option if you want something more substantial and a little different.
Don’t overlook pickled vegetables or a sharp, acidic condiment. A small spoonful of crispy fried onions on top, or a squeeze of fresh lemon, adds brightness that makes the whole dish sing. Horseradish cream is spectacular with beef stew if you’re feeling adventurous.
Final Thoughts
Beef stew isn’t complicated or intimidating once you understand the core techniques: sear for flavor, build an aromatic base, add wine and broth, cook low and slow, and taste before serving. The whole process takes about two and a half hours of actual cooking time (or eight hours in a slow cooker, much of it hands-off), but the hands-on time is minimal.
What makes this dish a family favorite isn’t magic or a secret ingredient. It’s the fact that it tastes care-tended and substantial, like someone spent the afternoon thinking about your comfort. The tender meat, the soft vegetables, the rich broth—these are the gifts of time and proper technique applied with attention. And once your family tastes it, they will absolutely ask for it again and again. Make it often, adjust it to your taste, and don’t be shy about seasoning it properly. This is the kind of food that creates traditions.