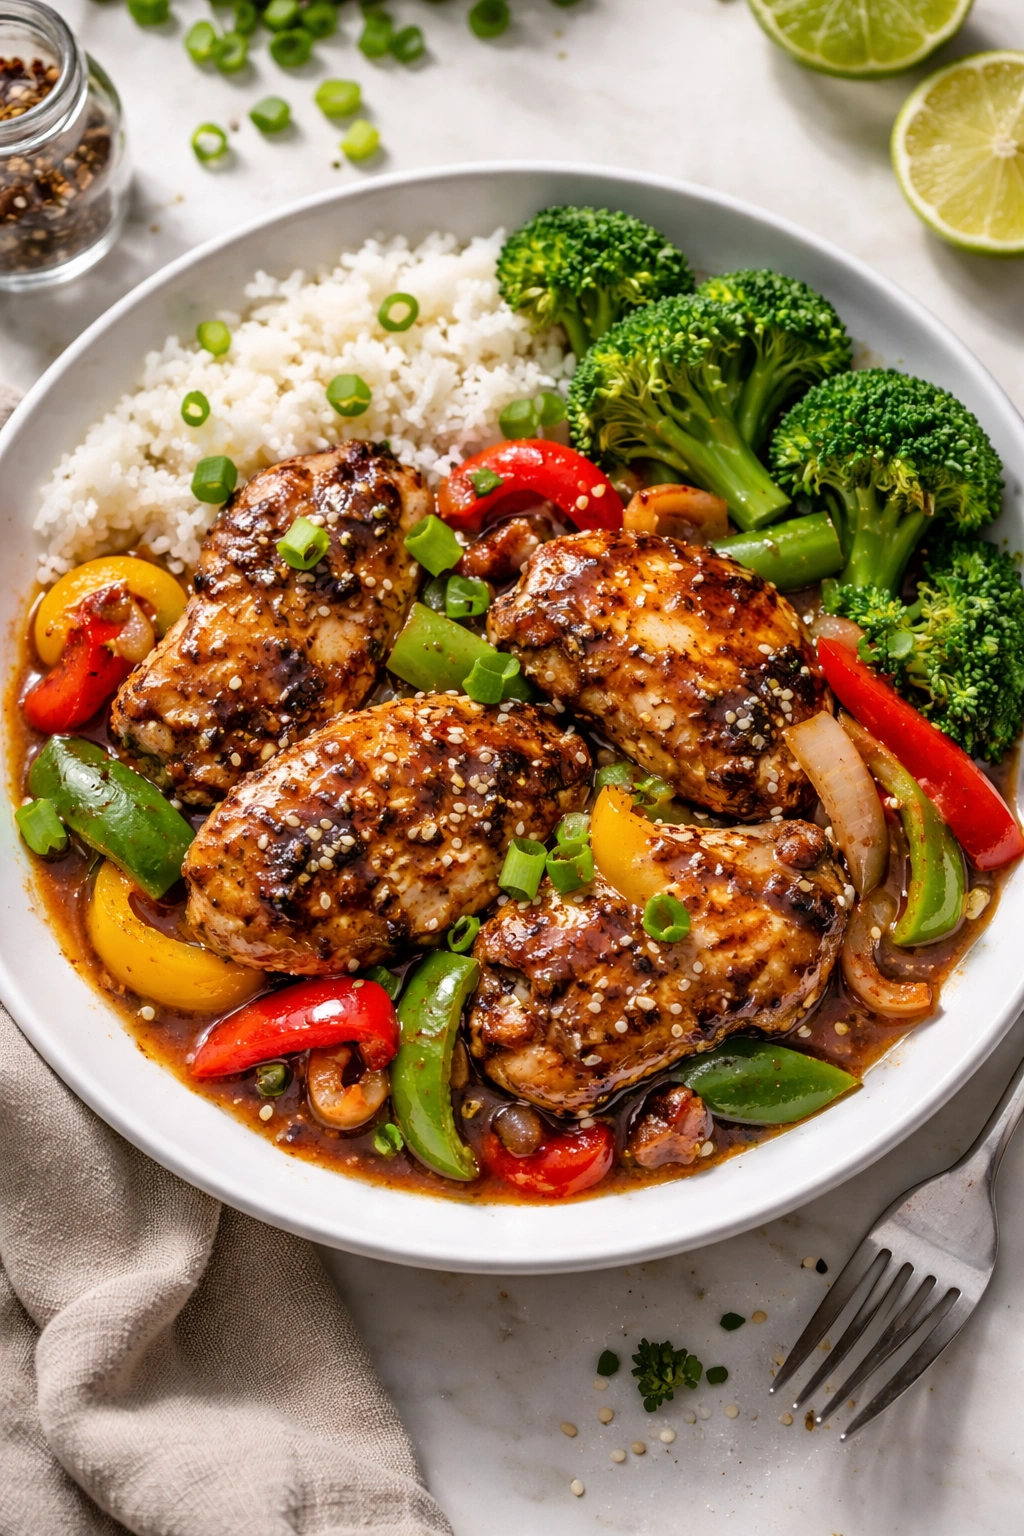
Black Pepper Chicken Worth Skipping Takeout For
There’s a moment that happens in every home cook’s life—that instant when something sizzles in a hot pan and suddenly smells so good you wonder why you ever thought ordering takeout made sense. For me, that moment came with black pepper chicken. The first time I nailed this dish, my family literally stopped mid-conversation to ask what restaurant I’d somehow smuggled from. When I admitted I’d made it at home in fifteen minutes, the skepticism in their eyes turned into something close to betrayal. Why hadn’t I been making this the whole time instead of handing money to the delivery driver?
Here’s the real truth about black pepper chicken: it’s not actually difficult, it doesn’t require mysterious ingredients or special equipment you don’t already own, and it genuinely tastes better than most takeout versions. The restaurant version drowns in oil and hides mediocre chicken under excessive sauce and salt. Your version—the one you’re about to learn—will have tender, juicy chicken with actual personality, vibrant vegetables that still have a bite to them, and a sauce so compelling that people will absolutely come back for seconds, sometimes before you’ve even finished plating.
The dish itself is an American-Chinese creation that’s become iconic at chain restaurants, but that’s precisely why making it at home matters. Once you understand the techniques and have made it a few times, you’ll have unlocked something bigger than just a weeknight dinner—you’ll have the confidence to approach stir-frying in general, knowing that if you can nail this, you can master the fundamentals that work across dozens of dishes.
Why This Black Pepper Chicken Beats Takeout Every Single Time
The gap between restaurant black pepper chicken and homemade versions made with proper technique is almost embarrassingly large. Restaurant versions often rely on deep frying to create that texture, which means the chicken absorbs enormous amounts of oil, and the coating becomes heavy and greasy rather than crispy. The sauce, while flavorful, typically contains more sodium in a single serving than many people should consume in a day, along with added sugars that mask rather than enhance the natural flavors of the ingredients.
Your homemade version accomplishes something restaurants can’t: it uses high heat and proper technique instead of excessive oil, resulting in chicken that’s genuinely crispy on the outside while remaining impossibly tender inside. The sauce is built from real ingredients you can see and taste—soy sauce, oyster sauce, fresh garlic, ginger, and genuine black pepper—rather than a mystery concentrate. You control every element, which means you can adjust the spice level, the sweetness, or the saltiness to match exactly what your family enjoys.
Beyond flavor, there’s the practical reality: homemade black pepper chicken comes together in roughly thirty minutes from start to finish, which isn’t actually slower than calling a restaurant, waiting for the order, and driving to pick it up. You’re saving money significantly—a restaurant meal for four easily costs thirty to forty dollars, while homemade costs a fraction of that. You also get the satisfaction of knowing exactly what went into your food, without mysterious ingredients or additives, and you end up with a dish that tastes genuinely better because every component is fresh and quality-focused.
Understanding the Real Star: Fresh Black Pepper and Why It Changes Everything
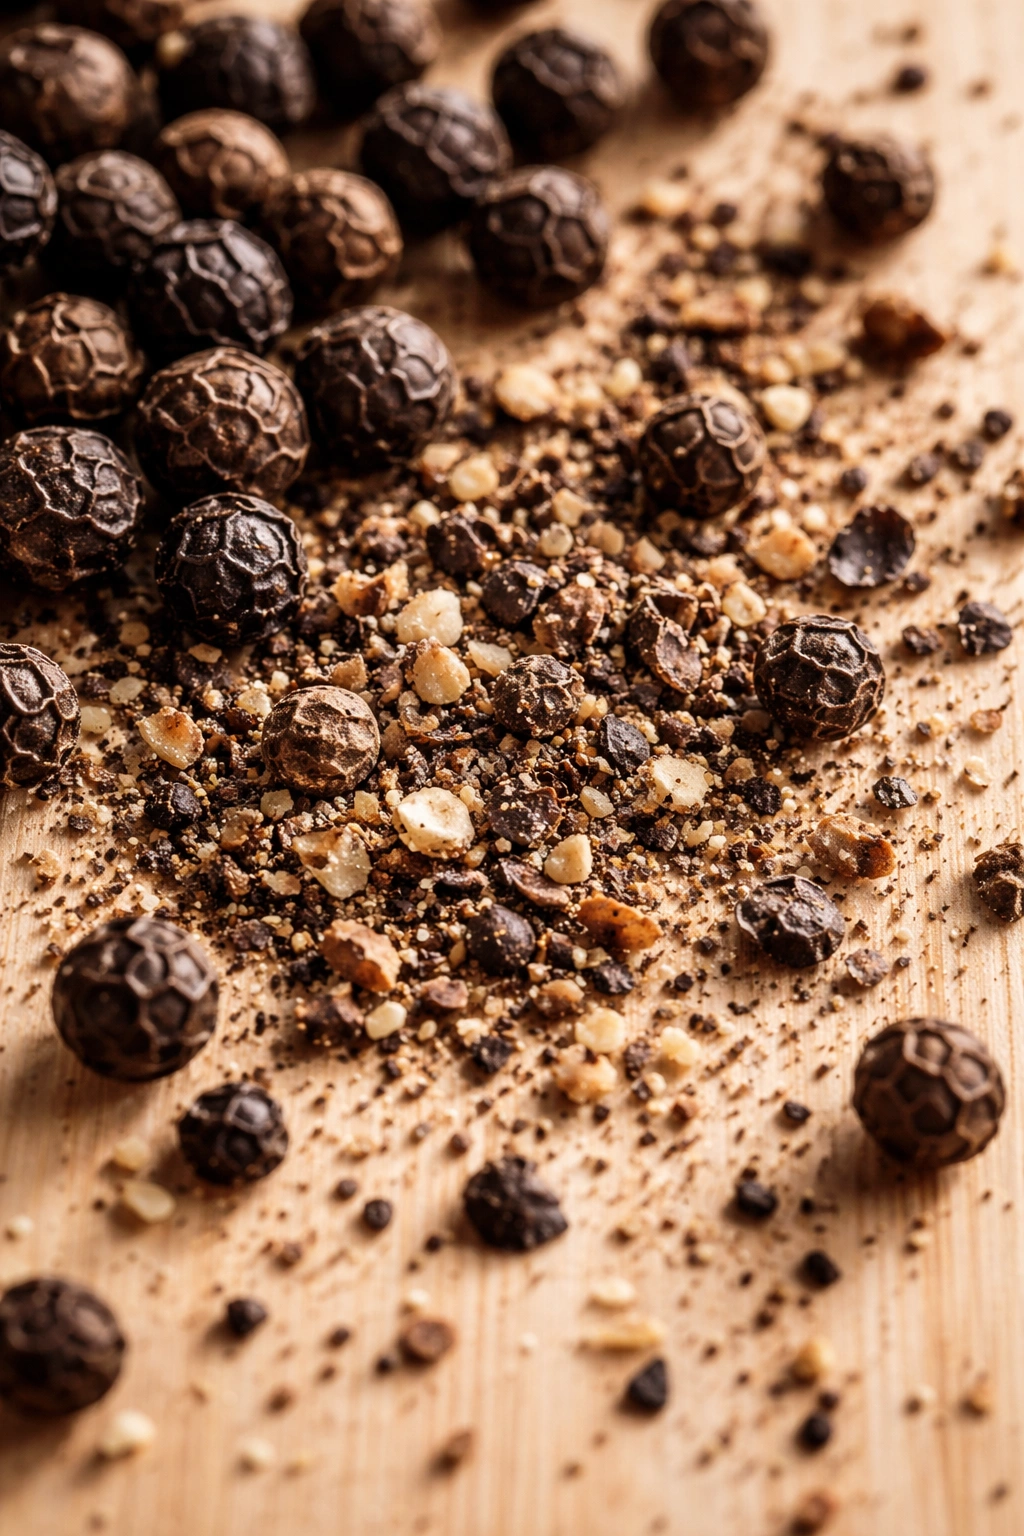
Most home cooks overlook the most important ingredient in this dish because it seems so basic and familiar. Black pepper sits in nearly every spice cabinet, often in the same container it’s been living in for months or years. Pre-ground pepper that’s been exposed to air gradually loses its aromatic oils, becoming dusty, flat, and honestly rather unpleasant. This is particularly tragic in a dish literally named after pepper, where the spice should be the defining characteristic.
Fresh-cracked black pepper is genuinely a different ingredient entirely. When you crack whole peppercorns, you release volatile aromatic compounds that give real black pepper its complexity—bright, slightly floral notes with a piney, almost perfumy quality that pre-ground pepper simply cannot deliver. The heat is also different; freshly cracked pepper provides warmth that builds gradually rather than the sharp, almost dusty bite of stale pre-ground pepper. The difference is roughly equivalent to comparing fresh herbs to dried herbs—technically the same ingredient, but worlds apart in actual flavor impact.
This is the point where I’m going to ask you to make a small investment if you don’t already own one: get a good pepper mill or grinder. Nothing fancy is necessary—a basic burr mill costs less than ten dollars and will serve you brilliantly for years. Keep whole black peppercorns in a sealed container in your pantry, and crack them fresh immediately before you start cooking this dish. This single change will elevate your black pepper chicken from “pretty good” to “where did you learn to cook like this?” territory. Your friends will taste it and know that something is different, even if they can’t quite articulate what. It’s the pepper.
The Velveting Technique That Creates Restaurant Texture
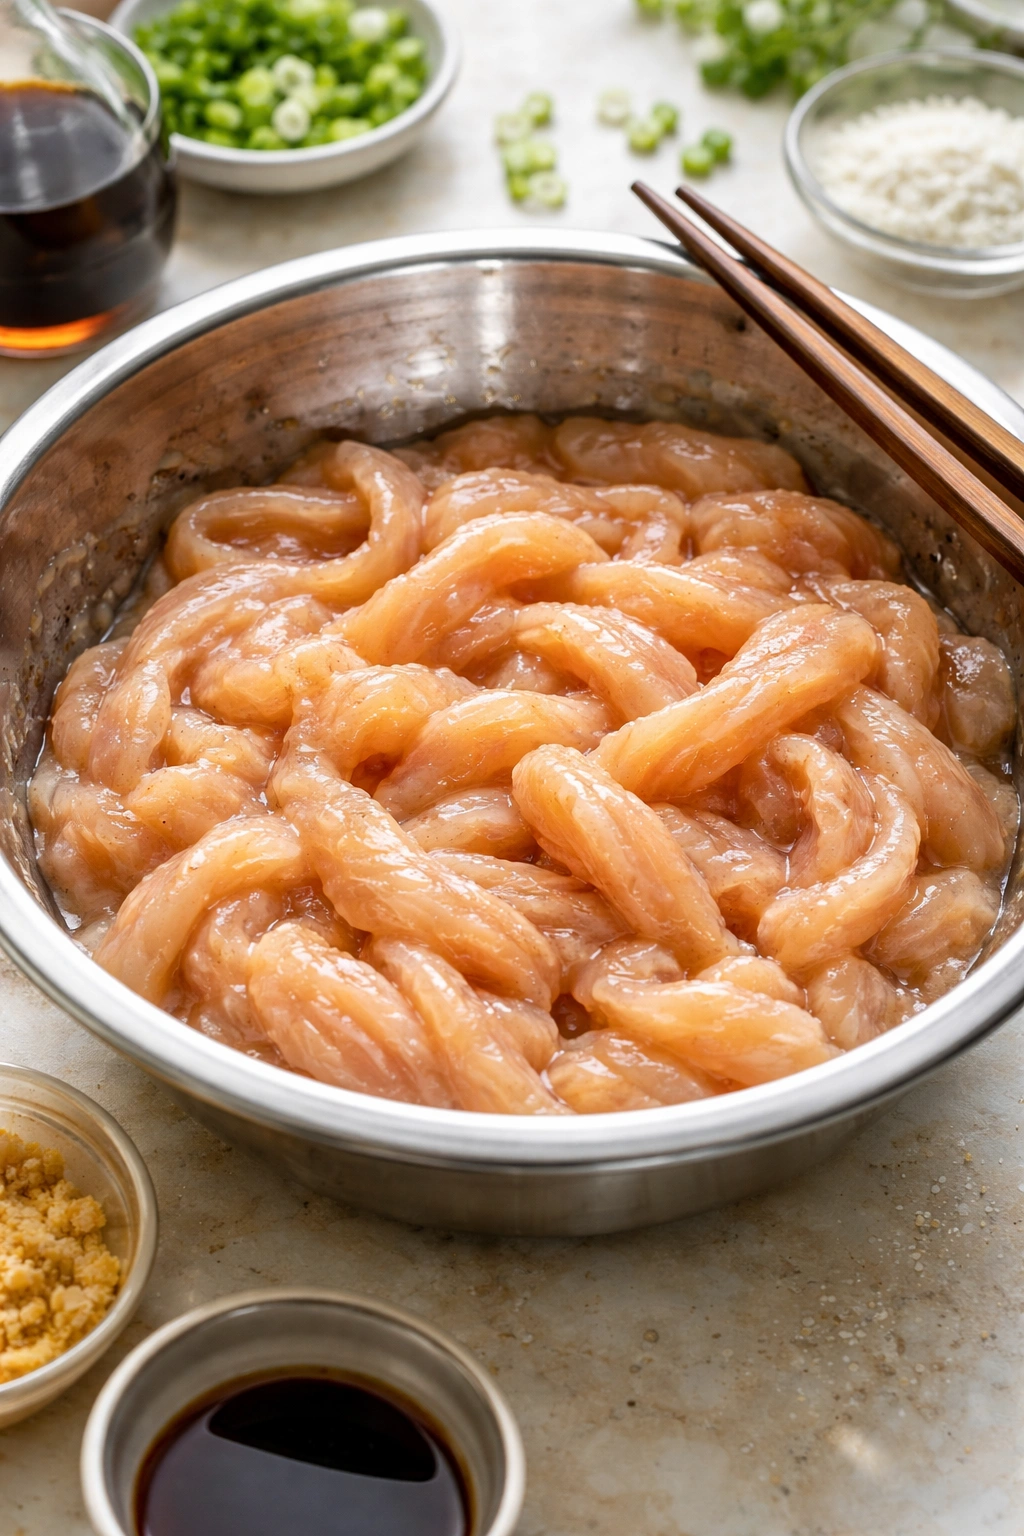
One of the most valuable discoveries you can make as a home cook is the Chinese cooking technique called velveting. This method uses a combination of cornstarch, soy sauce, and oil or water to create a protective coating around chicken that keeps it impossibly tender even when exposed to the high, dry heat of stir-frying. Understanding this technique explains why restaurant chicken tastes so silky and tender compared to home versions that often end up dry and tough.
Velveting works through a surprisingly simple mechanism: the cornstarch coating gelatinizes when it hits hot oil, forming a thin barrier that seals the chicken’s natural juices inside. This barrier prevents the moisture from escaping during the intense heat of cooking, which is particularly important for lean chicken breast that loses moisture quickly at high temperatures. Simultaneously, the coating provides a slightly slick surface that sauce clings to beautifully, creating that glossy appearance and even distribution you see in restaurant dishes.
The marinating time, though brief—typically ten to twenty minutes—is essential for allowing the cornstarch to fully hydrate and adhere to the meat. As the chicken sits in the marinade with soy sauce and cornstarch, the starch absorbs the liquid and forms a paste-like coating around each piece. Some traditional recipes blanch the coated chicken in oil before stir-frying, which pre-cooks the coating and makes it even more effective, but for home cooking, we skip that step for simplicity. The principle remains the same: the cornstarch becomes your secret weapon for tender results.
Cutting the chicken against the grain—a technique that works synergistically with velveting—is equally important for achieving that tender texture. Muscle fibers in chicken run in parallel lines, and when you chew cooked chicken, you’re essentially trying to break those fibers apart. When you cut perpendicular to the fiber direction, you pre-shorten them significantly, which means your teeth have less work to do and the meat feels more tender when you eat it. Combined with the moisture-retaining properties of the cornstarch coating, this simple cutting technique ensures incredibly tender results even from lean chicken breast that would normally dry out quickly at high heat.
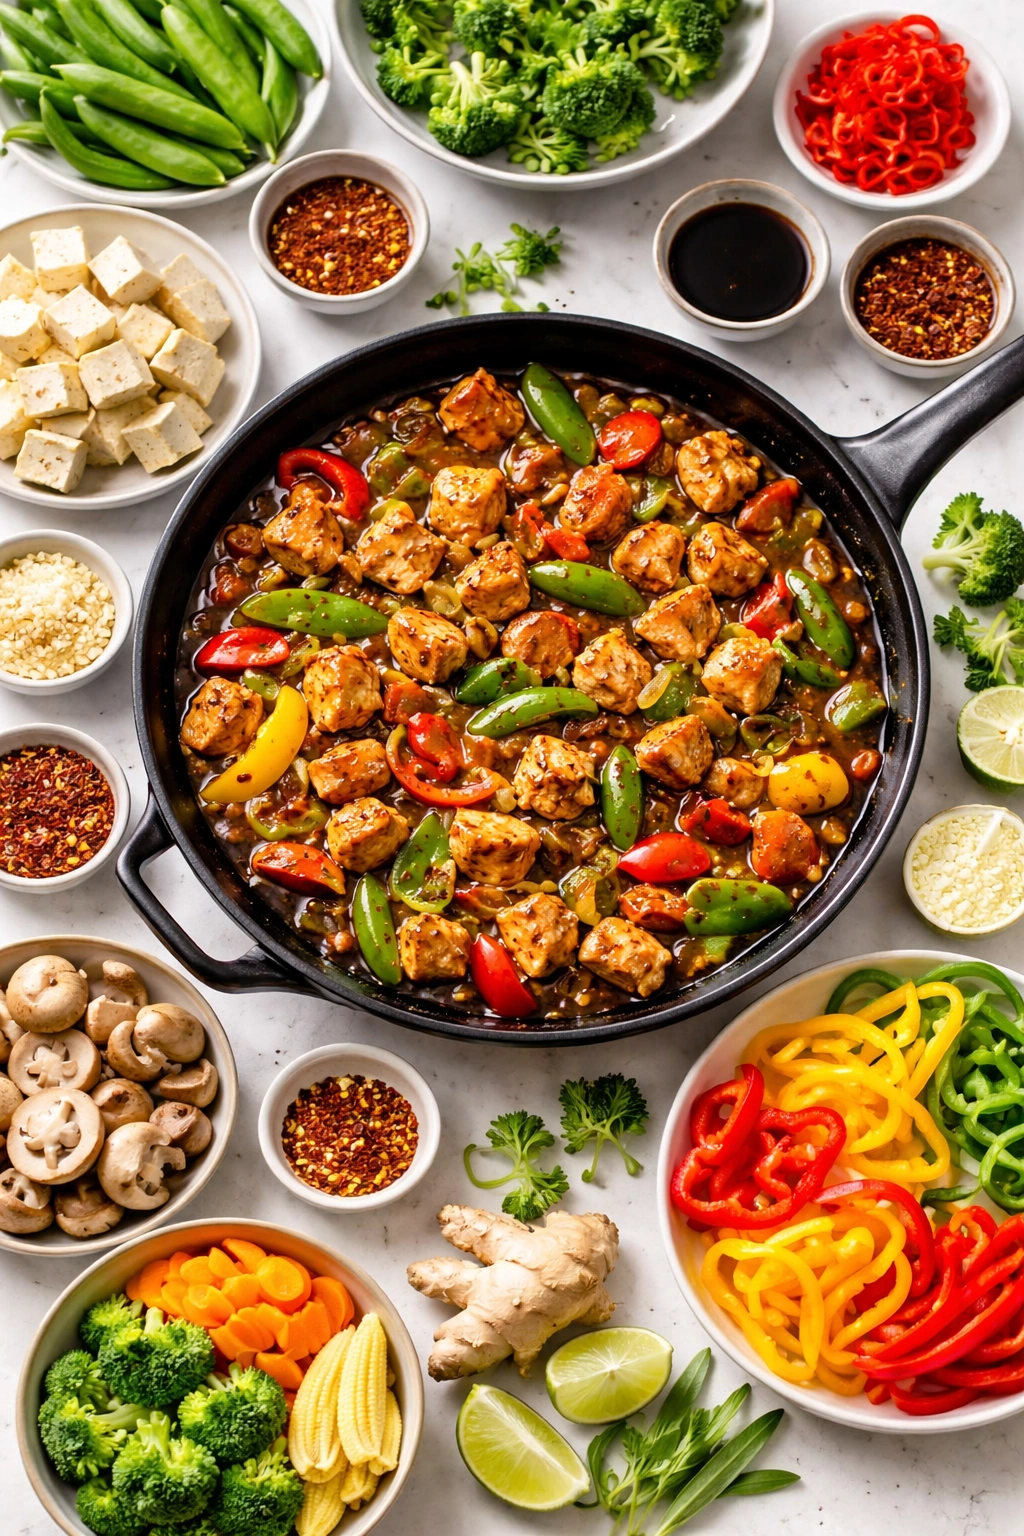
Complete Ingredients List with Detailed Notes
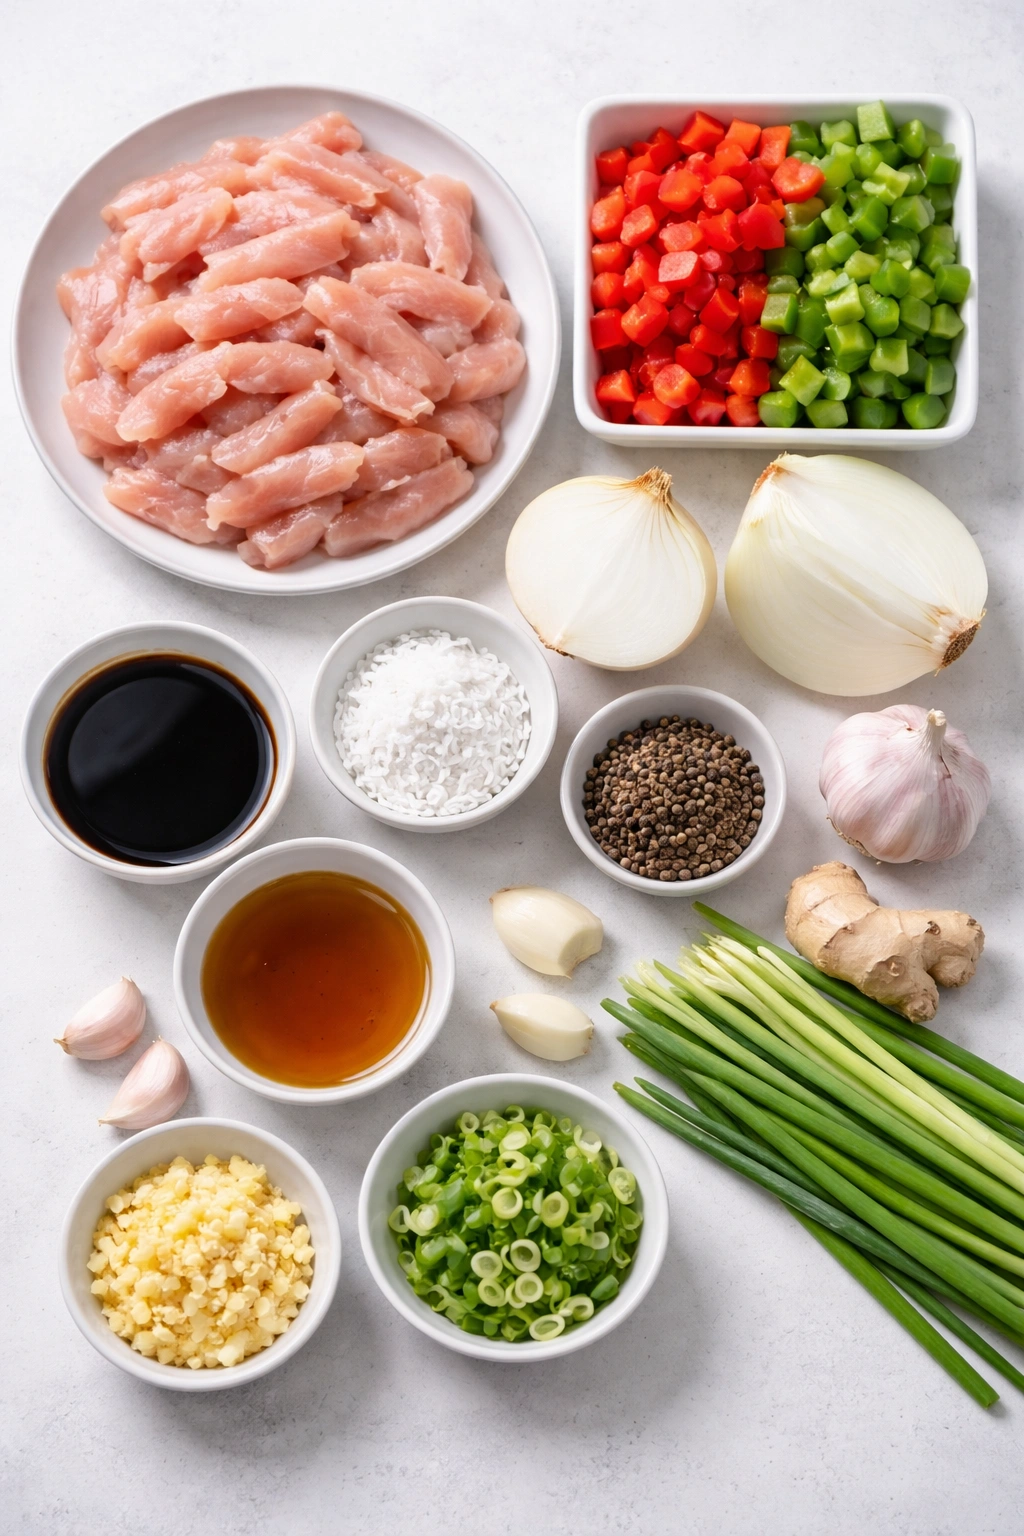
Yield: Serves 4 | Prep Time: 20 minutes | Cook Time: 15 minutes | Total Time: 35 minutes | Difficulty: Intermediate — The technique involves high-heat stir-frying which requires attention and proper sequencing, but the actual cooking is straightforward once you’ve prepped everything.
For the Chicken and Marinade:
- 1.5 pounds boneless, skinless chicken thighs or breast (I strongly recommend thighs for their juiciness and forgiving nature), sliced against the grain into thin strips approximately ¼-inch thick and 2 inches long
- 2 tablespoons low-sodium soy sauce (divided: 1 tablespoon for marinade, 1 tablespoon for sauce)
- 3 tablespoons cornstarch (divided: 2 tablespoons for marinade, 1 tablespoon for sauce thickening)
- 1 tablespoon Shaoxing wine (or dry sherry if absolutely necessary, though the authentic wine truly makes a difference)
- ½ teaspoon coarsely ground black pepper (for marinade)
For the Stir-Fry Vegetables:
- 1 large red bell pepper, cut into 1-inch bite-sized pieces
- 1 large green bell pepper, cut into 1-inch bite-sized pieces (optional but adds color and subtle bitter contrast)
- 1 medium yellow or white onion, cut into chunks roughly the same size as the peppers
- 4 to 5 fresh garlic cloves, minced finely (or 1 teaspoon garlic powder in a true pinch)
- 1-inch piece fresh ginger, peeled with a spoon and minced as finely as possible (do not substitute powdered unless absolutely necessary)
For the Black Pepper Sauce:
- ⅓ cup low-sodium chicken stock (or vegetable stock—do not use water, which produces flat, weak results)
- 3 tablespoons oyster sauce (or vegetarian oyster sauce made from mushrooms if needed)
- 1 tablespoon light soy sauce
- 1 teaspoon dark soy sauce (adds deeper color and richness, optional but recommended)
- 2 tablespoons Shaoxing wine (or pale dry sherry)
- ½ teaspoon sesame oil
- 1 to 2 tablespoons freshly ground black pepper (start at the lower end if your family is sensitive to heat, add more for boldness)
- 1 teaspoon Sichuan peppercorn powder (optional but genuinely excellent—adds citrusy complexity and a characteristic numbing tingle; substitute with ½ teaspoon ground coriander if unavailable)
- 1 tablespoon cornstarch (for thickening the sauce to proper consistency)
For Cooking:
- 3 to 4 tablespoons neutral high-heat oil such as vegetable, canola, or peanut oil (essential—olive oil will smoke and turn bitter at stir-fry temperatures)
Optional Additions for Extra Texture and Flavor:
- ⅓ cup roasted unsalted peanuts (added at the very end for crunch)
- 2 tablespoons toasted sesame seeds
- 2 green onions, sliced thin on a bias for garnish
Essential Equipment and Technique Setup
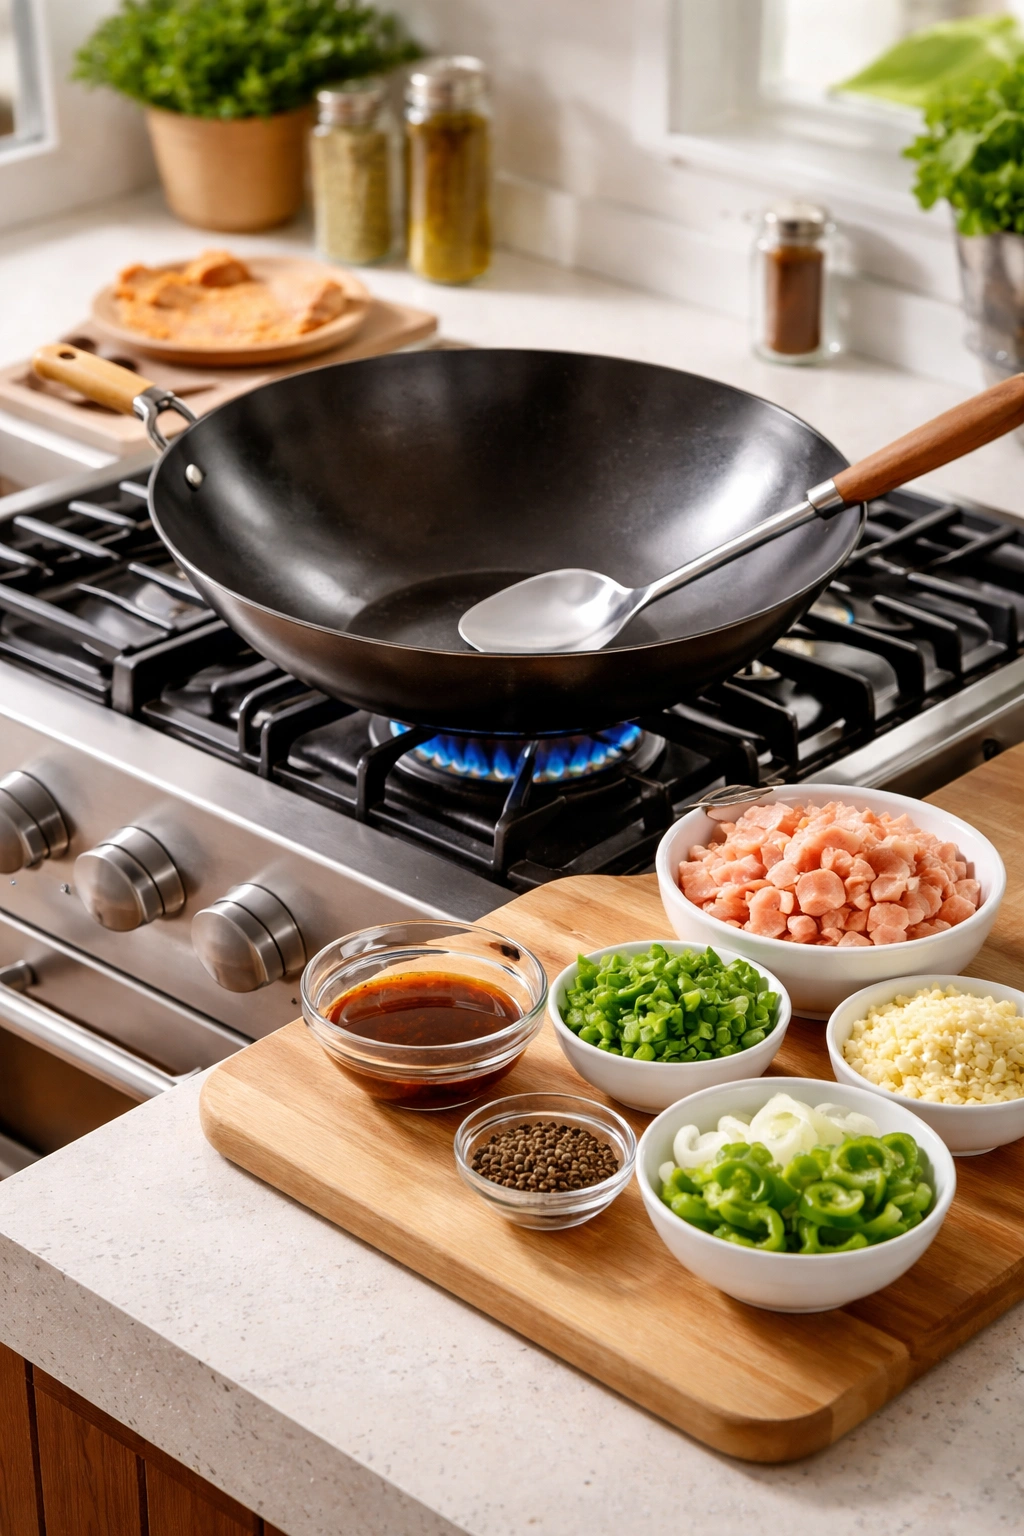
You don’t need fancy or specialized equipment to make excellent black pepper chicken, but understanding what works best helps explain why certain methods produce superior results.
A 12 to 14-inch skillet or wok is ideal for this dish. If you have a carbon steel or flat-bottomed wok, that’s excellent—they heat quickly and evenly while being light enough to toss and stir freely. Cast iron works but is too heavy for the constant motion that defines proper stir-frying. Nonstick pans can work, though they shouldn’t reach the extreme temperatures that proper stir-fry demands since the coating can break down. A standard stainless steel skillet works perfectly fine and is what most home cooks already own.
Have a long spatula or wooden spoon nearby for stirring and scraping the pan. You’ll also want a small bowl for the sauce mixture and another small plate for your minced aromatics (garlic and ginger should go into the pan together). Measure out your oil in a small container nearby. This setup—having everything ready and within arm’s reach before you start cooking—is absolutely critical. Once the pan heats up and you turn on the burner, the cooking moves so quickly that pausing to find an ingredient or measure something will result in burnt aromatics and overcooked vegetables.
Understanding Heat and Pan Preparation
Stir-frying requires genuinely high heat, much higher than typical Western cooking. Most home stoves’ highest setting is necessary here. Place your pan on the stove over high heat and let it sit for two to three full minutes before adding anything. You want the pan hot enough that a drop of water sizzles and evaporates immediately on contact. This extreme heat is what creates “wok hei,” or “breath of the wok”—the slight charring and caramelization that distinguishes restaurant stir-fry from home-cooked versions.
Add your oil to the preheated pan and let it heat for about thirty seconds. The oil should shimmer and flow like water across the pan surface. It should be almost smoking but not quite—if you see wisps of smoke, you’ve gone slightly too far, but it’s still fine. This is when you add your first ingredient, which in this case is the marinated chicken.
Step-by-Step Instructions with Pro Tips
Prepare Your Chicken and Create the Marinade:
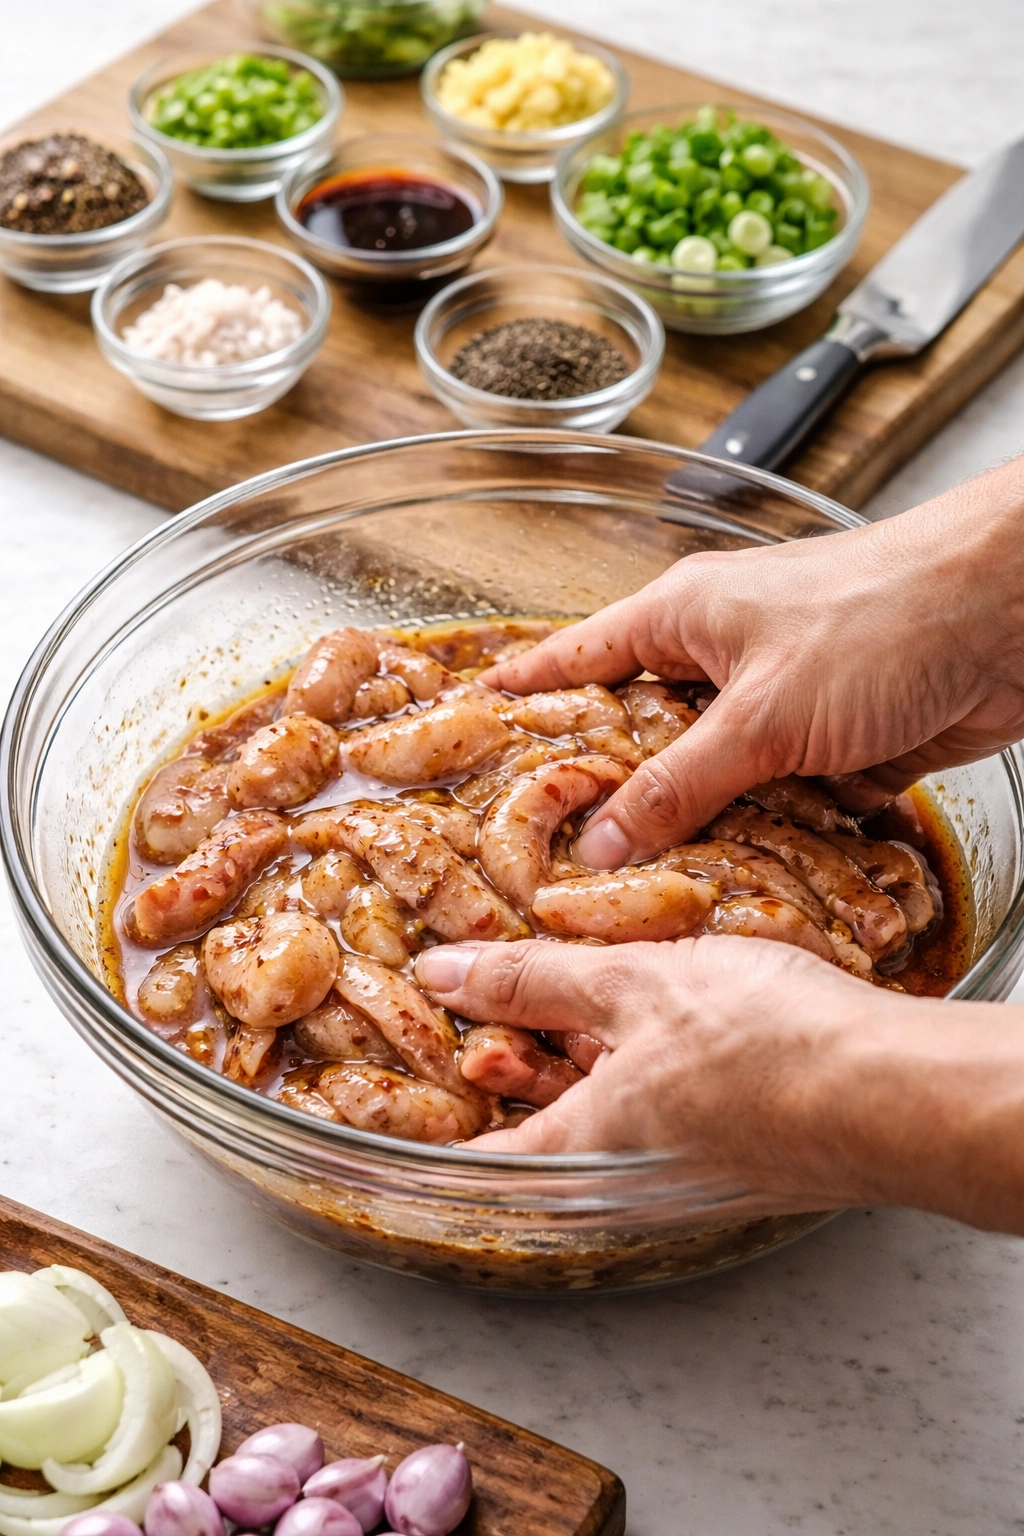
Start by placing your chicken on a clean cutting board and examining the meat to identify which direction the muscle fibers run. Position your knife perpendicular to those lines and slice the chicken into thin strips about a quarter-inch thick and two inches long. Try to keep all pieces roughly the same size so they cook evenly.
Transfer the sliced chicken to a medium bowl and add one tablespoon of soy sauce, one tablespoon of Shaoxing wine, and two tablespoons of cornstarch. Use your hands to massage the marinade into every piece of chicken, making sure the coating is thorough. The cornstarch will feel powdery at first but will quickly absorb the liquid and create a slightly sticky coating. Let the chicken sit at room temperature for at least fifteen minutes while you prepare everything else, or cover and refrigerate for several hours if working ahead. This marinating time allows the soy sauce and wine to penetrate the meat while the cornstarch forms that protective coating.
Prepare All Your Ingredients Without Exception:
This step is absolutely critical—Chinese cooks call it “mise en place,” and it means having absolutely everything prepped, measured, and within arm’s reach before you turn on the heat. Peel and mince your garlic and ginger finely, keeping them together on a small plate since they’ll go into the pan simultaneously. Cut your bell peppers and onion into bite-sized pieces about one to one-and-a-half inches across, arranging them together in a bowl.
In a small bowl or measuring cup, combine the remaining one tablespoon of soy sauce, two tablespoons of Shaoxing wine, three tablespoons of oyster sauce, one teaspoon of dark soy sauce (if using), one-third cup of chicken stock, one tablespoon of cornstarch, one to two tablespoons of freshly cracked black pepper, and Sichuan peppercorn powder if using. Whisk this sauce mixture thoroughly until the cornstarch dissolves completely with no lumps remaining. Keep a small spoon nearby because the cornstarch will settle to the bottom, and you’ll need to stir it again right before adding it to the pan. Have your marinated chicken ready in its bowl, and measure out your cooking oil. Everything should be arranged near your stove in the order you’ll use it.
Heat Your Pan Properly:
Place your largest skillet or wok on the stove over high heat and let it heat for two to three full minutes until it’s extremely hot. A drop of water should sizzle and evaporate immediately. Add two tablespoons of your cooking oil to the hot pan and swirl it around to coat the entire bottom surface. Let the oil heat for about thirty seconds until it shimmers and flows like water across the pan. The oil should be hot enough that it’s almost smoking—if you see wisps of smoke, you’ve gone slightly too far, but it’s still fine.
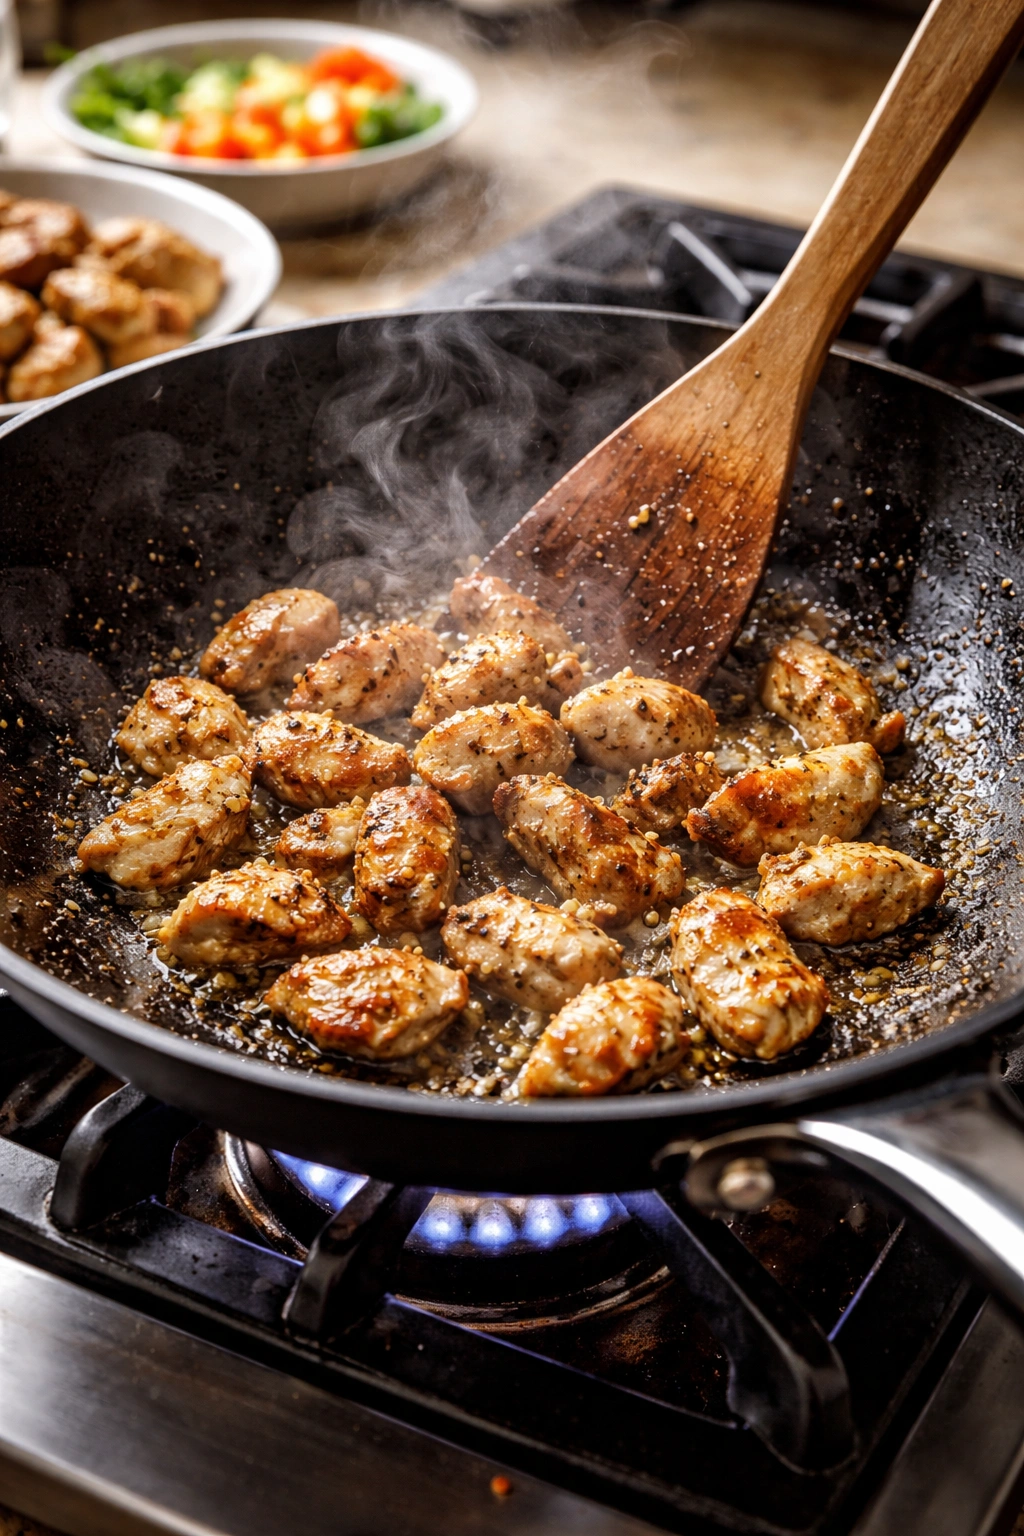
Cook the Chicken in Batches:
Take your marinated chicken and spread the pieces out across the hot pan in a single layer without overlapping. This might mean cooking in two batches if your pan isn’t large enough. This is the hardest part for home cooks—resist the overwhelming urge to stir or move the chicken immediately. Let the chicken sit undisturbed for about thirty seconds so the bottom can sear and caramelize. If you try to move it too soon, the cornstarch coating will stick to the pan and tear the meat apart, leaving you with shredded chicken and a messy pan.
After thirty seconds, use your spatula to flip the pieces over or stir them, breaking up any that have stuck together. Continue cooking for another one to two minutes, stirring occasionally, until the chicken is about eighty percent cooked—the outside should be lightly golden and no longer pink, but the center can still be slightly underdone. This is exactly right. Transfer the chicken to a clean plate and set aside. If there’s more chicken than will fit in a single layer, cook it in two batches rather than crowding the pan, which causes steaming instead of searing.
Cook the Aromatics Carefully:
Reduce your heat to medium to prevent burning the garlic and ginger, which happens easily at high temperatures and creates bitter, acrid flavors. Add another tablespoon of oil to the pan if it looks dry. Toss in your minced garlic and ginger and stir them constantly for about fifteen to twenty seconds until they become fragrant and release their aromas. Watch carefully and keep stirring because they can go from perfectly cooked to burnt in just seconds. You just want them softened and fragrant, without any browning.
Stir-Fry the Vegetables Quickly:
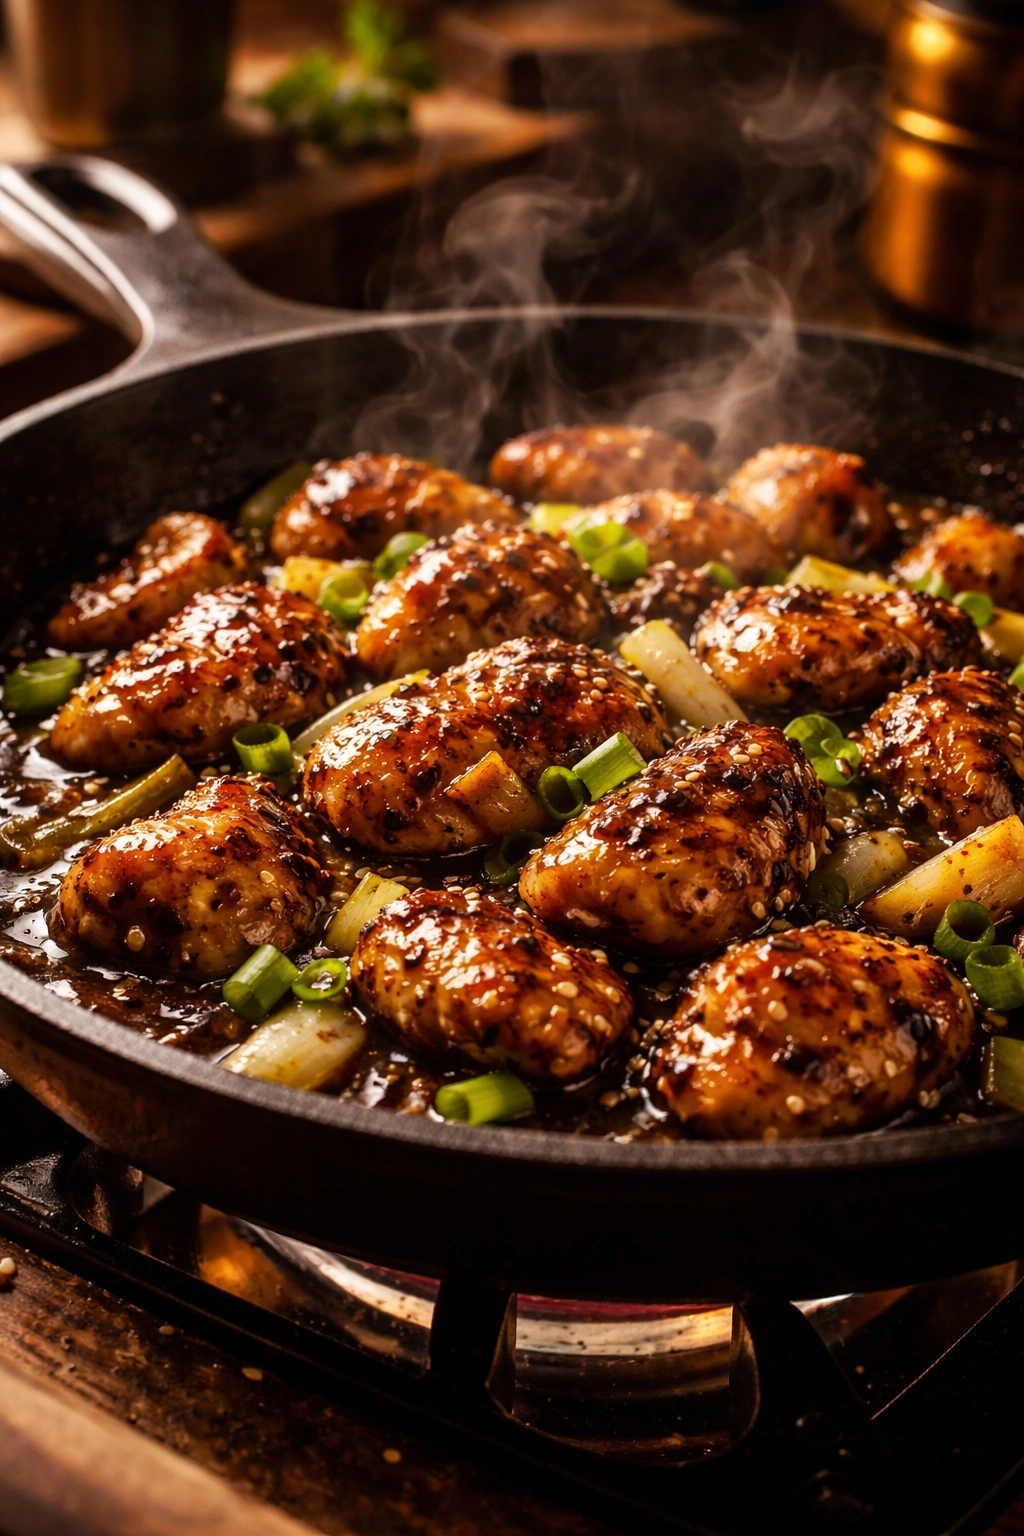
Immediately after the aromatics become fragrant, add your bell peppers and onions to the pan. Crank the heat back up to high and start stir-frying vigorously, tossing and stirring constantly so everything cooks evenly without burning. The vegetables will sizzle dramatically when they hit the hot pan—this is good. Keep them moving almost constantly for about two to three minutes. You want the vegetables to soften slightly and develop some charred spots on the edges, but they should still maintain significant crunch and vibrant color. The high heat creates light charring on the vegetables’ surface while keeping the interior crisp, which gives you that perfect balance of textures.
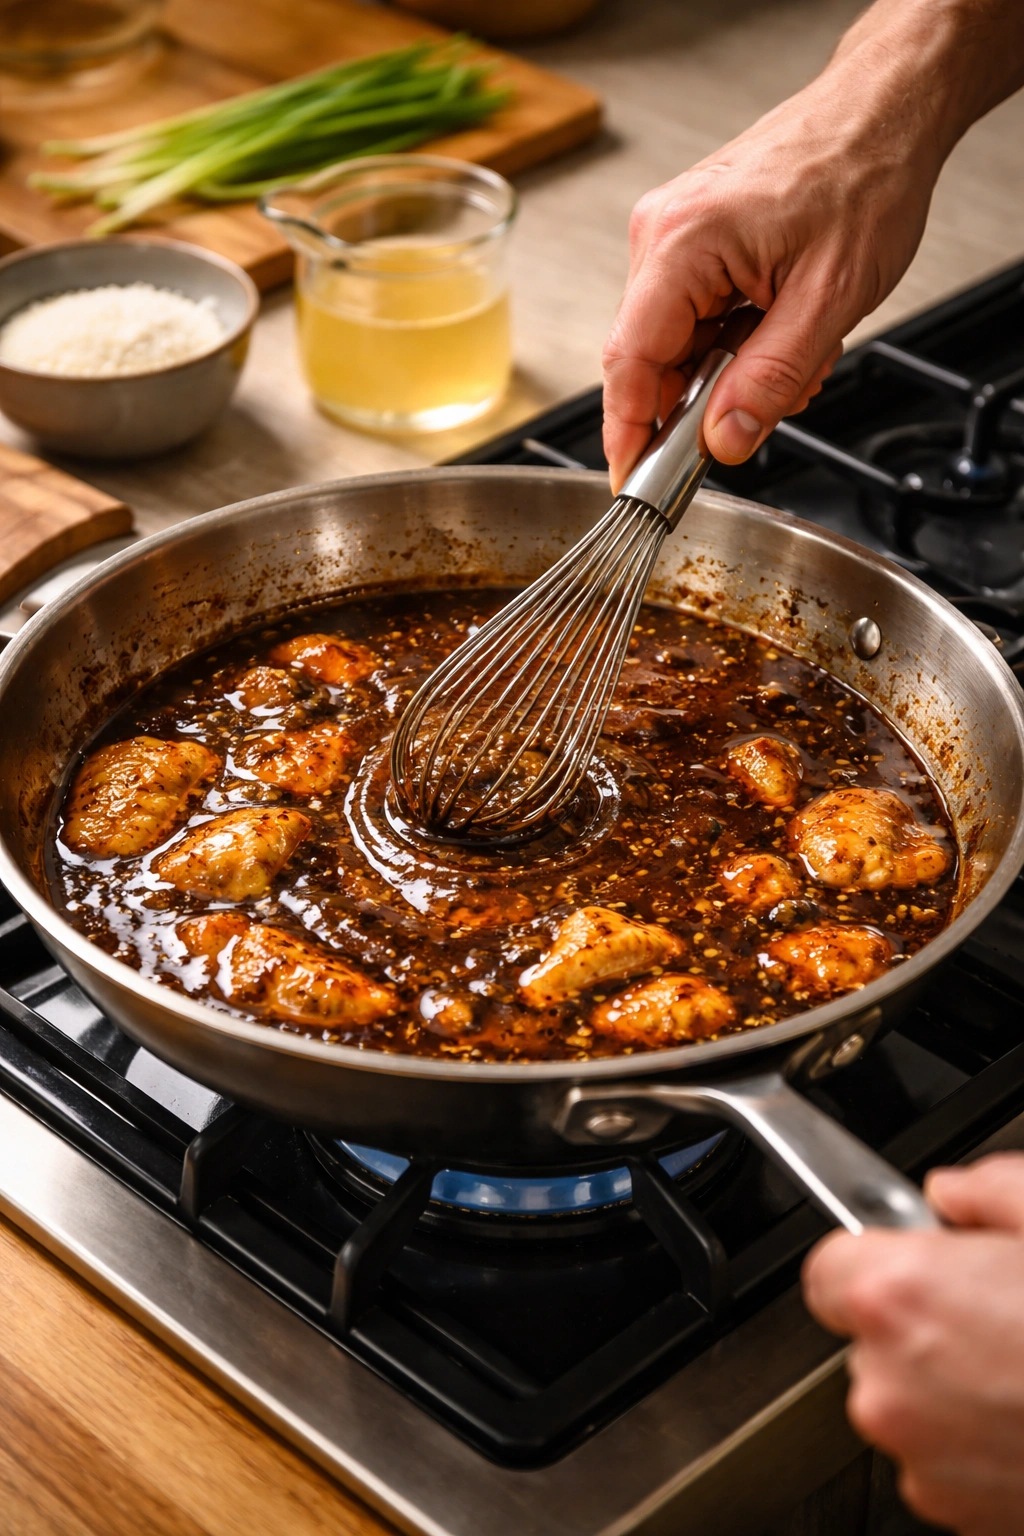
Add the Sauce and Thicken:
Give your sauce mixture one final stir since the cornstarch will have settled to the bottom, then pour it all into the pan with the vegetables. The sauce will immediately start bubbling and steaming as it hits the hot pan. Stir everything together constantly, scraping the bottom of the pan to pick up any stuck bits. The sauce will seem very thin initially, but as you continue stirring and the mixture comes to a boil, the cornstarch will activate and thicken everything into a glossy, coating consistency. This transformation takes about one to two minutes. You’ll see the sauce change from watery and translucent to thick and shiny. If your sauce seems too thick, splash in a tablespoon of water or stock. If it’s too thin, let it cook for another thirty seconds.
Finish with the Chicken:
Once your sauce has thickened properly and coats the back of a spoon, add the partially cooked chicken back to the pan along with any juices that have accumulated on the plate. Stir everything together thoroughly, making sure every piece of chicken and every vegetable gets coated in that glossy black pepper sauce. Continue cooking for another one to two minutes, stirring frequently, until the chicken is completely cooked through with no pink remaining in the center. The chicken will finish cooking during this final step, and because you removed it earlier when it was slightly underdone, it will be perfectly cooked now instead of dry and overdone.
Turn off the heat and give everything one final toss to combine. Taste a piece and adjust the seasoning if needed—you might want to add a pinch of salt or an extra crack of black pepper depending on your preference. If you’re adding peanuts or sesame seeds, toss them in now so they maintain their crunch.
Managing Heat and Timing for Perfect Results
Heat control is arguably the most challenging aspect of stir-frying for Western cooks accustomed to gentler cooking temperatures. Chinese stir-frying happens so quickly that you measure cooking time in seconds rather than minutes, and every second counts at temperatures hot enough to sear meat immediately on contact. Most home stoves struggle to maintain high heat when you add cold food to the pan, which is why working in smaller batches produces better results than trying to cook everything at once.
When you overload a pan, the temperature drops dramatically and food steams instead of sears, resulting in that soggy, grayed appearance instead of the lightly charred, vibrantly colored finish you want. This is why the recipe calls for cooking chicken in batches—it’s not laziness or overcomplexity, it’s the difference between excellent results and mediocre ones.
The staging technique of removing partially cooked chicken before adding vegetables might seem inefficient, but it’s based on solid cooking science. Chicken requires several minutes to cook through completely, while vegetables need only one to two minutes to maintain their crisp texture. If you left the chicken in the pan for the entire cooking time, it would be overcooked and rubbery by the time the vegetables finished. By removing the chicken early, you give the vegetables the high-heat attention they need, then add the chicken back at the end just long enough to finish cooking without drying out.
Understanding visual and aromatic cues helps you time things properly even if your stove heats differently than the recipe assumes. When oil shimmers and flows freely across the pan, it’s hot enough for cooking. When aromatics like garlic and ginger release their fragrance strongly enough to smell several feet away, they’re ready for the next ingredient. When chicken pieces release easily from the pan without tearing, the sear is set and you can flip them. When sauce coats a spoon and leaves a clear trail when you drag your finger through it, the cornstarch has activated and thickened properly.
Troubleshooting Common Mistakes
Even with the best instructions, things occasionally don’t work exactly as planned. Understanding what goes wrong and how to prevent it transforms you from someone who makes this dish once into someone who makes it confidently again and again.
If your sauce is too thin: The cornstarch didn’t activate properly, which usually means it wasn’t whisked thoroughly into the sauce mixture before adding to the pan, or the pan wasn’t hot enough when the sauce hit it. Make a fresh slurry by mixing one additional tablespoon of cornstarch with two tablespoons of water, whisking until smooth, and drizzling it slowly into the sauce while stirring constantly. Let it simmer for thirty seconds to activate.
If your sauce is too thick: You either used too much cornstarch or let it reduce too much. Add a tablespoon of chicken stock or water and stir to loosen. The sauce should coat everything but flow slightly when you tilt the pan.
If your chicken is tough or dry: You likely overcooked it during the initial searing, or you left it in the pan during the vegetable cooking stage. Remember that the chicken should be slightly underdone when you remove it initially—it will finish cooking when it goes back in with the sauce. Alternatively, you might have cut the pieces too large. Next time, make sure your strips are uniform and roughly the thickness of a pencil.
If your aromatics burned: The pan was too hot when you added them, or you didn’t reduce the heat to medium. Remember that garlic and ginger burn quickly at high temperatures. Reduce heat and stir constantly—they should smell amazing, not bitter.
If your vegetables are mushy: You cooked them too long or didn’t use high enough heat initially. Vegetables should only spend two to three minutes stir-frying. Use your highest heat and keep everything moving constantly. They should have some charred spots but still feel firm when you bite them.
If the dish tastes flat or dull: You probably used pre-ground pepper from a container that’s been sitting around for months. Fresh-cracked pepper makes a tremendous difference. You might also want to taste the sauce and add a tiny pinch of salt or a splash of soy sauce to brighten the flavors.
Variations to Make It Your Own
The beauty of black pepper chicken is its flexibility. The fundamental technique remains the same, but you can customize nearly every element to match your preferences or what you have available.
Vegetable variations: While bell peppers and onions are classic, you can substitute or add snap peas, broccoli florets, mushrooms, carrots cut into thin strips, zucchini, or asparagus. Adjust cook times slightly if using vegetables that take longer to soften—add them earlier or cut them smaller so everything finishes simultaneously.
Protein substitutions: Beef sirloin or flank steak sliced thin works beautifully with this sauce. You can also use pork tenderloin cut into strips, or even firm tofu pressed and cubed for a vegetarian version. The velveting technique works equally well with all of these proteins.
Heat level adjustments: If your family prefers milder flavors, reduce the black pepper to one tablespoon or use regular black pepper instead of combining it with Sichuan peppercorn. For those who enjoy serious heat, add a teaspoon of chili flakes or a tablespoon of Asian chili sauce like sambal oelek to the sauce.
Sauce depth variations: Add one tablespoon of rice vinegar or fresh lime juice at the very end for brightness that cuts through the richness. This adds complexity without making the dish taste obviously acidic. Alternatively, add a teaspoon of honey or brown sugar to the sauce for subtle sweetness that rounds out all the savory elements.
Nutty addition: Toast ⅓ cup of unsalted peanuts separately in a dry skillet for a few minutes until fragrant, then toss them into the finished dish just before serving. The toasted nuttiness pairs beautifully with the peppery sauce and adds textural contrast. You can also sprinkle toasted sesame seeds or chopped cashews for a different flavor profile.
Textural contrast: Reserve a small handful of raw bell pepper and add it during the last thirty seconds of cooking. This creates textural variety between the slightly softened cooked peppers and the crisp raw ones, giving each bite different sensations.
Lower-carb serving: Serve the chicken and sauce over cauliflower rice instead of regular rice, and you’ve transformed this into a low-carb or keto-friendly meal without sacrificing any of the flavor.
Storage and Meal Prep Strategy
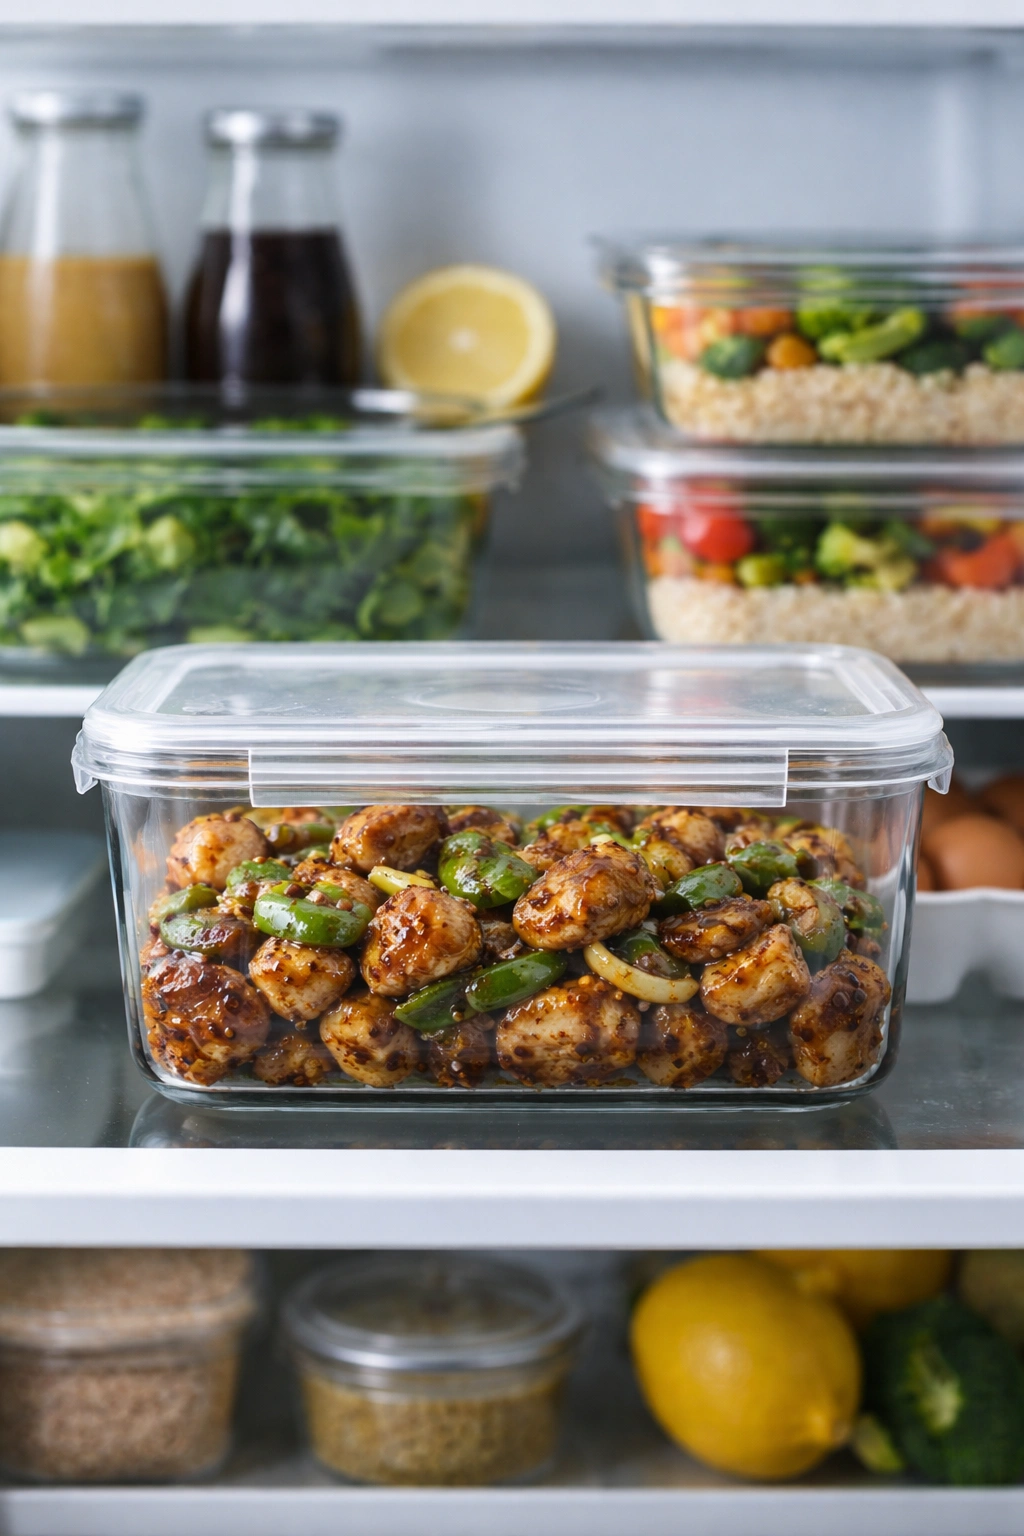
Black pepper chicken stores exceptionally well, and the flavors actually deepen and blend together as it sits, making it even more delicious the next day.
Refrigerator Storage: Transfer cooled black pepper chicken to an airtight glass container and refrigerate for three to four days. The sauce will thicken as it cools due to the cornstarch, which is completely normal and actually improves the next-day eating experience.
Freezer Storage: Allow the dish to cool completely, then transfer it to a freezer-safe container or resealable bag, removing as much air as possible. It keeps frozen for up to three months. Thaw overnight in the refrigerator before reheating rather than thawing at room temperature.
Reheating for Best Results: The stovetop method produces far superior results compared to microwaving. Place the cold chicken in a skillet over medium heat and add a splash of water or stock to loosen the thickened sauce. Stir gently until everything is heated through, about five to seven minutes. The sauce will return to its original glossy, flowing consistency. If you must microwave, use thirty-second intervals, stirring between each, to prevent overheating the chicken.
Make-Ahead Efficiency: You can marinate the chicken for up to twenty-four hours in advance, which actually improves tenderness and allows the flavors to develop. You can also chop all vegetables and store them in airtight containers in the refrigerator for up to three days. When you’re ready to cook, you’re essentially just executing the cooking steps, which means you can have dinner on the table in twenty minutes.
Portion Planning: This recipe easily serves four people as a main course with rice, or six people if you’re including other dishes. Leftovers reheat beautifully and are perfect for lunch boxes, meal prep containers, or quick dinners on nights when you don’t want to cook from scratch.
Perfect Sides and Serving Ideas
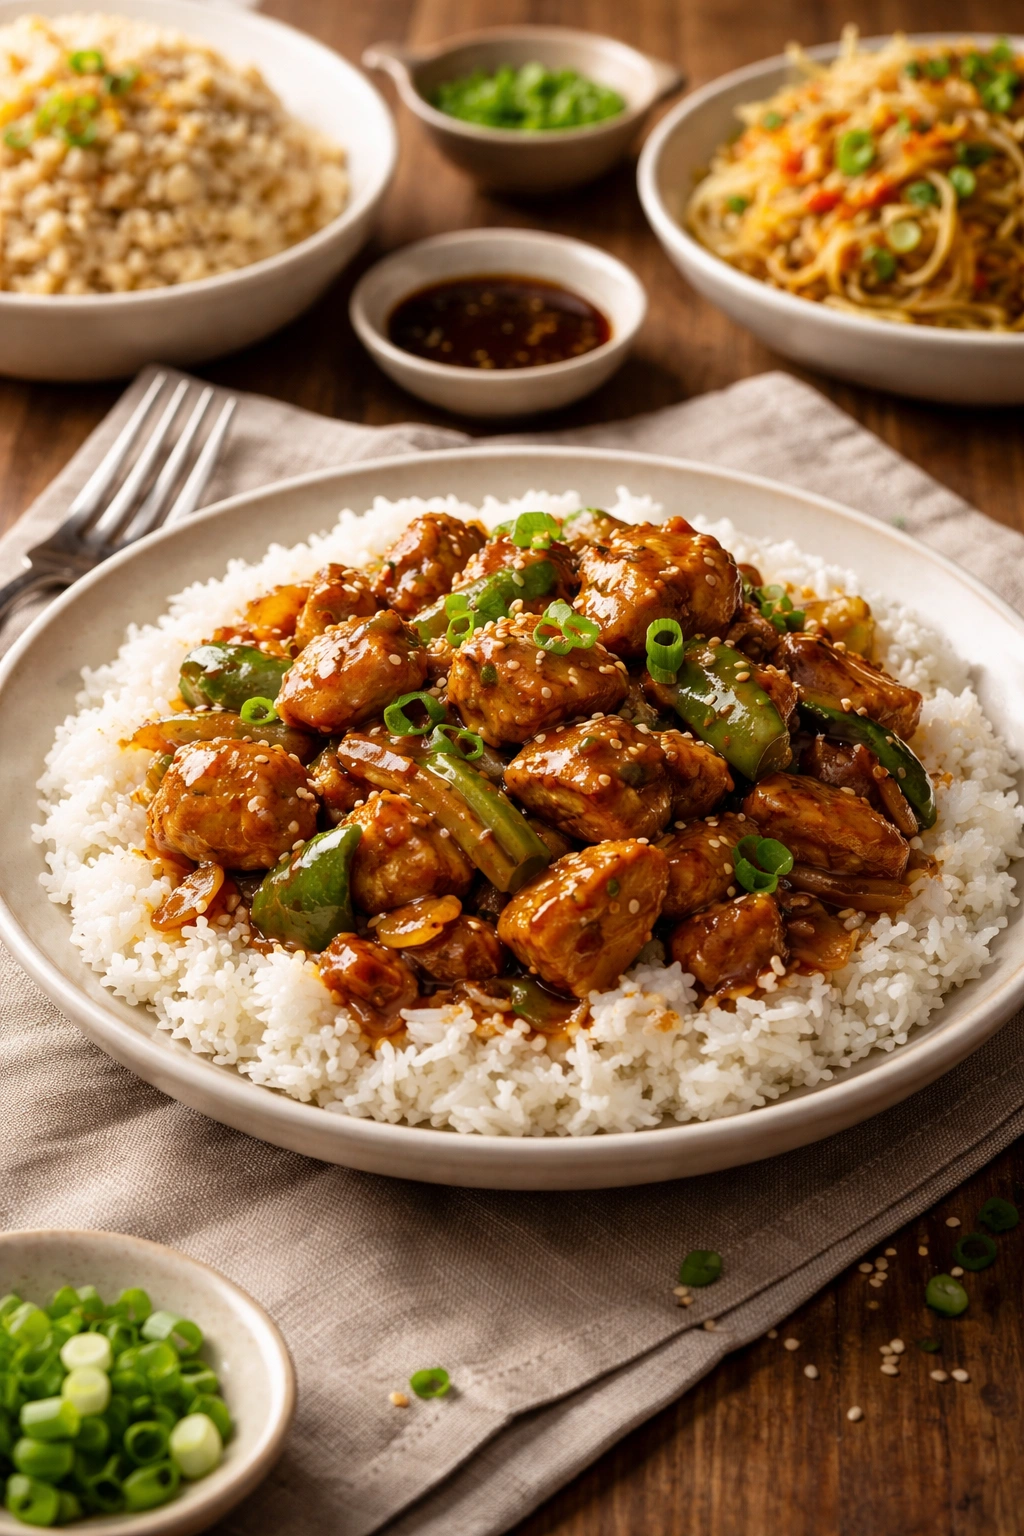
Black pepper chicken needs a vehicle for that incredible sauce, and your choice of side significantly impacts the overall eating experience.
Steamed White or Jasmine Rice: This is the classic pairing for good reason. Fluffy, neutral rice provides the perfect canvas for the peppery sauce to shine. The rice absorbs the sauce beautifully, and when you mix it together, each bite becomes a complete, balanced mouthful. A cup of uncooked rice yields about three cups cooked, which is sufficient for four people.
Brown Rice or Basmati: For heartier texture or more complex grain flavor, brown rice works wonderfully and adds nutritional value. Basmati rice offers fragrant, fluffy results with slightly more individual grains compared to white rice.
Fried Rice: If you have leftover rice, stir-fry it with an egg, some diced vegetables, and a splash of soy sauce for a more substantial meal that stretches your black pepper chicken across two dishes.
Cauliflower Rice: For lower-carb or keto-friendly eating, cauliflower rice absorbs the sauce beautifully and works surprisingly well with the Asian flavors.
Noodles: Egg noodles, ramen noodles (cooked and drained), or crispy chow mein noodles all pair well. The starch provides something for the sauce to coat, and the texture contrasts nicely with the tender chicken and crispy vegetables.
Side Vegetable Dishes: A simple stir-fried gai lan (Chinese broccoli) with garlic, steamed broccoli, or sautéed snap peas add color and nutrition without overwhelming the main dish. Soy-glazed mushrooms also pair beautifully.
Cucumber Salad: A quick sweet and sour cucumber salad or a crisp Asian slaw provides refreshing contrast to the rich, peppery sauce. The acidity and crunch balance the dish’s heavier elements.
Beverages: Jasmine tea complements the Asian flavors beautifully and aids digestion. For wine pairings, a chilled Riesling with slight sweetness balances the heat and saltiness, or a crisp Sauvignon Blanc cuts through the richness cleanly.
Nutritional Benefits of Homemade Black Pepper Chicken
Beyond flavor and satisfaction, black pepper chicken offers genuine nutritional value when made at home without the excess oil and sodium of restaurant versions.
Chicken thighs, which I strongly recommend, provide approximately twenty grams of protein per serving with more iron and zinc than breast meat. While they contain more fat than breast, that fat carries flavor and keeps the meat juicy—the total calorie difference between thighs and breast is actually quite modest. Chicken breast offers about thirty grams of protein per serving with slightly less fat for those prioritizing maximum protein and minimum calories.
Bell peppers contribute significant vitamin C—a single red pepper contains more than twice your daily requirement—along with vitamin A, vitamin B6, and various antioxidants. The antioxidants in peppers, particularly in red peppers, have anti-inflammatory properties and support heart health. Onions provide quercetin and other anti-inflammatory compounds that have been studied for potential immune-supporting benefits.
Garlic and ginger have been used in traditional medicine for thousands of years, and modern research has supported many traditional uses. Garlic contains allicin, a compound with antimicrobial and anti-inflammatory properties that forms when the cloves are minced or crushed. Ginger provides gingerol compounds that have anti-inflammatory and digestive benefits. Fresh ginger is also traditionally used to settle an unsettled stomach and support digestion, which is useful after a rich meal.
Black pepper itself isn’t just flavor—piperine, the compound that gives black pepper its bite, has been shown to enhance nutrient absorption and has anti-inflammatory properties. Fresh black pepper provides considerably more piperine than stale, pre-ground pepper, which is another reason using freshly cracked pepper matters nutritionally as well as flavor-wise.
Compared to restaurant black pepper chicken, homemade versions typically contain about half the sodium and a third less oil, making it significantly healthier without tasting like “diet food.” Restaurants use excessive amounts of oil both for flavor and to prevent sticking on their extremely hot burners, but home cooks can achieve excellent results with moderate oil quantities. The sauce in this recipe gets its body from cornstarch and oyster sauce rather than from sugar and additional sodium.
Final Thoughts

Black pepper chicken is the kind of recipe that changes how you think about home cooking. It’s simple enough that you can execute it reliably after making it just two or three times, yet sophisticated enough that people will honestly believe you’ve spent hours in the kitchen. The fundamental techniques—proper mise en place, high heat cooking, sauce thickening with cornstarch, and staging proteins separately from vegetables—work across dozens of stir-fry recipes, so what you learn here extends far beyond this single dish.
What I love most about mastering this recipe is the confidence it builds. The first time you nail the timing and plate something that looks like restaurant-quality food you made yourself, something shifts. You realize that takeout isn’t inevitable, that you’re genuinely capable of producing food that tastes better than what you could order. You also realize that those fifteen minutes of active cooking time is actually faster than the entire process of ordering, waiting, driving, and parking at a restaurant.
Keep whole black peppercorns on hand and crack them fresh every time. Don’t skip the mise en place—have everything prepped before you turn on the heat. Trust the high heat and don’t be afraid of it. Let the chicken sit undisturbed for those first thirty seconds so it sears properly. Stage your ingredients rather than cooking everything together. These practices aren’t extra steps—they’re the difference between really good results and mediocre ones.
Make this dish again and again until it becomes automatic. Invite friends over and watch their faces when you tell them you made it at home. Experiment with the variations once you’ve nailed the base version. Teach someone else how to make it and pass along the knowledge. This is home cooking at its best—delicious, efficient, cheaper than takeout, and genuinely impressive without requiring any special skills beyond following a logical sequence carefully. You’ve absolutely got this.