Roast beef doesn’t need to be intimidating or reserved for fancy holiday dinners. In fact, it’s one of the most forgiving dishes you can make—the kind of meal that comes together with minimal fuss but delivers maximum comfort and flavor. Whether you’re cooking for a family gathering or just want a spectacular Sunday supper, this method produces juicy, tender beef with a beautiful crust every single time.
The secret isn’t fancy technique or exotic ingredients. It’s understanding a few fundamental principles: choosing the right cut, bringing it to room temperature, seasoning boldly, and then letting the oven do the work. Once you nail this approach, you’ll never feel nervous about roasting beef again.
Why This Roast Beef Recipe Works
Most home cooks overthink roast beef. They worry about under- or overcooking it, fret about whether the meat will dry out, and stress over whether their seasoning is right. But here’s the beautiful truth: the cuts commonly used for roasting have enough natural fat and connective tissue that they practically cook themselves into tenderness. The lower heat method ensures even cooking throughout, which means you get consistent, beautiful results whether your roast is slightly irregular in shape or perfectly uniform.
This recipe works because it honors how beef actually cooks. When you start with high heat, you develop a caramelized crust through the Maillard reaction—that chemical process that creates deep, savory flavors. Then you lower the temperature dramatically and let time and gentle heat work their magic. The result is meat that’s tender, moist, and packed with beef flavor that tastes like you spent all day in the kitchen when you actually didn’t.
The best part? Your roast makes its own sauce. Those pan drippings become the foundation for gravy that’s infinitely more flavorful than anything from a packet. You’re not adding complexity; you’re just letting the beef express what it already is.
Picking the Right Cut of Beef
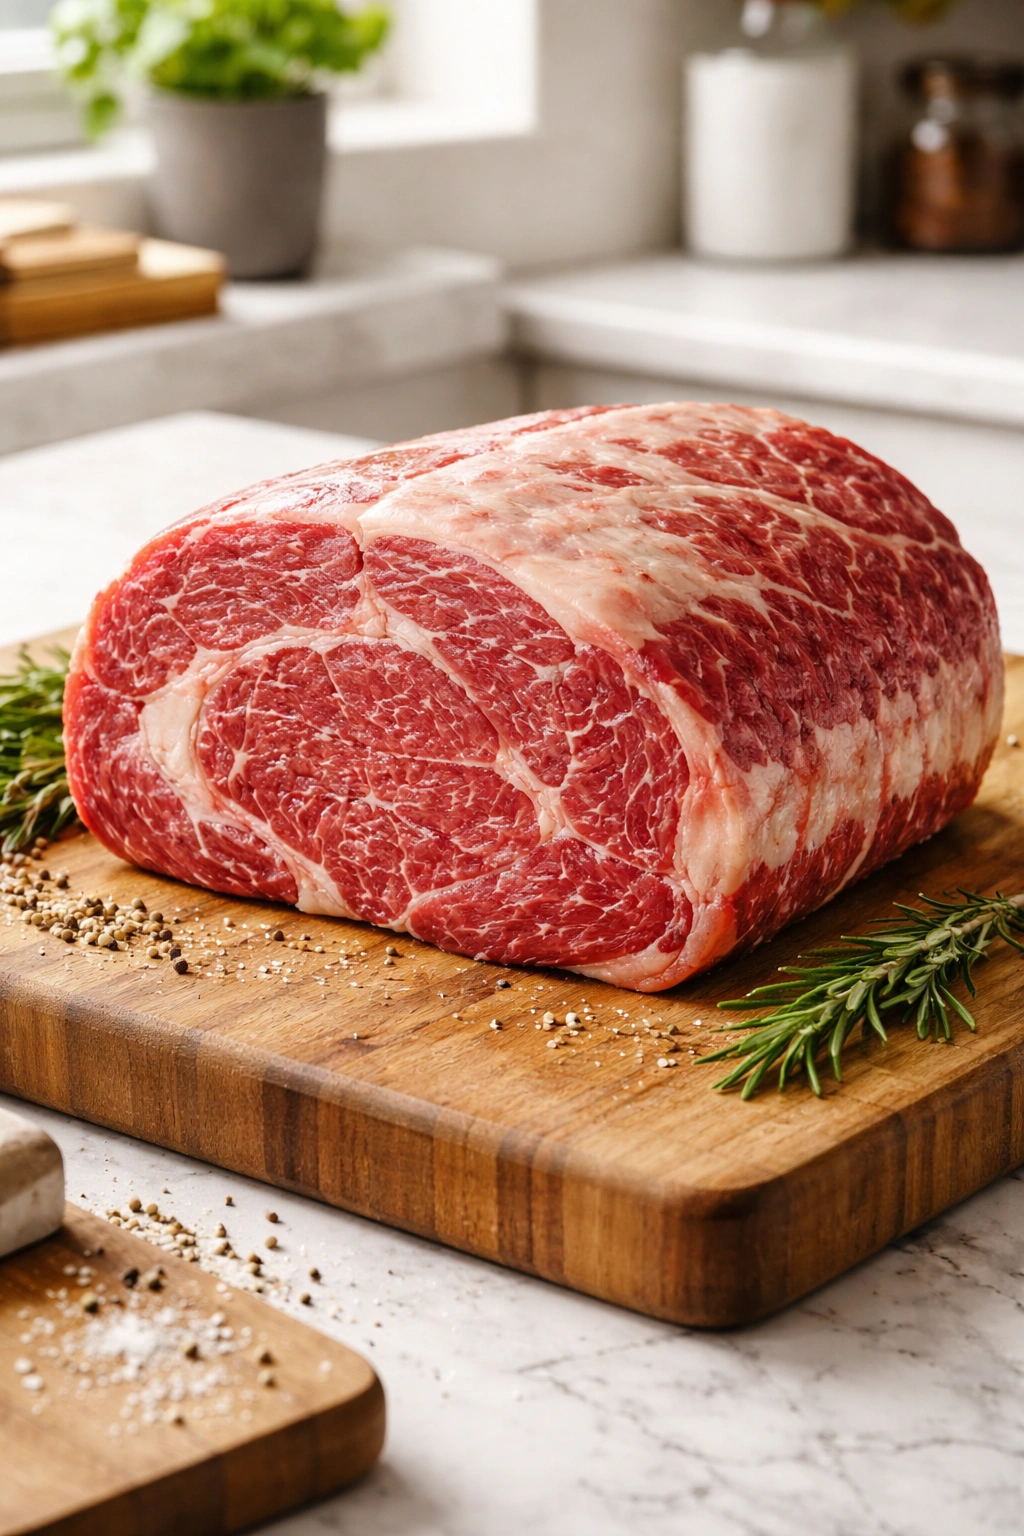
Not all roasts are created equal, and choosing wisely makes the entire process easier. The cuts that work best for this method are those with moderate marbling—fat distributed throughout the muscle rather than sitting on the outside. This fat melts into the meat as it roasts, keeping it moist and adding flavor.
Rump roast is an excellent choice for everyday meals and budgets. It’s lean but flavorful, cooks relatively quickly, and produces beautiful slices for sandwiches. Top round offers a good balance between tenderness and flavor, plus it cooks more evenly than some of the leaner cuts. Eye of round works well and is often reasonably priced. If you’re cooking for a special occasion and your budget allows, ribeye roast (also called standing rib roast) delivers exceptional tenderness and rich flavor thanks to its fat content.
Chuck roast, while delicious, needs longer cooking and benefits more from braising in liquid rather than dry-roasting. Save that cut for pot roast instead.
When you’re at the butcher counter or supermarket, look for meat with some visible marbling—those white lines of fat running through the muscle. Avoid anything that looks completely lean or has a thick external fat cap you’ll need to trim away. Ask the butcher for an end cut if possible, or request that they tie the roast with butcher’s twine. A tied roast cooks more evenly and holds its shape beautifully, which also makes it easier to slice.
Bringing Your Roast to Room Temperature
This step matters more than you might think, and it’s one reason roast beef fails in home kitchens. Cooking a cold roast from the refrigerator means the outside will overcook before the inside reaches the proper temperature. You’ll end up with an overcooked crust and unevenly cooked meat inside.
Remove your roast from the refrigerator at least 45 minutes before you plan to cook it—better yet, give it a full hour or even two hours if you have time. You want it sitting on your counter, loosely covered with foil, until it feels room temperature when you touch the thickest part. This takes patience, but it’s genuinely non-negotiable for consistent results.
While your meat is coming to temperature, use that time to prep your vegetables, make your seasoning mixture, and get your oven preheated. It’s also a perfect moment to line up your equipment and mentally walk through the cooking steps.
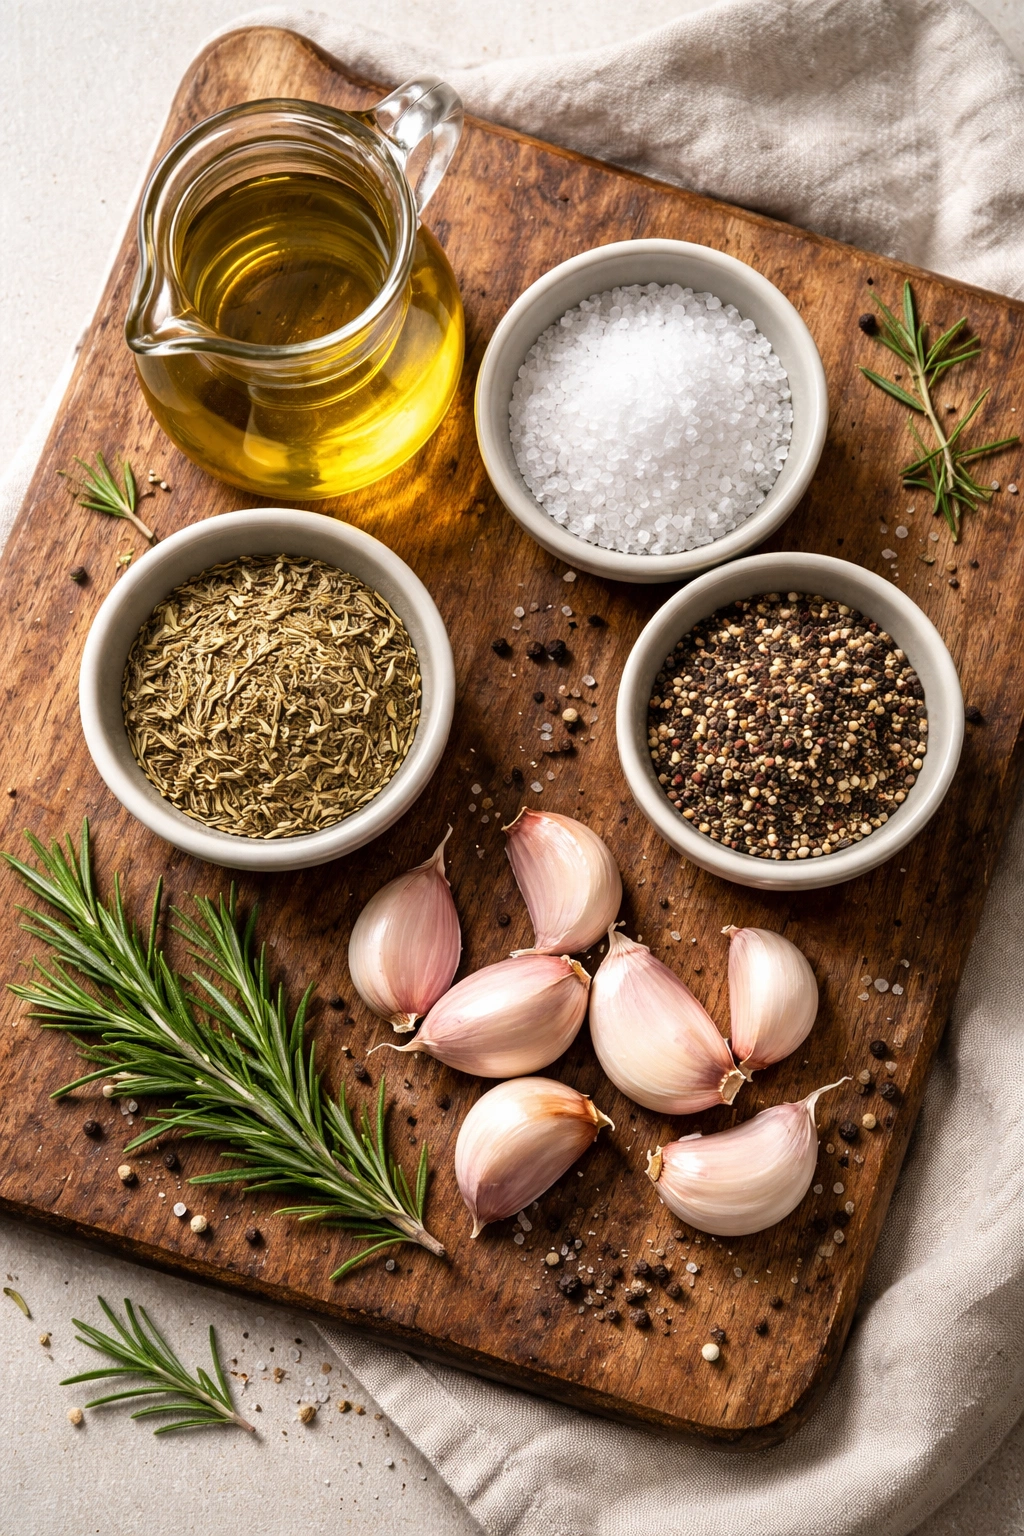
Simple Seasoning That Makes All the Difference
Salt and pepper—the absolute fundamentals—will get the job done beautifully. Don’t underestimate them. Many cooks are timid with seasoning, sprinkling just a pinch when they should be generous. You want to feel the salt crystals on your fingertips as you rub the meat.
Fresh herbs take things up a notch without adding complexity. Minced rosemary, thyme, or even oregano all pair wonderfully with beef. If you’re using dried herbs, crush them between your fingers before mixing them with oil to release their volatile oils and maximize flavor. A few slivers of fresh garlic pressed into the meat infuse every bite with savory depth.
Some cooks swear by a quick marinade of red wine, olive oil, and herbs, and there’s real value in that if you plan ahead—marinating overnight allows flavors to penetrate past the surface. But honestly, a bold seasoning rub applied right before cooking delivers excellent results and takes zero advance planning.
If you want a more sophisticated flavor profile without complicating things, make a paste with minced garlic, salt, pepper, and fresh herbs mixed into olive oil. This clings to the meat better than dry seasoning alone and creates a flavorful crust as it roasts.
Preparing Your Pan and Equipment
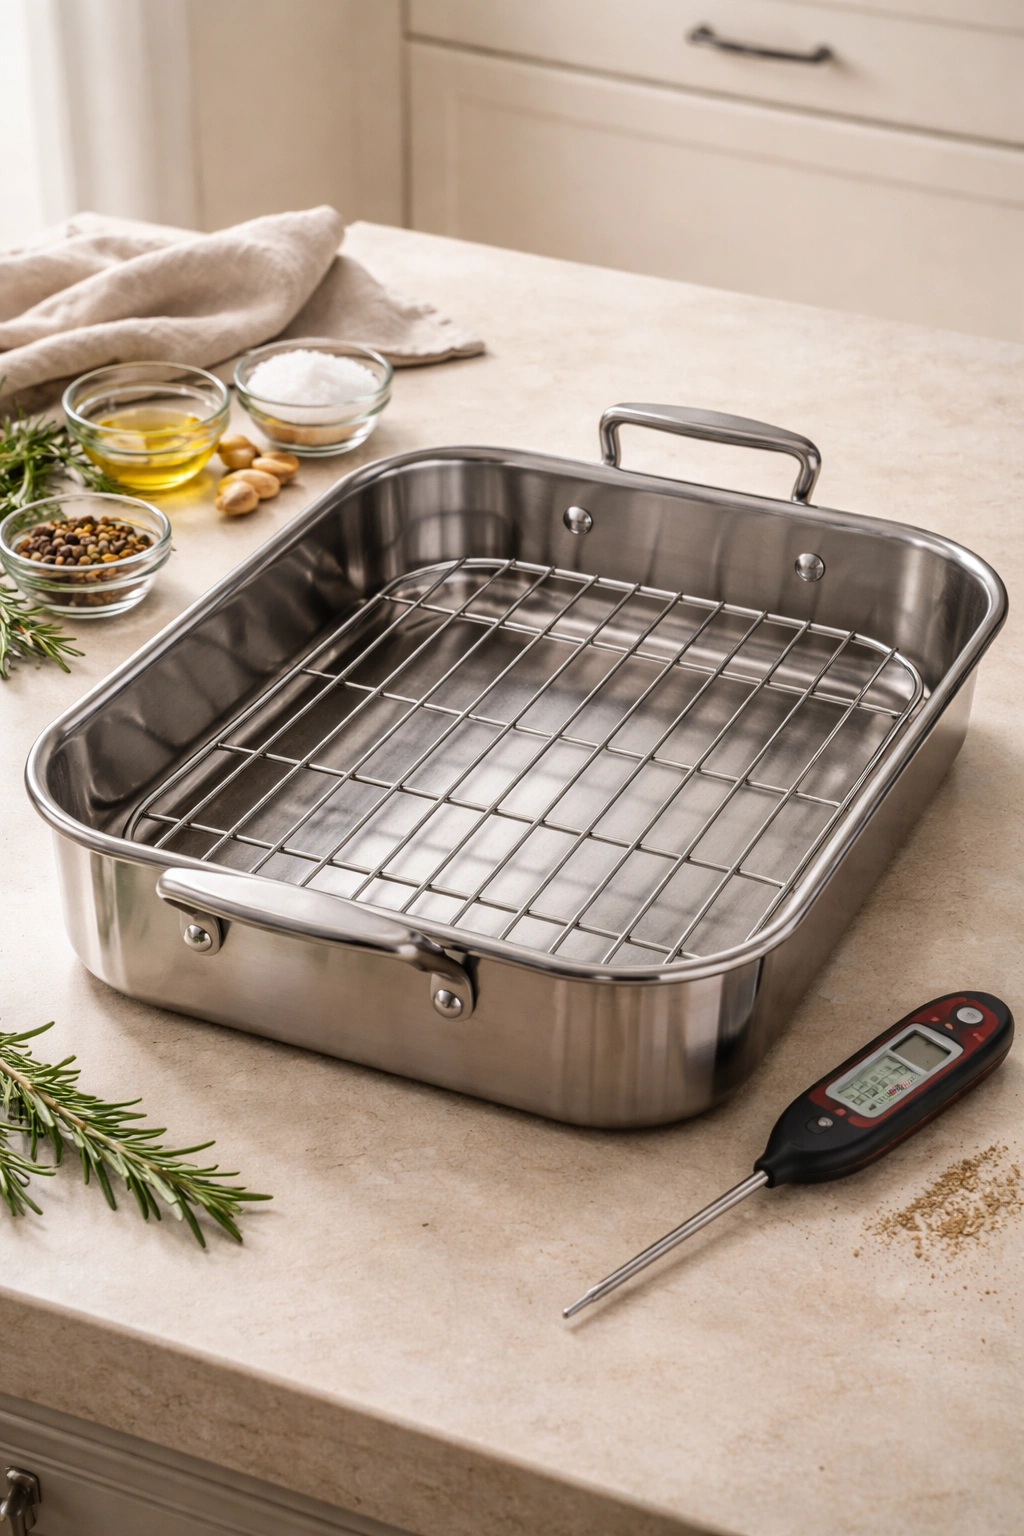
You need exactly two things here: a roasting pan (or large baking dish) and something to elevate the meat above the bottom of the pan. Some people use a built-in roasting rack; others stack foil into a makeshift rack. Both work perfectly.
Placing the roast directly on a rack with a pan underneath creates a convection-like environment. Hot air circulates underneath and around the meat, which means you don’t have to turn it during cooking and you get browning on all sides. This is better than placing the roast directly in the bottom of a pan, where it can stick and steam rather than brown.
Have your meat thermometer within reach. This is non-negotiable. Visual cues—checking color or firmness—lead people astray. You need a reliable instant-read thermometer that tells you exactly when your roast has reached the temperature that corresponds to your desired doneness.
Searing the Meat for a Golden Crust
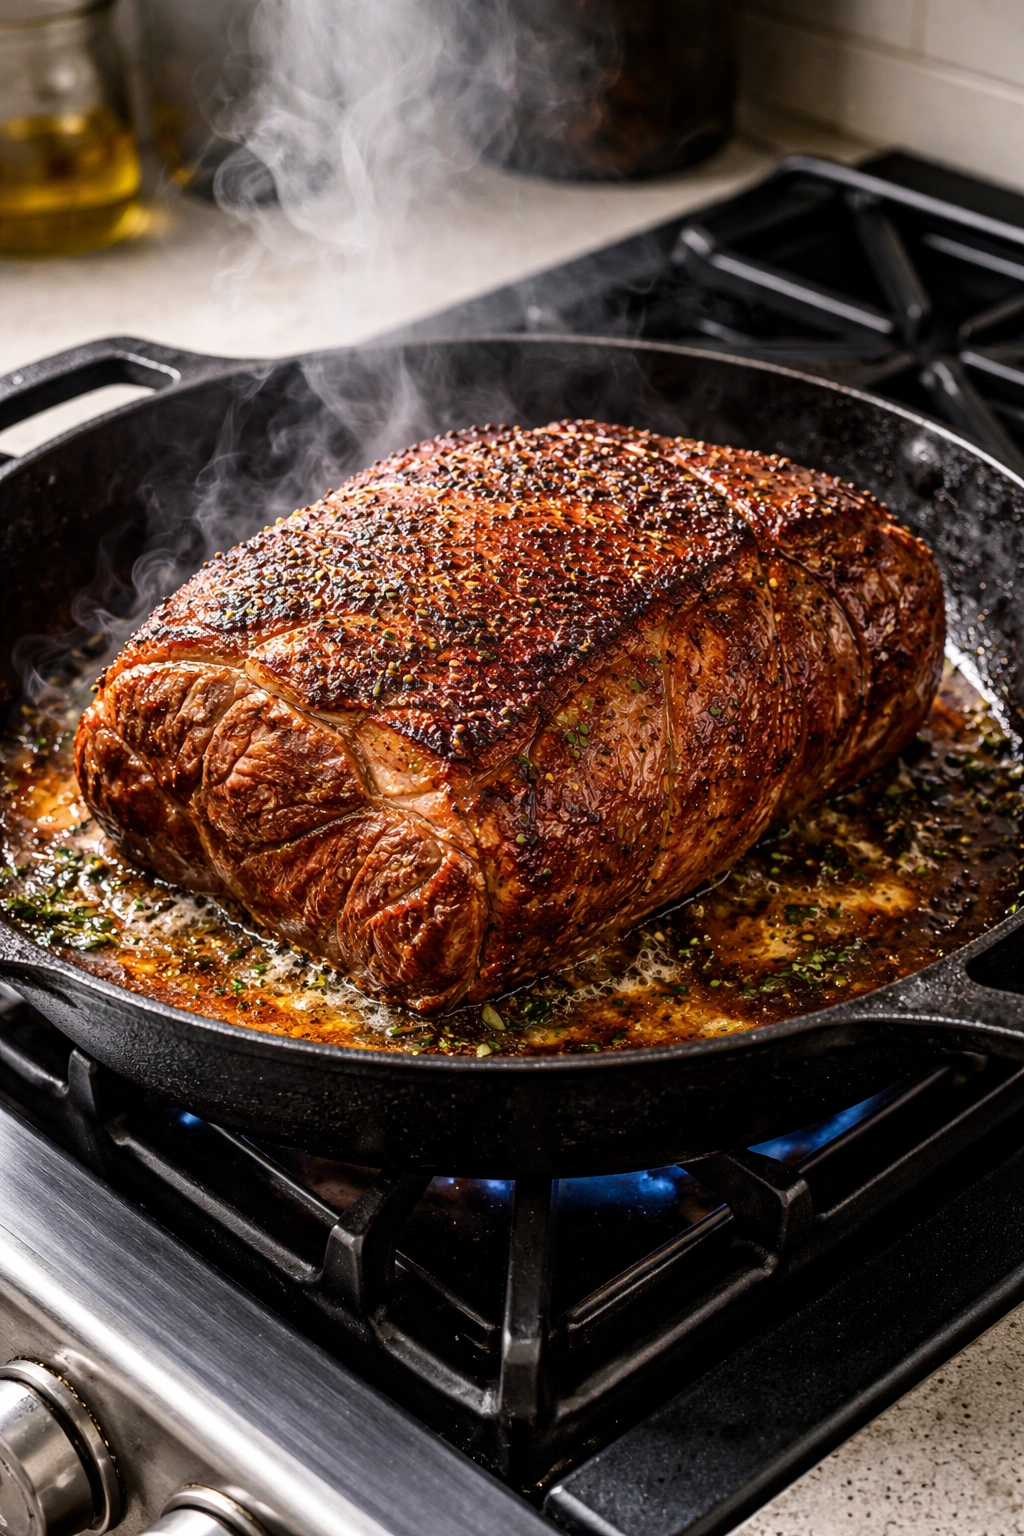
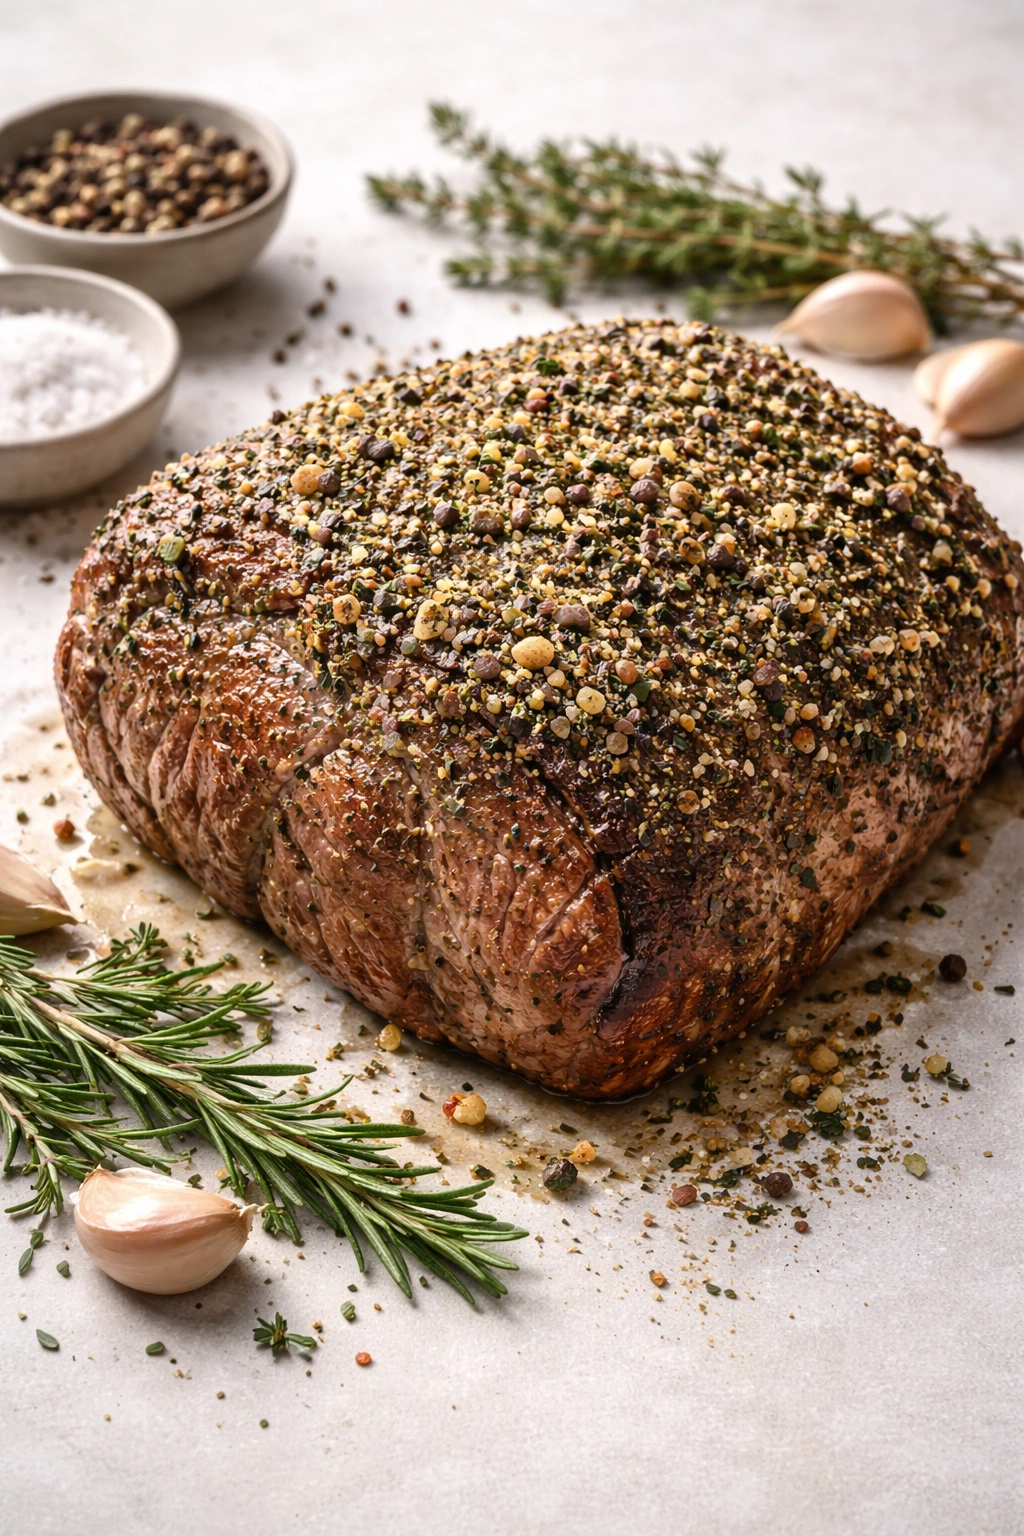
High heat at the beginning serves a critical purpose. Searing develops a flavorful crust through the Maillard reaction, which creates hundreds of complex flavor compounds. The Maillard reaction only happens at temperatures above 300°F, which is why this step matters and why low-heat-from-the-start methods produce pale, less-flavorful results.
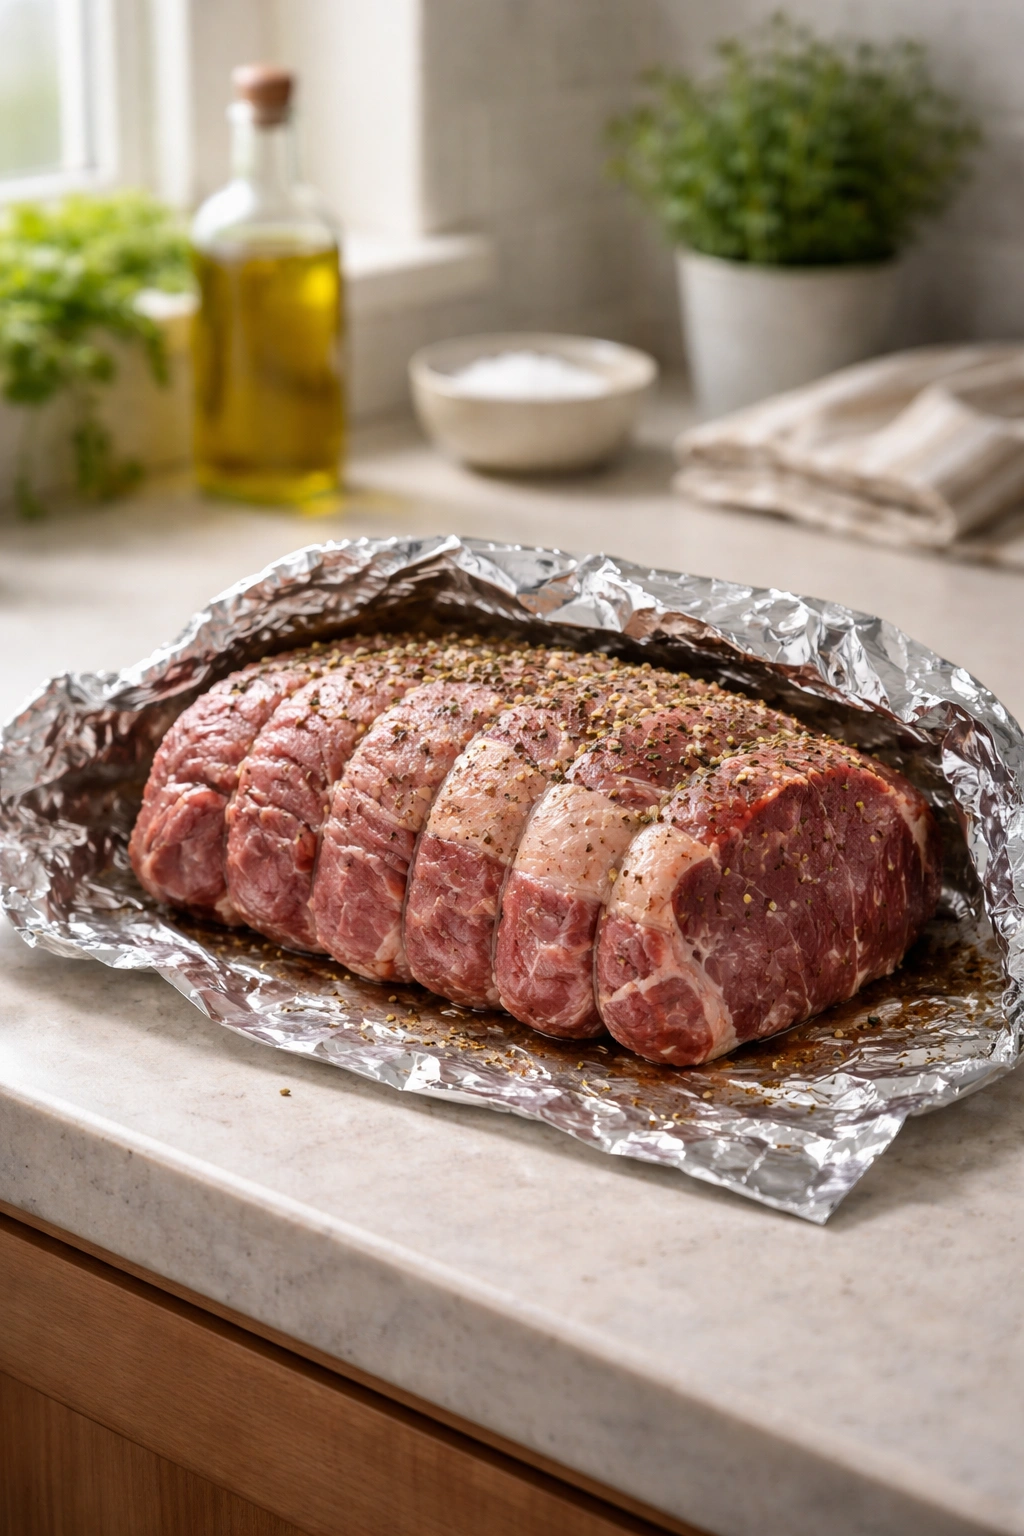
Preheat your oven to 375°F before your roast reaches room temperature. Pat the roast dry with paper towels—moisture on the surface interferes with browning. Rub it all over with oil if needed, then season generously all over with salt, pepper, and any herbs you’ve chosen.
Place the roast on the rack directly on the oven rack (position the roasting pan on the rack underneath to catch drippings). Some cooks prefer to sear the roast in a hot skillet on the stovetop first for extra color, then transfer it to the oven. If you do this, you’ll shorten the initial high-heat oven time slightly. Either way works beautifully.
The Low-and-Slow Roasting Method
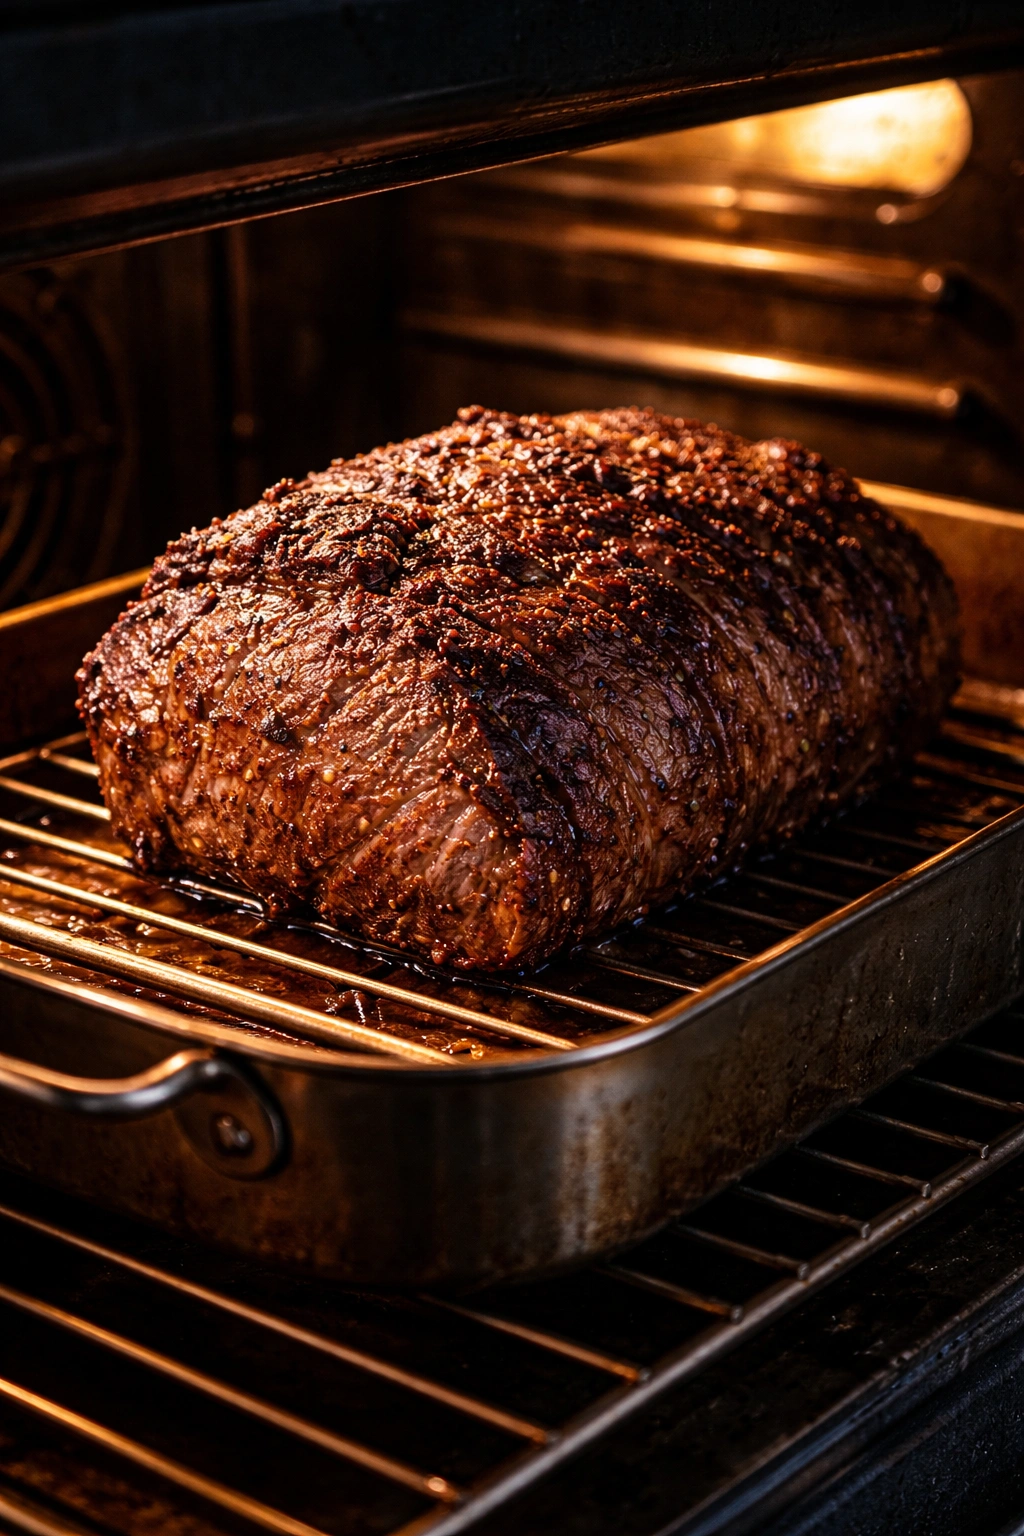
After 30 minutes at high heat, your roast should be deeply browned. This is exactly the moment to lower the oven temperature to 225°F to 250°F. This dramatic temperature drop shifts your cooking into a gentle, slow phase where the interior becomes tender while the crust stays intact.
The exact timing depends on your roast’s size, shape, and starting temperature, but as a general rule, figure about 25 to 30 minutes per pound at the lower temperature for medium-rare doneness. A 3-pound roast might take 1.5 to 2 hours at this point; a 4-pound roast could take 2 to 2.5 hours.
The beauty of this method is its forgiveness. If the roast reaches temperature early, you can hold it at that low temperature indefinitely without it becoming overcooked. If it’s taking longer than expected, there’s no panic. The gentle heat won’t dry it out.
Using a Meat Thermometer for Perfect Doneness
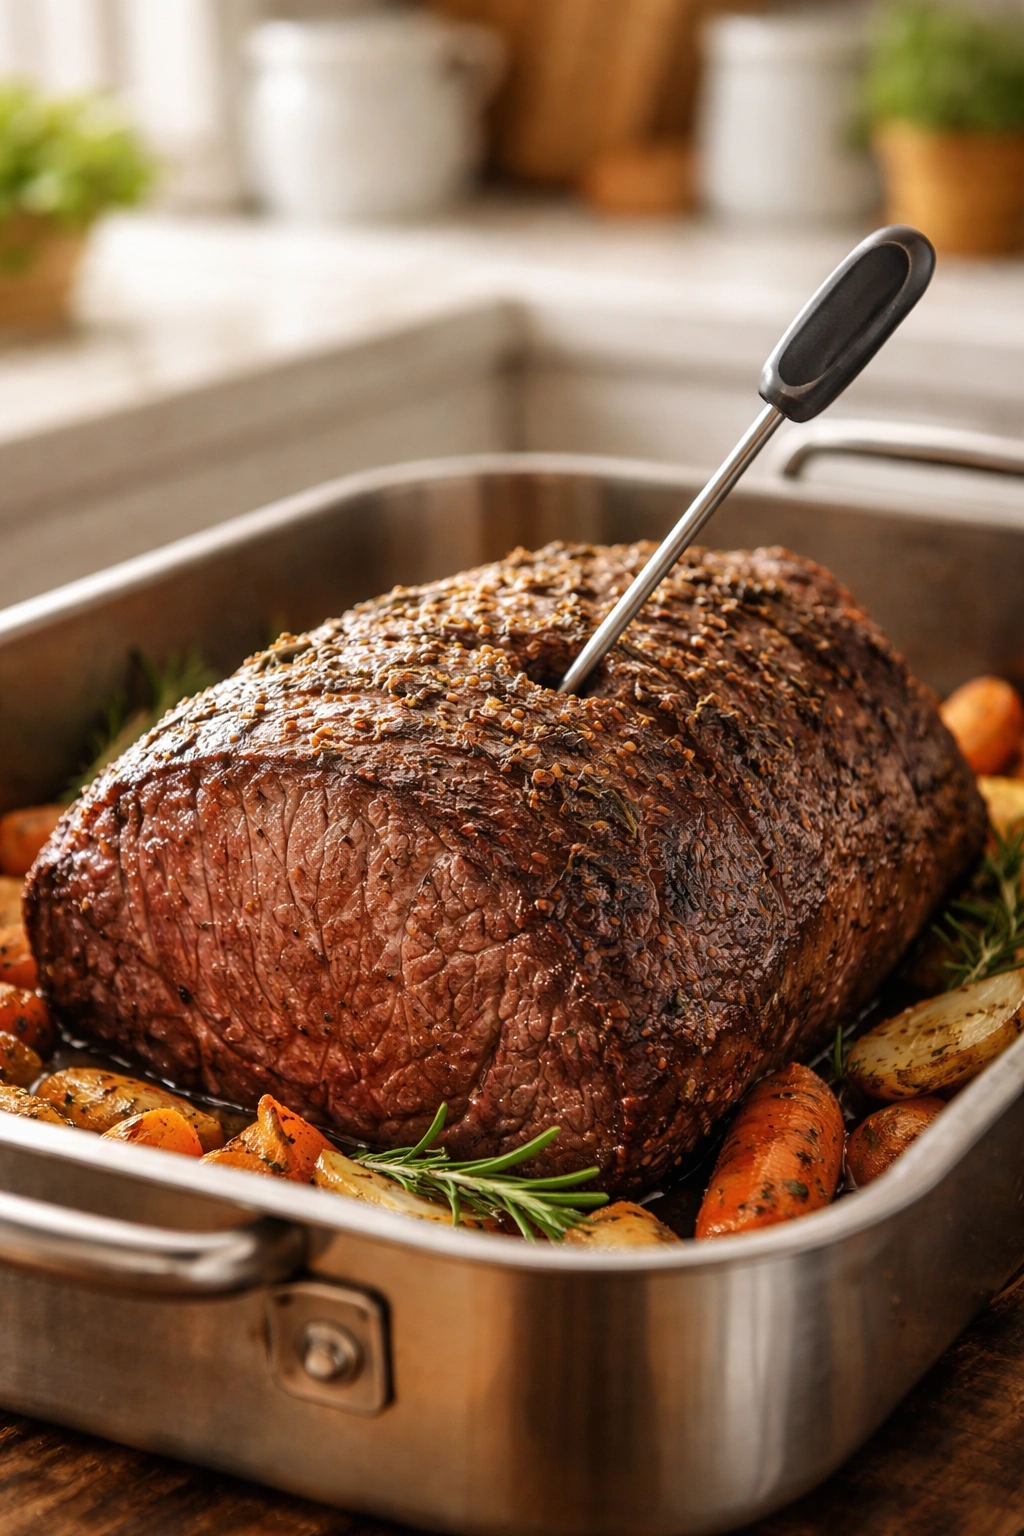
Stop guessing. Seriously—invest in a good instant-read thermometer and use it every single time. They’re inexpensive and are literally the only reliable way to know when your roast has reached the doneness you want.
For medium-rare beef, which is typically the most forgiving and flavorful result, remove the roast when the internal temperature reaches 130°F to 135°F. For medium, target 140°F to 145°F. For medium-well, 150°F to 155°F.
Here’s the crucial detail everyone needs to know: the temperature of the meat continues to rise as it rests, a phenomenon called carryover cooking. You’ll gain roughly 5°F as it sits. So remove your roast when it’s about 10°F below your target final temperature. Insert the thermometer into the thickest part of the meat, away from any bones, and read it at the center—not touching the probe to a particularly fatty or thin area.
Yield: Serves 6 to 8 | Depending on serving size and appetites
Prep Time: 15 minutes (plus time for roast to reach room temperature)
Cook Time: 2 to 2½ hours
Total Time: 3 to 3½ hours (including resting period, not counting room-temperature sitting time)
Difficulty: Beginner — No special skills required, just patience and a meat thermometer. The method is forgiving, and the oven does most of the work.
Ingredients for Classic Roast Beef
For the Roast:
- 1 boneless beef roast (rump, top round, or eye of round — 3 to 4 pounds)
- 2 tablespoons extra virgin olive oil
- 2 teaspoons kosher salt
- 1 teaspoon freshly ground black pepper
- 1 teaspoon dried rosemary, crushed between your fingers (optional, or use thyme or oregano)
- 3 to 4 garlic cloves, cut into thin slivers (optional but highly recommended)
For the Pan Drippings Gravy (optional but worth making):
- 1 tablespoon cornstarch or all-purpose flour
- ½ cup red wine, beef stock, or water
- Salt and freshly ground black pepper to taste
- 1 tablespoon unsalted butter (optional, for richness)
Step-by-Step Instructions for Foolproof Roast Beef
Prepare the Roast and Oven:
-
Remove the roast from the refrigerator 1 to 2 hours before cooking. It should feel room temperature when you touch the thickest part—not cold to the touch.
-
Preheat your oven to 375°F (190°C) and position one rack in the center and another rack below it.
-
Pat the roast completely dry with paper towels. Any surface moisture interferes with browning and prevents that golden crust from forming.
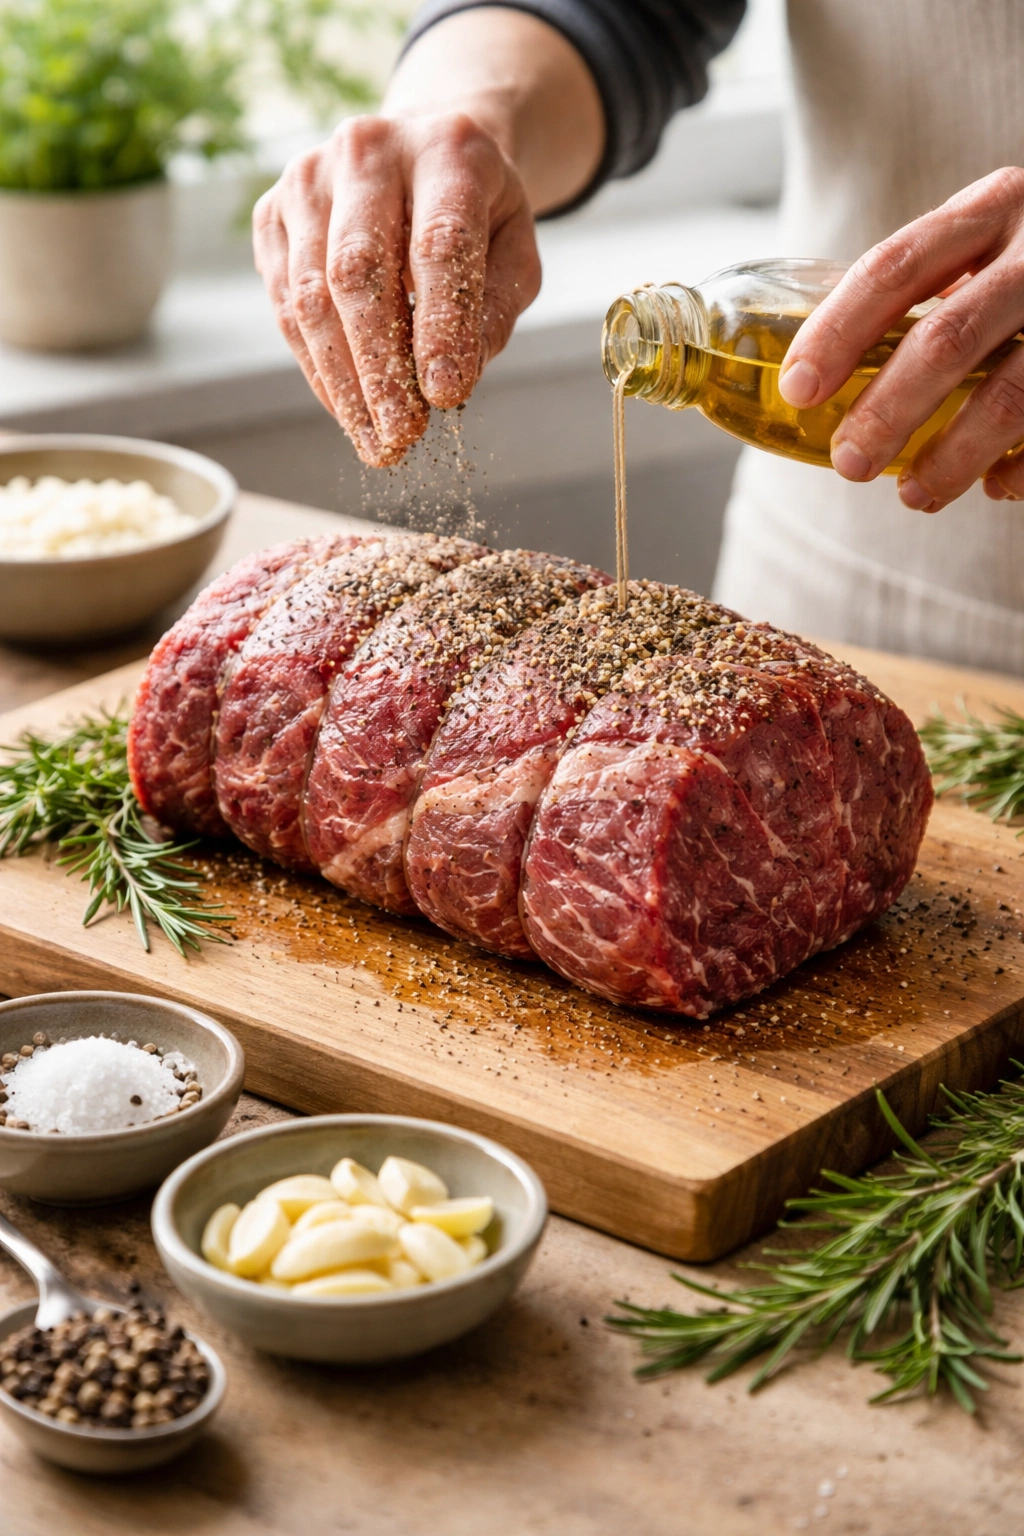
Season the Roast:
-
In a small bowl, combine the olive oil, salt, pepper, and crushed rosemary (if using). If you’re using garlic slivers, skip this step for now and prepare them separately.
-
If you want to stud the roast with garlic, use a sharp knife to make 6 to 8 small incisions around the roast, spacing them evenly. Push a garlic sliver into each cut. Don’t be timid—press it in firmly so it stays put.
-
Rub the seasoned oil all over the roast, working it into every surface. This creates a flavorful coating and helps develop the crust.
Initial High-Heat Searing:
-
Place the roast directly on the center oven rack with the roasting pan positioned on the rack below it to catch drippings. Position the roast with the fattier side facing up if there’s an obvious fat side.
-
Roast at 375°F (190°C) for exactly 30 minutes. You’re not checking it—just let it go. The oven should be undisturbed during this time.
-
After 30 minutes, the roast should be deeply browned on the outside. Do not skip the high-heat phase—this is what creates that flavorful crust.
Low-and-Slow Phase:
-
Lower the oven temperature to 225°F (107°C). This dramatic temperature drop is the secret to tenderness.
-
Continue roasting at 225°F until the internal temperature reaches 130°F to 135°F (for medium-rare) when measured in the thickest part with a meat thermometer. This typically takes 1.5 to 2.5 hours depending on the roast’s exact size and shape.
Advertisements -
Expect about 25 to 30 minutes per pound at this lower temperature, but don’t rely on time alone—the thermometer is your guide. Check the temperature starting at 1.5 hours and then every 15 minutes after that.
-
When the thermometer shows 130°F to 135°F (or 140°F to 145°F for medium), immediately remove the roast from the oven.
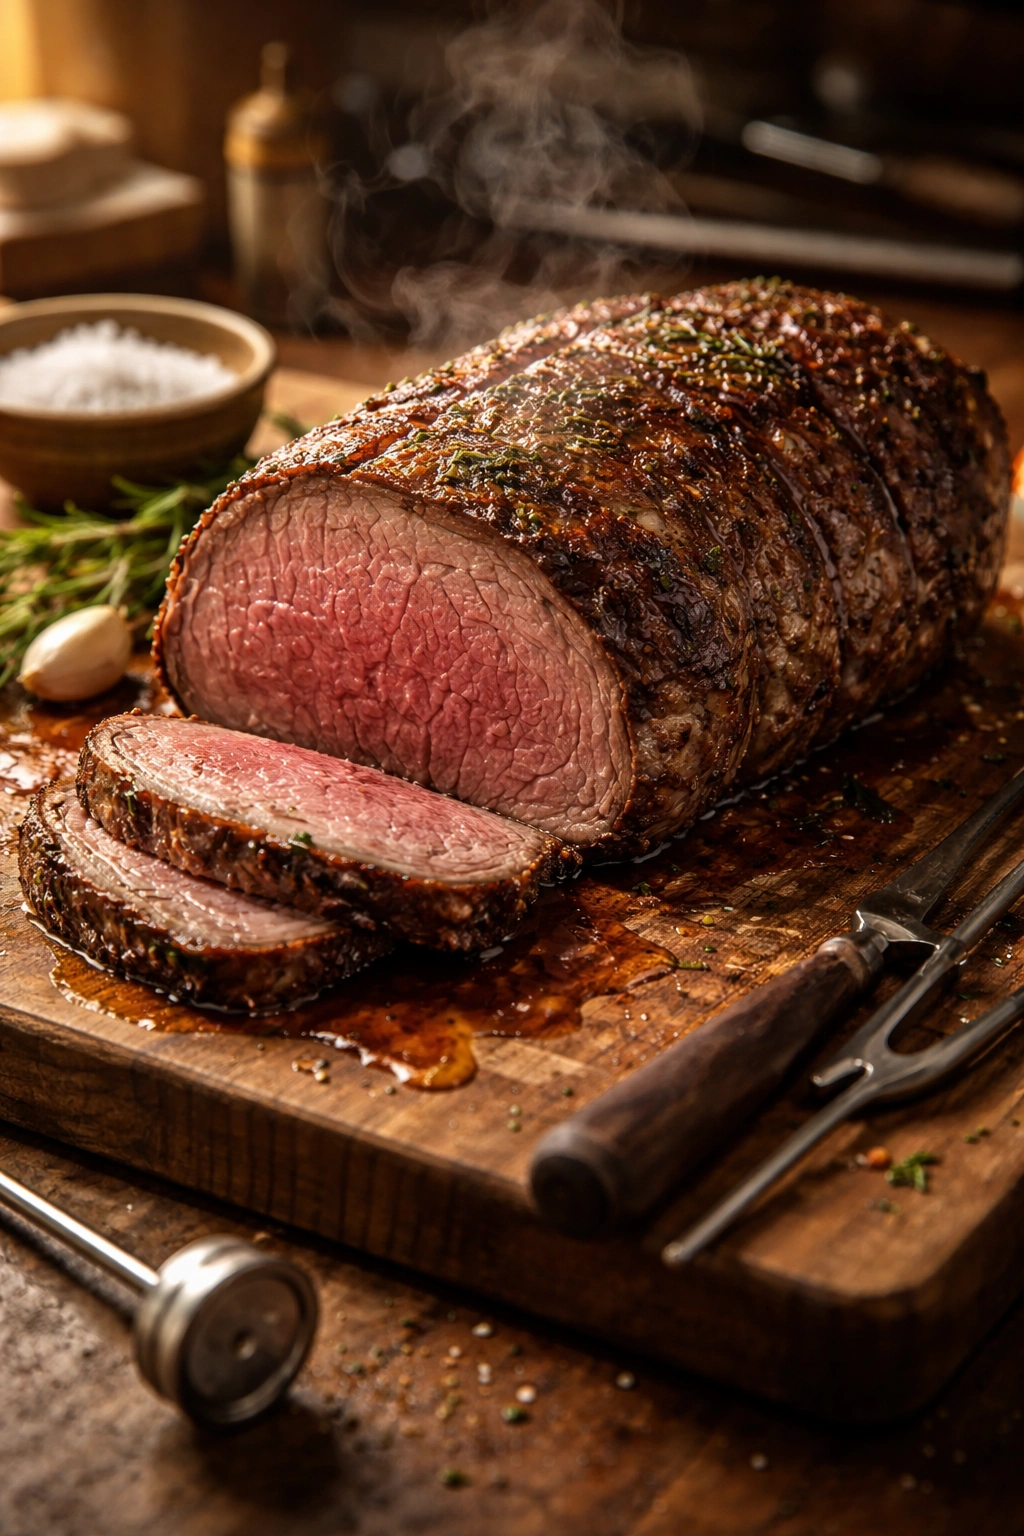
Resting (Critical — Do Not Skip):
-
Place the roast on a cutting board and tent it loosely with aluminum foil to keep it warm. Let it rest for at least 15 to 20 minutes—ideally 20 to 30 minutes. This is non-negotiable.
-
During the resting period, the carryover cooking will raise the internal temperature another 5°F, and more importantly, the muscle fibers relax and reabsorb the juices. If you cut into it immediately, all those beautiful juices run out onto the cutting board and you’re left with dry meat. Patience here makes the difference between decent roast beef and extraordinary roast beef.
Making Pan Drippings Gravy:
-
While the roast rests, carefully remove the roasting pan from the oven and place it on the stovetop over medium heat.
-
You should see flavorful browned bits stuck to the bottom—this is called fond. Pour in the red wine, beef stock, or water, and use a wooden spoon or whisk to scrape and dissolve the fond into the liquid. This deglazing step captures all that flavor.
-
Dissolve the cornstarch in a tablespoon of cold water, then whisk it into the simmering liquid. Stir continuously as the gravy thickens—this takes just a minute or two. You’re aiming for a gravy that coats the back of a spoon.
-
Taste and adjust seasoning with salt and pepper. A tablespoon of butter stirred in at the end adds richness and silkiness.
Advertisements
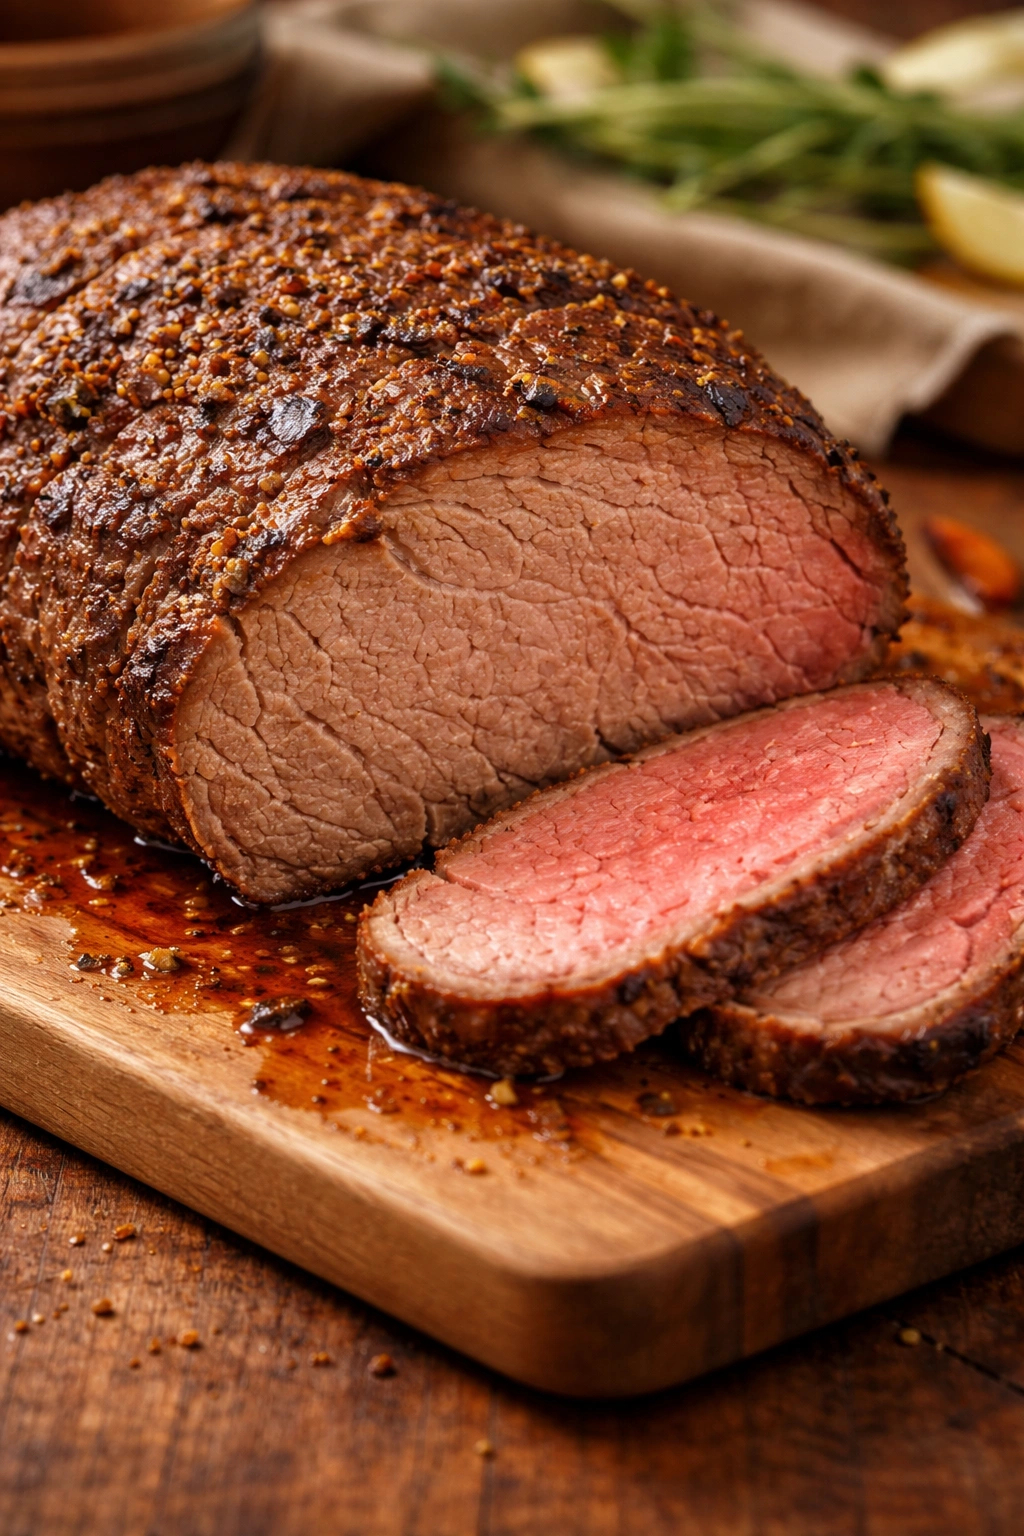
Slicing and Serving:
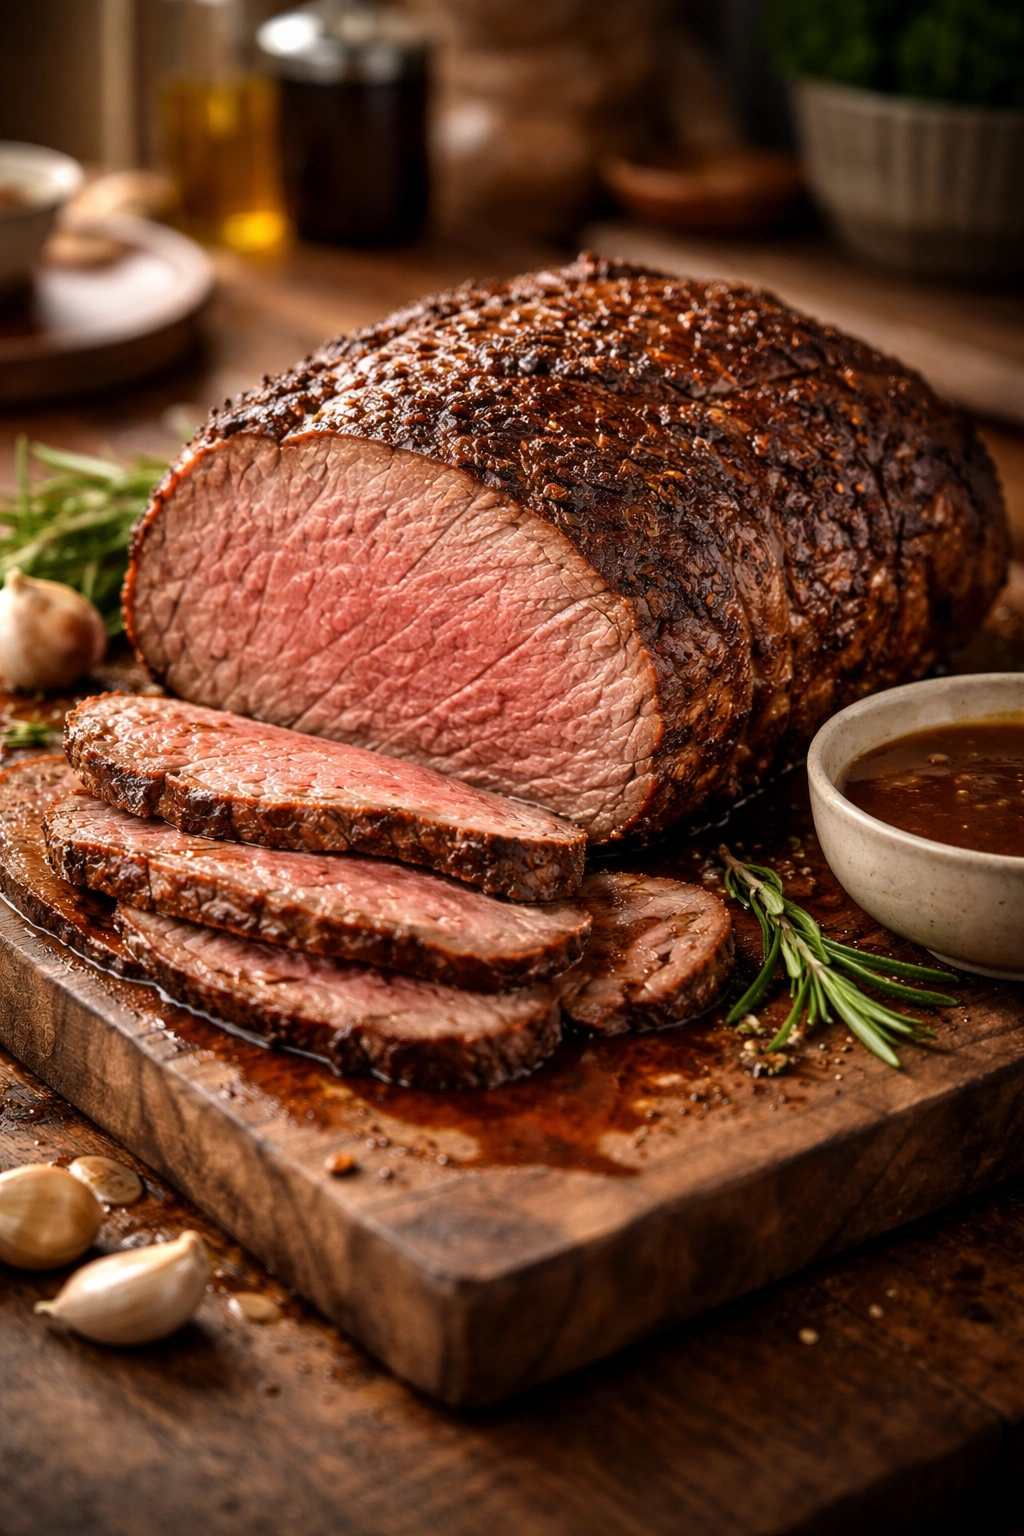
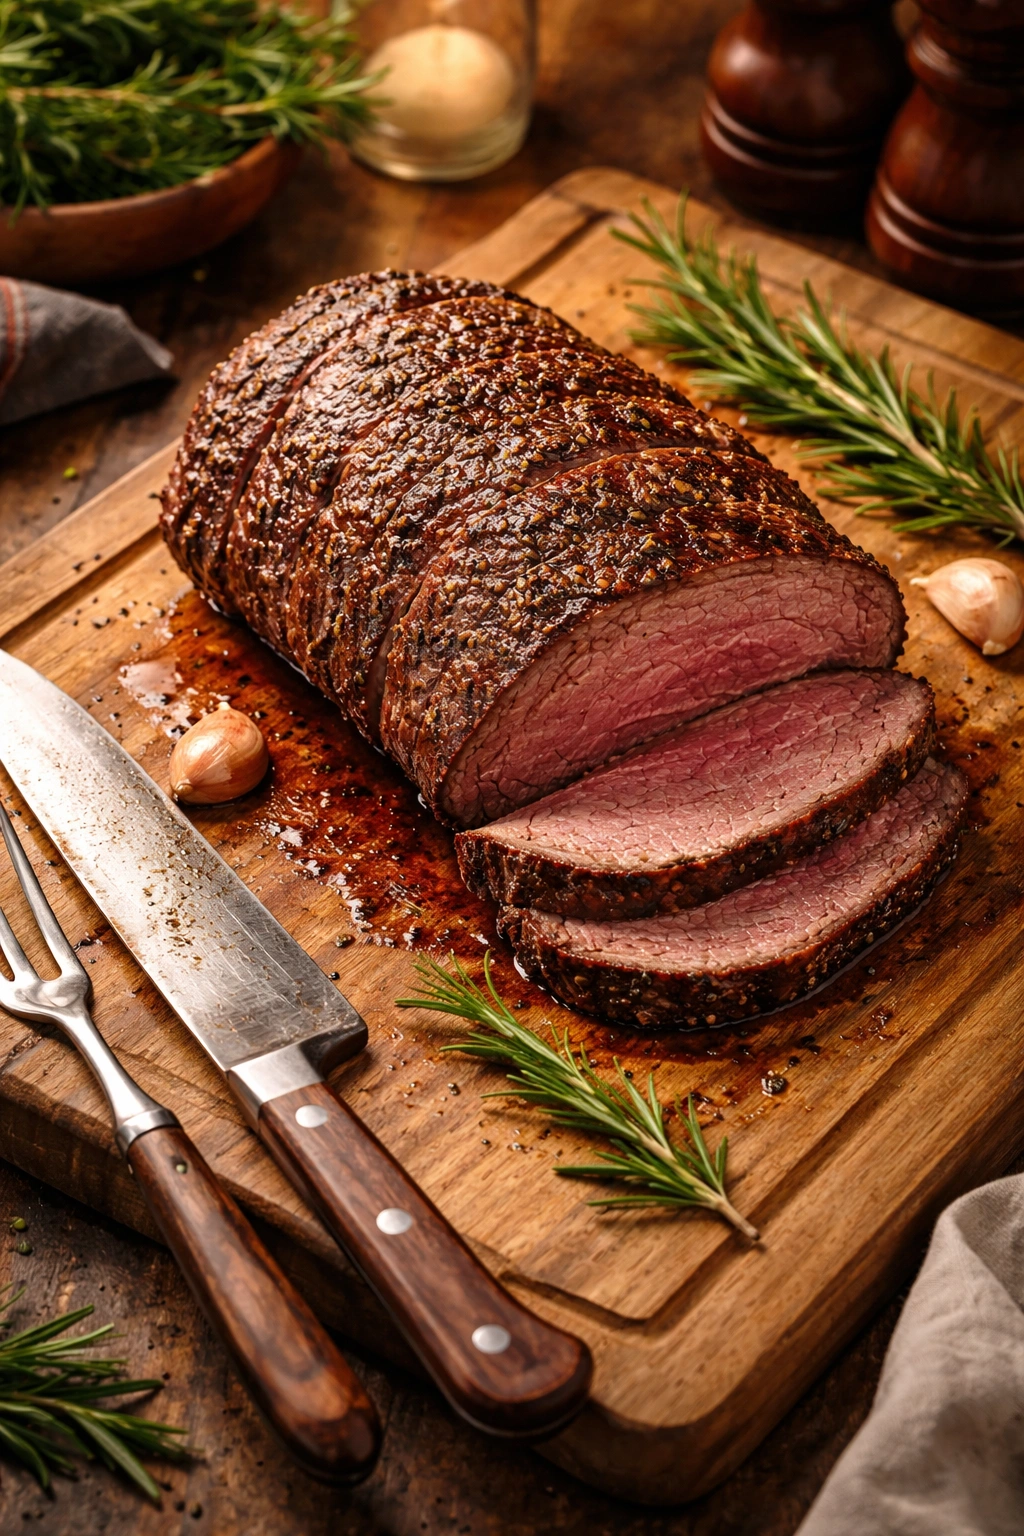
-
After the roast has rested, slice it as thinly as possible, cutting perpendicular to the grain of the meat. The grain is the direction the muscle fibers run—cutting against it shortens the fibers and makes every bite more tender.
-
Use a sharp chef’s knife with a long blade. Serrated knives actually tear the meat rather than slice cleanly, so avoid those.
-
Arrange sliced roast beef on a platter or individual plates and pour the gravy over top, or serve the gravy alongside for dipping. Serve immediately while warm.
Common Mistakes to Avoid
The biggest error people make is slicing the roast too soon. I can’t emphasize this enough. The moment you cut into that resting roast, all the juices release onto the cutting board instead of staying in the meat. Those 20 to 30 minutes of resting are genuinely the difference between juicy and dry beef. Tent it loosely with foil to keep it warm—that’s all you need.
Cooking from cold is another classic mistake. Roasts pulled straight from the refrigerator cook unevenly because the outside overcooks trying to get the cold center cooked through. Room-temperature roasts cook predictably and evenly.
Overcooking is easier to fall into than you’d think, especially if you skip the thermometer. Medium-rare beef is significantly more tender and juicy than well-done beef. If you prefer your meat cooked more, that’s absolutely your call, but do it intentionally with the thermometer rather than accidentally because you weren’t paying attention.
Skipping the initial high-heat phase creates a roast that’s pale and less flavorful. You need that browning for the Maillard reaction and the crust that makes every slice more appealing.
Practical Tips for Tender, Juicy Results
Invest in a good meat thermometer. You don’t need anything fancy—a basic instant-read digital thermometer costs under $20 and is genuinely the best tool you’ll buy for cooking beef. Insert it into the thickest part of the roast, away from any bones or large fat pockets, and wait for the reading to stabilize.
Use a roasting rack. Elevating the roast means hot air circulates underneath and creates browning on all sides. If your roast sits directly in the pan, the bottom steams instead of browning and you lose flavor.
Choose a roast with some marbling. That visible fat running through the muscle melts during cooking, keeping the meat moist and adding flavor. A completely lean roast is harder to cook successfully because it has nothing to help retain moisture.
Don’t be shy with salt. Salt doesn’t just make food salty—it’s the ingredient that makes food taste like itself. Salt in beef draws out the deep, beefy flavors. A pinch does nothing; generous seasoning does everything.
Let the roast come out of the fridge early. It seems tedious, but room-temperature roasts cook faster and more evenly. You’re shaving significant time off your cooking period and getting better results. It’s worth doing.
Make gravy from the pan drippings. Those caramelized bits stuck to the bottom of the roasting pan are pure flavor. Deglazing with liquid and making a simple gravy takes 5 minutes and creates something infinitely better than packaged gravy or store-bought au jus.
Variations and Custom Flavors
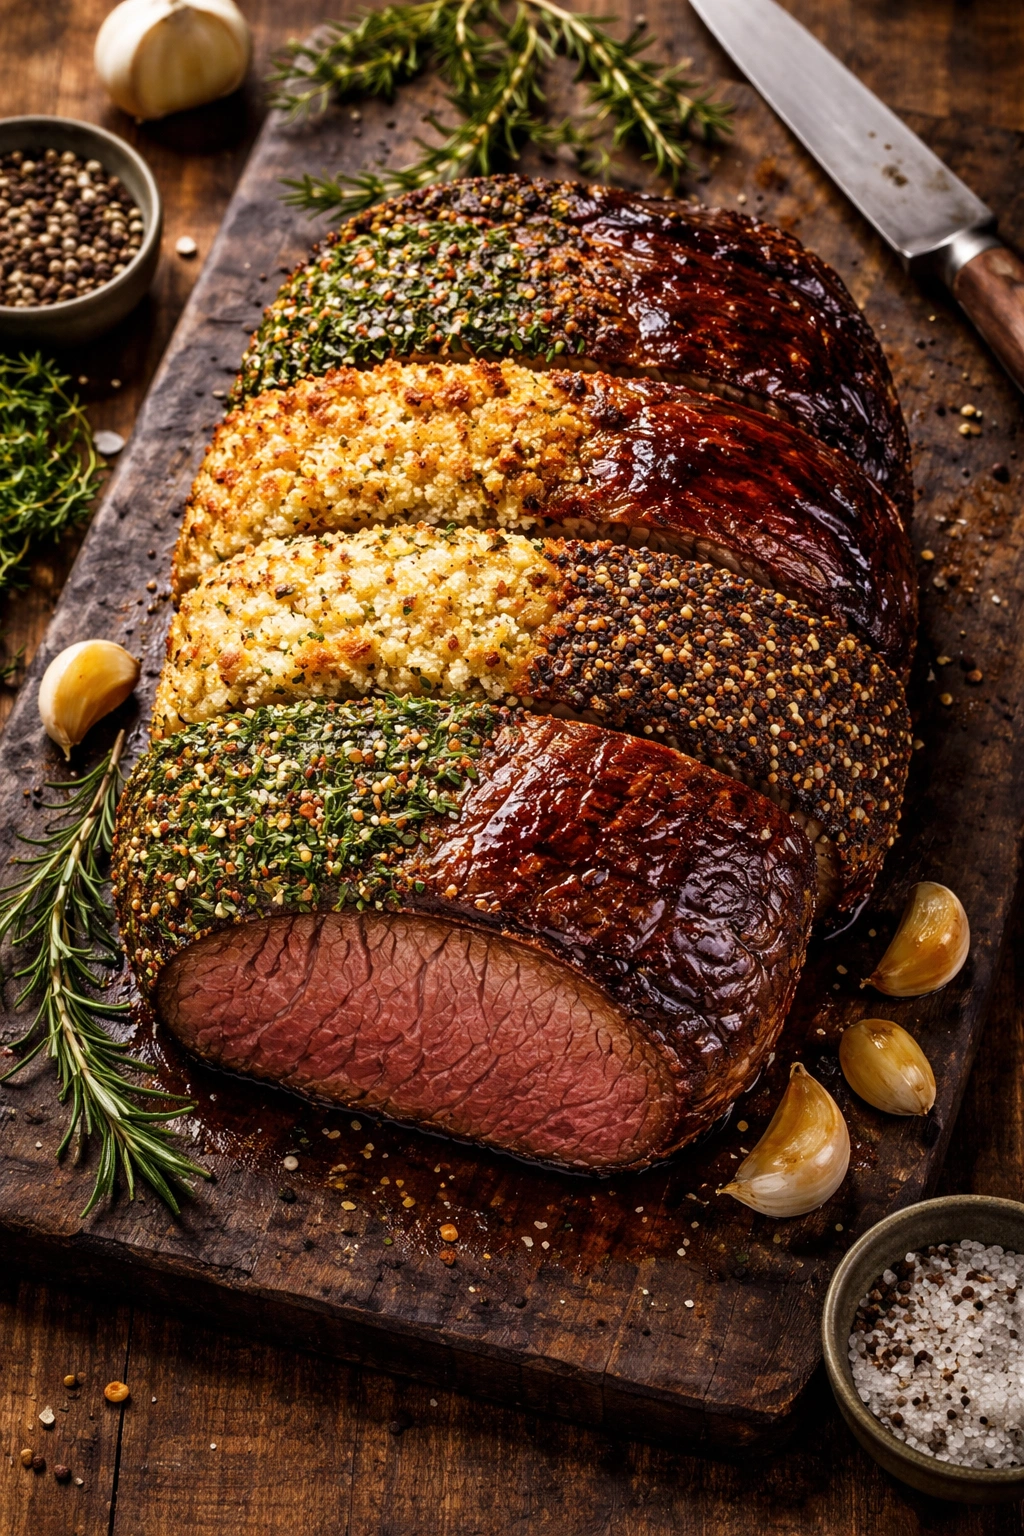
Herb-Crusted Version: Replace the single herb with a combination—2 teaspoons fresh rosemary, 1 teaspoon thyme, and ½ teaspoon oregano, all minced finely. Mix with the olive oil, salt, and pepper into a paste and rub it all over the roast before cooking. The mixed herbs create a more complex, sophisticated flavor.
Wine-Forward Approach: Instead of water or stock for the gravy, deglaze the pan with a full cup of red wine. Let it simmer until reduced by half before adding the cornstarch slurry. This creates a richer, more wine-forward sauce with elegant depth.
Garlic Lover’s Version: Double the garlic slivers (up to 8 whole garlic cloves) and add 1 teaspoon minced garlic to your oil-based rub. This emphasizes the savory, umami flavors and is perfect if you adore garlic.
Horseradish Crust: Mix 3 tablespoons of grated fresh horseradish (or horseradish paste) with your olive oil and seasoning mixture before rubbing it onto the roast. The sharp, spicy horseradish creates an exciting contrast to the rich beef. Serve with additional fresh horseradish sauce on the side.
Peppercorn-Crusted: Add 2 teaspoons of cracked black peppercorns (or mixed peppercorns) to your seasoning mix for a more peppery, sophisticated crust. Crack them coarsely with a mortar and pestle or by placing them in a towel and crushing them with a mallet.
Mustard-Tarragon Version: Whisk together 2 tablespoons Dijon mustard, 1 tablespoon whole-grain mustard, 1 teaspoon minced fresh tarragon (or ½ teaspoon dried), the olive oil, salt, and pepper. Rub this mixture all over the roast before cooking. The mustard’s tangy heat plays beautifully with beef, and tarragon adds a subtle licorice note.
Storing and Reheating Leftover Roast Beef
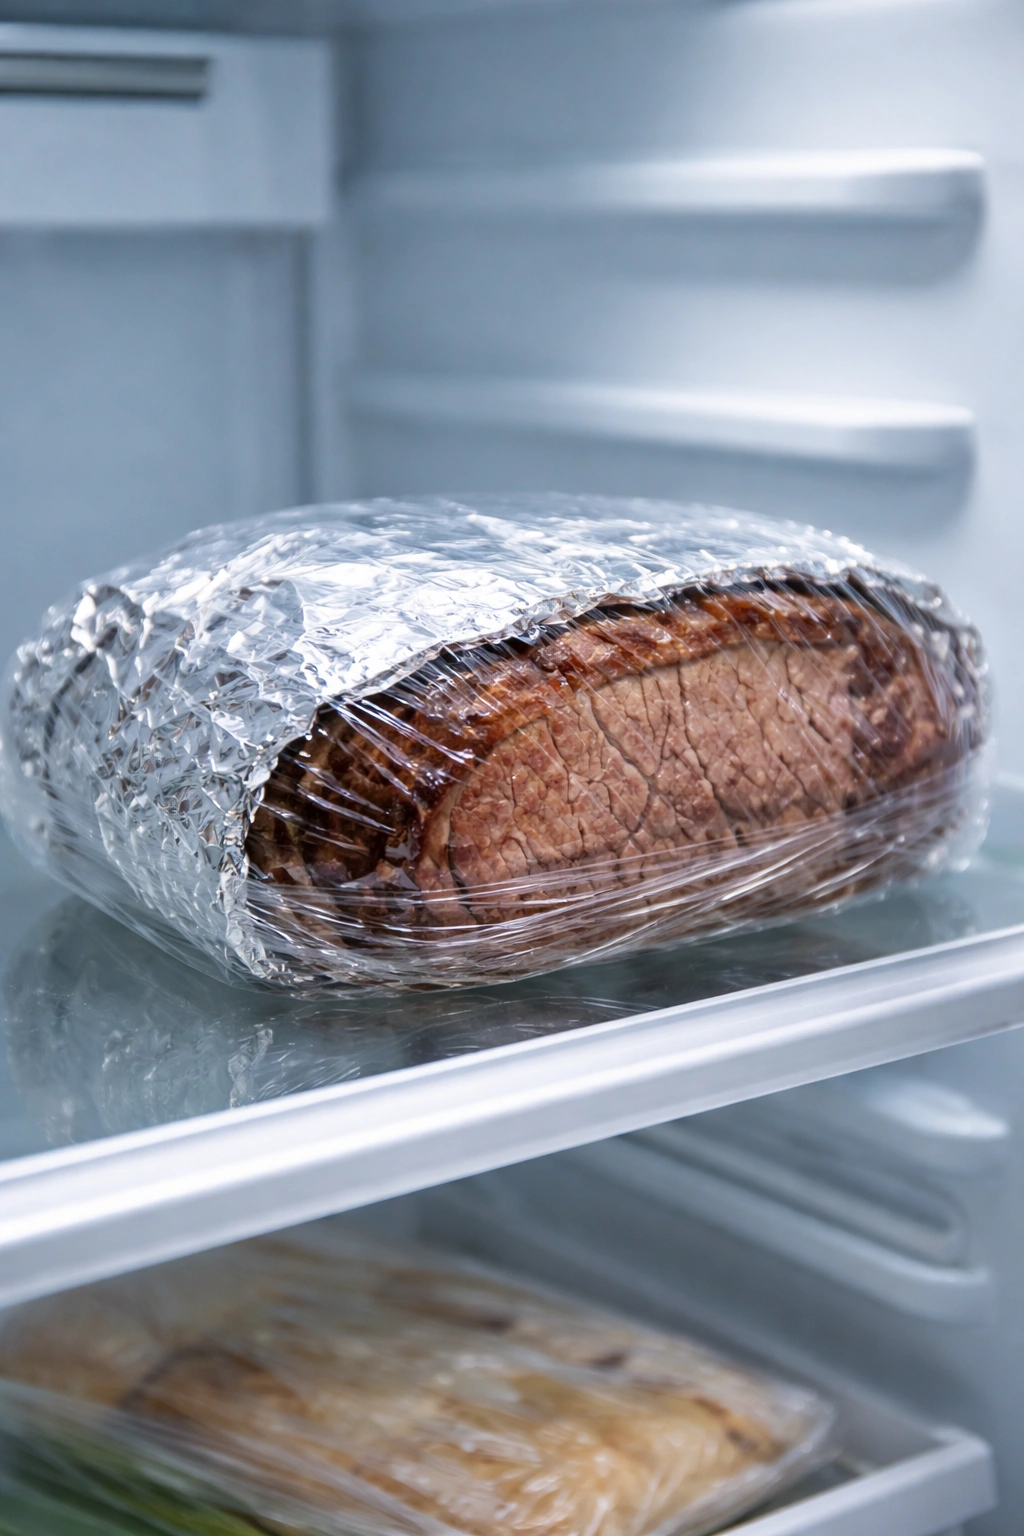
Wrapped tightly in plastic wrap or aluminum foil, leftover roast beef keeps in the refrigerator for 3 to 5 days. For longer storage, double-wrap it in plastic and seal it in a freezer-safe bag, pressing out as much air as possible. It freezes beautifully for up to 3 months.
To reheat without drying it out, slice the roast into serving portions and place them in a shallow roasting pan. Add a splash of beef broth or water and cover tightly with foil. Warm in a 325°F oven for 10 to 15 minutes until heated through. The liquid prevents the exterior from drying while the gentle heat restores tenderness. Microwaving is quick but often leaves edges tough—the oven method is worth the extra few minutes.
Alternatively, warm the sliced roast beef in a skillet over medium heat with a splash of broth, turning occasionally, just until heated through. This takes 5 to 7 minutes and prevents the dry, reheated texture you get from overcooking.
Serving Suggestions and Pairings
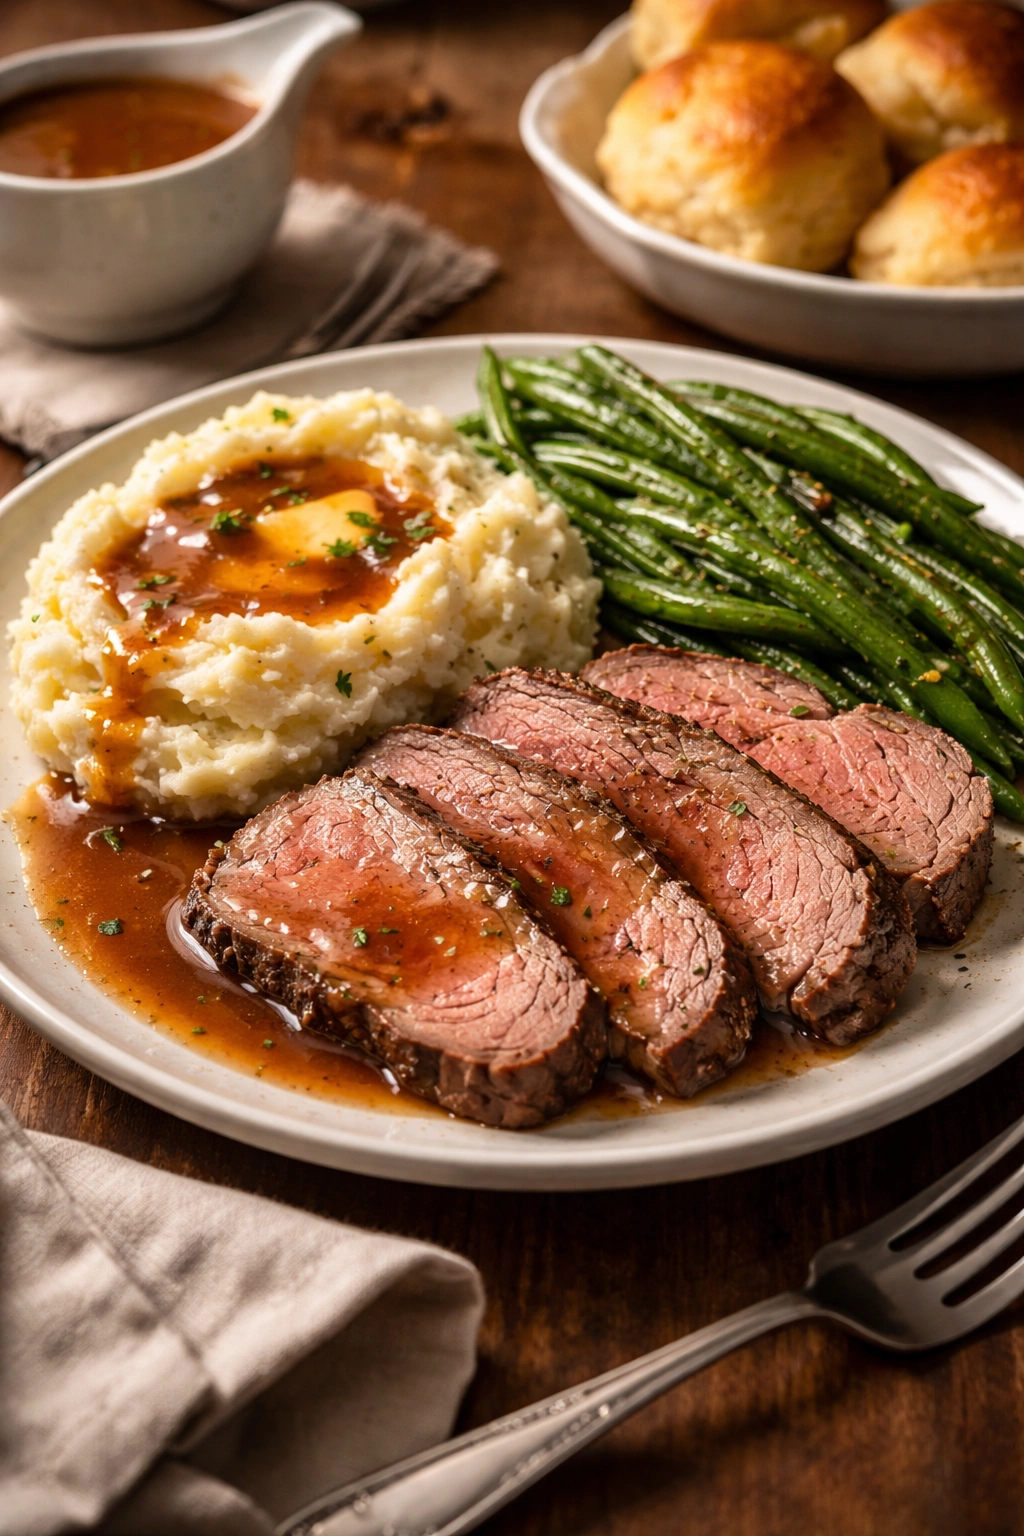
Classic Pairing: Serve sliced roast beef with creamy mashed potatoes (whipped with butter and a splash of cream) and green beans sautéed in butter with garlic. Pour the gravy over the potatoes and beef. This is what Sunday dinner was invented for.
Root Vegetable Route: Roast carrots, potatoes, parsnips, and turnips alongside the beef during the low-heat phase, adding them about 1 hour before the roast finishes. The vegetables cook in the beef’s drippings and absorb incredible flavor.
Yorkshire Pudding Tradition: Make traditional popovers or Yorkshire puddings to serve alongside. The crispy exterior and custardy interior are the perfect textural contrast to tender beef and smooth gravy.
Sandwich Legacy: Slice the roast beef thinly and layer it on crusty bread with sharp cheddar, horseradish sauce, and caramelized onions. This is how restaurant-quality sandwiches are born. Add a side of au jus for dunking.
Salad Route: Slice the beef thinly and arrange over a bed of peppery arugula or baby spinach with roasted beets, crumbled blue cheese, and a shallot vinaigrette. The cool salad and warm beef create a pleasant textural contrast.
Simple Comfort: Just roast beef and gravy, served warm with crusty bread for soaking up every drop of sauce. Sometimes the simplest preparation is the most satisfying.
Making Gravy from Pan Drippings
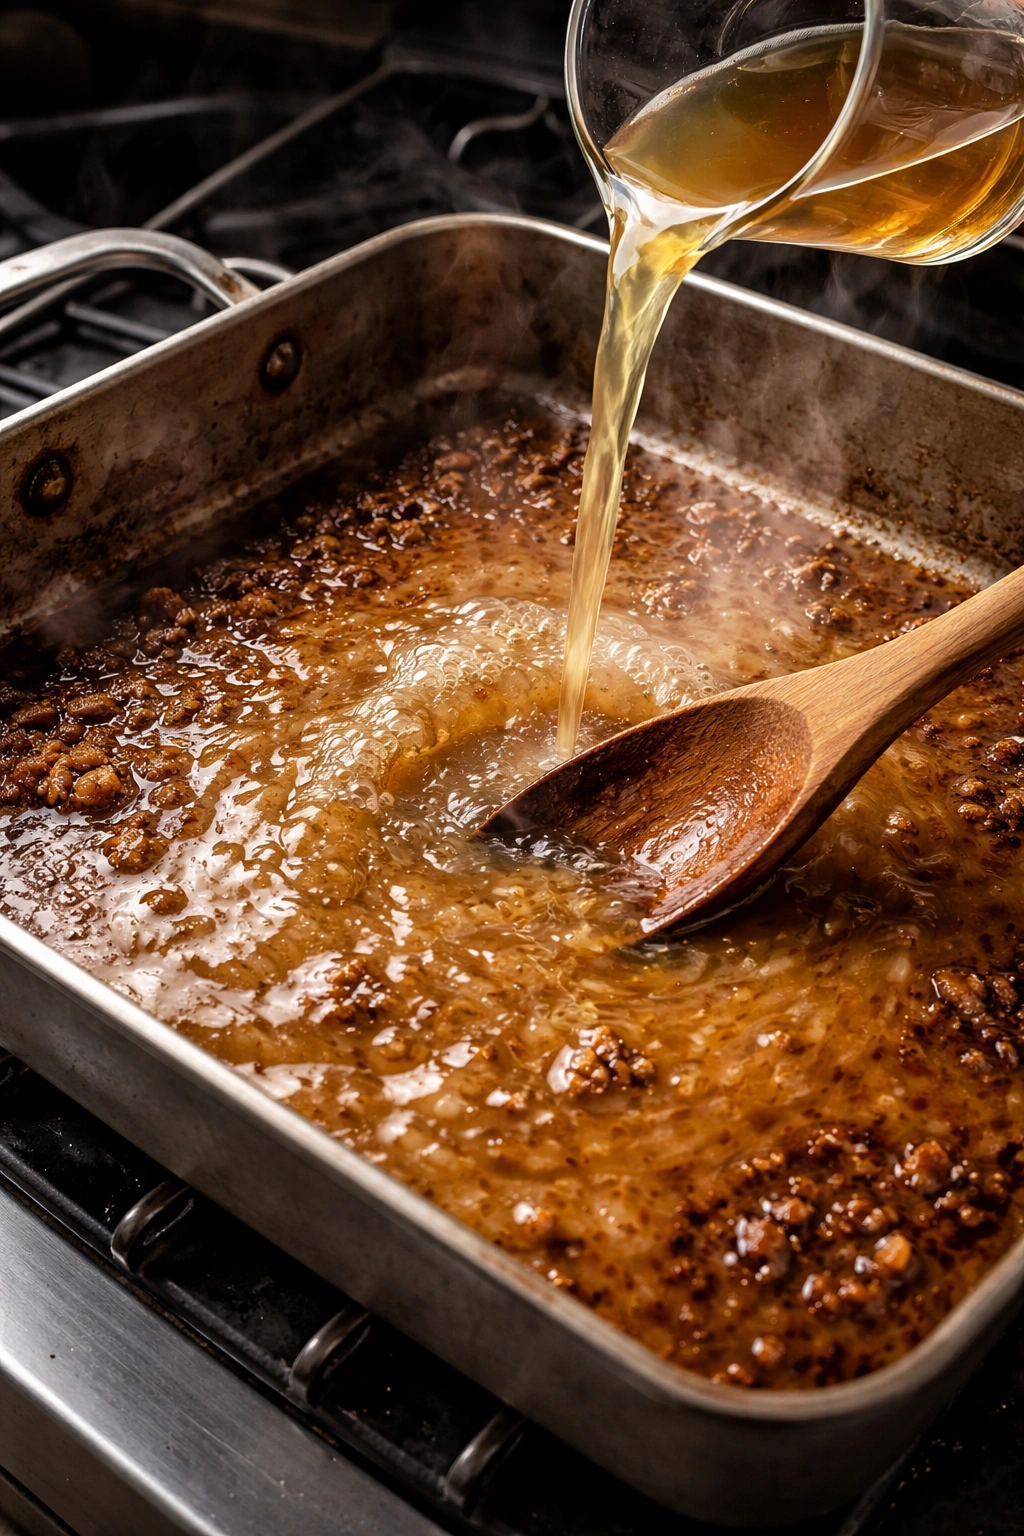
The pan drippings are your greatest asset, and they deserve respect. That caramelized fond stuck to the bottom of the roasting pan is pure umami—concentrated beef flavor that money can’t buy.
After you remove the roast to rest, place the roasting pan on the stovetop over medium heat. Pour in about ½ cup of red wine, beef stock, or water—whichever you prefer. Use a wooden spoon or whisk to scrape and dissolve the fond as you pour. Listen for the sizzle, see the liquid bubble, watch the brown bits break apart and incorporate into the liquid. This takes just a minute.
If you want a thicker gravy, dissolve 1 tablespoon of cornstarch or flour in 1 tablespoon of cold water separately, then whisk this slurry into the simmering pan liquid. Stir constantly as it thickens—it happens remarkably fast, usually within a minute. You want a gravy that clings to the back of a spoon, not something runny and thin.
Season generously with salt and pepper. If the gravy tastes a bit flat, whisk in a tablespoon of butter—the fat adds richness and rounds out the flavors. A splash of fresh lemon juice or Worcestershire sauce adds depth if you like.
Strain the gravy through a fine-mesh sieve if you want silky smoothness, or leave the flavorful bits in if you prefer a more rustic texture. Pour it into a gravy boat and serve warm alongside the sliced beef.
Final Thoughts
You now have everything you need to produce roast beef that tastes restaurant-quality but comes from your own kitchen. The method is straightforward, the ingredient list is short, and the technique is forgiving. The only real requirement is patience—allowing that roast to come to room temperature, letting the oven do its work without constant checking, and resting the finished roast before slicing.
Roast beef has fed families and celebrated occasions for generations because it delivers on its promise: elegant but easy, simple but impressive, affordable but tasting luxurious. Master this one method and you’ll make it often, serve it with pride, and create the kind of meal that makes people linger at the table a little longer. That’s the power of honest, well-executed food.