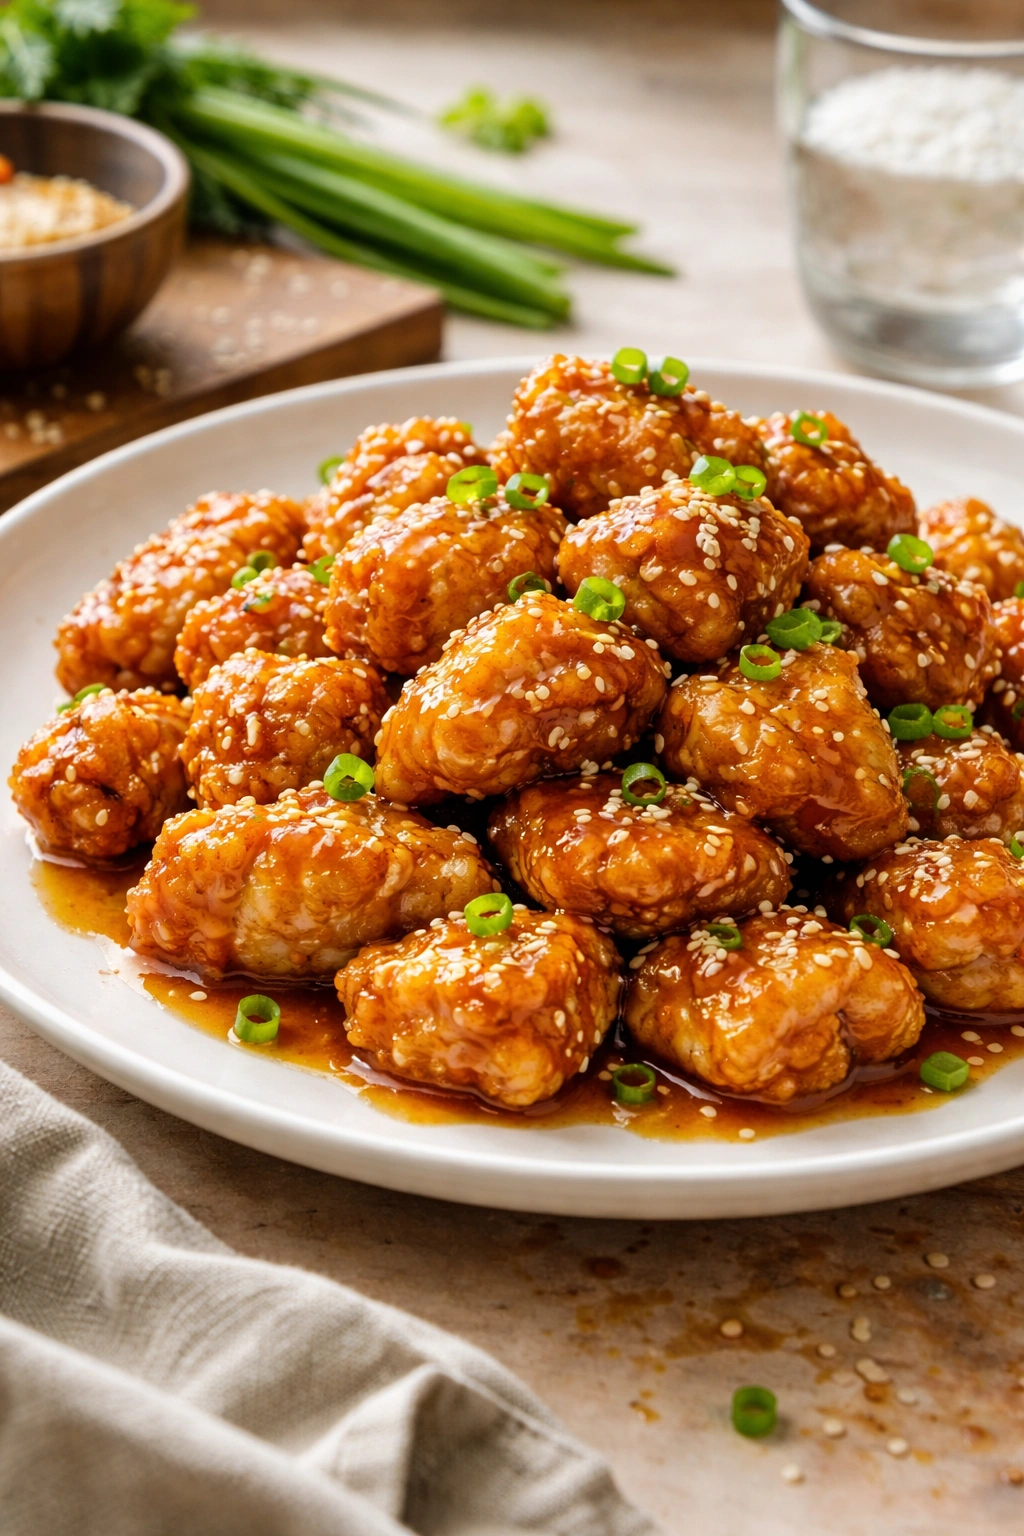
I’ve spent more than a decade perfecting this dish at home, and I can tell you with absolute confidence: you’ll never order takeout sesame chicken again once you master this recipe. There’s something deeply satisfying about biting into a piece of crispy, golden chicken enveloped in that glossy, amber-hued sauce—the kind that clings to every bite with sweet, savory, and nutty notes all dancing together perfectly. What makes this version genuinely special isn’t just the flavor (though it’s exceptional), but the knowledge that you created something restaurant-quality with ingredients you can pronounce and control.
The truth most people don’t realize is that takeout sesame chicken sits in delivery bags, losing its crispness by the minute. Your homemade version, by contrast, goes straight from your stovetop to your table still crackling. You’ll taste the difference immediately—the chicken stays impossibly tender inside, the coating doesn’t turn soggy, and the sauce has a brightness that greasy takeout versions simply can’t match. Plus, you’re not paying that delivery markup or waiting anxiously for someone to show up at your door.
This recipe takes around 45 minutes from start to finish, including prep, and it’s genuinely simpler than it appears. You don’t need special equipment or hard-to-find ingredients. Everything here works toward one goal: creating that perfect textural contrast and balanced sauce that makes people ask for seconds (and thirds). Let me walk you through exactly how to make it happen in your own kitchen.
Why Homemade Sesame Chicken Beats Takeout
Most restaurant versions rely on one trick: deep-frying everything and drowning it in sauce to mask uneven cooking. Homemade sesame chicken succeeds because you control every single variable, from the size of your chicken pieces to the exact sweetness of your sauce.
When you make this at home, you’re not limited by what the restaurant’s prep line made hours earlier. Your chicken goes from cutting board to hot oil to sauce in the span of minutes, meaning the coating stays crispy and the meat retains its moisture. Restaurant kitchens often use tougher, cheaper chicken thighs or a mix of parts; you choose quality chicken breast or the more forgiving thighs, whichever suits your preference.
The sauce is where homemade really shines. A takeout container’s sauce has been sitting under heat lamps, often growing sticky and one-dimensional. Your sauce comes together fresh, allowing you to taste and adjust the balance of sweet, salty, and tangy notes until it’s exactly how you like it. The entire difference between mediocre and exceptional sesame chicken comes down to this balance—and when you’re making it yourself, that balance is entirely in your hands.
Cost-wise, you’re looking at roughly $1.70 per serving for this recipe versus $4-6 at a restaurant. That’s not just cheaper; it’s substantially cheaper. You’ll also have leftovers that keep beautifully for several days, making this one of the most practical weeknight dinners you can master.
The Science Behind That Perfect Crispy Coating
The secret to crispy chicken that doesn’t turn soggy the moment it meets sauce lies in understanding how starch behaves. Most home cooks either skip coating entirely (resulting in bland, tender chicken) or use a single coating (which often falls off during frying).
Professional Chinese restaurants use a technique called velveting, which involves coating chicken in a combination of cornstarch, egg, and sometimes soy sauce before the initial fry. This creates a protective barrier that keeps the meat juicy while developing a light, delicate crust. When you dredge already-coated chicken in a seasoned flour-cornstarch mixture before frying, you’re building layers—each one serving a purpose.
Cornstarch is the MVP here. Unlike flour alone, cornstarch doesn’t develop gluten when wet, which means your coating stays light and crispy rather than becoming tough and chewy. When cornstarch hits hot oil, the moisture inside each granule turns to steam, creating tiny air pockets that give you that satisfying crunch. Baking powder added to your dredging mixture amplifies this effect—the leavening agent reacts with the heat, creating even more air pockets for extra crispness.
The double-fry method, used by many Chinese restaurants, isn’t just for show. The first fry cooks the chicken through and develops an initial crust. After a brief rest, the second fry at slightly higher heat seals the exterior and expels any remaining surface moisture, giving you that restaurant-quality golden-brown finish that stays crispy even after sauce application.
What You’ll Need: Ingredients Breakdown
This recipe succeeds because each ingredient plays a specific role. There are no fillers, no random additions—everything contributes to the final result.
Yield: Serves 4 | Prep Time: 15 minutes | Cook Time: 30 minutes | Total Time: 45 minutes | Difficulty: Intermediate — This involves frying, which requires careful heat management, but the technique is straightforward even for beginners who’ve never deep-fried before.
For the Chicken:
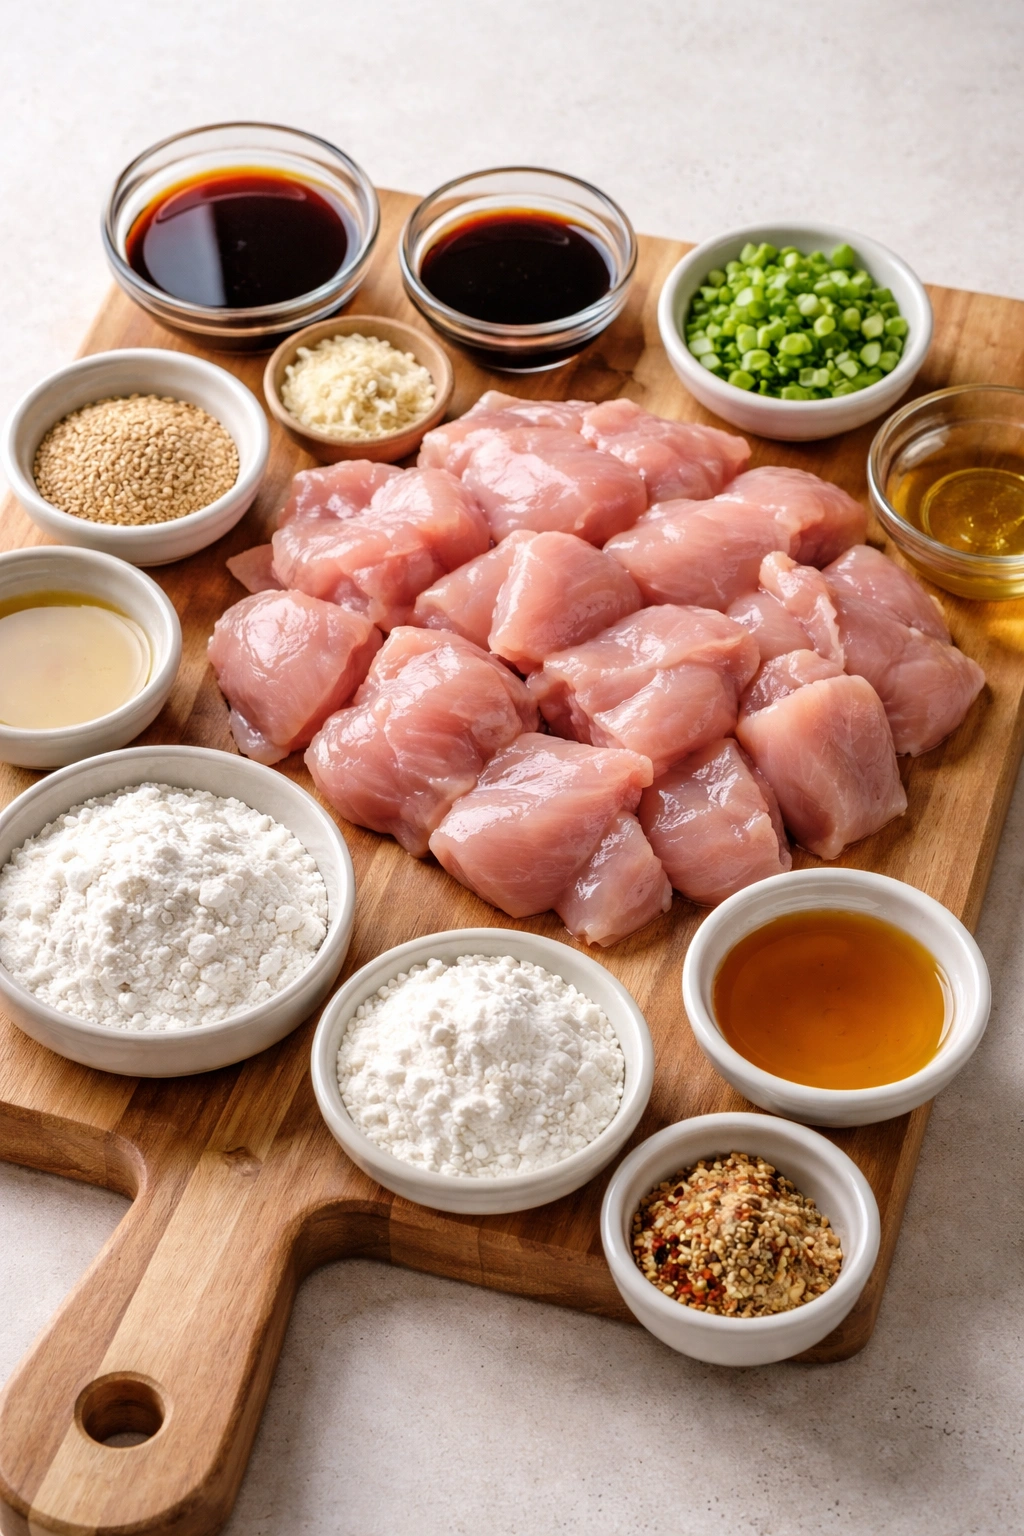
- 1½ pounds boneless, skinless chicken thighs, cut into 1-inch pieces (or chicken breast if you prefer; thighs stay more forgiving and juicy)
- ½ teaspoon kosher salt
- ½ teaspoon white pepper (or black pepper if white pepper isn’t available)
- 2 tablespoons low-sodium soy sauce
- 1 tablespoon Shaoxing wine (or mirin, sherry, or chicken broth as substitute for depth of flavor)
- 4 cloves garlic, minced or grated
- ½ tablespoon fresh ginger, grated (frozen ginger works perfectly and lasts indefinitely)
- 1 teaspoon toasted sesame oil
For the Dredging Mixture:
- 1 cup all-purpose flour
- 1 cup cornstarch
- ½ teaspoon kosher salt
- ½ teaspoon white pepper
- ½ teaspoon baking powder
For the Sesame Sauce:
- ¼ cup low-sodium soy sauce (use the “light” variety, not dark soy, which is too intense)
- 2 tablespoons ketchup (adds depth and slight sweetness without overpowering)
- ½ cup chicken stock
- 3 tablespoons brown sugar
- 2 tablespoons honey (or maple syrup or additional brown sugar)
- 1 tablespoon toasted sesame oil
- 2 tablespoons rice vinegar (crucial for cutting through richness)
- 1 tablespoon cornstarch mixed with 2 tablespoons water (the slurry that thickens sauce)
For Cooking and Serving:
- 1 quart neutral oil for frying (vegetable, canola, or avocado oil—nothing with a low smoke point like olive oil)
- 2 tablespoons fresh ginger, minced or grated
- 4 cloves garlic, minced
- 1 tablespoon sesame seeds (toasted, for garnish)
- 2 green onions, thinly sliced (for garnish)
- Steamed jasmine or white rice (for serving)
The ratio of ingredients matters enormously here. Too much soy sauce and your sauce becomes one-dimensional and salty. Too much sugar and you lose the savory backbone. The rice vinegar isn’t optional—it’s what elevates this from sweet-and-salty to balanced and bright.
The Art of Preparing and Marinating Your Chicken
Most people skip marinating because they think it takes too long. A 15-minute marinade for chicken makes a measurable difference, and if you have 30 minutes, even better.
Start by cutting your chicken into uniform 1-inch pieces. This step matters more than you’d think—unevenly sized pieces cook at different rates, meaning some pieces will be overcooked and dry while others remain underdone. Aim for consistency; if your chicken thighs vary in thickness, carefully cut thicker sections in half.
Place your cut chicken in a bowl and add the salt, white pepper, soy sauce, Shaoxing wine, minced garlic, grated ginger, and sesame oil. The soy sauce and sesame oil begin building flavor immediately, while the salt and cornstarch (you’ll add a tablespoon of cornstarch to the marinade) work together to help the coating adhere better during frying. This is called velveting, and it’s the technique that transforms ordinary fried chicken into something special.
Mix thoroughly with your hands, making sure every piece gets coated. Cover the bowl with plastic wrap and refrigerate for at least 15 minutes—though 30-45 minutes is ideal if you have the time. Don’t marinate longer than 2 hours; the salt can begin breaking down muscle tissue too much, making chicken mushy. After marinating, pat the chicken pieces dry with paper towels. Moisture is the enemy of crispness, so don’t skip this step.
Crafting the Signature Sweet and Savory Sauce
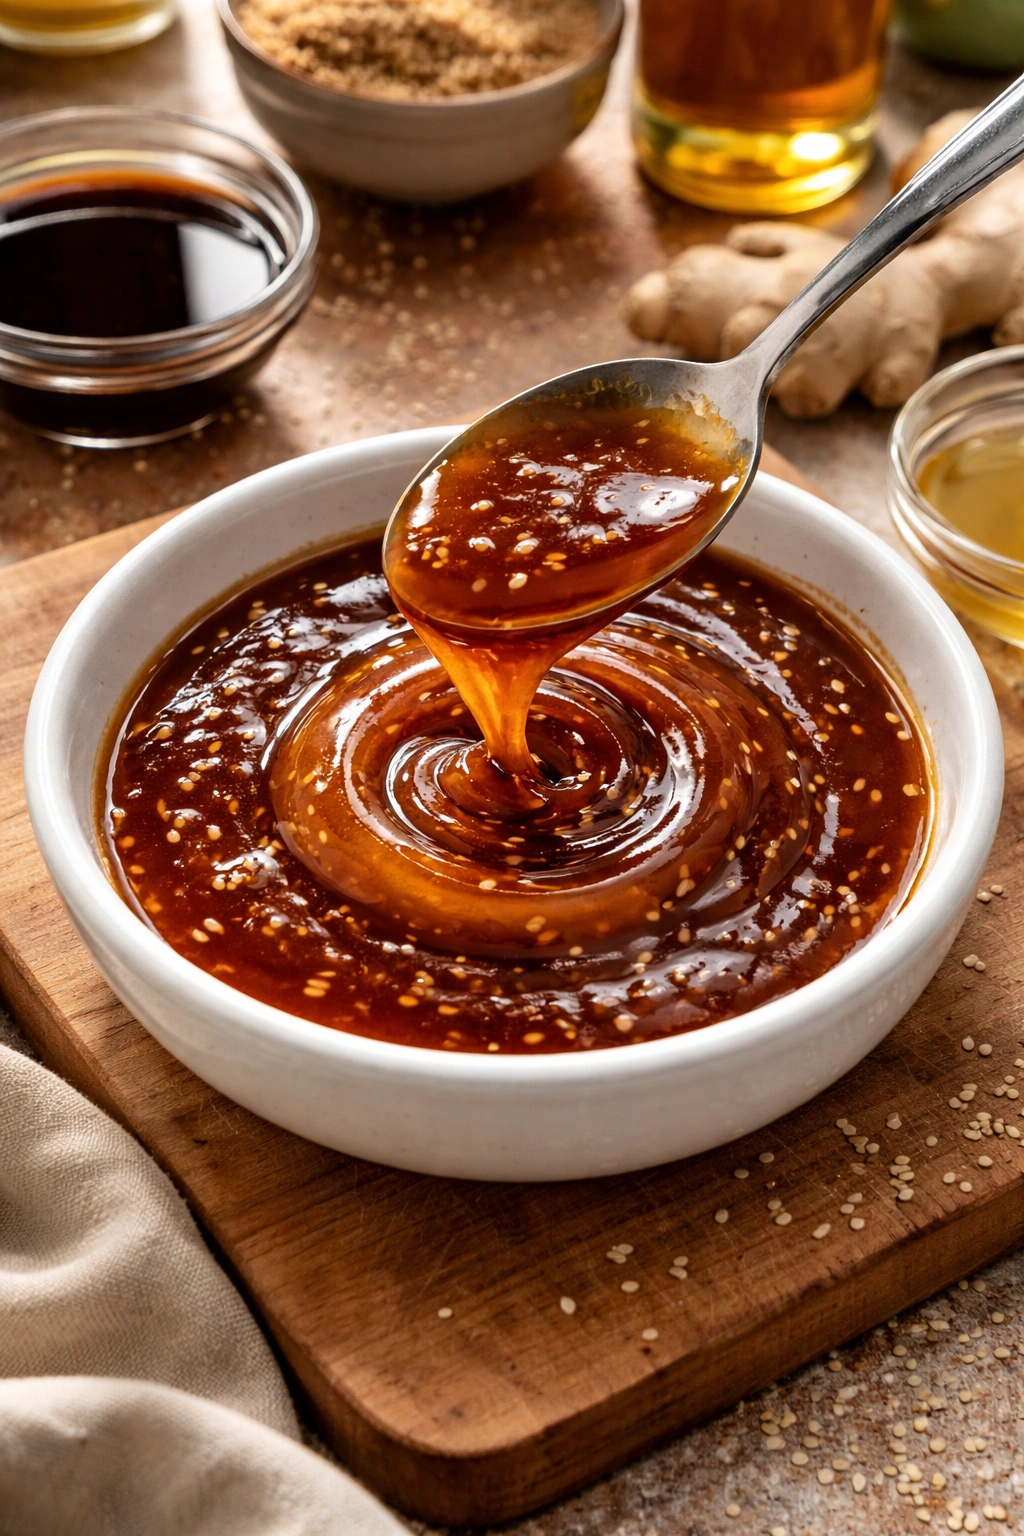
The sauce is where takeout sesame chicken often fails. It’s either cloyingly sweet (tasting more like dessert than dinner) or unpleasantly one-note salty. A properly balanced sauce whispers sweetness while building complexity through layers of flavor.
Begin by combining your sauce ingredients in a bowl: soy sauce, ketchup, chicken stock, brown sugar, honey, toasted sesame oil, and rice vinegar. Whisk them together thoroughly, making sure the sugar dissolves completely. This is also where you want to taste and adjust—if you prefer your sauce sweeter, add an extra tablespoon of honey; if you want more tang, splash in a little more rice vinegar. Your sauce should taste intentionally balanced right now, not perfect, because the flavors will concentrate as it simmers.
The ketchup might seem like an odd addition, but it serves multiple purposes. It adds umami depth that soy sauce alone can’t provide. It contributes a subtle sweetness and acidity without being identifiable as “ketchup.” It also helps thicken the sauce slightly and gives it that glossy, restaurant-quality appearance. Don’t skip it thinking you’re simplifying the recipe.
Rice vinegar is non-negotiable. It cuts through the richness of the fried chicken and the sweetness of the sauce, preventing the dish from becoming cloying. White vinegar is too sharp; apple cider vinegar works but introduces a different flavor profile. Stick with rice vinegar for authenticity.
Achieving That Irresistible Golden Crust
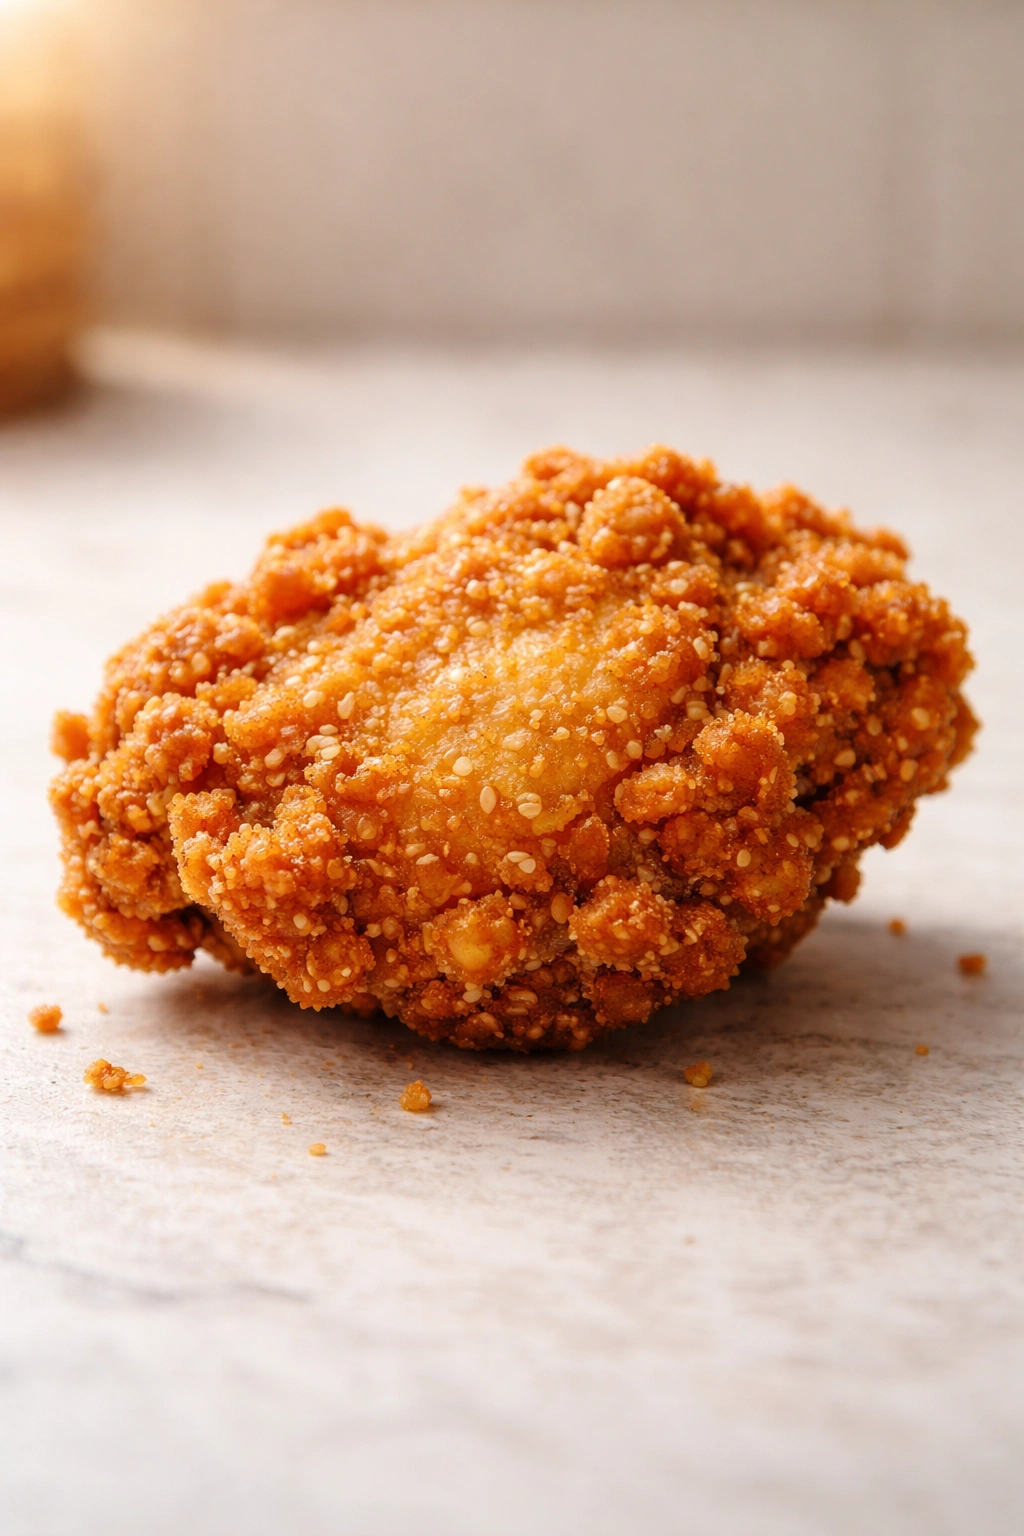
Preparation determines whether you’ll succeed here. Have your oil at the right temperature, your chicken coated and ready, and your sauce ingredients measured and waiting. Rushing any step results in either pale, grease-soaked chicken or a scrambled sauce.
Pour your neutral oil into a large, heavy-bottomed pot or Dutch oven. You need 2-3 inches of oil for proper frying—shallow oil doesn’t allow chicken to cook evenly. Use an instant-read thermometer to monitor temperature; don’t guess. Heat the oil to 350°F (175°C). This temperature is critical. Oil below 325°F results in soggy, greasy chicken because the coating absorbs oil instead of crisping. Oil above 375°F burns the exterior before the inside cooks.
While oil heats, prepare your dredging mixture. Combine flour, cornstarch, salt, white pepper, and baking powder in a large shallow dish. Many home cooks skip baking powder here, but it’s transformative—it creates lightness in your coating, making it crispy rather than dense.
Remove your marinated chicken from the fridge and let it sit at room temperature for 5 minutes. Pat the pieces one final time with paper towels. Working in batches, dredge each piece in your flour-cornstarch mixture, pressing gently so the coating adheres. Shake off excess before frying—clumps of loose coating will burn and make your oil dirty.
Carefully add chicken to the hot oil in a single layer, working in batches so you don’t overcrowd the pot (which drops oil temperature and results in greasy chicken). Avoid moving the chicken for the first minute or so—let it develop a golden crust on the bottom before flipping.
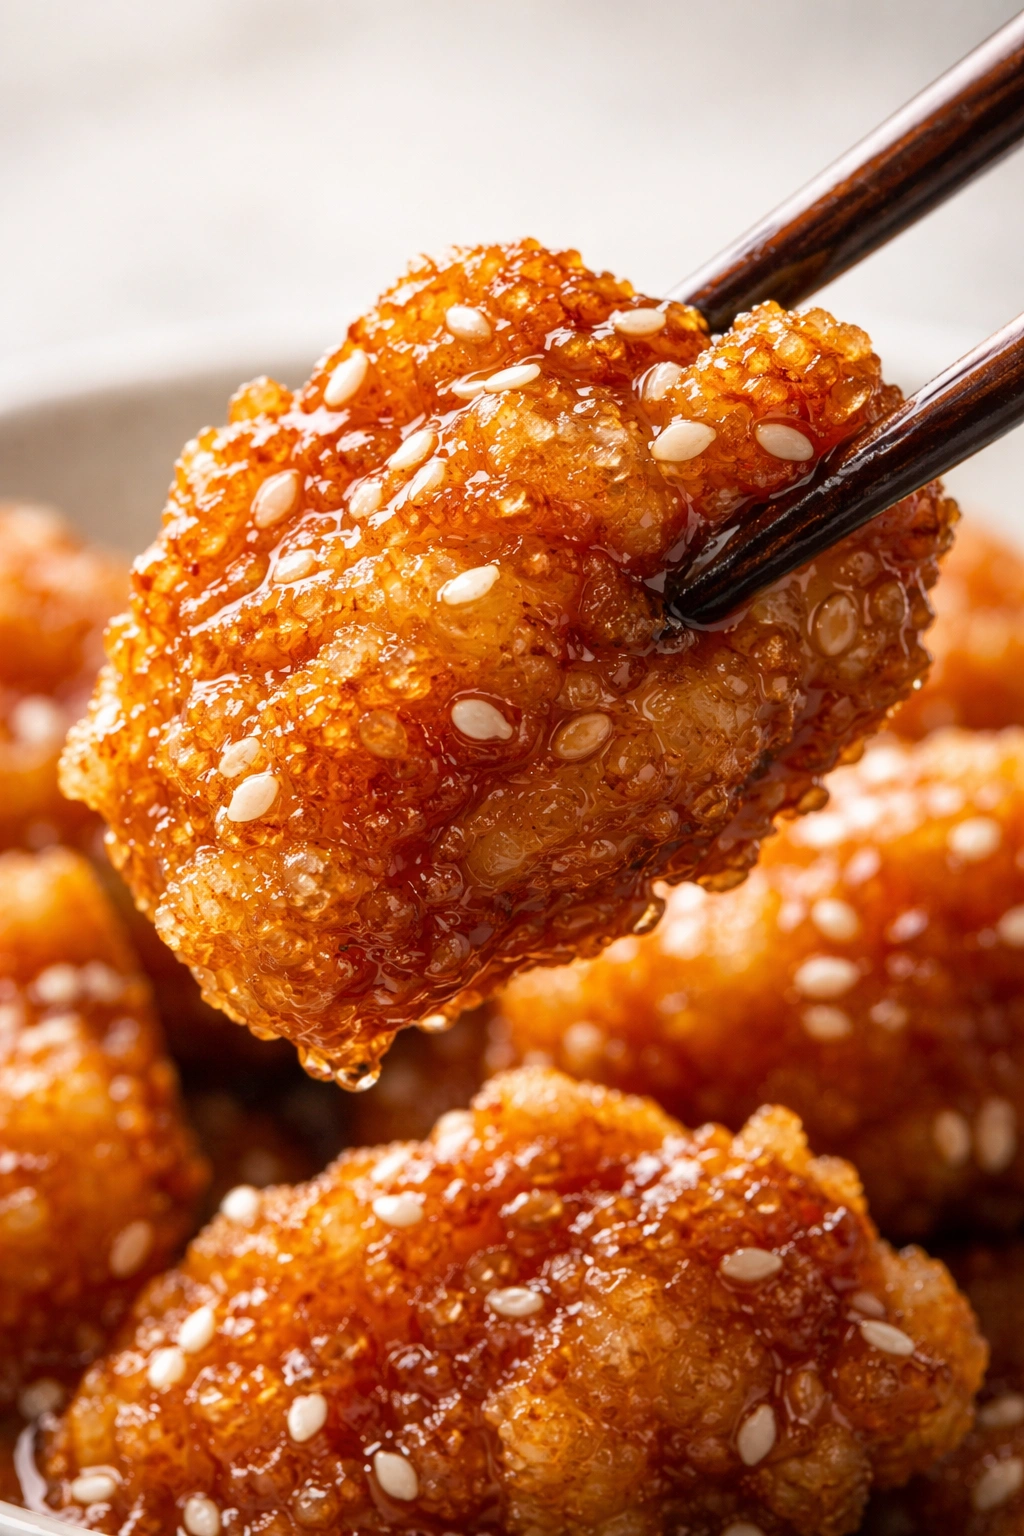
Fry for 4-5 minutes total, turning occasionally, until the chicken is golden brown and cooked through to an internal temperature of 165°F (74°C). Transfer finished pieces to a wire rack set over a baking sheet (not paper towels, which trap steam and soften the crust).
Once all chicken is fried, bring the oil back to 350°F and perform a quick second fry for 1-2 minutes. This re-crisps the exterior and ensures maximum crunchiness before sauce application. This step is optional but makes a noticeable difference.
Step-by-Step: Making Perfect Sesame Chicken
Here’s the complete process broken into clear, manageable steps. Follow this sequence and you’ll have restaurant-quality sesame chicken ready to eat in under 45 minutes.
Preparing the Marinade and Sauce:
-
Cut 1½ pounds of boneless, skinless chicken (thighs or breast) into uniform 1-inch pieces and place them in a medium bowl.
-
Add ½ teaspoon kosher salt, ½ teaspoon white pepper, 2 tablespoons soy sauce, 1 tablespoon Shaoxing wine, 4 minced cloves of garlic, ½ tablespoon grated fresh ginger, and 1 teaspoon toasted sesame oil to the chicken. Mix thoroughly with your hands until every piece is evenly coated. Cover and marinate for at least 15 minutes (30-45 minutes if you have the time).
-
While chicken marinates, prepare your sauce. In a medium bowl, whisk together ¼ cup low-sodium soy sauce, 2 tablespoons ketchup, ½ cup chicken stock, 3 tablespoons brown sugar, 2 tablespoons honey, 1 tablespoon toasted sesame oil, and 2 tablespoons rice vinegar. Taste and adjust sweetness or tanginess as desired. Set aside.
-
In a small bowl, whisk together 1 tablespoon cornstarch and 2 tablespoons cold water to create a slurry for thickening. Set this aside separately—don’t add it to the sauce yet, as it will thicken prematurely.
Coating and Frying the Chicken:
-
After marinating, pat the chicken pieces completely dry with paper towels. This moisture removal is essential for achieving crispness.
-
In a large shallow dish, combine 1 cup all-purpose flour, 1 cup cornstarch, ½ teaspoon kosher salt, ½ teaspoon white pepper, and ½ teaspoon baking powder. Mix well.
-
Heat 1 quart of neutral oil in a large, heavy-bottomed pot or Dutch oven over medium-high heat until it reaches 350°F (175°C). Use an instant-read thermometer to verify the temperature—this is critical for success.
-
Working in batches, dredge marinated chicken pieces in the flour-cornstarch mixture, pressing gently so the coating adheres evenly. Shake off excess coating.
-
Carefully place the dredged chicken into the hot oil in a single layer, working in batches to avoid overcrowding the pot (which lowers oil temperature and causes greasiness). Do not move the chicken for the first minute—allow it to develop a golden crust on the bottom before flipping.
-
Fry for 4-5 minutes total, turning occasionally, until golden brown and cooked through (internal temperature of 165°F or 74°C). Transfer cooked pieces to a wire rack set over a baking sheet.
-
After all chicken is fried, bring the oil temperature back to 350°F and perform a second fry: Add all chicken pieces back to the oil for 1-2 minutes until dark golden brown and extra crispy. Transfer to the wire rack again.
Making and Combining the Sauce:
-
Carefully pour off most of the frying oil from your pot, leaving about 1 tablespoon. Return the pot to medium heat.
-
Add 2 tablespoons minced garlic and 1 tablespoon minced fresh ginger to the remaining oil. Stir constantly for 15 seconds until fragrant—don’t let it burn.
Advertisements -
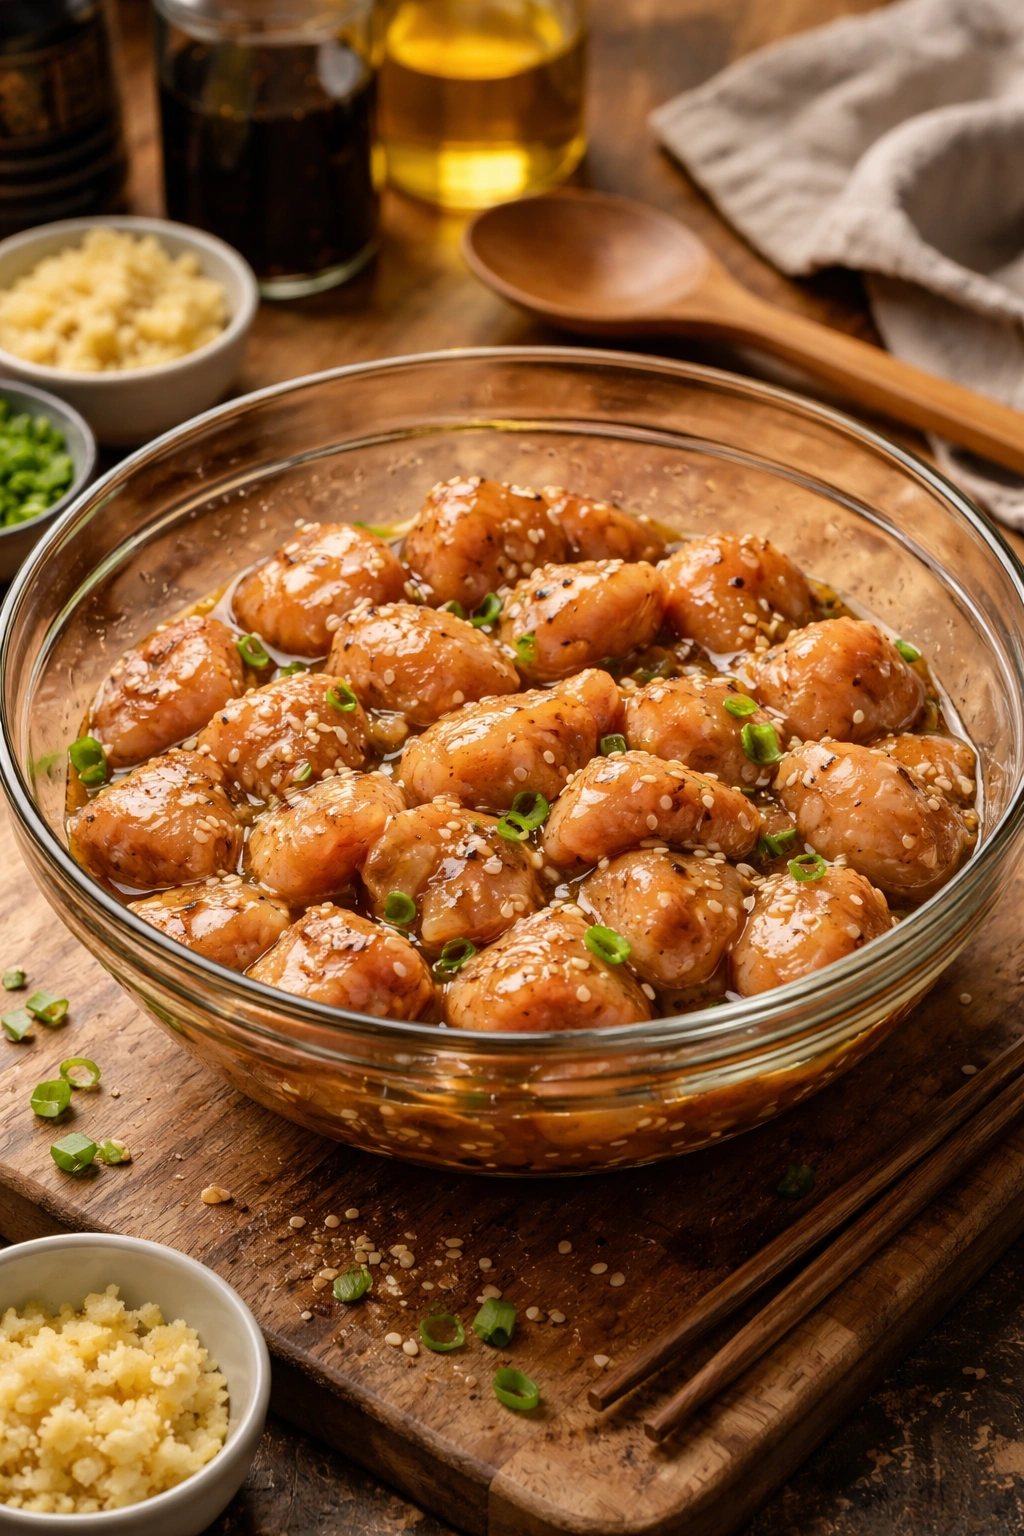
Immediately pour in your prepared sauce mixture. Bring to a gentle simmer, stirring frequently, for about 60 seconds.
-
Slowly whisk in your cornstarch slurry, whisking constantly. Continue whisking and simmering for 1-2 minutes until the sauce thickens to a glossy, syrupy consistency that coats the back of a spoon. The sauce should be noticeably thicker but still pourable.
-
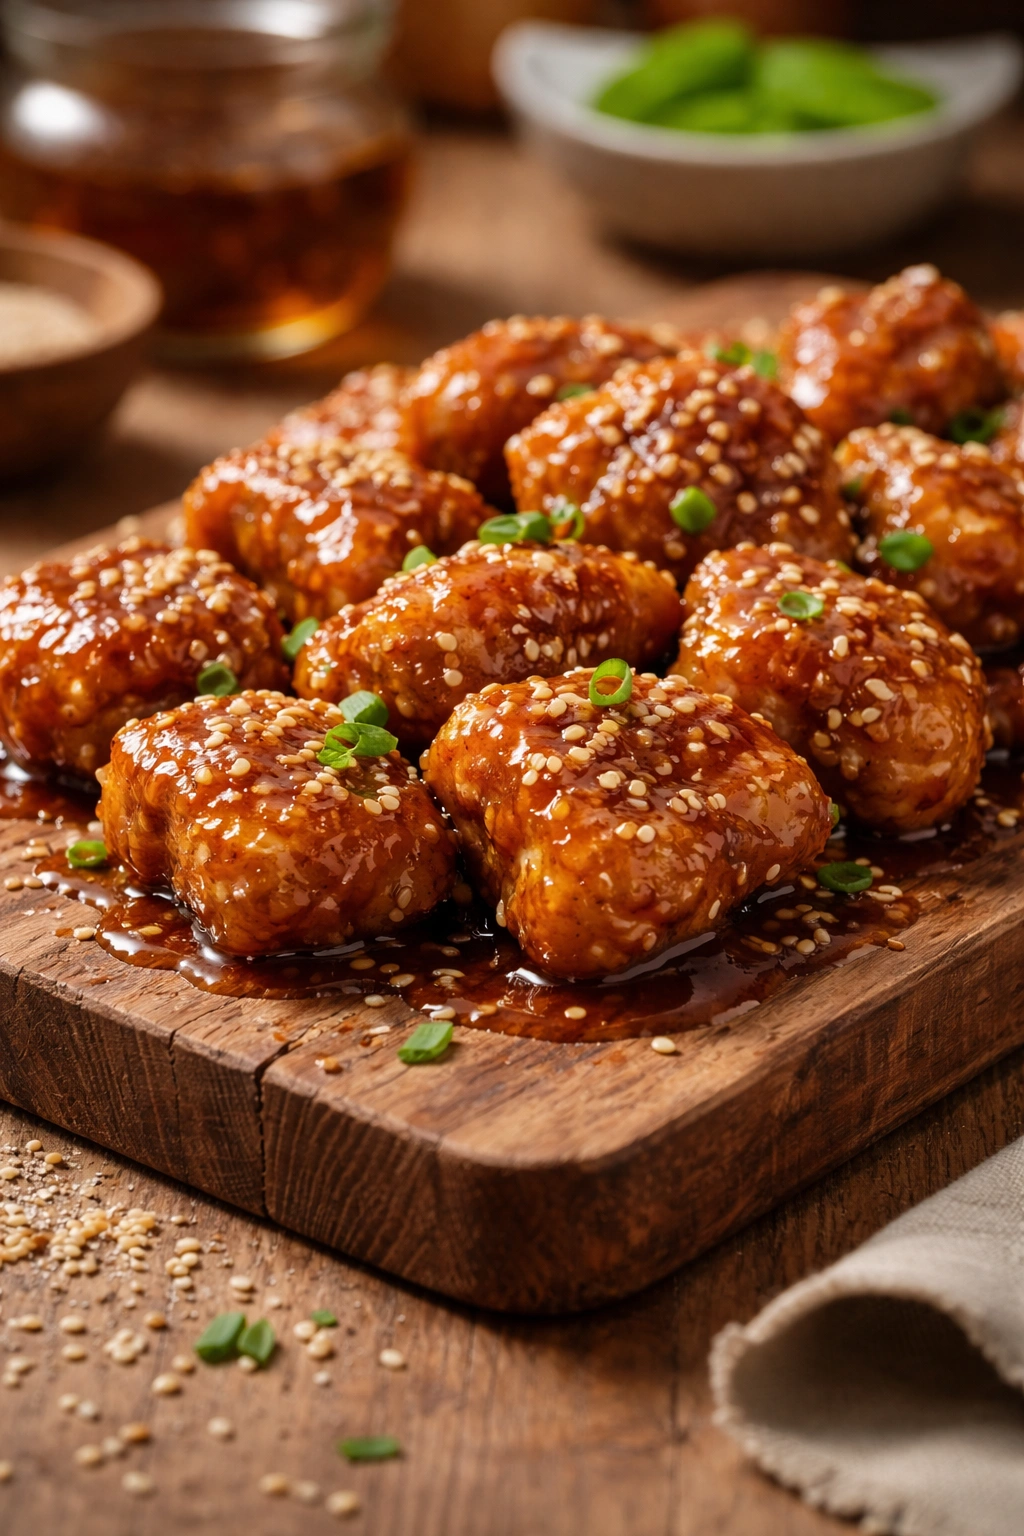
Remove the pot from heat immediately. Add all the crispy chicken pieces to the sauce and toss gently to coat evenly, being careful not to break the coating.
-
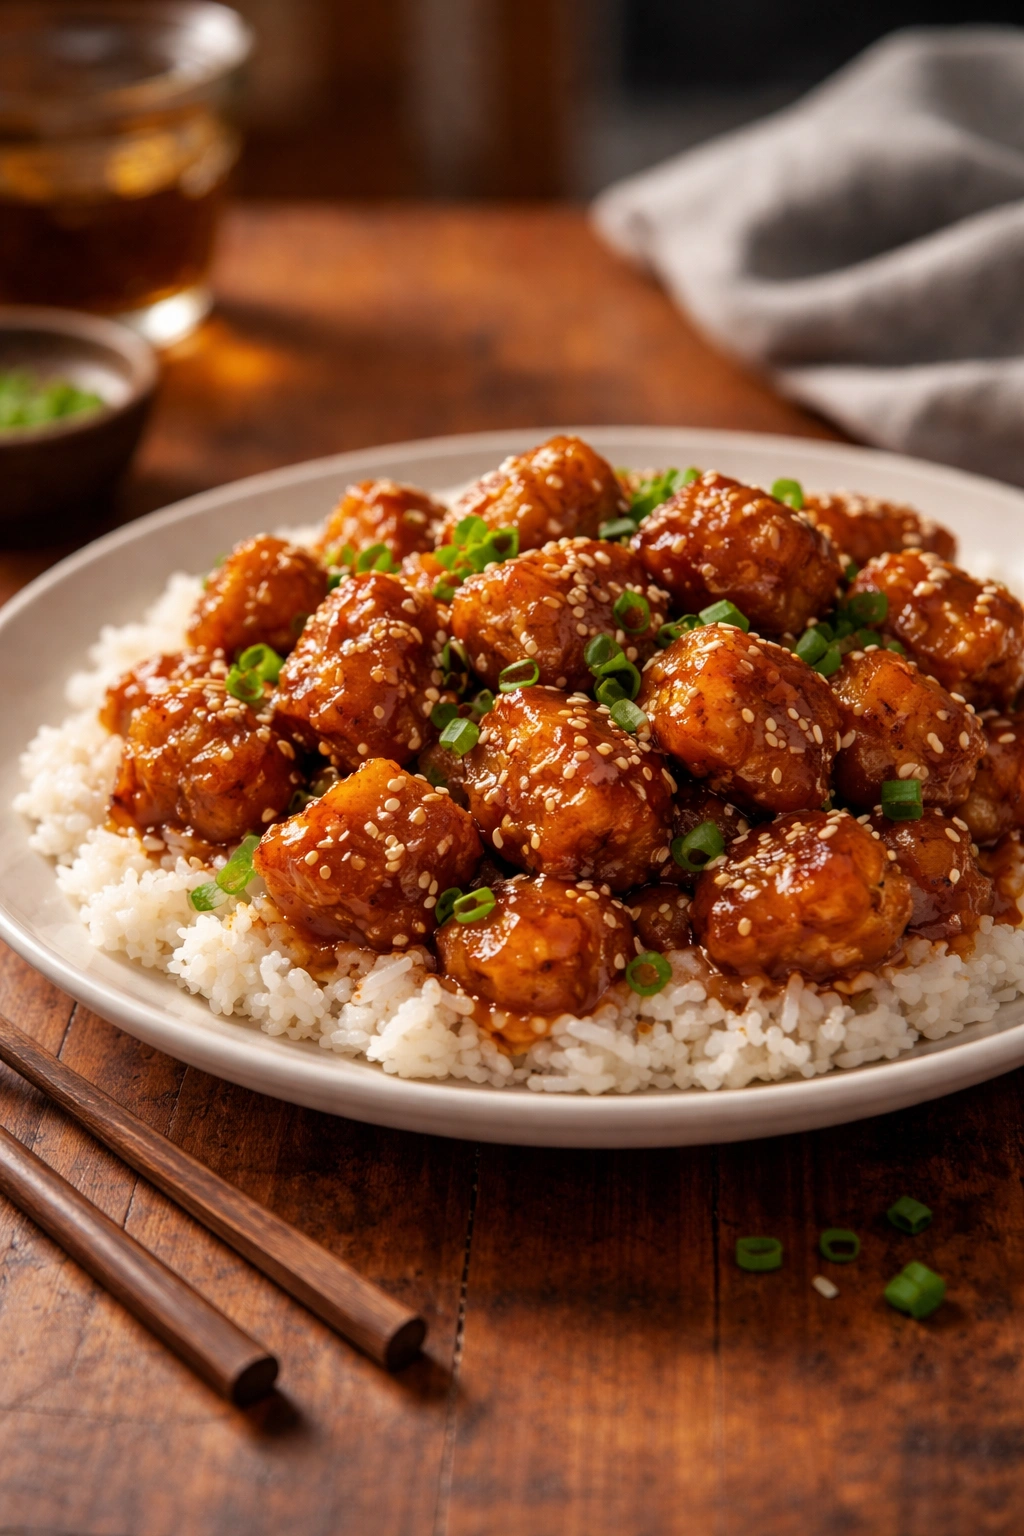
Transfer the sesame chicken to a serving dish. Garnish generously with 1 tablespoon of toasted sesame seeds and 2 thinly sliced green onions.
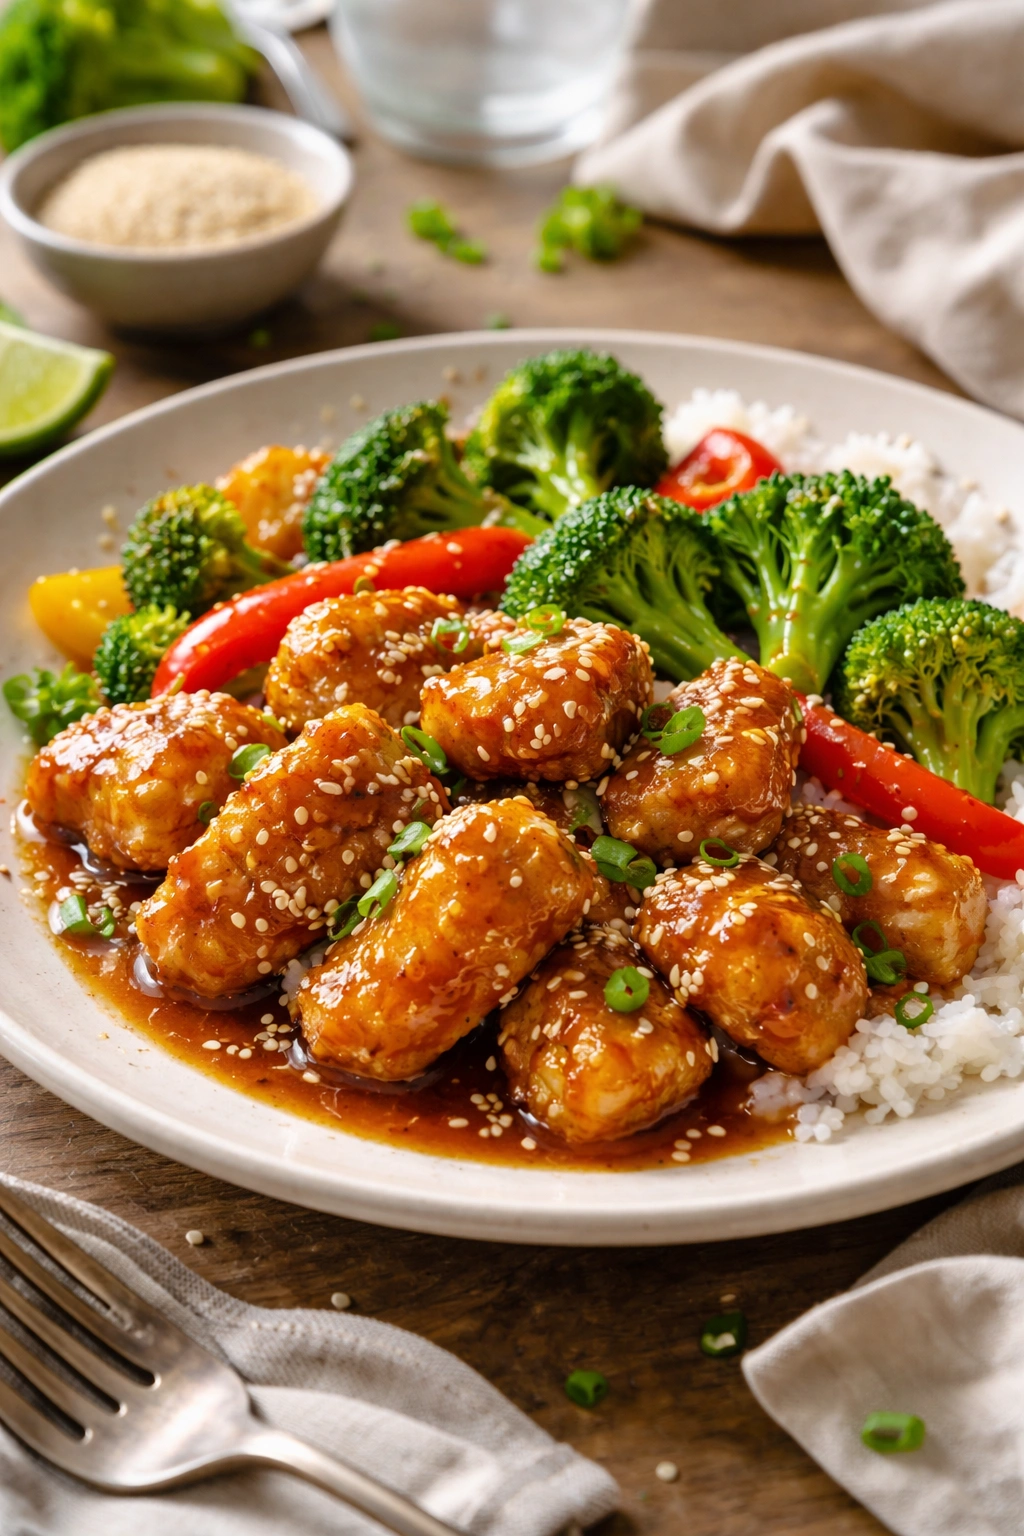
-
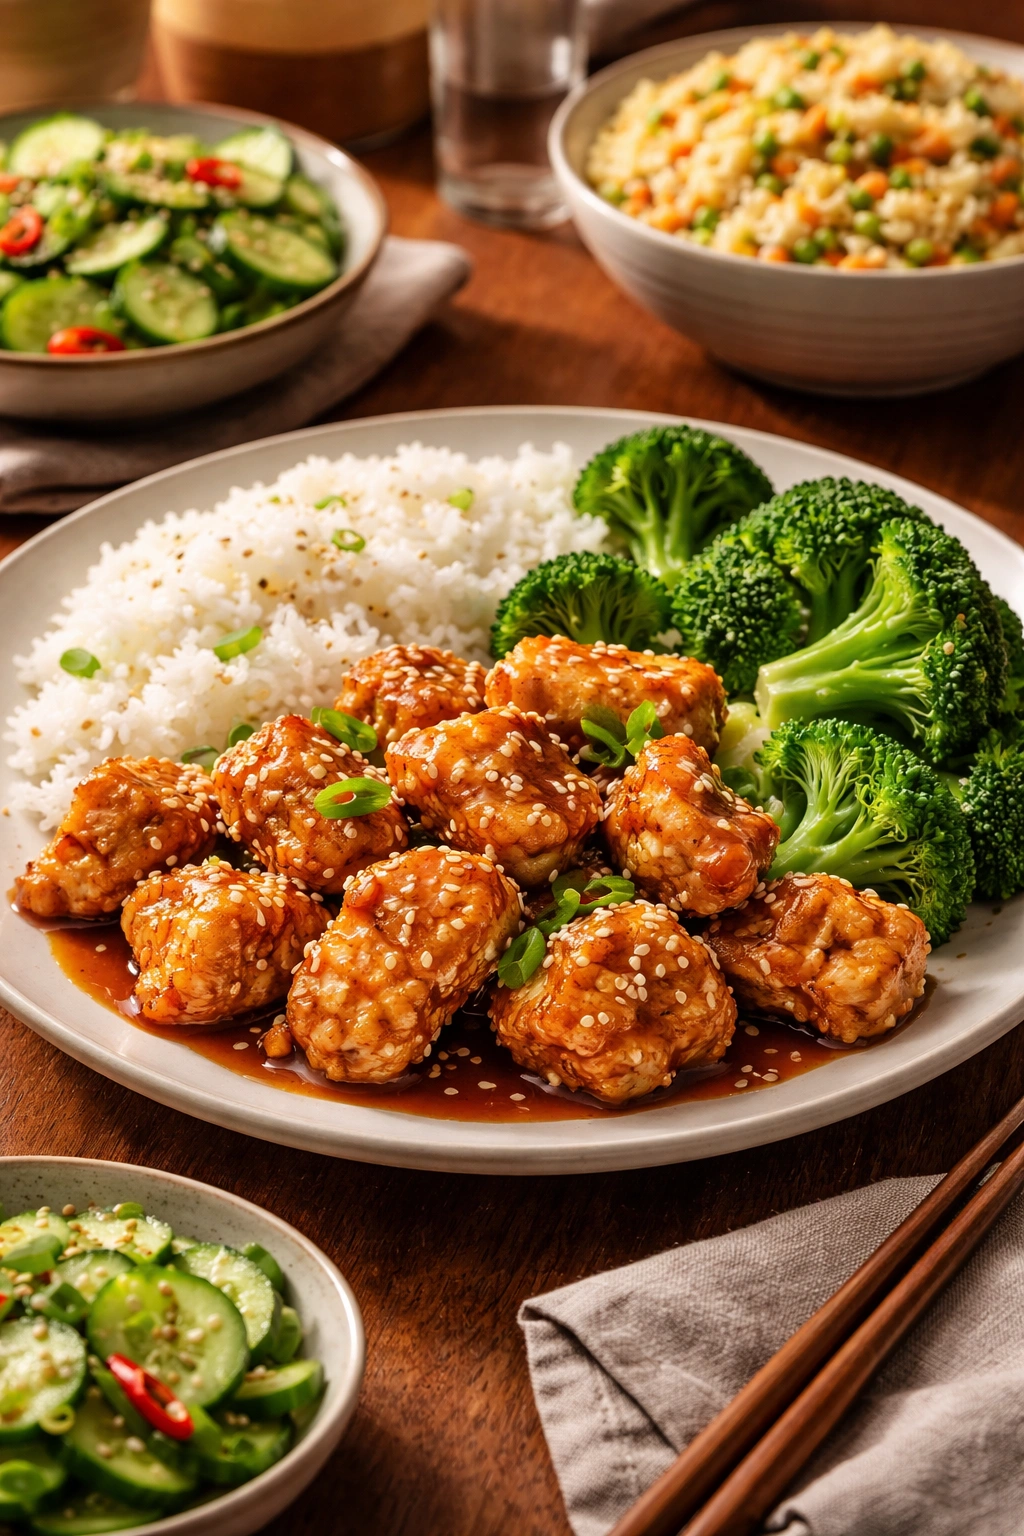
Serve hot over steamed jasmine rice or white rice. The sauce clings beautifully to the rice, making every bite irresistible.
Pro Tips from Experienced Home Cooks

Making sesame chicken successfully comes down to understanding the mechanics of what you’re doing, not just following steps blindly.
Temperature is everything. If your oil isn’t hot enough, you’ll end up with greasy chicken that absorbs oil like a sponge. If it’s too hot, the outside burns before the inside cooks. Invest in an instant-read thermometer—it costs less than a single takeout order and becomes indispensable for any frying project. A good thermometer pays for itself within a few uses.
Don’t skip the second fry. This brief, final fry at the end serves multiple purposes. It re-crisps the surface moisture that naturally migrates during the first fry. It stabilizes the crispiness so the coating resists the sauce better. It takes only 1-2 minutes but transforms the final dish from good to restaurant-quality.
Uniform chicken pieces matter more than you’d think. If some pieces are twice the size of others, they’ll cook at different rates. You’ll pull some pieces out overcooked while others are still underdone in the center. Take the extra minute to cut consistently.
Pat your chicken dry multiple times. After marinating, pat with paper towels. After coating, pat again. Right before frying, pat a third time. Each time you remove surface moisture, you’re investing in crispness.
The cornstarch slurry should be whisked right before adding. Cornstarch doesn’t stay suspended in water—it settles to the bottom. If you make it more than a few minutes ahead, whisk it again before adding to your sauce.
Taste your sauce before adding chicken. At this point, the flavors are still bright and you can adjust if needed. Once you toss in the chicken and everything heats together, adjustments become harder.
Use white pepper instead of black. Black pepper has a sharp, assertive flavor that can overpower the delicate sesame notes. White pepper contributes an earthier, more subtle peppery quality that doesn’t compete with other flavors. Chinese cooks use white pepper for exactly this reason. You can find it in the spice aisle of most groceries or at Asian markets.
Room temperature chicken fries better than cold. After marinating, let your chicken sit out for 5 minutes before frying. Cold chicken transfers heat more slowly, meaning the exterior can overcook before the interior reaches proper doneness.
Consider your pan size carefully. A wok or 14-inch skillet distributes heat more evenly than a small saucepan. If you’re using a small pot, fry in smaller batches to maintain oil temperature.
Elevating Your Sesame Chicken: Creative Variations
Once you’ve mastered the basic recipe, you can customize it to match your preferences or dietary needs.
For more heat: Add ¼ to ½ teaspoon red pepper flakes to your sauce, or substitute 1-2 teaspoons of Sriracha for part of the ketchup. Gochujang (Korean chili paste) creates a deeper, more complex heat. You can also drizzle finished chicken with chili oil right before serving for a spicy punch.
For a citrus brightness: Add 1 tablespoon of fresh lime juice or lemon juice to your finished sauce. This cuts through richness and adds a dimension takeout versions never achieve. Add it after the sauce has thickened but before tossing with chicken, so the acidity doesn’t continue breaking down the coating.
Incorporating vegetables: While traditional sesame chicken is chicken-only, you can stir in blanched broccoli florets, snap peas, or diced bell peppers during the last 30 seconds of cooking. Keep vegetables crisp rather than fully cooked. Some cooks prefer to stir-fry vegetables separately and serve them alongside rather than mixed in.
Lighter versions using baking or air-frying: If you want to reduce oil content, toss your dredged (but not marinated) chicken pieces with 1-2 tablespoons of oil, spread them on a baking sheet, and bake at 400°F (200°C) for 15-20 minutes, flipping halfway. Alternatively, air-fry at 375°F (190°C) for 10-15 minutes, shaking the basket halfway through. The texture won’t be quite as crispy as deep-fried, but it’s still delicious and substantially healthier.
Gluten-free adaptation: Use tamari instead of soy sauce, and ensure your cornstarch is pure (most are naturally gluten-free, but verify the label). Use a gluten-free all-purpose flour blend in place of regular flour. The result is virtually indistinguishable from the original.
Different protein options: While chicken is traditional, this sauce works beautifully on pork (pork shoulder or pork belly pieces), shrimp (skip frying; use just the sauce), or even tofu (press it first to remove excess moisture, then bread and fry like chicken).
Deeper sauce flavor: Substitute ¼ cup of the chicken stock with oyster sauce for more umami depth, or add 1 teaspoon of fish sauce (which adds savory complexity without tasting fishy). These additions are optional but notably elevate the sauce.
Storing and Reheating Like a Pro
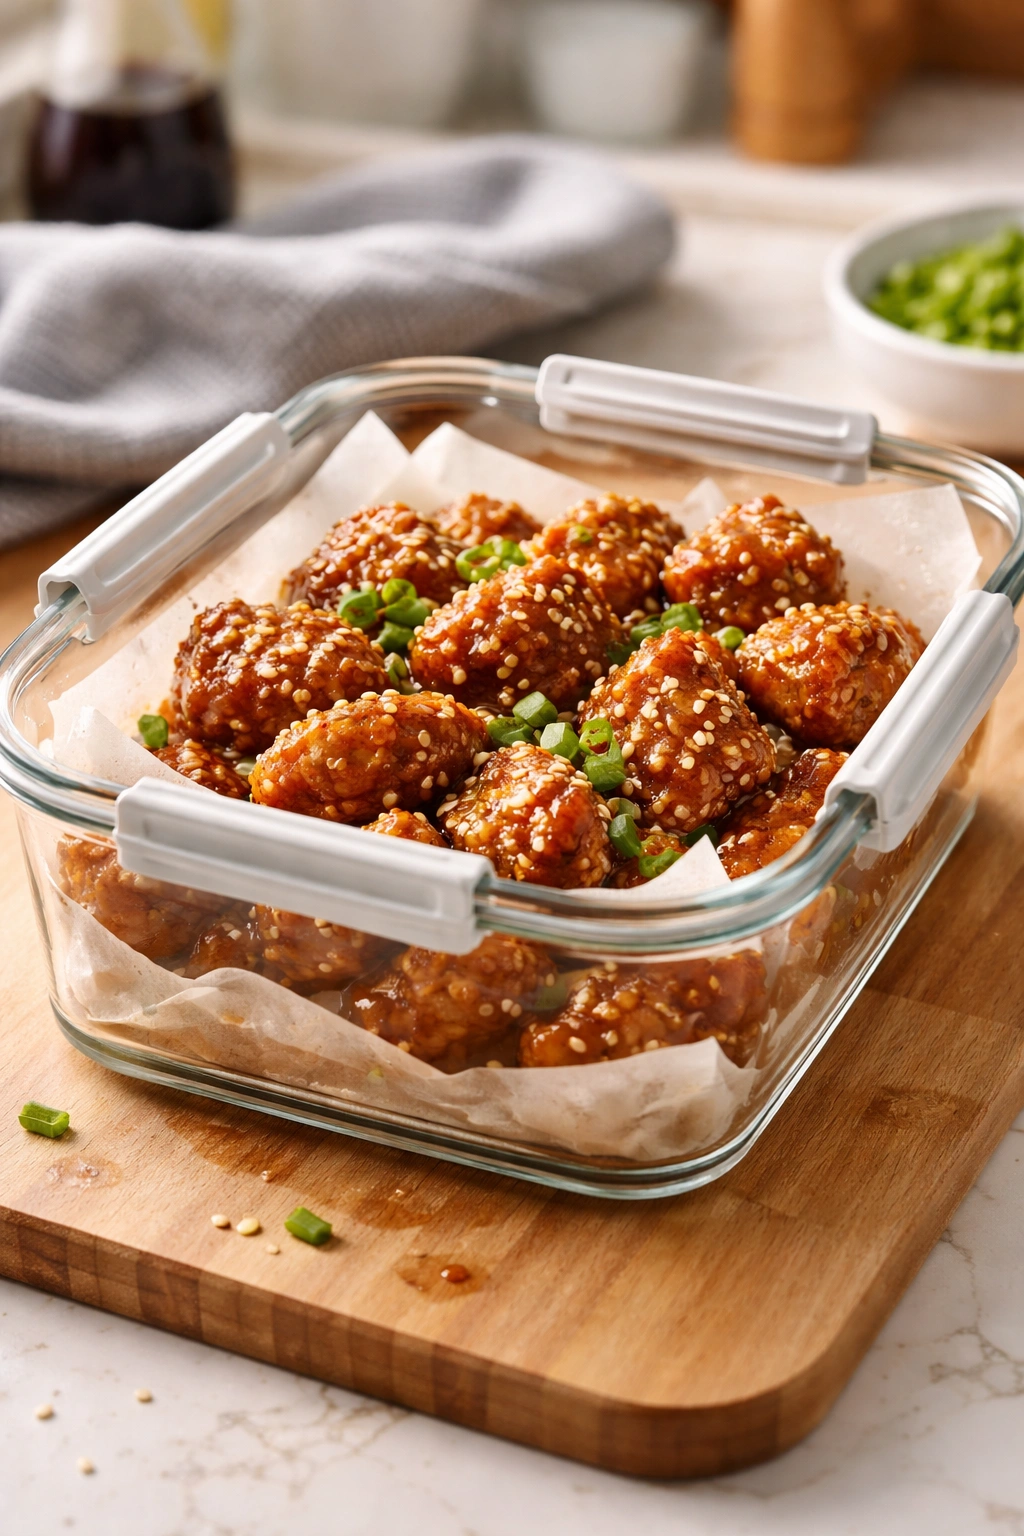
Sesame chicken actually improves overnight as the sauce flavors deepen and permeate the chicken. Knowing how to store and reheat properly means your leftovers taste almost as good as the fresh version.
After the dish cools to room temperature (usually 1-2 hours), transfer it to an airtight container. Place a paper towel on the bottom to absorb excess moisture, and place another paper towel on top before sealing. This simple step prevents the chicken from becoming soggy as it cools.
Refrigerated sesame chicken keeps beautifully for 3-4 days. The sauce will thicken further as it cools—this is normal and not a problem. When reheating, you have options depending on how much you care about texture.
For optimal crispness (recommended): Reheat in a preheated 375°F (190°C) oven for 10-15 minutes on a baking sheet lined with parchment paper. If the sauce seems dry, add a tablespoon of water or chicken broth. You can also separate any stuck-together pieces before reheating. The oven method doesn’t restore original crispness completely (nothing truly does after a few days), but it gets remarkably close while warming everything evenly.
For quick reheating without texture concern: Microwave in a microwave-safe dish at medium power for 1-2 minutes, stirring halfway through. This is faster but results in softer chicken. Works perfectly fine if you’re eating quickly and not fussing over texture.
In an air fryer: Spread the chicken in a single layer in your air fryer basket and reheat at 325°F (160°C) for 5-8 minutes. This method actually does restore some crispness while avoiding the longer oven preheat time.
Freezing for later: Allow cooked chicken and sauce to cool completely, then transfer to a freezer-safe airtight container or heavy-duty freezer bag. Frozen sesame chicken keeps for up to 2-3 months. Thaw overnight in the refrigerator before reheating using any of the methods above.
A word about texture: The longer sesame chicken sits in sauce, the more the coating absorbs moisture and softens. This is completely normal and doesn’t indicate spoilage—the flavors are actually better. If you strongly prefer crispness, store the chicken and sauce separately, then combine just before eating or reheating.
Perfect Pairings: What to Serve Alongside
Sesame chicken shines brightest when paired thoughtfully with complementary sides. These aren’t afterthoughts but essential components of a complete, balanced meal.
Steamed jasmine rice is the classic choice. Its delicate fragrance and soft texture provide the perfect neutral canvas for the chicken and sauce. White rice works equally well if jasmine isn’t available. The sauce clings beautifully to rice grains, making the side dish far more interesting than plain rice typically is.
Steamed broccoli adds textural contrast and nutritional balance. The slight bitterness of broccoli cuts through the sweetness of the sauce, preventing flavor fatigue. Toss the broccoli with a little sesame oil and salt for added interest.
A simple cucumber salad with rice vinegar, sesame oil, and white pepper provides brightness and crunch. The acidity refreshes your palate between bites of rich, sweet chicken. This is especially valuable if you’re eating a large portion.
Egg fried rice transforms sesame chicken into a more substantial meal. The rice’s savory, slightly fatty character complements the sweet sauce beautifully. If you have leftover rice from a previous meal, fried rice is an excellent use for it.
Stir-fried green beans or snap peas add color and freshness. Briefly stir-fry them separately with garlic, ginger, and a splash of soy sauce, then serve alongside the chicken. This keeps vegetables crisp rather than allowing them to soften in the sauce.
A light green salad with a simple vinaigrette provides an unexpected but delicious contrast. The greens’ earthiness and acidity balance the sweet, rich chicken perfectly.
Steamed bok choy or other Chinese greens work wonderfully. Serve them simply steamed with a drizzle of sesame oil and a pinch of salt.
Dumpling soup or clear broth alongside the main course adds warmth and lightness. It’s the way many Chinese restaurants structure meals, and it works beautifully at home.
The key is choosing sides that either provide textural contrast (soft sauce demands something crisp), flavor contrast (sweet chicken demands something acidic or fresh), or both. Avoid heavy, creamy sides that compete with the dish rather than complement it.
Final Thoughts
You’ve now learned everything you need to make sesame chicken that genuinely rivals—and exceeds—anything a restaurant can serve. The techniques here aren’t secret or complicated; they’re simply the accumulation of best practices from countless kitchens and home cooks who’ve perfected this dish.
The real advantage of homemade sesame chicken isn’t just superior flavor and texture, though both are measurable. It’s the satisfaction of creating something impressive from simple ingredients in your own kitchen. It’s knowing exactly what went into your meal. It’s having dinner ready in 45 minutes for a fraction of what takeout costs.
Start with the basic recipe exactly as written. Master that first, then customize. Once you understand how each component works—why the cornstarch matters, what the rice vinegar contributes, how temperature affects the outcome—you’ll have confidence to adjust and adapt based on your preferences. That’s when you’ve truly mastered the dish.
Make this once, and it’ll become a regular part of your rotation. Make it twice, and you’ll remember exactly what worked and what you’d tweak next time. By the third time, you’ll be making it without consulting the recipe, tasting as you go, and confidently adjusting. That’s the goal—not just to follow instructions, but to understand the why behind each step so you can own this recipe completely.
Your family’s going to love this. Your wallet’s going to thank you. And you’ll never look at a takeout menu the same way again.