There’s something undeniably romantic about a meal that smells like it’s been lovingly tended for hours—that rich, wine-dark aroma of beef and herbs slowly surrendering to gentle heat. Braised short ribs are exactly that kind of dish: impressive enough to feel restaurant-quality, yet entirely within reach for someone cooking at home without stress. They’re the perfect antidote to the pressure many feel when cooking for someone they want to impress, because the beauty of braising is that it’s almost impossible to fail. You brown the meat, add liquid and aromatics, slide everything into the oven, and then you have hours of uninterrupted time to get ready, set the table, light candles, and actually enjoy anticipating the meal instead of panicking in the kitchen.
This is food that tells a story—tender meat that falls from the bone at the gentlest pressure of a fork, a sauce so silky and complex that it tastes like it took a culinary degree to create, vegetables that have melted into the braising liquid and vanished into layers of flavor. What makes braised short ribs truly special for a date night, though, isn’t just how they taste. It’s that this dish gives you permission to cook confidently without being chained to the stove. You can prep everything in under twenty minutes, get the ribs into the oven, and then simply wait—no stirring, no basting, no last-minute scrambling. By the time your guest arrives, your home will smell incredible, and you’ll be calm, composed, and ready to enjoy their company.
The deep, savory richness that emerges from this cooking method is nothing short of luxurious. The connective tissues in short ribs—the parts that would make them tough using faster cooking methods—transform into silky gelatin that coats the meat and creates an incredibly succulent texture. Combined with a sauce built from red wine, beef broth, tomato paste, and aromatics, you end up with something that feels elevated and restaurant-quality while being remarkably straightforward to execute. This is the kind of meal you’ll find at fine dining establishments and quality steakhouses, served at prices that would make you wince, yet it costs far less to make at home and tastes just as extraordinary.
Why Short Ribs Are the Perfect Choice for an Intimate Dinner
Short ribs occupy a sweet spot in the beef world—they’re prized by chefs and home cooks alike for their perfect balance of fat, meat, and bone. These come from the chuck section of the cow and are typically sold as rectangular pieces about two to three inches long, each one a small, chunky masterpiece of marbling and connective tissue. What makes them so ideal for braising is precisely what would make them unsuitable for quick-cooking methods: they’re loaded with fat and collagen that need time to break down and transform.
The magic of braising is that it converts these seemingly tough, fatty cuts into something fall-apart tender and deeply flavorful. As the meat cooks slowly in liquid at a low temperature, the collagen dissolves into gelatin, which coats every fiber of meat and creates an almost silky mouthfeel. The fat, rather than being a drawback, becomes an asset—it carries flavor and keeps the meat moist throughout the long cook. This is why short ribs are far superior to leaner cuts for braising; they emerge more succulent and juicy than cuts like chuck or brisket could ever be.
For a date night specifically, short ribs offer another significant advantage: they’re inherently impressive. The presentation is beautiful—a substantial piece of meat still attached to its bone, glossy with rich sauce—yet they require zero knife skills to eat. There’s something deeply satisfying about cutting into meat so tender that a fork does all the work, and it’s a pleasure that doesn’t require the diner to navigate around difficult bits of gristle or cartilage. This ease of eating is genuinely important when you’re trying to have a good conversation and enjoy someone’s company without being distracted by wrestling with your food.
Selecting and Preparing Your Short Ribs
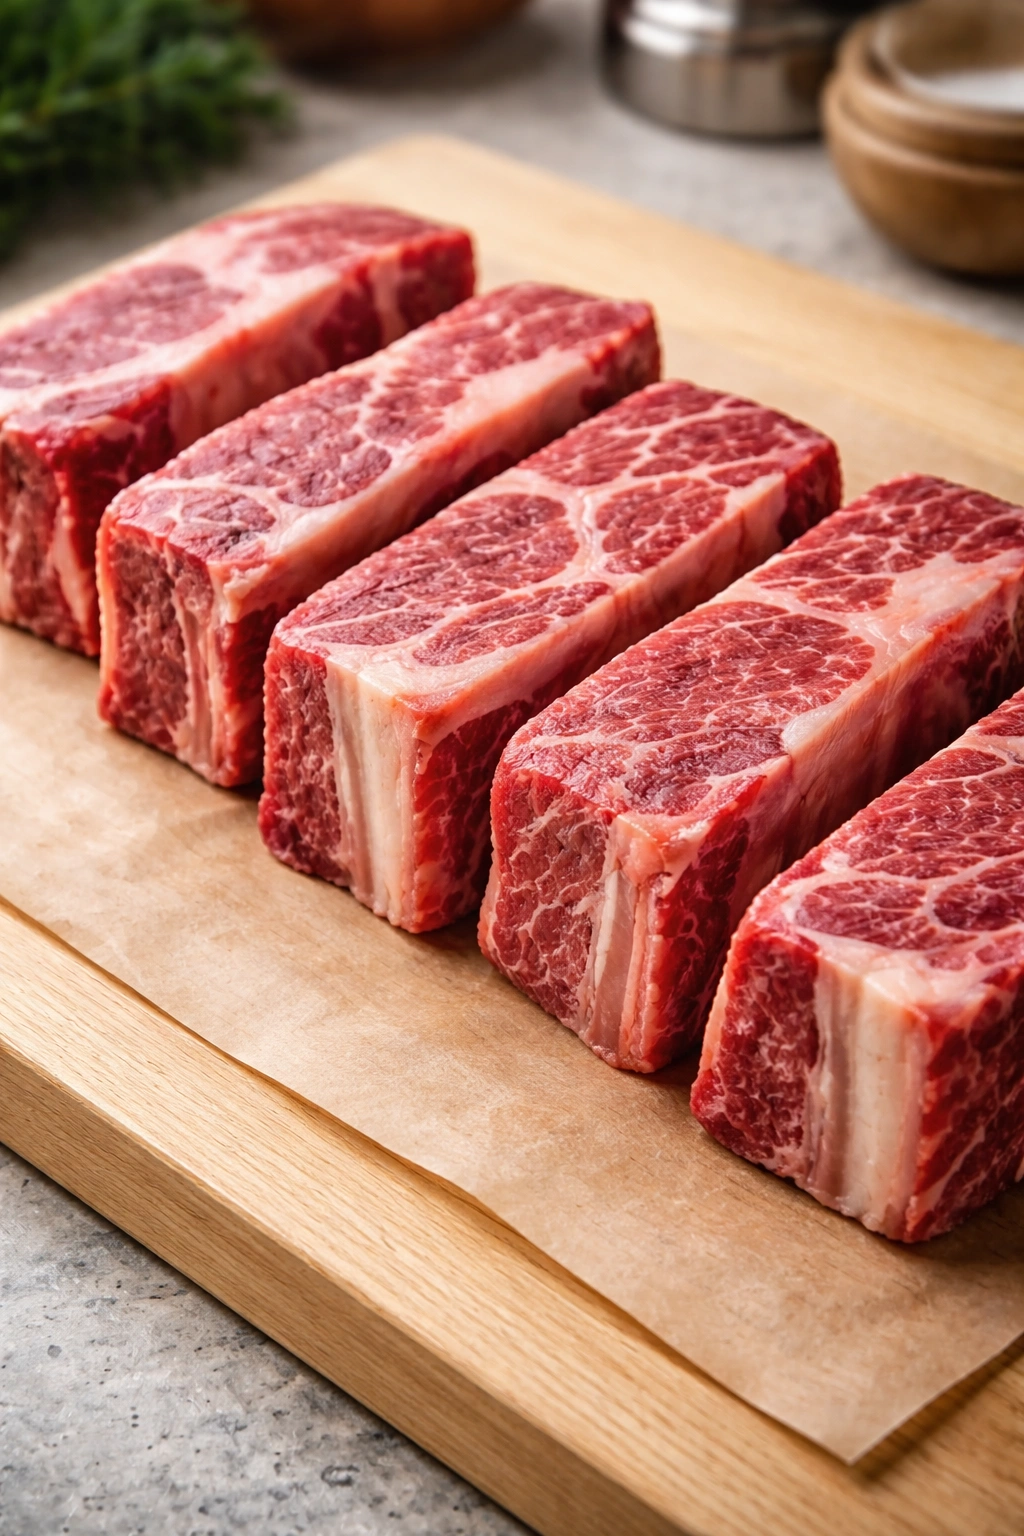
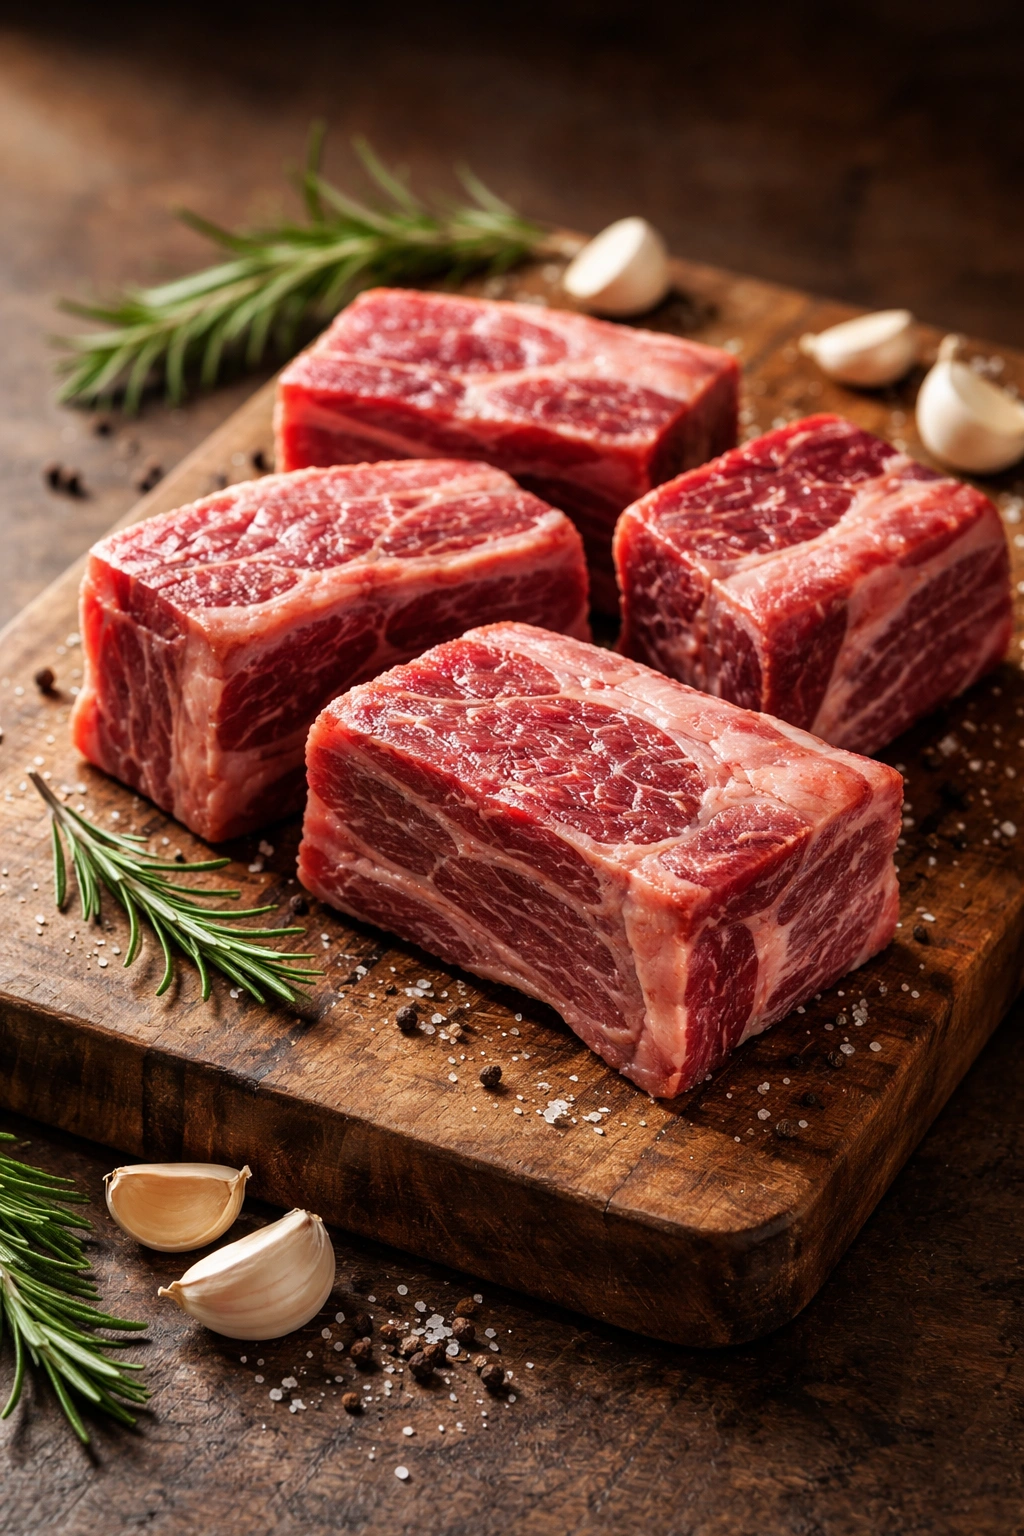
The quality of your final dish begins with the quality of your short ribs, so choosing them with care is worth the effort. Look for bone-in short ribs that are approximately 300 to 400 grams (10 to 14 ounces) each, cut crosswise into 2 to 3-inch pieces. The bone-in versions cook more evenly and develop significantly more flavor than boneless ribs. You want pieces that are visibly meaty—thick, chunky pieces with good marbling throughout, not thin pieces with more bone than meat. If you’re shopping at a butcher counter rather than selecting from pre-packaged options, ask specifically for thick, meaty short ribs and tell them you’re braising them; a good butcher will make sure you get pieces worth the money you’re spending.
Check the color of the meat carefully. Look for bright red meat, not meat that’s turned gray or brown in patches, which indicates it’s beginning to oxidize and lose freshness. The marbling—those white lines of fat running through the meat—should be visible and fairly generous. Short ribs are naturally fatty, which is exactly what you want, but you’re looking for marbling, not excessive surface fat. A package with good distribution of meat to bone, with marbling throughout, will yield the best results.
Before you begin cooking, bring your short ribs to room temperature for about thirty minutes. This step is genuinely important, not a fussy detail. Cold meat doesn’t brown properly; the exterior steams rather than caramelizing when you put it into a hot pan. Room-temperature meat, meanwhile, will develop a beautiful golden-brown crust through the Maillard reaction, which is the chemical process responsible for creating deeply flavorful browning. Pat each piece thoroughly dry with paper towels before searing—moisture on the surface interferes with browning, so don’t skip this step.
Understanding the Braising Process and Why It Works

Braising is a cooking method that seems fancy but is actually fundamentally straightforward: you brown meat, then cook it slowly in liquid. What happens during that slow cooking is genuinely transformative. The collagen in connective tissues—which would make the meat tough if cooked with dry heat—dissolves into gelatin when exposed to the moist heat of the braising liquid over extended time. This gelatin, when cooled, gives the dish its luxurious texture; when warm, it coats every fiber of meat and creates an almost silky sensation on the palate.
The braising liquid does multiple jobs simultaneously. It provides moisture to prevent the meat from drying out during the long cook. It carries flavor deep into the meat through osmosis and absorption. It picks up flavors and color from the meat and vegetables, becoming more complex and rich as it reduces. And it eventually becomes your sauce—no separate sauce-making required, no additional work needed. This efficiency is part of what makes braising so perfect for entertaining: one pot does all the heavy lifting.
The covered cooking environment is crucial to how this works. As the dish cooks, liquid evaporates from the braising liquid, but because the pot is covered, that moisture condenses on the lid and drips back down, keeping the top of the meat moist even as it sits partially above the liquid. This means every part of the ribs benefits from the humid, flavorful environment. Even the exposed portions cook beautifully and remain juicy.
The Critical Importance of Proper Searing
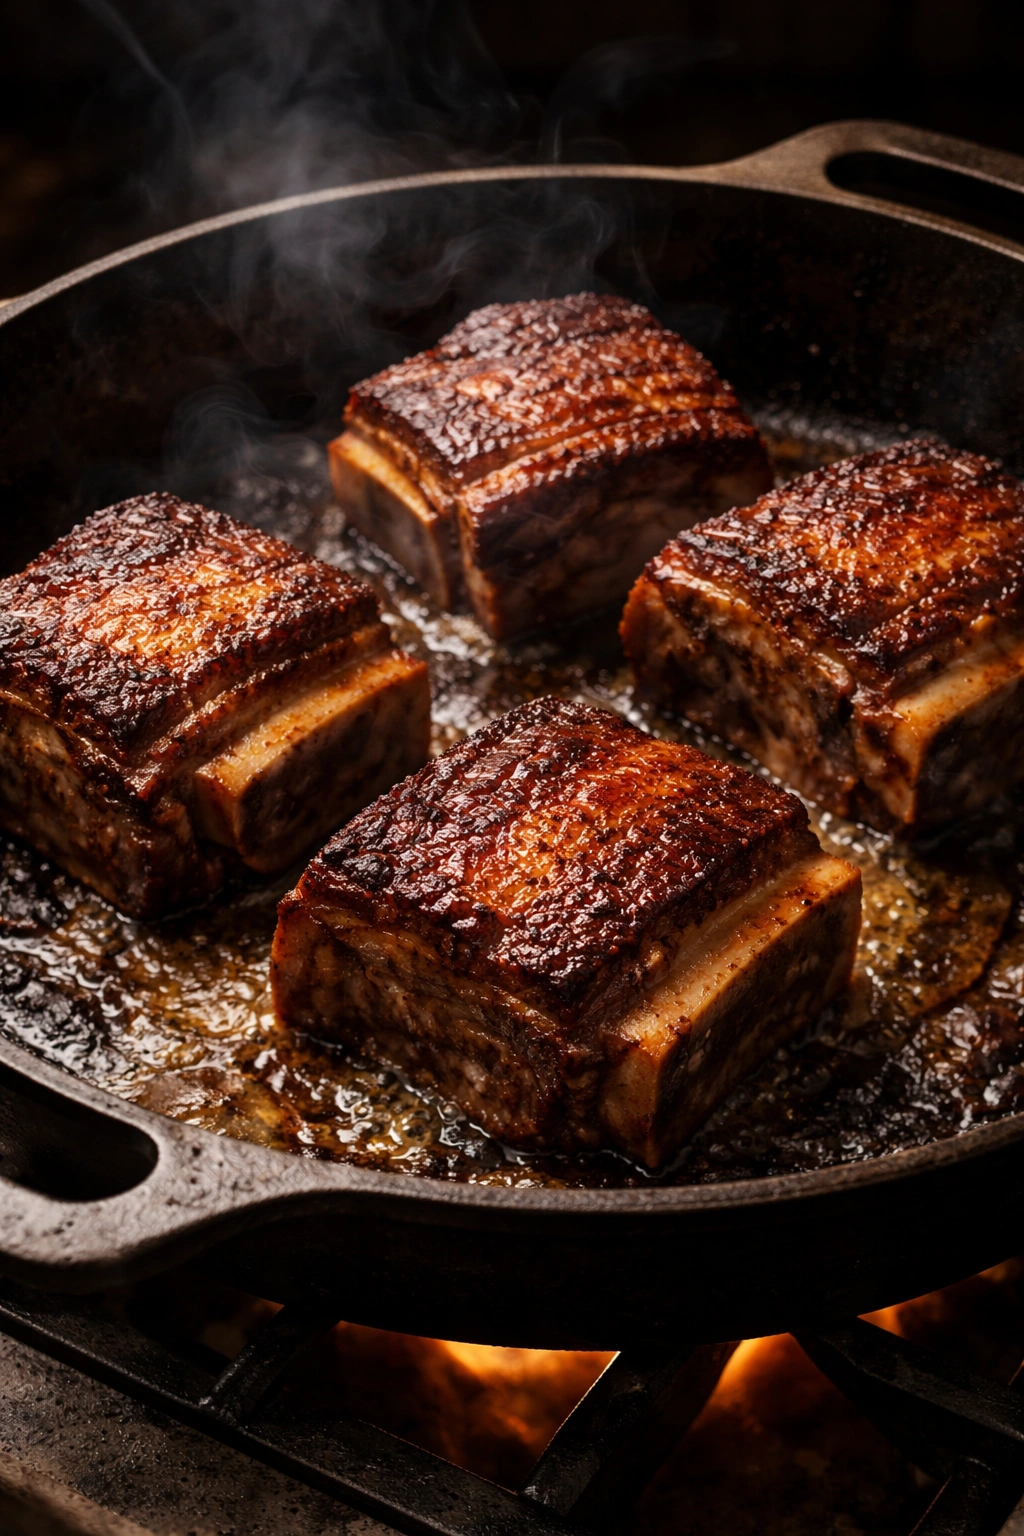
Before any braising happens, your short ribs must be seared. This isn’t just for browning—it’s for building flavor. The Maillard reaction that creates that beautiful golden-brown crust also creates complex flavor compounds that didn’t exist in the raw meat. These compounds add depth and richness that will permeate your entire dish. If you skip searing or rush through it, your final sauce will taste flat by comparison.
To sear properly, you need a heavy-bottomed pot (a Dutch oven is ideal), high heat, and patience. Heat your oil over medium-high to high heat until it’s shimmering—it should be hot enough that the ribs sizzle audibly the moment they hit the pan. Don’t crowd the pot; work in batches if necessary, searing only three or four ribs at a time. Each piece needs contact with the hot pan to brown properly. Sear each side for about forty-five seconds to a minute, developing a crust that’s golden brown, not pale. This takes longer than you might expect—typically five to seven minutes total per batch—but that’s exactly what you want.
Resist the urge to move the ribs around constantly. Let each side sit undisturbed in the hot pan for enough time to develop color. This actually requires less effort than frequent turning, and it yields far superior results. Once all the ribs are seared, remove them to a plate and set aside. Don’t worry about them cooling; you’ll return them to the hot braising liquid shortly, and they’ll come right back up to temperature.
Building Your Sauce Foundation: Aromatics and Tomato Paste
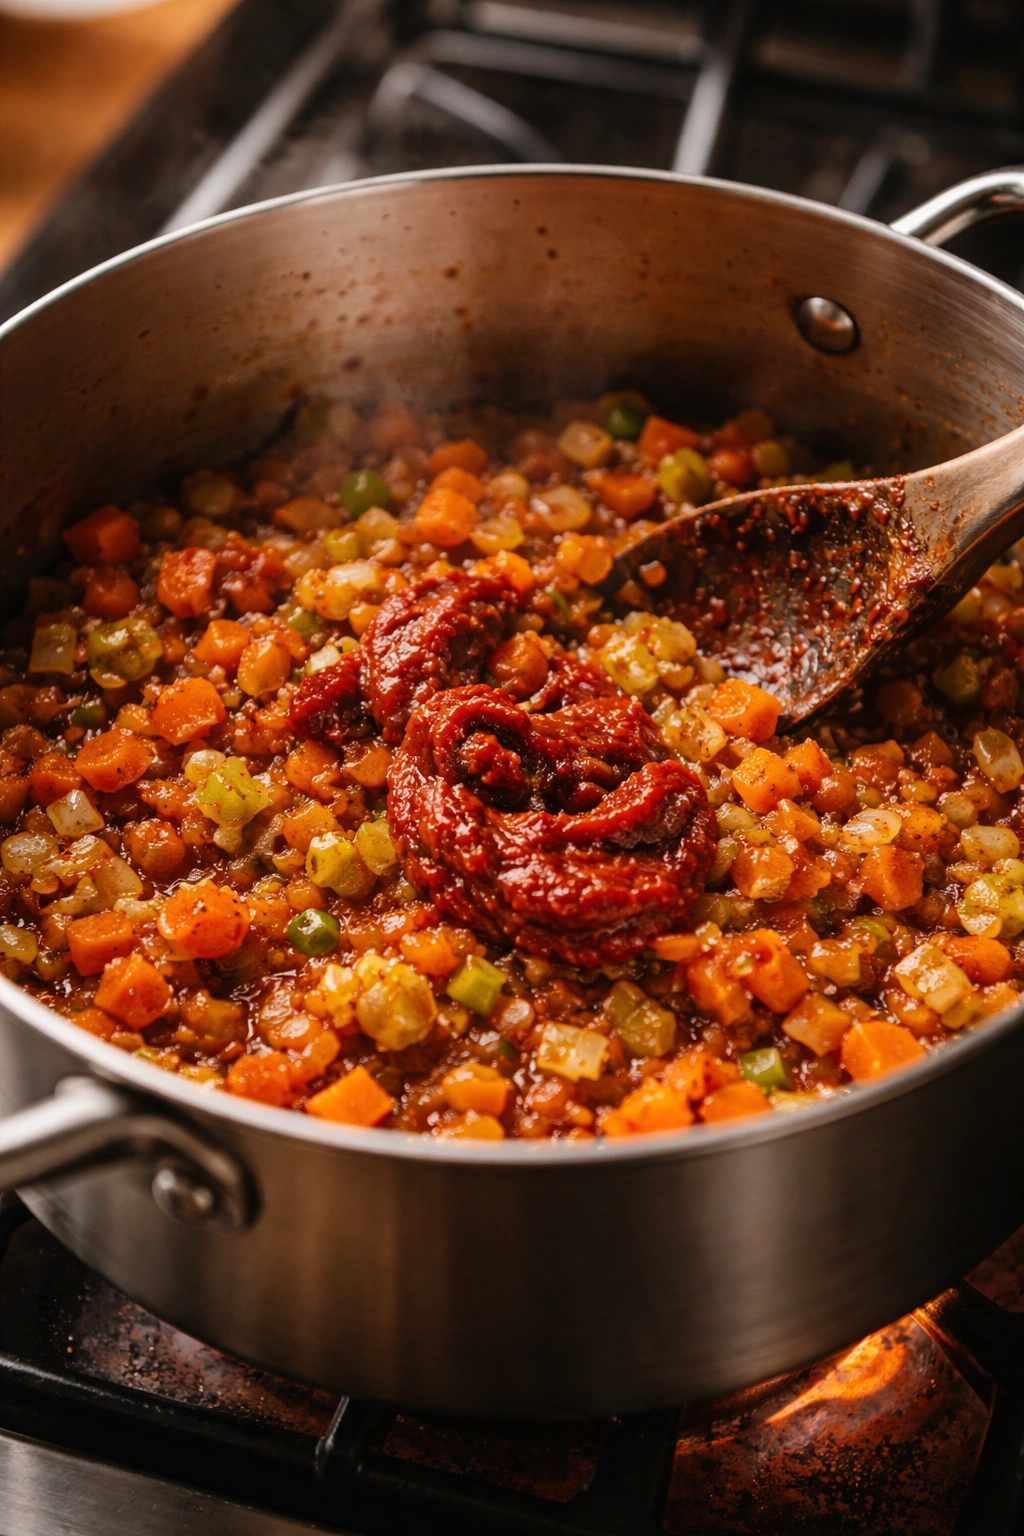
After searing the ribs, the same pot that created that flavorful crust becomes the foundation for your sauce. The browned bits stuck to the bottom—called fond—are pure concentrated flavor, and you’ll scrape them up into your sauce. Before you do that, though, you’ll sauté your aromatics: onions, carrots, celery, and garlic.
Add these vegetables to the same pot you used for searing, using the residual fat and those browned bits. Cook them over medium heat, stirring occasionally, until they’ve softened and begun to brown—about five minutes total. Don’t rush this step; the vegetables are breaking down and releasing their sugars and flavor compounds. This combination of onion, carrot, and celery is sometimes called a mirepoix (or soffritto if you’re thinking in Italian), and it’s the flavor base for countless braised dishes across many cuisines for excellent reason: these three vegetables create a rounded, balanced base of savory flavor.
Once the vegetables have softened, add tomato paste and stir it thoroughly into the vegetables, cooking for another minute. Tomato paste isn’t just a thickener; it adds richness, umami, and a subtle acidity that balances the richness of the beef and wine. It also helps bind the fats and seasonings into a cohesive sauce. Cook it for long enough that the raw edge comes off—you’ll smell the difference, a shift from bright and sharp to deeper and more mellow.
The Wine and Broth: Creating Depth and Complexity

Pour in your braising liquid—a combination of dry red wine and beef broth that will become the cooking medium for your ribs. Use a full-bodied, dry red wine like Cabernet Sauvignon, Merlot, or Côtes du Rhône. Don’t spend money on expensive wine; the New York Times has confirmed what experienced cooks already know: you cannot taste the difference between a discount wine and an expensive one once it’s been cooked for hours. The alcohol evaporates completely during the long braise, leaving behind the complex flavor compounds that give depth and earthiness to the sauce.
As you pour in the wine, use a wooden spoon to scrape up all those flavorful browned bits from the bottom of the pan. This process, called deglazing, dissolves those fond into the liquid, distributing all that concentrated flavor throughout the braising liquid. Stir well, breaking up any clumps of tomato paste, making sure everything is dissolved and combined.
Add your beef broth—use low-sodium broth so you can control the salt level of the final dish. The combination of wine and broth creates a more complex flavor than either one alone would provide. The wine brings fruitiness and earthiness; the broth brings savory, meaty depth. Together, they create something greater than the sum of their parts. Add bay leaves and fresh herbs—thyme and rosemary are classic choices—and stir everything together.
The Braise: Letting Low and Slow Heat Work Its Magic
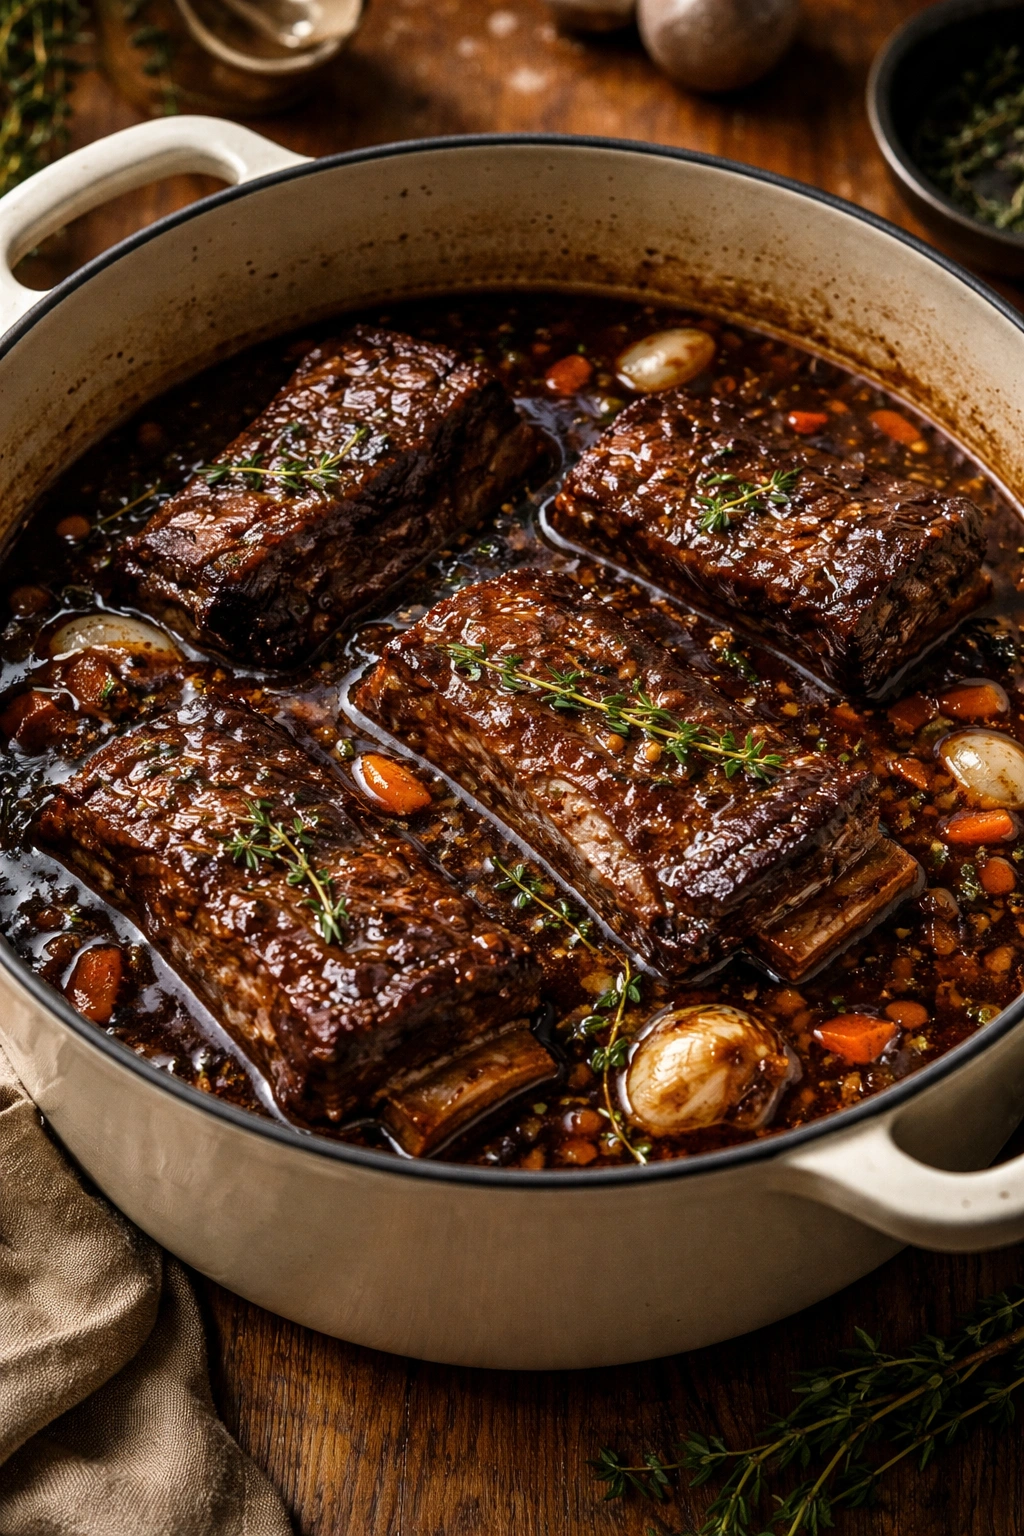
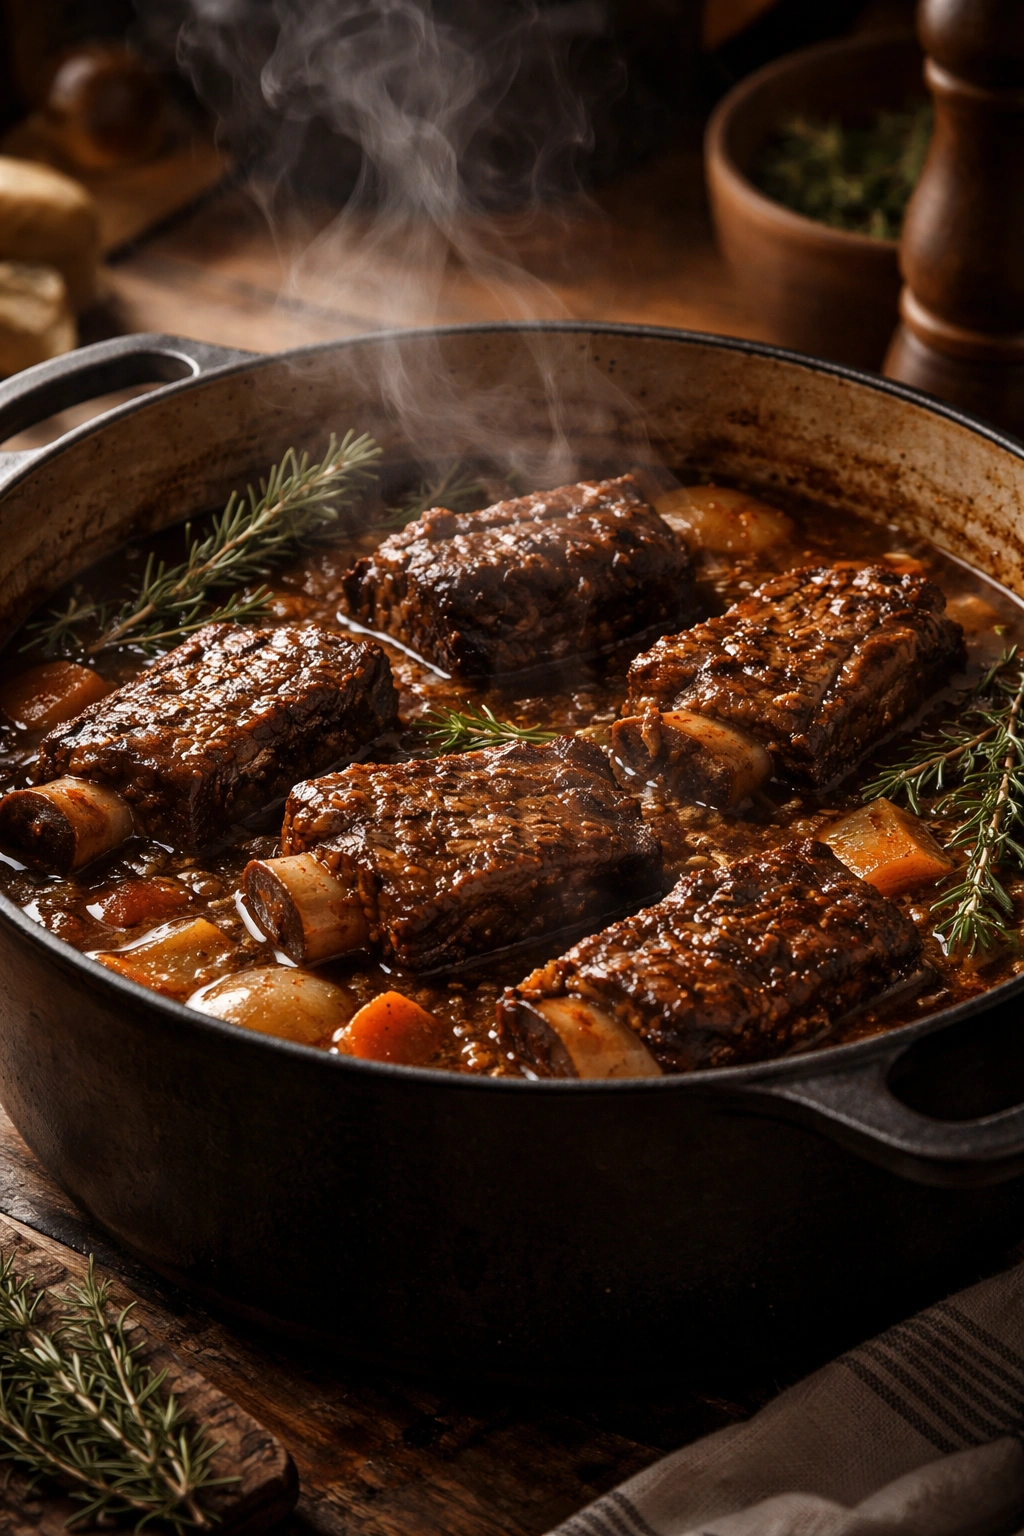
Bring the braising liquid to a boil, then carefully return the seared short ribs to the pot, arranging them so they’re submerged as much as possible. If some pieces stick out above the liquid, don’t worry; the steam in the covered pot will keep those portions moist and they’ll cook beautifully. Cover the pot with a lid and transfer it to a preheated 325°F (160°C) oven.
Now you can step away. The next two and a half to three hours require zero attention from you. This is the genius of braising: you’ve done your work, the oven does the rest, and you’re free to do whatever you need to do to prepare for your guest. Shower, get dressed, set the table, chill the wine, arrange flowers. The ribs are taking care of themselves, slowly becoming more and more tender as the collagen breaks down and the flavors meld and deepen.
The low temperature is essential. A slow, gentle simmer extracts maximum flavor and creates maximum tenderness. High heat would cause the meat to toughen and the liquid to evaporate too quickly. The covered pot maintains a steady, moist environment where the meat can cook gently and evenly. Resist any urge to check on them frequently; every time you open the oven door, you release heat and disrupt the cooking environment. Trust the process.
How to Know When Your Short Ribs Are Perfectly Done

The simple test for doneness is the fork test. Remove the pot from the oven and carefully remove a single rib with tongs or a slotted spoon—be gentle, as these ribs will be extremely tender. Using two forks, try to pull the meat away from the bone. If it parts easily and nearly falls away from the bone under gentle pressure, your ribs are done. If the meat is still holding to the bone with any resistance, return the pot to the oven and check again in fifteen minutes.
You’re looking for meat so tender that it literally falls apart at the gentlest touch. This isn’t an exaggeration; properly braised short ribs will separate from the bone with barely any effort, and the meat will shred easily under light pressure from a fork. This texture is the payoff for all those hours of slow cooking, and it’s what transforms short ribs from tough, chewy meat into something extraordinarily luxurious.
The exact cooking time depends on several variables: the exact size of your ribs, the temperature of your oven (ovens vary), how much liquid you’re using, and the type of pot you’re using. Expect somewhere between two and a half and three and a half hours. High-sided Dutch ovens with tight-fitting lids may cook faster than wider, shallower pans. This is why the fork test is far more reliable than the clock.
Creating the Perfect Pan Sauce
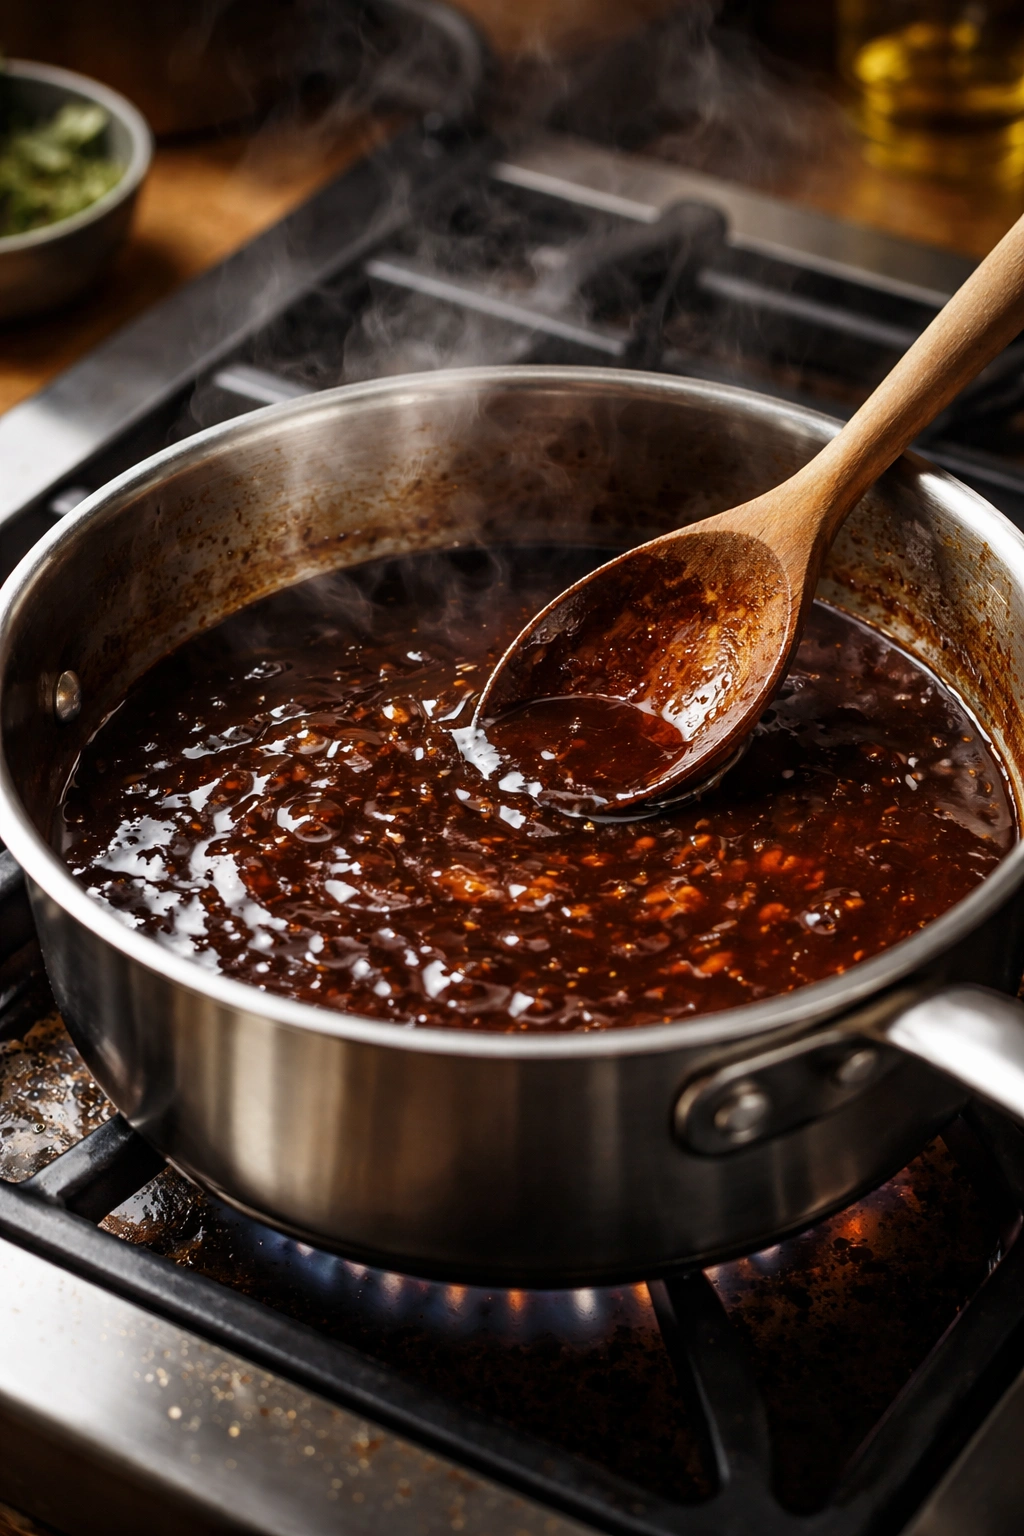
Once your ribs are perfectly tender, carefully remove them from the pot to a serving platter and cover loosely with foil to keep them warm. The braising liquid left behind is now your sauce, but it needs one final step: straining and reducing.
Pour the braising liquid through a fine mesh strainer into another pot, pressing gently on the vegetables with the back of a spoon to extract all the flavorful liquid. Discard the strained solids and herbs. Return the liquid to medium-high heat and let it simmer, uncovered. The goal is to reduce it by about one-third to one-half, which concentrates the flavors and thickens the sauce slightly. This typically takes five to fifteen minutes, depending on how much liquid you have and how vigorously it’s simmering.
As it reduces, taste the sauce and adjust the seasonings. It should be complex, deeply savory, with just a hint of acidity from the wine and tomato. Add salt and freshly ground black pepper to taste. Some cooks like to add a small splash of balsamic vinegar (just a teaspoon or so) to add a subtle sweetness and glossiness to the finished sauce, which gives it that silky, restaurant-quality appearance.
The finished sauce should be thin enough to pour and pool beautifully around the ribs, but with enough body that it coats a spoon for just a moment when you dip it. If it’s too thin, let it continue simmering. If it thickens too much, thin it with a splash of water or additional broth.
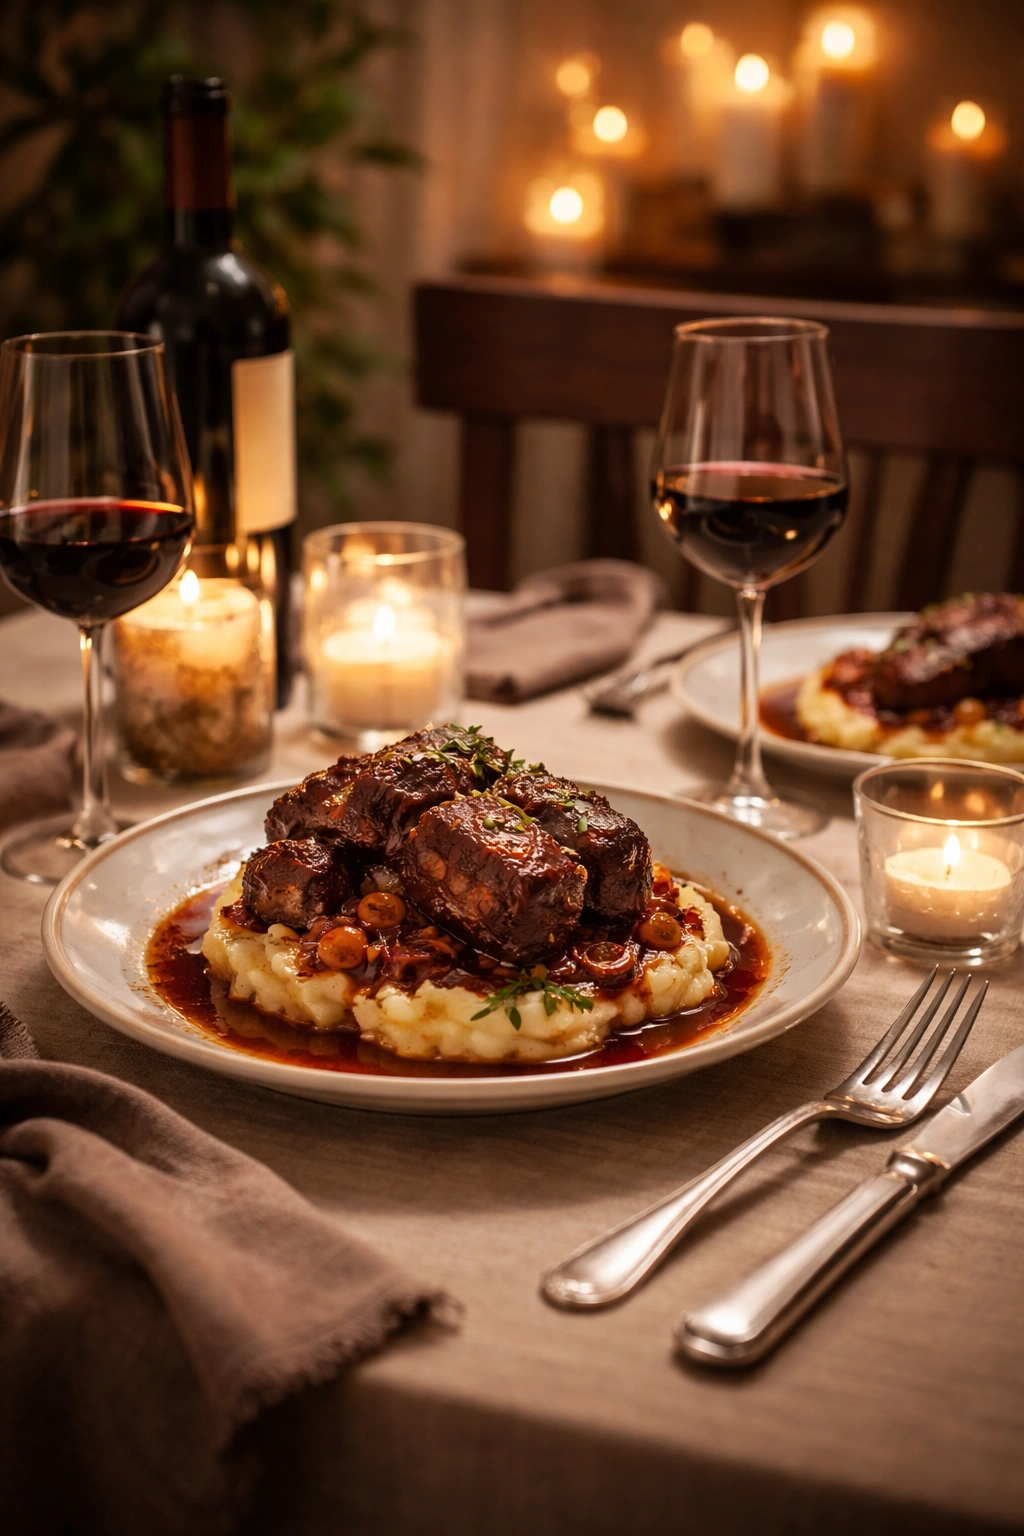
Setting the Stage: Plating and Presentation for Romance
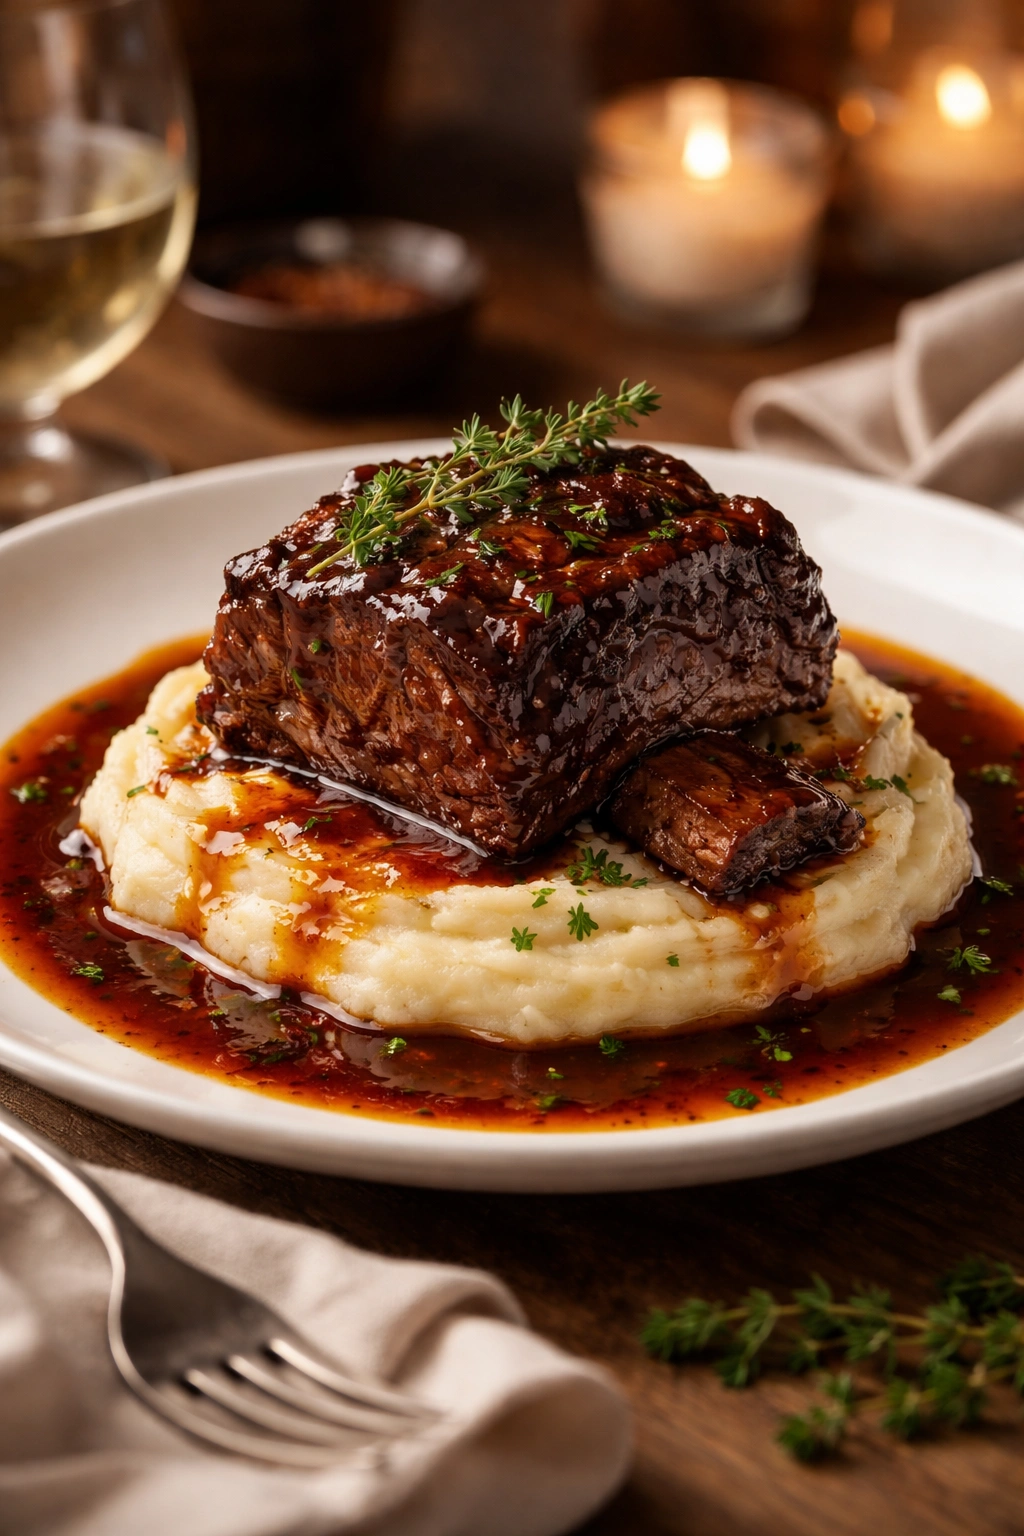
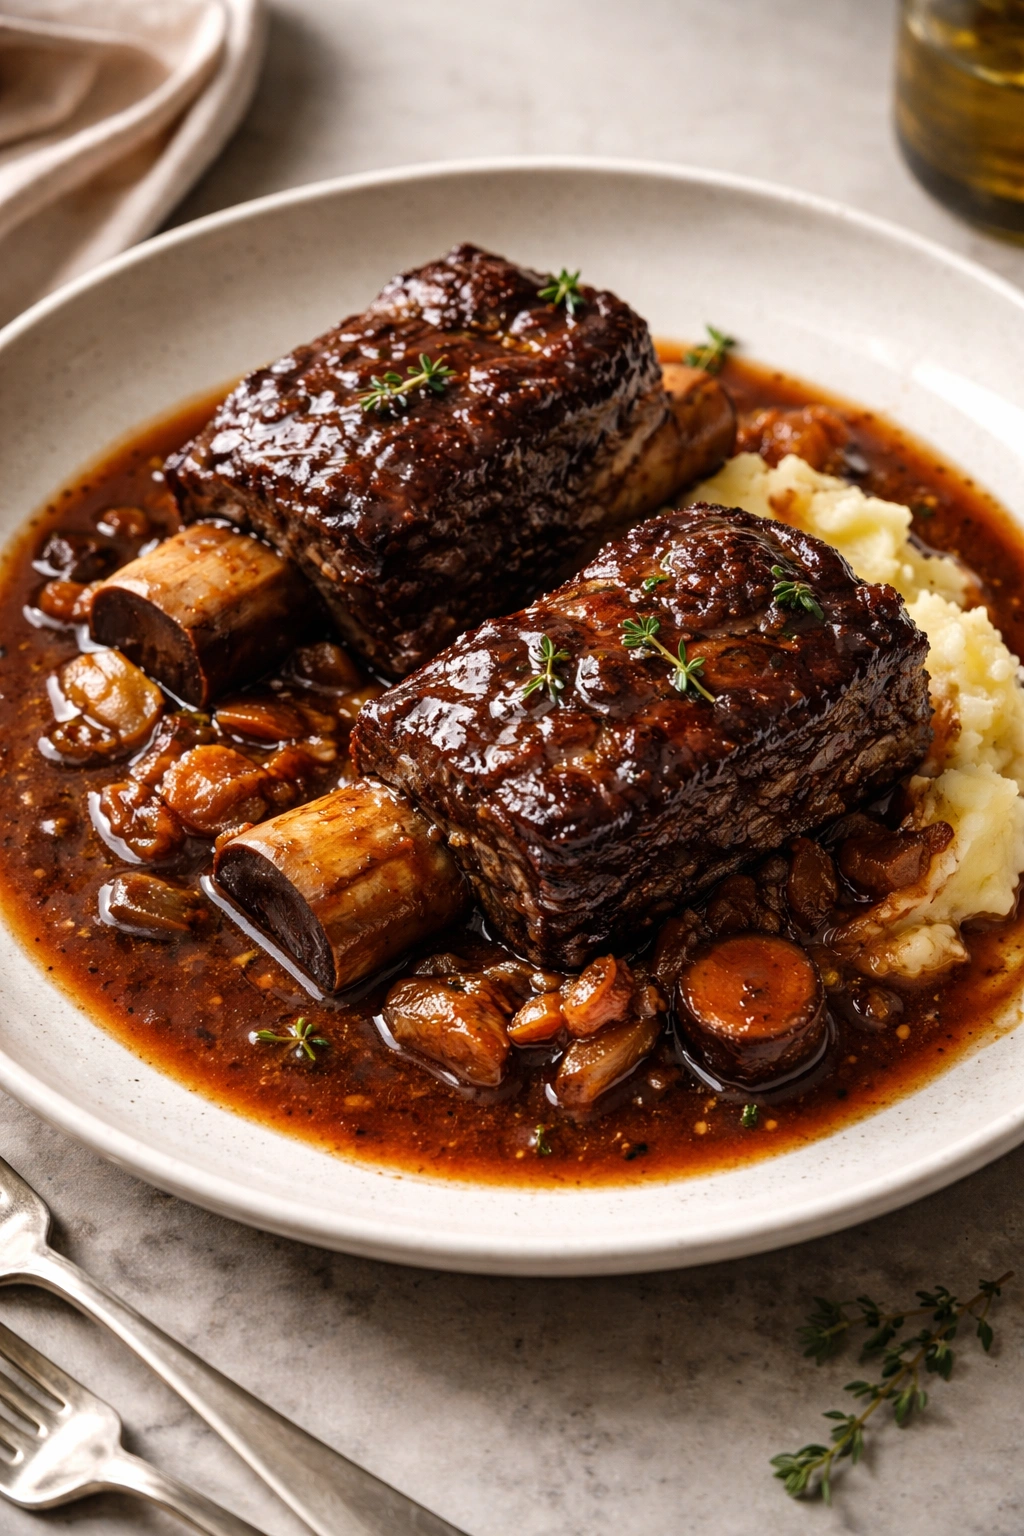
The presentation of braised short ribs is inherently beautiful—you’re not fighting the ingredient here. A single rib, glossy with sauce, sitting on top of creamy mashed potatoes or polenta, looks restaurant-quality with zero additional effort. The bone is rustic and elegant, the meat is an appealing mahogany brown from the braising, and the sauce is rich and dark.
Warm your serving plates in a low oven (around 200°F) for five minutes before plating. Warm plates keep your food at a better temperature and add a subtle luxury to the meal. Place your base—mashed potatoes, polenta, creamy pasta, or rice—on each plate, then carefully position a short rib on top. Spoon the sauce generously over and around the meat, letting it pool slightly on the plate. This isn’t fussy; it’s just showing off what you’ve created, and it’s entirely appropriate for a date night dinner.
Consider a light garnish of fresh chopped parsley for color and a small note of freshness, or a fine grating of lemon zest if you want to add brightness that cuts through the richness. These are optional—the dish is beautiful and complete without them—but they add a professional finishing touch if you have them on hand.
The Art of Make-Ahead Cooking: Stress-Free Entertaining
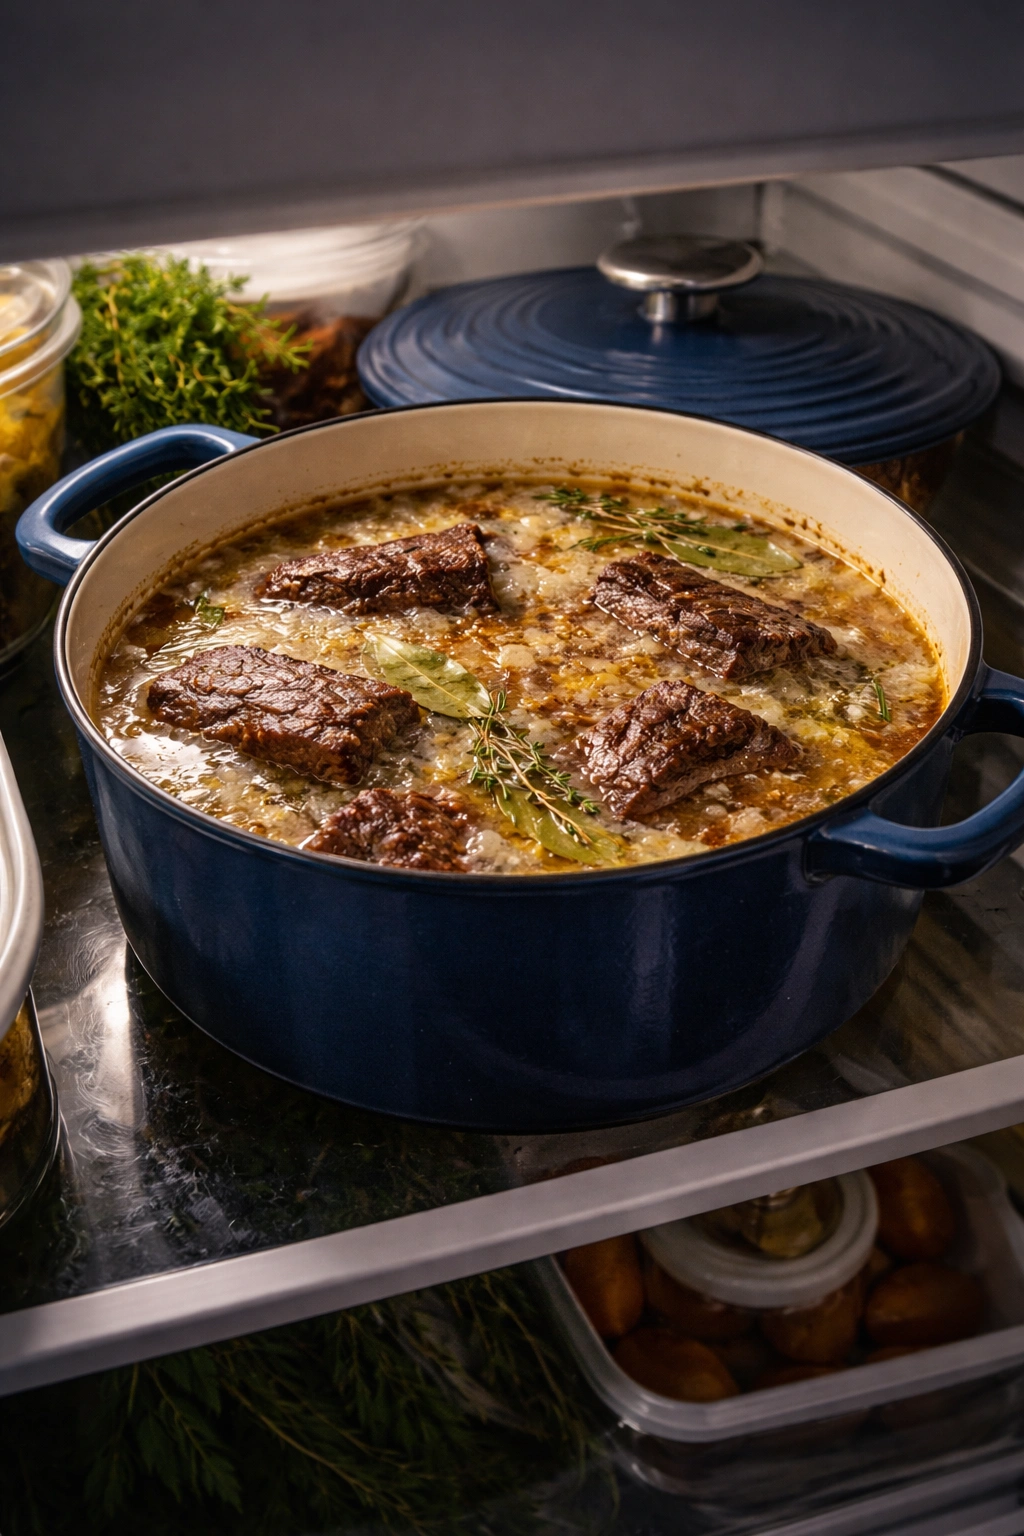
Here’s the secret weapon for date night success with this dish: braised short ribs actually taste better the day after they’re made. The flavors continue to develop and meld as the dish sits overnight. The fat in the sauce solidifies on the surface, making it easy to remove if you want to. And you can prepare the ribs entirely the day before your date, which means your only job on the actual night is reheating them and preparing your side dishes.
Make the short ribs exactly as described, but instead of serving them immediately after they come out of the oven, allow them to cool to room temperature in the pot (about thirty minutes), then cover and refrigerate them overnight in the braising liquid. The next day, remove the pot from the refrigerator thirty minutes before you want to eat. The fat will have solidified on the surface; scrape it off and discard it (or save it for cooking—it’s excellent fat for other uses).
Place the pot on the stovetop over medium-low heat and bring it gently to a simmer. Let it warm through slowly—this typically takes fifteen to twenty minutes. Alternatively, you can transfer the ribs and sauce to a baking dish, cover it with foil, and reheat in a 325°F oven for about thirty minutes. Both methods work beautifully; choose whichever fits your timeline and equipment best.
Yield: Serves 2 (with small leftovers, which are never a bad thing)
Prep Time: 20 minutes
Cook Time: 2 hours 45 minutes to 3 hours 15 minutes
Total Time: 3 hours to 3 hours 35 minutes (plus overnight resting if making ahead)
Difficulty: Beginner to Intermediate — The steps are straightforward, and the most critical skills are patience and proper searing. No special techniques or advanced knife skills required; an ordinary home cook with a Dutch oven can execute this beautifully.
Braised Short Ribs for Two
For the Braise:
- 4 to 5 pounds bone-in beef short ribs (typically 3 to 4 large pieces, cut 2 to 3 inches thick), patted dry and brought to room temperature
- Kosher salt and freshly ground black pepper, to taste
- 3 tablespoons olive oil (divided)
- 1 large yellow or red onion, diced
- 3 medium carrots, peeled and chopped
- 2 celery ribs, chopped
- 4 to 5 garlic cloves, minced
- 2 tablespoons tomato paste
- 1 cup dry red wine (such as Cabernet Sauvignon, Côtes du Rhône, or Merlot)
- 2 cups low-sodium beef broth
- 2 bay leaves
- 3 to 4 fresh thyme sprigs (or 1 teaspoon dried thyme)
- 2 fresh rosemary sprigs (or ½ teaspoon dried rosemary)
- Optional: 1 teaspoon balsamic vinegar, for finishing
For Serving:
- Creamy mashed potatoes, polenta, buttered egg noodles, or rice
- Fresh flat-leaf parsley, chopped (optional, for garnish)
- Fleur de sel or fine sea salt, for finishing
Prepare the Meat and Vegetables:
-
Remove the short ribs from the refrigerator 30 minutes before cooking. Pat them thoroughly dry with paper towels—this is crucial for proper browning. Sprinkle all sides generously with kosher salt and freshly ground black pepper, then set aside to come to room temperature.
-
While the ribs are coming to temperature, prep your vegetables. Dice the onion, chop the carrots and celery into roughly even-sized pieces (about half-inch), and mince the garlic. You’ll use these in just a moment.
-
Preheat your oven to 325°F (160°C). Position the oven rack in the lower-middle position to accommodate a covered Dutch oven.
Sear the Short Ribs:
-
Heat 1½ tablespoons of the olive oil in a large, heavy-bottomed Dutch oven over medium-high heat. Once the oil is shimmering and nearly smoking, carefully add the short ribs in a single layer—work in batches if your pot isn’t large enough to fit all of them without crowding. Do not crowd the pan; each rib needs direct contact with the hot surface to brown properly.
Advertisements -
Sear the ribs undisturbed for about 45 seconds to 1 minute per side, developing a deep golden-brown crust on all surfaces. This will take about 5 to 7 minutes total per batch. The color should be a rich, mahogany brown, not pale or only lightly golden. Once all sides are seared, transfer the ribs to a clean plate and set aside.
Build the Sauce Base:
-
Reduce the heat to medium. Add the remaining 1½ tablespoons olive oil to the pot, then add the diced onion, chopped carrots, and celery. Cook, stirring occasionally, for about 5 minutes, until the vegetables have begun to soften and brown slightly at the edges. You’re looking for the vegetables to release their natural sugars and develop a bit of color.
-
Stir in the minced garlic and cook for about 1 minute, until fragrant.
-
Add the tomato paste and stir it thoroughly into the vegetables, making sure it’s well combined. Cook for 1 additional minute, stirring constantly, until the raw edge comes off the tomato paste and it deepens in color slightly.
Deglaze and Add Braising Liquid:
-
Pour in the red wine, stirring with a wooden spoon and scraping up all the flavorful browned bits from the bottom of the pot. These browned bits, called fond, are concentrated flavor and should not be left behind. Let the wine simmer for about 2 minutes, allowing some of the sharp alcohol flavors to cook off and the wine to reduce slightly.
-
Add the beef broth, bay leaves, thyme sprigs, and rosemary sprigs. Stir well until everything is combined. Taste the liquid and adjust the salt and pepper if needed—it should taste savory and balanced.
Braise in the Oven:
-
Return the seared short ribs to the pot, arranging them so they’re submerged in the braising liquid as much as possible. If some pieces stick out above the liquid, that’s fine; the steam in the covered pot will keep those portions moist. Bring the liquid to a boil over medium-high heat on the stovetop—this should take about 3 to 5 minutes.
Advertisements -
Cover the pot with a tight-fitting lid and transfer it to the preheated 325°F oven. Cook for 2 hours 45 minutes to 3 hours 15 minutes, or until the meat is fall-apart tender. Check for doneness by carefully removing one rib with a slotted spoon and testing it with two forks; the meat should separate from the bone with just gentle pressure.
Remove the Ribs and Make the Sauce:
-
Carefully remove the pot from the oven (the handle will be hot). Using a slotted spoon or tongs, gently transfer the short ribs to a serving platter or shallow bowl, being careful to keep the meat intact. Don’t worry if a bone separates from the meat; this is a sign the ribs are perfectly cooked. Cover loosely with foil to keep warm while you finish the sauce.
-
Strain the braising liquid through a fine mesh strainer into another pot or large measuring cup, pressing gently on the vegetables and herbs with the back of a spoon to extract all the liquid. Discard the strained solids and herbs.
-
Return the strained braising liquid to the Dutch oven or a saucepan and bring it to a simmer over medium-high heat. Let it reduce, uncovered, for about 5 to 15 minutes, until it has thickened slightly and reduced by about one-third. You’re looking for a sauce that coats a spoon lightly but still pours easily. Taste it and adjust the seasoning with salt and freshly ground black pepper. If desired, add 1 teaspoon of balsamic vinegar for a subtle sweetness and glossiness.
Plate and Serve:
- Warm your serving plates in a 200°F oven for 5 minutes. Divide your chosen base (mashed potatoes, polenta, etc.) between the two plates, then carefully position the short ribs on top. Spoon the sauce generously over and around the ribs, allowing it to pool slightly on the plate. Garnish with chopped fresh parsley if desired, and serve immediately while everything is hot.
Troubleshooting: Common Questions and Solutions
My ribs are still tough after three hours. This happens occasionally, usually because the oven temperature wasn’t quite hot enough or because you have very large pieces of meat. Return the pot to the oven and check again in thirty minutes. Some pieces of beef just need more time; there’s no shame in cooking them longer. The braising method is very forgiving—you can’t overcook them to the point of dryness because they’re cooking in liquid.
The sauce is too thin. Don’t panic; this is easily fixed. After you’ve removed the ribs, simply continue simmering the sauce over medium-high heat for longer than specified, until it reaches the consistency you want. You can reduce it by quite a bit without negative consequences—in fact, some restaurants reduce their braising liquids until they’re almost syrupy.
The sauce is too thick or gelatinous when cold. This is actually perfect; it means your braising liquid is rich with gelatin from the bones and connective tissue. Simply reheat it gently and it will become pourable again. This is not a problem; it’s a sign you’ve done everything right.
Can I use boneless short ribs instead? Yes, though bone-in ribs are superior because they contribute more flavor to the braising liquid and create a more impressive presentation. If using boneless ribs, they will cook slightly faster—check for doneness at around 2 hours 15 minutes instead of 2 hours 45 minutes.
Storage, Reheating, and Make-Ahead Magic
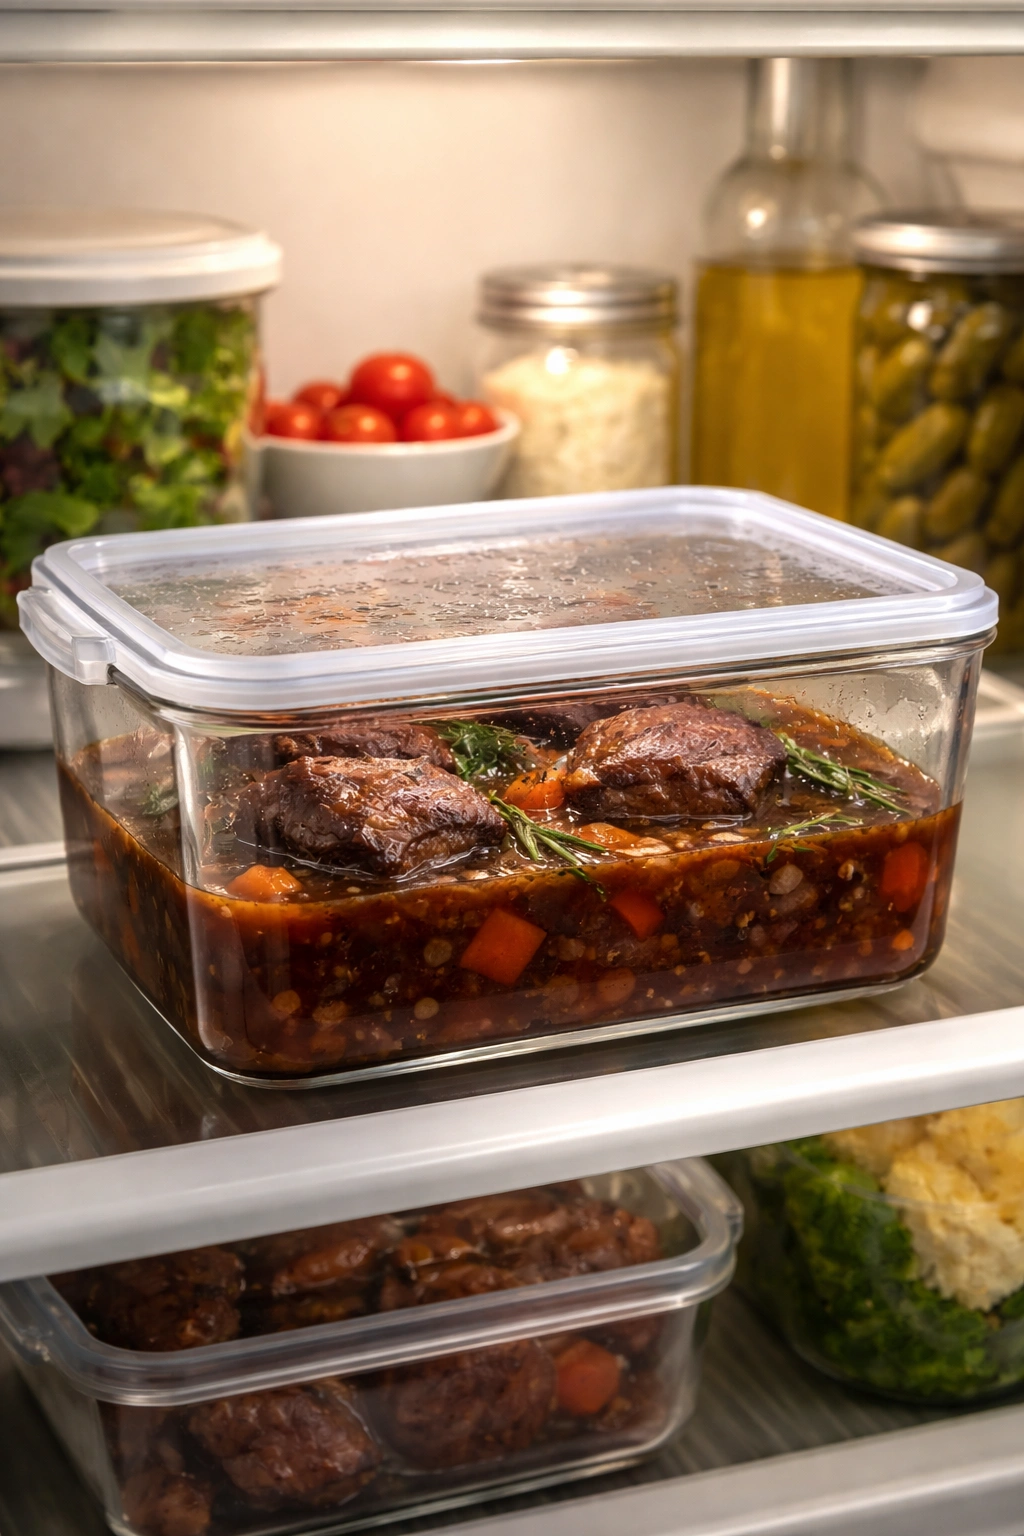
Making ahead: Braised short ribs are one of the best make-ahead dishes you can prepare. In fact, they taste even better the day after cooking, once the flavors have had time to meld further. Make the complete dish as described, allow it to cool to room temperature (about thirty minutes), then cover and refrigerate in the braising liquid for up to three days. The fat will solidify on the surface, making it easy to remove.
Reheating: Remove the pot from the refrigerator and allow it to sit at room temperature for about thirty minutes. Scrape off and discard the solidified fat from the surface. Place the pot over medium-low heat and bring the ribs and sauce to a gentle simmer, which typically takes fifteen to twenty minutes. Alternatively, transfer everything to a baking dish, cover with foil, and warm in a 325°F oven for about thirty minutes. Both methods restore the ribs to just-cooked perfection.
Freezing: Cool the dish completely, then transfer the ribs and sauce to a freezer-safe container. They’ll keep frozen for up to three to four months. Thaw overnight in the refrigerator, then reheat using the methods above.
Leftovers: While braised short ribs make for lovely leftovers (shredded and warmed gently in the remaining sauce), you likely won’t have many when you’re serving this for two. If you do, they’re extraordinary shredded into buttered noodles or spooned over creamy polenta the following night.
Variations and Adaptations
Without wine: If you prefer not to cook with wine, substitute an additional 1 cup of low-sodium beef broth for the wine, and add 1 tablespoon of Worcestershire sauce to the braising liquid for depth and umami. Cook exactly as directed; the ribs will be just as tender, though the sauce will taste slightly less complex.
Asian-inspired version: Substitute the red wine with a combination of low-sodium beef broth and soy sauce (about 1 cup broth to ½ cup soy), and add a 2-inch piece of fresh ginger (sliced), 3 scallions (chopped), and 2 tablespoons of brown sugar to the braising liquid. The result is a savory-sweet, aromatic braise that’s a delightful departure from the classic French preparation but equally impressive and romantic.
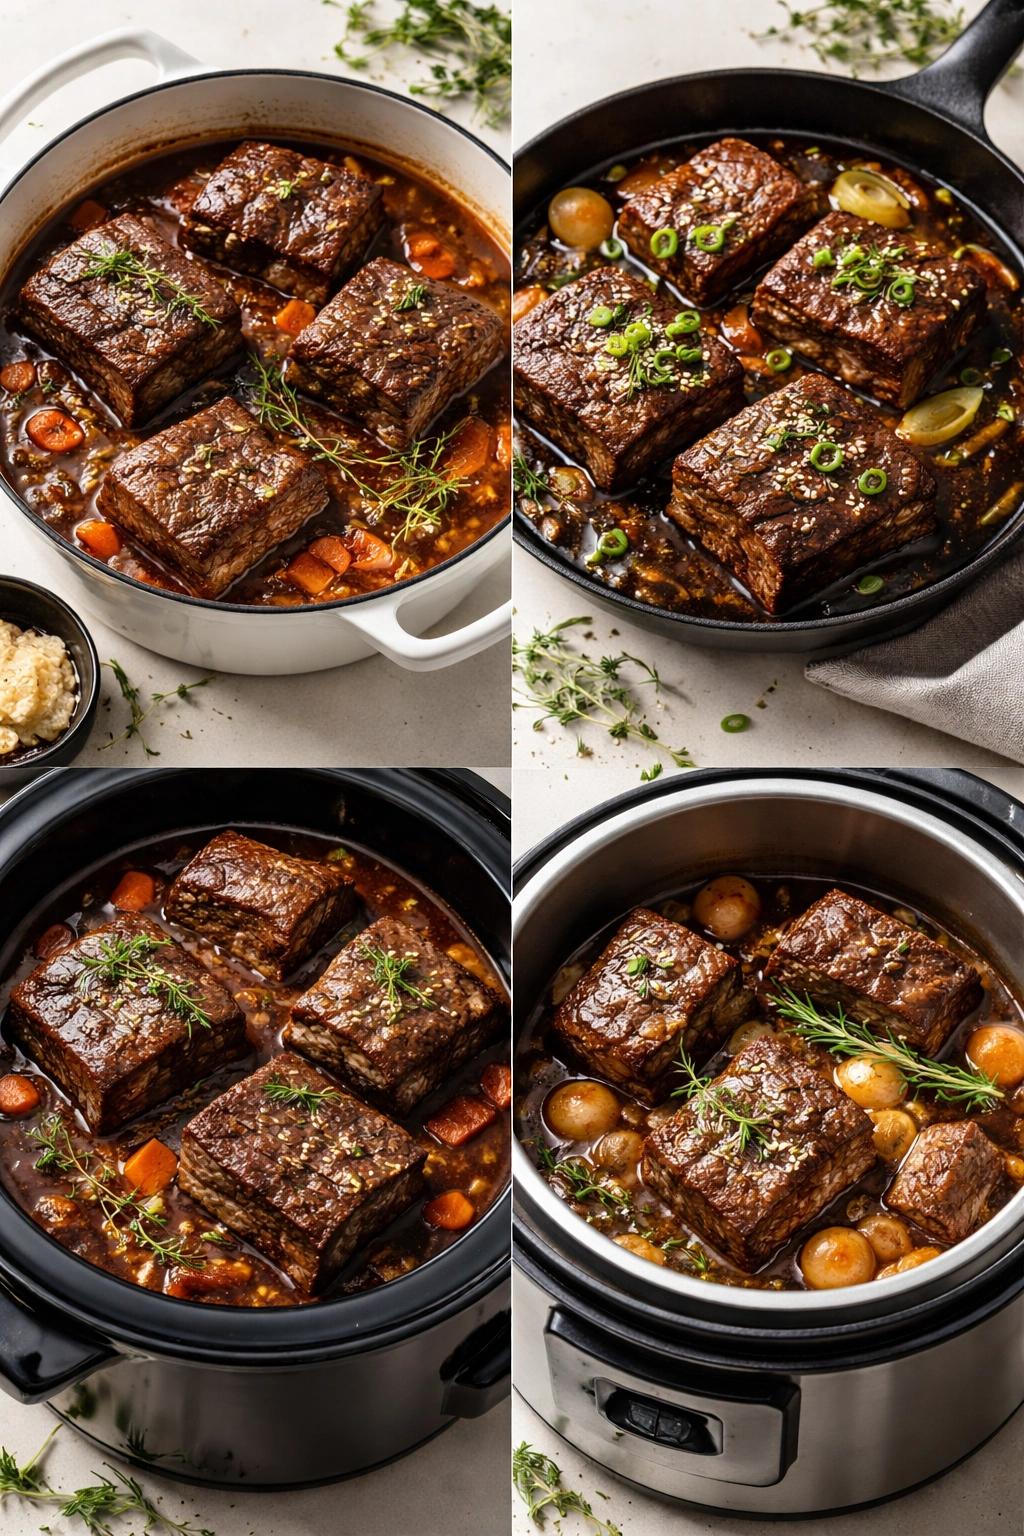
Slow cooker method: Brown the ribs and prepare the sauce base as instructed, then transfer everything (ribs, vegetables, and braising liquid) to a slow cooker. Cook on low for 6 to 8 hours, until the meat is fall-apart tender. Finish the sauce by simmering it on the stovetop (as described in the main recipe) to reduce and concentrate the flavors.
Pressure cooker or Instant Pot: Sear the ribs and prepare the sauce base as instructed, then cook under high pressure for 45 minutes. Allow the pressure to release naturally for 15 minutes, then carefully remove the lid. Finish the sauce exactly as described in the main recipe. The results are nearly identical to oven-braising, just much faster.
Perfect Sides and Beverage Pairings

Braised short ribs are rich and deeply savory, which means they pair beautifully with creamy, buttery starches that act as a perfect foil for all that sauce. Creamy mashed potatoes are the classic choice—buttery, smooth, and perfect for soaking up every drop of sauce. Creamy polenta offers a luxurious, almost silky base that feels special and restaurant-quality. Buttered egg noodles or pappardelle offer another elegant option; toss them lightly with butter and fresh herbs, then arrange the ribs on top.
For vegetables, keep them simple and light to balance the richness of the ribs. Sautéed green beans with garlic, roasted asparagus, or a simple bitter green salad with a bright vinaigrette all work beautifully. You’re not trying to compete with the ribs; you’re creating balance and adding texture contrast.
For wine, obviously you’ll want to drink something similar to what you braised with. A Cabernet Sauvignon, Merlot, or Côtes du Rhône—the same wine you used in the pot—will be perfect alongside the finished dish. Full-bodied reds with good acidity are ideal; the acidity cuts through the richness of the sauce beautifully and keeps your palate fresh between bites. If your guest prefers white wine, a full-bodied Burgundy or aged white Bordeaux would work, though red is genuinely the better choice here.
Final Thoughts
There’s real magic in a meal that tastes like it required far more effort than it actually did. Braised short ribs are the ultimate expression of that magic—a dish that feels elevated and impressive, that smells incredible throughout your home, that presents beautifully on the plate, yet asks so little of you in terms of active work or timing sensitivity. You brown the meat, add liquid, slide it in the oven, and then you’re completely free to prepare for your guest, get ready, set the table beautifully, and actually enjoy the anticipation of the evening instead of panicking in the kitchen.
The tenderness of properly braised short ribs is something that can’t be rushed or replicated with faster cooking methods. It’s the reward for respecting the ingredient and the process—for understanding that some of the best results come from time, gentle heat, and patience. And that patience, combined with a simple but flavorful braising liquid and a beautiful presentation, creates something that will genuinely impress anyone sitting across from you.
Make this dish with confidence. You’re not reinventing the wheel; you’re executing a classical cooking technique that’s been perfected over decades. The method works because it’s designed to work. All you need to do is follow the steps, trust the process, and then enjoy the evening and the company. The ribs will take care of the rest.