There’s something magical about the intersection of buttery cookies and crushed candy canes. The way the peppermint melts on your tongue, how those festive red and white shards catch the light as they bake into the dough—it transforms a simple sugar cookie into something that tastes like the holidays themselves. These cookies are the kind that make people ask for the recipe, the kind that disappear from cookie platters first, and honestly, the kind that remind you why holiday baking matters in the first place.
Candy cane cookies walk that beautiful line between nostalgic and sophisticated. They’re not overly complicated, but they’re not boring either. When you nail them—and you will—they deliver that satisfying snap when you bite into them, followed by a cool peppermint burst that lingers just long enough to make you reach for another one. The candy cane pieces do double duty: they add visual interest while they’re baking, and then they infuse the whole cookie with that signature holiday flavor.
What makes these cookies special isn’t just the flavor combination, though that’s certainly part of it. It’s the technique—understanding how to work with candy canes so they add crunch without burning, how to shape the dough so the cookies stay thick and tender in the center, and how to time everything so that the candy cane topping sets perfectly into the hot cookie. This guide will walk you through all of it, plus some variations and make-ahead strategies that’ll make your holiday baking feel manageable instead of stressful.
Why Candy Cane Cookies Win at Holiday Time

These cookies hit differently than your standard holiday bake. There’s the immediate visual appeal—those red and white pieces scattered across pale sugar cookies create genuine festive charm without feeling overdone. But beyond looks, there’s the flavor profile that just works. Peppermint isn’t heavy or overpowering when it’s baked into a cookie; instead, it becomes something more subtle and sophisticated than you’d expect from a candy-inspired treat.
The psychology of candy cane cookies matters too. People instantly connect them to December, to warm gatherings, to traditions they hold close. You’re not just offering someone a cookie; you’re offering them a memory, a moment of comfort, a taste of season. That’s why these cookies work as gifts, as party centerpieces, as part of a holiday spread, or simply as something you make for yourself on a cold afternoon when you need a little seasonal cheer.
The Practical Holiday Baker’s Angle
From a baker’s perspective, candy cane cookies are genuinely forgiving. Unlike some holiday cookies that demand precision or finicky techniques, these ones are cooperative. The dough is straightforward—no tempering, no elaborate lamination, no equipment you don’t already have. The flavor is built into the recipe itself, which means less room for error than decorating with icing (which can crack, slide, or refuse to set at inconvenient moments). You’re essentially making a sugar cookie base and letting the candy canes do the work.
They also scale beautifully for batch-baking season. Need a dozen cookies for tonight? This recipe makes them. Need three dozen for your holiday party next week? The dough freezes exceptionally well, and you can bake from frozen with minimal time adjustment. That flexibility is worth its weight in crushed candy canes.
The Heritage of Peppermint Cookies in Holiday Baking

Candy canes themselves have been a winter tradition since the 1600s, originally created in Germany as a way to keep children quiet during long Christmas services—a peppermint-flavored stick they could suck on. Over centuries, candy canes became embedded in holiday culture worldwide, so it makes perfect sense that home bakers eventually started incorporating that iconic flavor and appearance directly into their cookies.
Peppermint cookies as a category gained serious popularity in the mid-20th century, as home baking became more of a leisure activity and holiday entertaining became a bigger part of American celebration culture. The combination of peppermint and chocolate emerged as perhaps the most famous variation, but candy cane cookies specifically—the ones that embed actual pieces of candy cane directly into the dough—represent a slightly more playful, visually interesting approach.
What’s beautiful about this particular tradition is that it works across cultures and generations. It doesn’t require obscure ingredients or specialized equipment. A home baker with basic supplies and a willingness to invest a little time can produce cookies that look like they came from a professional bakery. That accessibility is part of why these cookies have remained a holiday staple.
Choosing Your Candy Cane Crunch: Crushed vs. Chopped

This decision matters more than you might think. Candy canes come in different sizes and thicknesses depending on where you buy them, and how you treat them changes the final result. Some recipes call for finely ground candy cane (almost a powder), while others ask for chunky pieces. The best approach for cookies specifically is what I call a medium chop—pieces that are roughly the size of small peas or lentils.
Why this matters: tiny powder-fine pieces dissolve too much during baking and just tint the dough without giving you those satisfying crunch moments. Pieces that are too large don’t distribute evenly through the dough, and you’ll get some cookies loaded with candy cane and others that taste barely peppermint-flavored at all. The medium size is the goldilocks zone where they stay mostly intact, distribute relatively evenly, and give you real texture contrast.
The Best Way to Crush Candy Canes
The most reliable method is a combination of techniques. First, unwrap your candy canes and place them in a sturdy plastic bag—freezer bags work perfectly. Let them sit in the freezer for at least two hours. Cold candy canes are dramatically easier to break without shattering into dust. Once they’re well-chilled, pound them with a meat mallet or the bottom of a heavy pot. You want controlled force, not a frantic mashing.
Alternatively, use a food processor fitted with the pulse function. Pulse the frozen candy canes 4-5 times in short bursts—do not process continuously, which will create powder. You can also use a mortar and pestle if you’re patient, though this works better in batches of 2-3 candy canes at a time.
After crushing, spread the pieces on a baking sheet and pick through them. Remove any extra-large shards (save them for garnish on the finished cookies if you like) and discard any fine powder. What remains—the medium-sized pieces—is what goes into your dough. This extra step takes maybe five minutes and makes a noticeable difference in your final cookies.
Serving and Timing Info

Yield: Makes 24 to 30 cookies
Prep Time: 20 minutes (plus 30 minutes chilling time)
Cook Time: 10 to 12 minutes per batch
Total Time: 1 hour 15 minutes active + cooling time (cookies cool for about 10-15 minutes on the baking sheet, then transfer to a wire rack)
Chill/Rest Time: Dough requires at least 30 minutes in the refrigerator before baking; overnight refrigeration is ideal for easier handling and better shape retention
Best Served: Immediately or within 24 hours while the candy cane pieces still have some snap and the cookies are fresh; storage instructions follow below
Difficulty: Intermediate — No special equipment is required, but the shaping technique matters, and the candy cane topping requires timing awareness. Even a first-time cookie baker can succeed with attention to the details covered in the tips section.
Ingredients
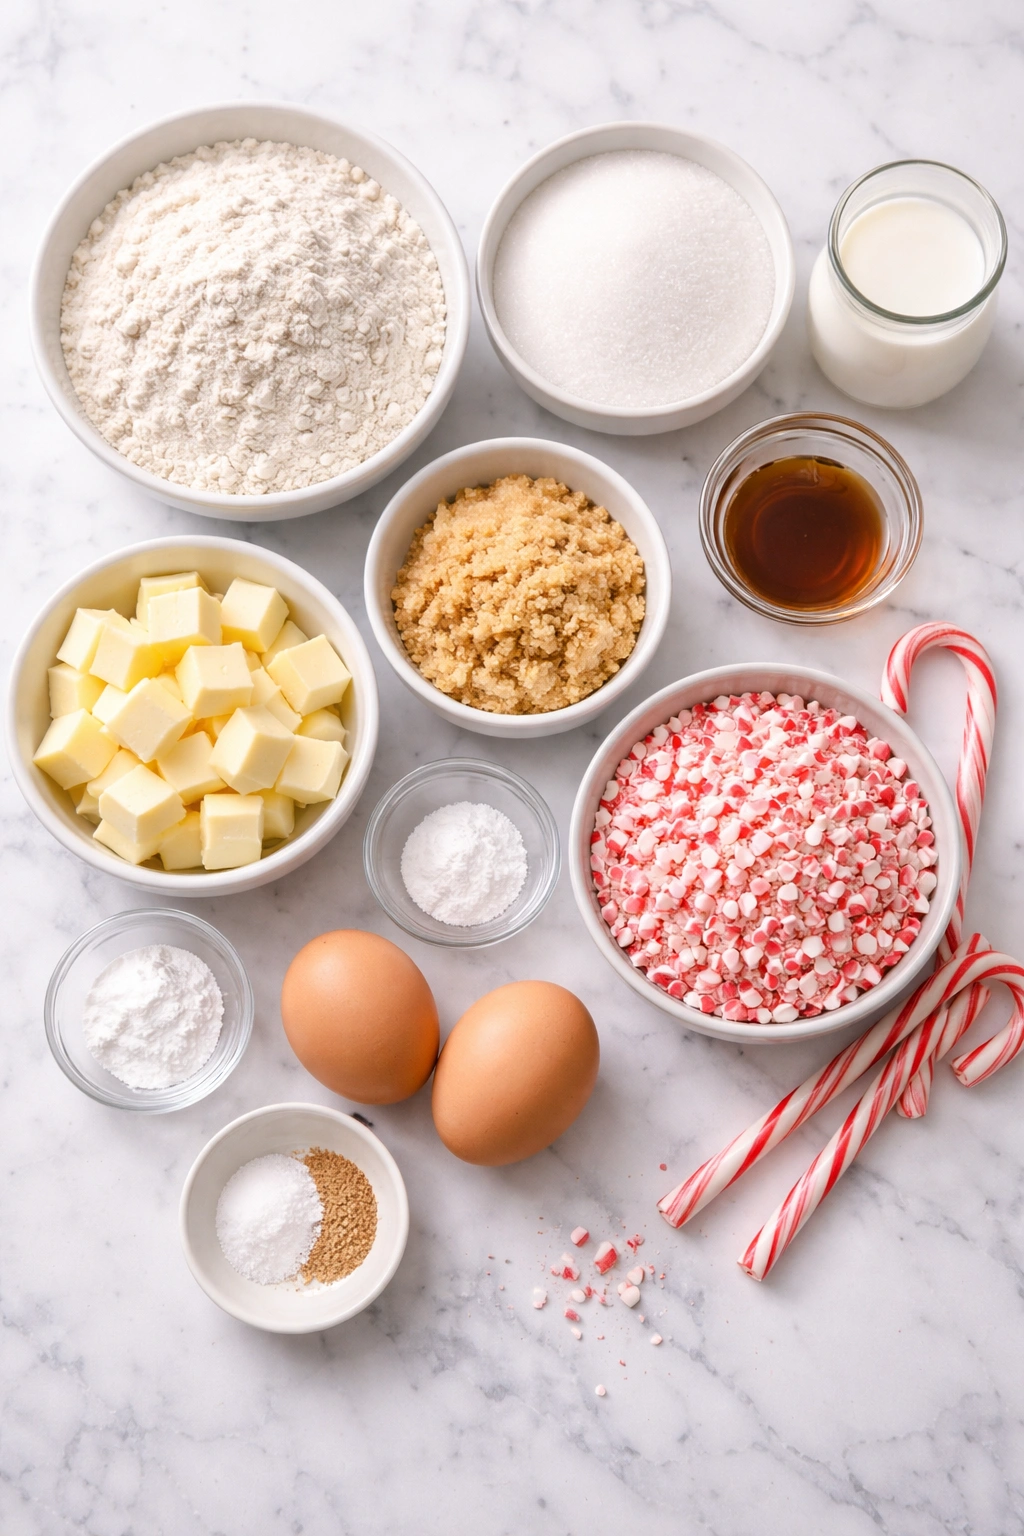
For the Cookie Dough:
- 2¼ cups all-purpose flour
- ½ teaspoon baking soda
- ½ teaspoon fine sea salt
- 1 cup (2 sticks) unsalted butter, softened to room temperature
- ¾ cup granulated sugar
- ¼ cup packed light brown sugar
- 1 large egg, room temperature
- 1 teaspoon pure vanilla extract
- ½ teaspoon peppermint extract (optional but recommended—it deepens the flavor without making the dough taste medicinal)
- ¾ cup crushed candy canes (about 6 to 8 full-size candy canes, medium chop as described above), divided in half
For the Topping:
- ¼ cup crushed candy canes (the remaining half from above)
- 1 tablespoon coarse or decorating sugar (optional; adds sparkle without affecting flavor)
Substitution Notes:
- If you can’t find or don’t want to use peppermint extract, substitute an equal amount of almond extract for a different but equally festive flavor, or simply omit it and rely on the crushed candy canes for peppermint flavor
- Dairy-free butter works well here in a 1:1 swap; use cultured dairy-free butter if possible, as it tends to have a richer flavor and better creaming ability than standard dairy-free options
- For gluten-free baking, use a 1:1 gluten-free all-purpose flour blend with xanthan gum already included (or add ¼ teaspoon xanthan gum to regular gluten-free flour); the dough will be slightly stickier, but the final cookies taste identical
Instructions
Prepare the Candy Canes and Chill the Dough:
-
Unwrap 6 to 8 candy canes and place them in a sturdy freezer bag. Freeze for at least 2 hours until very hard and brittle.
-
Remove the frozen candy canes from the freezer and crush them using a meat mallet, heavy pot bottom, or food processor (pulsed briefly). Aim for medium-sized pieces roughly the size of lentils—not powder, not large shards. You should have roughly ¾ cup total crushed candy cane. Divide this in half: ½ cup to fold into the dough, ¼ cup reserved for topping.
-
In a small bowl, whisk together the flour, baking soda, and salt. Set aside.
-
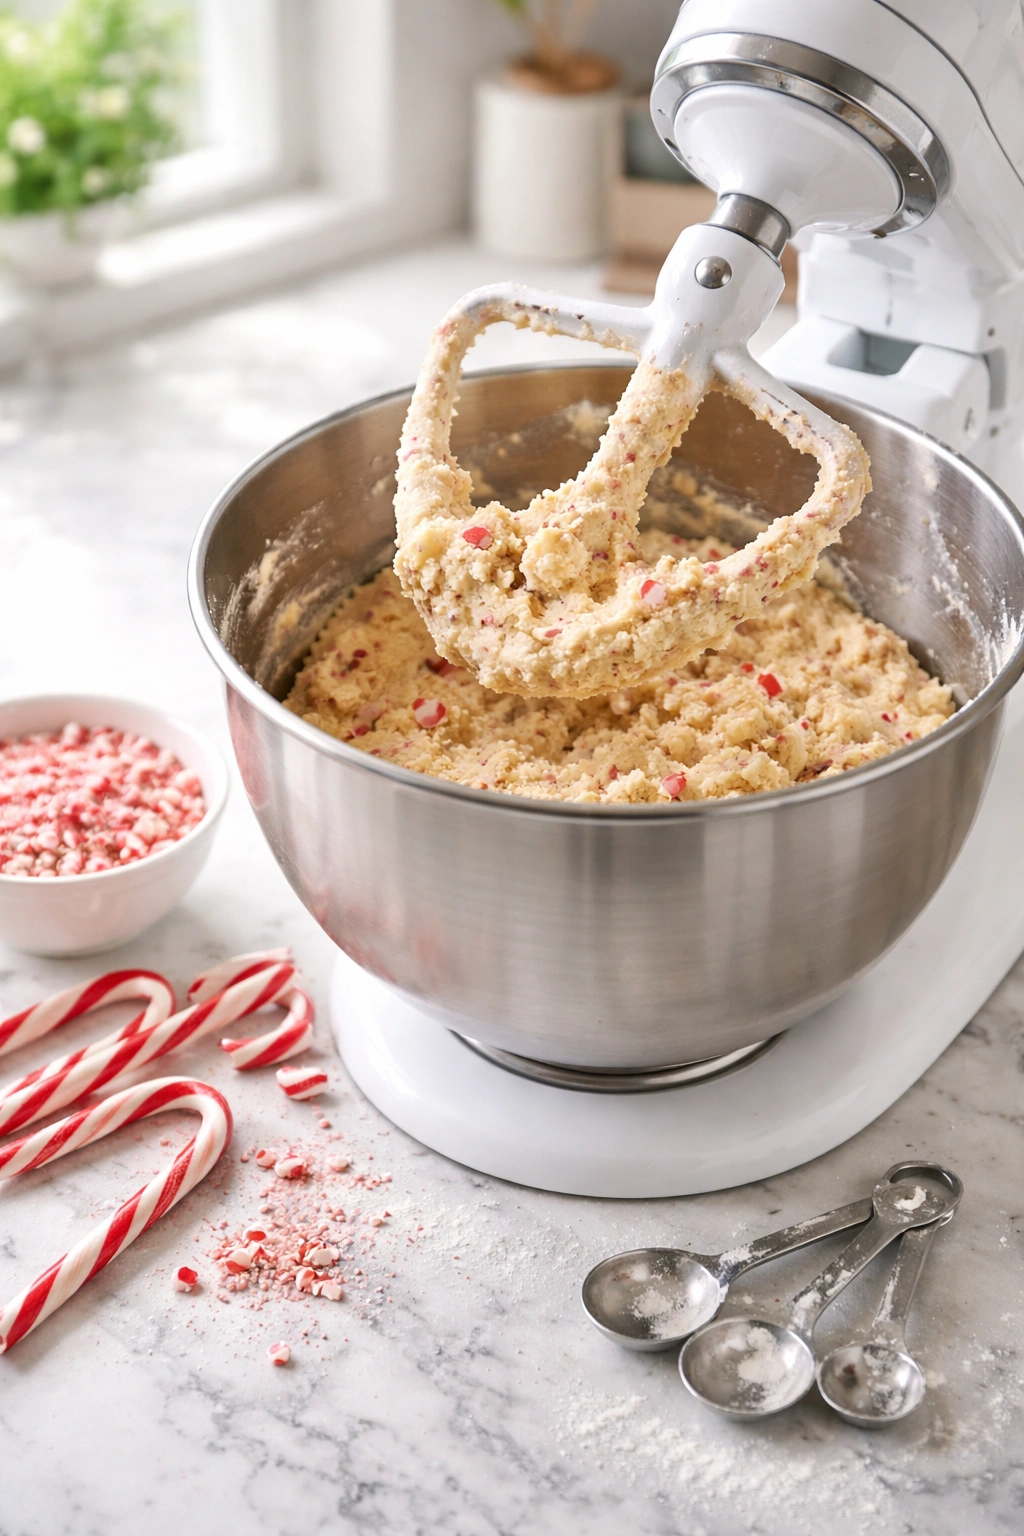
In a large mixing bowl, using a stand mixer fitted with the paddle attachment (or a hand mixer), beat the softened butter with both sugars on medium speed for 3 to 4 minutes, until the mixture is pale, noticeably fluffy, and increased in volume.
Advertisements -
Add the egg and vanilla extract, beating for 1 minute until fully incorporated. Scrape down the sides of the bowl. If using peppermint extract, add it now and beat for another 30 seconds.
-
Reduce the mixer to low speed. Add the flour mixture in two additions, mixing only until each addition just disappears into the dough. Do not overmix—overworking the dough develops gluten and will make the cookies tough instead of tender.
-
Remove the bowl from the mixer and fold in the ½ cup of crushed candy canes by hand using a rubber spatula. Use gentle, deliberate folds to distribute the pieces evenly without crushing them further.
-
Cover the dough with plastic wrap and refrigerate for at least 30 minutes. (Overnight refrigeration is ideal; cold dough is much easier to handle and produces cookies with better shape retention.)
Shape and Prepare for Baking:
-
Preheat your oven to 325°F (165°C) and position the rack in the center of the oven.
-
Line two baking sheets with parchment paper or silicone baking mats.
-
Remove the dough from the refrigerator. Using a 1-tablespoon cookie scoop or a tablespoon measure, scoop the dough and gently roll it between your palms into smooth balls roughly 1 inch in diameter. Place the balls about 2 inches apart on the prepared baking sheets—you should fit 12 to 15 cookies per sheet.
-
Gently flatten each ball using the bottom of a measuring cup or drinking glass, pressing down until the cookie is about ¼ inch thick. The key is gentle pressure—you’re not trying to compress the dough into a thin sheet, just flatten it enough that it bakes evenly without spreading excessively during baking.
Bake and Add the Candy Cane Topping:
-
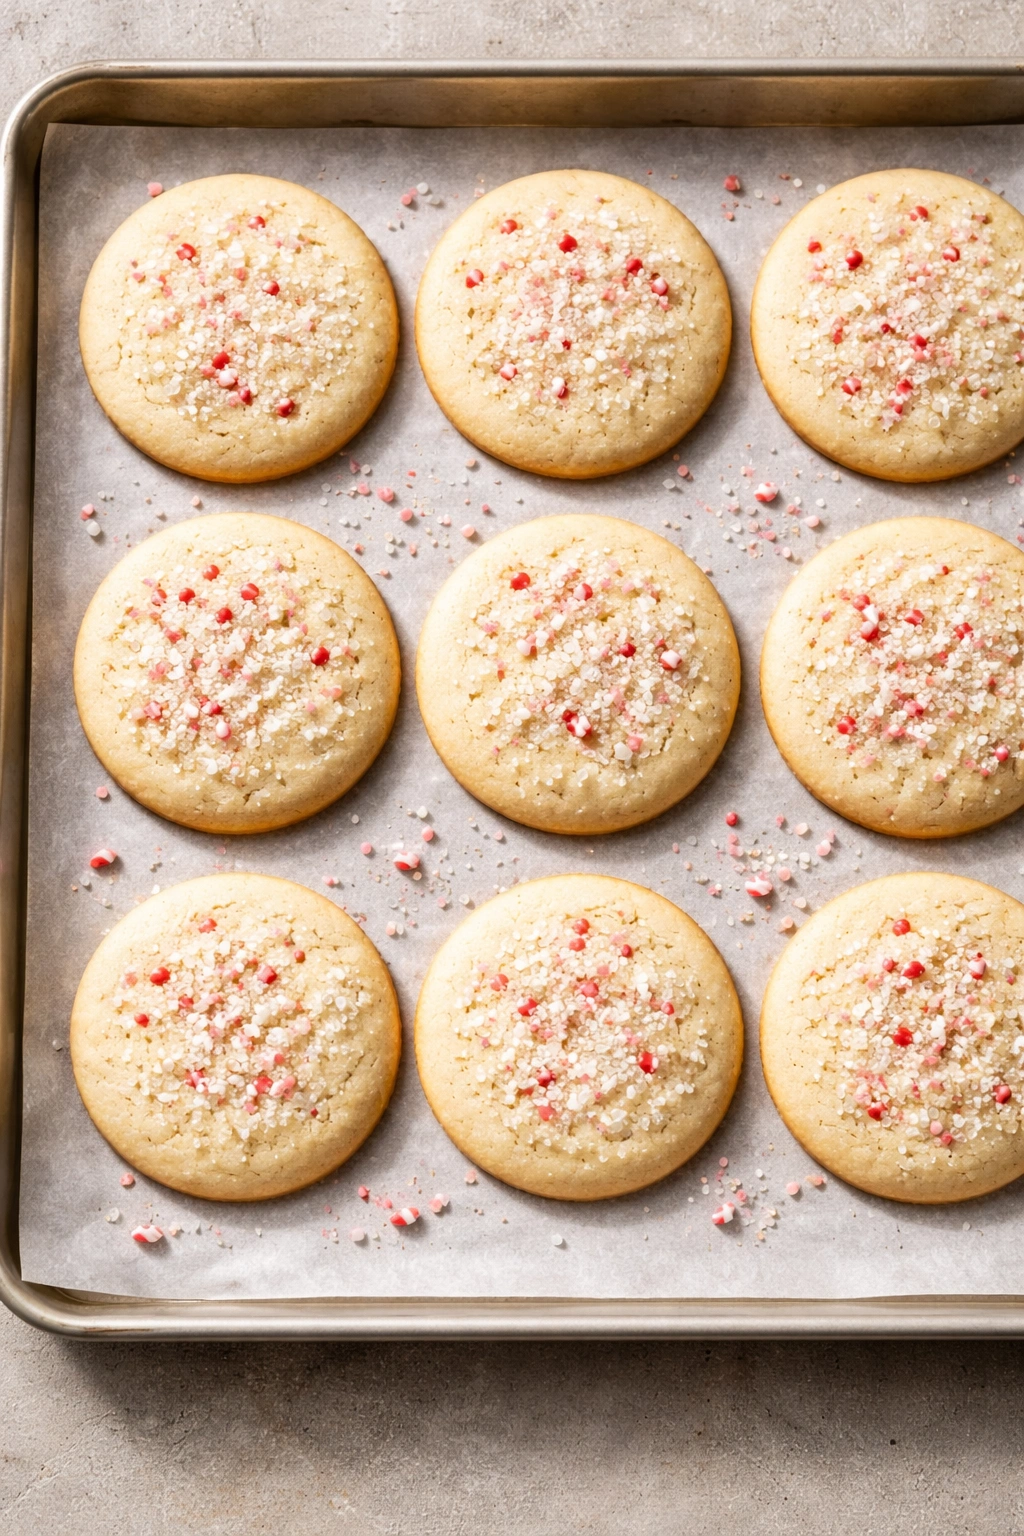
Place the first baking sheet in the preheated oven and bake for 8 to 10 minutes. The cookies should look pale and set but not yet golden—they’ll appear almost underbaked. This is intentional; they’ll continue to cook slightly from residual heat.
-
Remove the baking sheet from the oven and immediately (within 10 seconds) sprinkle the reserved ¼ cup of crushed candy canes evenly over the hot cookies. The heat will soften the candy cane pieces slightly, allowing them to partially adhere to the surface. If using coarse sugar for extra sparkle, sprinkle it over the still-hot candy canes.
-
Return the baking sheet to the oven for 2 to 3 more minutes, just until the edges of the cookies are set and very lightly golden. The candy canes should have softened enough to set into the cookie but not so much that they’re melting. This timing is crucial—watch carefully your first batch to understand the visual cues for your specific oven.
-
Remove from the oven and let the cookies cool on the baking sheet for 8 to 10 minutes. During this time, the candy canes will harden and set firmly into the warm cookies. The residual heat means the cookies continue to bake slightly and firm up, so resist the urge to move them to a cooling rack too quickly.
-
After 8 to 10 minutes, transfer the cookies to a wire cooling rack and allow them to cool completely. They’ll firm up further as they cool and reach room temperature.
-
Repeat steps 13 through 17 with the remaining dough and baking sheet.
Pro Tips for Perfectly Shaped and Flavored Cookies
The difference between good candy cane cookies and spectacular ones often comes down to attention to small details. Room temperature is genuinely important here—cold eggs and butter don’t cream together as efficiently, which affects both the texture and the flavor distribution. Pull your eggs and butter out of the refrigerator 30 to 60 minutes before baking and your cookies will have better texture.
The oven temperature matters more than you’d think. Baking at 325°F instead of the standard 350°F gives you a longer window before the cookies brown, which means the candy cane pieces have more time to set into the surface without burning. If your oven tends to run hot, you might even go down to 320°F. Every oven is different, so watch your first batch carefully and adjust for your second batch if needed.
Why Gentle Shaping Makes Better Cookies
When you scoop and flatten the dough, you’re not trying to shape perfect cookies at this stage. You’re just trying to create a relatively flat surface so the dough bakes evenly. Heavy-handed flattening squeezes out air bubbles and makes the cookies dense instead of tender. Think of it as a gentle suggestion rather than a firm instruction. The dough will spread a little during baking anyway, and that’s exactly what you want.
If your dough is too warm and starts sticking to your hands while shaping, pop the dough back in the refrigerator for 10 minutes and try again. Cold dough is dramatically easier to work with and produces better-shaped cookies. There’s no prize for speed here; taking an extra five minutes to work with properly chilled dough saves frustration and produces better results.
Why Your Cookies Might Spread Too Much (And How to Fix It)
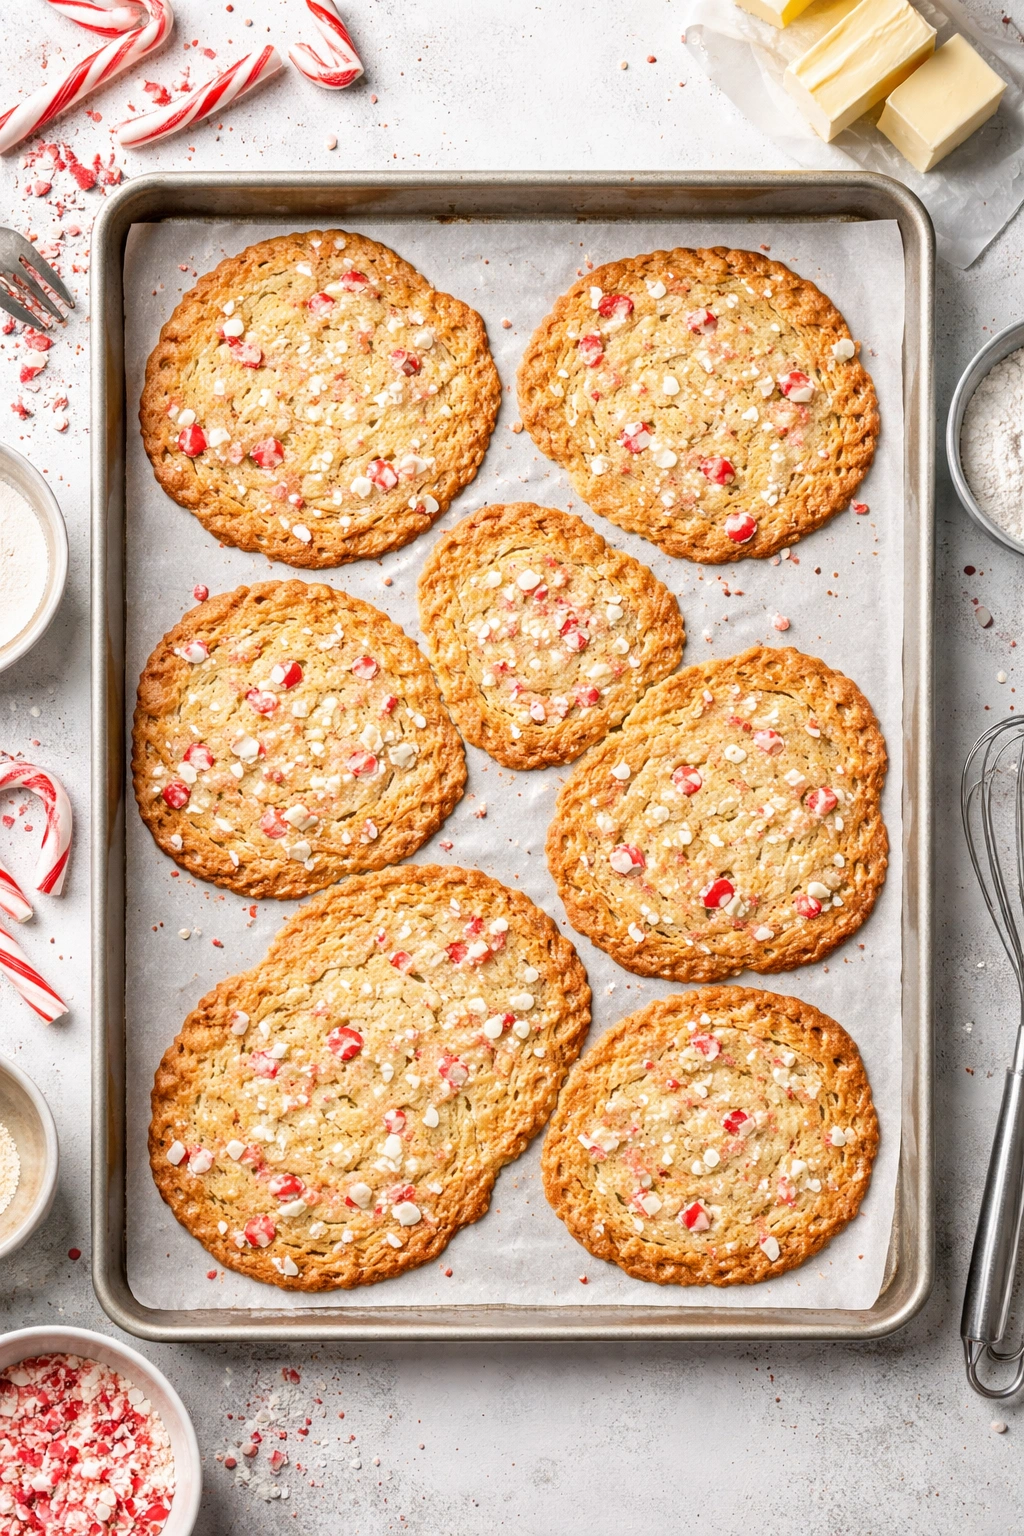
Spreading is usually one of two issues: either the dough was too warm when it went into the oven, or the butter was too soft during creaming. If you’re ending up with thin, lacy cookies that spread all over the baking sheet, your first troubleshooting move is longer chilling time. Even if you’ve chilled the dough once, if the room is very warm or if you’re working with dough balls for more than 15 minutes, chill again before baking.
The other culprit is overmixing. When you mix the flour into the butter too aggressively, you develop the gluten in the flour, which makes the dough more elastic and prone to spreading. Mix just until the flour disappears—when you think you’re done, you’re done. Stop mixing.
Recognizing When Spread Is Actually Okay
Here’s the thing: a little spreading is actually desirable. You want cookies that are roughly 2 inches in diameter when finished, not tiny dense buttons. If your cookies are spreading to maybe 2.5 inches and baking up with a soft center and slightly crispy edges, that’s perfect. You’re aiming for a tender texture, not a crunchy cookie throughout.
The problem only exists when cookies are spreading so much that they merge into each other or become completely thin and crispy all the way through. If that’s happening, use the troubleshooting steps above: colder dough, less mixing, and potentially a slightly lower oven temperature to give the structure more time to set before the cookies spread.
Creating the Perfect Candy Cane Topping

The candy cane topping is what transforms these from nice cookies into ones that look genuinely festive and special. The technique matters because timing determines whether the candy cane pieces stick to the cookie, melt into it, or just sit on top without adhering. You want them embedded but still visible and texturally distinct.
Sprinkling the candy canes onto the hot cookies immediately after the first bake is the key. The residual heat from the oven—the cookies are about 350°F when you pull them out—is hot enough to soften the candy cane coating slightly without melting the pieces outright. If you wait too long, the cookies cool down and the candy canes won’t stick. If the oven stays too hot during that second bake, the candy canes start melting and lose their shape.
Achieving Even Distribution
The best way to ensure even distribution is to sprinkle by hand or use a small fine-mesh strainer. If you try to dump all the candy cane pieces on one cookie, they’ll slide off. Instead, aim for a light, even coating over all the cookies on the sheet. You want enough that you can see festive red and white flecks, but not so much that the pieces are stacked on top of each other.
If you have some cookies with sparse topping and others with too much, you can redistribute slightly while the cookies are still hot. It’s a small thing, but it makes them look polished and professional. Those tiny adjustments—making sure every cookie gets a fair share of the toppings, taking care while moving them to the cooling rack—are what separate homemade cookies that look homemade from ones that look bakery-quality.
Peppermint Extract vs. Fresh Peppermint Leaves

Peppermint extract is your friend here because it’s concentrated and stable, and it won’t add moisture to the dough the way fresh leaves might. A little bit goes a long way—the ½ teaspoon in this recipe adds noticeable peppermint flavor without tasting artificial or medicinal. If you’re skeptical about extracts in general, this is where they genuinely shine.
That said, if you have fresh peppermint from a summer garden dried and saved, or if you can get fresh peppermint leaves, you can substitute. Use about 1 tablespoon of finely minced fresh peppermint (or 1 teaspoon if it’s dried), mixed in right after creaming the butter and sugar. Fresh peppermint will give you a brighter, grassier flavor compared to the extract, which tastes slightly more candy-like and intense. Both are valid—it’s just a different expression of the same flavor.
The candy canes themselves provide a surprising amount of peppermint flavor, so even without the extract, these cookies taste distinctly peppermint-forward. The extract just builds on that foundation and makes the flavor rounder and more complex.
Flavor Variations Worth Trying

Once you’ve made these once and understand the base technique, experimentation becomes fun and easy. The dough structure is sturdy enough that it can handle variations without falling apart.
Peppermint Chocolate Twist: Fold ½ cup of finely chopped dark chocolate into the dough along with the crushed candy canes. The chocolate will melt slightly during baking, creating pockets of richness against the cool peppermint. Use 60% or 70% cacao chocolate for depth; milk chocolate tends to be too sweet for this application and makes the cookies cloying.
White Chocolate Peppermint: Add 1 teaspoon of white chocolate liqueur (optional—adds a subtle richness) to the egg mixture, then fold ½ cup of white chocolate chips into the dough along with the candy canes. The white chocolate softens during baking and creates a tender, almost shortbread-like quality.
Gingerbread Peppermint Fusion: Replace 2 tablespoons of the all-purpose flour with whole wheat flour and add ¼ teaspoon each of ground ginger, ground cinnamon, and a tiny pinch of ground cloves to the dry ingredients. This creates a sophisticated spiced-peppermint flavor that feels more winter than candy-focused.
Peppermint Bark Cookies: After the cookies have cooled completely, drizzle tempered dark chocolate over the top of each cookie in thin lines, or dip the bottom half of each cookie in melted dark chocolate and let it set. This creates a texture and flavor combination that’s genuinely luxurious.
Non-Peppermint Candy Cane Cookies: Use crushed red and white hard candies (cherry flavored, for instance) instead of candy canes, and substitute ½ teaspoon cherry extract for the peppermint extract. You get the same visual appeal and candy texture but with a completely different flavor profile. This works beautifully if you’re baking for people who don’t love peppermint.
Dairy-Free and Gluten-Free Adaptations

These cookies adapt beautifully to different dietary needs without compromising texture or flavor. For dairy-free baking, use cultured dairy-free butter—it has a richer flavor and better creaming ability than regular dairy-free margarine. The ratio is 1:1. If you use coconut oil as a substitute, use slightly less (about ¾ cup instead of 1 cup) because coconut oil is slightly more dense. The cookies will be marginally crispier, which actually isn’t a bad thing—you want a little texture contrast with the soft centers.
For gluten-free baking, use a 1:1 gluten-free all-purpose flour blend that already contains xanthan gum (like Bob’s Red Mill or King Arthur), or use regular gluten-free all-purpose flour and add ¼ teaspoon of xanthan gum mixed into the dry ingredients. Gluten-free flour absorbs liquid slightly differently, so the dough might be slightly stickier—if it feels too sticky to scoop, refrigerate it for an extra 15 to 20 minutes.
Vegan and Nut-Free Options
For fully vegan cookies, use dairy-free butter and substitute the egg with a flax egg (1 tablespoon ground flaxseed mixed with 3 tablespoons water, let sit 5 minutes to thicken). The dough will be slightly less flexible, but the final cookies are identical in texture and taste. Use peppermint extract, not fresh peppermint, because it’s more shelf-stable and concentrated than fresh plant material, making it reliable in vegan baking.
The recipe as written is naturally nut-free, so there’s nothing to adapt there. If you’re baking for someone with nut allergies, just make sure your vanilla extract and peppermint extract come from nut-free facilities (most major brands do, but check labels).
How to Store and Keep Them Fresh
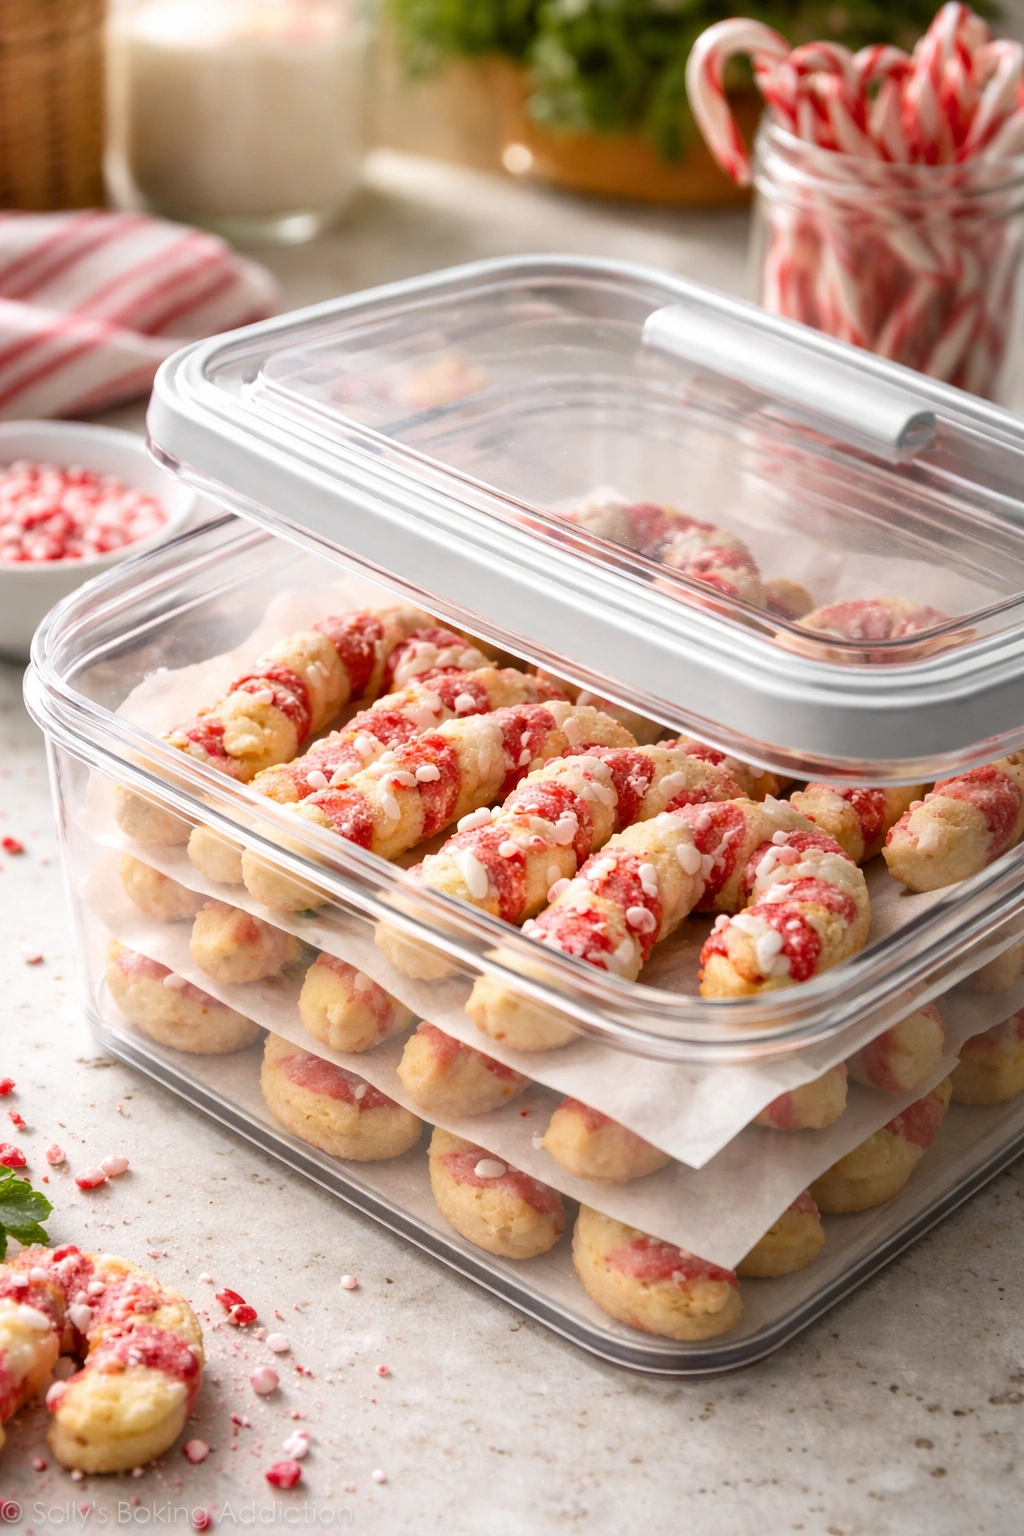
Properly stored, these cookies stay fresh and delicious for up to five days at room temperature in an airtight container. The candy cane pieces do gradually soften and lose some snap after a day or two, but the cookies themselves remain tender. If you want to maintain maximum crispness on the candy cane toppings, store the cookies in a single layer in an airtight container with a piece of parchment paper between layers rather than stacking them directly.
Refrigerator storage isn’t really necessary unless your kitchen is very warm and you’re worried about the butter becoming oily. In that case, store them in an airtight container in the refrigerator for up to a week. Let them come to room temperature for 10 minutes before eating—they’ll taste better warm than cold.
Freezing for Long-Term Storage
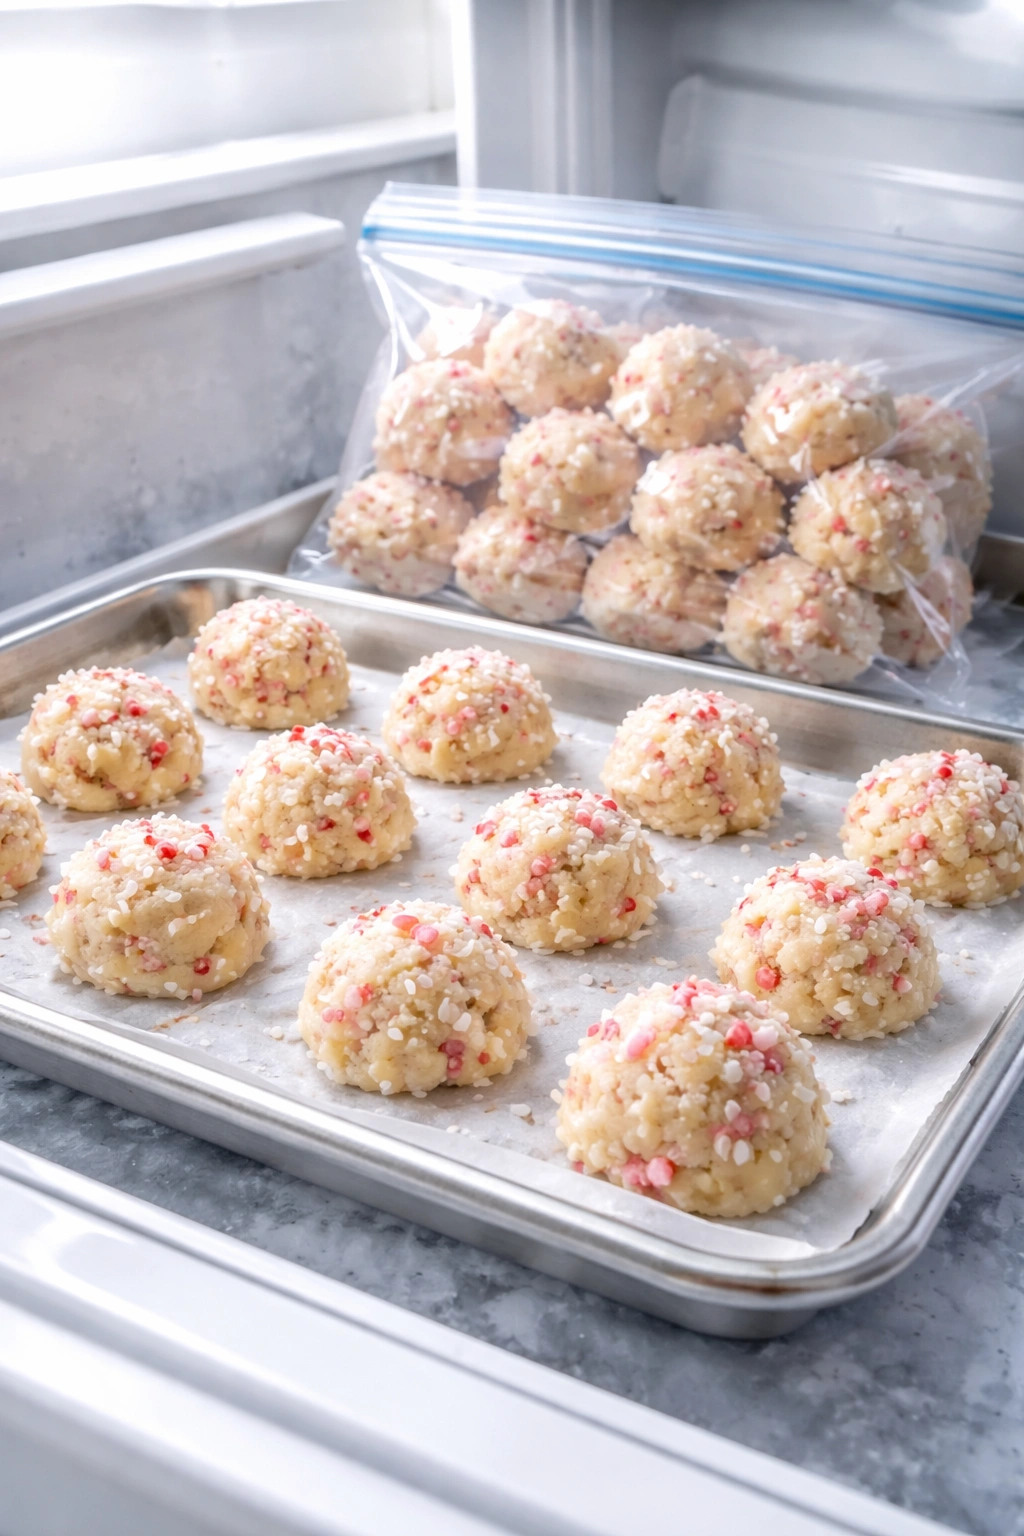
Baked cookies freeze beautifully for up to two months in an airtight container (with parchment between layers to prevent sticking). Thaw them at room temperature for about 30 minutes. If the candy cane pieces have softened, you can re-crisp them by placing the cookies in a 300°F oven for 3 to 4 minutes, then allowing them to cool again. This won’t fully restore the candy crunch, but it wakes them up noticeably.
Alternatively, freeze the dough balls (already scooped, on a baking sheet) and then transfer them to a freezer bag once they’re solid. Bake frozen dough balls straight from the freezer, adding 2 to 3 minutes to the first bake time. This is genuinely convenient during holiday season when you want fresh-baked cookies without advance prep.
Make-Ahead Strategies for Busy Holidays
These cookies are specifically designed for make-ahead baking because they keep beautifully and the dough freezes exceptionally well. Your best strategy is to make the dough up to three days in advance, refrigerate it, and then bake as needed. This way you can have fresh-baked cookies any time without the stress of preparing everything from scratch.
Another approach is to scoop the dough onto a baking sheet and freeze the scoops until solid (about two hours), then transfer the frozen dough balls to a freezer bag. Label the bag with the date and baking instructions. These will last in the freezer for a month, and you can bake a batch whenever you want warm cookies—they take only 12 to 15 minutes from frozen to cooled.
Planning for Holiday Platters and Gifts
If you’re making these to give as gifts or to contribute to a holiday party, bake them completely (with the candy cane topping) about two days before the event. Layer them with parchment paper in an airtight container and store at room temperature. They’re more stable at this point than immediately after baking, and any slight settling of the candy cane pieces just adds to the authentic homemade look.
If you’re packaging them as gifts, single-serve paper bags or small boxes lined with parchment create a professional presentation. Include a note about storage (airtight container, room temperature, up to five days) so the recipient knows how to keep them at their best. Homemade cookies have so much more impact as a gift than something you could buy, especially when you’ve invested real care into making them.
Serving Ideas and Gift-Giving Tips

These cookies shine in almost any context. On a holiday dessert platter, they add a festive pop of red and white among more traditional browns and darker cookies. They pair beautifully with hot chocolate, coffee, or tea. There’s something about the cool peppermint against something warm that just works.
For holiday parties, arrange them on a tiered stand or cake plate with a handwritten label identifying them (just “Candy Cane Cookies” is perfect—no need to overcomplicate it). They’re substantial enough to satisfy someone looking for a real dessert but elegant enough that they don’t feel like a heavy indulgence.
Gift Presentation That Stands Out
Package them in clear cellophane bags tied with a festive ribbon, or fill small gift boxes with three to five cookies wrapped individually in parchment paper with a wax seal. Include a simple card with the recipe name and a line about eating them within a few days for best freshness. Personal touches like these turn a gift of cookies into something that feels genuinely special.
Alternatively, make a holiday cookie assortment box with candy cane cookies alongside two or three other cookie varieties. The visual contrast—different shapes, colors, and textures—creates something more memorable than a single cookie type. Candy cane cookies work well with shortbread, gingerbread, or chocolate cookies because they’re different enough to provide variety but cohesive enough to feel intentional.
Final Thoughts

Candy cane cookies are one of those recipes that reward a little attention to detail but don’t demand complicated techniques. The joy of baking them comes from understanding the small decisions—how to crush the candy canes so they create the right texture, when to add the topping so it sets properly, how to chill the dough so shaping becomes easy instead of frustrating. These seemingly small choices are what separate decent cookies from ones that people remember and ask for by name.
The best part is that once you’ve made them once, you’ll recognize opportunities to customize them. Maybe next year you’ll add chocolate, or try a different extract, or make them smaller for a cookie exchange. The foundation is solid enough that it supports whatever direction your creativity wants to take. That’s the mark of a truly great cookie recipe—it’s reliable enough for beginners but flexible enough for experienced bakers to make it their own.
These cookies are genuinely worth the small amount of effort they require. They transform your kitchen with their aroma, they bring visual joy to any dessert spread, and they deliver on that promise of cool peppermint refreshment every single time. Make them this season, watch people light up when they taste them, and plan to make them again next year because you’ll absolutely want to.