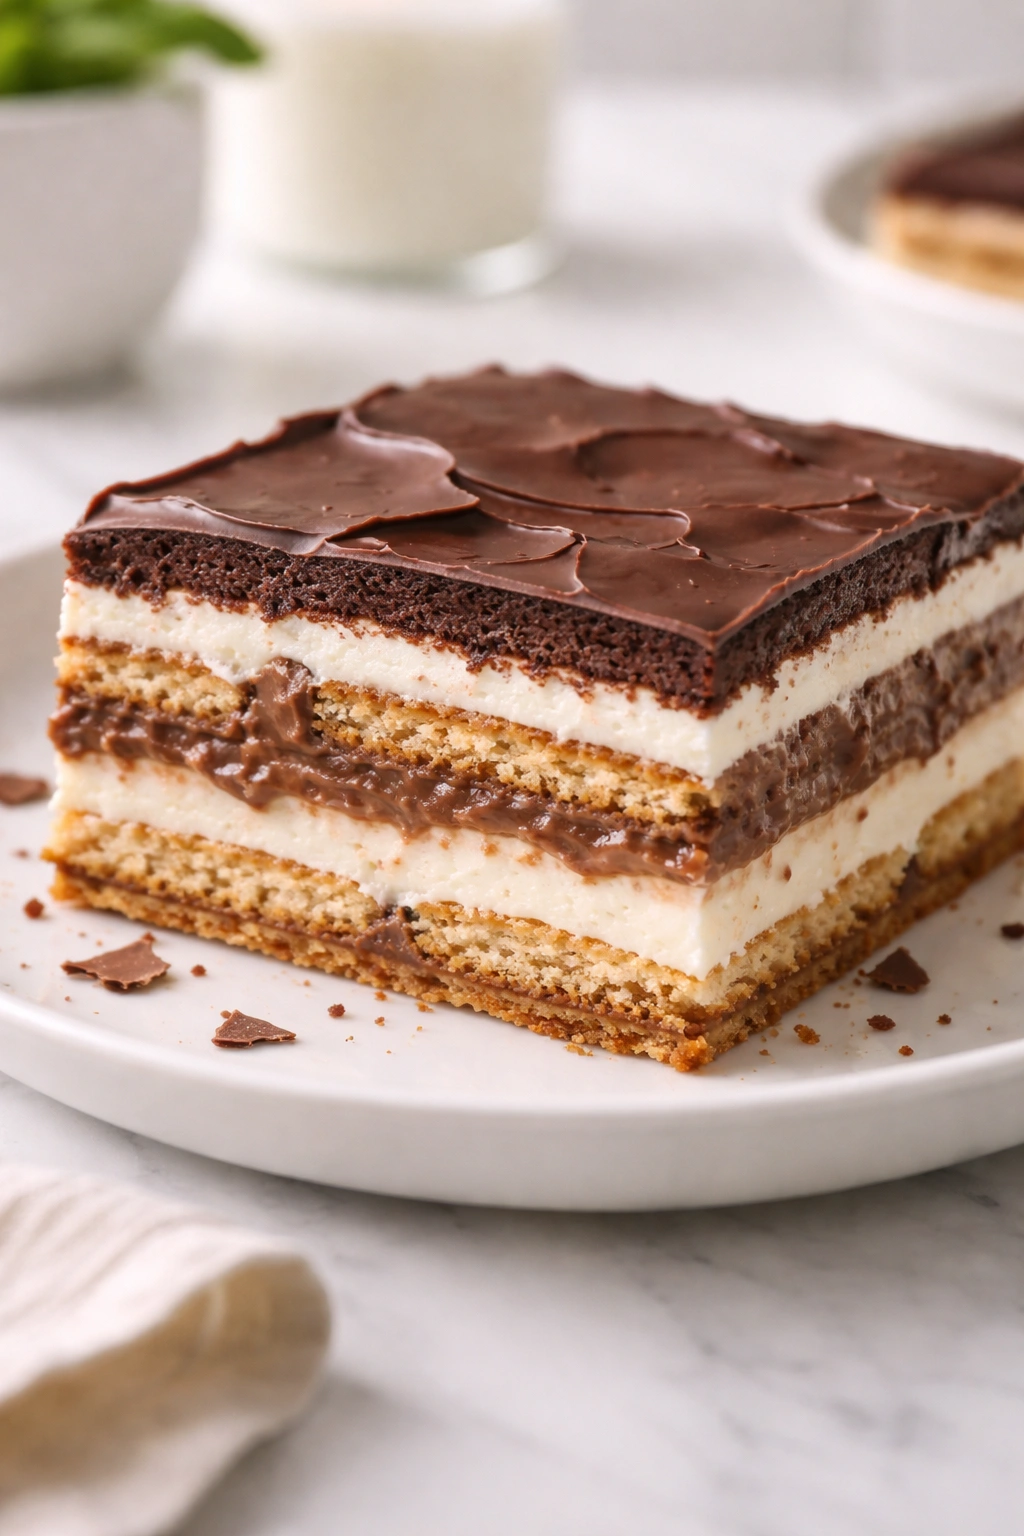
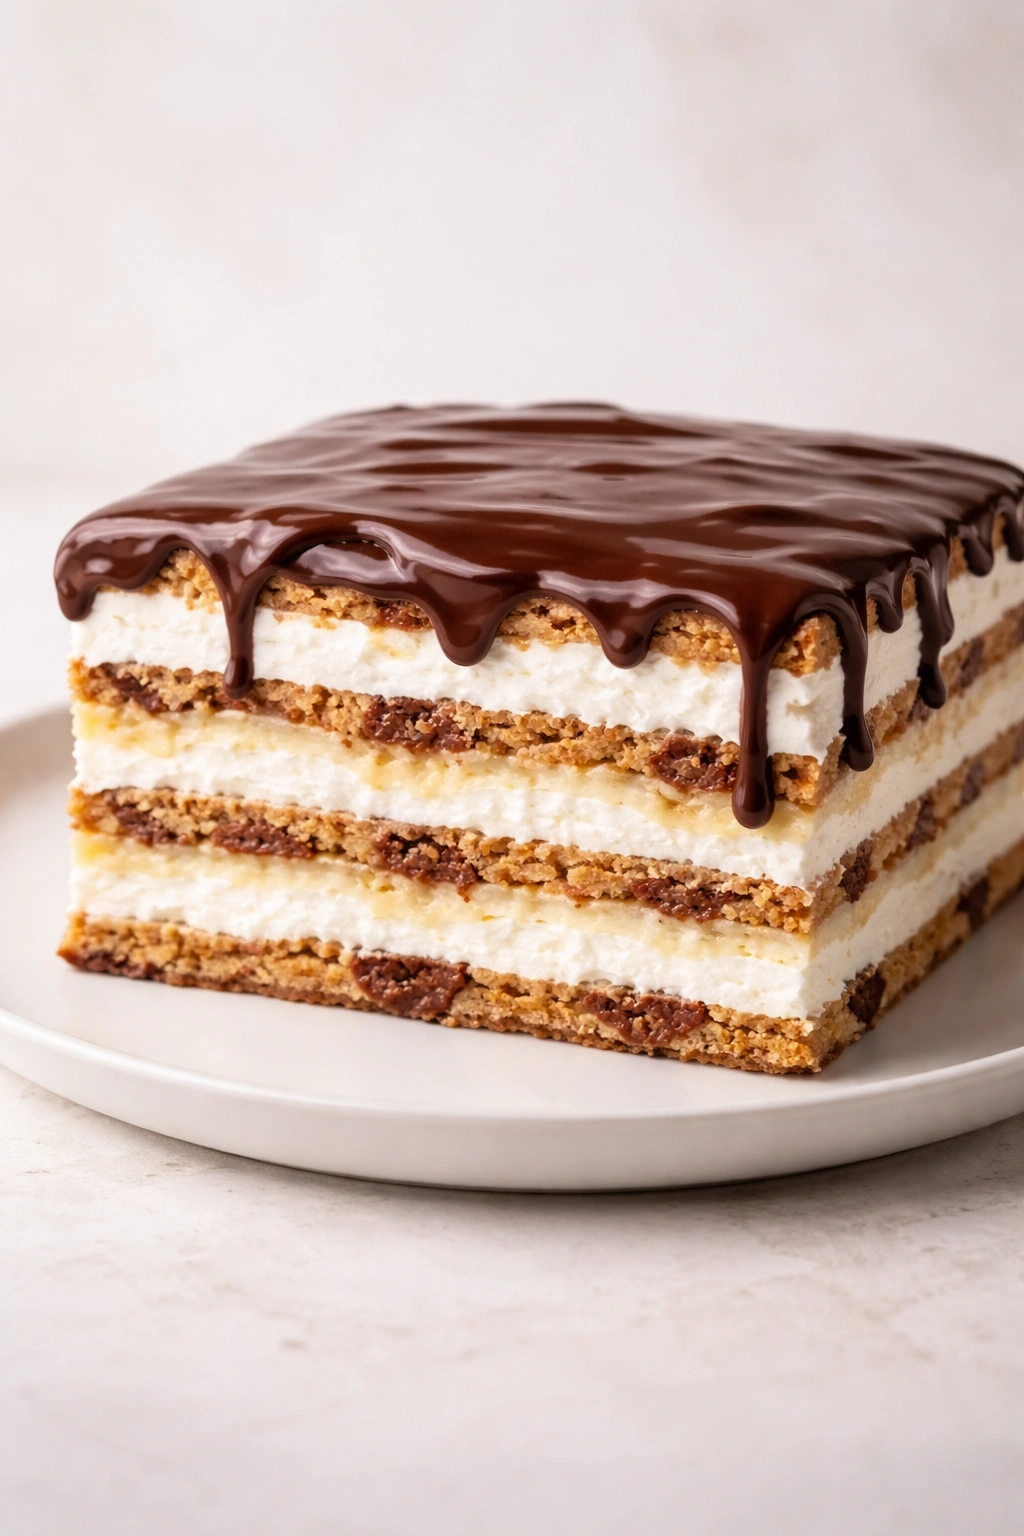
When you’re standing in the kitchen wondering how to impress your family with a showstopper dessert that won’t require you to fuss over a hot oven or worry about baking temperatures, no-bake chocolate eclair cake steps in as your answer. This is the kind of dessert that looks like you spent hours layering and tempering, when really you’ve assembled something genuinely simple—and somehow, that restraint is exactly what makes it so reliably delicious. Layers of soft vanilla wafer cookies, silky chocolate pudding, whipped cream, and a glossy chocolate topping come together into something that tastes like a sophisticated French eclair but requires nothing more than a mixing bowl and a refrigerator.
The magic of this dessert isn’t in precision baking; it’s in texture contrast and the way cold chocolate coating cracks slightly under your fork before giving way to the tender, custard-soaked wafers beneath. Families come back to this cake over and over because it hits all the notes people actually crave—it’s not overly complicated, the flavor combination is deeply familiar in the best possible way, and there’s something genuinely comforting about the way it comes together.
What Makes This Dessert So Special
This isn’t a cake that demands last-minute assembly or sits nervously in the refrigerator hoping it survives until serving time. No-bake chocolate eclair cake is remarkably forgiving, partly because the dessert actually improves as it sits. The wafer cookies gradually soften and absorb just enough moisture from the pudding and whipped cream to create that signature texture—not soggy, not crispy, but something between the two that feels almost like a very delicate sponge cake.
The chocolate topping sets into a thin, snappable shell that gives you two distinct experiences in one bite: that initial dark chocolate crackle followed by the cool creaminess underneath. It’s why people describe this as tasting fancier than it actually is. Everything about it feels intentional and refined, even though you’re not doing anything particularly advanced. The dessert practically makes itself once you understand the basic layering concept.
There’s also something deeply satisfying about knowing exactly what’s going into your dessert. You’re using simple ingredients that most home cooks already have on hand, and you’re not relying on box mixes or anything requiring special equipment. This is why families circle back to this recipe year after year—it delivers consistent, impressive results without ever feeling demanding.
Why No-Bake Is a Game-Changer for Family Desserts

No-bake desserts solve a problem that most home bakers face: timing anxiety. You don’t have to worry about whether your oven runs hot or cool, whether your eggs will scramble if you’re not careful, or whether you’ll over-bake something dry. Instead, you make simple components, combine them, and let time and cold temperatures do the work. This particular cake actually benefits from sitting overnight, which means you can make it a day ahead and have one less thing to stress about when guests arrive.
There’s also something genuinely liberating about not heating your kitchen. If you’re making dessert during warmer months, there’s no reason to turn on the oven just to feed your family something sweet. This cake sits happily in the refrigerator, and the cooling process isn’t an afterthought—it’s central to how the dessert comes together and actually tastes better when it’s had time to chill deeply.
From a practical standpoint, no-bake desserts are more forgiving with ingredient substitutions and variations. If you want to change the flavor profile or work around dietary restrictions, you’ve got flexibility that baked goods don’t always offer. The structure doesn’t depend on precise chemistry the way a cake or cookie does.
The Pudding-and-Wafer Foundation
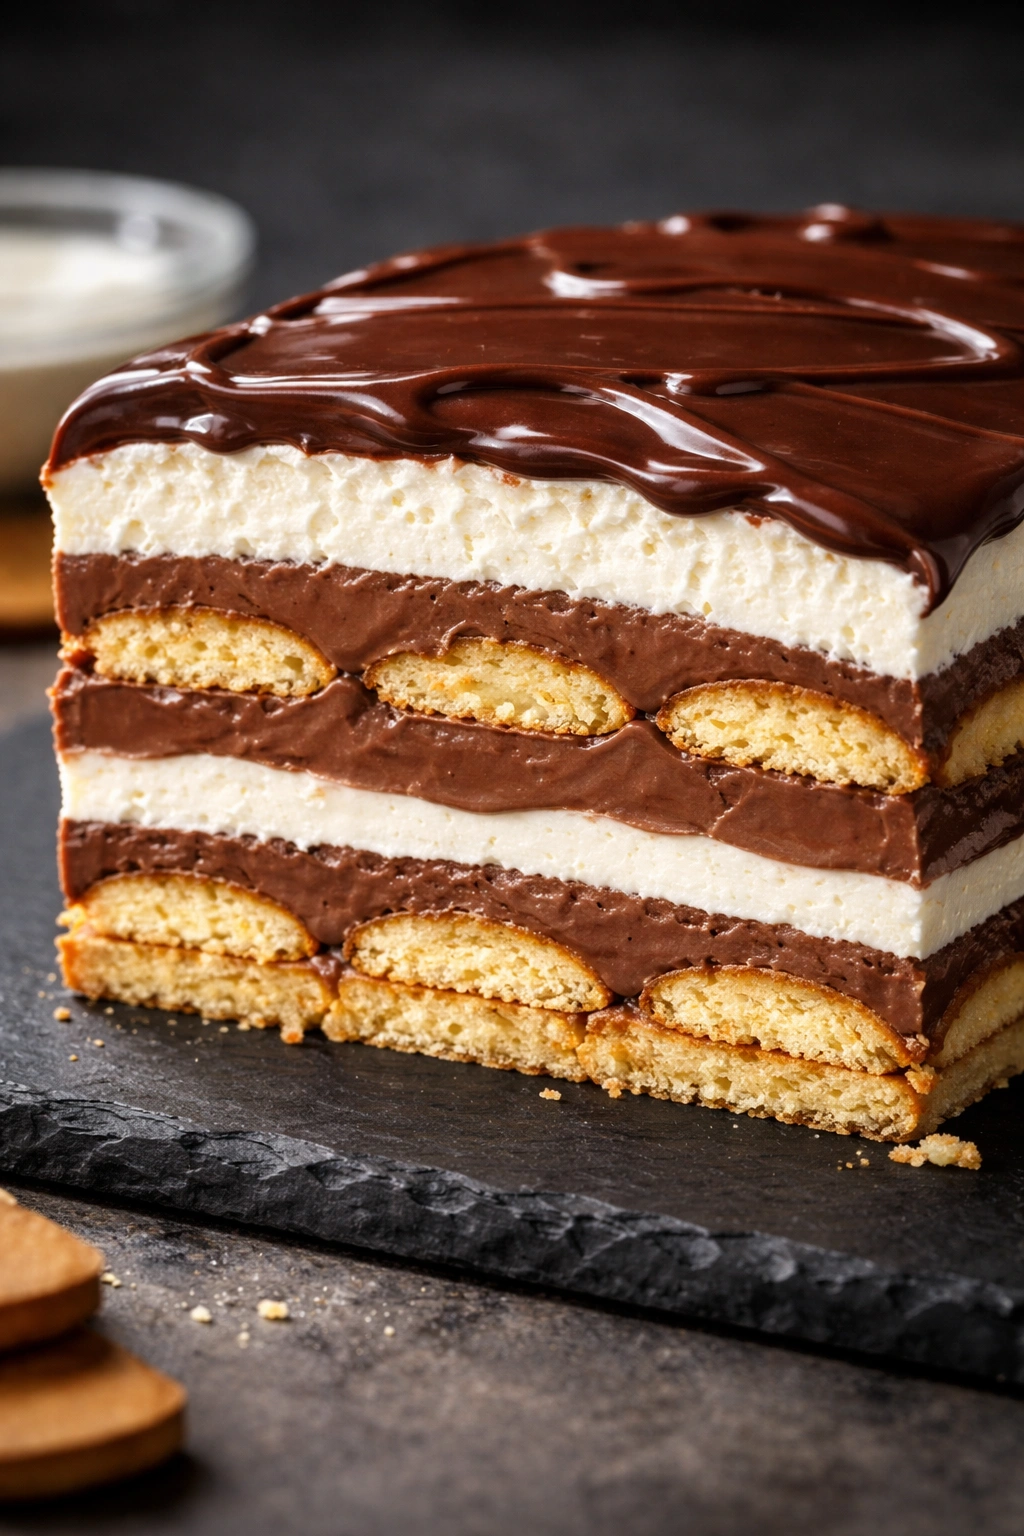
The backbone of this entire dessert rests on two humble components: vanilla wafer cookies and chocolate pudding. These aren’t fancy ingredients, but they’re doing serious work. The wafers are sturdy enough to hold up during layering without disintegrating, but tender enough that they absorb moisture beautifully as the cake sits in the refrigerator. They’re also neutral enough in flavor that they don’t compete with the chocolate and vanilla layers around them—they’re supporting actors, not stars.
The pudding is where the real flavor comes in. You can use instant pudding mix to save time, or make pudding from scratch if you prefer more control over the chocolate intensity and prefer avoiding cornstarch. Both approaches work perfectly. The pudding needs to be thick enough to support the layers above it without being so stiff that it’s chalky or unpleasant to eat. This is why the ratio of liquid to pudding mix matters—follow package directions exactly, or err slightly toward thicker if you’re concerned about structural integrity.
Whipped cream is the invisible hero here. It adds volume, lightness, and a subtle vanilla flavor that makes every bite feel a little more luxurious. The whipped cream also acts as a structural layer that helps stabilize everything above and below it. Using real whipped cream (rather than whipped topping) makes a noticeable difference—the texture is cleaner and airier.
Gathering Your Ingredients and Tools
Yield: Serves 12 to 14 | Makes one 9×13-inch dessert
Prep Time: 25 minutes
Cook Time: 5 minutes (for the chocolate topping only)
Total Time: 30 minutes active + 4 hours refrigeration (or overnight for best results)
Difficulty: Beginner — No baking required, straightforward layering, and the steps are easily completed by a first-time baker or a confident home cook who’s comfortable with pudding and whipped cream.
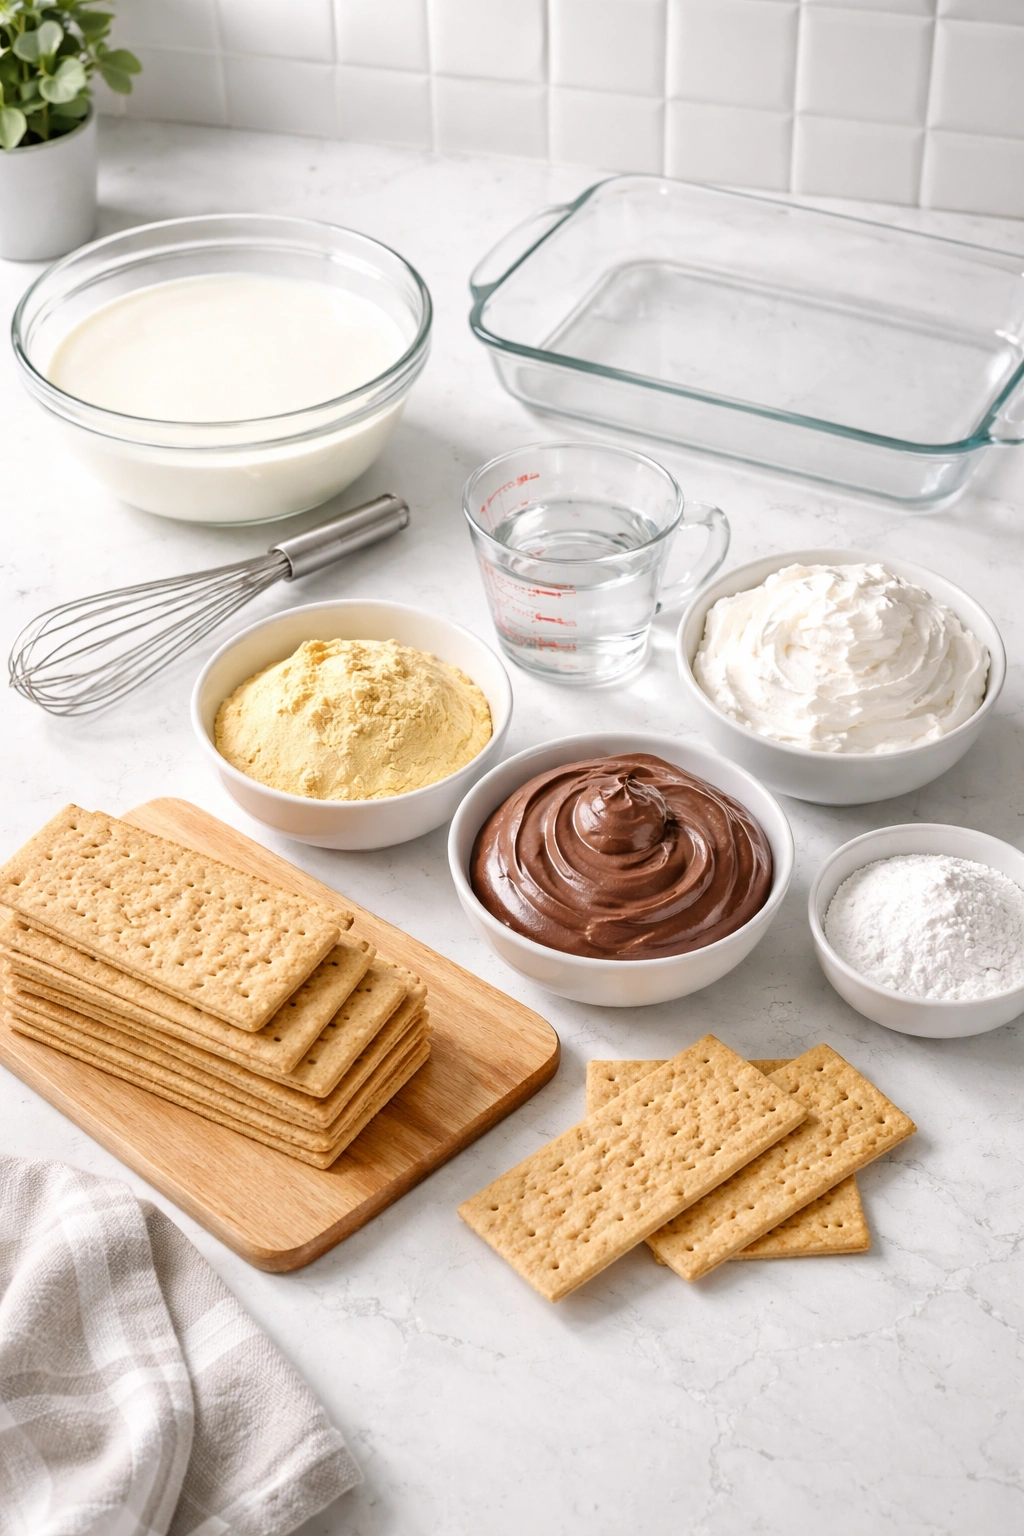
For the Cake Layers:
- 1 box (approximately 11 ounces) vanilla wafer cookies
- 2 cups cold whole milk
- 1 package (3.9 ounces) instant chocolate pudding mix (or homemade pudding equivalent — see variations section)
- 2 tablespoons granulated sugar
- 1½ cups heavy whipping cream, chilled
- ½ teaspoon pure vanilla extract
- Pinch of fine sea salt
For the Chocolate Topping:
- 4 tablespoons (½ stick) unsalted butter
- ⅔ cup unsweetened cocoa powder (Dutch-processed or natural, both work)
- ⅔ cup granulated sugar
- ⅓ cup whole milk (or heavy cream for richer chocolate)
- ¼ teaspoon pure vanilla extract
- Pinch of fine sea salt
The tools you’ll need are minimal: one 9×13-inch baking dish (glass or ceramic, not metal — metal conducts heat unevenly and can affect the chocolate topping), a large mixing bowl or stand mixer for the whipped cream, a medium saucepan for the chocolate topping, a whisk or electric hand mixer, a rubber spatula, and a sharp knife for neatly cutting the finished cake. Having your ingredients cold before you start makes a noticeable difference—put the heavy cream and milk in the refrigerator for at least 30 minutes before you begin.
Building the Layers: Step by Step

Prepare Your Dish:
-
Take your 9×13-inch baking dish and make sure it’s clean and dry. You won’t need to grease it since nothing is baking, but a dry surface helps the first layer of wafer cookies stay in place without sliding around. Position your baking dish on a flat shelf in the refrigerator where it will stay undisturbed while the dessert sets — this prevents the layers from shifting.
-
Line the bottom of the dish with vanilla wafer cookies in a single layer, filling the space as completely as possible. You’ll probably need 15 to 18 cookies depending on their size — snap some in half to fill gaps along the edges and corners. The wafers should cover the bottom of the dish so completely that you barely see the dish surface underneath. The cookies are your structural foundation, so don’t leave large gaps.
Mix the Chocolate Pudding Layer:
-
Pour 2 cups of cold milk into a large mixing bowl. Add the instant chocolate pudding mix and whisk vigorously for 2 minutes, making sure there are no lumps remaining. The pudding will begin to thicken as you whisk — stop when it’s noticeably thicker and reaches the consistency of soft pudding (it will firm up more as it sits). If you’re using homemade pudding, make it according to your recipe and allow it to cool to room temperature before using, then skip ahead to the next step.
-
Spread the chocolate pudding evenly over the first layer of wafer cookies using a spatula, working gently so you don’t break the cookies or push them into the baking dish. The pudding should come up to about ¼ inch thick — you’re creating a distinct layer, not drowning the wafers. This layer will soften the wafers slightly and infuse them with chocolate flavor as the dessert chills.
Make the Whipped Cream Layer:
-
Pour 1½ cups of cold heavy cream into a clean mixing bowl. Add the granulated sugar, vanilla extract, and salt. Using an electric hand mixer or a stand mixer fitted with the whisk attachment, beat on medium-high speed for 2 to 3 minutes until soft peaks form — the cream should be thick and billowy but still hold a slight peak when you lift the whisk out. Do not over-whip — if you beat it too long, the cream will begin to separate and turn grainy. Stop as soon as you reach soft peaks, which is the perfect texture for spreading.
-
Gently spread the whipped cream over the chocolate pudding layer, using your spatula to create a smooth, even surface. Work gently — you don’t want to scrape the pudding layer off onto the spatula and create a muddy middle section. The whipped cream should be about ½ inch thick, thick enough to create a distinct cloud of vanilla flavor between the chocolate layers.
Add the Second Wafer Layer:
-
Arrange another layer of vanilla wafer cookies over the whipped cream, fitting them together as closely as possible just like you did with the first layer. Again, snap cookies in half to fill gaps and make sure you have good coverage. This second wafer layer will soften from the moisture below and create a custard-like texture as the dessert sits overnight.
Advertisements -
Repeat the pudding layer by spreading another 2 cups of freshly mixed (or left-over) chocolate pudding over the second wafer layer. Use the same technique as before — gentle spreading, even distribution, about ¼ inch thick. If your pudding has begun to set up and is getting thick, you can thin it very slightly by whisking in 1 to 2 tablespoons of cold milk.
Top with Final Whipped Cream:
-
Make an additional batch of whipped cream by beating 1½ cups cold heavy cream with 2 tablespoons sugar, ½ teaspoon vanilla, and a pinch of salt, following the same technique as before — medium-high speed, 2 to 3 minutes, until soft peaks form. Spread this final whipped cream layer evenly over the pudding, creating a smooth, even surface across the entire top of the cake. This whipped cream will be the base for your chocolate topping, so make sure it’s as even and level as possible.
-
Place the assembled cake in the refrigerator uncovered while you make the chocolate topping. It needs at least 30 minutes to firm up enough that the chocolate topping won’t sink through the layers and create a soggy mess.
Make the Glossy Chocolate Topping:
-
In a medium saucepan, combine 4 tablespoons butter, ⅔ cup cocoa powder, ⅔ cup sugar, and ⅓ cup milk. Place the pan over medium-low heat and whisk constantly for 3 to 4 minutes until the mixture is smooth, glossy, and beginning to steam gently — it should reach about 165°F on an instant-read thermometer, though you don’t need to measure precisely. You’re aiming for the consistency of thick hot fudge sauce, pourable but not soupy.
-
Remove the pan from heat and stir in ¼ teaspoon vanilla extract and a pinch of salt. Let the chocolate cool for 3 to 5 minutes, stirring occasionally — it needs to be cool enough that it won’t melt the whipped cream layer, but warm enough that it’s still pourable. If it thickens too much before you’re ready to pour, you can gently reheat it over low heat for 30 seconds.
-
Pour the chocolate topping over the whipped cream layer, working quickly so it doesn’t set up as it cools. Spread it gently with a spatula so it covers the entire top surface and reaches the edges of the baking dish. The chocolate will be shiny and slightly warm at this point — it will set up into a thin shell as the cake refrigerates, which is exactly what you want.
-
Refrigerate the finished cake uncovered for at least 4 hours, preferably overnight, before serving. The cake will firm up completely and the layers will meld together perfectly during this time.
Common Mistakes and How to Avoid Them

The most frequent issue people encounter is having the layers shift or collapse partway through assembly. This happens when the bottom layers aren’t sturdy enough or when you’ve made the whipped cream layer too thick and fluffy to support weight. The solution is simple: don’t make your whipped cream layer thicker than ½ inch, ensure your pudding layer is thick enough to hold its shape (follow pudding package directions exactly), and refrigerate each major section for 20 to 30 minutes after assembly before adding weight on top.
Another common problem is the chocolate topping cracking excessively or looking more like thick fudge than a smooth glaze. This usually means the chocolate is either too cool when you pour it or you’re not adding enough milk to reach the right consistency. The topping should be pourable but not watery — more like salad dressing than pudding. If your topping is too thick, reheat it gently and add a tablespoon of milk to loosen it. If it’s cracking, you’ve either refrigerated it too quickly (let it set at room temperature for 5 minutes before chilling) or the chocolate mixture was too cold when you poured it.
Soggy wafers are actually a non-issue with this dessert, despite what intuition might suggest. The moisture from the pudding and cream softens them intentionally, creating that signature texture between cookie and cake. If your wafers feel genuinely mushy rather than tender and cookie-like, your pudding was too wet — next time, use milk at the exact ratio the pudding package specifies.
One more potential issue: if your whipped cream seems grainy or separated, you over-whipped it. Real cream has a point of no return, and beyond soft peaks, the fat separates from the water and you get a broken texture. This is why electric mixing is safer than vigorous hand whisking — you have more control and can stop at the exact right moment. If this happens, you can fold in a spoonful or two of cold milk to try to rescue it, but starting fresh is usually the better option.
Pro Tips From Making This Dozens of Times

Using cold ingredients is genuinely essential — don’t skip refrigerating your cream and milk beforehand. Cold cream whips faster and holds its shape better. Cold milk helps the pudding set properly without becoming grainy. Room-temperature ingredients will make everything take longer and risk not setting up correctly before you need to move forward with assembly.
The chocolate topping truly does improve the texture of the dessert. It’s not just decoration — that thin chocolate shell creates a snappable layer that contrasts beautifully against the soft, custard-like layers beneath. Even if you’re tempted to skip it and just serve the cake as-is, don’t. The chocolate topping is worth making.
If you’re concerned about the structural integrity of your layers, refrigerate for 30 minutes between major components. After you add the wafers and pudding, let it firm up before adding whipped cream. After you spread the whipped cream, let it chill before adding the next layer of wafers. This takes extra time, but it guarantees your cake will hold together and look beautiful when you slice it.
For the smoothest chocolate topping, use Dutch-processed cocoa powder rather than natural cocoa. It dissolves more smoothly into the milk and butter, creating a glossier finish. If you only have natural cocoa on hand, it works perfectly fine — just whisk a bit longer to make sure the cocoa powder fully combines.
Here’s a technique most people miss: let the finished cake sit at room temperature for 5 to 10 minutes before serving. It seems counterintuitive since you’ve worked so hard to refrigerate it, but allowing the cake to warm up just slightly makes the layers more distinct and easier to cut cleanly. The wafers will taste tender instead of cold and slightly rubbery. The chocolate topping will snap slightly rather than shatter. Everything just feels more elegant.
Easy Variations to Customize Your Cake
The beauty of this dessert is how endlessly adaptable it is. For a coffee lover’s version, make the chocolate pudding layer as directed but whisk 1½ teaspoons of instant espresso powder into the cold milk before adding the pudding mix. The coffee deepens the chocolate flavor without making the dessert taste coffee-forward — it just intensifies the richness.
For a lighter version with less chocolate, reduce the pudding layers to 1½ packages instead of 2, and increase the whipped cream layers accordingly. You’ll get a more vanilla-forward dessert that still has rich chocolate moments.
To make this dessert completely dairy-free, substitute heavy cream with coconut cream (the thick cream from a can of full-fat coconut milk, not the sweetened kind), and use non-dairy milk with the pudding. Most instant pudding mixes can be made with non-dairy milk — just check the package. For the chocolate topping, use dairy-free butter and substitute the milk with the same non-dairy milk or coconut cream. The flavor will be slightly different but genuinely delicious.
For a boozy adult version, whisk 1 to 2 tablespoons of dark rum, brandy, or whiskey into the final whipped cream layer, or dissolve a tablespoon of instant espresso in the chocolate topping liquid. These additions are subtle enough not to overwhelm the dessert but give it a sophisticated edge.
If you want to add texture, sprinkle a thin layer of finely crushed wafer cookies between the pudding and whipped cream layers, or layer in a few crushed candy pieces for crunch. Just avoid anything that will quickly absorb moisture and turn soggy — texture elements should be added right before assembly.
For a mint chocolate version, add ½ teaspoon peppermint extract to the whipped cream layers and use chocolate mint pudding instead of regular chocolate. The peppermint pairs beautifully with the dark chocolate topping.
Make-Ahead and Storage Guidelines
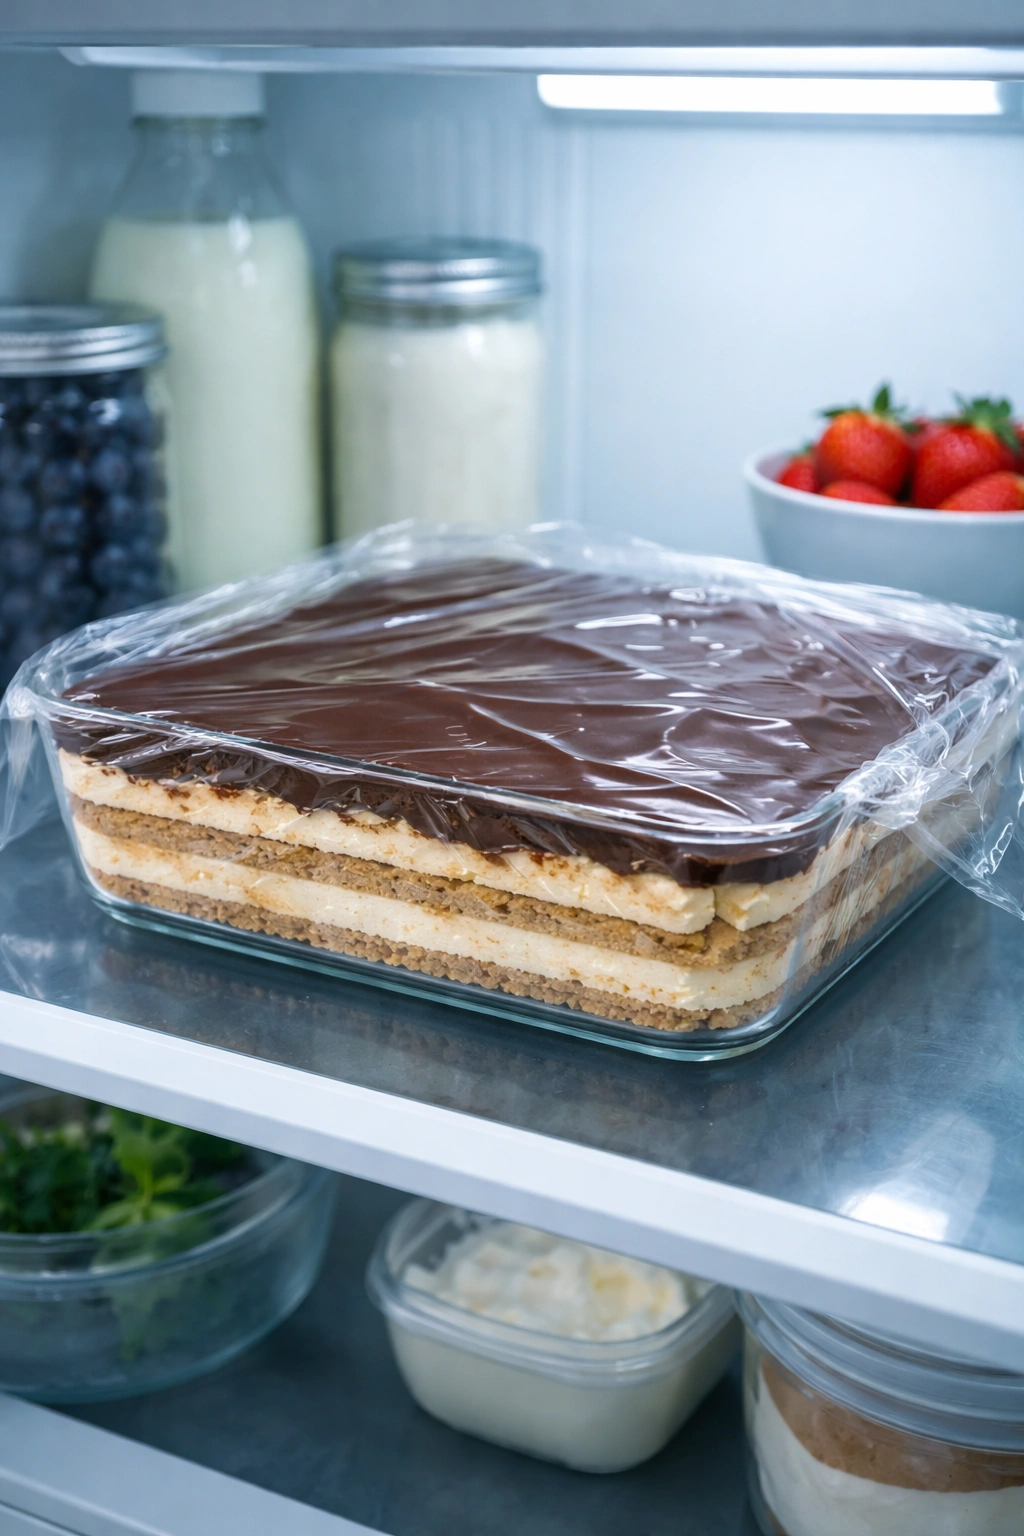
This dessert is the ultimate make-ahead cake. You can assemble it completely the day before serving — in fact, that’s often better. Overnight chilling allows the layers to meld together perfectly and creates more distinct textures. The wafers soften gradually, the flavors deepen, and the chocolate topping sets into exactly the right consistency. Cover the cake loosely with plastic wrap once the chocolate topping has fully set (about 1 hour after assembly) to prevent it from picking up refrigerator odors.
The finished cake keeps beautifully in the refrigerator for up to 3 days, though it’s best eaten within the first 2 days while the wafers still have slight structure and haven’t become too soft. You can partially assemble the cake ahead of time — make the first layer of wafers and pudding the day before, then add the remaining components a few hours before serving if you prefer fresher whipped cream layers.
Freezing isn’t recommended for this particular dessert. The texture doesn’t hold up well to freezing and thawing — the whipped cream can weep, and the wafers can become overly soft. However, you can make all the components ahead and freeze them separately: the chocolate topping (thaw and gently reheat before using) and extra whipped cream (though freshly whipped is always better). The assembled cake is best kept refrigerated.
If you’re taking this cake to a potluck or need to transport it, keep it in the baking dish and cover it tightly with plastic wrap once it’s fully set. It should stay in a cooler during transport and go straight into the refrigerator when you arrive. The cake is sturdy enough to travel reasonably well as long as you don’t jostle it excessively.
How to Serve and Plate This Dessert
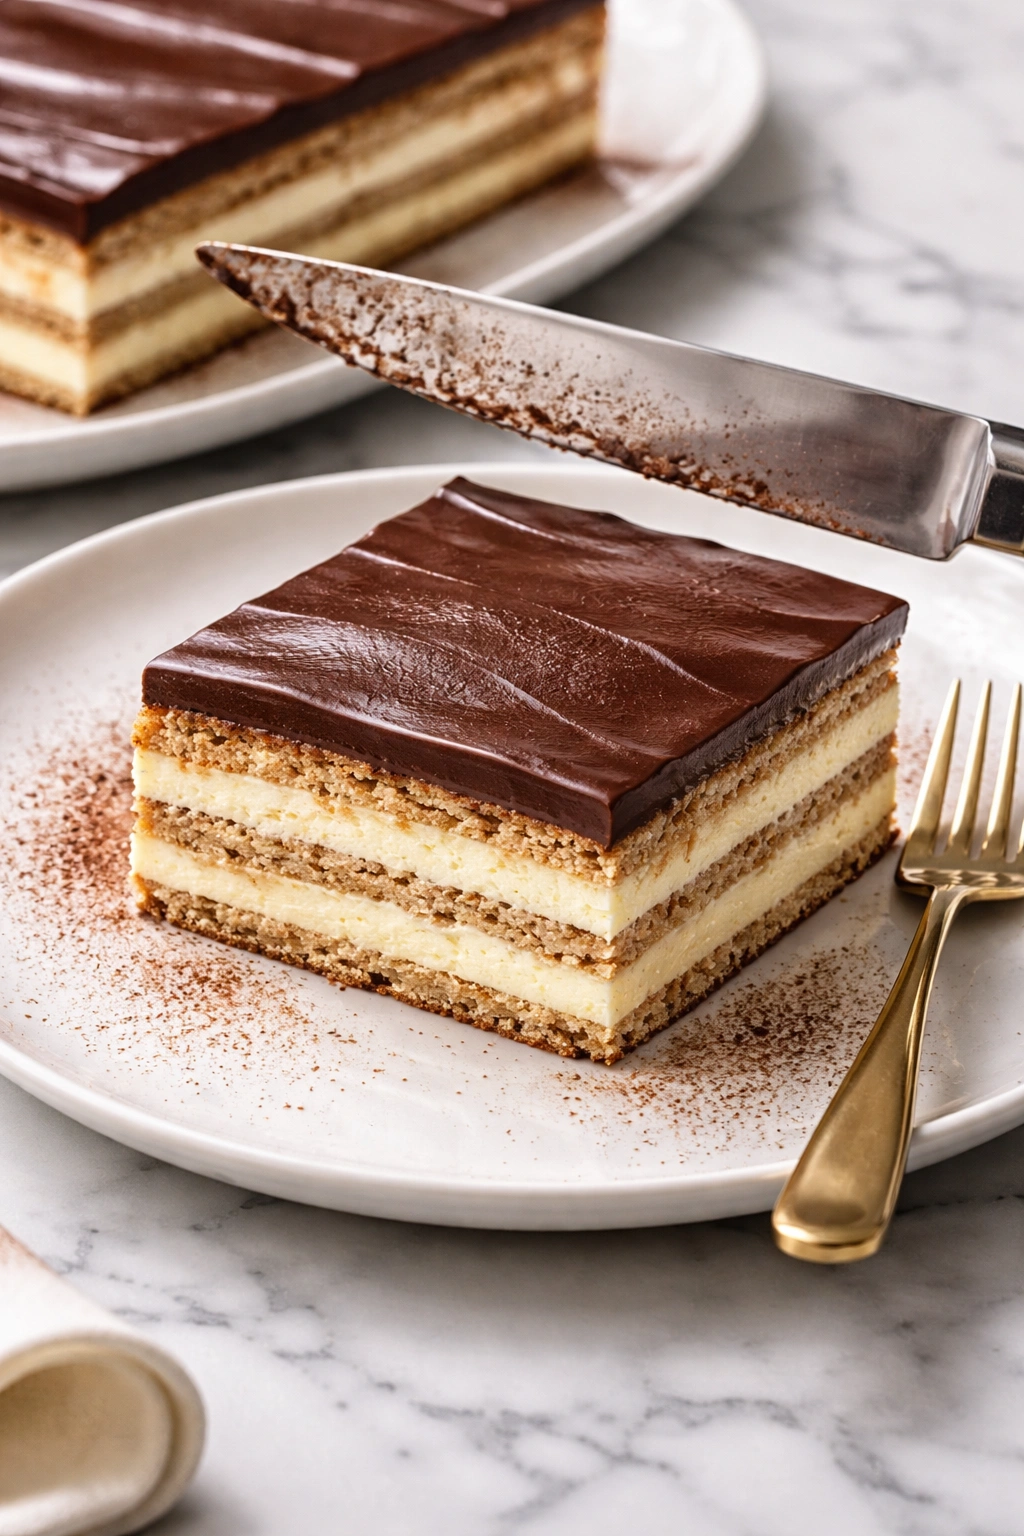
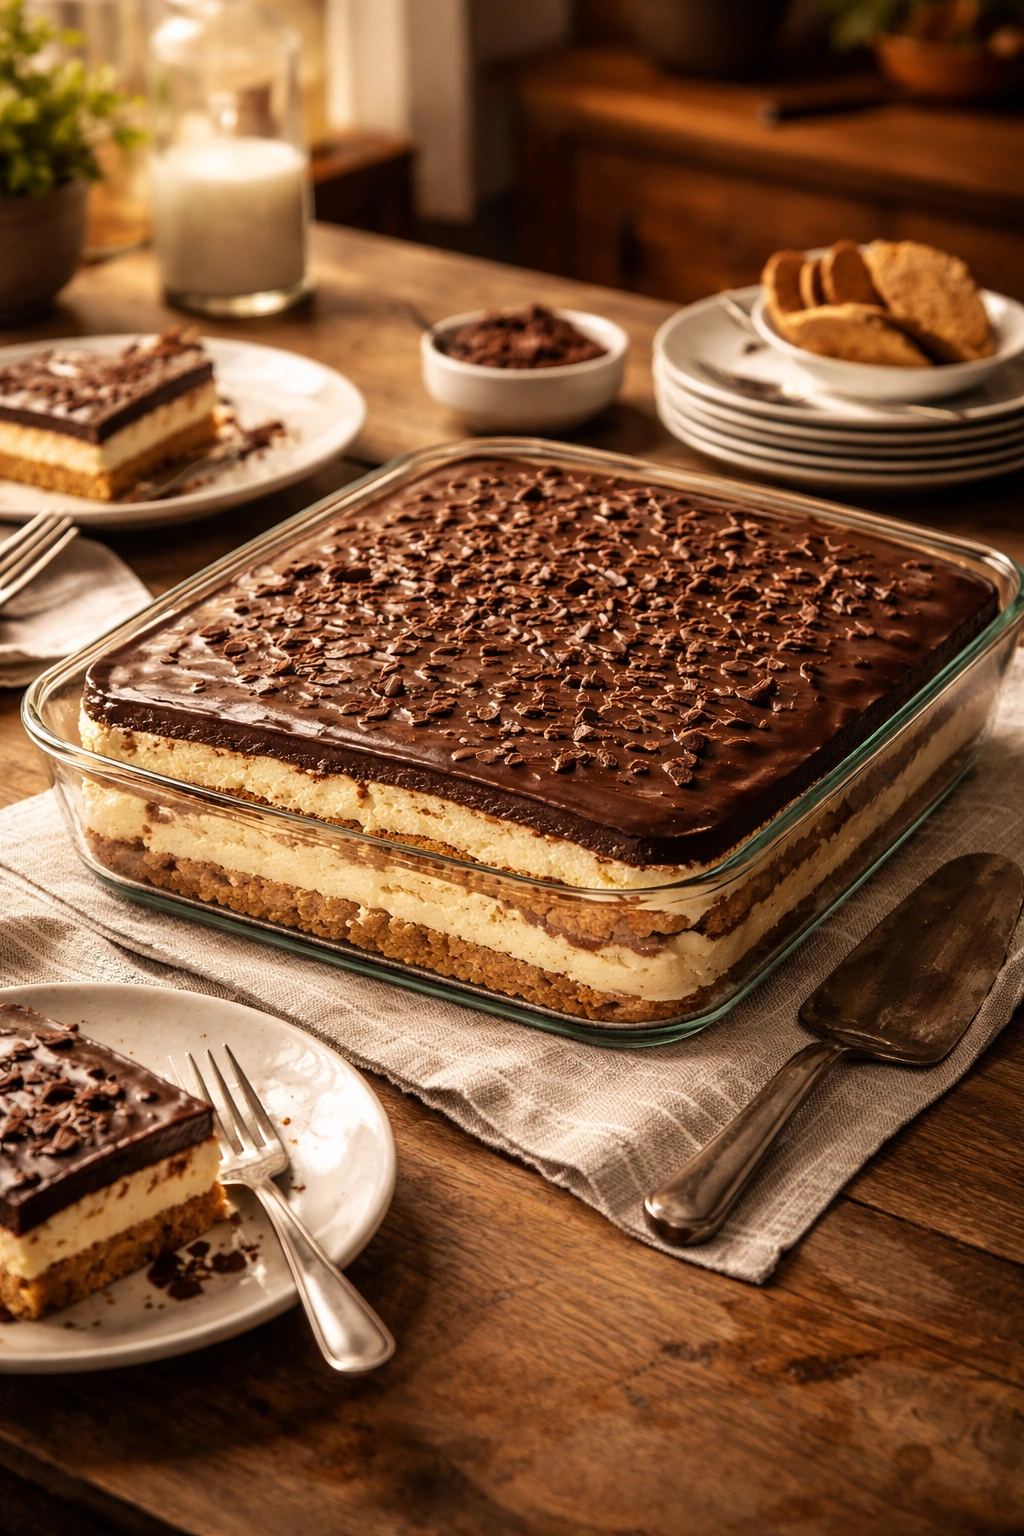
Cut the cake into portions using a sharp, clean knife dipped briefly in hot water and wiped dry between each cut. The hot knife slides through the layers cleanly without dragging the chocolate topping or crushing the wafers. A standard 9×13-inch cake serves 12 to 14 people with normal-sized portions, or 10 people if you prefer generous helpings.
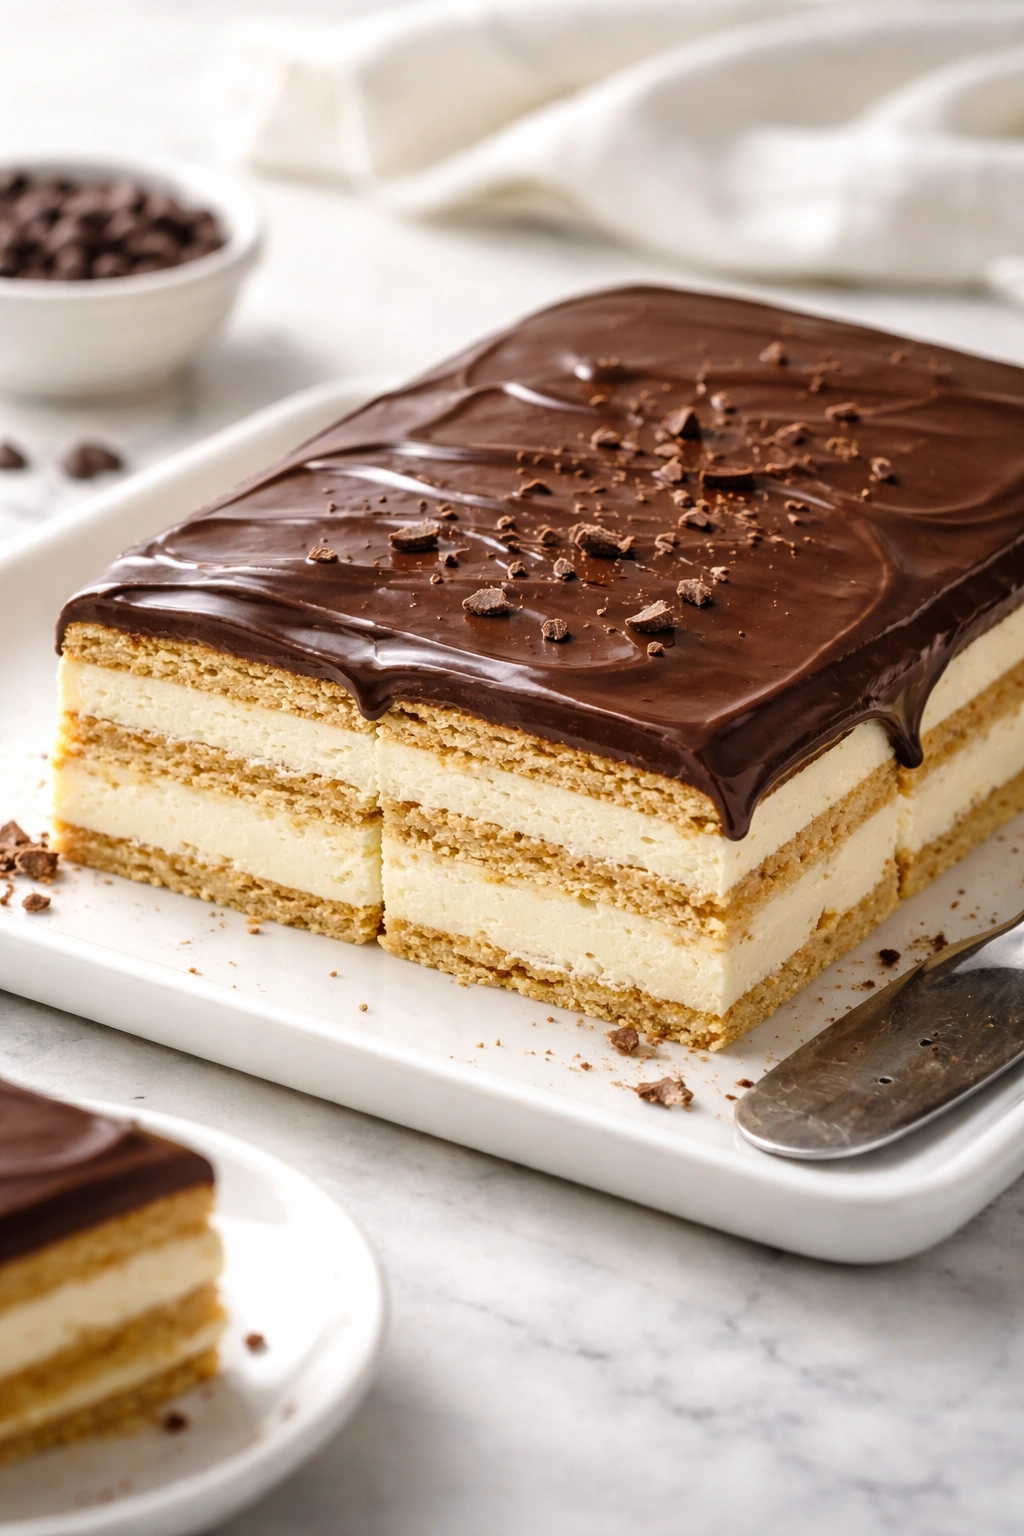
Plating makes a difference here. If you’re serving this at a dinner party, a rectangular slice on a chilled dessert plate looks elegant. You might add a small spoonful of whipped cream on the side and a sprinkle of cocoa powder or chocolate shavings if you want to make it feel special. The contrast of the cool cake against a cold plate keeps textures at their best.
For casual family servings, the classic approach is to simply serve it directly from the baking dish with a spoon. There’s something honest and unpretentious about that — everyone can see the layers and appreciate the care that went into building them.
This dessert pairs beautifully with coffee or espresso — the richness of the chocolate and the lightness of the whipped cream are perfectly complemented by the slight bitterness of coffee. A glass of cold milk is obviously wonderful too. Some people serve it with a small glass of dessert wine, which is entirely pleasant but unnecessary given how satisfying the dessert is on its own.
Why This Cake Becomes a Family Tradition
What makes a dessert turn into something families request year after year? Partly, it’s the reliability. You make this cake the same way twice and it comes out the same way both times — no surprises, no failures, just consistent excellence. People start requesting it because they know exactly what they’re going to get and they know they’re going to love it.
But there’s something deeper too. This dessert has a quality of generosity built into it. You’re not making something difficult and then hoarding the recipe jealously. You’re making something genuinely easy that looks and tastes impressive, and you’re willing to share how to make it. That generosity gets remembered. Kids grow up watching family members make this cake for holidays and celebrations, and they eventually make it themselves, and it becomes woven into family memory.
There’s also the texture story that keeps people coming back. Those soft, pudding-soaked wafers with the vanilla whipped cream and dark chocolate topping hit a very specific craving that most desserts can’t quite satisfy — it’s like eating something that’s between a cookie and a cake and a chocolate pudding cup all at once, and it somehow works perfectly. Once people taste that exact combination, they understand why it becomes a favorite.
Final Thoughts
This no-bake chocolate eclair cake proves that impressive desserts don’t require complicated techniques or advanced baking skills. What they require is understanding texture contrast, being patient enough to let cold time do the work, and having the confidence to make something simple, make it well, and trust that simplicity is exactly why people love it.
The dessert comes together in less than an hour of actual hands-on work, and then refrigeration handles everything else. You get back the gift of time, which is increasingly precious. You get to serve something beautiful and delicious that tastes far more complex than it actually is. Your family gets a dessert they’ll request again and again because it’s become part of how they experience sweetness and celebration.
Start with this exact recipe, make it once, and commit to it being perfect. Next time, when you’re confident, experiment with a variation. But don’t underestimate how good the straightforward version is. Sometimes the most treasured family traditions are built on exactly this kind of foundation — nothing fancy, nothing pretentious, just something made with genuine care that hits every note people actually want.