Cheesecake has a reputation for being finicky—especially the water bath part. That intimidating instruction to wrap your springform pan in foil and surround it with hot water stops plenty of home bakers before they even start. The good news? You don’t actually need it. A properly made cheesecake can emerge from your oven silky, dense, and creamy without ever touching water, and the final result is genuinely indistinguishable from the traditional method.
The secret isn’t some complicated technique or special ingredient. It’s understanding what a water bath actually does—creating gentle, even heat that prevents the edges from overcooking while the center stays creamy—and then achieving that same result through careful oven management and precise timing. Once you know the tricks, the no-water-bath method is actually easier, less messy, and produces zero risk of water seeping into your crust (a problem that ruins more cheesecakes than most people realize).
This is the approach I’ve used for years, and it works because it respects the physics of how cheesecake bakes. No shortcuts, no substitutions that would compromise the texture, just straightforward baking science applied in a practical way.
Why Skip the Water Bath?
The water bath serves one clear purpose: it moderates temperature fluctuations and prevents the edges from baking much faster than the center. But here’s what most recipes don’t mention—a water bath also creates its own problems. Water can seep past the foil. The pan can be awkward to handle. Your oven has to fit a huge, unwieldy setup without bumping the walls. And if you’re not careful with the foil, steam can condense back onto the cheesecake, creating a soggy top or introducing unwanted moisture.
The no-water-bath approach eliminates these headaches entirely. You’re relying instead on lower oven temperature, slower baking time, and careful monitoring. The tradeoff is minimal—you gain simplicity and reliability while losing nothing in terms of final quality. In fact, many experienced bakers prefer this method because you have more direct control over the baking process and can stop it the moment it reaches the exact point of doneness you want.
A water bath becomes truly necessary only if your oven has serious temperature inconsistencies or if you’re regularly opening the door (which disrupts the gentle heat environment). Most home ovens don’t have either problem, which means you can skip it entirely and get identical results with a fraction of the fuss.
The Science of Creamy Cheesecake Without Overcooking
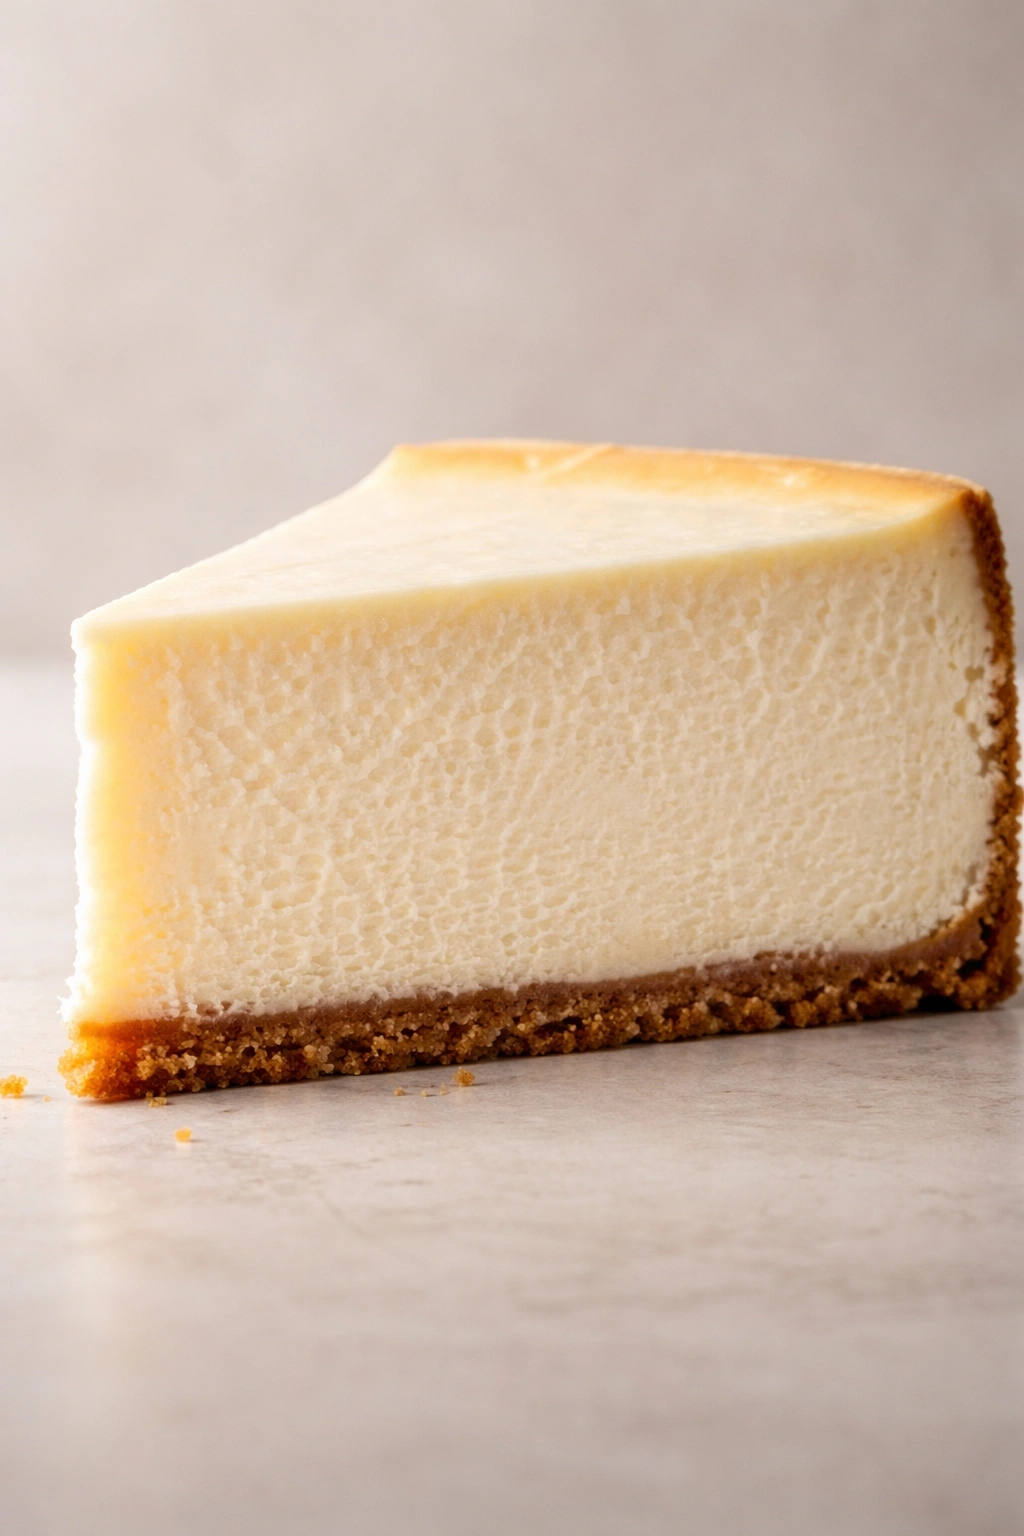
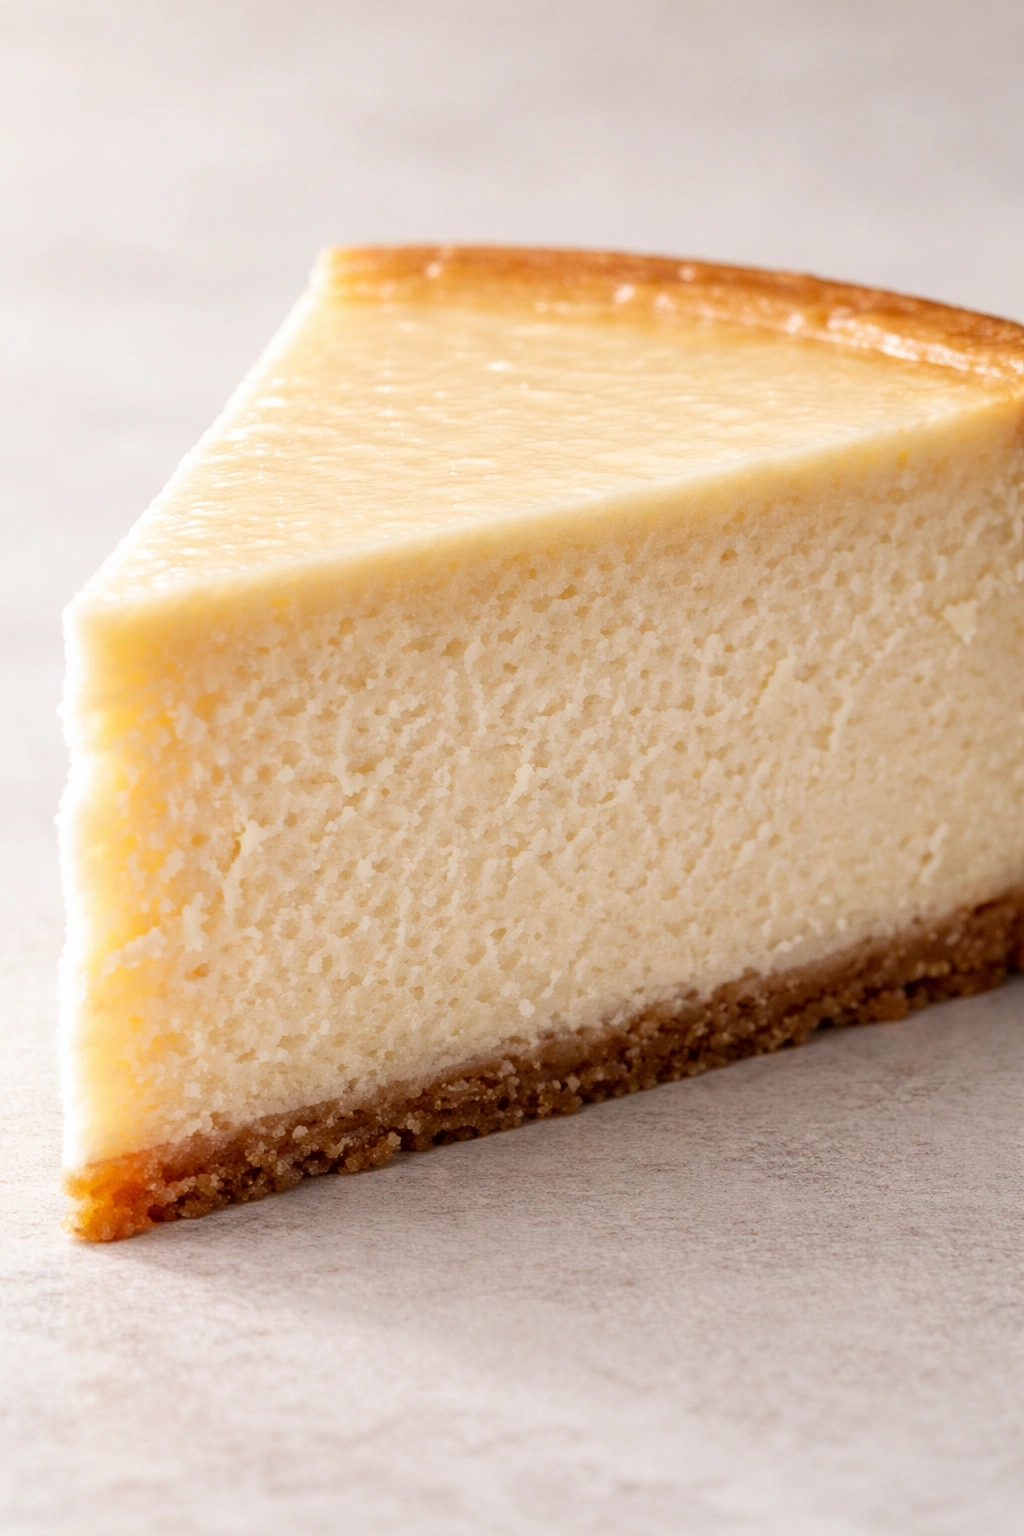
Cheesecake is fundamentally an egg custard baked inside a crust. The cream cheese and eggs bind together as the heat denatures the proteins, creating that signature dense, smooth texture. The challenge is that eggs tighten and become grainy when they overcook—even by just a few degrees. That’s why temperature control matters so much.
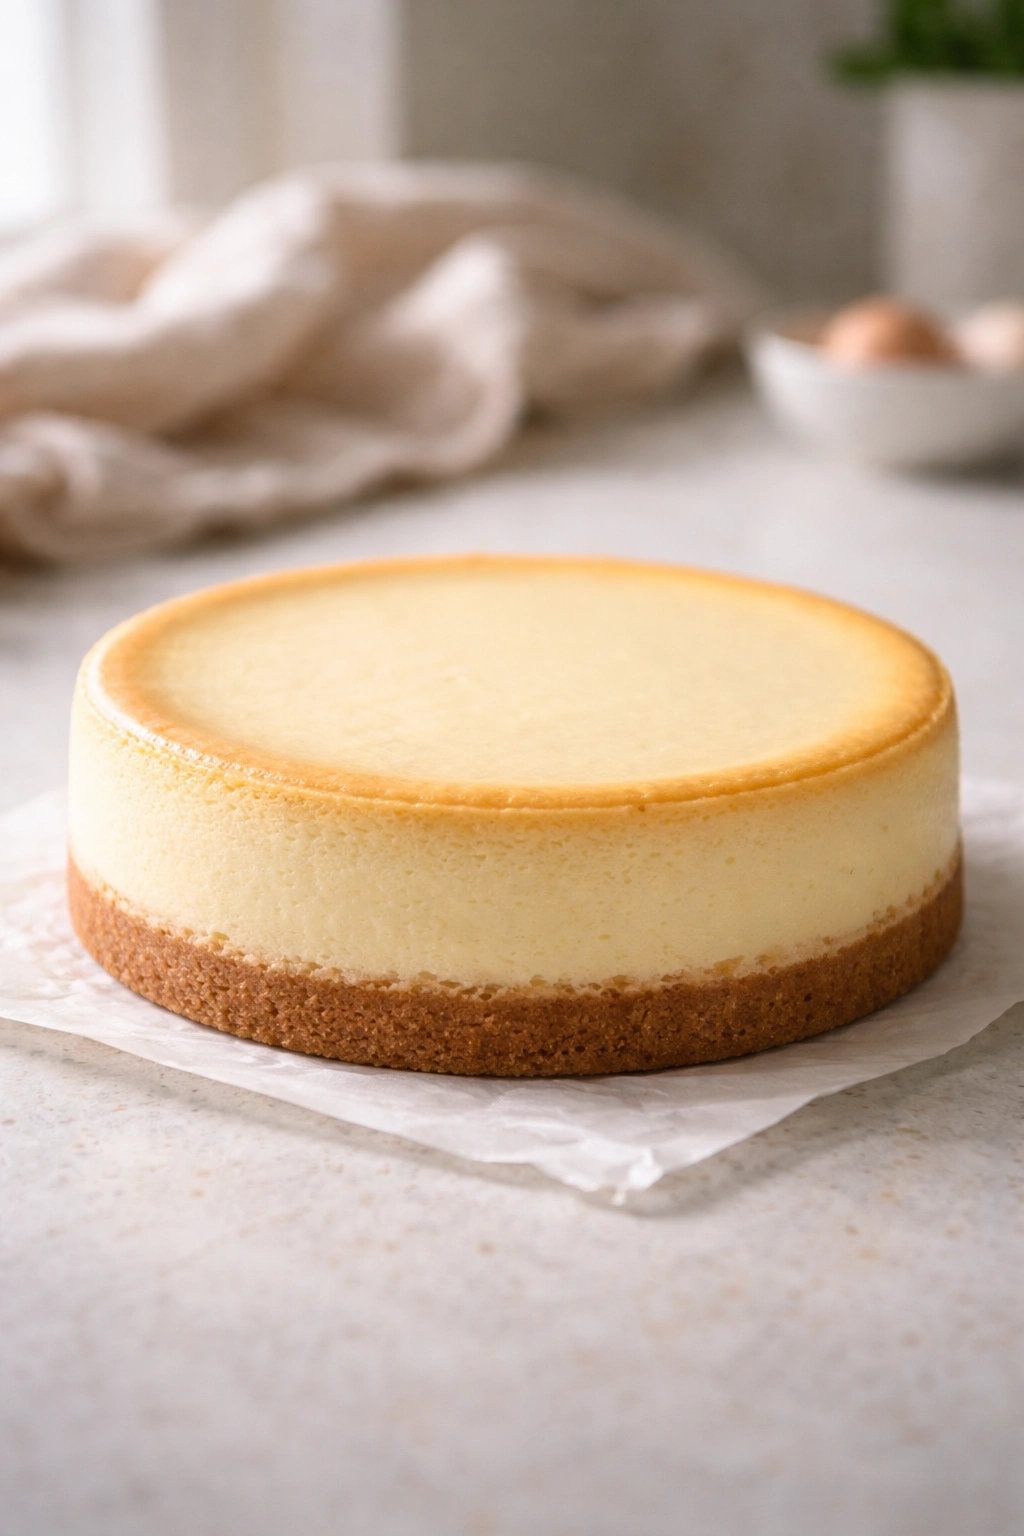
A water bath works by surrounding the pan with a buffer of water that heats up slowly and moderates the oven’s dry heat. Without it, the oven air hits the sides of your pan directly, and theoretically, the edges would bake faster than the center. However, this only becomes a real problem if you bake at standard high-heat settings (350°F / 175°C or higher). Lower the oven temperature to 325°F (163°C) and bake longer, and the entire cake bakes more slowly and evenly. The edges don’t race ahead; everything moves at roughly the same pace.
The other key factor is when you stop baking. A water bath lets you go longer because the gentle heat is more forgiving. Without it, you have to be more precise about pulling the cake out at exactly the right moment—when the very center still has a tiny bit of jiggle but the rest is set. This actually gives you better control, not worse, because you can see what’s happening and adjust based on visual cues rather than guessing.
Choosing Your Cream Cheese and Ingredients
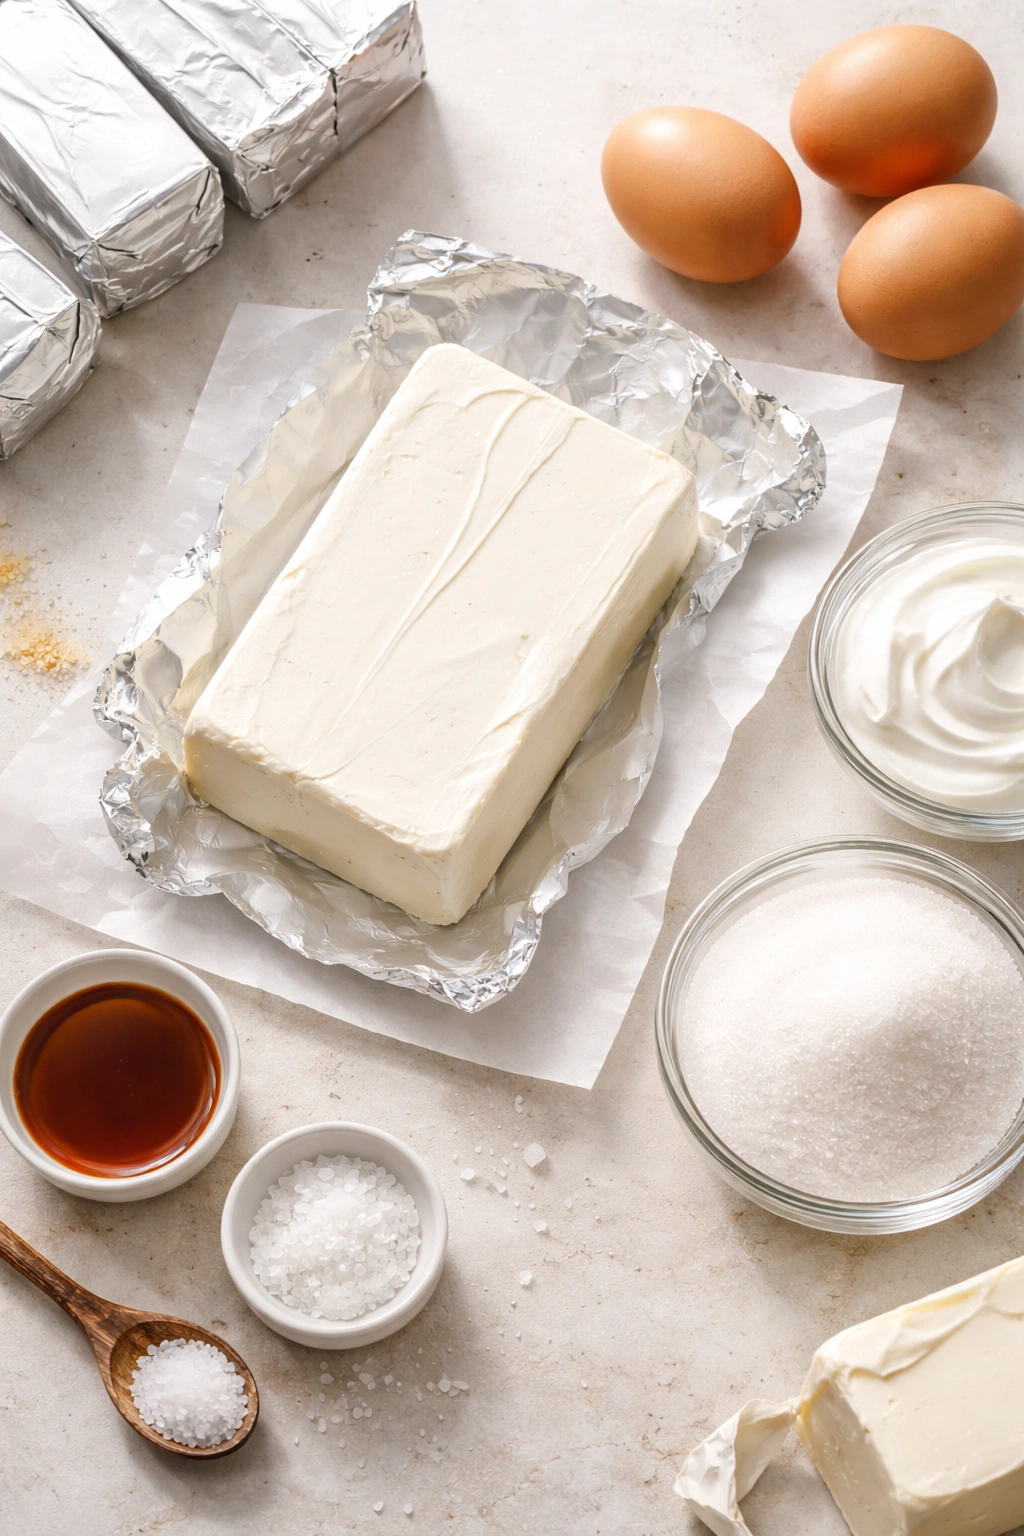
Not all cream cheese is created equal, and this matters more in cheesecake than in almost any other dessert. Standard brick cream cheese (Philadelphia is the reliable baseline) is your best choice. It has a consistent fat content and firmness that creates the right texture. Whipped cream cheese, cream cheese spread, or those “lower-fat” versions will give you a different crumb and won’t set properly. If you can only find individually wrapped packets, they work fine—just measure by weight to be sure (8 oz is roughly 230g, though weights vary slightly by brand).
Temperature is critical for every ingredient. Cream cheese at room temperature blends smoothly into the batter, creating an airy, lump-free filling. Cold cream cheese fights the mixer and creates dense clumps that never fully incorporate, even after five minutes of beating. Pull it out of the fridge 30-45 minutes before you start mixing. Do the same with eggs—they blend more easily into the batter when they’re around 70°F (21°C) rather than cold from the fridge.
The quality of your vanilla extract and salt makes a subtle but real difference. Use real vanilla extract, not imitation—the flavor is noticeably deeper and more complex. If you’re using almond or lemon extract, use less than the vanilla (they’re more concentrated) and taste the batter to be sure you haven’t overdone it.
Sour cream is crucial for tang and moisture. Don’t skip it or substitute Greek yogurt or crème fraîche. It has specific properties that keep the cheesecake creamy rather than dense. Use full-fat sour cream, not low-fat.
The Crust Foundation That Matters
The crust is less forgiving than people think. A soggy, oily crust will absorb moisture from the filling and turn into a paste at the bottom of your cheesecake. A crust that’s too thin will let the filling soak through and make handling difficult. You want something in between—sturdy enough to support the filling but thin enough that it crisps up during baking.
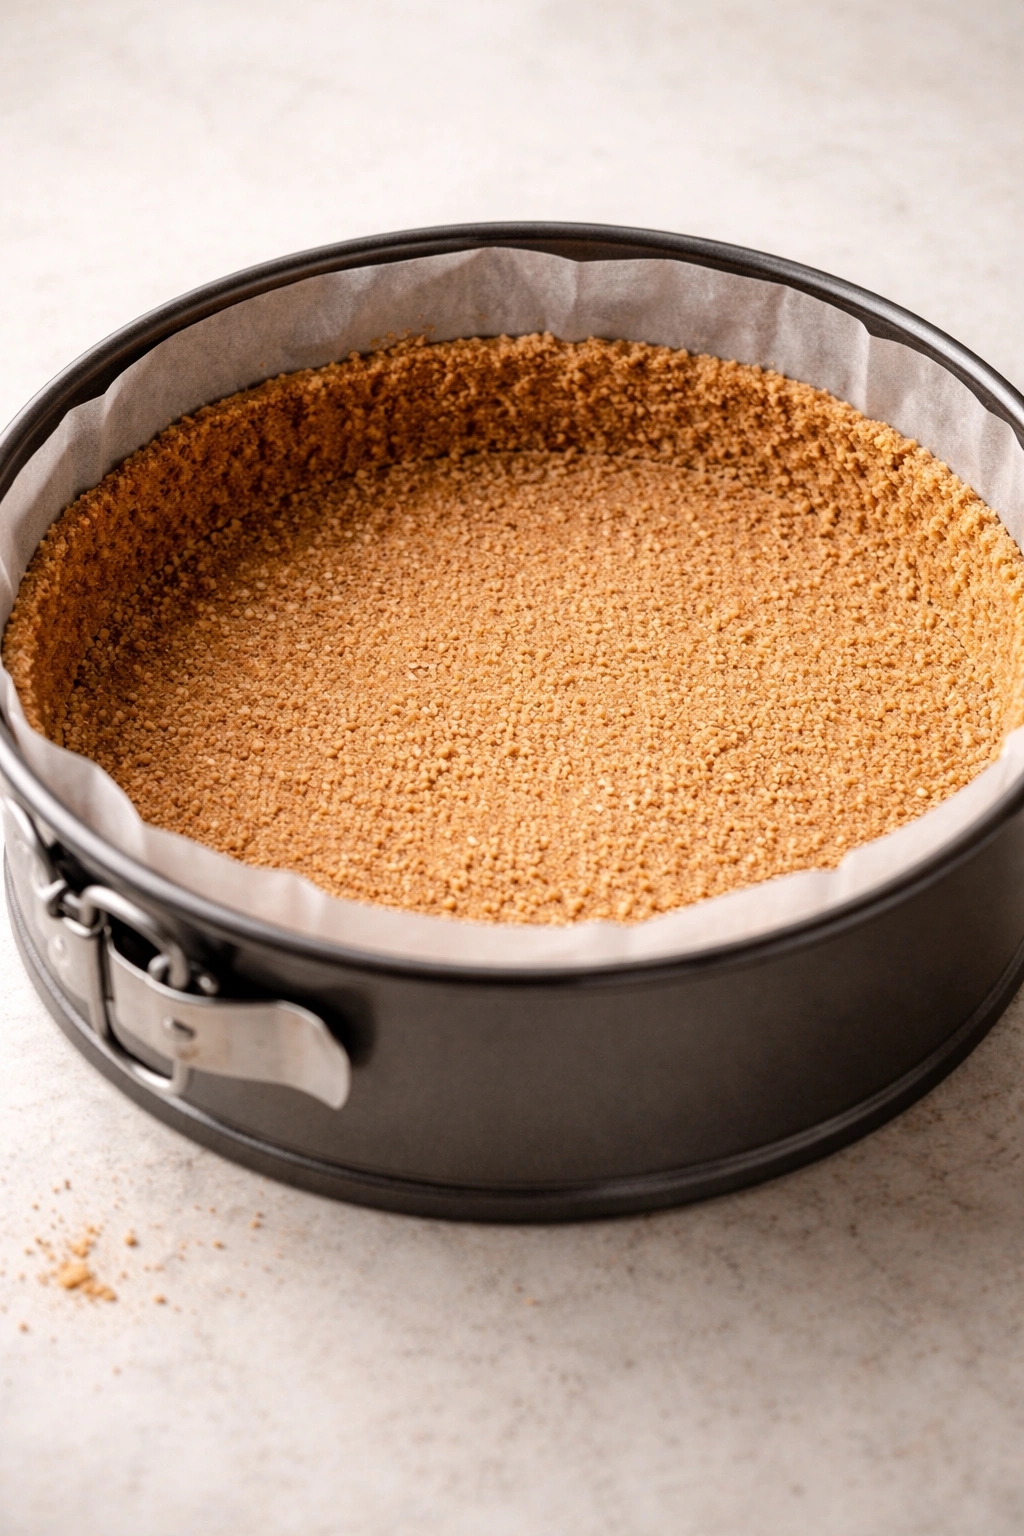
Graham cracker crumbs and melted butter in a 2:1 ratio is the classic proportion, and it works. Use full-fat butter, not oil, because it sets as it cools and actually holds the crust together. Mix the ingredients until they look like wet sand, then press firmly into the bottom of the pan and bake at 325°F (163°C) for 10 minutes. This partial bake sets the structure so the filling doesn’t sink in and turn it to mush.
Some people skip the pre-bake, and they end up with a soggy crust every time. The 10-minute head start is not optional—it’s the difference between a cheesecake that holds together and one that falls apart when you slice it.
If you’re using a springform pan, line the bottom with parchment paper before adding the crust. Let the parchment stick up about an inch on the sides. After the cheesecake cools, you can lift it out by grabbing the parchment, then slide it onto your serving plate and peel the paper away. This prevents cracks from trying to manipulate the whole pan.
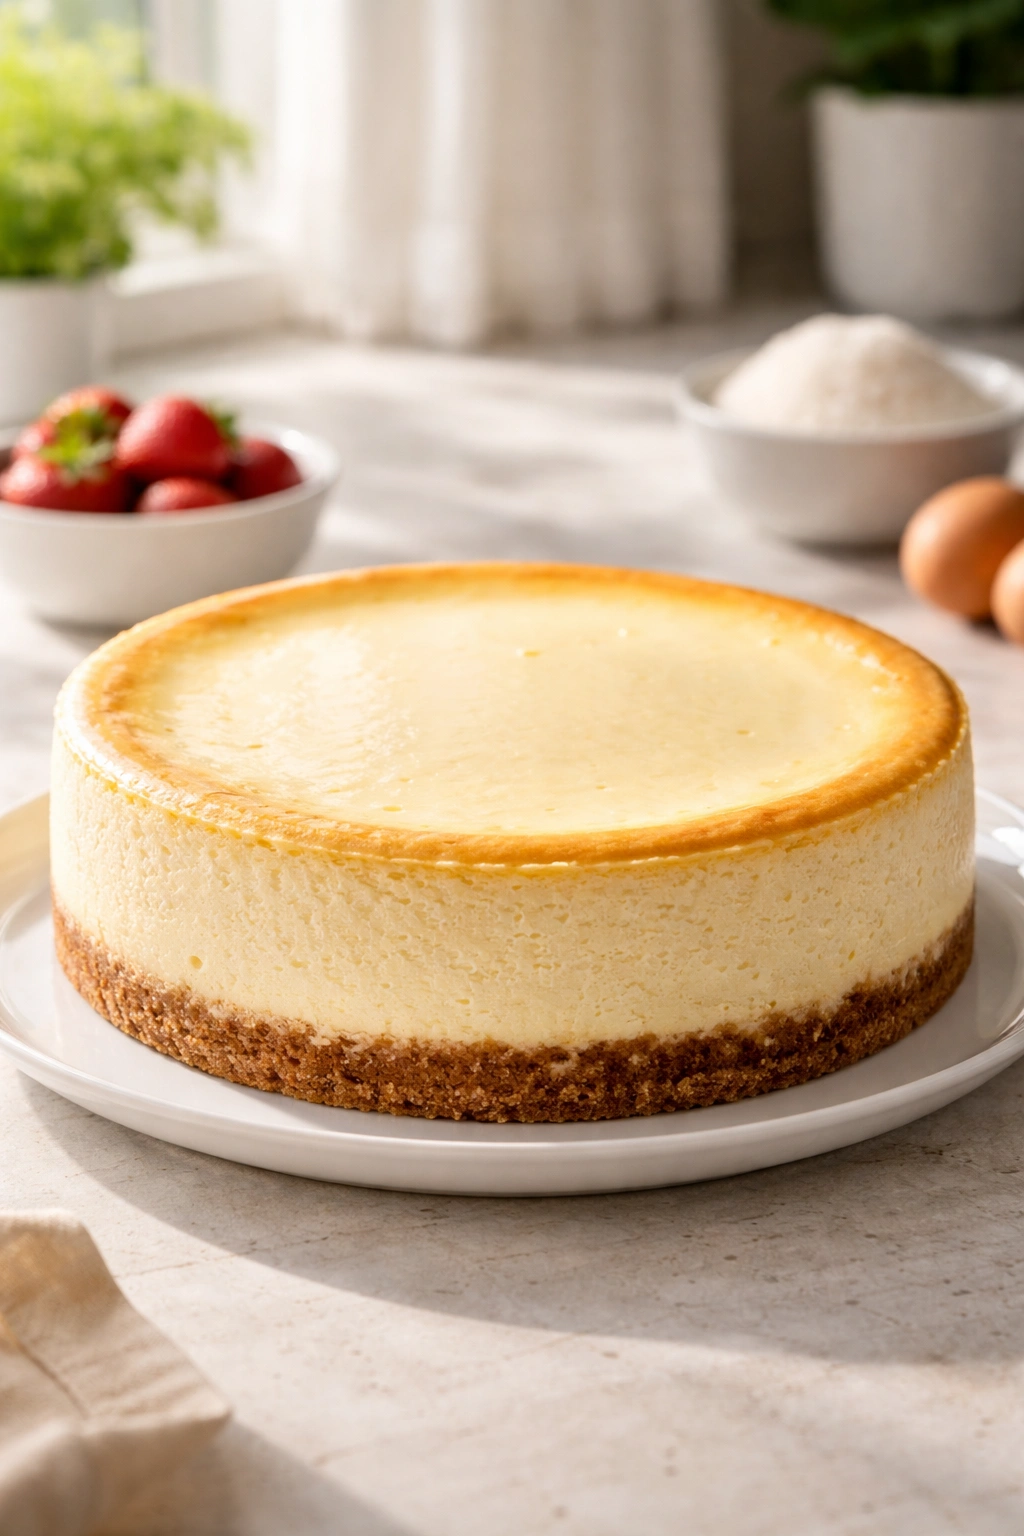
Creamy Cheesecake (No Water Bath)
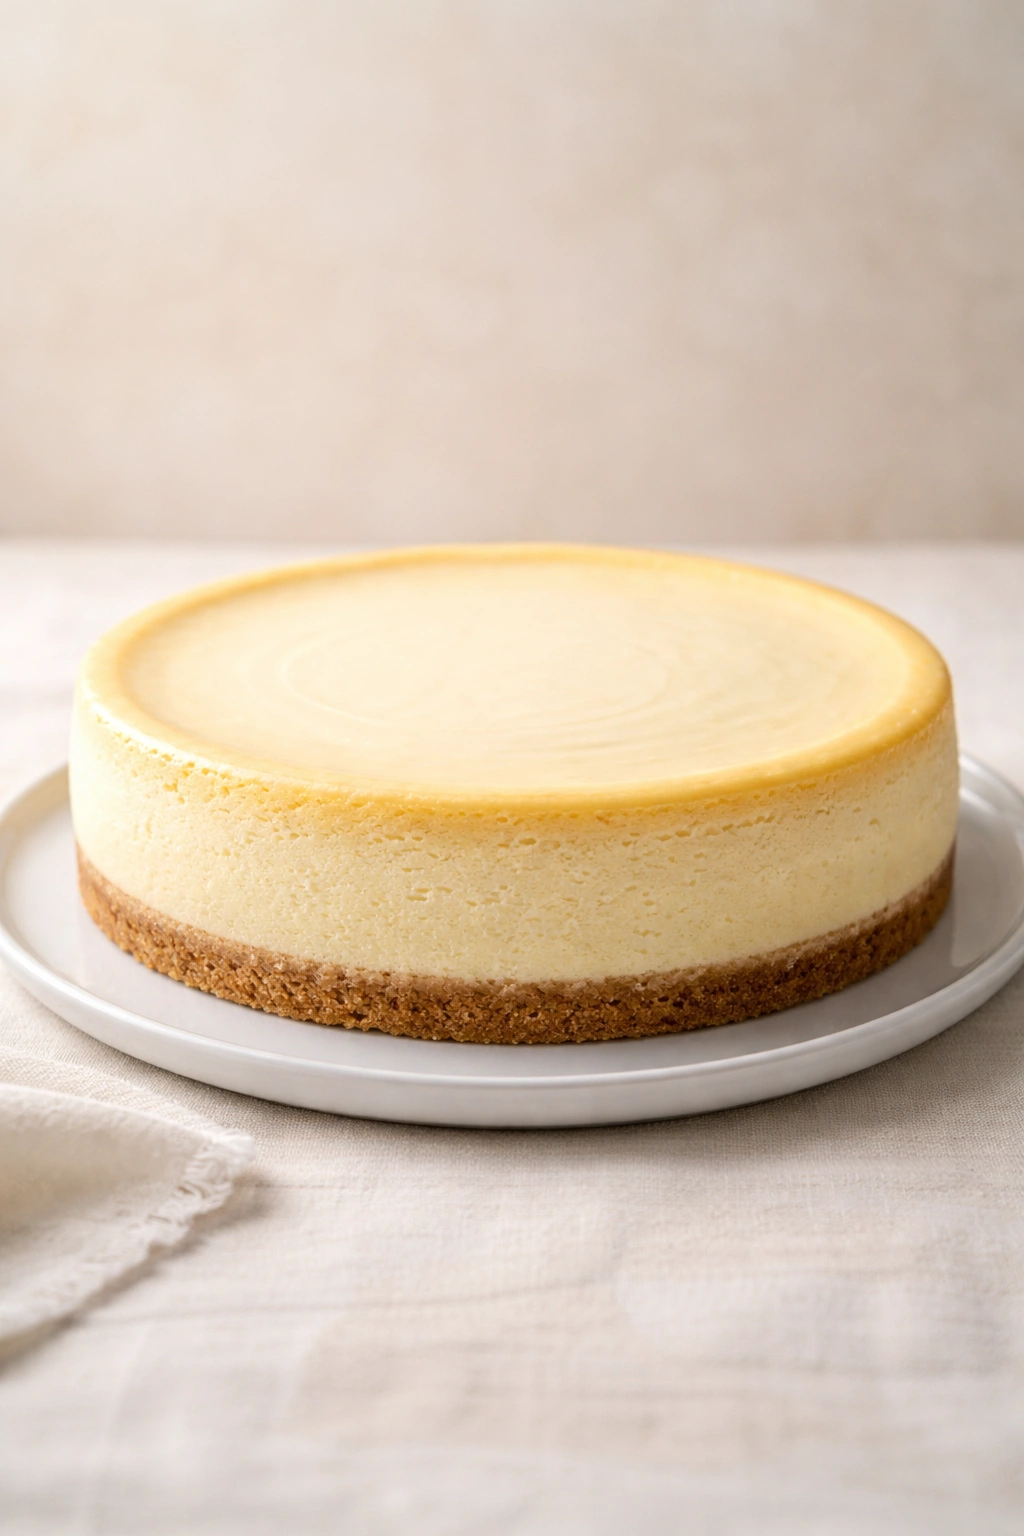
Yield: One 9-inch (23 cm) cheesecake, 12 to 16 slices
Prep Time: 25 minutes
Cook Time: 1 hour 10 minutes
Total Time: 1 hour 35 minutes active, plus 8 hours chilling
Difficulty: Intermediate — The technique is straightforward, but timing and temperature awareness matter. Success requires paying attention to visual cues rather than just following a timer blindly.
For the Graham Cracker Crust:
- 2 cups (180g) graham cracker crumbs (about 14 to 16 full crackers, crushed into fine crumbs)
- 4 tablespoons (57g) unsalted butter, melted
- 2 tablespoons granulated sugar
- Pinch of fine sea salt
For the Cheesecake Filling:
- 32 oz (910g) cream cheese, softened to room temperature
- 1 cup (200g) granulated sugar
- ¼ cup (30g) all-purpose flour
- ¼ teaspoon fine sea salt
- 1 teaspoon pure vanilla extract
- 3 large eggs, room temperature
- ½ cup (120ml) sour cream (full-fat), room temperature
Optional Add-ins (use one or none):
- 2 tablespoons fresh lemon zest (for lemon cheesecake)
- 1 teaspoon almond extract plus ½ teaspoon cardamom powder (for subtle depth)
- ½ cup (85g) mini chocolate chips, folded in gently at the very end
Step-by-Step Instructions
Prepare the Pan and Crust:
-
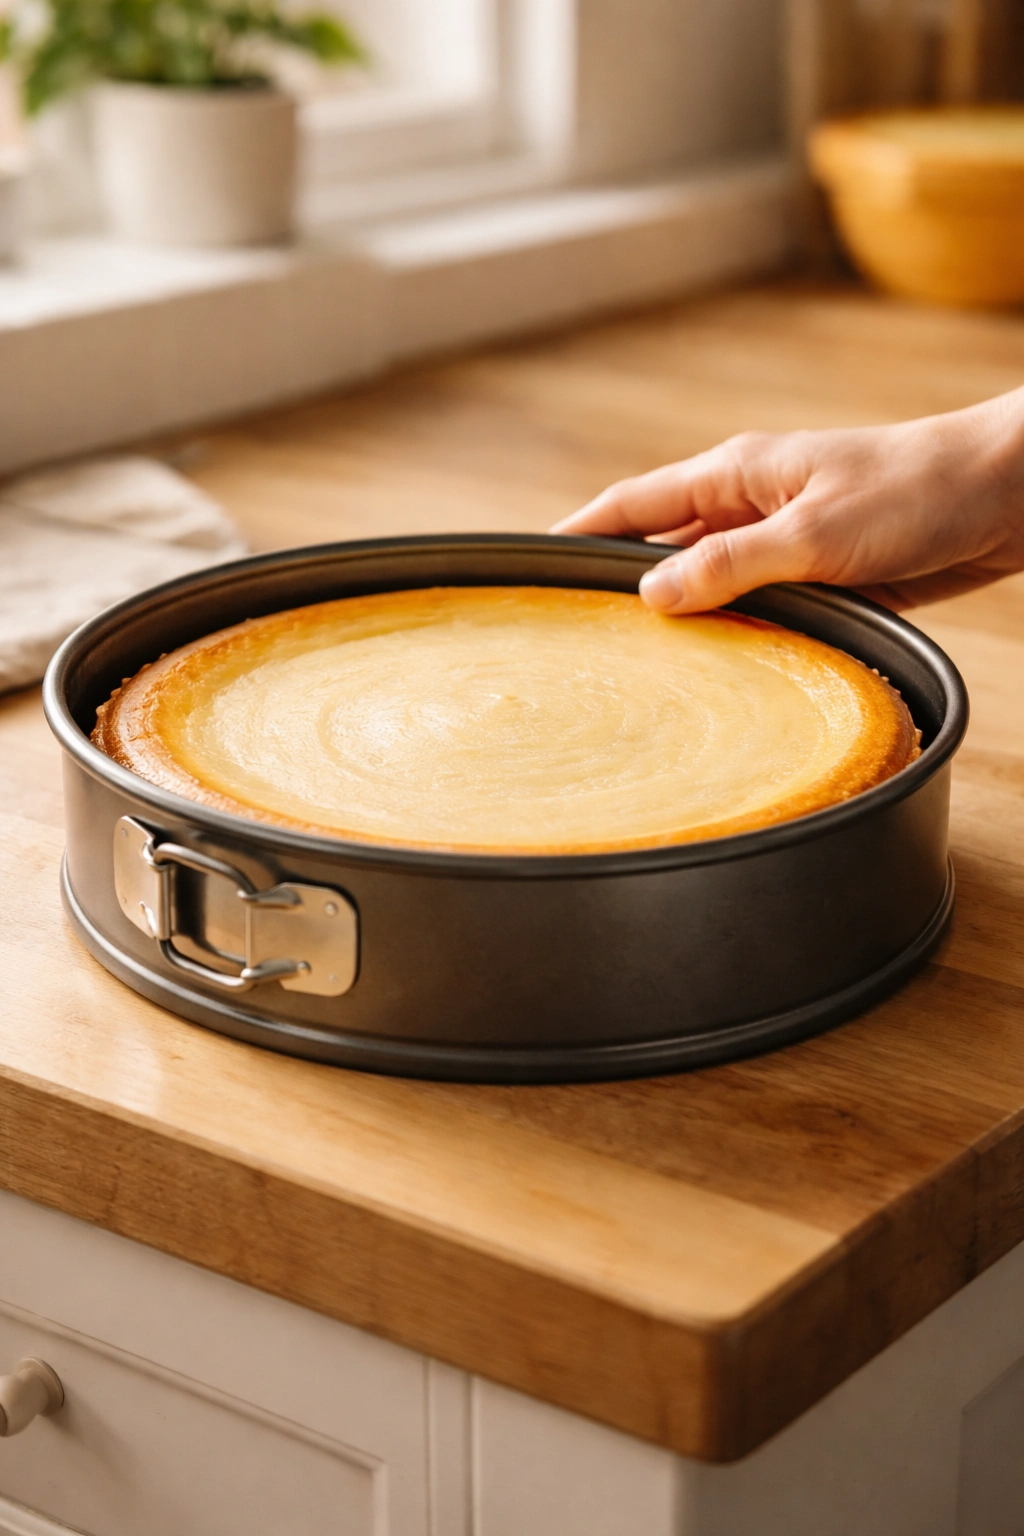
Preheat your oven to 325°F (163°C) and position the rack in the center of the oven. Line the bottom of a 9-inch (23 cm) springform pan with parchment paper, letting it extend about 1 inch up the sides.
-
In a small bowl, stir together the graham cracker crumbs, melted butter, sugar, and salt until the mixture looks like wet sand with no dry pockets of crumbs remaining.
-
Press the mixture firmly into the bottom of the prepared pan, creating an even, compact layer. Use the bottom of a measuring cup to flatten it. The crust should be about ¼ inch thick and feel solid when you press on it.
-
Bake the crust at 325°F (163°C) for 10 minutes, until it smells toasted and has darkened slightly. Remove from the oven and set aside on a wire rack while you prepare the filling. Do not skip this pre-bake step — it prevents the crust from absorbing moisture from the filling and turning soggy.
Advertisements
Make the Filling:
-
While the crust bakes, cut your room-temperature cream cheese into roughly 1-inch cubes. Cutting it into smaller pieces helps the mixer incorporate it faster and more evenly, preventing lumps in the final batter.
-
In the bowl of a stand mixer fitted with the paddle attachment (or using a hand mixer), beat the cubed cream cheese on medium speed for 3 to 4 minutes, stopping to scrape down the sides halfway through. It should look smooth, pale, and slightly fluffy — not dense or grainy. This initial beating is crucial. You’re breaking down the cream cheese’s structure so it blends seamlessly with the other ingredients.
-
In a small bowl, whisk together the flour, salt, and sugar until combined. Add this mixture to the beaten cream cheese and mix on low speed for about 1 minute, until no white streaks of flour remain visible.
-
Add the vanilla extract to the batter and mix briefly to distribute.
-
Crack your three room-temperature eggs into a small bowl and whisk them lightly with a fork until just combined (they don’t need to be perfectly uniform, just broken up). Add them one egg at a time to the mixer on medium speed, beating for about 30 seconds after each addition and scraping down the sides with a rubber spatula after the second egg. This prevents the batter from becoming curdled-looking (which is normal at this stage, but you’re blending it smoothly). By adding them gradually instead of all at once, you’re emulsifying them evenly throughout the batter.
-
Reduce the mixer speed to low. Add the room-temperature sour cream and mix just until no white streaks are visible — about 30 seconds. Do not overmix at this stage. Once you add the eggs and sour cream, minimize mixing time. Overworking develops gluten in the small amount of flour, which makes the cheesecake denser and tighter rather than creamy.
-
If you’re adding optional ingredients (lemon zest, chocolate chips, etc.), fold them in gently with a rubber spatula using about 10-15 slow folds. The batter is now ready to pour.
Bake the Cheesecake:
-
Pour the entire filling over the pre-baked crust in the springform pan. Use a rubber spatula to scrape every bit of batter into the pan and smooth the top into an even layer. Tap the pan gently on the counter two or three times — this releases any large air bubbles trapped in the batter.
Advertisements -
Place the filled springform pan on the center rack of your preheated 325°F (163°C) oven. Do not use a water bath. Do not wrap the pan in foil. Just place it directly on the oven rack.
-
Set a timer for 1 hour and 5 minutes. This is your reference point, not your stopping point. Start checking the doneness at 60 minutes, and use the visual and jiggle tests (see the Testing for Doneness section below) to determine the exact moment to stop baking.
-
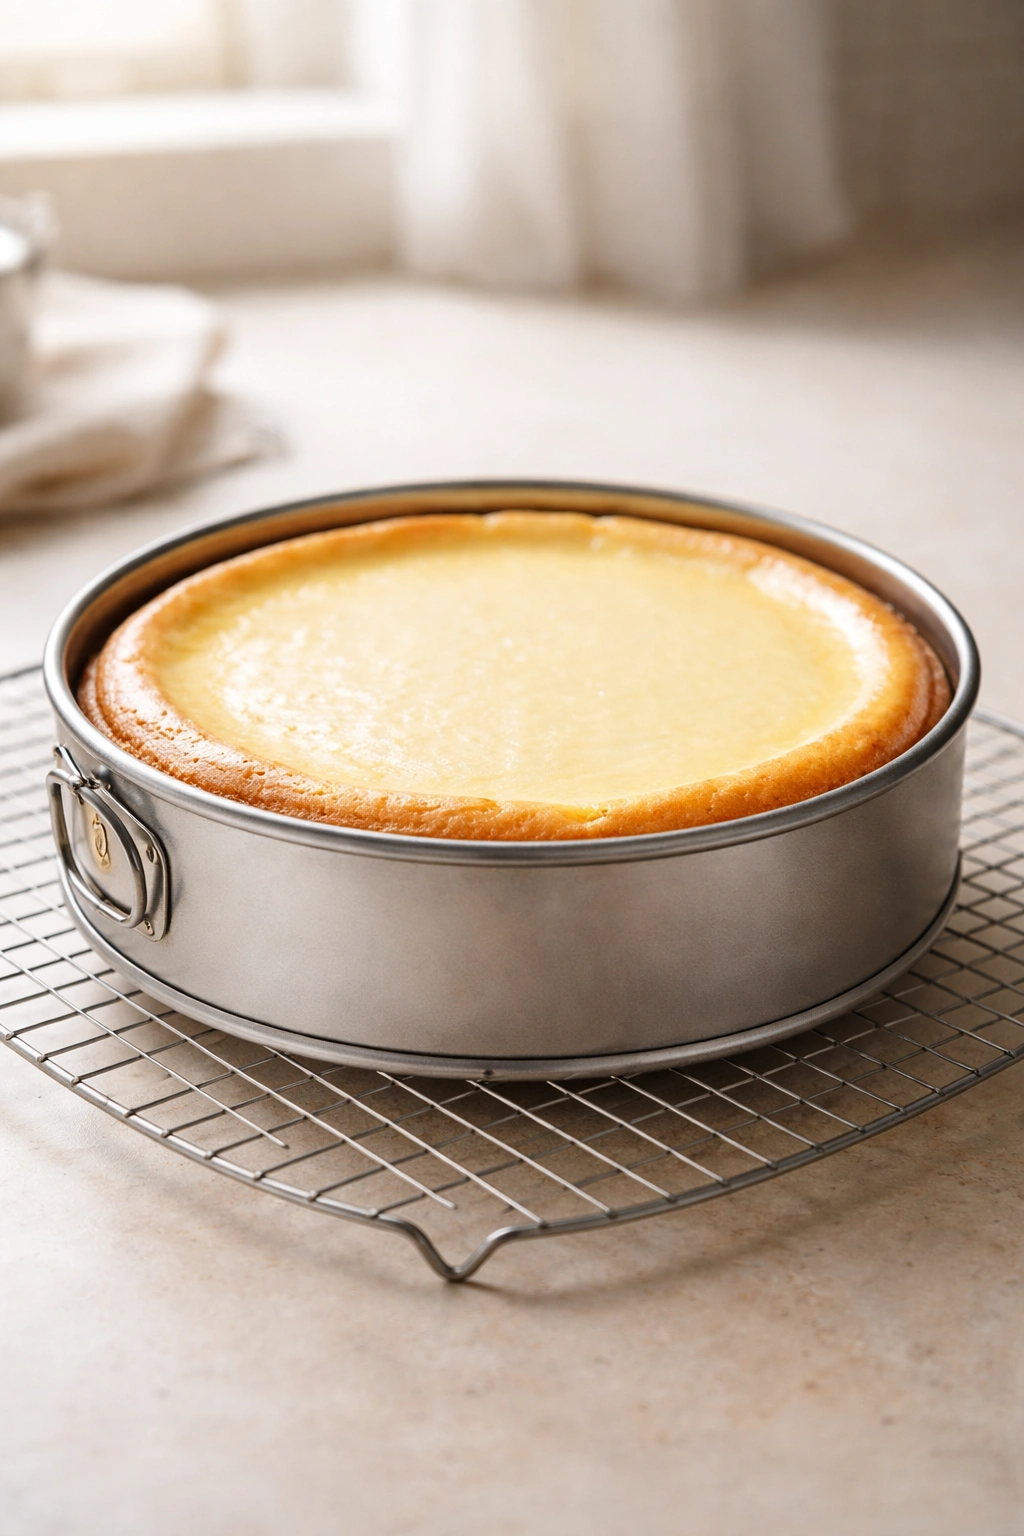
The cheesecake is done when the edges are fully set and no longer jiggle at all when you gently shake the pan, but the very center (about a 2-inch circle in the middle) still has a subtle, barely perceptible jiggle. If you jiggle the pan and the entire top moves like one solid mass, it’s overdone. If it’s still wobbling across the whole top, it needs more time. Pull it out the moment the center looks creamy but nearly set.
-
This visual test is more reliable than the toothpick test (which tends to break the surface) or an instant-read thermometer (which measures cold spots). Your eyes and a gentle shake are the best tools.
Cool and Chill:
-
Remove the cheesecake from the oven and place it on a wire cooling rack at room temperature. Do not attempt to remove it from the springform pan yet. This cooling phase is critical — cooling too quickly causes cracks because the outside contracts faster than the interior.
-
Allow the cheesecake to sit on the counter undisturbed for at least 2 hours, until it has cooled to room temperature. You can leave it longer (even 4 hours is fine) — there’s no penalty for slower cooling.
-
Once the cheesecake is completely cool, cover it loosely with plastic wrap and refrigerate for at least 6 hours, preferably overnight. The cold is where the cheesecake actually sets into its final texture. At room temperature, the filling is still relatively soft. Cold activates the gelatin-like behavior of the proteins and cream cheese, giving you that firm, sliceable texture.
-
When you’re ready to serve, remove the cheesecake from the fridge 10 minutes before slicing. This takes the hard, cold chill off the top, making slicing cleaner. Use a hot, wet knife, wiping it clean between each cut.
Common Mistakes That Lead to Cracks
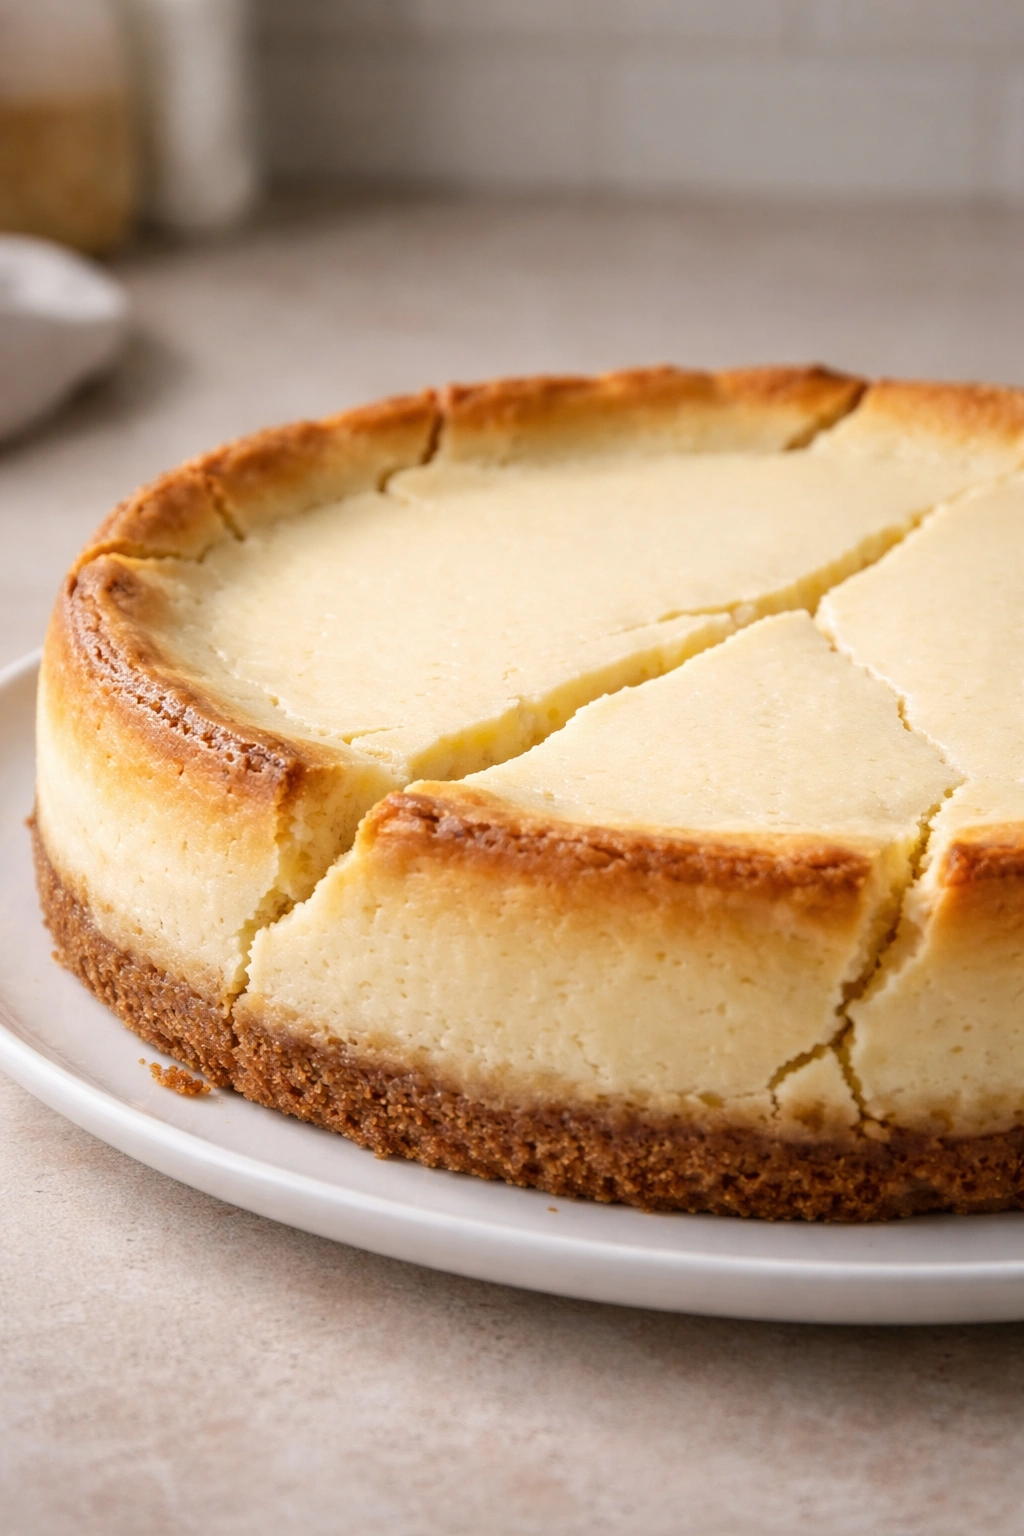
Cracks appear for one specific reason: uneven cooling or overbaking. Understanding this helps you prevent them.
Most cracks form around the edges, which cool and contract faster than the warm center. If you bake the cheesecake and then immediately move it to a cold environment (or open the oven door and let cool air rush in), the edges shrink quickly while the center is still warm and wants to expand—conflict creates cracks.
The no-water-bath method actually prevents this better than the water bath method, as long as you cool slowly. Leave it in the oven for 10-15 minutes after turning off the heat, then let it cool on the counter undisturbed for at least 2 hours. This gradual temperature change minimizes stress.
The other crack culprit is overbaking. Overbaked cheesecake tightens and actually shrinks from the edges inward, creating stress that manifests as cracks. This is why the jiggle test matters so much. The tiny bit of wobble in the center is your insurance that the interior is still creamy and will set properly as it cools, without tightening further.
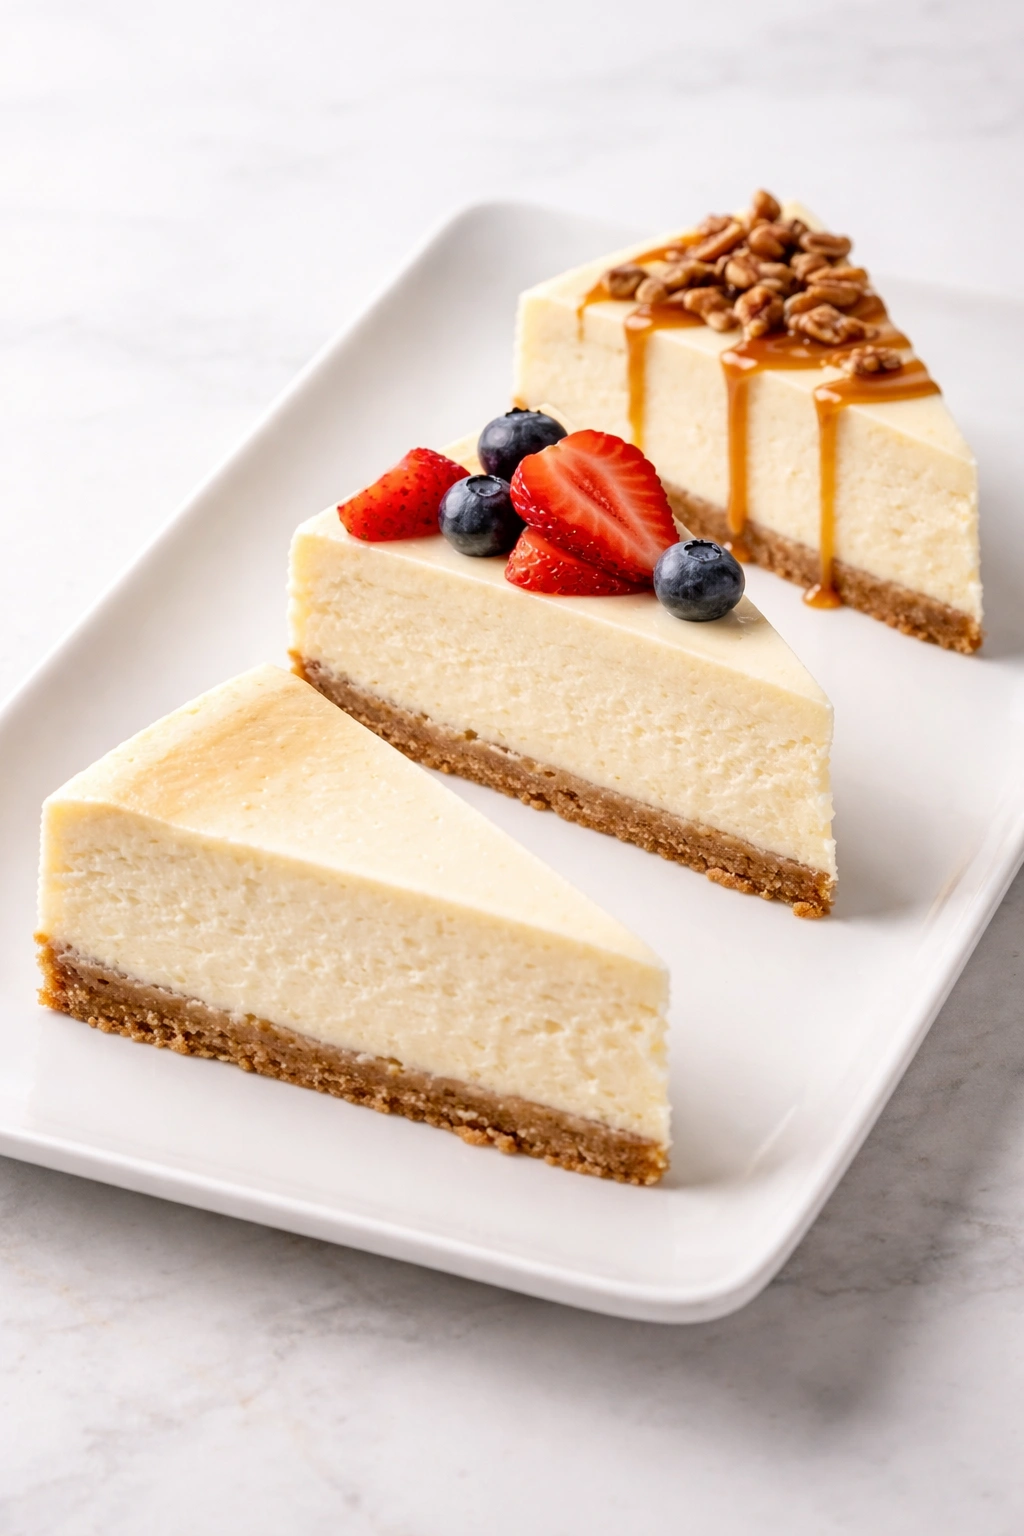
If you do end up with small cracks, they’re invisible once you add a topping (fresh berries, fruit compote, chocolate ganache, or sour cream mixture). Plan a topping if you’re nervous about cracks, and they’ll never be an issue from a visual standpoint.
Temperature Management Without a Water Bath
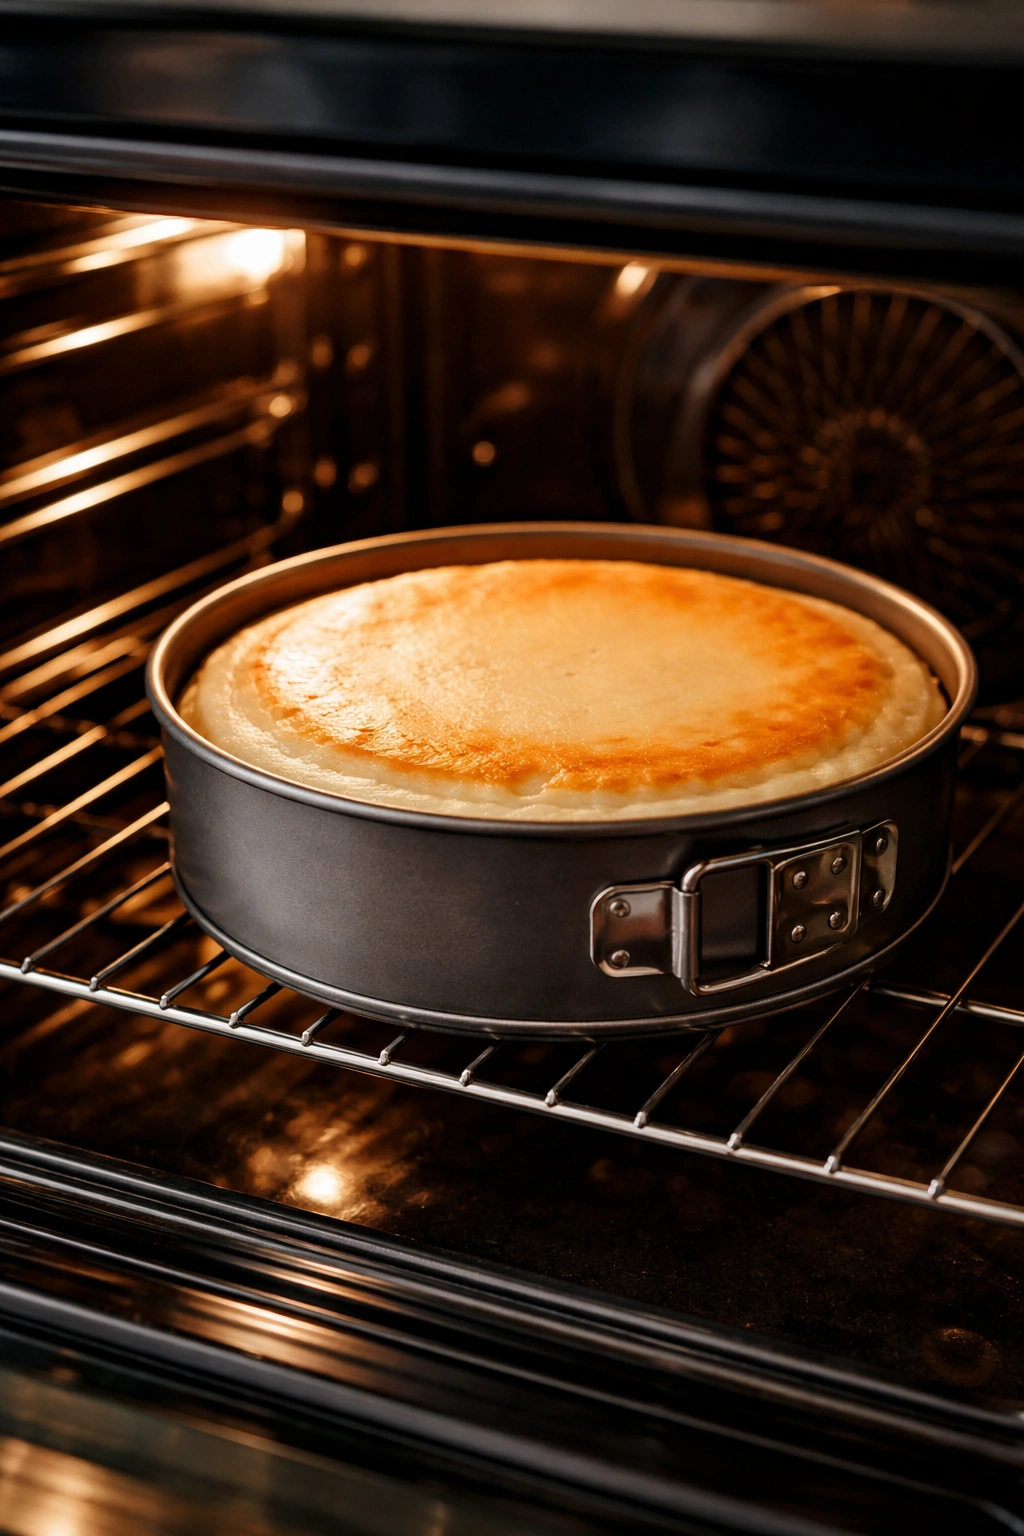
The key to success without a water bath is understanding that lower temperature means longer bake time, and that’s a feature, not a bug. At 325°F (163°C), your cheesecake bakes slowly enough that the residual heat from the pan itself is much less dramatic. The filling doesn’t overcook. The edges don’t race ahead.
If your oven tends to run hot (you can test this with an oven thermometer), add 10-15 minutes to your initial baking time and check doneness visually instead of by the clock. If it runs cool, you might need slightly less time. Every oven is different, which is why visual doneness cues matter infinitely more than following a timer blindly.
Avoid opening the oven door while the cheesecake is baking. Every time you open it, heat escapes and the internal temperature drops, extending bake time unpredictably. If you absolutely must peek (and I understand the urge), use the oven light and look through the glass. Crack the door open just barely if you need to, and close it quickly.
One advantage of skipping the water bath is that you can use the oven light as much as you want. Starting at around 50 minutes, watch for the filling to set from the edges inward. The perimeter will look fully set first; the center is the last part to firm up. This visual progression is your guide to when you’re getting close to doneness.
Testing for Doneness
The jiggle test is the gold standard for cheesecake doneness, and it’s more reliable than any other method. Here’s exactly how to do it: Grasp the sides of the springform pan gently with both hands (use mitts or a towel if it’s hot) and give the pan a very small, deliberate shake side to side. Observe what happens.
If the entire top wobbles together like one solid mass, the cheesecake is overdone or hasn’t finished baking yet (too soft). If you see ripples spreading across the surface and the center is clearly wobbling on its own, it needs more time. You’re looking for a state where the edges are completely still and set, but the very center has a subtle jiggle—about the size of a quarter or smaller—that indicates the interior is still just barely creamy.
This might look under-baked to you the first time you try it, and that’s normal. It’ll feel scary to pull it out when there’s any jiggle visible. But trust the test: that little bit of carryover cooking (the residual heat that continues to cook the cheesecake as it cools) is what gives you the perfect texture.
If you overbake trying to eliminate that center jiggle, you’ll end up with a dense, slightly grainy cheesecake instead of a creamy one. The jiggle is a feature, not a flaw.
Cooling and Resting the Cheesecake
After you pull the cheesecake from the oven, turn off the oven but leave the cheesecake in the oven for 10 minutes with the door cracked open about 1 inch. This prevents a sudden temperature shock and gives the filling time to continue setting gently. The residual oven heat helps the interior firm up slightly while the whole cake is still in a warm environment.
After those 10 minutes, transfer the cheesecake to a wire rack on the counter (not the fridge) and let it cool undisturbed at room temperature for at least 2 hours, ideally overnight. This slow cooling is where you prevent cracks. The longer and slower the cooling, the less stress on the structure.
Once it’s cooled to room temperature, wrap it loosely in plastic wrap and move it to the fridge. Refrigerate for at least 6 hours before serving, and overnight is even better. This cold time allows the filling to set completely into that dense, sliceable texture.
Many people make cheesecake a day or two ahead specifically because it improves over time. The flavors meld and deepen, and the texture actually becomes silkier. There’s no rush to serve it immediately.
Flavor Variations and Toppings
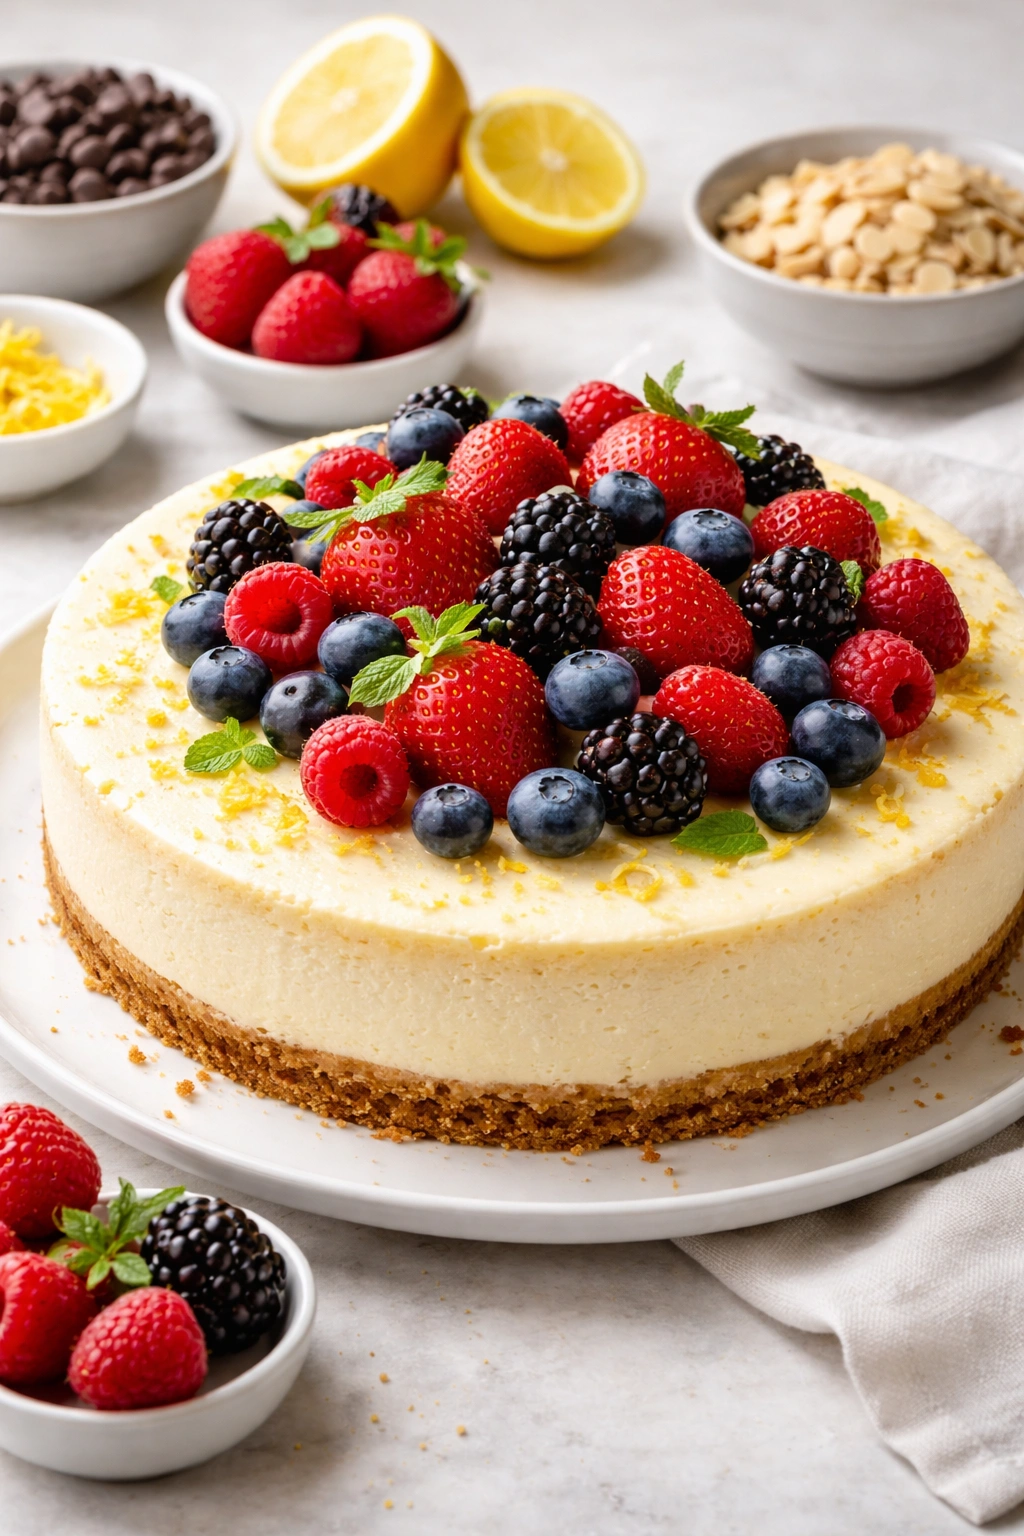
The basic vanilla cheesecake is perfect on its own, but it’s also a canvas for endless variations. Add 2 tablespoons of fresh lemon zest to the filling for a bright, citrusy version that pairs beautifully with berry toppings. Reduce the vanilla slightly when you add lemon (use ½ teaspoon instead of 1 full teaspoon) so the lemon is the star.
For a more subtle variation, add ½ teaspoon of almond extract plus a pinch of cardamom powder. Cardamom is soft and exotic without being loud—it adds depth that makes people wonder what the extra flavor is.
Chocolate chips folded into the filling at the very end (use about ½ cup of mini chocolate chips per the full recipe) create a studded texture. The chips don’t melt completely; they stay as distinct little pockets of chocolate throughout. Add them after all other ingredients are mixed, folding gently so they distribute evenly.
For toppings, fresh berries (especially raspberries or blackberries) are classic. A simple mixed-berry compote is even better—berries cooked down with a touch of sugar and lemon juice become jammy and deeply flavorful. Spread it over the top just before serving.
A thin layer of sour cream mixed with a tablespoon of sugar and a splash of vanilla creates a subtle, creamy topping that’s less sweet than the cake itself. Refrigerated pumpkin cheesecake (made by swirling 1 cup of pumpkin puree mixed with cinnamon and nutmeg into the batter before baking) is another beloved variation.
Chocolate ganache drizzled over the top is luxurious. Caramel sauce, berry coulis, or even a light dusting of cocoa powder all work beautifully. The cheesecake’s richness means even a thin layer of topping goes a long way.
Storage and Make-Ahead Tips
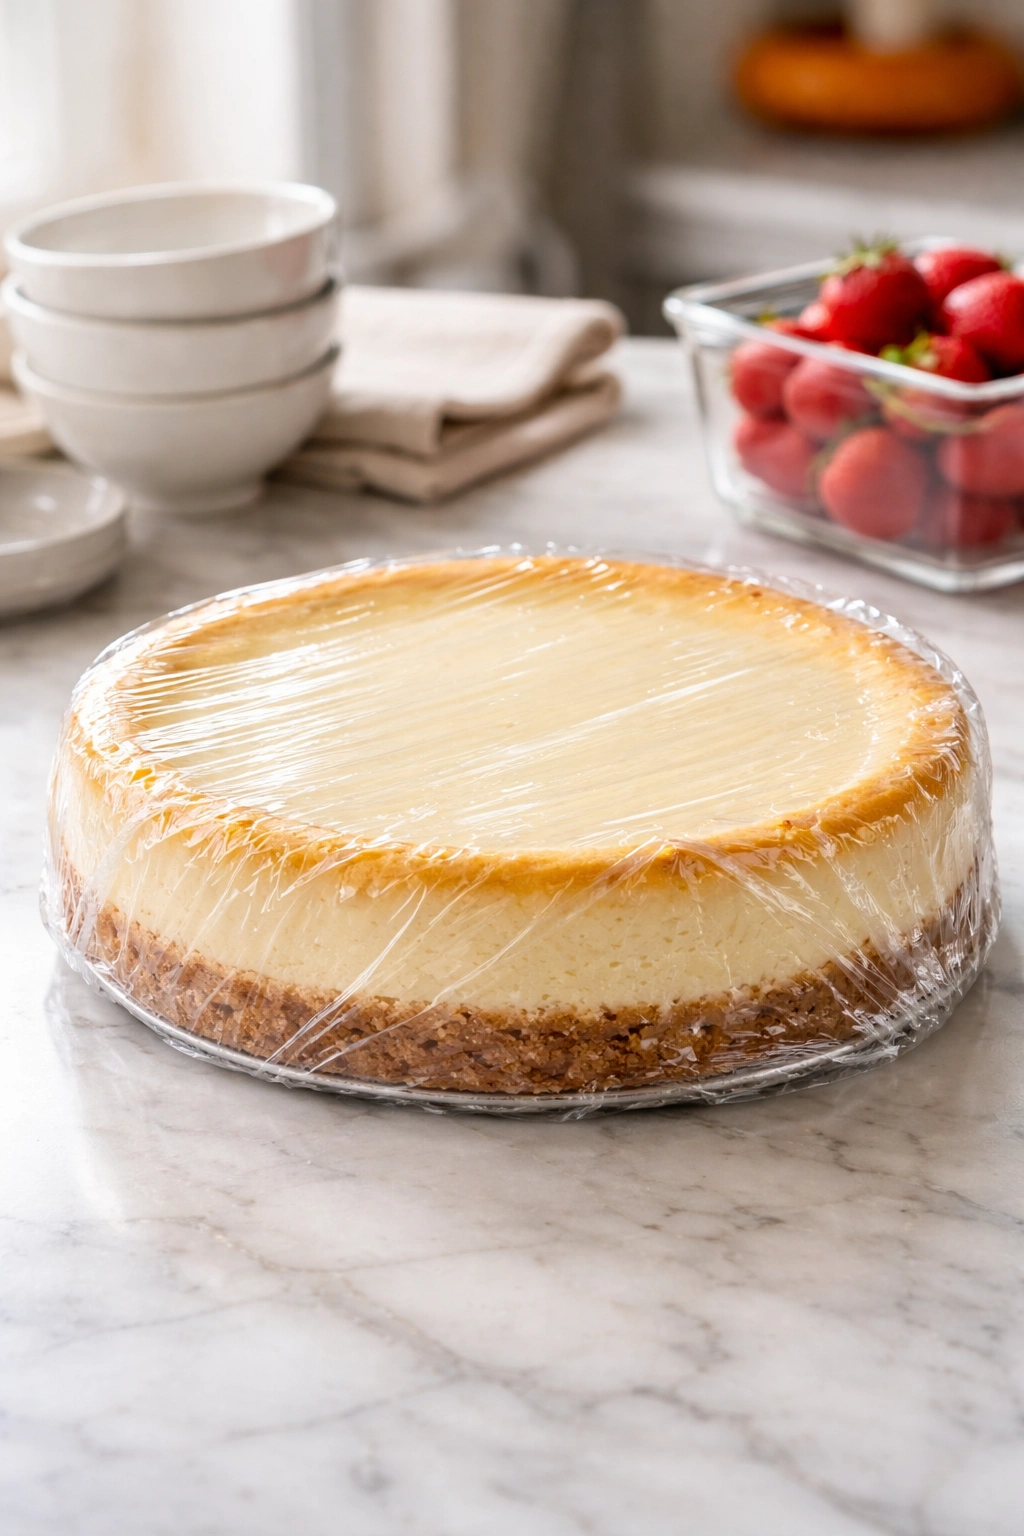
Cheesecake is one of the best make-ahead desserts. You can prepare it up to 3 days in advance, wrapped tightly in plastic wrap and refrigerated. In fact, cheesecake actually tastes better on day 2 or 3 than on day 1—the flavors meld and the texture becomes silkier.
For longer storage, cheesecake freezes beautifully. Wrap the entire cooled, refrigerated cheesecake (still in the springform pan) tightly in plastic wrap, then wrap again in aluminum foil. Freeze for up to 1 month. Thaw overnight in the fridge before serving. There’s no loss of texture or flavor; frozen-and-thawed cheesecake is indistinguishable from fresh.
You can also freeze individual slices. Cut the cooled cheesecake into portions, wrap each slice individually in plastic wrap, then place them in a freezer bag. Thaw a slice in the fridge for 2-3 hours before serving, or eat it straight from the freezer for a firmer, almost ice-cream-like texture (which is actually delicious on a hot day).
The crust can absorb moisture over time, so if you’re storing it for more than 2 days, consider adding a topping or glaze that seals the surface slightly. A thin layer of fruit compote or a sour cream topping actually helps preserve the crust’s crispness by preventing it from absorbing moisture from the filling.
Troubleshooting Density and Heaviness
If your cheesecake comes out dense and heavy rather than creamy, the culprit is almost always overmixing or overbaking. Dense cheesecake means the eggs cooked too much, tightening the structure and squeezing out moisture.
The prevention is simple: avoid overmixing after you add the eggs and sour cream. Once those ingredients go in, use low speed and stop the moment they’re incorporated. Overmixing at this stage develops gluten in the small amount of flour, which tightens the crumb structure. You want the filling to be smooth but relatively loose, not beaten until fluffy.
The second culprit is baking too long. The jiggle test exists specifically to prevent this. If your cheesecake came out dense, it was likely baked longer than necessary. Next time, err toward pulling it out earlier than you think is right. That little wobble in the center is your guarantee of creaminess.
One more factor: if your cream cheese wasn’t fully room temperature when you started, it may not have blended smoothly, leaving tiny pockets of dense, unincorporated cream cheese throughout the cheesecake. These feel grainy and heavy. Always bring cream cheese to room temperature (about 70°F / 21°C) before mixing.
Final Thoughts
Cheesecake without a water bath is not just possible—it’s actually easier and more forgiving than most recipes suggest. You trade the hassle of setting up and managing a water bath for the simplicity of careful temperature management and visual doneness cues. The result is identical: a creamy, dense, slice-able cheesecake that’s indistinguishable from the version made with a water bath.
The key is confidence in the method and patience with the cooling. Bake at a moderate temperature, pull it out at the jiggle test, and let it cool slowly at room temperature before refrigerating. These three steps are genuinely all that matters. Skip the water bath, skip the foil, skip the fuss.
Your first cheesecake might come out with a tiny crack, or the texture might be slightly different from what you expected. That’s normal and completely okay—it’s how you learn what your oven does and what “the right jiggle” looks like in your kitchen specifically. By your second or third try, you’ll nail it, and you’ll wonder why you ever considered wrestling with a water bath in the first place.