There’s something magical about a homemade dessert that tastes like it came from a bakery, yet you made it in your own kitchen with ingredients you already had in your pantry. The confidence boost is real. But here’s what holds most people back: the belief that impressive desserts require a culinary degree, fancy equipment, or hours of fussing. That’s simply not true.
The desserts that follow break that myth completely. They’re the ones bakers keep coming back to year after year—not because they’re elaborate, but because they deliver maximum flavor with minimum complexity. Each one uses techniques you can master in your first attempt. You won’t need a stand mixer, a candy thermometer, a piping bag, or any specialized knowledge. What you will have is something warm, indulgent, and utterly satisfying to pull from your oven.
What makes a dessert “easy” isn’t just a short ingredient list, though that helps. It’s about predictability. Easy desserts follow straightforward sequences, forgive small mistakes, and almost always turn out beautifully even if you’re working in an unfamiliar kitchen with different equipment. They’re confidence builders. After you nail your first one, the second feels effortless, and soon you’re improvising and personalizing without fear.
Let’s explore 10 desserts that prove homemade doesn’t have to mean complicated. These are the recipes that will become your go-to desserts—the ones you’ll make again and again, the ones you’ll proudly bring to gatherings, and the ones that’ll convince people you’re secretly a dessert wizard.
1. No-Bake Chocolate Peanut Butter Cups
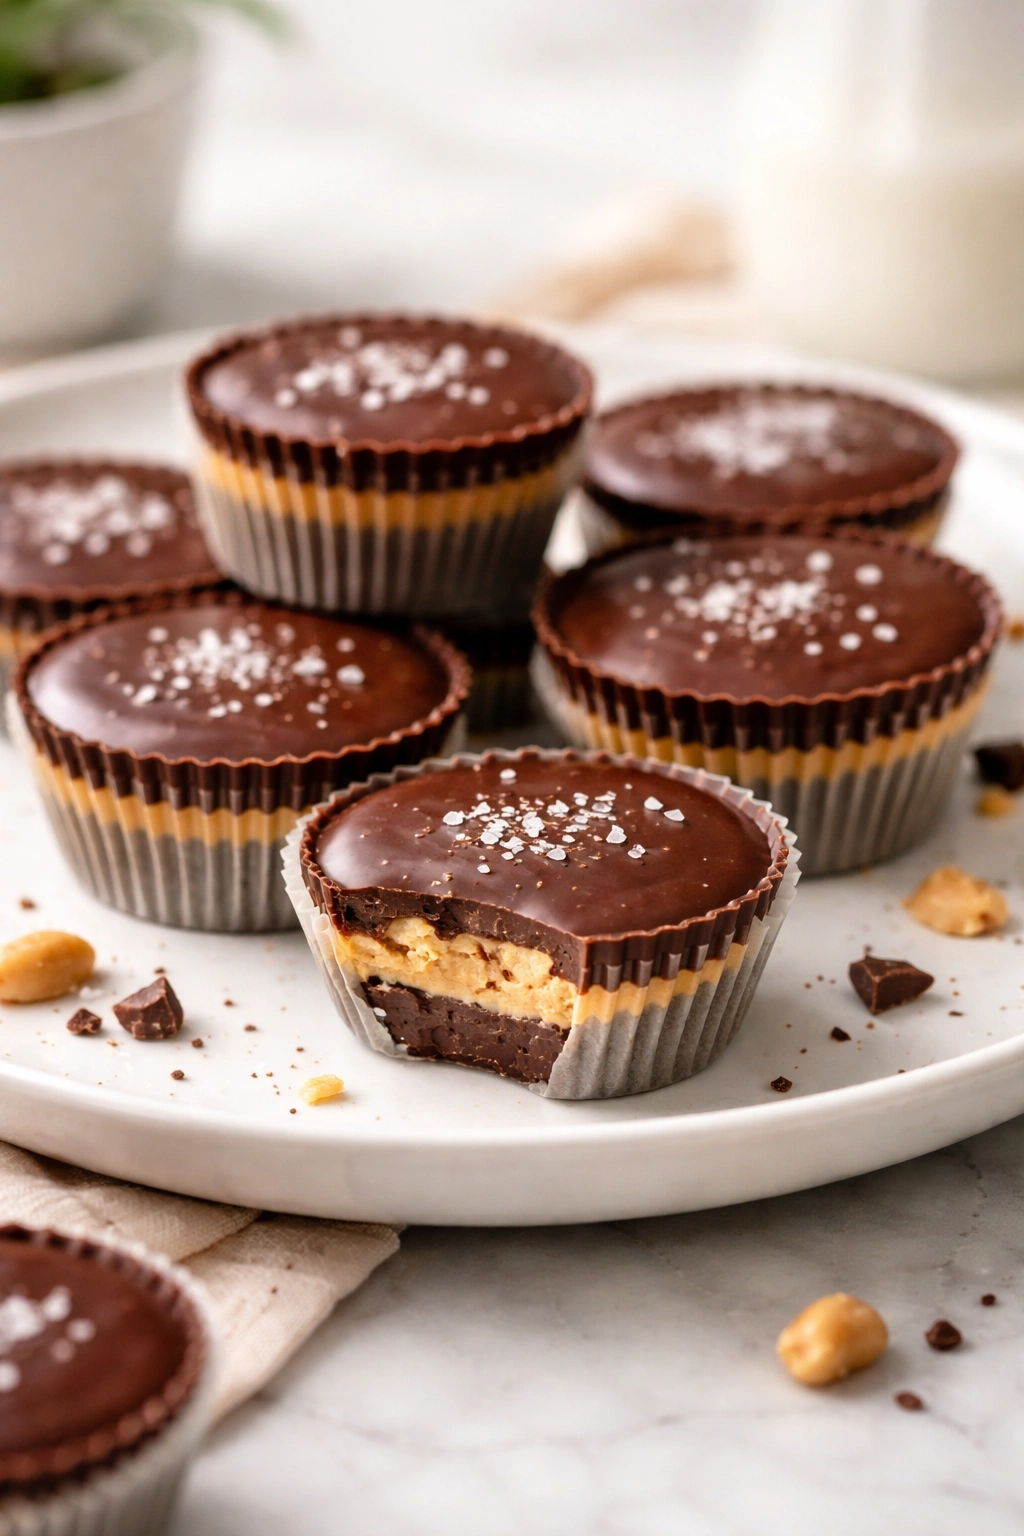
Imagine having the satisfaction of homemade candy without ever turning on your oven. Chocolate peanut butter cups sit at the intersection of ridiculously easy and impossibly delicious. The magic happens because you’re working with just four ingredients that barely need technique—they need only cold temperatures and a bit of patience.
Why This Is Foolproof
The entire process relies on chocolate melting and peanut butter staying put. There’s no precise timing, no temperature sensitivity, and absolutely no baking involved. Even if your chocolate takes a few minutes longer to set, the result is still perfect. The only real requirement is a freezer and a muffin tin, both of which you almost certainly have.
The Essential Process
Start with a double boiler or a microwave-safe bowl set over hot water. Melt semi-sweet or milk chocolate (about 8 ounces) in 30-second bursts, stirring between each pulse to prevent burning. While that’s happening, mix peanut butter (1 cup, creamy or chunky—your choice) with powdered sugar (½ cup) and a pinch of salt. This mixture should feel like putty, thick enough to hold its shape.
Line a 12-cup muffin tin with paper liners or silicone cups. Spoon a thin layer of melted chocolate into the bottom of each cup, then freeze for 5 minutes until set. Add a heaping tablespoon of peanut butter mixture to each cup, flatten it slightly with your thumb, then top with the remaining chocolate, making sure it covers the peanut butter entirely. Freeze again for at least 30 minutes until the chocolate is hard.
What Sets Them Apart
These taste fresher than store-bought versions because you’re using real peanut butter and quality chocolate. There’s no waxy mouthfeel, no artificial vanilla, just pure chocolate and peanut flavor. Store them in an airtight container in the freezer for up to two weeks—though they rarely last that long.
Pro tip: If your chocolate seizes (becomes grainy) during melting, stir in a small spoonful of coconut oil to smooth it out immediately.
2. Lemon Icebox Pie
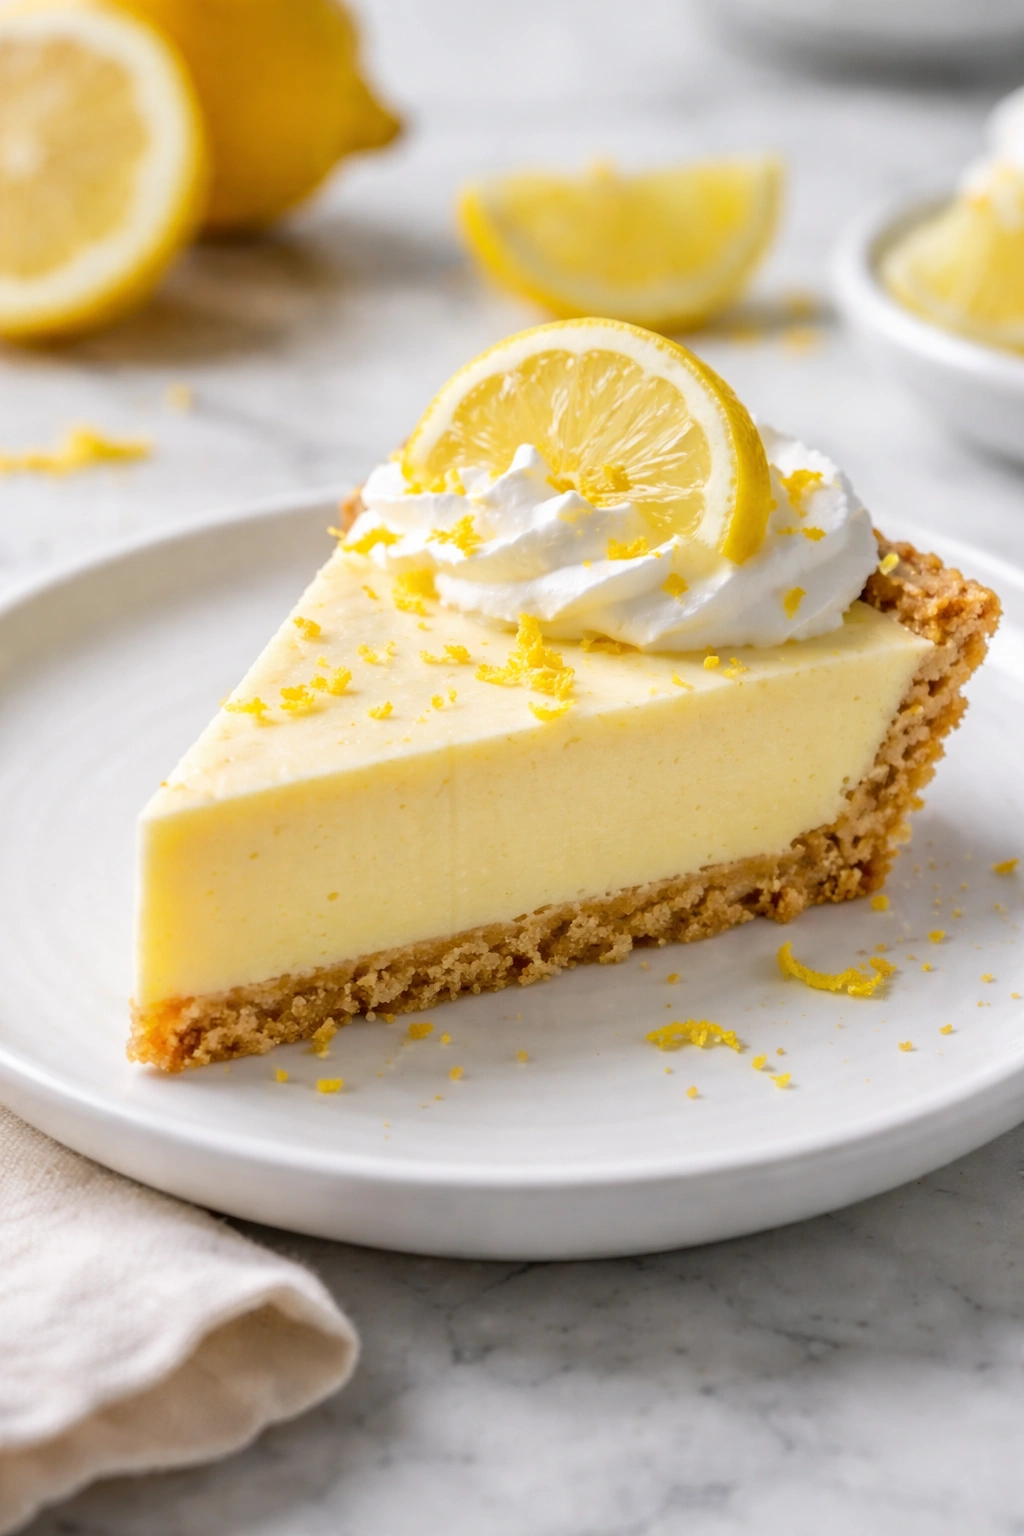
Icebox pies are called that because they require nothing but cold storage to set—no baking, no special technique, just simple chemistry. Lemon icebox pie takes three or four pantry staples and transforms them into something that tastes bright, sophisticated, and impossible to stop eating.
Why It Never Fails
The filling thickens as it chills, thanks to sweetened condensed milk’s natural properties. There’s no custard making, no precise thickening temperatures, and no risk of scrambled eggs. You stir ingredients together, pour them into a crust, and refrigerate. That’s genuinely the entire process.
The Actual Technique
Start with a store-bought graham cracker crust (this is not cheating—it’s being efficient). In a bowl, whisk together one 14-ounce can of sweetened condensed milk with ½ cup of fresh lemon juice (fresh is crucial here; bottled won’t deliver the same brightness). Add the zest of one lemon if you have it—this is optional but elevates the whole thing. Pour the mixture into the crust and refrigerate for at least 4 hours, though overnight is ideal.
The first time you pull a slice free from the pan, you’ll feel that satisfying yield—it’s set but still creamy, never rubbery. The lemon flavor hits sharp and citrusy, balanced by the sweetened condensed milk’s subtle richness. One slice is never enough, but somehow everyone leaves room.
The Make-Ahead Advantage
This dessert actually improves overnight. The flavors meld, the texture becomes perfectly smooth, and it stays fresh in the refrigerator for up to five days. This makes it an ideal choice for dinner parties—you can have it entirely ready a day ahead, which is genuinely rare for desserts.
Worth knowing: A squeeze of additional fresh lemon juice over the slice just before serving brightens the flavor further and adds a professional-looking garnish.
3. Brownies From Mix Plus One Secret Ingredient
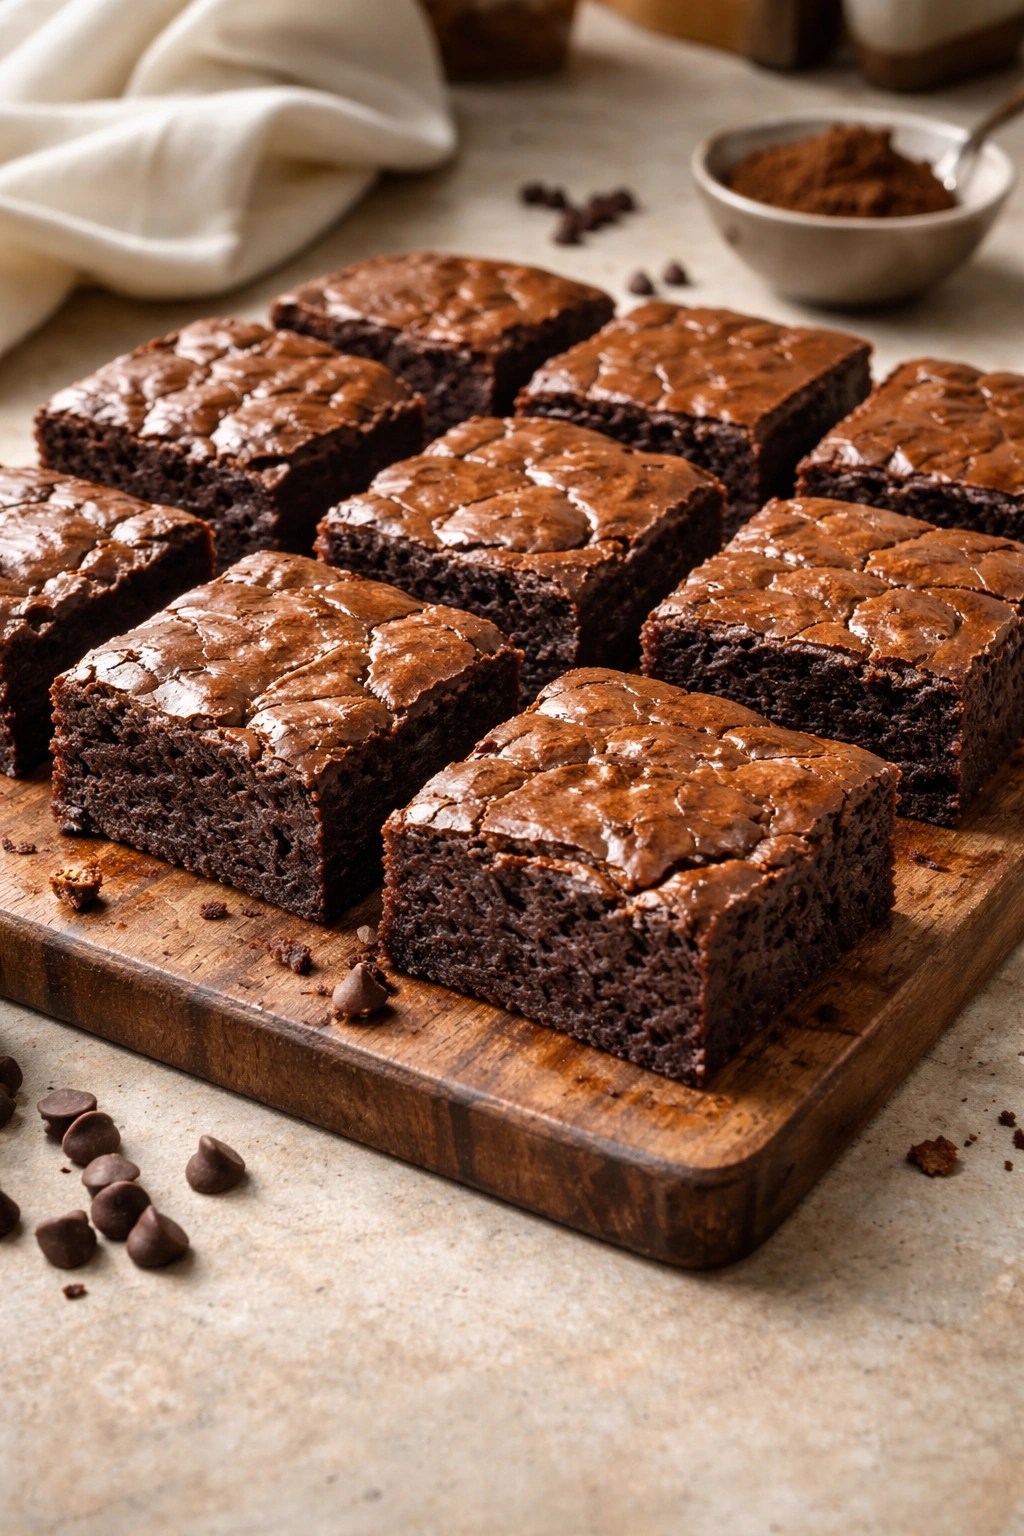
Box brownie mix gets unfairly dismissed. Yes, you can make brownies from scratch, but if you’re starting from a mix and adding one ingredient, you’ve created something that rivals any from-scratch version. The secret ingredient bridges the gap between “just a box” and “wow, these are incredible.”
The Game-Changing Addition
Instant espresso powder is your secret weapon. Just ½ to 1 teaspoon of espresso powder mixed into dry brownie mix before adding wet ingredients deepens the chocolate flavor without making them taste like coffee. The espresso isn’t detectable—it’s below the threshold of recognizability. What you notice instead is chocolate flavor that’s richer, more complex, and more grown-up than standard brownies.
The Proper Method
Make the brownie batter exactly as directed on the box, but add your espresso powder to the dry mix before combining with the wet ingredients. Other excellent additions include a pinch of fleur de sel (fine sea salt flakes) sprinkled on top before baking, or folding in a cup of chocolate chips after the batter is mixed. A tablespoon of butter added to the batter also creates a fudgier texture.
Bake according to package directions, then underbake them slightly—remove them from the oven when a toothpick still has a few moist crumbs clinging to it. They’ll continue cooking from residual heat and remain fudgy rather than cakey. Cool completely before cutting for clean edges.
Why This Works
You’re combining convenience with a small but meaningful technique. The espresso powder costs just a few cents, requires zero additional work, and elevates these brownies to look and taste like you spent an hour making them from scratch. This is the most efficient path to impressive brownies.
Insider note: Store cooled brownies in an airtight container with a slice of bread. The bread absorbs moisture, keeping the brownies fudgy for days.
4. Strawberry Shortcake Cups
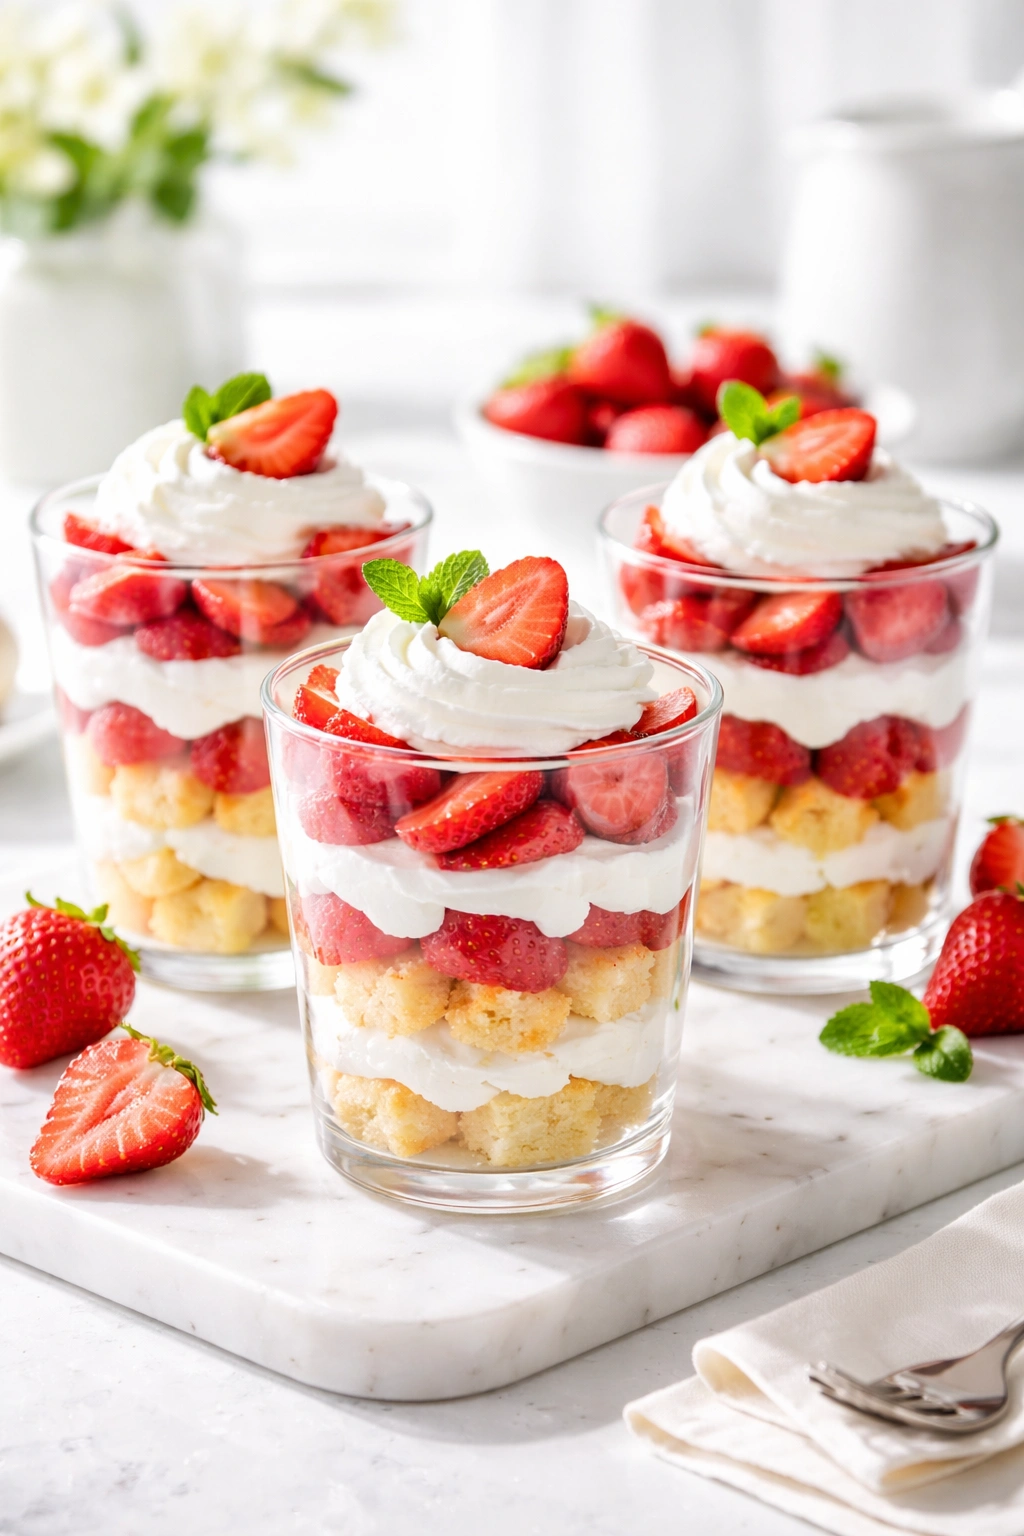
Strawberry shortcake gets special treatment—it’s holiday dessert, dinner-party-worthy, yet completely achievable. The secret is deconstructing the traditional version into component parts, which actually makes it easier to prepare and far more elegant to serve.
Choosing Your Shortcake Foundation
You have three legitimate shortcuts here. Store-bought pound cake, sliced and toasted lightly under the broiler, works beautifully. Sponge cake from a bakery is equally valid. Or buy vanilla wafer cookies and layer them into glasses—no one will judge you, and they’re structurally perfect. The point is that the shortcake vessel should be simple enough to not compete with the star ingredients.
Preparing the Berries and Cream
The berries are everything. Slice fresh strawberries and toss them with 2-3 tablespoons of sugar per pound of berries, then let them sit at room temperature for 15 minutes. This draws out their juice, creating a light syrup that flavors everything it touches. Whip cold heavy cream with a small amount of powdered sugar and a crack of vanilla extract until soft peaks form—don’t overwhip or you’ll have butter.
Assembly for Maximum Impact
Layer components in clear glasses: a spoonful of shortcake, a spoonful of berries with their juice, a dollop of cream, then repeat. The key is letting each layer show—the clear glass makes your dessert look restaurant-quality. Top with a whole strawberry or a small shortcake piece and maybe a tiny mint leaf if you’re feeling fancy.
Assemble these just before serving so the shortcake stays crisp. They keep for a few hours without getting too soggy if you add the cream and berries separately, letting diners assemble as they eat.
Pro tip: Macerating the berries with a pinch of balsamic vinegar (about ¼ teaspoon per pound) intensifies their flavor dramatically without tasting vinegary.
5. Mug Cake
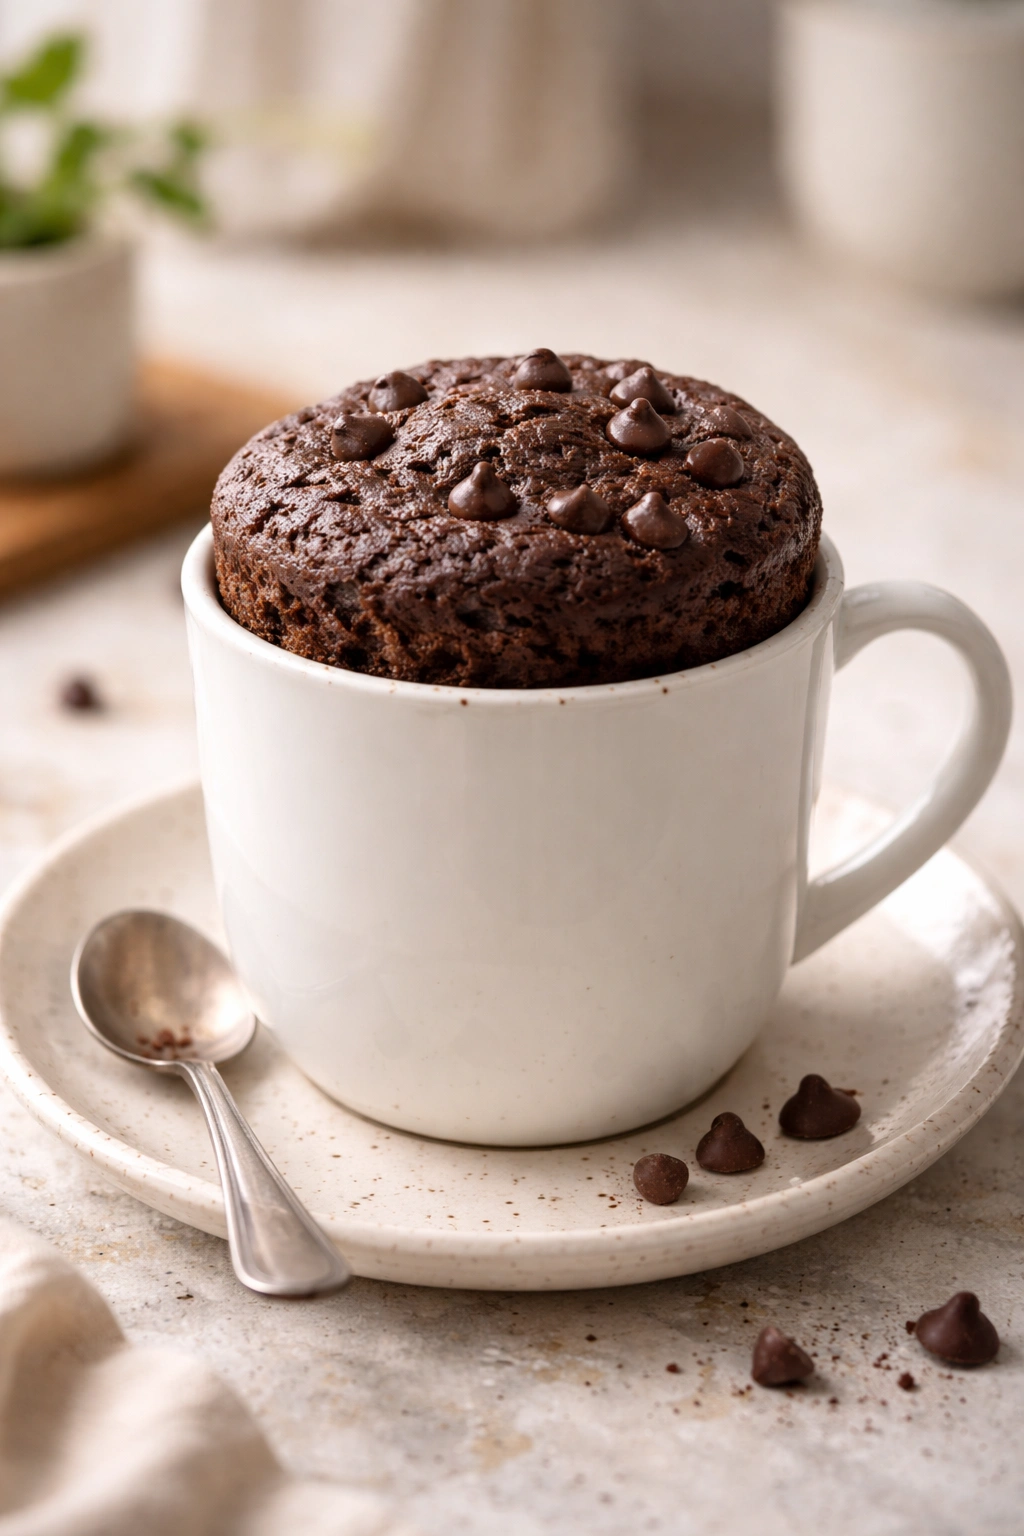
This one seems almost too gimmicky to work, yet mug cakes are genuine desserts that come together in three minutes. Mug cake is your answer to “I want something sweet right now” without requiring bowls, measuring spoons, or cleaning time. One person, one mug, one surprisingly delicious dessert.
The Simple Formula
Most mug cakes follow the same basic ratio. Into a microwave-safe mug, add 3 tablespoons of all-purpose flour, 2 tablespoons of sugar, 1 tablespoon of unsweetened cocoa powder (for chocolate) or omitted (for vanilla), a pinch of salt, and a pinch of baking powder. Pour in 3 tablespoons of milk and 1.5 tablespoons of vegetable oil, then stir until just combined—don’t overmix or your cake will be tough.
The Crucial Microwave Technique
Microwave on high for 70 to 80 seconds. Don’t go over 90 seconds or the top will overcook while the center stays raw. The cake will rise up and seem almost overflowing; this is completely normal. Let it cool for 1 minute—hot cake is too crumbly to eat—then eat it directly from the mug with a spoon, or turn it onto a plate.
The Flavor Variations
Chocolate is the classic, but add a teaspoon of instant espresso powder for mocha flavor. Use vanilla extract instead of cocoa powder for vanilla. Swirl in a spoonful of peanut butter, chocolate chips, or jam before microwaving. Top with whipped cream, ice cream, or a dusting of powdered sugar afterward.
This is not a cake for storing or making ahead. It’s designed for immediate gratification—five minutes from craving to dessert in your mouth. It’s also perfect for experimenting since the stakes are so low.
Worth knowing: Slightly underbaking creates a more tender, almost brownie-like texture that most people prefer to a fully cooked mug cake.
6. Tiramisu Without Eggs
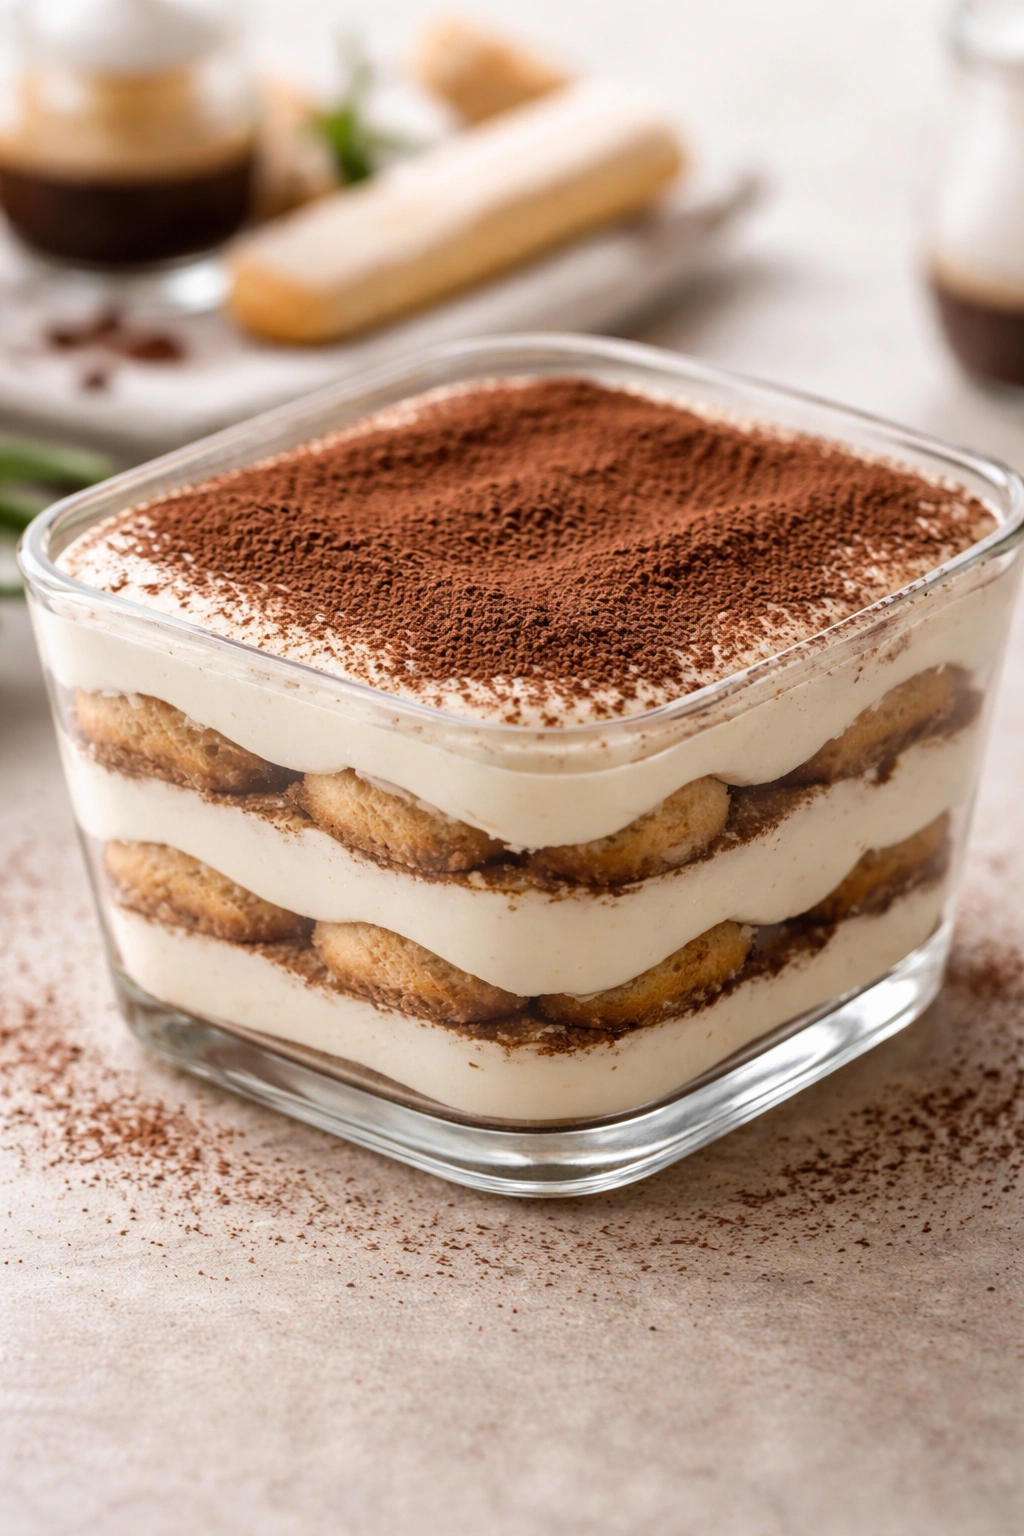
Traditional tiramisu involves raw or barely cooked eggs in the mascarpone cream, which makes many people nervous. This version replaces eggs with whipped cream, creating something just as decadent without any food-safety concerns—and honestly, just as delicious.
Why This Version Wins
You’re building layers of softened ladyfinger cookies dipped in coffee, alternating with sweetened mascarpone cream enriched with whipped cream. The result is creamy, coffee-soaked, completely indulgent, and entirely shelf-stable. Unlike egg-based versions, this can sit safely at room temperature for a few hours or refrigerate for days without any worry.
The Preparation Process
Brew strong espresso or very strong coffee—you need about 1 cup. Let it cool slightly, then stir in 3 tablespoons of coffee liqueur (Kahlúa) or dark rum if you have it, plus a tablespoon of sugar. This is your dipping liquid.
Beat 1½ cups of heavy cream to soft peaks, then in a separate bowl, whisk together 1 pound of mascarpone cheese, ½ cup of powdered sugar, and 1 teaspoon of vanilla extract until smooth. Fold the whipped cream into the mascarpone mixture gently.
Quickly dip each of about 36 Italian ladyfinger cookies (savoiardi biscuits) into the coffee mixture for just one second per side—too long and they disintegrate—then arrange in a single layer in a 9×13 baking dish. Spread half of the mascarpone cream over the cookies, then repeat with another layer of dipped cookies and the remaining cream. Dust the top generously with unsweetened cocoa powder.
The Storage Secret
Refrigerate for at least 4 hours, though overnight is ideal. This allows the cookies to soften as they absorb the coffee and the flavors to meld. It stays fresh for up to four days, making it perfect for entertaining.
Pro tip: A tiny pinch of instant espresso powder whisked into the mascarpone cream intensifies the coffee flavor without making it taste bitter.
7. Bananas Foster in Less Than 10 Minutes
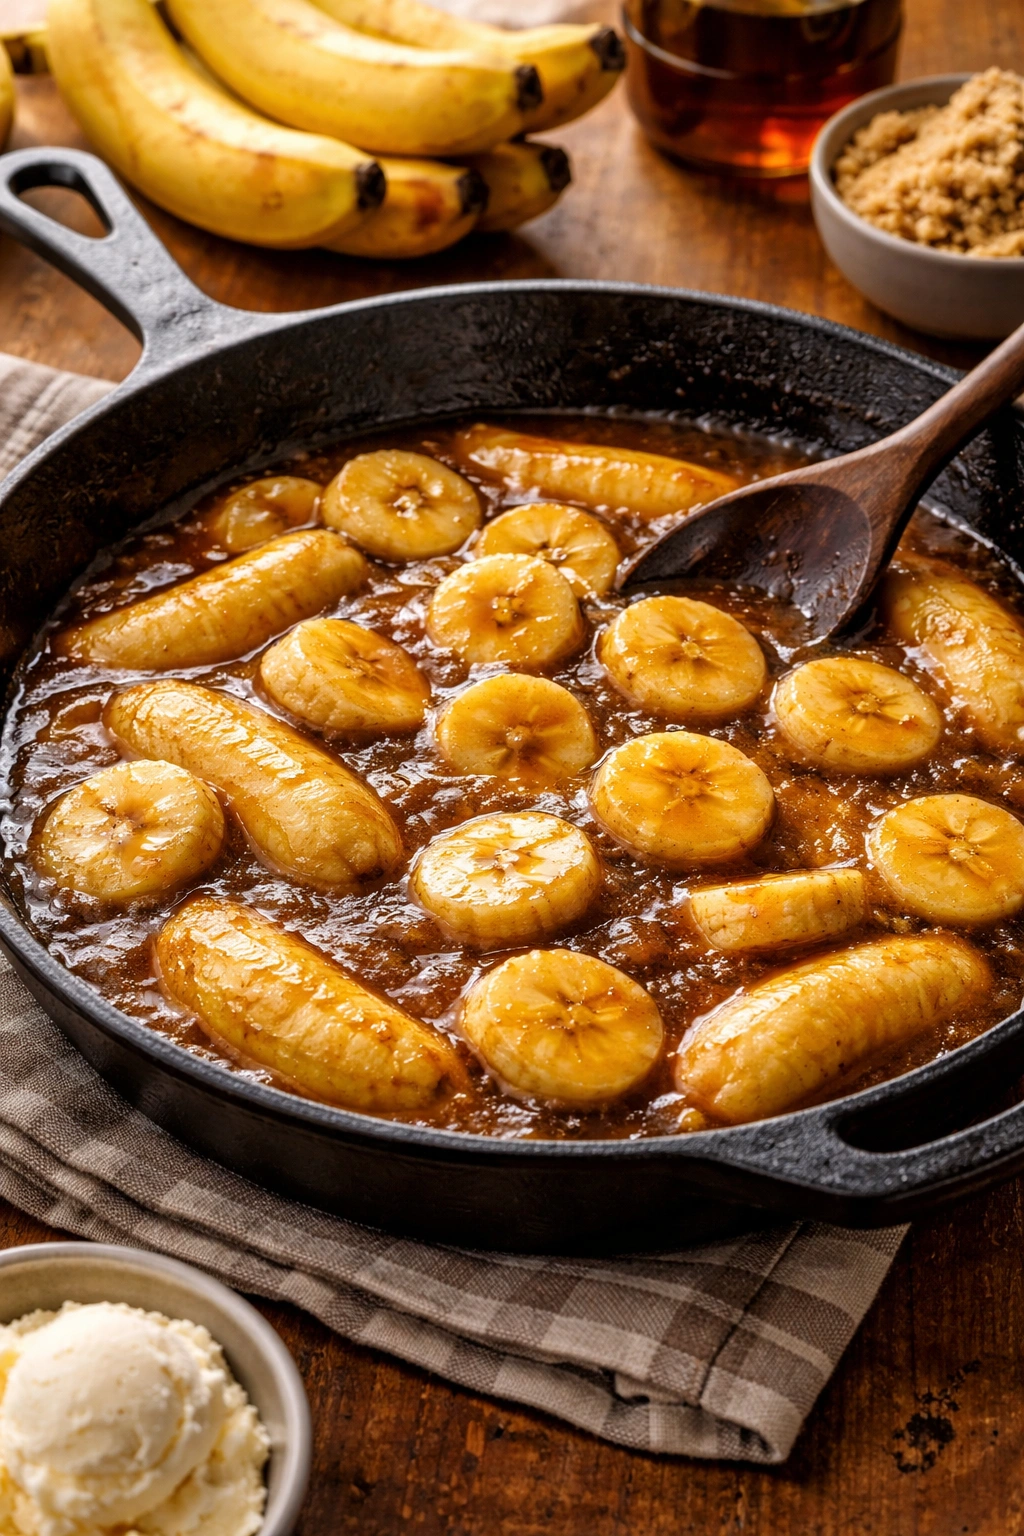
Bananas Foster is a showstopper dessert that seems like it requires serious technique—tableside flaming, precise timing, careful caramelization. The reality is far simpler. This dish comes together in under ten minutes in your own kitchen, no flame necessary (though you can add one if you’re feeling dramatic).
The Cast-Iron Secret
The best way to make bananas Foster is in a cast-iron skillet, which distributes heat evenly and adds a professional appearance. If you don’t have cast iron, any heavy-bottomed skillet works fine. The key is working at medium-high heat and moving quickly.
The Actual Process
Melt 3 tablespoons of butter in your skillet, then add ¼ cup of brown sugar and a pinch of sea salt. Let it bubble and caramelize for about 2 minutes until it darkens slightly and smells deeply caramel-like. Add ½ teaspoon of vanilla extract, then arrange 2 sliced bananas (slightly underripe, so they hold their shape) in the pan.
Spoon the caramel sauce over and around the bananas, cooking for about 1 minute per side. Pour in ¼ cup of banana liqueur or dark rum if you want (though it’s optional). If using alcohol and you’re comfortable with it, carefully tilt the pan toward a gas flame to ignite it—watch as it flares and burns off for about 30 seconds, then the alcohol cooks off. If you’re not using flame, just continue cooking until the sauce is thick and glossy, about 2 more minutes.
Serving Right
Serve immediately over vanilla ice cream. The warmth of the caramel, the heat of the skillet, and the cold ice cream create the perfect textural contrast. The bananas stay tender but hold their shape, the caramel is rich and complex, and the whole thing feels indulgent without being heavy.
Worth knowing: Use bananas that are just ripe—they should be mostly yellow with just a touch of green. If they’re fully yellow with brown spots, they’ll fall apart during cooking.
8. Raspberry Lemon Cheesecake Cups

Cheesecake gets a bad reputation for complexity, but individual no-bake versions turn it into something approachable. These are creamy, sophisticated, and ready in an hour of passive time.
The Simplified Approach
You’re building no-bake cheesecake in small cups or ramekins, eliminating the springform pan, water bath, and unpredictable cracking. Each component is simple enough that nothing can go seriously wrong.
Building the Layers
Start with a graham cracker base. Combine ¾ cup of graham cracker crumbs with 3 tablespoons of melted butter and a tablespoon of sugar, then divide among four ramekins and press firmly. These don’t need to bake—just press and refrigerate for 10 minutes while you prepare the filling.
Beat 8 ounces of softened cream cheese with ½ cup of powdered sugar until completely smooth and fluffy—this takes about 2 minutes with an electric mixer or 3-4 minutes by hand. Fold in the zest of one lemon, 2 tablespoons of fresh lemon juice, and ½ cup of whipped cream gently.
Divide half of the filling among the ramekins, then top with fresh raspberries, then the remaining filling. Chill for at least 30 minutes. Top with more raspberries just before serving.
The Quality Markers
The filling should be perfectly smooth with no lumps of cream cheese—this is why you beat the cream cheese thoroughly before adding anything else. The lemon flavor should be noticeable but not overwhelming; it’s about brightness, not pucker. The raspberries should be fresh and tart to balance the sweetness.
Pro tip: If you don’t have whipped cream on hand, whisk the cream cheese mixture with 2 tablespoons of sour cream instead. The sour cream adds tang and lightness without requiring whipping.
9. Chocolate Lava Cakes (Molten Chocolate Cakes)
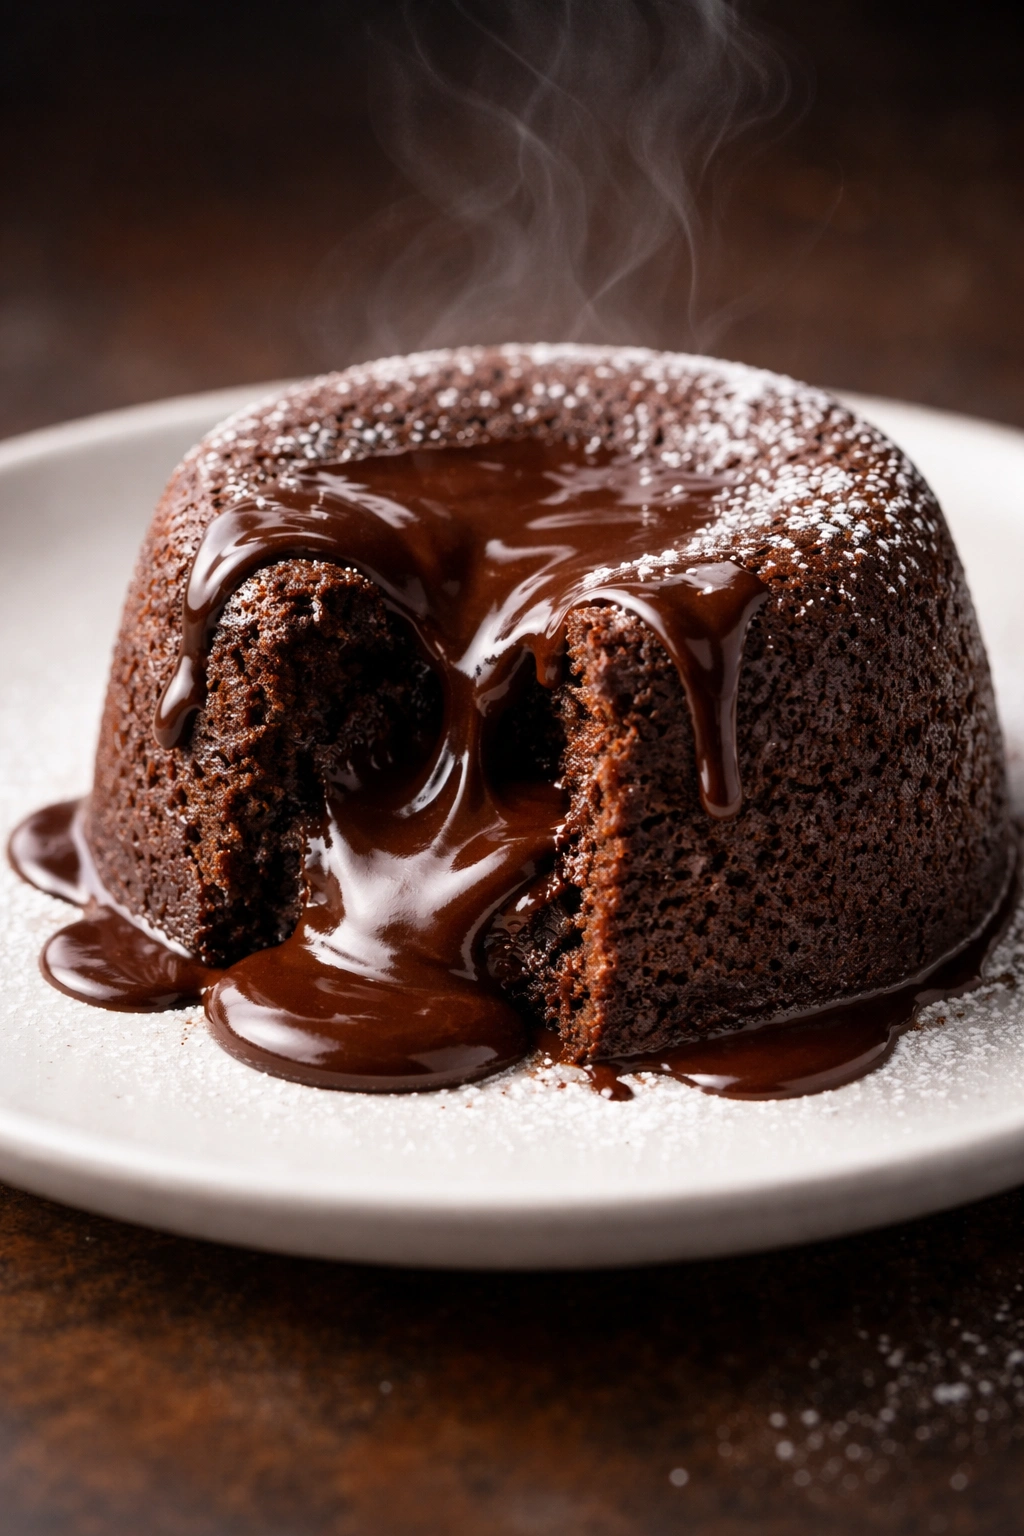
These individual cakes have a reputation for being fancy and difficult. They’re actually neither. Molten chocolate cakes require only basic stirring technique and one critical timing detail. Get that timing right, and you look like a culinary genius.
The Real Secret
Molten chocolate cakes aren’t special because they’re hard to make—they’re special because of what happens when you underbake them just enough. The edges bake fully while the center stays slightly liquid, creating that impressive chocolate flow when you cut into it. This isn’t luck or magic; it’s a predictable result of the right timing.
The Simple Batter
Combine 4 ounces of chopped dark chocolate with 4 tablespoons of butter in a microwave-safe bowl, heating in 30-second bursts until melted and smooth. Whisk together 2 eggs, 2 tablespoons of sugar, and a pinch of salt in a separate bowl until slightly frothy (about 1 minute). Fold the chocolate mixture into the eggs along with 2 tablespoons of all-purpose flour and a splash of vanilla extract.
Preparing for Success
Butter two ramekins generously and dust them with cocoa powder, tapping out any excess. Divide the batter between them. This is the point where you can refrigerate them for up to 24 hours if you want to prep ahead. When ready to bake, place them on a baking sheet and bake at 425°F for 11-13 minutes, until the edges are set and firm but the very center jiggles slightly when you shake the ramekin gently.
Remove from the oven and let cool for just 1 minute, then run a thin knife around the edges and invert onto a plate. The cake slides out, leaving the molten center exposed.
The Timing Details
Underbaking is the entire ballgame. Every oven is different, so the first time you make these, check at 11 minutes. You want the edges completely set and the center moving slightly. Overbake them by 2 minutes and they become regular cakes. Underbake them too much and they’re raw. Once you nail your oven’s timing, you can make these blindfolded.
Worth knowing: These cakes are best served warm, ideally with a scoop of vanilla ice cream beside them.
10. Panna Cotta (Without Gelatin Fear)
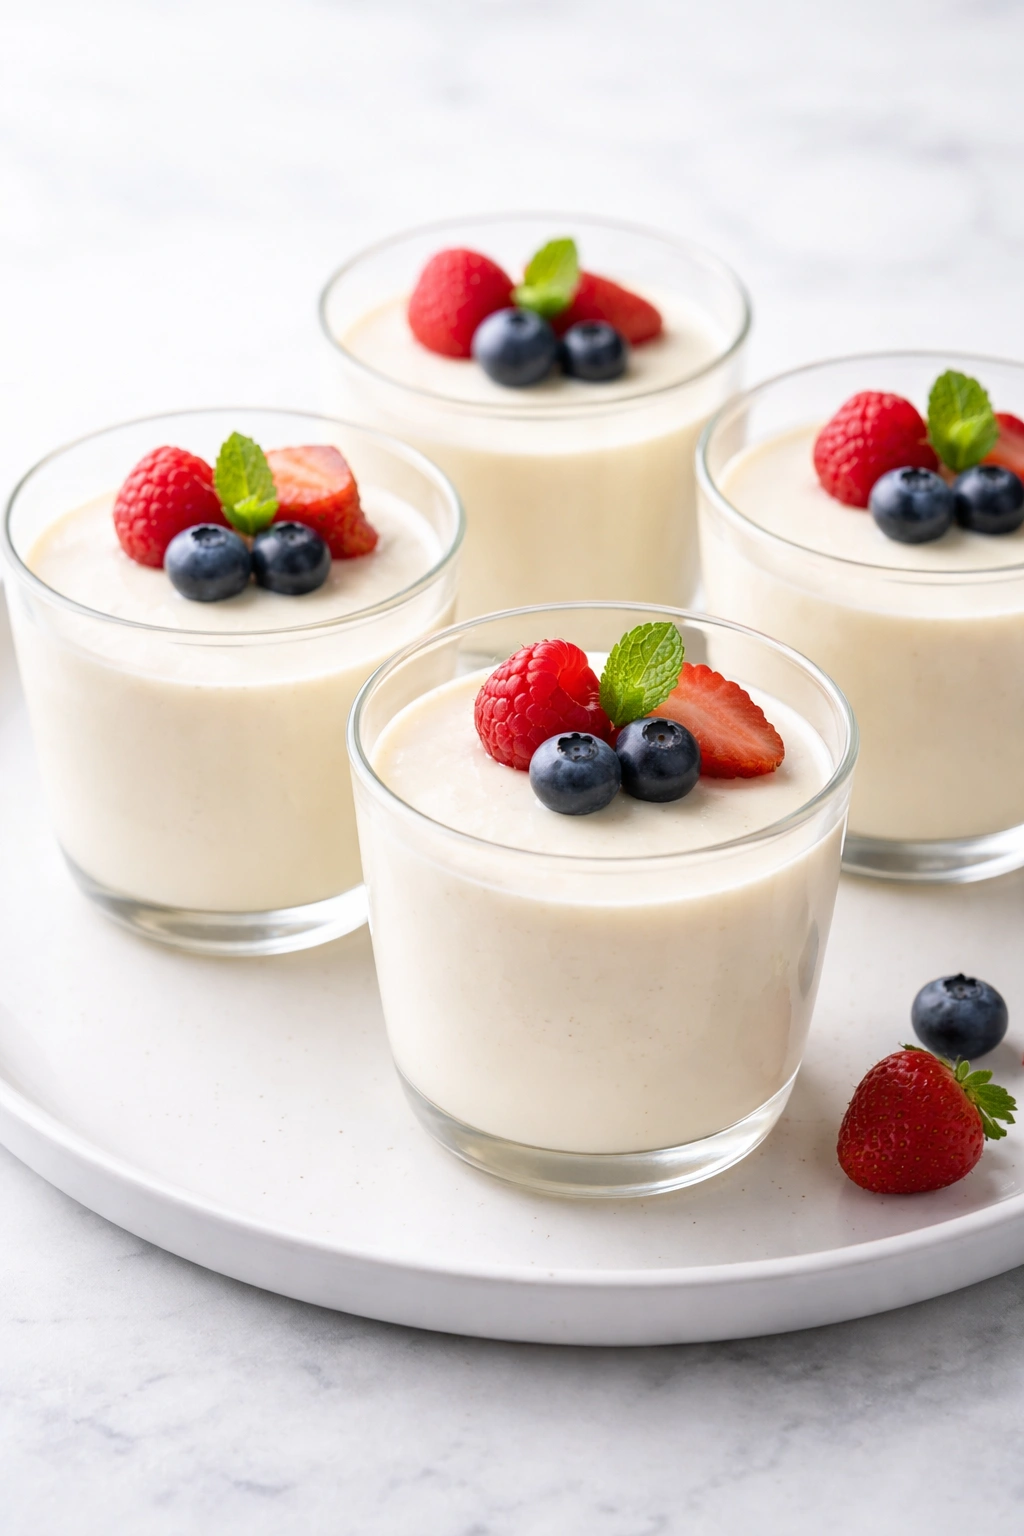
Panna cotta sounds Italian and elegant, which makes people assume it’s complicated. It’s literally just cream, sugar, and gelatin set into individual servings. If you’ve ever made Jello, you can make panna cotta, and it’ll taste infinitely better.
Conquering the Gelatin Question
Gelatin intimidates people unnecessarily. Bloom it (soak it in cold water) first, then gently heat it to dissolve, and fold it into your cream mixture. If you follow these steps, it works perfectly every time. The creamy texture is luxurious but never rubbery—that’s the whole point of panna cotta.
The Actual Process
Heat 1½ cups of heavy cream with ½ cup of whole milk and ¼ cup of sugar over medium heat until it’s steaming and the sugar dissolves completely—don’t let it boil. While that heats, sprinkle 1½ teaspoons of unflavored gelatin over 2 tablespoons of cold water in a small bowl. Let it sit for 5 minutes until the gelatin absorbs the water and becomes spongy.
Pour the warm cream mixture over the bloomed gelatin and whisk until the gelatin completely dissolves. Add 1 teaspoon of vanilla extract and any other flavorings—lemon zest, a splash of espresso, a hint of almond extract. Strain through a fine-mesh sieve to remove any gelatin bits or zest particles, then pour into glasses, small bowls, or ramekins.
Refrigerate for at least 4 hours until set. The texture should be soft and creamy, never bouncy or rubbery.
The Flavor Possibilities
Panna cotta is a blank canvas. Make it plain with just vanilla and serve with fresh berries on top. Infuse the cream with the zest of a lemon and serve with a drizzle of raspberry coulis. Add 2 tablespoons of coffee liqueur to the cream and top with crushed almond biscotti. Make it ahead for up to three days.
Pro tip: Run a thin knife around the edge and invert onto a plate for a more elegant presentation, or serve directly from the glass for simplicity.
Final Thoughts

Making desserts at home doesn’t require special talents or years of practice. It requires permission to stop overthinking and start baking. Every single dessert on this list exists to prove that impressive results come from straightforward techniques applied consistently, not from complexity or secret knowledge.
Start with whichever dessert calls to you first—the one that makes you feel hungry just reading about it. Make it on a day with no pressure, when you’re not stressed about timing. Taste it while it’s still warm or fresh. Notice how much better it is than anything you could buy, how the flavors taste clean and real, how the texture isn’t waxy or overly sweet.
Then make it again. That second time, you’ll work faster and with more confidence. By the third time, you won’t need to check the recipe for measurements—you’ll have absorbed the technique into your hands and your understanding of how flavors work. That’s when you become someone who makes desserts confidently, someone who can improvise and adapt recipes, someone who knows exactly what they’re doing.
These ten desserts are your foundation. Master them, and you have the skills to make dozens more. You have the confidence to experiment. You have the proof that homemade is better, simpler than you thought, and absolutely worth the small effort required.