If you’ve ever wanted to recreate that bakery magic at home—the kind where your kitchen fills with the aroma of toasted cinnamon and vanilla, and you pull something genuinely remarkable from your own oven—this is the recipe for you. A cinnamon roll cheesecake made completely from scratch combines two beloved desserts into one extraordinary dessert that looks impressive enough for a dinner party but is absolutely doable in your own kitchen. The secret isn’t anything fancy or complicated; it’s understanding how each layer works, how the flavors build together, and knowing exactly what to watch for so nothing goes wrong.
This isn’t a shortcut version that relies on store-bought cinnamon rolls or a pre-made graham cracker crust. You’re building this entire thing yourself—from the buttery crust that provides the perfect structural foundation, to the silky cheesecake filling that stays creamy and rich when baked just right, to the swirl of cinnamon and brown sugar that runs through the middle like a delicious secret. The reward for that effort is a dessert that tastes unmistakably homemade, with better texture and more nuanced flavor than anything you could buy.
The beauty of making this from scratch is that you control every element. You know exactly what goes into each component, you can adjust the spice level and sweetness to your preference, and you get to experience that deeply satisfying feeling of transforming simple ingredients into something that looks like it came from a professional bakery. This is the kind of dessert that makes people ask for the recipe, the kind that becomes a special-occasion tradition, and the kind that’s actually not as difficult to make as it sounds.
What Makes This Cheesecake Special
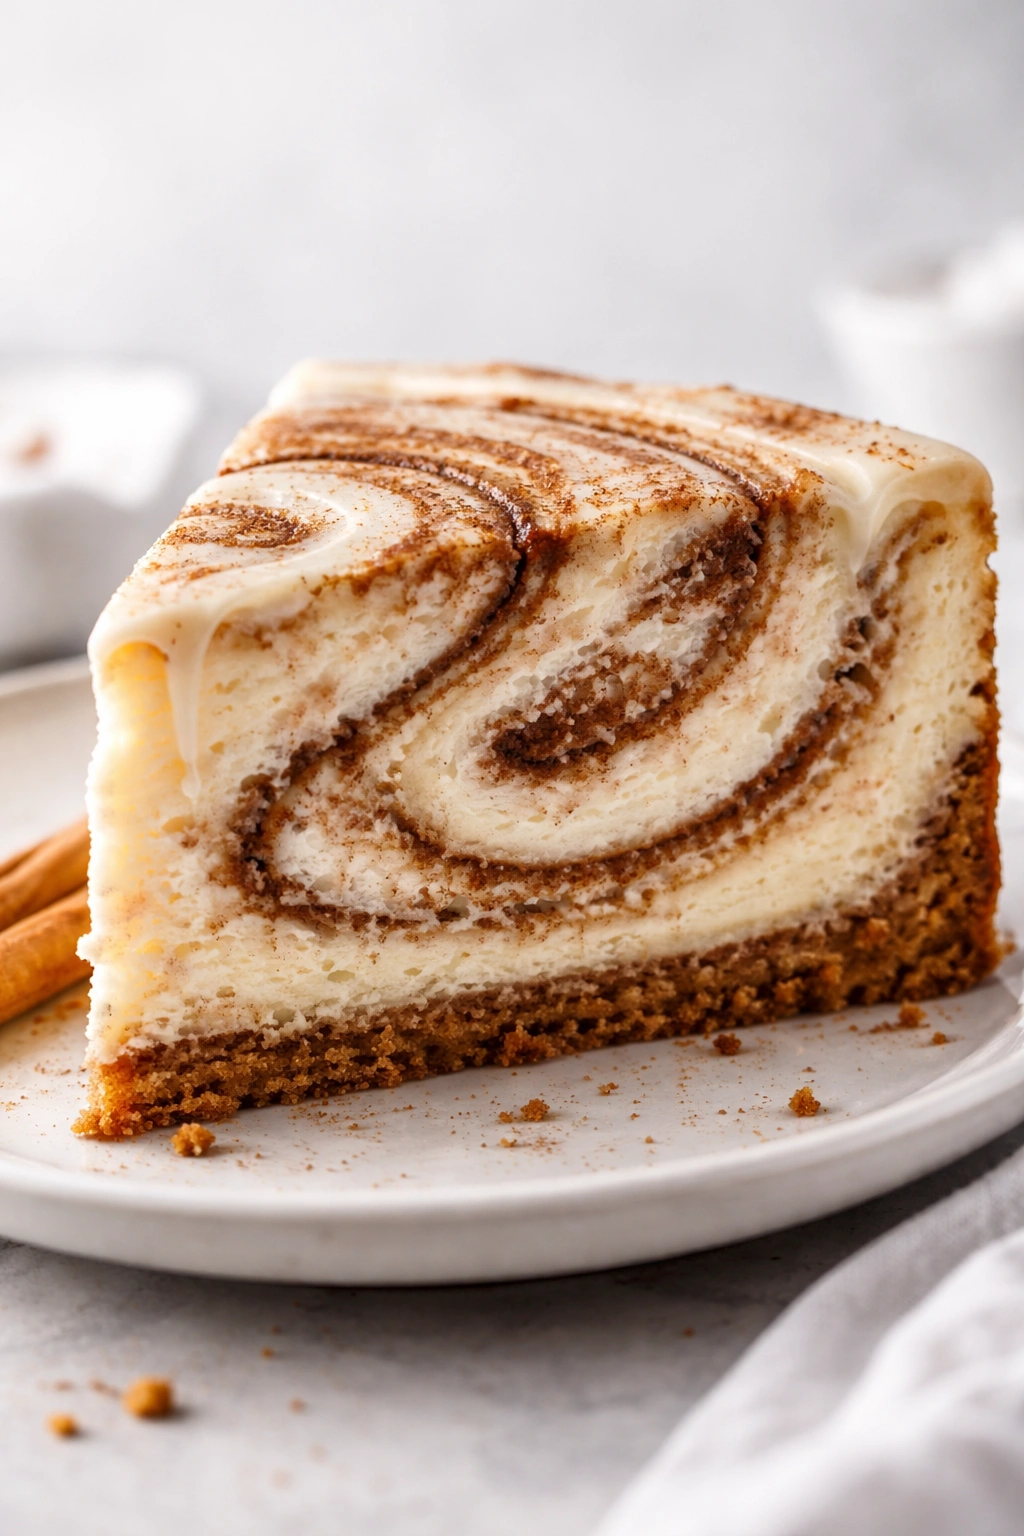
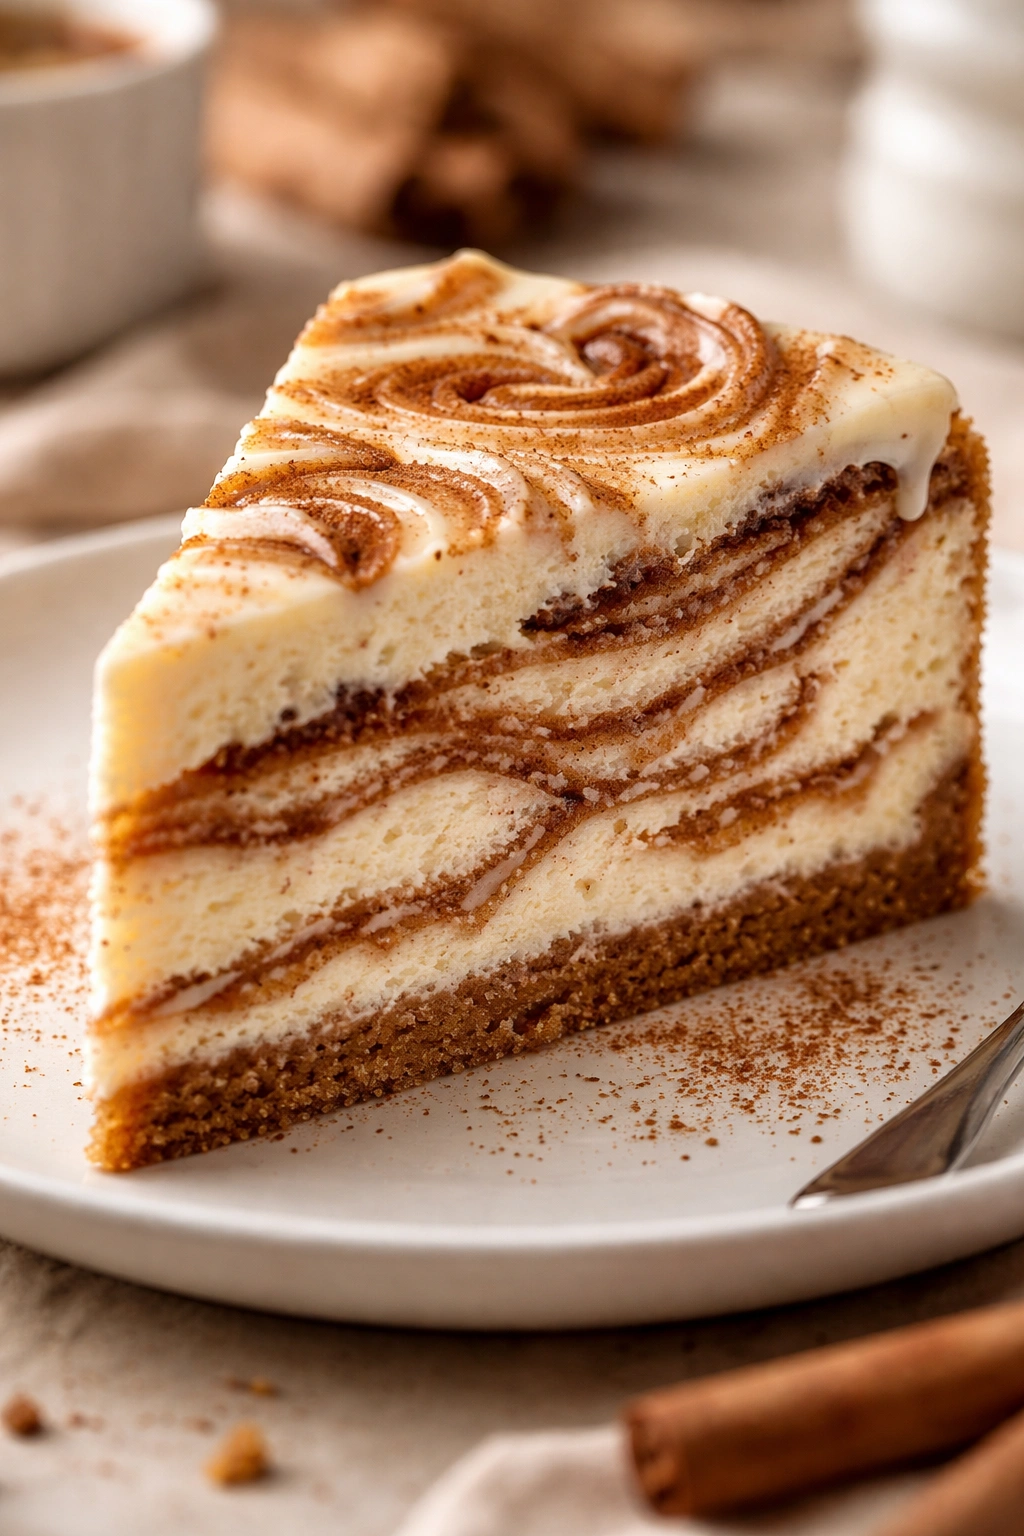
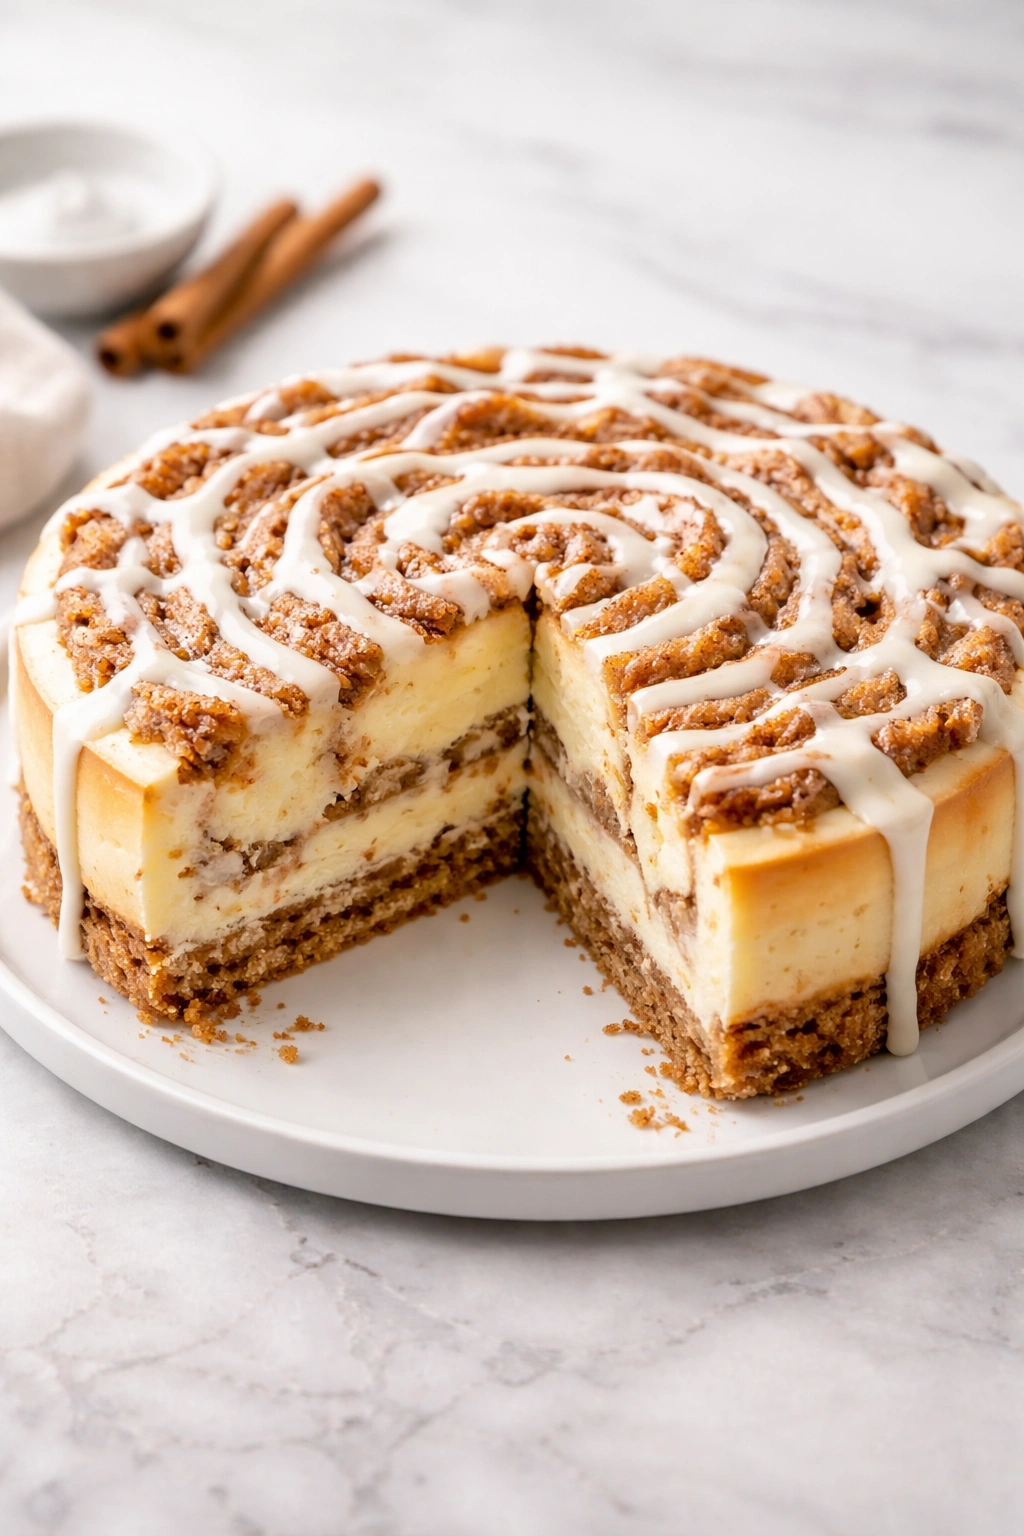
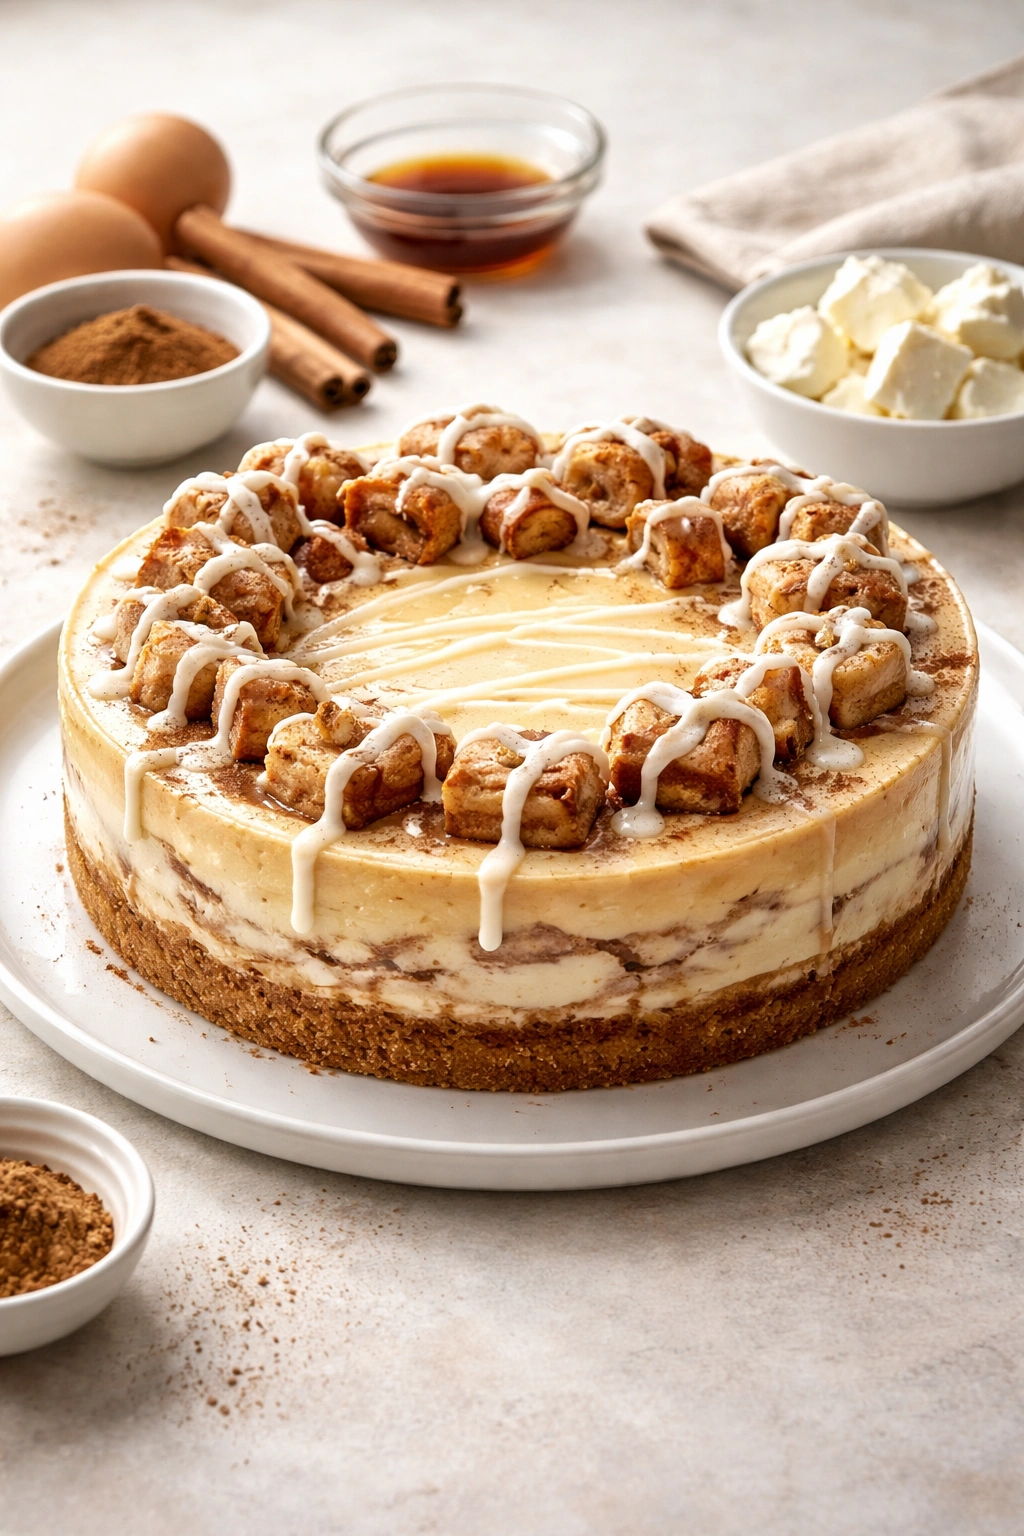
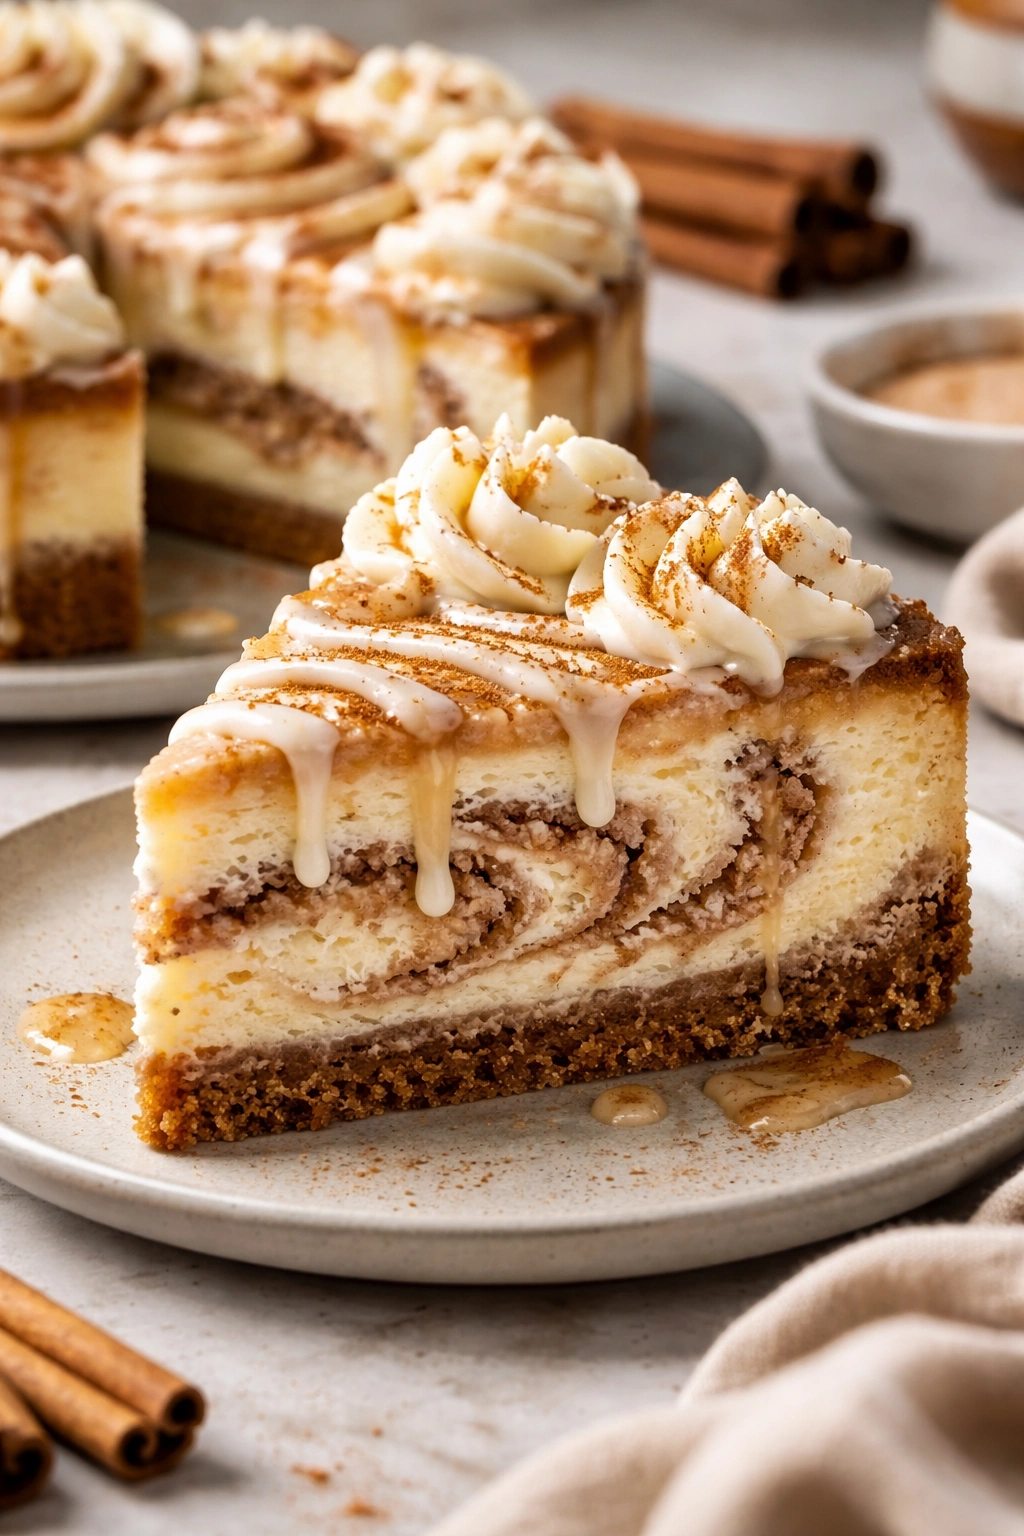
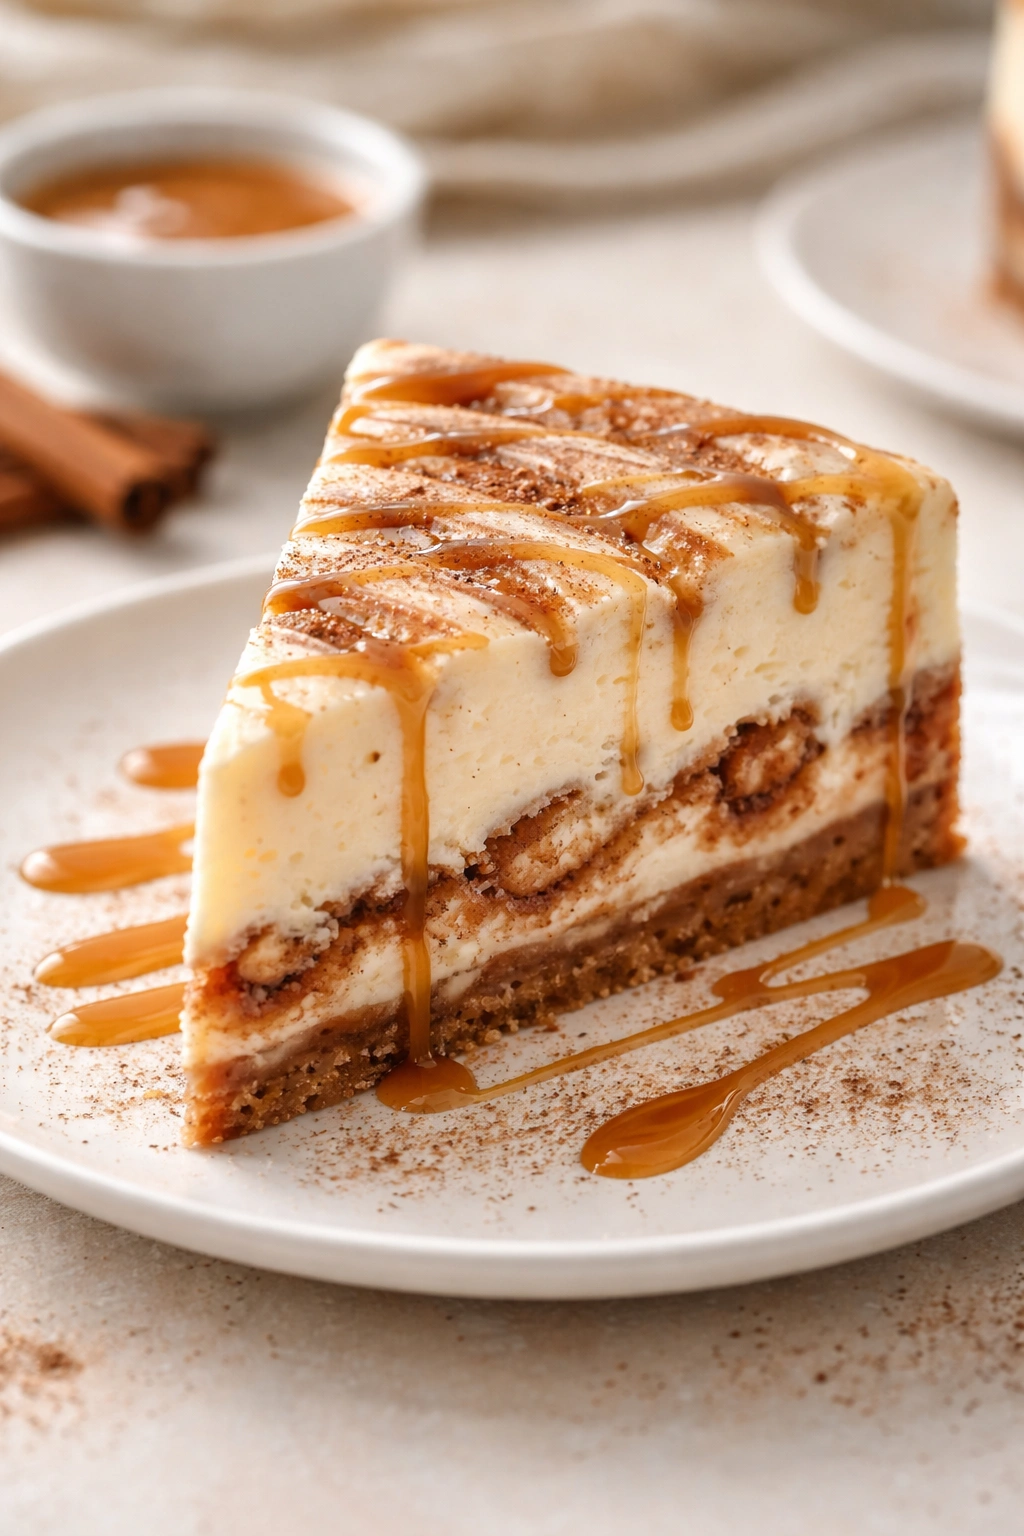
This isn’t just any cheesecake with cinnamon sprinkled on top. A true cinnamon roll cheesecake requires the cinnamon swirl to be baked directly into the filling, creating those beautiful spiral patterns when you slice it, and more importantly, delivering a burst of warm spice in every bite. The filling needs enough structure to hold that swirl without it dissolving completely, but still be creamy and tender when you bite into it.
The cinnamon-brown sugar mixture runs through the center of the filling rather than just sitting on top. This means the warmth and complexity of the spice flavors infuse throughout the entire cake, not just the top layer. You also get those little pockets of intense cinnamon flavor where the swirl is thickest, which creates an interesting textural and flavor variation from bite to bite.
What separates a really good cinnamon roll cheesecake from a mediocre one is restraint with the spice. Too much cinnamon and it becomes overpowering—you lose the delicate creaminess of the cheesecake underneath. The right balance lets both flavors shine equally, with the cinnamon enhancing rather than dominating the experience.
Why Bake This From Scratch
There’s a real difference between a cheesecake made from scratch and one built with shortcuts. When you make the crust yourself, you control the butter-to-crumb ratio so it has that perfect balance of structure and crunch. When you prepare the filling from cream cheese, eggs, and a carefully measured amount of sour cream, you achieve a texture that’s genuinely creamy and tender—not dense, not rubbery, but perfectly calibrated.
Homemade cinnamon roll cheesecake also smells infinitely better than anything storebought. As it bakes, the aroma evolves—first you smell toasted graham crackers and butter, then cinnamon and brown sugar, then finally that rich cream cheese smell layering underneath everything. It’s the kind of smell that fills your entire house and announces to everyone that something special is happening in your kitchen.
Making it yourself also means you can fine-tune the flavor profile. Want it less sweet? Reduce the sugar slightly in the filling. Want more intense cinnamon? Increase the spice in the swirl. Want to add vanilla extract or a hint of cardamom? You have complete control. That level of customization is impossible with a bakery-bought cake.
Understanding the Three Key Layers
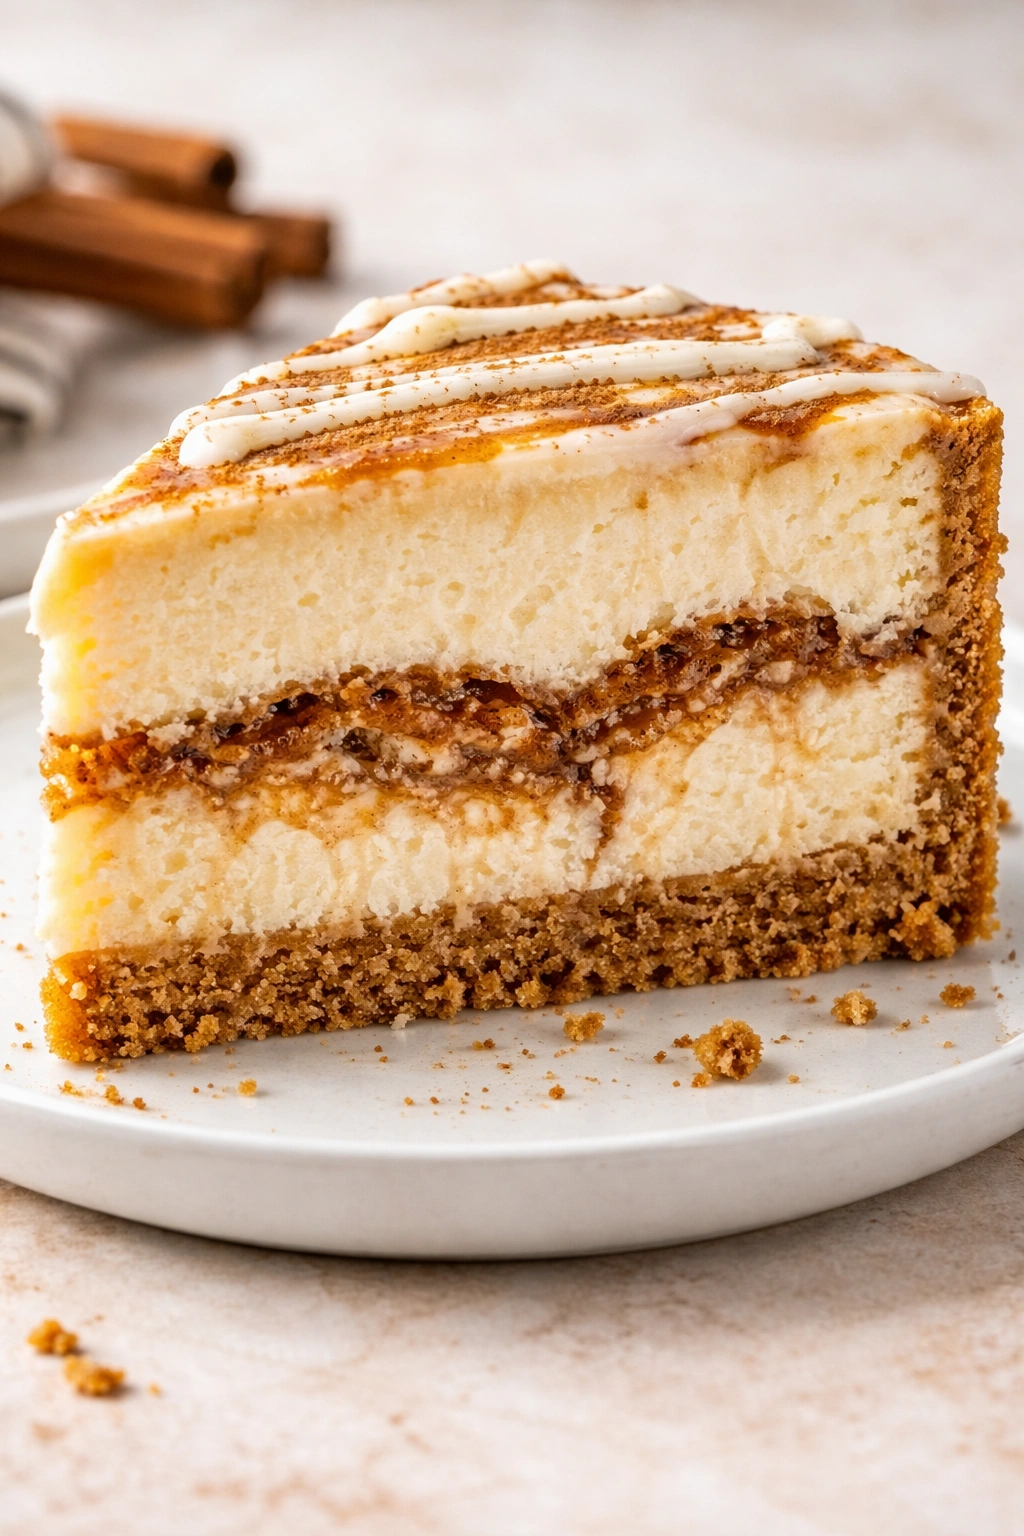
This dessert works because each layer has a distinct purpose and flavor profile, and they’re built in the right order. The crust provides structural support and textural contrast—without it, you’d have a delicious but one-note creamy dessert. The cheesecake filling is where the richness and creaminess come in, the main event that makes people fall in love with the dessert. The cinnamon swirl is the flavor anchor, the element that ties this whole creation to the cinnamon roll family of desserts.
Understanding how these layers interact is key. The crust needs to be packed firmly enough to support the filling during and after baking, but not so compressed that it becomes dense and hard. The filling needs enough binder (egg yolks, really) to hold together without cracking, but not so much that it becomes tough. The cinnamon swirl needs to be thin enough to distribute throughout without overwhelming the cake, but thick enough that you actually taste it in every slice.
The baking process itself is crucial. You’re not just throwing this in the oven and waiting for a timer. You’re managing a controlled bake with gentle heat, watching for the exact moment when the center is set but still has the slightest jiggle, and then cooling it down slowly so the cheesecake doesn’t crack from thermal shock.
Choosing Your Ingredients Matters
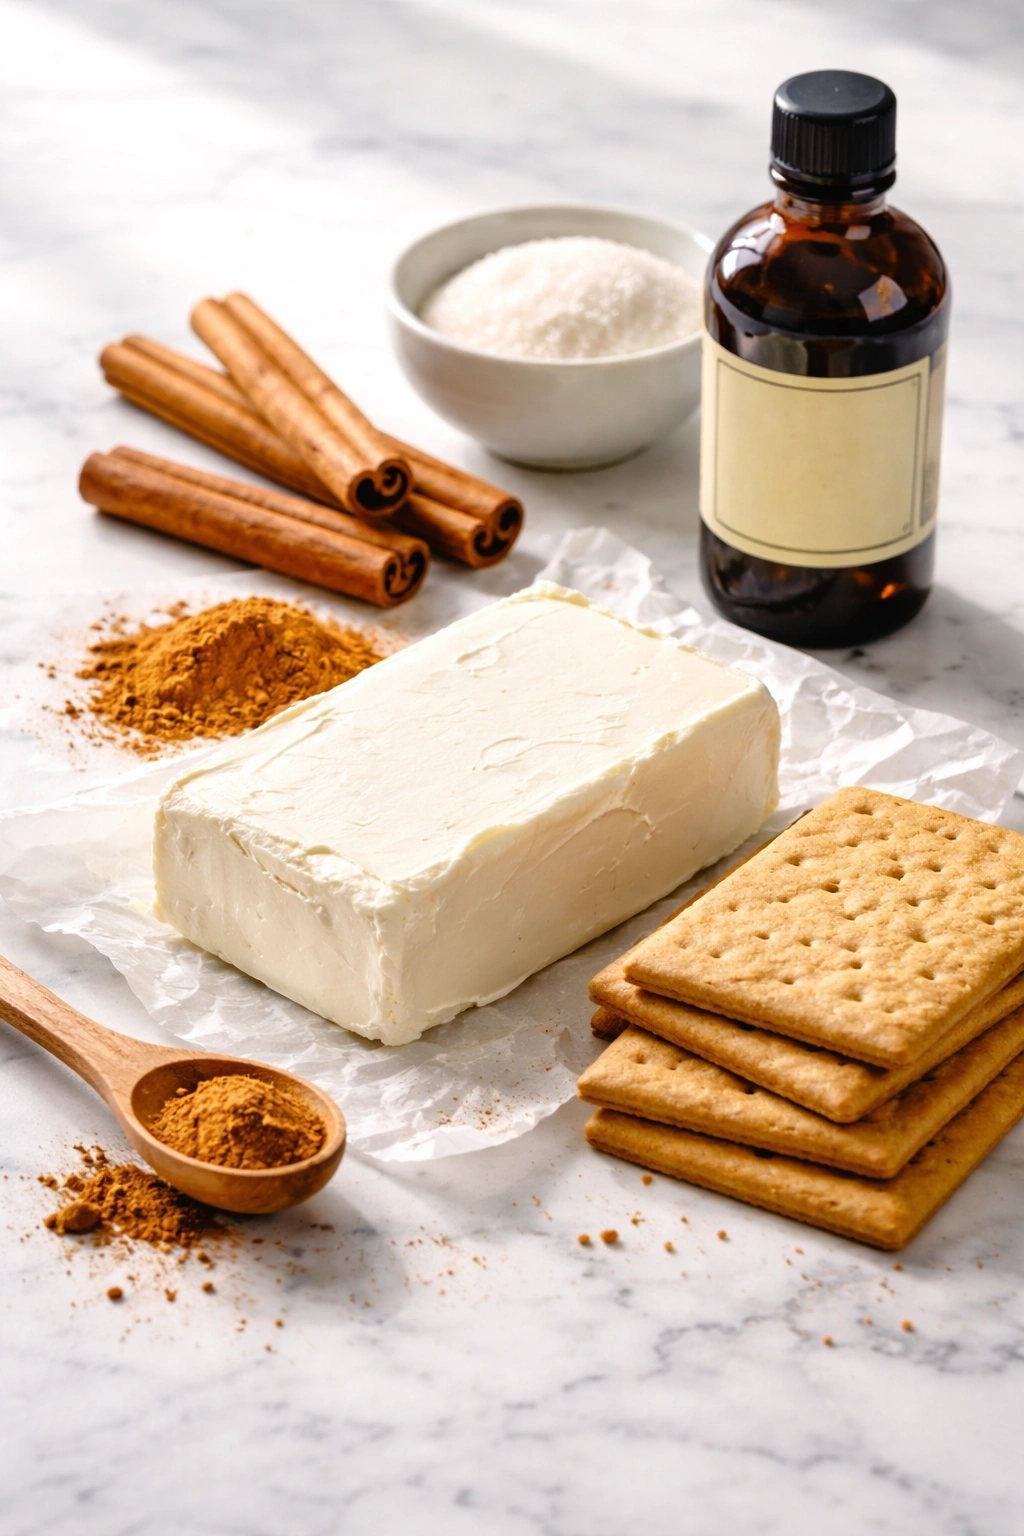
The single most important ingredient in cheesecake is the cream cheese. Use full-fat, brick-style cream cheese at room temperature—not the whipped kind, not a generic store brand if you can help it. Room temperature cream cheese mixes smoothly into the sugar and sour cream without lumps. If it goes into the mixer cold, you’ll end up with a grainy texture no matter how long you mix.
Graham crackers for the crust should be real graham crackers, not honey crackers or digestive biscuits, which have a different flavor and texture. You want that mild wheat flavor that doesn’t compete with the cinnamon swirl. If you’re toasting them yourself (which is optional but improves flavor), just pulse them into crumbs and toast them for about 5 minutes in a dry skillet—this brings out their subtle sweetness.
The cinnamon should be fresh. Ground cinnamon loses its aromatic compounds over time, so if your jar has been in the back of the spice cabinet for two years, pick up a fresh container. You’ll notice the difference immediately—the flavor will be warmer, spicier, and more vibrant. Real vanilla extract (not imitation) makes a difference too, especially since there’s no vanilla in the cinnamon swirl to compete with it.
Building the Crust Foundation

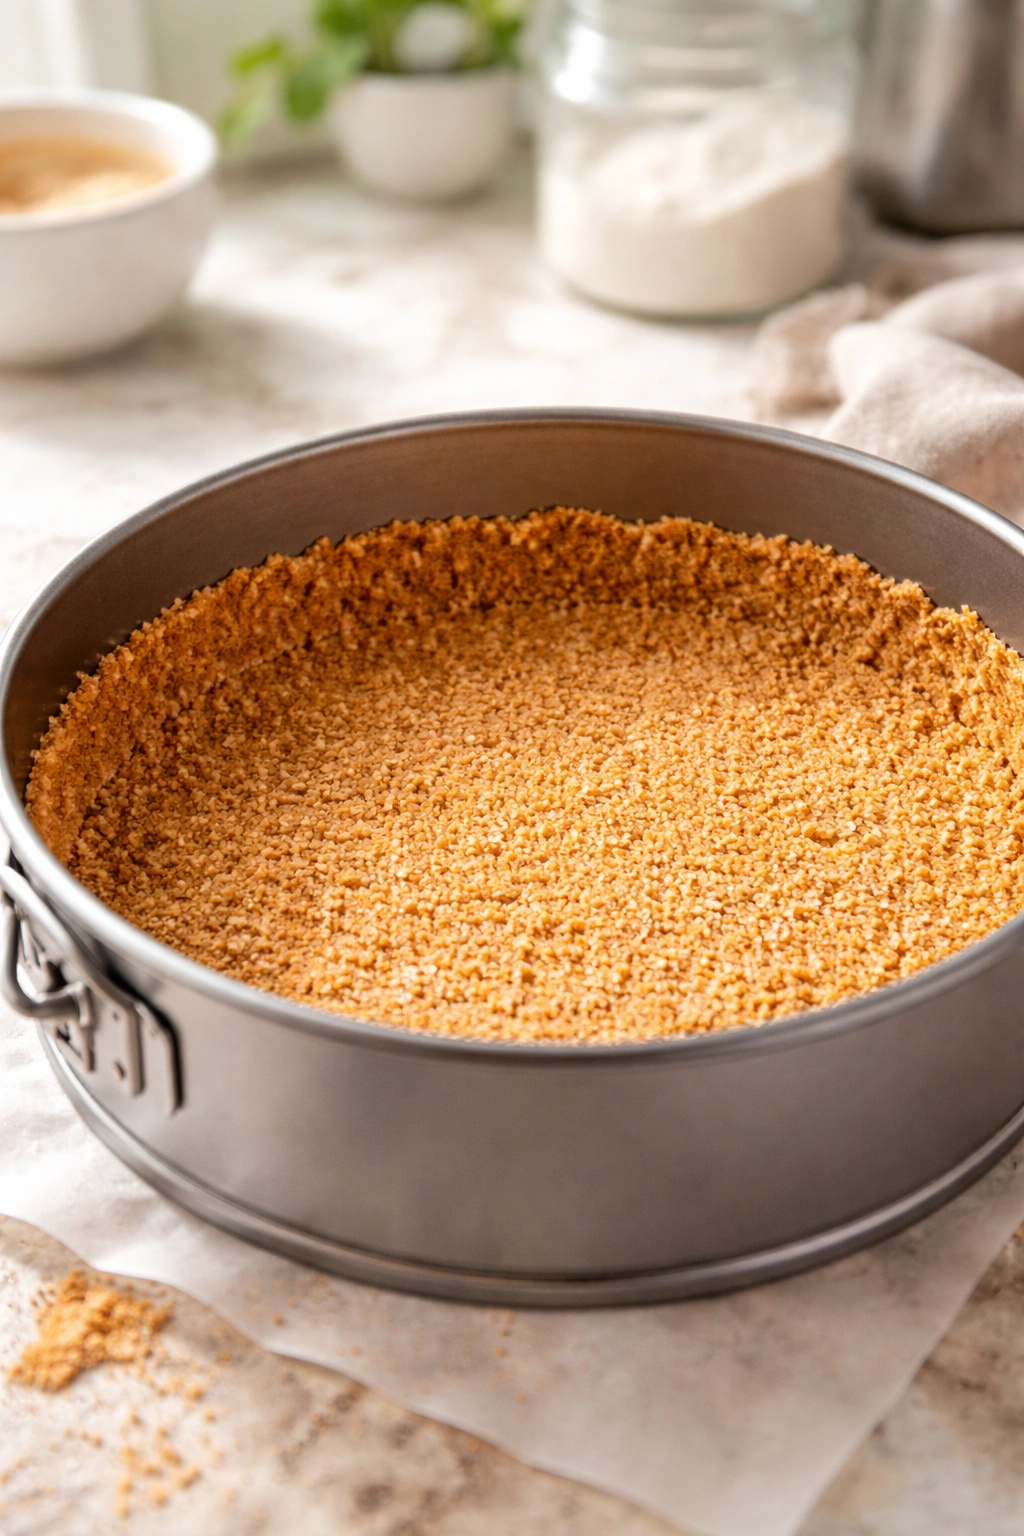
The crust is where this whole dessert starts, and it’s genuinely simple—just graham cracker crumbs, melted butter, a little sugar, and salt. The magic is in the proportion and the packing technique. You want enough butter that the crust holds together, but not so much that it becomes greasy or slides around in the pan. Generally speaking, about 4 tablespoons of butter to 1 1/2 cups of crumbs is the right ratio.
Press the crust mixture firmly and evenly into the bottom of your springform pan, using the bottom of a measuring cup to pack it down. You want it compact enough that it holds together, but you shouldn’t be aggressive about it—you’re just sealing the particles together, not compressing it into a hard brick. A crust that’s too tightly packed will feel dense and tough rather than crumbly and satisfying.
Pre-baking the crust is optional, but I recommend it, especially if you like a crust with more texture. A brief 8-minute bake at 325°F (160°C) sets the crust and helps it stay crispy even after the wet filling bakes on top. If you skip this step, make sure your oven is at the right temperature before the cheesecake goes in, and keep an eye on the crust edges to make sure they don’t brown too much.
The Creamy Filling Breakdown
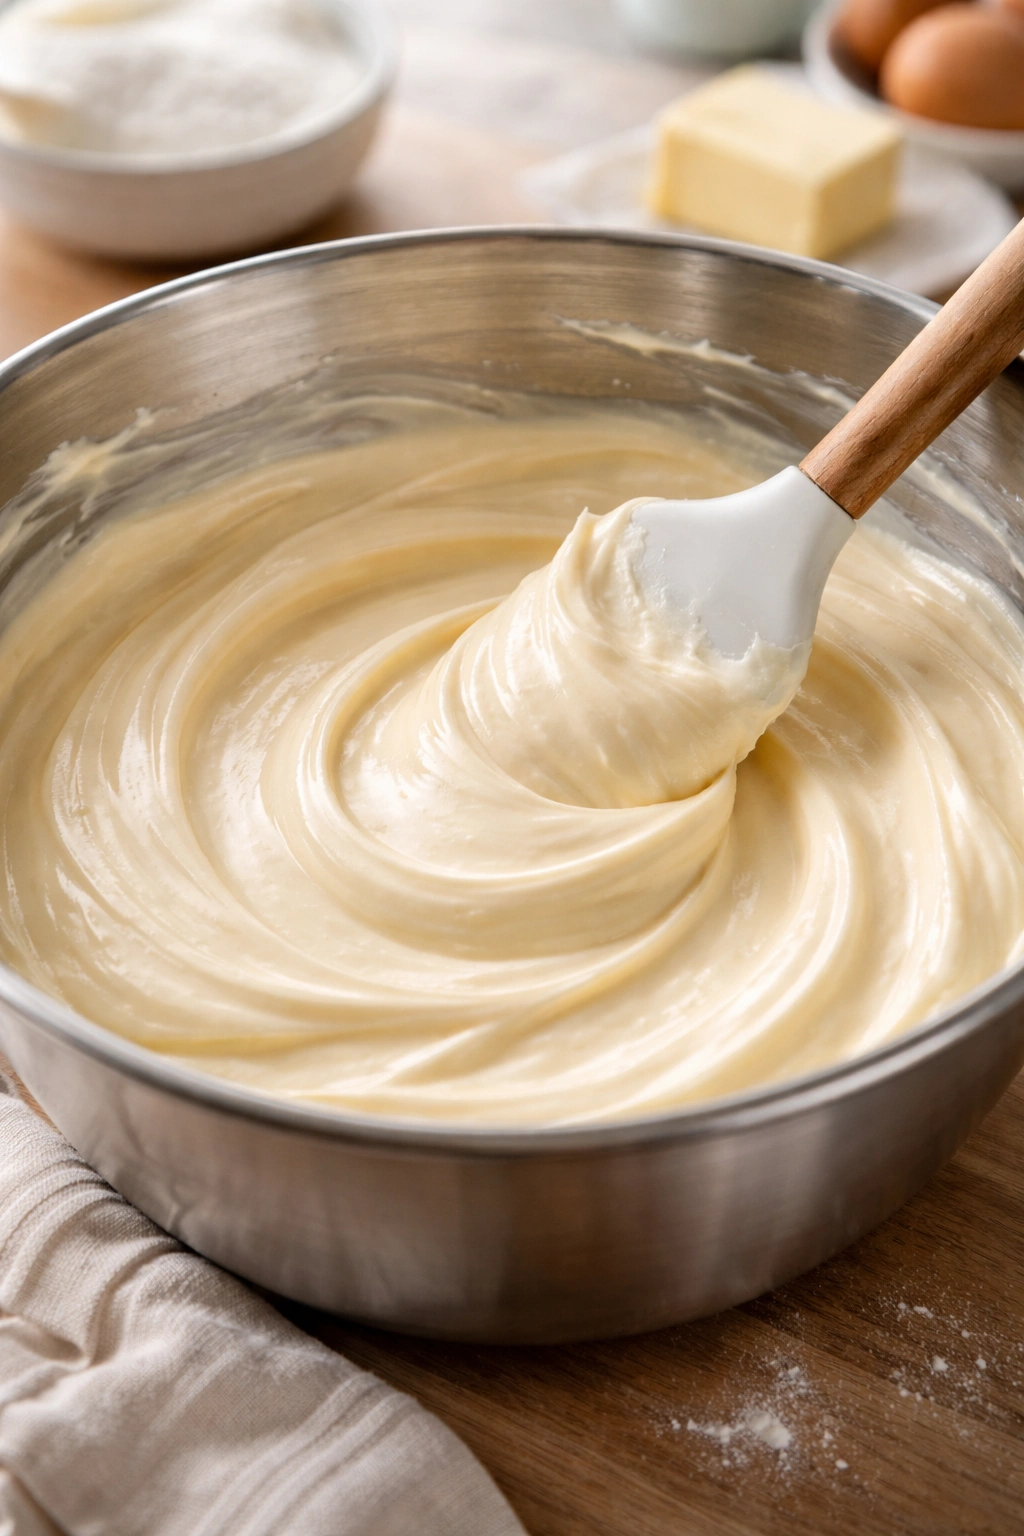
The cheesecake filling is where patience and technique truly matter. You’re mixing cream cheese, sugar, eggs, and sour cream into a smooth, lump-free batter that will bake into something silky and creamy. The sour cream does two jobs: it adds tanginess that balances the richness of the cream cheese, and it adds moisture so the filling stays tender rather than becoming dry or rubbery.
The order of mixing matters. Cream the softened cream cheese with sugar first until it’s pale and fluffy—this takes a good 3-4 minutes with a mixer. This step incorporates air into the filling, which helps it bake up light rather than dense. Then add the eggs one at a time, mixing gently after each addition. If you add them all at once or overmix at this stage, you can develop too much gluten structure, which makes the filling tough.
The sour cream and vanilla go in last, mixed just until combined. At this point, you’re done mixing—stop as soon as everything is uniform. Any more mixing risks overworking the batter and introducing air bubbles that can create little holes in the finished cheesecake.
The Cinnamon Swirl Magic
This is where the personality of the cake comes in. The cinnamon swirl isn’t just a topping—it’s baked into the filling itself, creating those beautiful swirled patterns and little pockets of intense spice throughout the cheesecake. The mixture for the swirl is simple: brown sugar, ground cinnamon, a pinch of salt, and a little melted butter to bind it together.
The key to a beautiful swirl is not mixing it into the filling directly. Instead, you’re layering it. Pour about half the cheesecake filling into the crust, sprinkle about half the cinnamon mixture on top, then add the remaining filling, then top with the rest of the cinnamon mixture. Using a knife or a wooden skewer, make gentle swirling motions through the layers—not too many, just enough to create those beautiful ribbon patterns. Too much swirling and you lose the definition; too little and you get big separate chunks of cinnamon instead of integrated swirls.
The brown sugar in the swirl adds depth that regular cinnamon alone can’t provide. Brown sugar has molasses in it, which brings richness and complexity. Combined with the warmth of cinnamon, it creates a flavor that actually tastes like the filling of a real cinnamon roll.
Serving and Timing Information
Yield: One 9-inch cheesecake (12-16 slices)
Prep Time: 30 minutes
Cook Time: 1 hour 15 minutes
Total Time: 1 hour 45 minutes active, plus 6 hours chilling
Difficulty: Intermediate — This recipe requires some attention to detail and patience with cooling, but the techniques are straightforward and the steps are clearly defined. Even a baker with moderate experience can succeed here.
Chill/Rest Time: The cheesecake must chill for at least 6 hours (overnight is ideal) before slicing. This allows the filling to set completely and makes for clean slices.
Best Served: At cool room temperature or chilled. Fresh cheesecake is best eaten within 2-3 days, though it keeps well refrigerated for up to 5 days.
Complete Ingredients List
For the Crust:
- 1½ cups graham cracker crumbs (about 10-12 full crackers, processed until fine)
- 4 tablespoons unsalted butter, melted
- 2 tablespoons granulated sugar
- ¼ teaspoon fine sea salt
For the Cheesecake Filling:
- 24 ounces (three 8-oz packages) full-fat cream cheese, softened to room temperature for at least 1 hour
- 1 cup granulated sugar
- 3 large eggs, room temperature
- ¾ cup sour cream, room temperature
- 1 teaspoon pure vanilla extract
- ¼ teaspoon fine sea salt
For the Cinnamon Swirl:
- ⅓ cup packed brown sugar
- 2 tablespoons ground cinnamon
- 2 tablespoons unsalted butter, melted
- Pinch of fine sea salt
For the Water Bath:
- 1 quart hot water (for the baking pan)
Step-by-Step Instructions
Prepare Your Equipment:
-
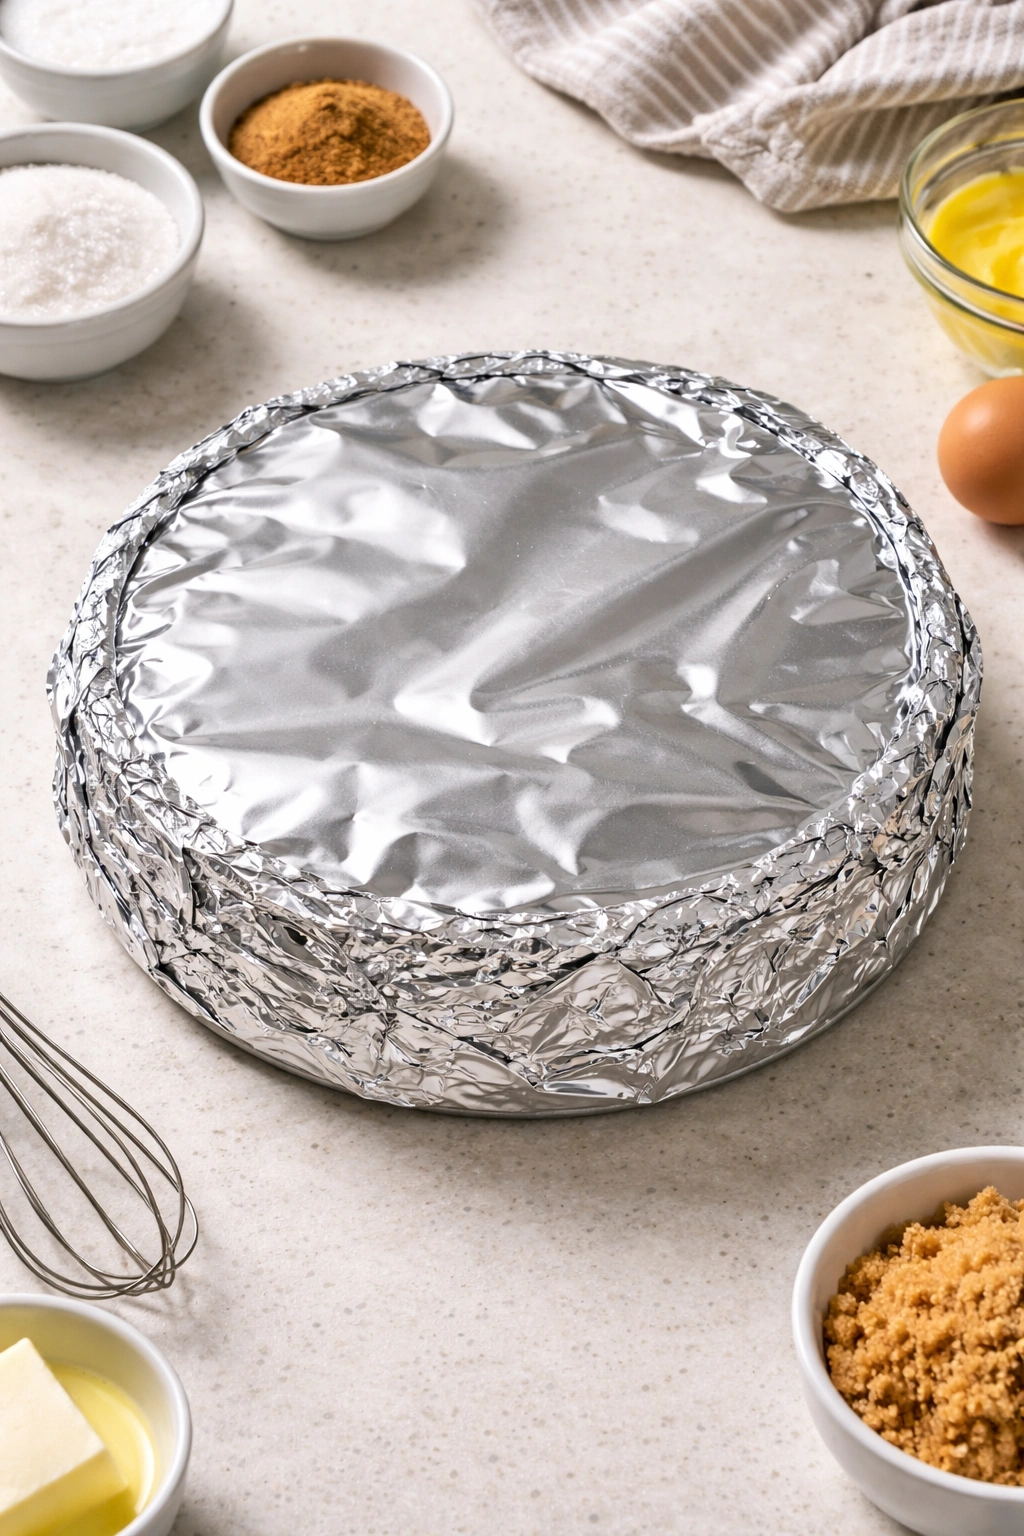
Position your oven rack to the center of the oven and preheat to 325°F (160°C). Wrap the outside of a 9-inch springform pan tightly with heavy-duty foil, covering the bottom and sides completely—this prevents water from seeping in during the water bath. Set the pan aside.
-
Fill a kettle or large pot with water and bring it to a boil. You’ll need this hot water ready when the cheesecake goes into the oven.
Make the Crust:
-
In a bowl, combine the graham cracker crumbs, melted butter, sugar, and salt, stirring until the mixture resembles wet sand and holds together when pressed. The mixture should feel slightly damp but not greasy.
Advertisements -
Press the crust mixture firmly and evenly onto the bottom of the prepared springform pan, using the bottom of a measuring cup to pack it down into a compact, even layer about ¼-inch thick. The edges don’t need to go up the sides—just cover the bottom completely.
-
Optional but recommended: Bake the crust on its own for 8 minutes at 325°F (160°C), then remove and cool slightly while you prepare the filling. This step helps the crust stay crispy beneath the filling. If you skip this, that’s fine—just make sure the filling goes in as soon as possible after the cheesecake itself enters the oven.
Prepare the Filling:
-
While the crust bakes (or simultaneously if you’re skipping the pre-bake), remove the cream cheese packages from the refrigerator and let them sit on the counter for the full hour if you haven’t already—cold cream cheese will seize up and become lumpy when mixed, so this step is crucial.
-
In the bowl of a stand mixer fitted with the paddle attachment (or using a hand mixer and a large bowl), beat the softened cream cheese and sugar on medium speed for 3 to 4 minutes, until the mixture is pale, noticeably fluffy, and has nearly doubled in volume. Scrape down the sides of the bowl halfway through.
-
Reduce the mixer to low speed. Add the eggs one at a time, beating for about 30 seconds after each addition and scraping down the bowl after the second egg. The mixture may look slightly curdled at this stage—that’s completely normal.
-
Add the sour cream, vanilla extract, and salt. Mix on low speed just until the ingredients are combined and no streaks of sour cream remain visible, about 30 seconds. Do not overmix from this point on—overworking the batter develops gluten, which can cause cracking and a tough texture.
Prepare the Cinnamon Swirl:
- In a small bowl, whisk together the brown sugar, cinnamon, salt, and melted butter until you have a thick, paste-like mixture with no lumps. Set aside.
Assemble and Bake:
-
Pour about half of the cheesecake filling (roughly 2½ cups) into the crust, spreading it into an even layer with a spatula.
Advertisements -
Sprinkle about half of the cinnamon-brown sugar mixture (roughly 3 tablespoons) evenly over the filling.
-
Pour the remaining filling over the cinnamon layer, spreading it gently and carefully into an even layer—don’t stir or mix it at this point.
-
Sprinkle the remaining cinnamon-brown sugar mixture across the top of the filling.
-
Using a small offset spatula, butter knife, or wooden skewer, make gentle swirling motions through the filling to create ribbon patterns. Start at one edge and drag the knife through the filling toward the opposite edge, then repeat from different angles—aim for about 8 to 10 gentle swirls total. Don’t over-swirl—you want distinct ribbon patterns, not a completely mixed filling.
-
Place the prepared springform pan inside a larger roasting pan. Pour the hot water into the roasting pan until it reaches about halfway up the sides of the springform pan. This water bath ensures even, gentle baking and helps prevent cracks.
-
Carefully transfer the water bath setup to the preheated oven. Bake for 1 hour and 15 minutes to 1 hour and 30 minutes. The cheesecake is done when the edges are set and barely firm to the touch, but the very center (about a 2-inch circle in the middle) still has a slight jiggle—it should wobble gently when you gently shake the pan, not slosh around.
Cool Slowly:
-
Turn off the oven and crack the door open about 3 inches. Let the cheesecake sit in the warm oven for 1 hour. This gradual cooling prevents the dramatic temperature change that causes cracks to form.
-
Remove the cheesecake from the oven and the water bath. Run a thin knife around the edges of the cheesecake where it meets the pan—this releases it from the sides and prevents cracks as it cools further. Do this while it’s still warm; don’t wait until it’s cold.
-
Let the cheesecake cool on the counter for another 30 minutes to 1 hour until it’s closer to room temperature. Once it’s cool enough to touch the bottom of the pan without it being too hot, place it in the refrigerator.
Advertisements -
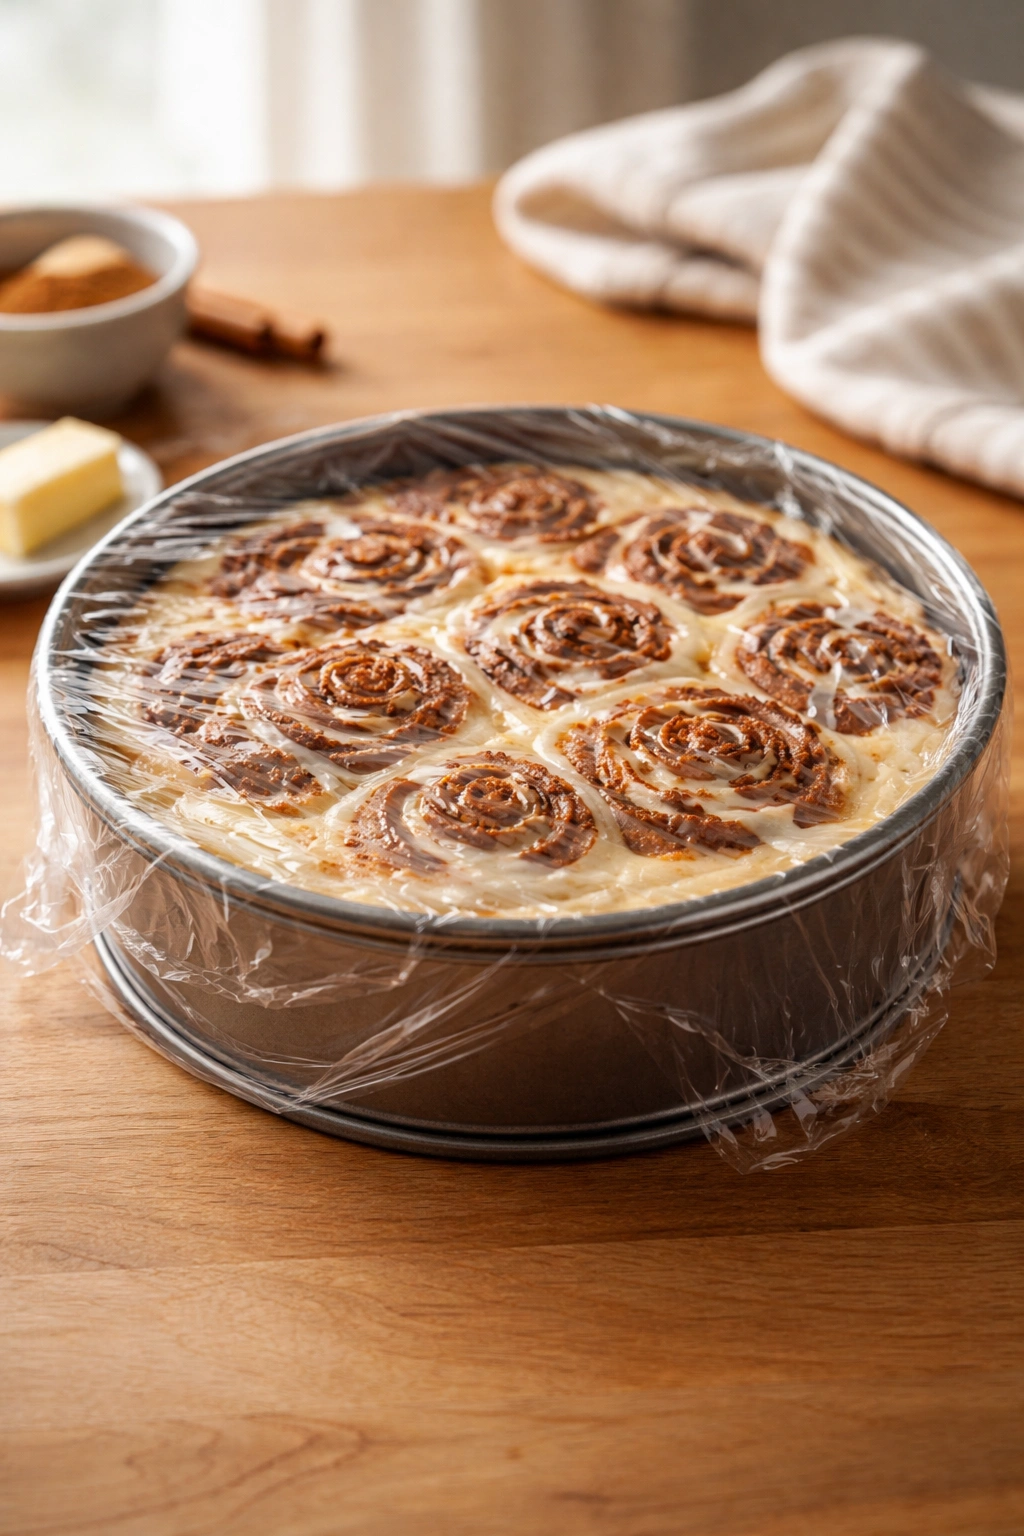
Refrigerate for at least 6 hours, but preferably overnight (8 to 12 hours), before removing the springform sides and slicing. The cheesecake must be completely chilled and set to slice cleanly.
Pro Tips and What to Avoid
Temperature Matters More Than You Think
Room-temperature ingredients are non-negotiable for this recipe. Cold cream cheese doesn’t blend smoothly; it stays lumpy no matter how long you mix it. The same applies to eggs and sour cream. If your kitchen is cold, set the ingredients on the counter for at least 1 hour, or place them in a warm water bath for 15 minutes to speed things up.
The Water Bath Isn’t Optional
Cheesecake without a water bath bakes hotter and faster, which means the edges overcook before the center is set—that’s what creates cracks and uneven texture. The water bath insulates the cheesecake from direct heat, promoting even, gentle baking. Don’t skip it, and don’t cut corners with the foil wrapping. You need to prevent water from seeping into the pan.
Don’t Rely on the Timer Alone
Every oven is different. The cheesecake is done when it looks set around the edges but still has a visible jiggle in the center—not raw looking, but definitely not completely firm. If you pull it out and it’s jiggles aggressively, it needs more time. If the top is already browning, cover the top with foil for the remaining bake.
The Gradual Cooling is Where Most Cracks Come From
If you skip the hour in the warm oven and the run-knife-around-the-edges step, you’re almost guaranteeing cracks. The thermal shock of going from hot oven to cold kitchen causes the cheesecake to contract suddenly. The gradual cooling process prevents this.
Chill Before You Slice
Warm cheesecake is delicious, but it won’t slice cleanly. You need the complete chill time—at least 6 hours—for the structure to fully set. When you’re ready to slice, warm a thin knife under hot running water, dry it, and use that warm knife for clean cuts. Dip the knife between every slice for the best result.
Variations and Flavor Twists
Swirl in Cream Cheese Frosting Instead
If you want the cheesecake to taste more authentically like a cinnamon roll with frosting, make a simple cream cheese frosting (softened cream cheese, butter, powdered sugar, and vanilla) and swirl that in along with or instead of the brown sugar mixture. Use less of it—about 2 tablespoons total to avoid making the filling too loose.
Add a Drizzle on Top
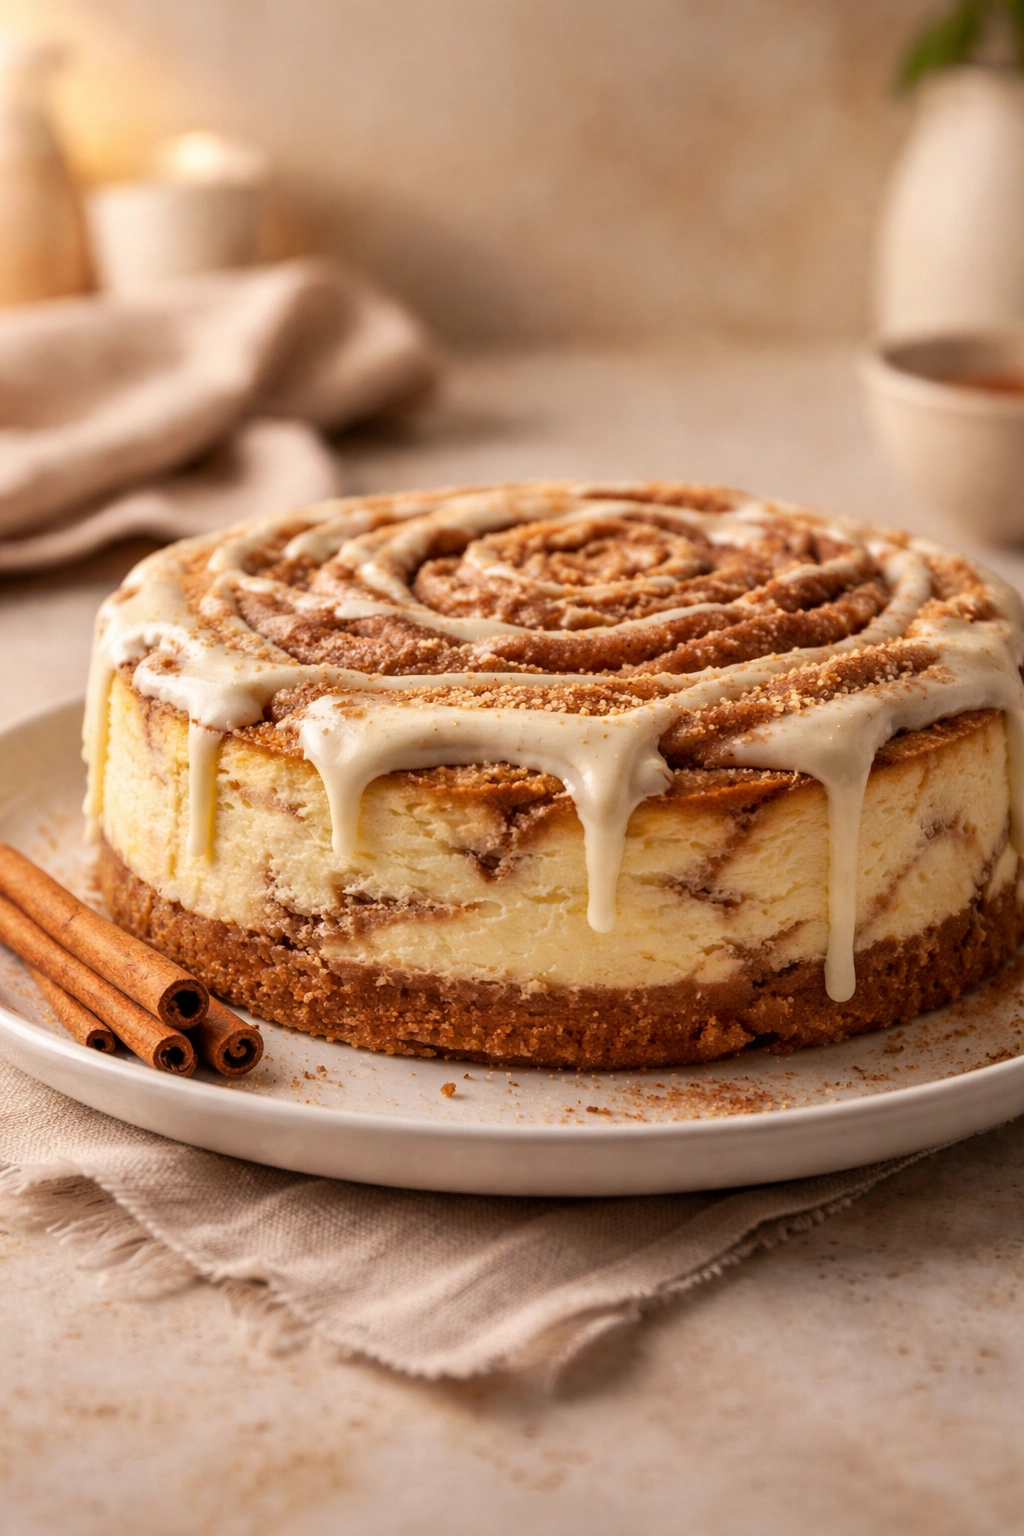
Once the cheesecake has chilled, drizzle a simple glaze over the top: mix 1 cup powdered sugar with 2 to 3 tablespoons milk and a pinch of vanilla extract until you have a pourable consistency. Drizzle it artfully across the top. This looks bakery-perfect and adds an extra touch of sweetness.
Make It With Cardamom and Cinnamon
If you want more complexity in the spice profile, use 1½ tablespoons cinnamon and ½ teaspoon ground cardamom in the swirl. Cardamom has a warm, slightly floral note that elevates the whole thing without making it taste completely different.
Spiced Brown Butter Swirl
Melt the butter in a saucepan and cook it until the milk solids at the bottom turn golden and nutty (about 5 minutes)—that’s brown butter. Mix it with the brown sugar and cinnamon for a swirl with noticeably richer, nuttier flavor.
Vanilla Bean Version
Instead of vanilla extract, scrape the seeds from half a vanilla bean pod into the filling. The tiny black specks throughout the cheesecake look professional and the flavor is more delicate and sophisticated.
Gluten-Free or Nut-Free Crust
Substitute the graham crackers with gluten-free graham crackers (same amount, same technique) or make a crust from crushed vanilla cookies, digestive biscuits, or even crushed shortbread—adjust the butter slightly depending on the cookie’s existing fat content.
Storage and Make-Ahead Guide
How Long It Keeps
Covered and refrigerated, this cheesecake stays fresh and delicious for up to 5 days. After that, the flavor doesn’t go bad, but the texture starts to become grainy. The cheesecake actually tastes slightly better on day 2 or 3 than on day 1, as the flavors have more time to meld.
Freezing
Cheesecake freezes remarkably well. Once it’s chilled and set, you can freeze the entire cheesecake (in the springform pan) for up to 3 months. Thaw it in the refrigerator for 12 hours before serving. Individual slices can be wrapped in plastic wrap and frozen separately—thaw a single slice in the fridge overnight when you want it.
Make-Ahead Strategy
You can prepare the crust up to 2 days in advance and keep it covered in the refrigerator. The filling can be mixed up to 4 hours ahead and kept covered in the fridge—just let it come to room temperature for about 15 minutes before baking. The assembled, unbaked cheesecake (ready to go into the oven) can sit in the fridge for up to 2 hours, though it’s best baked the same day it’s assembled.
Do Not Make the Cinnamon Swirl Too Far Ahead
The cinnamon-brown sugar mixture can be made several hours ahead, but once the butter cools, it can become a bit hard and lumpy. If you’re making it more than an hour ahead, let it soften slightly at room temperature before using it, or briefly reheat it so it’s spreadable again.
Serving Suggestions and Pairings
A slice of this cheesecake is genuinely satisfying on its own, but it’s also wonderful with accompaniments. A dollop of fresh whipped cream adds a cool counterpoint to the rich filling and warm cinnamon flavor. A small scoop of vanilla ice cream melts into the warm cinnamon swirls beautifully.
For a more elaborate presentation, dust each slice with a tiny amount of ground cinnamon and a whisper of powdered sugar. A drizzle of caramel sauce or even a thin smear of salted caramel on the plate elevates it to restaurant-quality. If you’re feeling fancy, serve it alongside a small cup of hot coffee or a glass of sweet dessert wine—the tannins and acidity in wine cut through the richness perfectly.
This cheesecake is excellent for special occasions, dinner parties, or just when you want to treat yourself to something remarkable. Bring it to a potluck and watch it disappear—people always ask for seconds. It’s the kind of dessert that makes an impression without requiring professional training to pull off.
Final Thoughts
Making a cinnamon roll cheesecake from scratch might feel like a big project, but it’s genuinely doable if you understand what each step is accomplishing and give yourself permission to take your time. The beauty of this dessert is that there’s no real rush—you prepare the components, you bake gently in a water bath, and you let it chill thoroughly. Every step makes sense once you know why it matters.
The flavor combination of creamy cheesecake with warm cinnamon and brown sugar is timeless for a reason—it works because both elements are genuinely delicious and they complement each other perfectly. You get richness from the cream cheese, spice and complexity from the cinnamon swirl, and a sturdy textural foundation from the crust. It’s a dessert that satisfies on multiple levels.
Once you’ve made this once and seen how impressive the results are, you’ll feel confident making it again. Each time you make it, you’ll understand the process better and trust your instincts more. That’s when the real magic happens—when you’re no longer following the recipe anxiously, but confidently assembling a dessert you truly understand. This is that recipe worth making more than once.