There’s something undeniably satisfying about pulling a tray of golden, crispy chicken parmesan from the oven—that moment when you realize you’ve created the restaurant-quality version everyone loves, without a single drop of oil splattering on your stovetop or lingering in your kitchen for hours. This baked chicken parm delivers everything you’d get from the traditional deep-fried version: a shattering, crunchy exterior that gives way to impossibly moist, tender chicken, all crowned with bubbling melted cheese and tangy tomato sauce. The best part? You achieve that coveted crispiness through strategic oven techniques and a few key ingredient choices, not through dangerous, messy frying.
The misconception that you can’t get truly crispy, golden-brown breading without submerging chicken in hot oil has kept many home cooks from attempting this classic dish. But the truth is far more encouraging: with the right approach—toasted panko breadcrumbs, a wire rack, a properly preheated oven, and just a light coating of cooking spray—you’ll get results that rival any pizzeria’s version. The chicken comes out of the oven with a satisfying crunch that stays crispy even when topped with sauce, while the meat inside remains tender and juicy, never dry or stringy.
What makes this baked method genuinely superior to frying goes beyond just being healthier and easier to clean up (though those are massive bonuses). You can cook an entire meal’s worth of chicken breasts simultaneously on one baking sheet instead of working in batches. There’s no oil temperature to monitor, no flipping required midway through cooking, and the moment the chicken finishes baking, you’re only about five minutes away from having dinner on the table. Whether you’re cooking for a family of four or preparing dinner for eight, this method scales effortlessly—just use multiple baking sheets.
Why This Baked Method Works Better Than You’d Expect
The secret to achieving restaurant-quality crispiness in a home oven comes down to understanding how moisture and heat interact with your breading. When chicken is pan-fried, the hot oil directly contacts the breadcrumbs, creating an immediate, intense crust that seals in moisture. Baked chicken, without this direct contact, requires a different strategy—and that strategy centers on removing excess moisture from the chicken before breading, using specially prepared breadcrumbs, and positioning the chicken to allow hot air to circulate completely around it.
Pan-frying also distributes oil unevenly, leaving some parts of the breading greasy and heavy while other sections remain relatively crisp. Oven baking, by contrast, applies consistent, dry heat from all directions, creating an evenly crisped exterior without the oil-logged heaviness. The wire rack is absolutely crucial here—it lifts the chicken away from the baking sheet so that hot air reaches the underside, preventing the bottom from steaming against the pan and becoming soggy.
Temperature precision matters enormously in this technique. A 425°F (220°C) oven creates enough heat to brown and crisp the breadcrumbs in the 20–25 minute window needed for chicken cutlets to cook through, without scorching the crumbs or drying out the meat. Lower temperatures would require longer cooking times, giving you pale, limp breading. Higher temperatures risk burning the exterior before the inside finishes cooking.
The Secret to Crispy Breading: Toasting Your Panko First
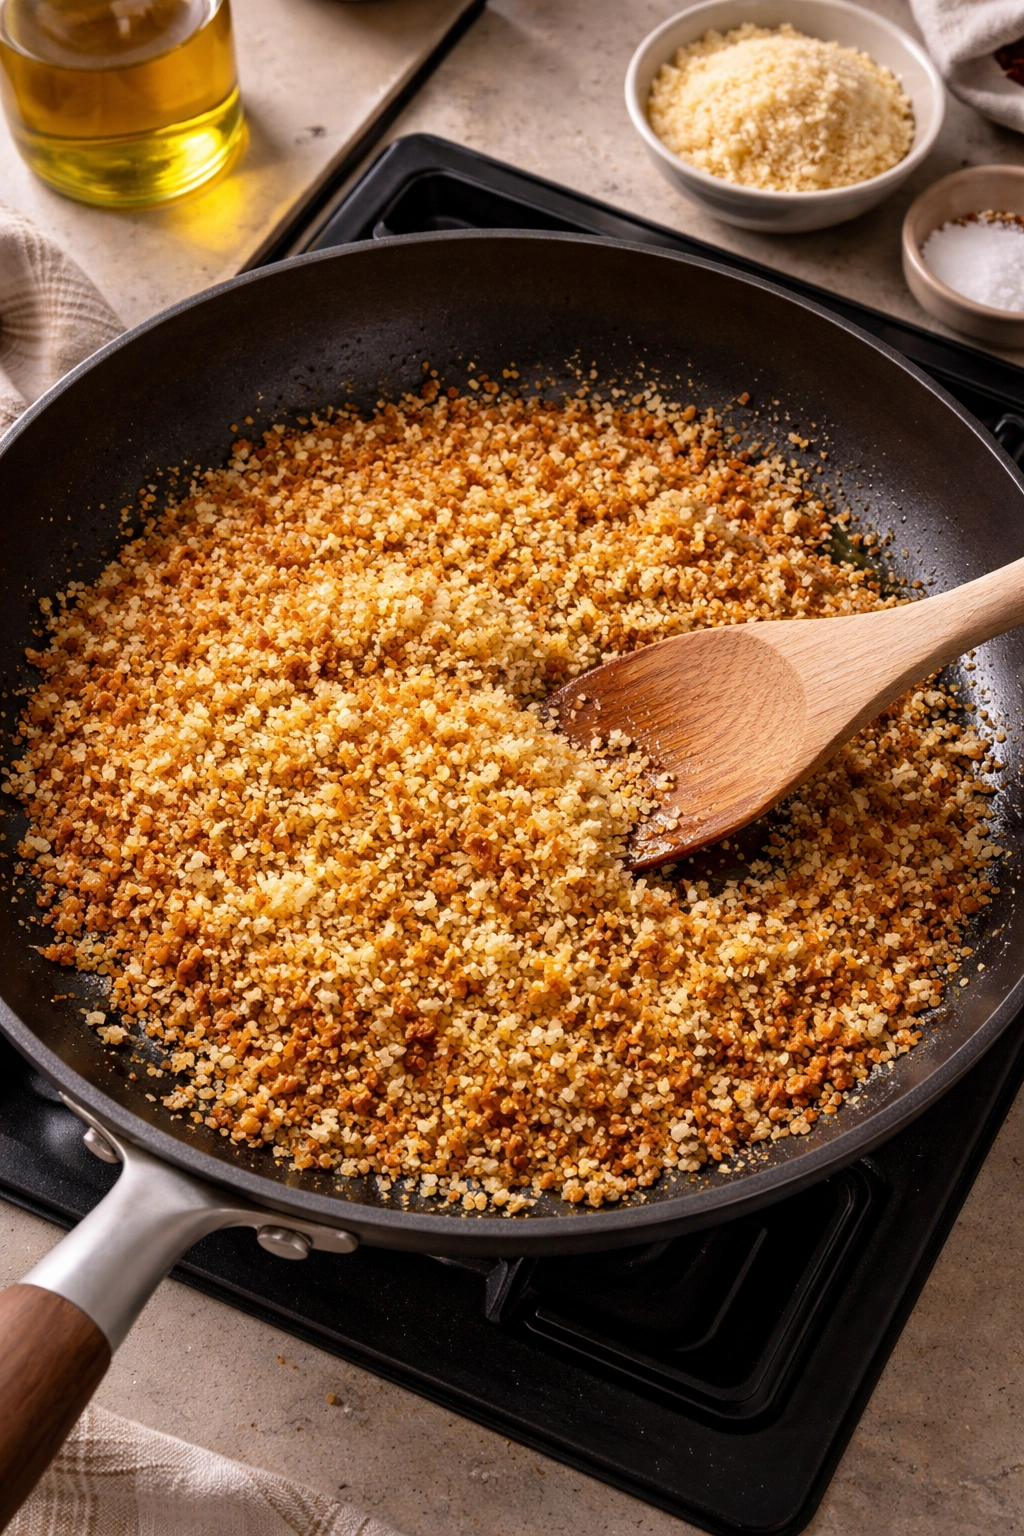
Here’s the insider technique that elevates ordinary baked chicken parmesan to extraordinary: toast your panko breadcrumbs in a hot skillet with olive oil before you use them. This single step makes the difference between breading that’s merely acceptable and breading that crackles between your teeth with genuine crunch. Toasting jumpstarts the Maillard reaction (the chemical browning process) before the chicken even enters the oven, so by the time those breadcrumbs finish baking, they’ve already developed deep color and nutty flavor.
The process is simple but requires attention. Heat a tablespoon of olive oil in a large skillet over medium-low heat, add your panko, and stir constantly for 3–4 minutes until the crumbs turn a deep golden-brown color. The moment they reach that shade, immediately pour them onto a plate or into a bowl so they stop cooking from the residual pan heat. Let them cool slightly before mixing with cheese and seasonings—this prevents the oil from carrying off or causing clumping.
Why not use regular breadcrumbs instead of panko? Traditional breadcrumbs are finer, more densely packed, and don’t create the same open, airy texture that panko delivers. Panko crumbs are larger and have a higher water content (which paradoxically helps them brown better in the oven), giving you that light, flaky crust you’re after. When you toast panko, those air pockets expand, creating an even more dramatic textural contrast between the crispy outside and moist inside.
Essential Ingredients for the Crispiest Results
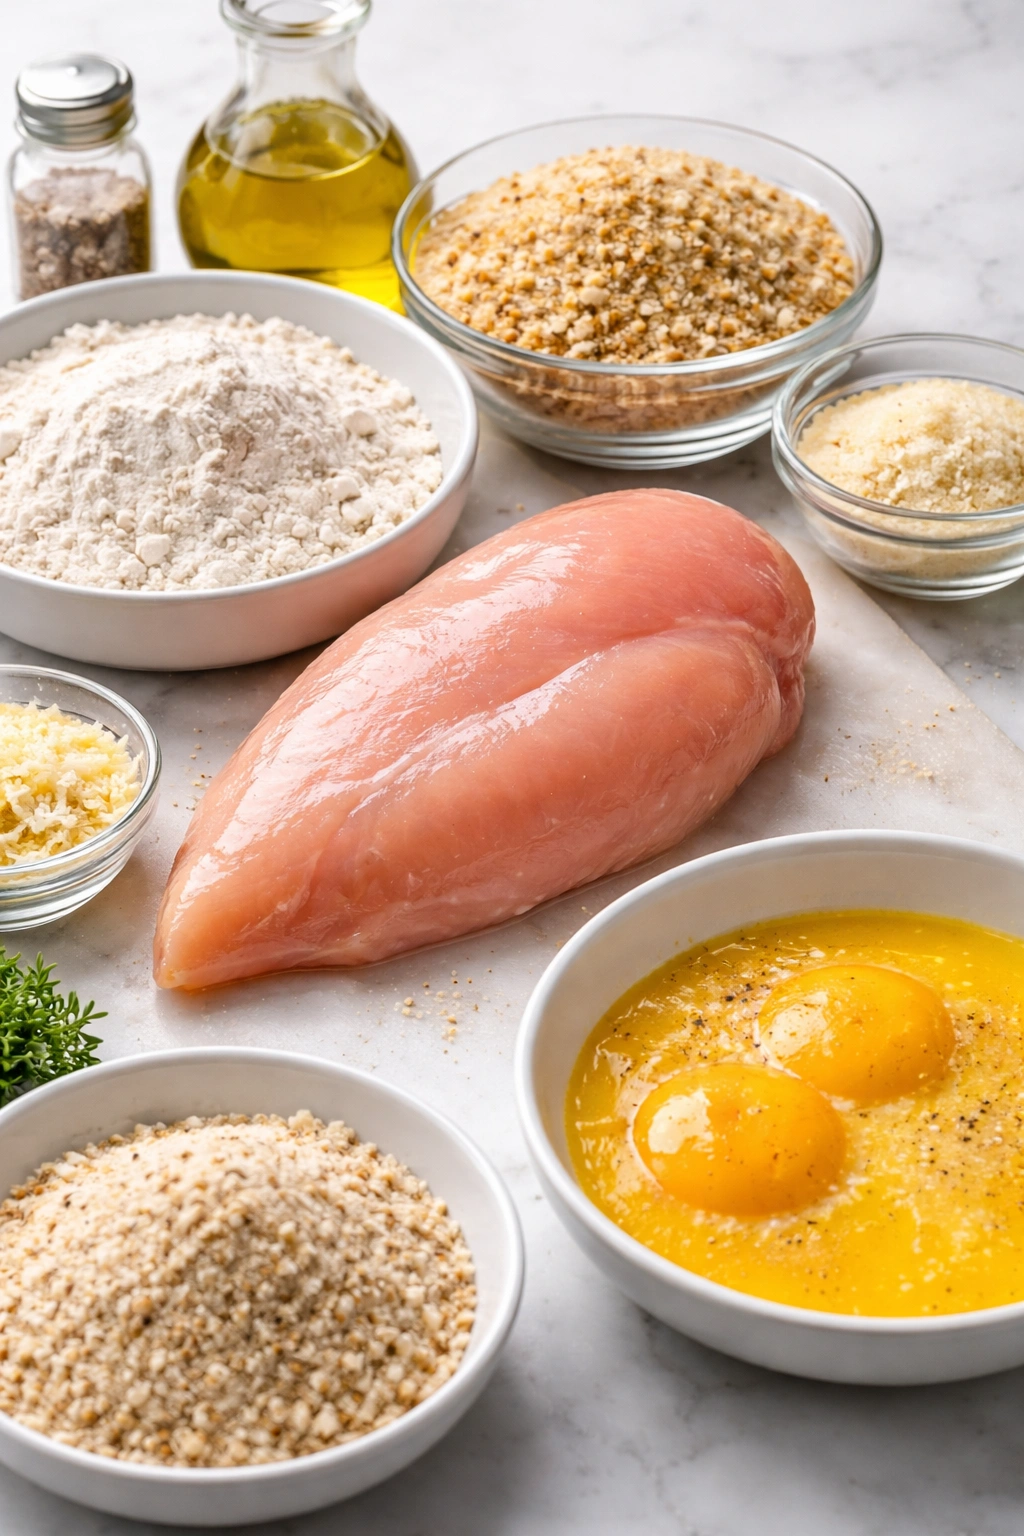
Success with baked chicken parmesan starts with understanding what each ingredient contributes. Boneless, skinless chicken breasts are the traditional choice, and for good reason—they cook relatively quickly, they’re lean enough that they can handle being cooked to the precise 165°F internal temperature without becoming tough if you’re careful, and they pair beautifully with the bright, bold flavors of tomato sauce and cheese without competing.
Your eggs matter more than you’d think. You’ll beat them lightly with a touch of water to create an egg wash that’s thin enough to coat evenly but rich enough to bind breadcrumbs to the chicken. Some recipes use whole eggs; others use just egg whites to reduce fat. Both work equally well—it’s more about personal preference. The egg wash is what ensures every bit of your breading sticks to the chicken through the baking process. Without it, or if you skip this step for a healthier version, the breadcrumbs will loosen and fall away.
All-purpose flour creates a foundation layer that helps the egg wash grip the chicken. You coat the chicken lightly in flour first, then dip in the egg wash, then bread—this three-step breading station process gives you maximum adherence. For a gluten-free version, rice flour or any gluten-free all-purpose flour works identically.
The cheese combination is essential: fresh grated Parmesan stirred into the toasted panko adds distinctive flavor and salt to your breading, while shredded mozzarella layered on top after baking creates that melty, gooey finish. Pre-shredded mozzarella often contains anti-caking agents that prevent smooth melting, so whole-milk block mozzarella shredded at home truly does melt more beautifully. If you can find it, a combination of low-moisture shredded mozzarella plus torn pieces of fresh mozzarella gives you the best of both worlds—the shredded version helps the cheese adhere and melt quickly, while fresh mozzarella adds creaminess.
Your tomato sauce significantly impacts the final dish. A thin, watery sauce will soak into your crispy breading and render it soggy within minutes. A good marinara sauce—whether homemade or from a quality jar—should coat the back of a spoon and fall in a ribbon without immediately running off. If your jarred sauce seems too thin, simmer it uncovered for 5–10 minutes while you’re preparing the chicken to reduce some of the moisture.
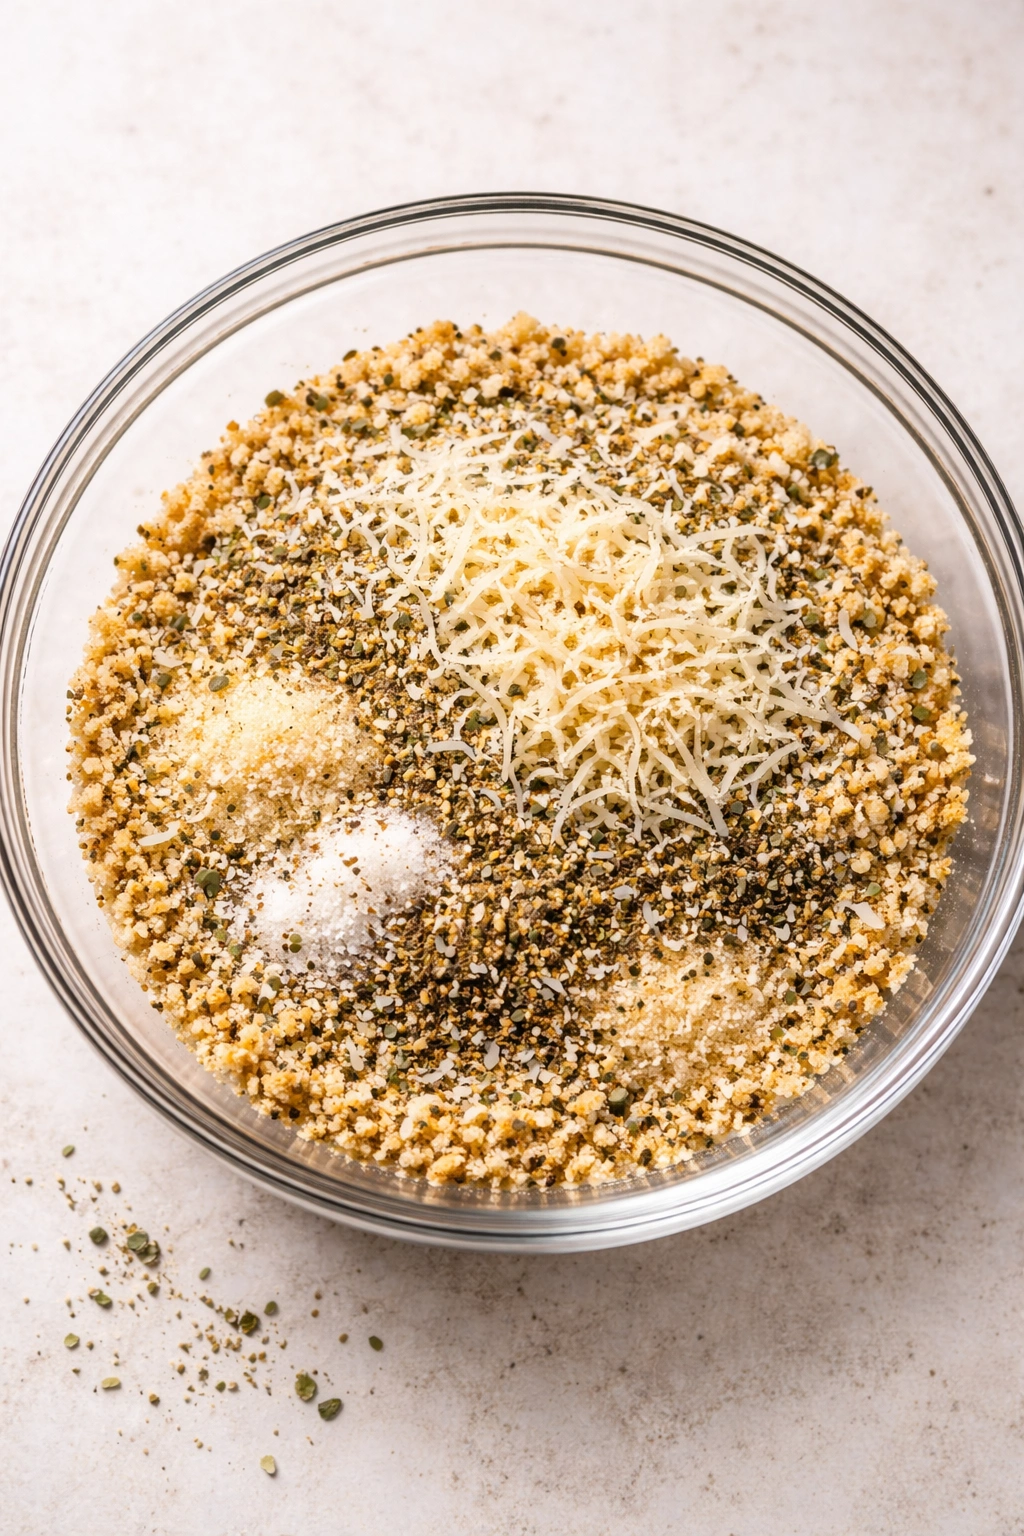
Seasonings in the breading matter more than you might expect. Beyond salt and pepper, dried Italian herbs (oregano, thyme, basil), garlic powder, and a pinch of red pepper flakes create a flavor-packed crust that tastes wonderful even before the sauce and cheese arrive. The herbs don’t need to be fresh here—dried herbs have concentrated flavor and handle oven heat beautifully.
Yield, Timing, and Difficulty Level
Yield: Serves 4 to 6 | Makes 6 cutlets
Prep Time: 20 minutes (hands-on preparation, breading station setup, and cutlet breading)
Cook Time: 30 minutes (20–25 minutes initial bake, plus 5 minutes for cheese melting under the broiler)
Total Time: 50 minutes active cooking
Difficulty: Intermediate — This recipe involves a three-step breading station and precise oven temperature management, but the actual technique is straightforward even for someone making it for the first time. The most important skills are properly pounding the chicken to even thickness and learning to recognize when the breading has reached the right golden-brown color.
For the Crispy Breading Mixture:
- 1 tablespoon olive oil
- 1½ cups panko breadcrumbs
- ½ cup freshly grated Parmesan cheese (from a block, not pre-grated)
- 1 teaspoon Italian seasoning (or a blend of dried oregano and thyme)
- 1 teaspoon garlic powder
- ½ teaspoon kosher salt
- ¼ teaspoon freshly ground black pepper
For Breading and Baking the Chicken:

- 3 boneless, skinless chicken breasts (about 8 ounces each)
- ½ cup all-purpose flour
- 2 large eggs
- 2 tablespoons water
- Kosher salt and freshly ground black pepper, to taste
- Cooking spray (preferably avocado oil spray for higher smoke point)
For the Sauce and Topping:
- 2 cups marinara sauce (homemade or high-quality store-bought)
- ¾ cup shredded low-moisture mozzarella cheese
- ¼ cup freshly grated Parmesan cheese
- 4 ounces fresh mozzarella, torn into small pieces (optional but recommended)
- 2 tablespoons fresh basil, chopped or torn, for garnish
Step-by-Step Instructions
Prepare Your Workspace:
-
Preheat your oven to 425°F (220°C) and allow it to reach full temperature—this typically takes 15 minutes. A fully preheated oven is non-negotiable for proper crisping; a lukewarm oven will give you pale, soft breading.
-
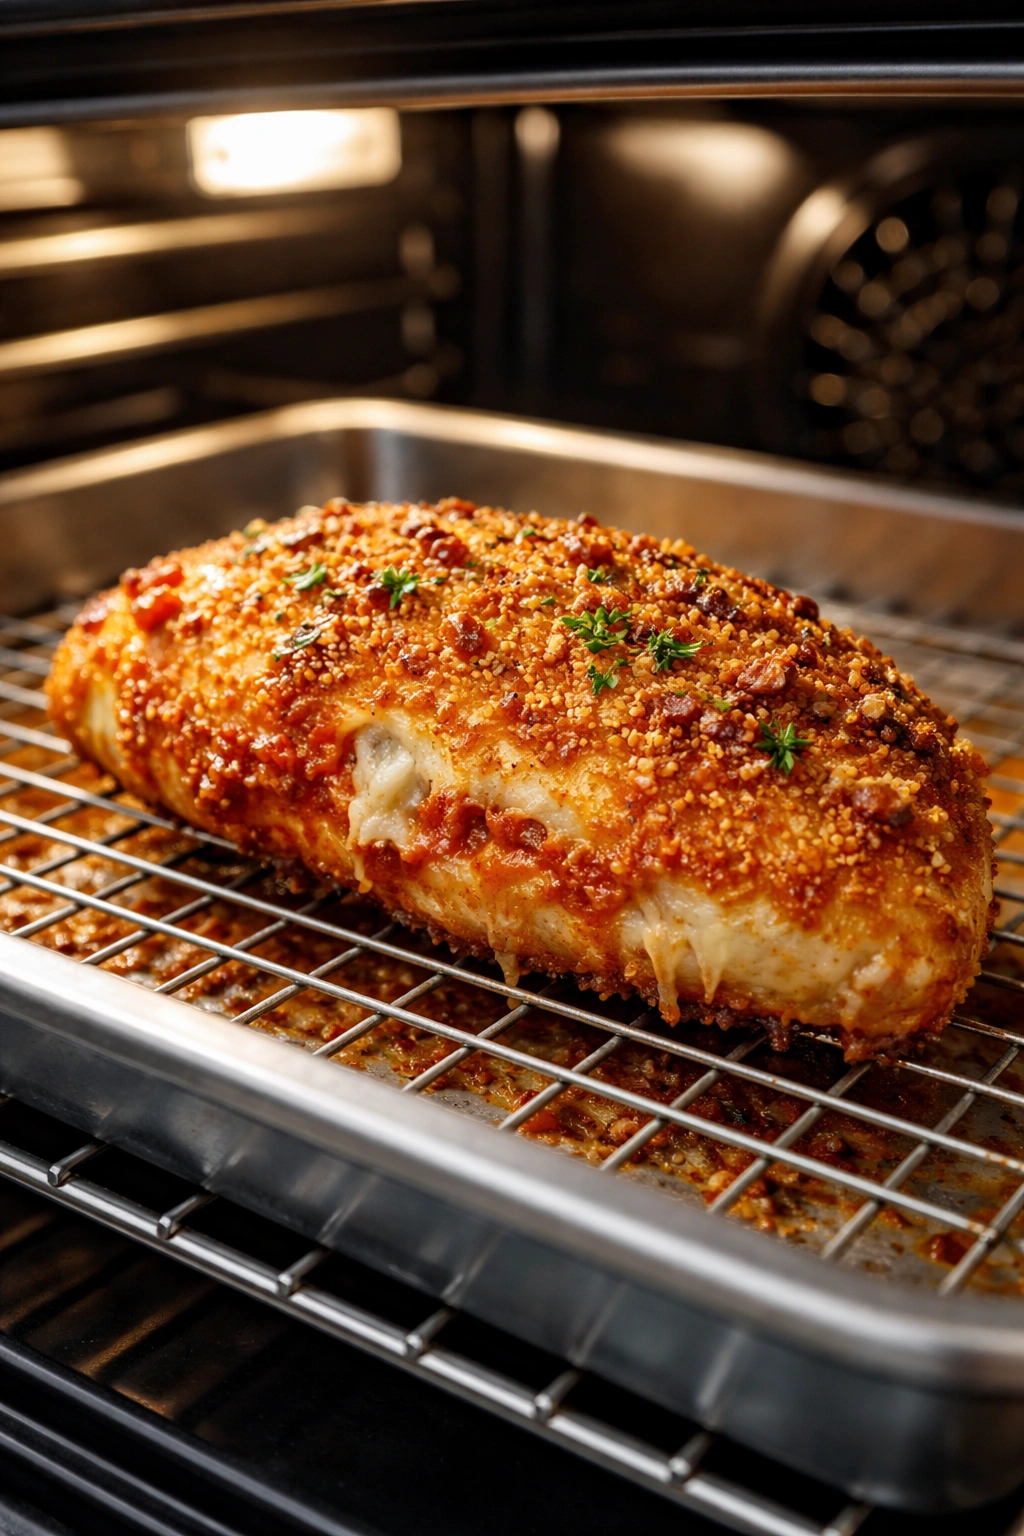
Fit a large rimmed baking sheet with a sturdy wire rack and place it on the center oven rack. Lightly grease the wire rack with cooking spray or brush it with a small amount of oil—this prevents the breaded chicken from sticking to the wire as it bakes. Do not skip this step; it’s the difference between perfectly crispy chicken and pieces that tear when you try to remove them.
Toast the Panko and Prepare Seasonings:
-
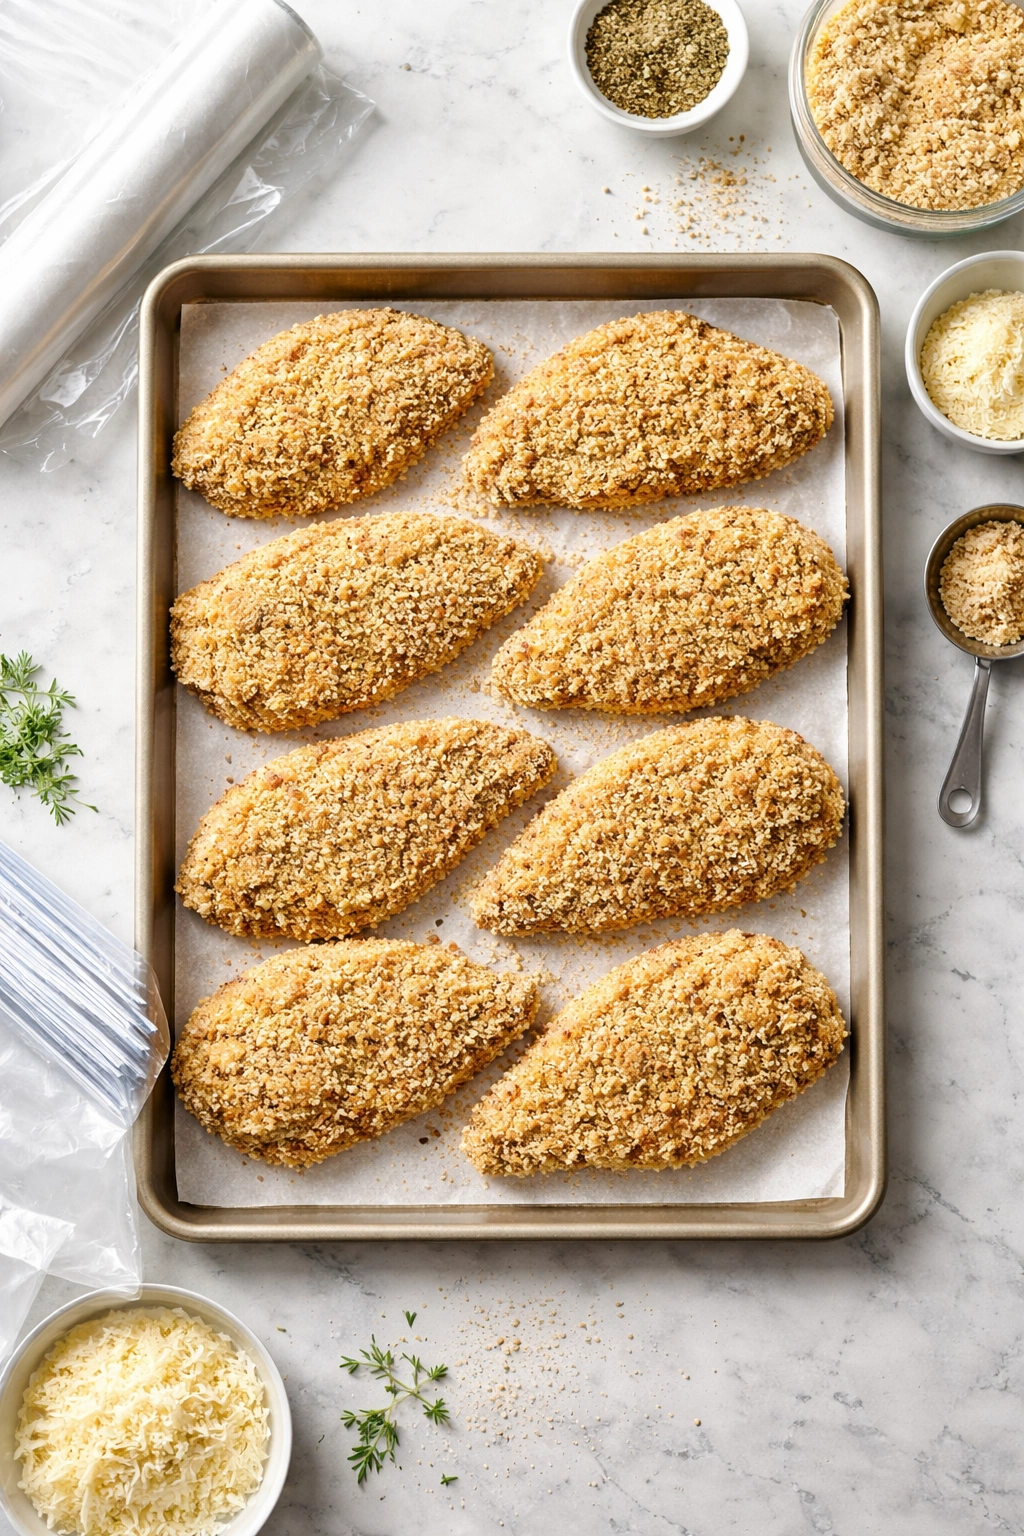
Heat 1 tablespoon of olive oil in a large non-stick skillet over medium-low heat. When the oil is shimmering, add the panko breadcrumbs and stir constantly for 3–4 minutes, until most of the crumbs have turned a deep golden-brown (not dark brown or black—you’re looking for a honey-gold shade). Immediately transfer the toasted panko to a plate or bowl to stop the cooking process, then allow it to cool for 2–3 minutes.
-
Once cooled, combine the toasted panko with ½ cup grated Parmesan cheese, Italian seasoning, garlic powder, ½ teaspoon salt, and ¼ teaspoon pepper in a shallow bowl or pie plate. Stir until evenly combined, breaking up any clumps. This is one of your three dredging stations.
Prepare the Chicken Cutlets:
-
Using a sharp knife, carefully slice each chicken breast in half lengthwise to create two thin cutlets. You should end up with 6 cutlets total. This is crucial—whole chicken breasts are too thick and would require significantly longer baking, by which time the breading would begin to burn.
-
Place one cutlet between two pieces of parchment paper or plastic wrap on a cutting board. Using the smooth side of a meat mallet or the bottom of a heavy skillet, gently pound the thicker portions of the cutlet until it reaches a relatively uniform thickness of about ½-inch throughout. Don’t pound too hard or too thin—you want the chicken to cook through in 20 minutes without drying out. Repeat with the remaining cutlets.
-
Arrange the pounded cutlets on a plate or baking sheet and season both sides generously with salt and pepper. This early seasoning helps draw out some surface moisture, which actually helps the breading adhere better during the dredging process.
Advertisements
Set Up Your Breading Station:
-
Arrange three shallow bowls or pie plates in a row in your work area. This is your breading assembly line. In the first bowl, place ½ cup all-purpose flour. In the second bowl, whisk together the 2 eggs, 2 tablespoons water, and a pinch each of salt and pepper until the mixture is light and foamy. In the third bowl, place your prepared panko-Parmesan mixture.
-
Working from left to right—flour to egg to breadcrumbs—you’ll dredge each cutlet. Establish a rhythm and don’t cross your hands or mix up the order; this three-step process creates a secure coating that survives baking without falling off.
Bread the Cutlets:
-
Working with one cutlet at a time, lightly coat both sides in the flour mixture, using your fingers or a fork to ensure even coverage. Shake off any excess flour—you want just a thin, light layer, not a thick flour coating. The flour should barely be visible on the chicken.
-
Dip the floured cutlet into the egg wash, turning once to coat both sides completely. Let excess egg drip back into the bowl for a second, then immediately transfer to the breadcrumb mixture.
-
Place the egg-coated cutlet into the panko mixture and press gently but firmly, turning it once or twice to coat both sides. The breadcrumbs should stick enthusiastically; if they’re not adhering well, the chicken is probably too wet, and you can dab it lightly with a paper towel before trying again.
-
Arrange the breaded cutlet on the prepared wire rack, leaving about 1 inch of space between each piece. Repeat the breading process with the remaining cutlets until all six are coated and positioned on the rack. Do not stack them or crowd the pan—each piece needs exposure to circulating hot air from all sides.
Bake Until Golden:
-
Lightly spray the top surface of each breaded cutlet with cooking spray—just a few quick bursts to create a light sheen. This helps the breading achieve deeper browning and a more uniform golden color.
Advertisements -
Bake for 20–25 minutes, checking for doneness at the 20-minute mark. The breading should be deep golden-brown, and the internal temperature of the thickest part of the chicken should read 165°F (74°C) on an instant-read meat thermometer. If the breading is still pale, continue baking for 2–3 more minutes. Do not rely solely on color—always verify internal temperature to ensure food safety. The chicken will continue to cook for a few moments after removal from the oven.
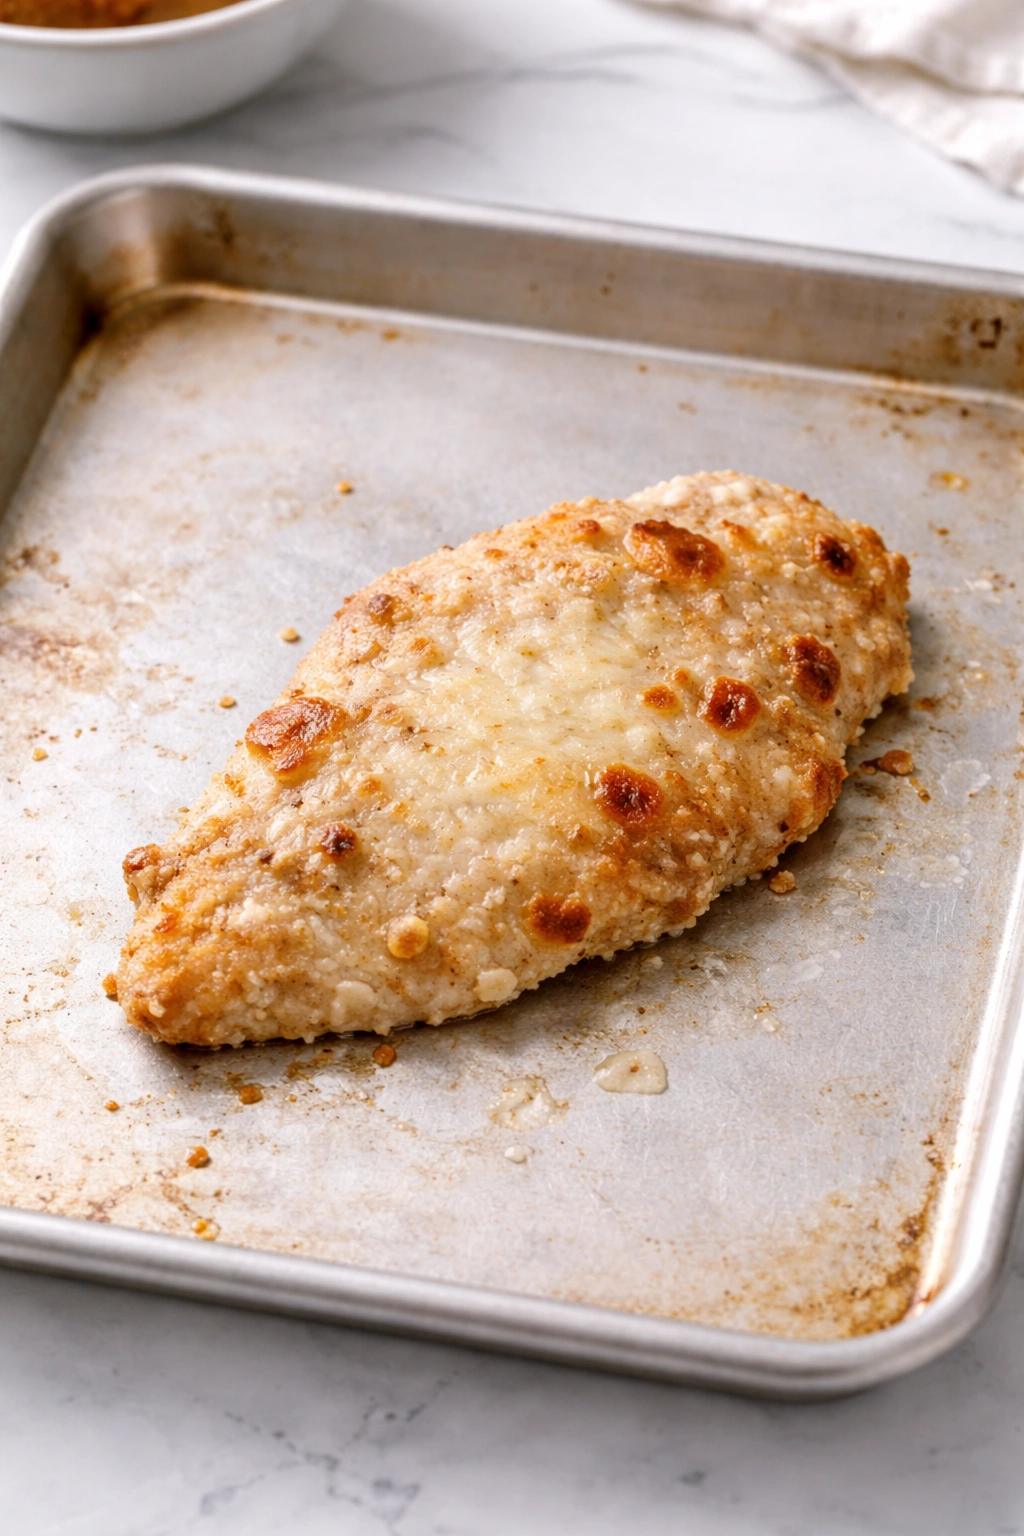
Add Sauce and Cheese:
-
Remove the baking sheet from the oven and carefully switch the oven to broil on high. Spoon 2–3 tablespoons of marinara sauce over each chicken cutlet, leaving at least a ½-inch border around the edges uncovered. This border is essential—it prevents the edges from steaming under the sauce and keeps the breading crispy. Do not apply sauce underneath the chicken.
-
Top each sauced cutlet with a small handful of the shredded mozzarella cheese, then add a sprinkle of the remaining grated Parmesan cheese. If using fresh mozzarella, tear a piece into small fragments and scatter it over the sauce. Fresh mozzarella can release water when melted, so use it sparingly—a light layer is all you need.
Broil Until Cheese Melts:
-
Return the baking sheet to the oven under the broiler (positioning it on the upper rack so it’s closer to the heating element) and broil for 2–5 minutes, until the cheese is melted, bubbly, and the edges have just begun to brown. Watch carefully—broilers vary wildly in intensity, and the difference between perfectly melted cheese and burnt topping can be just 30 seconds.
-
Remove from the oven and allow the chicken to rest for 1–2 minutes before plating. This brief rest allows the cheese to set slightly, making it less likely to slide off when you serve it.
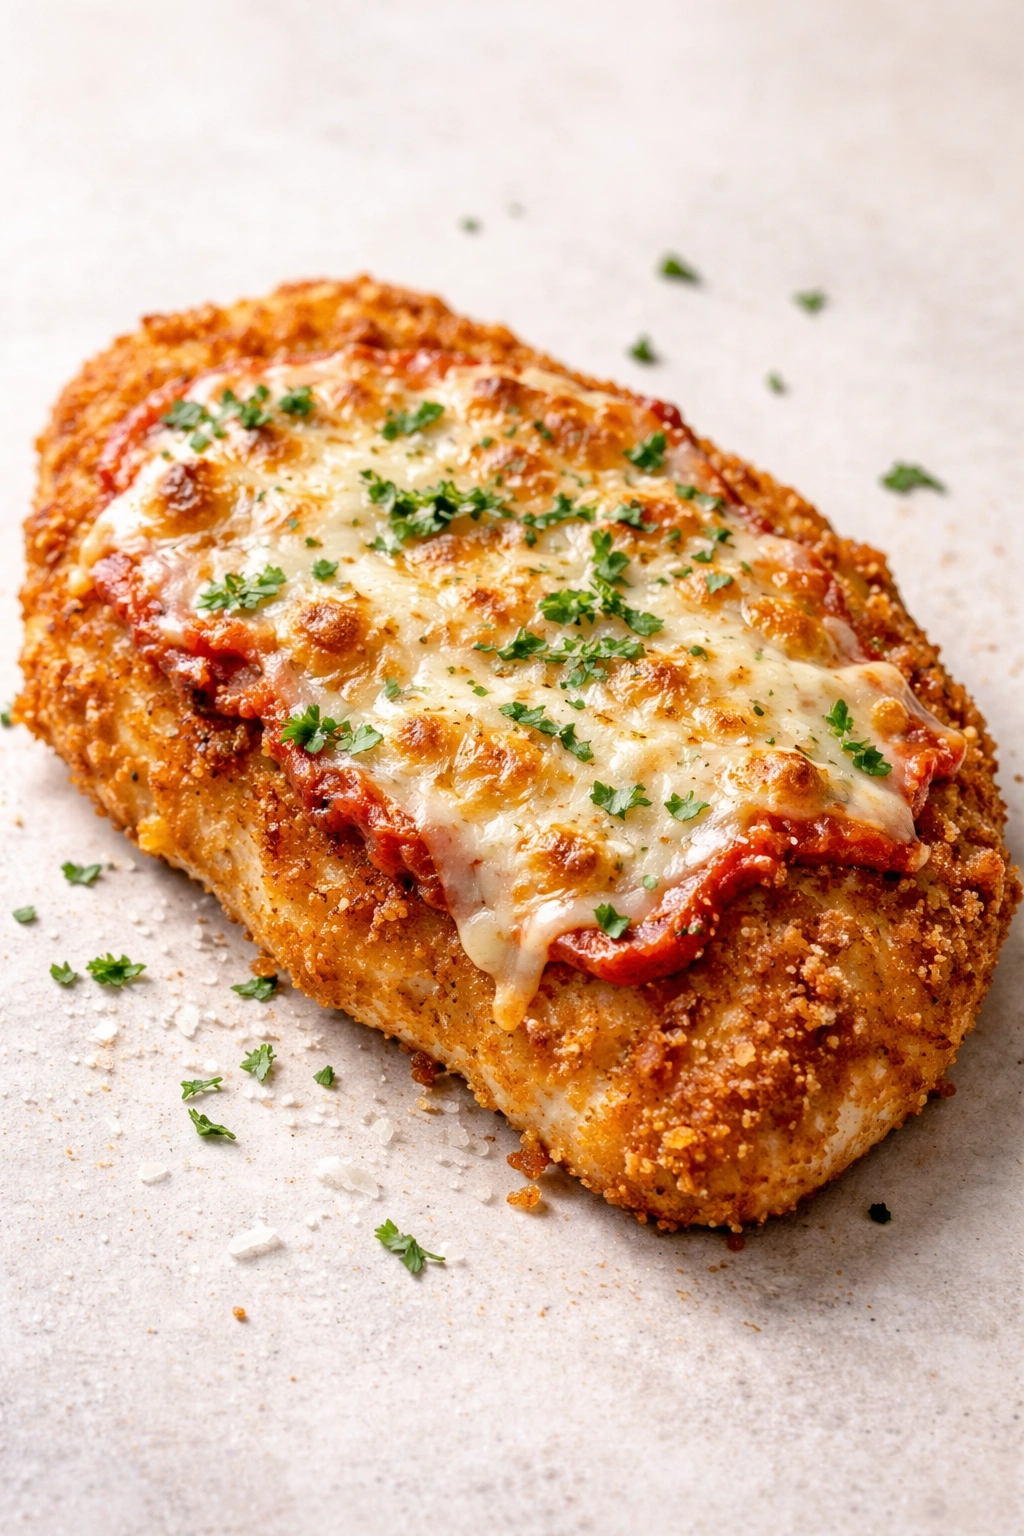
Plate and Serve:
- Transfer each chicken cutlet to a plate or serving platter and garnish with fresh basil. Serve immediately while the breading is still crispy and the cheese is warm and gooey.
Pro Tips for Maximum Crispiness Every Single Time
The wire rack isn’t optional—it’s absolutely essential. Hot air must circulate completely around the chicken, including underneath. When chicken sits directly on a baking sheet, steam rises up from below and softens the breading. A wire rack creates a small air gap that allows convection to happen on all six sides of the cutlet.
Pat the chicken dry before seasoning. Use paper towels to blot the surface of each cutlet after slicing. Moisture is the enemy of crispiness, and even the thin layer of moisture on raw chicken can prevent proper browning and adhesion of breadcrumbs. This single step makes a measurable difference.
Invest in a reliable instant-read thermometer. The only way to know if your chicken is done without cutting into it (which releases juices and ruins the final presentation) is to check the internal temperature. Chicken is safely cooked at 165°F, but you can pull it at 160°F and let carryover cooking finish the job—this reduces the risk of overcooking and drying out.
Don’t skip the egg wash, even if you’re trying to reduce fat. The egg is what makes the breadcrumbs stick. If you’re committed to lower-fat breading, use just the egg whites, but don’t eliminate this step entirely. Some recipes use melted butter or olive oil brushed onto the chicken instead of egg wash—this works, but egg provides superior adhesion.
Use panko, not regular breadcrumbs. Regular breadcrumbs are finer, denser, and don’t crisp up the same way. Panko is larger and airier, and when toasted, it creates that shattered, crunchy texture that makes baked chicken parm genuinely delicious. If you can only find regular breadcrumbs, don’t bake them first—they’ll burn. Just toss them with the oil and seasonings and proceed.
High-quality marinara sauce makes a huge difference in flavor but also in texture. A thin, watery sauce will soak into your crust and make it soggy. If your marinara seems watery, simmer it uncovered while you’re breading the chicken to reduce and concentrate it. A good sauce should coat the back of a spoon.
Toast your Parmesan cheese with the panko. Not all recipes do this, but combining them during toasting allows the cheese to add flavor to the breadcrumbs while preventing it from burning alone in the dry heat. The cheese becomes part of the breading’s flavor profile rather than just a binding agent.
Avoid pre-shredded mozzarella. The anti-caking agents in commercial shredded cheese prevent smooth, even melting. Block mozzarella shredded at home melts beautifully, creating a glossy, cohesive topping. If you absolutely must use pre-shredded, look for brands without cellulose or potato starch listed as ingredients.
Leave ½ inch of breaded edges uncovered. When you top the chicken with sauce and cheese, don’t extend them all the way to the edge. A border of bare, crispy breading prevents steam from building up under the sauce and ensures that every bite has at least some of that satisfying crunch you’ve worked to achieve.
Don’t add sauce underneath the chicken. Some recipes suggest placing sauce on the baking sheet under the chicken, but this is a mistake—the sauce creates steam that rises into the breading from below, making the bottom soggy. Apply sauce only to the top surface after the chicken has baked.
Broil with intention. The broiler is intensely hot and works quickly. If you step away, you’ll likely return to charred cheese and burnt bread crumbs. Stay in the kitchen, watch through the oven window (if you have one), and remove the chicken the moment the cheese is melted and the top is bubbling. Every broiler is different, so don’t rely on a set time—use visual cues.
Common Mistakes That Ruin the Crispy Exterior
Pounding the chicken too thin is remarkably easy to do and immediately creates problems. Thin cutlets cook too quickly for the breading to properly brown and crisp, and very thin chicken becomes stringy and tough. Aim for just under ½-inch thickness—that sweet spot where the meat is thin enough to cook quickly but thick enough to stay moist.
Skipping the wire rack almost guarantees soggy bottoms. Without airflow underneath, steam accumulates and the breading steams instead of crisps. There’s no way around this—the rack is non-negotiable.
Using insufficient egg wash or skipping it entirely means the breadcrumbs won’t adhere properly, and you’ll end up with a breading that separates from the chicken or falls into the pan during baking. The egg is your adhesive; respect the process.
Oven temperature that’s too low creates pale, rubbery breading that bakes for too long. Oven temperature that’s too high risks burning the exterior before the interior cooks. Trust the 425°F recommendation—it’s been tested repeatedly across different ovens and consistently delivers results.
Applying too much sauce or cheese sounds indulgent but actually works against you. The heavier the topping, the more weight presses down on the breading, preventing it from crisping. More importantly, excess sauce soaks into the breadcrumbs and ruins the texture. Use a light touch—you want flavor and meltiness, not submersion.
Double-coating the chicken (dipping it a second time in egg and breadcrumbs, as some recipes suggest) creates an excessively thick layer of breading that doesn’t crisp properly in the time available. A single, well-adhered coat is better than a double coat that hasn’t been given time to brown properly.
Not preheating the oven thoroughly is a common oversight. An oven that says it’s ready might not actually be fully up to temperature. If you have an oven thermometer, use it—many home ovens run 25–50°F cooler than the dial indicates. This single factor explains why your chicken isn’t browning like it should.
Storing breaded, unbaked chicken in the refrigerator for more than a few hours often leads to soggy breading when baked. If you’re prepping in advance, bread the chicken just before baking, or freeze the breaded cutlets on a tray and bake directly from frozen (add 5–10 minutes to the baking time).
Delicious Flavor Variations Worth Trying

The beauty of this technique is that it adapts beautifully to different flavor profiles while maintaining that signature crispiness. Italian herb breading is the classic, but you can create a lemon-herb version by adding the zest of one lemon to your panko mixture and squeezing fresh lemon juice over the finished chicken before serving. The brightness balances the richness of the cheese.
A spiced version with smoked paprika, cumin, and a touch of cayenne transforms this into something with more heat and complexity. Keep the Parmesan in the breading but use a spicy marinara sauce or add red pepper flakes to your store-bought sauce.
For a Greek-inspired twist, replace some of the Italian herbs with dried oregano (increase it to 1½ teaspoons) and add a touch of feta cheese to the topping instead of some of the mozzarella. Serve with tzatziki sauce for dipping instead of marinara.
A crispy panko coating with truffle oil creates a more luxurious dish. Drizzle a small amount of truffle oil over the finished chicken just before serving—the earthiness is incredible with tomato and mozzarella.
Buffalo chicken parmesan uses buffalo sauce instead of marinara and adds blue cheese crumbles to the topping. It’s unconventional but genuinely delicious, and the spicy heat plays wonderfully against the creamy cheese.
Create a caprese-inspired version by using fresh mozzarella exclusively for topping, adding sliced fresh tomatoes alongside the sauce, and garnishing generously with fresh basil and a drizzle of good balsamic vinegar.
For a vegetable-forward take, serve each chicken piece over a bed of garlicky sautéed spinach or roasted zucchini, then apply the sauce and cheese. The vegetables add nutrition and another flavor dimension.
An asiago and sage version uses asiago cheese (which is sharper and more complex than mozzarella) and fresh sage in the breading instead of some of the Italian herbs. This variation is slightly more adult and sophisticated in flavor.
Make-Ahead, Storage, and Freezing Guidelines
This dish is best enjoyed the day it’s made—the breading stays crispy for several hours but gradually softens as it cools and absorbs moisture from the sauce. However, strategic planning can make this easier.
You can bread the chicken cutlets up to 4 hours ahead and refrigerate them on a parchment-lined tray, loosely covered. When you’re ready to bake, remove them from the fridge while the oven preheats—bringing them closer to room temperature prevents dramatic temperature swings in the oven, which can cause uneven cooking.
To freeze breaded, unbaked chicken: Arrange breaded cutlets on a parchment-lined baking sheet and freeze until solid (at least 2 hours). Transfer frozen cutlets to a freezer-safe container or bag, separated by parchment paper, and freeze for up to 1 month. Bake directly from frozen, adding 5–10 minutes to the bake time and checking internal temperature carefully.
To refrigerate baked chicken parmesan: Allow it to cool completely, then transfer to an airtight container and refrigerate for up to 3–4 days. The breading will soften, but it’s still delicious cold or reheated.
To reheat: Preheat the oven to 375°F (190°C), place the chicken on a baking sheet lined with parchment, and bake for 10–15 minutes until warmed through. Avoid the microwave—it accelerates the loss of crispiness.
To freeze baked chicken parmesan: Cool completely, wrap each piece individually in plastic wrap, then place in a freezer-safe container or bag. Freeze for up to 2 months. Thaw in the refrigerator overnight before reheating in a 375°F oven for 12–15 minutes.
The tomato sauce can be made separately and frozen for up to 4 months in a freezer-safe jar or container. This gives you the flexibility to bake fresh chicken cutlets and top them with thawed, warmed sauce whenever you need a quick dinner.
Best Side Dishes and Serving Suggestions
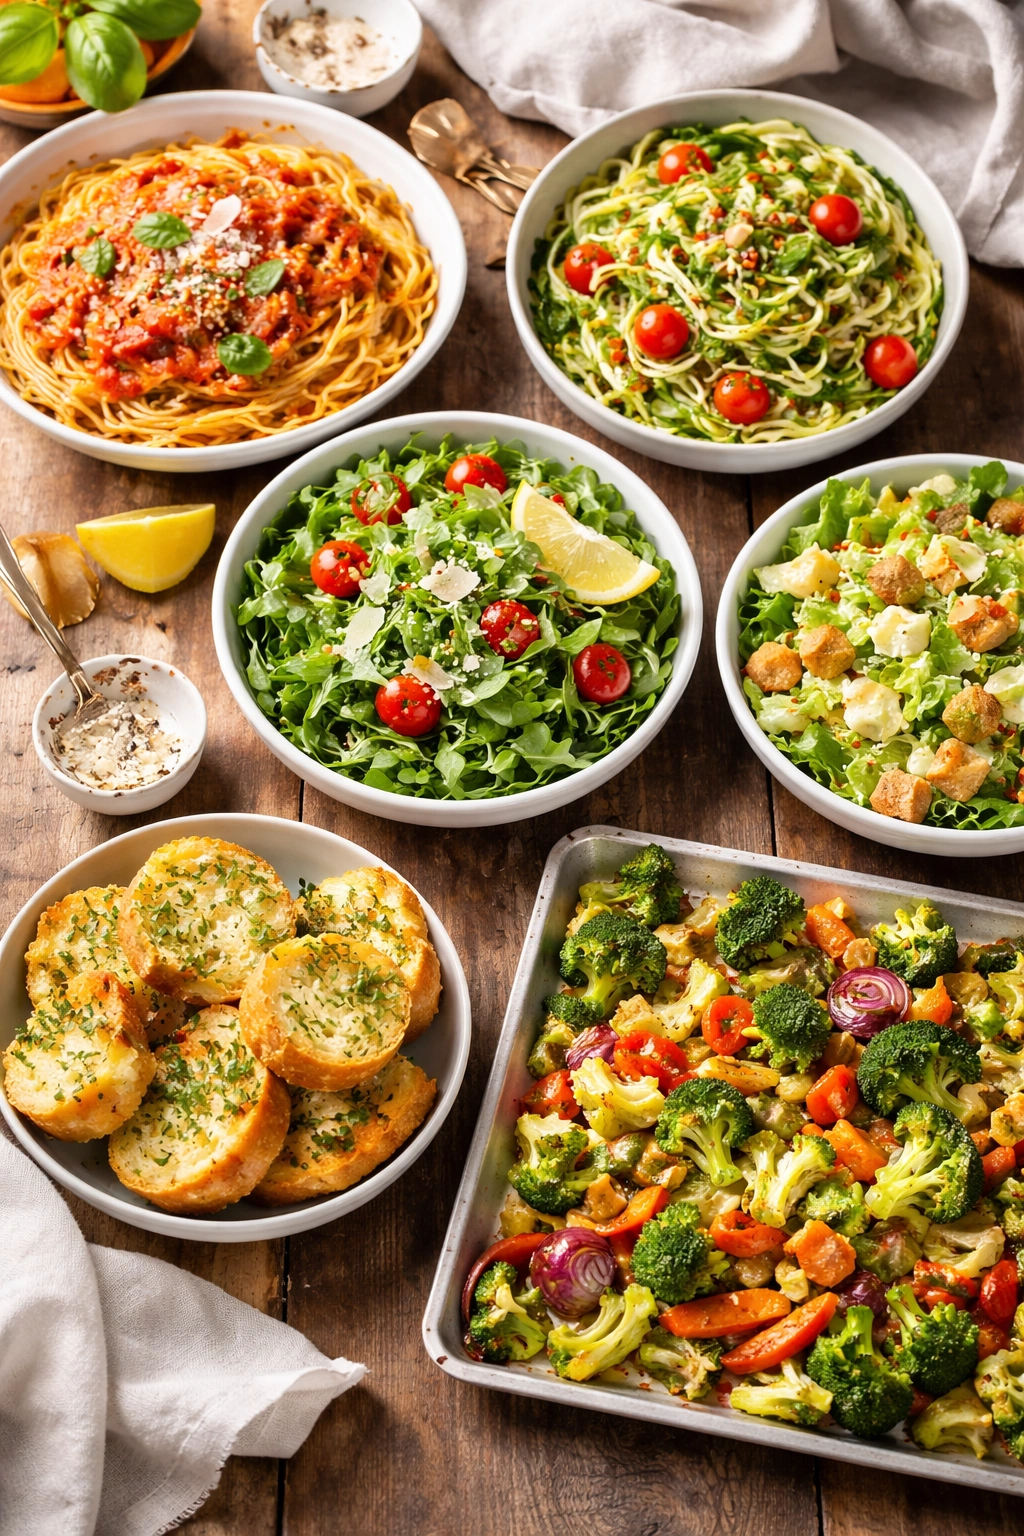
Pasta is the traditional companion, and for good reason. Serve over al dente spaghetti, fettuccine, penne, or any pasta shape you prefer. Toss the pasta with additional marinara sauce and a touch of olive oil, then plate the chicken on top so the crisped breading doesn’t become soggy from prolonged contact with the sauce underneath.
For something lighter, serve chicken parmesan over zucchini noodles, spaghetti squash, or even cauliflower rice. The contrast between the crispy, cheesy chicken and the delicate, fresh vegetable noodles is genuinely delicious and makes this feel less heavy.
A simple arugula salad dressed with lemon vinaigrette provides bright acidity and contrast. The peppery greens balance the richness of the cheese, and the vinaigrette cuts through the heaviness beautifully.
Roasted vegetables like zucchini, eggplant, bell peppers, or asparagus brushed with olive oil and finished with salt and pepper make excellent sides. Roast them while the chicken is baking so everything finishes at roughly the same time.
A crisp Caesar salad (traditionally made with anchovies, though you can omit them) provides cool, fresh contrast. The salty, umami-forward dressing works beautifully alongside the tomato sauce and melted cheese.
Garlic bread is never a bad choice. Slice a baguette lengthwise, brush with olive oil mixed with minced garlic and fresh parsley, toast until crispy, and serve alongside for soaking up extra sauce.
Roasted or sautéed broccolini or broccoli tossed with olive oil, garlic, and red pepper flakes provides nutrition and textural contrast. The slight bitterness of the greens complements the sweetness of the tomato sauce.
For a more Italian experience, serve with focaccia or ciabatta bread for dipping into extra sauce, a fresh caprese salad made with tomatoes, fresh mozzarella, and basil, and a simple mixed green salad.
Risotto or creamy polenta can transform this into a more elegant, restaurant-style meal. The rich, creamy starches pair beautifully with the crispy chicken and tangy sauce.
Final Thoughts

Mastering baked chicken parmesan without frying genuinely changes how you approach weeknight dinners. You stop viewing this as a special-occasion restaurant dish that requires planning and courage, and you start seeing it as an easy, reliable dinner that comes together in less than an hour with minimal mess. The technique isn’t complicated—it’s just a matter of understanding why each step matters and then committing to those specifics without shortcuts.
The toasted panko, the wire rack, the proper oven temperature, and the light hand with sauce and cheese all work together to create something that tastes indistinguishable from (and arguably better than) the fried version. You get restaurant-quality results without oil splatters, reduced fat and calories without sacrificing satisfaction, and the flexibility to cook for two people or a table full of guests without changing your technique.
Once you’ve made this a few times, you’ll find yourself returning to it regularly. It’s the kind of dish that reliably impresses whether you’re cooking for your family or hosting friends, the kind that leaves everyone asking for the recipe, and the kind that proves you don’t need a deep fryer to create genuine, craveable crispiness.