There’s something undeniably special about the sizzle and aroma of chicken fajitas hitting a hot skillet. That theatrical presentation—the steam rising, the aromatic blend of cumin and chili powder filling your kitchen, the vibrant colors of peppers and onions caramelizing to golden perfection—creates an experience that feels way more complicated than it actually is. Yet here’s the beautiful truth: chicken fajitas are one of the easiest, most impressive dinners you can prepare at home, and they come together in less time than it takes to drive to a restaurant and back.
Whether you’re planning a casual weeknight meal, hosting a dinner party, or looking for something interactive and fun that lets everyone customize their own tacos, chicken fajitas deliver on every front. They’re healthy, affordable, endlessly customizable, and they taste authentically delicious—not like you’re trying to recreate something that belongs in a restaurant kitchen. This is everyday cooking that feels special, and that’s exactly why it belongs in your regular rotation.
Why Chicken Fajitas Are Perfect for Taco Night
There’s a reason chicken fajitas have become a staple request on Mexican restaurant menus and a go-to home dinner for families everywhere. They hit the sweet spot between convenience and genuine flavor, between simplicity and sophistication. When you order fajitas at a restaurant, you’re paying a premium for something that’s mostly prep work and cooking that takes minutes—two things that translate beautifully to a home kitchen without any restaurant equipment.
Beyond the practical appeal, chicken fajitas offer incredible flexibility. You can prepare them with a minimal ingredient list or get creative with roasted poblano peppers, mushrooms, or whatever vegetables are in your crisper drawer. They work for dietary restrictions too—swap the tortillas for lettuce wraps, skip the cheese, use Greek yogurt instead of sour cream, and you’ve got a fajita plate that fits virtually any eating approach.
The interactive nature of fajitas makes them especially fun for casual entertaining. Instead of plating individual portions, you bring the skillet to the table with warm tortillas and an array of toppings, and everyone assembles their own combination. Kids love this hands-on element, and it somehow makes even simple food feel like more of an event. Plus, the leftover fajita mixture is incredibly versatile—it transforms into burrito bowls, nachos, breakfast tacos, or a simple taco salad.
What Makes the Best Chicken Fajitas

The foundation of truly excellent chicken fajitas rests on understanding what separates a good version from a forgettable one. It’s not about fancy techniques or hard-to-find ingredients—it’s about a few key principles executed with intention.
First is the quality and cut of the chicken. Thin, evenly-sized pieces are non-negotiable. When chicken breasts are thick, they dry out on the exterior while the center remains undercooked, or you overcook them trying to get the middle done. The solution is either starting with thinner breasts or slicing them horizontally to create two thinner cutlets. This even thickness means the chicken cooks in just a few minutes, staying juicy and tender throughout.
Second is the technique for searing. A properly seared piece of chicken develops a flavorful, slightly caramelized golden exterior—this isn’t just about looks, it’s about creating depth of flavor through the Maillard reaction. This requires a hot pan, a dry surface on the chicken (pat it with paper towels), and the discipline to let it cook undisturbed for a few minutes before stirring. Room-temperature chicken won’t sear properly; if you’ve marinated it, let it come to room temperature before cooking.
Third is the balance of seasoning and acid. The best fajitas taste bright and complex, not one-dimensional or heavy. This comes from a well-balanced spice blend combined with the acidic punch of fresh lime juice at the end. The lime isn’t an afterthought—it’s what makes your mouth sing and prevents the entire dish from tasting flat or greasy.
Finally, there’s the matter of the vegetables. Peppers and onions should have some textural contrast—they’re cooked through and tender but not mushy, with a bit of caramelized color but retaining some structure. This requires adequate heat and not overcrowding the pan. When there are too many vegetables in the pan with too much moisture, they steam instead of sear, and the difference is dramatic.
The Secret to Flavorful Chicken
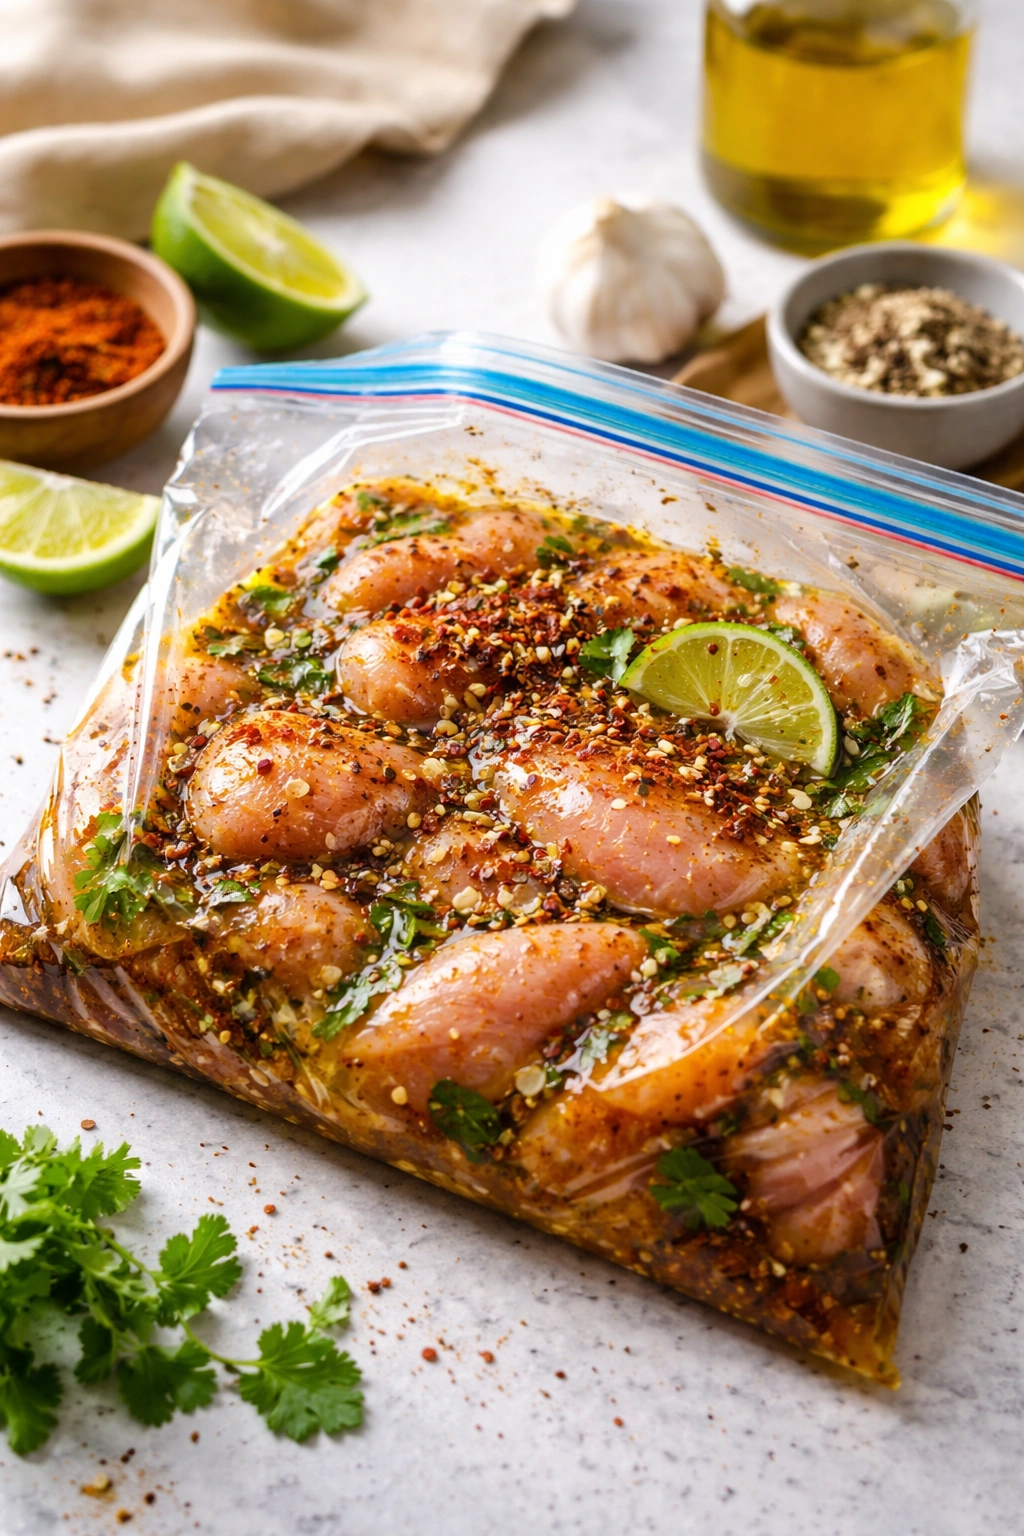
The chicken itself should be seasoned in one of two ways: a dry rub applied immediately before cooking, or a marinade that infuses flavor into the meat over time. Many home cooks assume you need an elaborate marinade, but the truth is more nuanced. A simple combination of oil, lime juice, and spices applied for anywhere from 15 minutes to several hours creates deeply flavorful chicken that still tastes juicy and tender.
The beauty of a marinade is that it’s insurance against dry chicken. The oil and acid in the marinade help the chicken retain moisture during cooking, and the longer it sits, the more the spices penetrate the meat. For busy weeknights, even 15 to 30 minutes makes a noticeable difference. If you’re planning ahead, marinating overnight or for several hours yields noticeably more flavorful results—just don’t marinate longer than 24 hours, as the citric acid can begin to break down the protein too much.
Some recipes skip the marinade entirely and simply season the chicken with a dry spice blend right before it hits the hot pan. This method works beautifully too and requires no advance planning. The seasoning sticks to the chicken’s surface, creating a flavorful crust, while the cooking technique (quick sear on high heat) ensures the inside stays moist. Choose whichever method fits your schedule and cooking style; both yield excellent results.
One critical tip: remove the chicken from the marinade and pat it dry before cooking. Excess marinade on the surface creates steam rather than a good sear. This takes just a minute with paper towels and makes a real difference in the finished texture and color.
Choosing and Preparing Your Vegetables
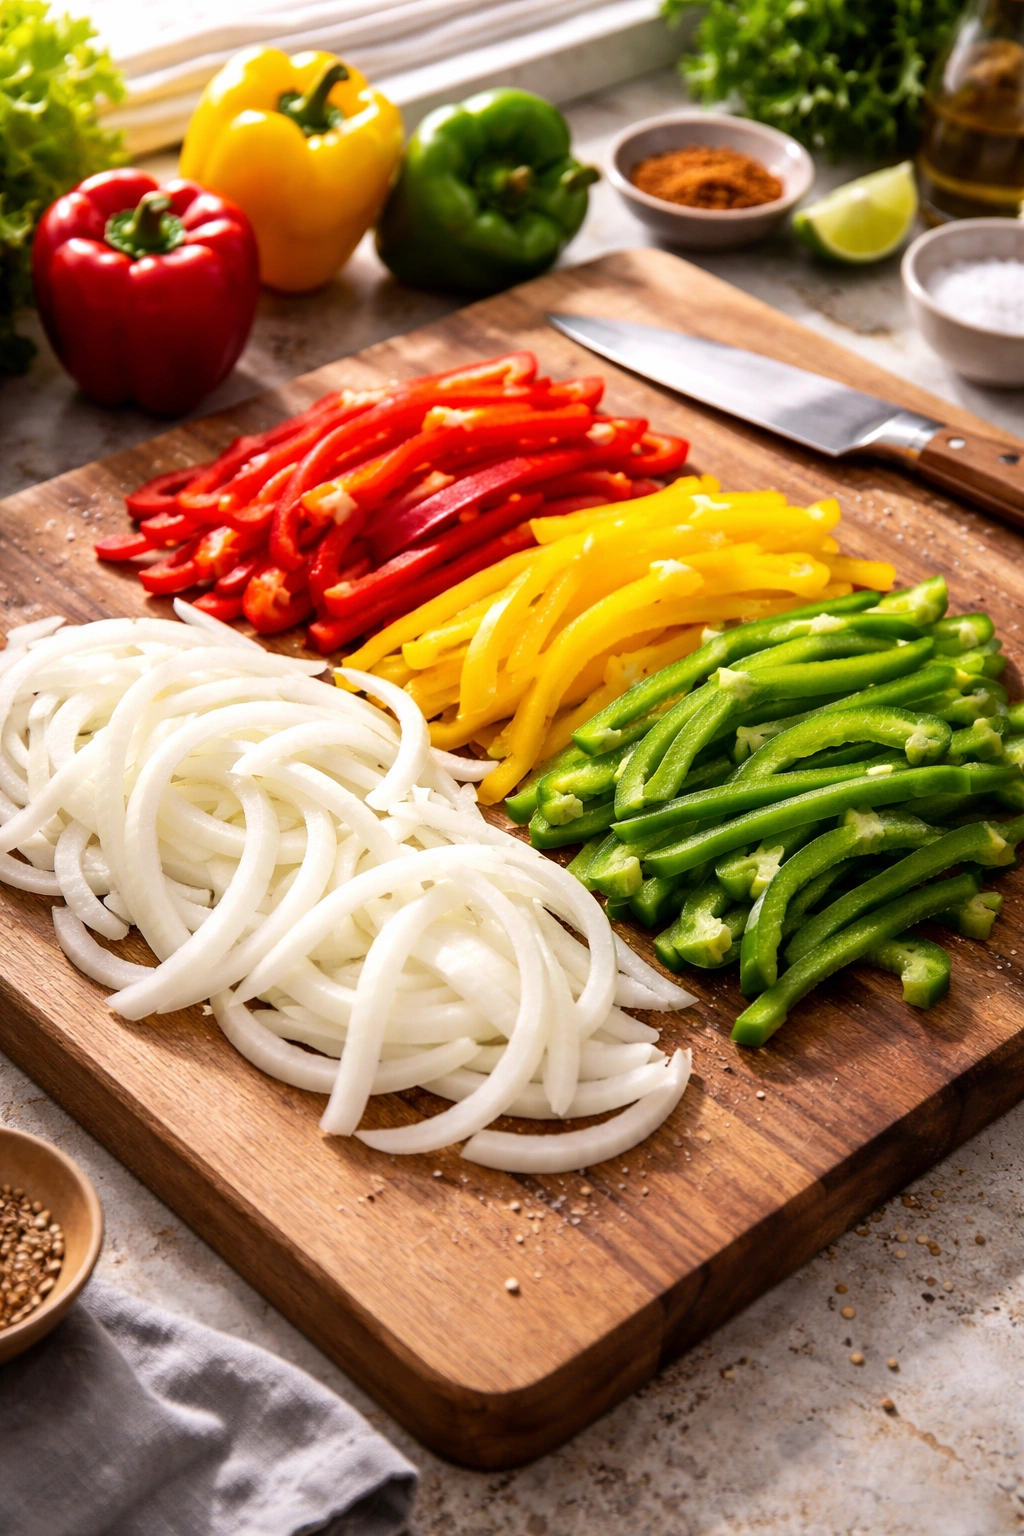
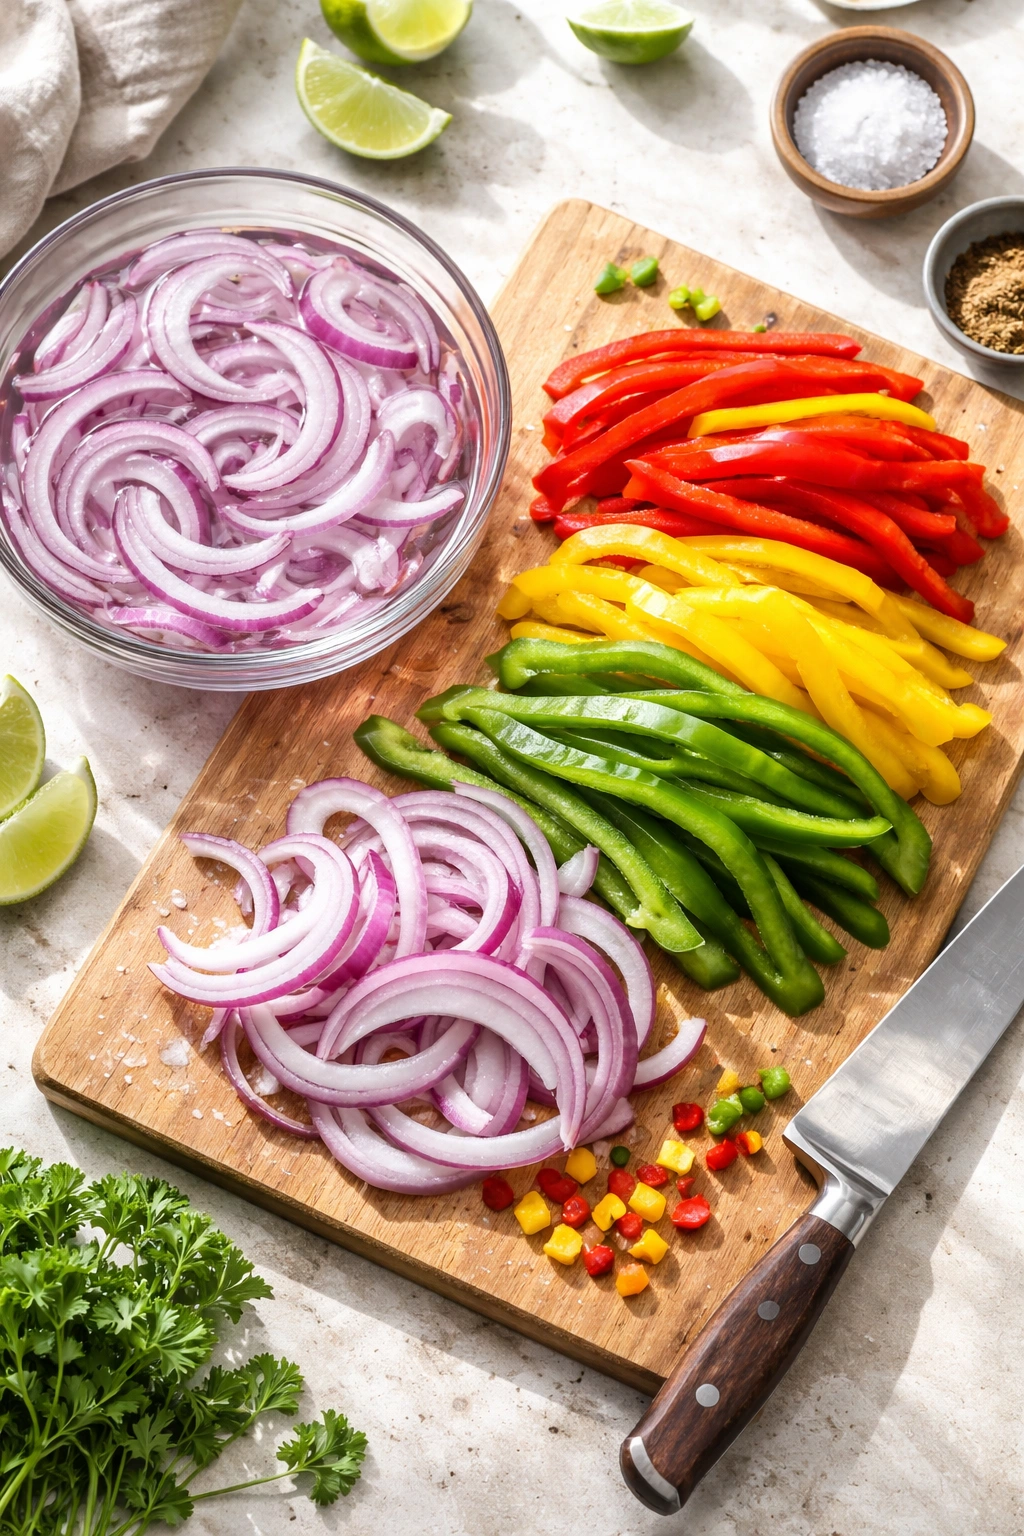
Pepper and onion selection is both simple and important. For peppers, you can choose by color based on taste preference—green peppers are slightly grassy and more peppery, while red, yellow, and orange peppers are progressively sweeter and milder. Many cooks prefer a mix of colors for visual appeal and a more complex flavor balance. Poblano peppers are another excellent choice if you want something slightly less sweet and with a subtle smoky note.
Onions are equally important. White onions are traditional and assertively flavored; yellow onions are sweeter and more versatile; red onions add a peppery note and gorgeous color. Slice them all the same way you’d slice the peppers—into roughly ¼-inch-thick strips that cook at the same rate as the peppers. A helpful trick: if you’re serving picky eaters or young kids, soak the sliced onions in cold water for 10 to 15 minutes before cooking. This takes the edge off their raw bite while maintaining their structure and flavor once they’re cooked.
The key to perfectly cooked vegetables is adequate heat and a single-layer arrangement in your pan. This isn’t the time to be economical with pan space. If the vegetables are piled on top of each other, they release moisture and steam rather than developing that caramelized color and slight char that makes them taste authentic. If you have a smaller pan, cook the vegetables in batches, or use a large skillet or griddle that gives them room to spread out.
Don’t add salt to the vegetables while they’re cooking—salt draws out their moisture and prevents browning. Season them after they’re cooked, or incorporate the salt into your spice blend so it’s applied at the beginning rather than creating a wet environment during the cook.
Homemade Fajita Seasoning vs Store-Bought
This is where a lot of home cooks second-guess themselves, wondering if they should mix their own spice blend or reach for a packet. The honest answer is that both work, and which you choose depends on your priorities and time constraints.
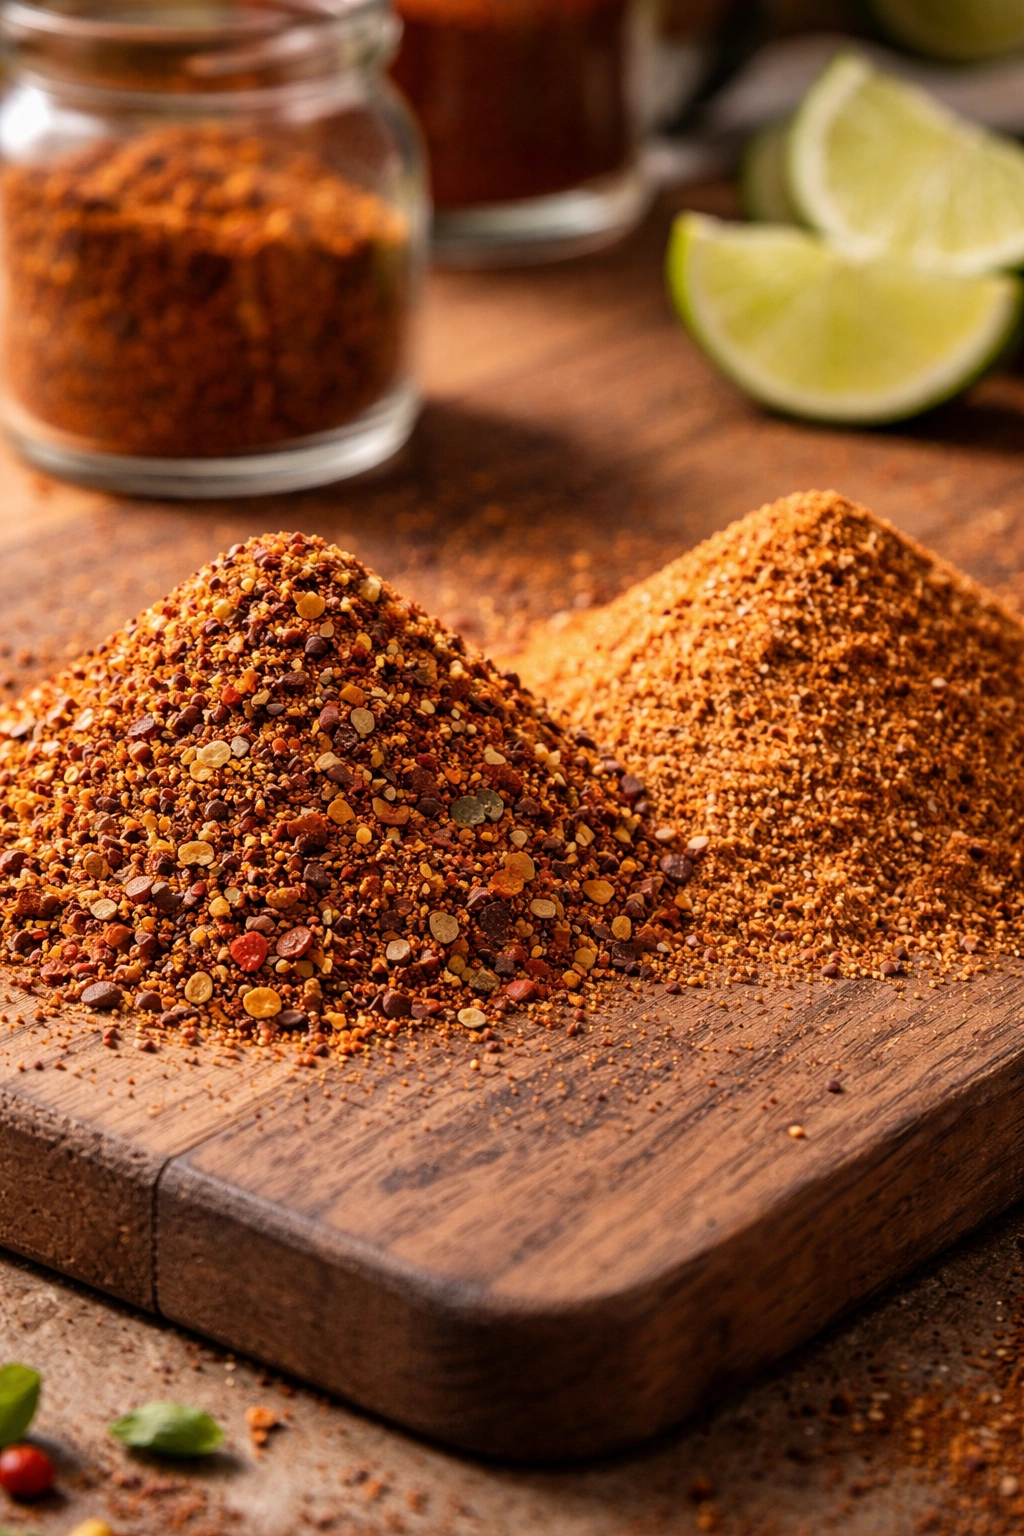
Homemade fajita seasoning gives you control over flavor intensity, heat level, and sodium content. You’re combining spices that you already have in your pantry—chili powder, ground cumin, smoked paprika, garlic powder, oregano, salt, and black pepper. The blend tastes noticeably bolder and more complex than pre-packaged versions because the spices are fresher and more potent. There are no fillers, anti-caking agents, or additives, and you can easily adjust the proportions to match your preferences or dietary needs.
Store-bought fajita seasoning packets are genuinely convenient and absolutely fine. They’ve been engineered to taste good and work reliably. The downside is that they often contain more salt than you’d add yourself, and the spices aren’t as bright-tasting since they’ve been sitting in a packet for weeks or months. Some people find them adequate; others notice the flavor difference immediately.
Here’s what experienced cooks do: make a double batch of homemade fajita seasoning and store it in an airtight container. Measure out your spices once, and you’ve got ready-to-grab seasoning for multiple meals. This takes five minutes and eliminates the need to measure individual spices each time you make fajitas. It’s a practical middle ground that gives you homemade quality with near-packet convenience.
Yield: Serves 4 to 6 | Makes 4 to 6 large fajitas servings
Prep Time: 15 minutes
Cook Time: 20 minutes
Total Time: 35 minutes (plus optional marinade time of 15 minutes to several hours)
Difficulty: Beginner — This recipe requires no special equipment beyond a skillet and basic knife skills. The technique is straightforward, and there’s significant margin for error—even if your vegetables cook a minute longer or the chicken comes off the heat a touch earlier than ideal, you’ll still end up with a delicious meal.
For the Marinade (Optional but Recommended)
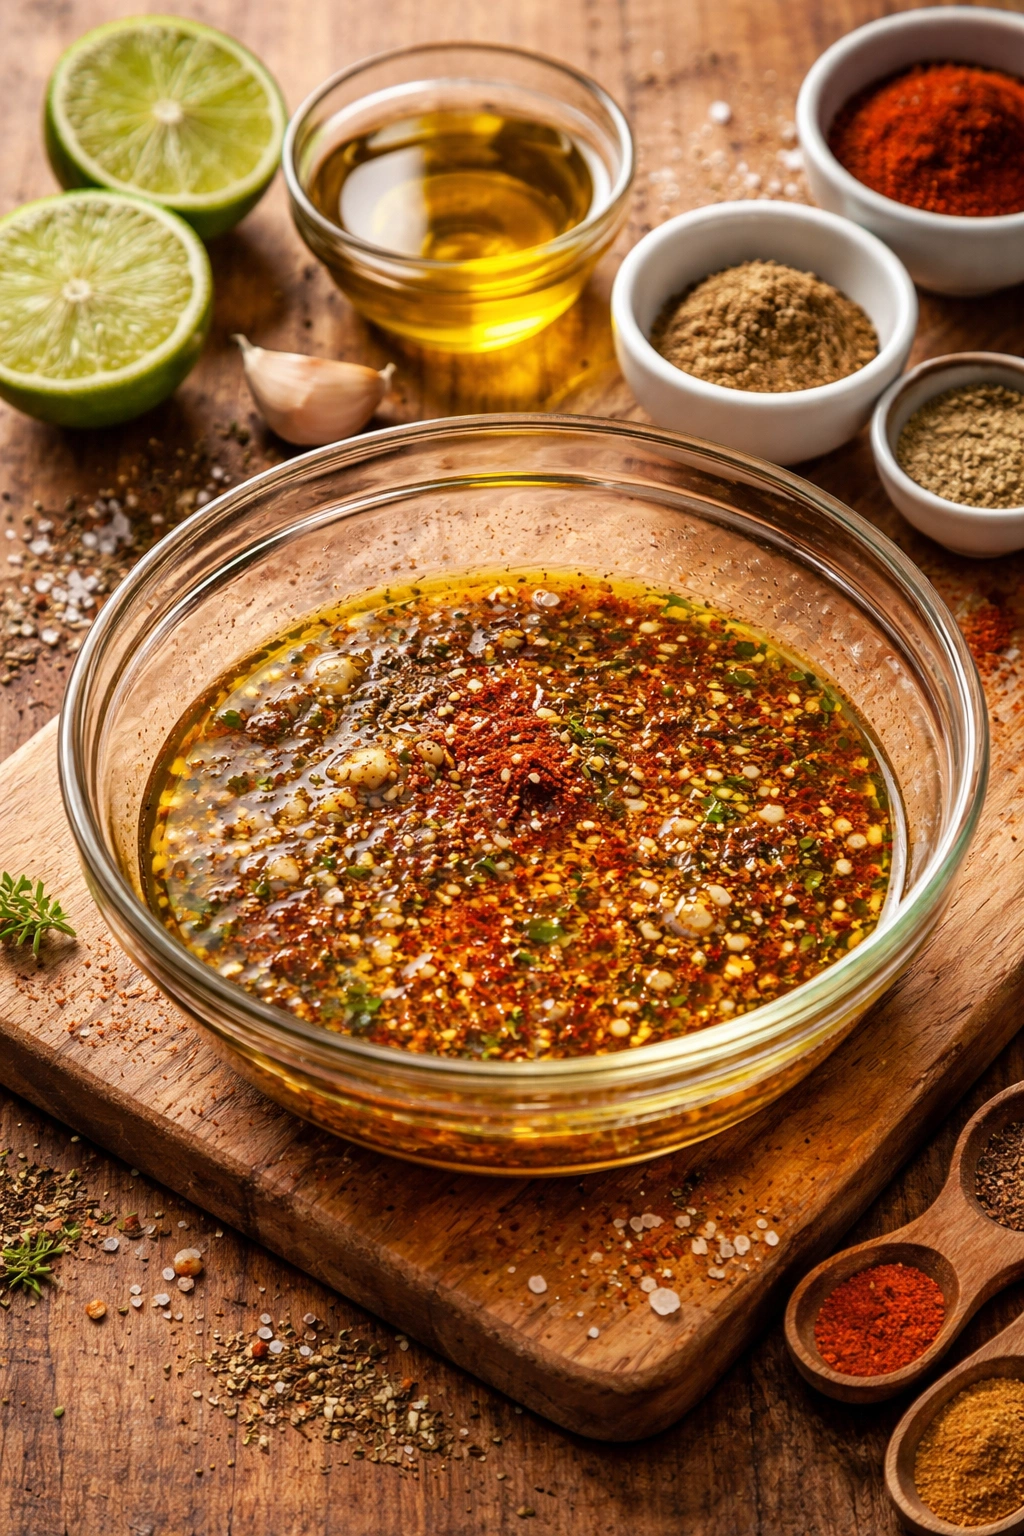
If marinating: Mix these ingredients together at least 15 minutes before cooking, or up to 24 hours in advance.
- 3 tablespoons olive oil or vegetable oil
- 2 tablespoons fresh lime juice (from about 1 lime)
- 1½ teaspoons dried oregano
- 1½ teaspoons ground cumin
- 1 teaspoon garlic powder
- 1 teaspoon chili powder
- ½ teaspoon smoked paprika
- ½ teaspoon salt
- ¼ teaspoon black pepper
- Optional: ½ teaspoon crushed red pepper flakes for extra heat
For the Chicken

- 1¼ to 1½ pounds boneless, skinless chicken breasts (about 3 medium breasts), sliced horizontally in half to create thinner cutlets, or cut into thin strips
- 2 tablespoons olive oil or vegetable oil (divided if not using marinade; use 1 tablespoon if marinating the chicken)
- Homemade fajita seasoning (see recipe below) or 2 tablespoons store-bought fajita seasoning
- Salt and black pepper to taste (additional, beyond seasoning)
For the Homemade Fajita Seasoning (Make Your Own Blend)
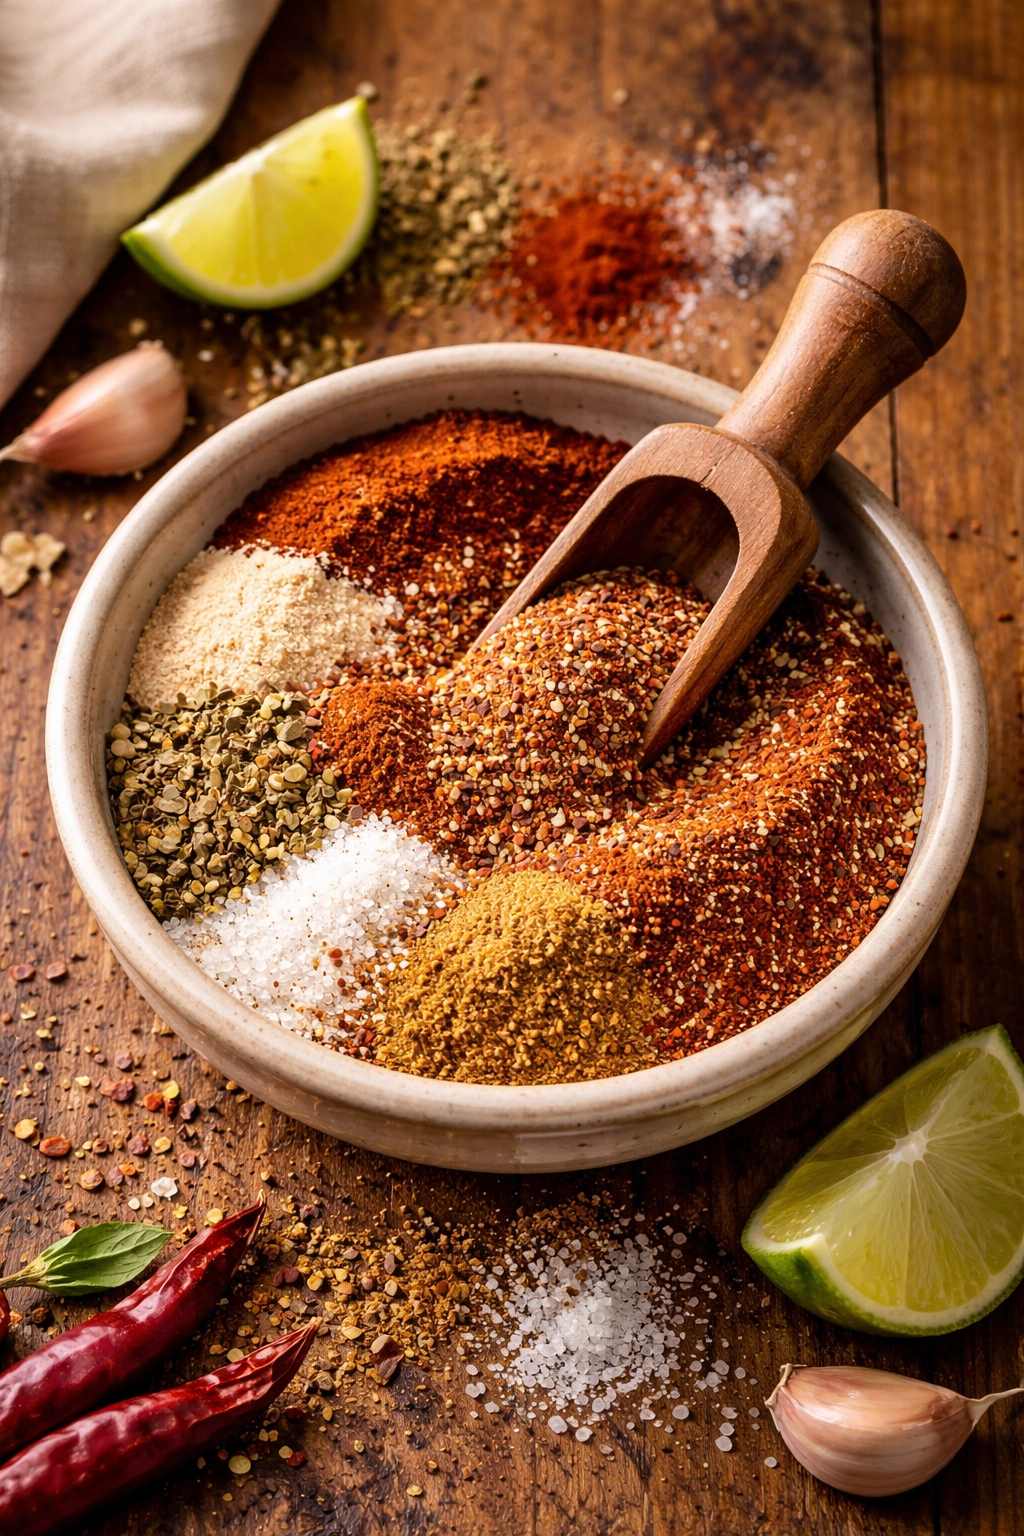
Mix these spices together and store in an airtight container for up to 3 months. This makes about ¼ cup of seasoning, enough for 4 to 5 batches of fajitas.
- 3 tablespoons chili powder
- 2 teaspoons ground cumin
- 1½ teaspoons smoked paprika
- 1½ teaspoons garlic powder
- 1 teaspoon onion powder
- 1 teaspoon dried oregano
- ½ teaspoon salt
- ¼ teaspoon black pepper
- Optional: ¼ teaspoon cayenne pepper for more heat
For the Vegetables
- 1 large yellow onion, thinly sliced into ¼-inch strips (about 3 cups when sliced)
- 3 to 4 large bell peppers (a mix of red, yellow, and green, or any colors you prefer), thinly sliced into ¼-inch strips
- 1 to 2 tablespoons olive oil or vegetable oil (for cooking the vegetables)
- Salt and black pepper to taste
For Serving and Assembly
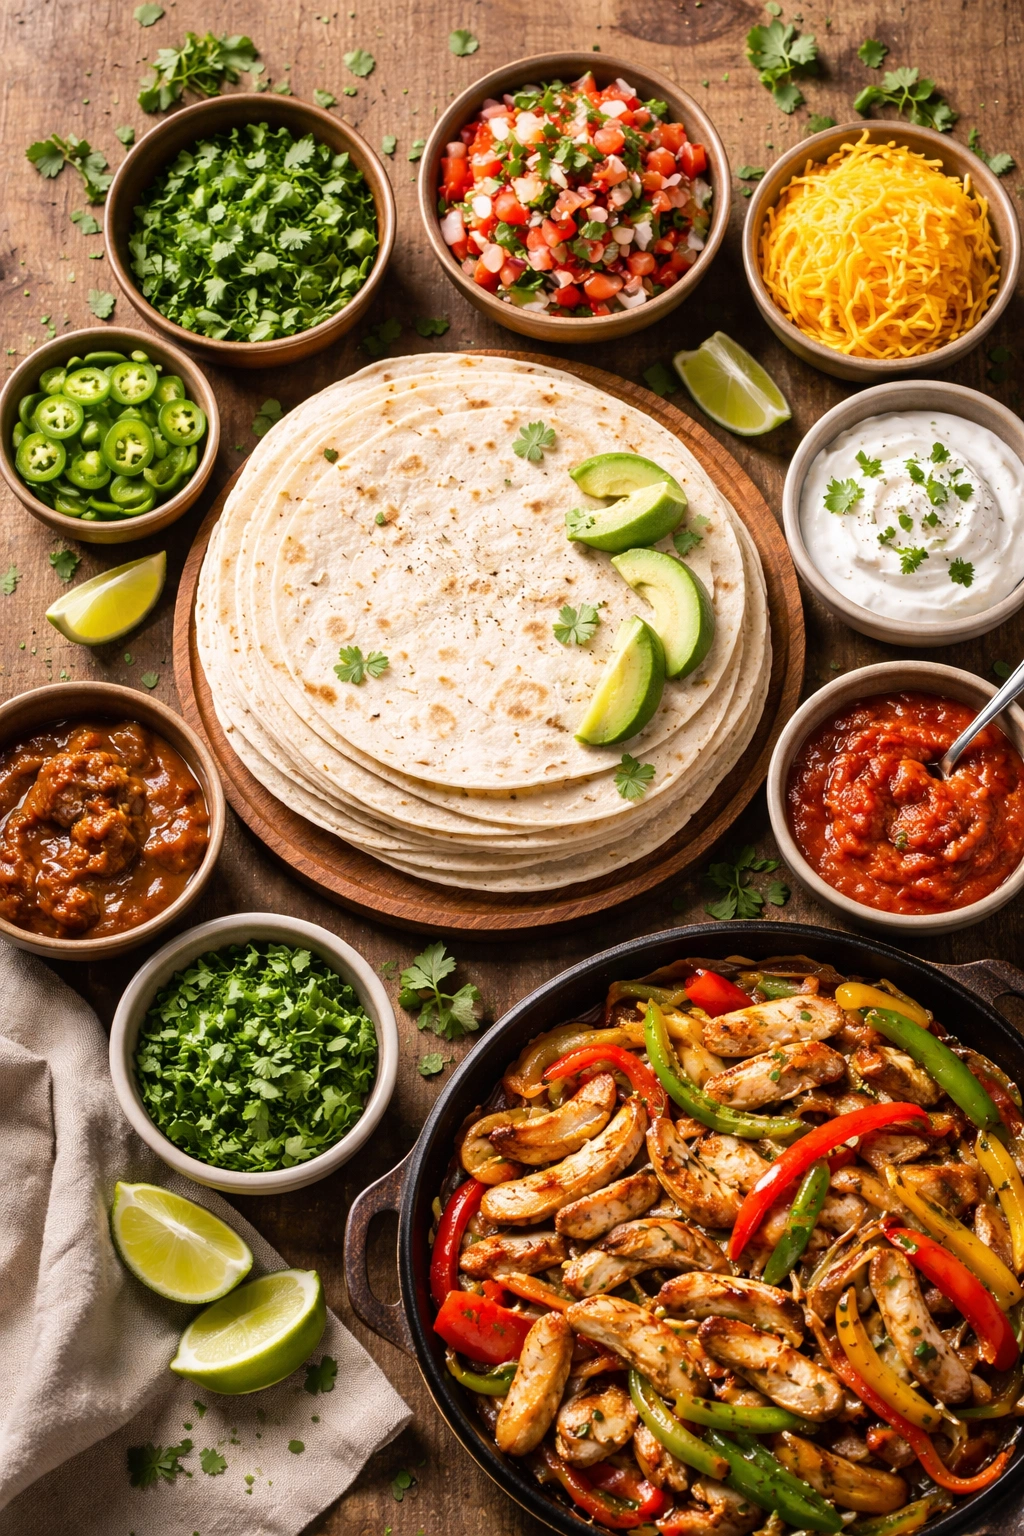
- 8 to 12 flour tortillas (or corn tortillas, 6 to 8 inches in diameter), warmed just before serving
- Fresh lime wedges
- Fresh cilantro leaves (optional)
- Avocado, sliced, or guacamole
- Sour cream
- Shredded cheese (cheddar, Mexican blend, or cotija)
- Salsa (store-bought or homemade)
- Pico de gallo (optional)
- Sliced jalapeños or pickled jalapeños (optional)
- Shredded lettuce (optional)
Prepare the Chicken and Marinade (Optional Step)
-
If you’re marinating: In a large resealable plastic bag or a shallow dish, combine the oil, lime juice, oregano, cumin, garlic powder, chili powder, paprika, salt, pepper, and red pepper flakes (if using). Add the chicken pieces and turn to coat them thoroughly with the marinade. Seal the bag or cover the dish, and refrigerate for at least 15 minutes. For deeper flavor, marinate for 2 to 8 hours. If marinating longer than 2 hours, refrigerate the chicken. Don’t marinate longer than 24 hours—the citric acid will begin to make the chicken mushy.
Advertisements -
If you’re not marinating: Simply skip to the cooking steps below. You’ll season the chicken with the dry spice blend just before it hits the pan.
Prepare Your Vegetables
-
While the chicken is marinating (or while your pan preheats), slice the onion into ¼-inch-thick strips, separating the rings so they’re loose rather than still clumped together. Slice the bell peppers into ¼-inch strips as well, removing the seeds and the white membrane as you go.
-
If you’d like to take the raw bite out of the onions (especially helpful if serving children), place the sliced onions in a bowl of cold water and let them soak for 10 to 15 minutes. When you’re ready to cook them, drain them well and pat them dry with paper towels.
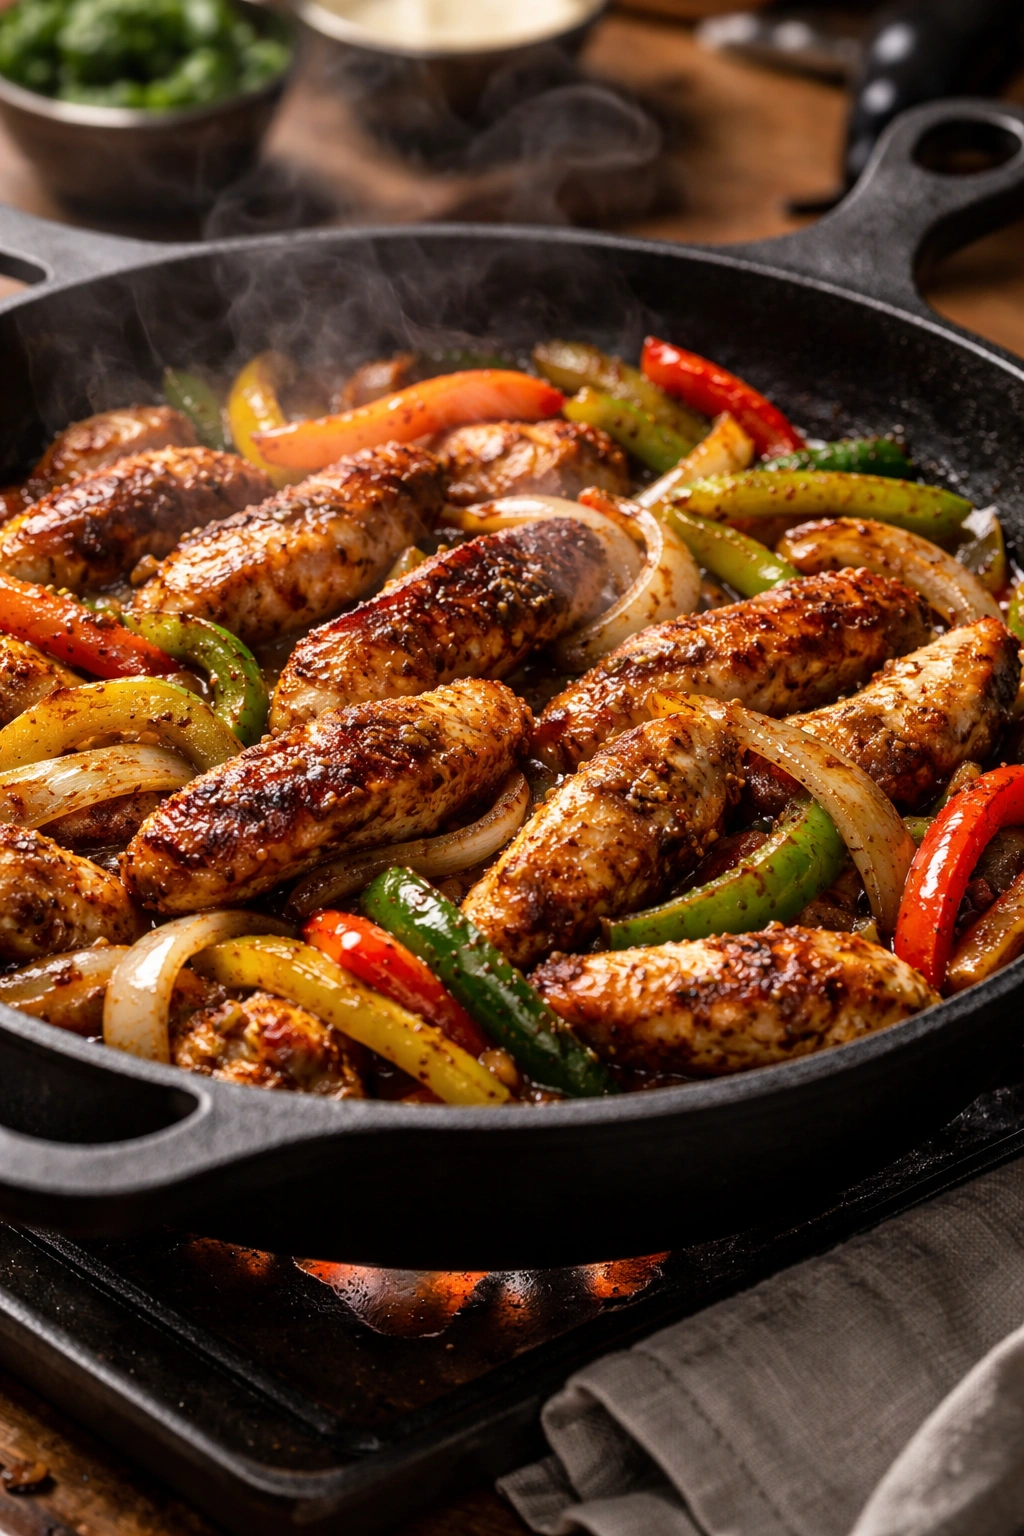
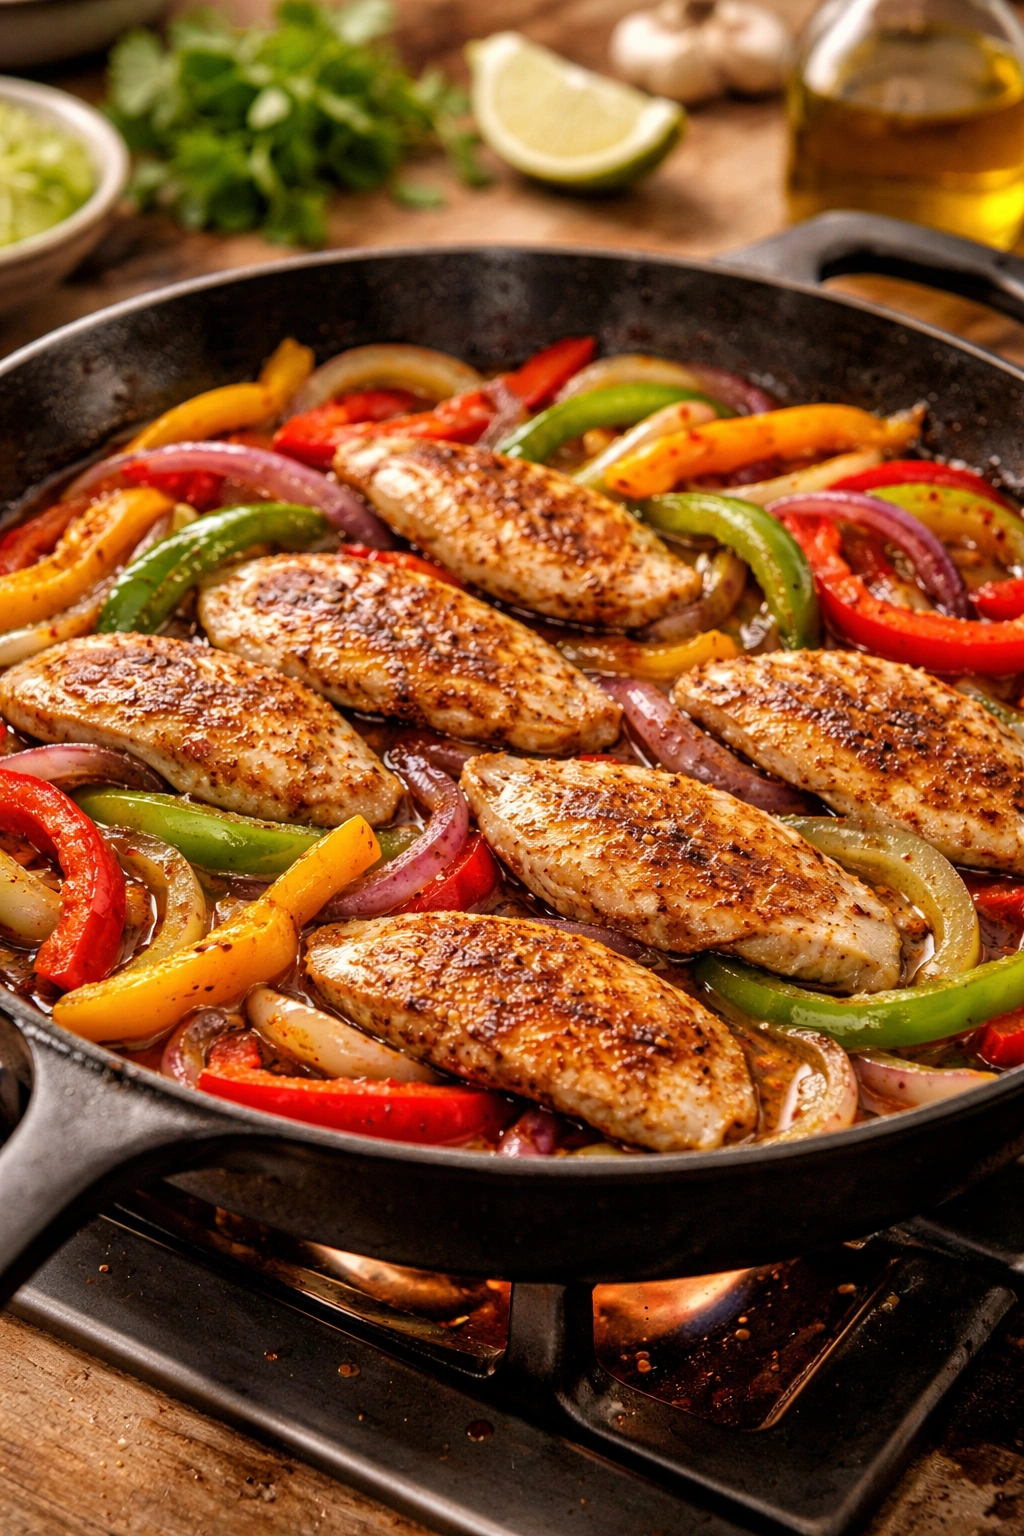
Sear the Chicken
-
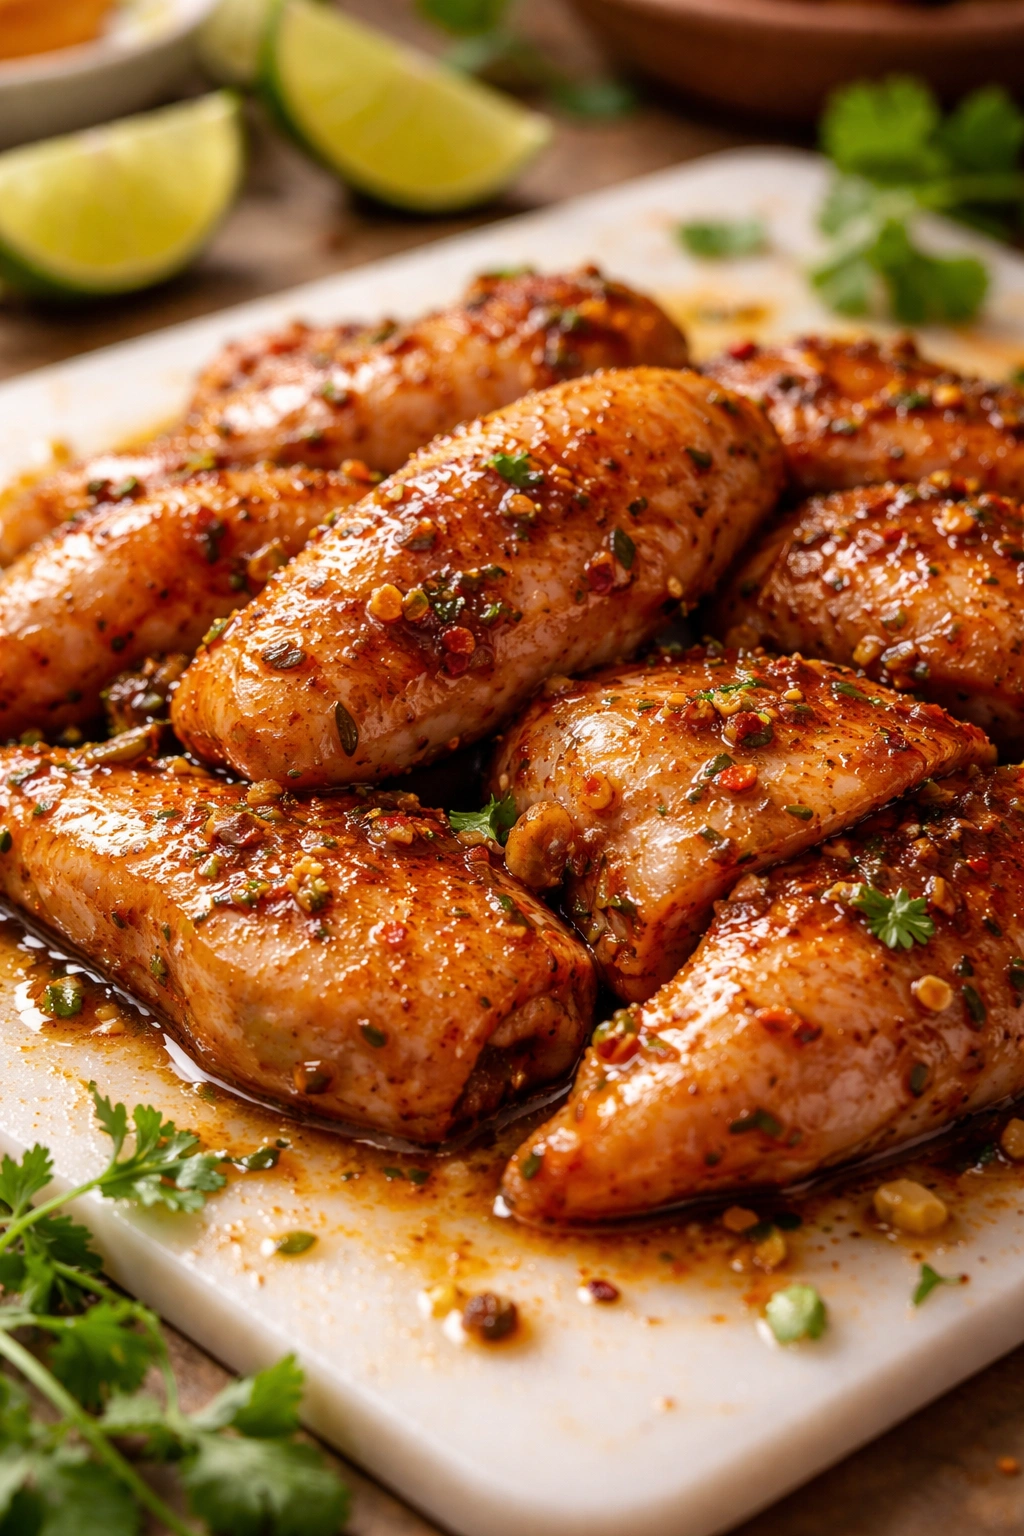
Remove the chicken from the marinade (if you marinated it) and use paper towels to pat it completely dry—this is crucial for getting a good sear. If you’re using the dry spice blend instead, season both sides of the chicken pieces generously with the fajita seasoning, pressing it gently into the surface with your fingers so it adheres. Season with a bit of additional salt and black pepper if desired.
-
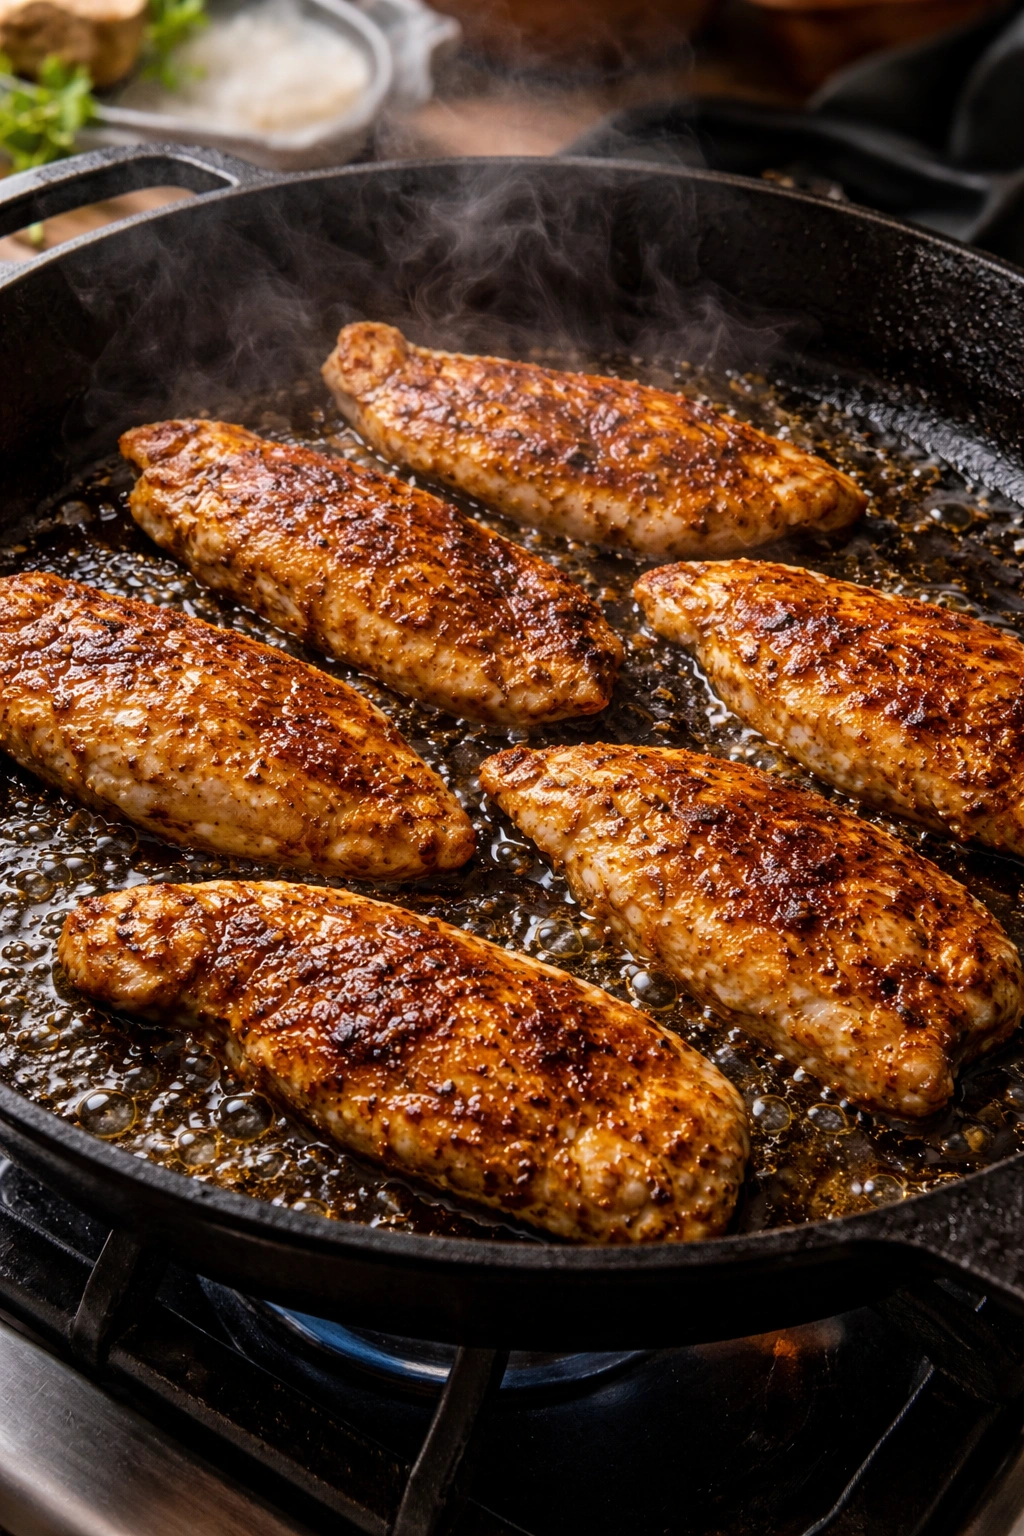
Heat 1 tablespoon of oil in a large cast iron skillet or heavy-bottomed skillet over medium-high heat. Once the oil is shimmering and just beginning to smoke slightly, carefully lay the chicken pieces in the pan in a single layer. Don’t move them for the first 2 to 3 minutes—this allows the undersides to develop a golden-brown sear.
-
After 2 to 3 minutes, flip each piece and cook for another 2 to 3 minutes on the second side until the chicken is golden brown and cooked through. The chicken is done when it reaches an internal temperature of 165°F (74°C) when measured with an instant-read thermometer at the thickest part. If you don’t have a thermometer, cut into the thickest piece with a sharp knife—there should be no pink remaining, and the juices should run clear.
-
Once the chicken is cooked, transfer it to a clean plate and loosely cover it with aluminum foil to keep it warm while you cook the vegetables. Pro tip: Stack the pieces on top of each other and then cover with foil; they’ll retain heat better than if they’re spread out.
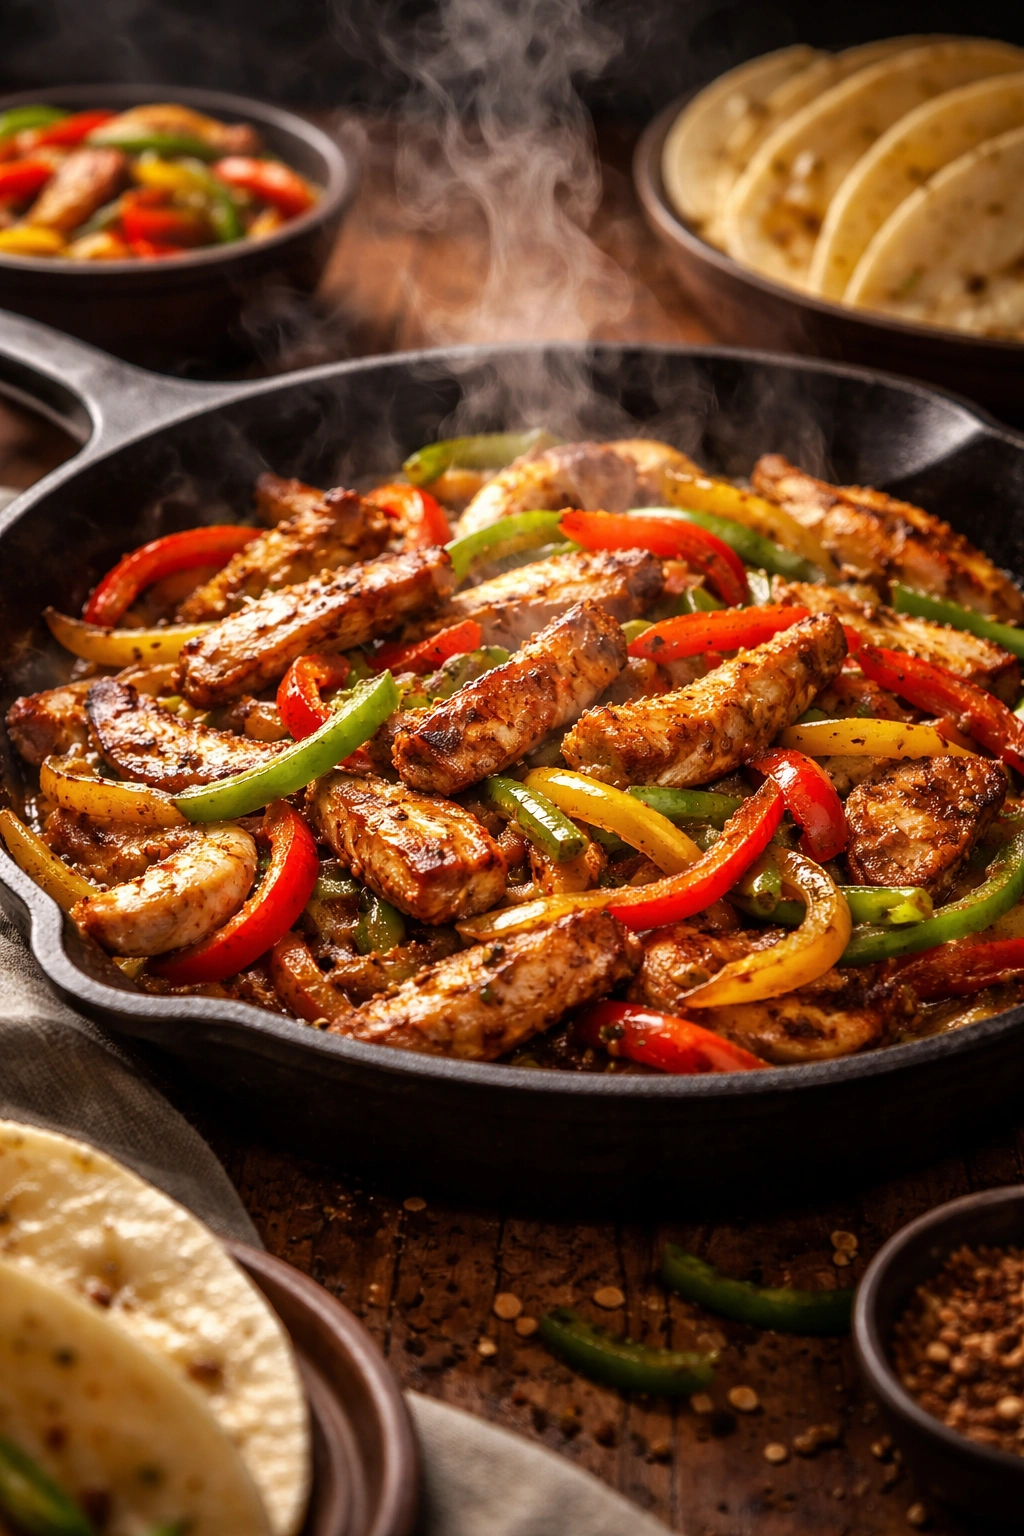
Cook the Vegetables
-
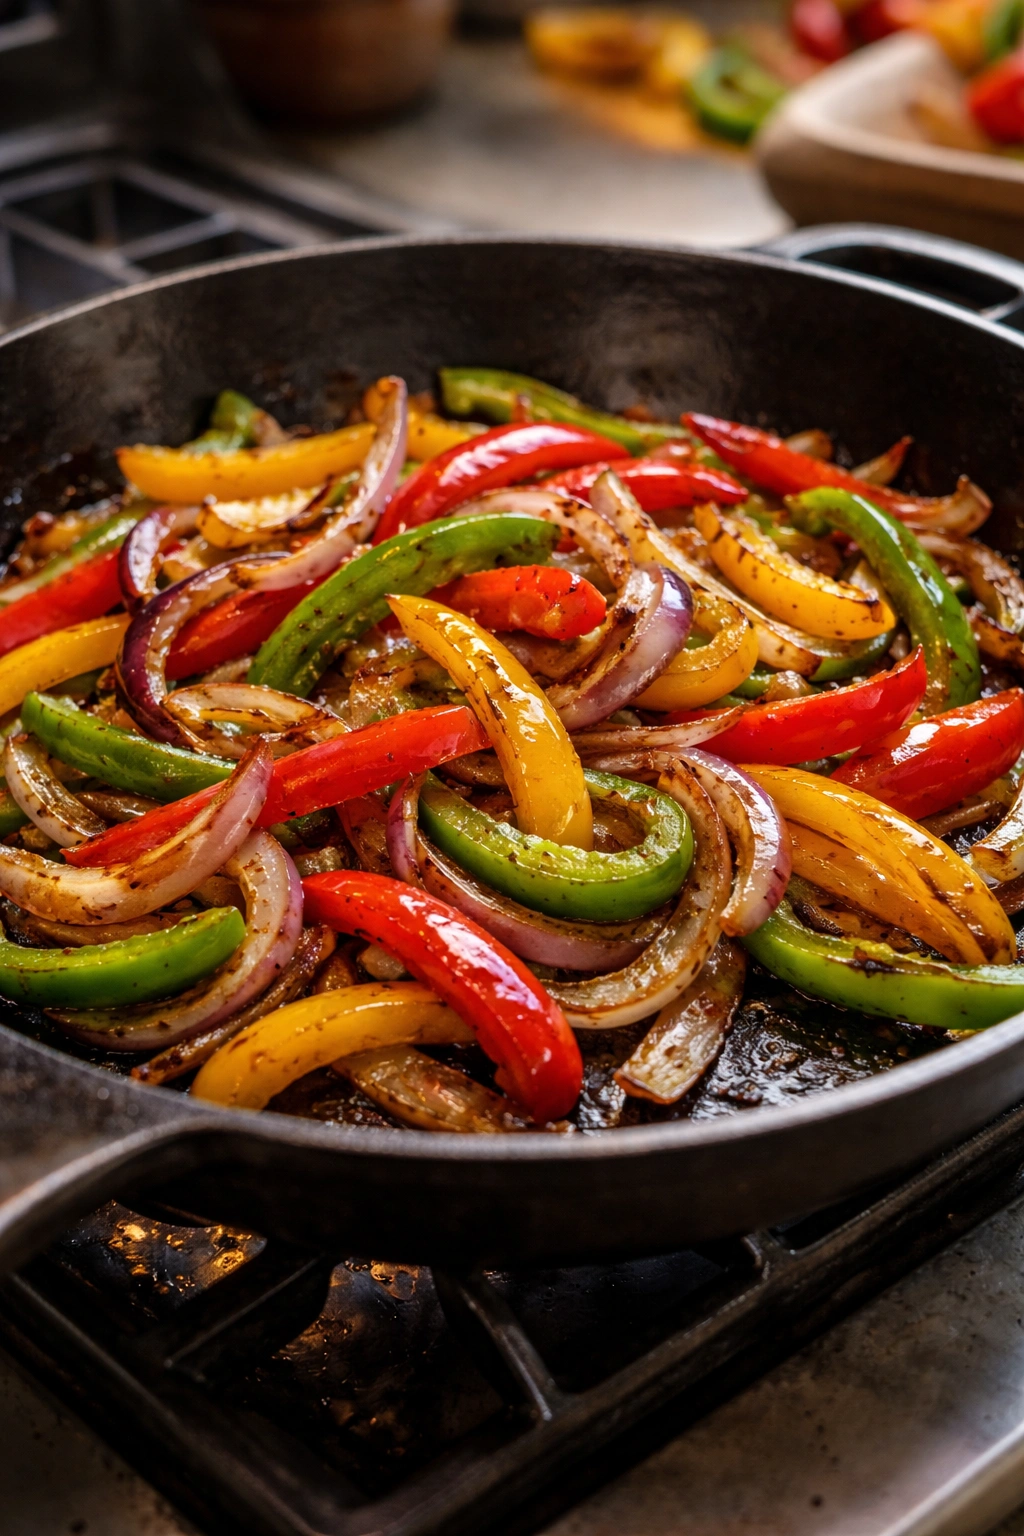
Add the remaining 1 to 2 tablespoons of oil to the same skillet (don’t wash it—those flavorful browned bits stuck to the bottom are pure umami). Heat the oil over medium-high heat until it shimmers.
-
Add all the sliced peppers and onions to the hot pan in an even layer. Let them cook undisturbed for 2 minutes without stirring—this allows them to develop some caramelization and color. You’ll hear them sizzle and smell the wonderful aroma as they begin to brown.
-
After 2 minutes, use a metal spatula or wooden spoon to stir the vegetables, scraping up some of the browned bits from the bottom of the pan and coating everything with the oil. Spread them back into a relatively even layer.
Advertisements -
Continue cooking for another 3 to 5 minutes, stirring occasionally, until the peppers are tender-crisp and the onions are softened with some golden-brown caramelized edges. You want them cooked through but still with a bit of bite and structure—not mushy. Season with salt and black pepper to taste.
Combine and Finish
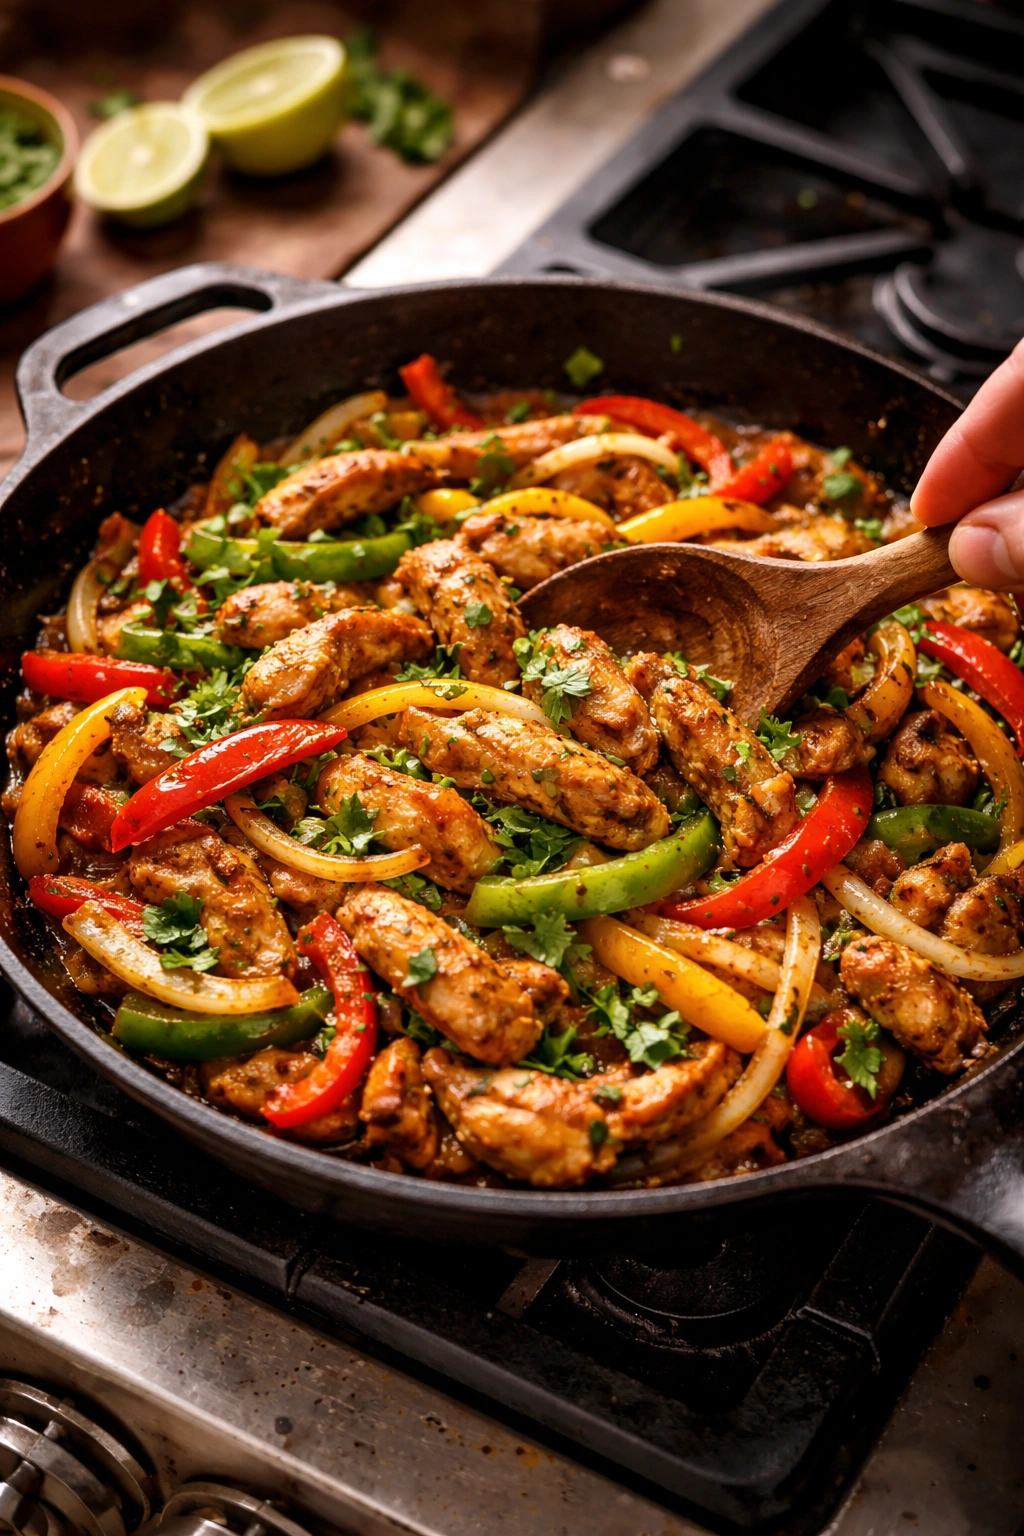
-
Return the cooked chicken pieces to the skillet with the peppers and onions. Stir everything together over medium heat for about 30 seconds to a minute to warm the chicken through and let all the flavors mingle.
-
Squeeze the juice from 1 or more fresh lime wedges over everything in the pan, then add a generous handful of fresh cilantro if desired. Stir to combine. Taste and adjust the seasoning if needed—add more salt, black pepper, lime juice, or a pinch of cayenne pepper depending on your preference.
Heat and Warm Your Tortillas
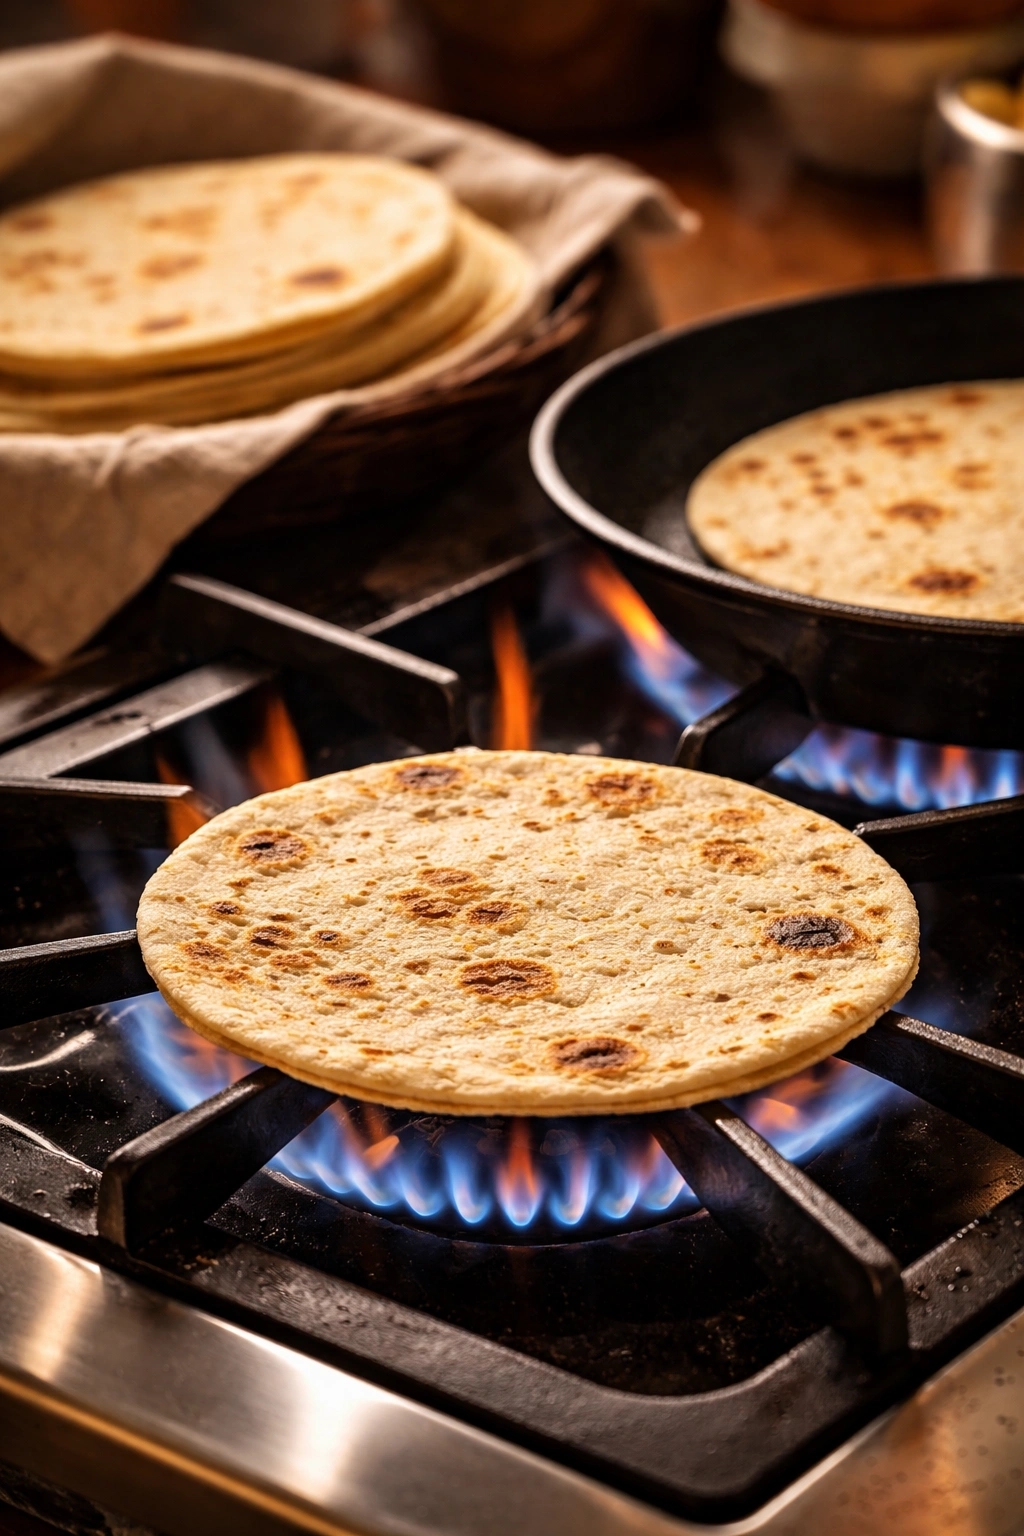
-
While the chicken and vegetables finish combining, warm your tortillas. The best method is to heat them one or two at a time directly over a gas burner flame on medium heat, turning them every few seconds until they’re warm and slightly charred on both sides—this takes about 30 seconds per tortilla. Alternatively, wrap a stack of tortillas in a damp paper towel and microwave them for 30 to 60 seconds, or place them in a dry skillet over medium heat, flipping every few seconds until warm and lightly toasted.
-
Transfer the warm tortillas to a tortilla warmer or wrap them in a clean kitchen towel to keep them warm while you serve.
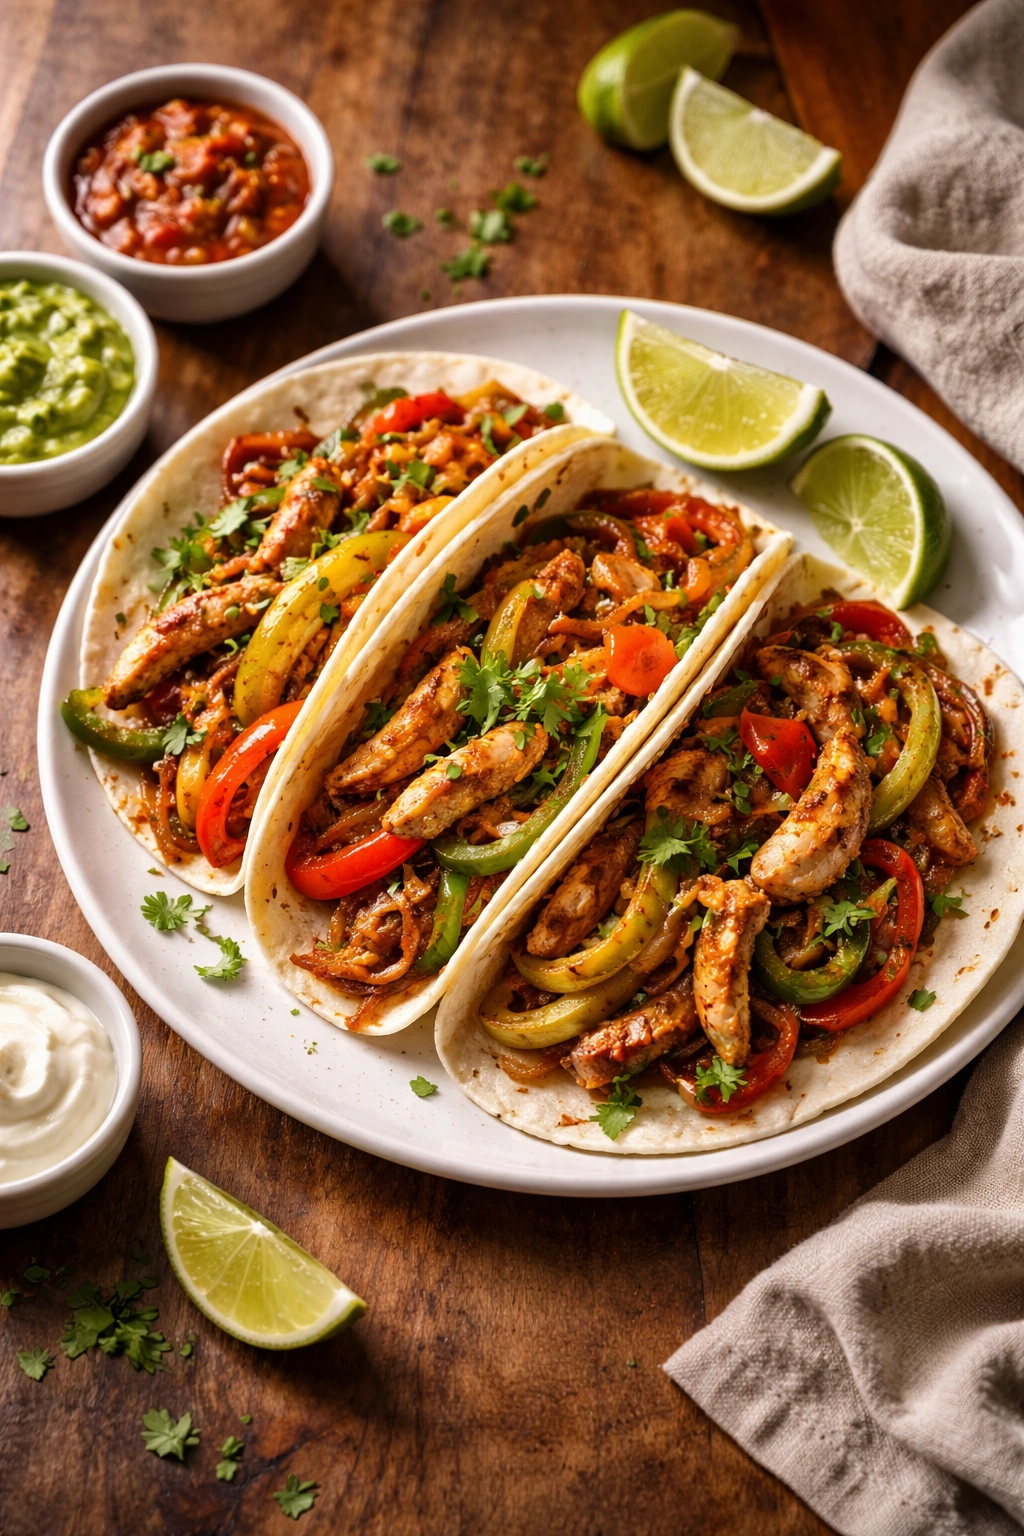
Serve and Assemble
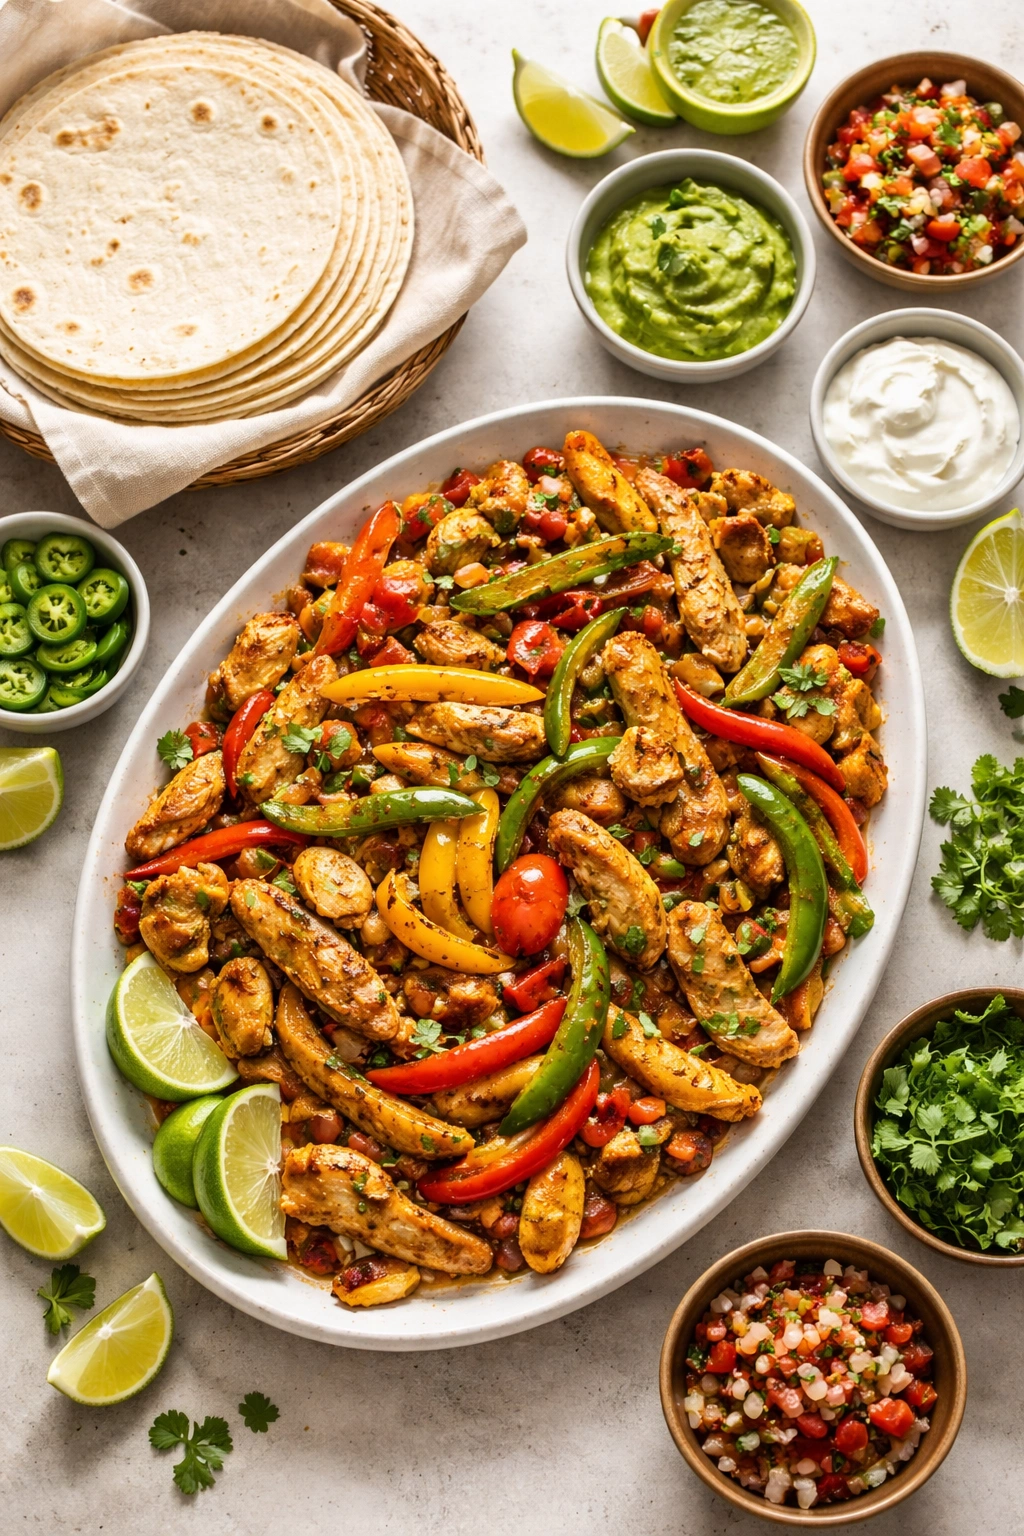
-
Transfer the chicken and vegetable mixture to a serving platter or serve directly from the skillet for that classic sizzling presentation. Arrange the warm tortillas on a separate plate, and set out your toppings—avocado, sour cream, cheese, salsa, pico de gallo, cilantro, lime wedges, and any other additions you’d like.
-
To assemble: Place 2 to 3 tablespoons of the chicken and vegetable mixture down the center of a warm tortilla. Add your chosen toppings—a dollop of sour cream, a bit of guacamole, a sprinkle of cheese, fresh cilantro, and a squeeze of fresh lime juice. Fold the tortilla in half and enjoy immediately.
Pro Tips for Restaurant-Quality Results
The difference between mediocre fajitas and truly excellent ones often comes down to a few small but important details. Use a cast iron skillet if you have one. Cast iron retains heat exceptionally well, creates a superior sear on both the chicken and vegetables, and that seasoned surface adds subtle flavor. If you don’t have cast iron, a thick stainless steel skillet works beautifully too—avoid non-stick pans, which don’t develop enough color or flavor through the Maillard reaction.
Don’t overcrowd the pan. This is the single biggest mistake home cooks make. When the chicken is piled on top of itself or the vegetables are crammed in too densely, steam builds up instead of allowing browning to happen. The result is boiled-tasting chicken and pale, limp vegetables. Work in batches if necessary, or use a larger pan. The few extra minutes this takes is worth it for dramatically better results.
Make sure everything is dry before it hits the hot oil. Pat the chicken with paper towels after marinating. If your vegetables seem wet (which can happen if you prepped them earlier), pat them dry too. Any excess moisture will steam away rather than creating that flavorful caramelization.
Taste as you go. After the chicken finishes cooking, taste it before adding it back to the vegetables. After the vegetables are done, taste them. Adjust the seasoning at each stage rather than trying to fix it all at the end. Finish with fresh lime juice—it’s not optional; it’s what makes your mouth light up and prevents the dish from tasting flat or greasy.
Warm your tortillas properly. Cold, stiff tortillas ruin fajitas. Warm tortillas are pliable, absorb the flavors from the filling and toppings beautifully, and just plain taste better. The small effort of warming them directly over a flame or in a pan makes a real difference.
Common Mistakes and How to Avoid Them
Mistake: Thick, unevenly-sized chicken pieces. Thick chicken dries out on the outside before the inside cooks through. Solution: Slice breasts horizontally to create two thinner cutlets, or cut into uniform thin strips. Aim for pieces about ½-inch to ¾-inch thick.
Mistake: Cooking the chicken over too low a temperature. Low heat causes the chicken to cook slowly and gently steam rather than sear. The result is pale, bland, and dry. Solution: Use medium-high or high heat, and let the oil get shimmering hot before adding the chicken.
Mistake: Not searing the chicken long enough. Some cooks flip the chicken too frequently, preventing browning. Solution: Let it sit undisturbed for a full 2 to 3 minutes before flipping, and another 2 to 3 minutes on the second side.
Mistake: Overcrowding the pan with vegetables. When vegetables are piled on each other, they steam. Solution: Use a large pan and spread the vegetables in a single layer, or cook them in batches.
Mistake: Forgetting the lime juice. Lime juice is what makes fajitas sing—it’s not a garnish, it’s essential. Solution: Always finish with fresh lime juice and taste the final dish before serving.
Mistake: Using cold chicken straight from the refrigerator. Cold chicken won’t sear properly and cooks unevenly. Solution: If you’ve marinated the chicken, let it sit at room temperature for 10 minutes before cooking. If cooking without marinating, it’s less critical, but still allow it to reach room temperature if time allows.
Mistake: Adding salt to vegetables while they’re cooking. Salt draws out moisture and prevents the golden caramelization you’re looking for. Solution: Season vegetables after they’re cooked, or salt the oil before adding them rather than adding salt once they’re in the pan.
Serving Suggestions and Perfect Pairings
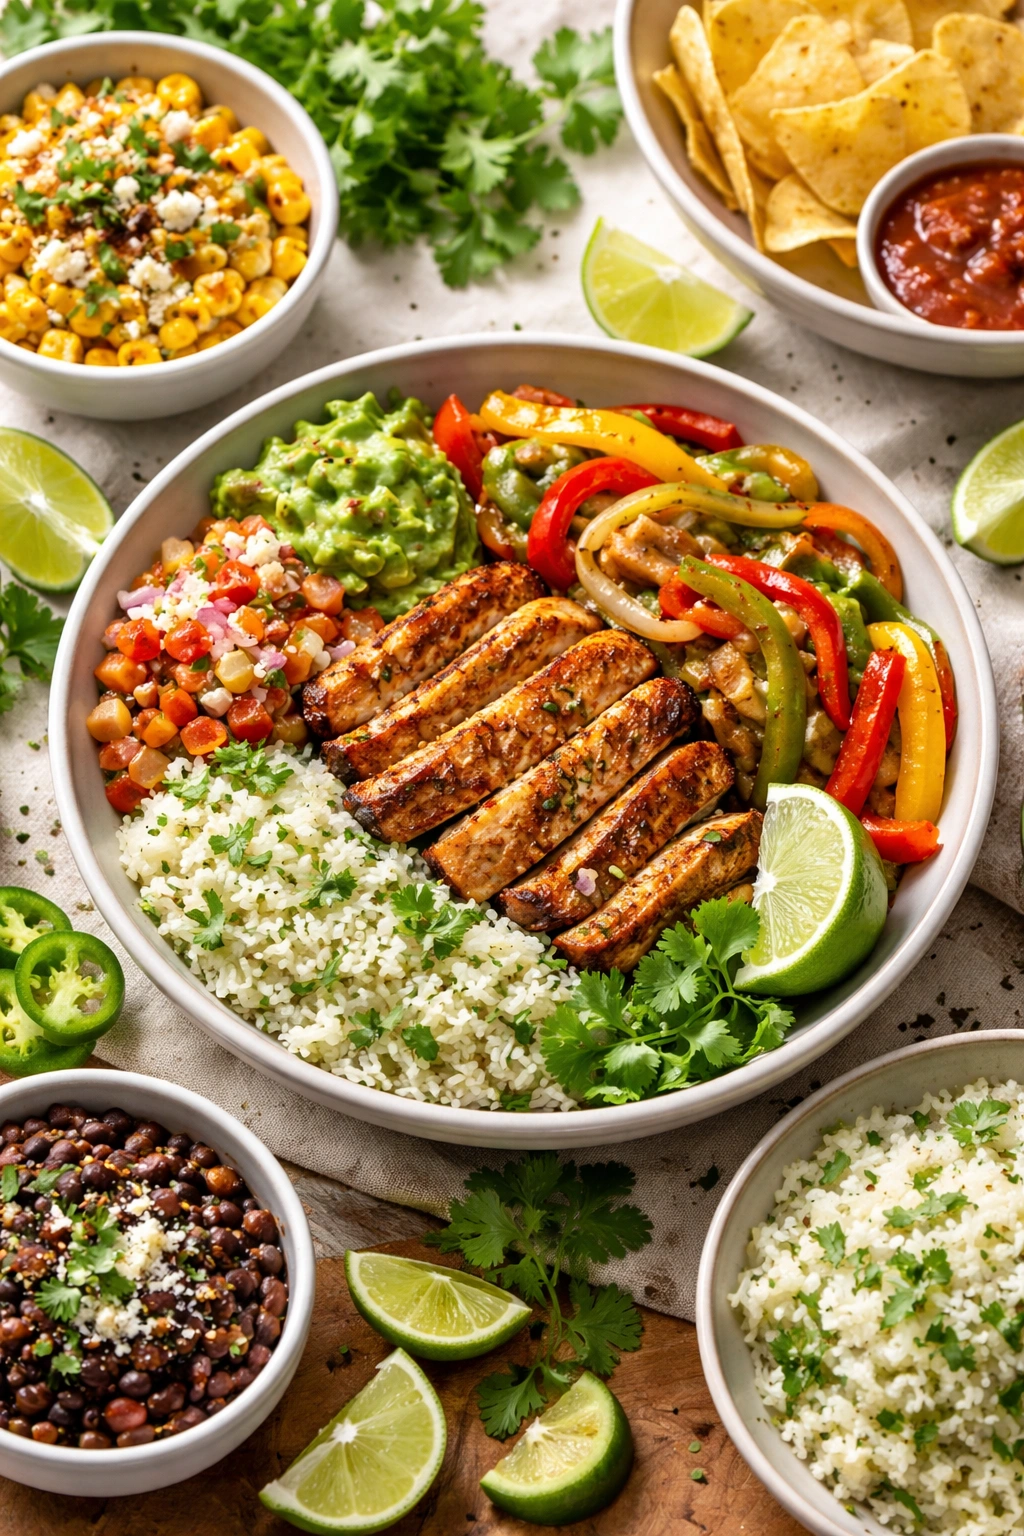
The versatility of chicken fajitas is part of their charm. Traditional fajita tacos are just the beginning. Serve the exact same chicken and vegetable mixture over cilantro lime rice for a fajita bowl that’s slightly lighter and more filling. Layer it on a bed of shredded lettuce with all your toppings for a fajita salad that works beautifully for lunch. Build fajita burritos using large flour tortillas and adding black beans and rice. Top tortilla chips with the chicken mixture, cheese, sour cream, and jalapeños for loaded fajita nachos.
Best side dishes to serve alongside fajitas include cilantro lime rice (bright, flavorful, and absorbs the juices from the filling), black beans (seasoned simply or refried), street corn (elote), a simple Mexican rice, or a fresh green salad dressed with lime vinaigrette. Warm chips and salsa are almost mandatory—they give you something to munch on while you’re assembling tacos. Many families serve fajitas with a simple marinated tomato salad or pico de gallo on the side.
Drinks that pair well include traditional margaritas (frozen or on the rocks), Mexican beer, agua fresca (a refreshing traditional Mexican beverage), or simply lime-infused water. For non-alcoholic options, Mexican hot chocolate or hibiscus tea work beautifully, though a cold agua fresca is probably the most refreshing complement to the warm, spiced fajitas.
Setting the table buffet-style makes fajitas more fun and interactive. Arrange the warm tortillas in a towel-lined basket, put the chicken and vegetable mixture in a serving dish (or leave it in the skillet for drama), and set out all your toppings in small bowls. This way, everyone assembles their own tacos according to their preferences—a win for people with different tastes and dietary needs.
Variations to Try
Spicy Chicken Fajitas: Increase the chili powder and add cayenne pepper to the spice blend. Marinate the chicken in the spiced oil along with sliced fresh jalapeños and add pickled jalapeños to the vegetables while they’re cooking. Finish with hot sauce on top.
Poblano and Mushroom Fajitas: Slice poblano peppers instead of bell peppers (they have a subtle smoky flavor and slightly more complex taste). Add sliced mushrooms (cremini, portobello, or oyster) to the vegetables while they’re cooking. This creates a meatier texture and earthier flavor.
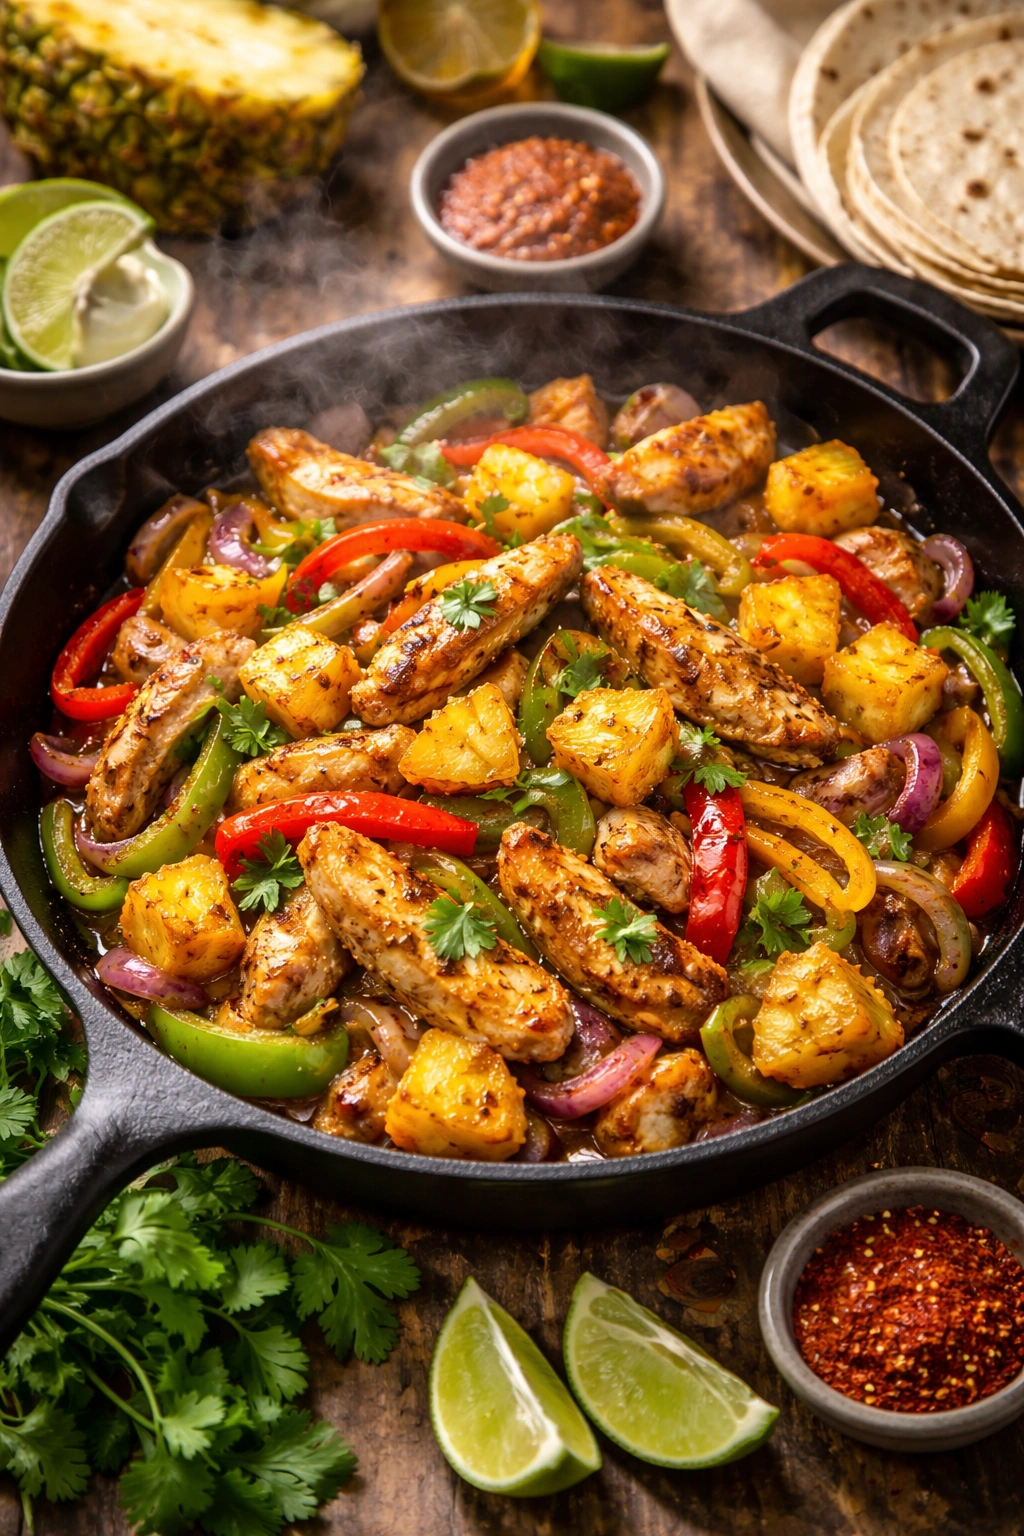
Pineapple Fajitas: Add fresh pineapple chunks to the vegetable mixture toward the end of cooking, or top your finished tacos with fresh diced pineapple. The sweetness and acidity of the pineapple play beautifully with the warm spices.
Cilantro-Lime Chicken Fajitas: Add fresh cilantro to the marinade or dust the chicken with dried cilantro before searing. Finish with a larger handful of fresh cilantro and extra lime juice.
Crema-Based Fajitas: Skip traditional sour cream and make a Mexican crema topping by whisking together sour cream (or crema), fresh lime juice, garlic powder, and fresh cilantro. This flavored crema adds brightness and sophistication.
Sheet Pan Fajitas: Toss everything on a large sheet pan with olive oil and seasoning, bake at 425°F for 20 to 25 minutes, stirring halfway through. This requires no stovetop skill and works beautifully for feeding a crowd or for meal prep.
Slow Cooker Fajitas: Add the marinated chicken and all the vegetables (cut into chunks rather than thin strips) to a slow cooker with the spices. Cook on low for 6 to 8 hours or on high for 3 to 4 hours. Add the vegetables at the halfway point if you prefer them to have more texture. The result is more of a fajita mixture perfect for serving over rice or in tortillas.
Shrimp Fajitas: Swap the chicken for large shrimp (peeled and deveined), cut into chunks if they’re very large. Shrimp cooks much faster—only 2 to 3 minutes total, depending on size. The everything else remains the same.
Steak Fajitas: Use skirt steak or flank steak instead of chicken, cut against the grain into thin strips. Sear over high heat for just 2 to 3 minutes—you want the inside slightly pink and rare, as steak can handle this unlike chicken. The cooking method and seasonings are otherwise identical.
Storage and Reheating
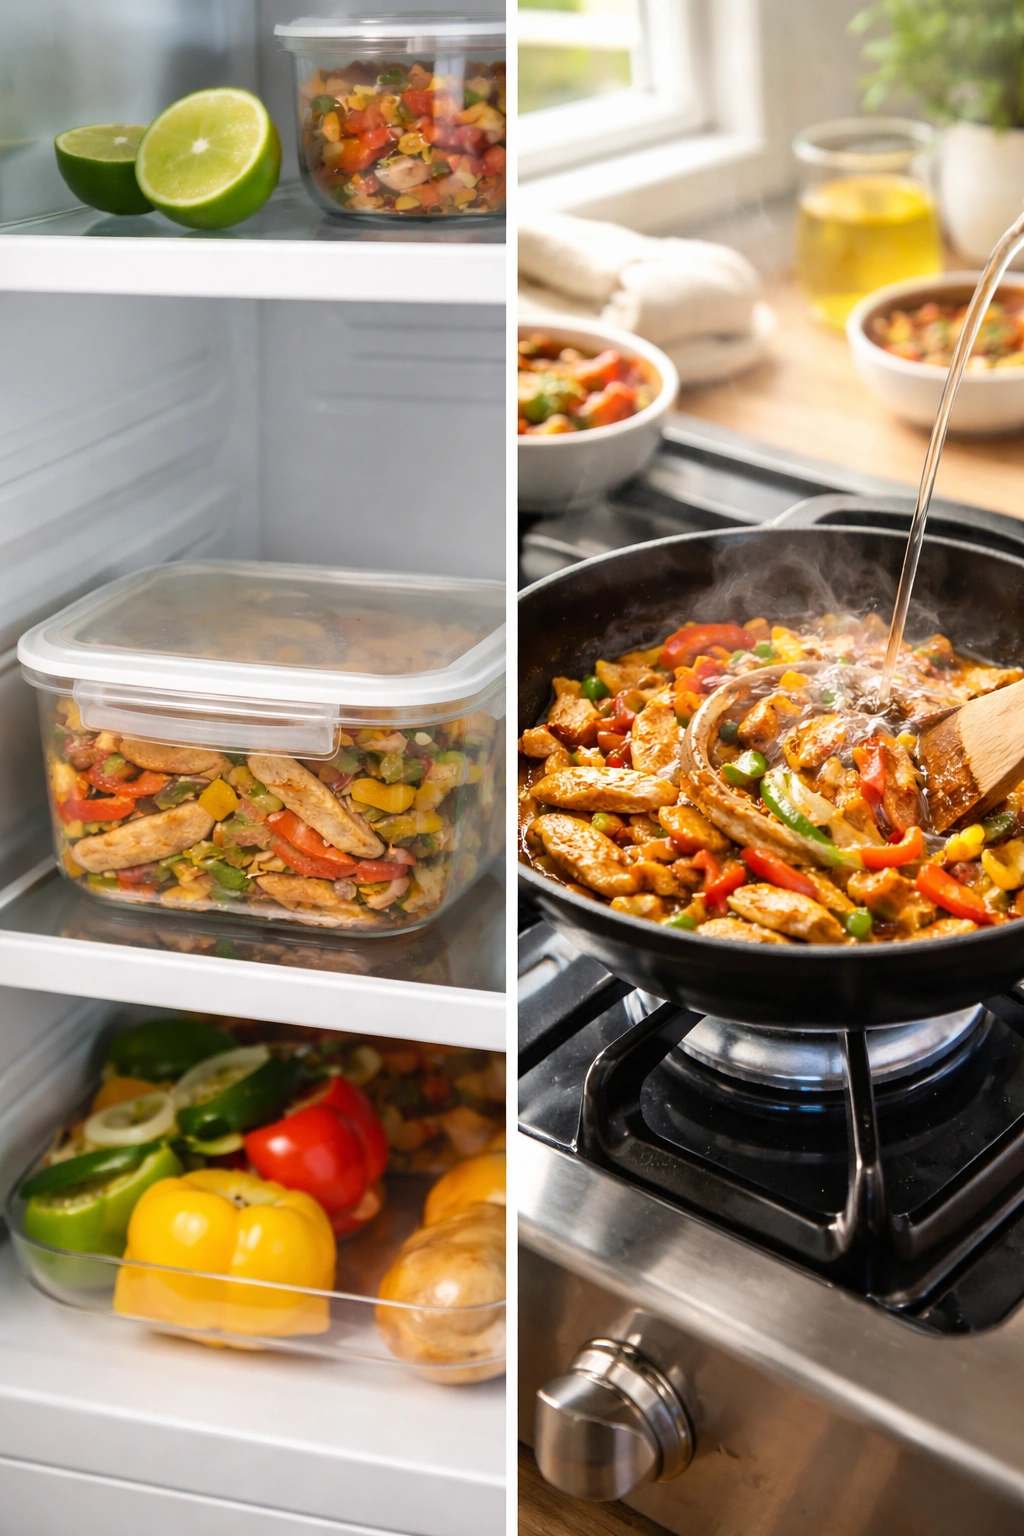
Chicken fajitas don’t keep quite as well as some other dishes because the vegetables lose their textural crunch when reheated. That said, store the cooked chicken and vegetables together in an airtight container in the refrigerator for up to 3 to 4 days. Separate the tortillas and toppings, or store the tortillas wrapped tightly at room temperature for up to a few days.
To reheat: Add the chicken and vegetable mixture to a skillet over medium heat with a splash of water, lime juice, or salsa to prevent it from drying out. Cover with a lid and heat through for 3 to 5 minutes, stirring occasionally. Alternatively, transfer the mixture to a microwave-safe container, add a splash of liquid, cover loosely, and microwave for 1 to 2 minutes, stirring halfway through.
For meal prep: This is actually where fajitas shine. The chicken and vegetable mixture stays fresh and flavorful and reheats beautifully. Make a big batch on the weekend, portion it into containers, and you’ve got quick lunches or dinners throughout the week. Just reheat and add to warm tortillas, or serve over rice for a burrito bowl situation.
Freezing: The chicken and vegetable mixture also freezes beautifully for up to 3 months. Freeze it in an airtight container or freezer bag, and thaw it overnight in the refrigerator before reheating. The vegetables’ texture will be softer after freezing and reheating, but the flavor remains excellent.
Final Thoughts
Chicken fajitas represent something important in home cooking: the intersection of simplicity and sophistication, ease and flavor. You’re not struggling with temperamental techniques or hard-to-find ingredients. You’re working with chicken, peppers, onions, and a handful of spices that probably already live in your pantry. Yet the result tastes special, impressive, restaurant-quality—the kind of dish that makes people ask for the recipe and compliment your cooking.
The beauty here is that once you understand the fundamentals—properly seared chicken, well-caramelized vegetables, balanced seasoning, and fresh lime—you have the foundation to improvise endlessly. Add poblanos, throw in mushrooms, pile on fresh pineapple, swap the protein, change the cooking method. Fajitas are a template that accommodates your preferences, your ingredients, your schedule.
Make these once or twice, and they become automatic. You’ll stop thinking about measurements and start trusting your instincts about heat and seasoning and when the vegetables are perfectly caramelized. You’ll develop your own signature version, your own topping lineup, your own way of serving them. That’s when weeknight cooking becomes confident and joyful rather than stressful. That’s when a simple dinner earned its place in regular rotation.