Growing up, the first time I tasted authentic chicken shawarma from a street vendor in the Middle East, I understood why this dish has conquered menus worldwide. The aroma alone stops people in their tracks—a intoxicating blend of warm spices, charred chicken, and fresh lemon that somehow smells both exotic and impossibly familiar. The tender, juicy meat with crispy golden edges, wrapped in warm flatbread with garlicky sauce and fresh vegetables, became an instant obsession. For years, I thought recreating that magic at home was impossible without a vertical rotisserie and decades of experience. But I’ve discovered something that changed everything: you don’t need specialized equipment or hours of training to make shawarma that tastes every bit as good as what you’d get from a street stand.
The secret isn’t some mysterious technique—it’s understanding the fundamentals that make shawarma work. A truly exceptional marinade, the right cut of chicken, proper heat management, and knowing exactly when to stop cooking so the meat stays juicy rather than dry. Every element matters, but none of them is complicated. This is the kind of recipe that bridges the gap between weeknight simplicity and restaurant-quality results. You’ll use ingredients you likely already have in your pantry, spend maybe fifteen minutes on actual hands-on work, and produce something so impressive that people will assume you’ve been cooking Middle Eastern food your whole life.
What makes this version special is that it honors the authentic traditions of shawarma while embracing the reality of cooking at home. You won’t need to hunt down obscure spices or invest in equipment you’ll never use again. Instead, you’ll work with a straightforward method that delivers those signature charred edges and juicy, deeply seasoned meat that makes shawarma absolutely irresistible. Let me walk you through everything you need to know to make this happen.
What Is Chicken Shawarma, Actually?
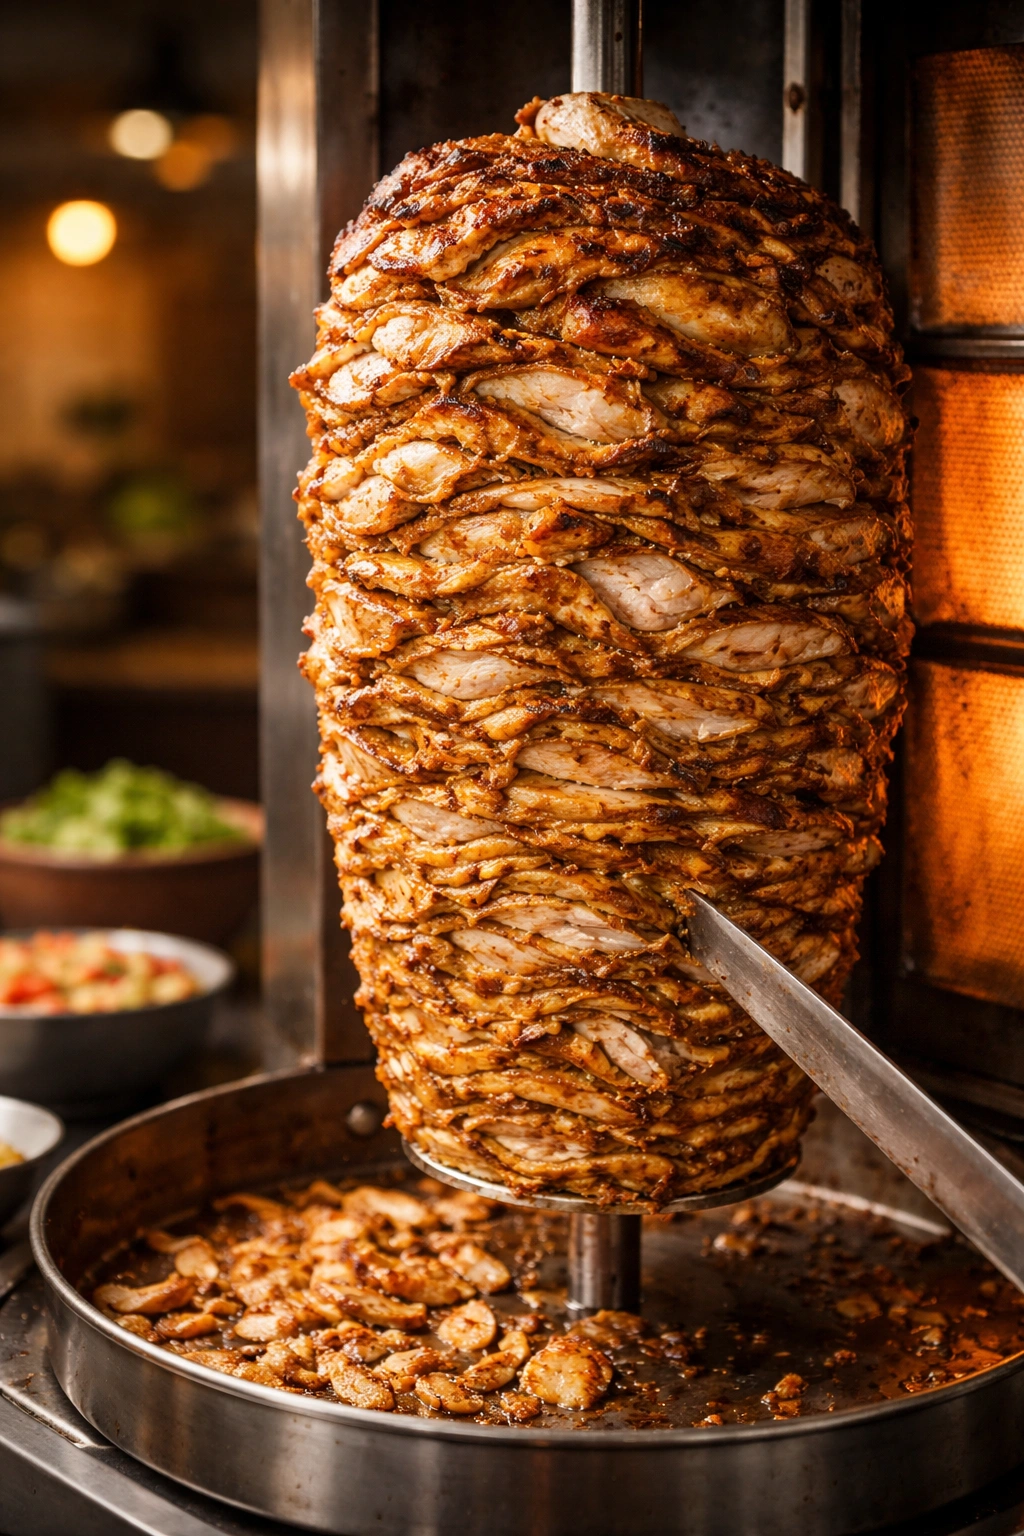
Shawarma originates from the Levantine region of the Middle East and represents one of the world’s most celebrated street foods. Traditional shawarma begins with spiced meat—typically chicken, lamb, beef, or a combination—that’s carefully stacked on a vertical rotisserie called a spit. As this spit slowly rotates, the outer layer of meat gradually crisps and chars while remaining tender and juicy inside, constantly basted in its own rendered fat and the accumulated juices of hours of cooking.
The skilled vendor shaves thin slices from the rotating stack whenever an order comes in, layering them into warm flatbread with fresh vegetables, pickles, and a generous pour of tahini or garlic sauce. It’s simultaneously simple and sophisticated—the product of understanding heat, timing, and the incredible flavor that develops when the right spices meet high heat and patience. Each region has its own version, with distinct spice blends and preferred meat options. Some versions include yogurt in the marinade for extra tenderness, while others keep it purely to oil, lemon, and spices.
The beauty of shawarma is that the fundamental principles work anywhere, with any basic kitchen equipment. You don’t need that rotating spit to build layers of flavor and create the textural contrast between crispy exterior and succulent interior that makes this dish so craveable. Understanding what shawarma actually is—deeply marinated meat cooked with high, direct heat—is the first step toward making it successfully at home.
Why This Recipe Works When Others Don’t
Most homemade shawarma attempts fall short in one critical area: they treat it like just another marinade-and-bake chicken dish. They skip the marinating step, rush the cooking process, or worse, end up with meat that’s tough and dry rather than tender and juicy. This recipe works because it honors the actual methods that make shawarma special, adapted for home cooking rather than compromised by it.
The foundation is marinating long enough for the spices to actually penetrate the meat rather than just sitting on the surface. Studies have shown that meat muscles require time for marinade components to work their way through the protein structure, breaking down connective tissue and allowing flavors to develop deeply throughout. A minimum of one hour makes a difference, but four to twelve hours is where the real magic happens. You’ll notice the chicken becomes noticeably more tender and every piece tastes equally seasoned rather than having a heavily spiced exterior with bland interior.
The cooking method matters just as much as the marinade. Whether you choose stovetop, oven, or grill, the technique focuses on building a caramelized crust—that beloved charred exterior—while maintaining moisture inside. This means using appropriately high heat, not crowding the pan or baking sheet so the chicken steams instead of sears, and understanding the exact moment when the chicken finishes cooking but before it dries out. Most home cooks either undercook chicken because they’re nervous about dryness, or they overcook it trying to get that crispy exterior. This recipe gives you the timing and techniques to nail both simultaneously.
The Shawarma Spice Blend Explained
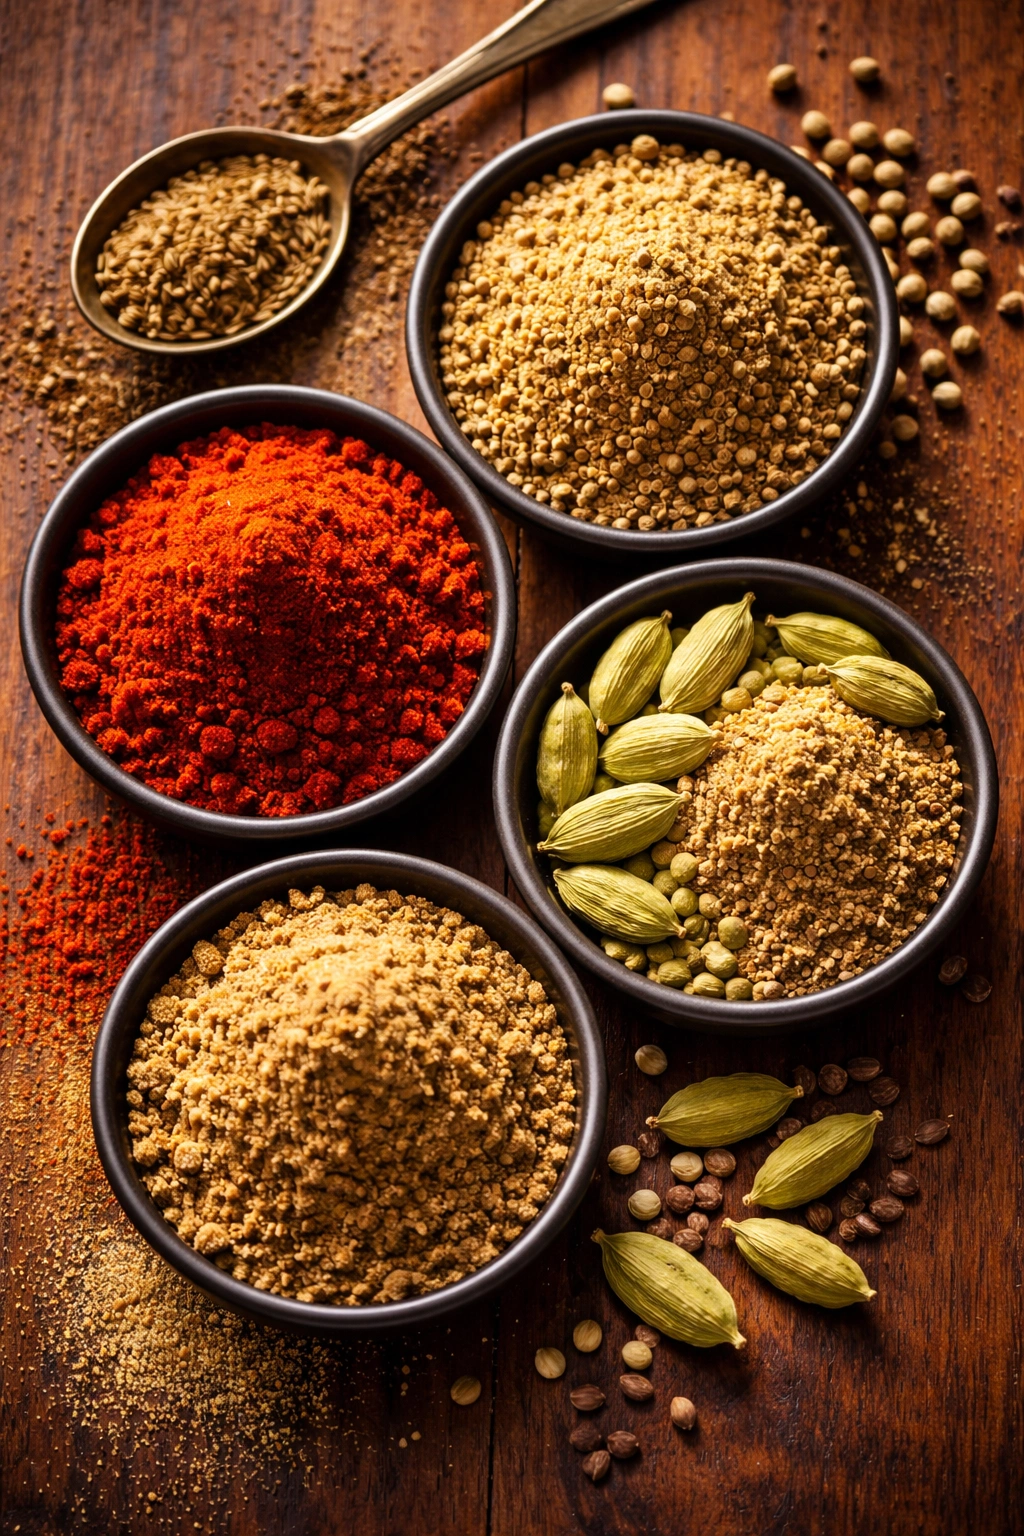
The distinctive flavor of shawarma comes from a specific combination of spices that work together in ways that seem almost magical when you first taste them. Understanding what each spice contributes helps you appreciate why this particular blend became standard across the region and why substitutions rarely produce the same result.
Ground cumin provides the earthy, toasty foundation that immediately signals “Middle Eastern spice blend” to your palate. Cumin contains compounds that are warm and slightly nutty, making up the backbone of nearly every version of shawarma. Ground coriander adds brightness and a subtle citrus quality that prevents the blend from feeling heavy or one-dimensional. Together, cumin and coriander create a balanced base that feels both comforting and exotic.
Smoked paprika (or sweet paprika in some versions) brings color, a gentle sweetness, and subtle smokiness that hints at the charring that happens during traditional rotisserie cooking. This is the spice that gives shawarma its characteristic reddish-brown color and creates depth beyond just heat. Ground cardamom is the spice that often surprises people—a small amount adds a piney, almost mentholated warmth that distinguishes shawarma from other Middle Eastern dishes like kebabs or kofta.
Ground cinnamon in small quantities adds sweetness and complexity without making the dish taste like dessert. It’s a crucial component in authentic shawarma that many home recipes omit, which is why they miss some of that authentic character. Turmeric contributes earthy warmth and additional color, along with compounds that have traditionally been valued for their health properties. Cayenne pepper or crushed red pepper brings heat, but it’s optional and adjustable to your preferences.
The combination of these spices creates a warming, layered flavor profile that tastes completely different from just “spicy chicken.” It’s sophisticated and complex, yet the individual spices are all common pantry staples. You’re not hunting for rare ingredients—you’re creating something extraordinary from everyday components.
Creating the Perfect Marinade
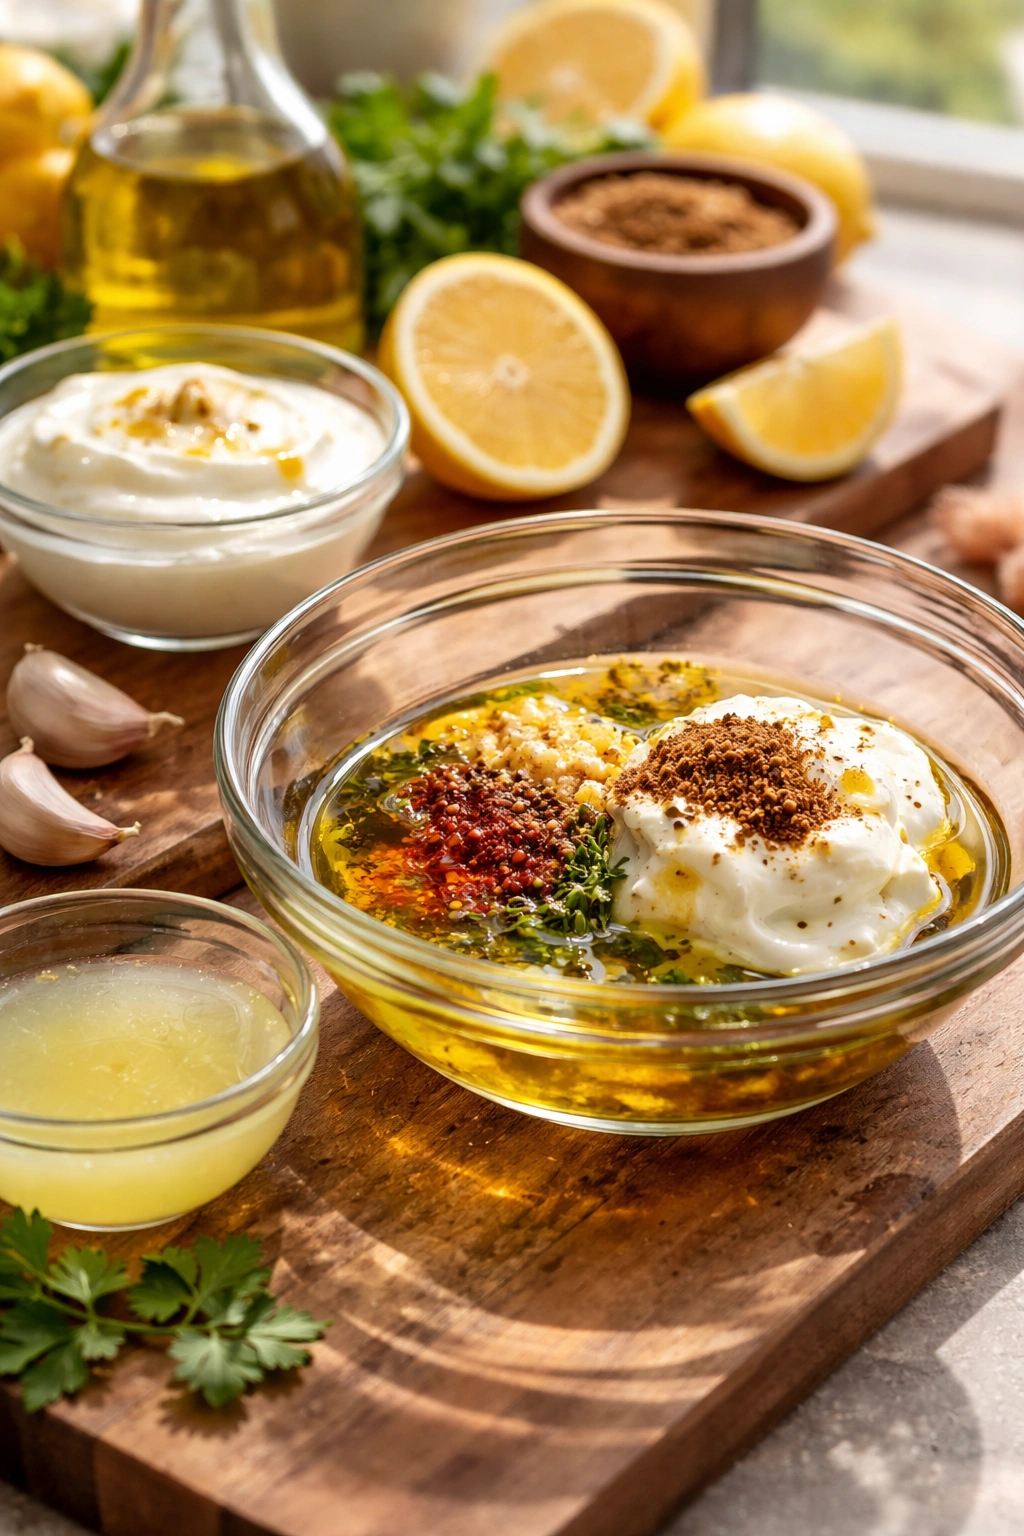
The marinade is where shawarma gets its character and tenderness. Beyond just the spice blend, the liquid components matter tremendously. Fresh lemon juice brings essential acidity that does double duty: it brightens the flavor and helps break down muscle proteins, making the chicken more tender. Never substitute bottled lemon juice—the difference is immediately noticeable, and fresh lemon is the ingredient that sets authentic shawarma apart from mediocre imitations.
Extra virgin olive oil serves multiple purposes in the marinade. It carries fat-soluble flavor compounds from the spices into the meat, prevents the acidic lemon from “cooking” the chicken’s exterior too much, and helps keep the meat moist during cooking. Some traditional recipes include yogurt in the marinade, which acts as an additional tenderizer and adds a subtle tanginess. Greek yogurt or plain yogurt works equally well—choose based on whether you prefer a marinade that’s thick and pasty or thinner and more liquid.
Minced fresh garlic is non-negotiable. Pre-minced garlic, garlic powder, or garlic from a jar simply won’t deliver the same punch. Fresh garlic minced right before mixing brings aromatic compounds that dissipate quickly, so timing matters. The amount might seem like a lot—we’re using four to six garlic cloves depending on size—but garlic is a primary flavor note in authentic shawarma, not a supporting player.
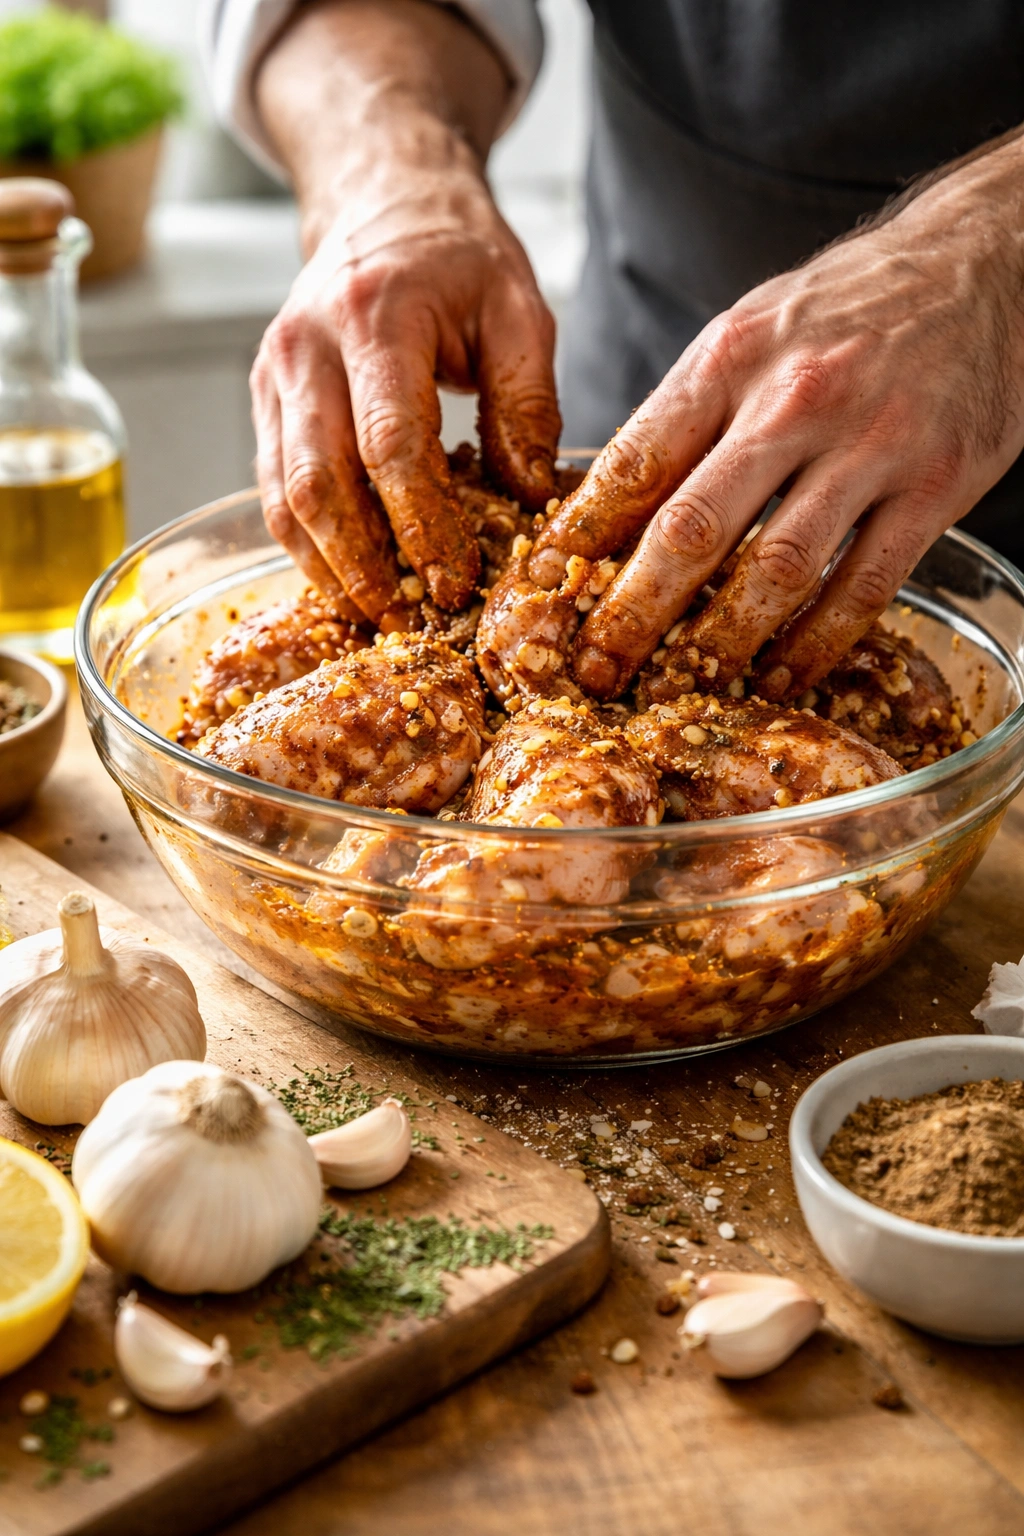
The technique of combining these elements matters too. Whisk the oil, lemon juice, and spices together in a bowl until you create an emulsion—a thick, almost paste-like consistency rather than a thin liquid. This consistency clings to the chicken better during marinating and distributes the spices more evenly. After you add the chicken, massage the marinade into the meat with your hands, ensuring every piece gets thoroughly coated. This extra step takes thirty seconds but makes a noticeable difference in how evenly the flavors develop.
Choosing Your Cooking Method
You have three primary options for cooking marinated chicken shawarma at home: stovetop in a cast-iron skillet, oven roasting, or outdoor grill cooking. Each method produces excellent results with slightly different characteristics, so your choice depends on what equipment you have available, how much time you want to spend actively cooking, and your preference for texture.
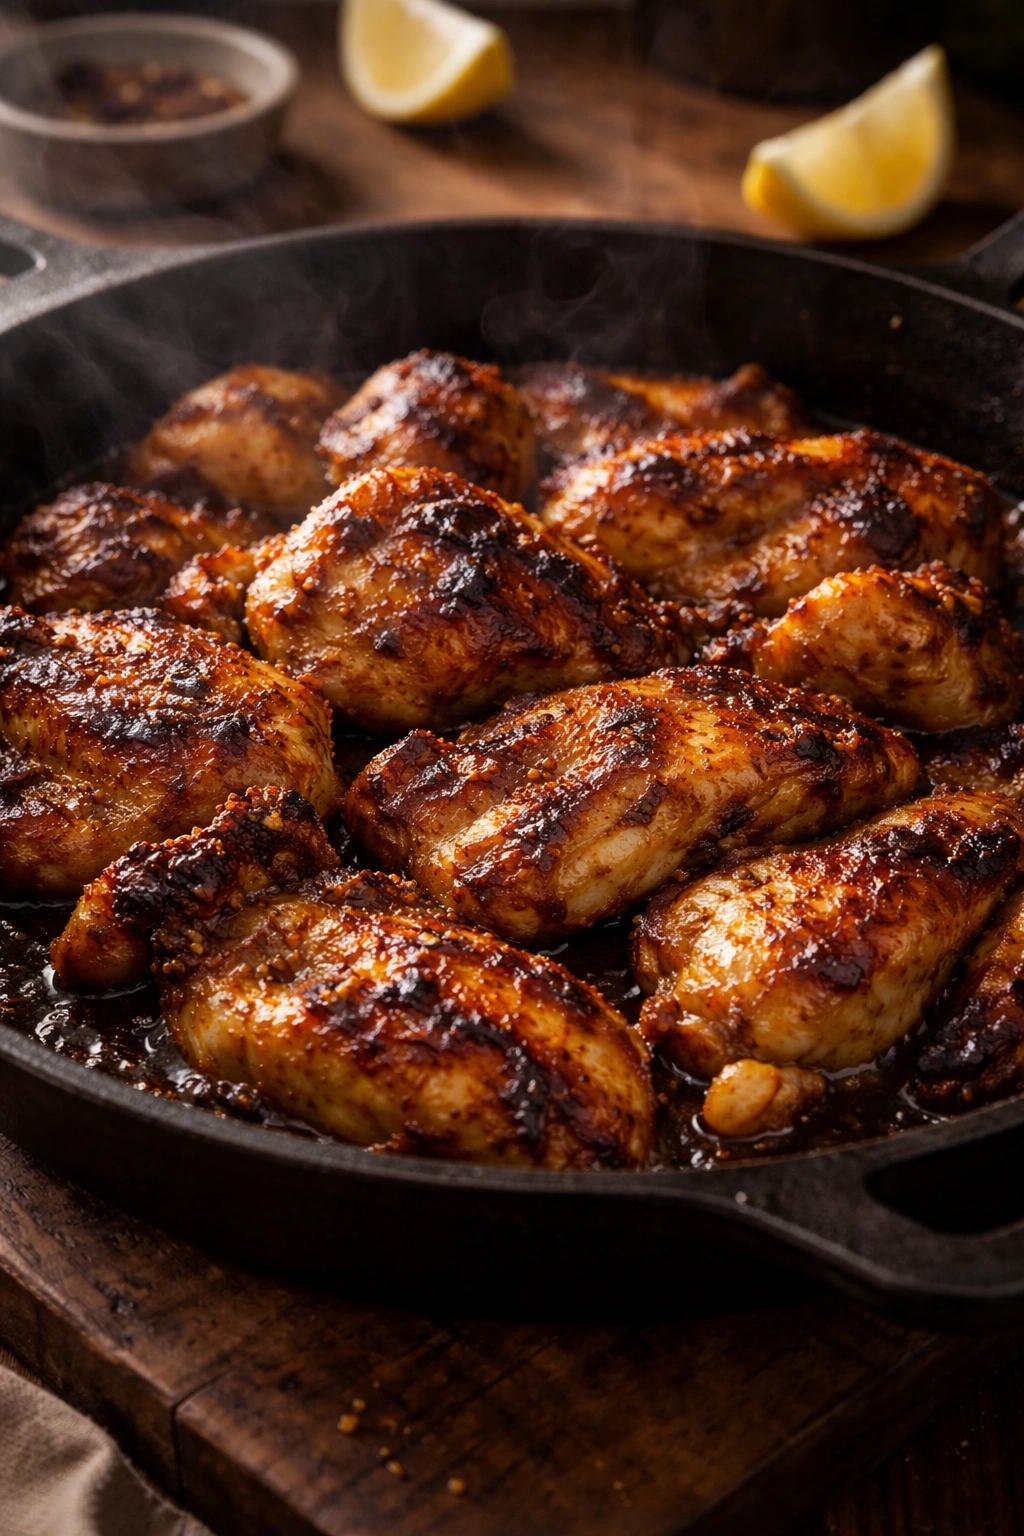
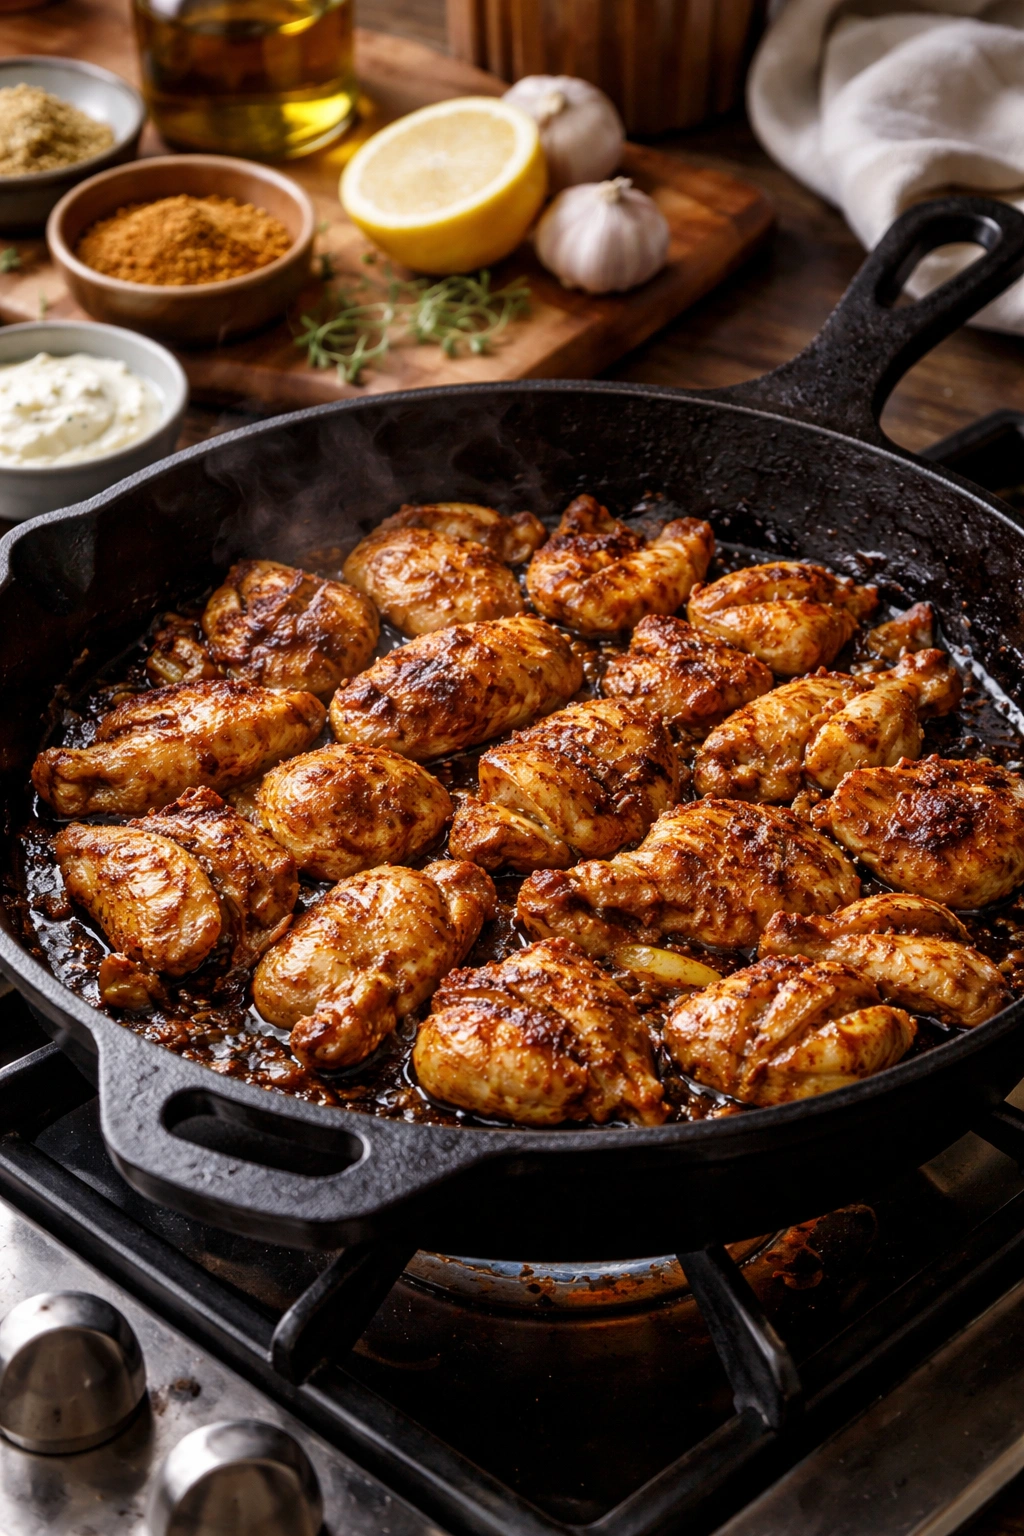
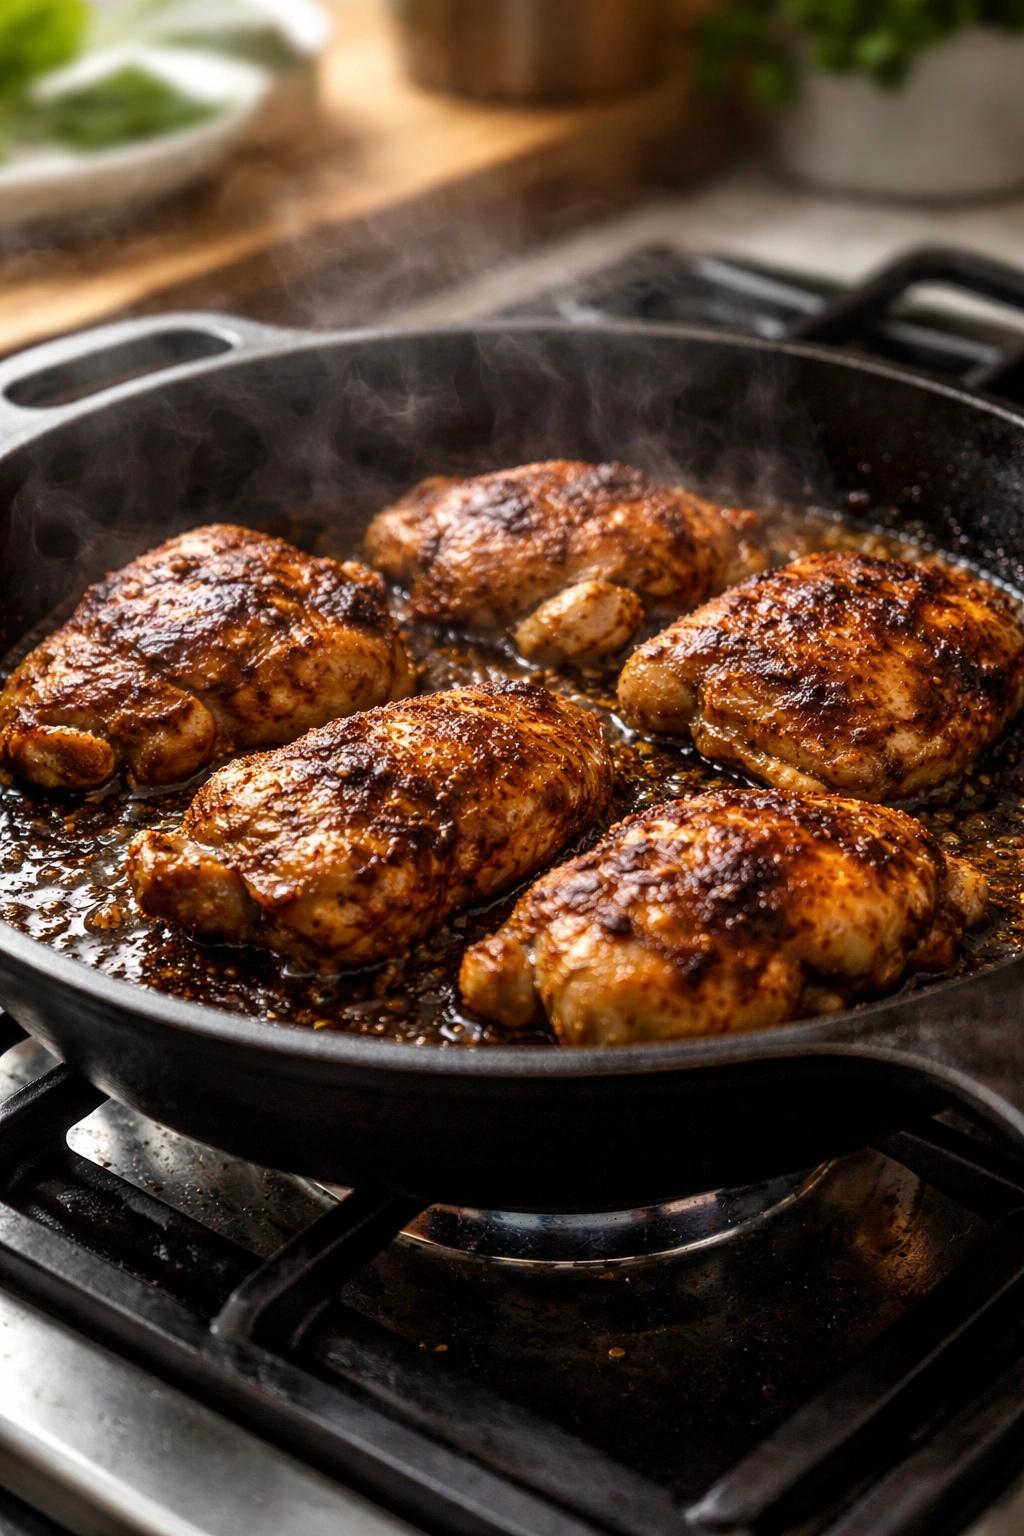
Stovetop cooking offers the most control and creates the deepest, most consistent browning. A heavy cast-iron skillet becomes incredibly hot and maintains that heat even when cold chicken is added to it, which is exactly what you need for a proper sear. You’ll get the most dramatic char and the most authentic texture mimicking a rotisserie’s crispy exterior. The downside is you’ll need to work in batches to avoid crowding the pan, which means more active cooking time and more dishes.
Oven roasting is the most hands-off approach and the easiest when you’re cooking for a crowd. Spread everything on a sheet pan, slide it into a 425°F oven, and walk away for thirty to forty minutes. You’ll get good browning and consistent cooking throughout, with minimal effort or cleanup. The downside is you won’t achieve quite as dramatic a crust as the stovetop method unless you finish with the broiler, which adds a few more minutes of attention.
Grill cooking produces incredible flavor with those signature char marks and smoky undertones that stovetop and oven methods can’t quite replicate. It’s ideal if you have access to an outdoor grill and want to infuse subtle smokiness into the chicken. Like stovetop cooking, it requires more active attention, and you’ll need to be careful not to have flare-ups from dripping marinade and oils.
For most home cooks, I recommend starting with the oven method for your first batch. It builds confidence, produces genuinely excellent results, and requires the least active participation. Once you’re comfortable with the recipe, you can explore the stovetop or grill methods to see which you prefer.
Stovetop Searing Technique
If you’re choosing the stovetop method, success depends on understanding the mechanics of what happens when cold, wet chicken meets a blazingly hot skillet. You need that skillet genuinely hot—not warm, not medium-high, but hot enough that a drop of water immediately sizzles and evaporates on contact. Pat the marinated chicken completely dry with paper towels before it touches the skillet. Any moisture on the surface will release steam and prevent proper browning.
Heat your cast-iron skillet over medium-high heat for at least five minutes before adding chicken. You’ll want the handle to be almost too hot to touch. Add just enough oil to coat the bottom—about one tablespoon. Once the oil shimmers and moves easily across the pan, add the chicken in a single layer without crowding. Work in batches if necessary rather than piling pieces on top of each other. Leave the chicken completely undisturbed for four to five minutes. This is when the magic happens—the exposed surface develops a deeply browned crust through a process called the Maillard reaction, which creates hundreds of new flavor compounds.
After that initial period, flip each piece and cook the other side for three to four minutes until it’s golden brown and the internal temperature reaches 165°F when checked with a meat thermometer. If you have pieces of varied thicknesses, the thinner ones will cook faster, so you might need to remove those and keep the thicker pieces in a bit longer. Transfer cooked chicken to a plate and cover it loosely with foil while you cook remaining batches. This resting period allows juices to redistribute throughout the meat, keeping it moist when you slice or shred it.
Oven Baking Method
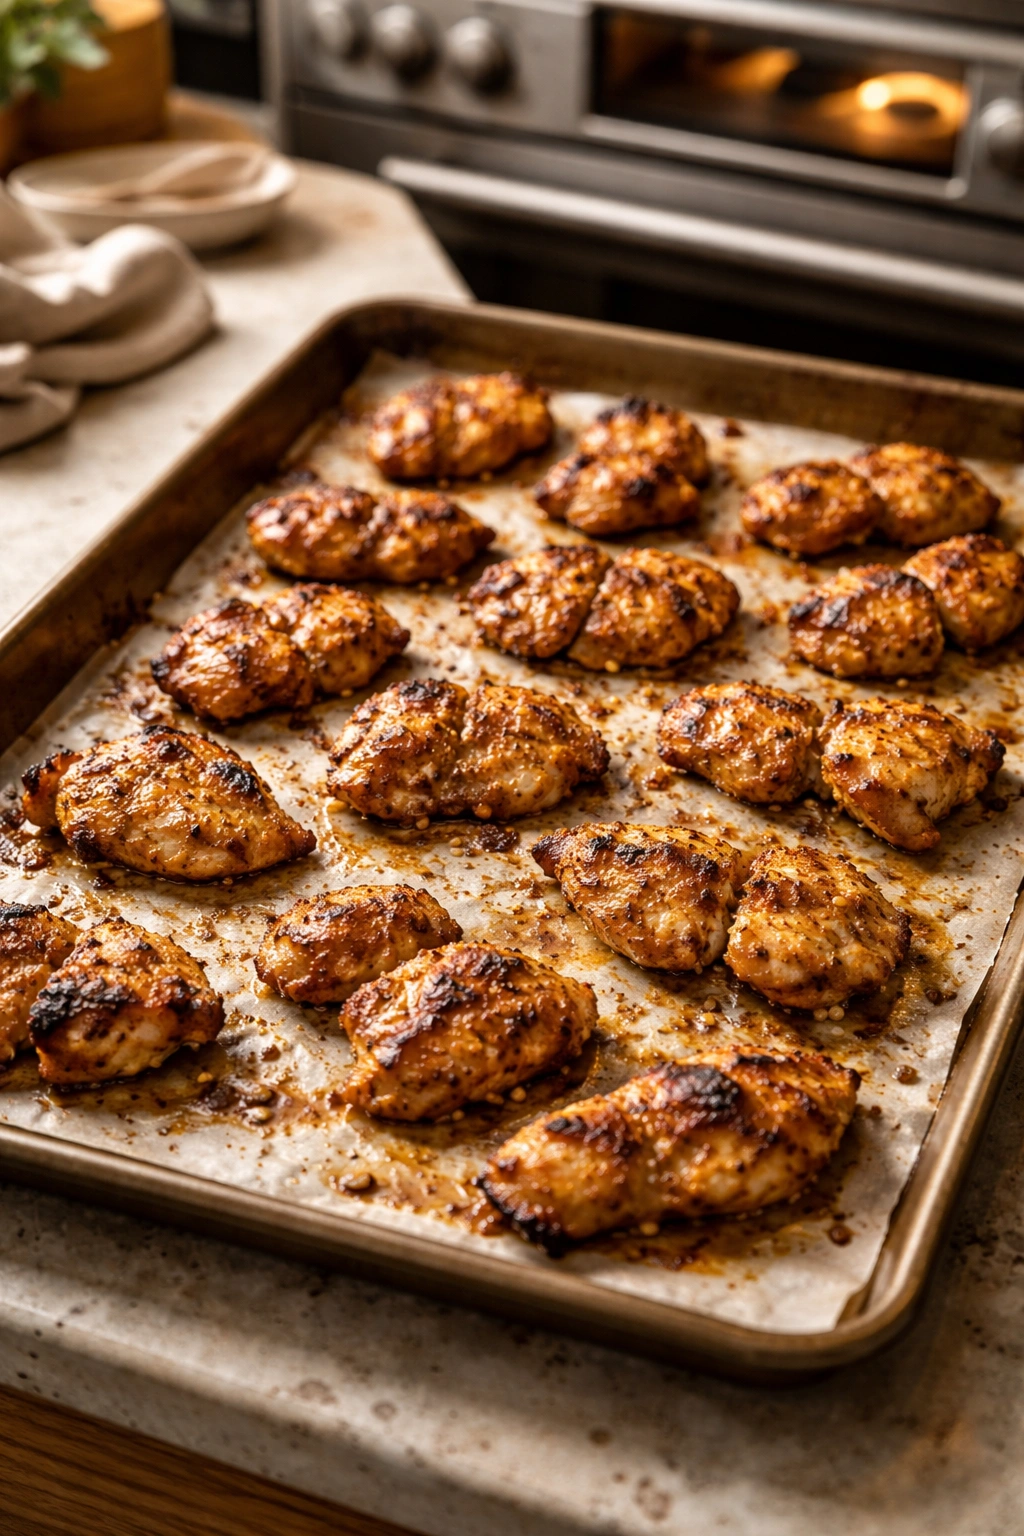
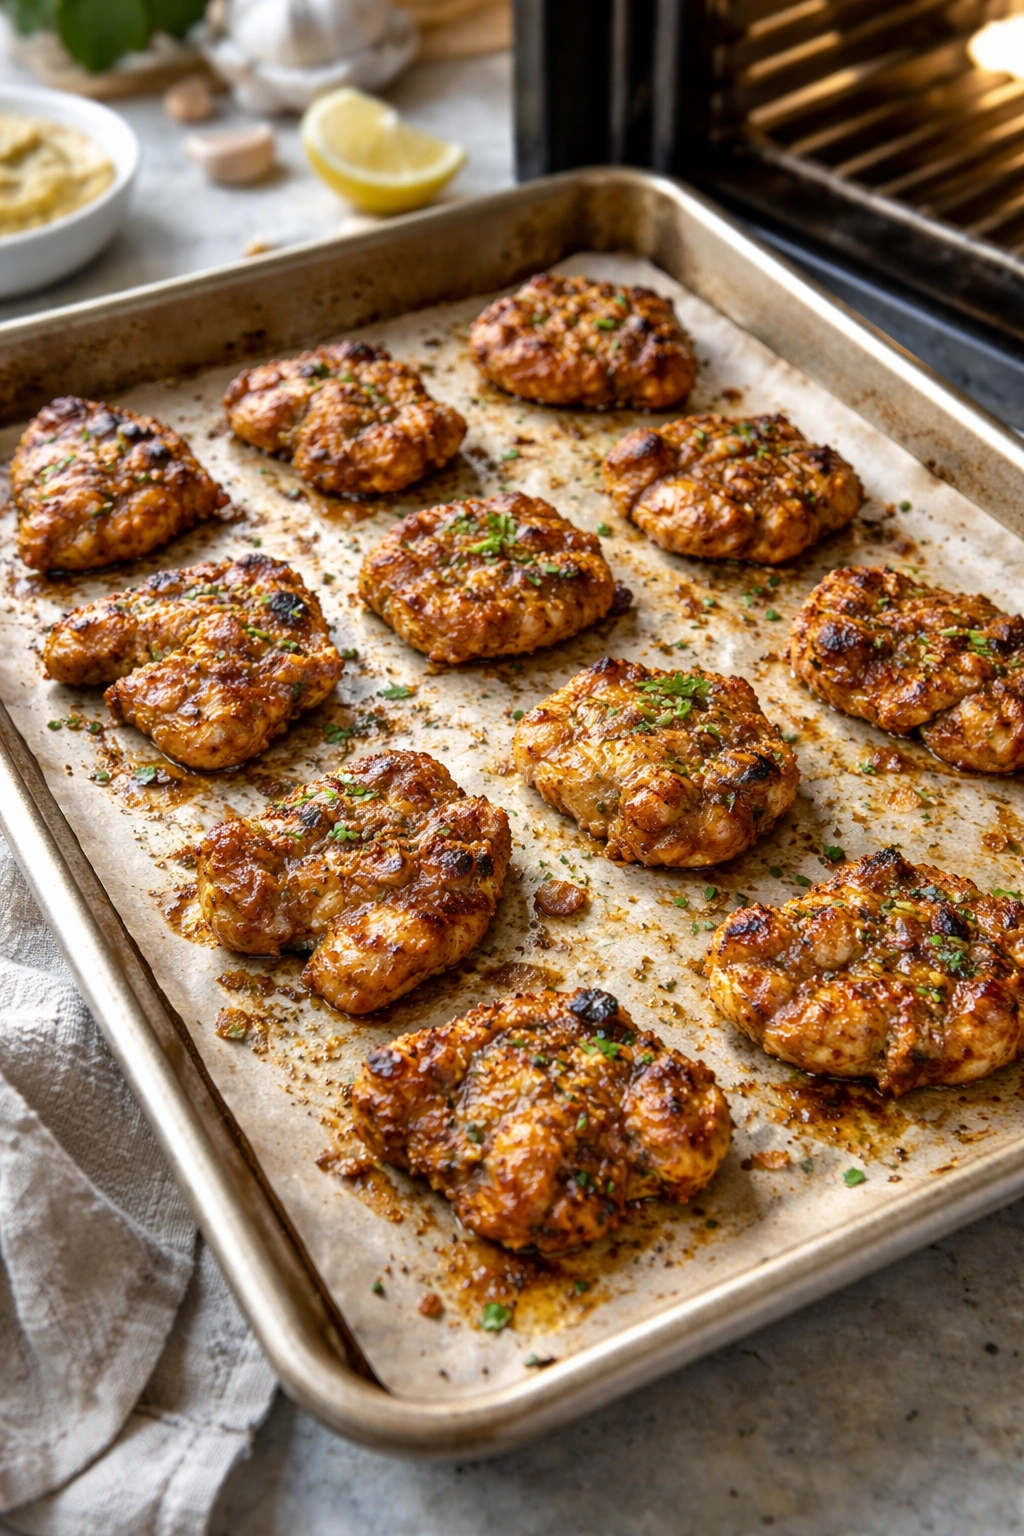
Preheat your oven to 425°F and position the rack in the middle. While it’s heating, pat the marinated chicken and sliced onions dry—any excess moisture will cause steaming rather than roasting. Lightly oil a large rimmed baking sheet and spread the chicken in a single layer with space between pieces. This is important: crowded pans lead to steaming, which produces pale, soft chicken rather than the golden, crispy result you’re after.
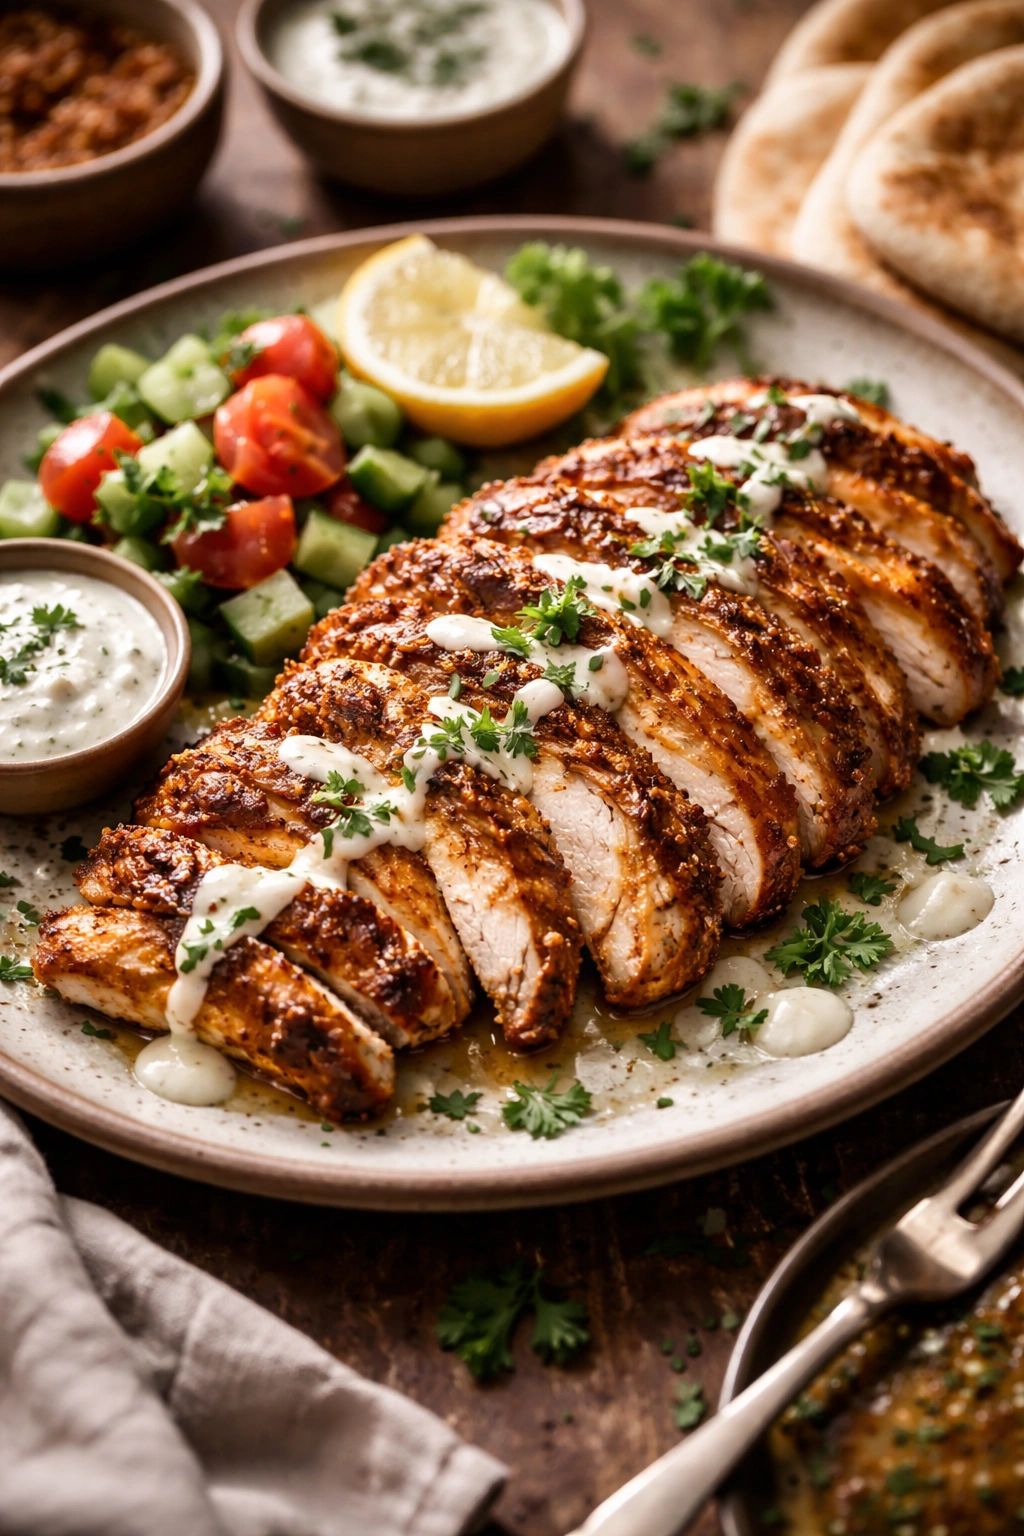
Roast for thirty to forty minutes, depending on the thickness of your chicken pieces and your particular oven. The chicken is done when the internal temperature reaches 165°F at the thickest point. The outer edges should be deeply golden brown, almost caramelized, while the inside remains juicy and tender. If you want more dramatic browning and charring, switch your oven to broil on high during the last three to five minutes, but watch carefully—you want caramelized edges, not burnt chicken. Move the sheet pan to the top rack, about six inches from the broiler element, and broil just until the chicken and onions develop charred spots.
The oven method produces more even cooking than stovetop since all the chicken is at the same distance from the heat source. There’s also the benefit of cooking a larger quantity at once without needing to work in batches. The main consideration is that you won’t get quite as pronounced a crust as the stovetop method creates, which is why the broiler finish is recommended if you want that authentic look and texture.
Grill Cooking Method
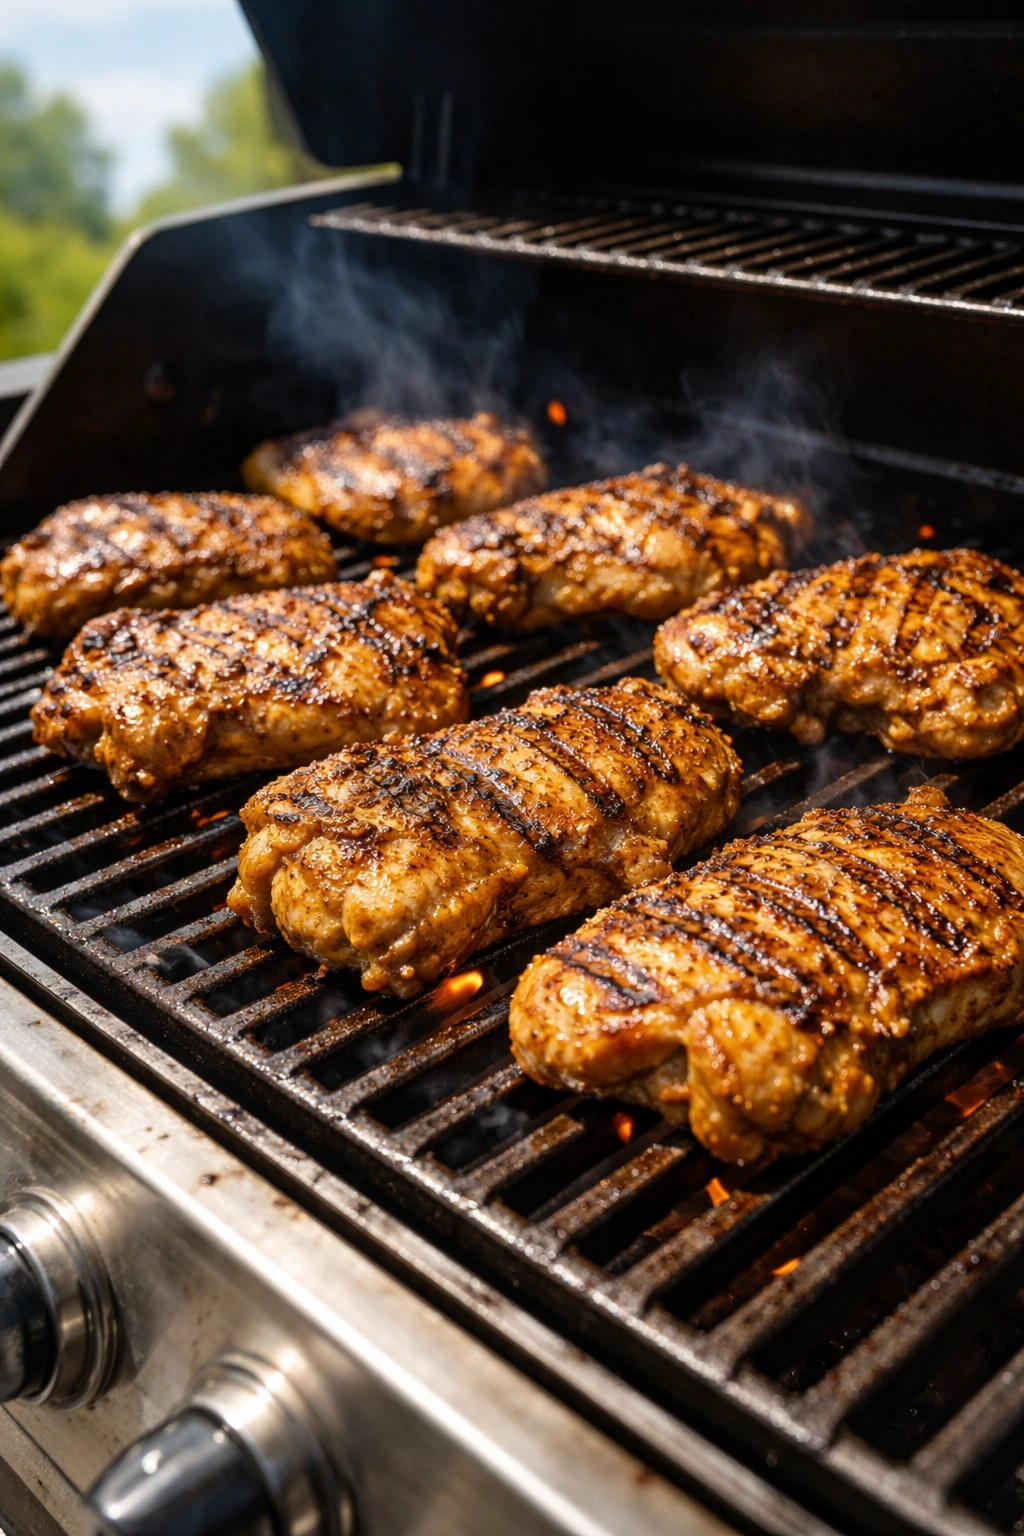
If you’re grilling, preheat to medium-high heat and clean the grates thoroughly. Oil them well using a folded paper towel dipped in oil and wiped across the hot metal—this prevents sticking far better than spraying oil on a cold grill. Pat the marinated chicken dry and place pieces directly on the grates in a single layer.
Close the grill lid and cook for six to eight minutes on the first side without moving the chicken. You want contact with the heat and those distinctive char marks, which won’t develop if you keep flipping. Flip once and cook the second side for another five to seven minutes until the internal temperature reaches 165°F. Chicken thighs are more forgiving than breasts—they stay moist even if you accidentally cook them a minute or two longer, which is why they’re preferred for this method.
Use a meat thermometer or make a small cut into the thickest piece to check for doneness. The meat should be opaque throughout with no pink remaining. If you’re cooking bone-in pieces, they’ll take a few minutes longer. Remove the chicken to a platter and cover loosely with foil for five minutes of resting before slicing or serving.
Tips and Tricks From Real Shawarma Masters
Let the marinade do its job. This is the single most important tip. A minimum of one hour makes a difference, but four to twelve hours is where chicken shawarma truly develops its character. If you’re planning dinner, marinate the night before and you’ll have genuinely authentic flavor. The longer marinating time also means the chicken will be more forgiving during cooking—it’s harder to overcook meat that’s been properly marinated because the acids and oils protect it.
Use chicken thighs, not breasts. This isn’t snobbery; it’s physics. Thighs contain more fat and connective tissue than breasts, which means they stay moist and tender even with high-heat cooking. Breasts are leaner, which is why they dry out so easily. If you prefer to use breasts for dietary reasons, pound them to an even thickness and watch the cooking time carefully—you’ll need just fifteen to twenty minutes in the oven rather than thirty to forty, and you must check the temperature frequently.
Don’t skip the garlic. Traditional shawarma is unapologetically garlicky. Fresh, minced garlic is essential; garlic powder or pre-minced versions from a jar simply won’t deliver the same impact. The amount seems like a lot—four to six cloves for about two pounds of chicken—but this is correct and authentic.
Temperature is your friend. Use a meat thermometer for foolproof results. Chicken is safely cooked at 165°F, but you don’t need to push it higher than 170°F or it will begin drying out. The carry-over cooking that happens during resting is minimal, so you’re safe hitting that target temperature directly.
Rest your chicken before slicing. Let it rest, loosely covered with foil, for five minutes after cooking. This allows muscle fibers to relax and reabsorb juices that moved to the surface during cooking. It’s the difference between chicken that’s juicy throughout and chicken that weeps liquid all over your plate when you slice it.
Common Mistakes and How to Avoid Them
Skipping or rushing the marinade is the most common mistake I see. People want to cook shawarma “quick,” so they marinate for fifteen minutes and wonder why it tastes bland. The marinade needs time to work. If you’re truly pressed for time, at least marinate for thirty minutes at room temperature while your oven heats, but aim for longer whenever possible.
Using wet chicken on a skillet prevents proper browning because the moisture creates steam instead of heat. Always pat marinated chicken dry with paper towels before cooking, even though you’re technically removing some of the marinade. The spices have already penetrated the meat—the wet surface just prevents the crust from developing properly.
Crowding the pan or baking sheet causes the chicken to steam rather than roast. Leave space between pieces so air can circulate and the surface can crisp properly. If you need to cook a large quantity, either use two baking sheets, work in multiple batches on the stovetop, or embrace the oven method at a larger scale.
Cooking without a thermometer leads to either undercooked or overcooked chicken. Visual cues help—the outside should be golden and the juices should run mostly clear—but a meat thermometer removes all guesswork. Even a basic instant-read thermometer is inexpensive and eliminates one of the main reasons homemade shawarma disappoints.
Using cheap lemon juice from a bottle instead of fresh. This is the one ingredient you absolutely cannot compromise on. Bottled lemon juice is oxidized and stale compared to fresh, and the difference in flavor is immediately noticeable in a recipe where lemon is a primary seasoning component.
Flavor Variations to Try
Once you’ve nailed the classic version, experimenting with variations keeps the dish interesting. Add Greek yogurt to the marinade—use about one-third cup mixed with the other ingredients. This creates a creamier marinade that tenderizes the chicken even more dramatically and is especially good if you’re using breasts rather than thighs.
Swap spice ratios to match regional preferences. Some versions emphasize cumin heavily, while others boost the cardamom for a more floral note. If you love cinnamon, add an extra quarter teaspoon. If you prefer less heat, reduce the cayenne or eliminate it entirely. The base spices are flexible—your preferences matter more than perfect authenticity.
Include pomegranate molasses or sumac if you want to add another layer of tangy flavor. Mix a tablespoon of pomegranate molasses into the marinade for subtle fruitiness and additional acidity. Sumac brings a lemony tartness that complements the other spices beautifully. Neither is essential, but both elevate the flavor if you have them on hand.
Try smoked paprika vs. sweet paprika depending on whether you want more smokiness or more sweetness. Smoked paprika creates a richer, more dramatic flavor, while sweet paprika is milder and slightly fruitier.
Marinate with thin-sliced onions included directly in the bowl. This is how some traditional versions are made—the onions absorb the marinade and cook right alongside the chicken, becoming caramelized and intensely flavorful. Use one large onion thinly sliced and include it throughout marinating.
The Recipe
Yield: Serves 4 to 6 | Makes enough for 4 to 6 pita wraps
Prep Time: 15 minutes
Cook Time: 30 to 45 minutes (varies by method)
Marinating Time: 1 hour minimum (4 to 12 hours recommended)
Total Time: 2 to 13 hours (depending on marinating duration)
Difficulty: Intermediate — The recipe involves multiple steps and requires proper marinating time, but each individual step is straightforward and forgiving.
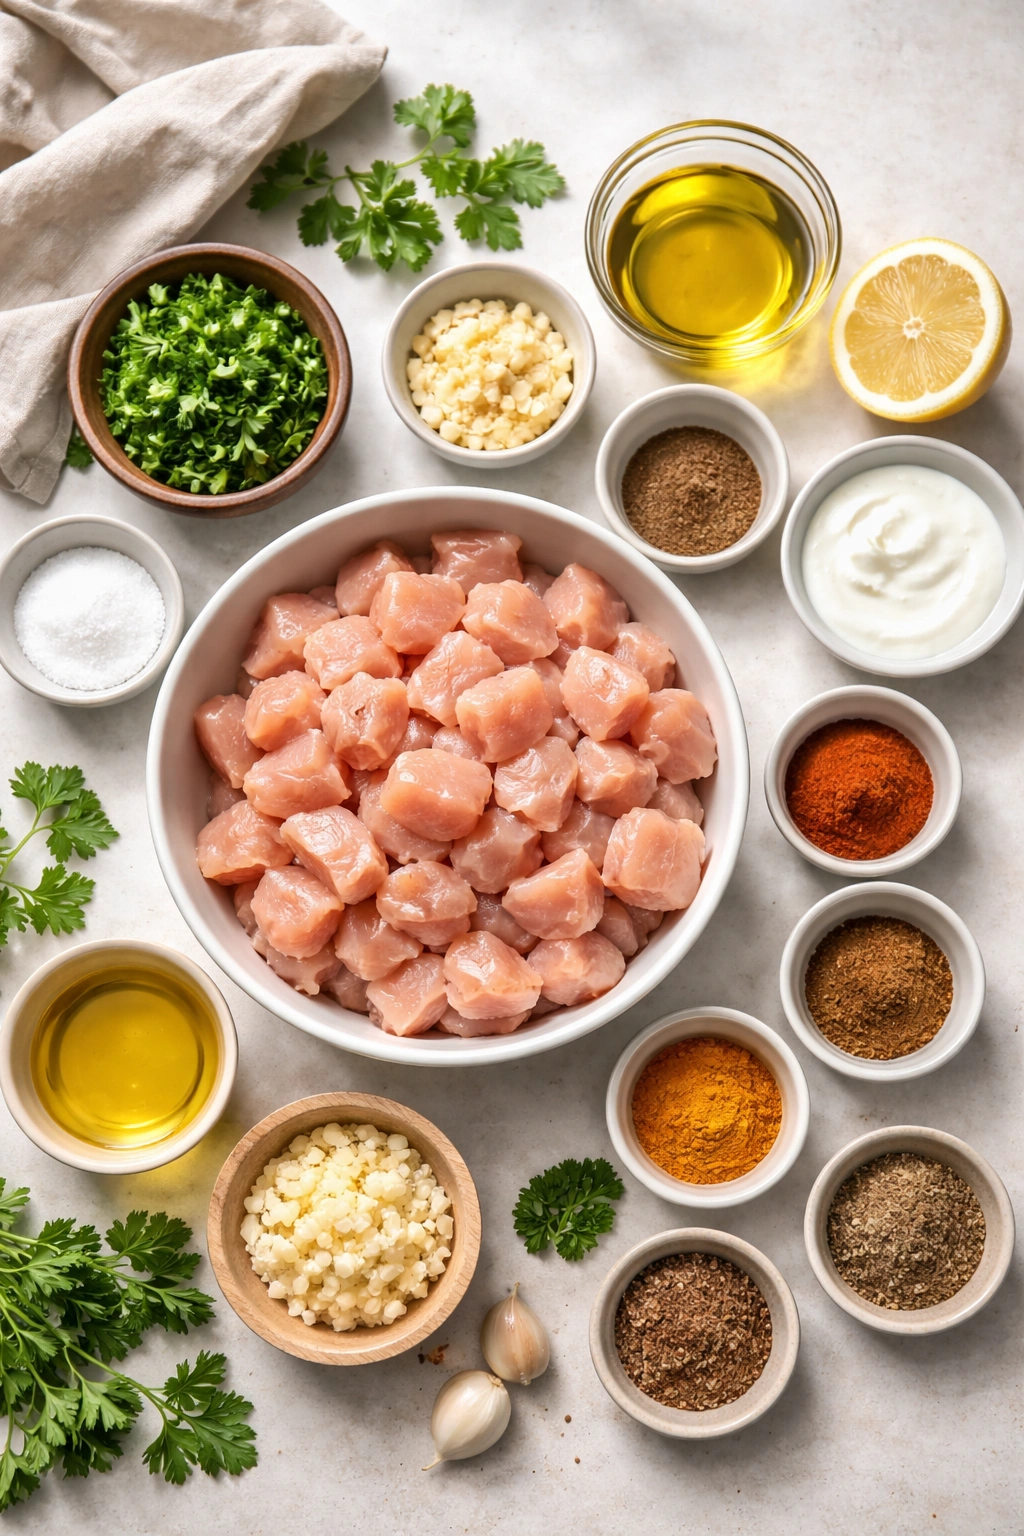
For the Shawarma Marinade:
- 1½ pounds boneless, skinless chicken thighs, cut into bite-sized pieces (or use a combination of thighs and breasts)
- 3 tablespoons fresh lemon juice (from about 1 large lemon)
- ½ cup extra virgin olive oil
- 4 to 6 garlic cloves, minced fresh
- 1½ teaspoons ground cumin
- 1 teaspoon smoked paprika (or sweet paprika)
- ¾ teaspoon ground coriander
- ½ teaspoon ground cardamom
- ¼ teaspoon ground cinnamon
- ¼ teaspoon ground turmeric
- ¼ teaspoon cayenne pepper (optional, adjust for heat preference)
- ¾ teaspoon fine sea salt
- ¼ teaspoon freshly ground black pepper
For Cooking (varies by method):
- 1 to 2 tablespoons additional olive oil (for stovetop or grill)
- 1 large onion, thinly sliced (optional but recommended)
For Serving:
- Warm pita bread or flatbread
- Tahini sauce, garlic sauce (toum), or yogurt sauce
- Fresh tomato slices
- Cucumber slices
- Shredded or chopped fresh lettuce
- Thinly sliced red onion
- Fresh parsley
- Pickles or pickled turnips (optional)
Prepare the Marinade:
-
In a large bowl, whisk together the lemon juice, olive oil, garlic, cumin, paprika, coriander, cardamom, cinnamon, turmeric, cayenne, salt, and black pepper until combined. The mixture should be thick and paste-like rather than thin and watery.
-
Add the chicken pieces and gently toss with your hands, massaging the marinade into each piece to ensure thorough coating. Every piece of chicken must be fully covered in the marinade—use your hands to work it in rather than just stirring with a spoon.
-
If using sliced onion, add it to the bowl now and toss everything together.
Advertisements -
Cover the bowl with plastic wrap or transfer to a large plastic bag, pressing out excess air. Refrigerate for at least 1 hour, but ideally 4 to 12 hours for maximum flavor development. The longer you marinate, the more tender and deeply flavored the chicken will be.
Stovetop Searing Method:
-
Remove the chicken from the refrigerator and allow it to sit at room temperature for 10 minutes before cooking. This ensures more even cooking.
-
Pat the chicken completely dry with paper towels—this is crucial for proper browning.
-
Heat a large cast-iron skillet over medium-high heat for 5 minutes until it’s very hot. You’ll know it’s ready when a drop of water sizzles and evaporates immediately.
-
Add 1 tablespoon of olive oil to the hot skillet and let it shimmer and move easily across the surface—about 30 seconds.
-
Working in batches to avoid crowding, add chicken pieces to the skillet in a single layer. Do not stir or move the chicken for the first 4 to 5 minutes. This undisturbed cooking time allows the surface to develop a deeply browned crust.
-
After 4 to 5 minutes, flip each piece and cook the other side for 3 to 4 minutes until golden brown. The internal temperature should reach 165°F when checked with a meat thermometer in the thickest piece.
-
Transfer cooked chicken to a plate and cover loosely with foil while you repeat with remaining batches, adding an additional tablespoon of oil to the skillet as needed.
Oven Roasting Method (Alternative):
-
Preheat your oven to 425°F (220°C) and position the rack in the center.
-
Pat the chicken completely dry with paper towels.
-
Lightly oil a large rimmed baking sheet and spread the chicken in a single layer with space between each piece. Do not crowd the pan—give each piece room so it can roast rather than steam.
-
Roast for 30 to 40 minutes, rotating the sheet pan halfway through, until the chicken is deeply golden brown on the edges and the internal temperature reaches 165°F. Check the temperature in the thickest piece to ensure it’s fully cooked.
-
Optional: For more dramatic browning and charring, switch the oven to broil on high during the last 3 to 5 minutes, moving the sheet pan to the top rack about 6 inches from the broiler element. Watch carefully to prevent burning.
Grill Cooking Method (Alternative):
-
Preheat your grill to medium-high heat and clean the grates thoroughly.
-
Oil the grates well using a folded paper towel dipped in oil.
-
Pat the chicken completely dry with paper towels.
-
Place chicken pieces directly on the grates in a single layer. Close the lid and cook undisturbed for 6 to 8 minutes to develop char marks and browning.
Advertisements -
Flip the chicken and cook the second side for 5 to 7 minutes until the internal temperature reaches 165°F in the thickest piece.
-
Transfer to a platter and cover loosely with foil.
Rest and Serve:
-
Allow the cooked chicken to rest, loosely covered with foil, for 5 minutes. This resting period allows juices to redistribute throughout the meat, ensuring maximum tenderness and juiciness.
-
Slice the chicken thinly against the grain, or cut into chunks depending on how you plan to serve it.
-
Serve immediately with warm pita bread, your choice of sauce, fresh vegetables, and toppings.
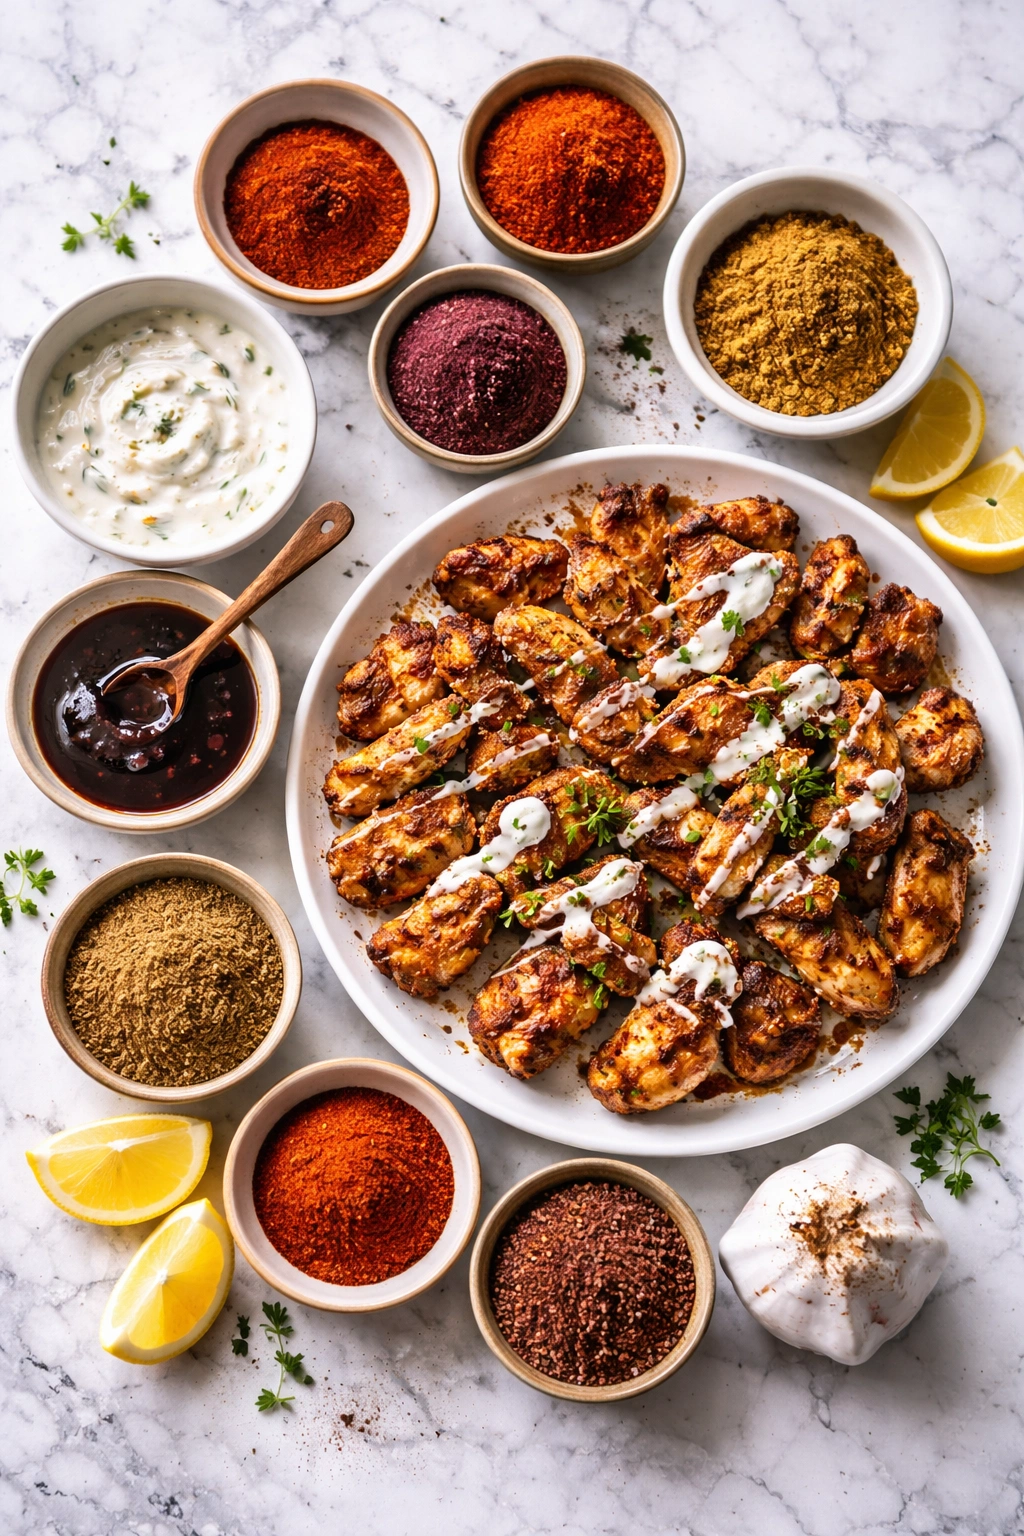
Serving Your Shawarma
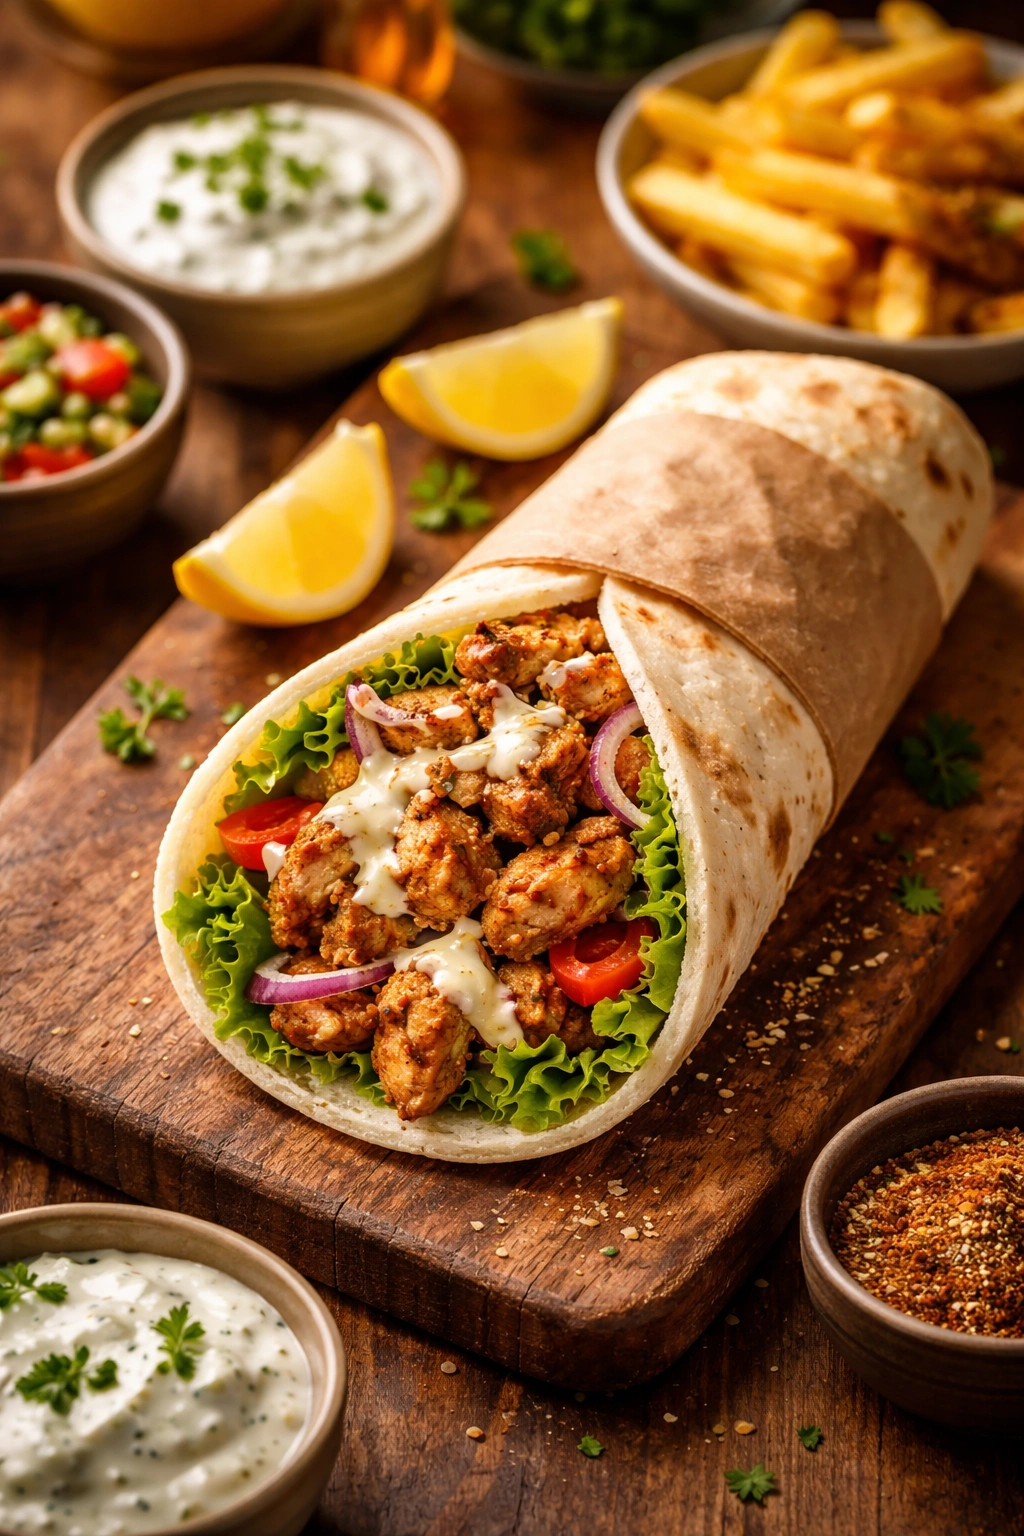
The beauty of shawarma is its flexibility—you can serve it as a wrapped sandwich, in a bowl over rice, on a platter for sharing, or even as an appetizer. For the classic wrap presentation, warm a piece of pita bread in the microwave for 15 seconds or in a dry skillet. Spread a generous dollop of tahini sauce, garlic sauce, or yogurt sauce onto the bread. Layer with shredded lettuce, sliced tomato, cucumber, thinly sliced red onion, and fresh parsley. Add a generous portion of the sliced chicken shawarma and roll tightly.
For a shawarma bowl, start with a bed of rice (plain, saffron-flavored, or herbed), add the warm chicken shawarma, and top with fresh vegetables and a drizzle of your favorite sauce. This version is great for meal prep since you can store components separately and assemble fresh bowls throughout the week.
For a sharing platter, arrange the sliced chicken on a large serving board alongside warm pita bread, fresh vegetables, pickles, olives, and bowls of various sauces. Let everyone build their own wraps according to preference—this is festive and interactive, perfect for feeding a group.
Garlic sauce (toum) is the traditional accompaniment and worth making fresh if you have time. Blend six to eight minced garlic cloves with ⅓ cup fresh lemon juice, one-third to one-half cup neutral oil (like light olive oil or vegetable oil), and salt. The garlic and lemon emulsify with the oil as you blend, creating a creamy, pungent sauce that’s absolutely essential to authentic shawarma. If making fresh sounds like too much, quality store-bought versions are readily available and save significant time.
Tahini sauce (tahini stirred with water, lemon juice, and garlic until creamy) is another traditional option. Yogurt sauce made from Greek yogurt, minced garlic, lemon juice, and salt works beautifully if you want something less assertive than traditional garlic sauce.
Storage and Make-Ahead Strategy
Cooked chicken shawarma stores beautifully in the refrigerator for up to four days in an airtight container. For the best texture when reheating, warm it gently in a skillet over medium heat with a splash of water or oil, stirring occasionally until heated through—about three to five minutes. Avoid the microwave if possible, as it tends to dry out the meat more than stovetop reheating.
You can also freeze cooked chicken shawarma for up to two months. Portion it into freezer bags or containers and thaw overnight in the refrigerator before reheating. The texture will remain excellent as long as you thaw it slowly in the fridge rather than at room temperature.
The make-ahead advantage of this recipe is that you can marinate the raw chicken for up to twelve hours in advance. Simply mix the marinade, add the chicken and onions, cover, and refrigerate. When you’re ready to cook, all the hard work is already done—just pat it dry, cook, and serve. You can even marinate and freeze the chicken together in a freezer bag. As it thaws overnight in the refrigerator, it simultaneously marinates, which means defrosted chicken is ready to cook immediately.
If you’re cooking for a crowd, prepare the chicken several hours ahead, cool it completely, and store it in an airtight container. About fifteen minutes before serving, reheat gently in a skillet with a splash of water until warm throughout. This approach allows you to do all the cooking ahead of time while still serving hot, fresh-tasting shawarma. The chicken is best sliced while warm, so do that final step right before serving rather than slicing and storing, which can dry it out.
Final Thoughts
Making chicken shawarma at home that rivals authentic street vendor versions comes down to respecting the fundamentals: a genuinely great marinade given enough time to work, the right cut of chicken that forgives slightly imperfect cooking, and proper technique for browning without drying. None of these elements is complicated individually, but together they create something genuinely extraordinary.
The first time you make this recipe, give yourself permission to take the time the process asks for. Marinate overnight if you can, use fresh lemon and fresh garlic without shortcuts, and invest in a meat thermometer so you remove the guesswork. These aren’t fancy professional techniques—they’re just choosing quality ingredients and taking time over rushing. That’s honestly the difference between shawarma that tastes okay and shawarma that stops people mid-bite and makes them ask for your recipe.
Once you’ve made this a few times, you’ll develop intuition about the spices and cooking times specific to your kitchen. You’ll start tweaking the spice ratios based on what you like, maybe adding extra cardamom or reducing cayenne. That’s exactly how it should be. This recipe is your starting point, not a rigid rulebook. Build confidence by following it closely the first time, then make it your own in whatever ways bring you joy. That’s how dishes become part of your regular rotation rather than something you attempt once and forget about—when they feel like yours rather than someone else’s instructions.