Making pad Thai at home doesn’t have to mean spending your entire evening in the kitchen. If you’ve been intimidated by this beloved Thai stir-fry, thinking it requires special equipment or hard-to-find ingredients, I have good news: a genuinely delicious, restaurant-quality pad Thai can be on your table in just 20 minutes. The key isn’t some cooking magic—it’s understanding which shortcuts actually work and which corners you should never cut.
I used to order pad Thai almost every other week because I’d convinced myself it was impossible to replicate at home. The sauce seemed too complex, the timing too precarious, and the technique too specialized. But after making this dish dozens of times and testing it at different speeds, I’ve discovered that pad Thai is actually one of the easiest weeknight meals you can prepare. It comes together fast, uses straightforward ingredients, and tastes genuinely fantastic when you know exactly what to prioritize.
The difference between a mediocre rushed pad Thai and an exceptional one doesn’t come down to fancy technique or exotic ingredients—it comes down to smart planning and understanding how each component works together. You prep while your noodles soak, build your sauce once, and then it’s just a matter of coordinated stir-frying. The whole operation feels less like cooking and more like assembly once you understand the rhythm.
What Is Pad Thai and Why It’s Perfect for Quick Weeknight Dinners
Pad Thai is a stir-fried noodle dish that balances four distinct flavor profiles: sweetness, sourness, saltiness, and umami depth. It’s built around thin, flat rice noodles combined with your choice of protein (traditionally chicken, shrimp, or tofu), scrambled eggs, fresh vegetables, and a signature sauce that makes the entire dish sing. What makes it such an appealing choice for busy home cooks is that every component cooks incredibly fast—nothing needs to simmer, braise, or spend time in the oven.
The dish originated as a popular street food in Thailand and became the country’s national dish in the 1930s when it was distributed as an inexpensive, nutritious meal. Today, it’s one of the most recognizable Thai dishes served at restaurants worldwide. The beautiful part is that what makes it so appealing in a Thai restaurant—the quick, high-heat stir-frying—also makes it ideal for home cooking on a busy weeknight.
When you’re working with just 20 minutes total, you’re not fighting against the clock because pad Thai is inherently a fast dish. Rice noodles don’t require boiling; they just need a hot-water soak. Your protein, whether it’s delicate shrimp, thin-sliced chicken, or tofu, cooks in minutes at high heat. The vegetables are cut small and added near the end so they stay crisp. It’s a genuinely efficient meal from start to finish.
The Secret to 20-Minute Pad Thai Is Advance Preparation
The real secret to making pad Thai in 20 minutes isn’t discovering some revolutionary cooking technique—it’s understanding that your actual cooking time is only about 10 minutes. The remaining 10 minutes is almost entirely prep work and soaking time, which means you can and should do most of your preparation before you turn on the heat.
Read through the entire recipe first. This isn’t just good practice; it’s essential when you’re working against the clock. You need to know exactly what you’re making before you start chopping your first ingredient. Set up your workspace so that everything you’ll need is within arm’s reach of the stove—your cut vegetables, your protein, your sauce ingredients, and your noodles.
This approach of preparing everything in advance before any cooking begins is called mise en place, a French culinary term that translates to “everything in its place.” It’s not fancy or complicated, but it’s transformative when you’re trying to cook fast. The difference between panicked, frantic stir-frying and calm, controlled cooking is often just whether you’ve prepped everything ahead of time.
Choosing the Right Rice Noodles for Maximum Success
Not all rice noodles are created equal, and this matters significantly when you’re working with a tight time constraint. Pad Thai traditionally uses thin, flat rice noodles that are roughly 1/4 inch wide (about 2-3 millimeters). These are sometimes labeled as “rice stick noodles,” “banh pho,” or “pad Thai noodles” depending on the brand. The thickness is important because thin noodles will soften quickly during the brief soak and won’t break apart as easily during stir-frying.
Avoid very thick rice noodles, which can take too long to soften and may need boiling rather than soaking. Similarly, skip the ultra-thin vermicelli noodles, which are so delicate they’ll turn to mush if you look at them wrong. Look for a brand like Chang’s, Thai Kitchen, or a well-reviewed Asian brand available at most supermarkets. The packaging often shows a picture of the finished dish, which helps confirm you’re buying the right thickness.
One important technique: soak your noodles in hot water rather than boiling them. Place your noodles in a shallow pan or large bowl, cover them completely with boiling water, and let them sit for about 5 to 7 minutes, stirring occasionally so they don’t stick together. They should be tender enough to bend without cracking but still with a slight chew—they’re going to cook a bit more when they hit the hot pan. Don’t leave them sitting in water for much longer than that, or they’ll get mushy. As soon as they’re al dente, drain and rinse them under cold water to stop the cooking process.
The Essential Pad Thai Sauce Components
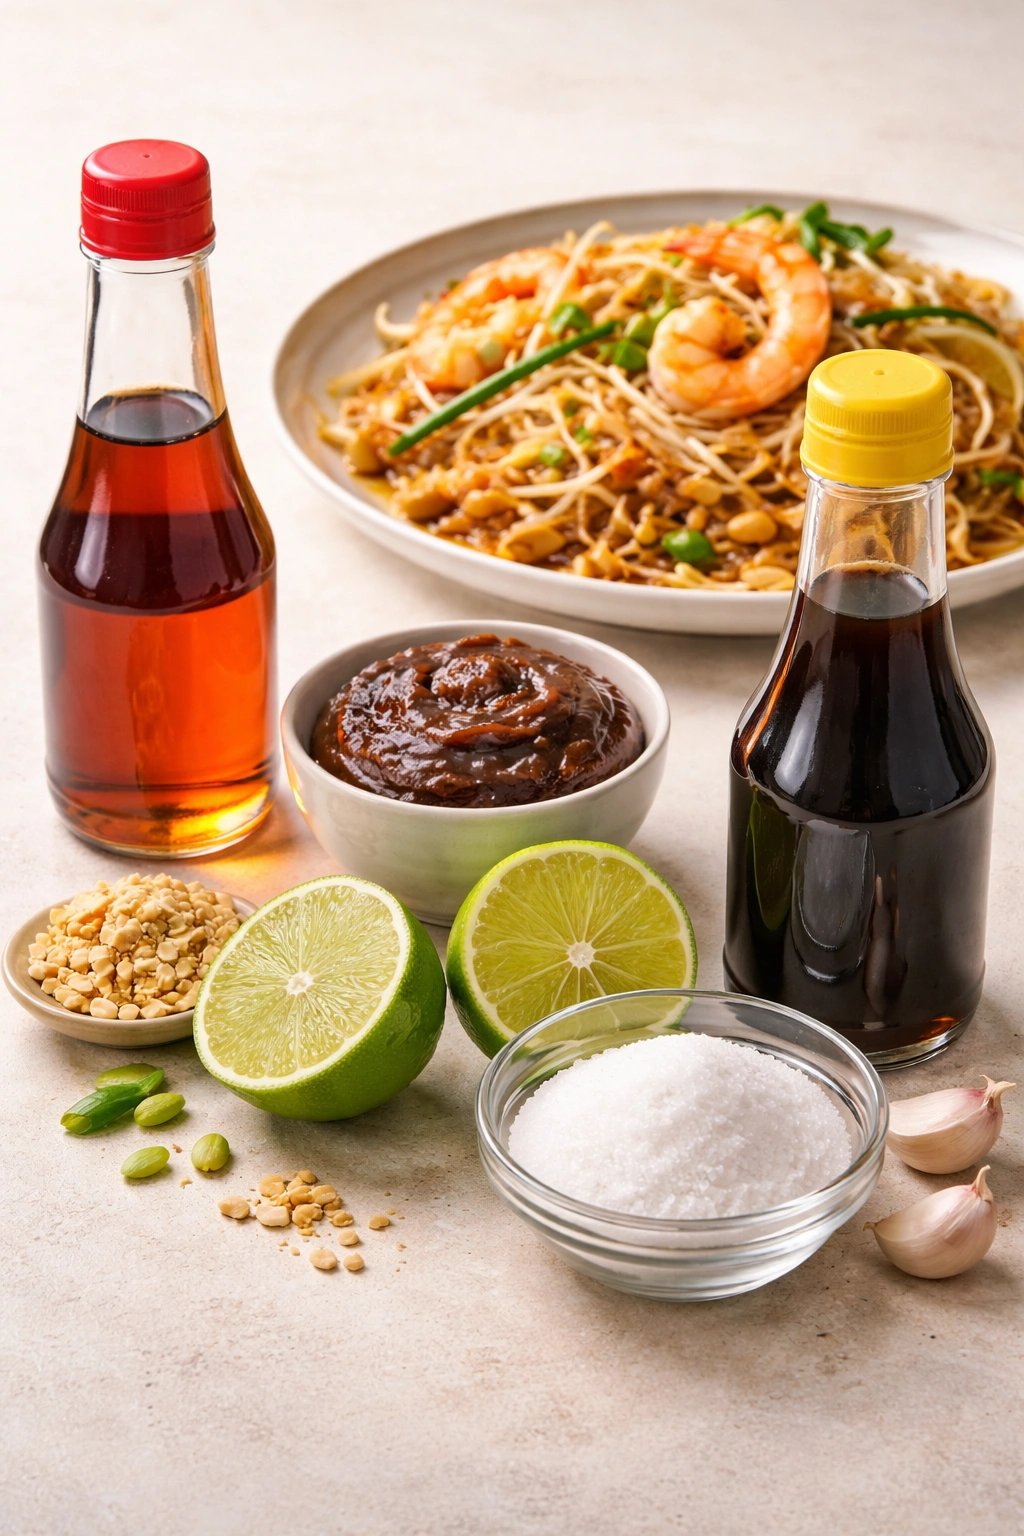
The sauce is where pad Thai gets its soul, and this is absolutely not the place to rush or skip ingredients. Authentic pad Thai balances four distinct tastes, and each element matters. The sauce typically includes fish sauce (for saltiness and umami), something sweet (traditionally palm sugar, but brown sugar works beautifully), something sour (tamarind, lime juice, or rice vinegar), and oyster sauce for additional depth.
Fish sauce is the most intimidating ingredient for newcomers, but it’s genuinely essential. Yes, it smells intense and funky when you first open the bottle—I’d describe it as vaguely fishy with a salty edge. But when it’s combined with the other sauce components and tossed with the noodles, it transforms into something addictive and delicious. It adds umami depth that you absolutely cannot replicate with soy sauce alone. Use a brand with anchovy listed in the ingredients, like Red Boat or Thai Kitchen brand, both of which are widely available.
Brown sugar is your sweetness component and works just as well as traditional palm sugar for this purpose. The sweetness isn’t meant to make the dish dessert-like; it’s meant to balance the sourness and saltiness. Don’t be tempted to reduce the sugar significantly—the balance of all four tastes is what makes pad Thai special, and removing the sweet component throws off the entire harmony.
For the sour component, you have several options. Tamarind is the most authentic choice and gives a distinct, rounded sourness that’s different from lemon or lime. If you can find tamarind puree (a thick paste sold in jars at most Asian markets or supermarkets), use about 1.5 tablespoons. If you can only find tamarind concentrate, it’s more potent—use about 1 tablespoon and adjust to taste. Rice vinegar is a more accessible substitute and works well, though the final flavor will be slightly different. White vinegar is too sharp and acidic; avoid it. Some recipes use lime juice, but fresh lime juice is something you’re already using as a finishing touch, so using it in the sauce can make the dish overly sour.
Making the Sauce Ahead of Time Saves Precious Minutes
Here’s a practical tip that genuinely streamlines the entire process: mix your pad Thai sauce in a small bowl before you start cooking anything. Measure out your fish sauce, brown sugar, tamarind or vinegar, and oyster sauce (if using) into a small bowl and stir it together until the sugar completely dissolves. Set it right by the stove where you can reach it instantly when you need it.
Having the sauce pre-mixed means you’re not fumbling around measuring ingredients in the middle of your stir-fry when everything is hot and happening quickly. You simply pour the sauce into the pan at the right moment without any hesitation or distraction. This single step shaves off significant time and reduces the likelihood of mistakes or oversalting or under-sweetening your finished dish.
Preparing Your Proteins While the Noodles Soak
While your noodles are soaking in hot water, use that time to prepare your protein. If you’re using chicken, slice it very thinly across the grain into pieces roughly 1/4 inch thick. Thin slices cook in just a minute or two, which is crucial when you’re in a hurry. Pat the chicken dry with a paper towel before adding it to the hot pan—dry protein sears much better than wet protein.
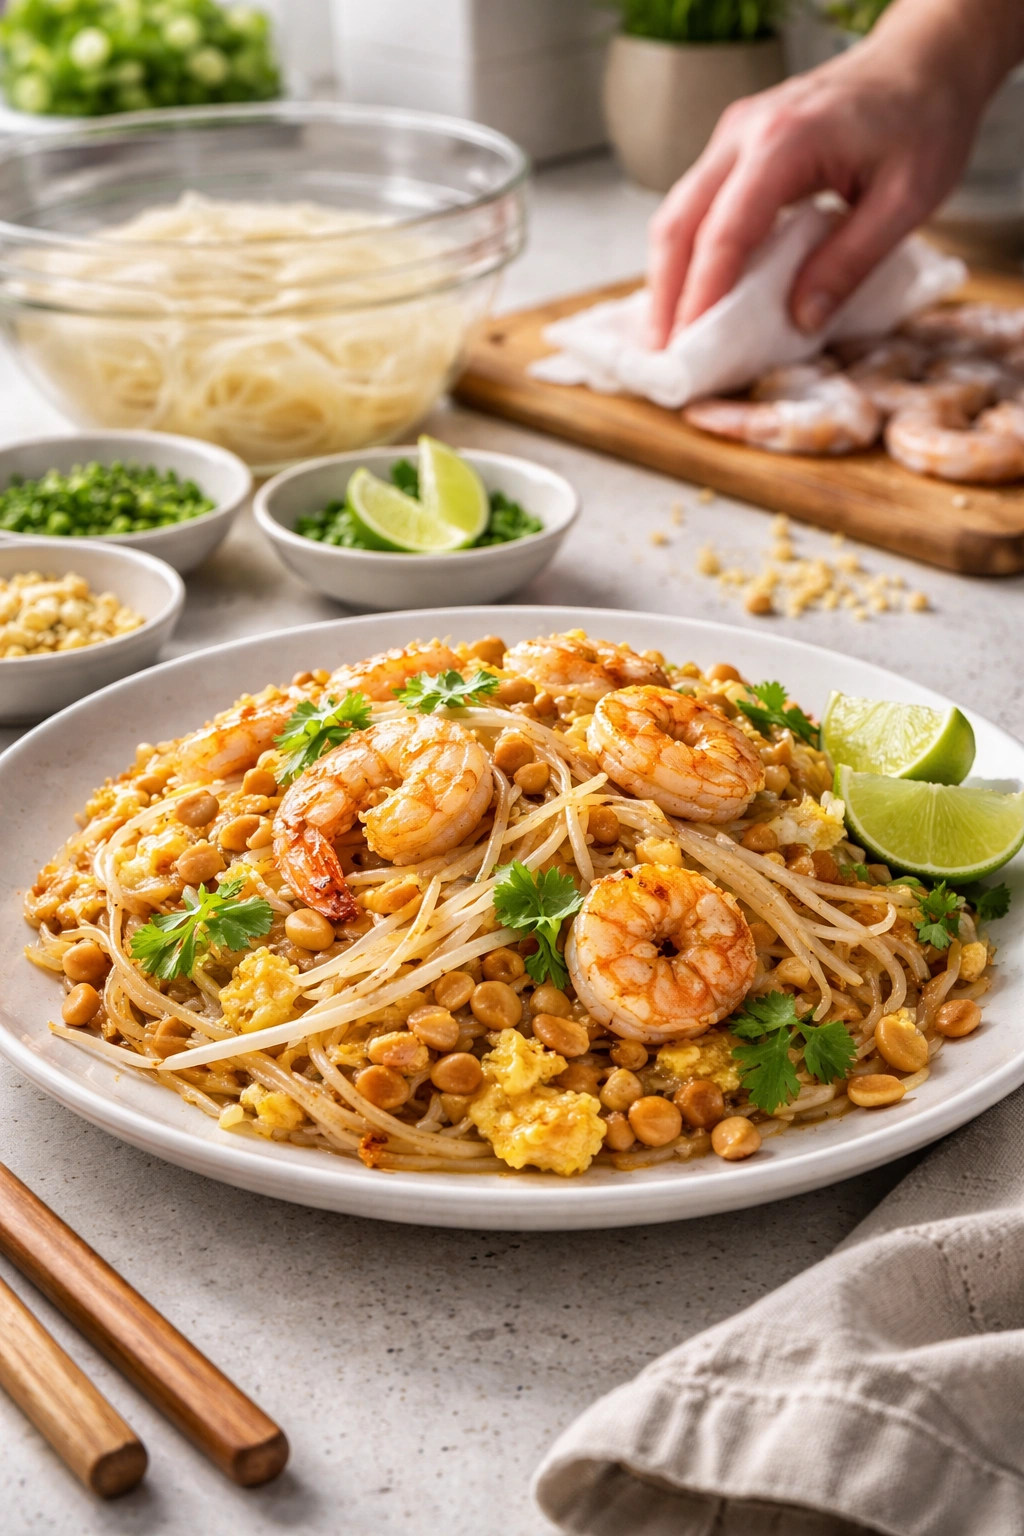
For shrimp, peel and devein them ahead of time if using fresh shrimp. Pat them completely dry before cooking. Frozen shrimp that you’ve thawed will have excess water, so pat them especially carefully. If you’re using tofu, press it gently with clean paper towels to remove excess moisture, then cut it into small cubes or rectangles. The drier your tofu, the better it will get slightly crispy at the edges during cooking.
If you want to cut your cooking time even further, use rotisserie chicken that you shred, or buy pre-cooked shrimp from the grocery store seafood counter. Neither of these is cheating; they’re smart shortcuts that get you delicious pad Thai even faster. Nobody needs to know that your homemade pad Thai involved buying pre-cooked protein.
Prepare Your Vegetables While Everything Else Soaks
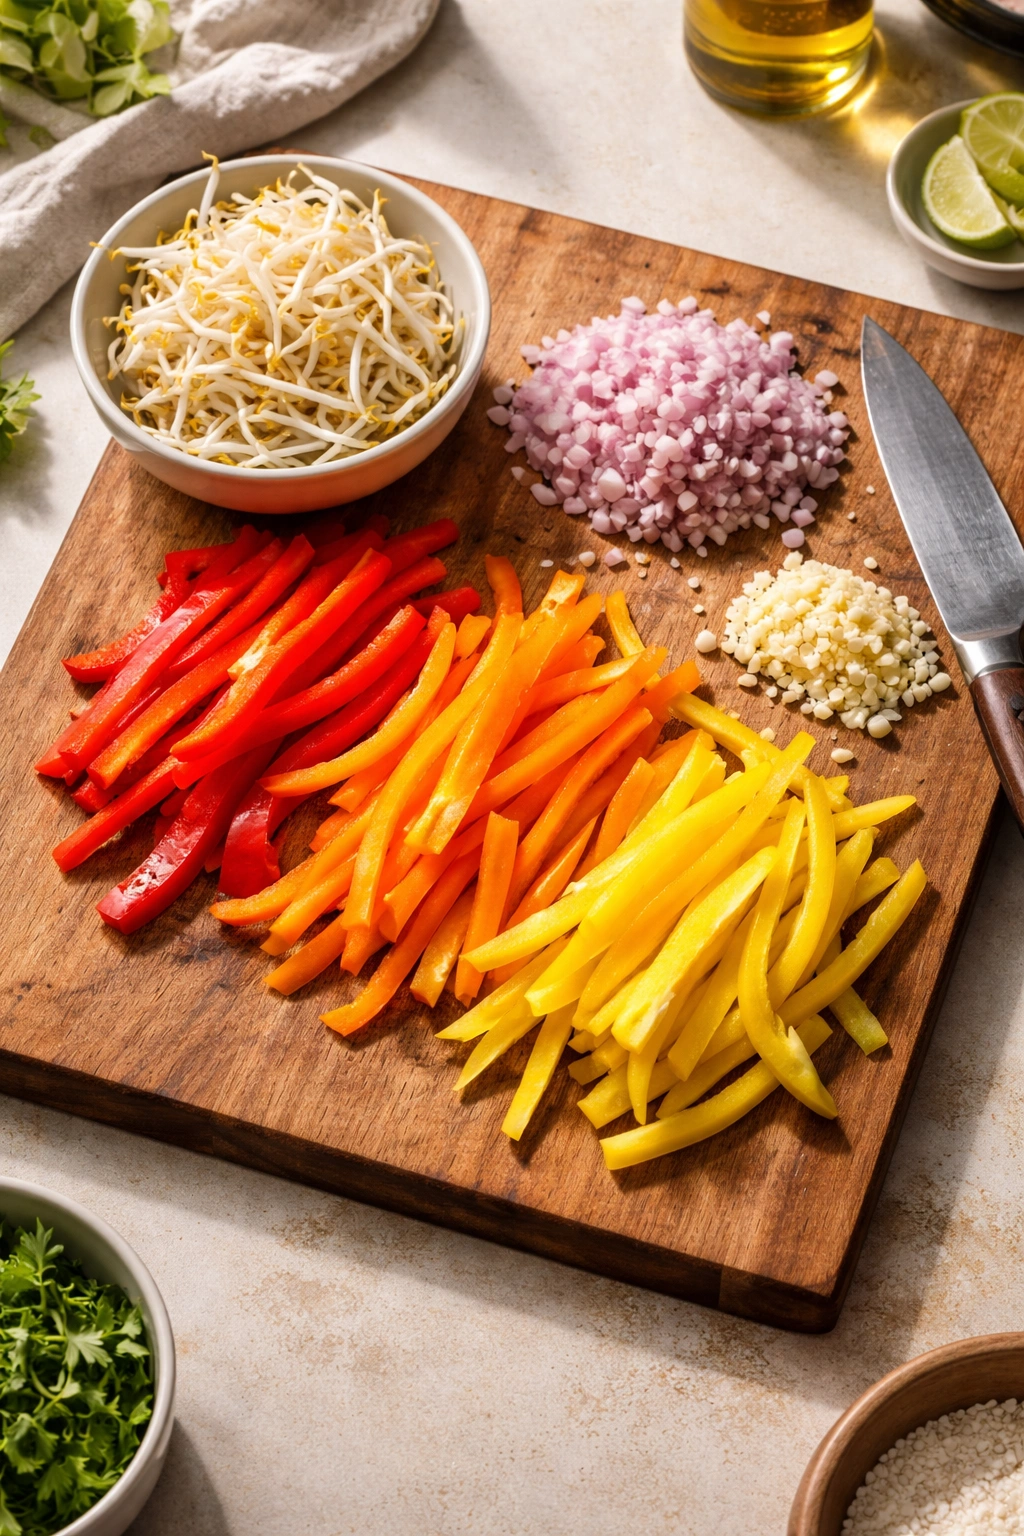
Chop your vegetables while your noodles and sauce are getting ready. For a basic quick pad Thai, you need bell peppers (red, orange, or yellow work best and look beautiful), shallots or green onions, garlic, and fresh bean sprouts. Slice your bell pepper into thin matchstick pieces so they cook through quickly. Chop your shallots finely or slice green onions into bite-sized pieces. Mince your garlic or use pre-minced garlic from a jar if you’re okay with that shortcut.
Bean sprouts are added at the very end and don’t need any cooking, which is why they stay crisp and fresh in the final dish. Have them ready in a bowl. The beauty of quick pad Thai is that because everything cooks so fast, you want your vegetables cut reasonably small so they don’t hold up the process. Large pieces would need more time to cook through, but thin pieces soften beautifully in just a minute or two of stir-frying.
Yield: Serves 2 to 3 | Makes approximately 4 cups
Prep Time: 15 minutes
Cook Time: 8 to 10 minutes
Total Time: 23 to 25 minutes (including soaking time)
Difficulty: Beginner — The steps are straightforward, and most ingredients are available at regular supermarkets. The recipe is forgiving if your timing isn’t perfect, making it ideal for beginners and experienced cooks alike.
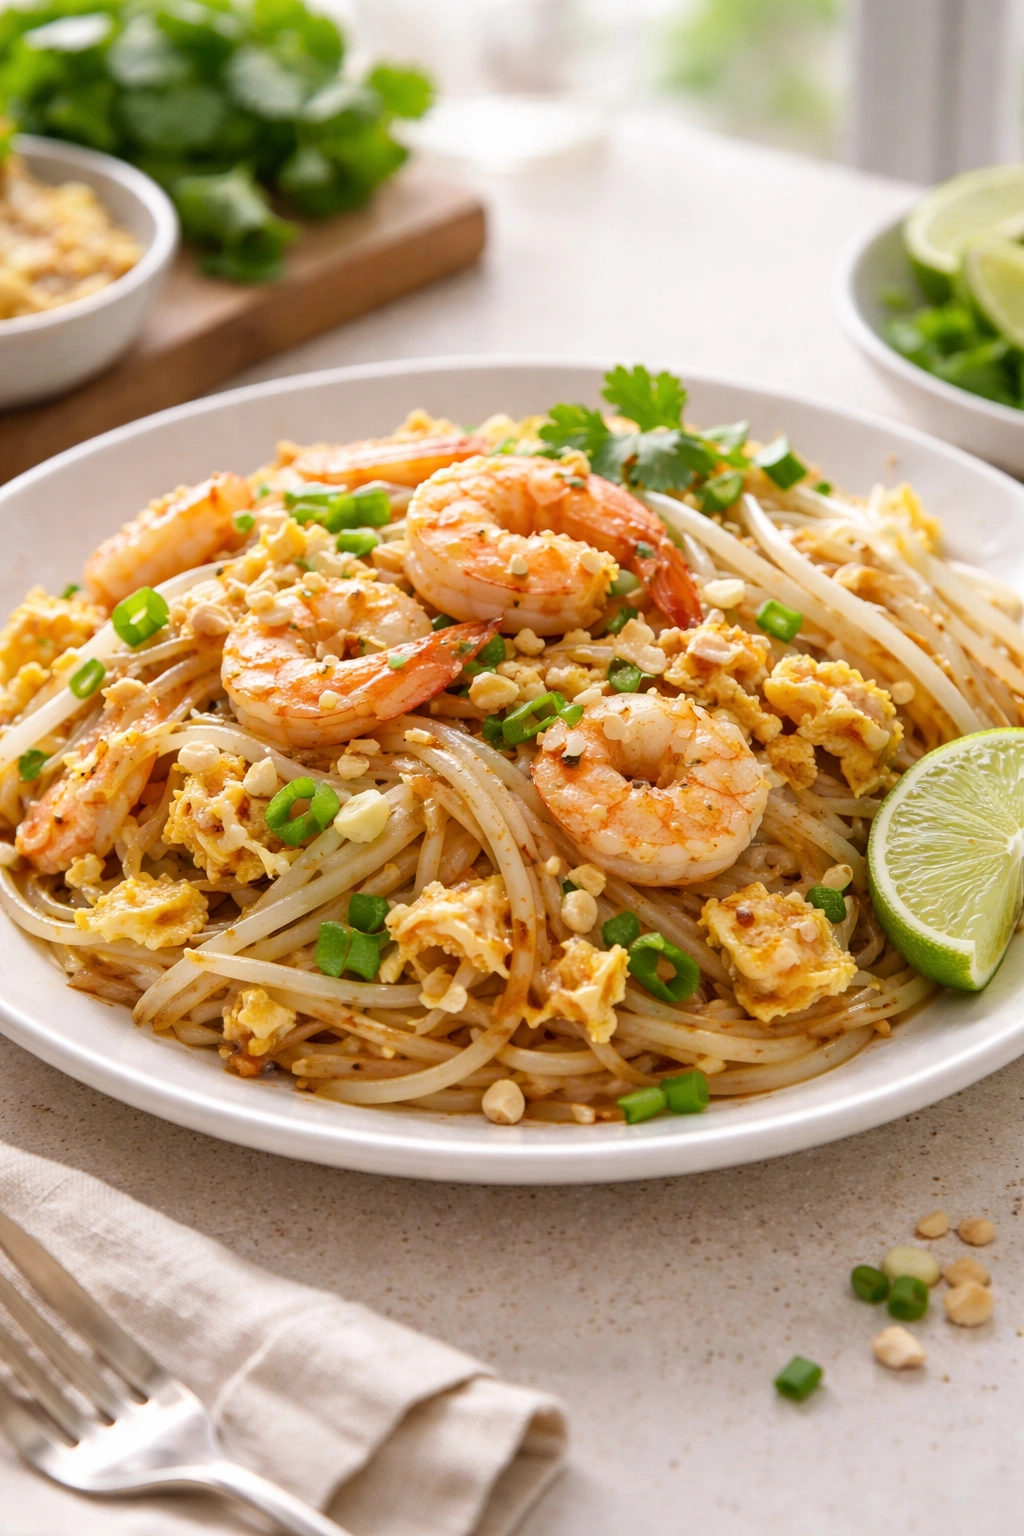
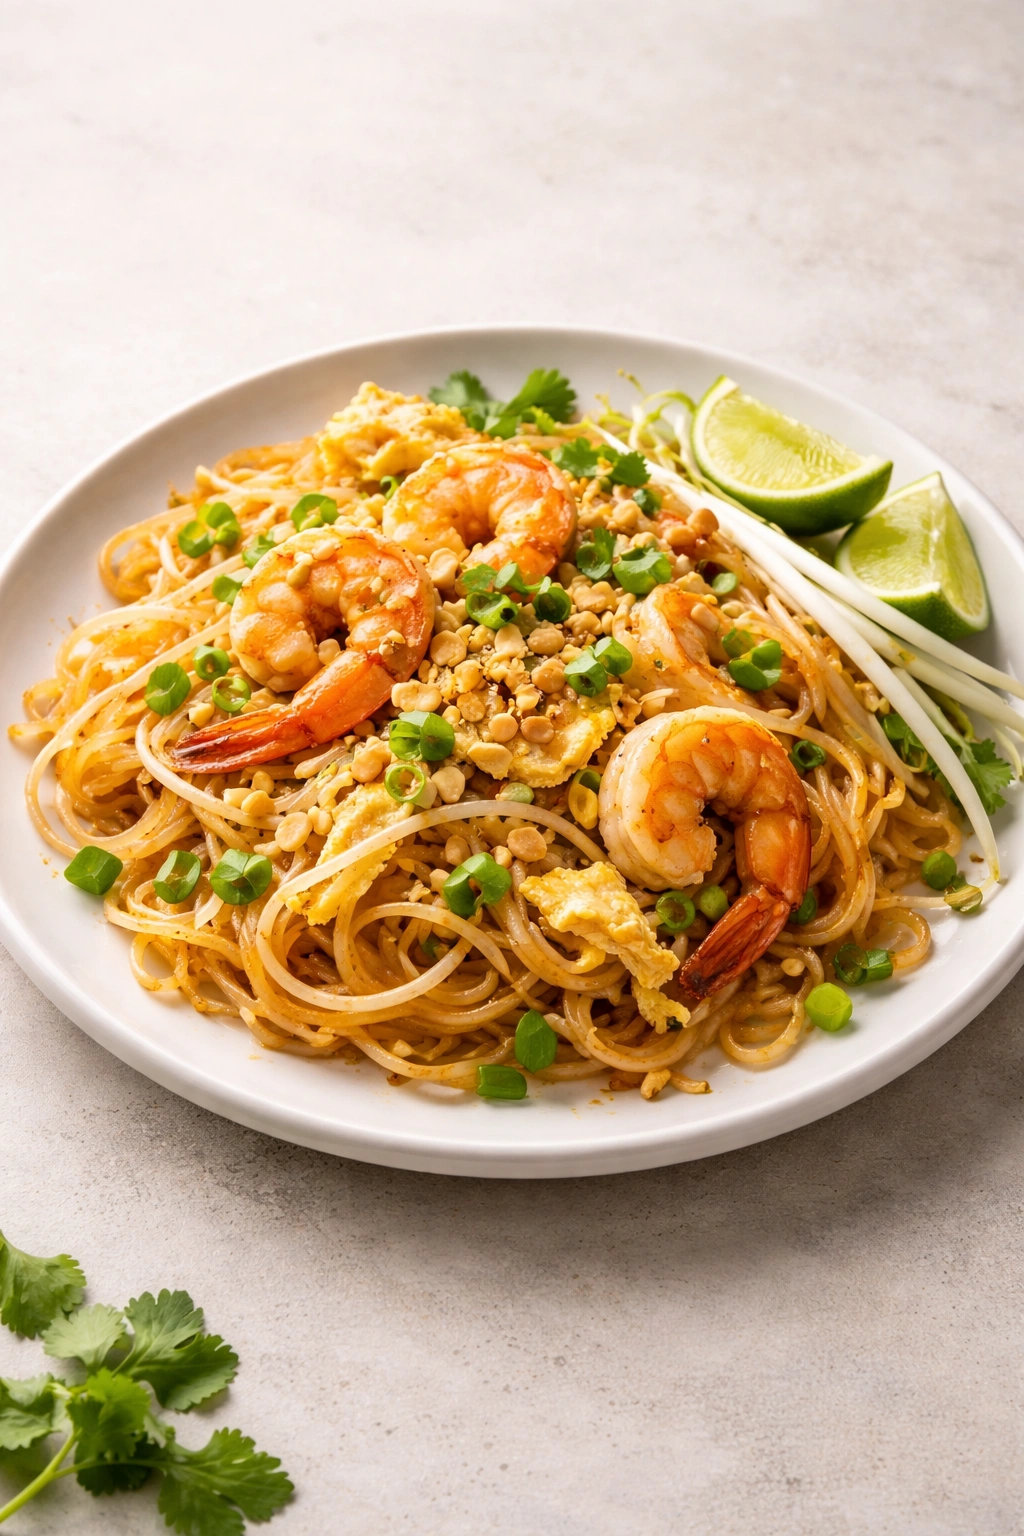
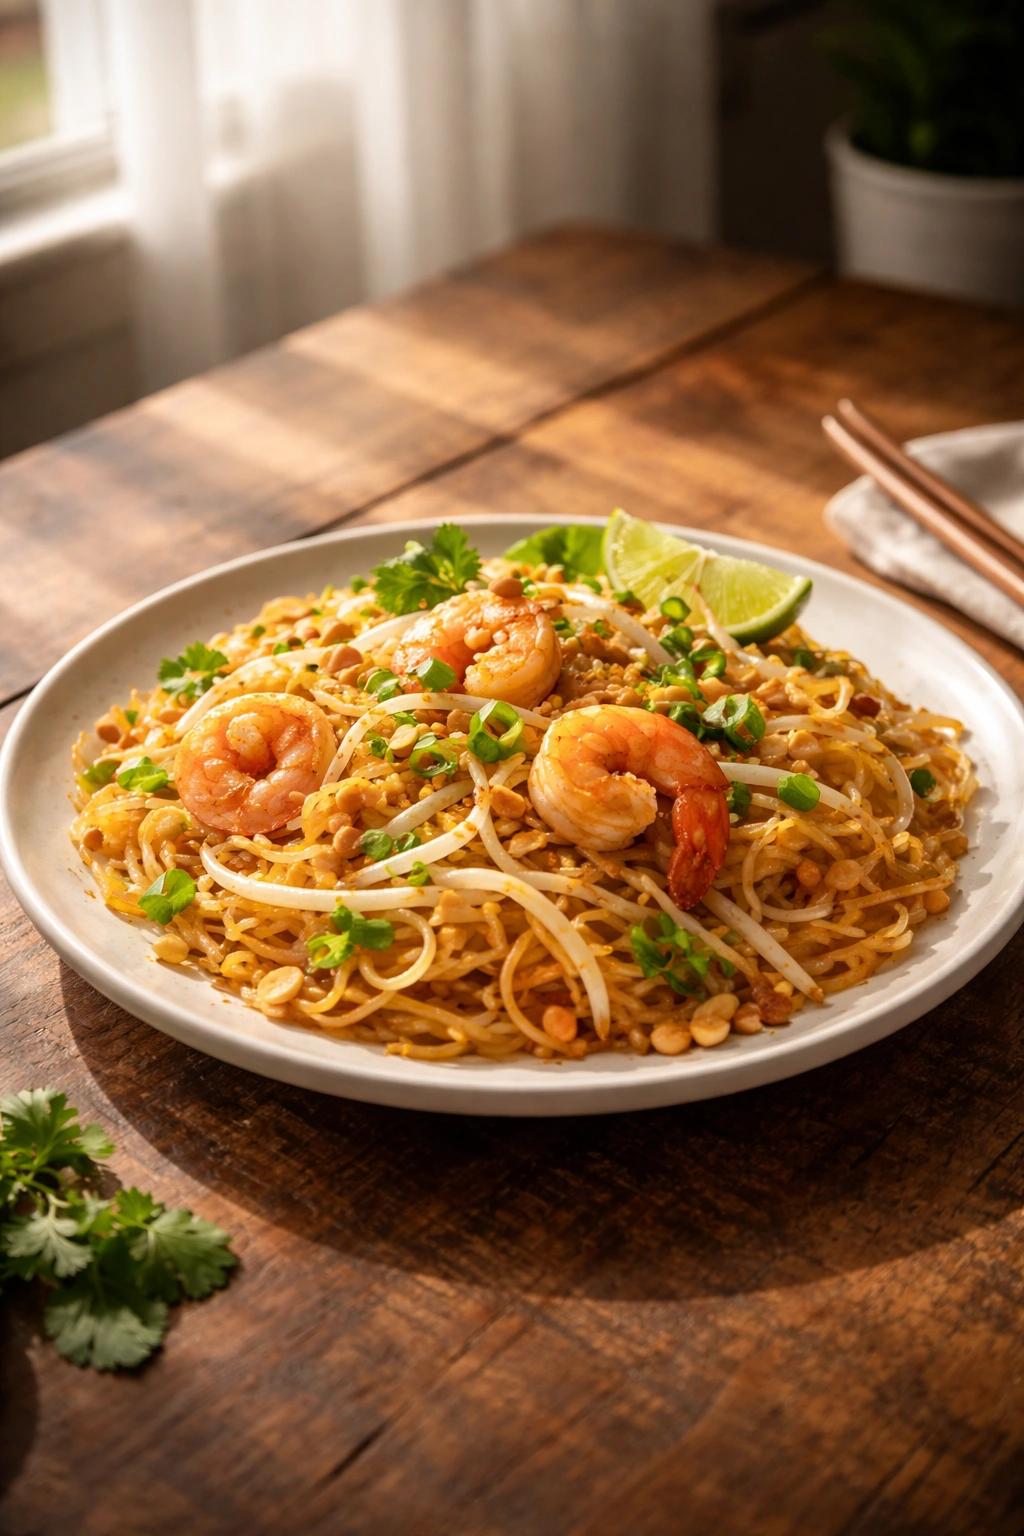
Best Served: Immediately while still warm, with lime wedges on the side and fresh bean sprouts as a garnish.
Ingredients for Quick 20-Minute Pad Thai

For the Pad Thai Sauce:
- 3 tablespoons fish sauce
- 1/4 cup (packed) brown sugar
- 1.5 tablespoons tamarind puree (or 2 tablespoons rice vinegar for a substitution)
- 1.5 tablespoons oyster sauce
- 1 tablespoon low-sodium soy sauce
For the Noodles and Stir-Fry:
- 8 ounces thin flat rice noodles
- 3 tablespoons neutral cooking oil (vegetable, canola, or peanut oil), divided
- 8 ounces boneless, skinless chicken breast (or shrimp, firm tofu, or a combination), cut into thin bite-sized pieces
- 1 medium red or orange bell pepper, thinly sliced into matchsticks
- 1 large shallot, finely diced (or 3 green onions, chopped)
- 3 garlic cloves, minced
- 2 large eggs, lightly beaten with a fork
- 1.5 cups fresh mung bean sprouts
- 1/4 cup dry-roasted peanuts, coarsely crushed
- 3 green onions, cut into 1-inch segments
- 1 lime, cut into 4 wedges
- Salt and white pepper to taste
- 1 tablespoon fresh cilantro, chopped (optional)
- Thai chili flakes or sriracha for serving (optional)
Step-by-Step Instructions for Quick Pad Thai

Prepare the Foundation:
-
Place the rice noodles in a large, shallow bowl and cover them completely with boiling water. Stir gently with chopsticks or a fork to separate the strands, then let them soak for 5 to 7 minutes while you prepare the other ingredients. They should be tender but still with a slight chew—not soft or mushy. Drain the noodles in a colander and rinse under cold running water until they’re completely cooled, then drain again. Set aside.
-
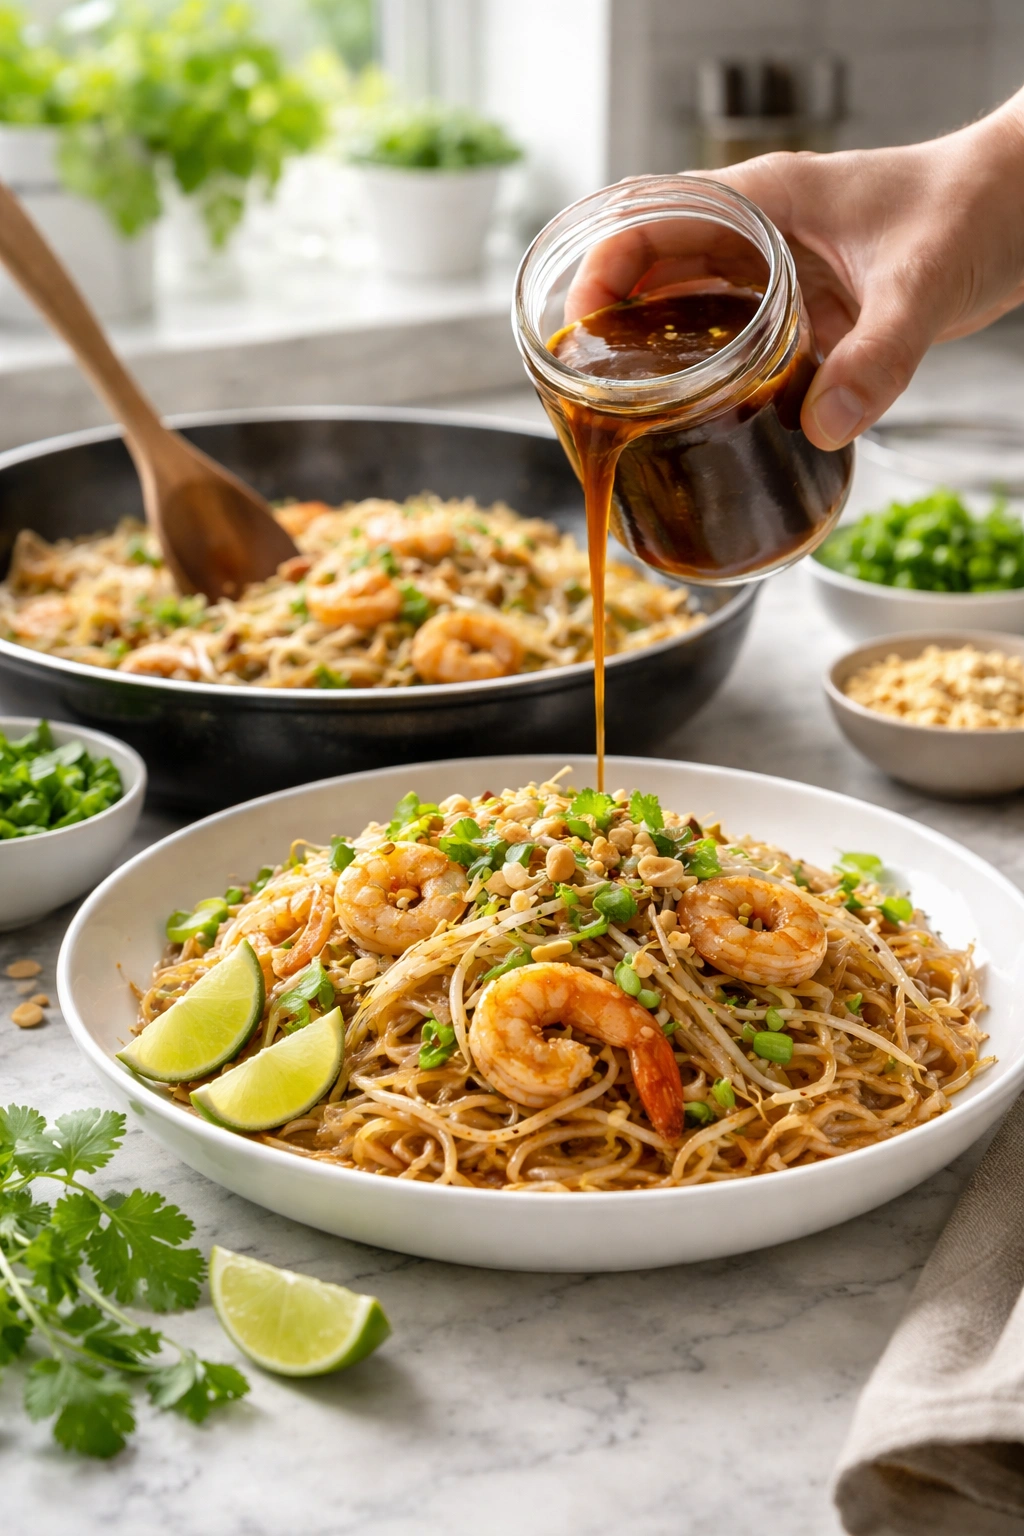
While the noodles are soaking, mix the fish sauce, brown sugar, tamarind puree, oyster sauce, and soy sauce together in a small bowl. Stir until the sugar is completely dissolved. Taste the sauce on your finger—it should taste quite salty and sweet and slightly tangy all at once. If the sugar hasn’t completely dissolved, stir for another 10 seconds. Set this sauce right next to the stove where you can reach it without looking away from your pan. This is your sauce, and you’ll pour it in all at once when the time comes.
-
Prepare all your remaining ingredients and arrange them on your counter in the order you’ll use them: chicken or other protein, garlic, shallot, bell pepper, beaten eggs, cooked noodles, sauce, bean sprouts, green onions, and peanuts. Having everything within arm’s reach is the single biggest factor in stress-free, fast cooking.
Cook the Protein:
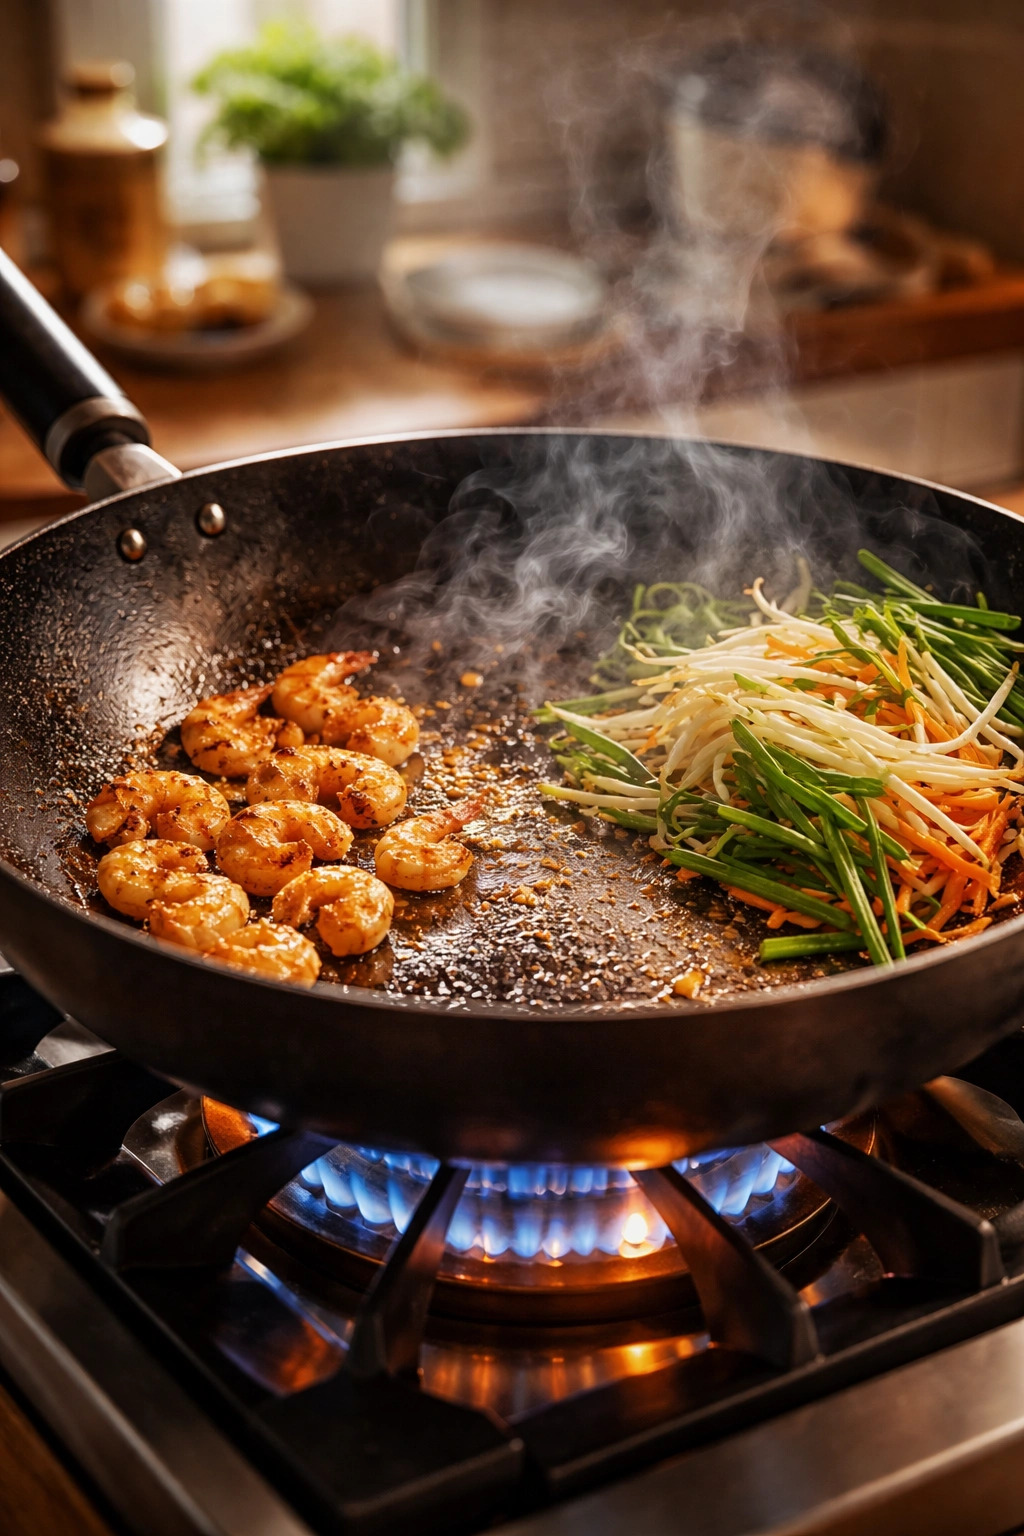
- Heat 1.5 tablespoons of oil in a large nonstick skillet or wok over medium-high heat for about 30 seconds. The oil should shimmer and just barely smoke at the edges. Add your prepared protein—whether chicken, shrimp, or tofu—in a single layer without stirring for the first 30 seconds to let it start to sear. This creates flavorful browning on one side. Then stir and continue cooking until the protein is just cooked through, approximately 1.5 to 2 minutes for thin chicken slices, 1 to 1.5 minutes for shrimp, or 2 minutes for tofu. Don’t overcook—the protein will continue cooking slightly when you add it back at the end. Remove the cooked protein to a clean plate.
Build Your Aromatics and Egg:
-
Add the remaining 1.5 tablespoons of oil to the same pan (don’t wash it—all those browned bits add flavor). Add your minced garlic and diced shallot and cook for exactly 30 seconds, stirring constantly. This is a very short time, but it’s enough to release their fragrance without letting them burn. You’ll smell the garlic as it hits the hot oil, which is your signal that things are happening correctly.
-
Push the garlic and shallot mixture to one side of the pan. Pour the beaten eggs into the empty space on the other side. Let the eggs sit undisturbed for about 15 seconds to start setting, then use a spatula to break them into small, bite-sized pieces while they cook. Stir them frequently for about 1 minute until they’re completely scrambled and cooked through. The eggs don’t need to be perfect—they’ll break up more as you stir everything together later.
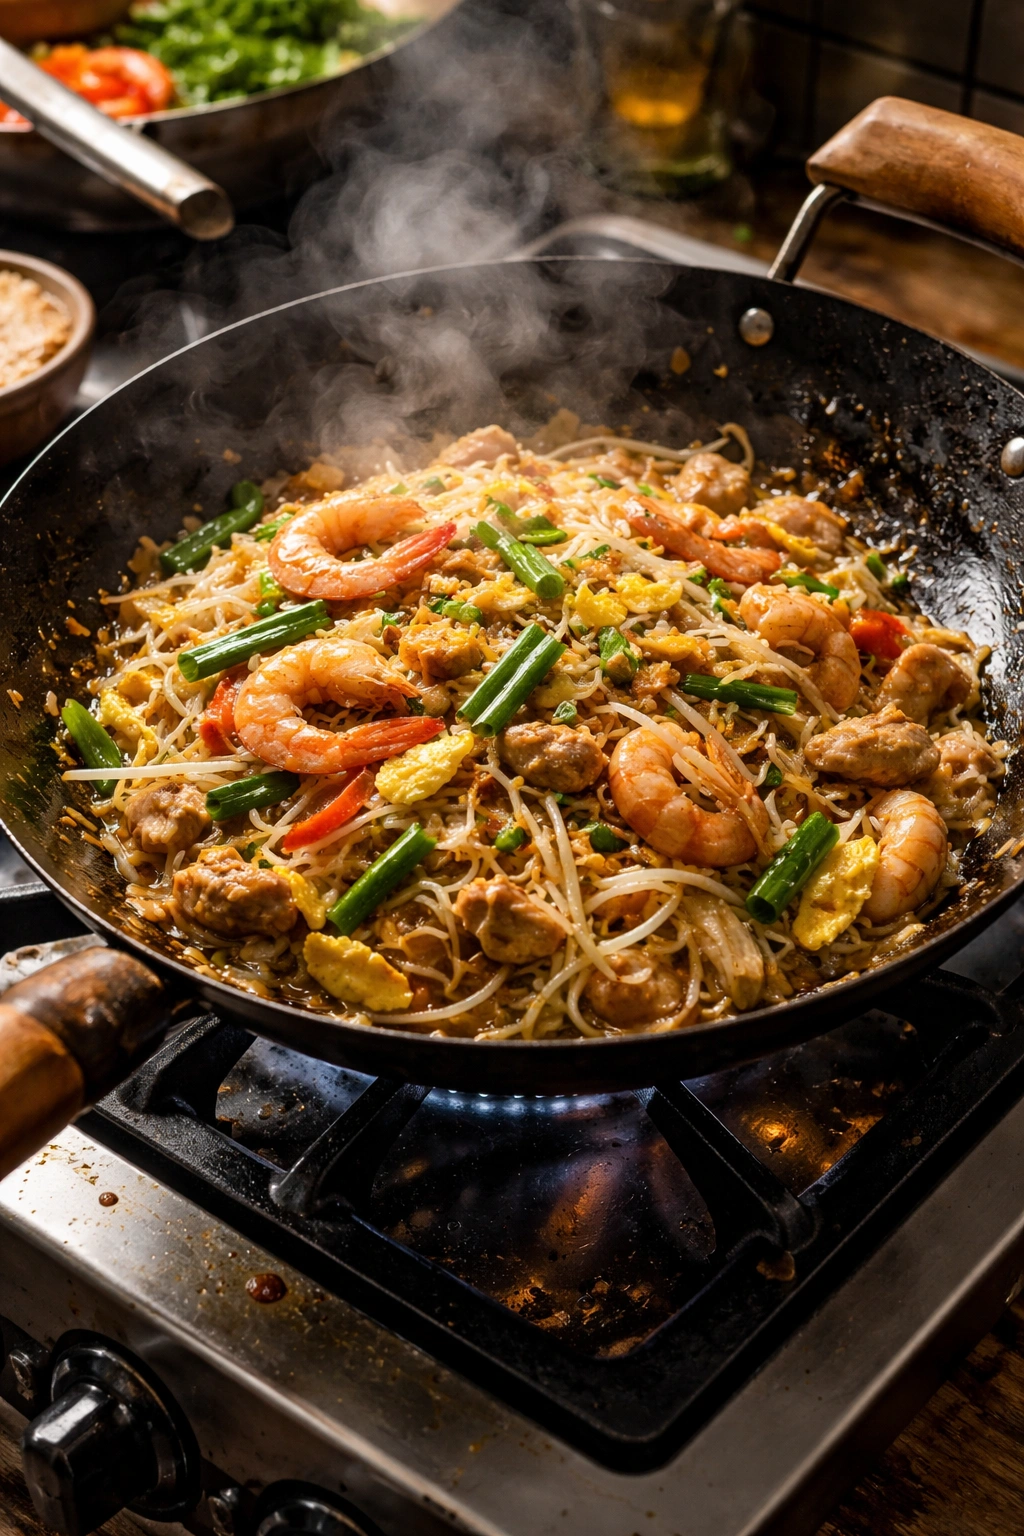
Bring Everything Together:
-
Add your sliced bell pepper and green onions to the pan with the eggs and scrambled mixture. Stir-fry for about 1 minute until the peppers just start to soften slightly. You want them to have a little crunch left, not to be completely limp.
-
Add the drained noodles to the pan. Pour the prepared sauce over everything and toss gently but thoroughly using tongs or two spatulas to coat all the noodles with sauce. This step is important—you want the sauce distributed evenly so every bite tastes balanced. Continue tossing for about 1 to 2 minutes, letting the noodles absorb the sauce. If the noodles look very dry, add 1 to 2 tablespoons of water and toss again.
-
Return the cooked protein to the pan with the noodles and toss everything together for another 30 seconds to heat through. The whole mixture should look glistening and saucy, with the noodles clearly coated.
-
Turn off the heat. Add the fresh bean sprouts, roughly half of the crushed peanuts, and the green onion segments. Toss very gently just a couple of times to combine—you want to keep the bean sprouts as fresh and crisp as possible, which is why you add them right at the end.
Finish and Serve:
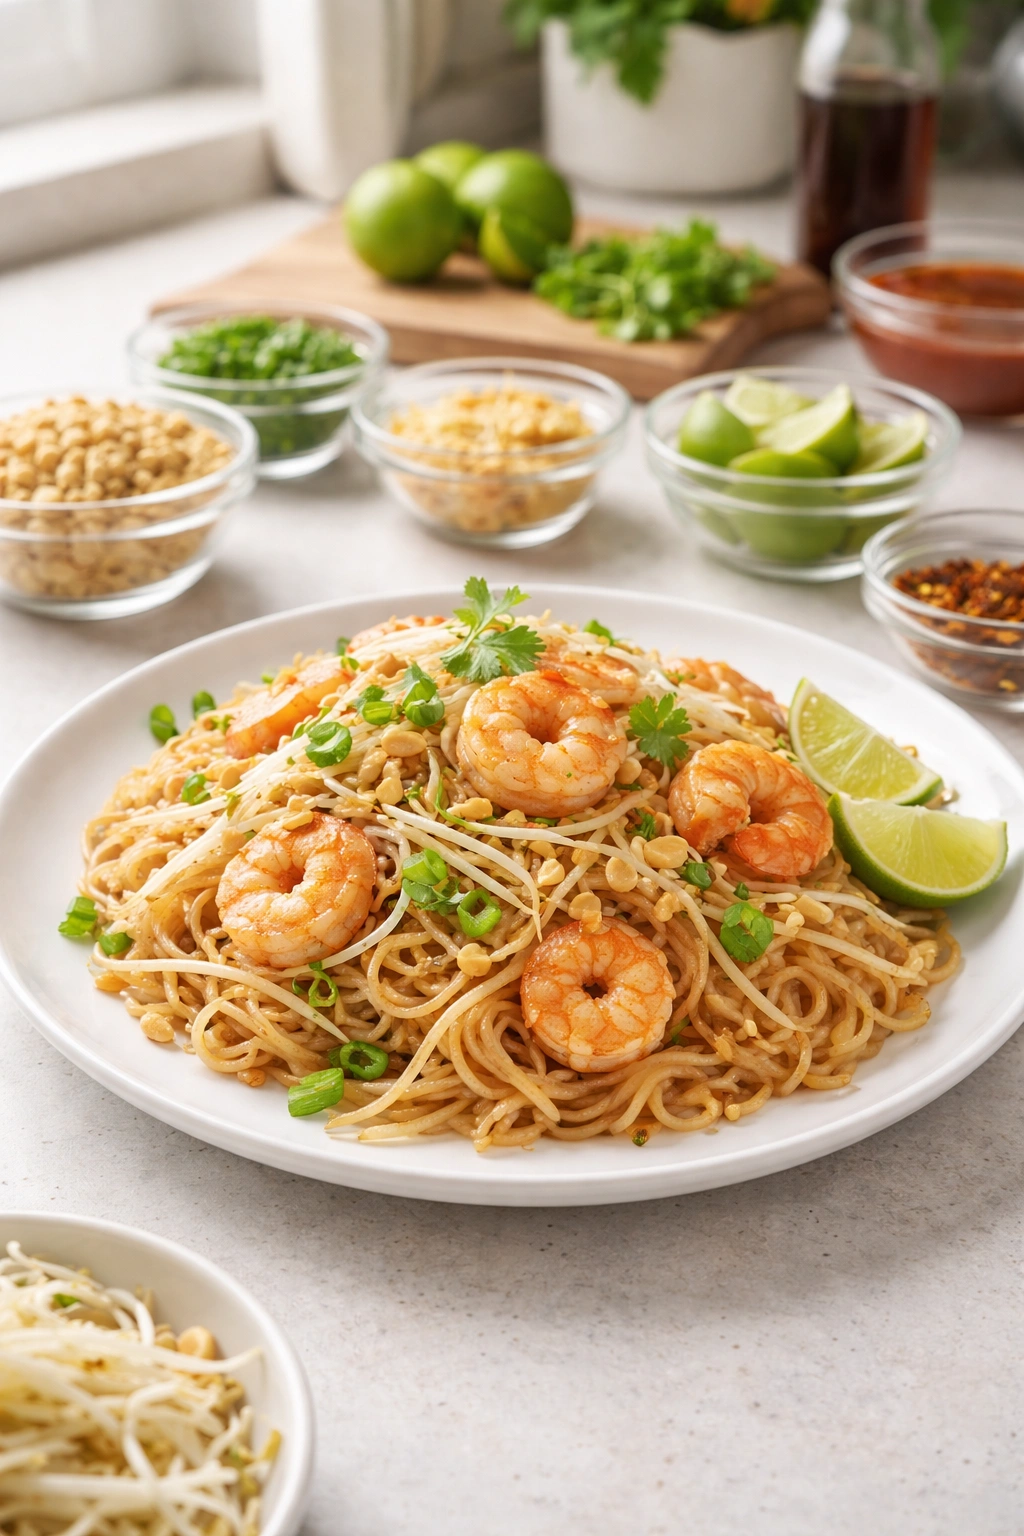
- Divide the pad Thai between serving bowls or plates. Top with the remaining crushed peanuts and a small sprinkle of fresh cilantro if you have it. Serve immediately with lime wedges on the side. Guests can squeeze lime over their portion to taste—this final brightness is what ties the entire dish together and should be adjusted to your preference.
Why Timing and Temperature Matter So Much
The reason this pad Thai comes together in 20 minutes isn’t because we’re cutting corners on flavor—we’re not. It’s because every step is optimized for speed without sacrificing what makes this dish delicious. The high heat of your pan matters tremendously. Your skillet or wok needs to be properly hot before you add your protein, which is why you heat it for 30 seconds after adding the oil.
When your pan isn’t hot enough, your ingredients steam rather than sear. Steam takes longer and creates a less flavorful result. High heat causes the noodles to get slightly crispy at the edges and helps the sauce caramelize and coat everything beautifully. If you’re using a regular skillet rather than a wok, that’s completely fine—you’ll still get excellent results. Just make sure it’s large enough that you’re not overcrowding the ingredients, which would lower the temperature of the pan.
The brief cooking times for each component are also strategic. You cook your protein first, then remove it so it doesn’t overcook while you finish everything else. You add your bell pepper late so it stays crisp rather than becoming limp and faded. You add your bean sprouts at the absolute end so they remain fresh and crunchy. Every timing decision is made with the final texture and flavor in mind.
Tips for Success When Making Quick Pad Thai
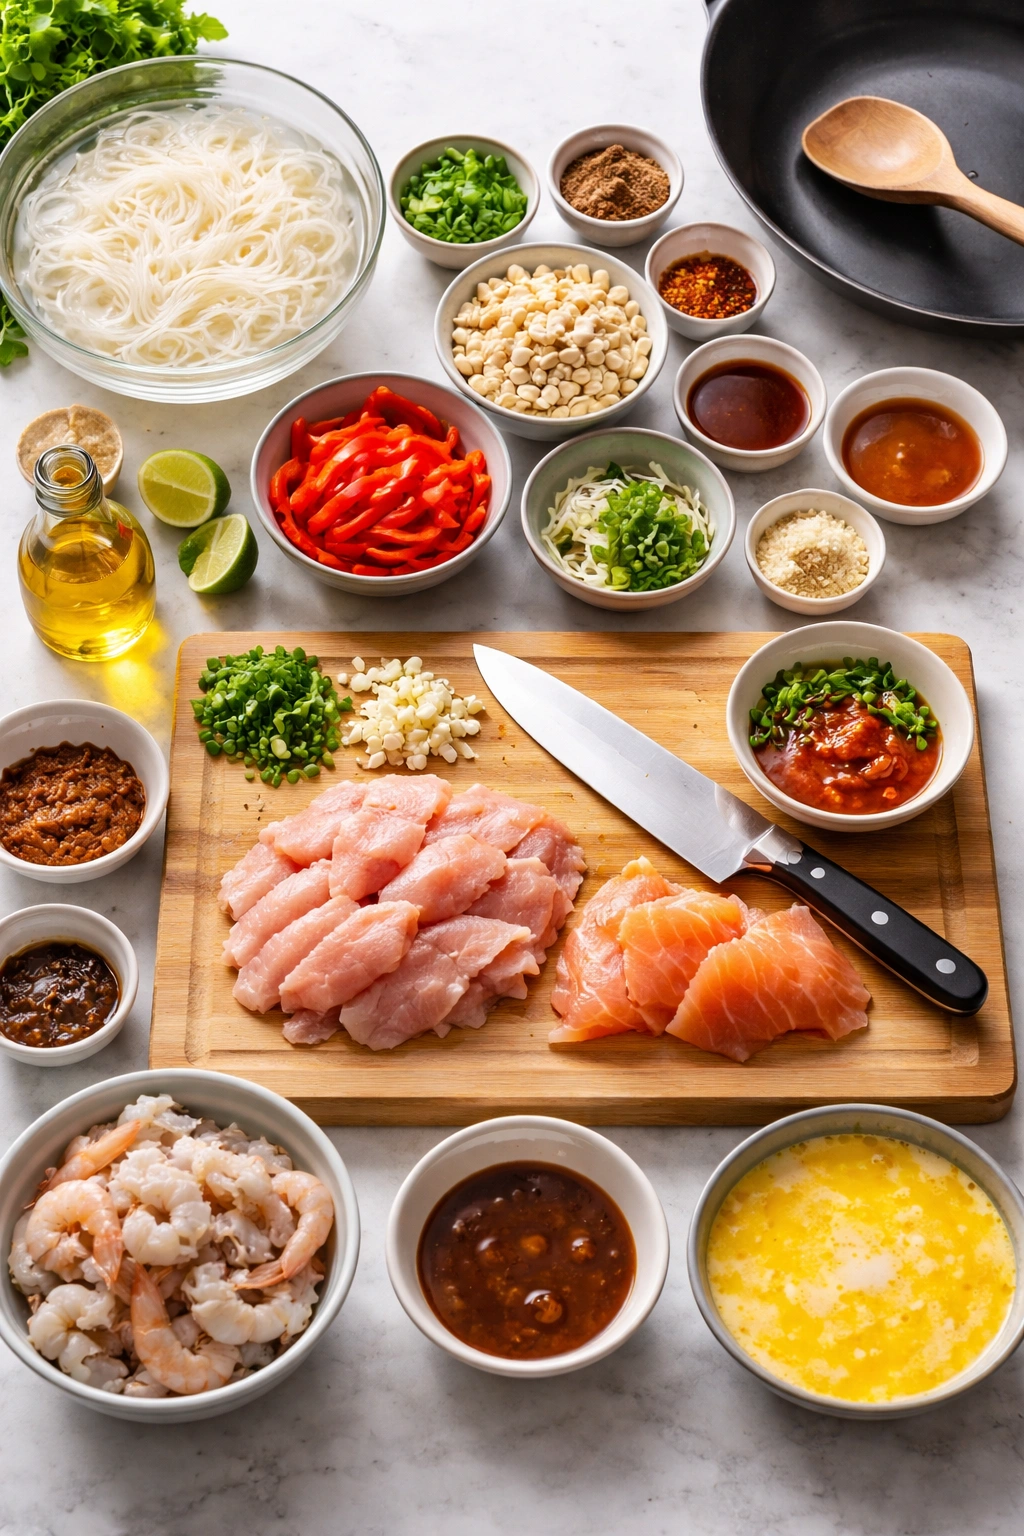
Have everything prepped and ready before you turn on the heat. This is the single most important tip. The actual cooking happens very quickly—in less than 10 minutes from the moment you turn on the burner. If you’re still chopping vegetables after you’ve started cooking, you’ll be stressed and distracted. Set up your entire workspace first, then start cooking.
Don’t skip the noodle soaking step. Some people try to boil their rice noodles instead of soaking them, thinking they’re saving time. They’re not. Soaking takes about 5 to 7 minutes while you prep other ingredients, meaning you’re multitasking efficiently. Boiling is also more likely to result in broken or mushy noodles. Soaking in hot water is the right way.
Cut your protein thin. This is what enables the fast cooking. A thick chicken breast will need 3 to 4 minutes to cook through. A thin slice cooks in 1 to 2 minutes. Same protein, completely different cooking time. Slice against the grain for even thinner pieces.
Pat your protein dry before cooking. Excess moisture prevents searing and slows cooking. A quick pat with a paper towel makes a noticeable difference in how efficiently your protein cooks.
Use high heat throughout. Medium-high heat isn’t quite hot enough for good stir-frying. You want high heat, which is why this dish comes together so fast. High heat also gives you that slightly crispy edge on the noodles that makes the texture interesting.
Taste as you go. Pad Thai sauce flavors can vary depending on your brand of fish sauce and the exact heat of your pan. Before serving, taste a small bite and adjust if needed. Need more salt? Add a splash of soy sauce. Need more sweetness? Add a tiny pinch of sugar. Need more sourness? Add lime juice or a splash of vinegar. These adjustments take seconds and make the difference between good and perfect.
Common Mistakes That Slow You Down or Reduce Quality
Overcooking the noodles during soaking. If your noodles sit in hot water for more than 10 minutes, they’ll get progressively softer and mushier. Start checking at 5 minutes. They should still have a slight chew—think al dente pasta. When in doubt, drain them a minute early rather than a minute late. They’ll continue cooking in the hot pan.
Not having ingredients prepped before cooking begins. This is the fastest way to end up with overcooked protein or broken noodles. If you’re chopping your garlic while your chicken is cooking, your chicken is overcooking. Prep everything first, then cook.
Adding too much liquid to the sauce. Some versions of pad Thai include water in the sauce, but for quick cooking and maximum flavor concentration, use less liquid. Your noodles still have some moisture from soaking, and they’ll release their own moisture as they cook. Add extra water only if the noodles look very dry during the final tossing step.
Crowding the pan with too much food at once. If you’re making pad Thai for more than 3 people, make two batches. Overcrowding the pan lowers the temperature significantly and prevents proper searing and caramelization. Two batches take only slightly longer than one and produce much better results.
Using the wrong noodles. Very thick rice noodles or thin vermicelli both cook differently and won’t give you the right texture. You specifically need thin, flat rice noodles labeled for pad Thai or as “rice stick noodles.”
Cooking the bean sprouts. This is a genuinely common mistake. Bean sprouts are added raw at the very end and should remain fresh, crisp, and slightly cool. They’re meant to provide textural contrast to the soft noodles. If you add them too early or cook them in the pan, they become limp and unpleasant. Add them only at the very last moment.
Variations You Can Make in Under 20 Minutes
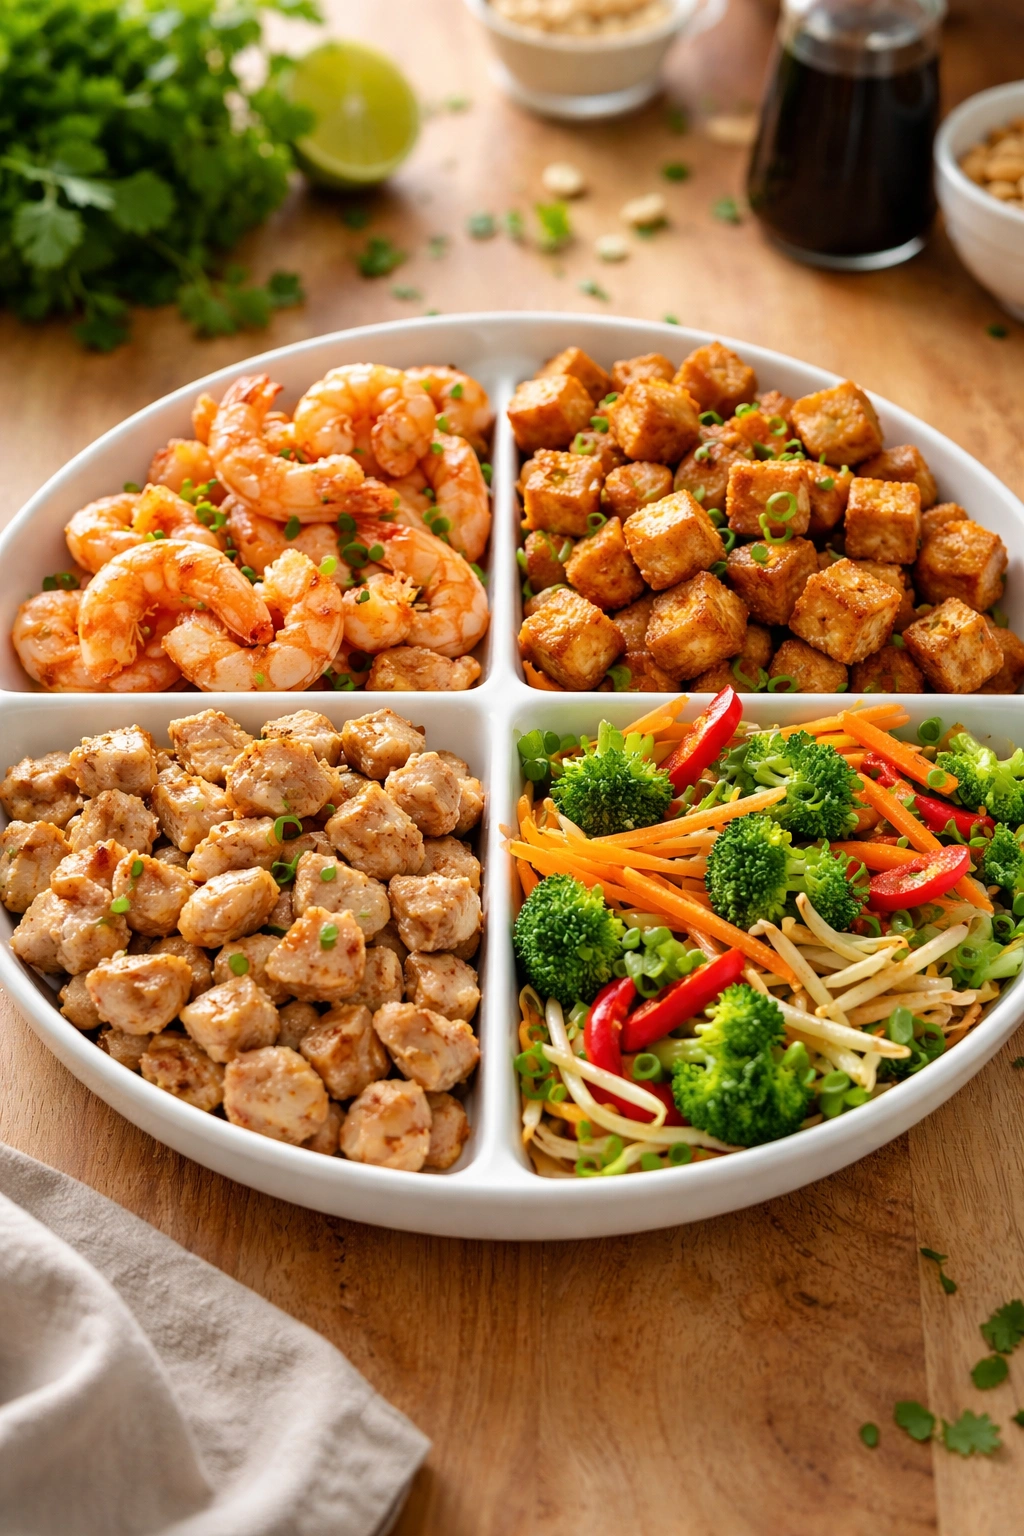
Shrimp Instead of Chicken: Shrimp actually cooks even faster than chicken—if you use medium shrimp, they’ll be done in just 1 to 1.5 minutes. Make sure they’re peeled and deveined ahead of time, and pat them dry. This variation is equally delicious and feels slightly more special, which is great when you want to impress someone without spending extra time cooking.
Tofu for Vegetarian Pad Thai: Extra-firm tofu works beautifully in this recipe. Press it gently with paper towels to remove excess moisture, then cut it into small cubes. It’ll get slightly golden and crispy at the edges during cooking. Omit the fish sauce and add an extra 1/2 tablespoon of soy sauce plus a pinch of salt to maintain the savory depth. Some people also like adding a tiny bit of mushroom paste or powdered mushroom to tofu pad Thai for extra umami.
Mixed Protein: Use a combination of protein—for example, 4 ounces of chicken and 4 ounces of shrimp. This gives you variety in texture and flavor within a single dish. Each protein cooks at a slightly different rate, so add the slower-cooking proteins first and the faster-cooking ones last.
Additional Vegetables: Any quick-cooking vegetables work beautifully. Try broccoli florets (cut small), snow peas, sugar snap peas, mushrooms (thinly sliced), zucchini (julienned), or bok choy (cut into bite-sized pieces). Add them with your bell pepper so they have time to soften slightly. Avoid dense vegetables like carrots or beets, which would need more time to cook through.
Extra Spicy: Add more sriracha or Thai chili flakes to the sauce. If you like serious heat, include 1/2 to 1 teaspoon of red pepper flakes or cayenne in the sauce itself, or add sriracha to taste when serving. Some people love serving pad Thai with extra chili flakes and sriracha on the side so guests can adjust their own heat level.
Peanut Butter Version: Some Western adaptations add a tablespoon of creamy peanut butter to the sauce for extra richness. This isn’t traditional, but if you enjoy it, melt the peanut butter into your sauce ingredients when you mix them together, stirring until smooth.
Lime Juice Variation: If you can’t find tamarind, increase your rice vinegar to 2.5 tablespoons and add the juice of one fresh lime to the sauce. This gives a different flavor profile—more citrusy and less rounded—but it’s still delicious.
Storage and Reheating Your Pad Thai
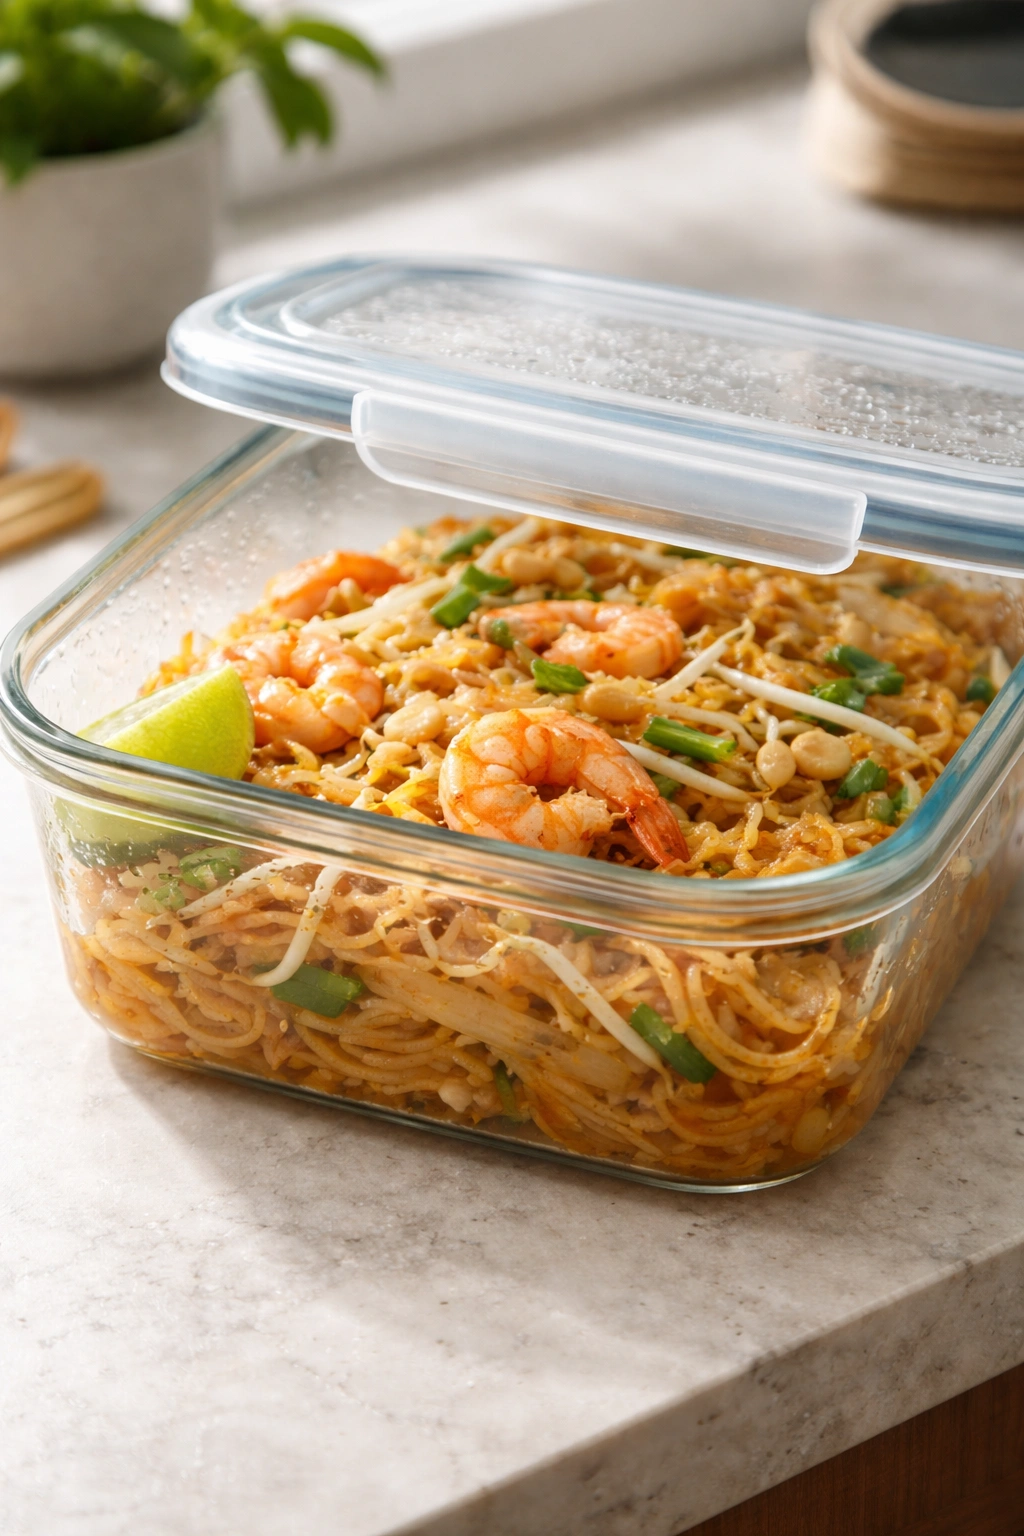
Pad Thai is best eaten immediately while the noodles are hot and the bean sprouts are still crisp. However, if you have leftovers, store them in an airtight container in the refrigerator for up to three days. The sauce will soak into the noodles as it sits, making them softer and the dish wetter, which is why fresh pad Thai is superior to reheated.
To reheat, place the pad Thai in a skillet over medium heat with 1 to 2 tablespoons of water to re-hydrate the noodles. Cover the pan and heat until everything is warm through, stirring occasionally. Alternatively, microwave it in a covered bowl for 1 to 2 minutes, stirring halfway through. The water is crucial—without it, the noodles will dry out further and become unpleasantly hard.
If you want to store pad Thai for longer than three days, freeze it in an airtight freezer container for up to two months. Thaw overnight in the refrigerator before reheating. The texture won’t be quite as perfect as freshly made pad Thai, but it’s still quite good.
For make-ahead convenience, you can prepare your sauce and cut all your vegetables up to one day in advance. Store them in separate containers in the refrigerator. Soak and drain your noodles up to 4 hours before cooking, then toss them with a tiny bit of sesame oil to keep them from sticking.
What to Serve Alongside Your Quick Pad Thai
Pad Thai is truly a complete meal on its own and doesn’t necessarily need side dishes. However, if you’d like to round out your dinner, consider pairing it with something cold and refreshing to balance the warm, savory noodles. A simple cucumber salad with a light vinaigrette is perfect—the cool crispness and tanginess complement pad Thai beautifully. You could also make a quick Thai green salad with fresh mint, cilantro, and a lime dressing.
If you want something more substantial, serve pad Thai with a simple protein like grilled shrimp skewers or Thai basil chicken on the side, though this would push your total cooking time beyond 20 minutes. For beverages, cold iced tea (especially Thai iced tea if you have it), limeade, or sparkling water with lime all pair wonderfully. Thai iced coffee is also a great option if you want something slightly sweet to finish your meal.
Many people like serving pad Thai with extra lime wedges, sriracha, and Thai chili flakes on the side so everyone can customize their portion to their taste preferences. This is exactly how it’s served at Thai restaurants and gives your homemade version an authentic feel.
Final Thoughts
The most eye-opening discovery when you start making pad Thai at home is how quick and easy it actually is compared to ordering takeout. You’ll spend less money, control exactly what goes into your dish, and end up with something that tastes every bit as good as restaurant food. The 20-minute timeline isn’t a rushed, stressed experience—it’s actually quite relaxed once you understand the rhythm and have everything prepped.
The beautiful thing about pad Thai is that it’s forgiving. If your noodles are slightly softer than you’d prefer, they’ll still taste delicious. If your sauce is a tiny bit too salty or too sweet, you can adjust it with lime juice or a bit more sugar. The core flavors are hard to get completely wrong because the balance of sweet, sour, salty, and umami is so fundamental to what makes this dish work.
Start with this straightforward recipe exactly as written, and you’ll understand the baseline. Once you’ve made it successfully once, you’ll feel confident playing with variations and adjustments. You’ll develop preferences for exactly how much spice you like, whether you prefer your noodles with just a touch of crispiness or completely tender, and what ratio of sauce to noodles feels perfect in your mouth. That’s when pad Thai stops being a recipe you’re following and becomes a dish you own.
The next time you’re tempted to order takeout because you don’t have time to cook, remember that pad Thai literally comes together in 20 minutes with minimal effort. Your version will be fresher, more customizable, and probably less expensive. More importantly, you’ll prove to yourself that you can make restaurant-quality food at home any night of the week, which tends to make every other meal in your cooking repertoire feel more achievable.