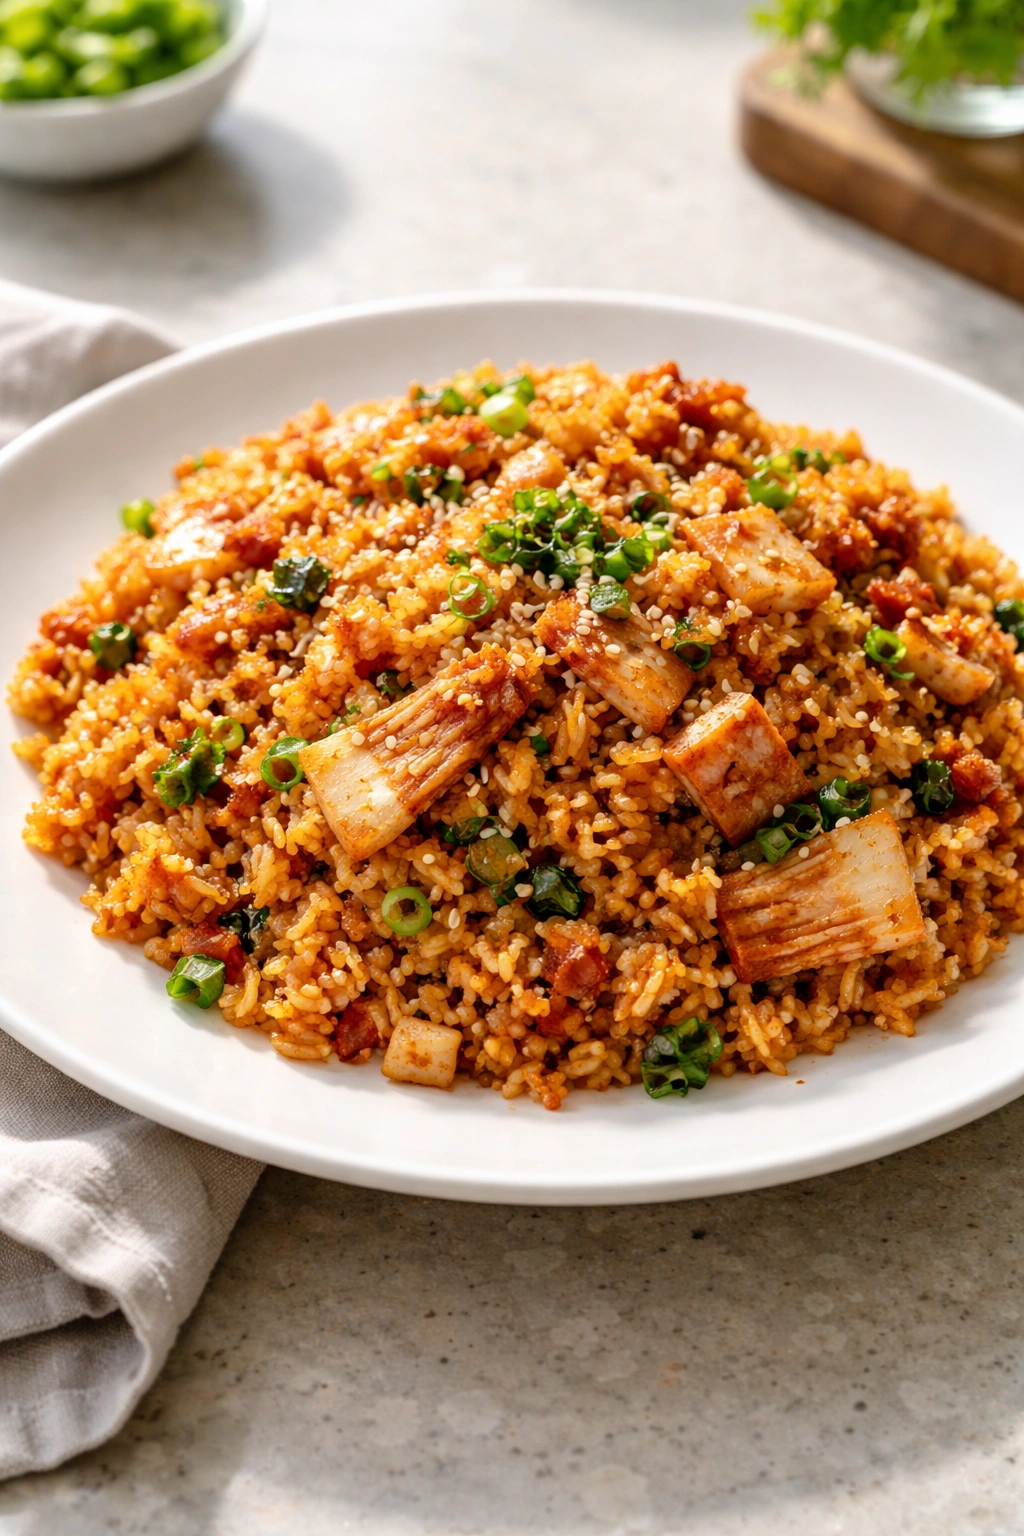
There’s something magical about watching a skilled cook work a wok over high heat, the rice sizzling and popping, steam rising dramatically, the finished dish landing on your plate in minutes—crispy, aromatic, and perfectly balanced between spicy, savory, and tangy. That’s the fantasy we buy into when we order kimchi fried rice from a restaurant. But here’s what I’ve learned after making this dish countless times: you don’t need a restaurant kitchen or professional technique to create something genuinely better than takeout. You just need to understand the fundamentals, use the right rice, and master one crucial cooking principle that separates soggy disappointment from that coveted crispy-edged perfection.
Homemade kimchi fried rice—or kimchi bokkeumbap in Korean—has become my go-to weeknight dinner precisely because it’s faster than ordering delivery, costs a fraction of the price, and tastes noticeably better when you know what you’re doing. The difference isn’t subtle. Restaurant versions often feel one-dimensional: heavy on soy sauce, sometimes greasy, occasionally mushy. What I’m sharing with you is how to make it the way Korean home cooks do—bright, balanced, with those addictive crispy bits that make you reach for another spoonful.
The secret starts with understanding that this isn’t complicated cooking. It’s straightforward technique applied to humble ingredients. A jar of well-fermented kimchi, cold leftover rice, a hot pan, and a few pantry staples are truly all you need. But the execution matters. Get the rice temperature right, control your heat properly, and understand how to build layers of flavor, and you’ll end up with something so good you’ll wonder why you ever called for delivery.
Why Homemade Kimchi Fried Rice Beats Restaurant Versions
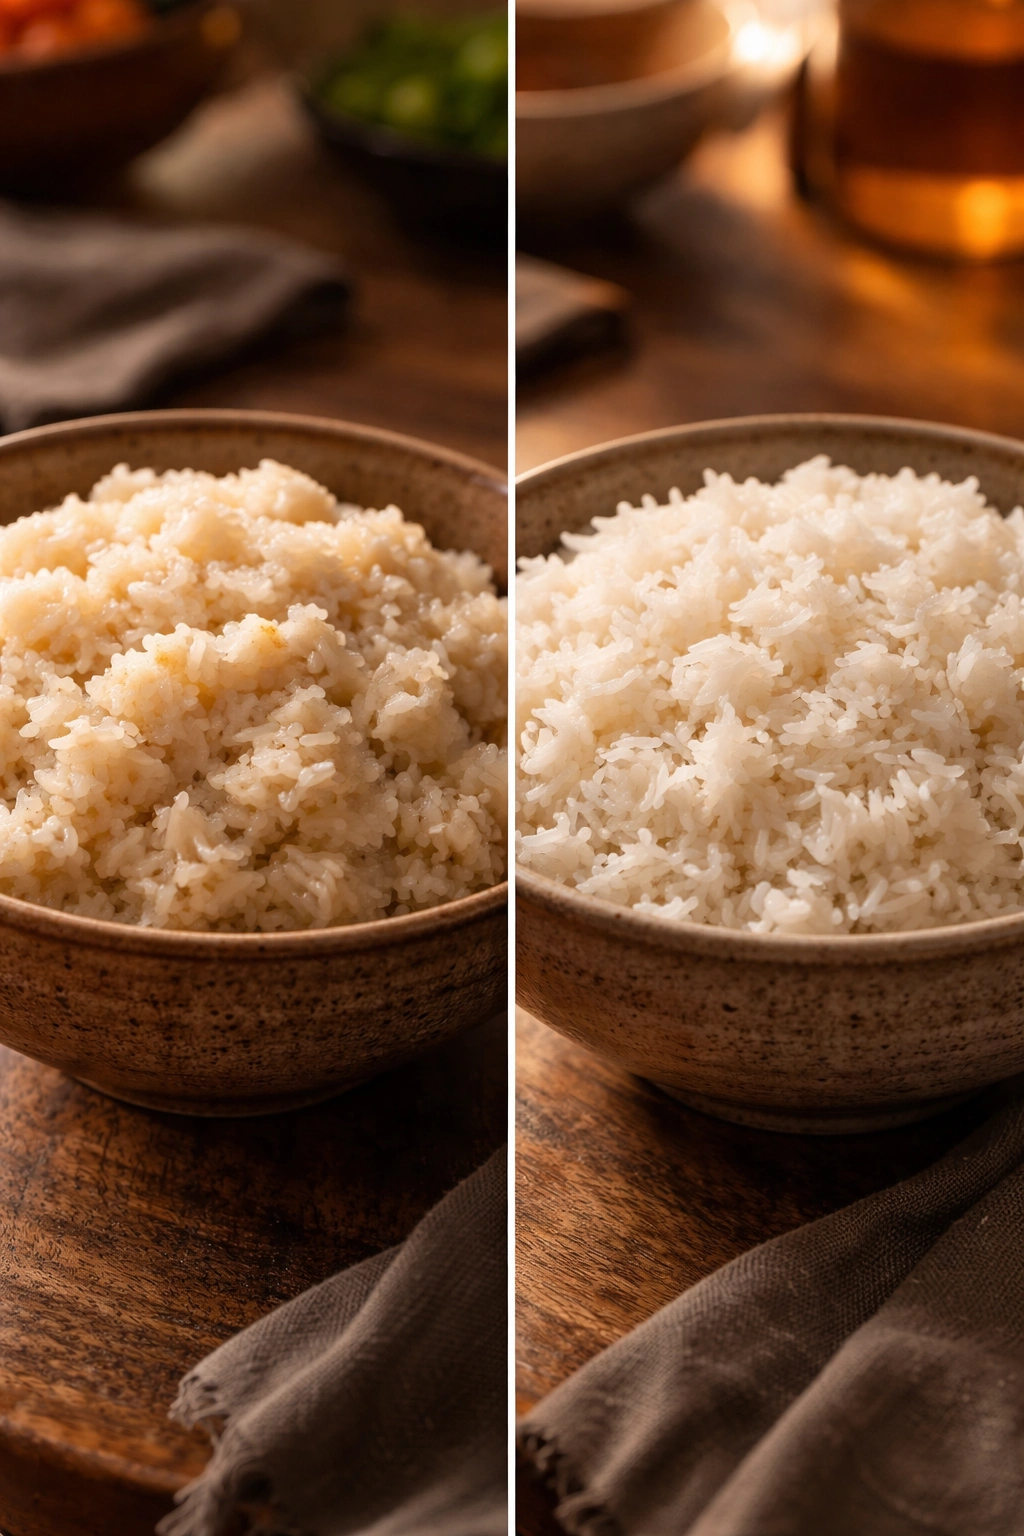
Restaurant kimchi fried rice often arrives at your table either disappointingly limp or strangely gummy—the result of cooking with freshly cooked warm rice or adding too much liquid trying to mimic the dish’s spicy sauce. Home cooks have an advantage restaurants don’t: time and intentionality. You’re not scrambling through a lunch rush. You can use cold rice, which is genuinely superior for this application.
When rice is freshly cooked, it’s full of moisture and the individual grains stick together as they cool. This moisture prevents proper browning and creates a steamed texture instead of a fried one. Cold rice, especially rice that’s been in the refrigerator overnight, has lost significant moisture. The grains separate easily and fry crisply rather than clump together. This is why homemade versions taste distinctly better—that textural contrast between slightly crispy exterior and tender interior is something you simply can’t achieve with warm rice.
Beyond the rice itself, control matters enormously. At home, you choose exactly how much kimchi juice goes into the dish, how much heat you apply, and how long everything cooks. You can let the rice sit undisturbed for a full minute, building those caramelized edges that restaurants often skip because they’re rushing through service. You can taste and adjust seasoning to your exact preference rather than accepting whatever the kitchen pre-standardized. These small choices compound into noticeably superior results.
Cost is another decisive factor. A restaurant charges $12 to $18 for a bowl of kimchi fried rice. The actual ingredient cost is maybe $2 to $3. Making it at home means paying that ingredient cost and getting four generous servings. Economically, there’s no competition. But the real win is flavor consistency. Once you dial in your preferred version—your ratio of kimchi to rice, your preferred protein, your ideal spice level—you can replicate it perfectly every time. That consistency, that personal optimization, is something no restaurant can offer.
Understanding the Key Ingredients and Why They Matter
The foundation of exceptional kimchi fried rice rests entirely on understanding what each ingredient contributes and choosing quality versions deliberately. This isn’t a dish where skimping on components helps your budget—it compromises the final result.
The Critical Role of Fermented Kimchi
Kimchi is never incidental to this dish; it’s literally the star. But not all kimchi is created equal for fried rice purposes. You want well-fermented, aged kimchi—ideally at least two to three weeks old, though older is genuinely better. Fresh kimchi (less than a week old) is still crunchy and bright but lacks the depth and sourness that transforms rice into something memorable.
As kimchi ferments, the flavor compounds deepen and evolve. The initial sharpness mellows into something more complex, with tanginess becoming more pronounced and the chili heat developing a slightly smoky undertone. The texture softens slightly, which matters because you want the kimchi to break down a bit when cooked, releasing its flavorful juices throughout the rice. If your kimchi is too young, you’ll get brighter flavors but less that savory, umami-rich depth that makes people ask for the recipe.
The juice—that spicy red liquid at the bottom of the kimchi jar—is equally important. This isn’t filler; it’s concentrated flavor in liquid form. It contains all the fermented notes, the chili intensity, and salt that seasons the entire dish. Most takeout places use minimal kimchi juice (which explains why their version tastes flat), while home recipes that succeed use generous amounts. Don’t skip this or treat it as optional.
Rice: Temperature and Type Both Matter
Short-grain or medium-grain white rice works best for this application, though some cooks swear by jasmine or sushi rice. The key characteristic is that the grains should remain slightly separate and firm rather than becoming mushy when cooked. Avoid long-grain varieties like basmati unless that’s genuinely all you have available—the starch structure behaves differently and can actually make the final dish feel mushier even with proper cold rice.
The temperature of your rice when it hits the pan is non-negotiable: it must be cold. If you’re cooking rice fresh, let it cool completely at room temperature (about 15-20 minutes), spread it out on a plate to help it dry, then refrigerate it for at least a few hours before cooking. Ideally, make rice the night before, spread it on a baking sheet uncovered, and let it sit in the refrigerator overnight. This overnight rest genuinely dries the rice and improves the final texture noticeably. If you’re using day-old rice from takeout or meal prep, that works perfectly—just use it straight from the fridge.
The Seasoning Trio: Gochujang, Soy Sauce, and Sesame Oil
Gochujang (Korean fermented red chili paste) adds heat, umami, and depth that plain chili flakes can’t replicate. It’s made from fermented soybeans, chili peppers, and salt, which means it brings both savory and spicy dimensions to the rice. About 1 to 2 tablespoons per 3 cups of rice is the standard range, though this varies based on your heat tolerance and the strength of your kimchi juice.
Soy sauce (specifically low-sodium versions work best, since kimchi is already salty) adds salty umami notes. You want roughly 2 tablespoons per batch. It seems like a modest amount, but soy sauce is concentrated—it doesn’t take much to register flavor. Too much and the dish becomes overly salty and flat-tasting.
Sesame oil is the finishing touch that makes this taste authentically Korean rather than generically Asian. It has a distinctive warm, nutty flavor that only develops in the final moments of cooking. Always add it right at the end, off heat, so it doesn’t break down. About 1 tablespoon for a full batch is sufficient. This isn’t the time to be conservative—the aroma and flavor that sesame oil contributes is fundamental to making your homemade version taste better than any restaurant takeout.
Serving and Timing Information
Yield: Serves 4 as a main course | Makes approximately 5 cups
Prep Time: 15 minutes (hands-on active preparation)
Cook Time: 12-15 minutes (stir-frying)
Total Time: 27-30 minutes active time
Difficulty: Beginner — No special equipment beyond a large skillet or wok, and the technique is straightforward enough that someone cooking for the first time can execute this successfully with attention to detail.
Complete Ingredient List
For the Kimchi Fried Rice:
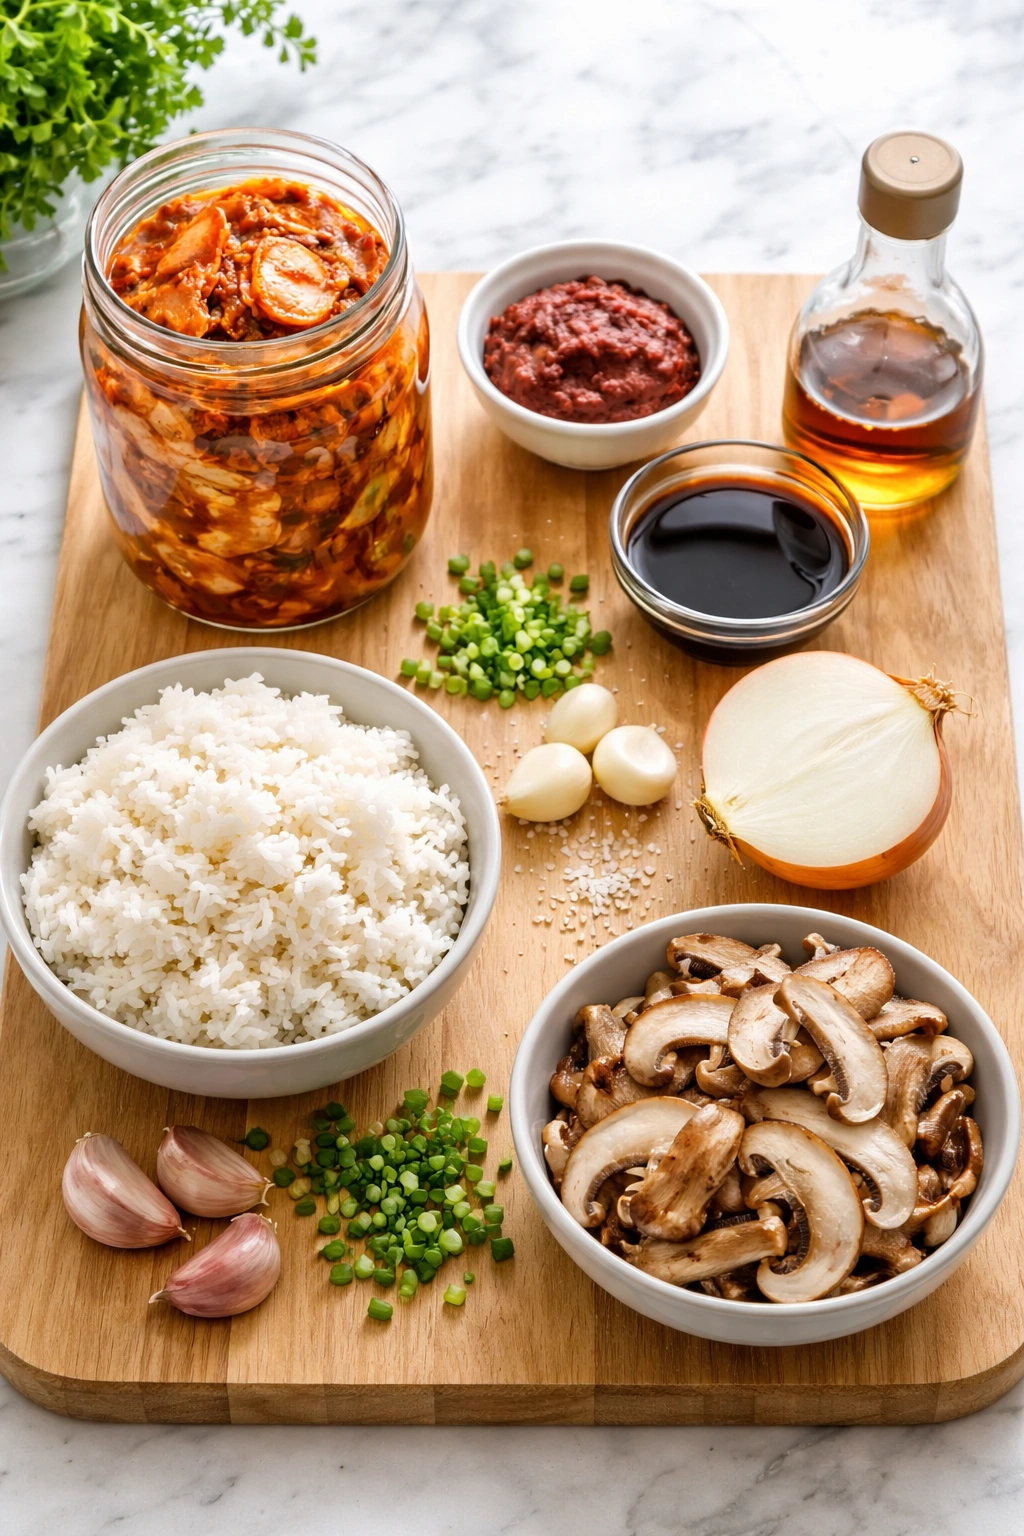
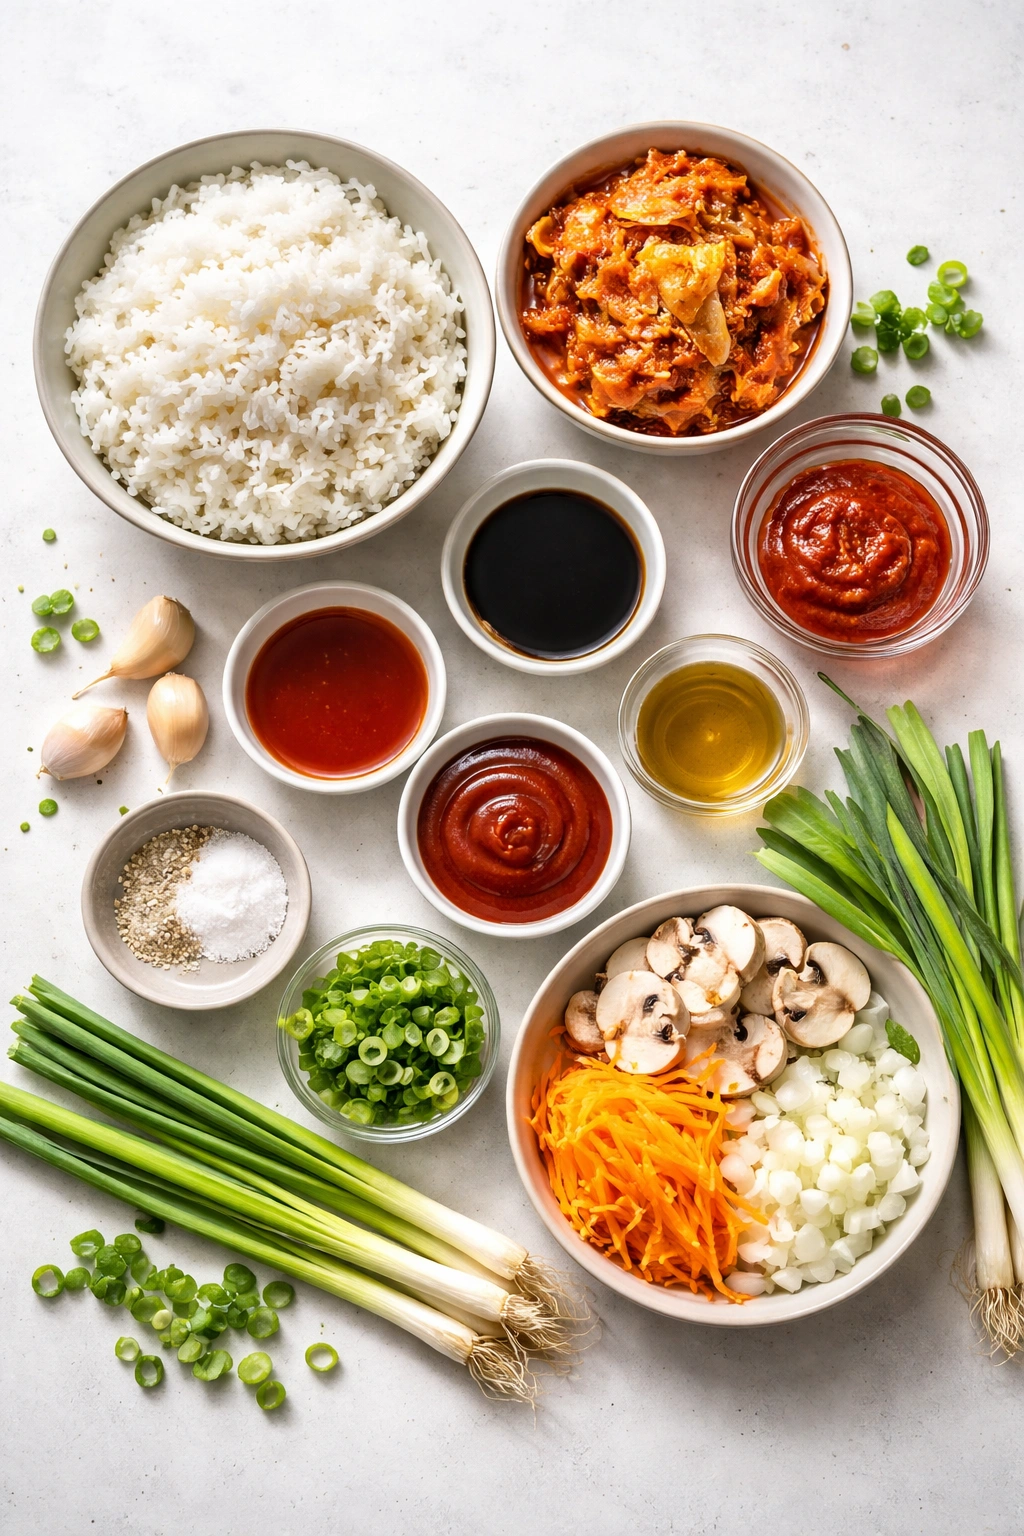
- 3 cups cold, cooked short or medium-grain white rice (day-old or overnight refrigerated)
- 1 ½ cups well-fermented kimchi (at least 2-3 weeks old), coarsely chopped
- ¼ cup kimchi juice (the spicy red liquid from the bottom of the kimchi jar)
- 2 tablespoons low-sodium soy sauce
- 1 ½ tablespoons gochujang (Korean fermented red chili paste)
- 1 tablespoon sesame oil
- 2 tablespoons vegetable or canola oil, divided
- 3 cloves garlic, minced
- 1 small onion, diced finely
- 1 cup mushrooms (cremini, shiitake, or enoki work well), sliced or torn into bite-sized pieces
- ½ cup carrots, diced small or sliced thin
- 2 green onions, white and green parts separated, thinly sliced
- Salt and white pepper to taste
Optional Add-Ins for Protein and Richness:
- 150g (5 ounces) bacon, cut into small pieces and cooked until crispy
- 1 can (12 ounces) SPAM, diced and quickly pan-fried until edges brown
- 2-3 eggs, lightly beaten (cooked separately and added at the end)
For Garnish:
- 2 tablespoons toasted sesame seeds
- ¼ cup nori (roasted seaweed), shredded or cut into strips
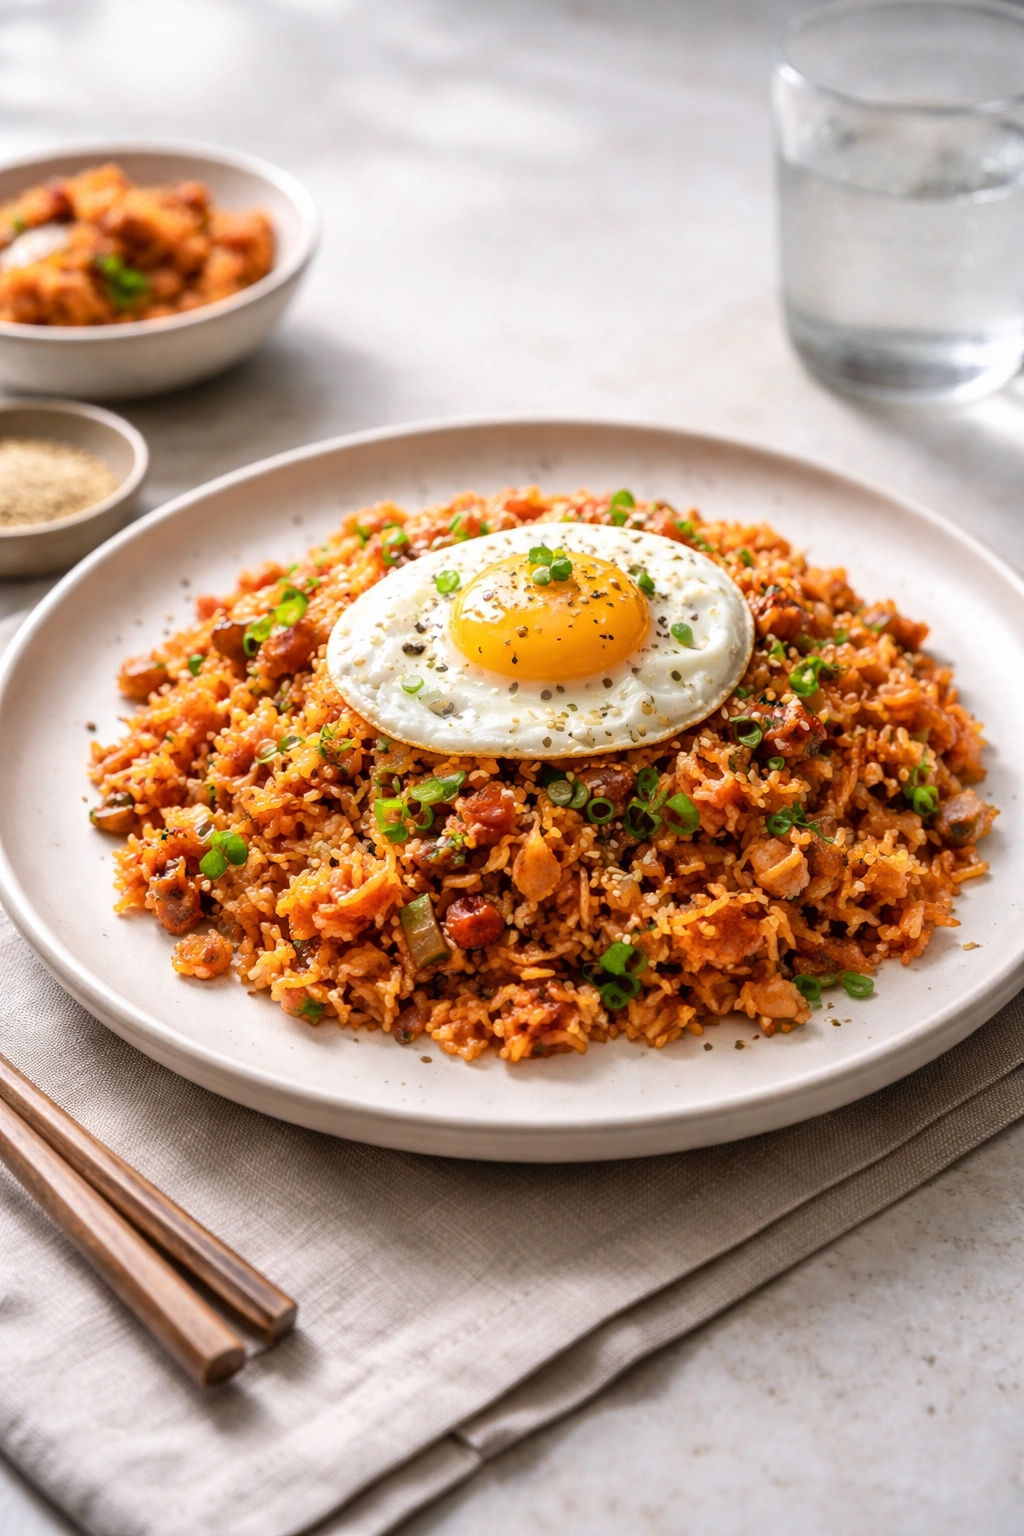
- 1 fried egg per serving (optional but highly recommended)
- Fresh cilantro, roughly chopped (optional)
The Secrets to Restaurant-Quality Results
The difference between mediocre and exceptional kimchi fried rice comes down to understanding and executing a few non-negotiable principles. These aren’t secrets in the sense of hidden knowledge—they’re simply techniques that professional cooks use consistently and home cooks often overlook.
Heat Control and Timing
The most crucial secret is using high heat but not maximum heat, and understanding that different ingredients need different temperatures at different stages. When your pan is first heating, you want it quite hot—medium-high to high. You’re building a base of aromatic flavor with garlic, onion, and ginger. This stage happens quickly, in maybe 2-3 minutes, and the high heat prevents these aromatics from burning while allowing them to release their oils and infuse the cooking fat.
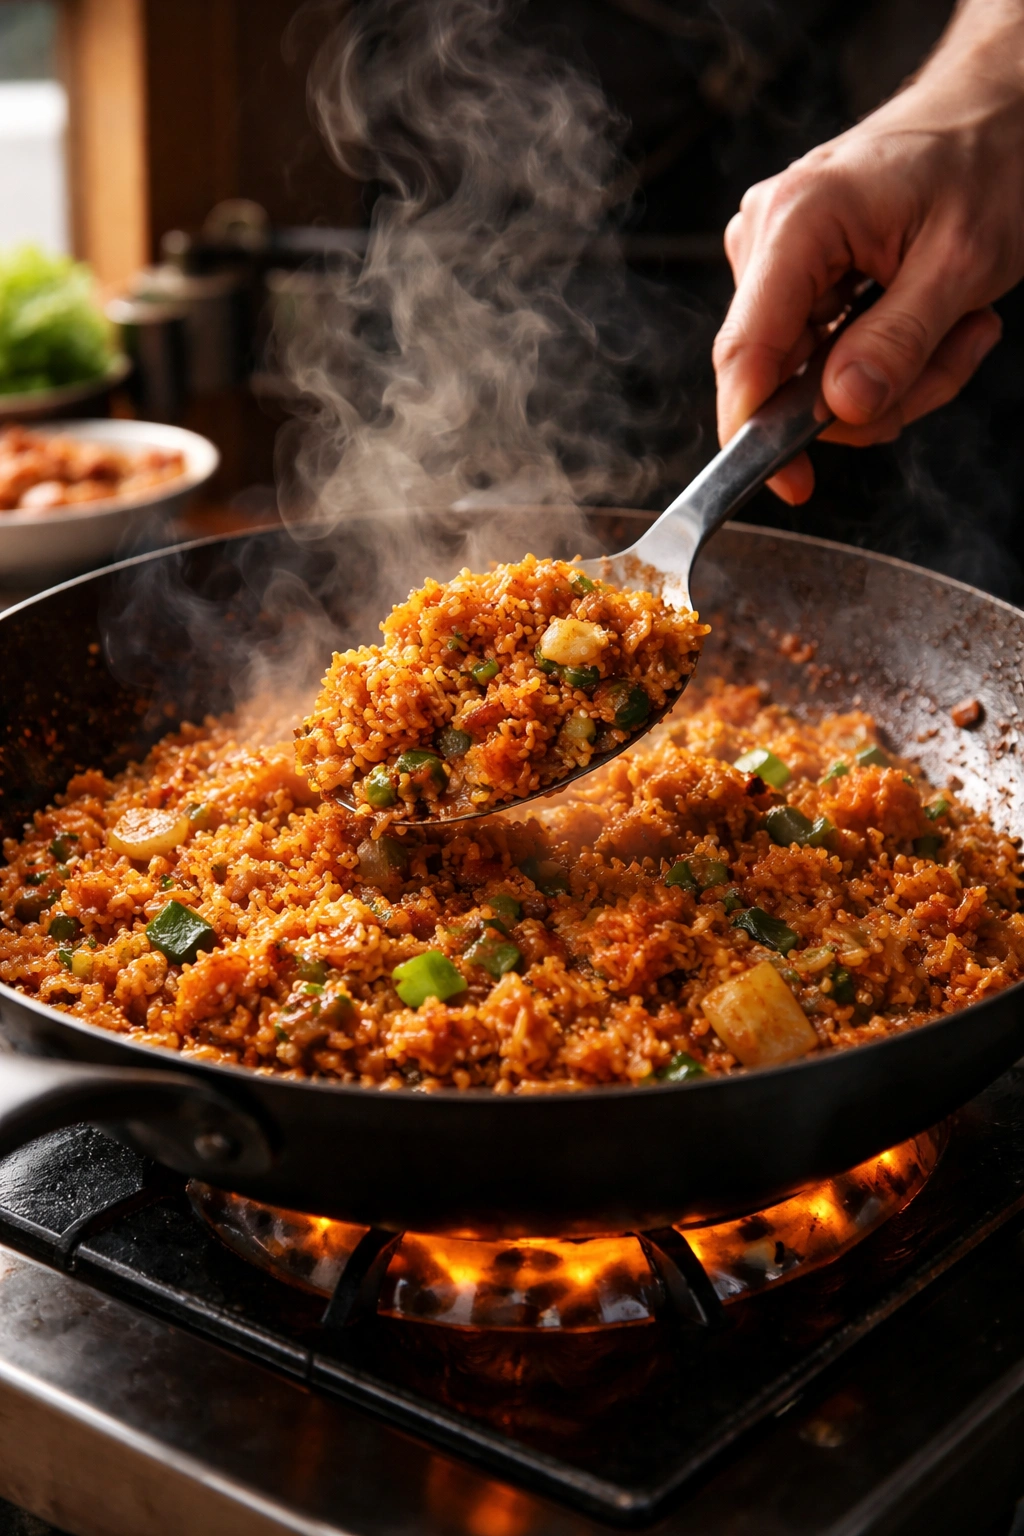
Once vegetables are partially softened, you’re reducing heat slightly as you add the rice. Now you want the heat at medium-high rather than full blast. This is where patience matters. Let the rice sit undisturbed for 60 to 90 seconds after adding it. Don’t immediately stir. Let the bottom layer make contact with the hot pan surface, creating those crispy, slightly caramelized edges that make the texture interesting.
After that initial rest period, you’re stirring more frequently but not constantly. The goal is to let rice spend time against the hot pan surface, then move around to get even coloring. This shouldn’t be rapid-fire stirring—it’s deliberate, purposeful movement every few seconds, giving the rice chances to brown.
Building Flavor Intentionally
Most home cooks make the mistake of adding everything at once—the kimchi, the soy sauce, the gochujang, all going into the pan simultaneously. Instead, add components sequentially and let each one cook for a moment before introducing the next. This layering of flavor creates complexity rather than a one-note spicy-salty taste.
Cook your aromatics (garlic, onion) until fragrant and slightly softened. Add the kimchi next, and let it cook for 2-3 minutes before the rice arrives. This time allows the kimchi to break down slightly, releasing its juices and caramelizing at the edges. When the rice joins the pan, you’re combining already-flavorful elements rather than expecting the rice to absorb raw ingredients.
The soy sauce and gochujang go in together with the rice, mixed into the oil. Let this cook for another minute before your sesame oil gets added. By the time you finish with sesame oil (off heat), the flavors have had a chance to meld rather than sitting on top of each other.
Managing Moisture Correctly
Moisture is the enemy of crispy fried rice, but you need some liquid to cook the rice grains evenly and distribute flavor. The kimchi juice provides that liquid, and the amount matters precisely. Too much and you end up with soggy, steamed rice. Too little and the rice becomes dry and one-dimensional.
The standard ratio is ¼ cup kimchi juice per 3 cups of cold rice. This sounds minimal, but remember: your rice is cold and dry from refrigeration. That small amount of liquid, combined with the moisture already in the kimchi and vegetables, is sufficient to cook the rice grains tender while still allowing them to get crispy edges.
If your kimchi is very young and doesn’t have a full ¼ cup of juice available, thin what you have with a splash of water or reduce the rice quantity accordingly. This prevents diluting your flavors with plain water while respecting the moisture balance.
Step-by-Step Cooking Instructions
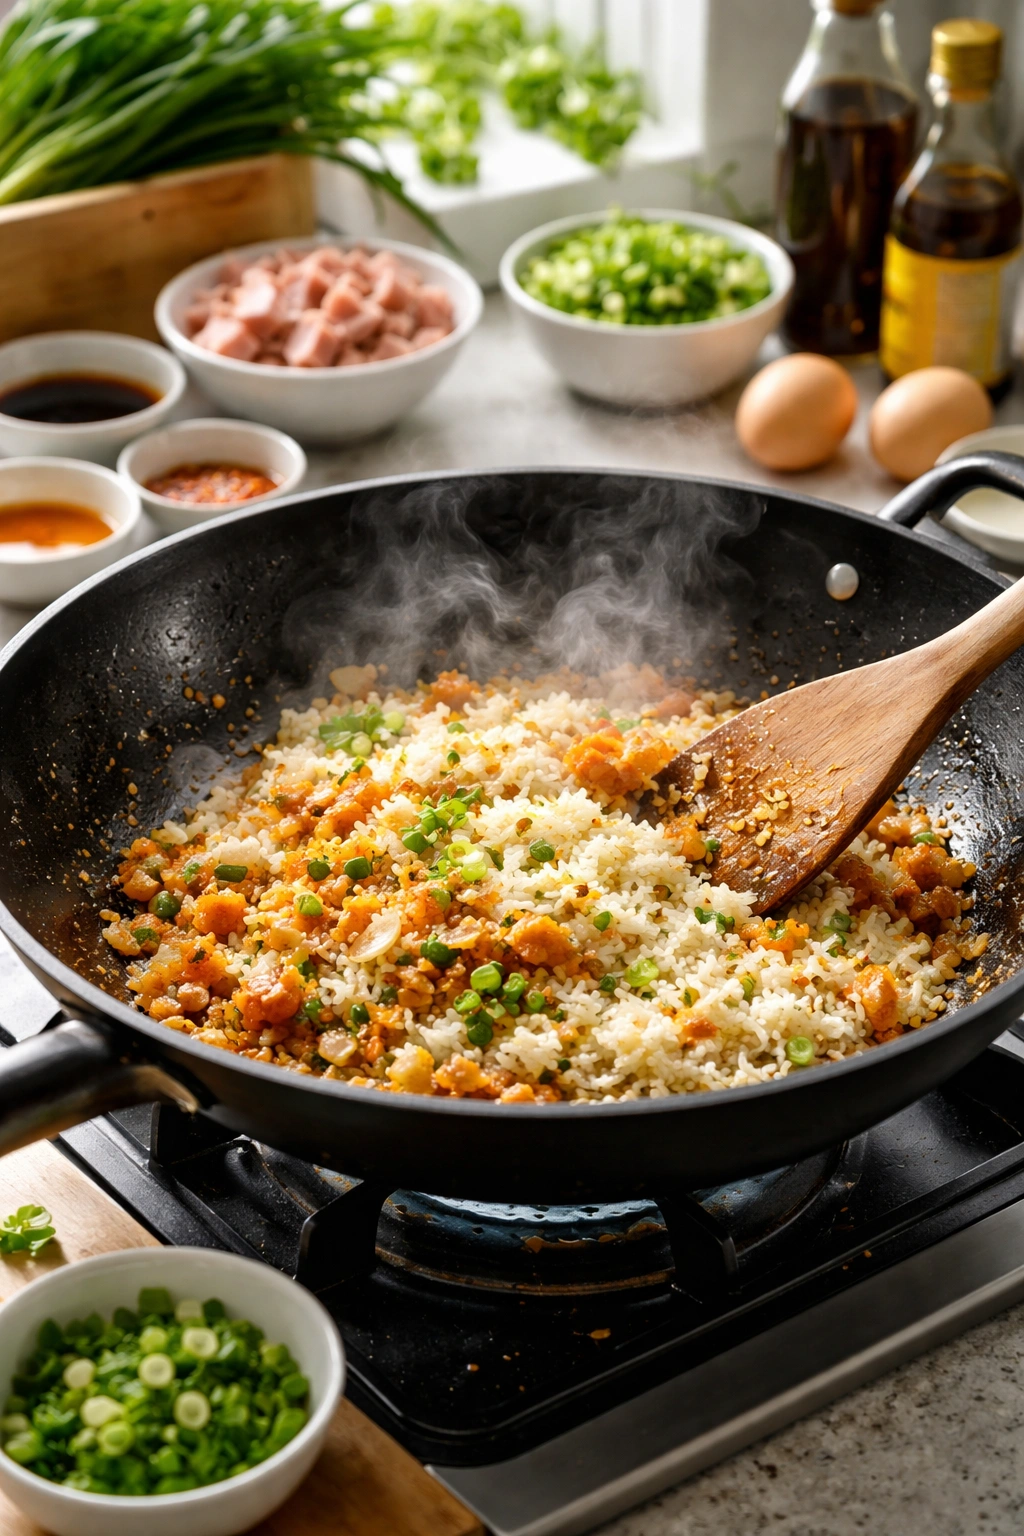
Prepare Your Components:
-
Remove your cold rice from the refrigerator and break up any clumps gently with your hands or a fork. Spread it out slightly on a plate so grains are as separated as possible before cooking.
-
Mince your garlic finely so it cooks quickly without burning. Dice your onion into small pieces roughly the size of a pea—they should cook in just a few minutes.
-
Slice your mushrooms roughly, or tear enoki mushrooms into separate strands. Cut carrots into small dice or thin matchsticks so they cook evenly.
-
Separate the white and green parts of your green onions. You’ll use the white parts early in cooking for additional flavor, and the green parts as garnish at the very end.
-
If using meat proteins, cook them separately before starting the fried rice. Bacon should be cooked until crispy, drained on paper towels, and broken into small pieces. SPAM should be diced and quickly pan-fried until the edges brown, then set aside.
Advertisements -
In a small bowl, whisk together the soy sauce, gochujang, and ¼ cup kimchi juice until smooth and well combined. This mixture should be pourable and free of lumps.
Cook the Fried Rice:
-
Heat a large wok or skillet (cast iron works beautifully for this) over medium-high heat for about 1 minute until quite hot. The pan should be hot enough that a drop of water immediately sizzles and evaporates.
-
Add 1 tablespoon of vegetable oil to the hot pan and swirl to coat evenly. Let it heat for just 10-15 seconds—you want it shimmering but not smoking.
-
Add the minced garlic and white parts of the green onions to the hot oil. Stir constantly for about 30 seconds, just until fragrant. You’re building an aromatic base, and this should happen very quickly to prevent burning.
-
Add the diced onion, mushrooms, and carrots to the pan. Stir frequently for 3-4 minutes, until the onion has become translucent at the edges and the mushrooms are starting to soften and release their moisture.
-
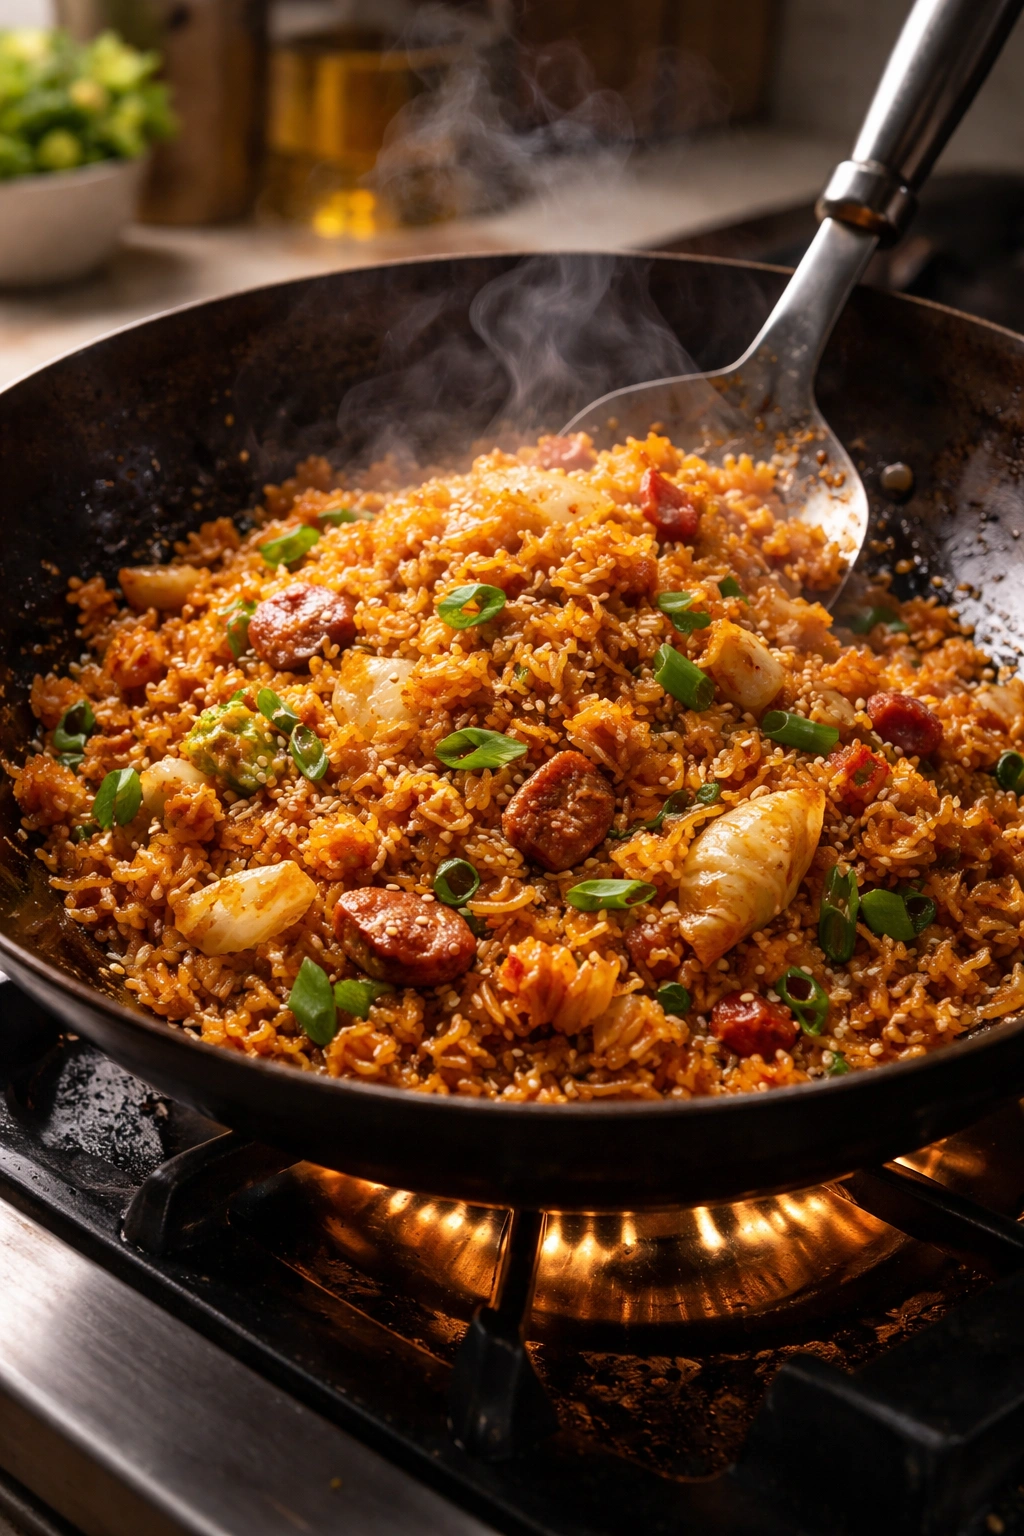
Create a well in the center of the pan and push vegetables to the sides. Add the remaining 1 tablespoon of oil to the center. Let it heat for just a few seconds, then add your chopped kimchi to this hot oil. Stir the kimchi with the oil for 2-3 minutes. Don’t stir the vegetables during this time—you want the kimchi to caramelize at its edges, releasing color and deeper flavor. You’ll notice the kimchi releasing its juices into the pan.
-
Increase heat to medium-high. Add your cold rice directly on top of the vegetables and kimchi, breaking up clumps as it hits the pan. Spread the rice evenly to cover the bottom of the pan, then do not stir for 60-90 seconds. This rest period allows the rice that’s in direct contact with the hot pan to brown and get crispy. You should hear it sizzling actively.
-
After that initial rest, pour the soy sauce and gochujang mixture around the rice, distributing it as evenly as possible. Begin stirring now, using a wooden spoon to combine rice, vegetables, and sauce. Continue stirring every 15-20 seconds for another 2-3 minutes. You’re looking for the rice to take on an even reddish-brown color and for grains to look separate and coated rather than clumped together.
-
Turn off the heat completely. Drizzle the sesame oil over the rice and stir it through gently. Sesame oil burns easily, which destroys its nutty flavor, so adding it off heat is critical. The residual heat will warm the oil and distribute its flavor throughout without damaging it.
Advertisements -
If using bacon or SPAM, add it now and fold gently to incorporate. If using eggs, you can either stir beaten eggs into the still-warm rice (which creates a scrambled-egg texture distributed throughout) or fry eggs separately and serve on top. I recommend frying them separately for better texture and appearance.
-
Taste the fried rice and adjust seasoning with salt and white pepper as needed. Remember that soy sauce, gochujang, and kimchi are all salty, so taste before adding additional salt.
-
Transfer to serving bowls or plates immediately while still warm. The rice will continue to absorb residual heat and flavors for another minute or so after cooking stops.
Fry Eggs (if using):
-
While the rice cooks or just before serving, heat a nonstick skillet over medium-high heat with a small amount of oil (about ½ tablespoon per egg).
-
Crack each egg into a small bowl first, then gently pour into the hot oil. This prevents getting shell fragments in your rice and gives you control over doneness.
-
Fry for approximately 3-4 minutes, without moving the egg, until the whites have set completely but the yolk remains runny. The edges should be crispy and golden.
-
Season the fried egg with a pinch of salt and white pepper. Carefully slide it onto the top of your serving of fried rice.
Common Mistakes and How to Avoid Them
Making kimchi fried rice once doesn’t guarantee success the second time if you fall into common pitfalls. Most of these mistakes are subtle enough that you’ll only notice them by comparison.
Soggy, Mushy Rice Texture
This is the most frequent complaint, and it stems almost entirely from using rice that’s too warm or too moist. Warm or freshly cooked rice retains internal moisture that prevents browning. Instead, the rice essentially steams in the pan, and the grains clump together as they would in a pot.
The fix is absolute: use cold rice from the refrigerator, ideally rice that’s been chilling overnight. If you must use freshly cooked rice, spread it on a baking sheet uncovered in the refrigerator for at least 2-3 hours, preferably overnight. This drying step is non-negotiable if you want the texture that justifies calling this dish “fried” rice.
Another contributor to sogginess is adding too much liquid. Stick strictly to the ¼ cup kimchi juice ratio. If you’re tempted to add more “juice” or liquid for more flavor, use the concentrated flavorings (more gochujang or soy sauce) instead, not more actual liquid.
Bland, One-Dimensional Flavor
When the finished dish tastes flat and salty without much character, the culprit is usually one of three things: young, under-fermented kimchi (which lacks the complex sourness and depth of aged kimchi), too little gochujang (which should be a generous 1.5-2 tablespoons, not a cautious tablespoon), or not letting the kimchi cook long enough to caramelize and concentrate its flavor.
The fix requires using aged kimchi at least 2-3 weeks old, measuring gochujang honestly rather than scaling it back, and giving the kimchi 2-3 minutes of cooking time in the oil before adding rice. That cooking time transforms the kimchi from a sharp ingredient into something more rounded and complex.
Rice Clumping Together
Even with cold rice, if you stir constantly from the moment rice hits the pan, you can accidentally break down the grain structure and cause clumping. The starches in the grains release, creating a glue-like effect.
Avoid this by respecting that initial 60-90 second rest period where you don’t stir at all. Let the rice make contact with the hot pan, then begin gentle stirring. If you do notice clumps forming, stop stirring and return to less frequent stirring. Most of the time, continuous gentle heat and occasional stirring will eventually break up clumps, but if they’re stubborn, you’ve used rice that was too moist to begin with.
Oil or Grease Residue Coating Your Mouth
Some home cooks end up with fried rice that feels oily rather than crispy. This typically happens when too much oil is used initially (more than 2 tablespoons total for 3 cups rice) or when oil is added multiple times throughout cooking.
Use the measured amounts provided: 2 tablespoons total vegetable oil, divided between the initial aromatics and the kimchi. Sesame oil comes at the very end and is measured at 1 tablespoon. This amount is sufficient to cook and flavor the rice without making it feel greasy. The rice itself has minimal oil content, so what you add is what you’ll taste and feel.
Variations to Make It Your Own
The beauty of this dish is its flexibility. Once you understand the foundational technique, you can adapt it to different proteins, different vegetables, different spice levels, and different dietary needs without compromising quality.
Protein Variations
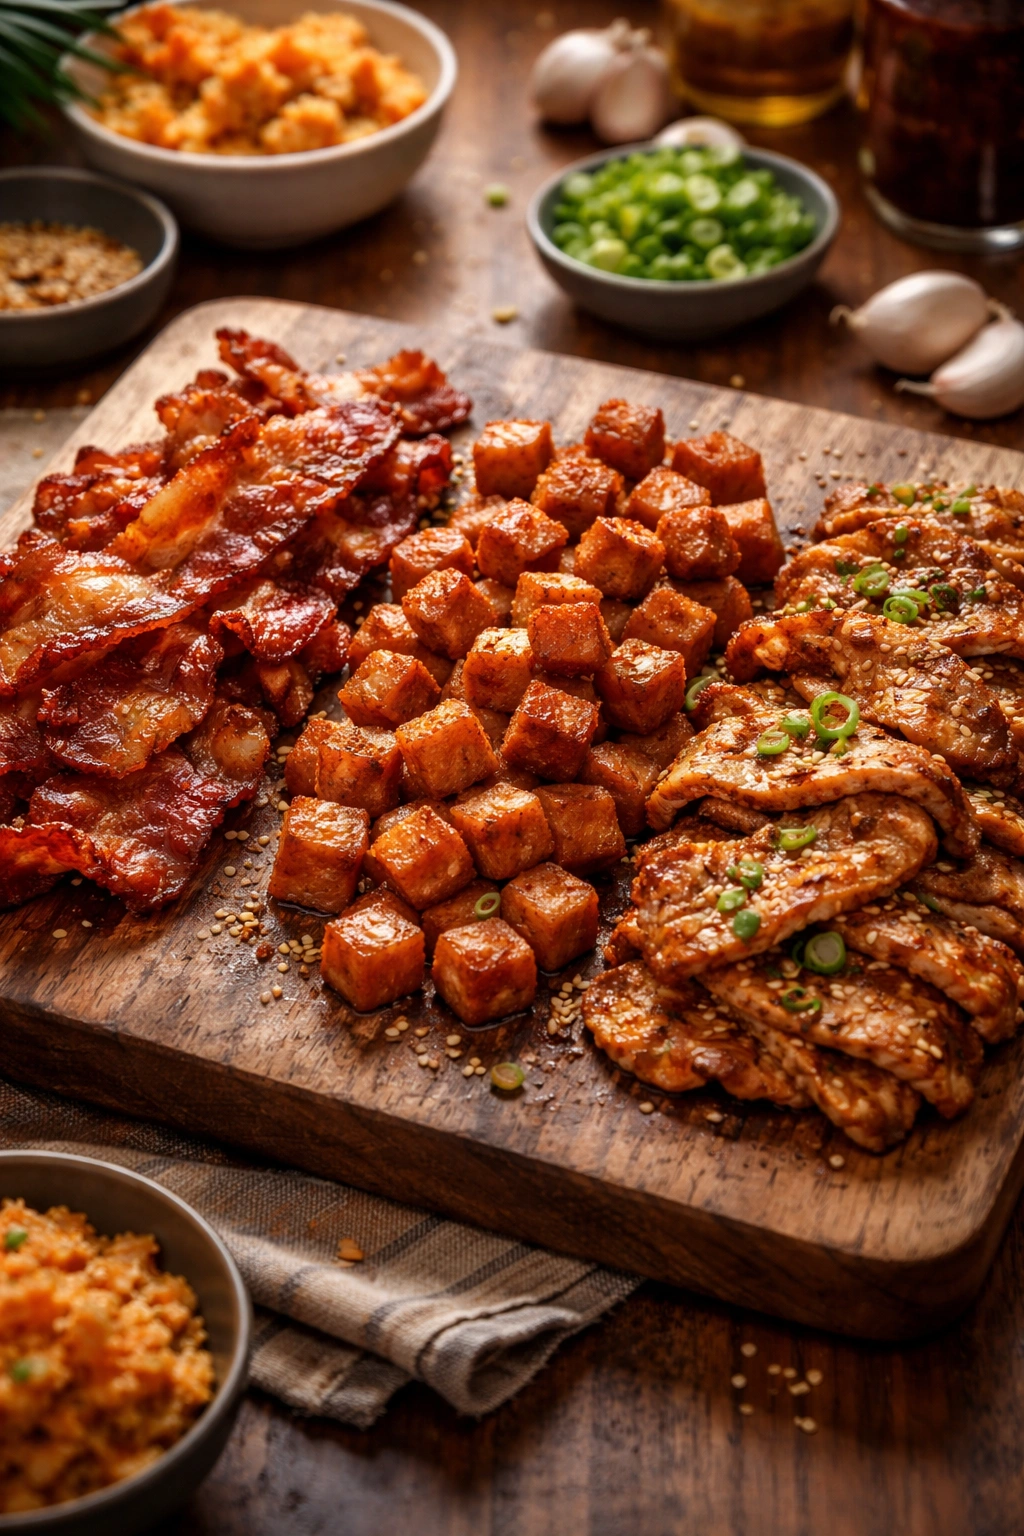
Bacon-Based Version: This is the classic meat approach. Cook 150-200 grams (5-7 ounces) of bacon until crispy, drain on paper towels, chop into small pieces, and fold into the rice at the very end. Bacon adds smoky richness and a crispy texture that complements the spicy kimchi beautifully.
SPAM Elevation: Diced SPAM browned in a separate pan adds a salty, slightly fatty component that some Korean households prefer to bacon. It’s also a cost-effective protein and lasts indefinitely in the pantry. Dice one can and quickly brown the pieces in a hot pan until edges caramelize, about 4-5 minutes.
Pork Belly Sophistication: Thinly sliced pork belly (not bacon, which is cured) marinated in a simple mixture of gochujang, soy sauce, ginger, and sesame oil, then briefly pan-fried until the edges brown, adds luxurious richness. This version feels more restaurant-quality and justifies serving the fried rice as a main course rather than a side.
Shrimp Lightness: Cook cleaned, deveined shrimp quickly in a separate pan with a bit of garlic and sesame oil until pink and just cooked through (about 3-4 minutes). Fold into the rice at the end. This gives the dish a lighter, more seafood-forward profile.
Fully Vegetarian/Vegan Version: The dish is absolutely complete without any meat. Focus on using varied vegetables (bok choy, snap peas, broccoli, corn, zucchini—whatever you have) and ensure you’re using enough gochujang and kimchi juice to build deep flavor. A fried egg on top adds protein if you eat eggs; if not, serve with a side of edamame or tofu.
Vegetable Variations
The vegetable base can shift dramatically based on season and availability. What matters is having roughly 2 cups total vegetables so they provide texture contrast and don’t overwhelm the rice.
Spring Version: Use baby bok choy, peas, diced asparagus, and green onions. This combination keeps the dish lighter and more delicate.
Fall/Winter Version: Use diced sweet potato, regular white onion, mushrooms (especially earthy varieties like shiitake or cremini), and kale. This creates a warmer, earthier bowl.
Summer Version: Include diced zucchini, corn kernels, red bell peppers, and cilantro. The sweetness of corn balances the spice beautifully.
You can also add leafy greens—kale, spinach, or even just the green parts of bok choy—near the end of cooking. They wilt in about 2-3 minutes and add nutritional depth without dramatically changing the flavor profile.
Spice Level Customization
If you prefer less heat, reduce gochujang to 1 tablespoon and use young kimchi (less fermented means less pungent and slightly less spicy). You can still use ¼ cup kimchi juice; the sourness matters more than the heat.
If you prefer more heat, use aged, very spicy kimchi, keep gochujang at 2 tablespoons, and add ½ to 1 teaspoon of gochugaru (Korean chili flakes) mixed into the soy sauce mixture for an additional heat layer. The flakes add dryness and intensity that paste can’t quite replicate.
Storage and Make-Ahead Tips
The wonderful news about kimchi fried rice is that it’s genuinely better the next day. The flavors marry and deepen, and leftover rice actually fries up slightly crispier when reheated properly.
Storing Leftovers
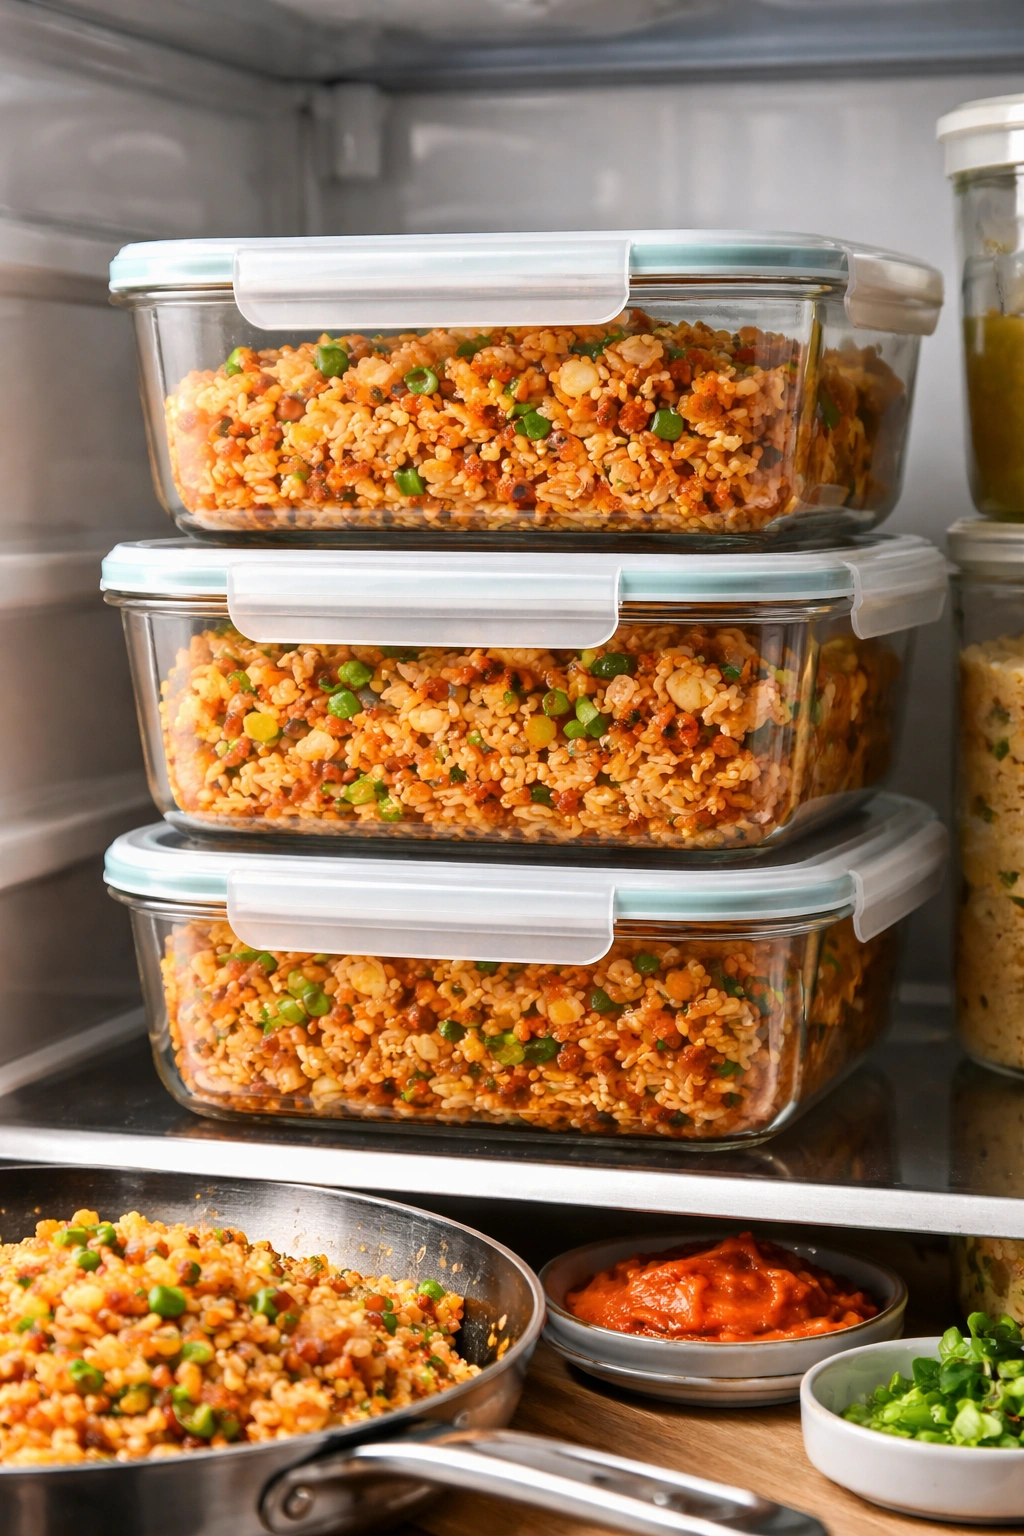
Transfer leftover fried rice to an airtight container and refrigerate it as soon as it’s cool enough to handle, ideally within 30 minutes of cooking. Stored this way, it keeps for 4-5 days without any quality degradation. The flavors actually improve in the first 24 hours, making day-old leftover rice an excellent lunch the next day.
Freezing also works well. Portion cooked fried rice into individual containers and freeze for up to 3 months. The texture holds remarkably well after freezing and thawing, far better than you’d expect from a rice dish.
Reheating for Best Texture
The worst way to reheat fried rice is in a microwave, where it tends to dry out and become harder. Instead, heat a large skillet over medium heat, add a small splash of water (just 2-3 tablespoons), then add your cold fried rice. Stir gently and frequently for 4-5 minutes until warmed through. The added water prevents drying while the pan heat restores crispy edges.
Alternatively, spread your cold leftover fried rice on a baking sheet and warm it in a 350°F (175°C) oven for about 8-10 minutes, stirring halfway through. This method distributes heat evenly and maintains texture better than stovetop reheating for larger quantities.
Make-Ahead Components
You can prepare individual components ahead of time without compromising the final dish. Cook your rice the night before, as planned. Prepare your vegetables (chop, dice, slice) the morning of cooking and store in the refrigerator in separate containers. Cook any meat proteins (bacon, SPAM, pork belly) a few hours ahead and leave them at room temperature covered, or refrigerate and quickly reheat before assembling.
The only component you cannot prepare in advance is the actual fried rice cooking itself. This final step must happen close to serving time (within 30 minutes ideally) to capture the warmth and optimal texture. However, everything else can be done during the day, making the final cooking just a 15-minute assembly and stir-fry.
Serving Suggestions and Pairings
Kimchi fried rice can stand alone as a complete meal, but certain pairings elevate it from dinner into something memorable. The dish’s spicy, tangy profile pairs with surprising things when you think beyond traditional Korean sides.
Serving as a Main Course
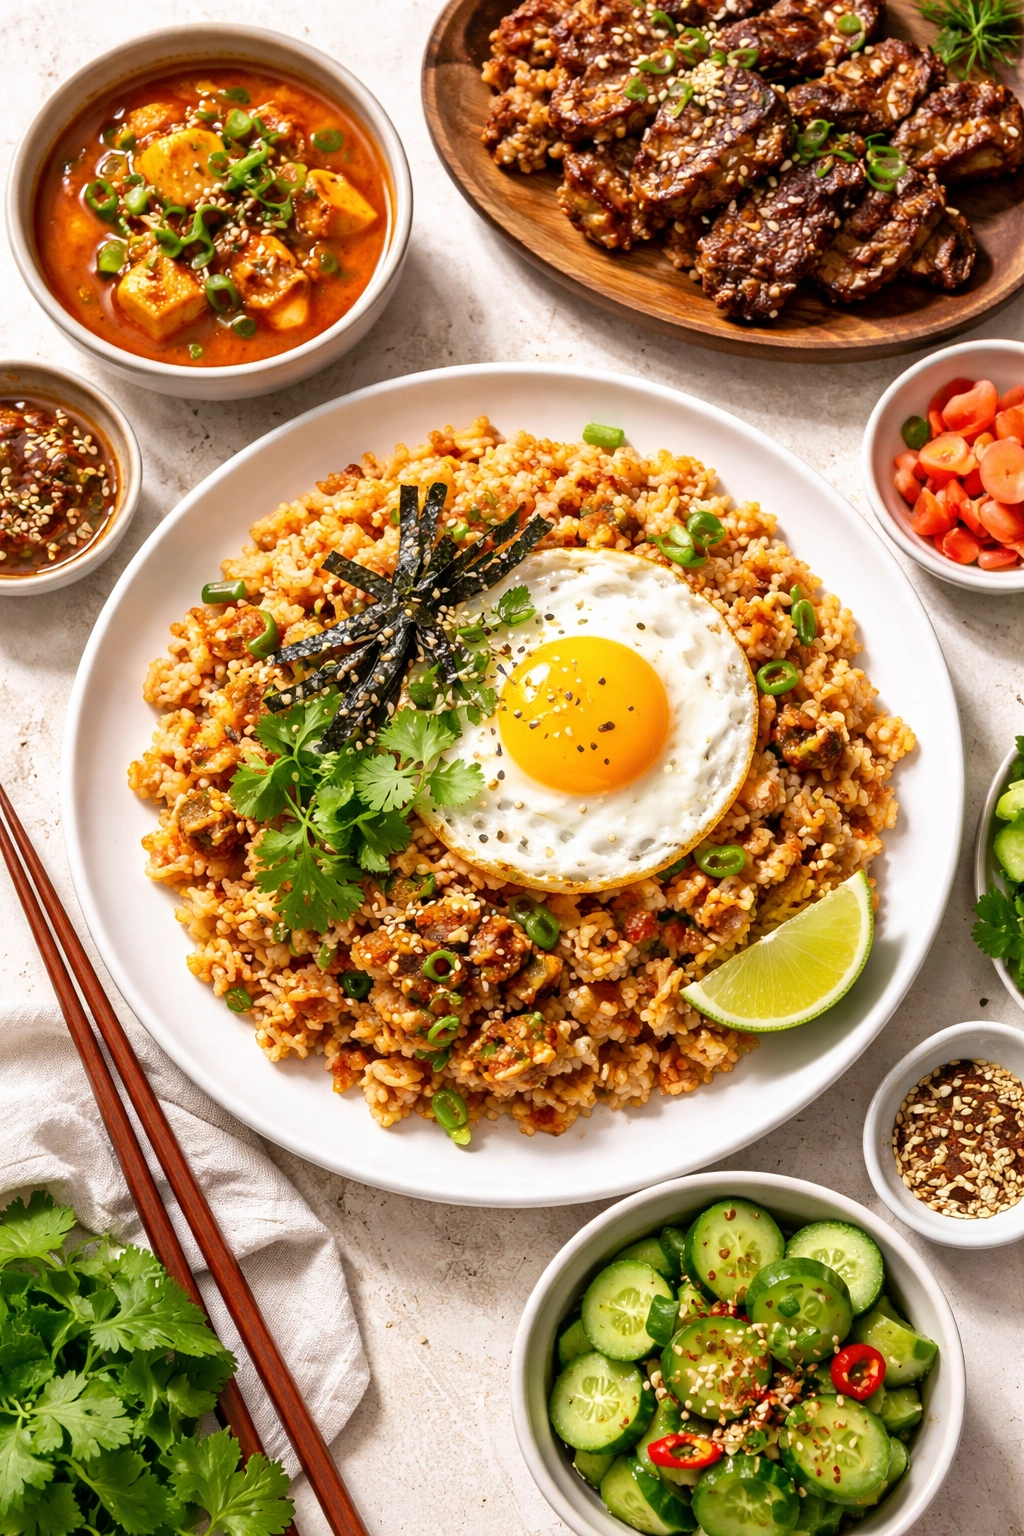
Serve generous bowls (about 1.5 cups per person) topped with a fried egg, toasted sesame seeds, nori strips, and fresh cilantro. Offer lime wedges on the side—a squeeze of lime’s brightness plays beautifully against the spice and fermentation. This becomes a fully satisfying meal without any side dishes needed.
Traditional Korean Accompaniments
Serve alongside kimchi jjigae (spicy kimchi stew), Korean grilled short ribs (galbi), or gochujang-marinated pork belly. The fried rice’s complex flavors support these bolder proteins rather than competing with them. Add a simple cucumber and vinegar salad or seasoned spinach for coolness and vegetable balance.
Unexpected Pairings That Work
A simple miso soup or clear broth on the side provides warmth and a cooling counterpoint to the spice. Grilled vegetables like zucchini or asparagus brushed with soy sauce complement the rice’s savory depth. Even a simple green salad with sesame ginger dressing works, providing acidity and freshness that prevents the fried rice from feeling heavy.
Beverage Pairings
Korean makgeolli (rice wine) is the traditional choice and genuinely pairs better than beer. The slightly sweet, creamy texture softens the spice effectively. If you prefer beer, choose something crisp and clean like lager or pilsner rather than heavy ales. A ginger ale or yuzu soda works beautifully if you’re avoiding alcohol, providing sweetness and brightness.
Tea drinkers should choose something robust without astringency—oolong or roasted barley tea are ideal, as they have enough body to stand up to spicy food without making your mouth dry the way black tea sometimes does.
Final Thoughts
Homemade kimchi fried rice that rivals and genuinely surpasses restaurant versions isn’t a matter of secret ingredients or advanced cooking skills. It’s about respecting three foundational principles: using cold, dry rice; building flavor intentionally through sequential ingredient additions; and managing heat and moisture precisely.
The first time you make this dish, follow the recipe exactly as written. Notice how the rice texture changes between the initial rest period (when you’re not stirring) and the subsequent cooking phases. Pay attention to the moment the gochujang and soy sauce get stirred through—that’s when the color transformation happens and flavors meld into something cohesive. Taste as you go, especially before adding extra salt, since you’re already working with three salty components.
The second time you make it, adjust based on your preferences. Prefer spicier? Add more gochujang or older kimchi. Want more umami depth? Use a bit more soy sauce or add a splash of oyster sauce. The baseline technique stays the same; the flavor profile becomes yours.
What makes this genuinely better than takeout isn’t any magical technique. It’s that you made it with ingredients you chose, at a heat level you controlled, with rice that was properly prepared, and without the time pressure that makes restaurants occasionally compromise on texture or flavor balance. You get to eat it hot, or store it for later knowing it’ll taste even better the next day. That control, that consistency, that personal optimization—that’s what transforms ordinary fried rice into something worth talking about.