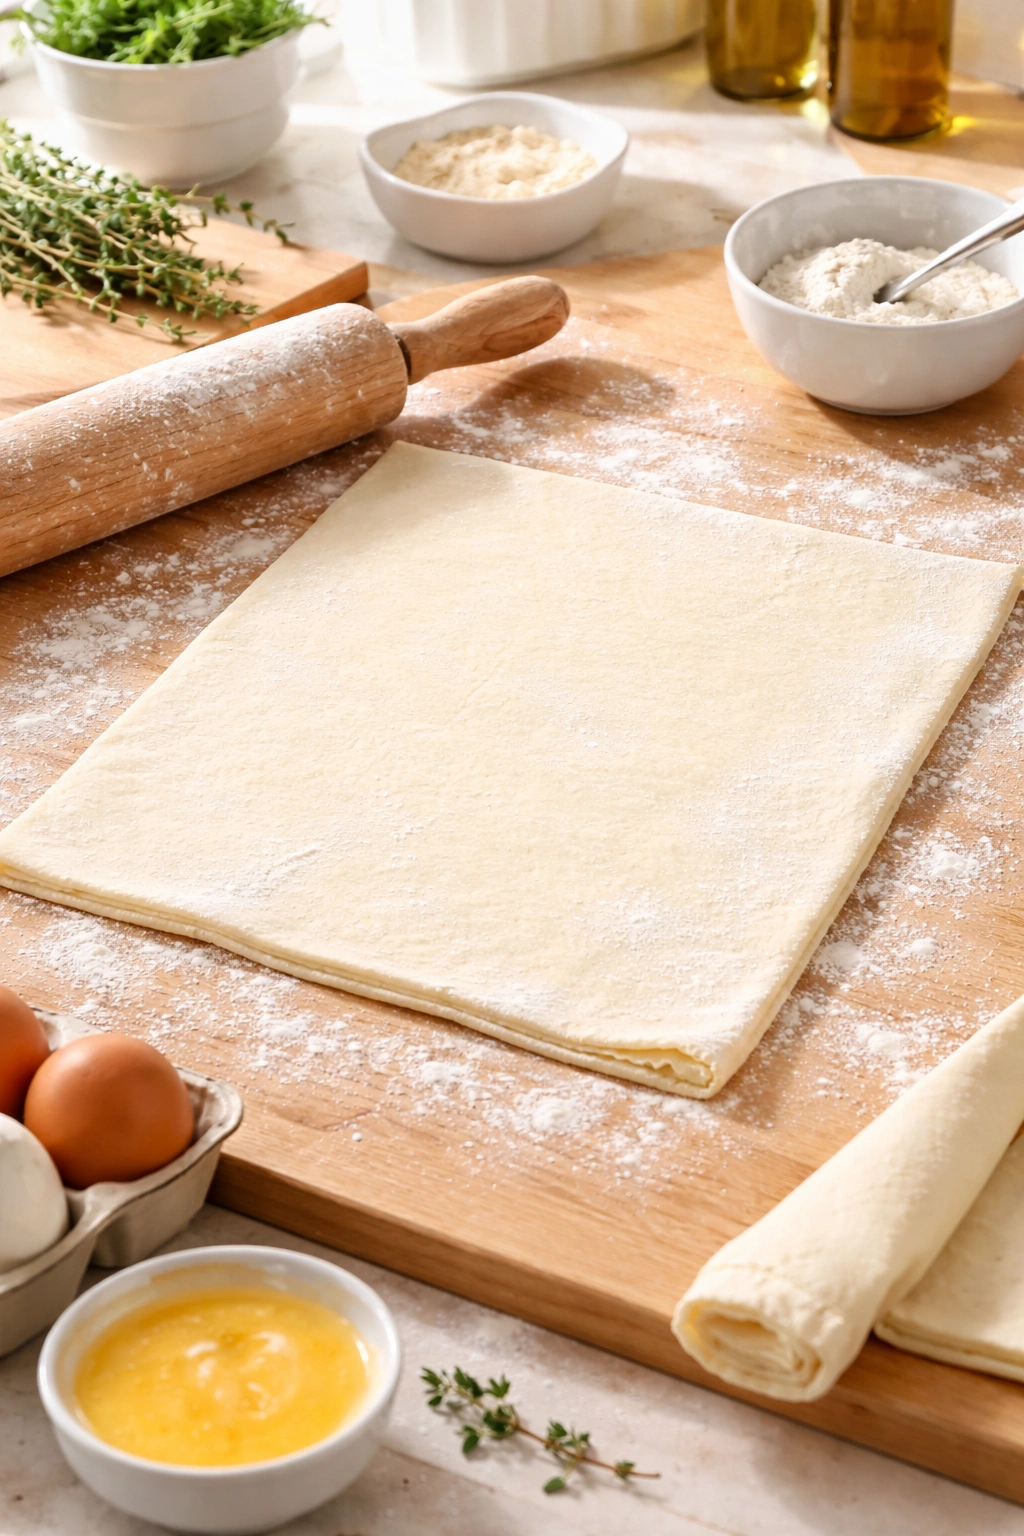
Puff pastry is one of the most forgiving ingredients a home cook can work with, yet it consistently delivers results that look elegant and taste indulgent. The magic is that most of the heavy lifting has already been done for you—those 1,000+ delicate, buttery layers arrive frozen in a box, ready to transform into impressive appetizers that absolutely nobody needs to know took you less than 20 minutes of hands-on time. Whether you’re hosting a dinner party, bringing food to a gathering, or simply want something a little more refined than crackers and cheese, puff pastry appetizers punch way above their weight in terms of visual impact and crowd-pleasing flavor.
The real beauty of puff pastry for appetizers isn’t just convenience—it’s versatility. The same base of golden, crispy pastry becomes entirely different depending on what you pile on top or fold inside. Top it with caramelized onions and goat cheese, it’s sophisticated. Add olive tapenade and a cured anchovy, it’s Mediterranean. Brush it with garlic butter and herbs, it’s practically restaurant-quality comfort food. The pastry itself stays the same, but you control the flavor profile completely, which means you can customize appetizers to match your guests’ preferences, dietary needs, or whatever ingredients you happen to have on hand.
What makes these appetizers especially valuable is that you genuinely don’t need special skills or obscure ingredients. If you can lay a sheet of puff pastry on a baking sheet and sprinkle toppings on it, you can make appetizers that will have people asking for your recipe. Puff pastry also has an incredible edge in terms of make-ahead flexibility—you can assemble everything hours in advance, refrigerate it uncovered, and pop it in the oven 15 minutes before guests arrive. That’s the kind of low-stress entertaining most home cooks dream about.
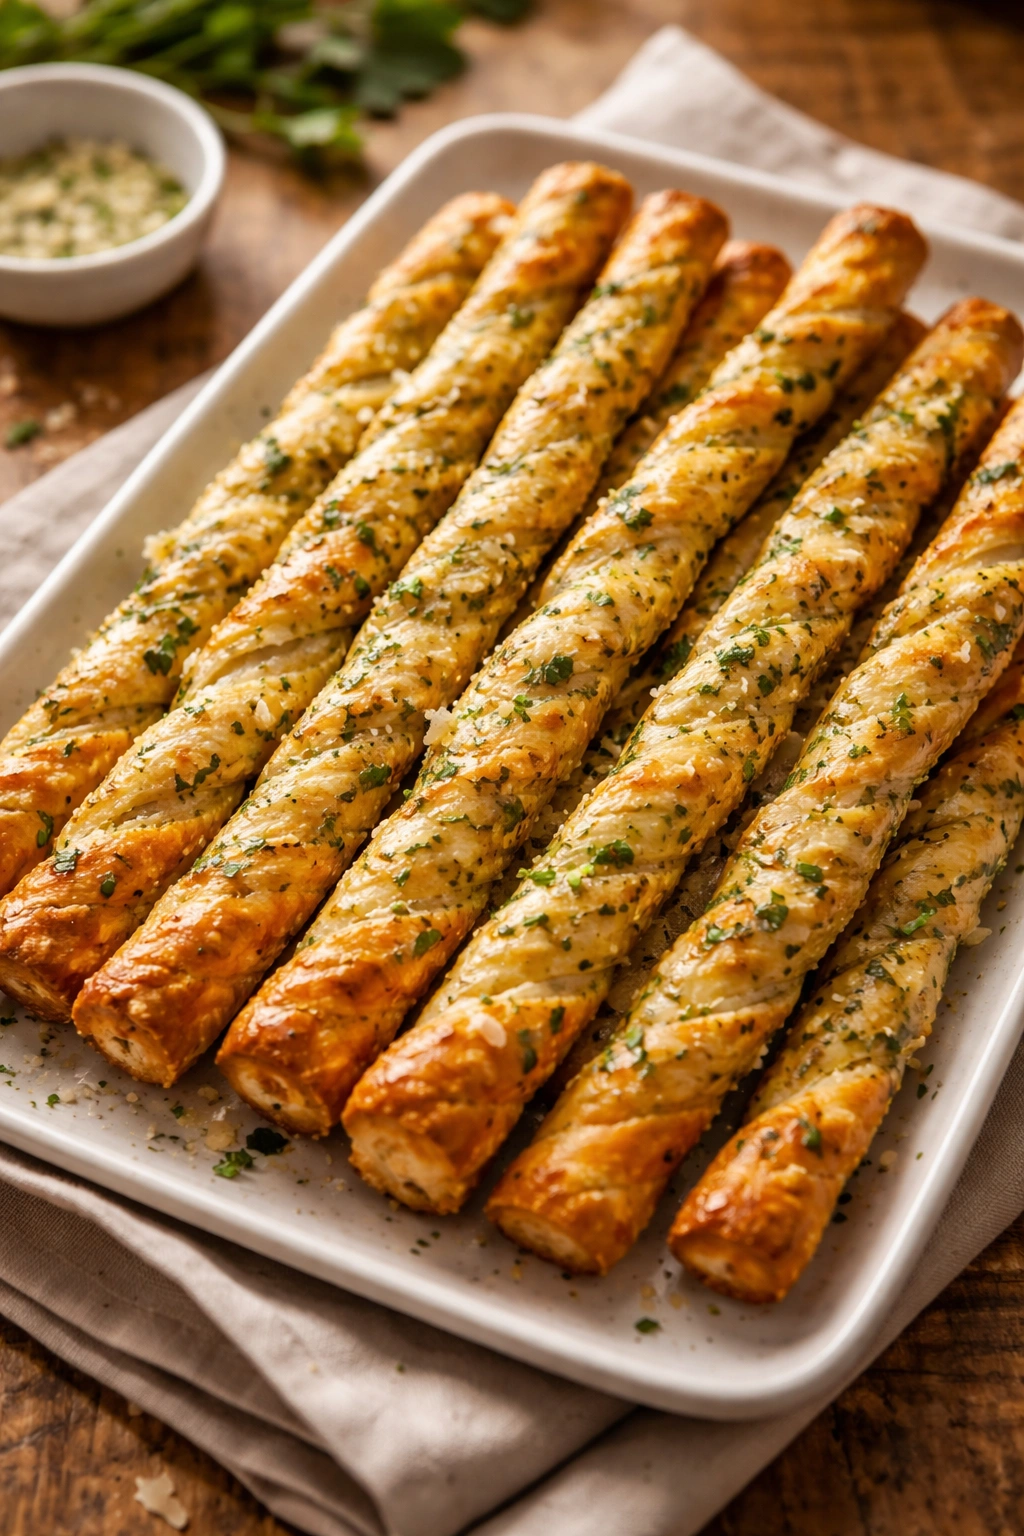
Classic Cheese and Herb Puff Pastry Twists

These twists are the appetizer that works everywhere—at casual gatherings, formal parties, packed into lunch boxes, or served alongside wine and cheese. They’re simple enough that a child could help make them, yet sophisticated enough that you’ll see them served at upscale restaurants. The pastry gets golden and crispy, the cheese melts and creates little flavorful pockets, and the herbs add enough aromatic punch that you only need a small bite to feel satisfied.
The best part about twists is their versatility in shape and flavor. You can make them exactly the same way every time and they’re consistent and reliable. Or you can season one batch with Parmesan and rosemary, another with sharp cheddar and cayenne, and a third with gruyere and thyme—all from the same preparation method. They’re also forgiving about size; smaller twists work as actual finger-food appetizers, while larger ones function as a light starter alongside soup or salad.
These twists stay crispy for several hours after baking, they reheat beautifully, and they’re one of the few puff pastry appetizers that actually improve slightly as they cool and firm up. Cold or room temperature, they remain structurally sound and delicious, which makes them perfect for make-ahead entertaining when you don’t want to worry about timing a warm oven.
Yield: Makes 24 twists | Prep Time: 15 minutes | Cook Time: 18-22 minutes | Total Time: 35-40 minutes | Difficulty: Beginner — no special equipment needed; the puff pastry does almost all the work.
For the Twists:
- 1 sheet (about 9.5 ounces) frozen puff pastry, thawed according to package directions
- 3 tablespoons unsalted butter, melted
- ½ cup grated Parmesan cheese, finely grated
- 1 tablespoon fresh rosemary leaves, finely chopped (or 1 teaspoon dried rosemary, crushed)
- ½ teaspoon fine sea salt
- ¼ teaspoon freshly ground black pepper
- Pinch of garlic powder (optional, but adds dimension)
- Pinch of cayenne pepper (optional, for gentle heat)
Prepare and Bake:
-
Preheat the oven to 400°F (200°C) and line two large baking sheets with parchment paper.
Advertisements -
Remove the thawed puff pastry sheet from its package and place it on a clean, dry work surface. Pat it gently with a paper towel if it feels damp—excess moisture will prevent it from crisping properly.
-
In a small bowl, whisk together the Parmesan, rosemary, salt, pepper, garlic powder, and cayenne until evenly combined. This mixture should look relatively uniform with no large clumps of herb.
-
Brush the entire top surface of the puff pastry sheet with melted butter, using a pastry brush or the back of a spoon to spread it in a thin, even layer. Don’t oversaturate—you want a coating, not a pool.
-
Sprinkle the cheese and herb mixture evenly across the buttered surface, using your fingers or a small spoon to distribute it so every area gets seasoning. Some spots will be heavier with cheese than others, and that’s fine—it creates little flavor hotspots.
-
Using a sharp knife or a pizza cutter, cut the pastry sheet in half vertically, then make cuts about ½ inch wide horizontally across both halves. You should end up with strips roughly 9 inches long and ½ inch wide. If the pastry becomes soft while cutting, refrigerate it for 5-10 minutes until it firms back up.
-
Pick up one strip by both ends and gently twist it 3-4 times along its length, stretching it slightly as you twist so the twist lengthens from about 9 inches to 10-11 inches. Place the twisted strip on the prepared baking sheet, pressing both ends down gently so the twist doesn’t unravel as it bakes. The slight stretch is important—it helps the twist set and stay twisted rather than relaxing back into a flat shape.
-
Repeat with all remaining strips, spacing them about 1 inch apart on the baking sheets. If you run out of space, use a third sheet or work in batches.
-
Bake for 18 to 22 minutes, rotating the baking sheets halfway through, until the twists are puffed, deep golden-brown on top, and you can see the cheese starting to caramelize at the edges. This caramelization indicates that the Parmesan has developed flavor and the pastry has cooked through. The bottoms should also be golden when you lift one with a spatula.
-
Remove from the oven and let the twists cool on the baking sheet for 5 minutes (they firm up slightly as they cool), then transfer to a wire rack or serving plate. Serve warm, at room temperature, or even cold—they’re genuinely delicious at any temperature.
Caramelized Onion and Goat Cheese Bites
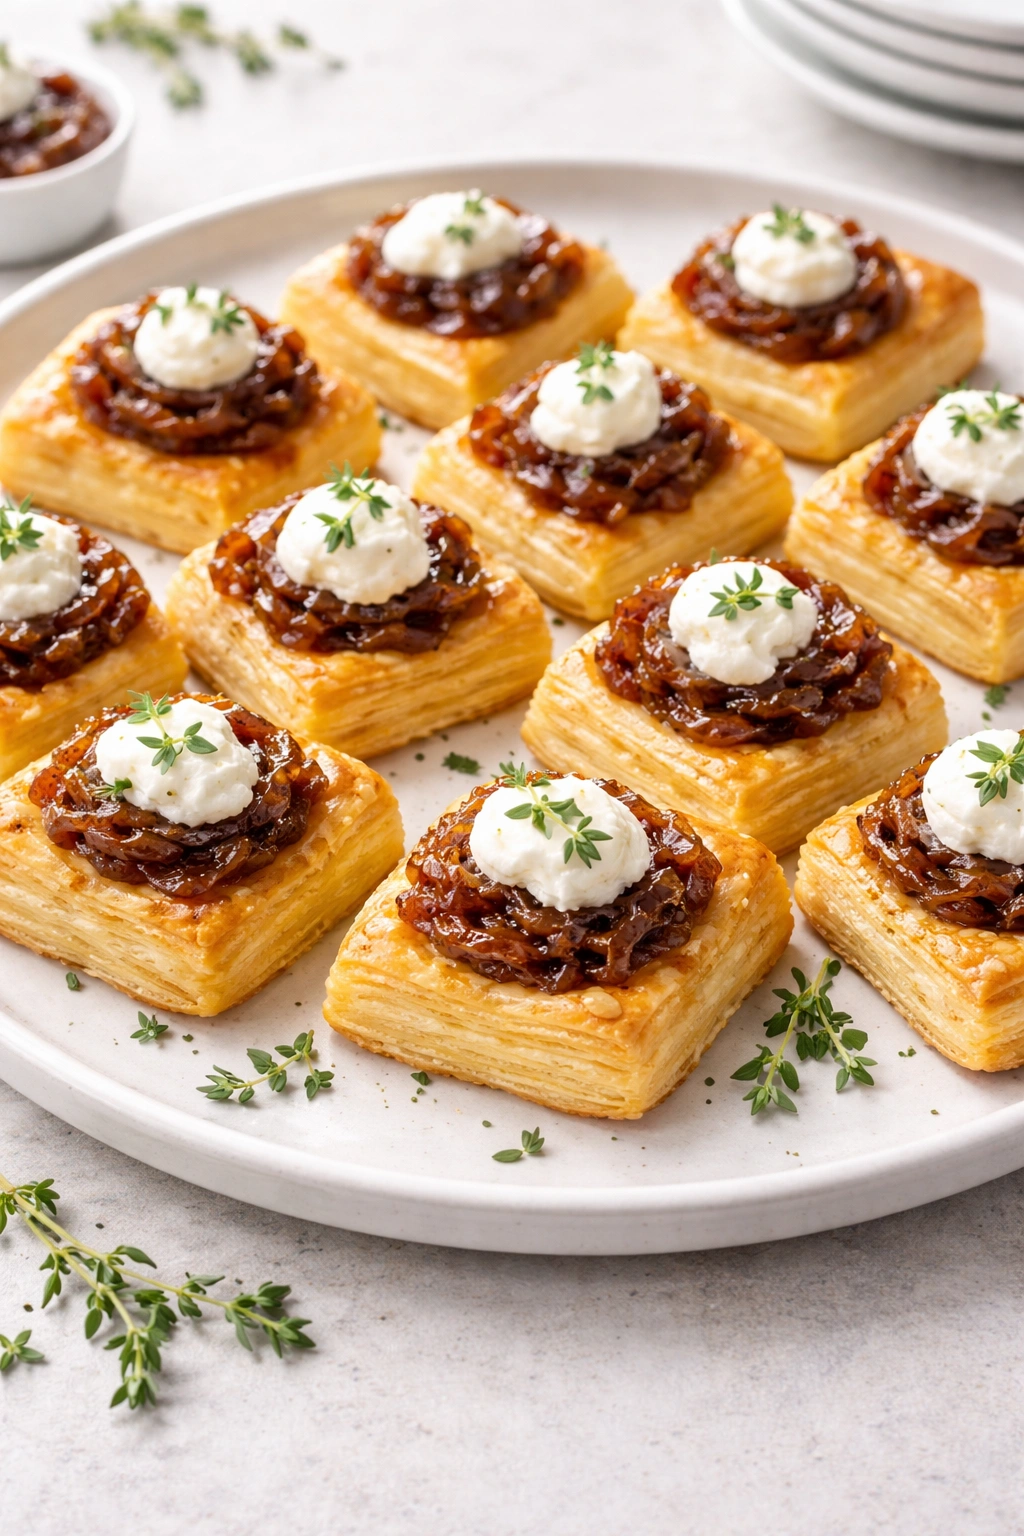
These little pillows are the kind of appetizer that makes people close their eyes after a bite—they’re that good. Caramelized onions are transformed by long, slow cooking into something deeply sweet and complex, almost like jam, and when paired with the tang of goat cheese and a hint of fresh thyme, they create a flavor combination that feels elegant but tastes completely approachable.
The key to these working beautifully is starting with genuinely caramelized onions, not just softened ones. The difference is significant. True caramelization takes 35-40 minutes of patient cooking, where the onions gradually turn golden, then amber, then deep brown as the natural sugars concentrate and break down. This process cannot be rushed, but the good news is that you can do it hours or even a day ahead, which means the actual assembly on appetizer day is nearly effortless.
These bites are slightly more involved than some puff pastry appetizers because they require a few minutes of advance prep work, but they’re worth every second of effort. They hold together beautifully, they look deliberately elegant (not accidentally fancy), and they’re substantial enough to feel like real food, not just empty pastry.
Start by cooking your onions: Slice 3 large yellow onions into thin half-moons. Heat 3 tablespoons butter and 1 tablespoon olive oil in a large skillet over medium heat. Add the onions along with a generous pinch of salt and a few grinds of black pepper. Cook, stirring frequently at first and less frequently as they soften, for 35-40 minutes. The onions will release moisture at first, creating steam, but keep cooking—that liquid needs to evaporate as the onions caramelize. You’re looking for deep golden-brown color, a jam-like consistency, and a sweet, rich aroma. Taste them toward the end and adjust the salt. Set aside to cool completely.
When you’re ready to bake, preheat the oven to 400°F (200°C) and line a baking sheet with parchment paper. Cut your thawed puff pastry sheet into 16-20 small squares or rectangles—roughly 2 inches across works perfectly. Place each piece on the prepared baking sheet, leaving about ½ inch between them for expansion.
Using a small spoon or your finger, place a small mound (about ½ teaspoon) of the cooled caramelized onions in the center of each pastry piece. Top the onions with a small dollop (about ¼ teaspoon) of goat cheese, crumbled or smooth depending on what you prefer. Sprinkle with a tiny pinch of chopped fresh thyme. The toppings should be modest—you want the pastry to puff properly around them, not weigh them down.
Bake for 15-18 minutes, until the pastry is puffed and golden and the cheese has begun to soften and warm through. The edges will be darker than the centers, and that’s exactly right. Remove from the oven and let cool for just a moment on the baking sheet before transferring to a serving plate. Serve warm or at room temperature.
Garlic Butter and Herb Sticks
Sometimes the simplest appetizers are the most craveable, and these thin, crispy garlic butter sticks fall into that category. They’re nothing more than puff pastry brushed with a garlicky, herbaceous butter and baked until golden, but there’s something almost addictive about them. People eat them while standing and chatting, reach back for another one without thinking, and invariably ask if you made them (as if seasoning puff pastry is some kind of culinary achievement requiring years of training).
The secret is using enough garlic to actually taste it, and enough butter that the pastry gets genuinely golden rather than pale. These are best served warm, straight from the oven, when the butter is still slightly melted and fragrant. They don’t keep as well as some other puff pastry appetizers—they gradually soften as they cool—but they only take 15 minutes to bake, which means you can have a fresh batch ready not long after guests arrive.
For the Sticks:
- 1 sheet (about 9.5 ounces) frozen puff pastry, thawed
- 4 tablespoons unsalted butter, softened to room temperature
- 3 large cloves garlic, minced extremely fine (or pressed through a garlic press)
- 1 tablespoon fresh parsley, finely chopped
- 1 teaspoon fresh thyme leaves (or ½ teaspoon dried)
- ¼ teaspoon fine sea salt
- Pinch of freshly ground black pepper
- Pinch of red pepper flakes (optional)
- Fleur de sel or coarse sea salt for finishing (optional but highly recommended)
In a small bowl, combine the softened butter, minced garlic, parsley, thyme, salt, and black pepper. Let this mixture sit for a minute so the garlic flavors can bloom slightly into the butter. Preheat your oven to 400°F (200°C) and line a baking sheet with parchment paper.
Place the thawed puff pastry sheet on a clean surface. Using a butter knife or offset spatula, spread the garlic herb butter across the entire surface of the pastry in a thin, even layer. The pastry should be covered but not swimming in butter—think of it more like a coating than a spread.
Using a sharp knife or pizza cutter, cut the pastry lengthwise into thin strips, about ½ inch wide. Lift each strip and gently place it on the prepared baking sheet, laying it flat. You can leave them straight or give each one a gentle twist for visual interest.
Bake for 12-15 minutes, until the pastry is puffed and the edges are deep golden brown. The butter will have soaked in and the garlic will have become fragrant. Remove from the oven and, if you’re using finishing salt, sprinkle a tiny pinch of fleur de sel over the top of each stick while they’re still hot. Serve immediately, while they’re still warm and the butter is at its aromatic best.
Olive Tapenade and Anchovy Bites
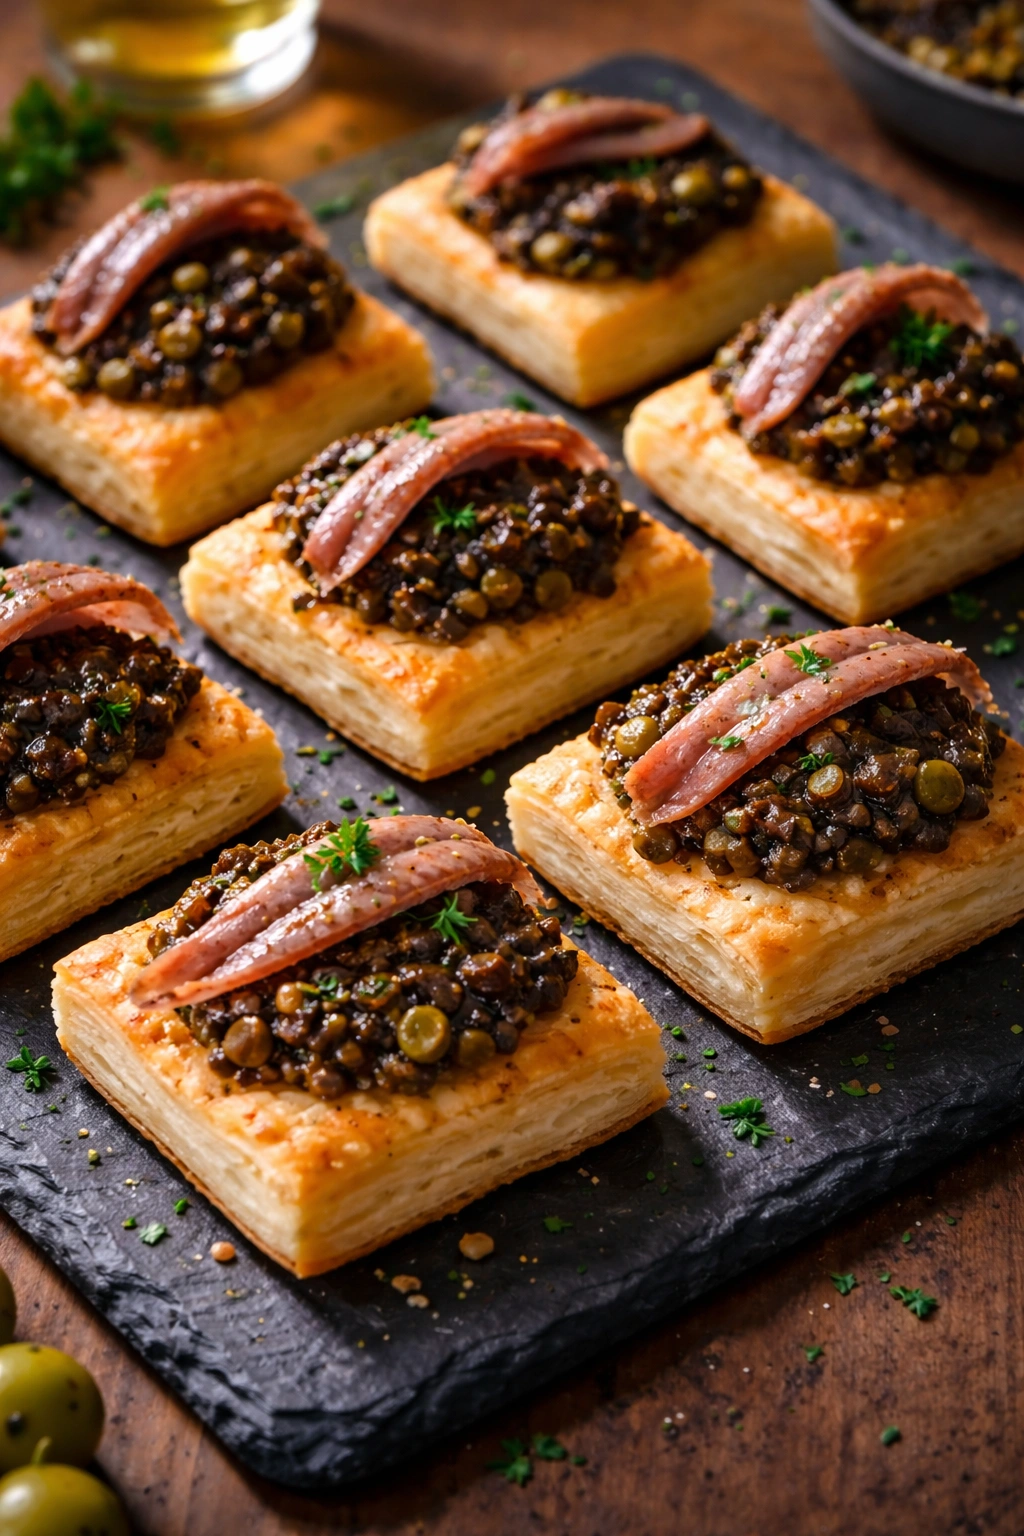
For the guests with more sophisticated palates, these little savory bites deliver serious flavor intensity. Olive tapenade—a concentrated, briny paste made from olives, capers, and anchovy—is the kind of ingredient that makes food taste like someone who actually knows what they’re doing made it. When you serve these at a party, people assume you’ve been fussing in the kitchen for hours.
The beauty of using store-bought tapenade is that you get all that complex flavor development without doing the work yourself. Look for a tapenade that lists olives as the first ingredient and has actual chunks of olives in it, rather than something that’s been processed into an overly smooth paste. The texture matters—you want distinct little pieces that create interest and visual appeal on top of the pastry.
These bites are particularly good alongside white wine or champagne, and they work beautifully on a mixed appetizer table where you want something that reads as “I’m serving Mediterranean flavors.” They’re also a smart choice if you have guests who eat fish, because anchovy brings a depth and umami that people sense even if they can’t identify the source.
For the Bites:
- 1 sheet (about 9.5 ounces) frozen puff pastry, thawed
- ¾ cup quality olive tapenade (kalamata-based works beautifully)
- ¼ cup grated Parmesan or Pecorino Romano cheese
- 1 tablespoon fresh lemon juice
- Zest of ½ lemon, finely minced
- 2 tablespoons fresh parsley, finely chopped
- Cracked black pepper to taste
- Optional: whole or halved anchovy fillets for garnish
Preheat your oven to 400°F (200°C) and line a baking sheet with parchment paper. Cut your thawed puff pastry into 16-20 small squares or rectangles, roughly 2 inches across, and arrange them on the prepared baking sheet with about ½ inch between each piece.
In a small bowl, stir together the tapenade, lemon juice, and lemon zest. Taste it and adjust the lemon juice if you want more brightness—tapenade can be quite salty and rich, and the acid helps balance it.
Spoon about ½ teaspoon of the tapenade mixture onto each pastry piece, spreading it gently with the back of the spoon so it covers most of the surface. Sprinkle each bite with a small pinch of grated cheese.
If you’re using anchovy fillets as garnish, place one small piece on top of each bite (optional—some people love anchovies, others prefer not to see them, so this is your call).
Bake for 13-16 minutes, until the pastry is puffed and golden and the tapenade is warm. Remove from the oven, transfer to a serving plate, and garnish with a light sprinkle of fresh parsley and a few cracks of black pepper. Serve at room temperature or slightly warm.
Spinach and Feta Phyllo-Style Parcels

While technically not pure puff pastry, these parcels use puff pastry as a wrapper for a filling inspired by spanakopita (the Greek spinach and feta pie), creating little bundles that are crispy on the outside and creamy-savory on the inside. They’re more involved than simply topping a sheet of pastry, but they’re still approachable for a home cook, and they read as significantly more sophisticated than their actual preparation time suggests.
The key is getting the filling dry enough that it doesn’t make the pastry soggy. Fresh spinach releases a lot of moisture when it cooks, so you’ll be squeezing it dry in a clean kitchen towel—this step is non-negotiable. The feta adds creaminess and saltiness, but it needs a partner like nutmeg or dill to feel complete rather than one-dimensional.
These parcels can be assembled and frozen on a baking sheet, then baked directly from frozen (adding just 5 minutes to the baking time). That makes them exceptional for advance entertaining—prep them whenever you have 20 minutes, freeze them, and bake them the day of your event. They’re simultaneously impressive and incredibly practical.
Start with 10 ounces of fresh spinach (thawed and drained if frozen). If using fresh, roughly chop it and cook it in a large skillet over medium-high heat for 3-4 minutes, stirring occasionally, until wilted and bright green. Transfer the hot spinach to a clean kitchen towel and squeeze it firmly and repeatedly until it releases as much moisture as possible. This step is crucial—wet spinach will make soggy pastry.
Transfer the squeezed spinach to a bowl and mix it with 6 ounces crumbled feta cheese, 1 small shallot (finely minced), 1 clove garlic (minced), 1 tablespoon fresh dill (or 1 teaspoon dried dill), a tiny pinch of nutmeg, and salt and pepper to taste. Taste the filling and adjust seasonings—it should taste quite flavorful, because it will be distributed throughout several small parcels.
Preheat your oven to 400°F (200°C) and line a baking sheet with parchment paper. Thaw your puff pastry sheet and cut it into 16 squares (4 rows × 4 columns works perfectly). Place a heaping teaspoon of the spinach filling in the center of each square. Fold the corners of each square up and over the filling, creating a little parcel shape, and press the edges lightly to seal. The pastry doesn’t need to be perfectly sealed—it will stick to itself as it bakes—but you want it to hold together during baking.
Place the parcels on the prepared baking sheet and bake for 16-18 minutes (or 21-23 minutes if baking from frozen), until the pastry is puffed and golden. Remove from the oven, let cool for just a minute, and serve warm. These are best eaten within a few hours of baking, while the pastry is still crispy.
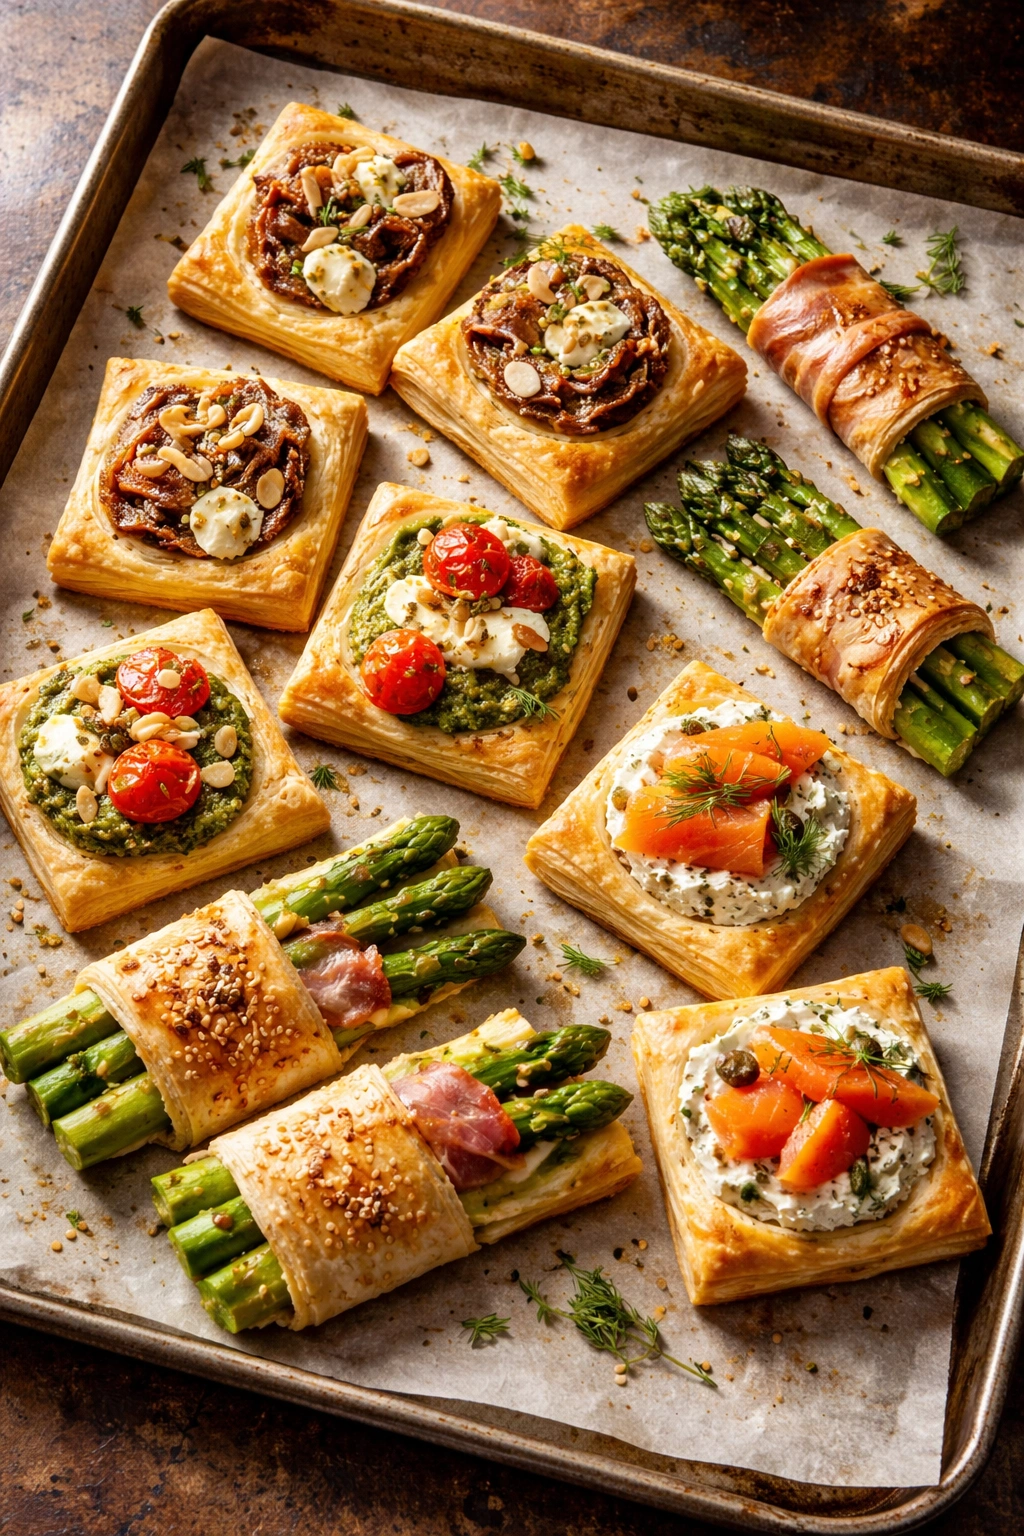
Sun-Dried Tomato and Basil Triangles

These bright, summery triangles are proof that puff pastry doesn’t need heavy cheese or meat to be satisfying. Sun-dried tomatoes bring concentrated tomato flavor and a slight chewiness, fresh basil adds aromatic brightness, and just a touch of goat cheese or ricotta brings creaminess without overwhelming the other flavors.
The beauty of these triangles is that they celebrate vegetarian flavors in a way that feels substantial rather than like an afterthought. They’re perfect for mixed-diet gatherings where you want every appetizer option to genuinely appeal to everyone, not just be “the vegetable thing.”
For the Triangles:
- 1 sheet (about 9.5 ounces) frozen puff pastry, thawed
- ⅓ cup sun-dried tomatoes (either oil-packed or rehydrated), chopped fine
- ½ cup fresh basil leaves, finely chopped
- ¼ cup ricotta or goat cheese
- 2 tablespoons Parmesan cheese, finely grated
- 1 clove garlic, minced extremely fine
- 1 tablespoon fresh lemon juice
- Salt and pepper to taste
- Olive oil for brushing
In a small bowl, combine the sun-dried tomatoes, basil, ricotta, Parmesan, garlic, and lemon juice. Mix gently with a spoon until it resembles a chunky paste. Taste and adjust salt and pepper—sun-dried tomatoes are already salty, so go easy with added salt.
Preheat your oven to 400°F (200°C) and line a baking sheet with parchment paper. Place the thawed puff pastry sheet on a clean surface and cut it into a grid of squares (4 rows × 4 columns). Using a small knife, cut each square diagonally, creating triangles—you should have 32 triangles total.
Place a small spoonful (about ½ teaspoon) of the filling on one half of each triangle. Fold the triangle in half along the diagonal, creating a smaller triangle, and press the edges gently to seal. The filling shouldn’t squish out—you’re looking for a neat little package.
Arrange the triangles on the prepared baking sheet, brush the top of each lightly with olive oil, and bake for 13-15 minutes, until the pastry is puffed and golden. Remove from the oven, cool for a minute, and serve. Fresh basil is at its best when it hasn’t been cooked extensively, so these are best served within an hour of baking, when the basil’s flavor is still bright and aromatic.
Prosciutto and Pear Bites

Puff pastry gets along beautifully with cured meat and fruit—the slight sweetness of pear, the saltiness of prosciutto, and the buttery richness of the pastry create an appetizer that tastes like it came from a restaurant kitchen. These are especially good to serve with sparkling wine or champagne, as they have an almost refined quality that pairs well with bubbles.
The trick is using ripe but not mushy pear, and using prosciutto thin enough that it crisps up slightly in the oven rather than just warming through. These also work beautifully with other cured meats like serrano ham or speck, so adapt based on what you have access to.
For the Bites:
- 1 sheet (about 9.5 ounces) frozen puff pastry, thawed
- 1 ripe but firm pear, peeled, cored, and thinly sliced
- 8-12 slices prosciutto, halved
- 3 tablespoons whole grain mustard
- 2 tablespoons honey
- ¼ cup arugula, roughly chopped
- Salt and pepper to taste
- Small pinch of fresh thyme
In a small bowl, whisk together the whole grain mustard and honey. This creates a sweet-savory spread that acts as both glue and flavor component for the bites.
Preheat your oven to 400°F (200°C) and line a baking sheet with parchment paper. Cut the thawed puff pastry into 16-20 small rectangles (about 2 inches × 1.5 inches) and place them on the prepared baking sheet with about ½ inch between them.
Spread a thin layer of the mustard-honey mixture on each pastry rectangle. Top with a slice of pear, then fold a piece of prosciutto on top of the pear in a loose, slightly rumpled arrangement—you want it to look organic, not perfectly smooth.
Bake for 13-16 minutes, until the pastry is puffed and golden and the prosciutto is slightly crispy at the edges. Remove from the oven and, while still warm, top each bite with a small pinch of arugula, a crack of black pepper, and a tiny pinch of fresh thyme. Serve warm or at room temperature.
Pesto and Pine Nut Pastry Squares

Basil pesto brings an herbal punch that elevates puff pastry from simple to crave-worthy. These squares are nutty, herbal, and aromatic—the kind of appetizer that makes guests immediately ask what you put in them, even though it’s essentially “really good pesto on pastry.”
The beauty of pesto-topped puff pastry is that you can use store-bought pesto if you want to, or make your own in five minutes with a food processor. Either way, the result looks and tastes like you’ve invested significant effort. Top with pine nuts for texture and richness, or sun-flower seeds or walnuts if that’s what you prefer.
Cut your thawed puff pastry into 16 squares and place them on a parchment-lined baking sheet. Spread about ¾ teaspoon of pesto on each square, using the back of a spoon to spread it in a thin layer. Sprinkle with pine nuts, a tiny pinch of grated Parmesan, and a light crack of black pepper.
Bake at 400°F (200°C) for 13-15 minutes, until the pastry is puffed and golden and the pesto is warm and fragrant. Serve warm or at room temperature, and finish with a single small basil leaf on each square if you want to add a visual flourish.
Crispy Asparagus and Gruyere Bundles

These bundles are essentially puff pastry wrapped around fresh asparagus spears, creating an appetizer that’s crispy on the outside and tender on the inside, with the nuttiness of aged Gruyere bringing everything together. They’re slightly more sculptural than some other puff pastry appetizers, which makes them visually impressive on a plate.
The trick is using asparagus spears that are relatively thin to medium—thick spears take too long to cook and can overcrowd the appetizer. Blanch the asparagus briefly in salted boiling water before wrapping it, which cooks it partially and ensures it won’t be crunchy when you eat the finished appetizer.
Trim 1 pound of fresh asparagus, removing the woody bottom inch or so. Bring a pot of salted water to a boil and blanch the asparagus for 3 minutes, then drain and pat dry on a clean kitchen towel. This partial cooking ensures the asparagus will be tender, not crunchy, in the finished appetizer.
Preheat your oven to 400°F (200°C) and line a baking sheet with parchment paper. Thaw your puff pastry sheet and cut it lengthwise into strips about ½ inch wide. Grate about ¼ cup of Gruyere or other aged cheese that you want to feature.
Lay one puff pastry strip on your work surface. Sprinkle it lightly with some of the grated cheese, then place an asparagus spear at one end. Roll the pastry tightly around the asparagus, encasing it completely, then place it seam-side down on the prepared baking sheet. Repeat with all remaining asparagus spears and pastry strips.
Brush the top of each bundle lightly with a little melted butter mixed with minced fresh thyme, and sprinkle with a small pinch of salt and cracked pepper. Bake for 15-17 minutes, until the pastry is puffed and golden and the cheese inside is melted and fragrant. Serve warm.
Smoked Salmon and Dill Cream Cheese Bites

For a more elegant, almost brunch-adjacent appetizer, these smoked salmon bites work beautifully. Creamy dill-spiked cream cheese, silky smoked salmon, and crispy puff pastry create an appetizer that feels more refined than its easy preparation suggests. These are perfect for morning or afternoon gatherings, though they work equally well at evening events.
The key is not over-topping them. A small spoonful of seasoned cream cheese, a small piece of high-quality smoked salmon, a squeeze of lemon, and a tiny pinch of fresh dill is all you need. More than that and the flavors muddy together and it becomes hard to eat neatly.
Cut your thawed puff pastry into 16-20 squares and place them on a parchment-lined baking sheet. Bake at 400°F (200°C) for 8-10 minutes, just until the pastry is puffed and starting to turn golden (you’re going for partially baked here, not completely done). Remove from the oven and set aside to cool completely.
While the pastry cools, mix 4 ounces softened cream cheese with 2 tablespoons fresh dill (finely chopped), 1 teaspoon fresh lemon juice, and a pinch each of salt and white pepper. When the pastry has cooled, top each piece with a small spoonful (about ½ teaspoon) of the seasoned cream cheese, then a small piece of smoked salmon folded loosely on top. Finish with a tiny squeeze of fresh lemon juice and a single dill leaf.
Serve cold or at room temperature. These are best eaten within an hour or two of assembly, as the pastry gradually softens if they sit too long.
Working with Puff Pastry: Essential Tips and Tricks
Puff pastry seems like it should be fragile and finicky, but it’s actually remarkably forgiving once you understand a few basic principles. The biggest issue most home cooks run into is ending up with pale, flat pastry instead of the golden, puffed results they’re after. This almost always comes down to a few preventable mistakes.
The most common pitfall is opening the oven door repeatedly to check on the pastry. Puff pastry puffs because heat causes the moisture in the butter layers to turn to steam, which pushes the layers apart. Every time you open the oven door, that steam escapes and the pastry deflates. Resist the urge to check. Set a timer, trust it, and only open the door in the final 2-3 minutes if you genuinely need to assess doneness.
Another frequent issue is baking puff pastry at too low a temperature. Puff pastry needs high heat to puff properly—350°F is too gentle. 400-425°F is the sweet spot for most puff pastry appetizers. If your oven tends to run cool, consider using a baking stone or pizza steel on the rack below your appetizers to help maintain high heat.
Moisture is puff pastry’s enemy. If you’re topping pastry with something wet—like fresh tomatoes or caramelized onions—don’t assemble the appetizers more than 30 minutes before baking. Excess moisture sitting on the surface will gradually soak into the pastry and prevent proper crisping. If you must assemble further ahead, keep the toppings in a separate container and add them to the pastry just before it goes into the oven.
Conversely, thawing puff pastry in the refrigerator overnight (rather than at room temperature) gives you better handling and puffing results. Room temperature pastry becomes soft and sticky; cold pastry from the fridge is firm and easy to work with. If you must thaw at room temperature, do it on parchment paper in a cool room, and work with it as soon as it’s pliable but still cold to the touch.
Seasoning matters more than you might think. Because puff pastry is relatively neutral in flavor, the toppings and flavorings need to be assertive. A pinch of salt and pepper on a simple topped appetizer should taste like actual seasoning, not be barely detectable. Don’t be shy—taste your filling or topping before you add it to the pastry, and make sure it tastes flavorful on its own. It will taste slightly less intense on the finished pastry once you’ve added the butter and starch of the puff.
If you want pastry that puffs tall and dramatic, chill the assembled appetizers for 15-30 minutes before baking. This allows the gluten in the pastry to relax and the butter to firm back up, which leads to better puffing during baking. This is especially true for shaped appetizers like twists or parcels. Flat, topped squares don’t need this step—they puff fine without chilling—but if you’ve rolled, twisted, or folded the pastry, a quick chill helps the final product look more intentional and impressive.
Make-Ahead and Storage Guidelines
One of the most appealing things about puff pastry appetizers is how well they handle advance preparation. Understanding exactly what can be done ahead takes stress out of entertaining and lets you focus on your guests rather than last-minute cooking.
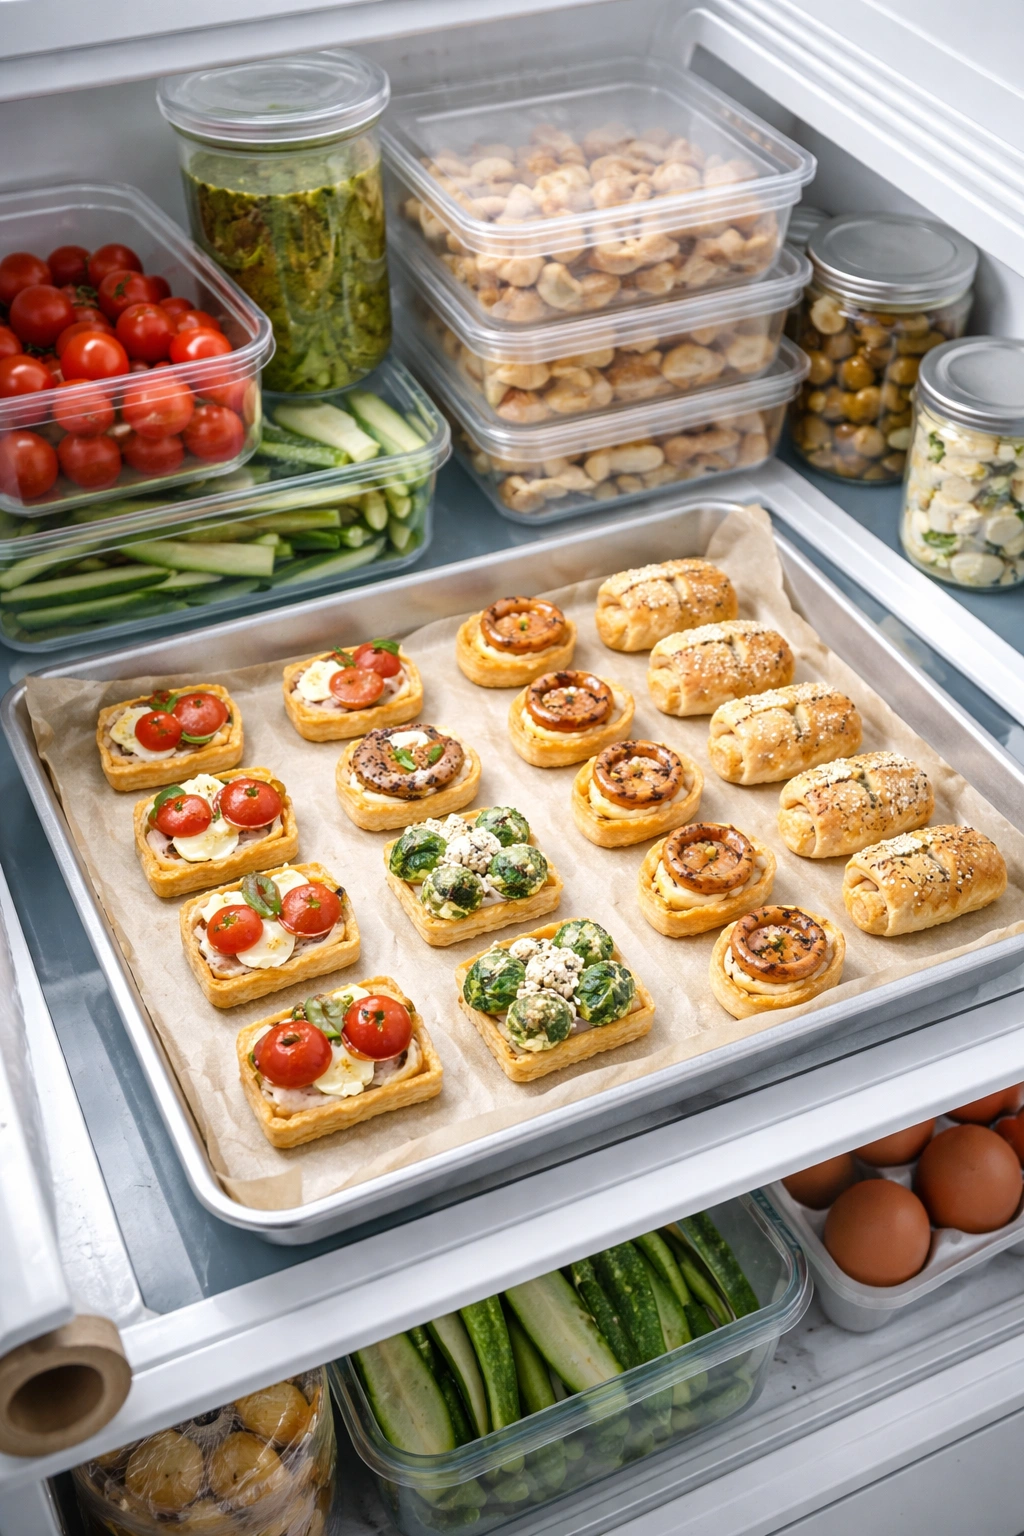
Assembled appetizers can be refrigerated for up to 24 hours before baking. Lay them in a single layer on a parchment-lined baking sheet, cover loosely with plastic wrap, and refrigerate. When you’re ready to bake, there’s no need to bring them to room temperature—bake them directly from cold, adding just 1-2 minutes to the baking time. This approach is especially smart for appetizers with delicate toppings that might dry out if left at room temperature.
Many puff pastry appetizers can also be frozen on a baking sheet before baking. Lay them in a single layer, freeze until solid (about 3 hours), then transfer to a zip-top freezer bag and freeze for up to 3 months. Bake directly from frozen, adding 5-8 minutes to the baking time, depending on the size and topping of the appetizer.
Baked appetizers stay crispy for 3-4 hours at room temperature when stored in an airtight container. After that, they start to soften. If you baked them ahead and they’ve gone slightly soft, you can restore crispness by reheating them in a 350°F (175°C) oven for 3-4 minutes. Never microwave puff pastry appetizers—microwaving makes them rubbery and soggy.
For appetizers with toppings prone to weeping or becoming soggy (caramelized onions, creamed cheese, pesto), it’s better to assemble them within 1-2 hours of serving. The pastry shell itself can be baked hours ahead, then topped and warmed through just before guests arrive.
Flavor Combinations That Always Work

Once you understand the basic structure of puff pastry appetizers—crispy pastry base, flavorful topping or filling—you can riff endlessly on flavor combinations. There are a few flavor pairing principles that consistently deliver results, so you can create appetizers confidently even if you’re inventing them on the fly.
Sweet plus salty always works: caramelized onion plus crispy bacon, pear plus prosciutto, fig jam plus sharp cheddar, honey plus blue cheese. The contrast between sweet and salty creates a kind of flavor complexity that people find crave-worthy.
Herb plus acid plus richness: basil plus lemon juice plus ricotta, fresh dill plus lemon juice plus smoked salmon, thyme plus lemon juice plus mushroom, parsley plus lemon juice plus goat cheese. The herb brings freshness, the acid brightness, and the richness grounds everything.
Concentrated flavors: pesto, tapenade, sun-dried tomato, caramelized onion, olive spread—these are intense flavors that don’t need a lot of quantity to register clearly. A small amount of concentrated flavor reads as more sophisticated than a larger amount of milder flavor.
Textural contrast: crispy pastry + creamy filling, crispy pastry + tender vegetable, crispy pastry + crunchy nut. Puff pastry provides crispness, so pair it with something softer or creamier, or add a crunchy element like toasted nuts or seeds.
Balance: if your topping is rich (cream cheese, cheese, meat), balance it with something bright or acidic (lemon juice, fresh herbs, vinegar-based condiment). If your topping is light (fresh vegetables, herbs), you can add more richness (cheese, nuts, oil).
Serving and Presentation Ideas

The way you present puff pastry appetizers can elevate them visually with minimal extra effort. Unlike some appetizers that require fancy plating skills, puff pastry appetizers photograph beautifully when arranged simply on a board or plate.
Arrange appetizers at varying heights rather than in a flat line. Use a wooden cutting board, a white ceramic plate, or a slate tile as your serving surface, and cluster the appetizers in the center rather than spreading them to the edges. This makes them look intentional and abundant without requiring you to make twice as many.
Garnish the serving board rather than the individual appetizers. A few fresh herb leaves scattered around the appetizers, a small bowl of fleur de sel or cracked pepper on the side, or thin lemon slices interspersed among the appetizers makes the whole spread look more polished. You’re not decorating each appetizer individually—you’re creating an attractive serving scene.
Fresh herbs make a huge visual difference. A single small basil leaf on a pesto appetizer, a tiny dill sprig on a salmon bite, or a single arugula leaf on a prosciutto-pear bite transforms them from “homemade appetizers” to “intentionally garnished appetizers.” The herb doesn’t need to cover the top—just a single, strategically placed leaf shifts the visual perception.
Warm appetizers taste better and look better. Serve them within 15 minutes of coming out of the oven. If you baked them ahead and they’ve cooled, a quick 3-4 minute refresh in a 350°F (175°C) oven will restore warmth and help the cheese or butter elements meld back together. Don’t let hot appetizers sit on serving boards for more than 30-40 minutes—after that, they’re cooling down and your guests are eating room-temperature food.
Final Thoughts
The real secret to puff pastry appetizers isn’t special technique or hard-to-find ingredients. It’s understanding that you’ve already got a professional-quality base of buttery, crispy pastry ready to go, and you just need to choose toppings and fillings that taste good and don’t weigh it down. A little time in the oven transforms simple seasoning or filling into something that tastes like it took hours of work.
The versatility is the true magic. The same sheet of pastry becomes entirely different things depending on what you put on top—sophisticated when it’s topped with caramelized onion and goat cheese, fresh when it features pesto and pine nuts, elegant when it’s wrapped around asparagus, oceanic when it carries smoked salmon and dill. You’re only limited by what you feel like making and what your guests actually like to eat.
Start with whichever appetizer in this guide appeals to you most. Make it once and understand the basic structure. Then branch out and adapt. Substitute the cheese, change the herb, swap the protein—puff pastry is remarkably forgiving of variations, and you’ll quickly build confidence in your ability to create appetizers that look restaurant-quality and taste absolutely delicious. That’s the kind of entertaining that lets you actually enjoy time with your guests instead of stressing in the kitchen.