Stuffed peppers are one of those rare dishes that manages to be both impressive and effortless—a complete meal that looks fancy enough to serve to guests, yet simple enough to pull together on a busy Tuesday night. The beauty of this recipe lies in its elegant simplicity: hollowed bell peppers filled with seasoned ground beef, fluffy rice, and melty cheese, then baked until the peppers are tender and the filling is bubbling hot. What makes it truly special is that it checks every box for a weeknight dinner. You get protein, vegetables, and carbs all in one colorful package, there’s minimal cleanup since everything cooks in a single dish, and the whole process—from prep to table—takes about an hour, which means dinner can be ready shortly after you walk in the door.
This version strikes a perfect balance between the classic comfort food versions that have been feeding families for generations and a fresher, more flavorful approach that’ll have everyone asking for seconds. The secret isn’t complicated: it’s about choosing quality ingredients, understanding a few key technique tricks that keep the peppers from becoming soggy, and building layers of flavor through careful seasoning and timing. Whether you’re cooking for a family of four or trying to meal prep for the week ahead, this recipe adapts beautifully to your needs. Plus, it’s one of those dishes that tastes just as good (or maybe even better) the next day, making it a genuine make-ahead winner.
Why Stuffed Peppers Make the Perfect Weeknight Dinner
Stuffed peppers have earned their place as a reliable weeknight staple for solid reasons beyond just taste. They’re a complete, balanced meal—you’re not scrambling to figure out sides because the entire dinner equation is already solved with the pepper itself. The beef provides your protein, the rice gives you the carb component, and the bell pepper delivers vitamins, fiber, and natural sweetness that balances the savory filling.
What really makes this dish shine for busy evenings is the minimal prep work relative to the impressive payoff. You’re not juggling multiple pans or complicated timing; everything cooks together in one baking dish. Unlike stir-fries that demand constant attention or slow braises that tie up your oven for hours, stuffed peppers let you layer them in a dish, slide them into the oven, and focus on other things while they bake. The hands-on time is genuinely short—maybe 15 to 20 minutes from opening the fridge to closing the oven door.
There’s also something deeply satisfying about a one-dish dinner from a mental standpoint. You’re not managing side dishes or wondering if everything will be hot at the same time. Everything finishes together, and cleanup is refreshingly straightforward. This matters more than you’d think when you’re tired after work and the last thing you want to do is spend an hour at the sink.
Selecting the Best Bell Peppers for Your Recipe
The foundation of an exceptional stuffed pepper starts with selecting the right peppers. This step matters more than many recipes acknowledge, because the quality and characteristics of your peppers directly impact both the cooking process and the final result.
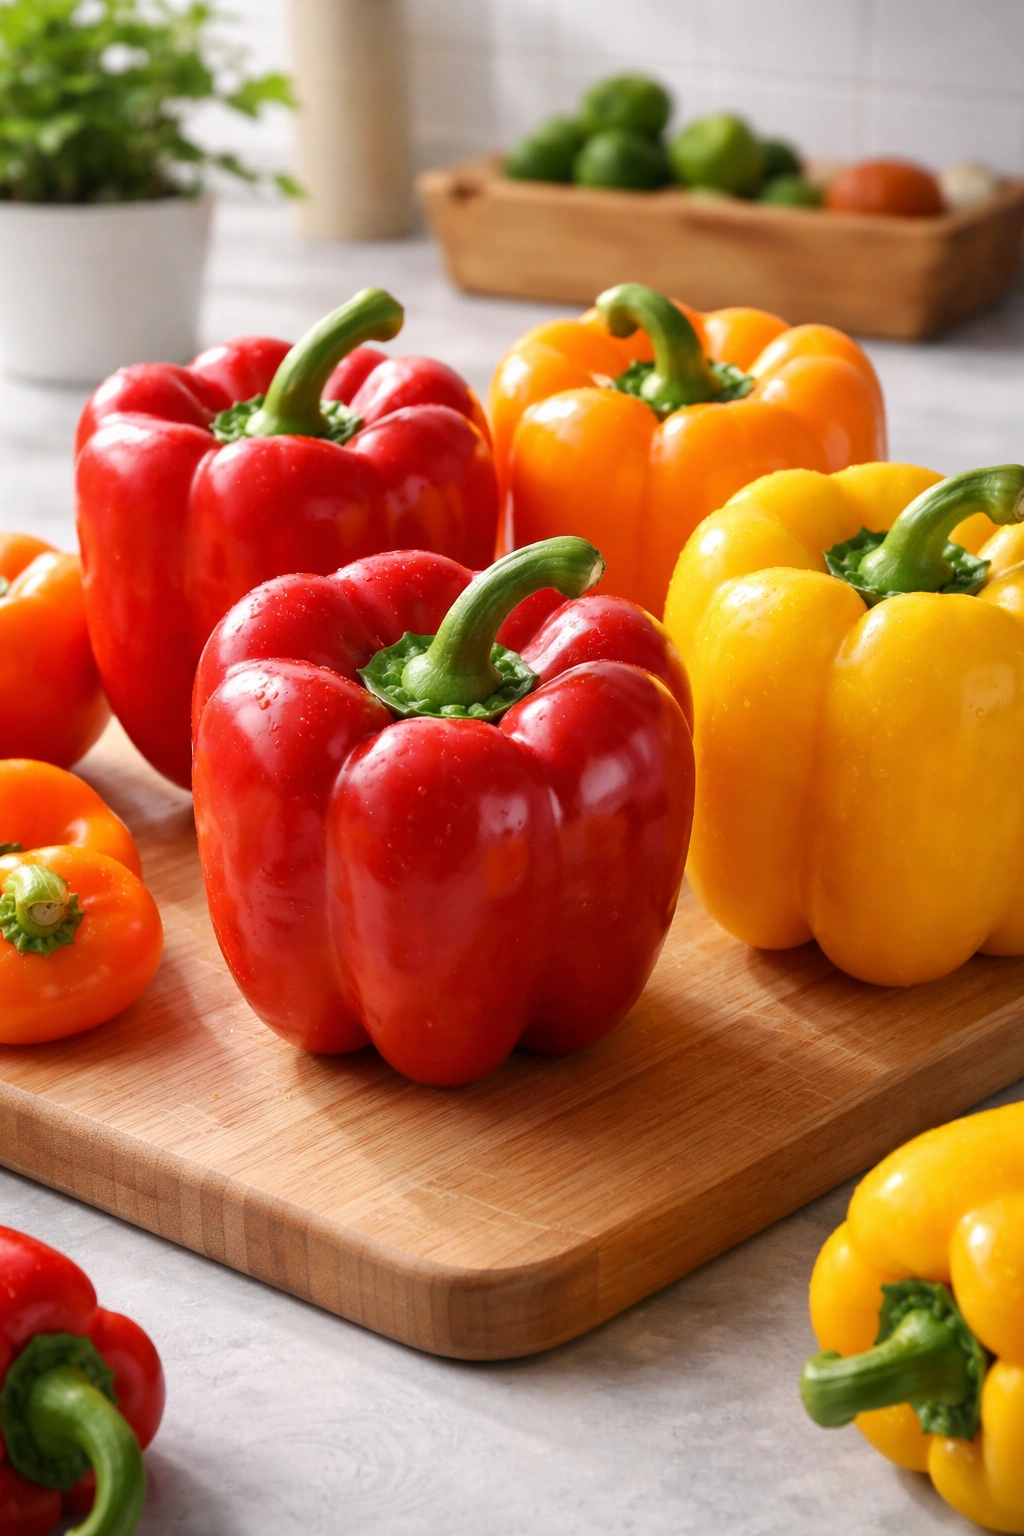
Look for large, firm bell peppers with thick walls. The walls need substance so they hold their shape during roasting and baking without collapsing into mush. Peppers with thicker flesh also require less cooking time relative to thinner-walled varieties, which helps you avoid that disappointing overcooked texture. Choose peppers that feel heavy for their size—this indicates they’re full of moisture and will have better flavor and texture after cooking.
Color is worth discussing because it affects both flavor profile and appearance. Red, orange, and yellow peppers are sweeter and more tender than their green counterparts, making them ideal for this dish. Green peppers are technically just unripe red peppers, and they carry a noticeably more bitter, vegetal taste that doesn’t complement the savory beef filling as elegantly. If you’re buying peppers at the market, reach for the colored ones. Your peppers should have shiny, unblemished skin with no soft spots or wrinkled areas. A firm pepper stores better and will hold its shape through the baking process.
Check the bottom of the pepper before you buy it. Look for a level base so the pepper sits upright naturally without rolling around your baking dish. If the bottom is curved or rounded, the pepper will topple over while you’re filling it—manageable, but annoying. You can trim a tiny slice off the bottom if needed, just avoid cutting into the pepper itself or the filling will leak out during cooking.
Store peppers in the refrigerator crisper drawer until you’re ready to use them. They’ll keep for up to a week, which makes them great for planning ahead. If you’re shopping and planning to cook these peppers in the next day or two, that’s the sweet spot for freshness and flavor.
Why Preparation Method Matters
The method you use to prepare the peppers before filling them significantly impacts the final texture. Some recipes call for boiling peppers first, but there’s a better approach that gives you more control over the outcome.
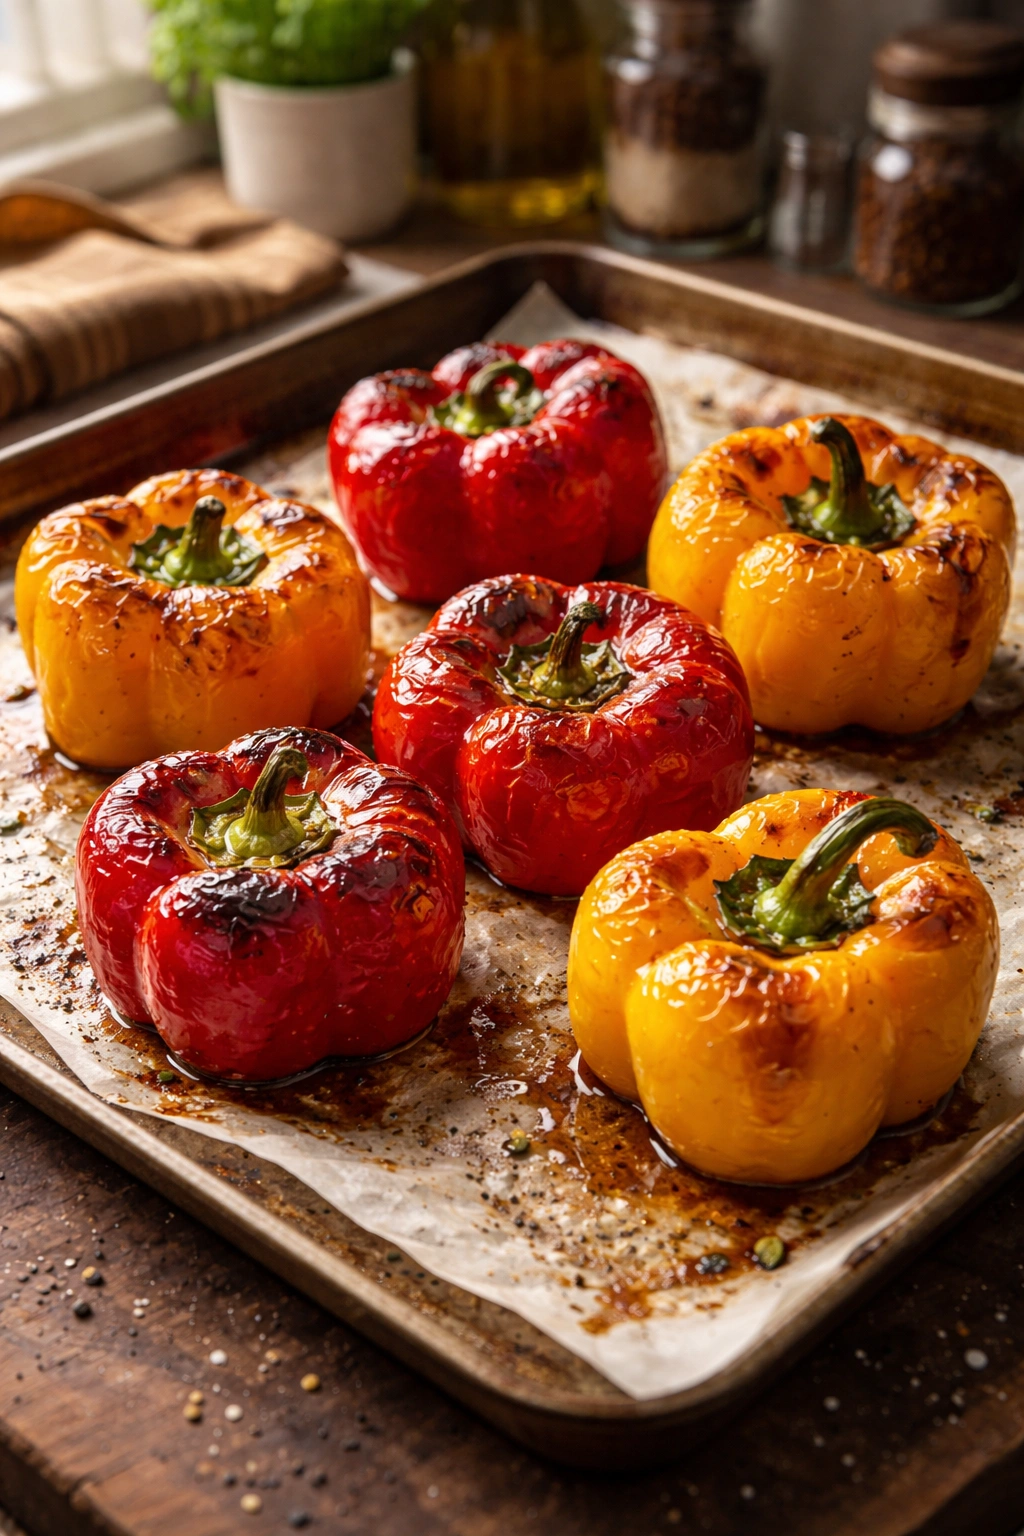
Roasting peppers rather than boiling them preserves more flavor and creates a better texture. When you boil peppers, they lose some of their structural integrity and absorb water, which can make them mushy or waterlogged by the time they finish baking. Roasting—even for a short time—gently softens the peppers while keeping the cell walls intact, and it actually deepens their natural sweetness through a light caramelization of the surface sugars.
The key is roasting them face-down in the baking dish for about 15 to 20 minutes at 425°F (or 350°F if that’s your preferred temperature). This pre-roasting step accomplishes two critical things: it starts the cooking process so the peppers finish baking in a reasonable timeframe, and it gives you control over exactly how soft they become. Unlike boiling, where the length of time is harder to gauge, roasting lets you see clearly how the peppers are progressing and pull them out when they’ve just begun to soften.
The short pre-roast also prevents the classic soggy pepper problem that plagues many homemade versions. If you try to bake raw peppers filled with a warm beef mixture, the peppers steam from the inside out, and all that moisture gets trapped. By pre-roasting for just 15 to 20 minutes, you’re starting the cooking process and allowing some of the peppers’ natural moisture to evaporate before you fill them.
Yield, Prep Time, Cook Time, and Difficulty
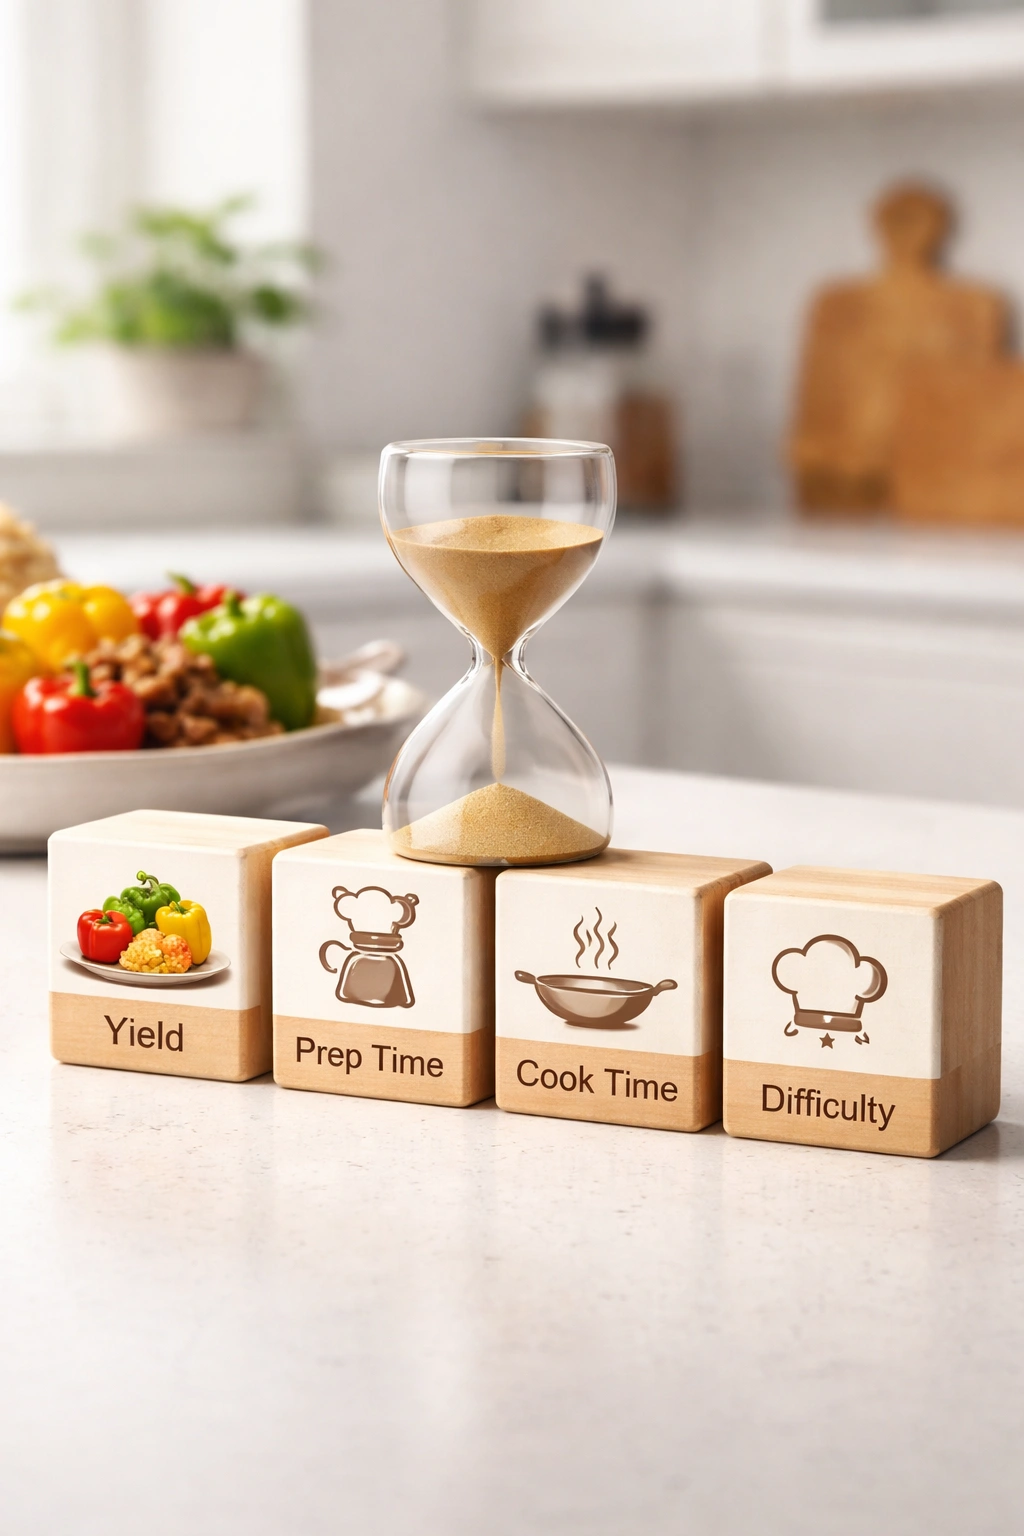
Yield: Serves 4 to 6 (typically 2 to 3 pepper halves per person depending on appetite and sides)
Prep Time: 20 minutes (hands-on active preparation—cutting peppers, browning beef, mixing filling)
Cook Time: 40 minutes (15-20 minutes pre-roasting peppers + 20 minutes final baking)
Total Time: 60 minutes active cooking
Difficulty: Beginner — This recipe requires no special techniques or equipment beyond standard kitchen tools. The steps are straightforward even if you’ve never made stuffed peppers before, and there’s very little that can go wrong if you follow the timing guidelines.
Complete Ingredient List
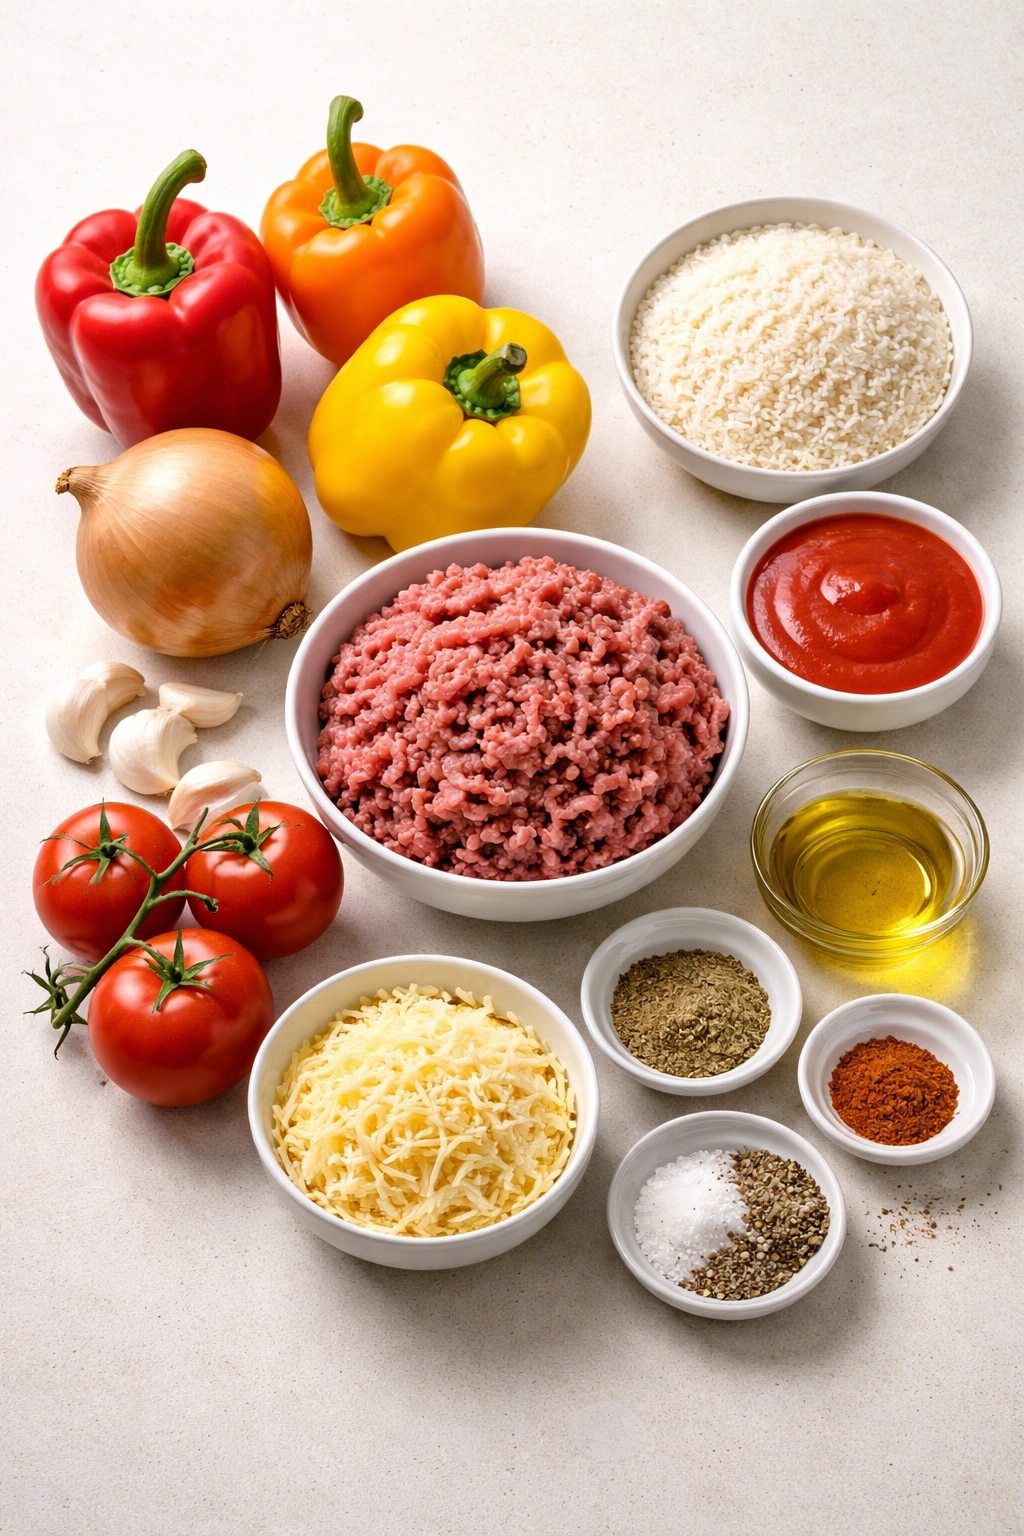
For the Peppers and Base:
- 6 large bell peppers (red, orange, or yellow for sweetness and color), cut in half lengthwise with seeds and membranes removed
- 3 tablespoons extra-virgin olive oil, divided
- Kosher salt and freshly ground black pepper to taste
For the Filling:
- 1 pound ground beef (80% lean works perfectly—lean enough to avoid excess grease, but not so lean that the mixture becomes dry)
- 1 medium yellow onion, finely diced
- 5 cloves garlic, minced
- 1½ cups cooked rice (white, brown, or wild rice—see note below)
- 1 can (15 ounces) fire-roasted diced tomatoes, with juices (or use 1 can diced tomatoes plus ½ cup tomato sauce if you prefer a saucier filling)
- ½ cup tomato sauce
- 1 tablespoon Italian seasoning (or a combination of dried basil, oregano, and thyme)
- 1 teaspoon smoked paprika (optional but recommended for depth)
- 1 teaspoon Worcestershire sauce (optional but adds savory complexity)
- 1½ cups shredded cheese—Monterey Jack, sharp cheddar, or mozzarella (split between the filling and topping)
- ¼ teaspoon red pepper flakes (optional, for subtle heat)
For Serving and Garnish:
- Fresh parsley, chopped (optional but adds brightness)
- Extra cheese for topping if desired
Notes on Ingredients: If you don’t have cooked rice on hand, you can use quick-cooking or minute rice, which takes only 5 to 10 minutes. Alternatively, most grocery stores sell microwaveable rice packets that cook in 90 seconds—perfectly acceptable for this recipe. The fire-roasted tomatoes add a subtle smoky depth that regular diced tomatoes don’t provide; if you can’t find them, regular canned tomatoes work fine, just add an extra ½ teaspoon smoked paprika to compensate. For cheese, avoid pre-shredded varieties if possible, as they contain anti-caking agents that prevent smooth melting. Buy a block of cheese and shred it yourself—it makes a noticeable difference in the final texture.
Step-by-Step Instructions for Perfect Stuffed Peppers

Prepare the Oven and Peppers:
-
Preheat your oven to 425°F and position an oven rack in the center of the oven. Line a 9×13-inch baking dish with a sheet of parchment paper or aluminum foil for effortless cleanup—simply lift the peppers out when they’re done, and your baking dish stays pristine.
-
Rinse your bell peppers under cool running water and pat them dry completely. Moisture on the outside can steam the peppers rather than allow them to roast properly.
-
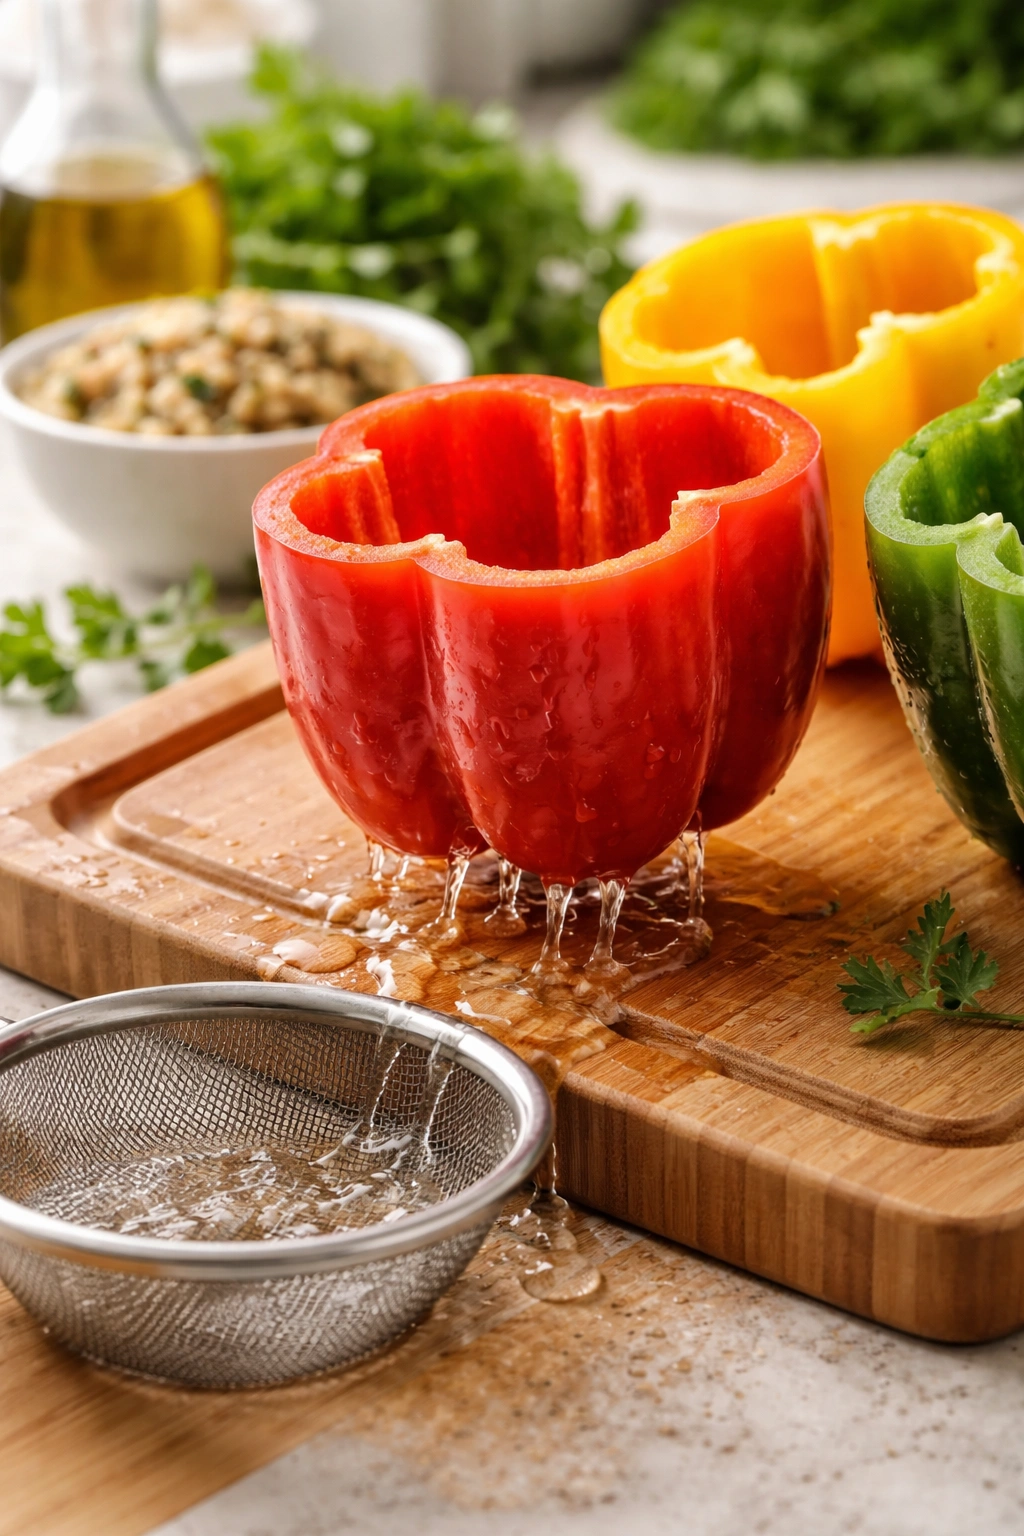
Cut each pepper in half lengthwise, running your knife from the stem end straight down to the bottom. This creates two boat-shaped halves. Using a small knife or your hands, carefully remove the seeds and white membrane (the ribs inside the pepper), leaving a clean, hollow cavity for the filling. Be careful not to puncture the walls of the pepper, or filling will leak out during cooking.
-
If a pepper doesn’t sit flat, trim a very thin slice from the bottom—just enough to create a level surface. This prevents the pepper from rolling around the baking dish.
-
Arrange all the pepper halves cut-side up in your prepared baking dish. Drizzle with 1 tablespoon of the olive oil and sprinkle with a light pinch of salt and pepper. This seasons the peppers from the outside and helps them brown slightly.
-
Roast the peppers in the preheated oven for 15 to 20 minutes, until they’re just starting to soften and the edges are beginning to turn golden brown. They should still hold their shape firmly—you’re not trying to fully cook them, just give them a head start. Remove from the oven and set aside while you prepare the filling.
Advertisements
Make the Filling:
-
While the peppers roast, heat the remaining 2 tablespoons of olive oil in a large skillet over medium-high heat. Once the oil shimmers, add the diced onion and cook, stirring frequently, until the onion is soft and just barely starting to turn golden at the edges, about 4 to 5 minutes. This builds a flavorful base.
-
Add the minced garlic to the hot skillet and stir constantly for about 1 minute, just until the garlic becomes fragrant. Don’t let the garlic brown—burned garlic tastes bitter and will compromise the entire filling. The garlic’s job is to add aromatic depth, not to brown.
-
Increase the heat to medium-high and add the ground beef to the skillet. Using a wooden spoon or spatula, break the beef into small pieces as it cooks. Stir frequently to ensure even browning and to break up any large clumps. The beef should cook until it’s completely browned with no pink remaining anywhere, about 6 to 8 minutes depending on your stove. Drain off any excess grease by tilting the skillet and spooning it out, or use a fine-mesh skimmer to remove fat from the top.
-
Return the beef to the skillet (if you drained it). Stir in the cooked rice, fire-roasted tomatoes with their juices, tomato sauce, Italian seasoning, smoked paprika, Worcestershire sauce, and red pepper flakes if using. Stir everything together and cook over medium-low heat for 2 to 3 minutes, just long enough for the flavors to meld and the mixture to warm through.
-
Remove the skillet from the heat and stir in ¾ cup of the cheese until it’s fully melted and incorporated into the filling. The warm filling will melt the cheese perfectly. Taste a small spoonful and adjust the seasoning—add more salt, pepper, or Italian seasoning if you think it needs it. Remember that the peppers themselves will add some flavor, so don’t oversalt at this stage.
Fill and Bake:
-
Remove the par-roasted peppers from the baking dish. If any liquid has accumulated in the peppers (which is totally normal), carefully pour it out or use a small spoon to scoop it away. This liquid, while harmless, can make the peppers soggy if left in.
-
Spoon the beef filling evenly into each pepper half, mounding it slightly so the filling is generous. Don’t worry if a little filling is leftover—use it to fill a few extra pepper halves if you have them, or save it for another use. You want the peppers to be full and satisfying.
-
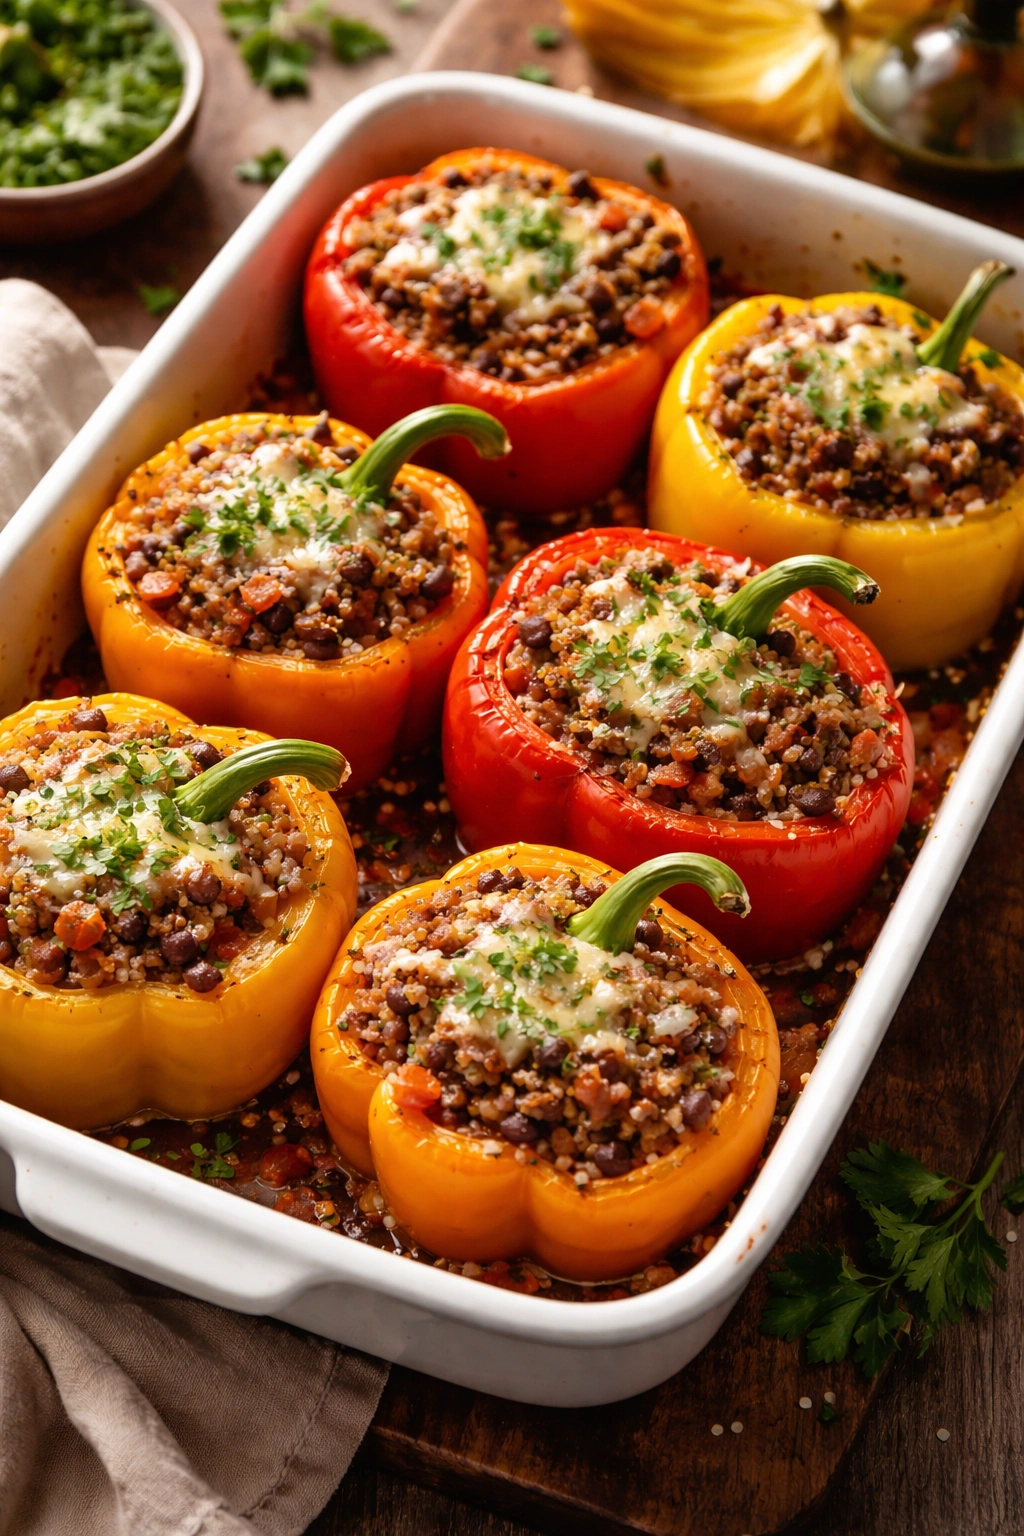
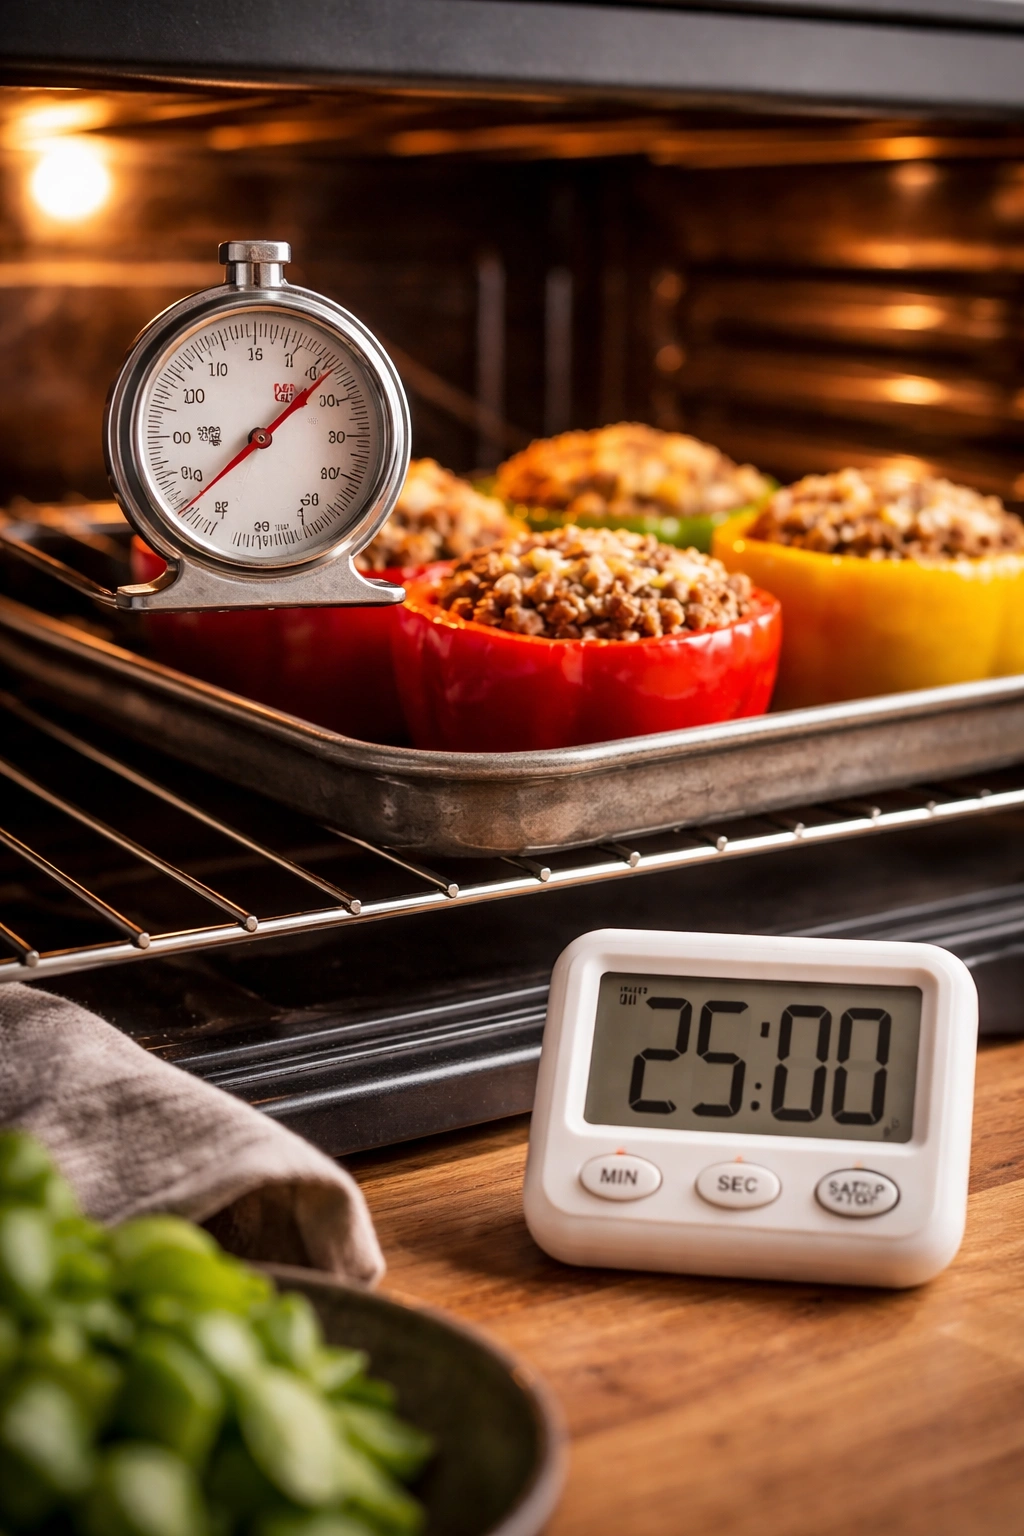
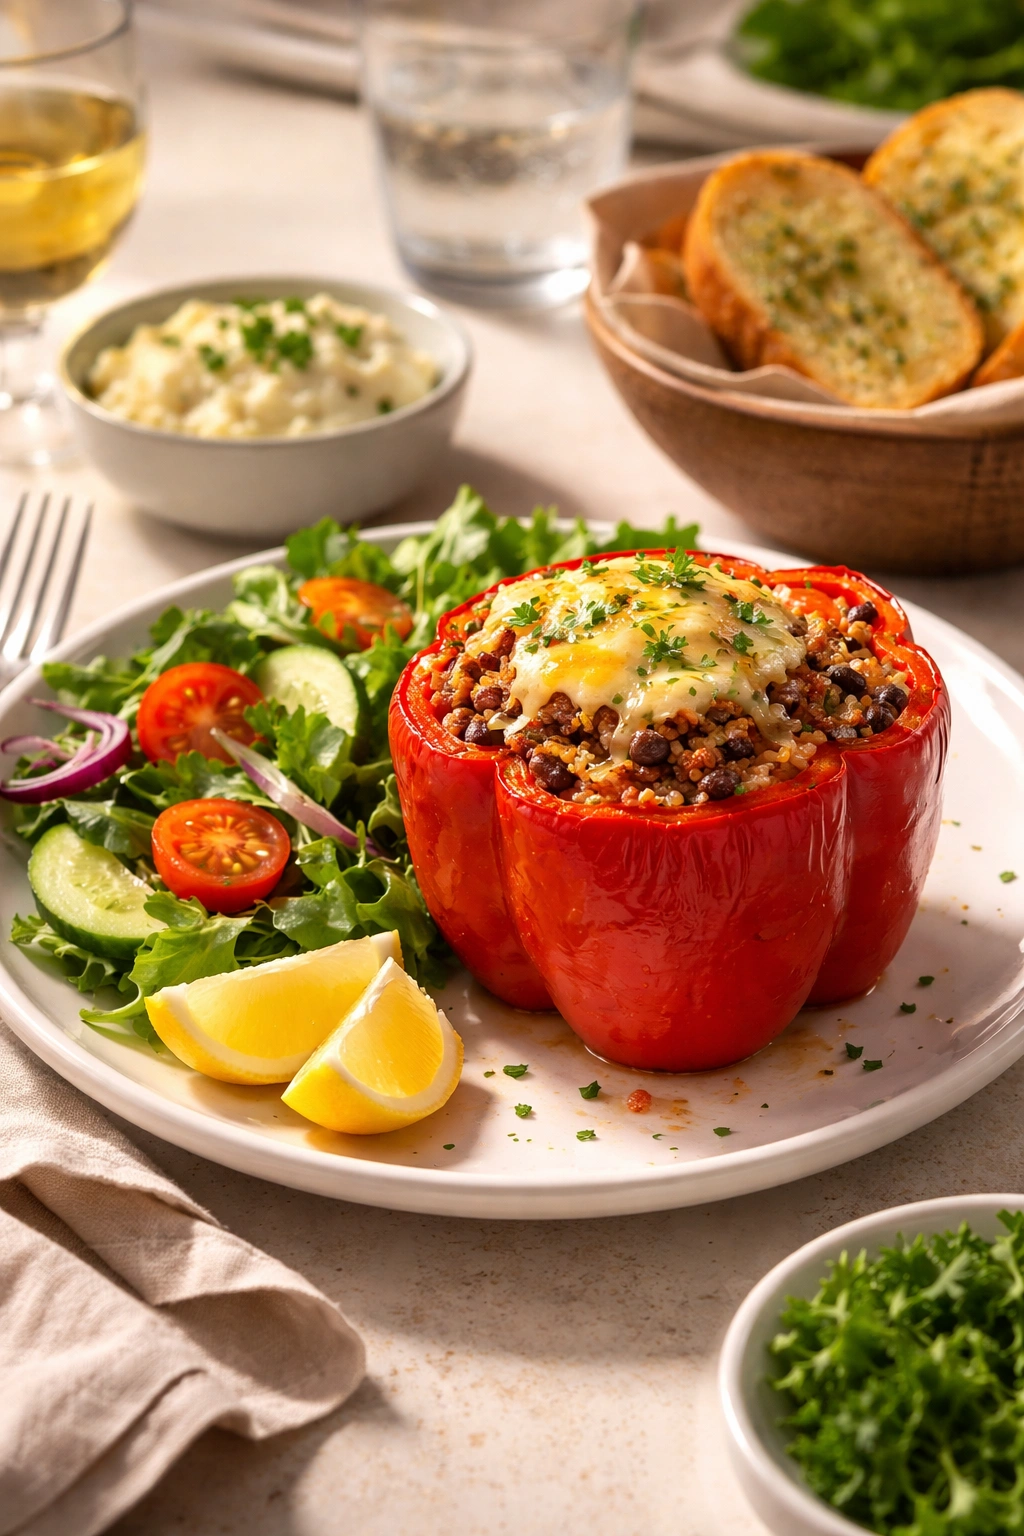
Sprinkle the remaining ¾ cup of shredded cheese over the tops of the filled peppers, distributing it evenly so each pepper gets a good amount of melty cheese. Return the baking dish to the oven and bake, uncovered, at 425°F for 20 to 25 minutes, or until the filling is hot throughout (you can check this with an instant-read thermometer—aim for 160°F in the center of the filling), the peppers are tender, and the cheese is melted and bubbling at the edges.
Advertisements -
Remove the baking dish from the oven and let the peppers rest for 2 to 3 minutes. This allows the filling to set slightly so it won’t spill all over the plate when you plate them. Garnish with fresh chopped parsley if you’d like a pop of color and brightness.
-
Serve the peppers warm directly from the baking dish, or transfer them to individual serving plates. They’re best enjoyed immediately while the cheese is still melty and the peppers are warm.
Pro Tips to Ensure Perfect Results Every Time
Temperature and Timing Are Your Best Friends
The biggest reason stuffed peppers sometimes disappoint is inconsistent oven temperature or misjudged timing. If your oven runs hot or cold, invest in an inexpensive oven thermometer and place it in the center of your oven. Adjusting your actual oven temperature by 25 degrees makes a huge difference in whether your peppers finish tender or tough.
The Fill-and-Chill Trick for Make-Ahead Success
If you want to prep these peppers earlier in the day and bake them later, here’s the trick: prep and fill the peppers as directed, then cover the baking dish tightly with plastic wrap and refrigerate for up to 8 hours. When you’re ready to bake, add 5 to 10 minutes to the cooking time to account for the fact that you’re starting with a cold filling. This is genuinely convenient for busy days.
Preventing the Soggy Pepper Problem
The most common complaint about homemade stuffed peppers is that they turn out soggy and waterlogged. This happens when too much liquid gets trapped in the peppers during cooking. Here’s how to avoid it: pre-roast your peppers for the full 15 to 20 minutes as directed (don’t skip this step thinking you’ll save time), and drain any accumulated liquid from the peppers before filling them. Additionally, don’t use sauce that’s too thin—if your filling mixture looks watery, simmer it for another minute or two on the stove to reduce the liquid slightly before you stuff the peppers.
Choosing the Right Cheese
Real shredded cheese melts and distributes more evenly than pre-shredded packaged varieties, which contain anti-caking agents that prevent smooth melting. If you shred your own cheese, the top will be creamy and cohesive. This sounds like a small thing, but it noticeably improves the eating experience.
Calculating Rice Correctly
You need 1½ cups cooked rice for this recipe. A good rule of thumb is that ½ cup of uncooked white rice yields approximately 1½ cups cooked rice. If you’re cooking rice from scratch, start it first so it’s ready when you need it. The filling should incorporate the rice while it’s still warm—it’ll absorb the flavors better.
Flavor Variations and Customizations
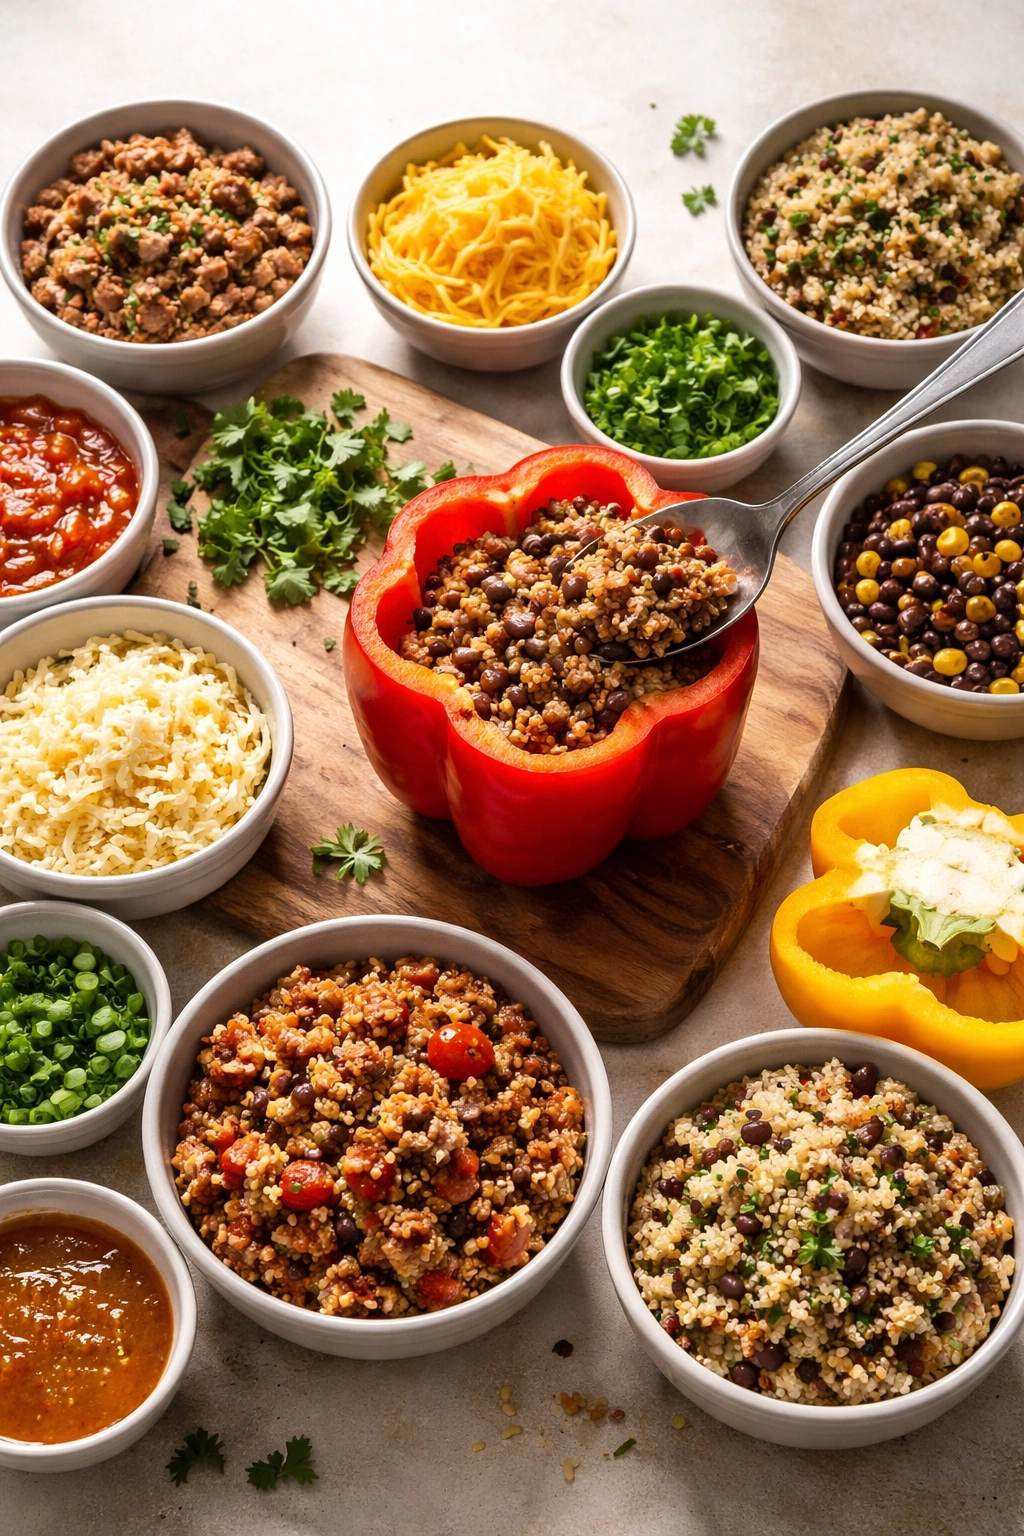
The Beauty of Adaptability
The base recipe is solid as written, but stuffed peppers are genuinely one of the most flexible dishes you can make. You can change the meat, the seasonings, the grain, or the cheese without compromising the essential concept.
Meat Variations
Swap ground beef for ground turkey, ground chicken, ground pork, or even ground lamb. Ground turkey and chicken are leaner options that cook a bit faster—reduce the cooking time by a minute or so. Ground pork and sausage bring more fat and richness; ground lamb adds a Mediterranean angle. You can also use a combination—half ground beef and half ground sausage is a killer flavor combination.
Grain and Carbohydrate Swaps
While rice is traditional, you can substitute brown rice (earthier and nuttier), wild rice (chewier texture), quinoa (higher in protein, slightly different texture), farro, barley, or even couscous. Each brings a different character to the dish. Adjust any liquid in the filling slightly depending on which grain you choose—some varieties absorb more liquid than others.
Seasoning Adventures
Keep the base aromatic ingredients (onion, garlic, tomatoes), but experiment with the spice profile. For a Southwestern angle, use chili powder, ground cumin, and smoked paprika plus a pinch of cayenne pepper. For an Italian direction, use fresh basil, more oregano, and a splash of balsamic vinegar. For a Mediterranean vibe, add dried oregano, a pinch of cinnamon, pine nuts, and raisins. For a spicy kick, add fresh jalapeños to the filling or increase the red pepper flakes.
Vegetable Additions
Diced mushrooms, zucchini, spinach, corn, or bell pepper pieces (using part of the pepper you cut off) can all go into the filling. If you add watery vegetables like zucchini, sauté them first to drive off excess moisture, or the filling will become too wet.
Cheese Innovations
Beyond the standard Monterey Jack or cheddar, try sharp aged cheddar for more complex flavor, or a blend of mozzarella and parmesan. For a spicy version, use pepperjack. Feta or goat cheese adds tang. Mix cheeses for more interesting texture and flavor—try half cheddar and half mozzarella, for instance.
Storage, Make-Ahead, and Reheating Guide
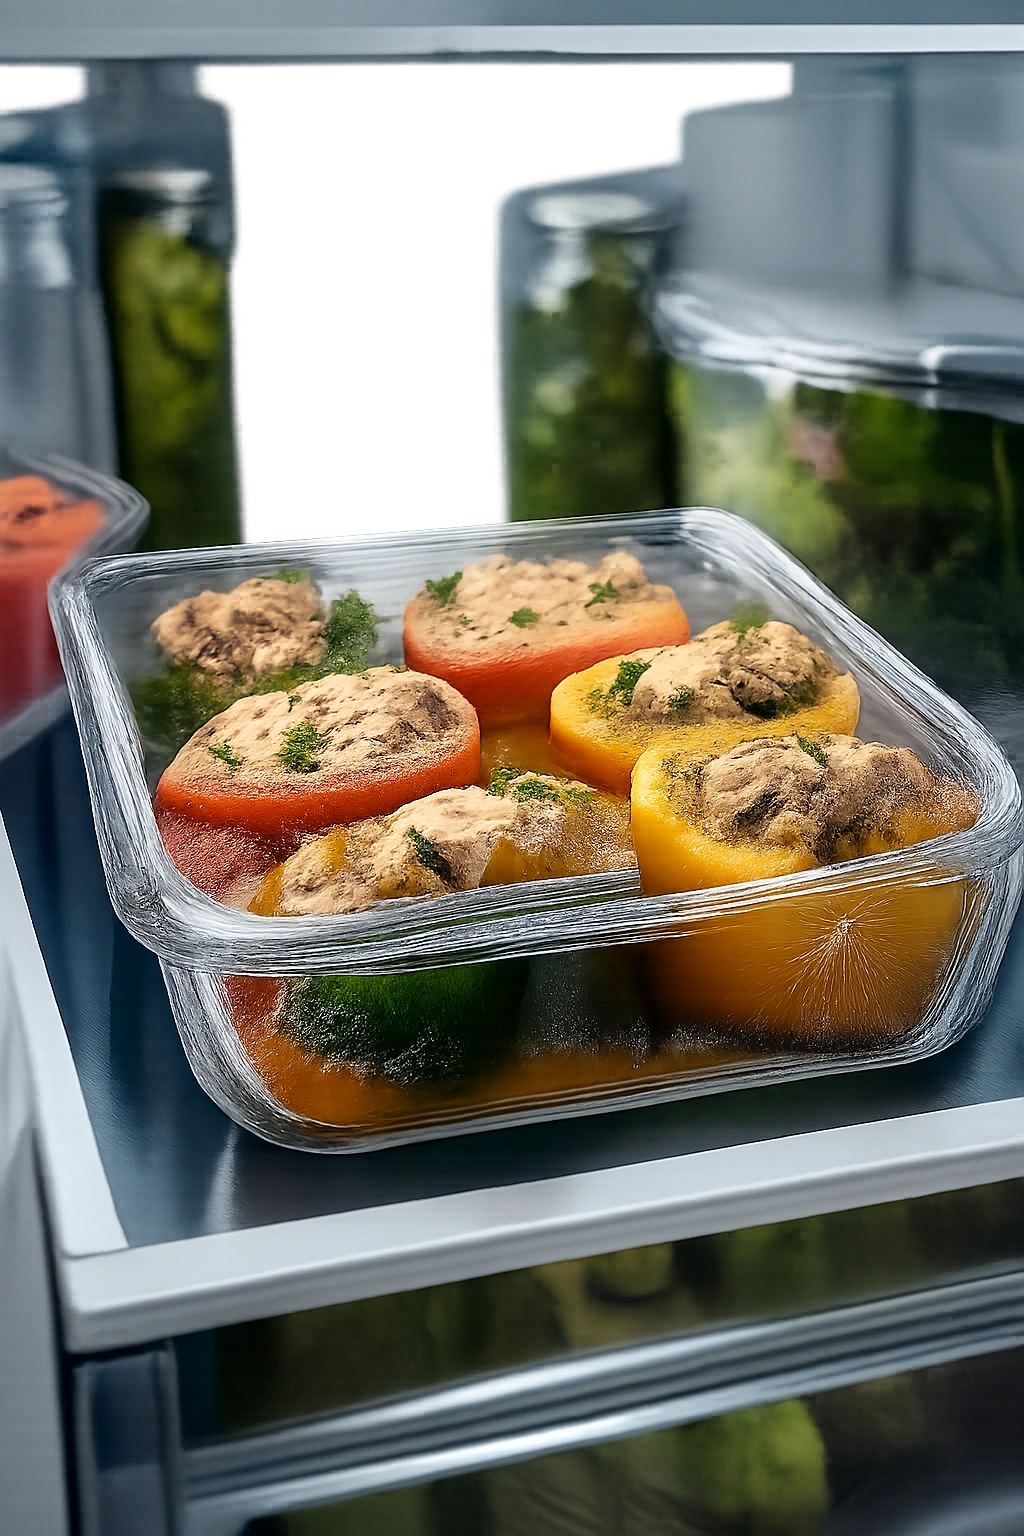
Preparing Peppers in Advance
You can par-roast the peppers up to 8 hours ahead. Arrange them in a baking dish, cover with plastic wrap, and refrigerate. When you’re ready to make dinner, prep your filling fresh while the oven preheats, then fill and bake as directed, adding just 5 minutes to the cooking time since everything starts cold.
Make-Ahead Fully Assembled Peppers
If you want to assemble the entire dish and bake it later, fill and top the peppers with cheese, cover the baking dish tightly with plastic wrap, and refrigerate for up to 24 hours. When you’re ready to bake, add about 10 minutes to the cooking time. This is genuinely convenient for weeknight cooking—you can assemble everything in the morning and just pop the dish in the oven after work.
Storing Leftovers
Cooked stuffed peppers keep beautifully in the refrigerator for 3 to 4 days when stored in an airtight container. They actually taste better the next day as flavors meld together overnight. Don’t freeze cooked stuffed peppers if you can help it—the peppers tend to become mushy and the texture suffers noticeably. However, you can freeze the raw filling separately for up to 3 months; thaw it overnight in the fridge before using.
Reheating for Best Results
The absolute best way to reheat stuffed peppers is in a 350°F oven, loosely covered with foil, for about 15 to 20 minutes until warmed through. This gently reheats everything and prevents the cheese from separating or becoming greasy. In a microwave, cover loosely and heat on 50% power for 3 to 4 minutes, checking halfway through. The oven method really does produce superior results if you have the time.
Serving Suggestions and Side Pairings
Why Stuffed Peppers Stand Alone (But Don’t Have To)
Because stuffed peppers contain protein, carbohydrates, vegetables, and fat, they’re genuinely a complete meal on their own. You don’t need sides—many nights, you’ll serve them solo and everyone will be completely satisfied. That said, if you want to add sides, here are the pairings that make the most sense.
Bread and Grain Sides
Warm cornbread is the classic pairing, especially if you’re leaning into a Southwestern flavor profile with your filling. Garlic bread or crusty Italian bread soaks up the filling juices beautifully. A side of roasted polenta, creamy grits, or buttered egg noodles adds richness and comfort.
Vegetable Sides
A crisp green salad provides textural contrast and freshness—Caesar salad or a simple vinaigrette-dressed arugula salad both work beautifully. Roasted or sautéed green beans, a medley of roasted vegetables (Brussels sprouts, broccoli, carrots), or a fresh tomato salad (if you’re not using tomatoes heavily in the peppers) all complement the dish well.
Light and Fresh Pairings
If you want to keep the meal lighter or your peppers are already fairly rich, serve alongside a bright salad or fresh salsa. A squeeze of lime juice over the finished peppers adds acidity and brightness. Chopped fresh cilantro instead of parsley brings a completely different flavor direction.
Common Questions and Troubleshooting
Why Are My Peppers Coming Out Soggy?
This is the most common problem, and there are usually three culprits. First, you’re not pre-roasting the peppers long enough—make sure you roast them for the full 15 to 20 minutes. Second, you’re not draining the liquid that accumulates in the peppers before filling them. Third, your filling mixture is too wet. If you see excess liquid at the bottom of your filling, simmer it for an extra 2 to 3 minutes on the stove before filling the peppers. The goal is for the filling to be moist but not soupy.
My Peppers Won’t Stand Up Straight—What Should I Do?
If you’re having trouble getting peppers to stand upright, trim a thin slice from the bottom of each pepper. Make sure you’re not cutting into the hollow interior—just shaving a tiny bit off the base. If they still refuse to cooperate, prop them up with small balls of aluminum foil tucked between the peppers and the sides of the baking dish. Or simply lay them on their sides in the dish; they’ll cook fine, you’ll just need to rotate them halfway through.
Can I Make These With a Vegetarian Filling?
Absolutely. Sauté finely diced mushrooms, zucchini, spinach, and bell peppers in place of the ground beef. Add extra beans (black beans, kidney beans, or chickpeas) for protein, or increase the amount of cheese. The filling might be a bit wetter, so reduce the tomato sauce slightly or add a cup of cooked farro or barley to absorb the extra liquid.
What If I Don’t Have Fire-Roasted Tomatoes?
Use regular canned diced tomatoes and add an extra ½ teaspoon of smoked paprika to replicate the smoky depth. Or use 1 can of diced tomatoes plus ½ cup of tomato sauce instead of using fire-roasted tomatoes. The result will be slightly different but still delicious.
How Do I Know When the Peppers Are Done?
The peppers should be fork-tender (a fork pierces the flesh easily), the cheese on top should be melted and bubbling at the edges, and the filling should register 160°F on an instant-read thermometer inserted into the center. Start checking at the 20-minute mark; if your peppers are particularly thick-walled, they might need the full 25 minutes or even a few minutes more.
Final Thoughts

Stuffed peppers have endured as a dinner staple for decades because they genuinely deliver on every front: they’re affordable, approachable, forgiving, and most importantly, they taste delicious. This version respects the tradition while bringing enough flavor and refinement to feel special even on an ordinary Tuesday night. The key to success is taking your time with the pre-roasting step (this truly does prevent the soggy pepper problem), using real cheese that you shred yourself, and tasting your filling before you stuff the peppers so you can adjust the seasoning to your preferences.
Whether you’re cooking for a family night, preparing meals for the week ahead, or looking for an easy dish to bring to a potluck, this recipe delivers without drama or complicated technique. Make these peppers once and you’ll have a reliable blueprint to customize endlessly based on what’s in your pantry and what your family loves. That’s the real power of this dish—it’s both a complete recipe and a framework for creativity. Keep this in your regular rotation and you’ll never run out of weeknight dinner ideas.