The frustration is real. You fire up the grill with confidence, place those chicken breasts on the grates, and somehow they emerge looking decent on the outside but tasting like the inside of a desert. Dry, bland, disappointing—the opposite of what juicy, tender grilled chicken should be. The worst part? It’s not because you’re a bad cook. It’s because boneless, skinless chicken breasts are genuinely difficult to grill without knowing the right approach.
Here’s the thing: chicken breasts are lean meat. Unlike thighs or drumsticks, they have almost no fat to insulate and protect them from the intense direct heat of a grill. That same leanness that makes them a healthy choice also means they dry out faster than almost any other piece of poultry. The window between perfectly cooked and hopelessly parched is shockingly narrow—sometimes just two or three minutes of overcooking can be the difference between restaurant-quality chicken and rubber.
The good news is that getting juicy, flavorful grilled chicken isn’t about luck or special equipment. It’s about understanding exactly what causes dryness and then using proven techniques that eliminate it. Whether you prefer the brining method, the marinading approach, or a hybrid of both, the path to juicy grilled chicken is completely within your control. This guide walks you through every single technique, tip, and trick that separates dry, forgettable chicken from the kind that makes people ask for your recipe.
Why Grilled Chicken Breasts Turn Out Dry
Understanding the enemy is the first step to defeating it. Chicken breasts dry out for specific, preventable reasons—and recognizing them changes everything about how you approach grilling.
The primary culprit is the lack of fat. Chicken breasts are almost entirely lean protein, which means there’s no natural insulation protecting the meat from heat. When you place a cold breast on a hot grill, the outer layers start cooking immediately, and if you’re not careful, they can cook so much faster than the interior that the center is still undercooked while the outside is already overdone and moisture-free.
The second reason has to do with uneven thickness. Most chicken breasts aren’t uniform—they’re thicker on one end and taper to a thin, almost wispy point on the other. This creates a cooking nightmare. The thin end reaches the safe internal temperature long before the thick end, meaning you either pull it off before the middle is done, or you leave it on the grill long enough for the thin portion to lose all its moisture and become unpleasantly tough.
Overheating is another major issue. Chicken proteins denature and expel moisture when they’re cooked past a certain temperature. The USDA recommends 165°F for safety, but research and experienced cooks have found that cooking beyond this point—even by just a few degrees—causes moisture loss that makes the meat noticeably drier. The protein fibers tighten up and squeeze out the juice.
Finally, there’s the issue of not resting the chicken. When you pull a chicken breast off the grill and immediately cut into it, the juices haven’t had time to redistribute throughout the meat. They run right out onto the plate, taking moisture with them. A simple five-minute rest solves this problem elegantly.
Flatten Your Chicken to Even Thickness
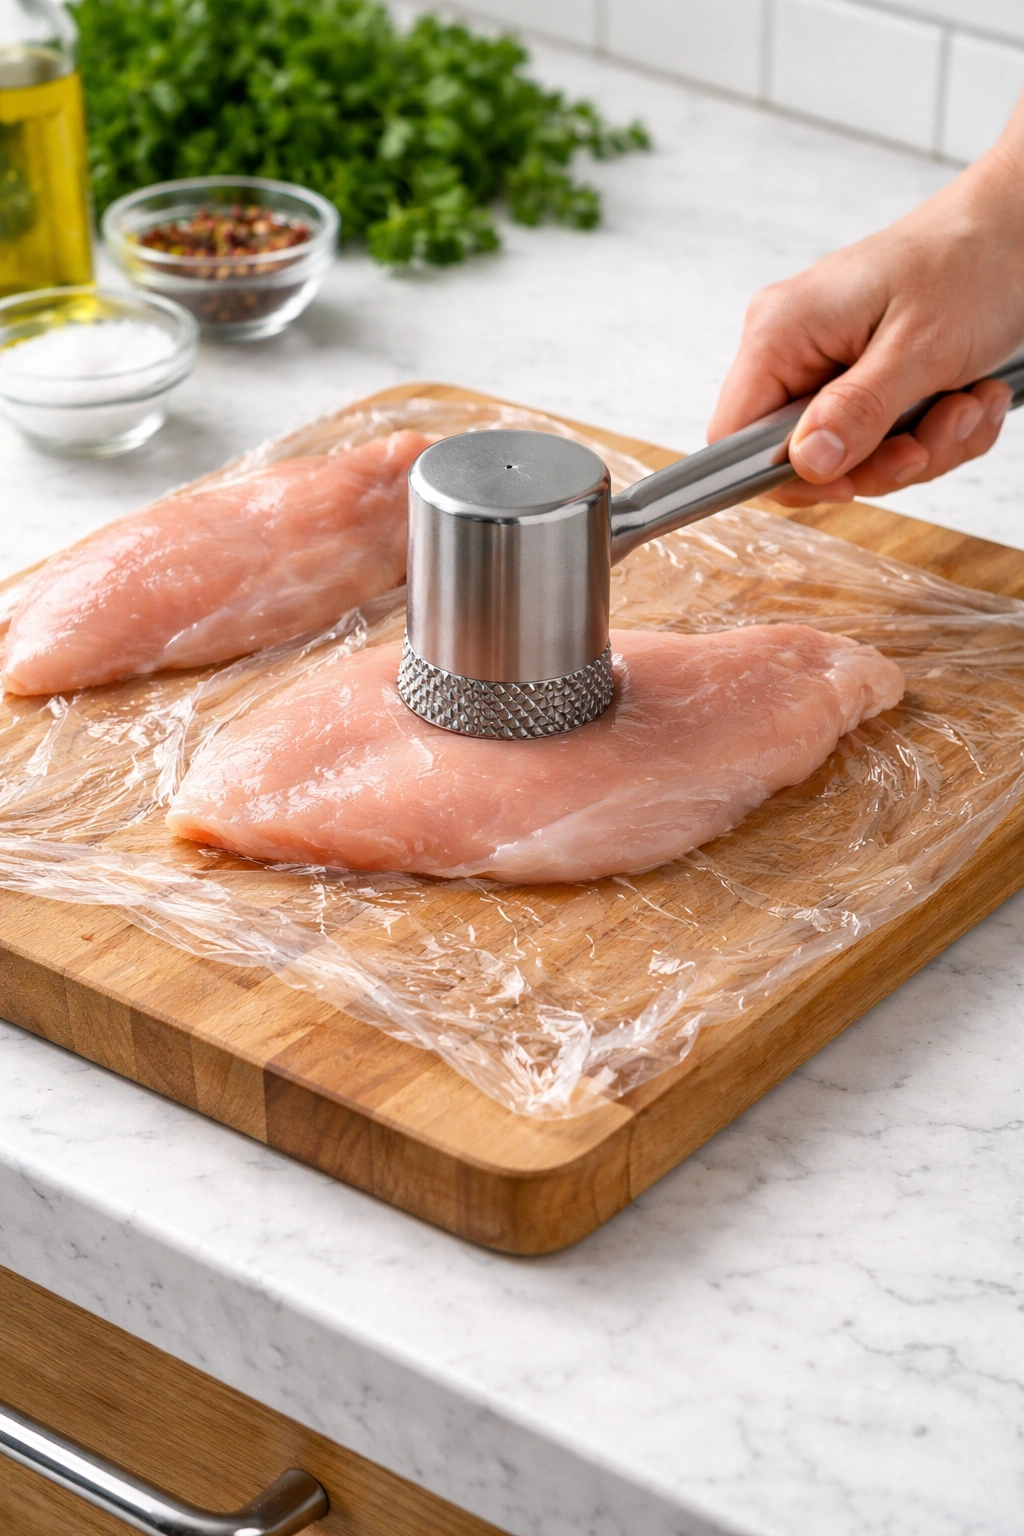
This is step one, and it’s non-negotiable. Pounding your chicken breasts to a consistent thickness is the single most important thing you can do to ensure even cooking, and it takes maybe three minutes.
Place one chicken breast on a cutting board and cover it loosely with plastic wrap—loosely is key, because if you wrap it too tightly, the plastic will split when you pound it. Leave a couple of inches of space around the edges so the meat can expand downward as you strike it.
Using a meat mallet with a flat side (not the textured side meant for tenderizing), focus on the thickest part of the breast. Strike it firmly 8 to 10 times, breaking down the fibers and flattening the meat. The goal is to make the breast uniform in thickness all the way across—ideally about 3/4 inch to 1/2 inch thick throughout. You’re not trying to pound it paper-thin; you’re trying to make it even.
This accomplishes several things simultaneously. First, even thickness means even cooking. The thin and thick parts now cook at roughly the same rate, so nothing gets overcooked before everything is done. Second, it reduces total cooking time, which means less opportunity for the outside to dry out while you’re waiting for the inside to cook through. Third, it increases surface area, which helps if you’re brining or marinating, because those treatments can now penetrate more quickly and evenly.
One pro tip: do this pounding while the meat is still cold, straight from the refrigerator. Cold meat is firmer and easier to work with, and you’ll get cleaner, more even results. Some cooks also like to poke small holes all over the chicken with a fork after pounding—this creates more surface area for marinades to penetrate and helps seasonings work their way into the meat more effectively.
The Brining Method for Maximum Moisture
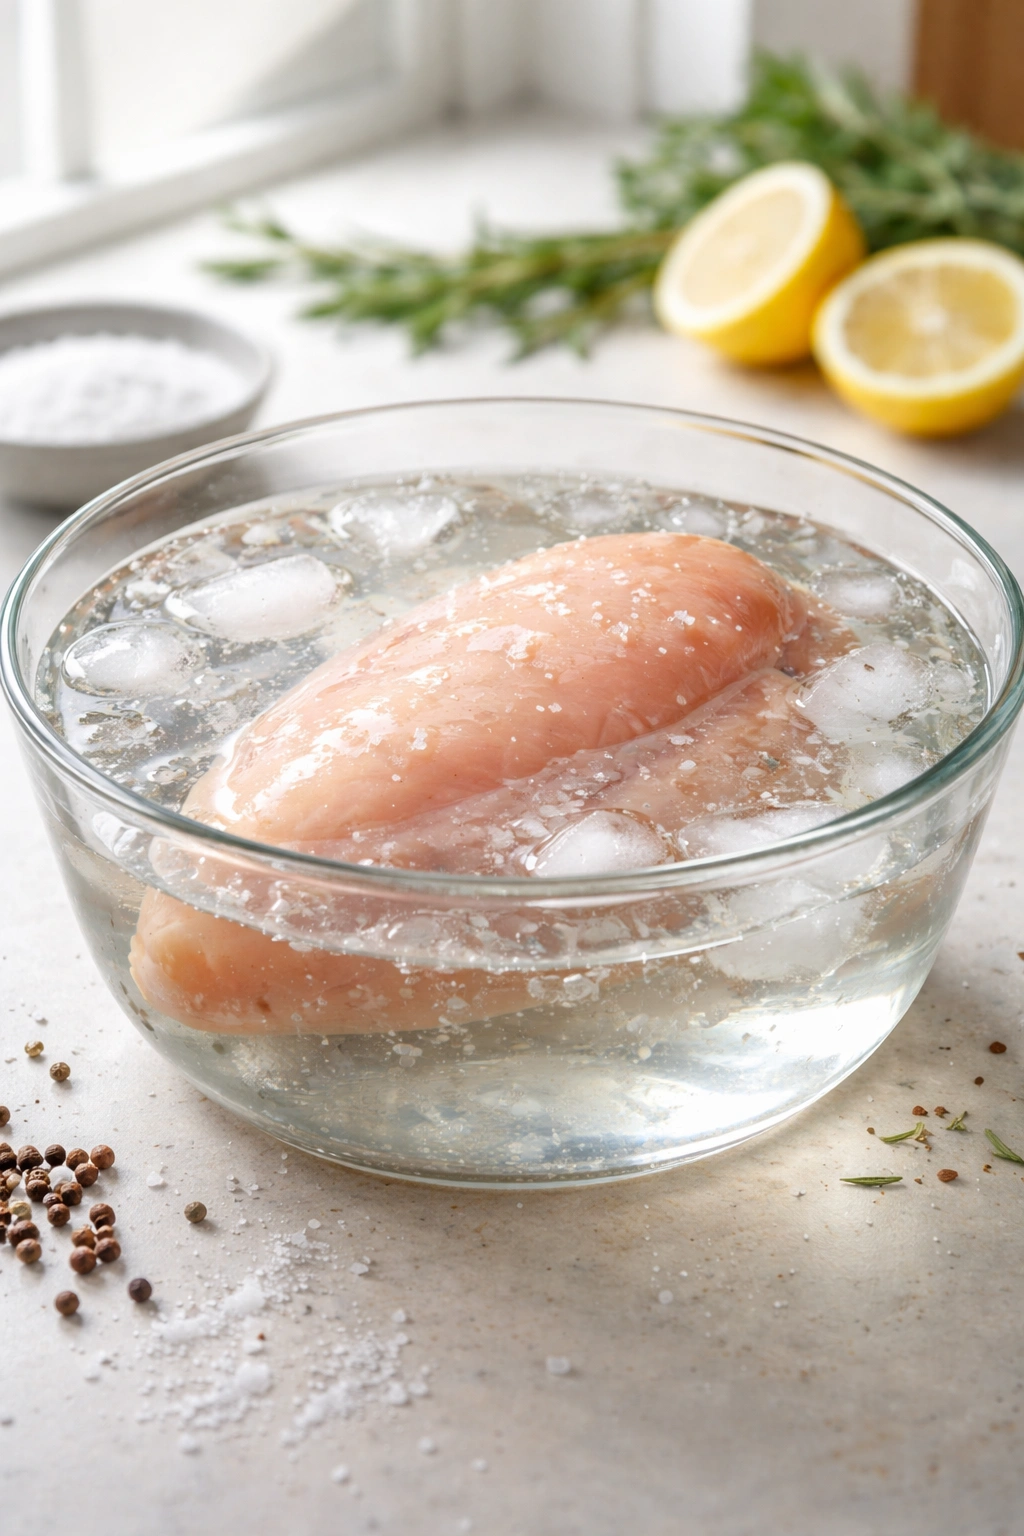
If you want to guarantee juicy chicken, brining is your most foolproof technique. Brining works by allowing salt to penetrate the meat itself, not just season the surface, and this salt helps the chicken retain moisture as it cooks.
Here’s how it works at the chemical level: the salt in the brine dissolves the muscle proteins slightly, which causes them to unwind and form a gel-like matrix that traps and holds water. When you cook the chicken, even though some moisture is lost, the meat retains significantly more than it would have without brining. The difference is genuinely dramatic—brined chicken stays noticeably juicier and more tender.
The basic brine formula is simple: 4 cups of cold water, 4 tablespoons of kosher salt, and optionally 1 to 2 tablespoons of sugar. If you’re using table salt instead of kosher salt, use only 2 to 3 tablespoons, since table salt has finer crystals and is more densely packed. Different salt brands have different crystal sizes, so the measurement matters.
How Long to Brine
The timing is crucial. After just 15 minutes in brine, your chicken will have enhanced flavor but no real change in juiciness. At 30 to 60 minutes, you get the sweet spot: noticeably enhanced flavor and improved tenderness and juiciness. Brining longer than 90 minutes can actually be counterproductive—the chicken can absorb too much salt and start to taste like cured ham, which is not what you’re after. If you’ve flattened your chicken first, 30 to 45 minutes is perfect.
Here’s a basic brining process: In a medium bowl, whisk together your salt and water until the salt completely dissolves. Add the flattened chicken breasts, making sure they’re fully submerged—if they’re floating, use a narrower bowl or add a bit more brine. Cover and refrigerate. After your brining time is done, remove the chicken, pat it dry with paper towels (this is important—excess surface moisture prevents good browning), and proceed to the grill.
Optional Flavor Additions to Brine
You can add flavor directly to your brine without compromising its moisture-retention properties. Dried herbs like thyme, oregano, and rosemary work beautifully. Garlic powder, black pepper, and even a light hand with paprika all work well. The key is to go subtle—remember, you’re also going to be seasoning the chicken directly before it goes on the grill, and you don’t want oversalting to become an issue.
The Marinade Approach
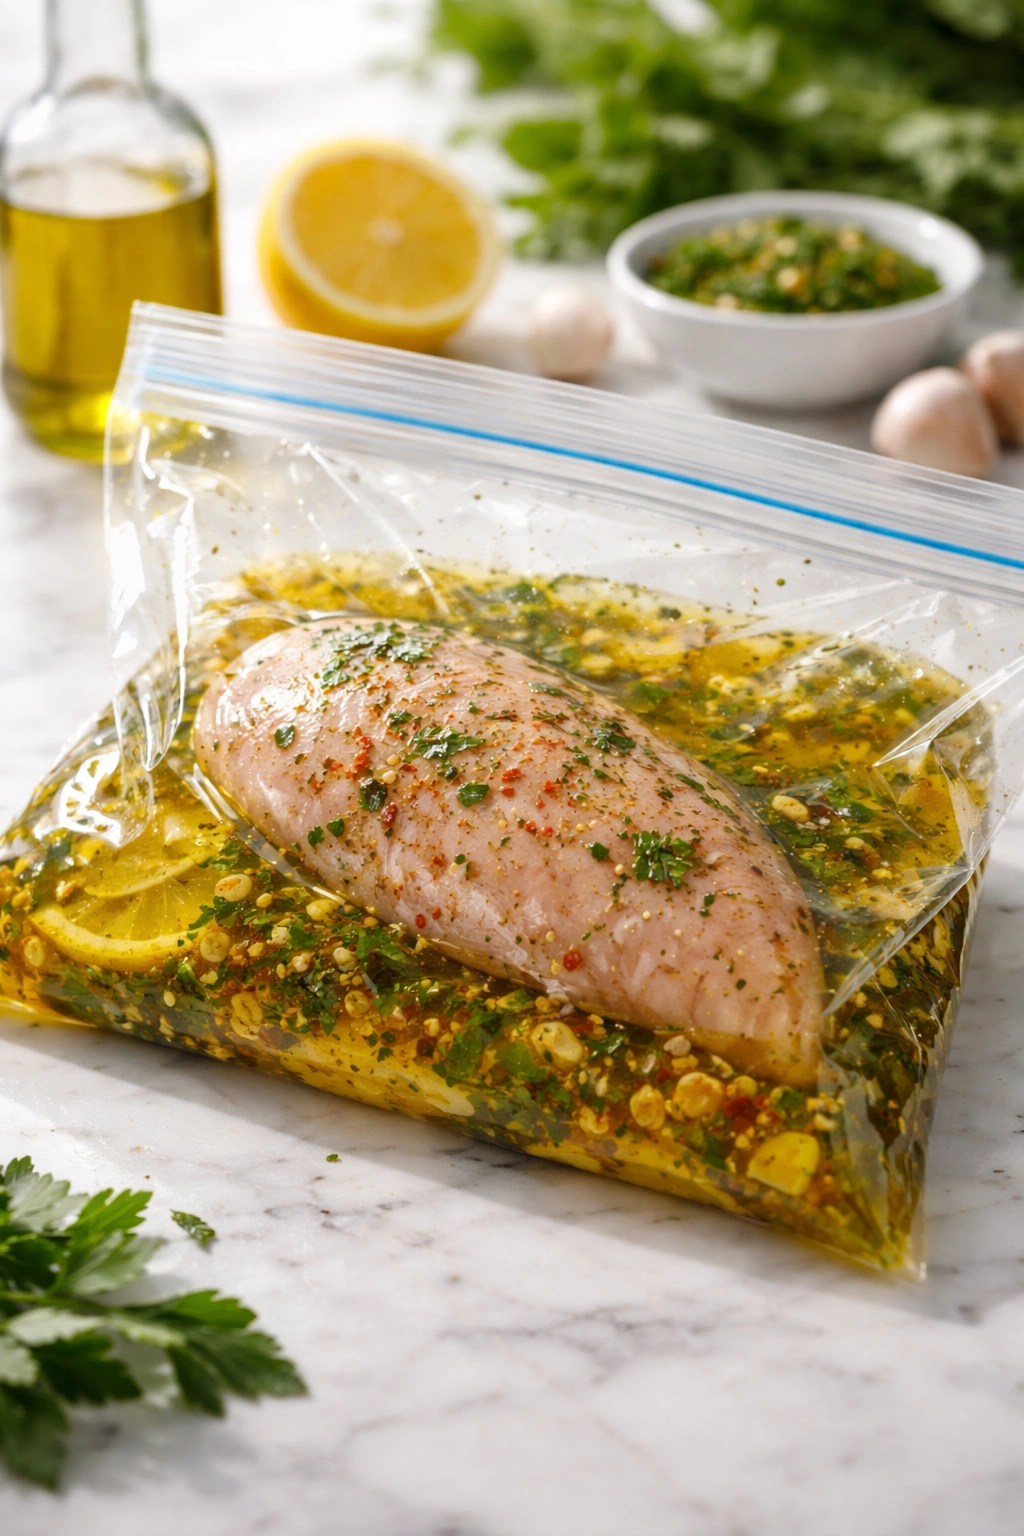
Not everyone wants to brine, and marinading is a perfectly valid alternative that adds tremendous flavor, though it doesn’t penetrate quite as deeply as brining for moisture retention.
The key to an effective marinade is the ratio of ingredients. Most experienced cooks use a 2-to-1 ratio of oil to acid—meaning for every 2 tablespoons of olive oil, use 1 tablespoon of something acidic like lemon juice, vinegar, or lime juice. This ratio creates a rich, flavorful marinade that coats the chicken evenly and adheres well to the meat.
A simple all-purpose marinade might look like this: 1/3 cup olive oil, 2 to 3 tablespoons lemon juice (or your acid of choice), 1 to 2 teaspoons kosher salt, 1/2 teaspoon ground black pepper, 1 teaspoon garlic powder, and 1 to 2 teaspoons of dried herbs like Italian seasoning, thyme, or oregano. Combine these in a zip-top bag, add your pounded chicken breasts, seal it, and refrigerate.
Optimal Marinating Time
For maximum flavor absorption, marinate for at least 30 minutes, but preferably 6 to 8 hours. Overnight marinating works beautifully if you’re planning ahead. Unlike brining, you can safely marinate chicken for longer periods without it becoming overly salty or developing an unpleasant texture. The longer it sits, the more flavor it develops.
One important note: avoid marinades with significant amounts of sugar or honey. These can burn on the high heat of the grill, creating bitter char that overwhelms the delicate flavor of chicken. If you want sweetness in your marinade, add just a touch and keep the heat moderate.
When you’re ready to grill, remove the chicken from the marinade and shake off excess liquid. You can either discard the marinade or reserve some (the portion that hasn’t touched raw chicken) to use as a finishing sauce if you’d like.
Preparing Your Grill Properly
Before the chicken even touches the grates, you need to set yourself up for success. A properly prepared grill is the foundation for juicy chicken.
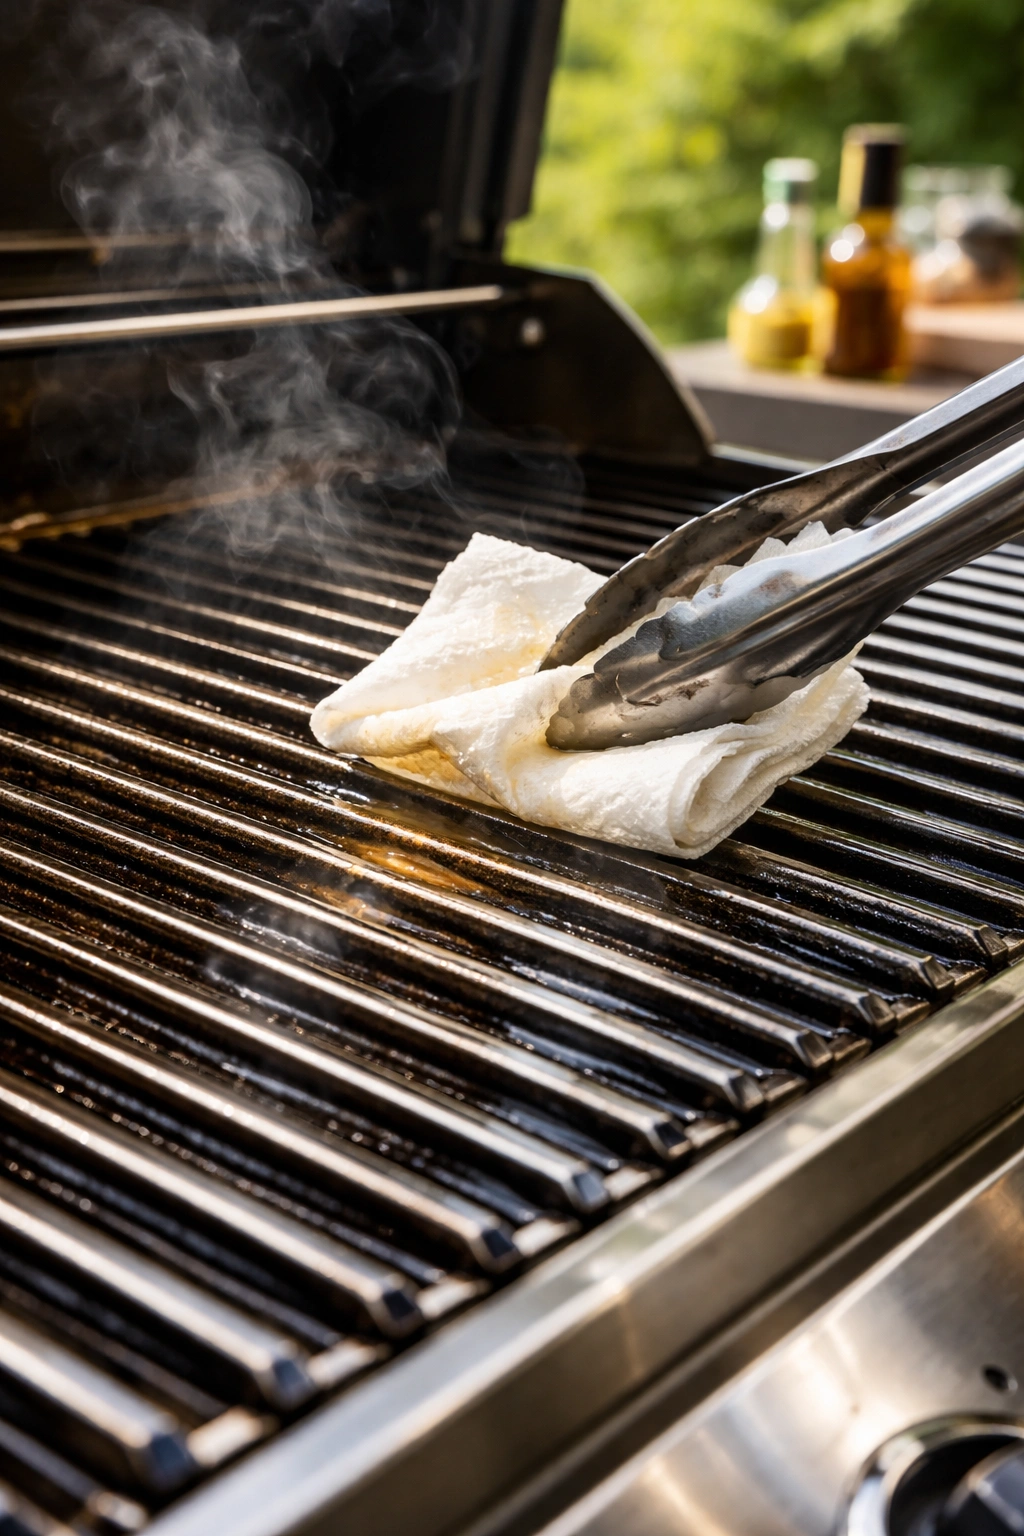
Start by cleaning your grill grates thoroughly. Cold grates are easier to clean, so if your grill has been sitting unused, brush them with a grill brush to remove any debris or old residue. Some cooks swear by cleaning with a raw onion cut in half—the natural acids in the onion have mild antibacterial properties and remove stuck-on food effectively.
Next, oil your grates. This is critical for preventing sticking, which is especially important with skinless chicken that lacks fat to create a natural non-stick surface. When your grill is cold, use tongs to dip a paper towel in vegetable oil, grapeseed oil, or another high-smoke-point oil, then rub that oiled towel all over the grates in the cooking area. This creates a light, even coating that prevents sticking without imparting flavor.
Preheat your grill to medium-high heat, around 400 to 450°F, depending on your grill and how quickly you want the chicken to cook. Hotter (450 to 475°F) means faster cooking, which gives less time for moisture to escape—this is actually ideal if you can monitor temperature carefully. A grill thermometer is invaluable here. If your grill doesn’t have a built-in thermometer, you can estimate the temperature by holding your hand six inches above the grates; if you can hold it there comfortably for only 2 to 3 seconds before pulling away, the grill is hot enough.
Temperature Control: The Make-or-Break Factor
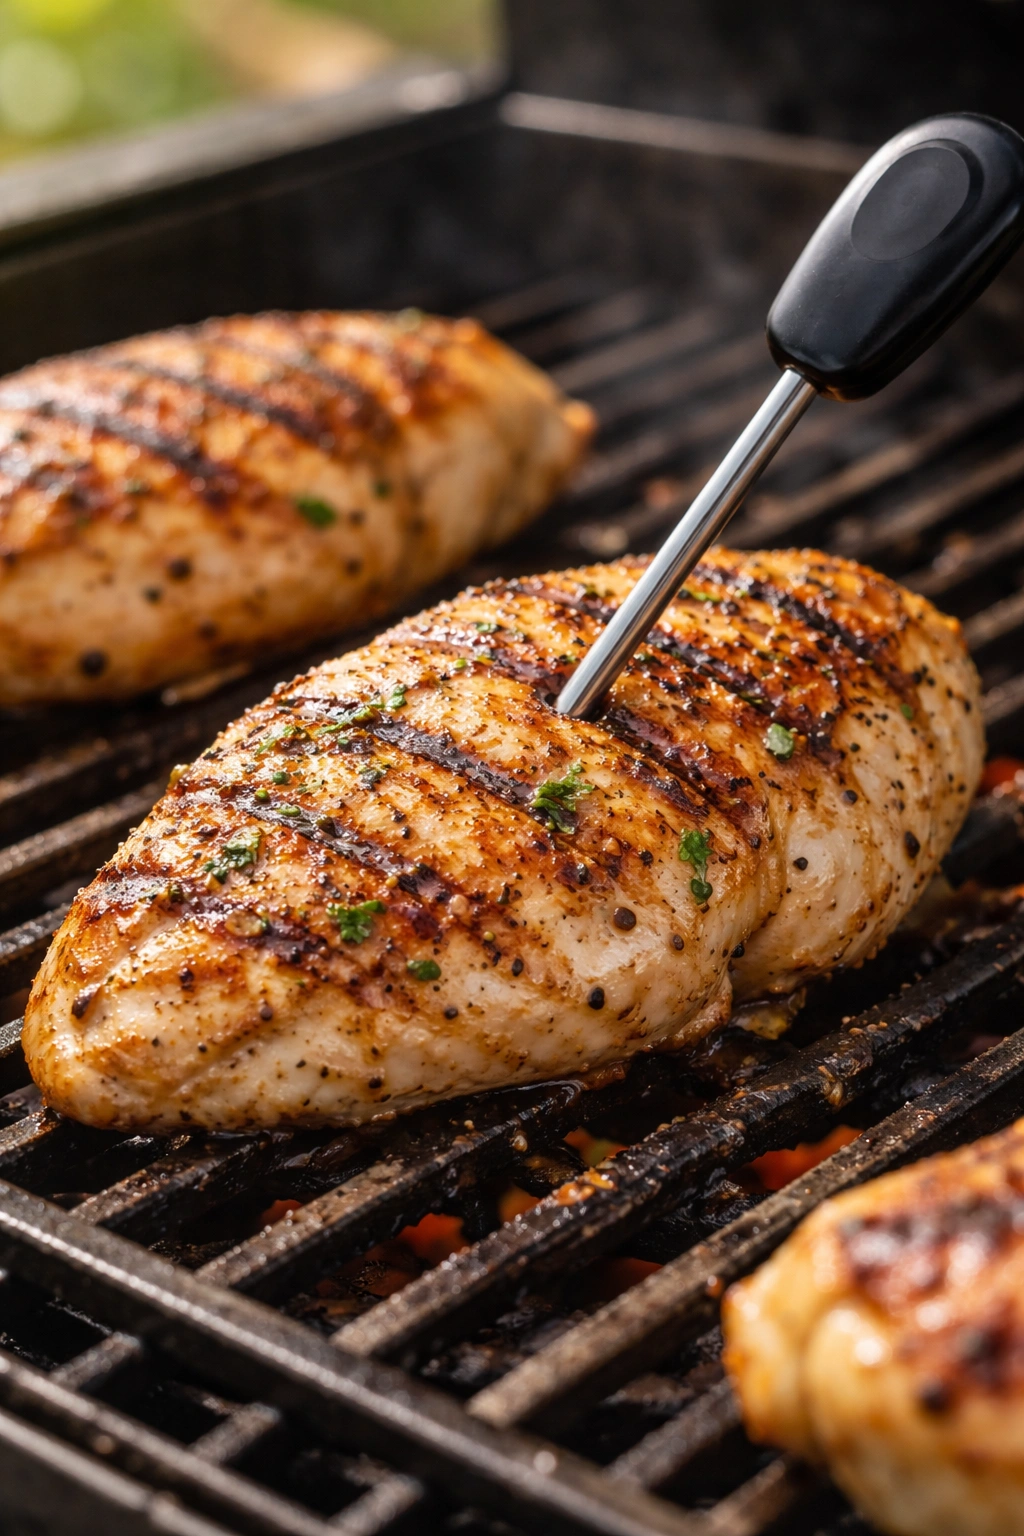
This is where precision matters most. Using an instant-read meat thermometer is the single best tool for preventing overcooked, dry chicken, and it’s not even close.
The USDA’s safe-temperature recommendation of 165°F is based on killing bacteria instantly at that temperature. However, chicken remains safe at lower temperatures if held for a certain amount of time. Many experienced cooks pull chicken at 155 to 160°F for breasts, allowing it to coast up another 5 degrees during resting, landing in the 160 to 165°F range. This approach delivers noticeably juicier chicken without any food-safety compromise.
When you pull the chicken at a lower temperature and allow it to rest, the residual heat continues to cook it gently while the juices redistribute. This is crucial for texture and moisture. A chicken that’s cooked all the way to 165°F on the grill and then cut immediately will be drier than one that’s cooked to 155°F and rested for five minutes.
Insert your thermometer into the thickest part of the breast, away from bone if you’re using bone-in chicken. For boneless breasts, aim for the center. Digital instant-read thermometers give you a reading in seconds and are far more reliable than guesswork or checking doneness by touch.
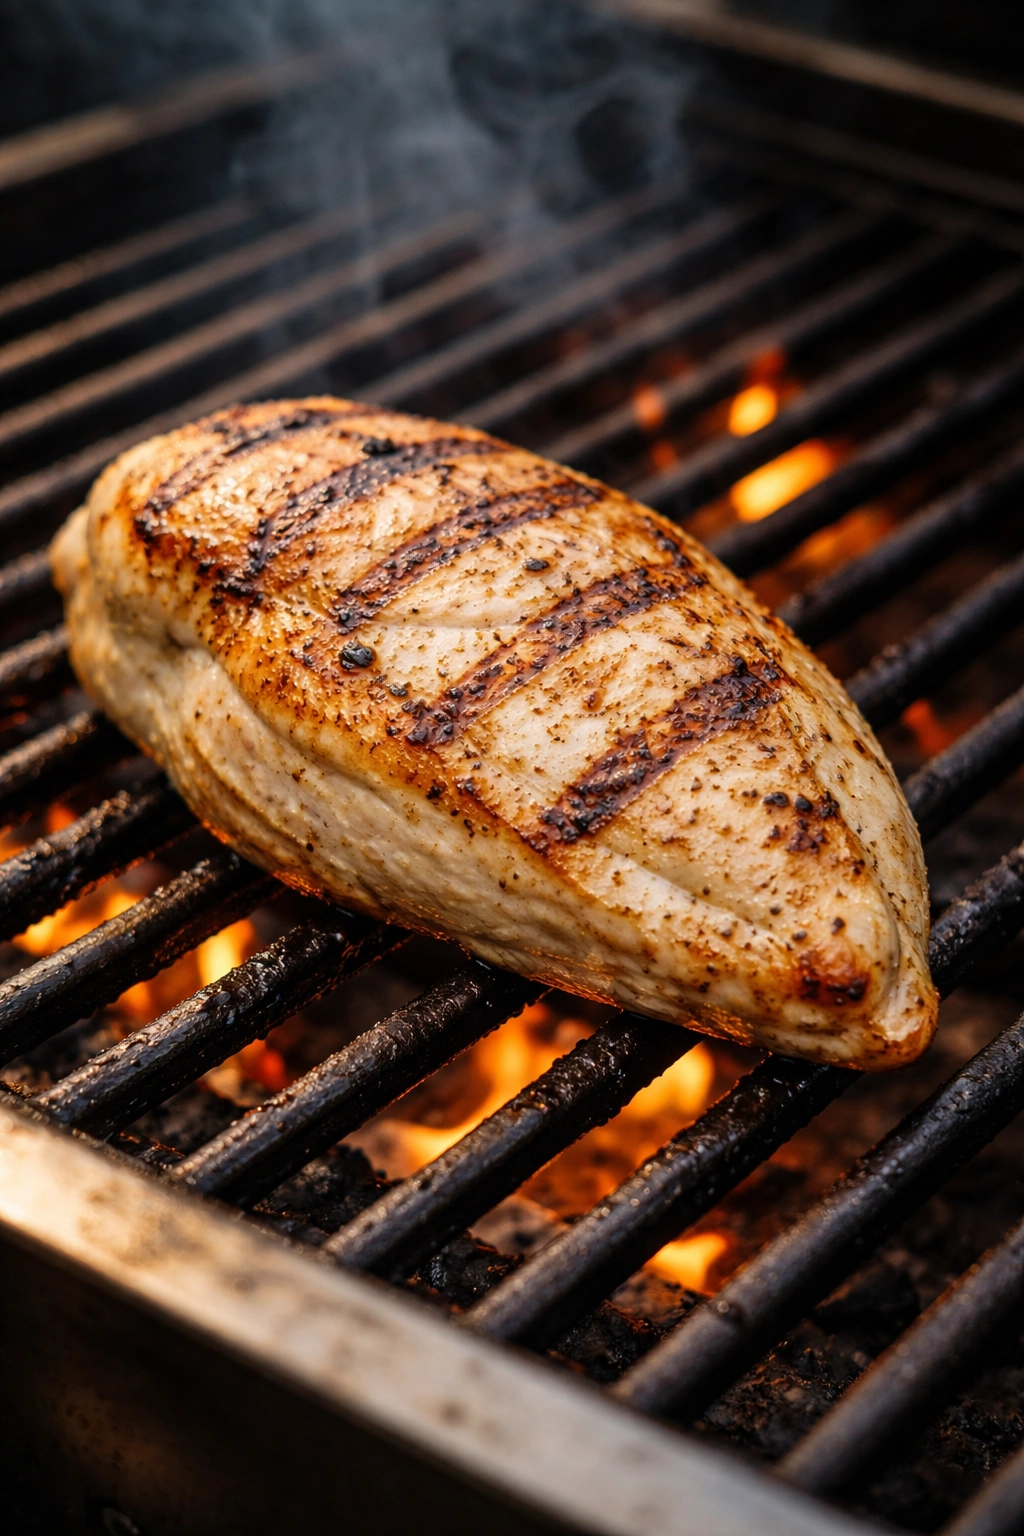
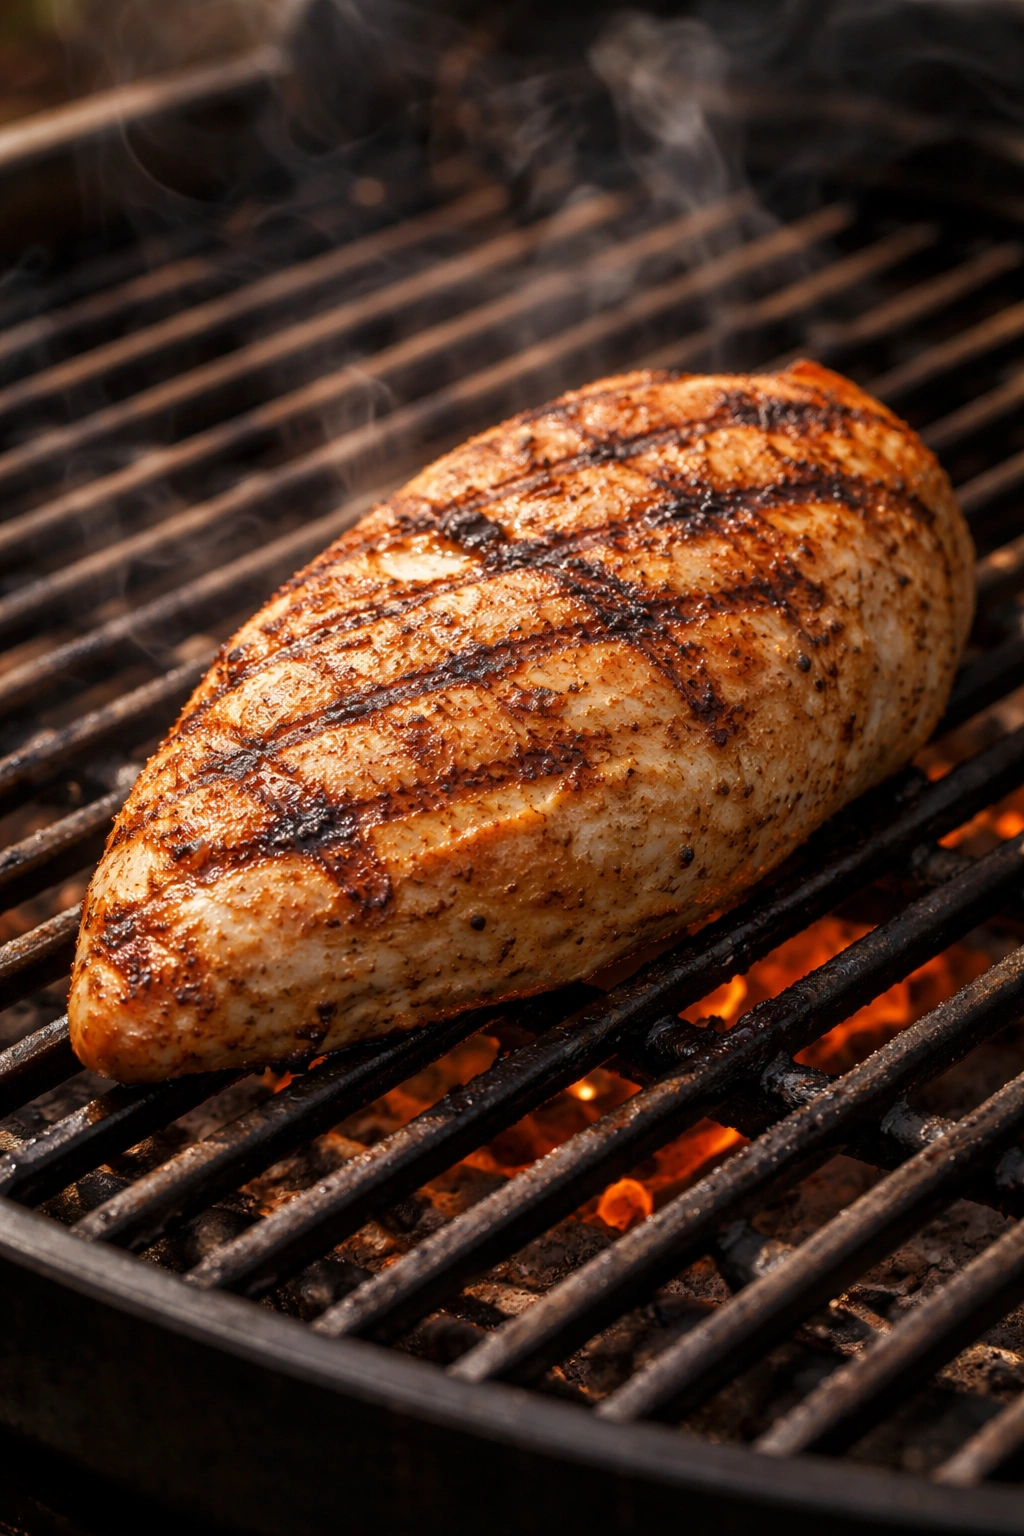
The Cooking Technique: Hot and Fast
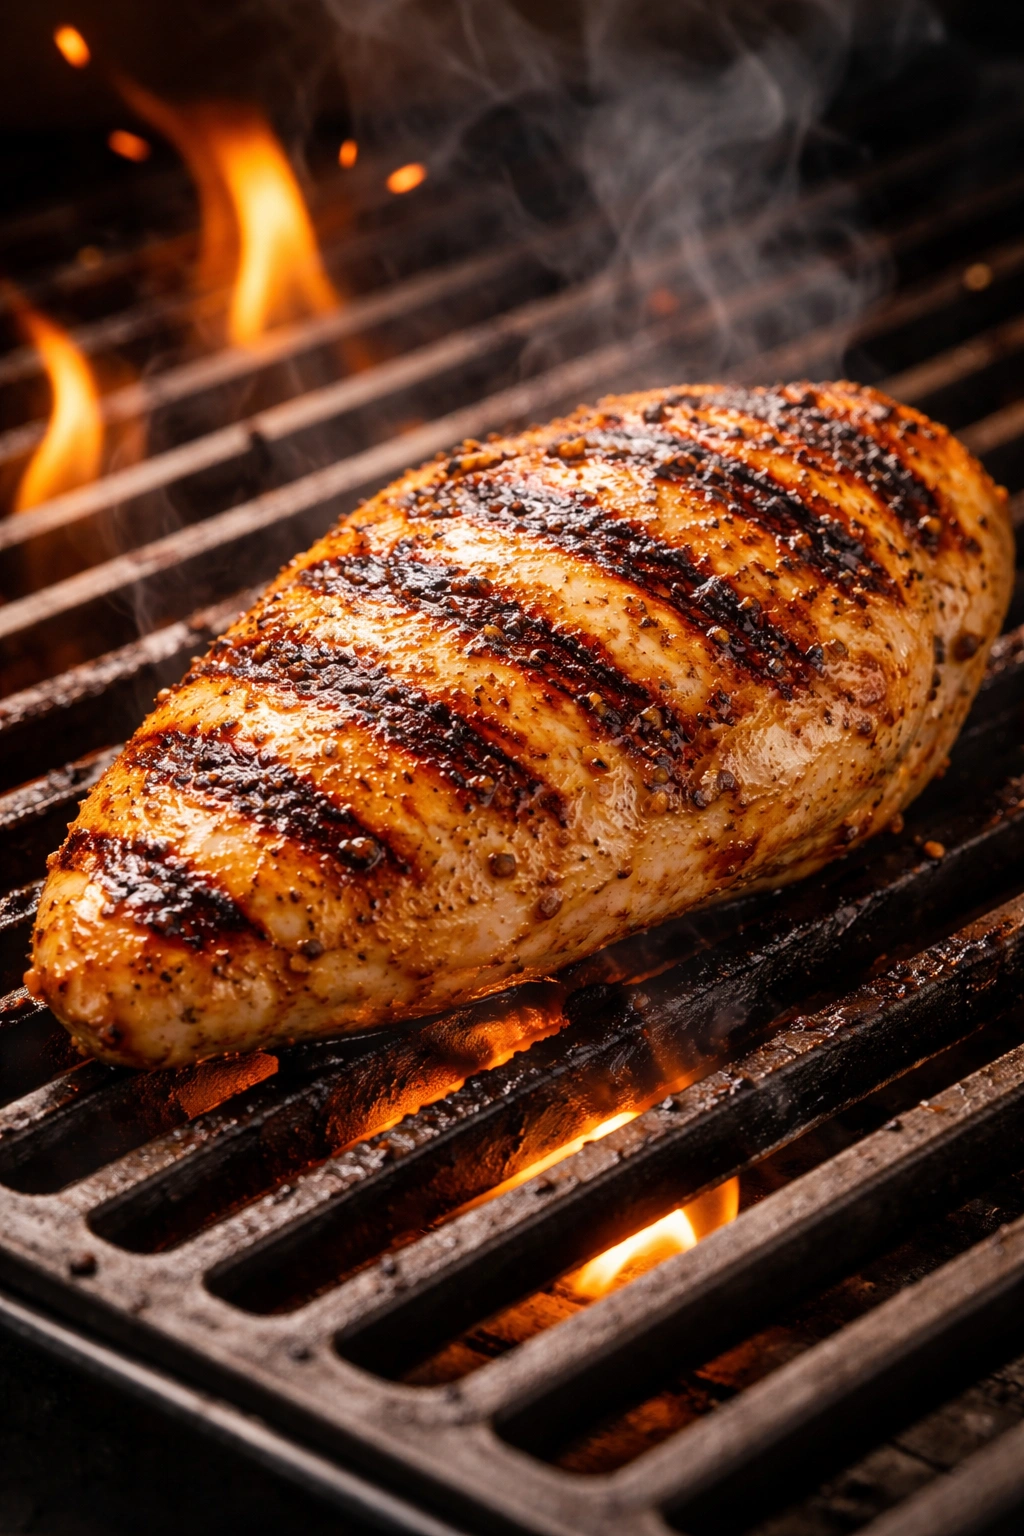
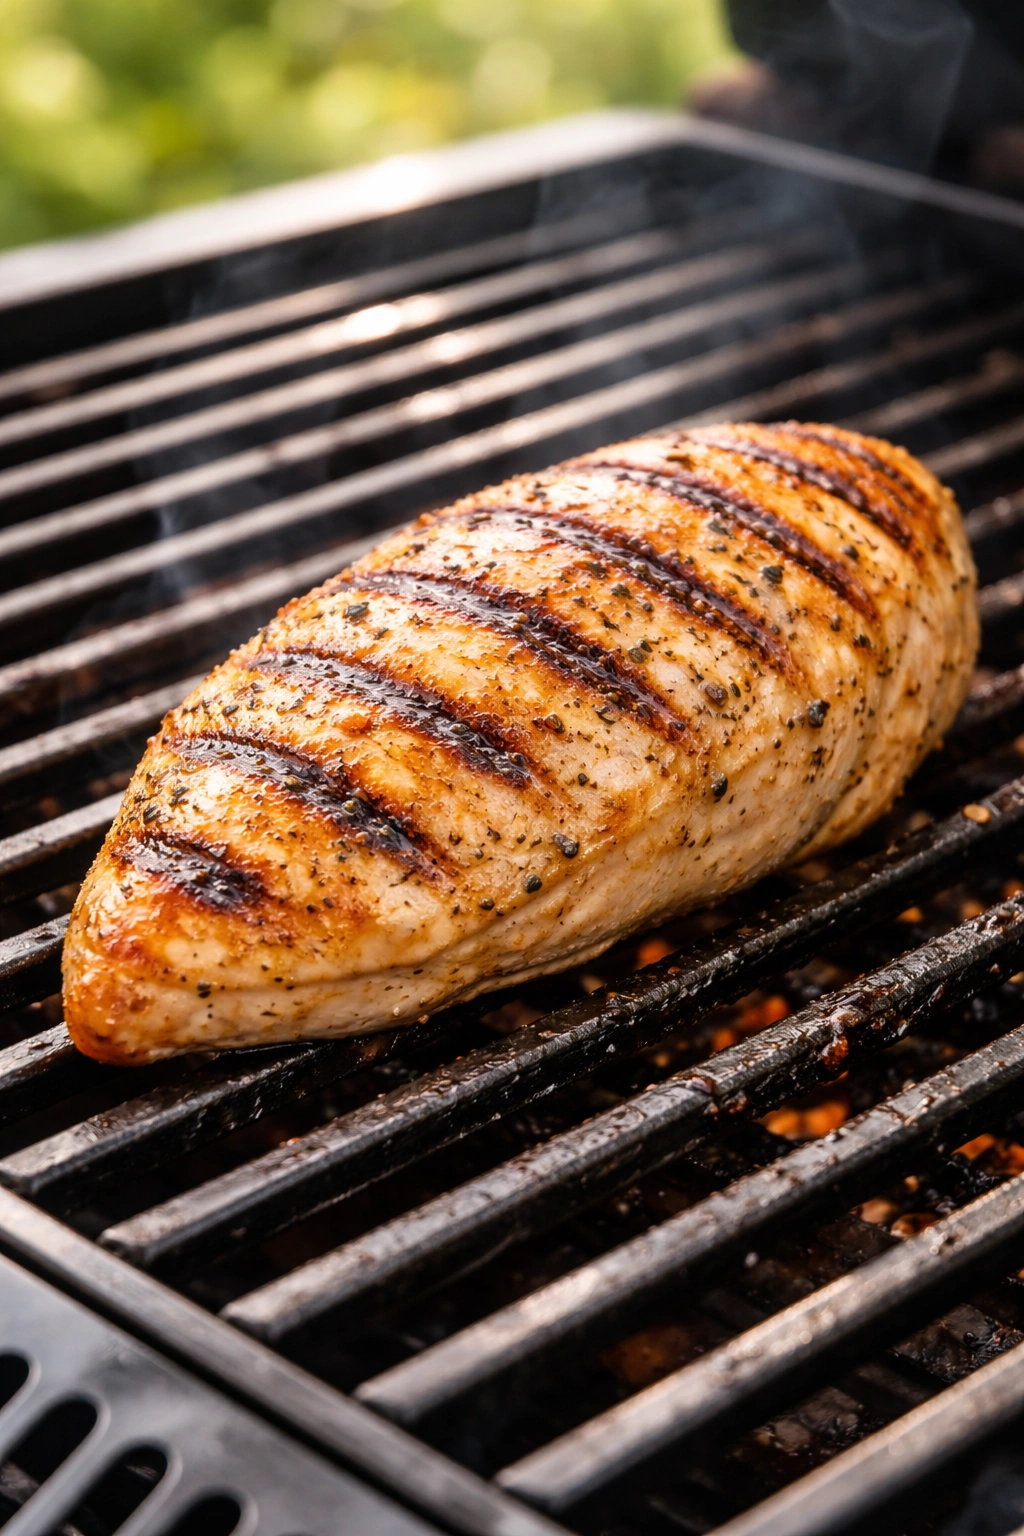
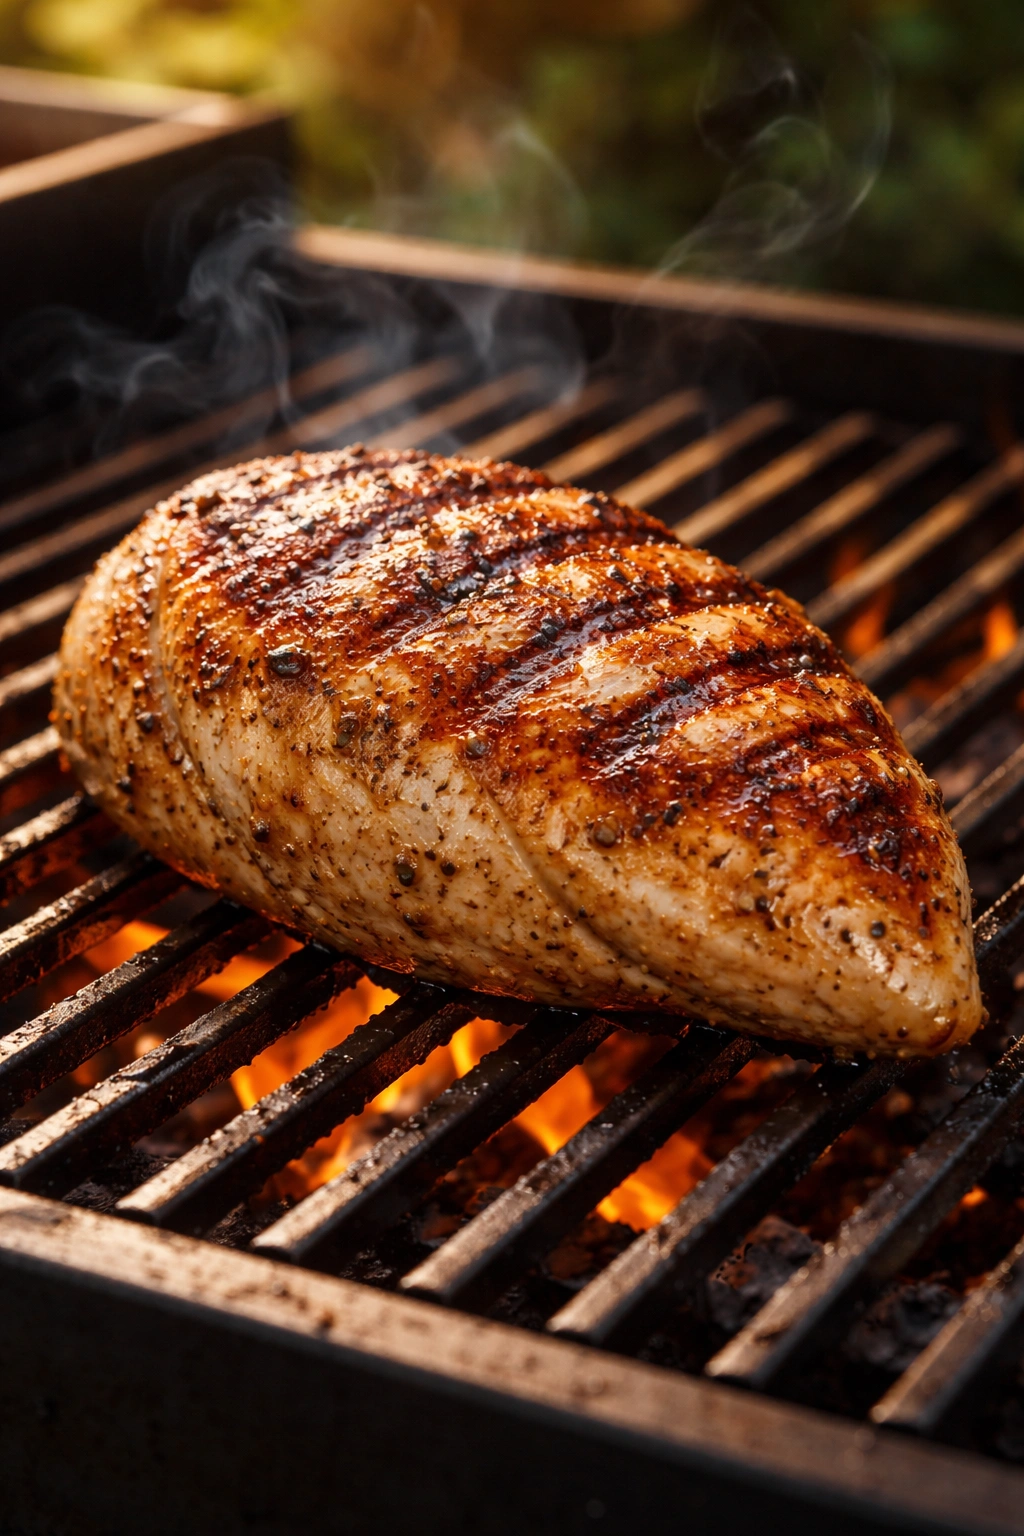
Here’s the standard approach: Place your oiled, seasoned chicken breasts directly over medium-high to high heat and cook undisturbed for 4 to 5 minutes on the first side, depending on thickness. Don’t flip constantly, don’t move them around, and don’t press down on them—just let them cook. This initial sear creates those attractive grill marks and begins building a flavorful crust.
After 4 to 5 minutes, flip each breast once and cook the other side for another 4 to 5 minutes, depending on thickness and your grill temperature. The chicken should lift easily off the grates; if it’s sticking, let it cook another minute before flipping.
Two-Zone Grilling for Extra Insurance
Some grills have multiple burners or you can arrange coals differently to create hot and cool zones. If you have this capability, use it. Place the chicken over direct high heat for the first 2 to 3 minutes per side to develop a nice sear and grill marks, then move it to a cooler zone to finish cooking. This hybrid approach gives you the visual appeal and flavor development of direct heat while reducing the risk of overcooking.
Close the grill lid while cooking. This creates an oven-like environment where heat circulates all around the chicken, promoting even cooking. Some people worry that this traps steam and makes the chicken less crispy, but the slight reduction in crust quality is worth the gain in juiciness.
Resting Is Not Optional
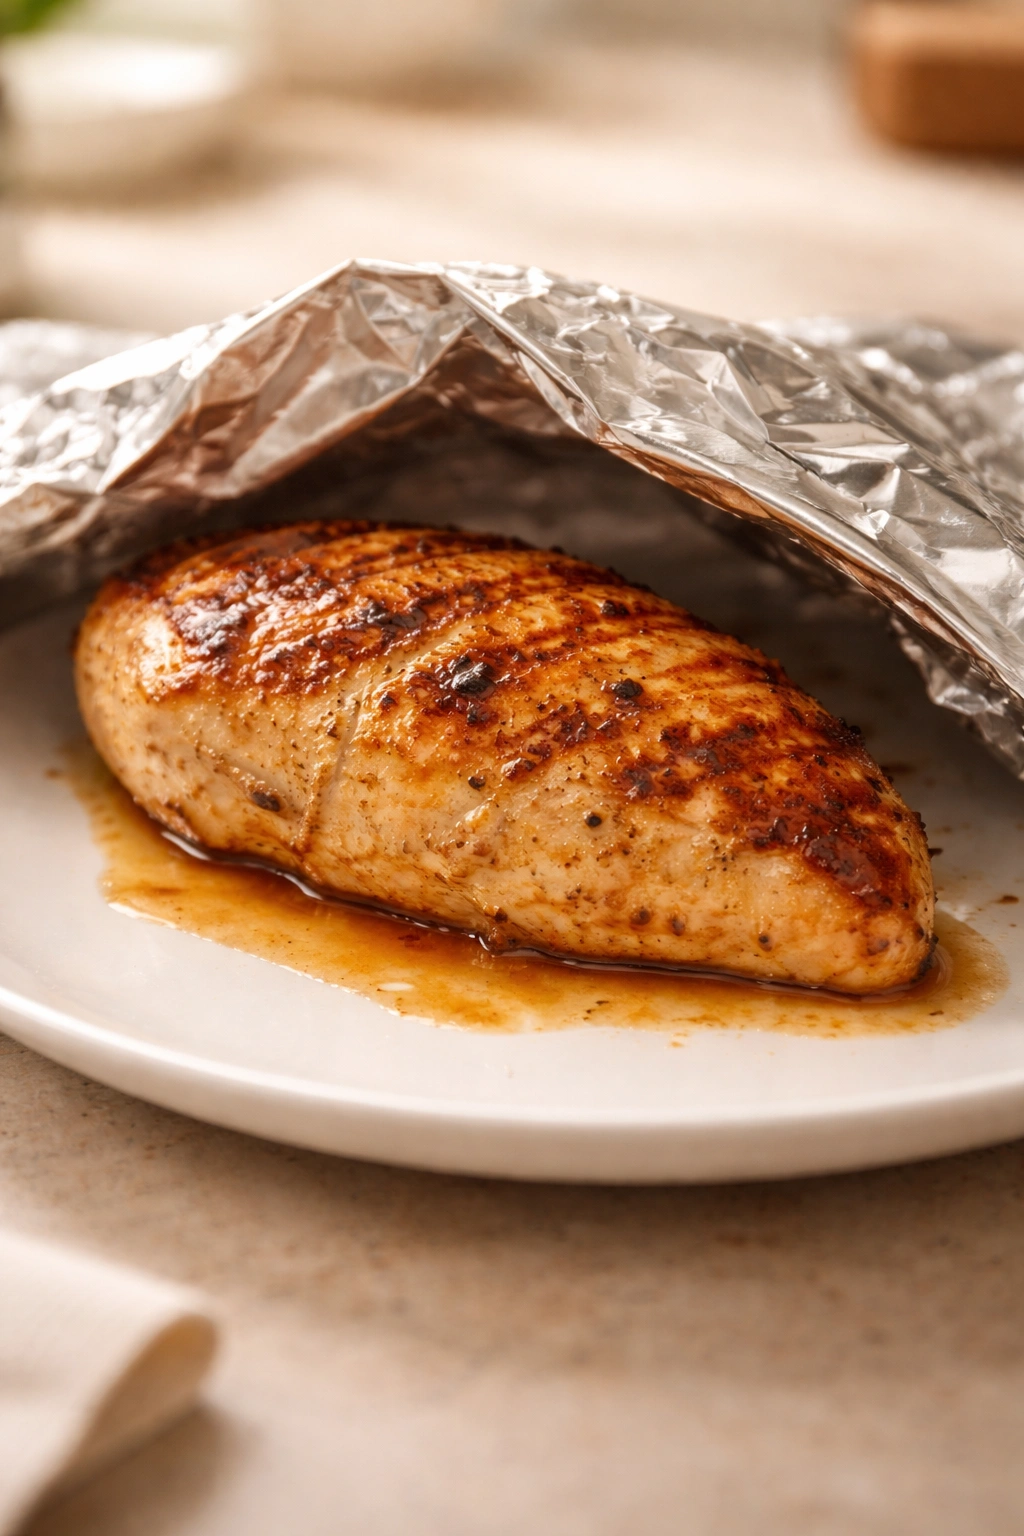
The moment the chicken reaches your target internal temperature, remove it from the grill and place it on a clean serving plate. Cover it loosely with foil (not tightly—you want a little steam to escape) and let it rest for at least 5 minutes, ideally longer.
This resting period accomplishes several things. First, it allows residual heat to finish cooking the chicken to your target temperature without the grill’s direct heat anymore—this prevents overshooting your temperature. Second, it gives the meat fibers time to relax, allowing them to reabsorb juices more effectively. When you cut into a well-rested chicken breast, the juices stay in the meat instead of running out onto the plate.
If you skip resting and cut immediately, those juices have nowhere to go but out, and your chicken will taste noticeably drier even if it was cooked perfectly.
Avoiding Common Mistakes
Several preventable errors routinely lead to dry chicken. Recognizing these traps helps you dodge them entirely.
The most obvious mistake is overcooking. If you don’t use a thermometer and just cook “until it looks done,” you’ll overshoot the mark more often than not. Chicken breasts that look completely opaque and firm to the touch are often already overcooked. Trust the thermometer, not your eyes or touch.
Another common error is cooking with the lid open. While open-lid grilling might seem like it would create crispier chicken, it actually increases drying because the heat isn’t circulating evenly around the meat. Closed-lid grilling is gentler and more forgiving.
Some people make the mistake of moving the chicken constantly, flipping it obsessively or rotating it for different grill marks. Every time you move the chicken, you interrupt the cooking and heat transfer process. Let it sit undisturbed until it’s ready to flip.
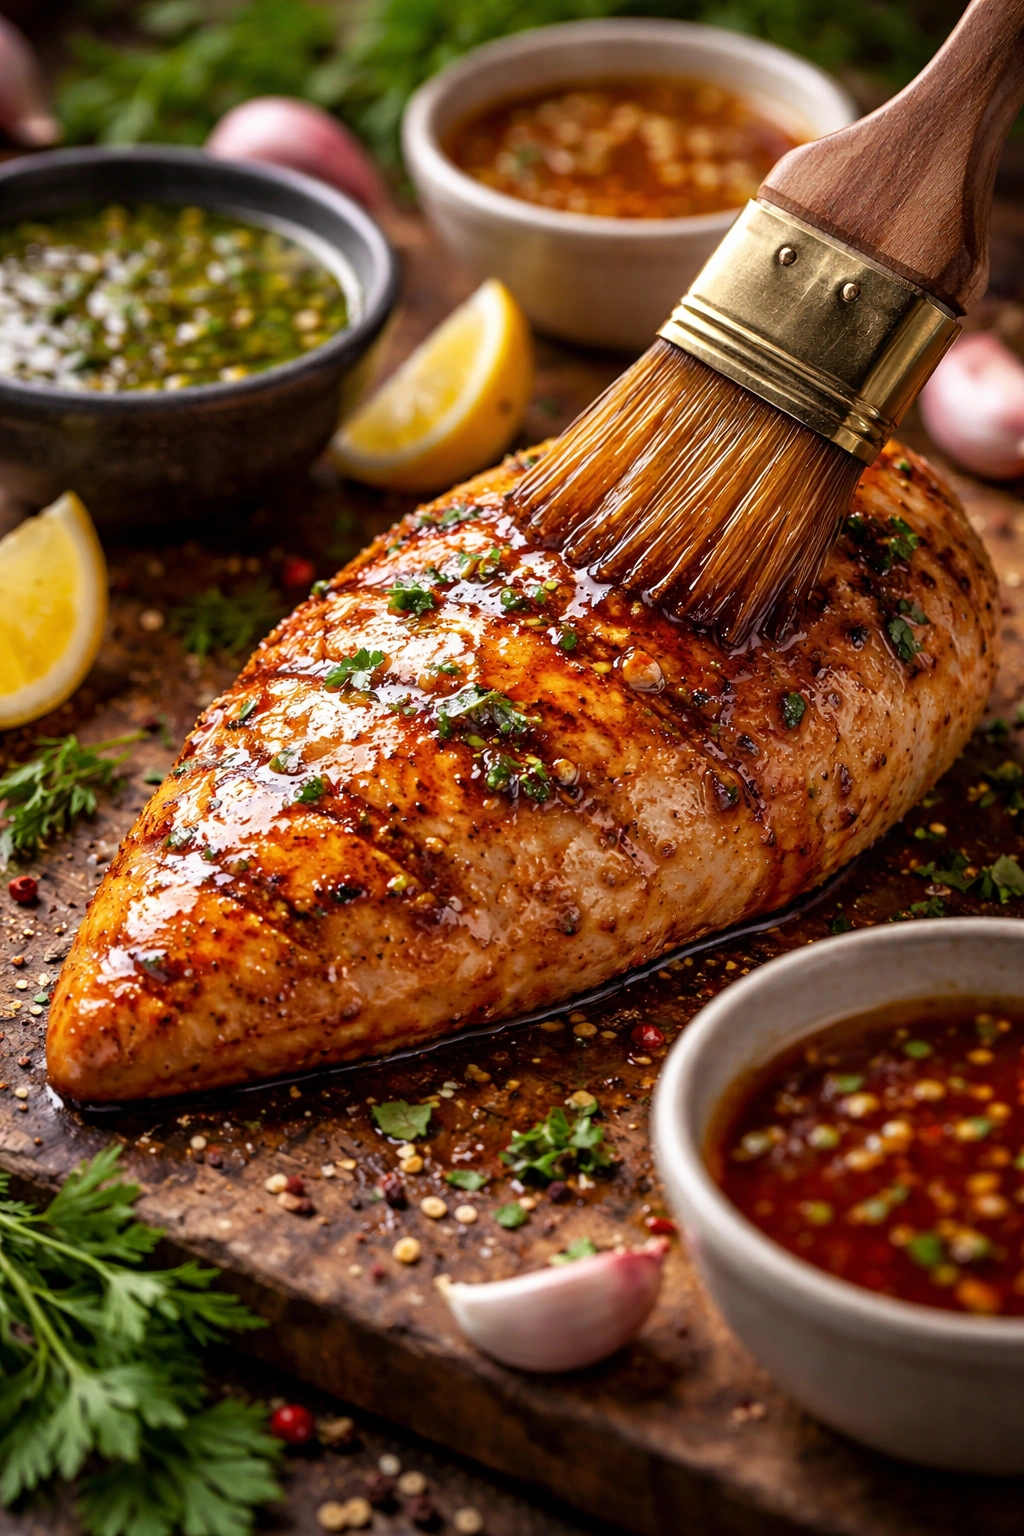
Using a marinade with high sugar content that burns on the grill is another misstep. When sugar caramelizes and burns, it creates bitter compounds that overpower the chicken’s delicate flavor. If you want sweetness, use maple syrup or honey, but only brush it on in the last minute or two of cooking.
Finally, not giving the chicken time to come to room temperature before grilling can extend cooking time unnecessarily. If the chicken is cold in the center, it takes longer to cook through, which means more time on the heat and more moisture loss. Remove brined or marinated chicken from the refrigerator 10 to 15 minutes before grilling so it can reach closer to room temperature. This reduces total cooking time and improves juiciness.
Flavor Variations and Marinades
Once you’ve mastered the basic technique, you can customize your chicken endlessly. The foundation stays the same, but the flavors can go in countless directions.
For a Mediterranean version, marinate in olive oil, lemon juice, minced garlic, fresh thyme, and oregano. For something with more smoke and complexity, use a oil-based marinade with balsamic vinegar, Dijon mustard, and smoked paprika. A cilantro-lime marinade works beautifully for a brighter, more tropical flavor—use lime juice instead of lemon and add fresh cilantro and cumin.
If you prefer brining but want deeper flavor, add 2 to 3 teaspoons of dried herbs like rosemary, thyme, or tarragon directly to the brine. You can also experiment with garlic powder, onion powder, smoked paprika, or even a pinch of cayenne pepper for subtle heat. The important thing is to keep it relatively restrained—you want to enhance the chicken, not overpower it.
Some cooks use a technique where they reserve a portion of their marinade before adding the raw chicken, then use that reserved, untouched portion as a finishing sauce—drizzled over the chicken just before serving. This adds another layer of flavor without food-safety concerns.
Thickness Matters More Than Timing
Here’s something crucial: always cook to internal temperature, never just by time. A small chicken breast might be done in 7 to 8 minutes, while a large, thick one could need 14 minutes or more. Grill temperature also matters enormously. Higher temperatures cook chicken faster; lower temperatures cook it more gently but require longer time.
The only reliable way to know when chicken is done is with an instant-read thermometer. Every single time. Period. This isn’t overthinking it—it’s the difference between dry and juicy, tough and tender. It’s the single most important tool in your grilling kit, more important than fancy marinades or expensive seasonings.
Serving and Using Your Grilled Chicken
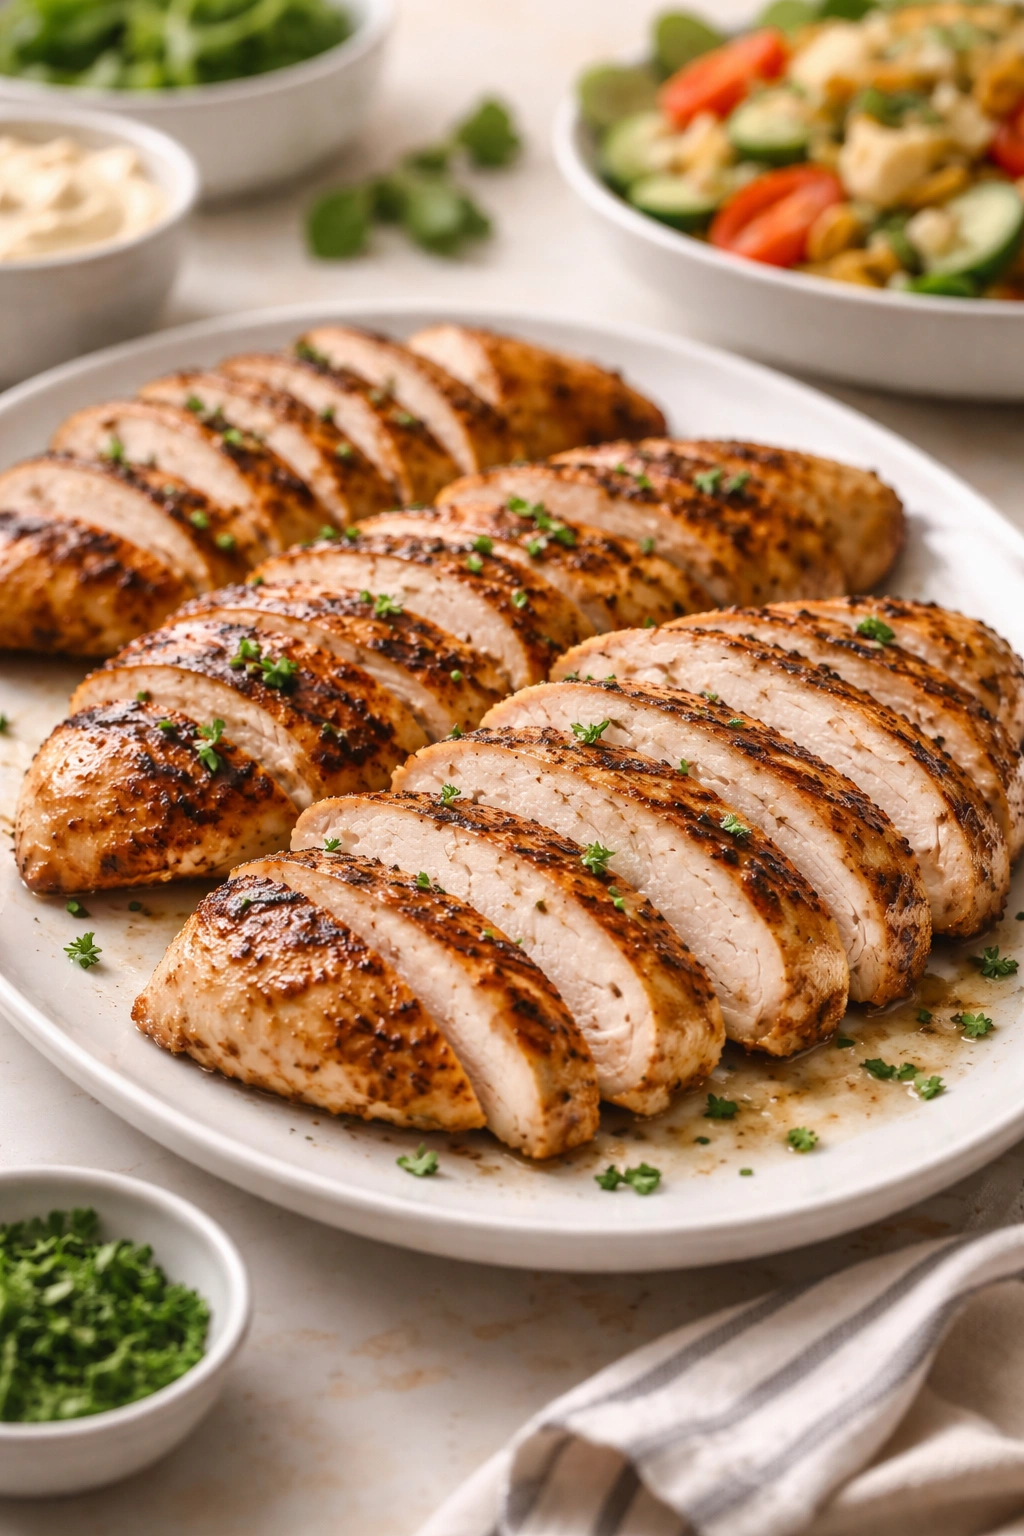
Once your chicken has rested and cooled slightly, you have options. Serve it as is with simple sides like grilled vegetables, rice, or potatoes. Slice it and add it to salads, sandwiches, or grain bowls. Shred it for tacos, pulled chicken salads, or grain bowls. The juicy, well-cooked chicken from this method works beautifully in any of these applications.
If you’re planning to use the chicken in recipes later, remember that it will firm up somewhat as it cools, but it should still be noticeably juicier than chicken cooked using other methods. Store it in an airtight container in the refrigerator for up to three days, or freeze it for up to three months.
Troubleshooting: When Chicken Still Comes Out Dry
If you’ve followed all these techniques and the chicken is still coming out dry, consider these possibilities.
Your grill might be running hotter than you think. Even if the dial says 400°F, the actual temperature at grate level could be significantly higher. Invest in an accurate grill thermometer that measures the cooking surface temperature, not just ambient grill temperature.
You might be brining or marinating too long. The maximum is around 90 minutes for brine; longer than that and you risk over-brining. For marinades, while longer times are generally fine, if the marinade is very acidic, extremely long marinating (24+ hours) can make the meat mushy. Aim for 6 to 12 hours as a sweet spot.
Your chicken might be starting too cold. If it goes straight from the refrigerator to the grill, the center needs longer to reach temperature, which means more time on heat. Let it warm up first.
You could be cutting too early. Not resting the chicken properly is a common culprit. Even if everything else is perfect, skipping the 5-minute rest means you’re releasing all those juices when you cut in.
Key Takeaways
The path to juicy grilled chicken is straightforward once you know what to do. Pound your chicken to even thickness, either brine for 30 to 60 minutes or marinate for at least 6 hours, prepare your grill with oiled grates and medium-high heat, monitor internal temperature carefully with a thermometer, and absolutely rest the chicken for at least 5 minutes before serving.
These steps aren’t complicated, and none of them requires special equipment beyond an instant-read thermometer—which costs less than a decent cut of steak and will pay for itself in better-cooked food forever. The difference between dry, disappointing grilled chicken and the kind that makes people ask for your secret is simply understanding the why behind each step and then executing consistently.
Your next grilled chicken doesn’t have to be a gamble. With these techniques, it’ll be juicy, flavorful, and tender every single time.