When your weeknight schedule is packed but your family still expects a delicious, satisfying dinner, grilled chicken skewers are the answer. These bite-sized pieces of marinated chicken deliver maximum flavor in minimal time, hitting the table in well under an hour from prep to plate. The beauty of skewers lies in their efficiency — the smaller surface area means the chicken cooks quickly and evenly, absorbing every ounce of flavor from the marinade while developing that irresistible caramelized char that makes people keep coming back for more.
What makes this dinner option genuinely quick isn’t just the cooking time. It’s the simplicity of the whole process. You don’t need any special equipment beyond what most home cooks already have. You’re not managing multiple pans or complex techniques that require constant attention. Thread the chicken and vegetables onto skewers, get your grill hot, and in about 10 to 15 minutes you’ve got a restaurant-quality meal that tastes like you spent hours in the kitchen. If grilling isn’t an option on a particular evening, these skewers broil beautifully in the oven or cook perfectly in a grill pan on the stovetop, making them genuinely adaptable to whatever cooking method suits your situation.
The real secret to pulling off an impressive weeknight dinner with chicken skewers is understanding that the marinade does most of the heavy lifting. A well-balanced marinade that combines acid (like lemon juice or vinegar), fat (olive oil), and bold seasonings transforms simple chicken breast into something genuinely memorable. You’re not fighting dryness or bland flavors — you’re working with a foundation that practically guarantees juicy, deeply flavorful results.
Why Chicken Skewers Are Perfect for Busy Weeknights
The fundamental advantage of chicken skewers for quick dinners comes down to geometry and heat transfer. When you cut chicken breasts into 1-inch cubes, you’re dramatically increasing the surface area exposed to the grill’s heat. This means the chicken reaches the proper internal temperature faster than a whole breast ever could, typically in 10 to 15 minutes total. There’s no guesswork about whether the center is cooked through while the edges dry out — every piece cooks uniformly and stays juicy.
Beyond the physics of cooking speed, there’s the psychological advantage of portion control built right into the format. Nobody needs to stand at the grill with a knife, slicing portions and watching carefully. The skewer itself becomes both your cooking vessel and your serving utensil, which cuts down on cleanup and makes plating feel effortless. If you’re feeding a family, everyone gets the same amount of chicken and vegetables without anyone feeling shortchanged.
The preparation itself is genuinely straightforward. Unlike dishes that require you to monitor simmering sauces or juggle the timing of multiple components, skewers let you prep everything in advance during a calm moment, then simply grill when you’re ready to eat. You can marinate the chicken for as little as 20 minutes or prepare it several hours ahead, fitting seamlessly into whatever your day actually looks like rather than forcing you into a rigid schedule.
Building the Perfect Quick Marinade
A marinade is where chicken skewers transform from adequate to actually exceptional. The marinade serves three purposes simultaneously: it adds flavor, tenderizes the meat, and keeps it moist during cooking. For a weeknight dinner, you’re looking for a marinade that comes together in about 5 minutes using pantry staples you already have on hand.
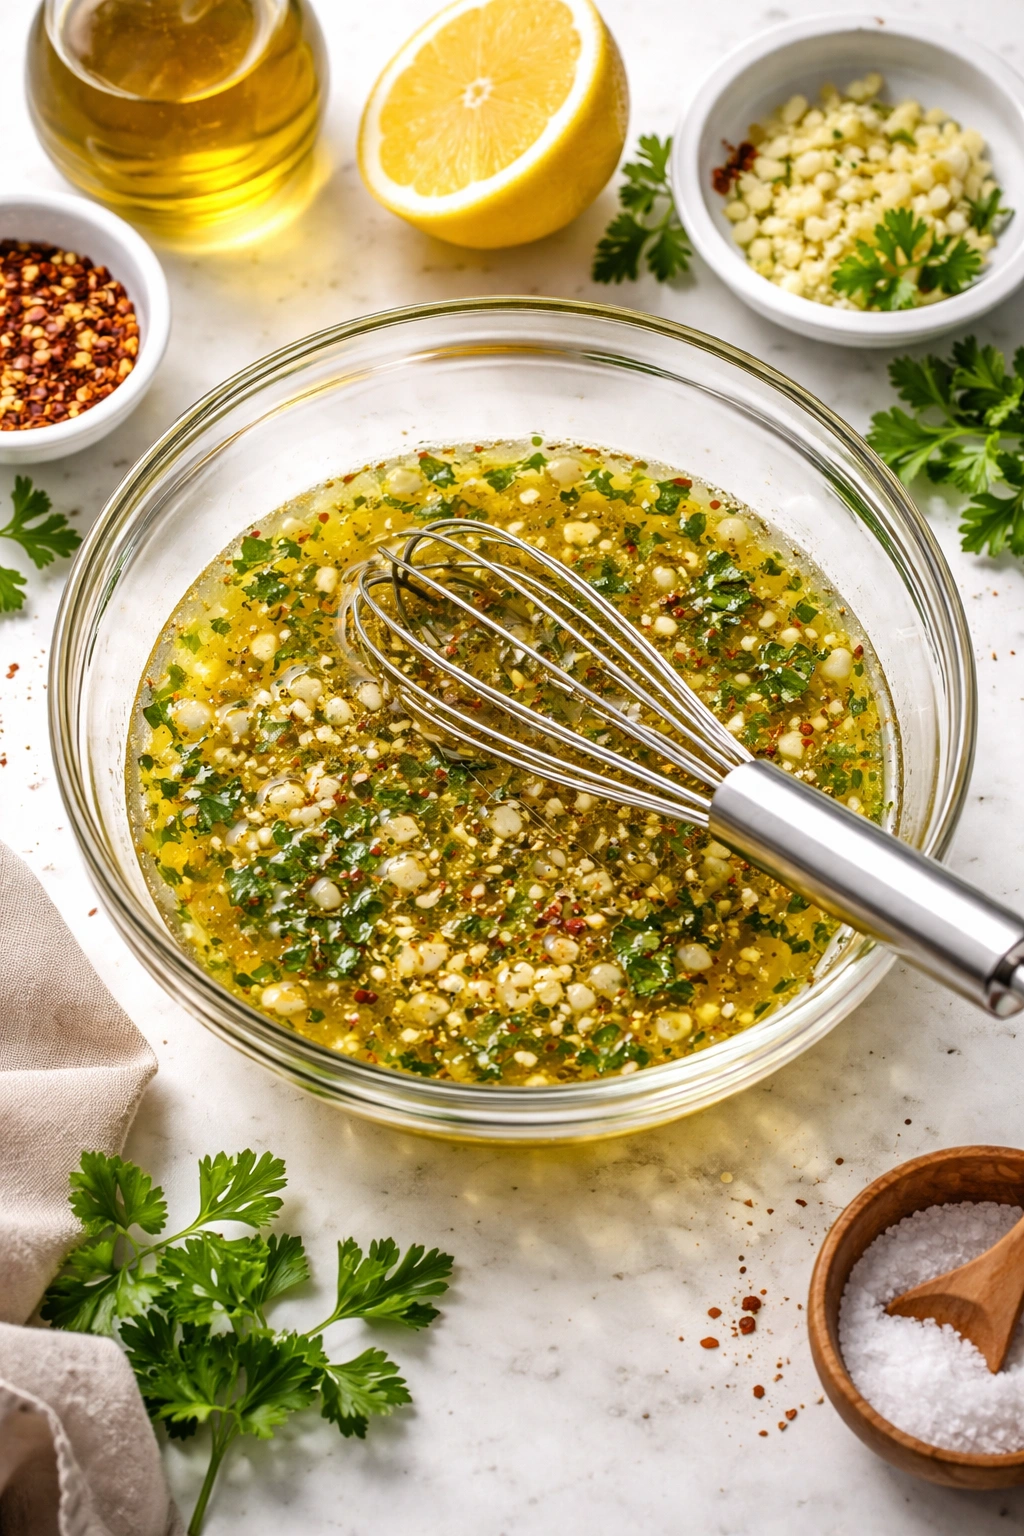
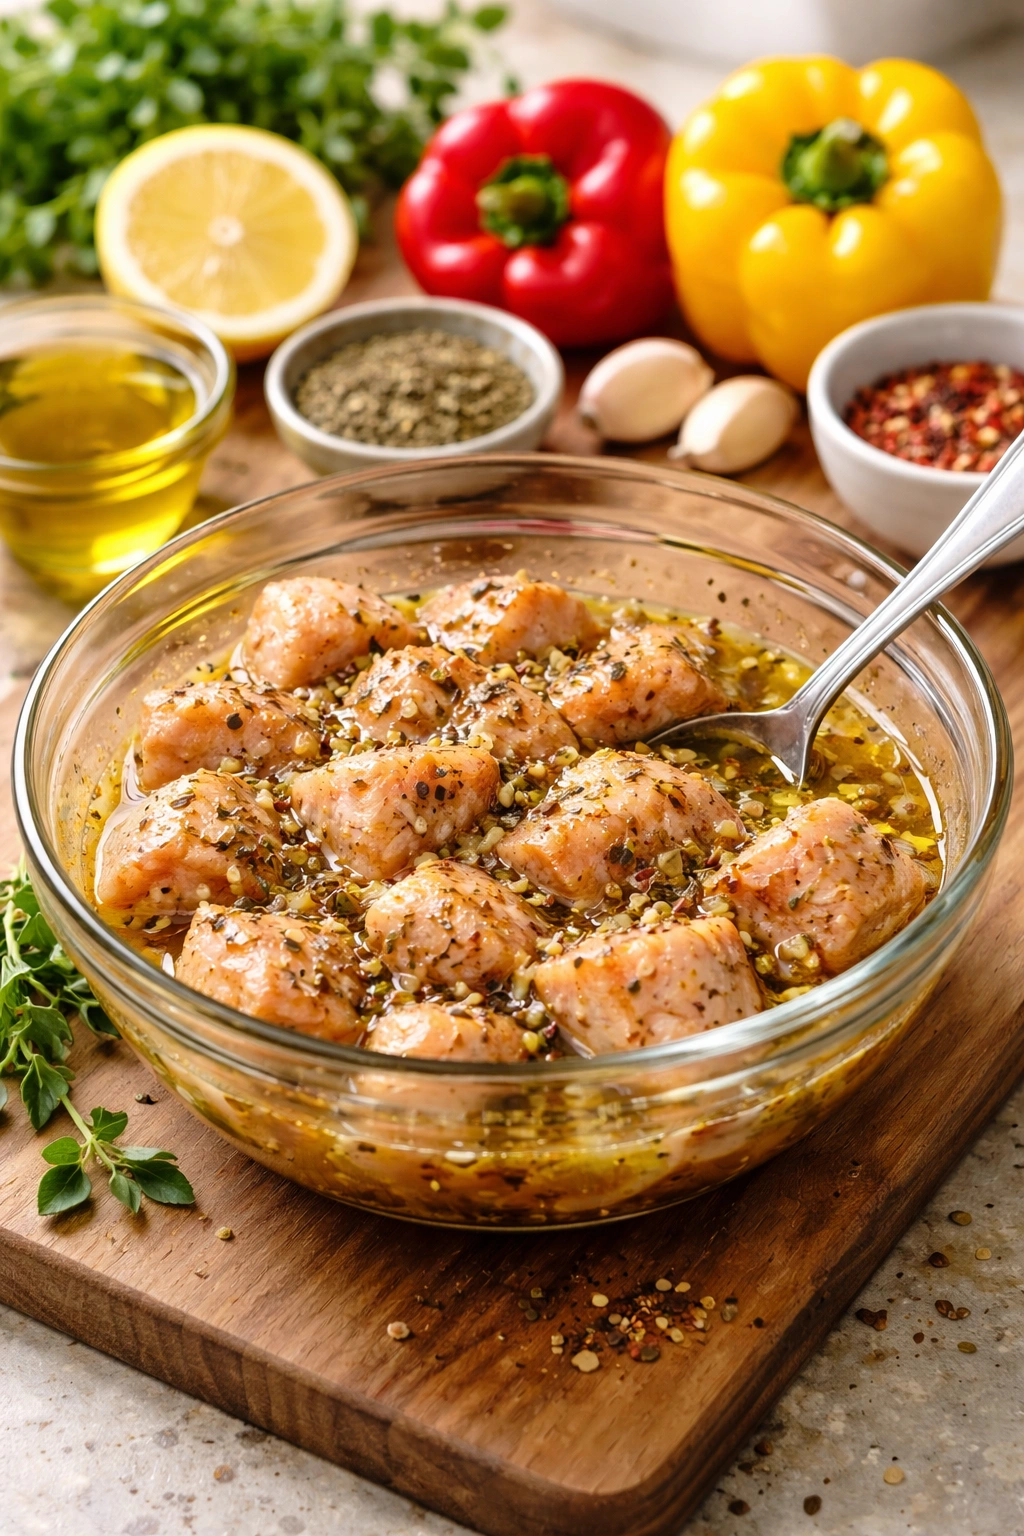
The foundation of any great marinade includes three essential components. First, you need acid — this could be lemon juice, lime juice, vinegar, or even yogurt. The acid begins breaking down the protein fibers in the chicken, making it more tender, and it adds brightness to the overall flavor profile. Second, you need fat, almost always olive oil, which carries flavor throughout the marinade and helps keep the chicken moist during cooking. Third, you need bold seasonings and aromatics — garlic, spices, and herbs that give the chicken genuine character.
A beautifully simple weeknight marinade might combine ¼ cup olive oil, 3 tablespoons fresh lemon juice, 2 minced garlic cloves, 1 teaspoon dried oregano, ½ teaspoon paprika, and salt and pepper. Whisk it together while your grill preheats, toss the chicken cubes in it, and you’re ready to thread skewers within 15 minutes. If you have an extra 10 minutes, letting the chicken sit in the marinade while you prep vegetables or set the table means deeper flavor absorption and noticeably more tender meat.
Choosing the Right Cut of Chicken
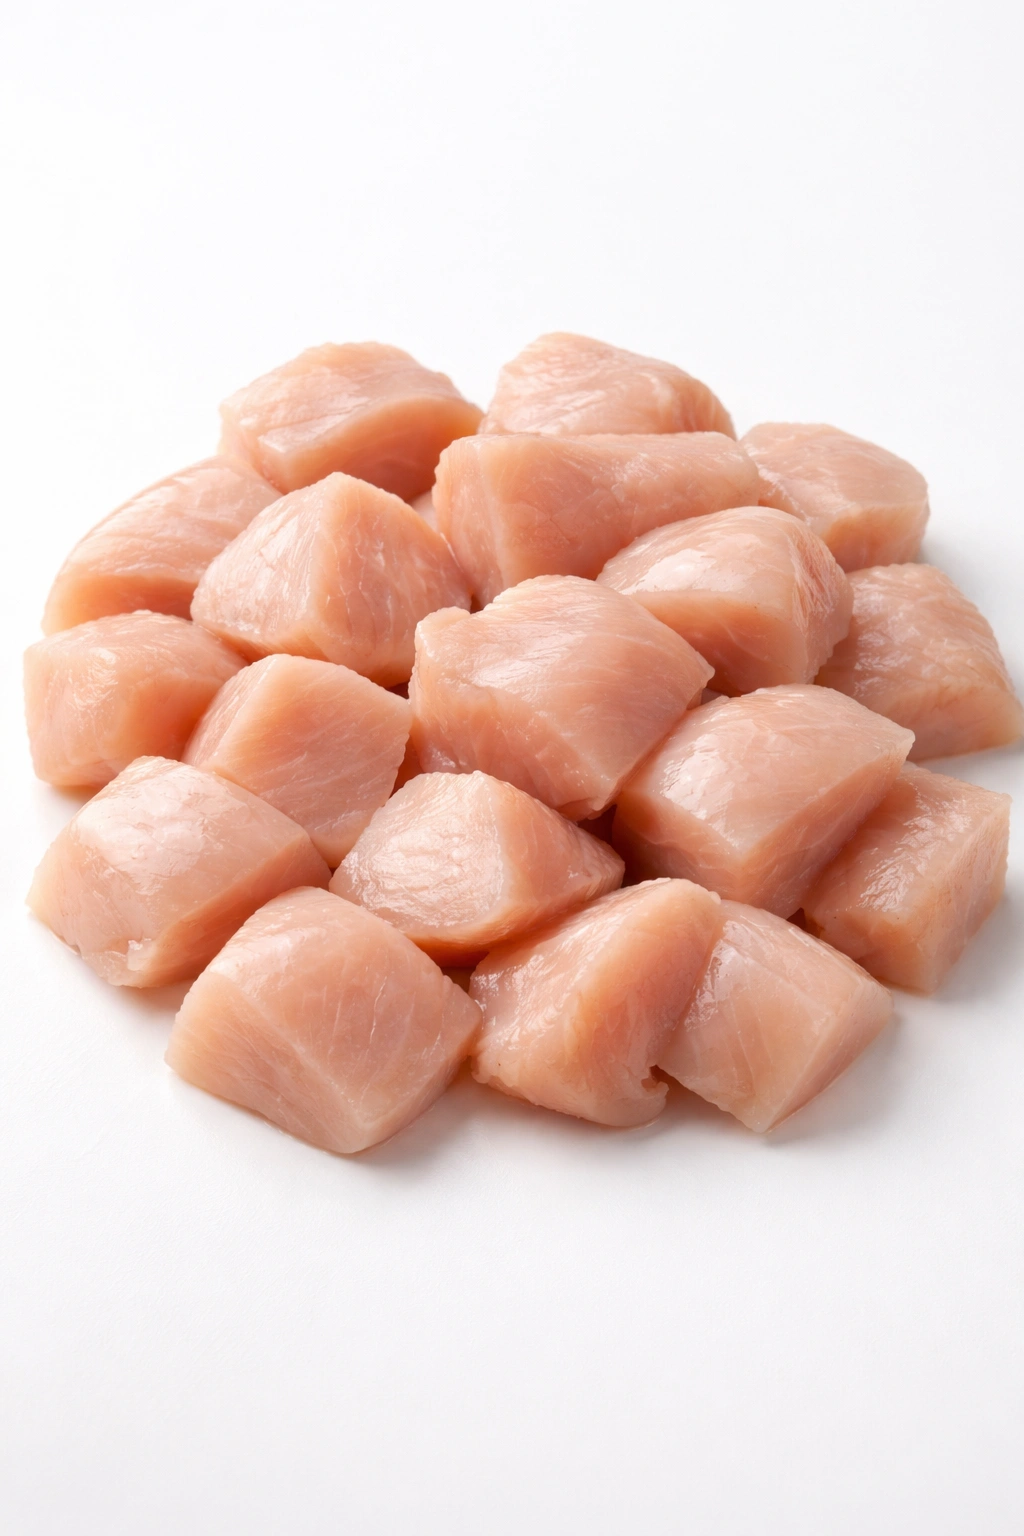
The cut of chicken you choose directly impacts both how quickly dinner comes together and how juicy the final result will be. Boneless, skinless chicken breasts are the obvious choice for a weeknight dinner — they’re widely available, affordable, and don’t require any butchering beyond cubing. They cook in 10 to 15 minutes and have a mild flavor that works beautifully with virtually any marinade flavor profile.
That said, boneless, skinless chicken thighs deserve serious consideration. Dark meat contains more fat and connective tissue, which means it stays juicier and more forgiving if you accidentally grill it a minute or two too long. Many experienced cooks and food writers actually prefer thighs for skewers specifically because they’re nearly impossible to dry out, even if you’re juggling other dinner tasks and lose track of time. Thighs take about the same amount of time to cook, so there’s no real downside beyond the fact that they cost slightly more per pound.
If your market happens to have bone-in, skin-on chicken thighs, those are genuinely special for grilled skewers. The skin crisps up beautifully on the grill, rendering fat that bastes the meat from the inside. The rendered fat also creates smoke and char that ordinary boneless pieces can’t achieve. If you do use skin-on thighs, just remove and discard any excess skin or gristle before cubing so the pieces are relatively uniform in size and cook evenly.
Whatever cut you choose, aim for pieces that are roughly the same size — about 1 inch cubes. Uniform sizing ensures even cooking. A mix of large and small pieces means your small pieces are done when the large pieces are still slightly undercooked, or your small pieces are overcooked and dry by the time the large pieces are done.
Preparing Vegetables for Skewering
Vegetables are what transform skewers from a straightforward protein into a genuinely complete dinner. The vegetables serve multiple purposes: they cook down and caramelize, developing sweet, rich flavors that complement the savory chicken; they add visual appeal and color to the finished plate; and they provide fiber and nutrients that round out an otherwise protein-heavy meal.
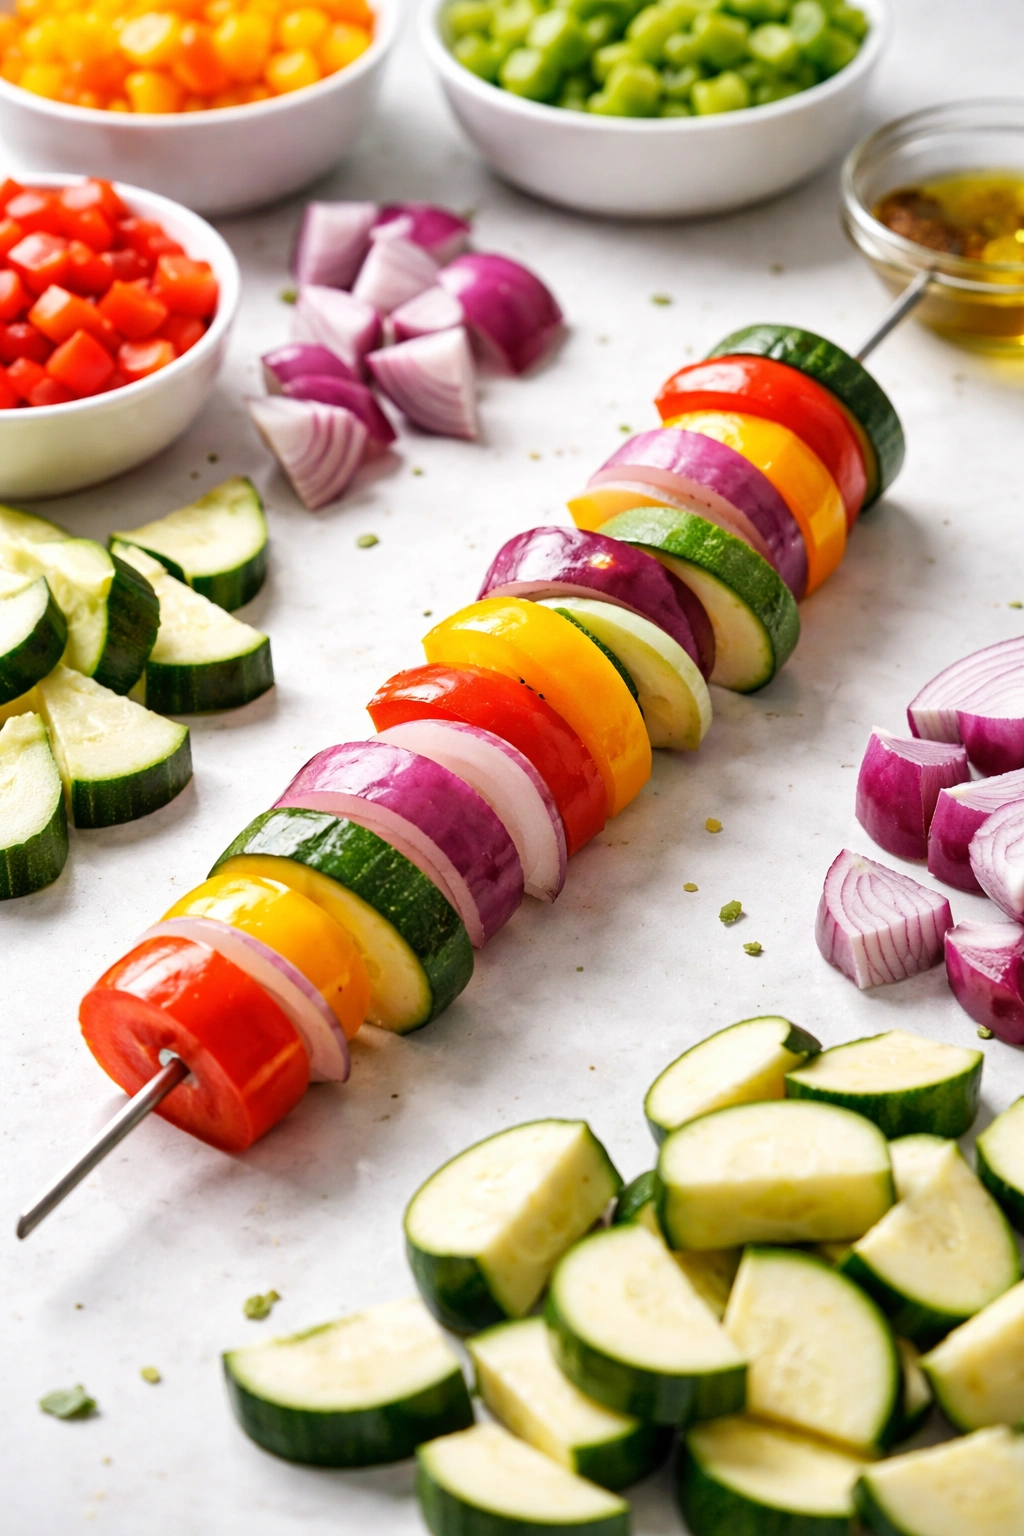
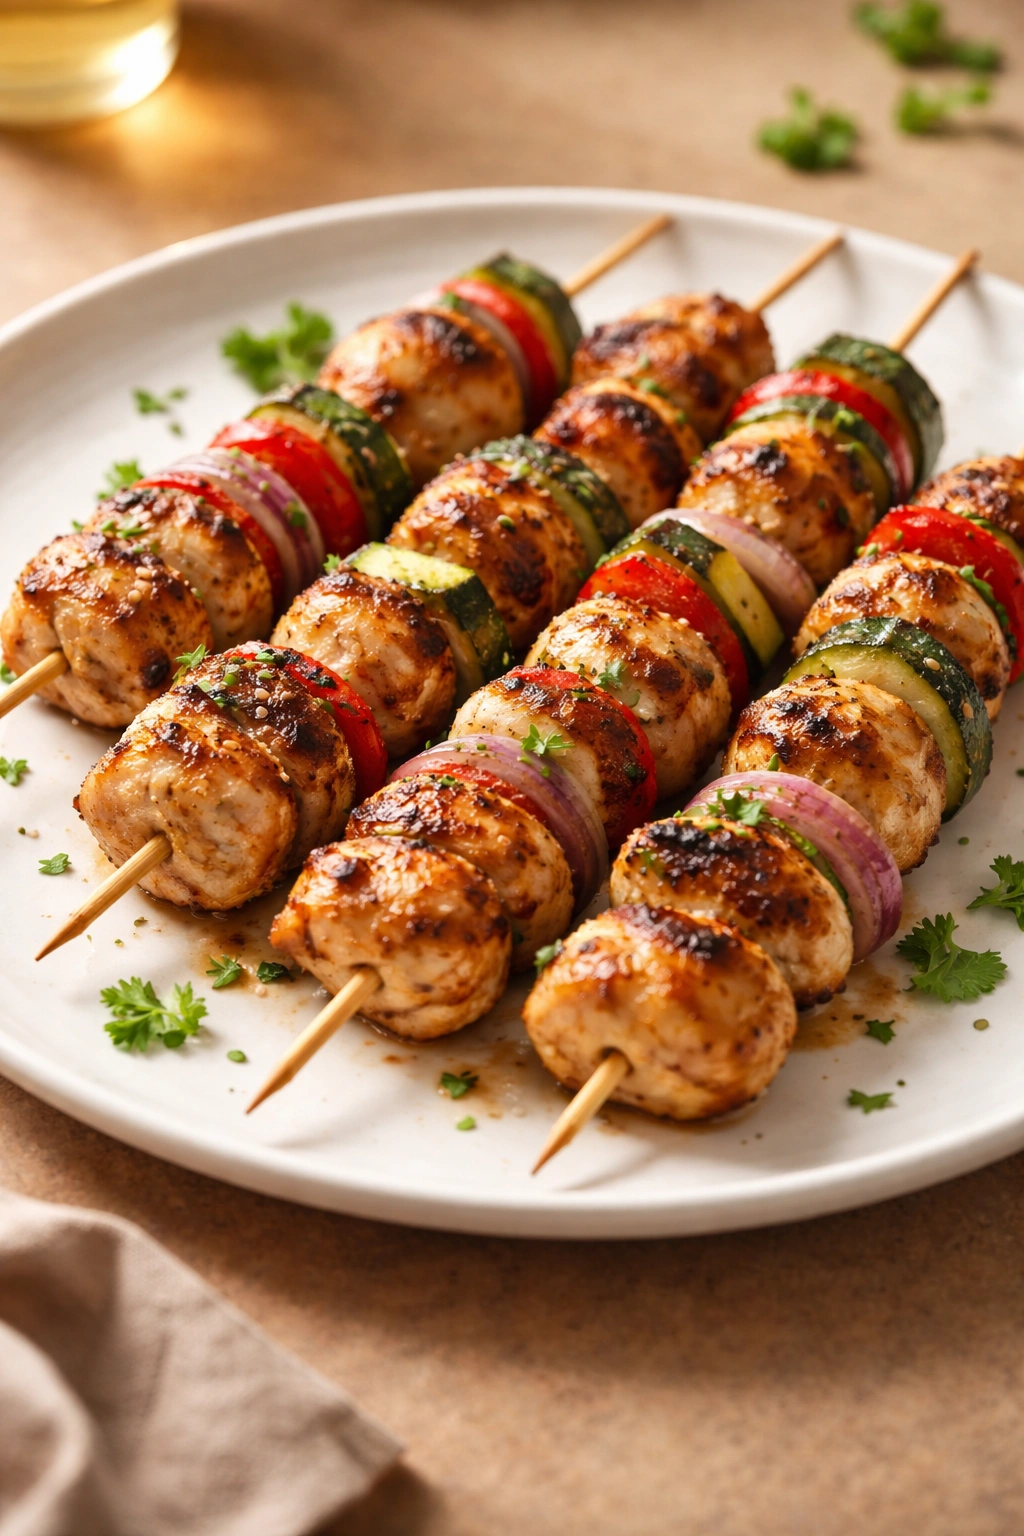
The vegetables you choose should have similar cooking times to the chicken so everything finishes together. Bell peppers are the classic choice — red, yellow, and orange peppers add color and develop a beautiful sweetness as they grill. Cut them into 1-inch pieces, matching the size of your chicken cubes. Red onions work beautifully on skewers, developing a mild, caramelized flavor that’s genuinely different from raw onion. Cut them into chunks, keeping a few layers together so they hold together on the skewer rather than falling apart during cooking.
Zucchini and summer squash are excellent choices that cook quickly and develop beautiful grill marks. Cut them into roughly ½-inch-thick rounds or half-moons so they’re sturdy enough to hold together on the skewer. Cherry tomatoes work if you’re using metal skewers and threading them carefully, though they can split or roll off wooden skewers during cooking. Mushrooms, particularly cremini or portobello varieties, are meaty enough to work beautifully on skewers and develop a rich, almost umami flavor as they grill.
You can also prep vegetables without the same marinade as the chicken. Simply toss your vegetable pieces with a light coating of olive oil, salt, and pepper. This approach lets the clean, grilled flavor of the vegetables shine while still allowing them to cook alongside the marinated chicken without any flavor conflict. Just thread them onto the skewers alternating with chicken pieces so everything cooks at the same rate.
Prepping and Soaking Skewers

Whether you’re using wooden or metal skewers depends partly on what you have available and partly on personal preference, but the choice affects your preparation time. Metal skewers are reusable, don’t require soaking, and conduct heat directly to the food, which some people claim helps cook the chicken slightly faster. They do get extremely hot during cooking, so use tongs or a folded kitchen towel when handling them, and warn anyone eating directly off the skewer that they’re hot.
Wooden skewers are inexpensive, disposable, and feel more casual and fun for a family dinner. They do require soaking to prevent burning, but this is genuinely simple. Place them in a tall glass or container, cover them with room-temperature water, and let them sit for at least 20 minutes before using. Some cooks soak them for an hour or even longer. The water absorption prevents the exposed wood from catching fire or charring excessively, though some light charring is actually desirable for flavor. If you’re in a real hurry, you can soak skewers while you’re marinating chicken and prepping vegetables, so it doesn’t add extra time to your overall process.
Once skewers are ready, threading chicken and vegetables is straightforward but requires a bit of attention. Start with a piece of chicken, then add a vegetable piece, then another piece of chicken, alternating throughout. Leave about ½ inch at the pointed end of the skewer uncovered — that’s the part that will rest on the grill grate. Leave at least 1 inch at the handle end clear so you can safely hold it. Pack the chicken and vegetables fairly close together so they hold each other in place and cook more evenly, but don’t cram them so tightly that they’re touching along their entire length.
Setting Up Your Grill for Success
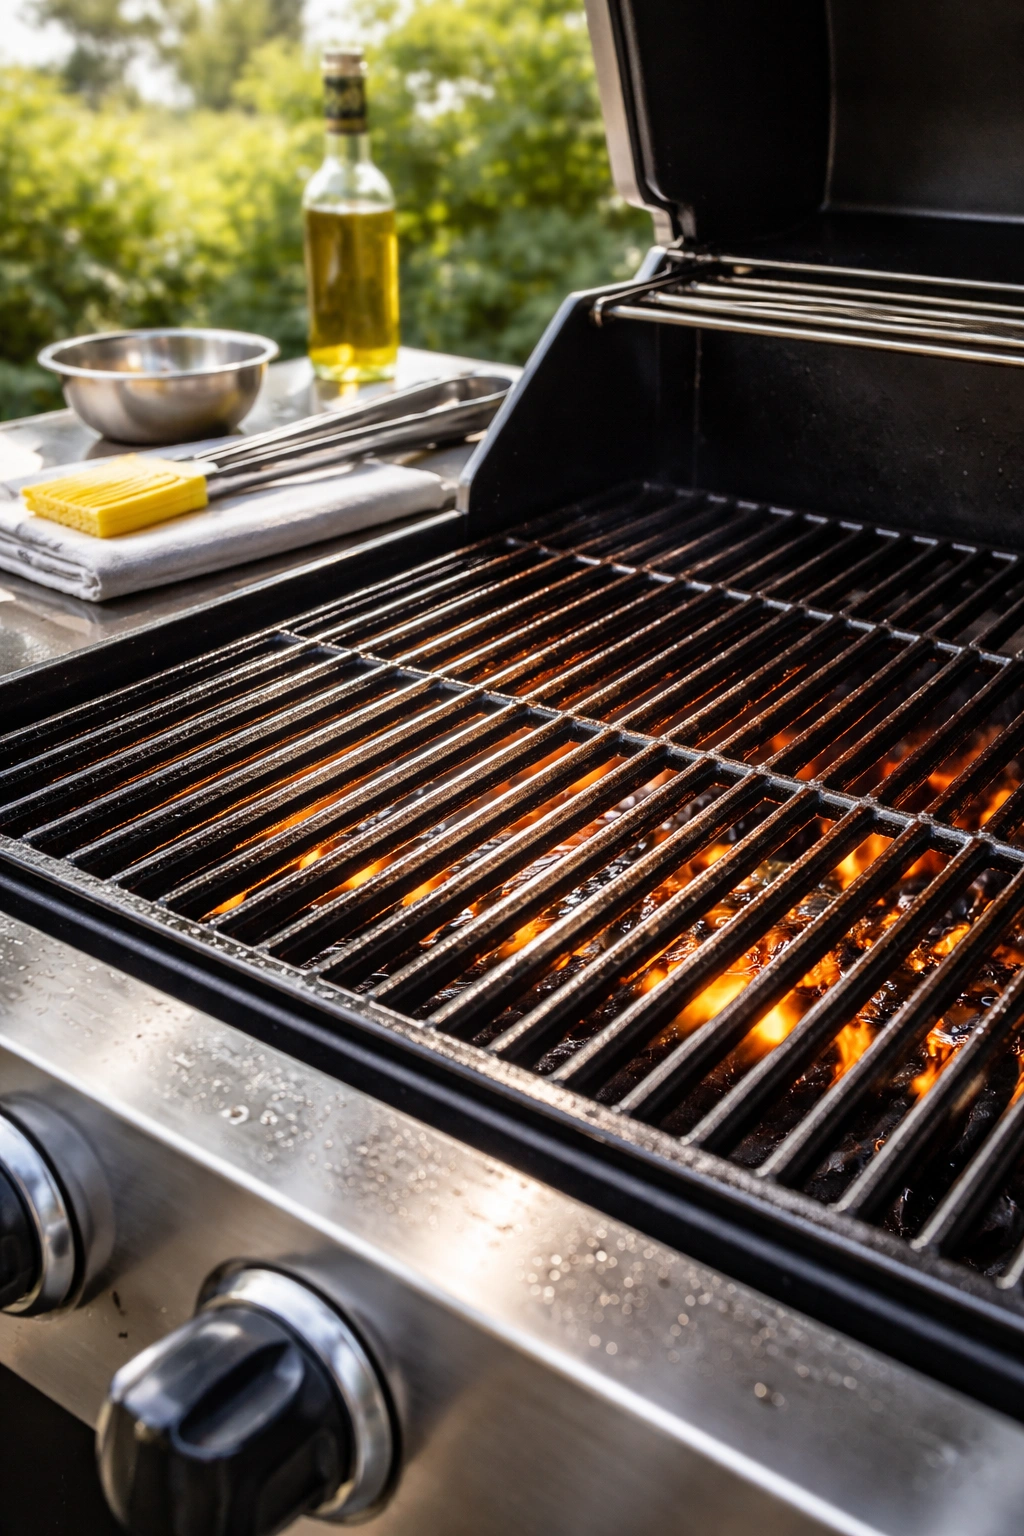
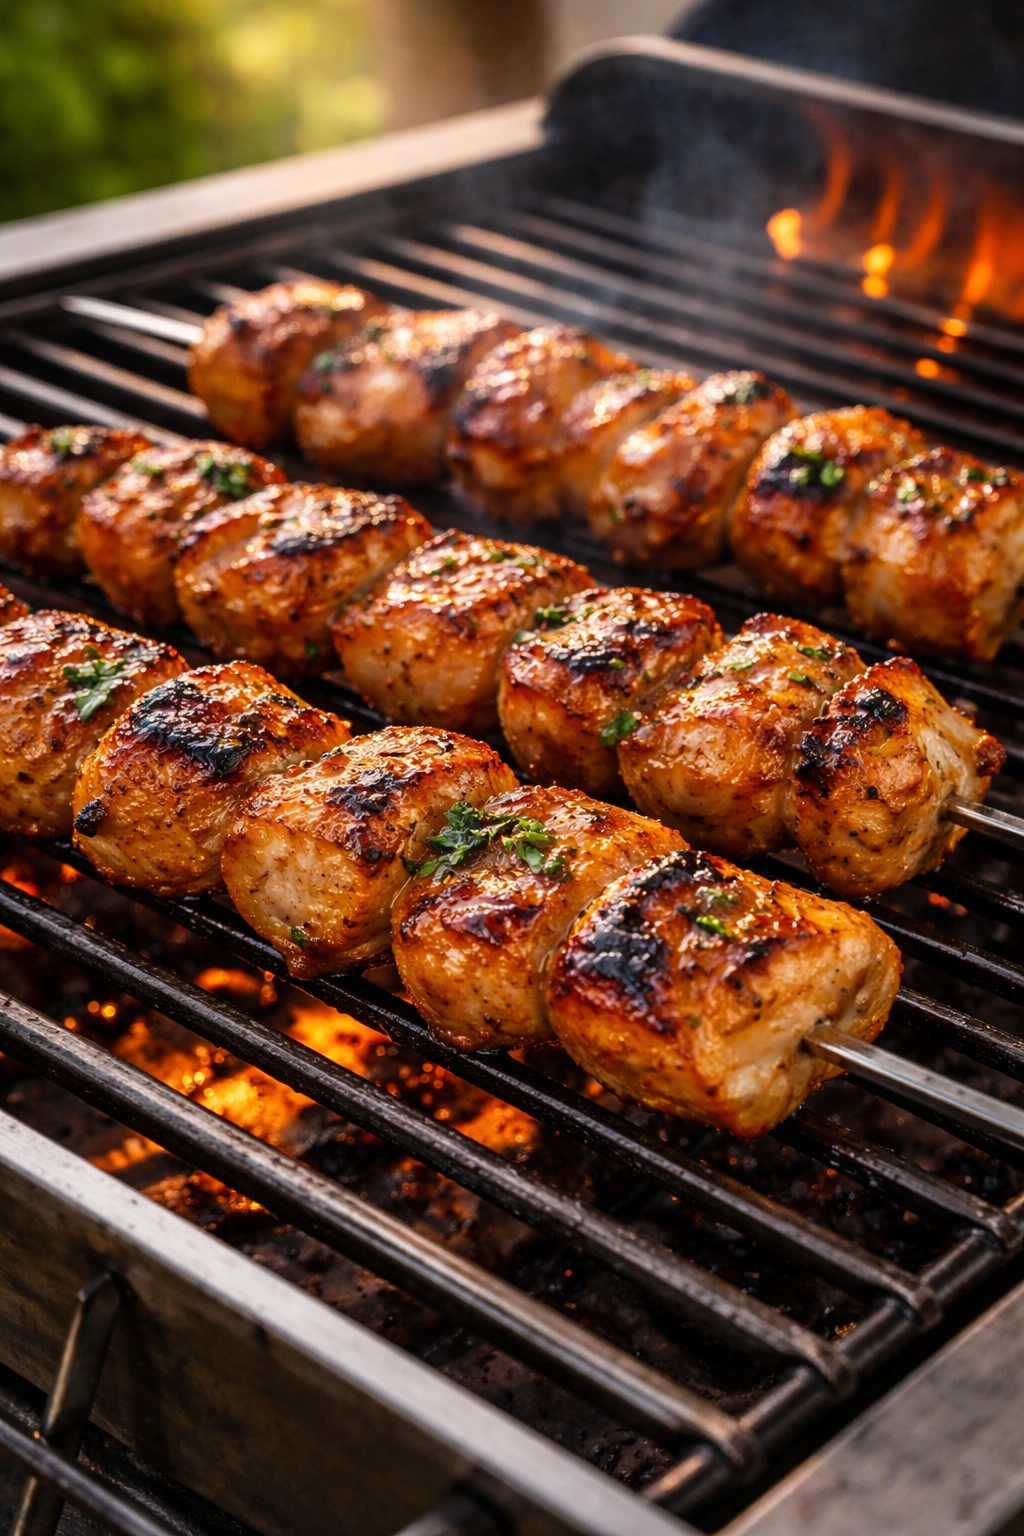
Properly preparing your grill before cooking is genuinely the difference between skewers that stick to the grates and skewers that release easily and develop beautiful char. The most critical step is making sure your grates are clean and well-oiled. Heat your grill for about 5 to 10 minutes until it’s quite hot, then use a grill brush to scrub the grates thoroughly, removing any residue from previous cooking. This serves two purposes: it removes any rust or debris that might stick to your food, and the brushing itself helps loosen buildup.
After brushing, oil the grates. The easiest way is to dip a wadded-up paper towel in vegetable oil or avocado oil (not olive oil, which has a lower smoke point and will burn) and, using tongs, rub it over the hot grates several times until they’re glossy and well-coated. This creates a temporary non-stick surface that helps the chicken release easily and prevents sticking that can tear the meat. The oil will smoke slightly, which is exactly what you want — it indicates the grates are hot enough.
Temperature control matters but doesn’t need to be complicated for skewers. You’re aiming for medium-high heat, roughly 400 to 425°F. If you can hold your hand about 6 inches above the grates and count to about 2 seconds before the heat forces you to pull away, you’re in the right range. This temperature is hot enough to develop beautiful caramelization and cook the chicken through quickly, but not so hot that the exterior burns before the interior cooks.
The Grilling Process and Timing
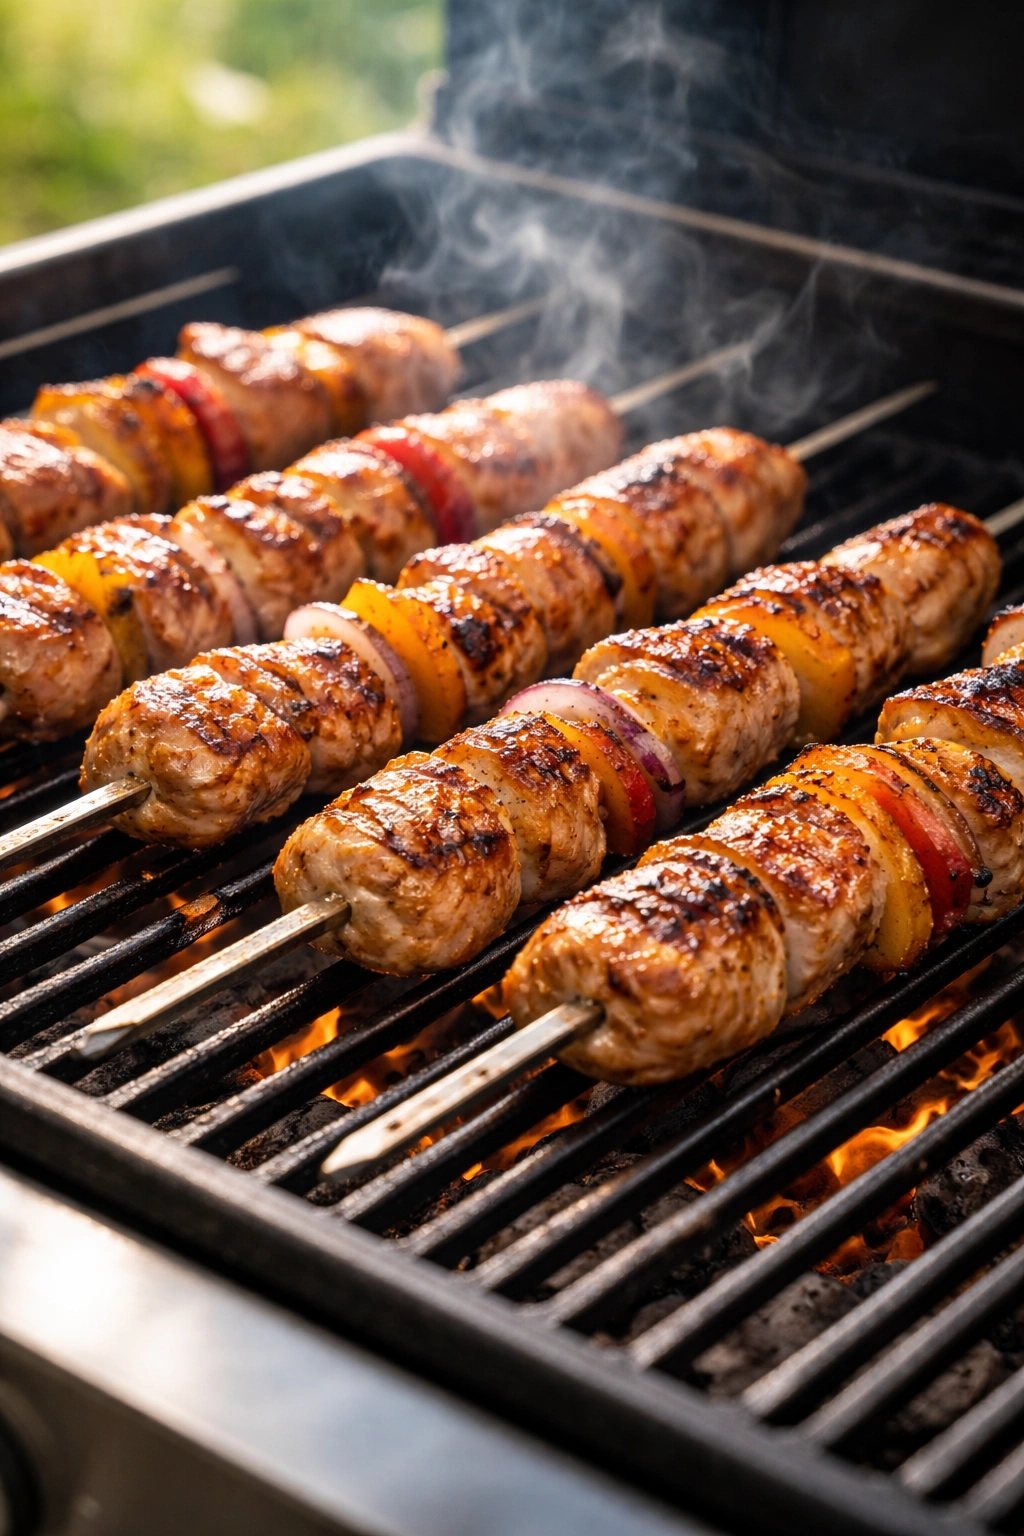
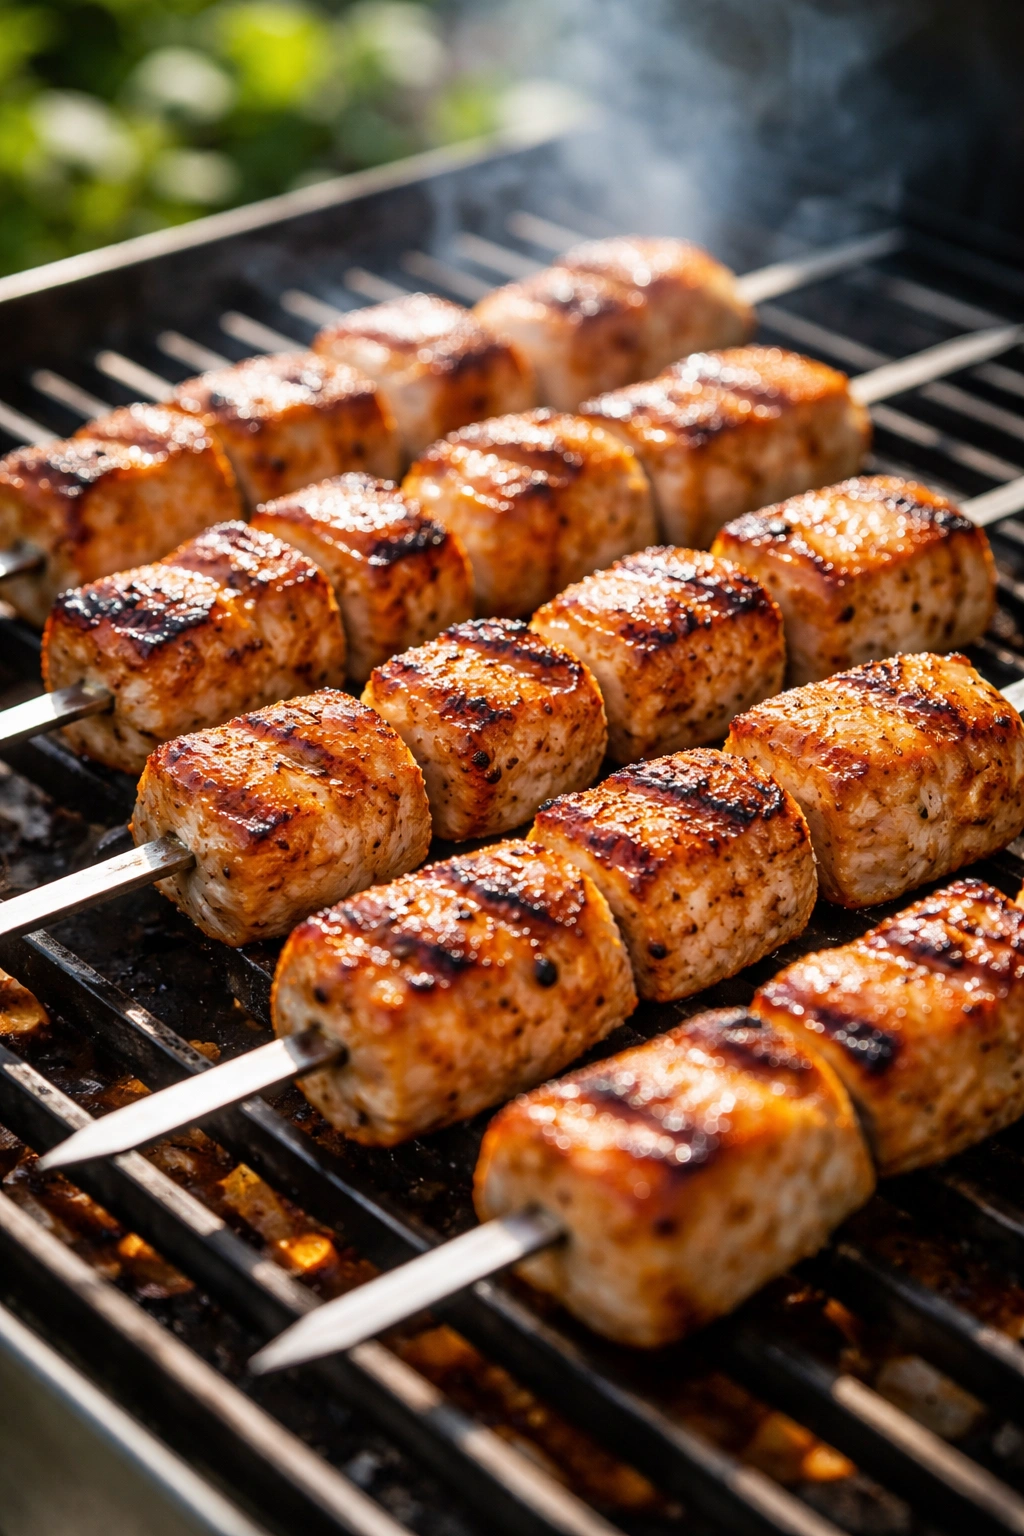
Once your skewers hit the hot grates, the cooking is genuinely fast. Place them directly over the heat, arranging them so they don’t touch each other. Close the grill lid if you have one, which helps circulate heat and speeds cooking. Set a timer for 4 to 5 minutes — this is when you’ll do your first flip.
After 4 to 5 minutes, use tongs to turn each skewer about a quarter turn. The chicken should have developed nice grill marks and should release from the grates relatively easily. If a skewer is sticking, give it another 30 seconds before trying again — sometimes a quick sear needs a moment before the crust sets and releases. Continue cooking, rotating the skewers every 3 to 4 minutes so all sides develop color and the chicken cooks evenly. The total cooking time is typically 12 to 15 minutes, though this varies based on the size of your chicken pieces, whether your grill runs hot or cool, and whether you’re using a covered or uncovered grill.
The chicken is done when it reaches an internal temperature of 165°F, which you can verify with an instant-read thermometer poked into the thickest piece. Don’t cut into the chicken on the skewer to check for doneness — cutting releases those precious juices that keep it moist. If you don’t have a thermometer, look for the meat to be completely opaque with no pink remaining, and the juices that run from the meat should be clear rather than pink.
The final step is resting. Remove the skewers from the grill and transfer them to a clean plate. Loosely tent them with foil and let them rest for 5 minutes. This allows the juices to redistribute throughout the meat rather than running out all over your plate the moment you eat. It’s a small step that genuinely improves the eating experience.
Broiler and Stovetop Alternatives
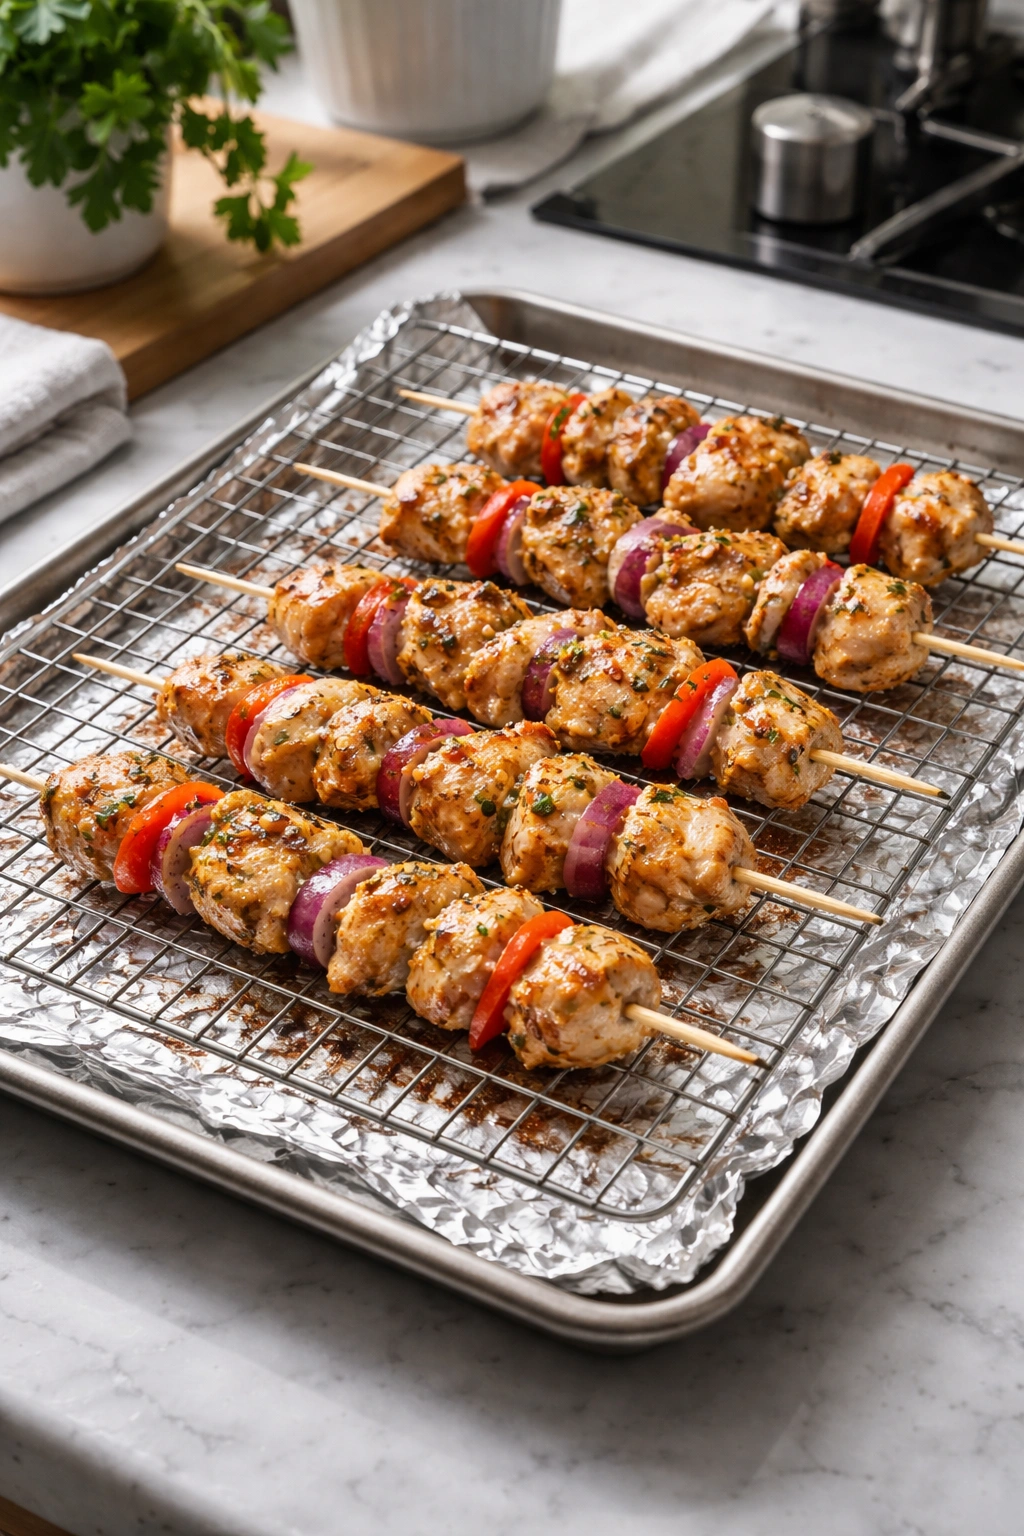
If your grill isn’t available or grilling conditions aren’t ideal, broiling in the oven produces nearly identical results with only slightly different technique. Line a rimmed baking sheet with foil for easy cleanup, place a wire cooling rack on top, and arrange your skewers on the rack (the rack lifts them slightly above the pan, allowing heat to circulate underneath, which is important for even cooking).
Position your oven rack so the skewers are about 4 to 6 inches below the broiler element, which is typically the top rack. Preheat the broiler for a few minutes, then place the skewers under the broiler and set a timer for 5 to 7 minutes. Carefully pull the rack out and flip each skewer, then return to the broiler for another 5 to 7 minutes until the chicken is cooked through and has developed browning on all sides. Broilers vary considerably in intensity, so keep an eye on things — the chicken cooks quickly and can char if you’re not attentive.
A grill pan on the stovetop is another option for skewers. Heat a large grill pan or cast-iron skillet over medium-high heat until it’s quite hot, then oil it lightly. Place skewers on the hot pan in a single layer and cook for 4 to 5 minutes per side, rotating every few minutes to develop color on all sides. This method takes about 12 to 15 minutes total and produces results nearly identical to grilling, making it a genuine option when weather or circumstance prevents outdoor cooking.
Yield: Serves 4 to 6 | Makes 8 to 12 skewers
Prep Time: 20 minutes
Cook Time: 15 minutes
Total Time: 35 minutes (plus 20 minutes to soak skewers if using wooden ones)
Difficulty: Beginner — The steps are straightforward, and the marinade requires only whisking together a few ingredients. Threading skewers is the most time-consuming part, but it’s a simple task that doesn’t require any cooking skill.
Core Marinade Recipe for Everyday Grilling
For the Marinade:
- ¼ cup extra-virgin olive oil
- 3 tablespoons fresh lemon juice (or lime juice)
- 3 cloves garlic, minced
- 1 teaspoon dried oregano
- ½ teaspoon sweet paprika
- ½ teaspoon salt
- ¼ teaspoon freshly ground black pepper
- Optional: ½ teaspoon red pepper flakes for heat, or 1 tablespoon honey for sweetness
For the Skewers:
- 1½ to 2 pounds boneless, skinless chicken breasts (or chicken thighs), cut into 1-inch cubes
- 1 large red bell pepper, cut into 1-inch pieces
- 1 large yellow bell pepper, cut into 1-inch pieces
- 1 medium red onion, cut into 1-inch chunks
- 1 medium zucchini, cut into ½-inch-thick rounds
- 2 tablespoons olive oil (for the vegetables)
- Salt and pepper to taste
- 8 to 12 wooden or metal skewers (wooden ones should be soaked)
Prepare the Marinade and Marinate the Chicken:
-
In a small bowl, combine the olive oil, lemon juice, minced garlic, oregano, paprika, salt, and black pepper. Whisk together until well combined. If desired, add red pepper flakes or honey.
-
Place the cubed chicken in a large bowl or zip-top plastic bag. Pour the marinade over the chicken and toss or massage gently until all the pieces are evenly coated.
Advertisements -
Cover the bowl or seal the bag and refrigerate for at least 20 minutes. If you have time, marinating for 30 minutes to 2 hours yields noticeably deeper flavor, though even a quick 20-minute soak makes a difference. The chicken can also marinate overnight if you’re planning ahead.
Prepare the Vegetables:
-
If using wooden skewers, place them in a tall glass or container filled with room-temperature water and let them soak for at least 20 minutes.
-
Cut the bell peppers into 1-inch pieces, removing any remaining seeds. Cut the red onion into roughly 1-inch chunks, keeping a few layers together so they hold together on the skewer. Cut the zucchini into ½-inch-thick rounds.
-
Place all the cut vegetables in a bowl. Drizzle with 2 tablespoons of olive oil and sprinkle with salt and pepper. Toss gently to coat everything evenly.
Thread the Skewers:
-
Remove the marinated chicken from the refrigerator about 10 minutes before threading. Pat the chicken pieces dry with a paper towel — this helps them develop better color on the grill.
-
Thread the chicken and vegetables onto the skewers, alternating pieces and dividing everything evenly. Start with a piece of chicken, then a vegetable piece, then another piece of chicken. Aim for about 3 to 4 pieces of chicken per skewer with vegetables interspersed between them. Leave about ½ inch of the pointed end uncovered and at least 1 inch of the handle end clear.
Grill the Skewers:
-
Preheat your grill to medium-high heat (about 400 to 425°F) for 5 to 10 minutes. Clean the grates thoroughly with a grill brush, then oil them with a folded paper towel dipped in neutral oil.
Advertisements -
Place the skewers directly on the hot grates. Close the grill lid if you have one. Cook for 4 to 5 minutes without moving the skewers — this allows a nice sear to develop.
-
Using tongs, rotate each skewer about a quarter turn. Cook for another 3 to 4 minutes, then rotate again. Continue this process, rotating every 3 to 4 minutes, for a total cooking time of 12 to 15 minutes until the chicken is cooked through.
-
Check for doneness by inserting an instant-read thermometer into the thickest piece of chicken — it should register 165°F. The chicken should be opaque throughout with no pink remaining.
-
Transfer the skewers to a clean plate and loosely tent with aluminum foil. Let them rest for 5 minutes before serving. This allows the juices to redistribute throughout the meat.
Tips for Genuinely Juicy Chicken Every Single Time
The most common reason home cooks end up with dry grilled chicken is overcooking. Because chicken pieces are small, they cook quickly, and there’s only a narrow window between perfectly cooked and overdone. Set a timer and actually pay attention to it rather than estimating. The difference between 10 minutes and 12 minutes can mean the difference between perfectly juicy and noticeably dry.
Equally important is the marinade itself. An acidic marinade (with lemon juice, vinegar, or yogurt) doesn’t just add flavor — it actually breaks down the protein structure of the chicken, making it more tender and helping it retain moisture during cooking. Don’t skip the marinade thinking it’s an extra step. Even 20 minutes makes a genuine difference in the final texture.
Resist the urge to move the skewers around constantly. While rotating them for even color is important, unnecessarily shuffling them around prevents a good sear from developing and can cause sticking. Develop the practice of rotating with purpose about every 3 to 4 minutes rather than constantly fussing.
If your chicken does overcook, don’t throw it away. Slice it thinly, top with sauce, and serve it in wraps or on top of a salad. The sauce adds back moisture and the thin slices are easier to eat than overdone chunks. This is also a genuinely delicious way to serve leftover grilled chicken for lunch the next day.
Equally valuable is understanding that the marinade is the workhorse ingredient here. A well-seasoned, well-balanced marinade carries so much of the flavor that the resting process, the vegetable selection, and the cooking method all become secondary to getting the marinade right. Spend time experimenting with different acid-fat-seasoning combinations and dial in what you actually enjoy eating.
Flavor Variations to Keep Dinner Interesting

The beauty of chicken skewers is that the formula is flexible enough to accommodate virtually any flavor profile you’re craving. Mediterranean flavors come from combining olive oil, lemon juice, garlic, oregano, and a pinch of red pepper flakes — this is the most straightforward version and works beautifully as your default when you’re not sure what sounds good.
Asian-inspired skewers swap lemon juice for a combination of soy sauce and rice vinegar, add minced fresh ginger along with garlic, and incorporate a small drizzle of sesame oil and a touch of honey. This version develops a deeper, more complex flavor, and the addition of honey means the marinade will caramelize beautifully on the grill, developing a slight glaze. These skewers taste spectacular served with jasmine rice and a side of quick cucumber salad.
Middle Eastern flavors emerge from combining olive oil and lemon juice with cumin, paprika, cinnamon, and crushed red pepper flakes. This version is warm and aromatic, genuinely different from the Greek approach while using many of the same pantry ingredients. Serve these over rice pilaf with roasted vegetables for a genuinely complete meal.
Honey-garlic is another direction that’s simple but delicious. Combine olive oil, soy sauce, honey, minced garlic, and fresh ginger. The honey means the exterior caramelizes gorgeously on the grill, developing a sticky-sweet glaze. These skewers appeal to people who prefer sweetness balanced with the savory notes of soy sauce and garlic.
You can also play with different herbs. Cilantro and lime create a fresh, bright marinade that’s different from oregano-based versions. Fresh rosemary works beautifully if you mince it finely so it doesn’t overpower. Thyme is another herb that works excellently with chicken and develops deeper flavor as the chicken cooks. The principle is the same regardless of which direction you take it — combine acid, fat, and seasonings that genuinely appeal to your taste buds.
Pairing Skewers with Sides That Complete the Meal
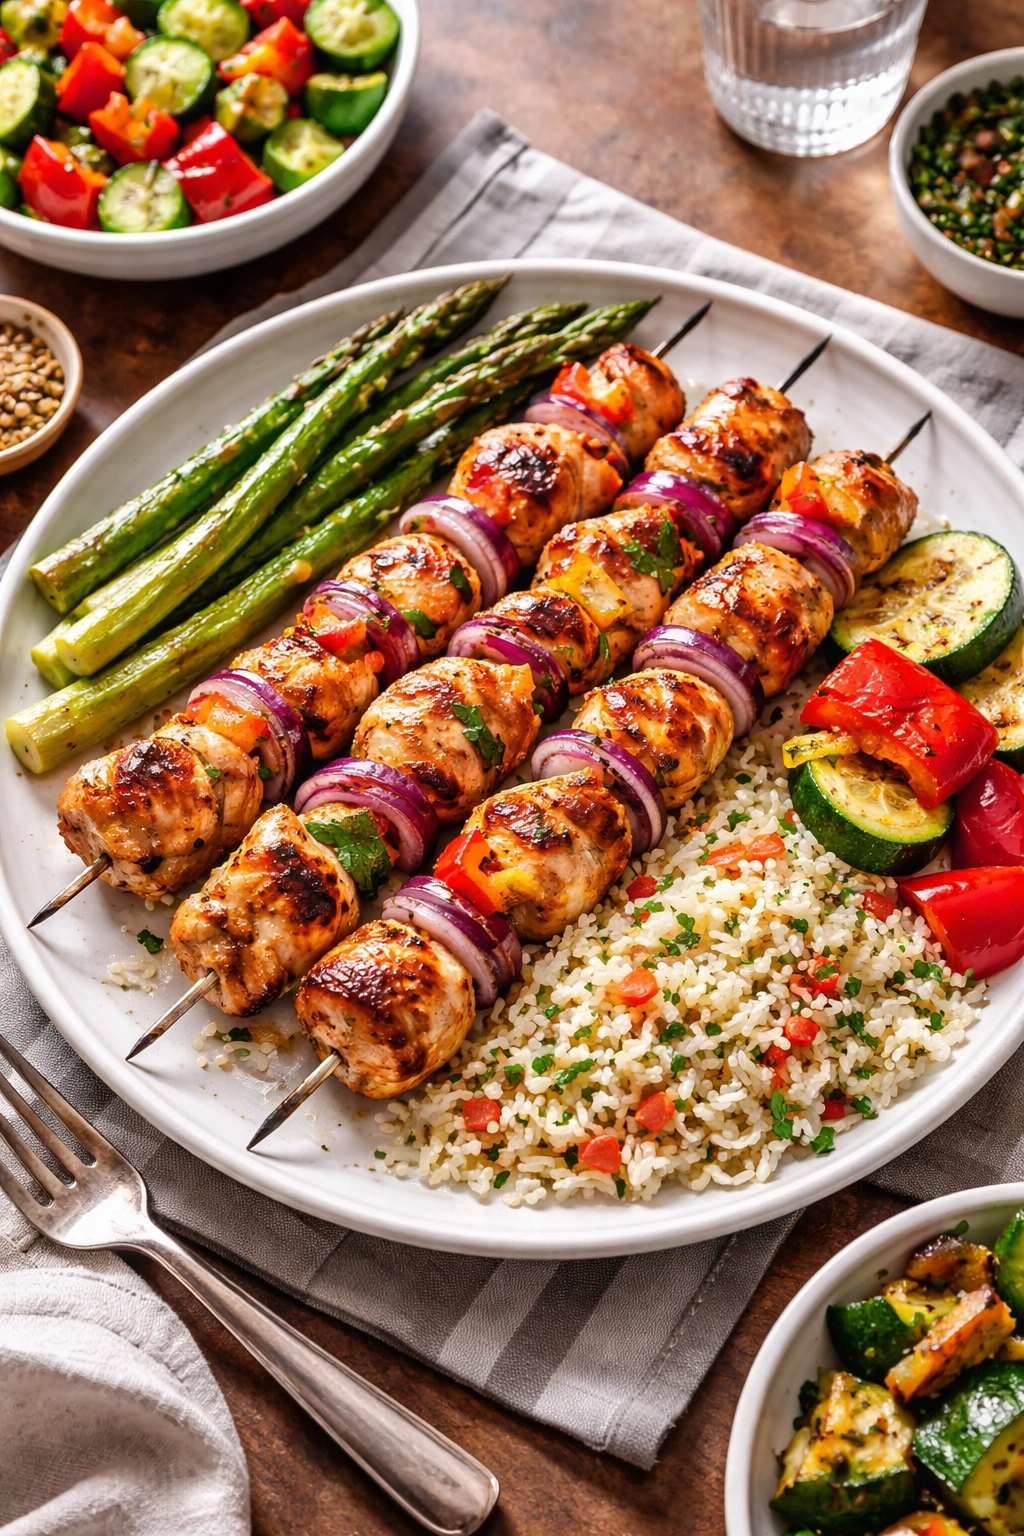
Grilled chicken skewers are genuinely satisfying on their own, but pairing them with a thoughtful side dish transforms dinner into something more complete. Rice is the most obvious choice — either white rice, brown rice, or a rice pilaf with vegetables and herbs woven throughout. The rice absorbs flavorful juices from the chicken and vegetables while providing a neutral base that lets the star ingredients shine.
Grilled or roasted vegetables develop caramelization and sweetness that pairs beautifully with the charred exterior of the skewers. Asparagus takes about the same time to grill as the skewers, so you can cook them simultaneously. Zucchini, bell peppers, or mushrooms work equally well. Broccoli and Brussels sprouts roast beautifully at high temperature in the oven while skewers grill, developing crispy, caramelized edges.
A simple salad is refreshing and balances the richness of grilled chicken. Cucumber and tomato salad with a light vinaigrette is classic for good reason. A Greek salad with olives, feta, and crisp lettuce provides freshness and healthy fat that satisfies. Coleslaw, particularly a light one with vinegar-based dressing rather than cream-based, provides crunch and a slight acidic bite that cleanses the palate between bites of chicken.
For a more casual weeknight feel, serve skewers with bread. Warmed pita is traditional for Greek or Middle Eastern flavors. Crusty ciabatta or focaccia works beautifully for Mediterranean skewers. You can use the bread to build quick wraps, layering the chicken and vegetables with sauce and fresh greens. Corn on the cob, particularly if you grill it alongside the skewers, is summer simplicity at its finest.
Sauces elevate skewers from simple to special. Tzatziki (yogurt, cucumber, and dill) is classic for Mediterranean versions. Chimichurri (fresh herbs, garlic, vinegar, and olive oil) works beautifully for any version and adds brightness and depth. A simple lemon aioli is luxurious with very little effort. Even a drizzle of good olive oil finishing oil and fleur de sel is enough to make the meal feel intentional and special.
Making Skewers Ahead for Busy Weeknights

One of the biggest advantages of skewers for busy people is how far ahead you can prepare them. The marinated chicken keeps beautifully in the refrigerator for up to 24 hours, so you can marinate in the morning when you have a calm moment, then grill in the evening with minimal preparation. This is genuinely useful if your schedule is unpredictable or if you want to spread the work across the day rather than trying to do everything at once before dinner.
You can also thread the skewers a few hours ahead. Place the threaded skewers on a baking sheet, cover with plastic wrap, and refrigerate until you’re ready to grill. This means your grill time is genuinely 15 minutes from cold skewers to finished dinner, which is genuinely quick even for the busiest weeknights.
If you’re really planning ahead, you can freeze marinated, unthreaded chicken for up to 3 months. Place the chicken in the marinade, seal in a freezer bag, and freeze flat so it doesn’t take up much space. Thaw completely in the refrigerator the night before you plan to grill. The marinade continues to work on the chicken as it thaws, meaning you actually get deeper flavor penetration than you would with chicken marinated for just a few hours at refrigerator temperature.
You can also freeze assembled, cooked skewers. Cool them to room temperature, wrap them individually in foil, place in a freezer bag, and freeze for up to 3 months. Reheat gently either on the grill for a few minutes per side or in a 350°F oven for about 10 to 15 minutes. They reheat beautifully and taste nearly identical to freshly grilled skewers.
Storage and Keeping Leftovers Fresh
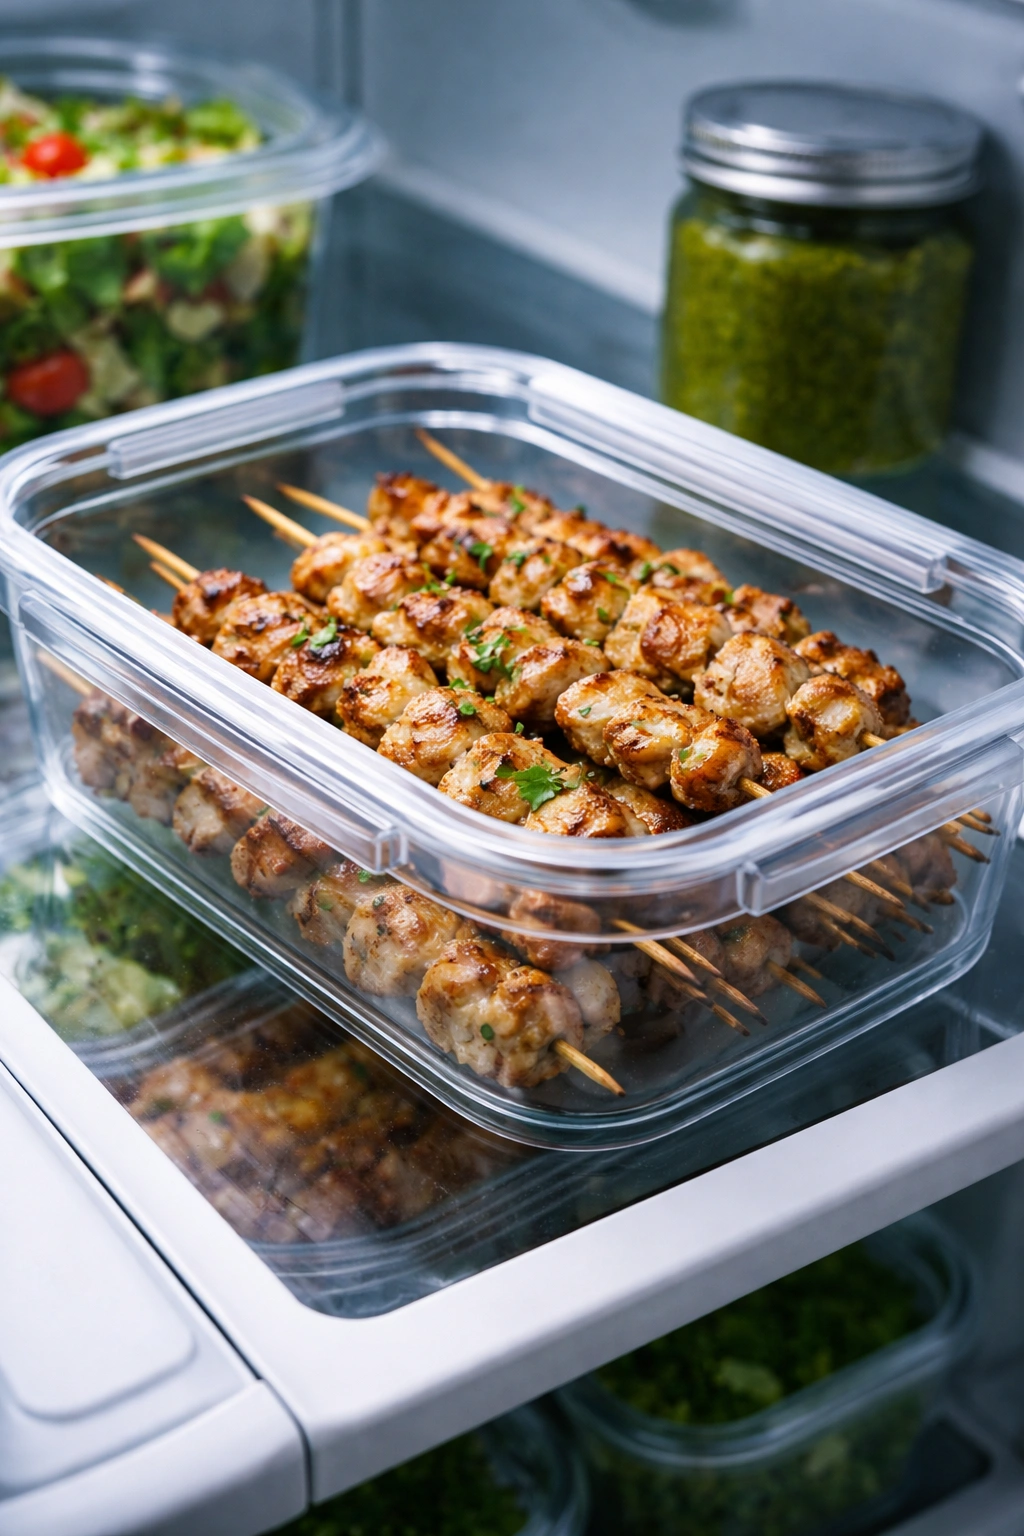
Cooked skewers keep beautifully in the refrigerator for 3 to 4 days when stored properly. Allow them to cool to room temperature, then place them in an airtight container. Don’t stack them if possible — arrange them in a single layer if you have the space, as this prevents them from sweating and keeps the exterior from becoming soggy.
Reheating is straightforward. The best method is to place them on a grill or grill pan over medium heat for just a few minutes per side. This warms them through while preserving the texture of the exterior. Alternatively, you can reheat them in a 350°F oven for about 10 to 15 minutes, loosely covered with foil so they warm through without drying out further.
Leftover chicken is genuinely useful for multiple follow-up meals. Slide the cooked chicken off the skewer and use it to top salads, fill wraps or sandwiches, or toss with pasta and olive oil. The vegetables are equally useful — toss them with rice, fold them into frittatas, or arrange them on a plate with cheese and cured meats for a quick charcuterie situation.
The assembled raw skewers, whether refrigerated for a few hours or frozen for months, keep your future self from having to do any real work when you’re tired or pressed for time. You literally just transfer them to a hot grill and walk away until they’re done. There’s genuine value in this convenience for people juggling busy schedules.
Final Thoughts
Grilled chicken skewers genuinely are the weeknight dinner solution. They’re fast enough to get a complete, impressive meal on the table in about 35 minutes, yet flavorful and satisfying enough that nobody feels like they’re eating “quick food” in a negative sense. The formula is so flexible that you can build them around whatever flavors you’re craving and whatever vegetables are in season or on sale at your market.
The trick to making this work as your go-to weeknight dinner is understanding that most of the work happens through the marinade and prep, not through standing at the grill. Spend 10 minutes at a calm moment putting chicken in a bowl with flavorful liquid, and the rest of the process is genuinely effortless. This is the kind of dinner that can happen on a night when you had no plan and didn’t start preparing until an hour before you needed to eat.
Once you’ve made skewers a few times and understand how they cook, how long they take, and what seasonings you actually enjoy, you’ll find yourself making them regularly. They’re the kind of recipe that builds confidence because there are so few variables and so many ways to customize them to suit your taste. Start with the basic Mediterranean version, nail that technique, then experiment with other flavor directions. Before long, you’ll have multiple skewer recipes you can execute on autopilot, which is genuinely the goal for busy weeknight cooking.