Easy Air Fryer Chicken Perfect for Beginners
If you’ve just purchased an air fryer or you’re standing in front of one wondering where to start, chicken is your answer. Air fryer chicken represents one of the most forgiving, foolproof ways to cook protein, and it’s the perfect launchpad for learning how your new kitchen gadget works. The beauty of this approach lies in the speed, the simplicity, and the consistently delicious results—even if you’ve never used an air fryer before.
The truth is, cooking chicken in an air fryer removes most of the anxiety that surrounds preparing this versatile protein. There’s no need to monitor hot oil, no risk of unevenly cooked centers, and no elaborate techniques to master. What you get instead is restaurant-quality chicken that’s crispy on the outside and juicy on the inside, ready in under 20 minutes. For beginners, this means you can build confidence quickly while creating meals that actually taste restaurant-quality.
Why beginners love air fryer chicken: The learning curve is gentle, the failures are forgiving, and success comes fast. You’ll understand your air fryer’s personality within a few batches, and you’ll have a reliable baseline recipe you can return to endlessly. Whether you’re meal prepping for the week or throwing together a quick weeknight dinner, mastering air fryer chicken opens the door to hundreds of recipes.
Understanding Your Air Fryer Basics

Before diving into chicken specifically, it helps to understand what makes an air fryer work. An air fryer is essentially a compact convection oven that circulates superheated air at high speed around your food. This rapid air circulation creates the browning and crisping that deep frying achieves, but without submerging food in oil. For beginners, this is genuinely liberating—you’re not dealing with dangerous hot oil, you’re not wrestling with splatters, and cleanup takes literally 30 seconds.
The temperature range on most air fryers sits between 300°F and 400°F, though some models go higher. The basket or tray holds food in a single layer where air can reach every surface. This is critical for beginners to understand: overcrowding defeats the purpose and results in steaming rather than crisping. Think of the air fryer basket like a stage where each piece of chicken needs its own spotlight.
Preheat time is typically just a few minutes—far faster than a conventional oven. This is one reason air fryer cooking is so efficient for weeknight dinners. Once you hit the preheat button, you’re looking at a 4-minute warm-up before your chicken goes in.
Why Chicken Breasts Are the Ideal Beginner Protein
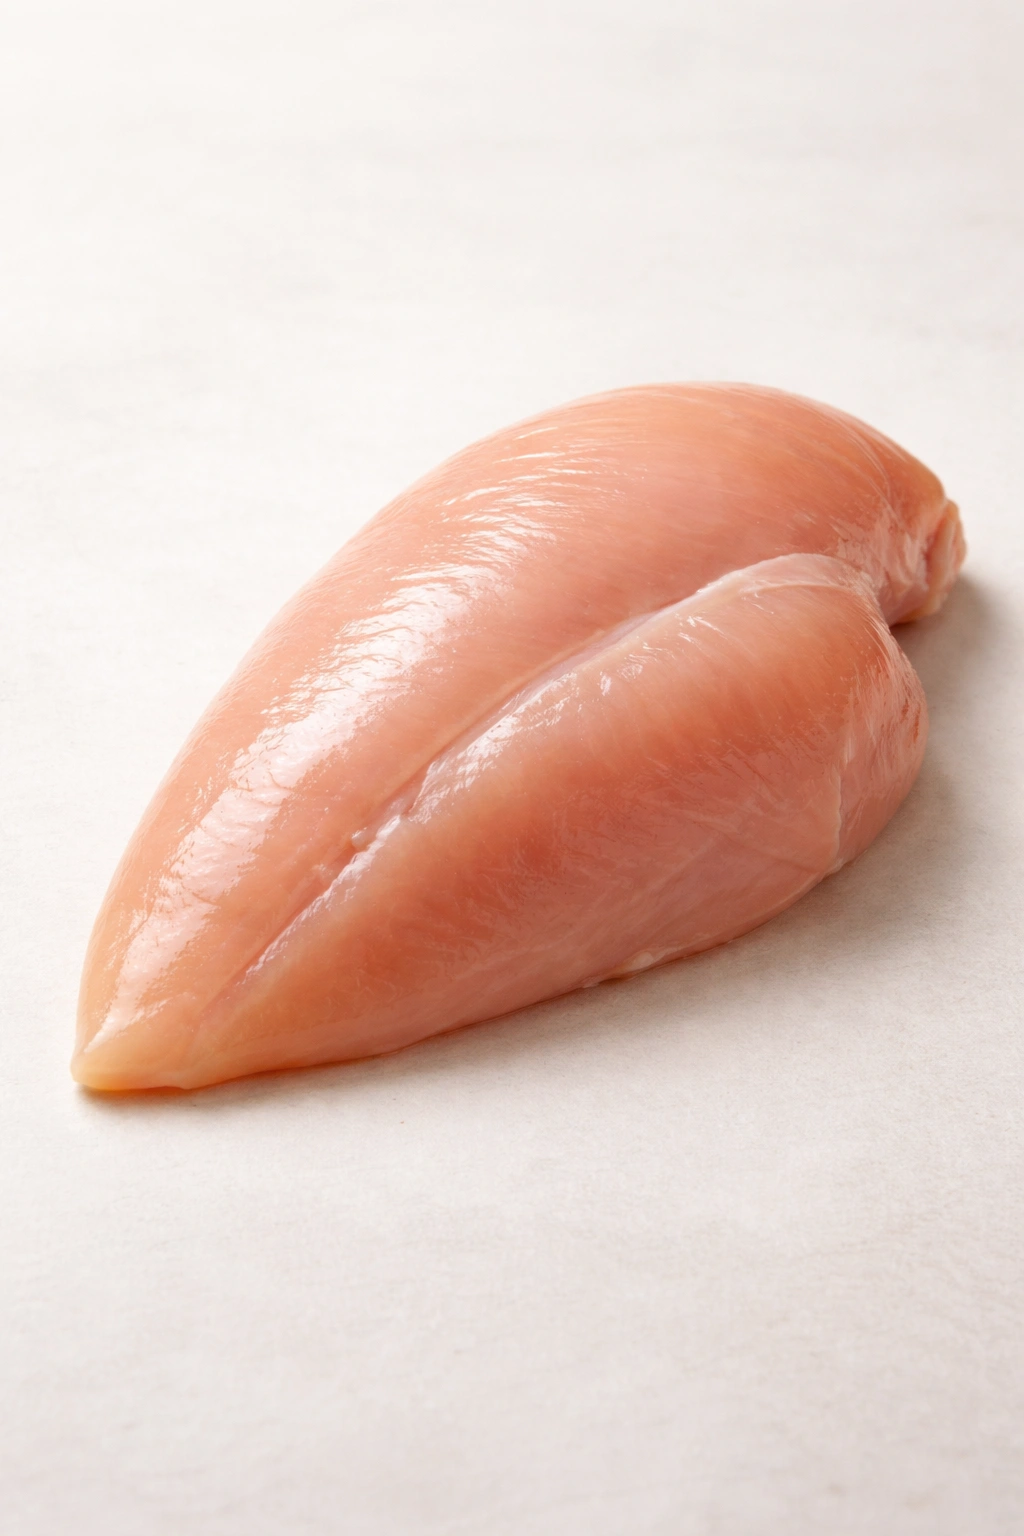
Chicken breasts intimidate many home cooks because they dry out so easily in traditional cooking methods. But in an air fryer, they’re almost impossible to ruin. The rapid air circulation and shorter cooking times mean the exterior browns and crisps before the interior dries out. This is why chicken breasts consistently win the “easiest thing to cook in an air fryer” title.
A single boneless, skinless chicken breast typically weighs between 5 and 9 ounces. For beginners, buying the smaller ones (around 5-6 ounces) gives you more control over timing and guarantees even cooking. Larger breasts can cook unevenly unless you slice them or pound them to uniform thickness—something we’ll cover shortly, but it’s an extra step many beginners want to avoid at first.
The versatility of chicken breasts also matters for beginners. You can season them simply with salt and pepper, or you can layer in complex spice blends. You can serve them whole, slice them, dice them, or shred them. The same cooked breast works for a salad lunch, a protein bowl dinner, or chopped chicken for tacos. Once you nail the basic cooking technique, you unlock dozens of meal possibilities.
The Best Cuts for Beginner Success
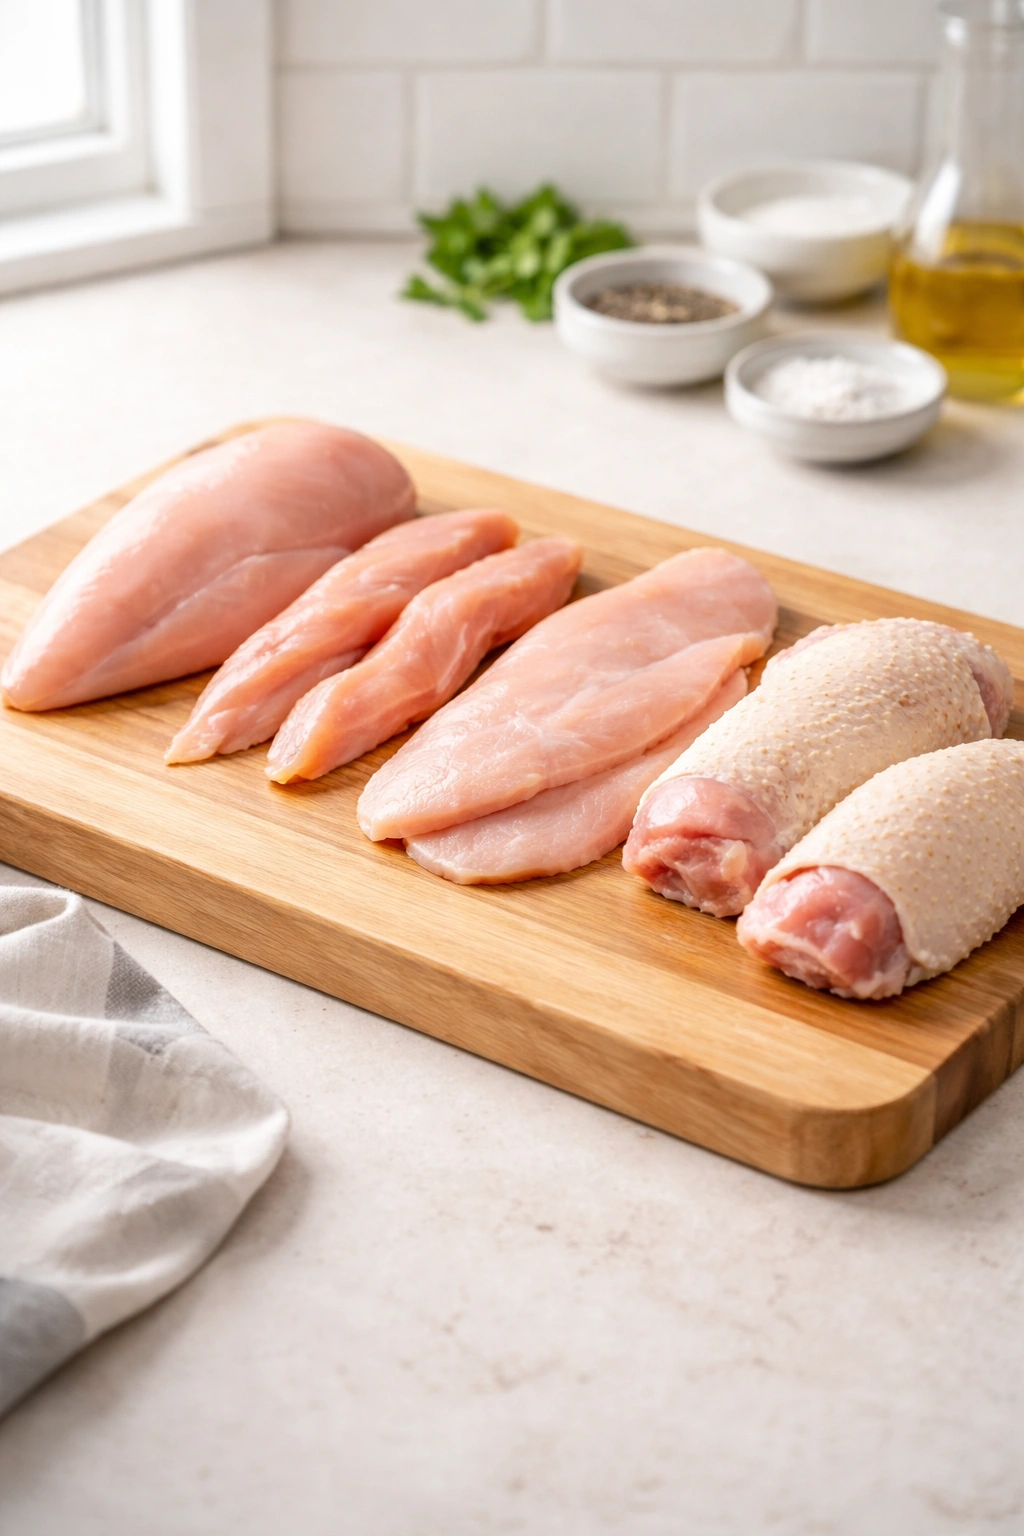
While chicken breasts are the poster child for beginners, other cuts work beautifully and sometimes offer easier execution.
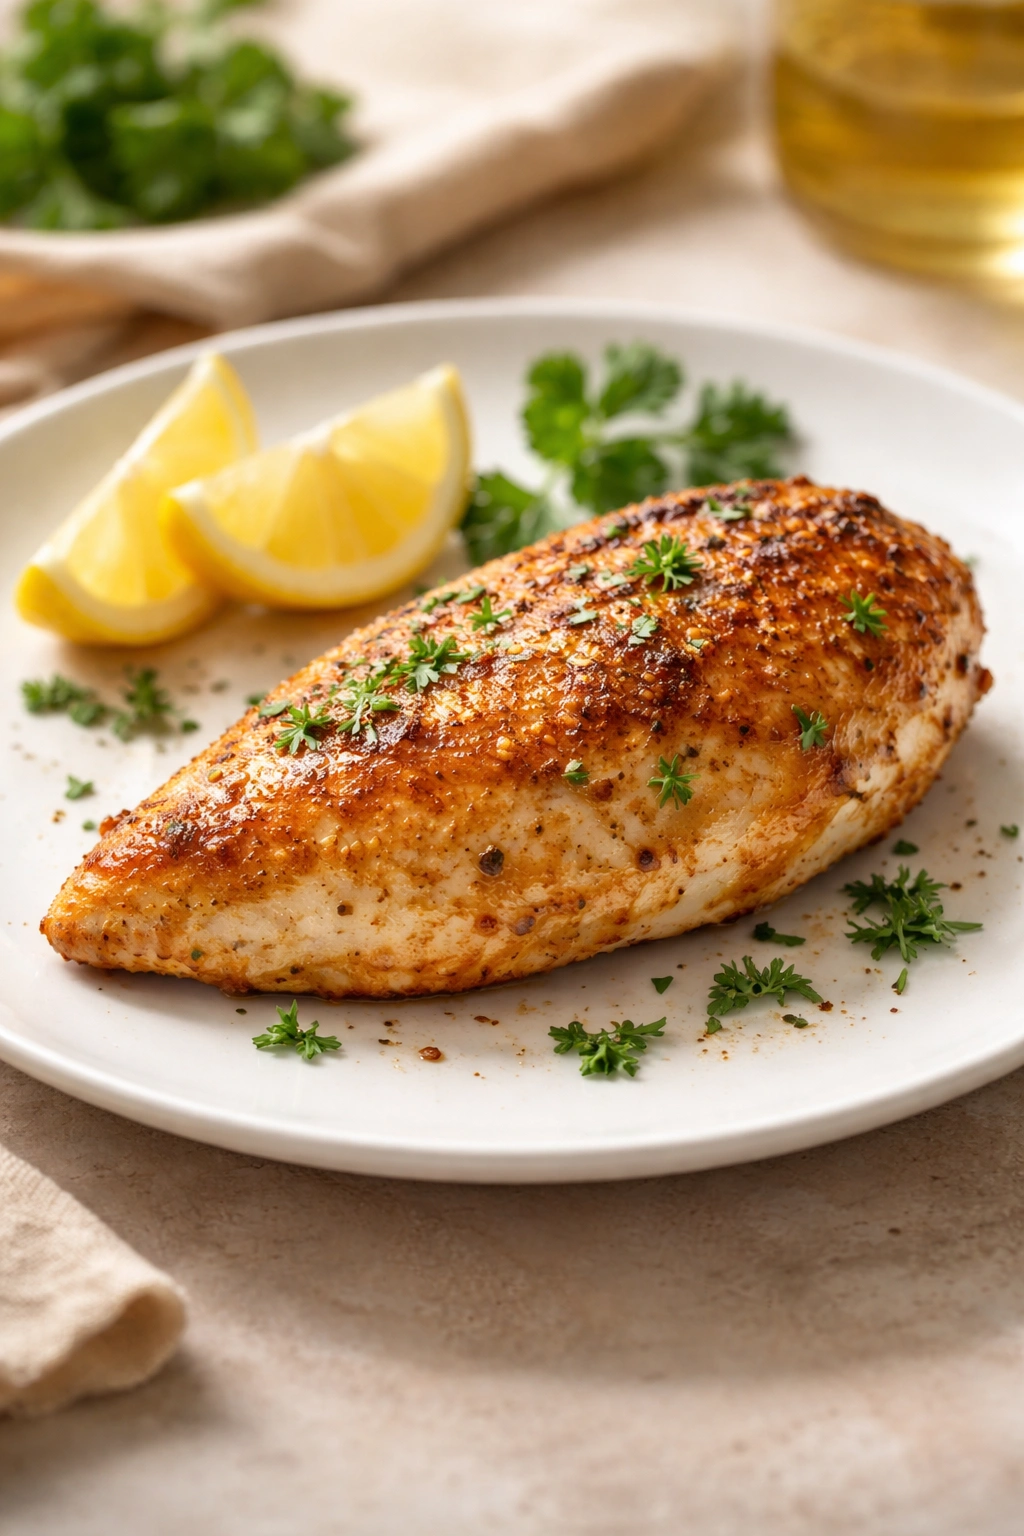
Boneless, skinless chicken breasts: These are the classic choice. They cook quickly and predictably. Cook at 380°F for 10-12 minutes for a medium breast (7-8 ounces), flipping halfway through.
Chicken tenderloins: These are the tender strips that run along the underside of the breast. They’re smaller, cook even faster (8-10 minutes), and are essentially impossible to overcook. If you want the absolute quickest success as a beginner, start with tenderloins.
Thin-sliced chicken cutlets: Some grocery stores sell chicken breasts pre-sliced thin, almost like scaloppine. These cook in as little as 6-8 minutes and develop beautiful golden edges. If your store carries them, they’re a shortcut worth taking.
Chicken thighs: Dark meat is more forgiving than white meat because the higher fat content keeps it moist even with longer cooking. Thighs take a few extra minutes (12-14 minutes for bone-in, skin-on), but they’re nearly impossible to dry out.
For absolute beginner confidence, start with boneless, skinless breasts in the 5-6 ounce size. You’ll master the technique in two batches and never look back.
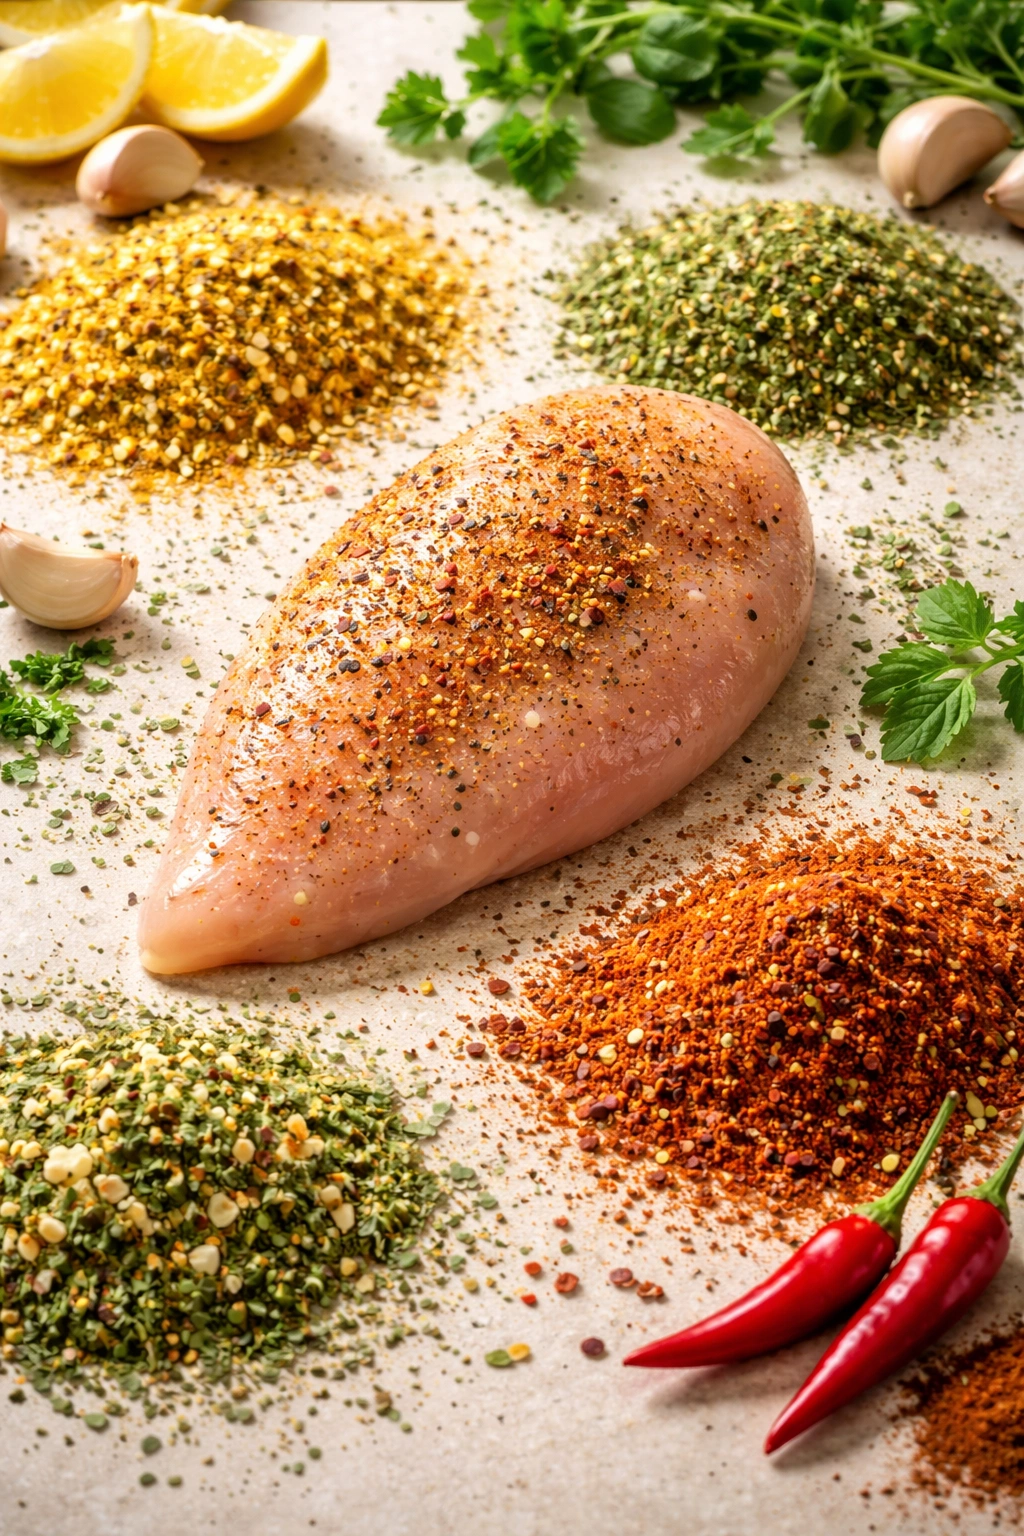
The Simplest Seasoning Approach for Beginners

Seasoning intimidates beginners because they worry about ruining a meal with too much salt or creating an unbalanced flavor. The solution is to start with proven combinations that work every time.
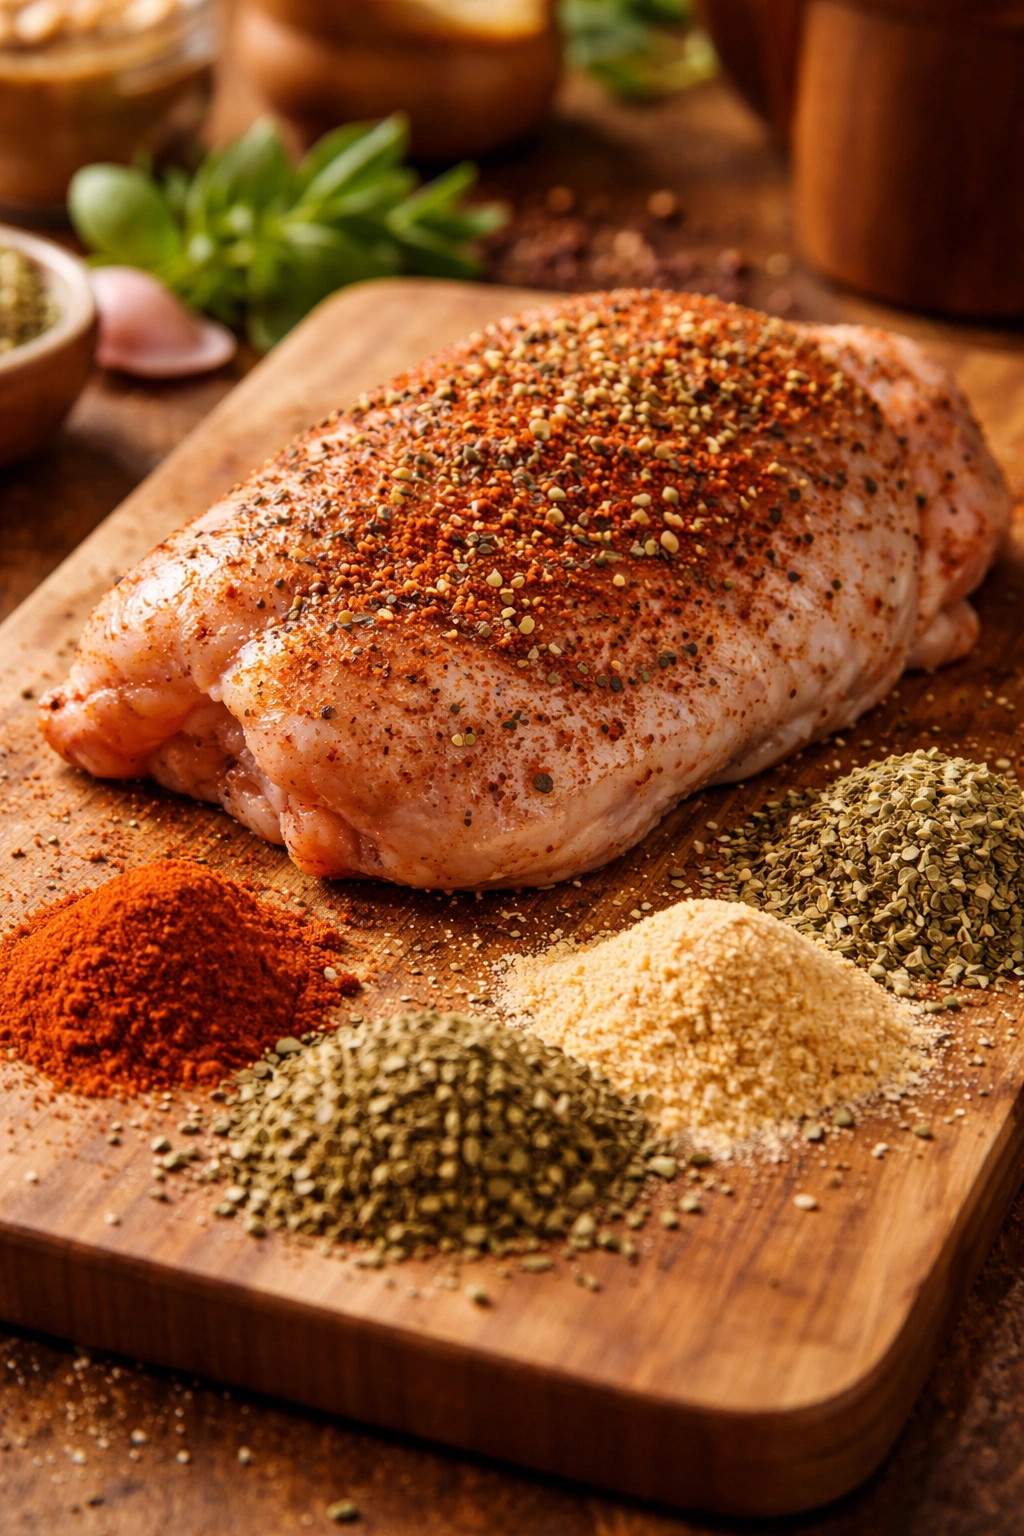
The no-fail basic seasoning: Salt, black pepper, and garlic powder. That’s it. One teaspoon of salt, half a teaspoon of black pepper, and half a teaspoon of garlic powder coats a single 7-ounce breast perfectly. This combination builds confidence because it can’t go wrong—it simply tastes good, every single time.
The paprika-forward option: If you want slightly more interest without complexity, add paprika to the basic formula. A mix of one teaspoon paprika, half a teaspoon garlic powder, half a teaspoon salt, and a quarter teaspoon black pepper gives you color and subtle smokiness without overwhelming your palate.
The all-purpose seasoning shortcut: Many beginners benefit from using a pre-mixed seasoning blend like rotisserie chicken seasoning, lemon pepper, or Cajun seasoning. Using one tablespoon of a quality pre-mixed blend removes the guesswork entirely. You’re not compromising on flavor—you’re using the work of professional spice blenders.
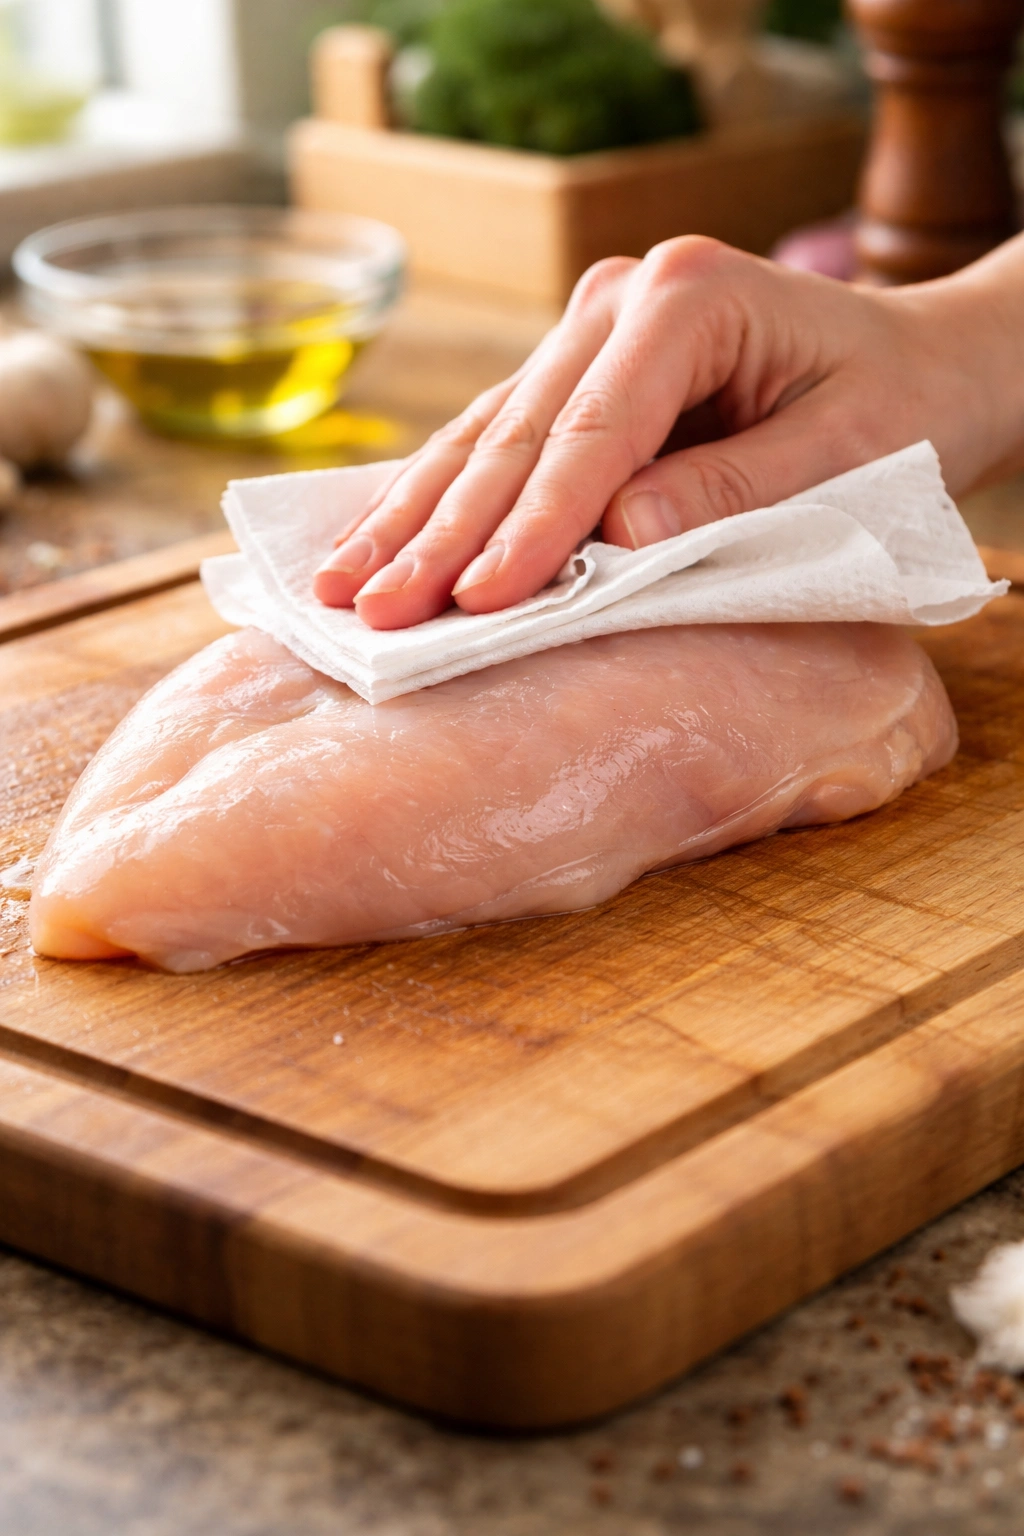
The technique matters more than the seasoning itself. Pat your chicken completely dry with paper towels (moisture prevents browning), brush or rub it lightly with oil (this helps seasoning stick and aids browning), then coat generously with your chosen seasoning on both sides. Let it sit for just a few minutes if you have time—this allows the seasoning to adhere rather than fall off during cooking.
Step-by-Step Guide to Your First Batch
Success on your first attempt builds the confidence to cook chicken regularly. Here’s exactly what to do.
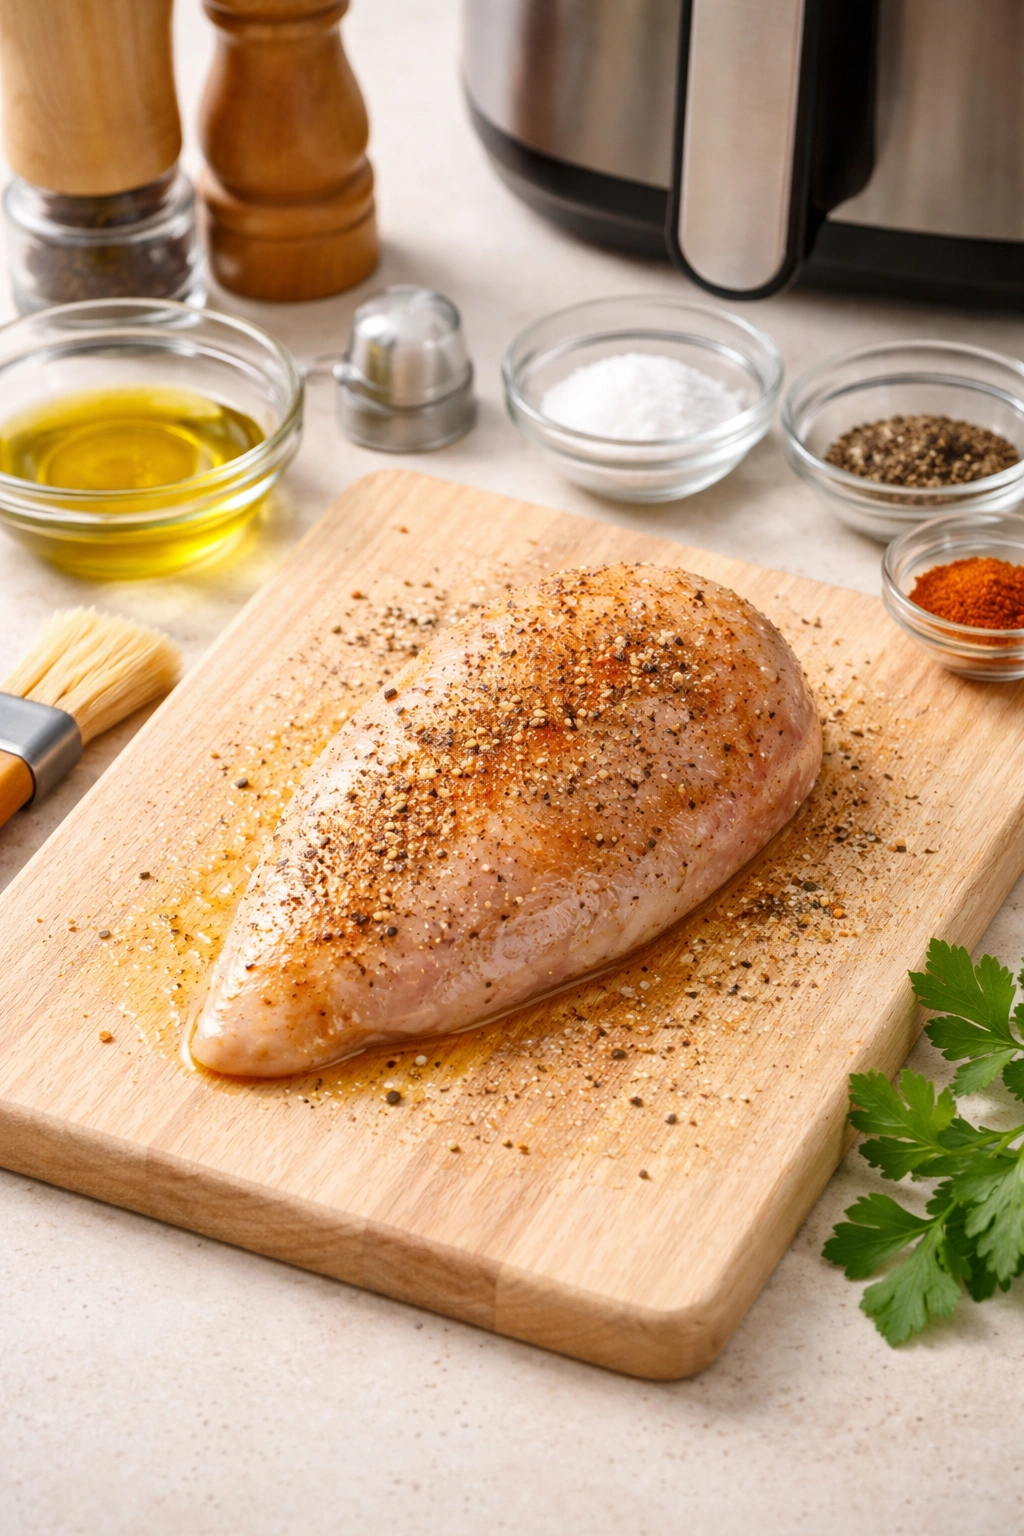
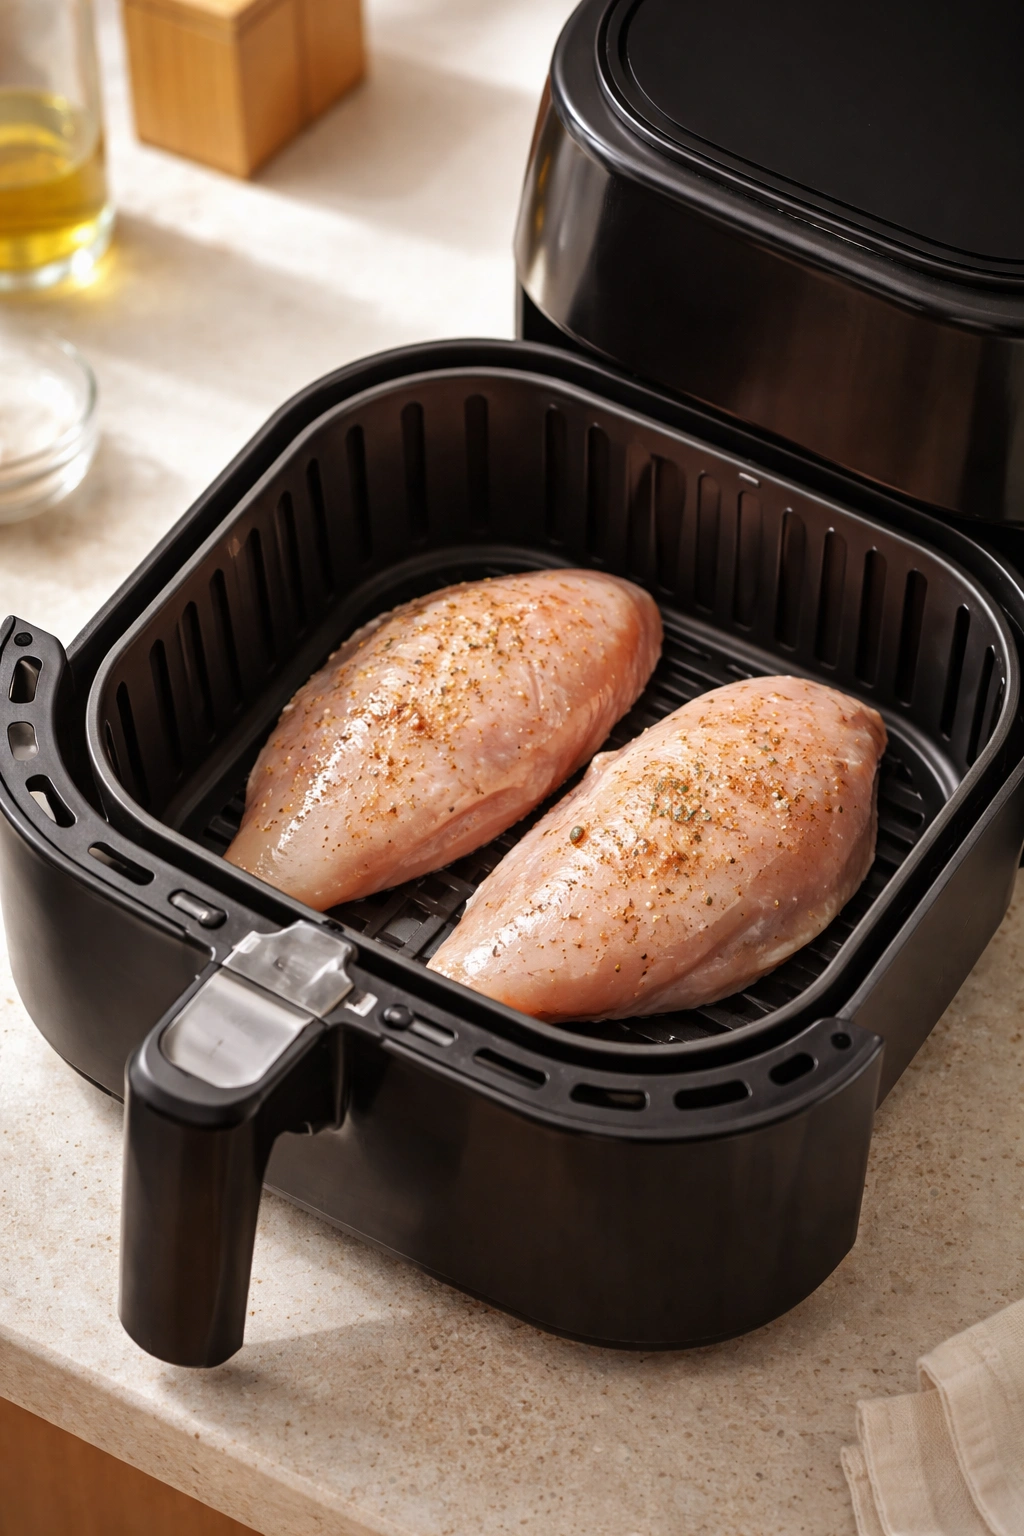
Step 1: Choose and prepare your chicken: Remove one boneless, skinless chicken breast from the refrigerator. Pat it completely dry on both sides with paper towels. If it’s thicker on one end (which it usually is), gently pound the thick end with the heel of your hand or a meat mallet until it’s roughly the same thickness throughout. This ensures even cooking from edge to edge.
Step 2: Season your chicken: Drizzle or spray the breast lightly with olive oil on both sides. Sprinkle your chosen seasoning over both sides—be generous, as some will fall away during cooking. Rub the seasoning into the surface so it adheres. The chicken should look well-coated, not bare.
Step 3: Preheat your air fryer: Set your air fryer to 380°F and press the preheat button. Most air fryers have a small indicator light or sound that lets you know when preheating is complete. While it preheats, you’re already finished with prep—this is why beginners love this method.
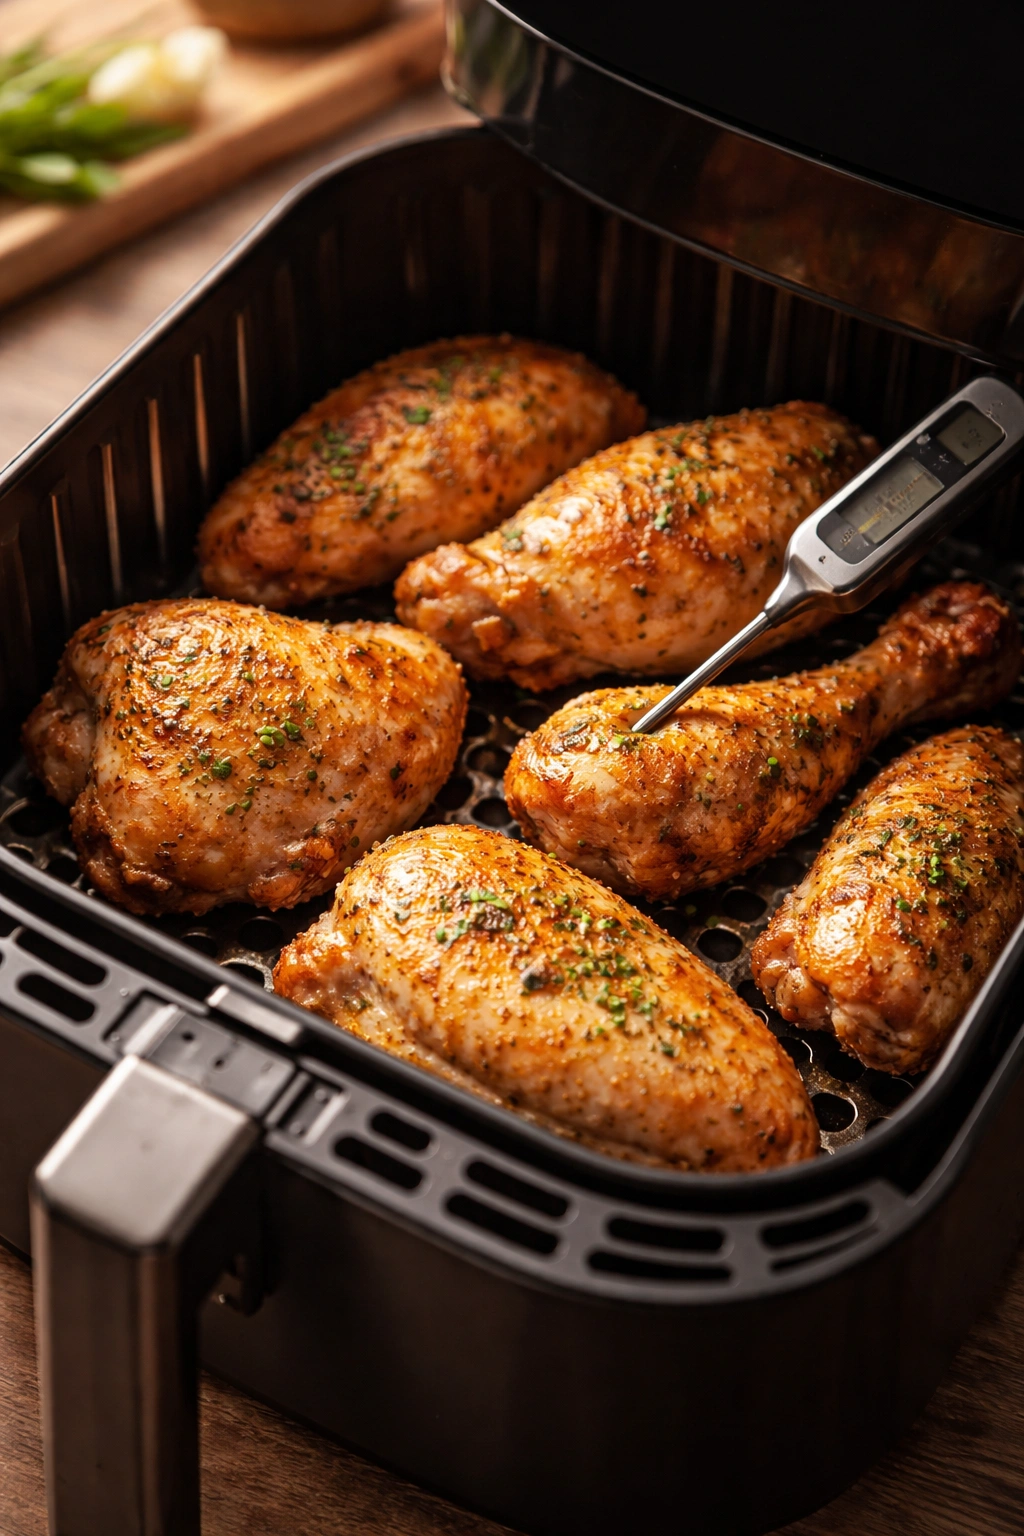
Step 4: Load and cook: Once preheated, carefully place the chicken breast in the air fryer basket, flat-side down. It should sit in a single layer with a bit of space around it. Close the basket and set the timer for 10 minutes for a medium breast (7-8 ounces), or 8 minutes for a smaller breast (5-6 ounces).
Step 5: Flip halfway: When half the time has elapsed, open the air fryer (don’t be scared—nothing bad happens when you open it), flip the chicken over using tongs, and close it again. This ensures even browning on both sides and even cooking throughout.
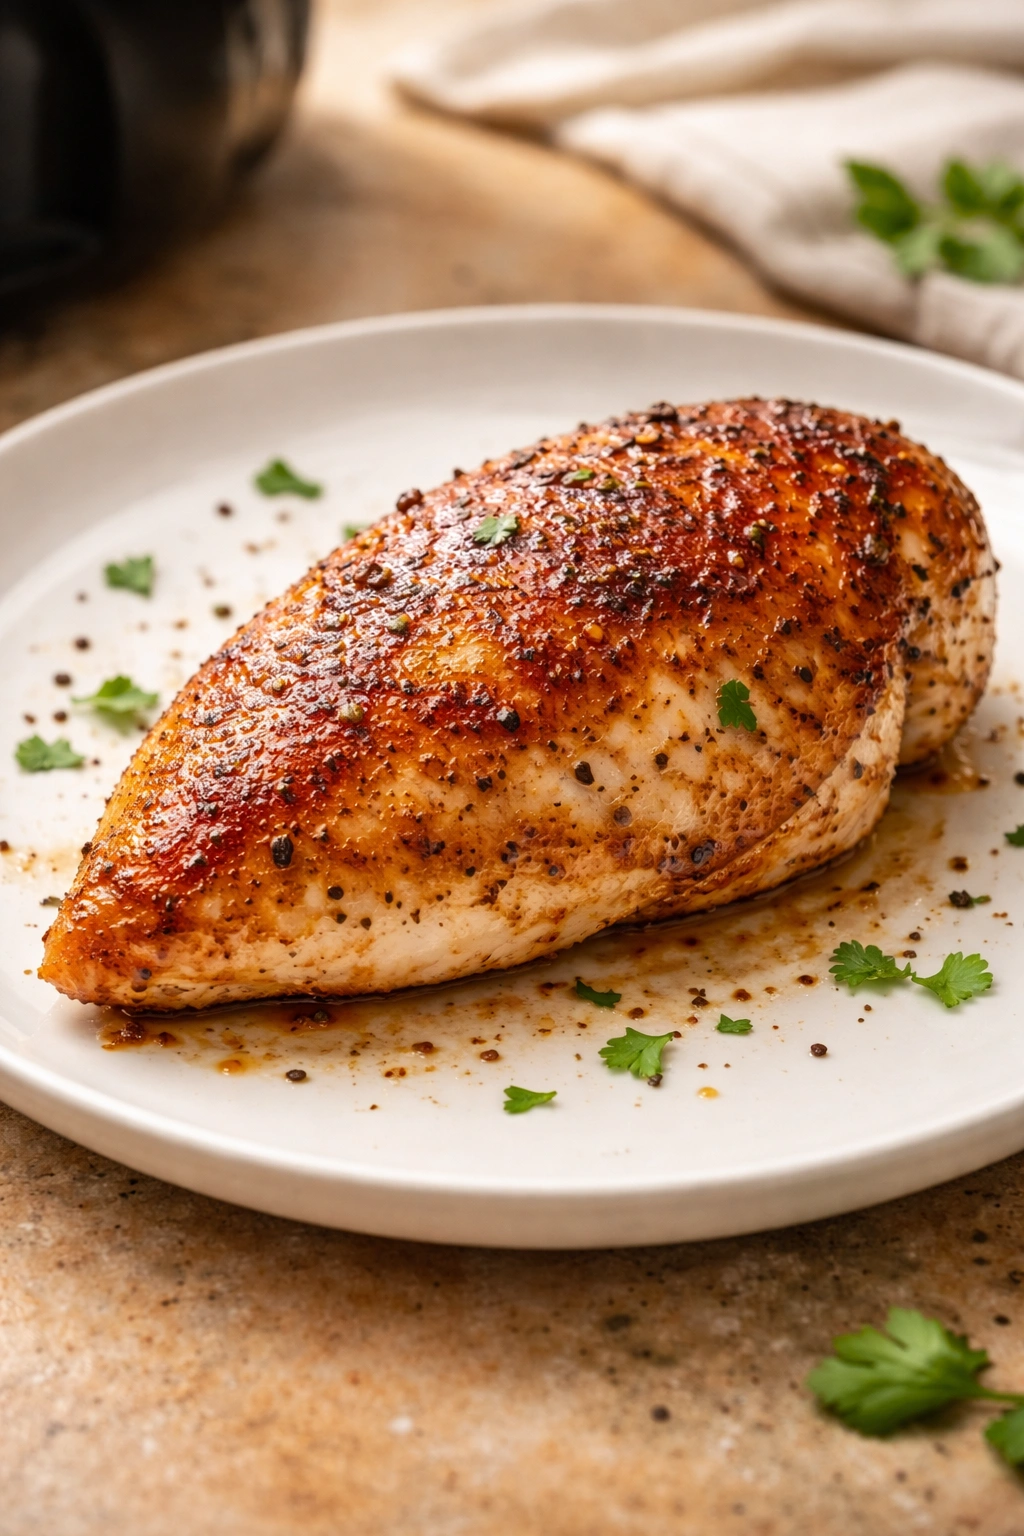
Step 6: Check for doneness: When the timer sounds, insert an instant-read thermometer into the thickest part of the chicken. It should read 165°F (74°C). If it’s not quite there, add 1-2 minutes and check again. Once it hits 165°F, you’re done.
Step 7: Rest and serve: Remove the chicken to a plate and let it rest for 5 minutes while you finish any sides or set the table. This brief rest allows the juices to redistribute, ensuring maximum juiciness in your finished chicken.
Temperature and Timing: The Beginner’s Reference Guide
Consistency comes from understanding how your specific air fryer behaves. Every air fryer has slight variations based on wattage, heating element placement, and basket design. Your first few batches establish your baseline; after that, adjustments come naturally.
For boneless, skinless chicken breasts at 380°F:
- Small (5-6 ounces): 8-10 minutes total, flip at 4-5 minutes
- Medium (7-8 ounces): 10-12 minutes total, flip at 5-6 minutes
- Large (9+ ounces): 12-14 minutes total, flip at 6-7 minutes
For chicken tenderloins at 380°F: 8-10 minutes total, flip at 4-5 minutes. These cook so quickly that watching them closely on your first batch prevents any mishap.
For bone-in, skin-on thighs at 380°F: 12-14 minutes total, flip at 6-7 minutes. The bone insulates the meat slightly, requiring a few extra minutes.
Temperature check is non-negotiable: An instant-read thermometer transforms you from guessing to knowing. Insert it into the thickest part of the chicken (for a whole breast, that’s typically the center near the bone). The safe internal temperature is 165°F (73.9°C). Below this, the chicken isn’t safe to eat. Above 170°F, you’re heading toward dryness.
If your chicken hits 165°F before the expected time, it’s done—remove it immediately. If it needs more time, add 1-2 minutes and check again rather than guessing. This approach eliminates the frustration that plagues beginners.
Common Beginner Mistakes and How to Avoid Them
Learning from others’ missteps saves you from experiencing them yourself. Here are the mistakes beginners actually make, and exactly how to sidestep each one.
Mistake 1: Wet chicken. Moisture is the enemy of browning. Chicken pulled straight from the package contains surface moisture that prevents the Maillard reaction (the chemical process that creates browning and crust). Solution: Pat your chicken completely dry with paper towels before seasoning. Seriously—use two or three paper towels and dry it thoroughly.
Mistake 2: Skipping the preheat. Some beginners think preheating is optional to save a few minutes. It’s not. Preheating ensures the air fryer basket reaches the correct temperature, so your chicken browns and cooks evenly from the first second it hits the basket. Solution: Always preheat. It takes 4 minutes and is non-negotiable.
Mistake 3: Overcrowding the basket. The temptation to cook multiple breasts at once is real, but overcrowding means they steam rather than air-fry. The hot air can’t circulate properly, and you end up with pale, soft chicken instead of crispy, golden results. Solution: Cook one breast at a time until you’re confident, or split your batch and cook two at a time in a larger air fryer with plenty of space between pieces.
Mistake 4: Forgetting to flip. Some beginners assume “air fryer” means “set it and forget it.” It doesn’t. Flipping halfway ensures both sides brown and cook evenly. Bottom-up cooking means the underside sits on the basket where heat concentrates, while the top side faces circulating air. Without flipping, you get an unevenly cooked breast. Solution: Set a phone alarm or timer for the halfway point. Flipping takes five seconds and makes a measurable difference.
Mistake 5: Guessing doneness. Beginners often remove chicken when it looks golden, only to cut into it and find it undercooked. Or they cook it until they’re certain it’s done, which means overcooking. Solution: Invest in an instant-read thermometer (they cost $10-15) and never guess again. Insert it into the thickest part, and cook until 165°F. This removes all uncertainty.
Mistake 6: Using too much oil. Some beginners think more oil means crispier results. It actually prevents browning because oil forms a barrier between the chicken and the hot air. Many successful recipes use barely any oil—just enough to help seasoning stick and aid browning. Solution: Lightly spray or brush oil, don’t coat the chicken. You want a whisper of oil, not a sheen.
Mistake 7: Not letting it rest. Beginners often cut into chicken immediately after cooking, which causes juices to pour out onto the plate. The chicken inside the meat is still hot enough to distribute those juices if you wait. Solution: Rest your cooked chicken for 5 minutes before slicing or serving. This simple pause makes a noticeable difference in juiciness.
Building Flavor Beyond Basic Salt and Pepper
Once you’ve mastered the basic technique, layering in flavor is straightforward. The beauty of air fryer chicken is that it accepts any seasoning you throw at it.
Mediterranean-style: Mix one teaspoon dried oregano, half a teaspoon garlic powder, half a teaspoon salt, quarter teaspoon black pepper, and quarter teaspoon dried thyme. Add a squeeze of fresh lemon juice just before serving.
Smoky and bold: Combine one teaspoon smoked paprika, half a teaspoon garlic powder, quarter teaspoon cayenne pepper (optional—adjust to your heat preference), half a teaspoon salt, and quarter teaspoon black pepper. This works beautifully with a squeeze of lime.
Asian-inspired: Mix one teaspoon garlic powder, half a teaspoon ginger powder, half a teaspoon salt, and a pinch of white pepper. Serve with a drizzle of soy sauce and a sprinkle of sesame seeds.
Italian herb blend: Combine three-quarter teaspoon Italian seasoning (or a mix of dried basil, oregano, and thyme), half a teaspoon garlic powder, half a teaspoon salt, and quarter teaspoon black pepper. Add a light drizzle of balsamic vinegar after cooking.
The key is using these seasonings confidently. You’ve already mastered the cooking technique—now you’re just playing with flavors. Even if a particular seasoning mix isn’t your favorite, you know the chicken itself will be perfectly cooked. That confidence removes hesitation.
Serving Suggestions for Maximum Versatility
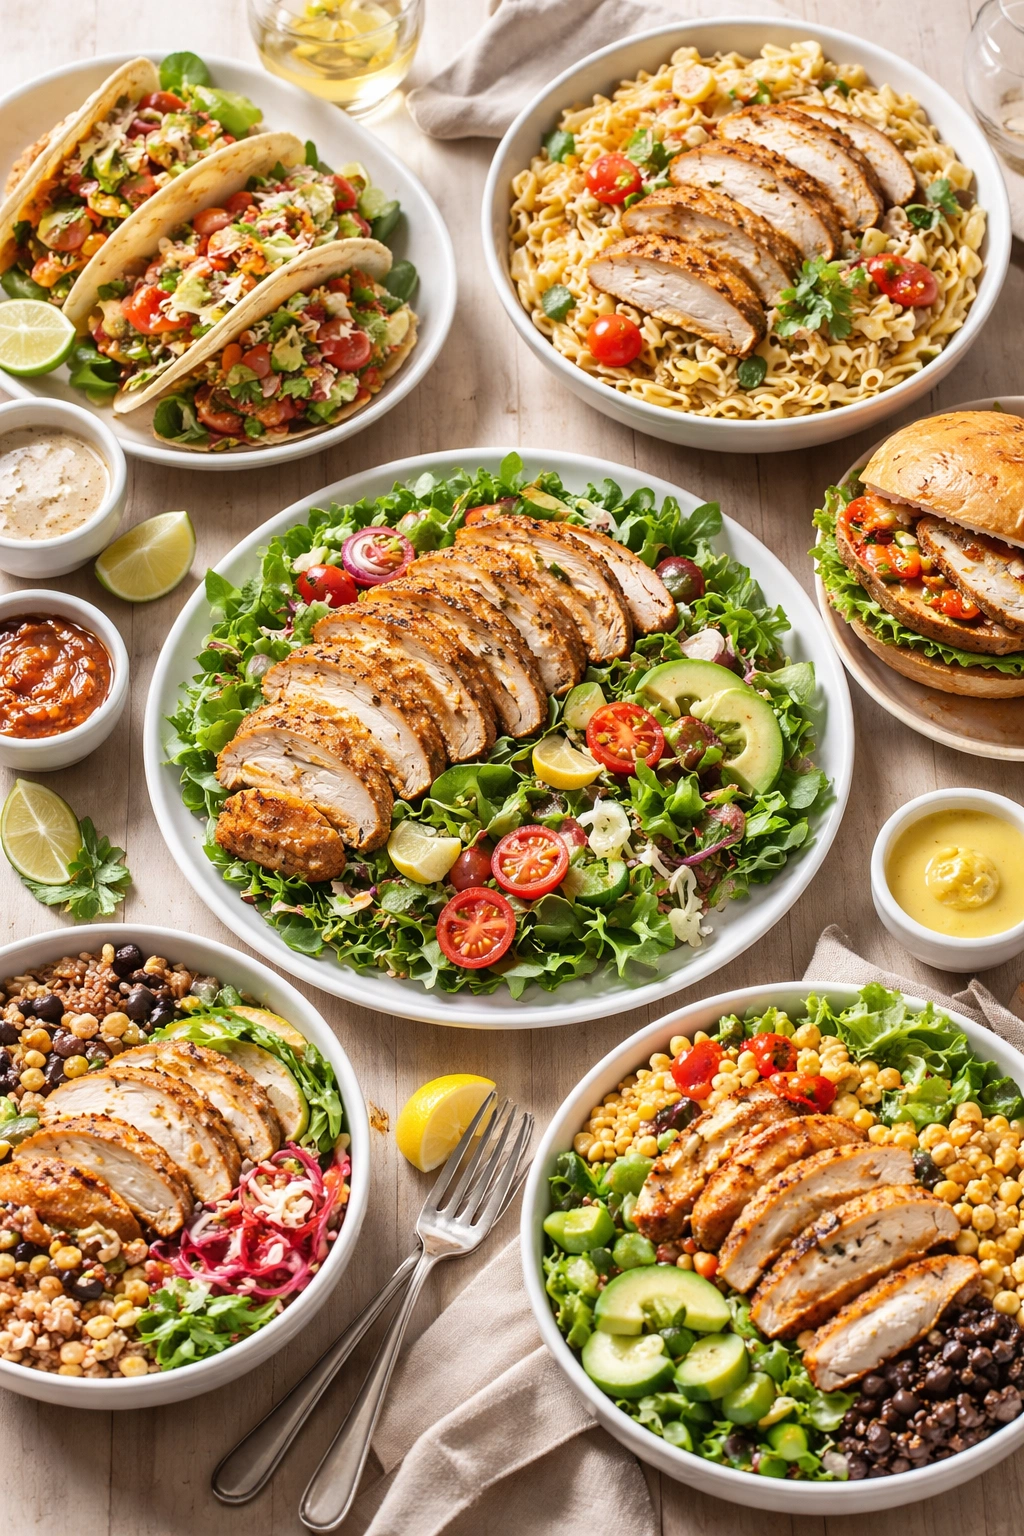
The real genius of mastering air fryer chicken is realizing how many meals it enables. One batch of chicken becomes a week of different dinners.
Salad topping: Slice your cooked chicken and layer it over a bed of greens with your favorite vegetables and dressing. It’s fresh, light, and an easy way to add protein to lunch.
Grain bowls: Slice or dice the chicken and serve over quinoa, brown rice, or couscous with roasted vegetables and a sauce. These bowls are perfect for meal prep because components stay separate until you’re ready to eat.
Tacos and wraps: Shred your cooked chicken with two forks and serve in warm tortillas or wraps with your favorite toppings. This is one of the quickest weeknight dinners you can assemble.
Pasta dishes: Dice the chicken and toss it into your favorite pasta sauce or cream sauce. It adds heartiness without requiring additional cooking.
Sandwiches: Slice the chicken and build a classic sandwich with your favorite condiments and vegetables. It’s a protein-packed lunch that beats most takeout options.
Rice bowls: Combine with stir-fried vegetables and sauce for an easy, customizable dinner that cooks almost entirely in your air fryer.
Chicken salad: Shred cooked chicken, mix with mayo, diced celery, and seasonings for a creamy spread that works on sandwiches or crackers.
The point is simple: learn the chicken, and you’ve learned dozens of meals.
Storage, Reheating, and Meal Prep Strategies
Beginners often cook one chicken breast thinking it’s just for that meal. But cooked chicken is one of your greatest meal prep tools.
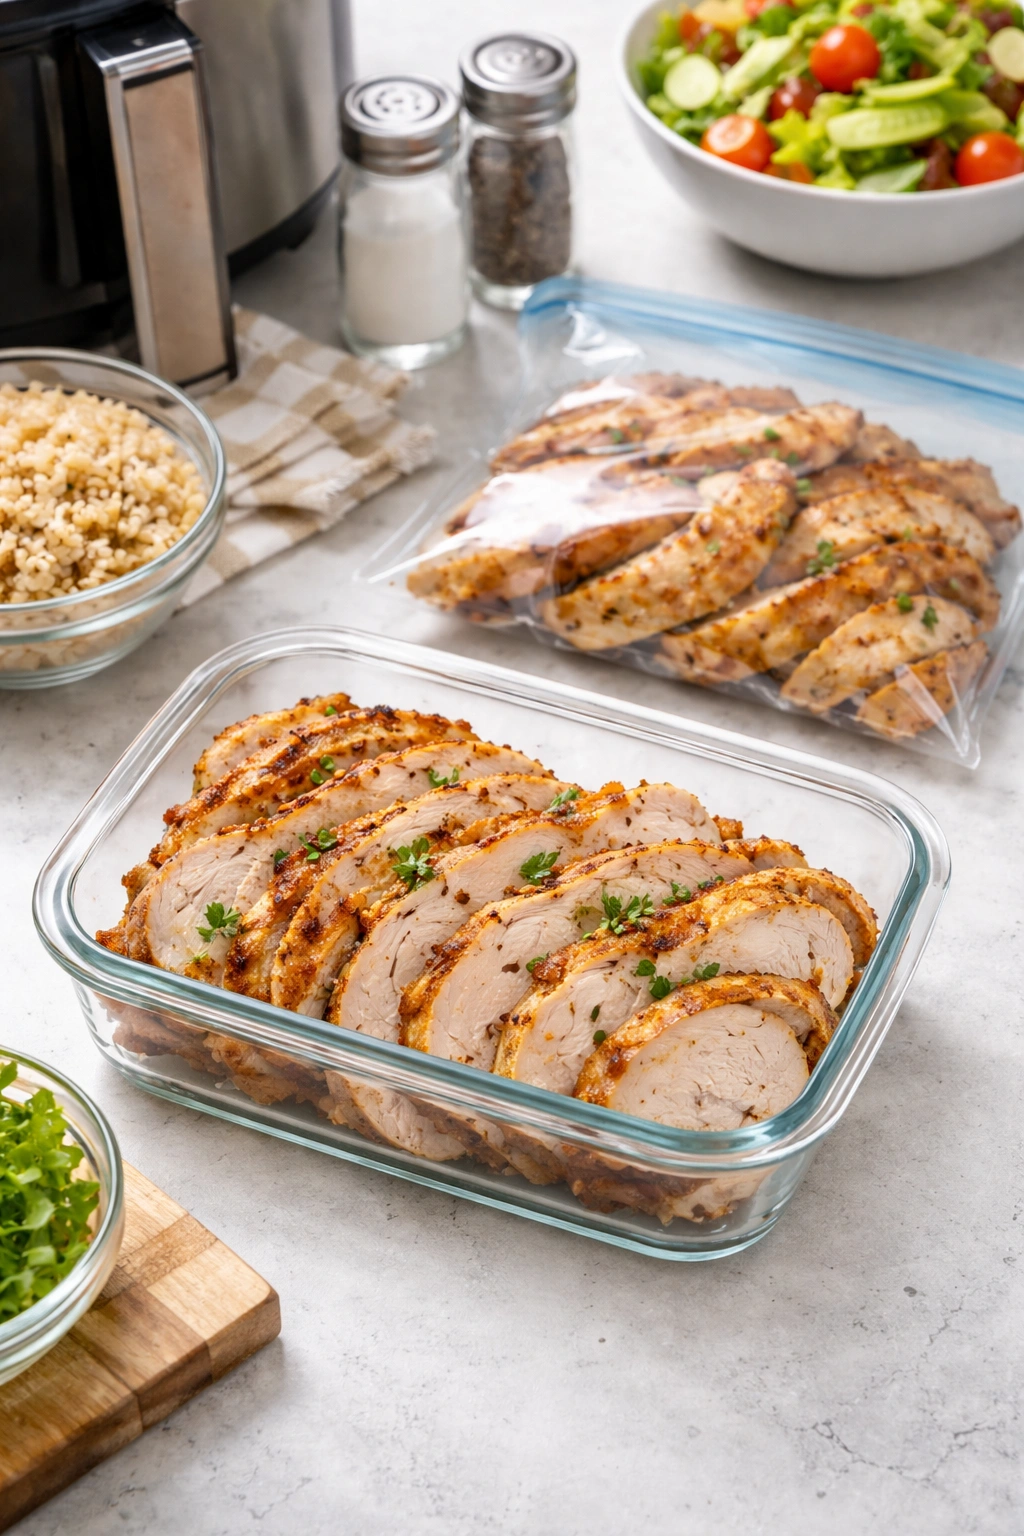
Refrigerator storage: Cooked chicken keeps in an airtight container in the fridge for up to 4 days. If you plan to use it within three days, you maximize quality and safety. Beyond that window, transfer to the freezer.
Freezer storage: Cool the chicken completely, then freeze in a single layer on a baking sheet for a couple of hours. Once frozen solid, transfer to a freezer bag or container and label with the date. Frozen chicken keeps for up to three months, though quality peaks within the first month.
Reheating methods: The air fryer is genuinely the best way to reheat air fryer chicken—simply pop it in at 350°F for 3-5 minutes until warmed through. The crust stays crispy and the inside stays moist. Alternatively, reheat gently in a 300°F oven for 8-10 minutes, or heat sliced chicken in a skillet over low heat with a splash of water to add moisture.
Meal prep strategy: Cook a batch of four chicken breasts on Sunday, allow them to cool completely, then portion them for the week. Keep one or two in the fridge for the next few days, and freeze the rest. When you get home tired on Wednesday and have no dinner plan, you have perfectly cooked protein waiting in the fridge. Add quick sides like steamed vegetables, rice, or a salad, and dinner comes together in 10 minutes.
Shredding for versatility: If you’re cooking multiple breasts, shred half of them while still warm. Shredded chicken works in tacos, sandwiches, pasta, soups, and grain bowls, making it more versatile than whole sliced chicken. Store shredded and sliced chicken in separate containers so you have options.
Seasoning Variations That Build Confidence
Once the basic cooking method is automatic, trying new seasonings expands your repertoire without adding complexity.
Lemon pepper: One tablespoon lemon pepper seasoning (pre-mixed), or combine one teaspoon black pepper, one teaspoon lemon zest, half a teaspoon garlic powder, and half a teaspoon salt. Finish with a fresh squeeze of lemon juice.
Garlic herb: Three-quarter teaspoon each dried basil and oregano, one teaspoon garlic powder, half a teaspoon salt, and quarter teaspoon black pepper. The herb combination smells incredible while it cooks.
Cajun style: One teaspoon Cajun seasoning blend (store-bought or homemade with paprika, cayenne, garlic powder, onion powder, and salt). This adds heat and depth without overwhelming the chicken.
Honey mustard finish: Coat the chicken with basic salt and pepper, then brush with a mix of Dijon mustard and honey after cooking. The heat caramelizes the honey slightly, creating a glossy finish.
Garlic butter: Cook the chicken plain, then brush with melted butter mixed with minced garlic and fresh parsley while still warm. This takes 30 seconds and completely elevates the dish.
These variations take seconds to prepare and transform your cooked chicken into something that feels more intentional and restaurant-quality. Beginners are often surprised how a tiny tweak in seasoning or a simple finishing sauce changes everything.
Troubleshooting Common Beginner Problems
Even with the best intentions, things sometimes don’t go exactly as planned. Here’s what to do when they don’t.
The chicken came out dry: This typically means it cooked longer than necessary. Next time, check the temperature at the lower end of your range (like 9 minutes instead of 10). Dry chicken also happens when you skip the resting step—always rest for 5 minutes. If you forgot the rest this time, dice the dry chicken and use it in a sauce-heavy dish like a curry or pasta.
The chicken looks pale instead of golden: This usually means moisture stayed on the surface. Pat it extra dry next time. Also, ensure your air fryer preheated fully and the basket reached temperature before you added the chicken. If it’s already cooked but pale, a light spray of oil and a few minutes back in the air fryer at 390°F can improve browning.
One side cooked faster than the other: This suggests uneven thickness or the basket wasn’t positioned evenly. Pound your chicken to uniform thickness before cooking next time. Also, ensure it’s centered in the basket.
The thermometer shows 160°F but the chicken looks done: Don’t eat it. Cook for another 1-2 minutes. The safe temperature is 165°F for food safety. What looks done and what is done are different things. The thermometer never lies.
I forgot to flip it: If you realize midway through cooking, flip it immediately and add a minute or two to the remaining time. If you forgot entirely, check the temperature. If it’s at 165°F, eat it—it’ll just have more browning on the bottom. It’s still delicious.
The seasonings fell off into the basket: This is fine. A little seasoning in the basket actually helps flavor, and next time, pat the chicken dry better so seasonings stick. You can also lightly spray oil before seasoning to help things adhere.
None of these problems ruin your chicken. Air fryer cooking is genuinely forgiving—at worst, you have chicken that tastes fine but doesn’t look magazine-worthy. That’s still a win for a beginner.
Choosing and Understanding Your Air Fryer
Different air fryers behave slightly differently, so understanding yours removes variables from the equation.
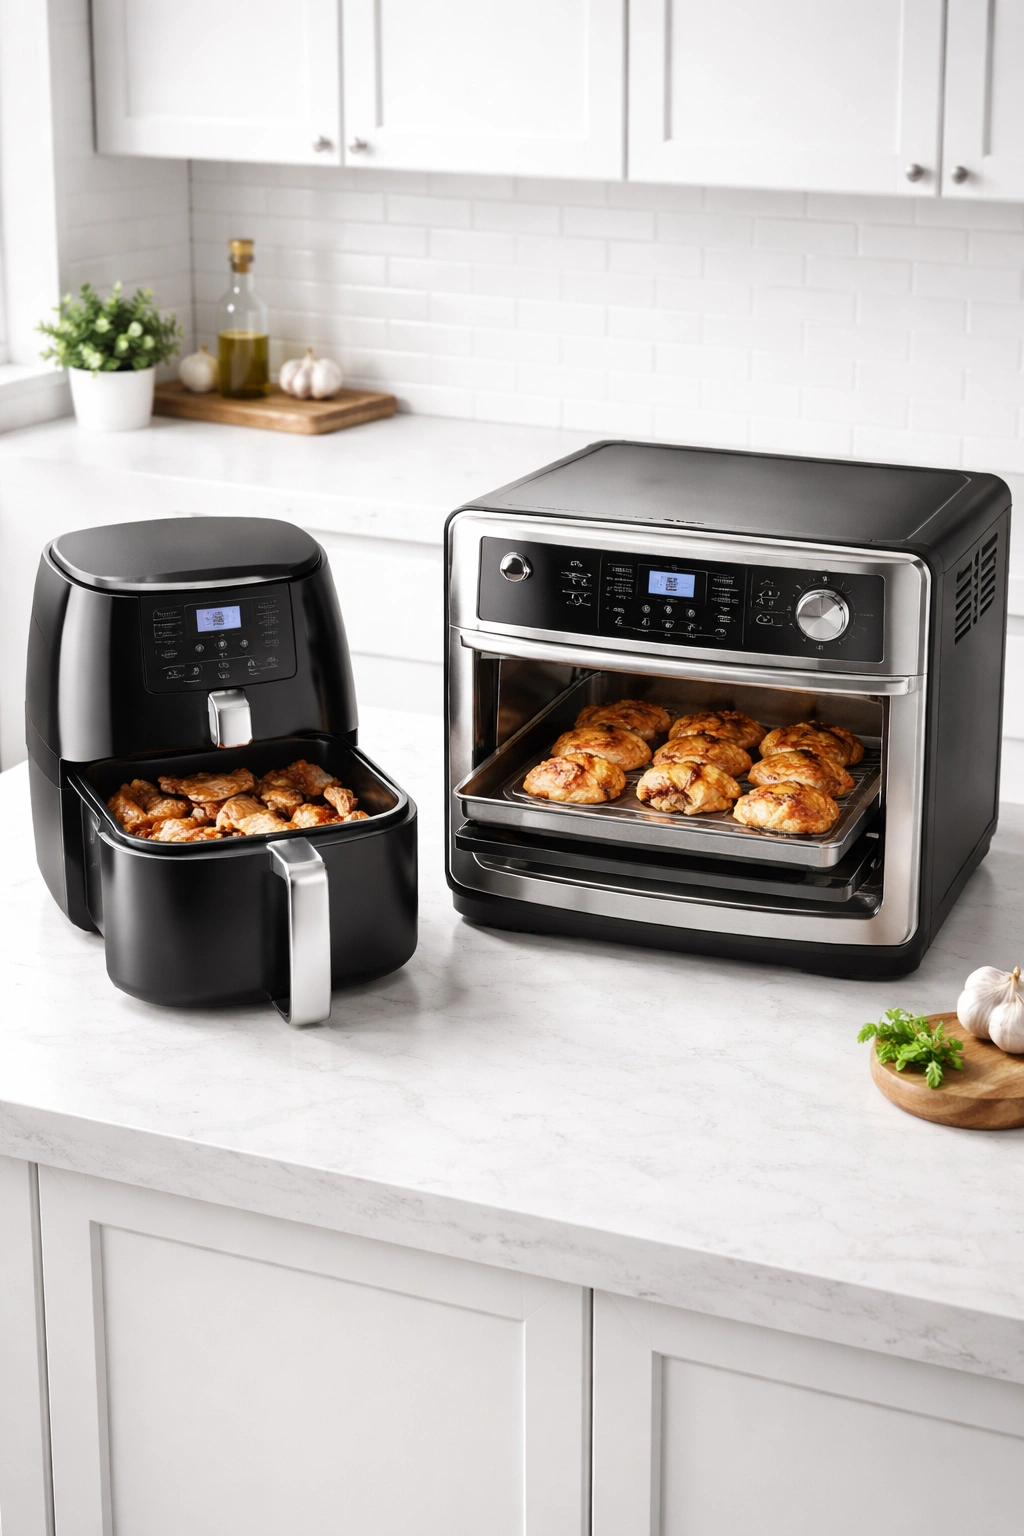
Basket-style air fryers: These look like small countertop fryers with a pull-out basket. They’re compact, heat quickly, and cook evenly. The basket capacity is typically 2-4 quarts, limiting how much you can cook at once. For beginners, the smaller size actually helps—you’re less tempted to overcrowd.
Toaster oven-style air fryers: These are larger and sit on your counter like a toaster oven. They have a tray inside rather than a basket, and they can handle more food at once. Cooking times and temperatures are the same, but the layout takes some getting used to if you’re switching from a basket-style.
Multi-cooker air fryer attachments: Some instant pots and pressure cookers have air fryer lids or attachments. They work, though many reviewers find they don’t brown quite as aggressively as dedicated air fryers. They work for beginners, but a dedicated air fryer is better.
What to look for as a beginner: A temperature range that goes to at least 400°F, a basket or tray that’s easy to load and clean, and a clear digital display. You don’t need fancy presets or special features—basic time and temperature controls are genuinely all you need. Read reviews before buying, and choose something with consistent 4.5+ star ratings from many reviewers.
Getting to know yours: Your first batch of chicken teaches you how your specific air fryer behaves. If it finishes at 9 minutes instead of 10, note that. If it browns aggressively on the bottom, note that too. After two or three batches, you’ll have a baseline for your specific machine.
Frequently Asked Questions About Beginner Air Fryer Chicken
Can I cook frozen chicken without thawing? No. Frozen chicken distributes heat unevenly and often cooks through before the exterior browns. Thaw completely in the refrigerator (allow about 24 hours for a full breast), then cook using your normal method.
What if my air fryer only goes to 375°F instead of 380°F? Cook at 375°F but add one minute to your total time. The difference is minimal, and your chicken will still turn out beautifully.
Is it okay to open the air fryer basket during cooking? Yes. Many beginners worry that opening it ruins the process. It doesn’t. The air fryer maintains temperature, and you’re only peeking in for 10 seconds. This is how you flip halfway through, so don’t hesitate to open it.
Can I cook two breasts at once? Only if your air fryer is large enough that they don’t touch and air can circulate around both. If they’re packed closely, cook in batches. One batch cooks perfectly; two batches packed together often results in one side steaming.
Do I need to add water to the air fryer? No. Air fryers don’t need water unless your specific model’s manual indicates otherwise. The circulating hot air does all the work.
What oil should I use? Any neutral-flavored, high-heat oil works: avocado oil, vegetable oil, canola oil, or olive oil. You need so little that the type barely matters—just use whatever you have. If you prefer no oil at all, many recipes work without it, though the browning is less dramatic.
Should I brine the chicken? Brining (soaking chicken in salt water) locks in moisture and creates incredibly juicy results, but it’s not necessary for air fryer cooking. The rapid heat already preserves juiciness. Brining is a step for beginners who want to guarantee the juiciest possible results—and many find it worth the extra hour of planning.
How do I know if my chicken is done without a thermometer? Don’t rely on guessing. An instant-read thermometer is your safety net and costs under $15. Food safety isn’t worth saving a few dollars. Buy one and use it.
Can I marinate the chicken before cooking? Yes. Pat it completely dry after marinating, or the moisture will prevent browning. If you marinate for more than a few hours, the salt in most marinades can make the chicken salty, so taste-test your seasoning after marinating.
Is air fryer chicken healthy? It’s significantly healthier than deep-fried chicken because it uses minimal oil while achieving similar texture and browning. Chicken breast is high in protein and low in fat, making it a genuinely nutritious choice for regular meals.
Final Thoughts
Mastering air fryer chicken is the launchpad for confident home cooking. You’re learning fundamental skills—how to season, how to check for doneness, how to understand your equipment—while creating meals that taste genuinely delicious. Unlike many beginner cooking projects that risk disappointing results, air fryer chicken is almost impossible to fail at.
Your first batch might not be perfect. The seasoning might be slightly off, or you might cook it 30 seconds longer than ideal. But here’s what matters: it will be good. You’ll have made a meal from scratch that beats takeout, costs a fraction of what restaurant chicken costs, and required actual technique rather than just following instructions mindlessly.
After your first success, you’ve cracked the code. Each subsequent batch builds confidence. Within a month of cooking air fryer chicken twice a week, you’ll stop thinking about the process and start thinking about flavor variations and meal combinations. That’s the moment you realize you’re not a beginner anymore—you’re a home cook who knows their craft.
Start with the basic salt-and-pepper chicken. Master the timing for your specific air fryer. Move into simple seasonings. Then experiment with flavors and applications. In a few weeks, you’ll have created dozens of different meals from a single core technique. That’s the real power of learning air fryer chicken as a beginner.