A charcuterie board isn’t actually as intimidating as it sounds. Despite what fancy food magazines might suggest, there’s no secret formula or professional certification required to arrange cured meats, cheeses, and accompaniments on a wooden surface and make something genuinely delicious and impressive. What separates a mediocre board from one that people actually remember comes down to a few simple principles: thoughtful variety, quality ingredients you genuinely like, and understanding how flavors and textures work together.
The beauty of building a charcuterie board is that it’s infinitely forgiving. You’re not following a precise recipe where a single mistake derails the whole thing. Instead, you’re creating an edible landscape where your guests can pick and choose, experiment with flavor combinations, and eat at their own pace. That’s actually liberating—it means there’s room for personal taste, creativity, and honest learning as you go.
Whether you’re prepping for a casual weeknight gathering, hosting a wine tasting with friends, or bringing something substantial to a party, this guide walks you through every decision point. You’ll learn how to select ingredients that complement each other, arrange them so the board looks intentional rather than random, and time everything so everything’s at its best when people arrive. By the end, you’ll have the confidence to build a board that looks like you spent way more effort than you actually did.
Understanding Charcuterie Board Basics
The core idea of a charcuterie board is straightforward: gather a collection of ingredients with complementary flavors, textures, and colors, then arrange them beautifully on a serving surface. But before you start shopping, it helps to understand what actually makes a board feel complete and balanced rather than just “some stuff on wood.”
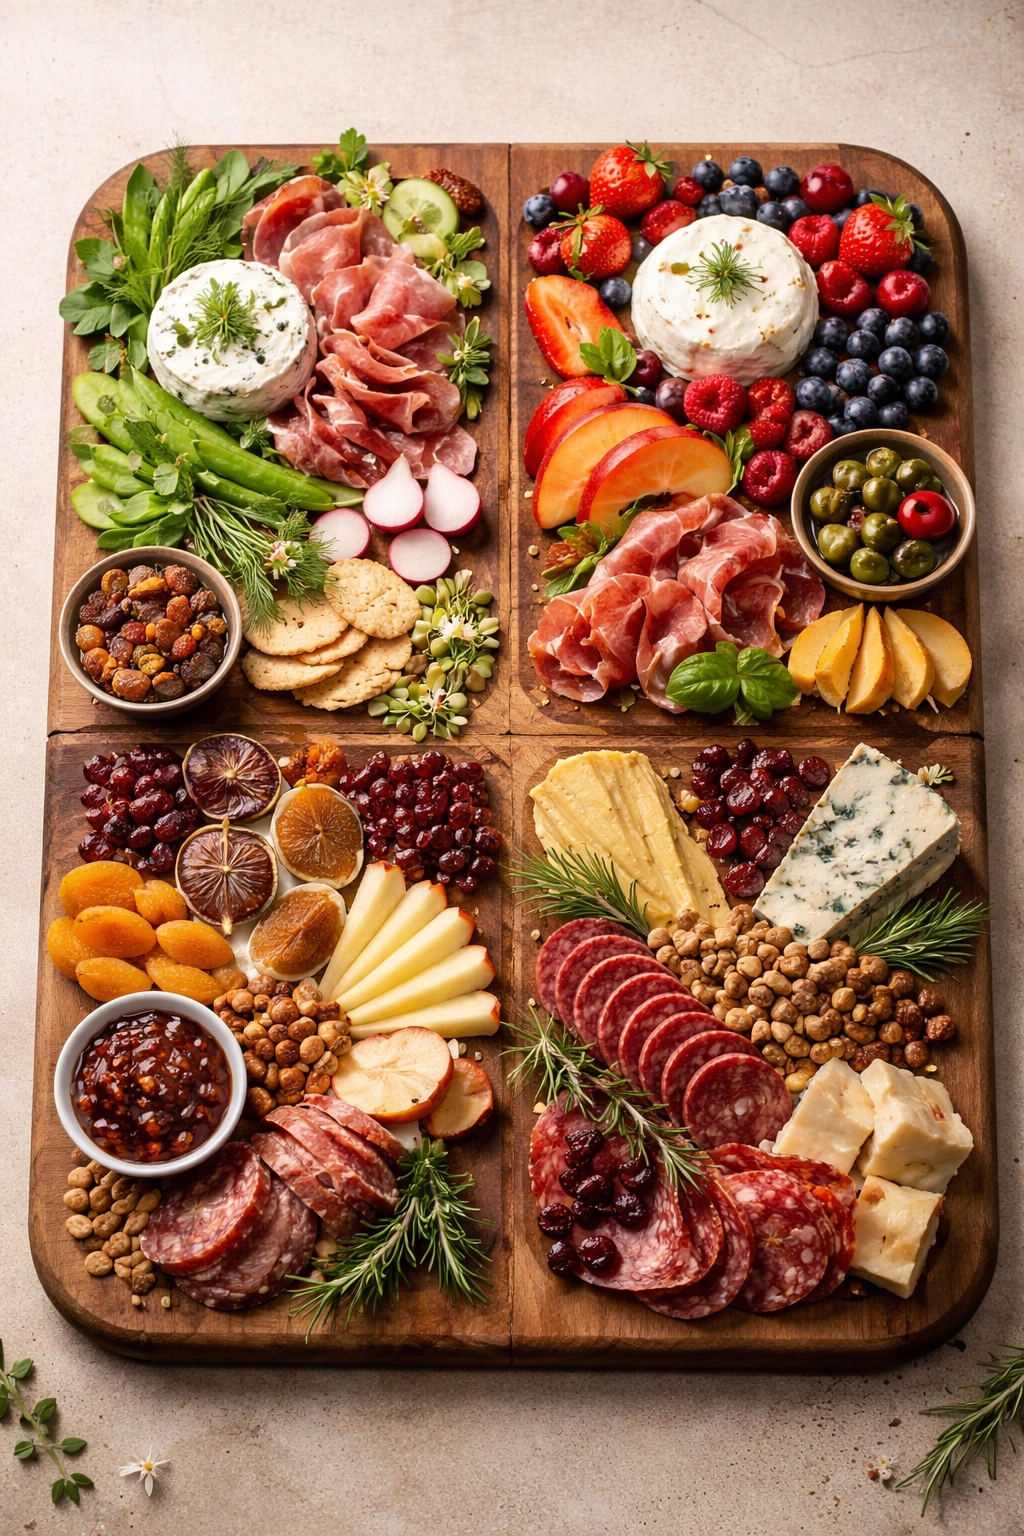
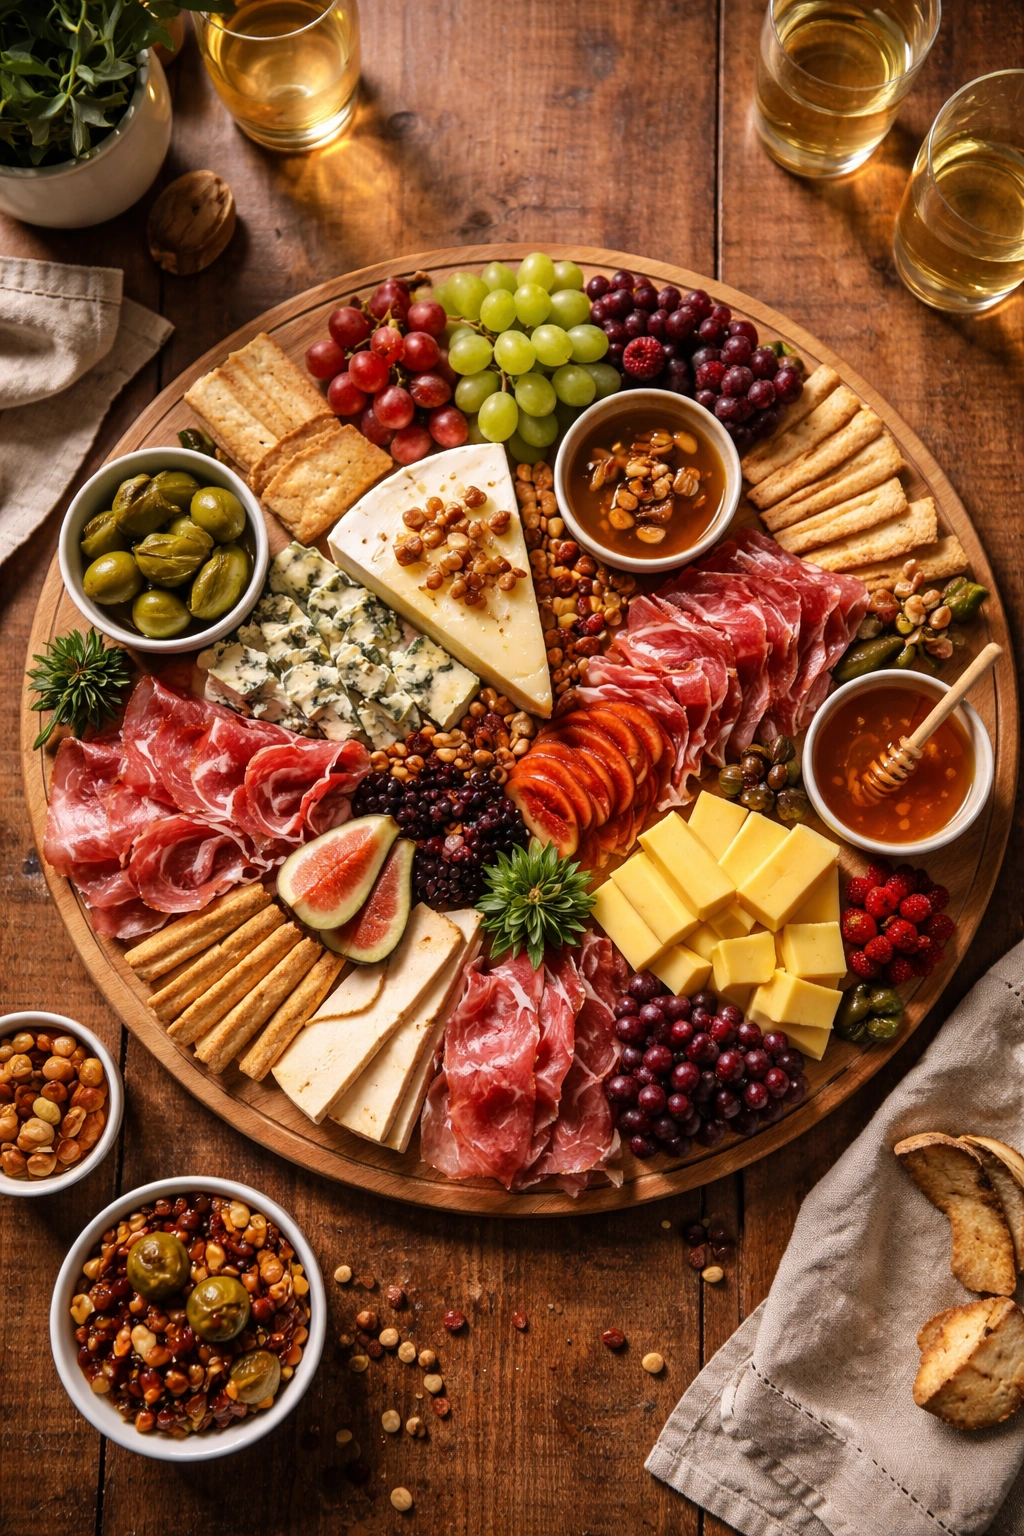
A proper charcuterie board traditionally features cured and preserved meats (that’s the “charcuterie” part), multiple styles of cheese, and accompaniments—the supporting ingredients that help you taste and enjoy those center-stage items. The accompaniments might include crackers, bread, fresh fruit, dried fruit, nuts, pickled items, and fresh vegetables. Each category brings something distinct to the experience: texture contrast, flavor bridges, palate cleansing, and visual interest.
The French word “charcuterie” originally referred specifically to pork products and their preparation—think prosciutto, saucisson, and pâtés. But modern charcuterie boards have evolved far beyond strict tradition. You’ll see beef, poultry, and even seafood included. The real point is creating a balanced tasting experience where different flavor profiles exist side by side, and guests can layer flavors however they like.
The Golden Ratio for Variety
Think of your board in terms of rough proportions rather than exact measurements. About one-third should be cured meats, one-third should be cheese, and one-third should be everything else combined—crackers, fruit, nuts, vegetables, and spreads. This prevents the board from feeling meat-heavy or too carb-focused. If you’re serving the board as the main event (rather than an appetizer), you might want to shift slightly toward more accompaniments and less meat.
Why Texture and Flavor Balance Matters
The experience of eating a charcuterie board works best when flavors, textures, and sensory intensity vary. Without contrast, even high-quality ingredients feel monotonous. A creamy soft cheese tastes better when followed by something crunchy. A peppery salami hits differently after something sweet. A rich, salty cured meat needs something acidic or fresh to reset your palate.
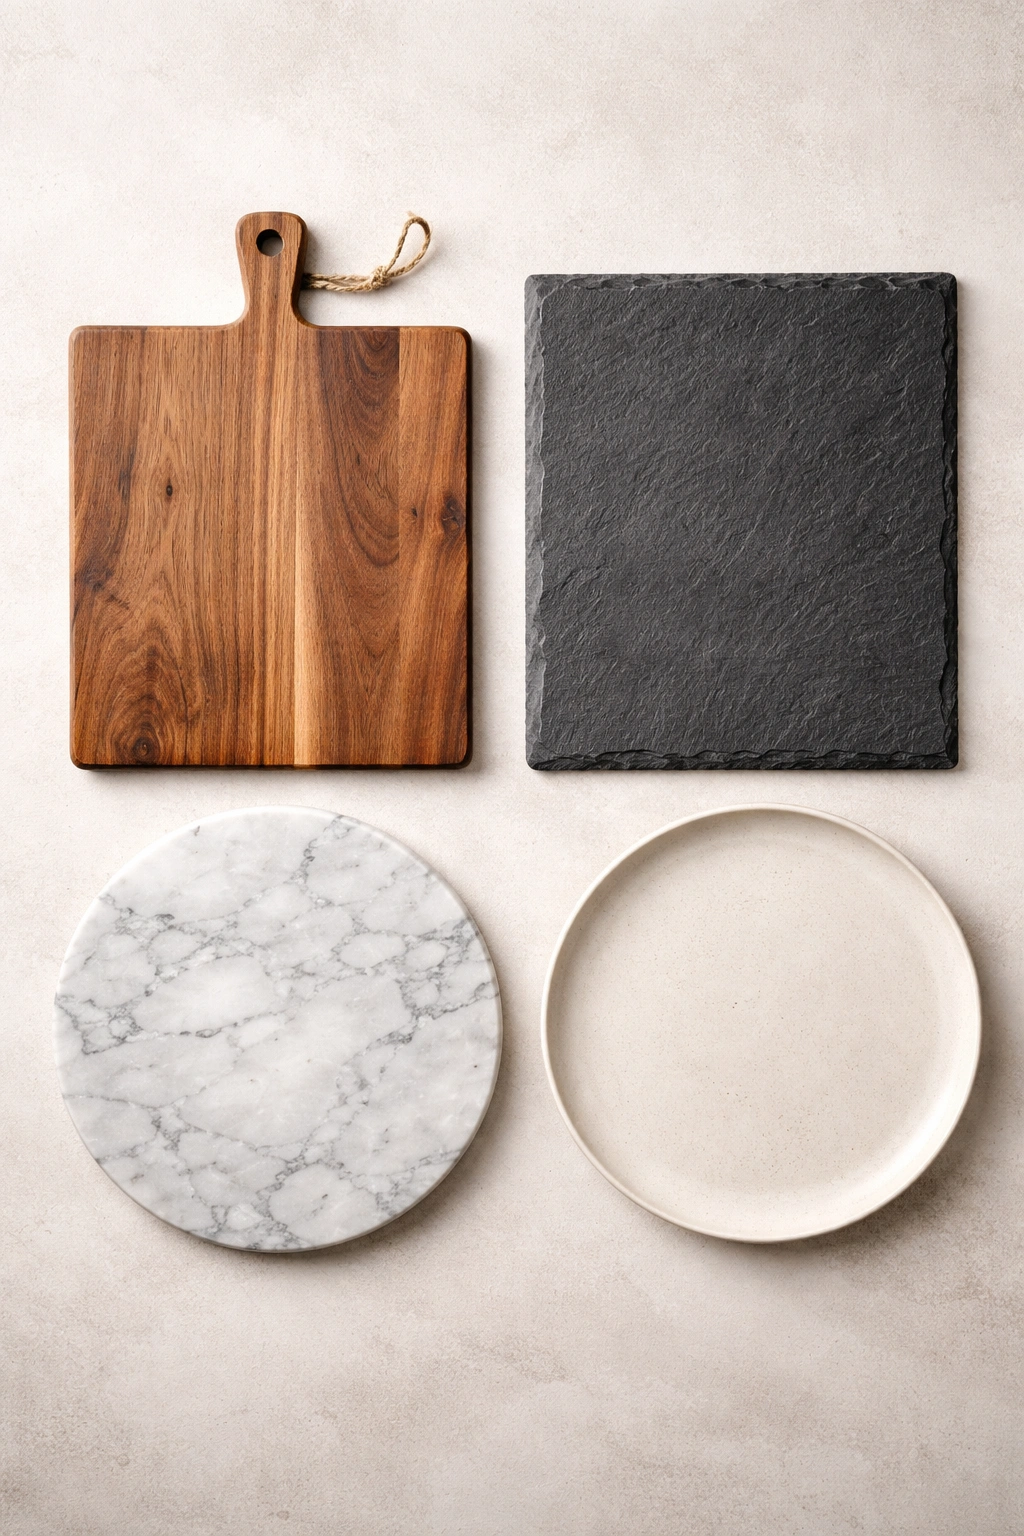
Choose Your Board or Serving Surface
Before you buy a single ingredient, you need a surface to build on. This decision matters more than most people realize—the right surface makes arrangement infinitely easier and the final presentation significantly more appealing.
Wooden boards are the classic choice and for good reason. They’re naturally beautiful, warm-toned, and provide a neutral backdrop that makes food colors pop. Look for boards that are at least 16 to 18 inches long for a board that serves 4 to 6 people comfortably. If you’re expecting a larger crowd (8+ people), go bigger—24 inches or more. Thicker boards are more stable and look more intentional than thin ones.
Slate boards offer a sophisticated, modern look with excellent contrast. Marble boards are elegant but can be cold and sometimes slippery. Ceramic or stoneware platters work beautifully and often have subtle colors and textures. Even a large cutting board, a serving platter, or a flat-bottomed cake stand can work perfectly. The key is choosing something with enough surface area that ingredients don’t feel cramped, and a surface that’s visually interesting enough to complement rather than compete with your food.
Avoid anything with a glossy finish or lip around the edge if possible—they make food placement and visual flow awkward. Look for smooth, flat surfaces or boards with minimal raised edges. Size matters more than material. A board that’s too small will feel cluttered no matter what ingredients you choose. A board that’s too large will look sparse unless you’re serving a crowd.
If you’re buying a board specifically for charcuterie, opt for one without compartments or dividers. Those look cute but make actual arrangement feel constrained and choppy. Wooden boards sometimes come with a small groove carved around the edge—useful for catching oil or juice from ingredients, but not essential.
Select Quality Cured Meats (The Foundation)
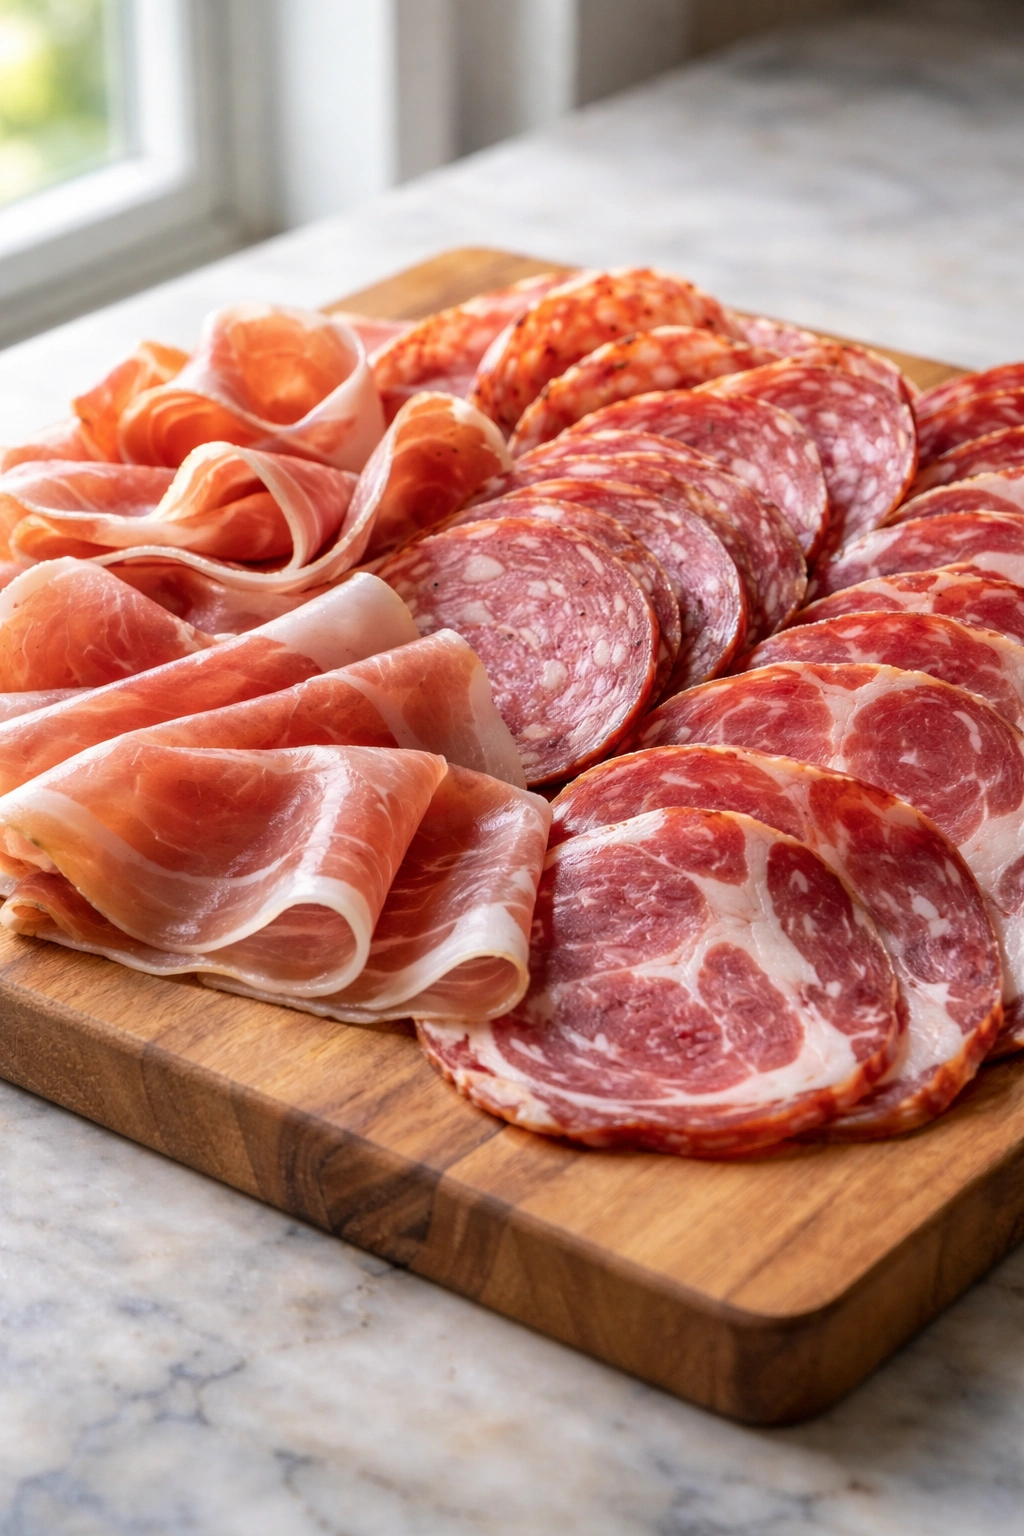
The meats you choose set the tone for everything else. You don’t need expensive, rare imports (though those are lovely). You do need meats you genuinely like, because that flavor will anchor the board and influence which cheeses and accompaniments you pair with them.
Most grocery stores carry several accessible cured meats: prosciutto (thinly sliced Italian ham, salty and delicate), salami (fully cured sausage with visible white fat specks and a deeper red color), soppressata (Italian salami that’s coarser and denser), capicola or coppa (peppery, slightly sweet), and speck (smoked prosciutto with a deeper flavor). Each brings a different flavor profile—some more peppery, others more salty, some with subtle spice or smoke.
Include 3 to 4 different varieties on a board for 4 to 6 people. Choose meats with different flavor intensities and textures. If you pick one very mild and buttery (like a delicate prosciutto), balance it with something more assertive (like a fennel-forward salami or a peppery speck). If you’re new to cured meats, go with familiar options first—prosciutto, regular salami, and soppressata form a solid flavor foundation that works with almost any cheese or accompaniment.
How to Present the Meats
The way you fold or roll cured meats matters for both presentation and practicality. Roll thin meats loosely rather than folding them into neat triangles—the rolled presentation feels more organic and is easier for guests to grab. Thicker sliced meats like soppressata or capicola can be folded once or twice or left flat depending on how you want them to look.
Cut prosciutto or other delicate meats just before serving if possible—they dry out quickly and lose that silky texture when exposed to air. If you’re prepping an hour or two ahead, wait to unpack that until 30 minutes before service.
Group meats together visually rather than scattering them randomly across the board. This creates visual clarity and makes it obvious to guests where the cured meats section is. Leave small gaps between varieties so flavors don’t blur together on the palate.
Add Cheese Variety (Different Types and Styles)
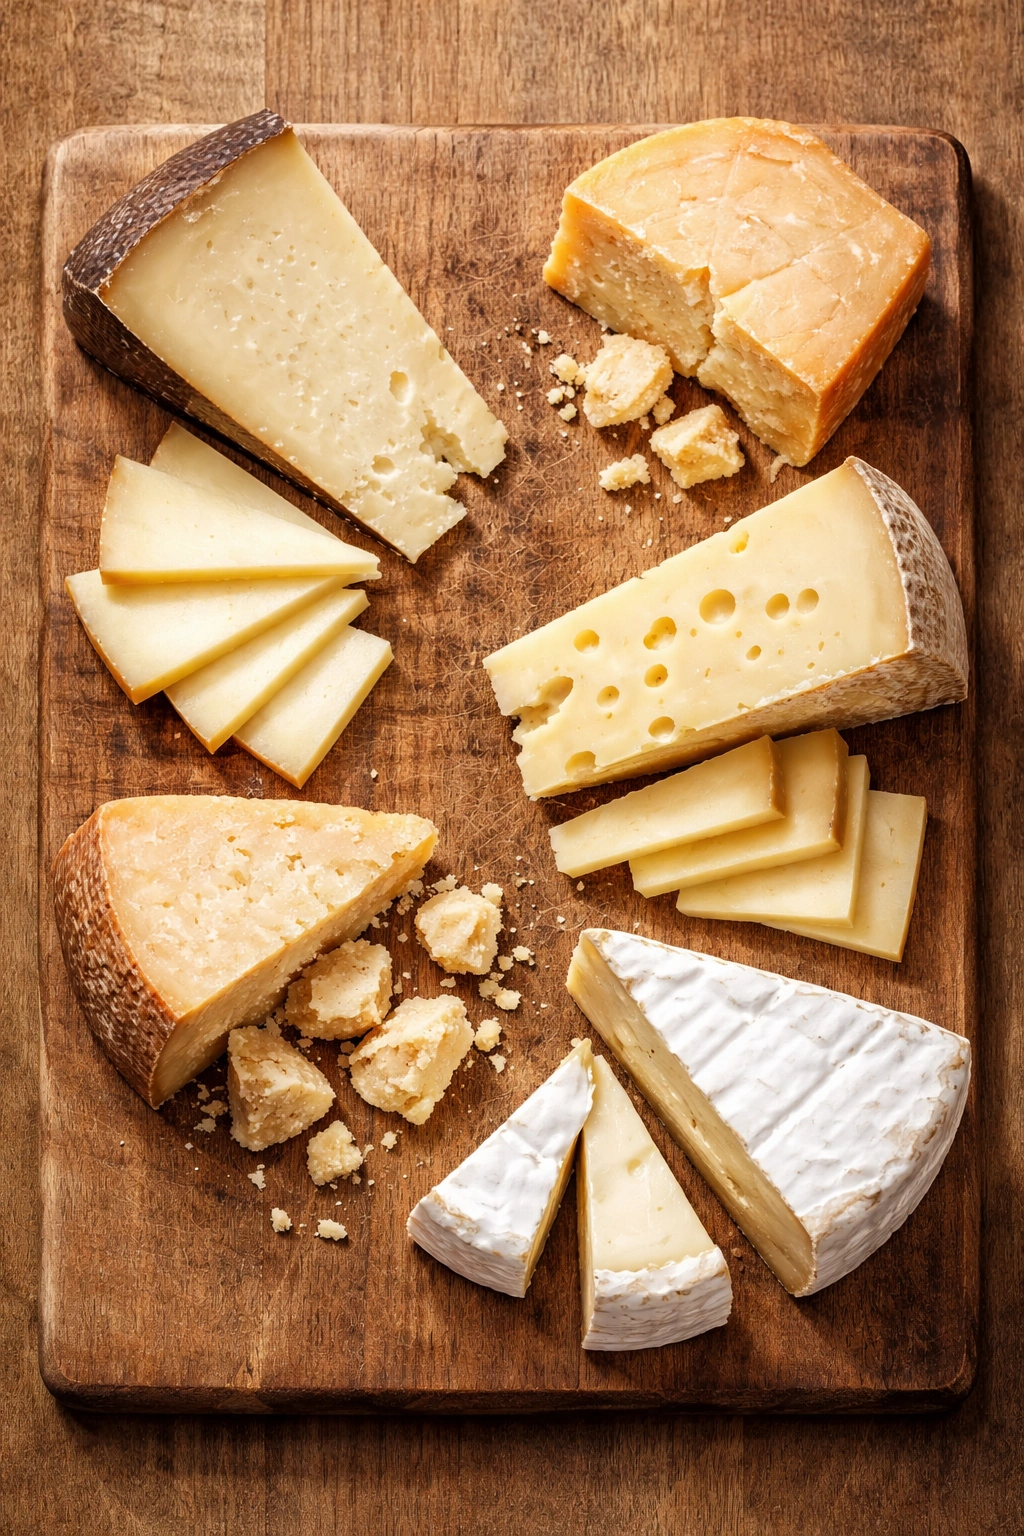
Cheese is arguably the most important category after meats because it’s where most people spend time grazing. You want enough variety that there’s something for every taste, but not so much that the selection feels overwhelming or incoherent.
Include 4 to 5 different cheeses on a board for a proper variety. Choose cheeses from different categories rather than picking four different aged cheddar-type cheeses. Think in terms of texture and intensity.
Hard and Aged Cheeses
These are firm, dense, and complex—they develop flavor over time. Manchego (Spanish, buttery and nutty), aged cheddar (sharp, crystalline), Parmigiano-Reggiano (Italian, salty and mineral), and Gruyère (nutty, rich) all work beautifully. These cheeses taste great on their own and pair excellently with cured meats. A block of hard cheese also looks visually substantial on a board—leave it partially sliced with a cheese knife nearby so guests can cut more if they want.
Soft and Spreadable Cheeses
These are indulgent, creamy, and meant to be eaten more generously—spread on crackers or bread. Brie or Camembert (buttery, mushroomy) add elegance and obvious luxury. Chèvre (tangy, bright) offers a sharp counterpoint to rich meats. Burrata (creamy, luxurious) is visually impressive but can be messy—cut it just before serving and position it somewhere guests can access it easily.
Blue or Veined Cheeses
These are intense, peppery, and usually a little funky—they’re not for everyone, but they add intrigue. Gorgonzola, Roquefort, or even a milder blue cheese bring sharp, mineral notes that cut through richness beautifully. Include them if you know your guests like them. One blue cheese is usually enough—more than that can overwhelm a board.
Semi-Soft or Washed-Rind Cheeses
These occupy the middle ground between hard and soft. Époisses has a stinky reputation but mild flavor (warning: it smells stronger than it tastes). Taleggio is fruity and slightly funky. Gruyère technically fits here too. These are interesting choices that show you’ve put thought into the selection.
Buy cheese from a good source—a specialty shop with a real cheese counter, a quality grocery store with regular turnover, or an online retailer that ships cheese properly. The flavor difference between cheese bought from a warehouse club versus actual fresh cheese from a shop is significant. Ask whoever’s cutting your cheese if they’d recommend a particular cheese that’s fresh or interesting that week.
Cheese Presentation Tips
Let cheese come to room temperature for 30 to 45 minutes before serving—cold cheese tastes muted and has a rubbery texture. Plan to take it out of the fridge while you’re arranging everything else on the board.
Leave harder cheeses in small blocks rather than slicing everything ahead of time. Provide small cheese knives so guests can cut what they want. For soft cheeses like brie, slice a wedge out to expose the creamy interior, or spread a bit on a cracker to show guests how to eat it. This visual cue makes soft cheeses feel more accessible.
Group similar cheeses together visually just like you did with meats. Cluster your hard cheeses in one area, soft cheeses in another. This creates visual organization and prevents flavors from blurring together.
Position a cheese knife next to each variety—or at least provide 2 to 3 knives across the board so guests don’t double-dip or transfer strong flavors (like blue cheese) to mild cheeses.
Include Crackers and Bread
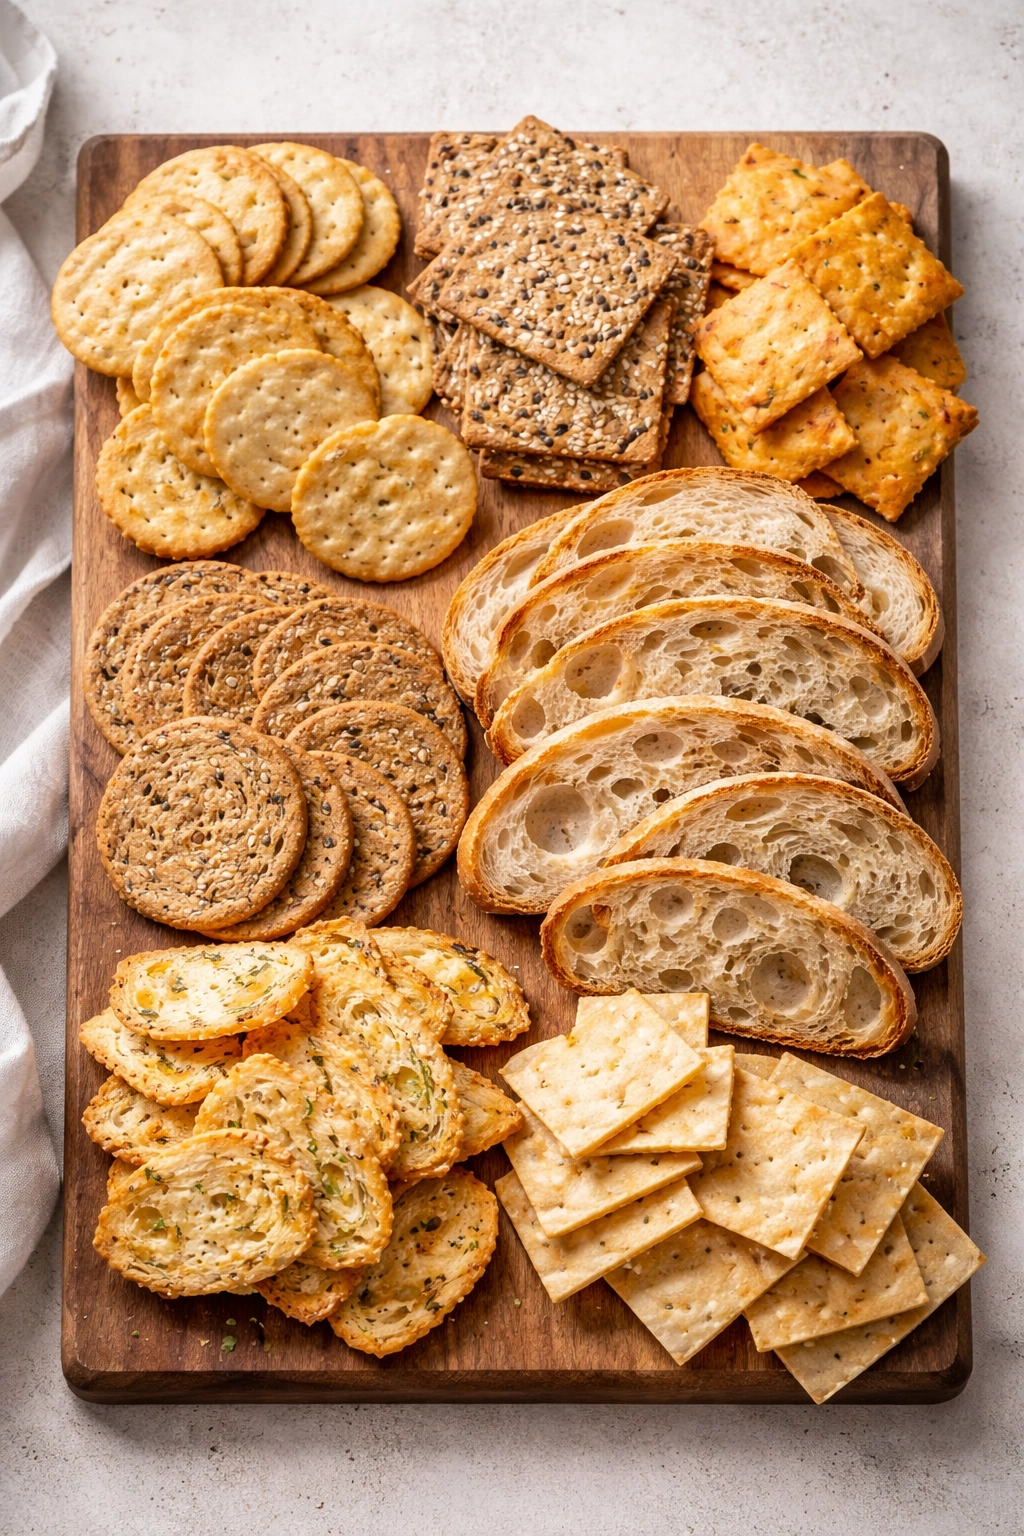
Crackers and bread serve two purposes: they’re a vehicle for cheese and meats, and they provide textural contrast. Choose a variety of styles and flavors rather than one default cracker option.
Include 3 to 4 different crackers on your board. Choose varieties with different textures and flavors: a neutral water cracker or Carr’s table cracker (subtle, crispy, won’t compete with cheese), a seeded cracker like everything or sesame (adds textural crunch and subtle flavor), maybe a cheese cracker or herb cracker (more assertive flavor), and something heartier like a whole grain or multigrain cracker (more substantial, earthier taste).
Avoid overly flavored crackers with strong seasonings or sweet notes—they can clash with cured meats and cheese. Skip things like ranch-flavored crackers or heavily peppered varieties. Your crackers should be supporting players, not stealing the spotlight.
Breadsticks (called grissini in Italian) are a stylish alternative to crackers. They’re long, elegant, and interesting to look at on a board. They also toast easily if you want to prepare them ahead.
Sliced bread works too—choose something with personality like sourdough, ciabatta, or whole grain bread. Slice it about ¼-inch thick and arrange the slices propped up against each other like you’re displaying them. The texture is different enough from crackers that it adds value to the board. If you’re prepping ahead, brush the bread lightly with olive oil, toast it lightly, and let it cool—this prevents it from getting soggy and gives it a better texture.
Avoid bread that’s too soft or fluffy—it feels less intentional and gets messy when topped with soft cheese or salami. Look for bread with a bit of structure and a good crust.
Add Fruits (Fresh and Dried)
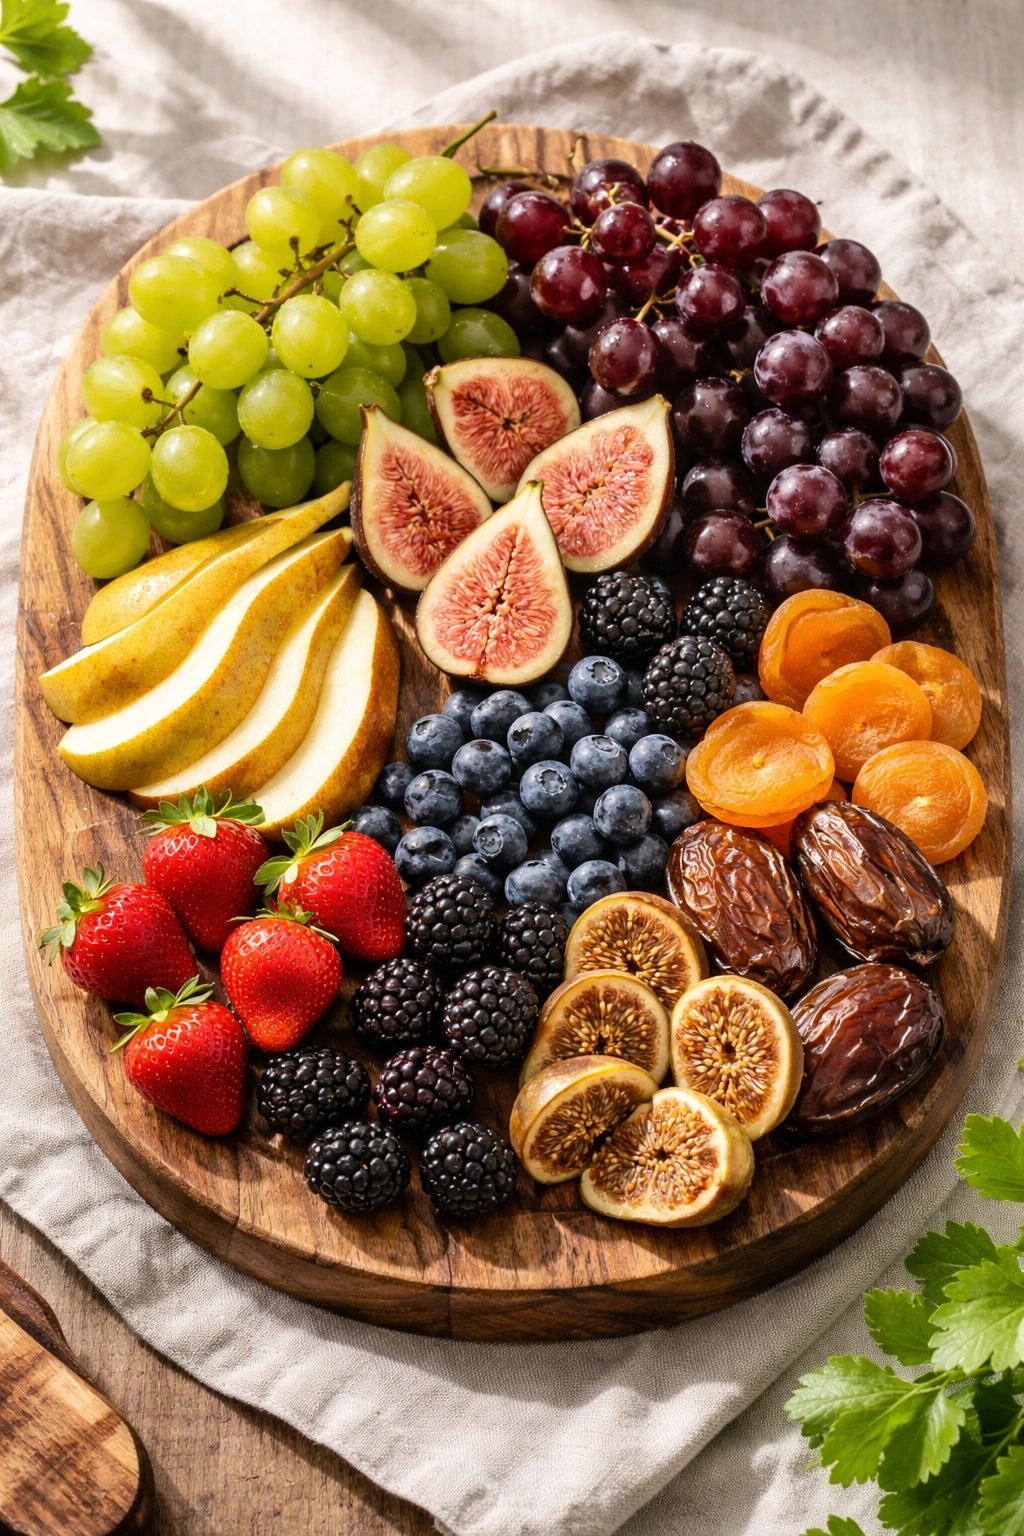
Fruit serves multiple roles: it provides palate cleansing brightness, adds color and visual interest, offers textural contrast, and gives guests flavor variety without meat or cheese. Fresh and dried fruits work differently on a board.
Fresh fruits are about texture and brightness. Grapes (red and green if you want color contrast) are classic for good reason—they’re easy to eat, need no cutting, and provide refreshing sweetness. Figs, pears, and apples (tossed lightly in lemon juice to prevent browning) offer sophistication and complexity. Berries like raspberries and blackberries add color. Citrus segments (grapefruit, orange, tangerine) bring acidity that resets the palate beautifully.
Dried fruits are intense and concentrated. Apricots, figs, cranberries, and dates bring sweetness and chewiness that contrasts dramatically with salty cured meats. Dried fruit also won’t oxidize or brown like fresh fruit, so you can prep a board with dried fruit well in advance.
Include 2 to 3 types of fresh fruit and 1 to 2 types of dried fruit on a board for balance. The fresh fruit should be chosen based on what’s in season and what you genuinely enjoy. There’s no point serving strawberries in December if they’re flavorless and expensive. Local, seasonal fruit always tastes better.
Fresh Fruit Prep and Placement
Cut larger fruits into bite-sized pieces or thin wedges—grapes stay whole, pears and apples get sliced, figs get halved. Toss cut fruit lightly in lemon juice to prevent browning and add a subtle brightness. If you’re making the board more than 30 minutes ahead, don’t add fresh fruit until closer to serving time.
Cluster fruits together so their colors create visual impact. A bunch of green grapes next to red grapes next to dark figs creates visual interest. Scattered fruit feels random; grouped fruit feels intentional.
Dried fruit doesn’t require prep beyond opening the package, which is part of why it’s so convenient. Small dried fruits like cranberries can stay whole. Larger dried fruits like apricots or figs can be left whole or halved depending on how you want them to look.
Select Nuts and Spreads
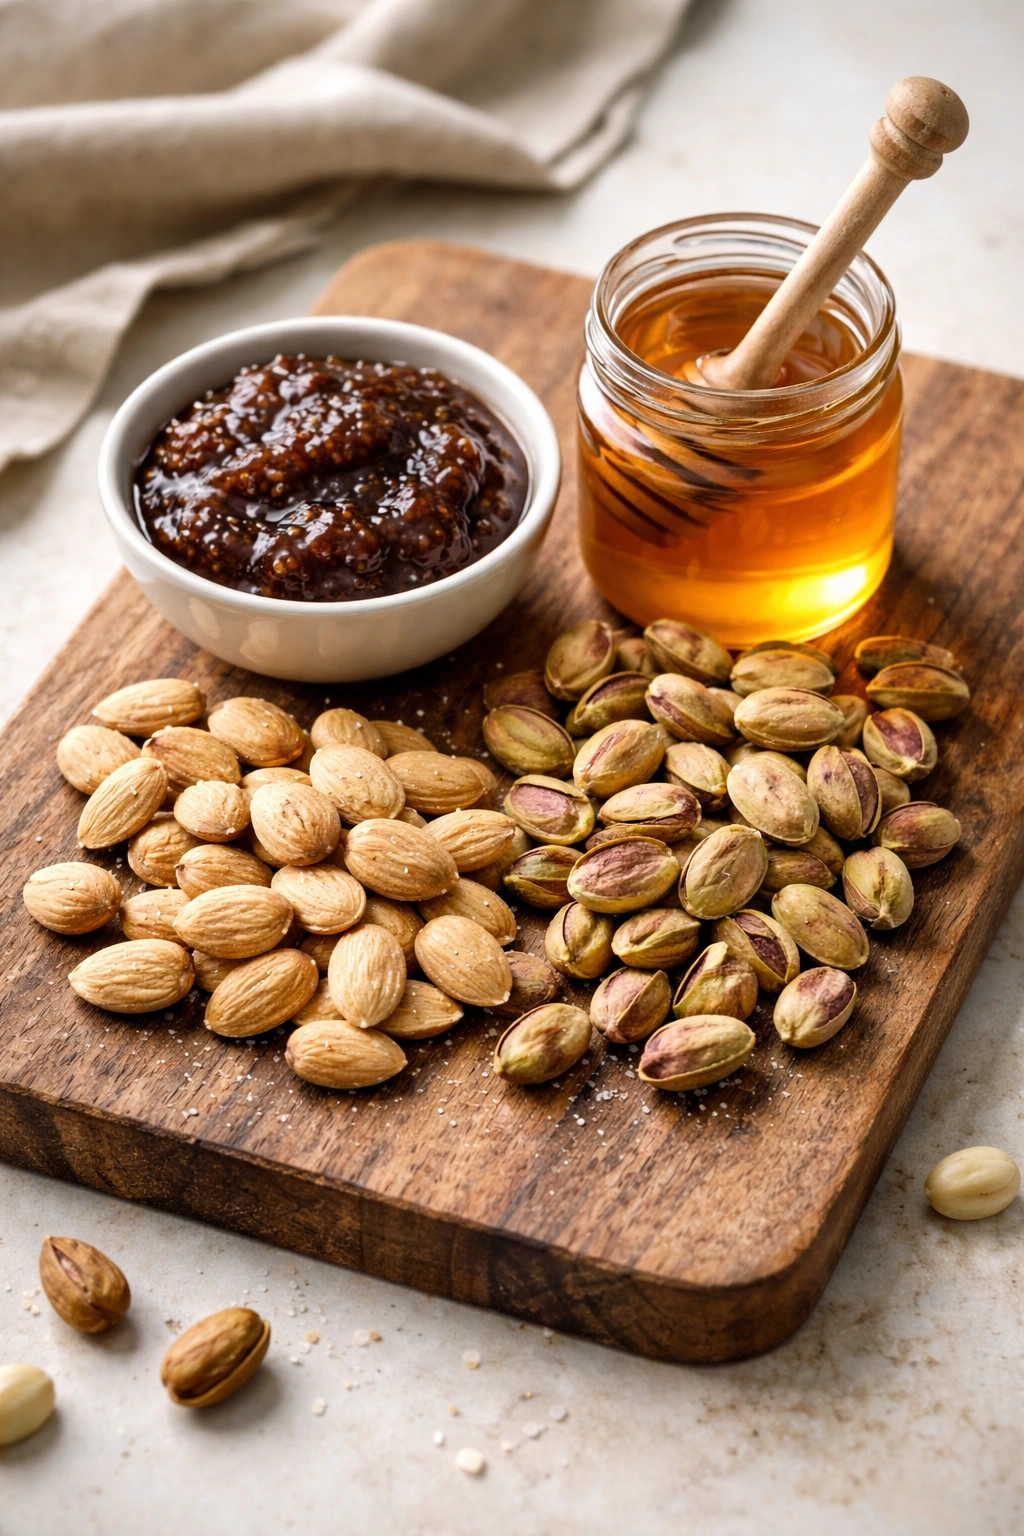
Nuts add crunch, richness, and protein. Spreads add another layer of flavor and richness that makes the board feel more complete and luxurious.
Choose 1 to 2 types of nuts rather than turning it into a nut sampler. Marcona almonds (Spanish, butter-roasted, almost creamy) are elegant and less “snacky” than regular roasted almonds. Candied or spiced nuts add sweetness or spice. Marcona almonds and roasted pistachios together create nice visual contrast. Walnuts or pecans work if you want something more traditionally American. Avoid heavily salted varieties—your cured meats and cheese are already salty.
Spreads bridge the gap between bread/crackers and the bolder flavors of meat and cheese. Fig jam or apricot jam is sophisticated and pairs beautifully with blue cheese and cured pork. Honey (in a small bowl or jar) adds sweetness and works with almost every pairing. A nut butter like almond or peanut butter adds richness. Mostarda (an Italian sweet and spicy condiment) is more adventurous and pairs exceptionally well with cured meats.
Keep spreads in small bowls or jars, and provide small spreading knives or spoons. This prevents guests from double-dipping and makes the board feel more refined.
Include Pickles, Olives, and Brined Items
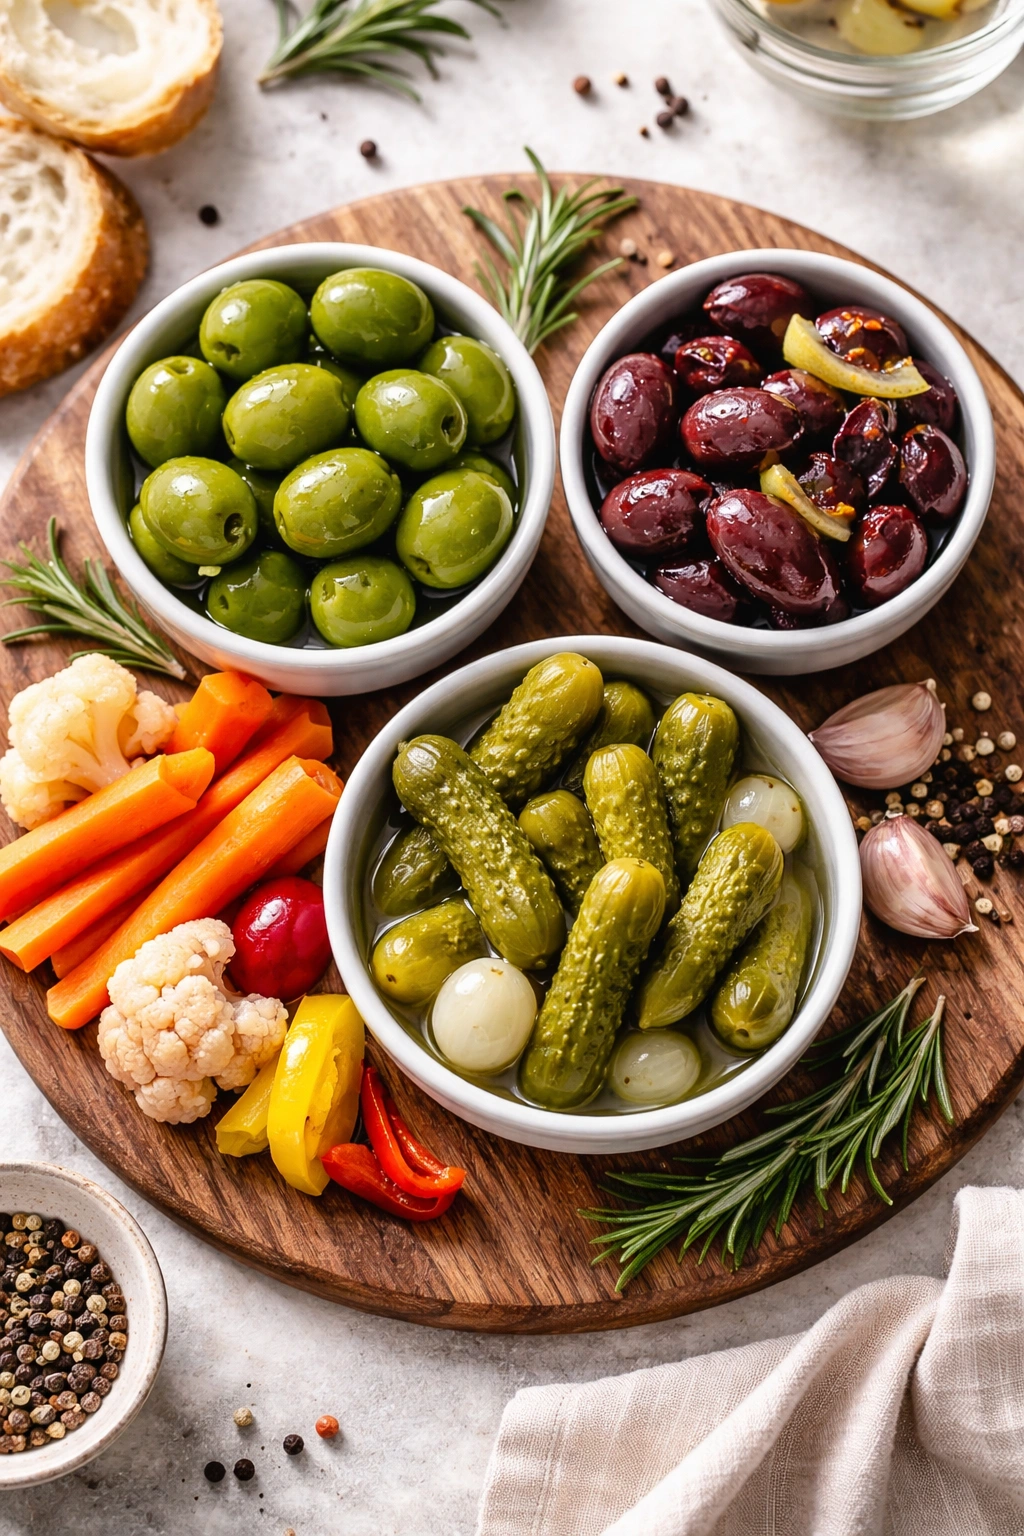
These salty, acidic, and sometimes spicy items are the unsung heroes of a charcuterie board. They reset your palate between bites, complement the richness of cheese and meat, and add complexity.
Olives are essential. Choose 1 to 2 varieties—green olives (often brined, herbaceous, crispy) and black or dark olives (riper, milder, less assertive) create nice contrast. Castelvetrano olives (buttery, mild) work well if you want something friendly. Kalamata olives (bold, earthy) if you want more assertiveness.
Cornichons (tiny pickled cucumbers, distinctly French) or pickled onions add sharp acidity. Pickled vegetables like peppers, beets, or cauliflower add color and crunch. A spread of whole grain mustard or spicy mustard works as both a condiment and a flavor bridge.
Serve brined items in small bowls with small forks or spoons—they’re usually too wet to leave loose on the board.
Add Vegetables and Fresh Herbs
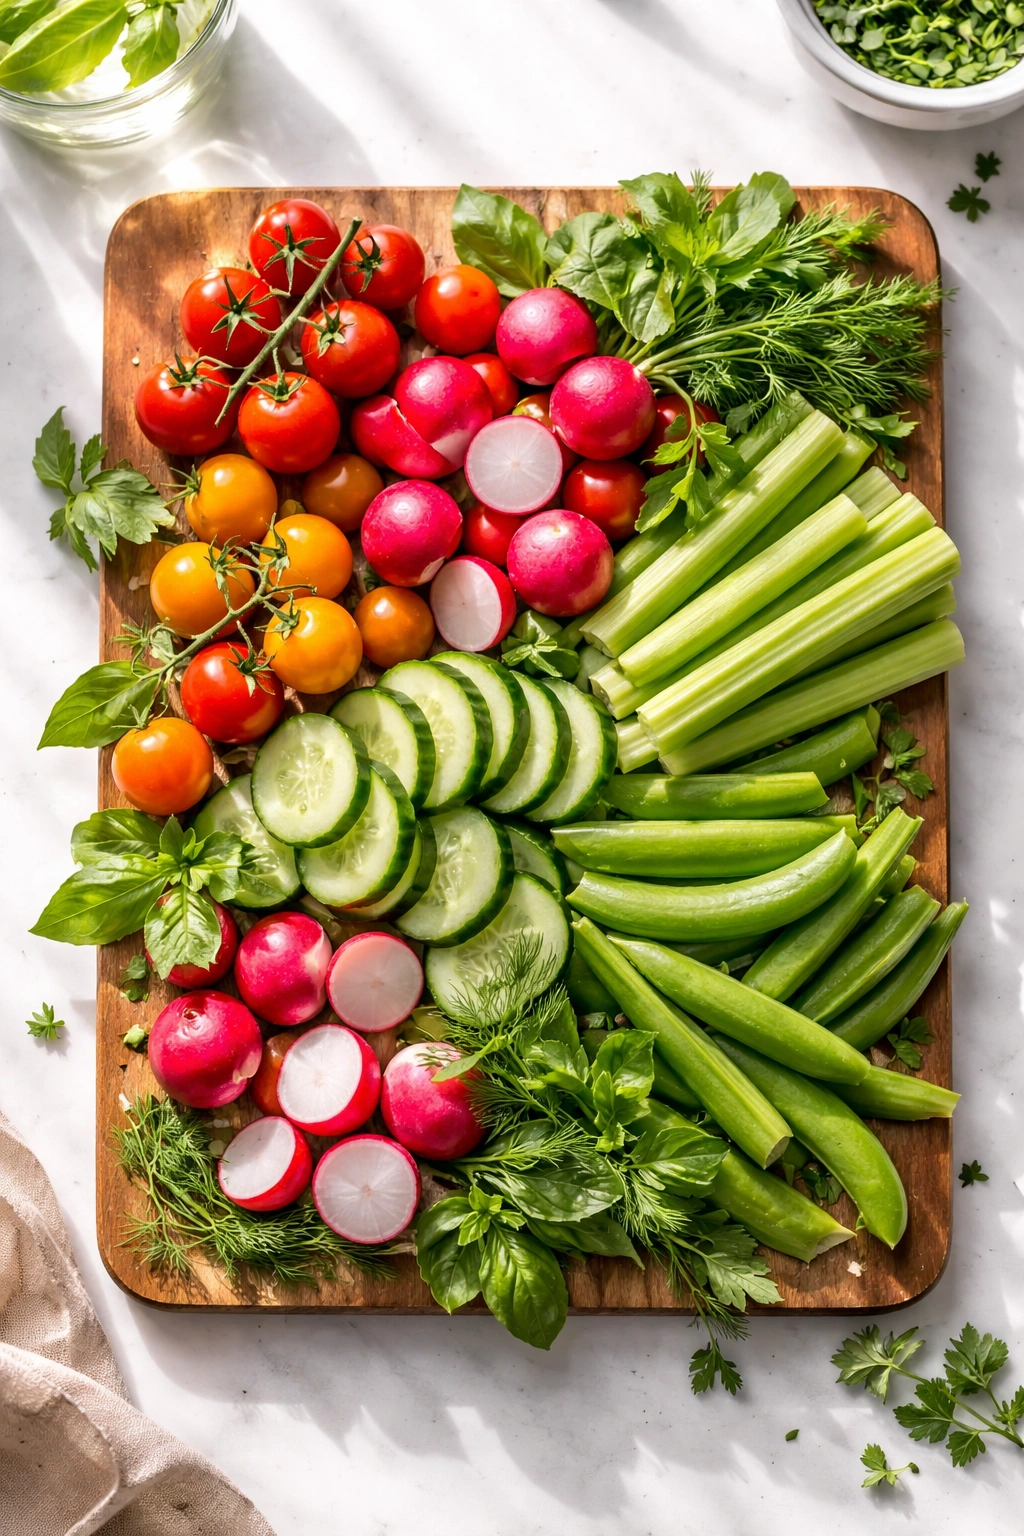
While not absolutely required, fresh vegetables add color, crunch, and a certain freshness that makes boards feel vibrant and less heavy.
Choose vegetables that are naturally beautiful and don’t require much prep. Cherry tomatoes (halved), radishes (thinly sliced on a mandoline for drama), snap peas, cucumber slices (use a mandoline to get them thin and shiny), and celery (cut into manageable pieces) all work well. Red bell pepper (sliced into strips) adds color and sweetness.
Fresh herbs like sprigs of rosemary, thyme, or basil scattered across the board add fragrance, color, and visual interest. They’re edible but mostly serve as garnish and aroma.
Prep vegetables as close to serving as possible—once cut, they start drying out and looking sad. Keep them cold until the last minute.
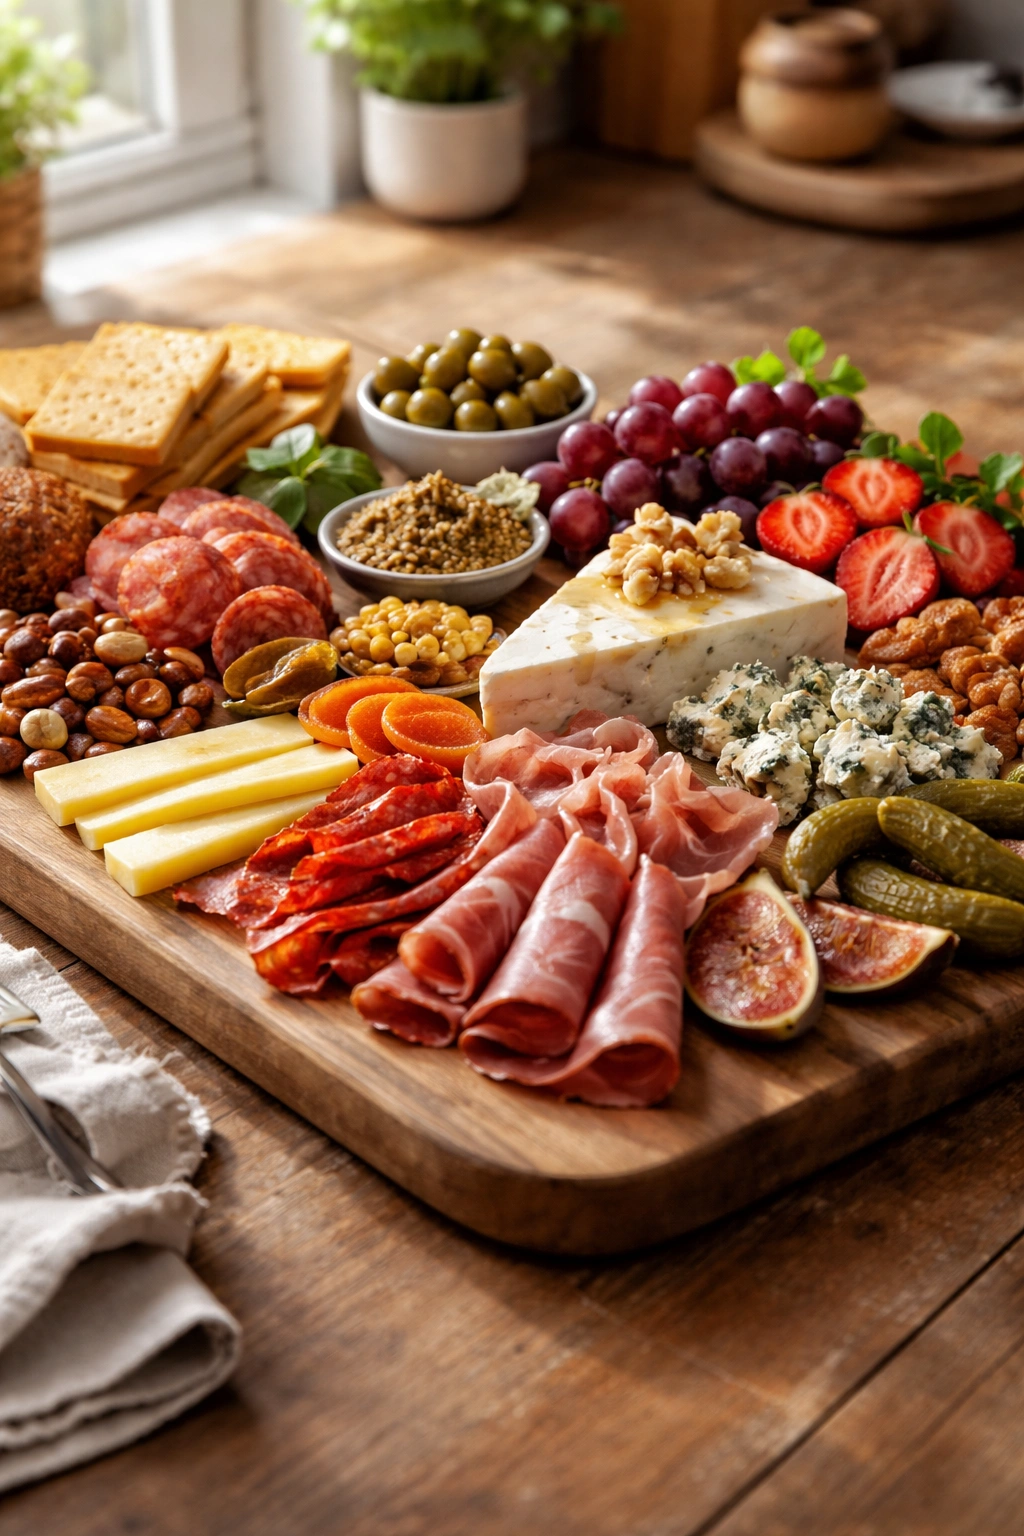
Building the Layout and Arrangement
Here’s where the magic happens. A thoughtfully arranged board looks intentional and delicious; a randomly assembled board looks accidental, even if the individual ingredients are excellent.
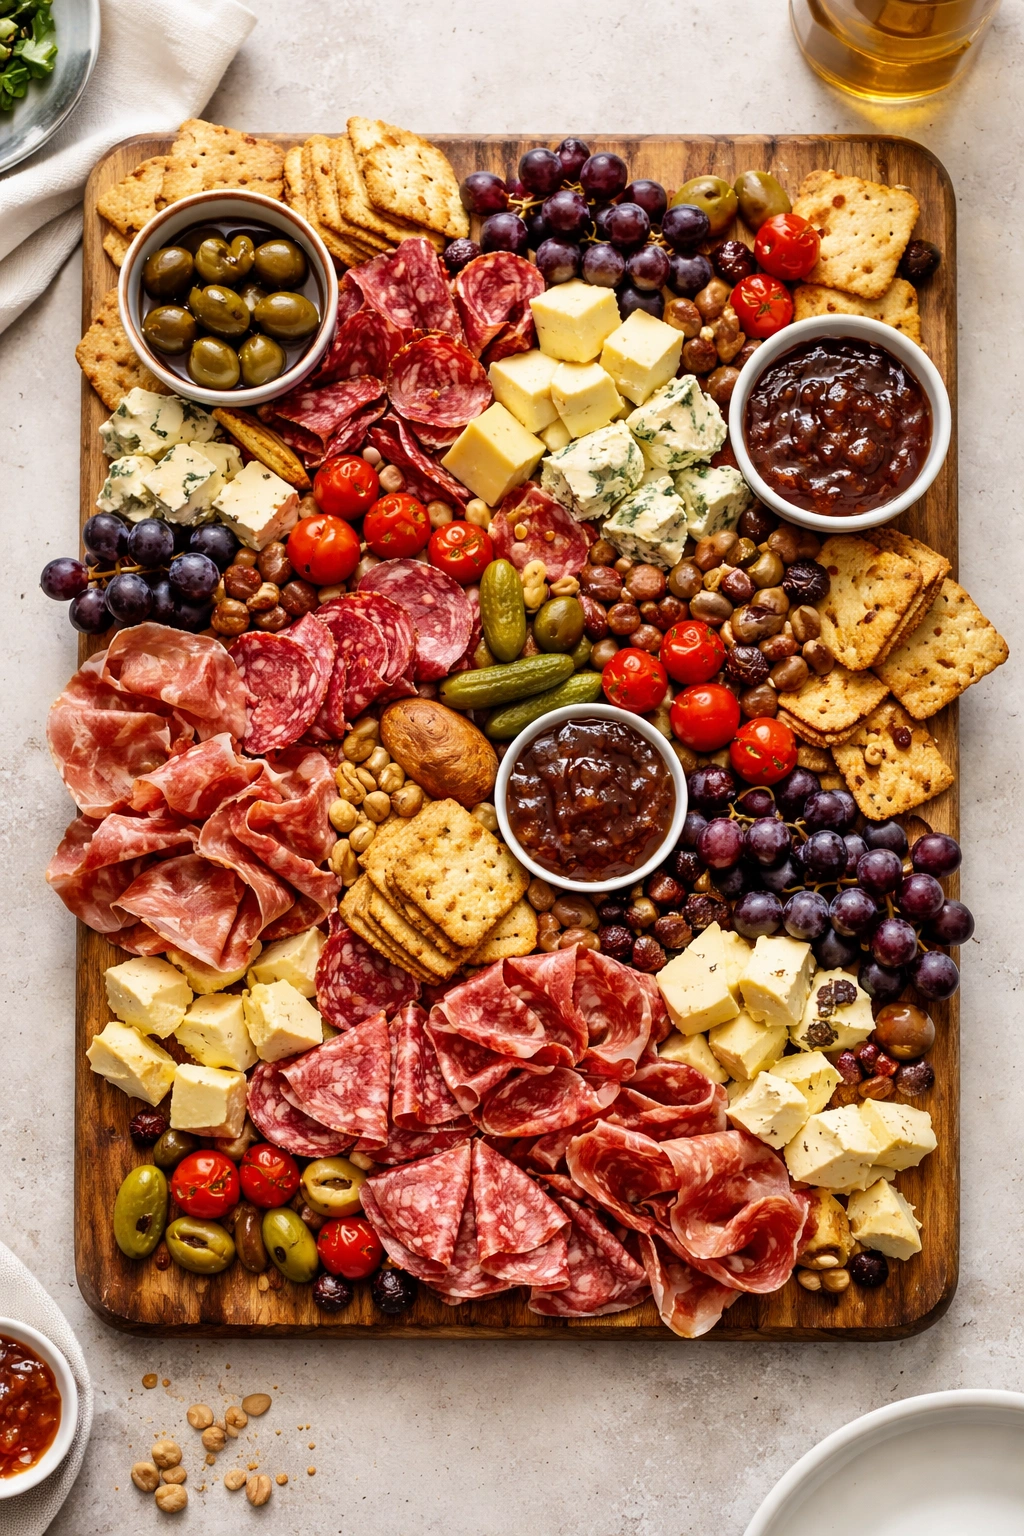
The fundamental principle is balance. You want colors distributed across the board, textures varied, and your eye guided naturally across the entire surface. There’s no single “right” way to arrange a board, but there are patterns that work better than others.
Start with Anchor Items
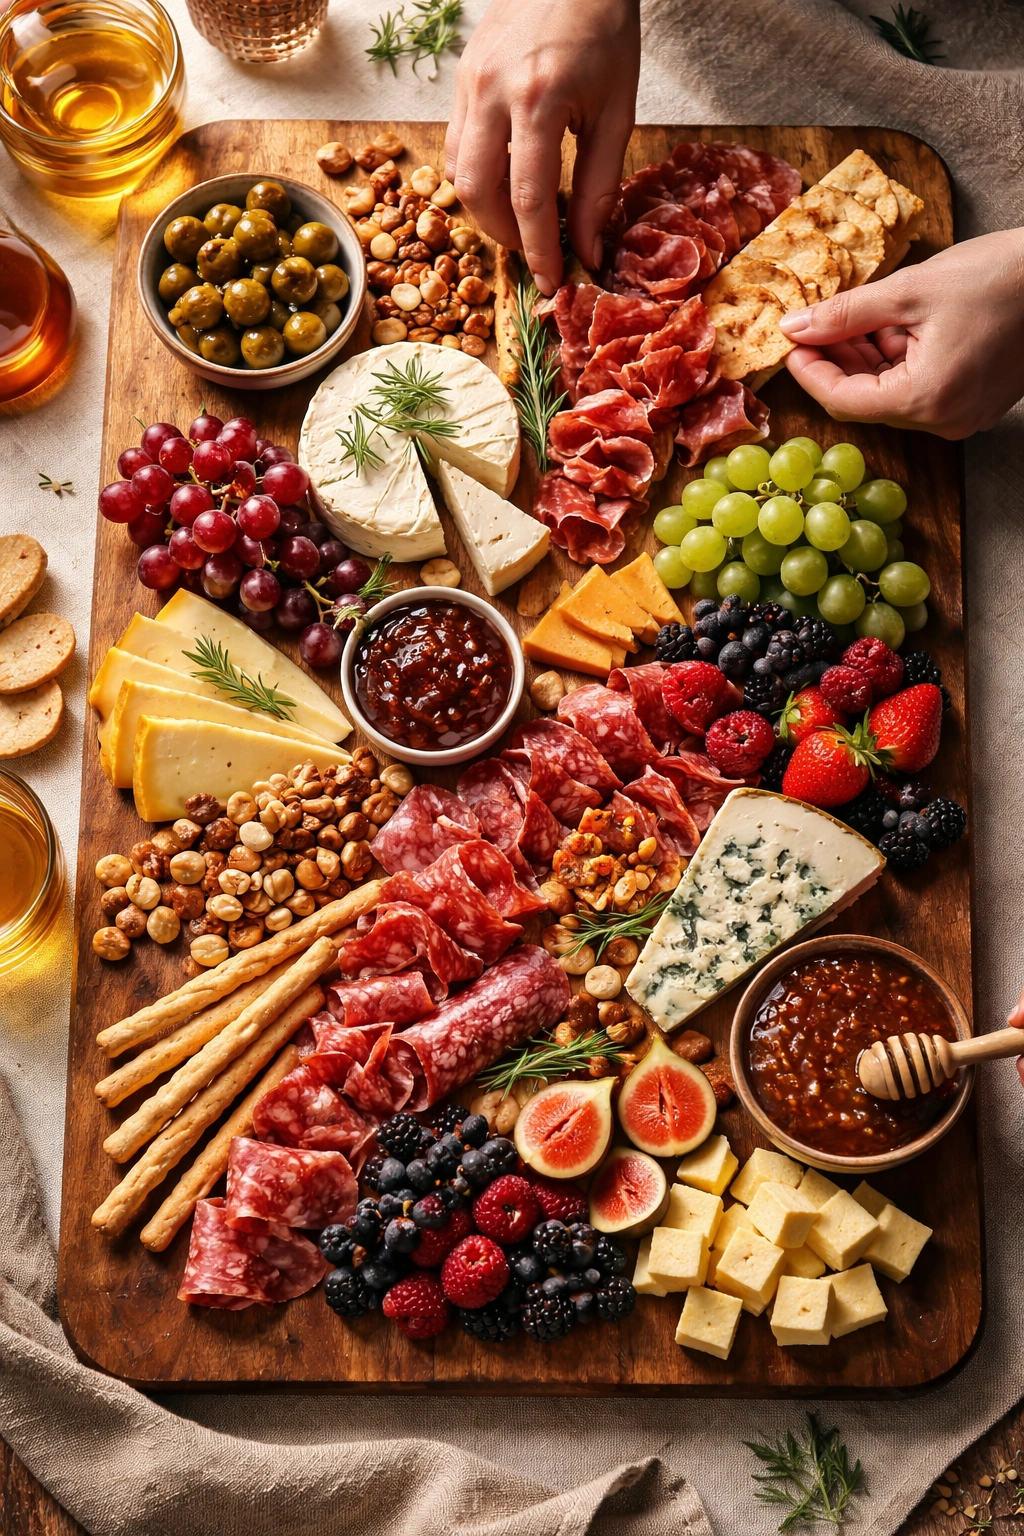
Begin by placing your biggest or most visually impressive items first. A wheel of brie, a block of aged cheddar, or a cluster of grapes serves as an anchor that everything else relates to. Don’t place items in exact rows or columns—that looks too rigid. Instead, think in terms of creating visual balance across the space.
Work in Odd Numbers
Place items in clusters of 3 or 5 rather than pairs. Five grapes clustered together look intentional; four looks like someone was being economical. Three apricots feel right; two feels incomplete. This comes from basic design principles that humans find asymmetrical odd numbers more interesting than even ones.
Mix Heights and Textures
Don’t lay everything flat. Prop up crackers against each other, tilt cheese slices, stand breadsticks upright, arrange some items stacked and some items single-layer. Varying heights and density makes the board feel dynamic and inviting.
Create Visual Zones
Mentally divide your board into thirds or quarters, and plan to have different categories in different zones. Cured meats in one area, cheeses in another, fresh fruit in another, crackers and bread filling gaps. This prevents the board from feeling chaotic and helps guests understand where each category lives.
Distribute Color Intentionally
Place your most vibrant items across the board rather than clustered in one corner. If you have red grapes, distribute them rather than piling them all together. Same with figs, radishes, or any visually striking ingredient. Empty space is fine—an un-crowded board looks elegant, while an over-packed board feels chaotic.
Fill Negative Space Strategically
Use your smaller items to fill gaps between larger anchor items. Nuts work perfectly for this. Herbs as garnish. Small crackers. But leave some breathing room—the board should feel gathered, not completely packed.
The Actual Arrangement
Start by placing your largest items (a wheel of brie, a block of aged cheddar) where they create visual anchor points. Place cured meats in folded or rolled piles—these take up space and look intentional. Add cheese blocks and slices. Position fruits in small clusters. Tuck nuts into gaps. Lay crackers and bread propped at angles. Add bowls of olives, spreads, and brined vegetables.
Stand back frequently and look at the board from several angles. Does one area feel too empty? Is any ingredient hard to access? Does the color feel balanced? Does your eye move naturally across the board or do you get stuck staring at one area?
The final step is garnish. A scatter of fresh herb sprigs, a few edible flowers if you have them, maybe a light grinding of black pepper across cheeses. These finishing touches make the board feel polished and intentional.
Timing and Temperature Considerations
When you serve your board matters almost as much as what’s on it. Temperature dramatically affects flavor, and timing affects both quality and logistics.
Remove cheese and cured meats from the refrigerator 30 to 45 minutes before serving. Cold cheese is dense and muted; room temperature cheese is creamy and flavorful. Cold cured meats are stiff and chewy; room temperature meats are silky and nuanced. This timing matters.
Make the board no more than 1 to 2 hours before service. Fresh fruit will start browning or drying. Crackers can get a bit soft depending on humidity. Everything’s at its best when you eat it within an hour or two of assembly. If you’re making an afternoon board for evening service, do the prep work (cutting cheese, slicing bread) ahead, but don’t actually arrange it until closer to when people will eat.
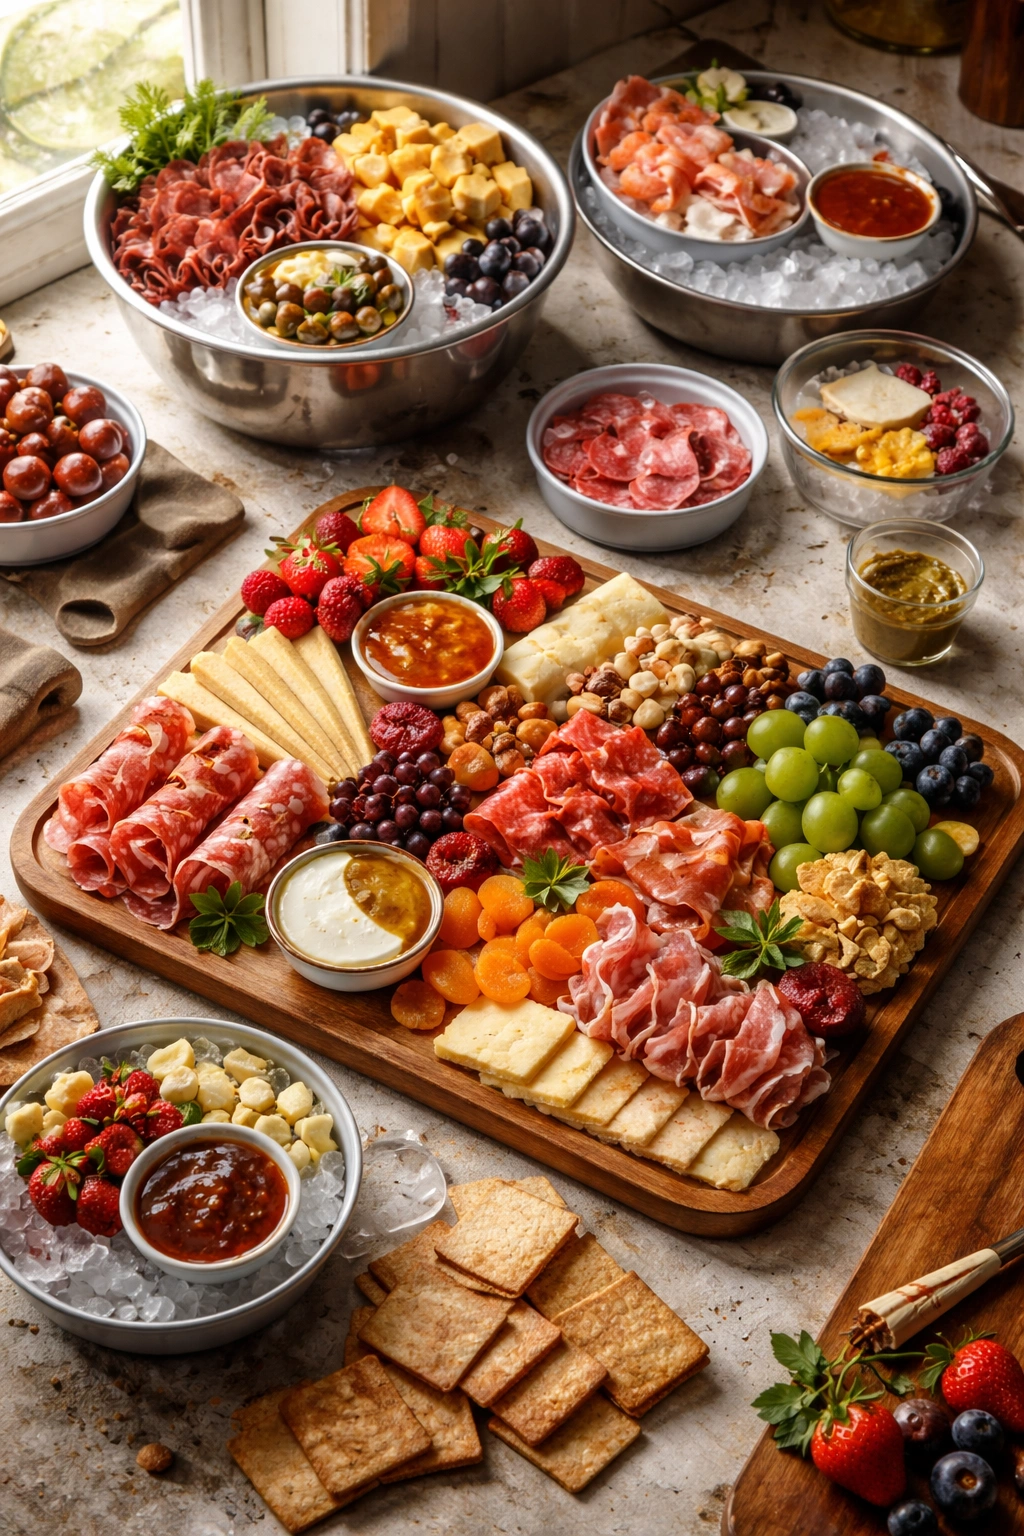
Keep everything else cold until the last minute. Vegetables should come straight from the fridge. Fresh fruit should be cold. Nuts can be at room temperature but will taste fresher if chilled. Cold ingredients will help cheese stay a bit firmer while you’re serving.
For outdoor summer gatherings, you might want to keep the entire board on ice or in a cooler until serving, then assemble just before guests arrive. Cheese melts in heat, and meats can get a bit oily.
Consider your serving style. If this is a stationary board people graze from throughout an event, make sure everything’s accessible and arrange it so items in the middle aren’t blocked by items at the edge. If this is something you’re serving at a specific eating time, you have more flexibility.
Common Beginner Mistakes to Avoid
Learning from other people’s missteps saves you from them. Here are the pitfalls that most first-time board builders hit.
Buying too much. New charcuterie board makers usually overbuy, worried they won’t have enough variety or that something will run out. A board for 4 to 6 people actually needs less of each item than you’d think. You’re doing variety, not abundance. Buy less, choose quality, and you’ll have a better result than buying lots of mediocre options.
Choosing items because they look pretty instead of because they taste good. Beautiful doesn’t matter if nothing tastes delicious. A board of bland cheese and boring crackers will get picked over no matter how perfectly you arrange it. Prioritize flavor and quality, and presentation will follow naturally.
Cutting everything ahead of time. Cut cheese and bread early if you want, but hold off on slicing cheese blocks, halving figs, or cutting apples until as close to serving as possible. Everything looks fresher and tastes better when it’s not exposed to air and oxidizing.
Mixing strong flavors without buffer items. If you’ve got a very peppery salami, a sharp blue cheese, and nothing mild or sweet nearby, people will be overwhelmed. Always have gentle, mild cheeses and fresh fruit nearby to balance intense flavors.
Crowding the board too much. An overstuffed board looks like you raided a grocery store. A thoughtfully edited board with breathing room looks intentional and elegant. Fewer, better items arranged with space around them beats a board that’s completely packed.
Serving everything cold. This is the biggest flavor mistake. Cheese especially suffers when cold. Give ingredients time to warm up slightly and flavors will sing.
Forgetting about vessel options for messy items. Olives, pickles, spreads, and small nuts should go in bowls or small dishes. Loose on the board, they get chaotic and hard to eat.
Creating a board without considering your specific guests. If you know someone’s vegetarian, don’t make the board 60% cured meat. If you know someone doesn’t like cheese, maybe keep their portion lighter on dairy and heavier on other options. You don’t need to change your entire board, but slight adjustments show thoughtfulness.
Seasonal Variations and Themes
The beauty of charcuterie boards is that you can customize them to seasons, themes, and occasions. The fundamental structure stays the same, but the specific ingredients shift with what’s available and what feels appropriate.
Spring boards feature fresh herbs, bright green grapes, radishes, fresh cheeses like chèvre, and lighter cured meats. Asparagus spears and spring onions add freshness.
Summer boards lean into berries, stone fruits like apricots and peaches, lots of fresh vegetables, and lighter cheeses. You might add fresh mozzarella or burrata, which feel summery and light.
Fall boards emphasize dried fruits, nuts, aged cheeses, darker cured meats with more complexity, apple slices, figs, and maybe candied nuts. There’s an earthier, richer feel.
Winter boards go darker and richer: aged cheeses, assertive cured meats, dried fruit, nuts, maybe some whole grain breads or darker crackers. Herbs like rosemary feel seasonal. Rich spreads like fig jam or honey feel appropriate.
Themed boards follow the same principles but with a specific angle. A “Spanish” board might emphasize Spanish cured meats (jamón, soppressata), Spanish cheeses (Manchego, Tetilla), Spanish olives, Spanish almonds, and maybe some pan con tomate (tomato bread). An “Italian” board highlights Italian meats, Italian cheeses, Italian olives, and Italian spreads. A “wine pairing” board deliberately chooses items that pair with a specific wine you’re serving.
The theme is just a guide—the actual rule is still balance, quality, and variety. Your guests will appreciate the thoughtfulness more than the strict adherence to a theme.
Final Thoughts
Building a charcuterie board isn’t a complicated skill that requires special training or expensive equipment. It’s really about choosing ingredients you love, understanding how to balance flavors and textures, and arranging everything with a bit of intentionality. Your first board might not be restaurant-quality perfect, but if the cheese is at room temperature, the meats are flavorful, the crackers are fresh, and everything’s arranged with some thought, your guests will be impressed and genuinely enjoy it.
The confidence comes with repetition. Make a board once and you’ll know what you like and what works. Make it twice and you’ll tweak based on what you learned. By the third or fourth time, you’ll be arranging boards without thinking much about it, trusting your instincts about proportions and balance. That’s when it stops feeling like a project and starts feeling like something you just know how to do.
The best part about charcuterie boards is that they’re endlessly flexible. Once you understand the framework—quality meats, good cheese, smart accompaniments, thoughtful arrangement—you can adapt it to any season, any occasion, any group of people. You can spend $40 on a board or $100. You can make it fancy or casual. You can emphasize certain categories or introduce entirely new ones. The fundamentals stay the same, but how you express them is entirely up to you.