There’s a special kind of panic that sets in when someone texts asking if they can bring a friend to dinner in thirty minutes. Or when you realize guests are arriving soon and your cheese board looks embarrassingly bare. The good news? The best appetizers don’t require hours of prep work, fancy techniques, or ingredients you can’t pronounce. Some of the most impressive, crave-worthy bites come together in less time than it takes to watch a TV episode.
The appetizers that follow share one crucial quality: they’re designed to impress without demanding your entire evening. Each one takes twenty minutes or less from start to plate, which means you can handle actual dinner prep while these are coming together. Most use ingredients you probably already have on hand, and the techniques are straightforward enough that even if you’ve never made them before, you’ll nail it on the first try. These aren’t shortcuts or compromises on flavor—they’re genuinely delicious bites that happen to be quick.
Whether you’re hosting a casual gathering, bringing something to a party, or just want to elevate your snacking game, these appetizers deliver impact with minimal stress. Let’s dive into each one.
1. Caprese Skewers with Balsamic Glaze
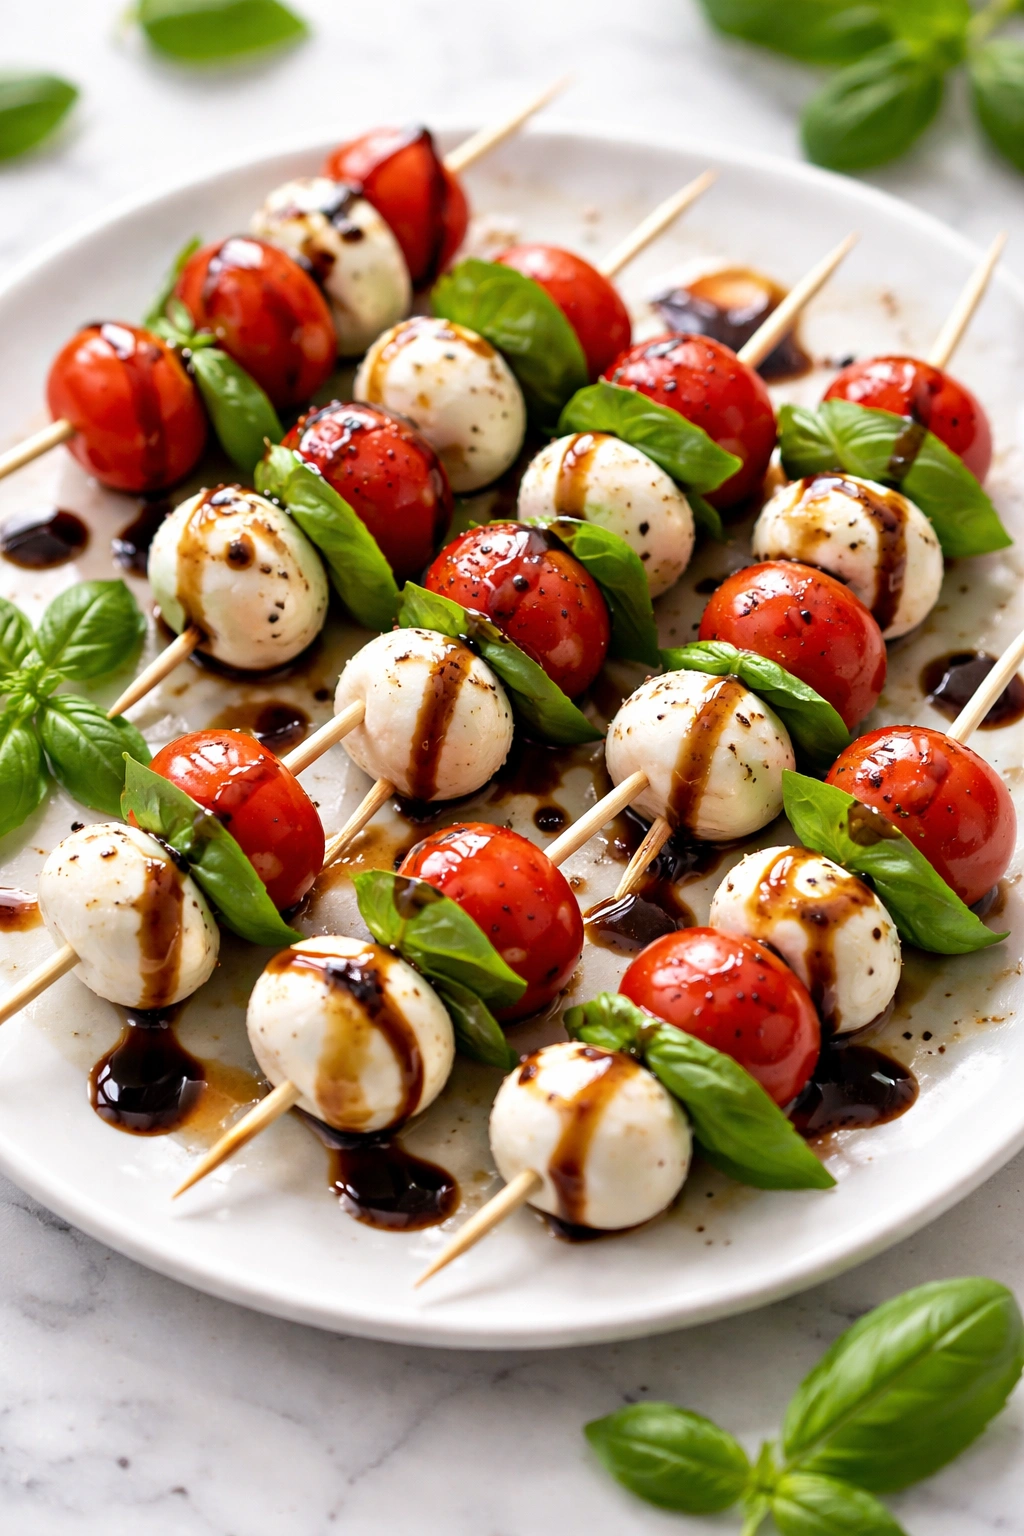
Caprese skewers are the definition of effortless elegance. Fresh mozzarella, ripe tomatoes, and basil threaded onto toothpicks create a bite that tastes far more sophisticated than it actually is. The balsamic glaze adds depth and keeps everything from tasting one-note.
Why This Works for Quick Entertaining
These skewers require zero cooking, so they come together entirely during your prep window. The only real work is assembling the components on toothpicks and drizzling the glaze. You can prep everything ahead and assemble five minutes before guests arrive if you need that buffer. The presentation automatically looks intentional and refined, even though you spent maybe twelve minutes total.
What You’ll Need
- 1 pint cherry tomatoes, halved
- 8 oz fresh mozzarella (preferably bocconcini or cherry mozzarella), halved
- Fresh basil leaves (about 20-25 leaves)
- 2 tablespoons balsamic vinegar
- 1 tablespoon honey
- 2 tablespoons extra-virgin olive oil
- Sea salt and cracked black pepper
- Toothpicks
Putting It Together
Combine the balsamic vinegar and honey in a small saucepan over medium heat, stirring occasionally, until it reduces by about half and becomes syrupy—roughly 3 to 4 minutes. Remove from heat and let cool slightly, then whisk in the olive oil. On each toothpick, thread a basil leaf, a piece of mozzarella, and a tomato half (cut-side down so it looks polished). Arrange the skewers on a platter, drizzle lightly with the balsamic glaze, and finish with a generous pinch of sea salt and cracked pepper.
Pro tip: Make the balsamic glaze up to two days ahead and store it in an airtight container in the fridge. This cuts your assembly time dramatically when you’re in crunch mode.
2. Prosciutto-Wrapped Figs with Goat Cheese
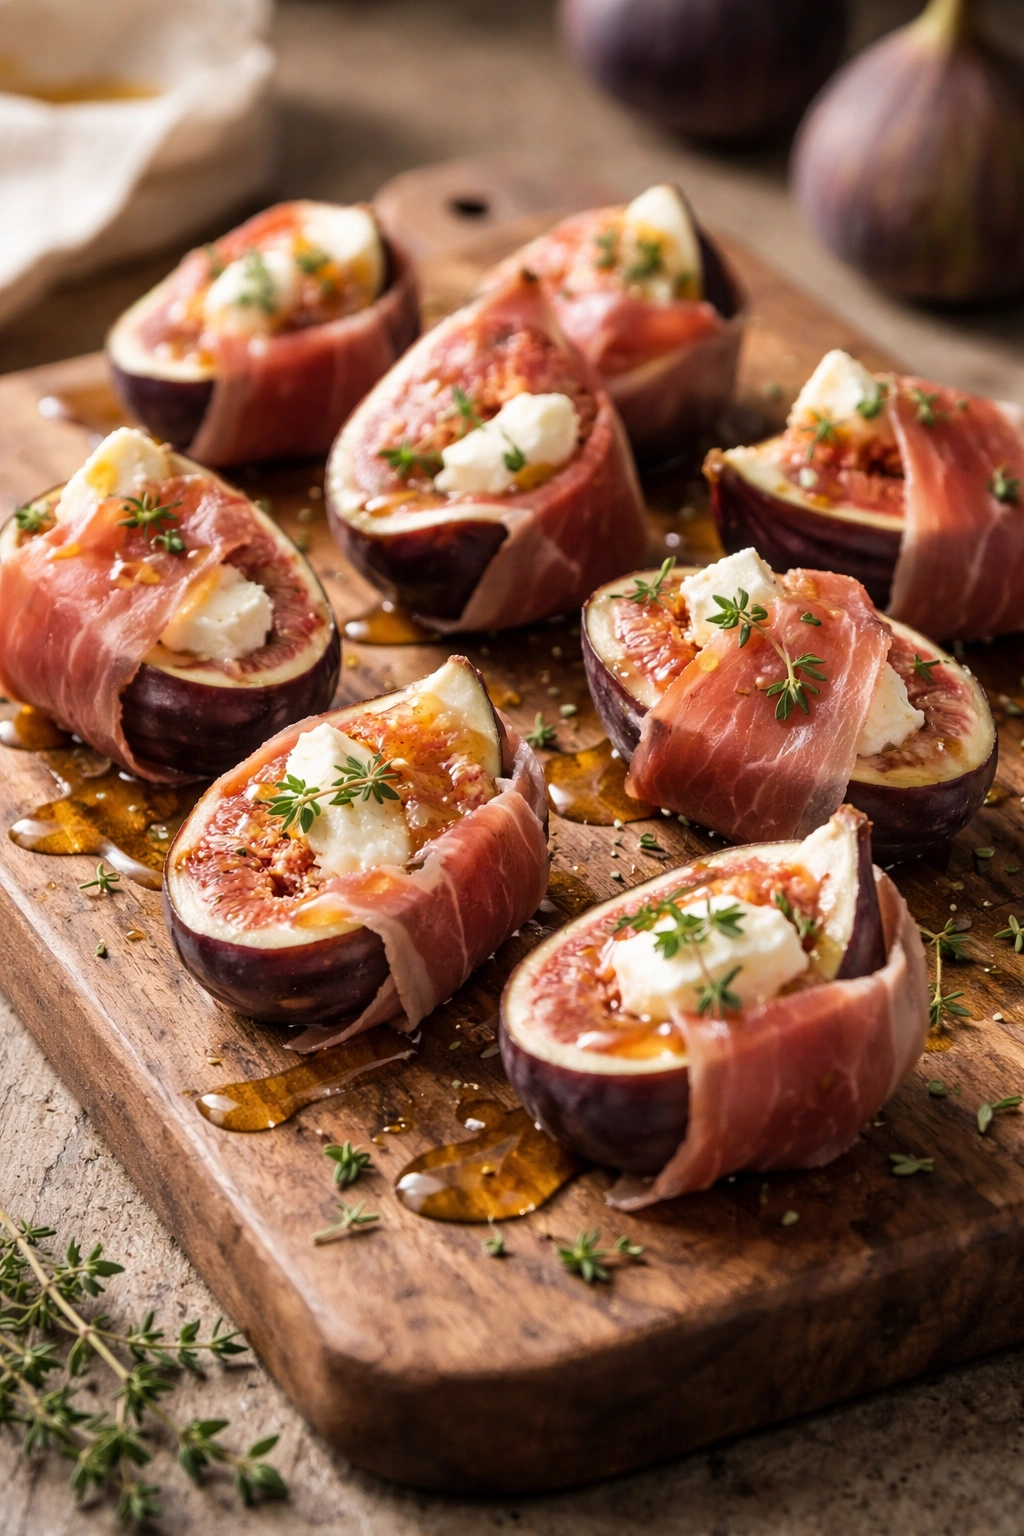
When fresh figs are in season, this combination feels almost decadent in its simplicity. The salty, savory prosciutto plays beautifully against the sweet fig and tangy goat cheese—each bite tastes like something you’d order at a fancy restaurant, except you made it in your kitchen.
Why This Appetizer Comes Together So Fast
Everything here is literally assembled and served. There’s no cooking required, no sauce to make, no complicated layering. Your entire job is splitting figs, spreading cheese, and wrapping prosciutto. The hardest part is finding good figs and quality prosciutto, and once you have those, you’re basically done.
What You’ll Need
- 12 fresh figs, halved
- 4 oz goat cheese, at room temperature
- 12 thin slices prosciutto, cut in half
- 1 tablespoon raw honey
- Fresh thyme leaves (about 1 teaspoon)
- Cracked black pepper
Putting It Together
Spread about a teaspoon of goat cheese onto the cut side of each fig half. Wrap a piece of prosciutto around each fig, leaving a small part of the fig exposed so you can see the goat cheese inside. Arrange on a platter, drizzle very lightly with honey, scatter with fresh thyme leaves, and add a crack of black pepper to each one.
Pro tip: If your goat cheese is cold from the fridge, soften it for five minutes at room temperature so it spreads easily without tearing the figs.
3. Garlic and Herb Cream Cheese Dip with Crunchy Vegetables
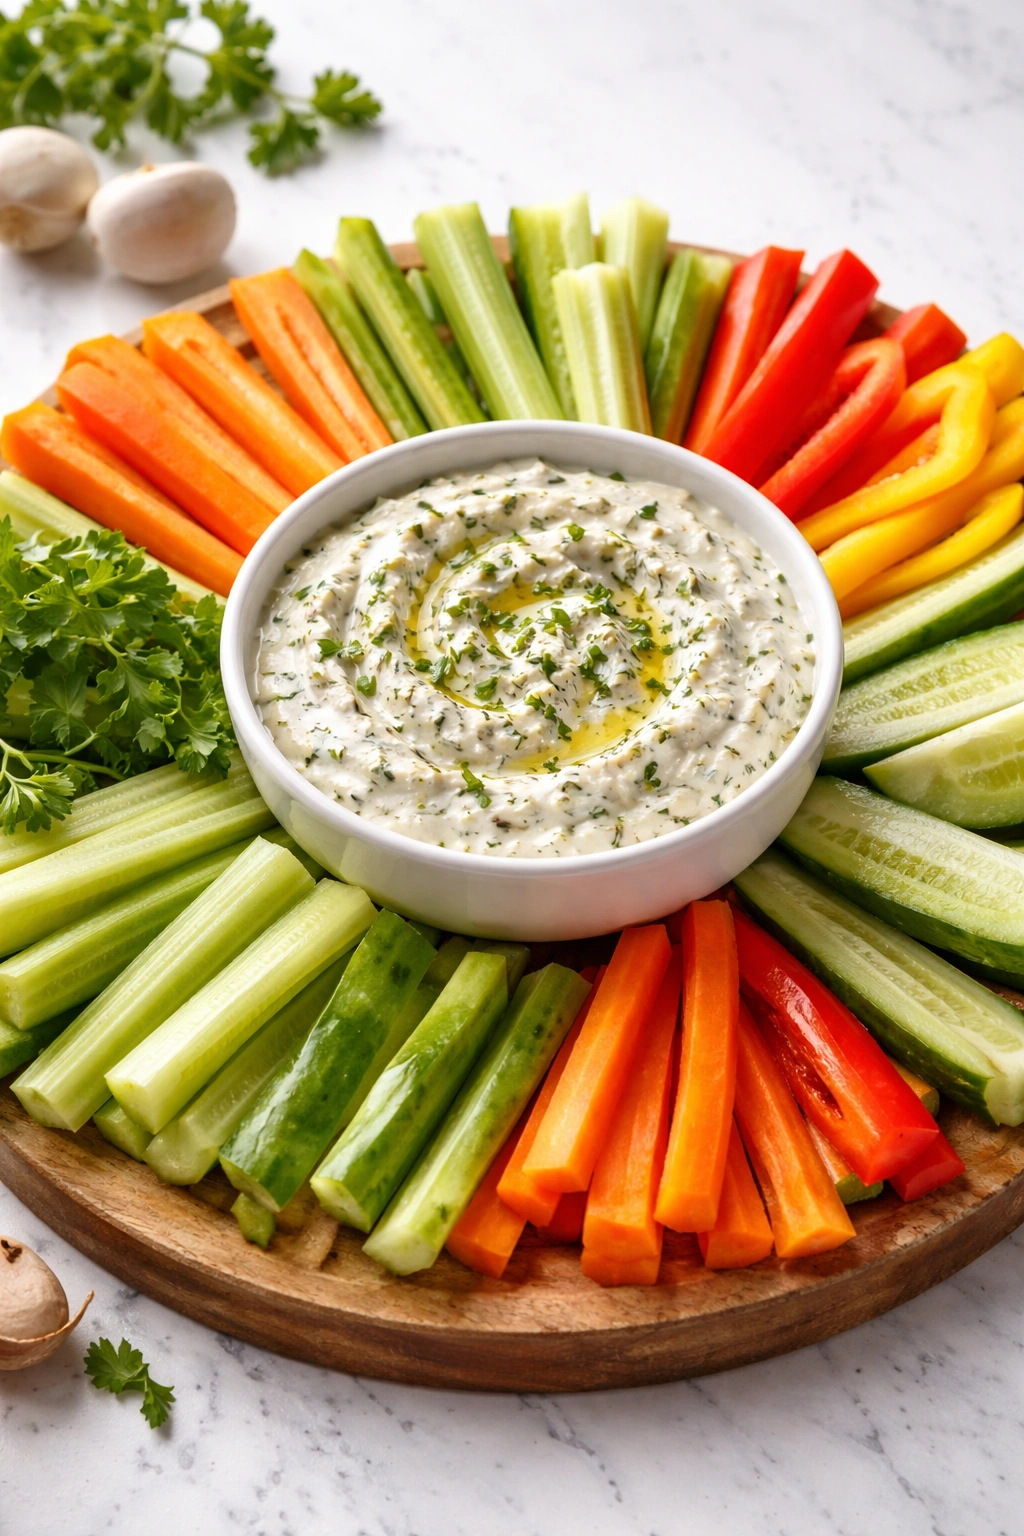
This is the dip you make when you want something that tastes like you put effort into it but doesn’t require skill or special ingredients. The base is literally cream cheese mixed with seasonings, and the magic comes from using really good ingredients and tasting as you go so the flavors are balanced.
Why This Is the Quickest Appetizer You Can Make
While some dips demand homemade béchamel sauce, toasted nuts, or fermented elements, this one comes together in the time it takes to chop vegetables. Mix the dip, arrange the veggies, and you’re done. People always assume it took longer than it did because the flavors are layered and bright.
What You’ll Need
- 8 oz cream cheese, softened
- ¼ cup sour cream
- 2 tablespoons fresh lemon juice
- 3 cloves garlic, minced very fine
- 2 tablespoons fresh parsley, finely chopped
- 1 tablespoon fresh chives, finely chopped
- 1 teaspoon fresh dill, finely chopped
- ½ teaspoon salt
- ¼ teaspoon black pepper
- Vegetables for serving: carrots, celery, bell peppers, cherry tomatoes, cucumber
Putting It Together
Combine the softened cream cheese and sour cream in a bowl, stirring until smooth. Add the minced garlic, lemon juice, and all the fresh herbs. Stir to combine, taste, and adjust seasoning—this is where your control is. If you like more garlic, add more. If you want brighter flavor, add more lemon juice. Transfer to a serving bowl and surround with vegetables cut into bite-sized pieces.
Pro tip: Make this dip up to two days in advance and store it covered in the fridge. The flavors actually meld and improve overnight, so you can prep this the night before a gathering.
4. Crispy Baked Mozzarella Sticks with Marinara Sauce

Homemade mozzarella sticks feel like an indulgence, but they actually cook faster than frozen ones from a box. Baking them means less mess than deep-frying, and they come out crispy on the outside with that glorious molten center that makes people light up when they bite into one.
Why Homemade Beats Frozen for Speed and Taste
The baking method means you don’t have to heat oil to a specific temperature or babysit a fryer. You prep them, pop them in the oven, and they’re done in about twelve minutes. The cheese stays inside the breading instead of leaking out, and they taste distinctly better because the mozzarella is fresher and the breading is less heavy.
What You’ll Need
- 8 oz mozzarella cheese (block form), cut into 8 sticks
- ½ cup all-purpose flour
- 2 large eggs, beaten
- ¾ cup Italian-seasoned breadcrumbs
- 1 teaspoon garlic powder
- Salt and pepper
- Cooking spray
- 1 cup marinara sauce for serving
Putting It Together
Preheat the oven to 400°F (200°C) and line a baking sheet with parchment paper. Cut the mozzarella block into 8 equal sticks about 3 inches long. Set up three shallow bowls with flour in the first, beaten eggs in the second, and breadcrumbs mixed with garlic powder, salt, and pepper in the third. Working quickly, coat each mozzarella stick first in flour (tap off excess), then in egg, then in breadcrumbs, pressing gently so the coating sticks. Place on the prepared baking sheet and spray lightly with cooking spray. Bake for 10 to 12 minutes, until golden and the cheese just starts to leak slightly at the ends. Serve immediately with warm marinara.
Pro tip: Freeze the breaded mozzarella sticks for at least thirty minutes (or up to three days) before baking. The cold cheese takes longer to heat, which gives you a crispier exterior and creamier interior.
5. Bruschetta with Tomato, Basil, and Garlic
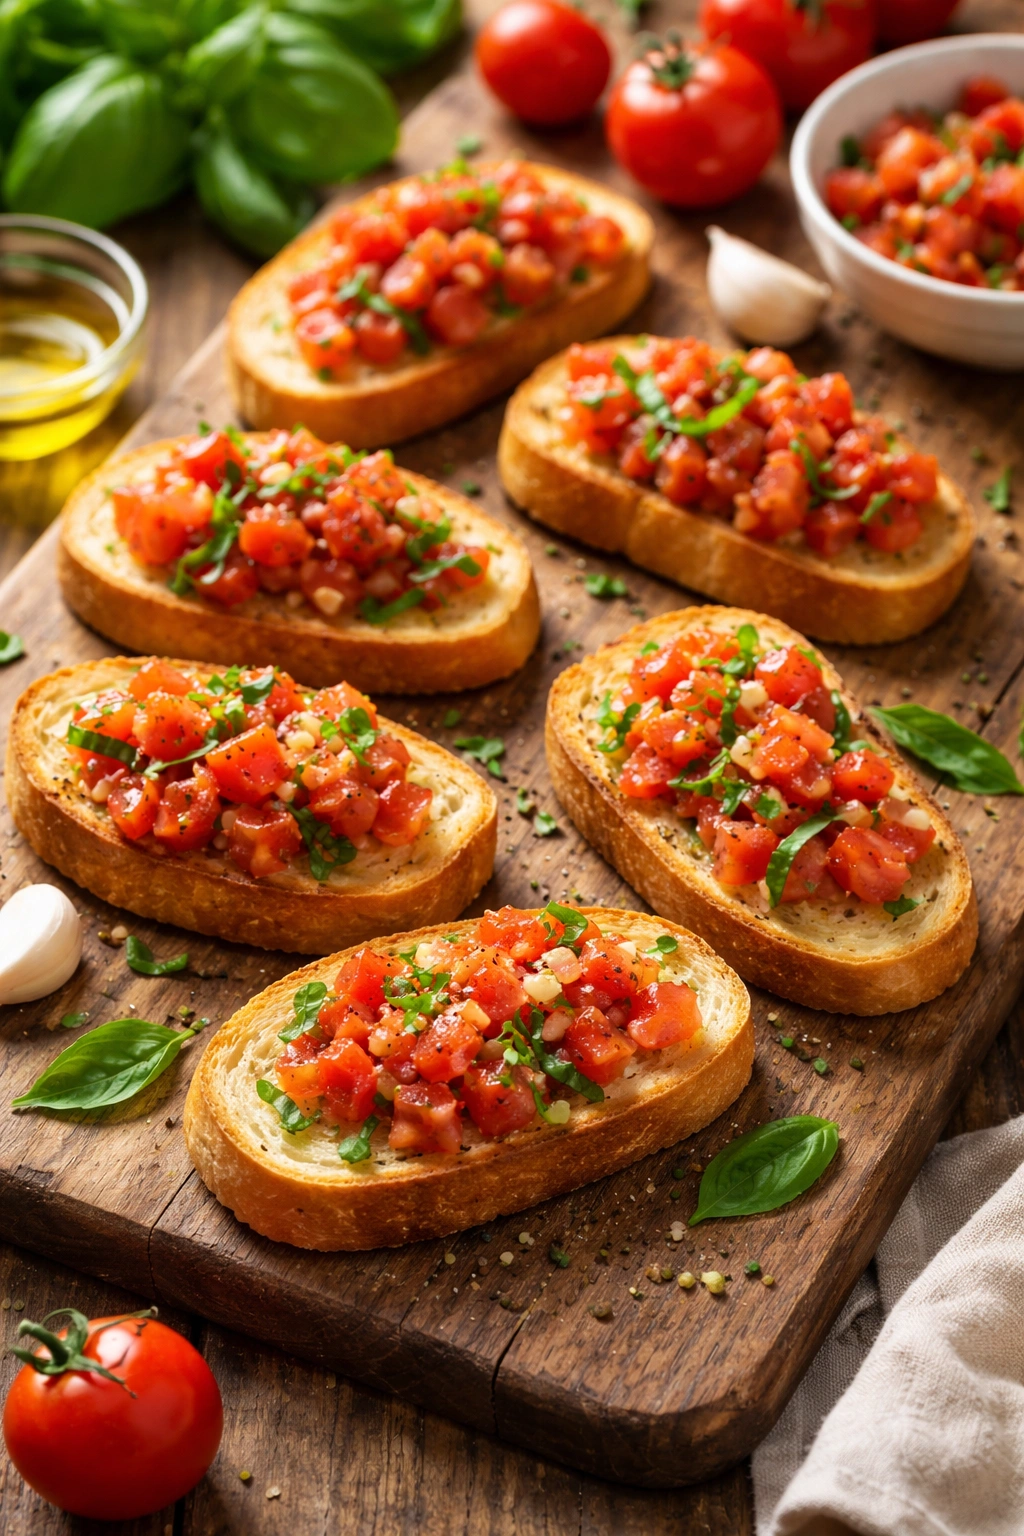
Bruschetta is the appetizer that makes people think you’re an experienced cook, even though it’s just grilled bread with excellent toppings. The key is using tomatoes that actually taste like something and not skimping on the garlic and basil.
Why This Classic Comes Together in Minutes
You’re toasting bread, dicing tomatoes, and mixing them with garlic and basil. That’s it. There’s no complicated technique, no special equipment, no skills to master. The magic is in choosing good ingredients and assembling them with intention, not in any difficult cooking method.
What You’ll Need
- 1 French baguette, sliced diagonally into ½-inch pieces
- 4 medium Roma tomatoes, diced small
- 3 cloves garlic, minced
- ¼ cup fresh basil, torn into small pieces
- 2 tablespoons extra-virgin olive oil
- 1 tablespoon balsamic vinegar
- Salt and pepper to taste
Putting It Together
Preheat the oven to 400°F (200°C). Arrange baguette slices on a baking sheet and toast them for 4 to 5 minutes, until just starting to crisp and lightly golden. While they toast, combine the diced tomatoes, minced garlic, basil, olive oil, and balsamic vinegar in a bowl. Season with salt and pepper, stir, and let sit for a minute to allow flavors to meld. Once the bread is toasted, spoon a generous amount of the tomato mixture onto each slice. Serve immediately while the bread is still warm.
Pro tip: Toast the bread just before serving. If you do it too far in advance, the bruschetta topping will make it soggy, and no one wants soggy bruschetta.
6. Spicy Honey Sriracha Shrimp Bites

These shrimp get a quick sear in a screaming-hot pan and come out with a caramelized exterior and tender, juicy center. The honey and sriracha glaze hits sweet, spicy, and savory all at once—addictively good in a bite-sized format.
Why This Feels Restaurant-Quality But Takes Fifteen Minutes
The trick is getting your pan hot enough that the shrimp sear immediately instead of steaming. The high heat creates that caramelized crust that makes these taste impressive. Everything else is just stirring together a glaze and tossing the shrimp in it.
What You’ll Need
- 1 lb large shrimp, peeled and deveined
- 2 tablespoons butter
- 3 cloves garlic, minced
- 2 tablespoons honey
- 2 tablespoons sriracha sauce
- 1 tablespoon soy sauce
- 1 tablespoon lime juice
- Salt and pepper
- Fresh cilantro for garnish
- Toothpicks or small skewers
Putting It Together
Pat the shrimp dry with paper towels—moisture prevents browning. Heat a large skillet over medium-high heat until very hot, then add the butter. Once it foams, add the shrimp in a single layer and let them sit without moving them for 2 minutes. Flip each shrimp and cook for another 1 to 2 minutes until cooked through (they’ll turn opaque and slightly pink). Remove the shrimp to a plate. In the same pan, combine the minced garlic, honey, sriracha, soy sauce, and lime juice, stirring constantly for 30 seconds. Return the shrimp to the pan and toss to coat evenly. Transfer to a serving platter, garnish with cilantro, and serve warm on toothpicks.
Pro tip: Buy shrimp that’s already peeled and deveined if you want to shave five minutes off your prep time. The quality is identical, and it’s worth the small extra cost when you’re in a time crunch.
7. Crispy Parmesan Chips with Herb Dip
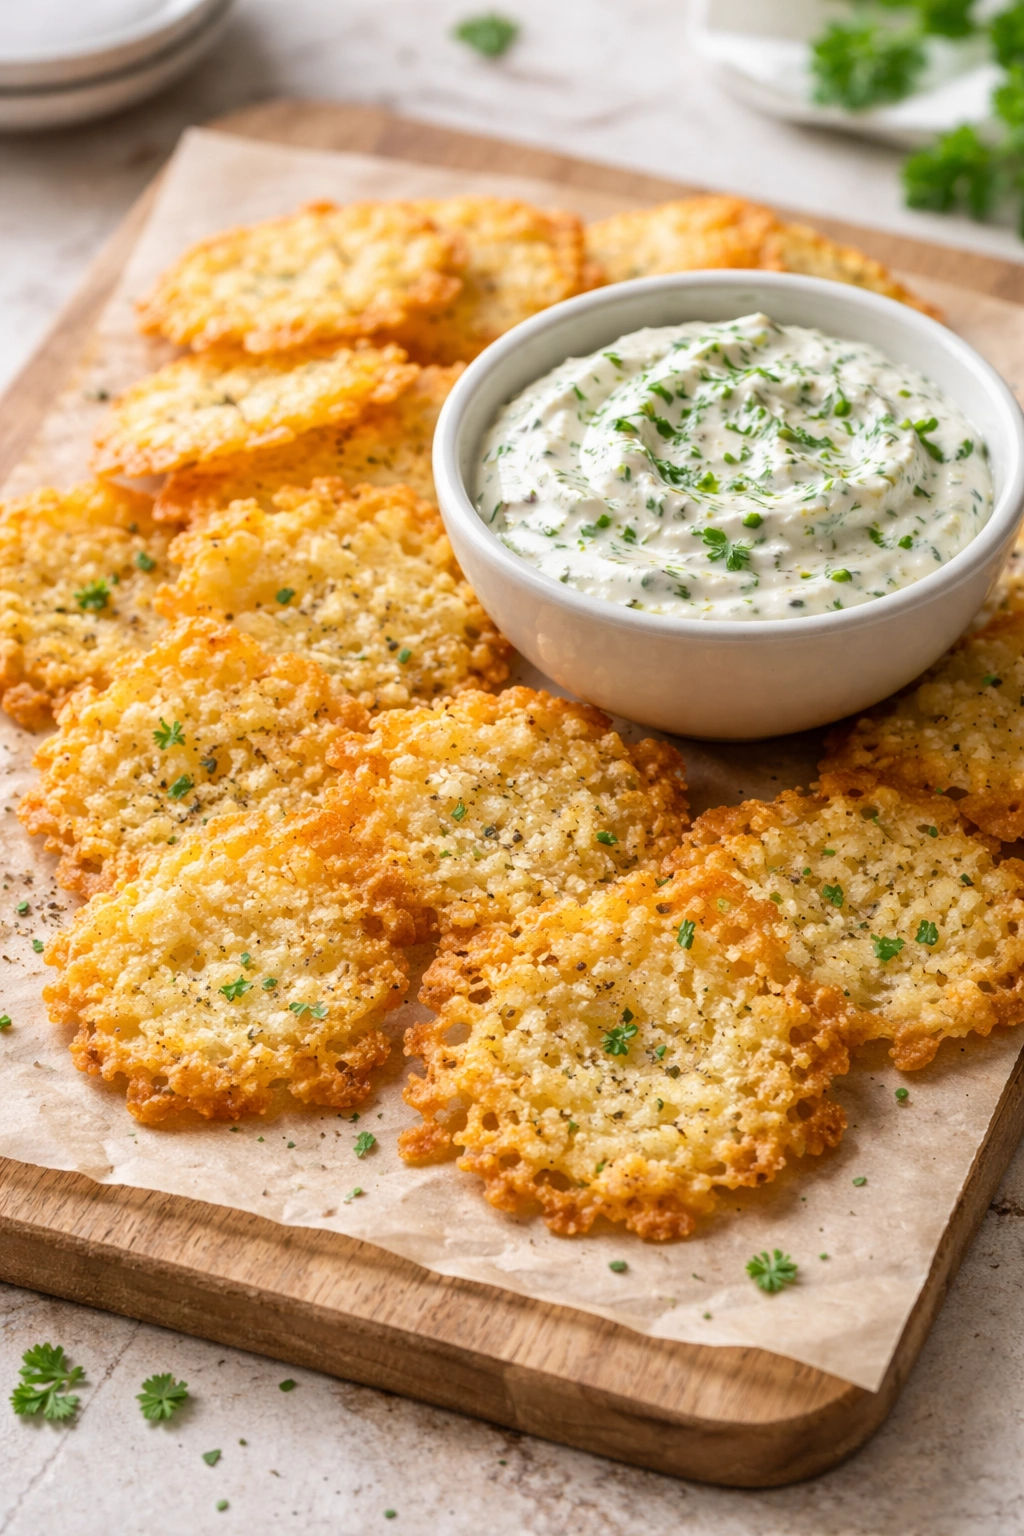
These are literally just grated Parmesan cheese baked until golden and crispy—essentially dehydrated cheese crisps that come out of the oven after ten minutes looking like something from a fancy appetizer menu. Serve them with a simple herb dip and people will ask where you bought them.
Why These Come Together So Easily
There are exactly zero ingredients to mix, chop, or prepare. You measure out cheese onto parchment paper and bake it. The only decision is whether you want them plain or mixed with some herbs before baking.
What You’ll Need
For the Chips:
- 2 cups finely grated Parmesan cheese (not the powdered kind in a can)
- 1 teaspoon garlic powder (optional)
- ½ teaspoon dried Italian seasoning (optional)
- Fresh cracked pepper
For the Dip:
- ½ cup sour cream
- 2 tablespoons fresh parsley, finely chopped
- 1 tablespoon fresh dill, finely chopped
- 1 clove garlic, minced very fine
- Salt and pepper to taste
Putting It Together
Preheat the oven to 400°F (200°C) and line a baking sheet with parchment paper. If using the optional seasonings, toss the Parmesan with garlic powder and Italian seasoning first. Drop small mounds (about a tablespoon each) of cheese onto the parchment paper, spacing them about two inches apart. They’ll spread as they bake, so don’t crowd the pan. Bake for 8 to 10 minutes, until golden and starting to crisp. Let them cool on the baking sheet for 2 minutes (they’ll continue to crisp as they cool), then transfer to a serving platter. For the dip, simply combine the sour cream, parsley, dill, minced garlic, salt, and pepper in a small bowl and serve alongside the chips.
Pro tip: Make the chips up to two days ahead and store them in an airtight container at room temperature. They stay crispy and you can assemble everything on the platter just before guests arrive.
8. Creamy Spinach and Artichoke Dip in Minutes
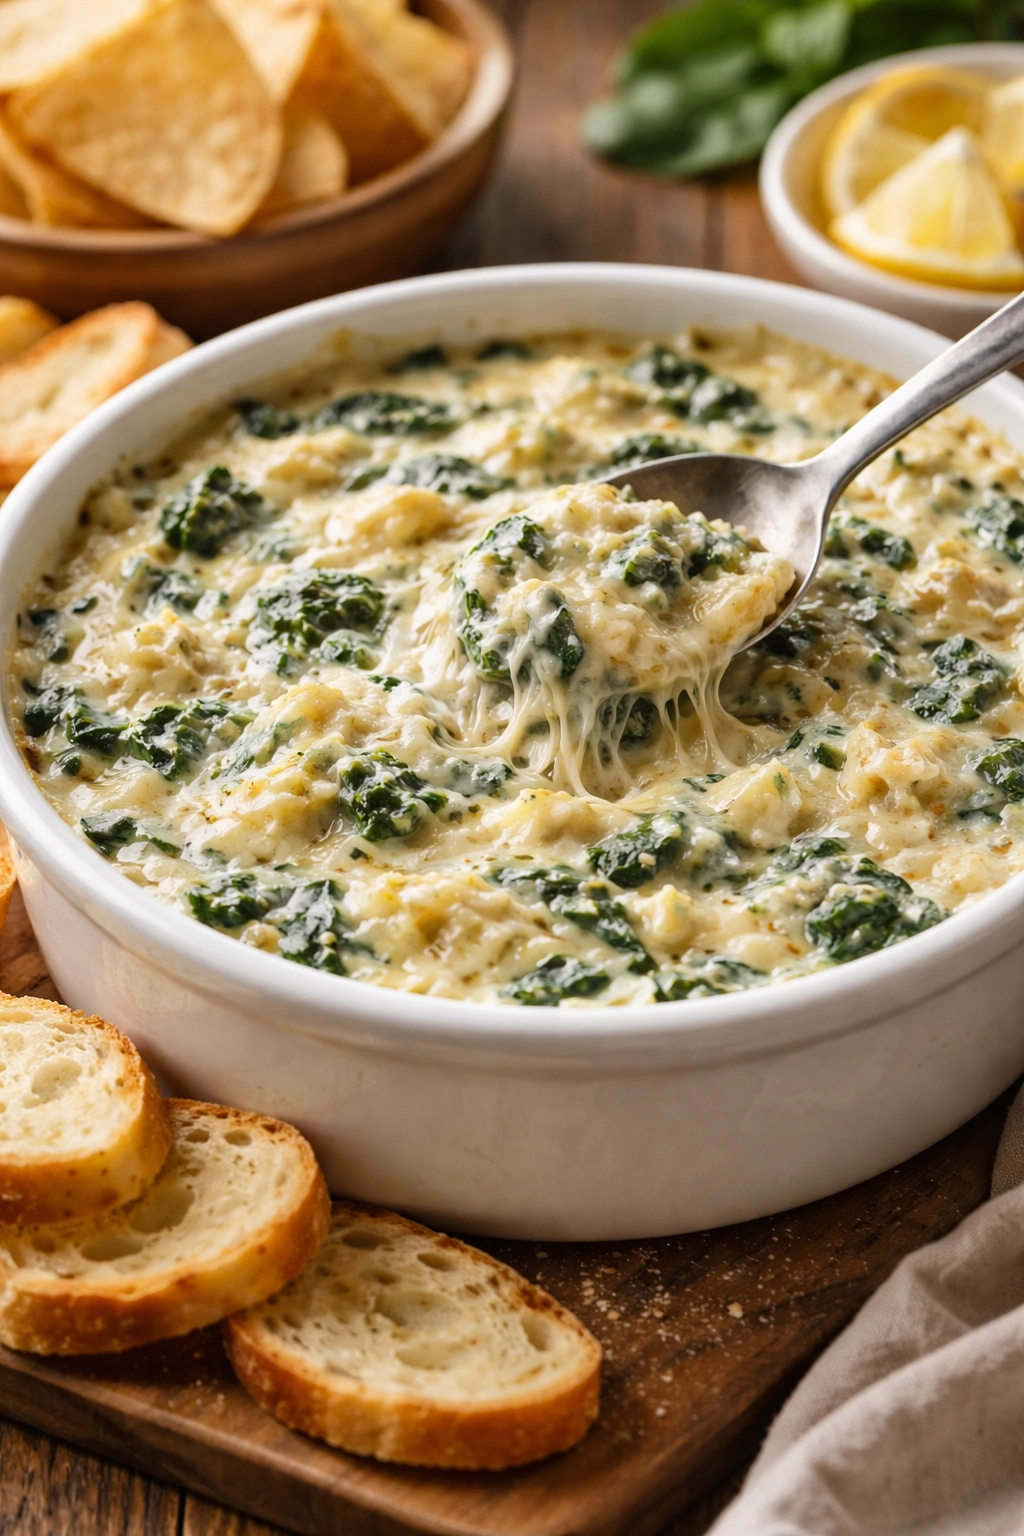
This dip is a crowd favorite for good reason—it tastes rich, decadent, and impossible to stop eating. What people don’t realize is that homemade versions are actually faster than the canned soup-based versions, and they taste infinitely better.
Why Homemade Is Actually the Quicker Option
Most traditional recipes call for cream of chicken soup, which sounds convenient but requires hunting for that specific ingredient. The stovetop method here uses cream cheese and sour cream, which you likely already have, and it takes about ten minutes to come together.
What You’ll Need
- 4 oz cream cheese, softened
- ¼ cup sour cream
- ¼ cup grated Parmesan cheese
- ½ cup mozzarella cheese, shredded
- 1 (10 oz) package frozen spinach, thawed and squeezed dry
- ½ cup canned artichoke hearts, chopped
- 2 cloves garlic, minced
- Salt and pepper
- Crackers or vegetables for serving
Putting It Together
Combine the cream cheese and sour cream in a medium saucepan over medium-low heat, stirring until smooth and creamy. Add the Parmesan and mozzarella, stirring until melted. Fold in the drained spinach, chopped artichokes, and minced garlic. Season with salt and pepper to taste. Transfer to a serving bowl and serve warm with crackers or fresh vegetables.
Pro tip: If you’re making this ahead, prepare it completely and reheat gently in a saucepan or microwave in thirty-second intervals, stirring between each, until warmed through.
9. Bacon-Wrapped Dates Stuffed with Cheese

Dates have a natural sweetness that pairs beautifully with salty bacon and creamy cheese. These hit all the flavor notes—sweet, salty, creamy, and slightly crispy—in one elegant bite.
Why This Combination Works Every Time
The natural sugar in dates caramelizes slightly as they bake, creating a deeper sweetness. The bacon crisps up while protecting the date, and the cheese melts inside creating a rich, gooey center. It’s an extremely forgiving recipe where pretty much any quality mishap still results in something delicious.
What You’ll Need
- 16 pitted dates
- 8 slices thick-cut bacon, halved
- 4 oz cream cheese or goat cheese
- ¼ cup chopped roasted almonds (optional)
- Toothpicks
Putting It Together
Preheat the oven to 400°F (200°C) and line a baking sheet with foil. Stuff each date with about a teaspoon of cream cheese and a few chopped almonds if using. Wrap each stuffed date with a piece of bacon and secure with a toothpick. Arrange on the prepared baking sheet and bake for 10 to 12 minutes, until the bacon is crispy and the cheese is soft and slightly oozing from the sides. Serve immediately while warm.
Pro tip: Freeze the bacon-wrapped dates on a baking sheet for up to two days before baking. This actually helps the bacon cook more evenly and crisps up better.
10. Whipped Feta Dip with Roasted Red Peppers
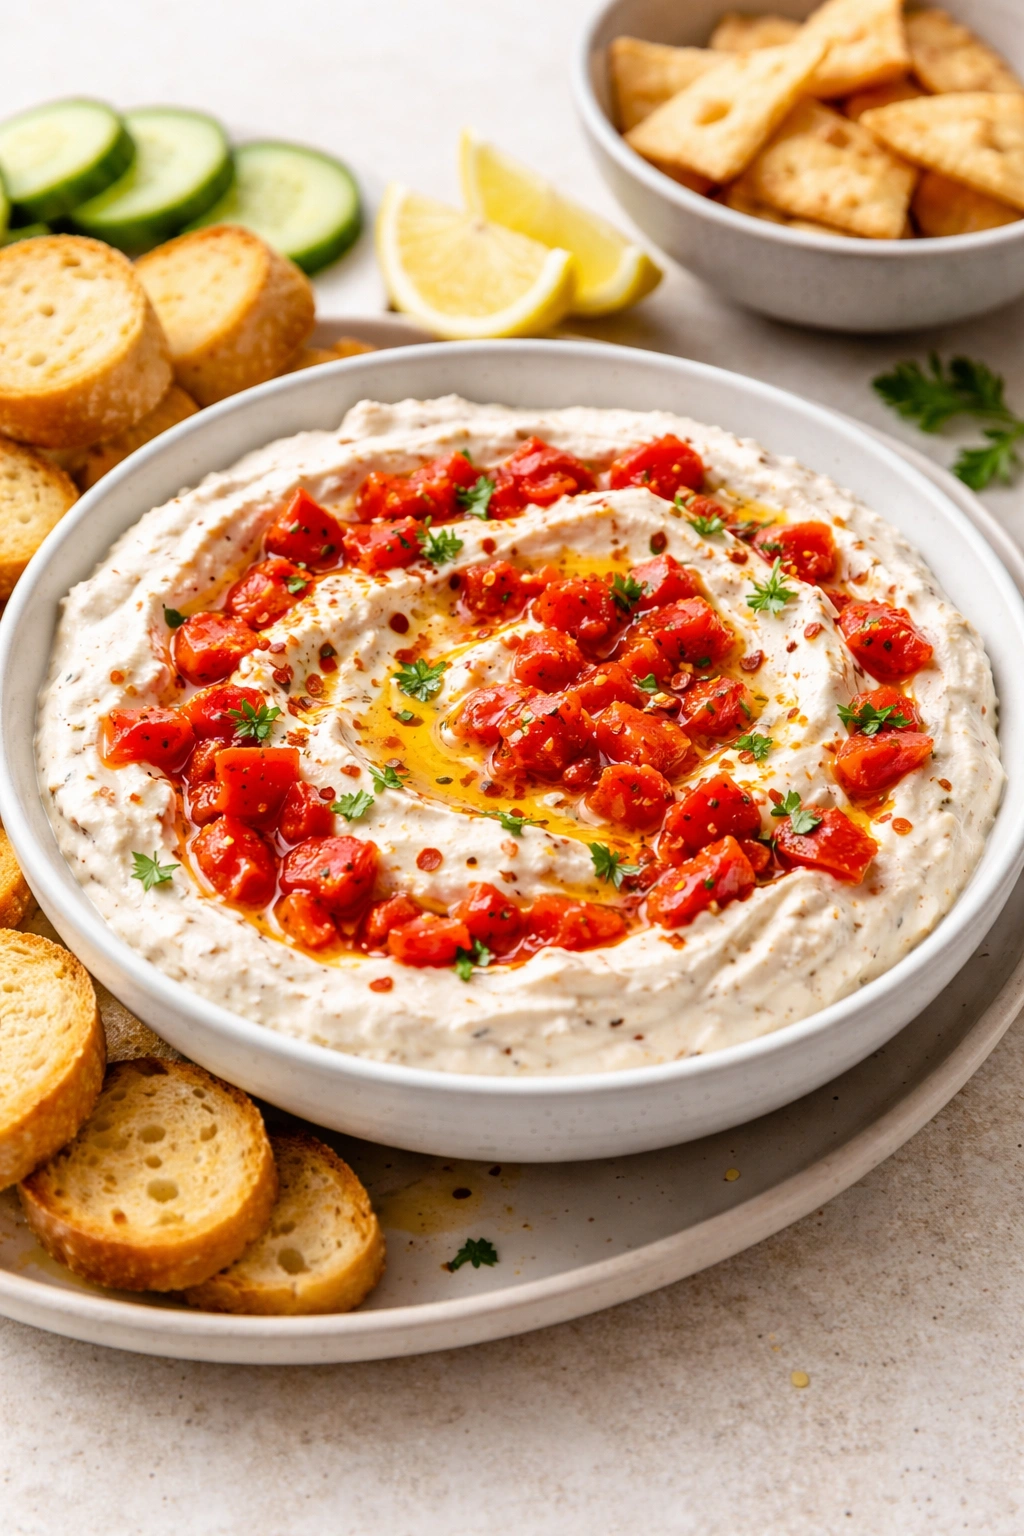
This dip tastes Mediterranean and sophisticated, but it’s primarily feta cheese whipped with olive oil until fluffy. The roasted red peppers add color, sweetness, and a subtle smoky note without requiring you to roast anything yourself.
Why Whipped Feta Changes Everything
Most people think of feta as a crumbly, salty cheese suitable only for salads. Whipped with olive oil, it transforms into something silky, spreadable, and infinitely more interesting. The whipping aeration makes it feel luxurious and rich, even though it’s mostly just cheese and oil.
What You’ll Need
- 8 oz feta cheese, crumbled
- 3 tablespoons extra-virgin olive oil
- 2 tablespoons fresh lemon juice
- 1 tablespoon honey
- ½ cup roasted red peppers (jarred is fine), chopped
- 2 tablespoons fresh dill or parsley, chopped
- Salt and pepper
- Crackers, bread, or vegetables for serving
Putting It Together
Add the crumbled feta, olive oil, and lemon juice to a food processor. Pulse until smooth and creamy, stopping to scrape down the sides as needed. Add the honey and pulse again briefly. Transfer to a serving bowl and fold in the chopped roasted red peppers and fresh herbs. Season with salt and pepper to taste. Serve at room temperature with crackers or fresh vegetables.
Pro tip: This dip tastes even better the next day after the flavors have melded overnight. Make it the day before a gathering and simply bring it out thirty minutes before serving.
11. Salty-Sweet Candied Bacon Bites
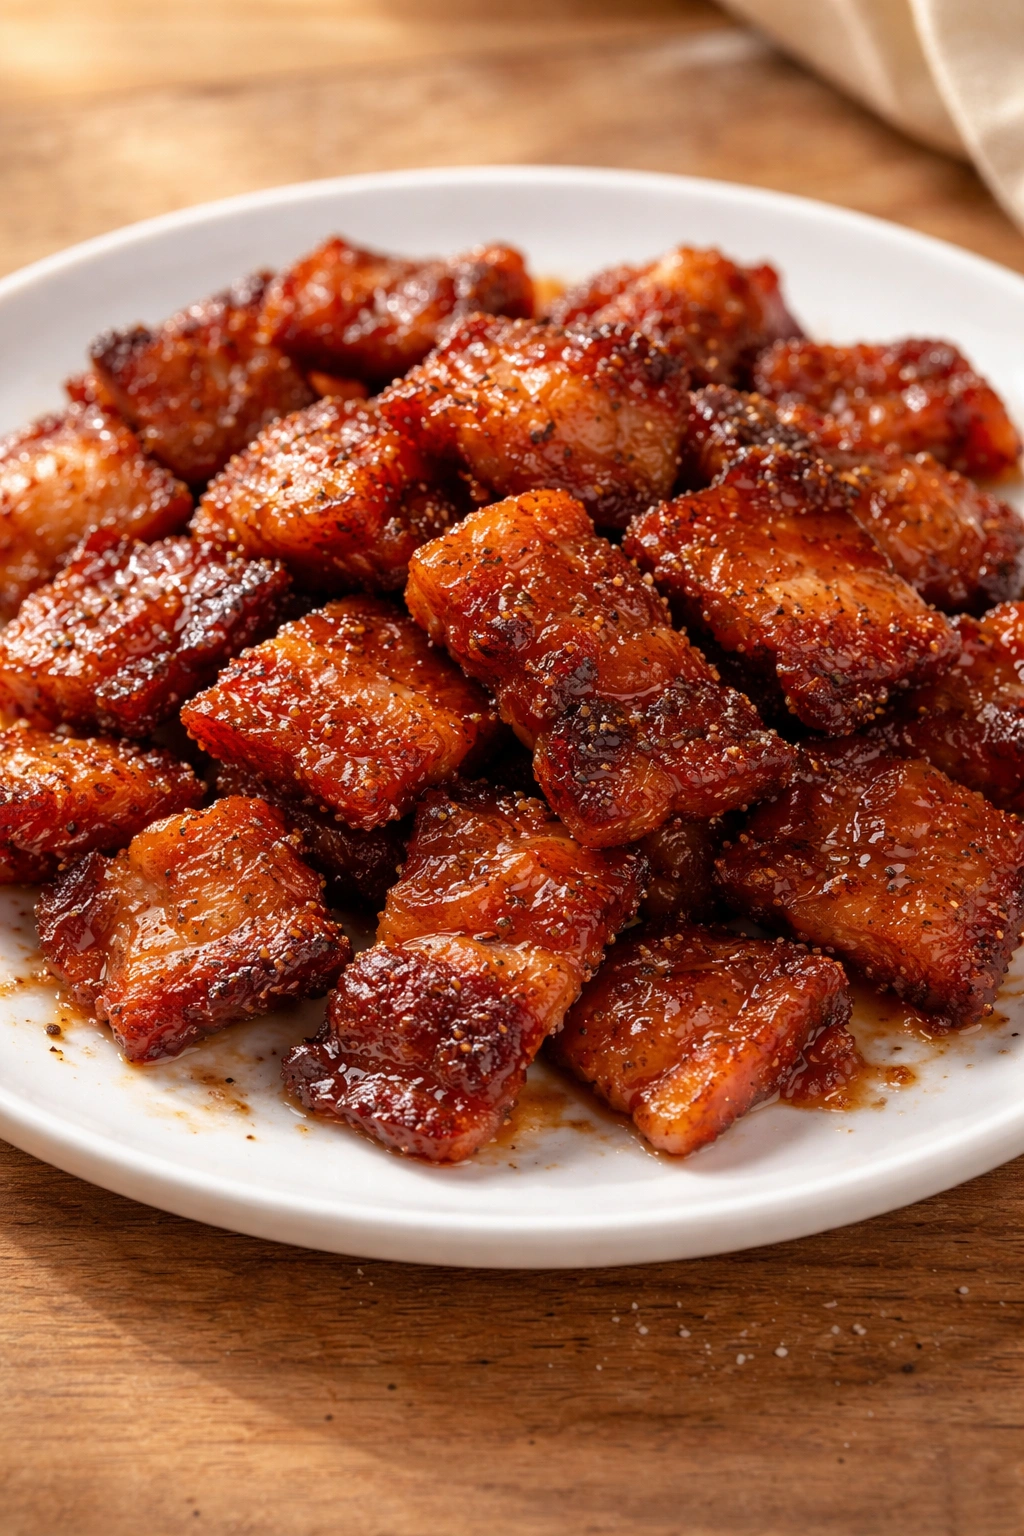
Bacon gets a light coating of brown sugar and a dash of heat before crisping in the oven. The sugar caramelizes, creating a sweet glaze while the bacon stays crispy and salty underneath. It’s addictive, elegant, and absolutely foolproof.
Why This Works as an Appetizer
Bacon is already a crowd-pleaser, but sweet candied bacon elevates it into something special. The caramelized sugar coating catches the light and looks intentional. Guests will eat several of these before they realize it, which is the hallmark of a great appetizer.
What You’ll Need
- 1 lb bacon (about 16 slices)
- 3 tablespoons brown sugar, packed
- 1 teaspoon cayenne pepper (optional, or use smoked paprika for less heat)
- ½ teaspoon garlic powder
- Freshly cracked black pepper
Putting It Together
Preheat the oven to 400°F (200°C) and line a baking sheet with foil for easy cleanup. Combine the brown sugar, cayenne pepper (if using), garlic powder, and black pepper in a small bowl. Lay bacon strips flat on the prepared baking sheet and sprinkle the sugar mixture generously over each slice, using about half the mixture. Bake for 12 to 15 minutes, until the bacon is crispy and the sugar is caramelized and glossy. Remove from the oven and let cool on the baking sheet for 2 minutes—the sugar will harden slightly as it cools, making the bacon easier to remove. Transfer to a serving platter.
Pro tip: Cut the bacon in half before cooking if you want smaller, more elegant pieces suitable for eating with one hand at a party.
12. Avocado Toast Bites on Crispy Bread
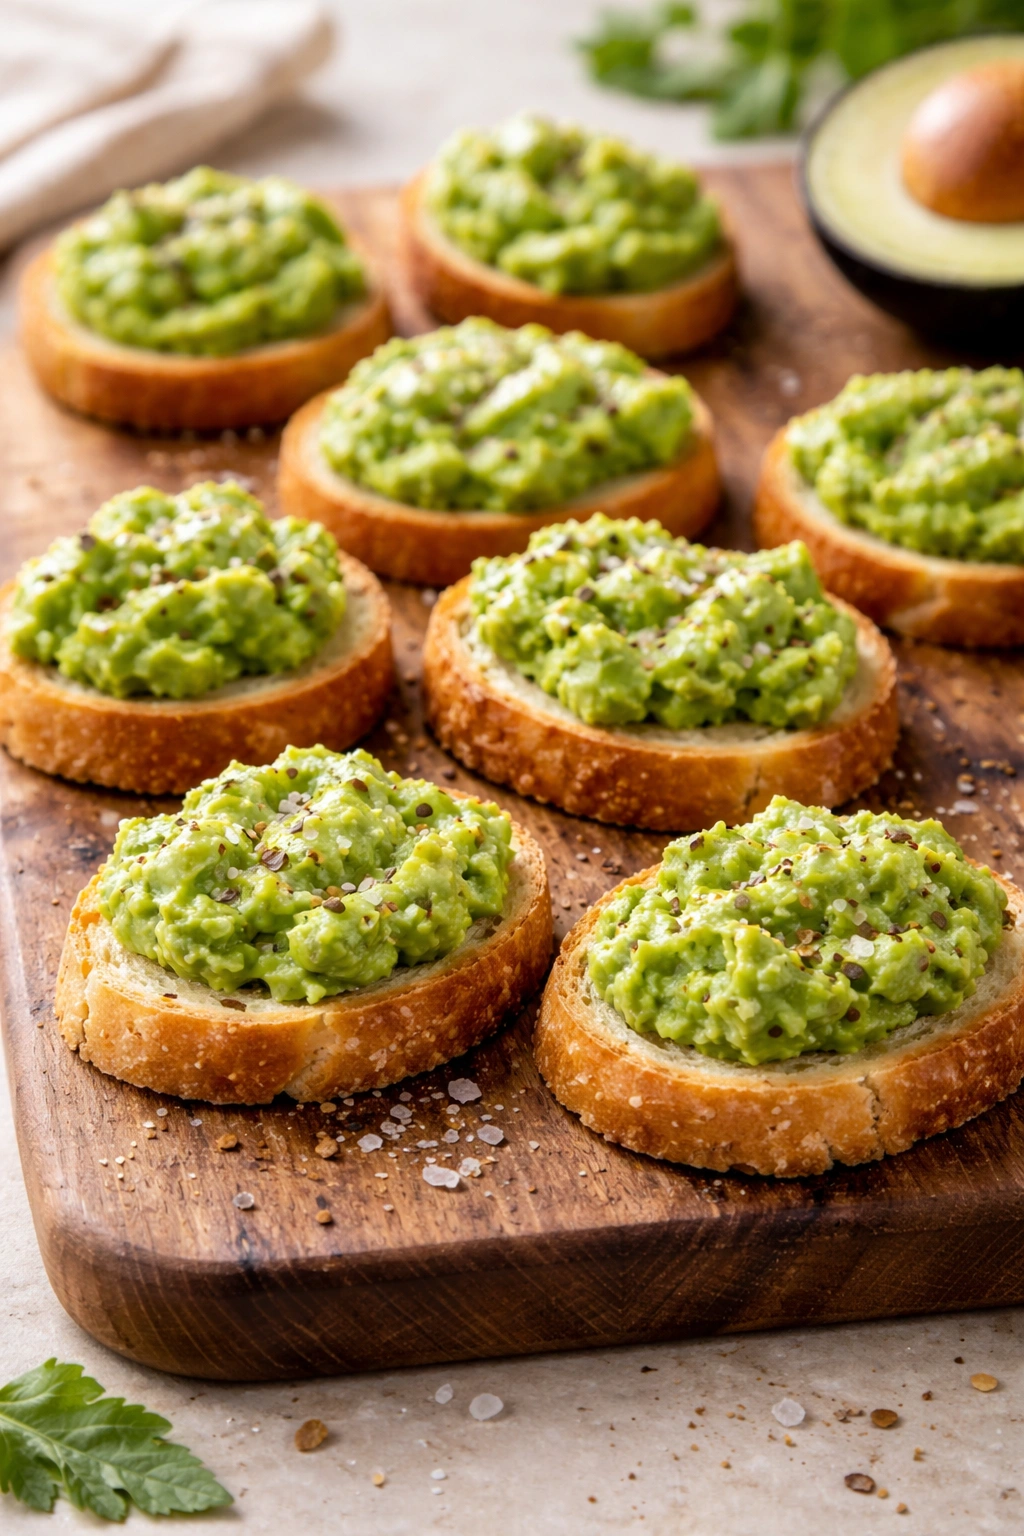
Creamy avocado on crispy toast sounds simple because it is, but the quality of execution makes all the difference. Use excellent bread, perfectly ripe avocado, and quality salt, and you get an appetizer that tastes fresh and intentional.
Why This Feels Like It Took More Work Than It Did
The crispiness of the bread provides textural contrast, and the creamy avocado needs minimal preparation. A squeeze of lemon juice and flaky sea salt transform avocado into something restaurant-quality without any actual cooking skill.
What You’ll Need
- 1 French baguette or sourdough bread, sliced ¼-inch thick
- 2 ripe but firm avocados
- 2 tablespoons extra-virgin olive oil
- 2 tablespoons fresh lemon juice
- Flaky sea salt
- Cracked black pepper
- Optional toppings: crushed red pepper flakes, microgreens, or crispy prosciutto pieces
Putting It Together
Preheat the oven to 400°F (200°C). Arrange bread slices on a baking sheet and toast for 4 to 5 minutes until crispy and lightly golden. While the bread toasts, cut the avocados in half, remove the pit, and scoop the flesh into a small bowl. Mash lightly with a fork—you want some texture, not a completely smooth puree. Add the lemon juice and mix gently. Spread about a tablespoon of mashed avocado onto each piece of toasted bread, drizzle lightly with olive oil, and finish with flaky sea salt, cracked pepper, and any optional toppings. Serve immediately.
Pro tip: Prepare the avocado topping no more than 15 minutes before serving to prevent the avocado from browning. Toast the bread ahead of time and assemble right before guests arrive.
13. Crispy Garlic Parmesan Potato Rounds

Thin slices of potato get a quick pan-fry until golden and crispy, then topped with sour cream, chives, and Parmesan. They taste like loaded baked potato meets crispy French fries, all in a one-bite format.
Why These Feel Fancy But Cook Incredibly Fast
Thin slicing means the potatoes cook in just a few minutes in a hot pan instead of requiring oven time. The crispy edges are flavorful, and the creamy topping contrasts beautifully with the crispiness of the base.
What You’ll Need
- 2 large waxy potatoes (like Yukon Gold), sliced ⅛-inch thick
- 3 tablespoons olive oil or butter
- Salt and pepper
- ½ cup sour cream
- 3 tablespoons grated Parmesan cheese
- 2 tablespoons fresh chives, chopped
- 1 clove garlic, minced
- Optional: crispy bacon pieces
Putting It Together
Heat a large skillet over medium-high heat with the oil or butter. Once hot, add the potato slices in a single layer (you may need to work in batches) and cook without moving them for 2 to 3 minutes until the bottom is golden and crispy. Flip each slice and cook for another 1 to 2 minutes on the second side. Transfer to a paper towel-lined plate and season with salt and pepper. While the potatoes cook, stir together the sour cream, minced garlic, salt, and pepper. Once the potatoes are cool enough to handle, top each with a small dollop of sour cream mixture, a sprinkle of Parmesan, fresh chives, and optional bacon pieces.
Pro tip: Use a mandoline slicer to get uniform thin slices quickly, but be careful with your fingers—those blades are sharp.
14. Crispy Wonton Cups with Asian Dipping Sauce
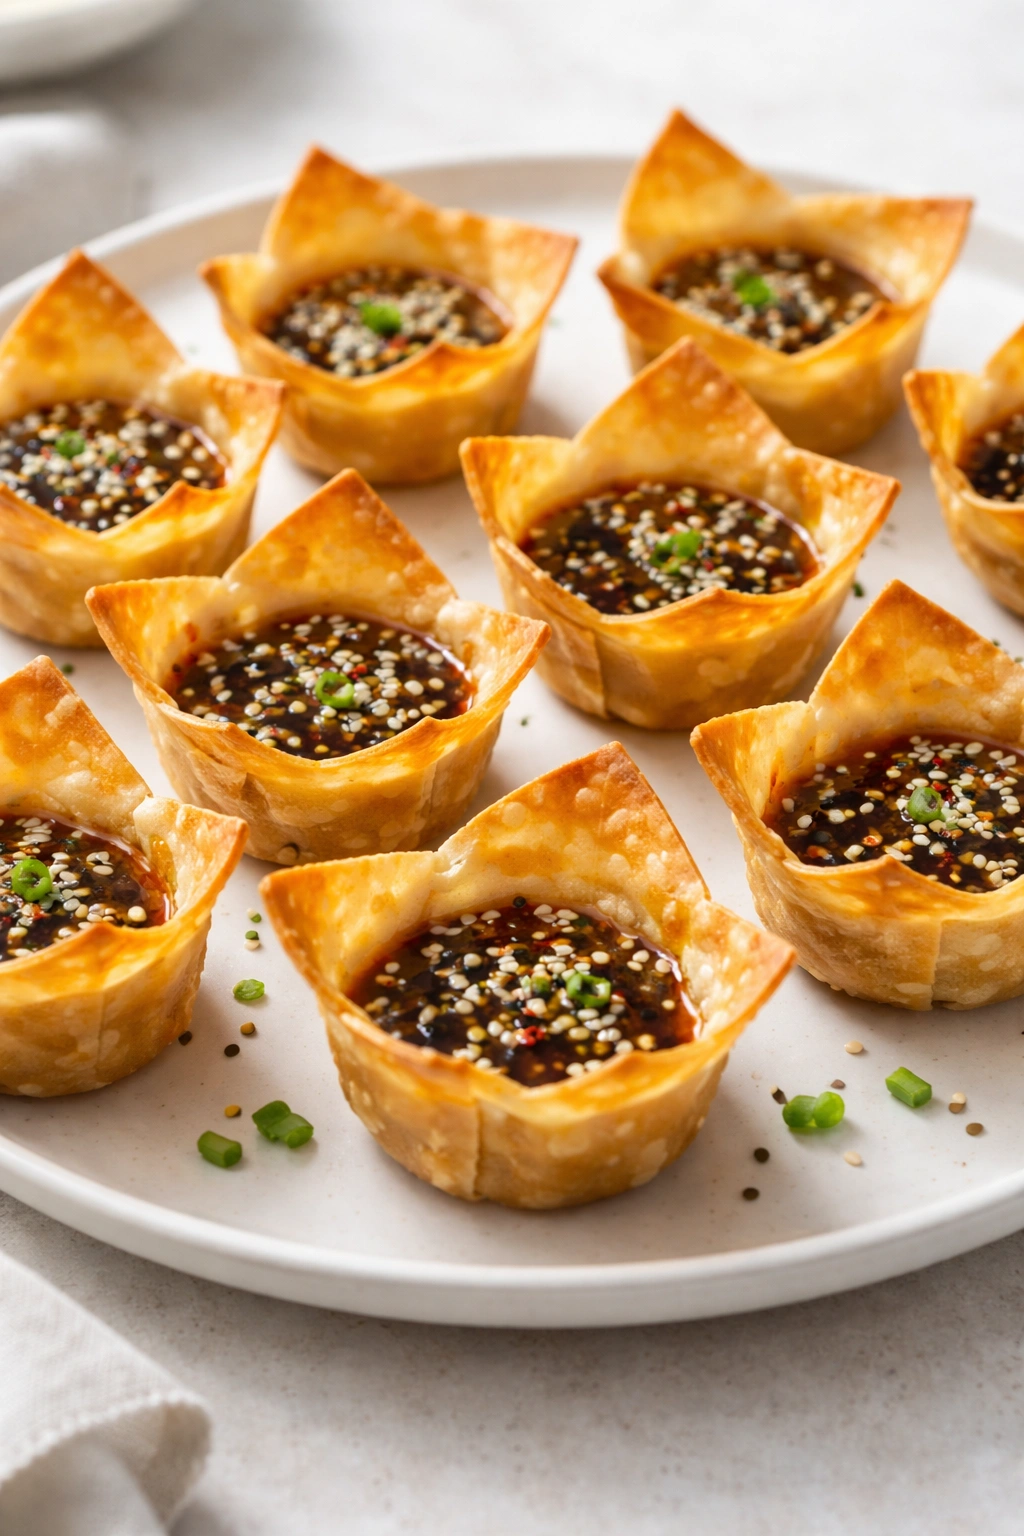
Wonton wrappers crisped in a muffin tin and filled with a sesame-soy dipping sauce create an elegant appetizer that’s primarily theater and minimal effort. The cups can be made ahead, and you assemble them literally right before serving.
Why This Looks Way More Complicated Than It Is
You’re basically baking wonton wrappers in a muffin tin so they crisp up into cup shapes, then filling them with sauce. The presentation automatically looks sophisticated because the wonton cups are dramatic and unusual.
What You’ll Need
- 24 wonton wrappers
- Cooking spray or melted butter
- Salt
For the Dipping Sauce:
- 3 tablespoons soy sauce
- 1 tablespoon rice vinegar
- 1 tablespoon sesame oil
- 1 teaspoon honey
- 1 clove garlic, minced
- ½ teaspoon fresh ginger, minced
- 1 teaspoon sesame seeds
Putting It Together
Preheat the oven to 375°F (190°C). Spray a muffin tin with cooking spray. Press a wonton wrapper gently into each muffin cup, allowing the edges to stick up slightly. Lightly spray the tops with cooking spray and sprinkle with a pinch of salt. Bake for 6 to 8 minutes until golden and crispy. Let cool in the tin for a minute, then carefully remove and place on a serving platter. For the sauce, whisk together the soy sauce, rice vinegar, sesame oil, honey, minced garlic, and ginger. Transfer to a small bowl and sprinkle with sesame seeds. Fill each wonton cup with a small amount of sauce and serve immediately, or serve the sauce alongside for dipping.
Pro tip: Make the wonton cups up to two days ahead and store them in an airtight container at room temperature. They stay crispy and you can fill them with sauce just before serving.
15. Stuffed Mushroom Caps with Herbs and Cheese
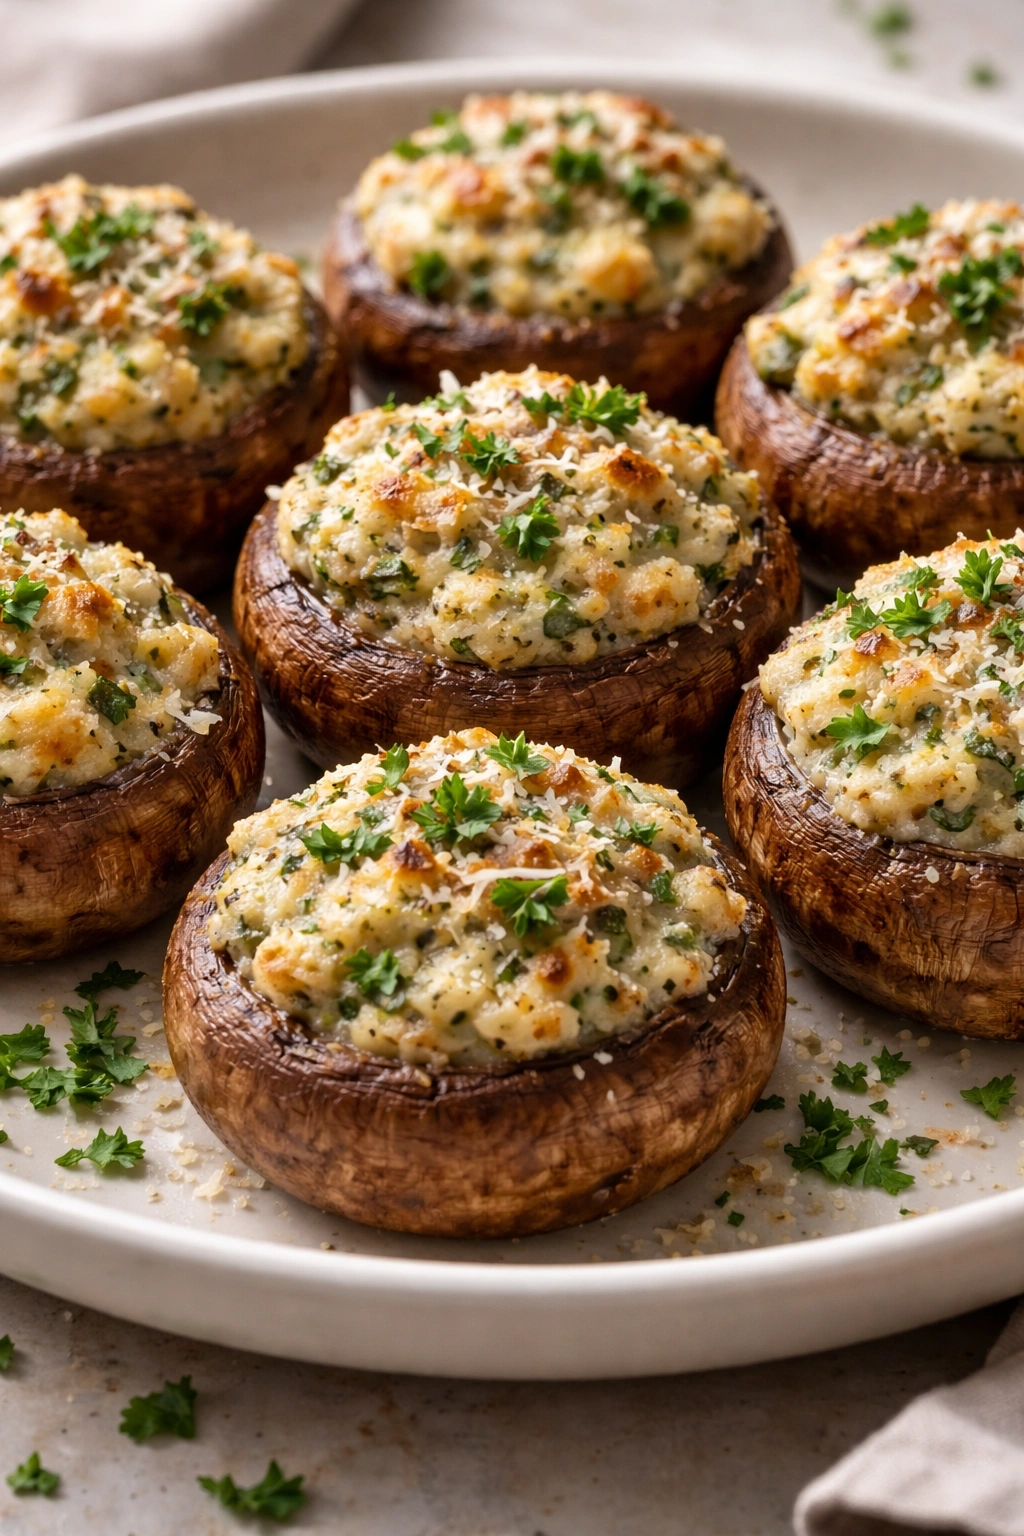
Mushroom caps hollowed out and filled with a savory herb and cheese mixture, then baked until golden, are comfort food in bite-sized form. They feel substantial and homemade, but come together incredibly quickly.
Why Mushrooms Make Perfect Vessels for Quick Appetizers
Mushroom caps cook fast because they’re thin, and they create a natural container for filling. You don’t need to make a wrapper or figure out how to contain your filling—it’s built in. The mushrooms also absorb the flavors of the filling while releasing their own umami into the pan.
What You’ll Need
- 1 lb large mushrooms (cremini or button), stems removed
- 3 tablespoons olive oil
- 4 cloves garlic, minced
- ½ cup breadcrumbs
- ½ cup grated Parmesan cheese
- ¼ cup fresh parsley, finely chopped
- 2 tablespoons fresh thyme, finely chopped
- Salt and pepper
- Optional: 2 oz mozzarella, shredded
Putting It Together
Preheat the oven to 400°F (200°C). Clean the mushroom caps with a damp cloth and arrange them on a baking sheet, gill-side up. Heat the olive oil in a small skillet over medium heat and add the minced garlic, cooking for about 30 seconds until fragrant. Remove from heat and stir in the breadcrumbs, Parmesan, parsley, thyme, salt, and pepper. Spoon about a tablespoon of filling into each mushroom cap, pressing gently so it stays in place. If using mozzarella, add a small handful to the top of each cap. Bake for 10 to 12 minutes until the mushrooms release their liquid and the filling is golden. Serve warm.
Pro tip: Remove the dark gills from the mushroom caps with a spoon if you want them to look cleaner and hold more filling without releasing excess moisture.
Final Thoughts

The best part about these fifteen appetizers is that none of them require special skills, expensive ingredients, or hours of advance planning. Each one comes together in twenty minutes or less, which means you can go from “guests are arriving soon” to “here’s an impressive spread” without stress.
Start with whichever sounds most appealing to you and master that one first. Once you’ve made a couple of these, you’ll develop a feel for timing and assembly, and the next ones will feel even faster. Keep your pantry stocked with basics like cream cheese, crackers, good olive oil, and fresh herbs, and you’ll always be ready to pull together something excellent on short notice.
The real secret isn’t some advanced cooking technique—it’s recognizing that impressive appetizers don’t require complexity. They require good ingredients, simple techniques you can execute with confidence, and the willingness to serve food that tastes intentional and delicious, regardless of how long it took to make. Every single one of these will get you there.