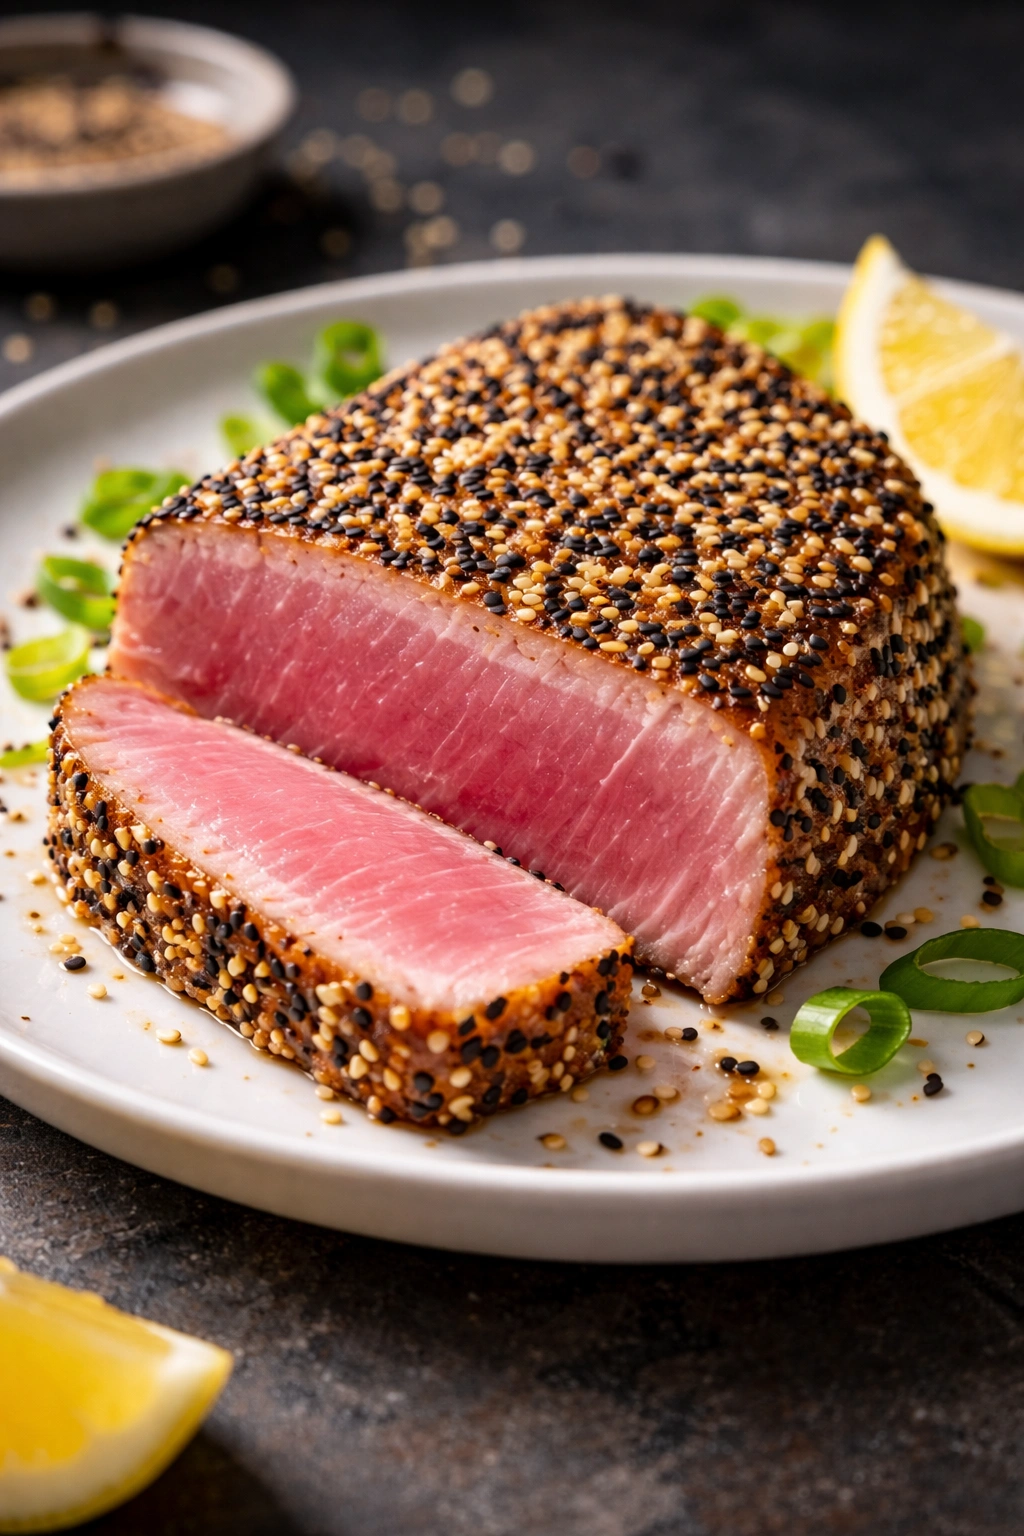
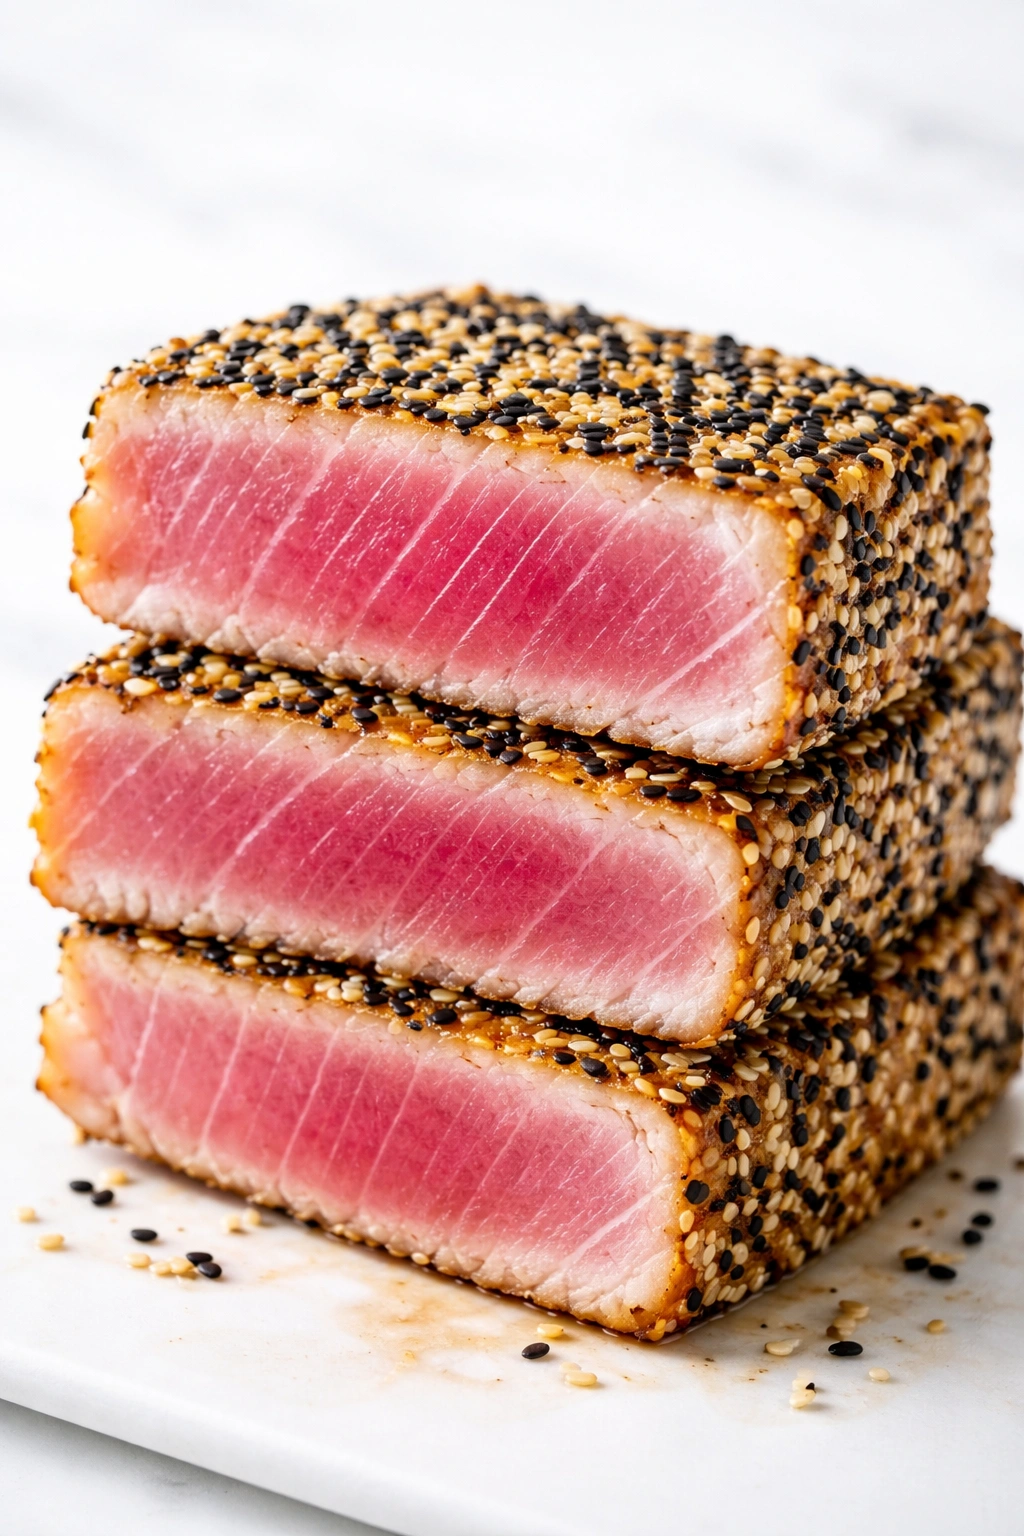
Seared ahi tuna with a crispy sesame crust is one of those dishes that feels restaurant-quality but takes less than 15 minutes from pan to plate. The exterior gets this incredible golden-brown crunch packed with nutty sesame flavor, while the interior stays buttery and rare — the textural contrast alone makes this dish addictive. And here’s the best part for anyone following keto: it’s pure protein and healthy fat with virtually zero carbs, making it a perfect centerpiece for a low-carb meal that doesn’t feel like a compromise.
What makes this recipe particularly satisfying is how the sesame crust creates a flavor boundary that seals in the ahi’s delicate, clean taste while adding an umami-rich dimension that elevates the whole dish. You’re not covering up the tuna — you’re enhancing it. The sesame seeds toast slightly as the exterior browns, releasing oils and aromas that make your kitchen smell like a high-end sushi restaurant. Paired with fresh ginger, wasabi, and perhaps some soy-based sauce on the side, this becomes the kind of meal you’ll want to make weekly.
This recipe bridges the gap between weeknight cooking and something you’d proudly serve to guests. It requires minimal equipment, teaches you a genuinely useful technique that applies to other proteins, and delivers impressive results that make you look like you spent hours in the kitchen when you barely spent 20 minutes active time. Let’s walk through exactly how to make this restaurant-quality dish at home.
Why Ahi Tuna Is Perfect for Keto
Ahi tuna is one of the leanest, most protein-dense fish available, making it a keto superstar. A 3-ounce serving contains roughly 25 grams of protein and fewer than 1 gram of carbohydrates — that’s an exceptional macro ratio that fits perfectly into ketogenic eating. Unlike fattier fish like salmon, which carry more calories per serving, ahi gives you pure muscle with clean flavor that doesn’t overwhelm the palate.
The real advantage goes beyond mere macros, though. Ahi’s firm, meaty texture means it can stand up to bold flavor treatments like sesame crusts, spice rubs, and assertive sauces. It won’t flake apart or become mushy when seared at high heat. This structural integrity is what allows you to develop that golden crust while keeping the interior perfectly rare, something that wouldn’t work nearly as well with delicate whitefish.
Ahi also provides omega-3 fatty acids, selenium, and B vitamins including B12 — nutrients your body actually needs on a ketogenic diet. The nutrient density paired with the flavor profile makes ahi one of the most satisfying protein choices for keto eating. You get satiety, genuine enjoyment, and excellent nutrition all in one meal.
Understanding the Sesame Crust Component
The sesame crust isn’t just a topping — it’s a crucial element that serves multiple purposes. Sesame seeds contain lignans and phytosterols, compounds that add nutritional depth to the dish. The seeds are also mostly fat and protein with minimal carbohydrate content, making them perfectly keto-compliant while adding richness and mouthfeel to the finished dish.
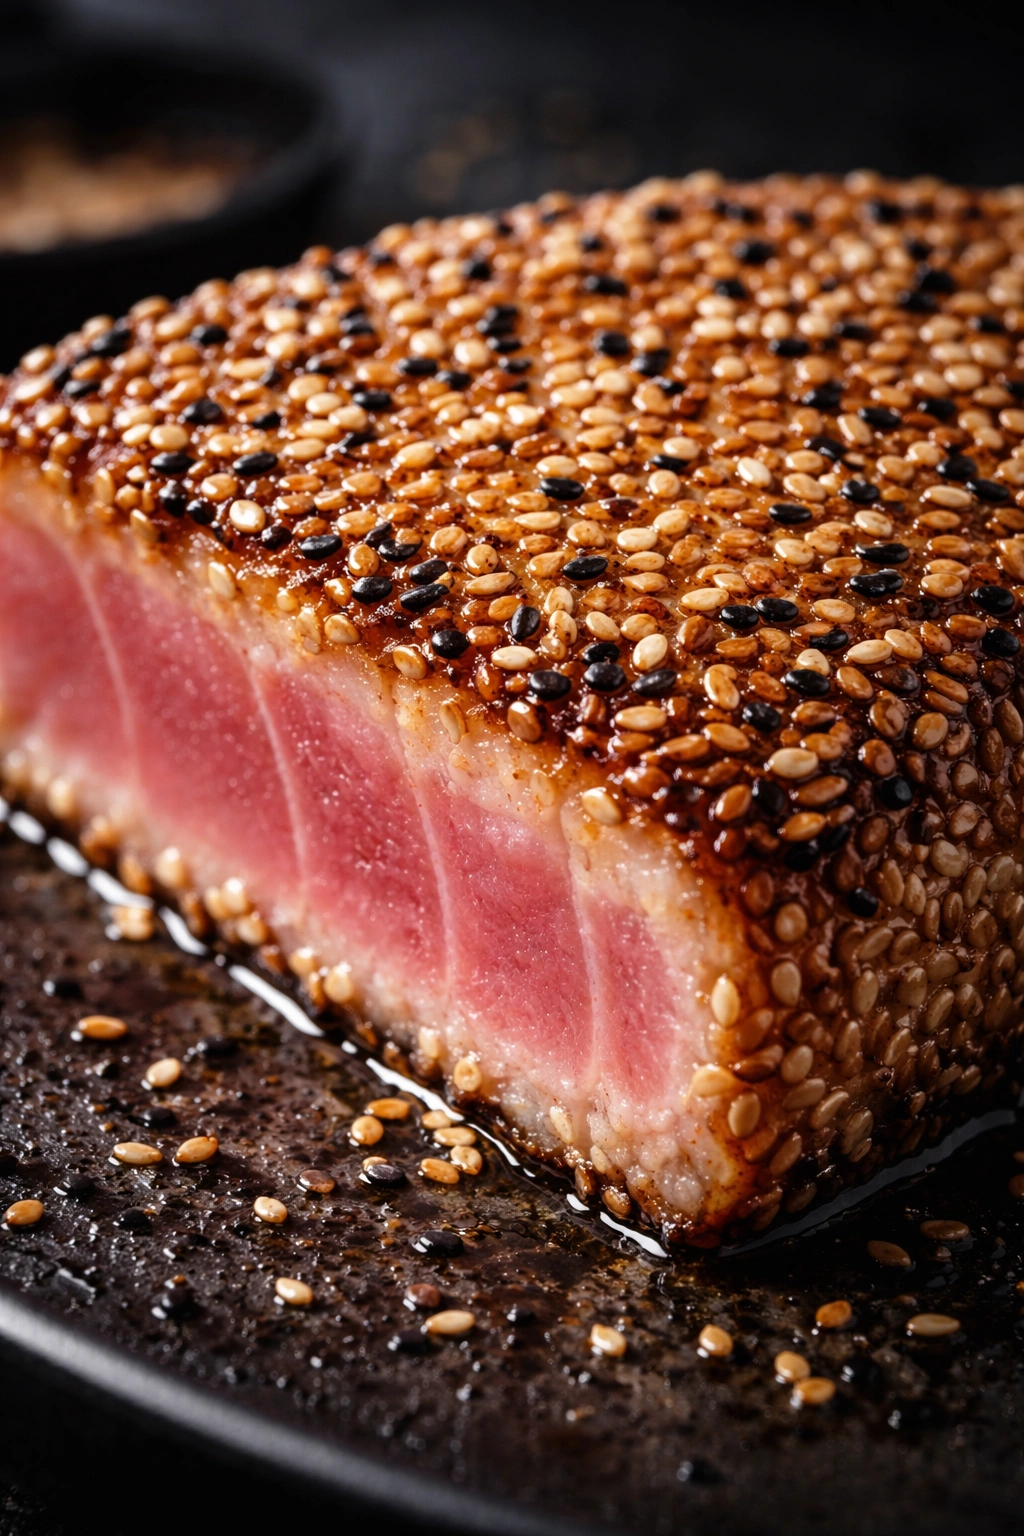
When sesame seeds toast during the searing process, their oils release and amplify dramatically. Raw sesame has a mild, slightly nutty flavor, but toasted sesame becomes aromatic, almost sweet, and deeply savory. This transformation happens in just 30-45 seconds of high heat — the same window where you’re developing the ahi’s crust. The timing works perfectly because the two cooking processes happen simultaneously.
The crust also serves a practical function: it creates a flavor and texture boundary that seals the ahi’s exterior while preventing the fish from sticking to the pan. The seeds catch in the hot oil and brown before the fish’s surface overcooks, developing that desirable golden appearance and crispy texture. This technique is actually borrowed from traditional sashimi-grade tuna preparation in Japanese cuisine, where the concept of “seared rare” is refined to an art form.
Choosing Quality Ahi Tuna for Best Results
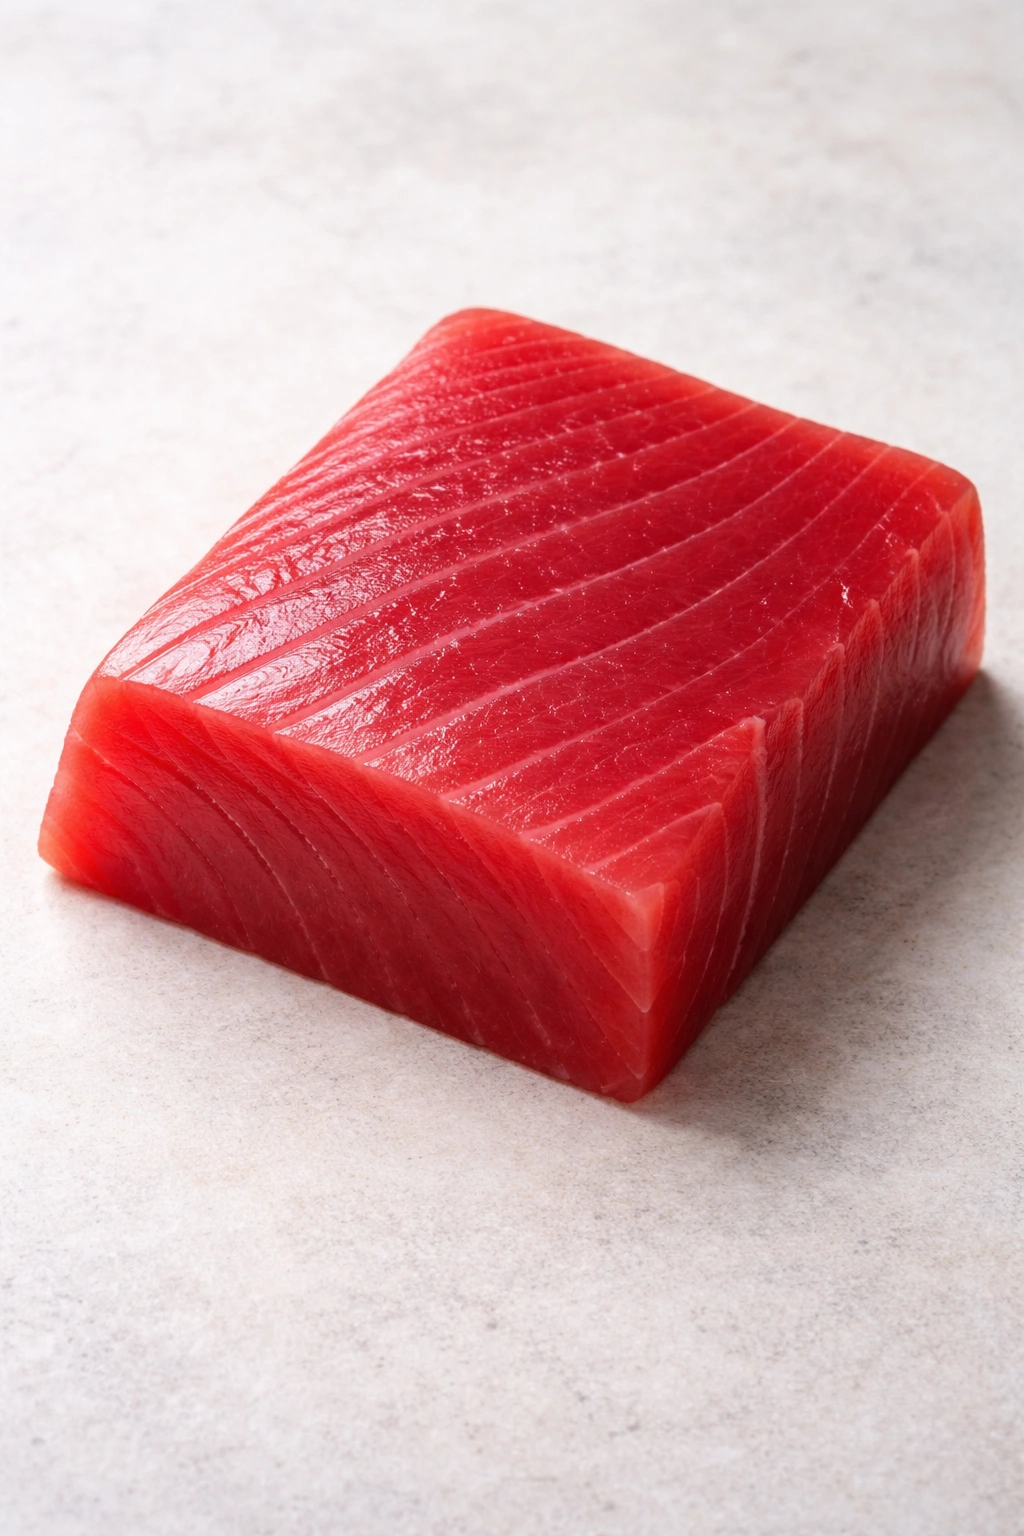
Not all ahi tuna is created equal, and the quality of your starting ingredient directly determines your results. For this recipe, you absolutely need sashimi-grade ahi — the highest quality designation that indicates the fish is safe to consume raw. This isn’t just about safety, though that matters. Sashimi-grade ahi has been frozen at specific temperatures to eliminate parasites, and it’s handled with exceptional care from catch to counter.
Look for ahi that’s deep red with a glossy surface, showing no browning, discoloration, or areas that appear dull or oxidized. The flesh should be firm to the touch, and the smell should be clean and briny — never fishy or ammonia-like. Ask your fishmonger when the fish arrived and where it came from. Reputable fishmongers source their ahi from reliable suppliers and can tell you specific details about the fish’s origin and handling.
Buy your ahi the same day you plan to cook it, or at most one day before. Ask the fishmonger to cut a block that’s roughly 1 to 1.5 inches thick and about 4 inches on each side — perfect for the searing method in this recipe. If you cut it yourself, use a very sharp, clean knife with a single decisive stroke rather than sawing motions, which damage the tissue and create a ragged surface.
Essential Equipment and Ingredients

You’ll need a few key pieces of equipment to execute this recipe properly. A cast-iron skillet or stainless steel skillet is essential — both retain heat exceptionally well and develop that superior sear you’re after. Nonstick pans won’t get hot enough to create a proper crust. A quality chef’s knife helps with any final prep work on the tuna block itself.
Paper towels are crucial for drying the tuna’s surface thoroughly before cooking — moisture is the enemy of crust development. An instant-read thermometer (optional but helpful) lets you hit your exact doneness level, which matters when you’re working with such a quick-cooking protein. A small shallow bowl works perfectly for dredging the sesame mixture.
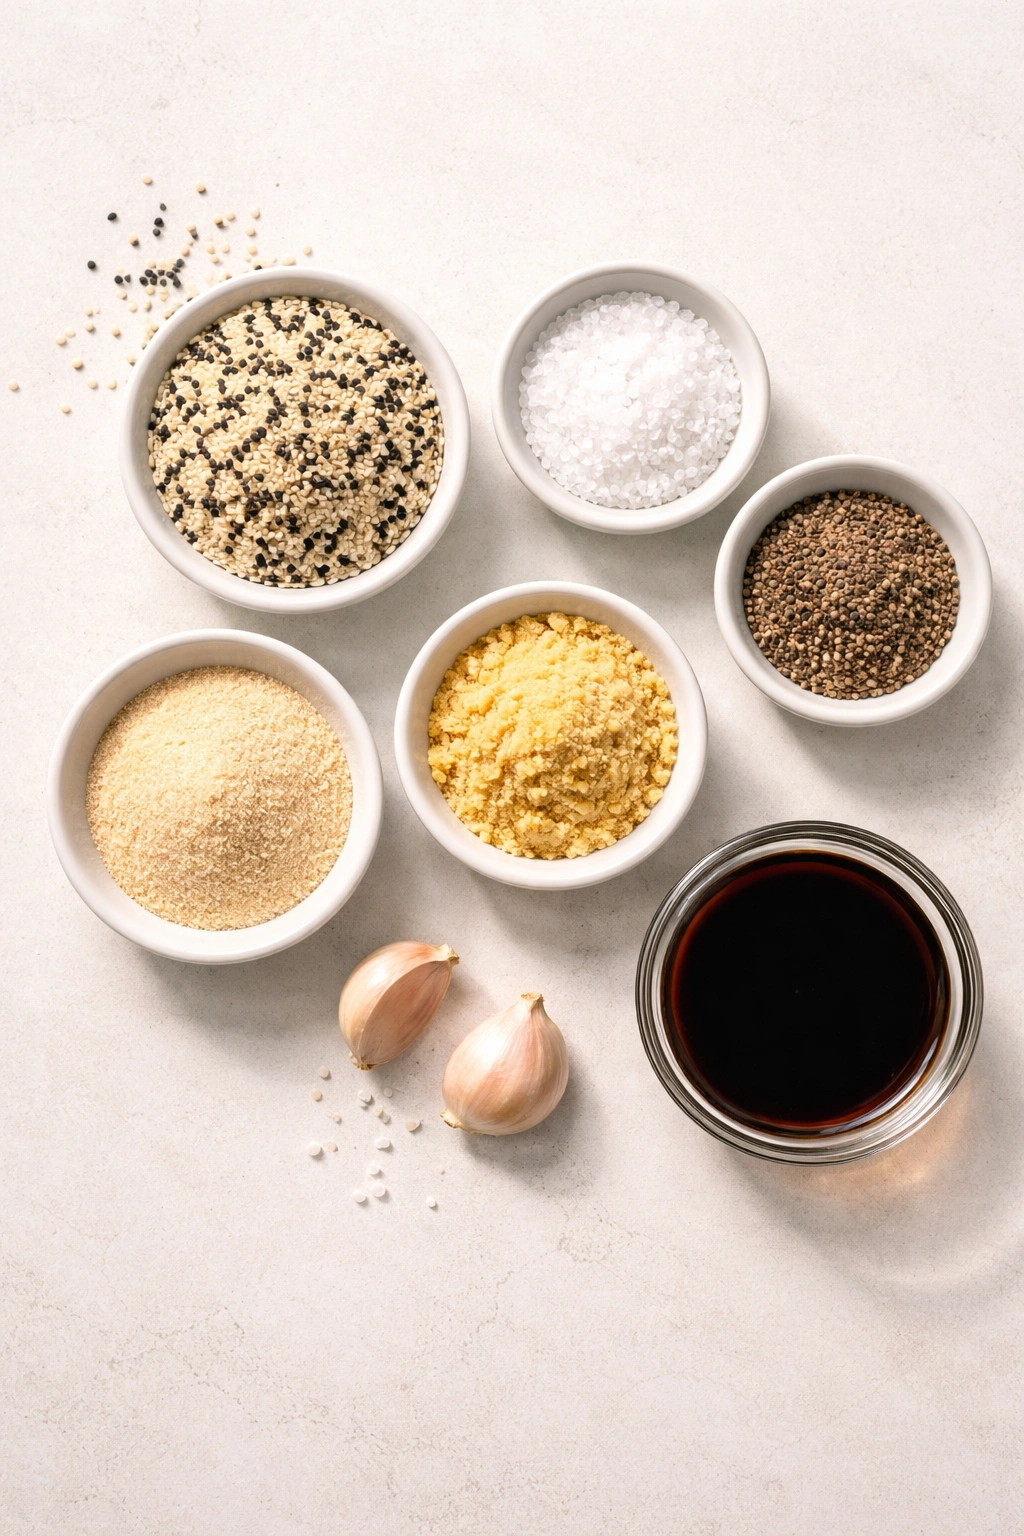
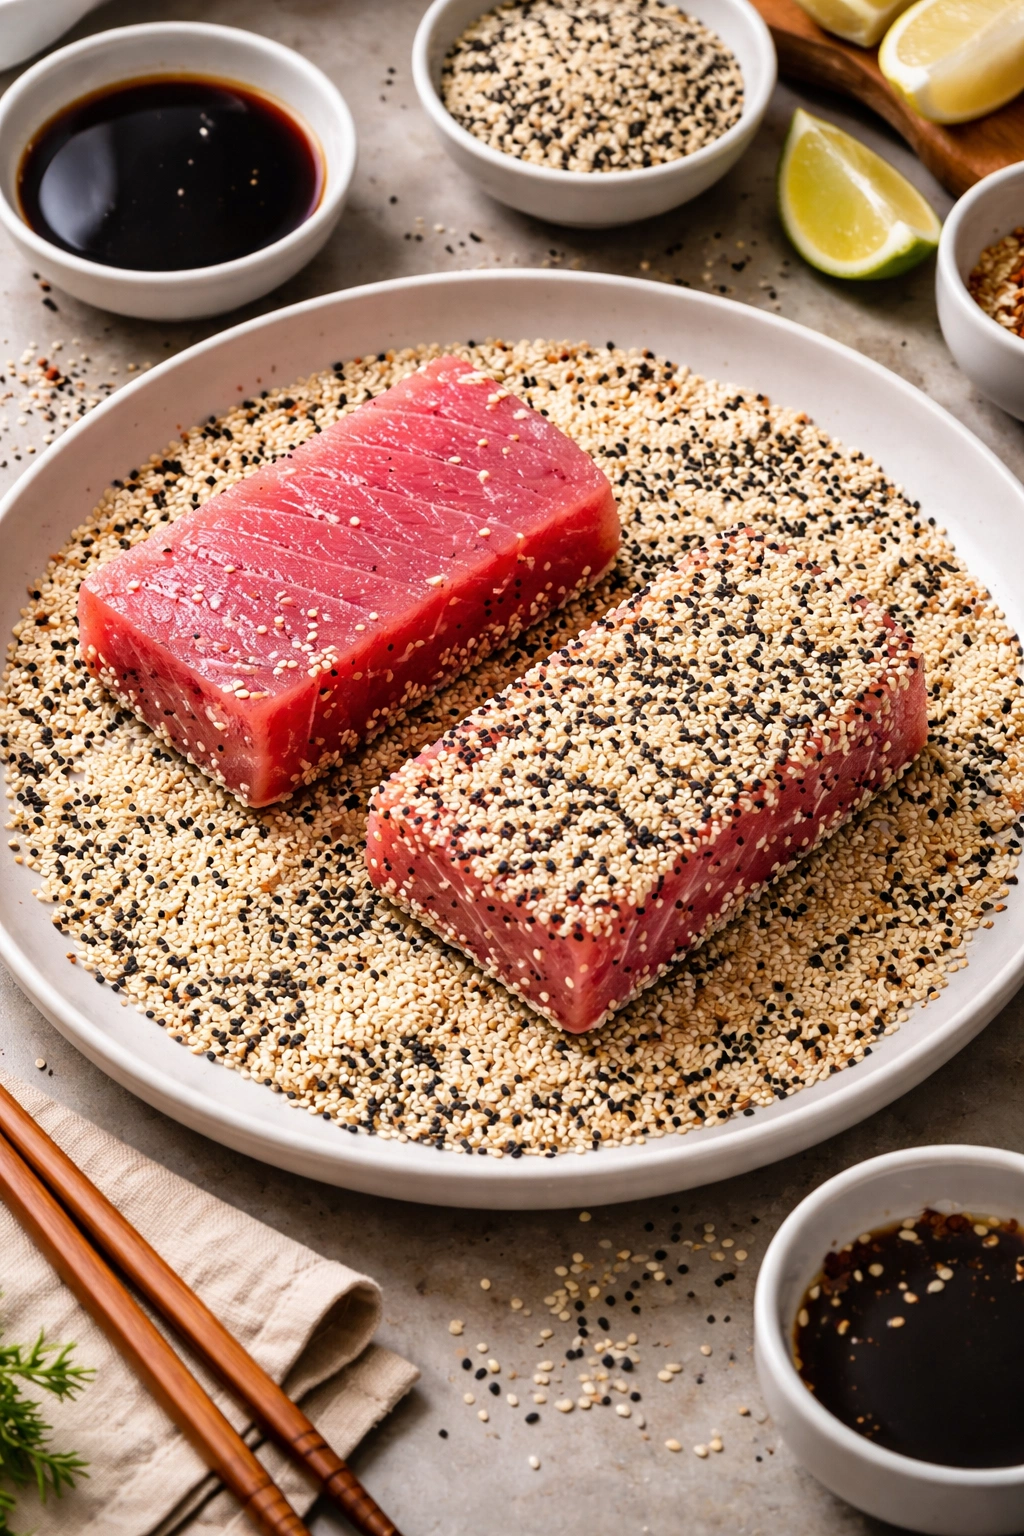
Beyond equipment, you’ll want several core ingredients on hand. Sesame seeds come in white, black, or mixed varieties — white sesame is most traditional and neutral, while black sesame adds visual drama and a slightly more complex flavor. You’ll also want high-heat cooking oil (avocado oil, grapeseed oil, or refined coconut oil all work well). Sea salt, fresh cracked black pepper, and ideally some wasabi and soy sauce round out the flavor profile.
Yield: Serves 2 as a main course | Makes two 4-ounce seared portions
Prep Time: 10 minutes (including pan heating)
Cook Time: 4 minutes (1 minute per side searing, with resting)
Total Time: 14 minutes active time
Difficulty: Intermediate — The technique is straightforward, but nailing the sear and achieving rare centers requires attention to heat management and timing. Nothing is technically complex, but precision matters.
Best Served: Immediately after searing while the crust is still warm and crispy and the center is at its optimal temperature
The Complete Ingredient List
For the Sesame Crust:
- ¼ cup white sesame seeds (or black sesame, or a 50/50 mix)
- ½ teaspoon fine sea salt
- ¼ teaspoon freshly cracked black pepper
- ⅛ teaspoon garlic powder (optional but recommended)
- ⅛ teaspoon ground ginger (optional but adds depth)
- 1 teaspoon soy sauce or tamari (this binds the seeds to the fish)
For the Ahi:
- Two 4-ounce blocks of sashimi-grade ahi tuna (about 1 to 1.5 inches thick, roughly 4 inches on each side)
- 2 tablespoons high-heat cooking oil (avocado, grapeseed, or refined coconut oil)
- Sea salt and freshly cracked black pepper to taste
- Optional: wasabi, soy sauce, or coconut aminos for serving
Step-by-Step Cooking Instructions
Prepare the Sesame Mixture:
-
Pour the sesame seeds, salt, pepper, garlic powder, and ground ginger (if using) into a shallow bowl. Stir to combine evenly, ensuring the salt and spices are distributed throughout the seeds — this prevents clumpy patches of spice on the finished tuna.
-
In a separate tiny bowl, combine the soy sauce with a pinch of extra salt if desired. You’ll use this as an adhesive to help the sesame seeds stick to the tuna’s surface. Set it within arm’s reach of your cooking station.
Prepare the Tuna:
-
Remove the ahi from the refrigerator 10 minutes before cooking — this allows the center to come closer to room temperature, ensuring a more even cook with a rare, buttery center. The exterior will still be cold enough to sear properly.
-
Pat the tuna blocks completely dry using paper towels, pressing gently but firmly to remove all surface moisture. Do not skip this step — water on the surface prevents crust development and causes the fish to steam rather than sear. If necessary, use fresh paper towels for a second pass until the surface is genuinely dry.
-
Season both sides of each tuna block generously with sea salt and freshly cracked black pepper. Season the sides and top surface, but don’t coat the bottom surface until just before searing (this allows air circulation and prevents the salt from drawing out moisture during resting).
Advertisements
Prepare the Pan:
-
Place your skillet over medium-high heat for 2 to 3 minutes, allowing it to preheat thoroughly. You want the pan hot enough that a drop of water dances and evaporates immediately, but not so hot that it smokes noticeably (which would indicate the oil is beginning to break down). The correct temperature is usually around 450–475°F if you’re using a thermometer, though experience is your best guide.
-
Once the pan is preheated, add the high-heat cooking oil and let it heat for another 30 seconds. The oil should shimmer and move easily across the pan surface, indicating it has reached the necessary temperature for searing.
Sear and Crust the Ahi:
-
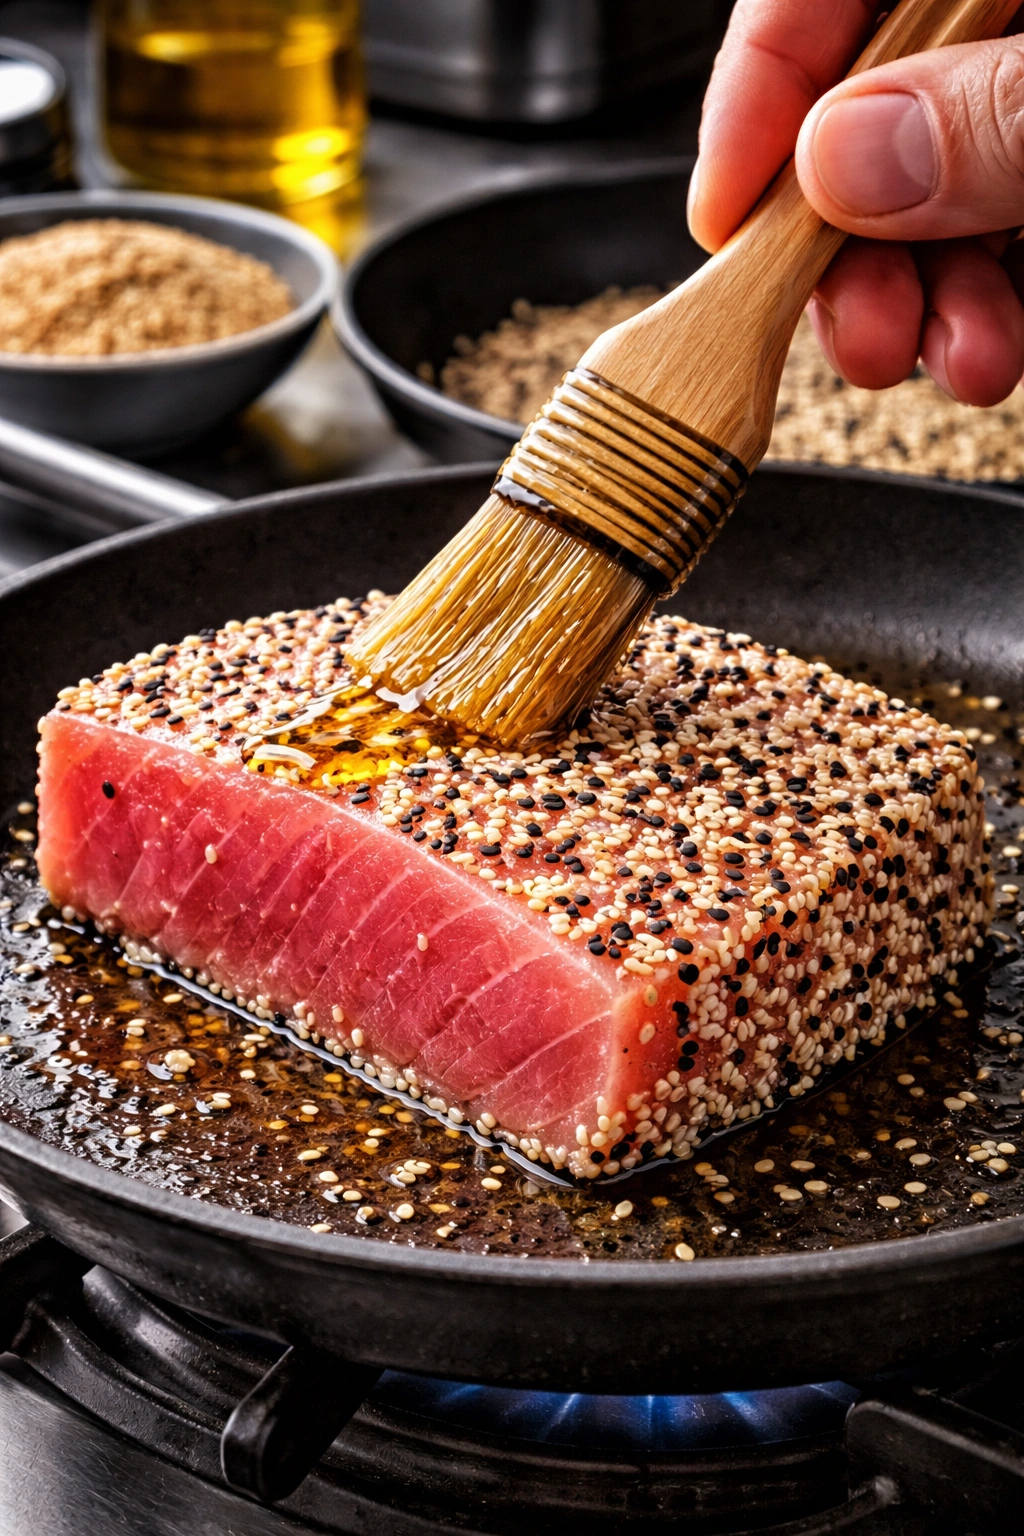
Working quickly, dip the top and sides of the first tuna block in the soy sauce mixture, then immediately dip it into the sesame seed mixture, pressing gently so the seeds adhere to all coated surfaces. The seeds should stick to the damp soy sauce and create a thin, even coating. Repeat with the second block.
-
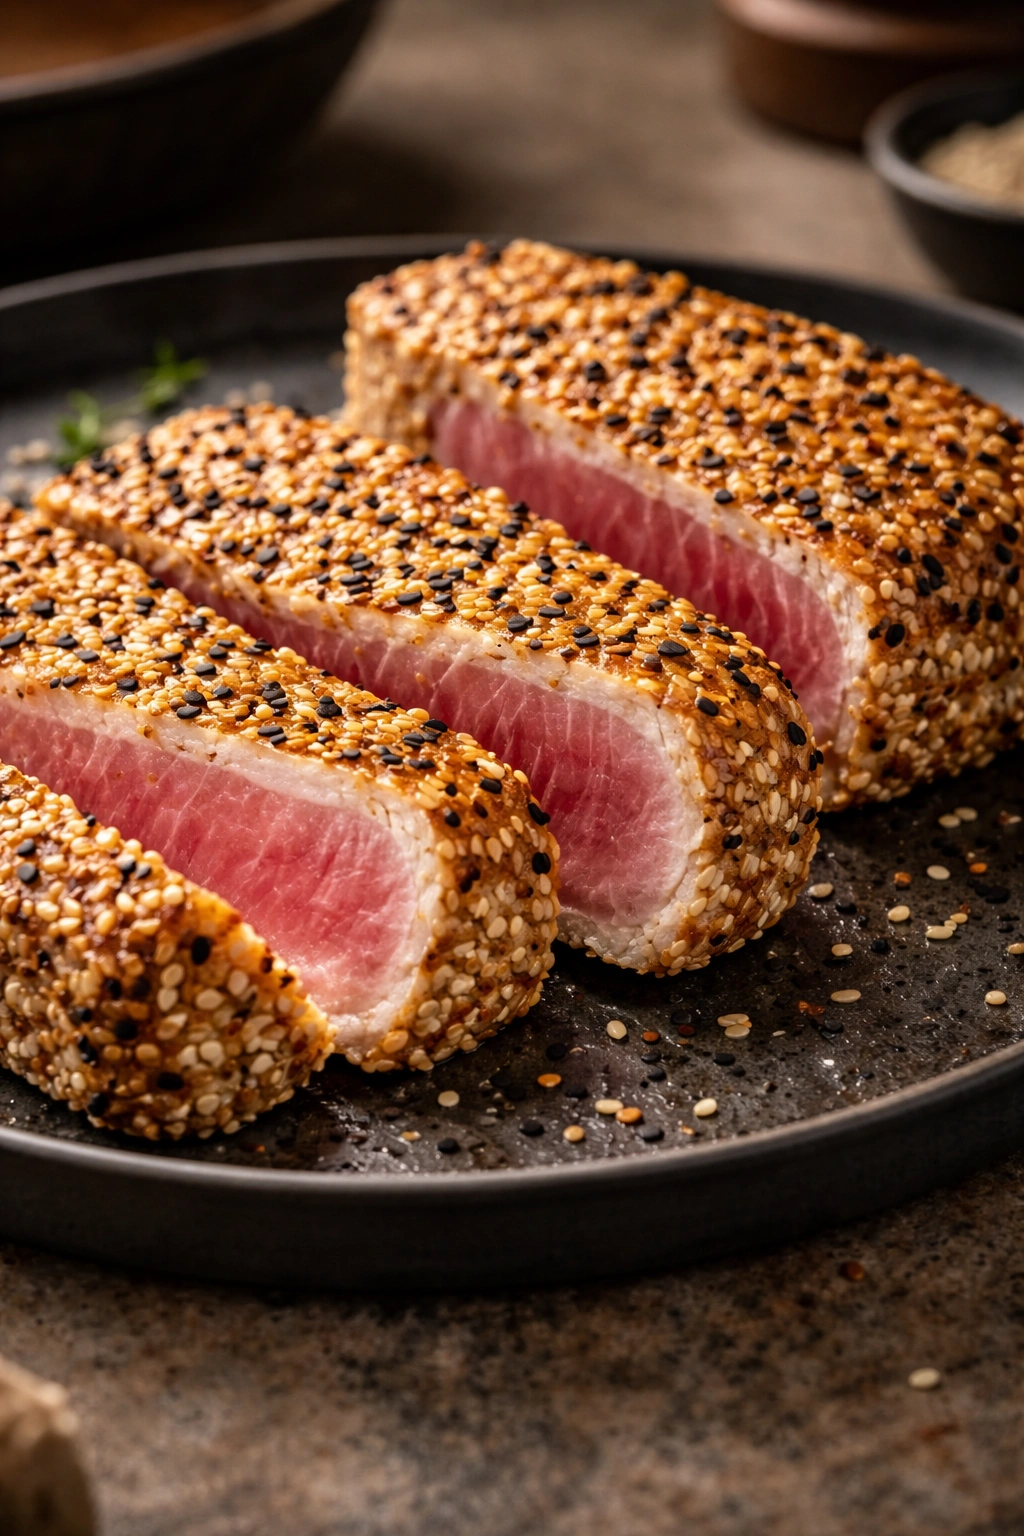
Carefully place the first tuna block sesame-side down into the preheated oil. You should hear an immediate sizzle — this confirms the heat is correct. Do not move the fish for the next 60 to 90 seconds. Let it sit undisturbed so the sesame seeds toast and the tuna’s exterior develops a golden crust. The seeds will brown and smell incredible.
-
After 60 to 90 seconds, flip the tuna to sear the opposite side. If the first side isn’t golden brown, give it another 15 seconds before flipping. The second side will sear faster than the first, so watch carefully — aim for 45 to 60 seconds on this side. The exterior should be uniformly golden and crispy around all surfaces.
-
Remove the first seared tuna block from the pan and place it on a clean plate. Repeat the searing process immediately with the second block, using the remaining oil in the pan. Work quickly so the pan stays hot and your timing remains consistent.
Rest and Serve:
-
Allow both seared blocks to rest for 1 to 2 minutes on the plate before serving. This brief rest allows the proteins to relax and the interior to reach optimal doneness. The residual heat will continue cooking the very center slightly, bringing it from ice-cold rare to a buttery, just-set state.
Advertisements -
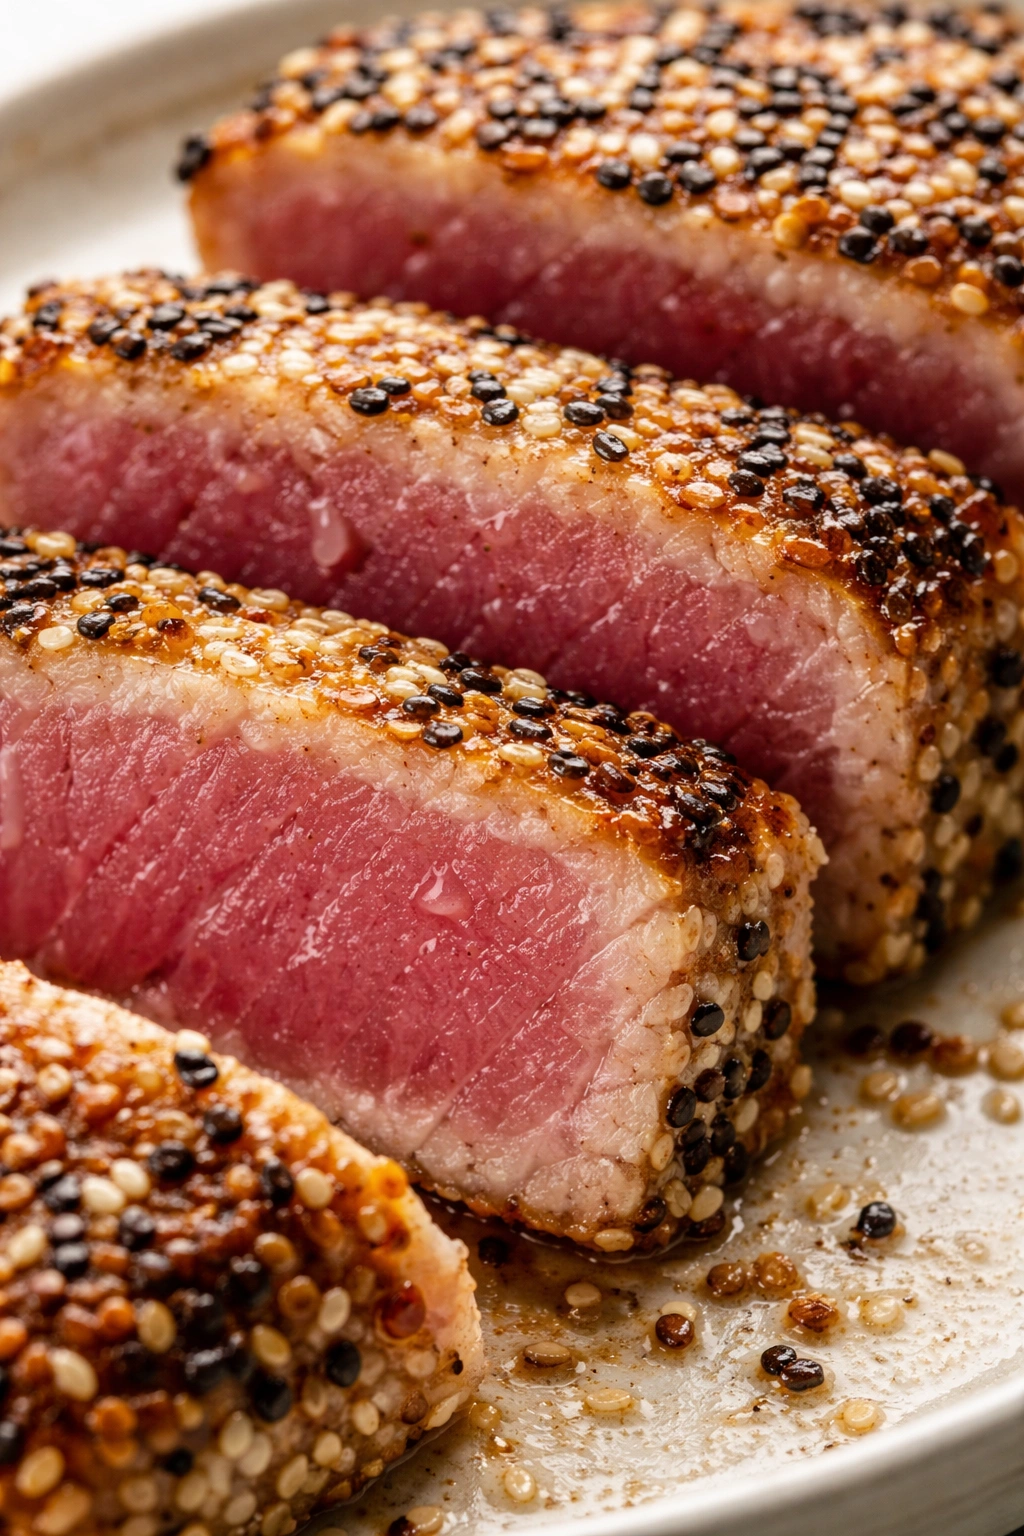
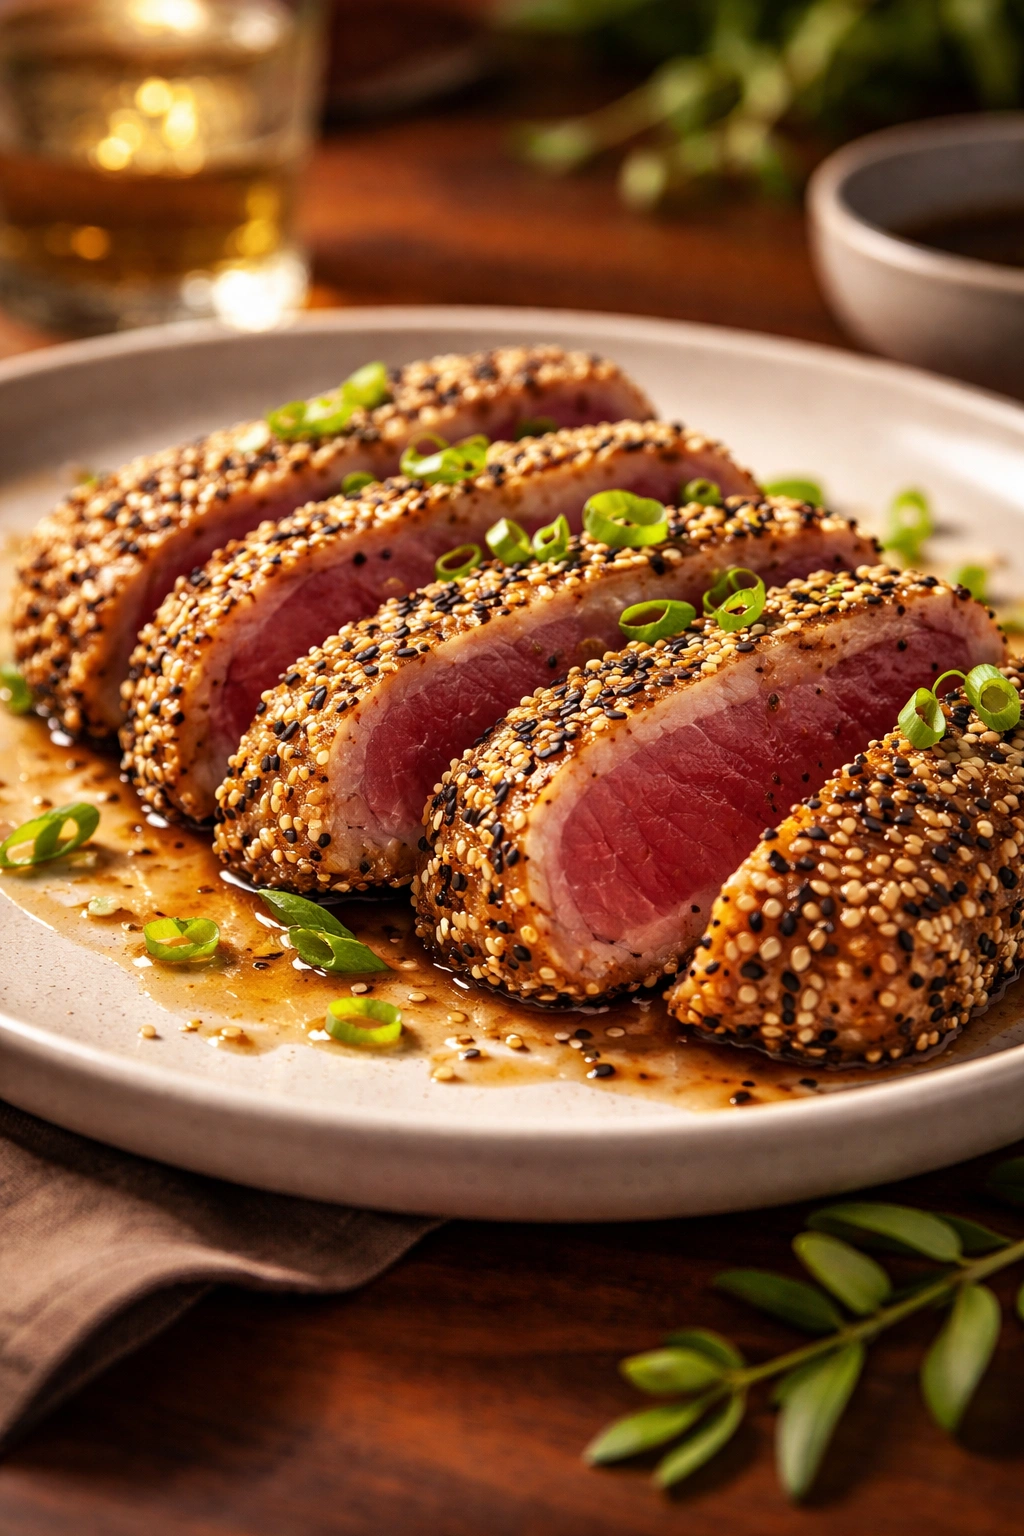
Slice each tuna block into ½-inch-thick pieces with a sharp knife, using a single decisive stroke for each slice (sawing motions tear the delicate flesh and create a ragged appearance). Arrange the slices on serving plates and serve immediately with your chosen accompaniments.
Mastering the Sesame Crust Technique
The difference between a mediocre and an exceptional seared ahi tuna comes down to understanding heat, timing, and the chemistry of how sesame seeds toast. The sesame crust works because those seeds have a relatively low smoke point compared to the oil itself — they brown and crisp before the tuna’s exterior overcooks. This creates a narrow window of perfection that takes practice to recognize.
The first time you make this, trust your senses rather than a timer. Listen for the sizzle, watch the sesame color, and smell the toasted sesame aroma. Once you’ve done it two or three times, you’ll develop an intuition for exactly how long each side needs. The whole process should feel like controlled urgency — hot enough to create a crust, quick enough that the interior stays rare.
Temperature consistency matters enormously. If your pan isn’t hot enough, the sesame will slowly toast rather than quickly crisp, and the tuna will begin to cook all the way through instead of staying rare. If the pan is too hot, the seeds will burn black before the fish’s exterior properly develops color. Getting the temperature right is the single most important factor in mastering this dish.
Common Mistakes and How to Avoid Them
The most frequent error is failing to dry the tuna adequately before searing. Water on the surface creates steam, which prevents crust development and boils away the sesame seeds instead of crisping them. This is why the paper towel step is non-negotiable — spend the extra 30 seconds ensuring the surface is genuinely dry.
Another common mistake is moving the tuna around in the pan while it’s searing. Every time you flip or shift the fish, you interrupt the crust-building process and allow precious heat to escape. Resist the urge to check on it — let it sit completely undisturbed for the full 60-90 seconds on each side.
Using low-quality oil is another pitfall. Oils with low smoke points (like olive oil or regular coconut oil) will smoke excessively and impart off-flavors to your tuna. Stick with avocado, grapeseed, or refined coconut oil, which handle high heat gracefully. The oil is a crucial component of the crust, not just a cooking medium.
Overcooking is the most disappointing mistake because the damage is irreversible. Ahi tuna’s appeal lies entirely in its rare, buttery interior. If you cook it through, it becomes rubbery and loses the textural contrast that makes this dish special. When in doubt, undercook slightly — the residual heat during resting will continue the cooking process, and you can always sear a bit longer if needed.
Flavor Variations and Seasonal Twists
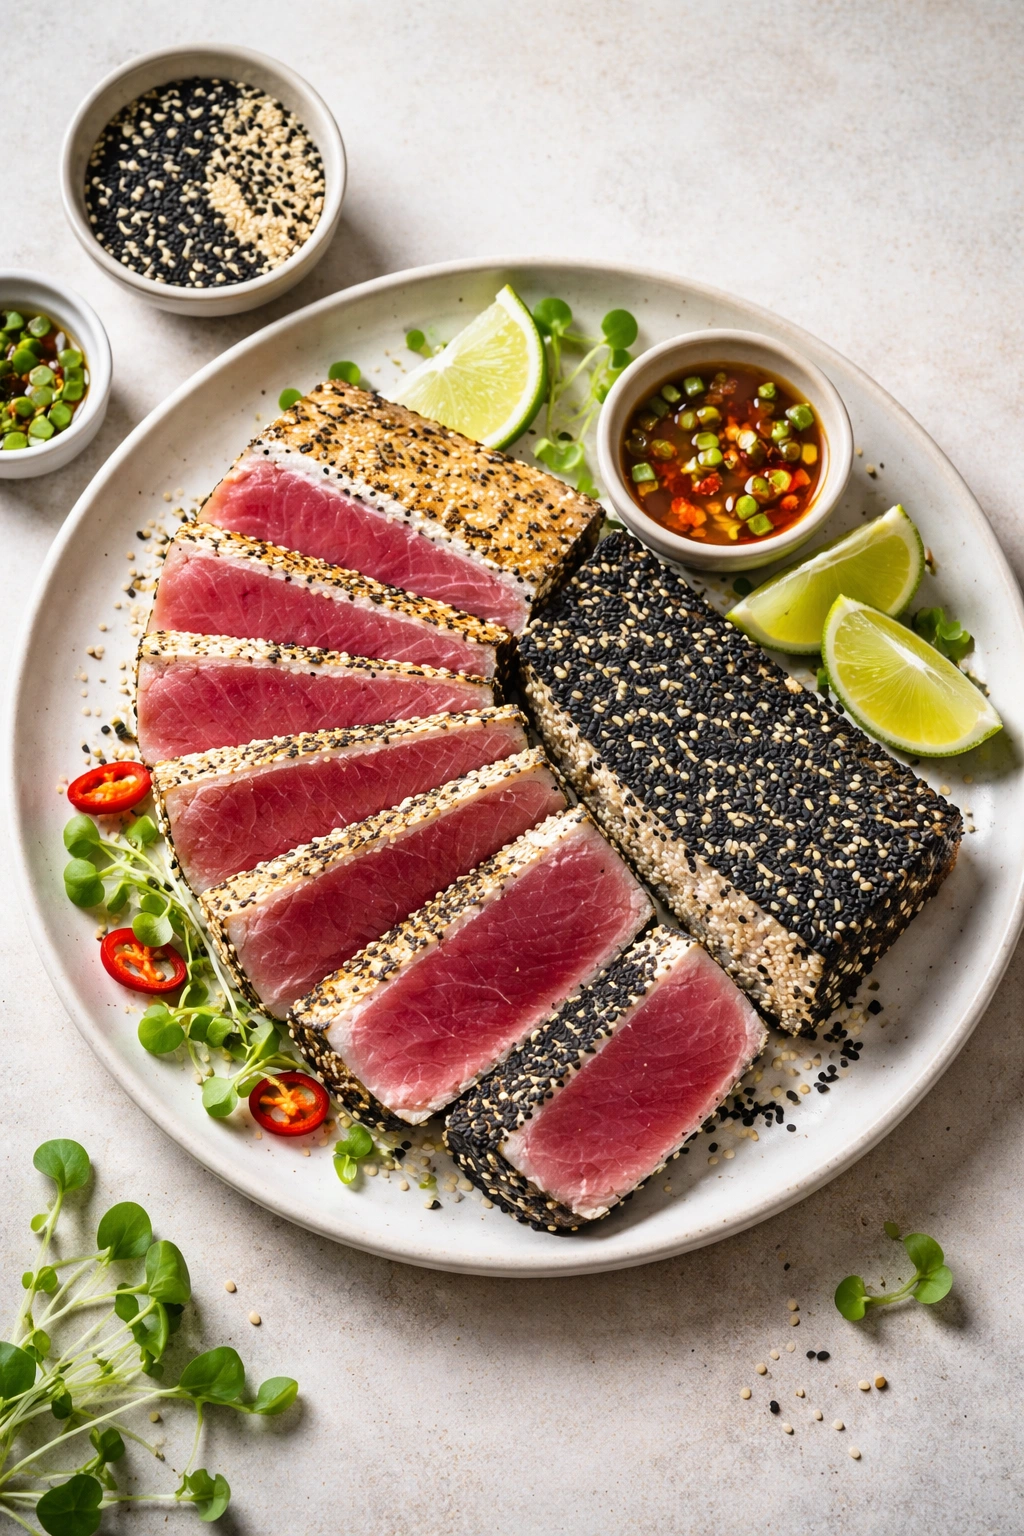
While the classic white sesame preparation is perfection, the basic technique opens the door to fascinating variations. Try coating the tuna in black sesame seeds for a more dramatic appearance and a slightly earthier, more complex flavor. Mix white and black seeds 50/50 for visual interest while maintaining the classic taste profile.
A spiced sesame crust incorporates a pinch of cayenne pepper, smoked paprika, or even dry wasabi powder mixed into the sesame seeds for subtle heat. These additions add intrigue without overwhelming the ahi’s delicate flavor. Start conservatively — you can always increase the spice next time, but you can’t remove it once it’s applied.
For those enjoying warmer months, a citrus sesame variation adds brightness: crush a bit of lemon or yuzu zest into the sesame mixture, then serve with a squeeze of fresh lemon juice and microgreens for visual pop. The acidity brightens the rich sesame and fatty tuna beautifully.
An Asian-inspired twist uses half white sesame and half black sesame, with a pinch of five-spice powder and ground star anise mixed into the seeds. Serve with a ginger-soy drizzle and fresh cilantro for herbaceous freshness. This variation feels slightly more complex and aromatic than the simple version.
You can also experiment with nut-based crusts by replacing some sesame with finely crushed macadamia nuts, pistachios, or even toasted coconut flakes (unsweetened, of course). Use a 75/25 ratio of sesame to alternative ingredients to maintain the classic flavor profile while adding textural variation.
Cooking Ahi to Perfection: Doneness Levels
Ahi tuna has a narrower range of desirable doneness than most proteins. The point is searing the exterior while leaving the interior completely raw or barely set. If you prefer your fish cooked slightly more, adjust the timing rather than changing your technique — add 15-30 seconds per side and you’ll progress from rare to medium-rare.
Rare (Recommended): The center is completely raw, cold, and buttery. The exterior is golden and crispy with the sesame crust intact. This is the classic preparation and what sashimi-grade ahi is designed for. Cooking time: 60-90 seconds per side.
Medium-Rare: The very center is still cool but just barely set, like chilled butter. The exterior edges show a tiny band of opaque flesh just inside the crust. This takes slightly longer: 90 seconds per side, or 75 seconds per side plus 1-2 minutes of additional resting time.
Medium: The center is warm and mostly set with a tiny sliver of barely-translucent flesh. This requires 2 minutes per side and isn’t recommended for ahi — the texture becomes firmer and less luxurious, diminishing what makes this fish special.
Use an instant-read thermometer inserted horizontally into the center of the thickest part if you want precision. Rare ahi reads about 110-115°F at the center. Medium-rare reaches 120-125°F. Pull the fish from the heat slightly below your target temperature and let carryover cooking finish the job.
Storage and Make-Ahead Guidance
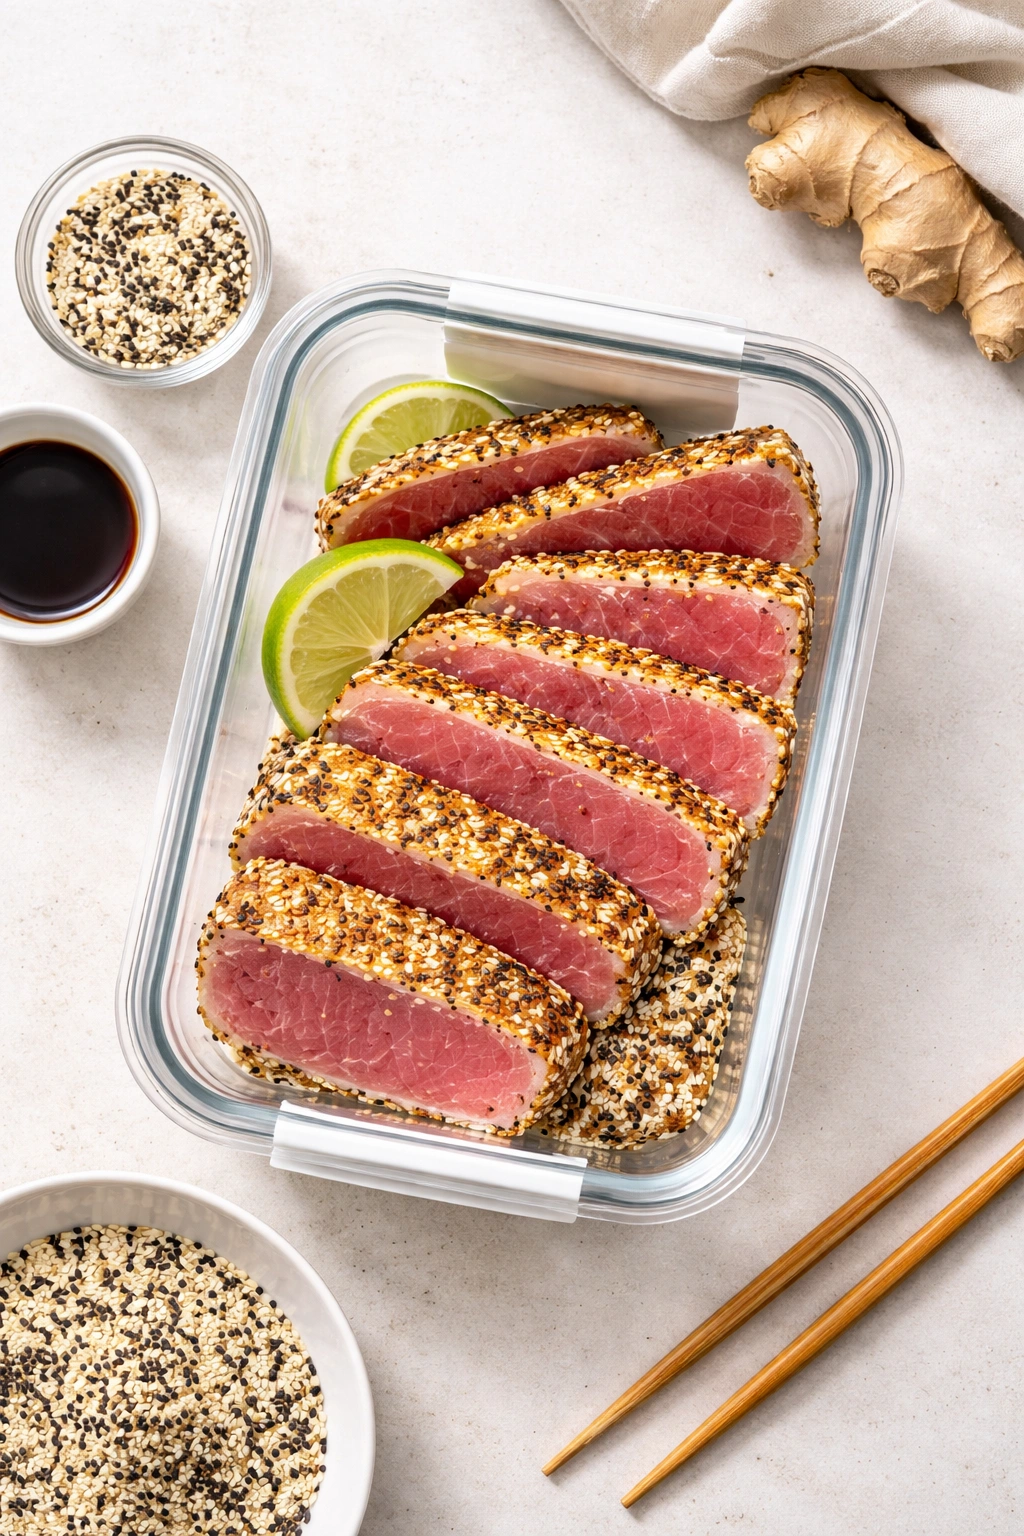
Cooked ahi tuna keeps in the refrigerator for up to 3 days in an airtight container, though it’s genuinely best eaten the same day you cook it. The texture softens slightly as it cools, and the sesame crust loses its crispness. If you’re planning to eat leftovers, store them in an airtight container and reheat gently — either quickly in a hot skillet for 30-45 seconds per side to restore crispness, or at room temperature for 5 minutes if you prefer a softer texture.
You cannot freeze cooked seared ahi successfully — the texture suffers dramatically upon thawing. However, you can freeze raw sashimi-grade ahi blocks in an airtight container or vacuum-sealed bag for up to 3 months. Thaw in the refrigerator overnight before cooking. This is a practical solution if you buy ahi on sale and want to preserve it for later.
The sesame seed mixture can be prepared up to one week ahead and stored in an airtight container at room temperature. Mix it just before cooking so the seeds maintain their texture. The soy sauce adhesive is best applied immediately before cooking to maximize seed adhesion.
For entertaining, you can prep and plate the sesame mixture up to 2 hours before guests arrive, keeping it in a sealed container. You can also pat the tuna dry and season it 30 minutes ahead. The final searing must happen just before serving — this is actually advantageous because it gives you a clear task to focus on while guests arrive and settle.
Perfect Side Dishes and Serving Ideas
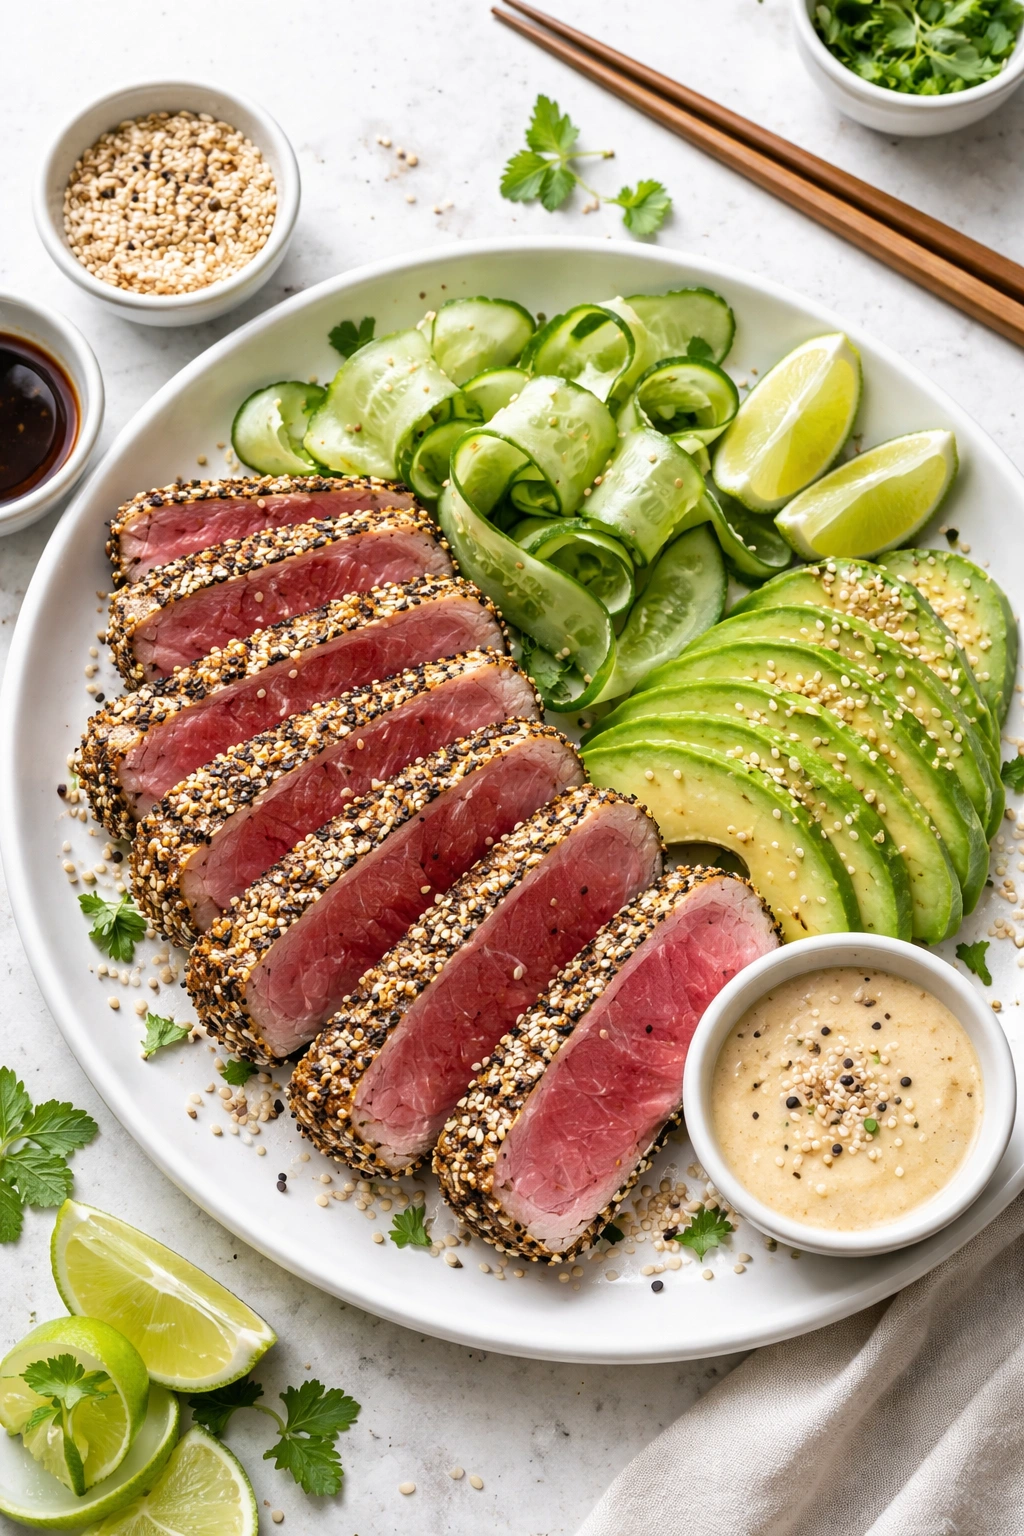
Ahi tuna with sesame crust deserves accompaniments that don’t compete with its delicate flavor. Simple vegetables prepared with minimal fuss work best: a cucumber salad with rice vinegar and a pinch of salt provides cool, refreshing contrast. Steamed broccoli or blanched asparagus offers textural variety and fulfills the vegetable portion of your keto meal.
For a more elaborate presentation, serve alongside a soy ginger reduction: simmer soy sauce (or tamari for gluten-free) with fresh ginger slices and a touch of sesame oil for 5 minutes, then strain out the ginger. Drizzle this around the seared tuna slices for subtle umami depth. You could also offer wasabi cream — a dollop of sour cream or full-fat Greek yogurt mixed with wasabi powder to taste. The cool creaminess balances the hot, pungent wasabi beautifully.
For keto sushi lovers, serve the seared tuna alongside cucumber ribbons (raw or lightly marinated in rice vinegar), avocado slices, and crispy seaweed snacks. This transforms your plate into a deconstructed sushi experience without any rice. Pickled ginger on the side cleanses the palate between bites, which is particularly nice if you’re serving this with bold flavors.
Microgreens and fresh cilantro add visual elegance and a fresh herbal note. A simple arrangement of seared tuna slices fanned out and topped with a tiny handful of microgreens looks restaurant-quality while requiring almost no effort.
Pairing Wine and Beverages with Sesame Ahi
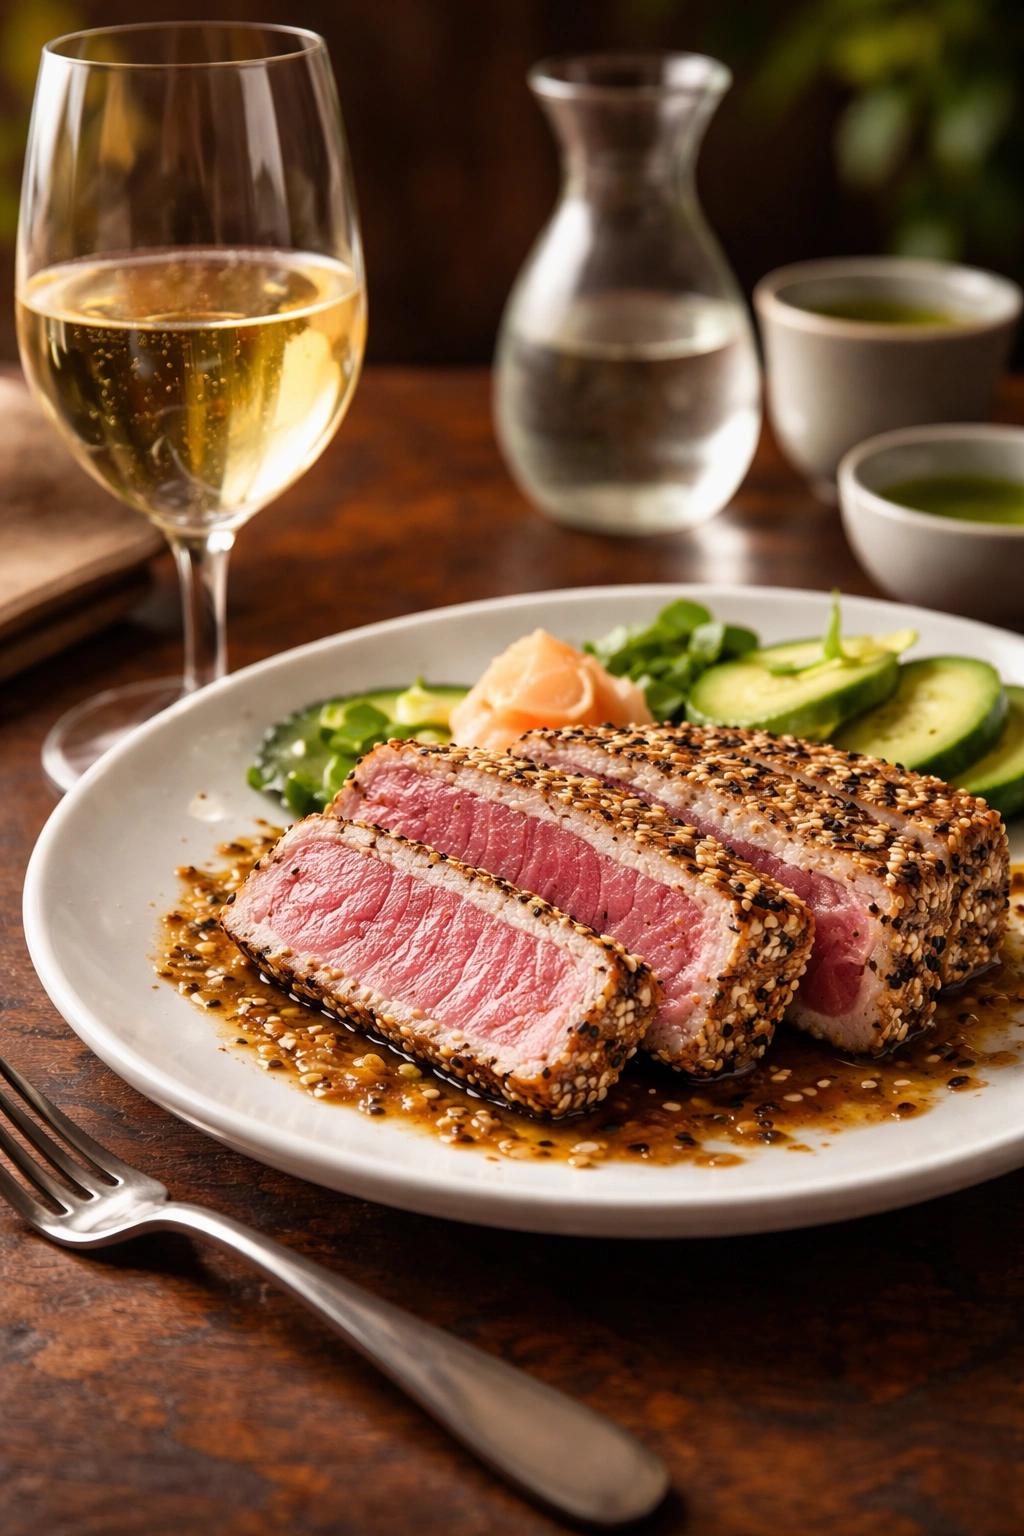
The sesame crust and umami flavors of ahi pair surprisingly well with several wine categories. Crisp white wines like sauvignon blanc, albariño, or Chablis complement the dish beautifully — their acidity cuts through the richness of the sesame oil and brightens the fish’s delicate flavor. The citrus notes in many white wines echo nicely with the tuna’s briny quality.
Lighter red wines like pinot noir (especially cooler-climate versions with higher acidity) or grenache work if you prefer red wine. These wines have enough body to stand up to the sesame crust without overwhelming the fish. Avoid heavy reds with high tannins — they clash with raw and rare fish preparations.
Sparkling wines — whether champagne, prosecco, or cava — are fantastic choices. The bubbles and acidity provide constant palate cleansing, and the wines’ elegance matches the sophistication of the dish. If you’re planning a special dinner, sparkling wine is always an excellent choice.
For non-alcoholic pairings, sake (if you’re not strictly avoiding alcohol) complements sesame ahi beautifully in terms of flavor pairing. A cold, crisp green tea offers delicate flavor without competing. Sparkling water with fresh lemon or fresh ginger tea served chilled provides refreshment and aids digestion.
Pro Tips from Professional Sushi Chefs
Professional sushi chefs, who work with ahi tuna constantly, have several techniques worth stealing. Many use sesame seed oil brushed lightly onto the tuna’s surface before rolling in seeds — this creates even better adhesion and amplifies the sesame flavor. Use a light touch so the oil doesn’t create puddles.
Chefs often toast sesame seeds lightly before using them in a dry skillet over medium heat for 2-3 minutes, stirring constantly until fragrant. This enhances their nutty quality and ensures they don’t dry out further during the brief searing. If you try this method, let the toasted seeds cool before applying them to the fish.
Many professionals chill the seared tuna briefly after searing — about 30 seconds in the freezer — before slicing. This firms up the exterior slightly while the interior remains perfectly rare and actually helps the sesame crust maintain its crispness. It’s a small technique that makes a noticeable difference in texture.
The sharpest sushi chefs always slice ahi with a wet knife, wiping the blade with a damp towel between each slice. This prevents the delicate flesh from tearing and keeps the slices from sticking together. It’s a simple habit that dramatically improves presentation.
High-end sushi restaurants often plate the tuna while it’s still warm, usually within 60 seconds of slicing. The warmth is part of the experience — the contrast between the warm, crispy sesame crust and the cool, rare interior creates an incredible sensory experience. Don’t let it cool on the plate before serving.
Final Thoughts
Seared ahi tuna with sesame crust represents everything great about keto cooking: it’s sophisticated and restaurant-quality, requires minimal time and ingredients, delivers impressive results, and tastes absolutely delicious. The technique teaches you valuable skills — proper heat management, understanding crust development, and the importance of not overthinking simple preparations — that apply to countless other dishes.
Once you’ve made this a few times, you’ll develop the intuition to do it without thinking much, which is exactly when you can play with variations and make it your own. The sesame crust technique works beautifully on other proteins too: yellowfin, salmon, even duck breast benefit from this same approach. You’ve essentially learned a fundamental cooking technique that belongs in your permanent repertoire.
The real secret to this dish’s success isn’t anything mysterious. It’s sashimi-grade ahi treated with respect, a properly preheated pan, sesame seeds toasted to golden perfection, and restraint — knowing when to stop cooking and let the fish be what it is. That simplicity, executed with care, is why this meal feels restaurant-quality despite taking barely 15 minutes from start to finish.