There’s something almost magical about a bowl of bright, lemony chicken soup that gets your whole family asking for seconds—and thirds. Maybe it’s the warmth of the broth, or the way the lemon cuts through everything with a jolt of freshness that feels both comforting and alive. More likely, it’s because this particular soup hits that sweet spot where it’s actually good for you, tastes genuinely delicious, and doesn’t require you to stand over a stove for hours. That’s the soup we’re making here—the one your kids will request without rolling their eyes, your partner will actually want for dinner, and you’ll find yourself craving when the weather turns cool.
I started making versions of this soup years ago after tasting something similar at a cozy little restaurant, and I’ve been refining it ever since. Over time, I’ve learned exactly which moves make the difference between a forgettable bowl of broth and something that lingers in everyone’s memory long after dinner ends. The secret isn’t complicated, but it does require understanding a few key principles: how to build real flavor into the broth itself, why the pasta matters more than you’d think, and exactly how to add brightness without making the soup taste like a lemon dropped into hot water.
This soup has become my go-to when someone in the house isn’t feeling well, when I need to use up half a rotisserie chicken, or when I want something that tastes substantial but leaves everyone feeling energized instead of sluggish. It’s fast enough for a weeknight—ready in under an hour from start to finish—but impressive enough to serve to people who actually care about food.
The Story Behind This Beloved Dish

Lemon chicken soup has roots in multiple cuisines, but the most famous version is probably Greek avgolemono, a soup that’s been warming tables for generations. The name itself tells the story: avgo means egg and lemoni means lemon, and those two ingredients transform simple chicken broth into something luxuriously creamy without a drop of cream. It’s the kind of recipe that seems to have been passed down through families who understood something fundamental about comfort food—that you don’t need heavy ingredients to make something feel nourishing and satisfying.
What makes this particular approach to lemon chicken soup different is that it’s designed specifically to appeal to families. It’s brighter than traditional chicken noodle soup, simpler than the traditional avgolemono (which involves tempering eggs, a step that intimidates many home cooks), and it actually tastes like something worth remembering. The combination of sautéed aromatics, chicken simmered in the broth, a light pasta, fresh vegetables, and a generous squeeze of lemon juice creates a soup that’s somehow both light and filling, sophisticated and comforting.
Over the years, I’ve noticed that this is the soup people ask for by name. Not “chicken soup” generically, but this chicken soup—the lemony one they remember having at your house. There’s something about how the brightness of the lemon plays against the richness of the chicken and the subtle sweetness of the carrots that just works. Kids who refuse most soups will happily eat this. Adults who think they want something heavier often discover they’re completely satisfied by a big bowl of this instead.
Why Lemon Flavor Works Magic on Picky Eaters

If you’ve ever struggled to get anyone in your house excited about soup, lemon is your secret weapon. Most chicken soups taste safe and mild—which is to say they taste kind of like nothing in particular. Lemon changes that equation entirely. The acidity wakes up your taste buds and makes you taste all the other flavors in the soup: the actual richness of the broth, the sweetness of the carrots, the herbaceous quality of fresh herbs. It’s not about making the soup taste sour—it’s about using acid to amplify everything else.
There’s real science behind why this works. Acid enhances flavor perception in a way that’s almost impossible to replicate with salt alone. When you taste something sour, your taste buds literally become more sensitive to other flavors. That’s why a squeeze of fresh lemon juice makes chicken taste more like chicken, vegetables taste more like vegetables, and broth taste like actual broth instead of just hot salt water. For families with picky eaters, this is genuinely important. You’re not hiding flavors or disguising the soup—you’re making it actually taste good.
Kids also respond to the brightness. There’s something about lemon that feels like spring, even if you’re eating the soup in the middle of winter. It doesn’t feel heavy or institutional the way some soups do. It feels like someone cared enough to make something that tastes intentional, not just nutritious.
The Secret to a Broth That Actually Tastes Like Something
The difference between a forgettable bowl of soup and one people ask for comes down to how you build your broth. Most recipes just dump chicken broth straight into a pot with some vegetables and call it done. That’s technically correct, but you’re missing the opportunity to create real flavor.
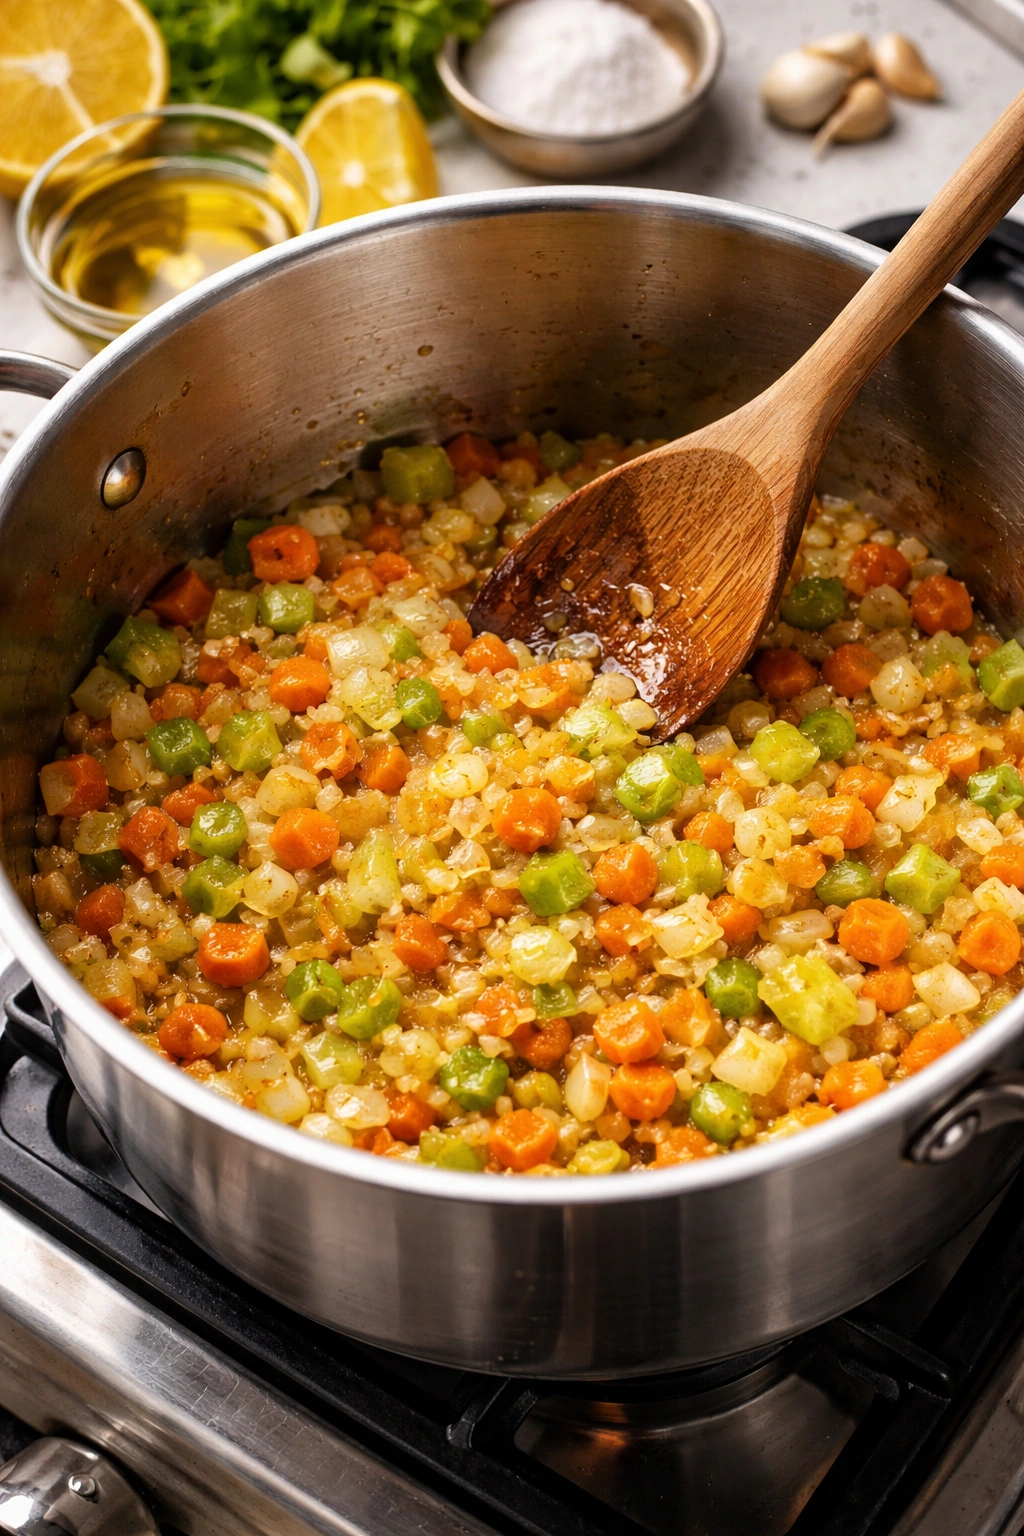
The magic happens in the first five minutes when you sauté your aromatics—the onion, carrots, and celery—in a little olive oil and butter before you add any liquid. This step is called building a mirepoix, and it’s the foundation of virtually every professional soup. When you heat vegetables in fat, they release aromatic compounds that dissolve into the oil, creating an incredibly flavorful base. This is why restaurant soup tastes better than home soup, even when the recipes are technically identical. They’re not skipping this step.
When those vegetables are soft and fragrant—you’ll see the onion turn translucent and the edges of the carrots just start to caramelize slightly—that’s when you add your broth. At that point, the broth isn’t just mixing with water; it’s mixing with an already-flavorful base. Add some freshly minced garlic to this stage as well, cooking it just until fragrant, and you’ve now built a foundation that makes everything that follows taste more intentional.
The chicken cooks right in this broth, which means the broth absorbs flavor from the chicken while the chicken stays juicy and tender. You’re not boiling chicken separately and then combining ingredients—you’re creating an integrated whole where every element strengthens every other element.
Choosing Your Pasta or Grain for the Perfect Bite

This might seem like a detail, but the pasta you choose genuinely affects the final soup. There are actually several good options, and which one you choose depends on what texture you prefer and how you’re planning to handle leftovers.
Orzo is probably the most popular choice for this soup, and for good reason. Orzo is a small, rice-shaped pasta that cooks quickly, absorbs flavor beautifully, and creates a pleasant, substantial bite without being heavy. The downside is that orzo continues absorbing liquid even after cooking stops, so leftovers tend to become thicker and more pasta-heavy over time. If you know you’ll have leftovers, you can either cook the orzo separately and add it to individual bowls as you serve, or thin the leftover soup with extra broth when you reheat it.
Pearl couscous (also called Israeli couscous) is larger than regular couscous and has a lovely, slightly chewy texture that holds up well in soup. It cooks even faster than orzo and has a pleasant, almost toasted flavor. Pearl couscous doesn’t absorb quite as much liquid as orzo, so it’s slightly better for leftovers, though the same basic principle applies.
Rice is another option if you prefer something more traditional. Short-grain white rice or long-grain white rice both work, though short-grain creates a slightly creamier texture as the starches release into the broth. Brown rice takes longer to cook and will make the soup feel denser, so if that’s what you’re using, plan for a longer cooking time and potentially a bit more broth.
Small pasta shapes like ditalini or small shells work beautifully and provide a pleasant contrast to the tender vegetables. They have a slight advantage over orzo in that they feel more like traditional pasta, which appeals to people who are skeptical about soup in general.
For a family soup that needs to be approachable, orzo is probably your best bet. It’s forgiving to cook, widely available, and genuinely delicious. The key is not to overthink it—whatever pasta or grain you choose will work fine as long as you cook it to just past tender without letting it turn mushy.
Building the Aromatic Base That Changes Everything

Let’s talk about what happens in that first crucial stage of cooking. You’re starting with about a tablespoon of olive oil and a tablespoon of butter in a large pot over medium heat. The butter adds a subtle richness and helps the vegetables cook evenly; the olive oil provides flavor and helps prevent sticking.
While the oil and butter are heating, dice your vegetables fairly finely—you want small, uniform pieces that will cook at roughly the same rate and create surface area for browning. One medium onion, about three medium carrots, and two stalks of celery is the classic proportion. Some people skip the celery (I get it—not everyone loves celery), but it contributes a subtle savory depth that’s hard to replicate any other way. It doesn’t taste like celery; it just makes everything taste slightly more sophisticated.
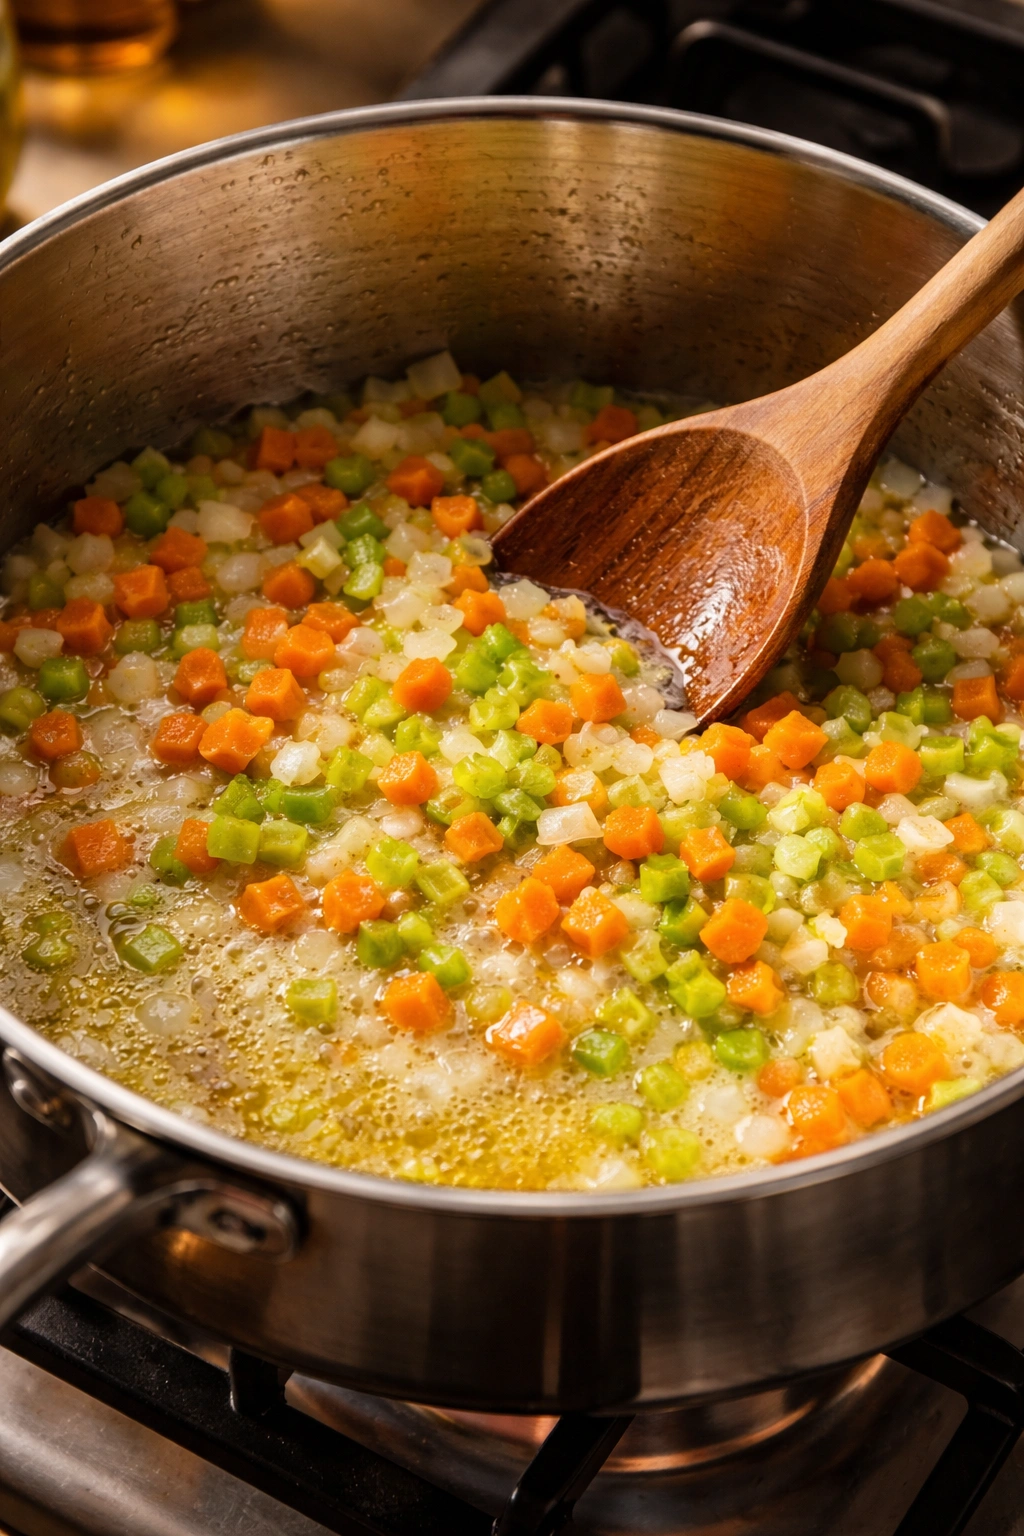
Add all your vegetables to the pot at once and stir to coat them in oil. Let them cook undisturbed for about a minute—this allows some of the surface moisture to evaporate and starts the browning process. Then stir occasionally for about 4 to 5 minutes, until the onion becomes translucent and the edges of the vegetables show just the slightest caramelization. You’re not trying to brown them deeply; you just want them softened and fragrant.
This is when you add your garlic—three or four cloves, minced as fine as you can make them. Stir it into the hot vegetables and let it cook for just about 30 seconds before you add your broth. If you let garlic cook too long, it becomes bitter, so this is one of those moments where timing matters.
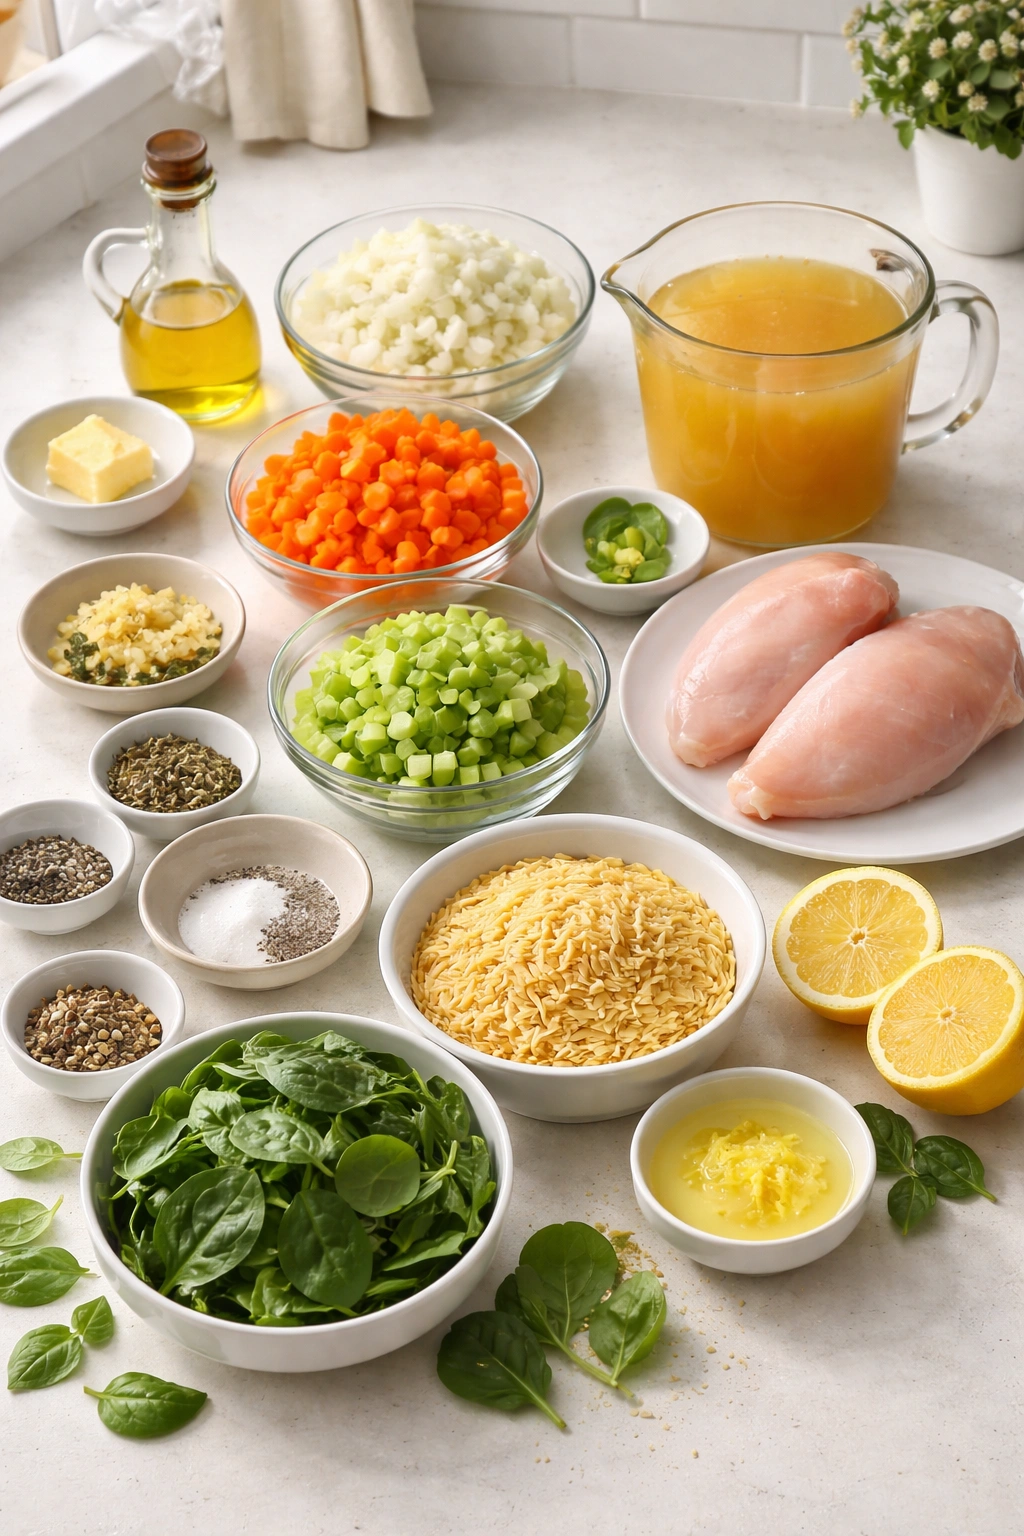
The Complete Ingredient List
Yield: Serves 6 to 8 | Total soup makes about 10 to 12 cups
Prep Time: 20 minutes
Cook Time: 35 minutes
Total Time: 55 minutes
Difficulty: Beginner — The steps are straightforward even if you’ve never made soup before, and there are no special techniques required.
For the Soup Base:
- 1 tablespoon olive oil
- 1 tablespoon unsalted butter
- 1 medium yellow or sweet onion, diced finely
- 3 medium carrots, peeled and diced into small pieces
- 2 stalks of celery, diced finely (or 1½ if you’re hesitant about celery)
- 4 cloves garlic, minced as fine as possible
- 10 cups good-quality chicken broth (low-sodium, so you can control the salt level)
- 2 boneless, skinless chicken breasts (about 1 pound total), or 3 cups of shredded rotisserie chicken if using cooked chicken
- 1 teaspoon dried thyme
- ½ teaspoon dried oregano
- 1 bay leaf
- ½ teaspoon salt (adjust to taste, depending on your broth)
- Freshly ground black pepper to taste
For the Pasta Component:
- 1 cup orzo pasta, uncooked (or pearl couscous, or small pasta shape of choice)
- ½ cup fresh lemon juice (about 3 to 4 medium lemons, freshly squeezed)
- Zest of 1 lemon (about 1 tablespoon)
For Finishing:
- 2 to 3 cups fresh spinach or baby spinach, packed
- 3 to 4 tablespoons fresh parsley, chopped finely
- 2 tablespoons fresh dill, chopped (or 1 teaspoon dried dill, though fresh is noticeably better)
- Salt and pepper to taste
- Optional: shaved or grated Parmesan cheese for serving
- Optional: additional fresh lemon slices for garnish
Substitutions and Notes:
- If you don’t have fresh herbs, you can use dried, but use roughly half the amount. Dried herbs are more concentrated, so 1½ tablespoons fresh parsley becomes ½ teaspoon dried, for example. Fresh is genuinely better here, though.
- If fresh lemon isn’t available, bottled lemon juice works in a pinch, but fresh makes a noticeably brighter soup. It’s worth squeezing actual lemons if you can.
- For a gluten-free version, swap the orzo for brown rice, wild rice, or a gluten-free pasta alternative. Cooking times may vary slightly, so taste for doneness.
- If you want to make this vegetarian, use vegetable broth instead of chicken broth and substitute the chicken with white beans, chickpeas, or additional vegetables like diced zucchini or mushrooms.
Step-by-Step Instructions for Perfect Results
Building the Aromatic Base:
-
In a large pot or Dutch oven, combine the olive oil and butter over medium heat. Once the butter is melted and foamy, add the diced onion, carrots, and celery all at once. Stir to coat everything in the oil and let it sit undisturbed for about 1 minute to allow some browning to begin.
-
Stir the vegetables occasionally for 4 to 5 minutes, until the onion becomes translucent and the edges of the carrots and celery show just the slightest caramelization. The whole kitchen should smell distinctly savory and vegetal at this point.
-
Add the minced garlic and stir constantly for about 30 seconds—just until fragrant. Don’t let the garlic cook longer than this, or it will become bitter and unpleasant.
Building the Broth:
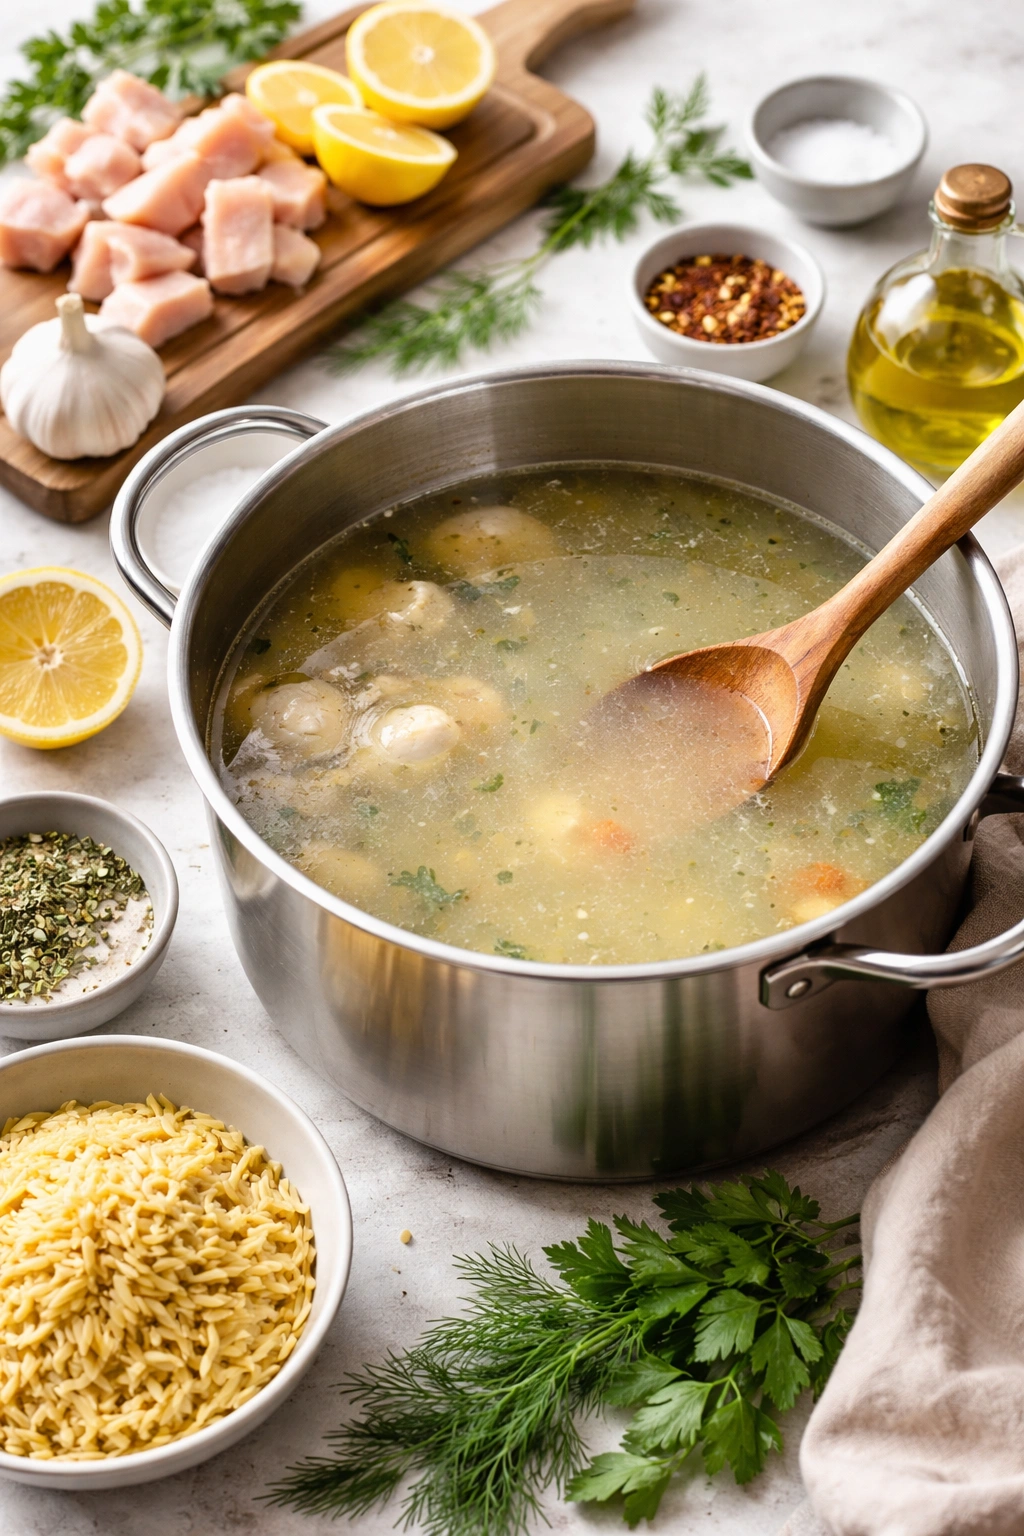
-
Pour in all 10 cups of chicken broth and stir to combine everything evenly. Add the bay leaf, dried thyme, dried oregano, and ½ teaspoon of salt. Stir well.
-
If you’re using raw chicken breasts, add them to the pot now. If you’re using pre-cooked shredded rotisserie chicken, you’ll add it later. Bring the broth to a boil over high heat, then reduce the heat to medium-low and cover the pot partially with a lid (leave it slightly ajar so steam can escape).
-
If using raw chicken, simmer for 12 to 15 minutes, until the chicken is completely cooked through. An instant-read meat thermometer should read 165°F (74°C) in the thickest part. The chicken will be tender and beginning to break apart slightly.
Advertisements
Adding the Pasta:
-
Carefully remove the chicken from the pot using tongs and set it on a cutting board to cool slightly. Add the uncooked orzo pasta to the pot and stir well to distribute it evenly. Do not skip the stirring here—orzo has a tendency to stick together if not stirred occasionally as it cooks.
-
Maintain a gentle simmer and cook the orzo for about 8 to 10 minutes, stirring every couple of minutes, until the pasta is tender but not mushy. It should have just a slight firmness when you bite into it (this is called al dente). The broth will begin to look slightly thicker as the pasta releases its starch.
-
While the orzo cooks, shred the cooled chicken into bite-sized pieces using two forks—one to hold the chicken steady and one to pull it apart into shreds. Or, if you’re using rotisserie chicken, simply shred it now.
Bringing It Together:
-
Once the orzo is tender, add the shredded chicken back to the pot along with the fresh lemon juice and lemon zest. Stir everything together and let it simmer for 1 to 2 minutes so the flavors meld.
-
Add the fresh spinach, parsley, and fresh dill. Stir gently until the spinach completely wilts into the broth—this will happen almost immediately, within about 30 seconds to 1 minute. The spinach should turn a bright, darker green, which indicates it’s ready.
-
Taste the soup carefully and adjust the seasoning. Add more salt and pepper to your liking. Remember that you can always add more lemon juice if it needs more brightness, but you can’t take it out once it’s in. Start with the amount called for and add more gradually if needed.
-
Remove the bay leaf (if you can easily find it) and ladle the soup into bowls. Serve immediately, with optional Parmesan cheese shavings, fresh lemon slices, or additional fresh herbs as garnish.
Pro Tips That Make All the Difference

Use low-sodium broth. This isn’t a health thing; it’s a flavor thing. Regular, full-sodium broth is often oversalted, and you lose the ability to control the final salt level of your soup. You want to be the one deciding how much salt goes into your family’s food, not the broth manufacturer. Low-sodium broth also tastes fresher and more like actual chicken.
Fresh lemon juice changes everything. I know bottled lemon juice seems convenient, but the flavor difference is genuinely significant. Bottled lemon juice has a slightly chemical, flat taste that fresh lemon doesn’t have. Fresh lemon juice is brighter, more alive, and actually worth the 30 seconds it takes to squeeze a few lemons. A simple hand juicer makes this effort minimal.
Don’t skip the zest. The zest—the colored outer peel of the lemon, without the white pith—contains all the most intensely lemony oils. A teaspoon or two of lemon zest adds brightness that juice alone can’t replicate. Use a microplane grater or a fine box grater to get the zest, being careful not to grate into the bitter white pith underneath the colored skin.
Stir the pasta occasionally as it cooks. Orzo is particularly prone to sticking to the bottom of the pot. Stirring every couple of minutes ensures it cooks evenly and prevents scorching on the bottom. This takes literally 10 seconds per stir, and it makes a real difference in the final texture.
If you’re making this ahead, cook the pasta separately. If you know you’ll have leftovers or you’re making this for a party where it needs to sit in a pot for a while, cook the orzo separately in salted boiling water until just tender, drain it, and store it separately from the broth. When you’re ready to serve, warm the broth and add the orzo to individual bowls as you serve. This prevents the pasta from continuing to absorb liquid and turning your soup into thick mush.
Add fresh herbs right at the end. The volatile oils in fresh herbs—parsley, dill, chives—are delicate and lose flavor if they cook for long periods. Adding them in the last minute before serving means they taste bright and fresh instead of muted and cooked. If you’re serving leftovers, add fresh herbs again rather than assuming the ones you added the first day are still good.
Let your soup cool slightly before tasting and adjusting seasoning. Your taste buds don’t work well on extremely hot food, so you might undersalt or over-lemon if you taste too early. Wait until the soup cools just slightly—it should still be hot enough to eat, but cool enough that you can actually taste it properly.
Common Mistakes and How to Avoid Them
Undersalting the broth. This is probably the most common mistake in home soup making. People are afraid of salt, so they use too little, and the result is a soup that tastes flat even though the individual ingredients are fine. Start with the recommended amount and taste as you go—you need enough salt that you notice the individual flavors coming through. Salt isn’t the enemy; too little salt is.
Overcooking the pasta. Pasta continues to absorb liquid even after it’s finished cooking, and overcooked pasta becomes mushy very quickly in a soup. Taste the orzo around the 8-minute mark to check doneness. It should be tender with just a slight firmness when you bite into it. If you’re unsure whether it’s done, slightly underdone is better than overdone—you can always cook it a minute or two longer, but you can’t undo mush.
Using old, stale herbs. Those dried herbs in the back of your spice cabinet that have been there for three years aren’t doing you any favors. Dried herbs lose their flavor over time and become dusty-tasting. If you’re going to use dried herbs, make sure they’re relatively fresh—ideally less than a year old. Better yet, use fresh when possible. Fresh herbs make a dramatic difference in the final taste.
Boiling the soup after adding the lemon juice. High heat makes lemon juice taste slightly bitter and less bright. Once you’ve added the lemon juice, keep the heat at a gentle simmer. This is especially important if you’re planning to keep the soup warm for any length of time before serving.
Skipping the sauté step. I’ve mentioned this already, but it bears repeating: the five minutes you spend sautéing the vegetables at the beginning of the recipe is the most important five minutes. This is where the flavor foundation gets built. Skipping this step or rushing through it results in a soup that tastes significantly less flavorful than it should. It’s not a shortcut; it’s essential.
Variations Your Kids Will Actually Eat

One of the best things about this soup is that it’s incredibly adaptable. You can change ingredients based on what’s in your kitchen or what your family will actually eat, and it still works.
For the vegetable-averse: If your family won’t eat visible vegetable pieces, you can puree some or all of the cooked vegetables using an immersion blender. This creates a creamy broth (without adding cream) while the vegetables essentially disappear. The soup becomes thicker and more luxurious, and nobody can complain about carrot chunks.
For the adventurous: Add fresh diced zucchini, mushrooms, or even a handful of kale along with the spinach. These vegetables add nutrition and flavor without making the soup feel heavy. Add them at the same time as the spinach so they soften slightly without losing their character.
For gluten-free eaters: Swap the orzo for brown rice, wild rice, or certified gluten-free pasta. Cooking times will be different—brown rice takes about 35 to 40 minutes of simmering, while wild rice takes about 40 to 45 minutes. Add the rice earlier in the cooking process to give it time to become tender.
For a Greek-style version: This soup is already inspired by Greek avgolemono, but you can lean further into that direction by using feta cheese instead of Parmesan, adding a bit of dried oregano, and serving with crusty Greek bread and a simple salad.
For a heartier version: Add white beans, chickpeas, or even shredded turkey instead of chicken. You can also increase the amount of vegetables or add something like diced potatoes or sweet potatoes for more substance.
For kids who like creaminess without cream: Stir in a couple of tablespoons of Greek yogurt or sour cream at the very end, just before serving. This adds creaminess and a subtle tang without being heavy. Some people also add an egg yolk or two, tempered slowly into the hot broth (similar to traditional avgolemono)—this creates a silky, creamy texture that’s genuinely luxurious.
For a spiced-up version: A tiny pinch of crushed red pepper, some fresh ginger, or even a bit of turmeric can add depth and warmth without making the soup hot or spicy. Start with small amounts and taste as you go.
Storage and Make-Ahead Guidance

One of the best things about this soup is that it actually keeps beautifully and often tastes even better the next day, once the flavors have had time to meld and deepen.
Storing in the refrigerator: Let the soup cool to room temperature before transferring it to an airtight container. It will keep in the fridge for 3 to 4 days. If you cooked the pasta in the soup, the orzo will continue absorbing liquid as it sits, so the soup will become thicker. When reheating, add a bit of extra broth or water to thin it back out to the consistency you prefer.
Freezing: This soup freezes beautifully for up to 3 months. The key is storing it properly—use freezer-safe containers or heavy-duty freezer bags, and make sure to leave a bit of headspace at the top since liquids expand slightly as they freeze. Thaw overnight in the refrigerator before reheating. When reheating, do so gently over low to medium-low heat, stirring occasionally, and add extra broth as needed. The frozen soup won’t look as bright when you first thaw it, but it will regain its color and vibrancy as it reheats.
The make-ahead strategy: If you’re making this soup in advance for a party or a busy week, you have a few options. You can make the entire soup and refrigerate it, reheating it gently before serving. You can make the broth base (everything up through the simmering stage) and freeze it, then add fresh pasta and herbs when you’re ready to serve. Or, you can make the broth base, refrigerate it, and add fresh pasta and vegetables when you reheat it—this keeps everything tasting bright and fresh.
About those fresh herbs: The parsley and dill taste significantly better when added fresh right before serving. If you’re making the soup ahead, don’t add these until just before you eat it. The lemon juice and zest are more stable, but lemon juice can become slightly bitter if it’s heated multiple times, so consider adding a bit of fresh lemon juice when you reheat as well.
What to Serve Alongside Your Soup

Lemon chicken soup is actually a complete meal on its own—it has protein from the chicken, carbs from the pasta, vegetables, and bright flavor that keeps you satisfied. But it’s also delicious served alongside other things, depending on what meal you’re having and how hungry people are.
Crusty bread for dipping is the classic pairing. A baguette, sourdough, or even store-bought Italian bread works beautifully. There’s something deeply satisfying about tearing off a piece of bread and using it to scoop up the broth and vegetables. Some people toast the bread lightly first for a bit more crunch.
A simple green salad provides a nice textural contrast. Dressed simply with a light vinaigrette, lettuce or mixed greens help balance the richness of the soup. The acidity of the salad dressing complements the acidity of the lemon in the soup without being redundant.
Roasted vegetables make the meal feel more substantial. Roasted carrots, zucchini, or green beans alongside the soup create a more complete dinner, though honestly, the soup is already fairly complete on its own.
Grilled cheese sandwich is a pairing that works especially well for kids. There’s something about soup and grilled cheese that just feels like comfort food. It’s indulgent but satisfying, and it keeps everyone happy.
A simple crackers or cheese board works nicely if you’re serving this as a light lunch or at a gathering. Offer good quality crackers, maybe some cheese, olives, or cured meats on the side so people can assemble plates that suit their preferences.
Lemon wedges aren’t technically a side, but serving fresh lemon wedges alongside the soup lets people adjust the brightness to their own taste. Some people want more lemon; some prefer less. Having wedges available means everyone gets their perfect version.
Final Thoughts

This is the kind of soup that feeds your body and your soul at the same time. It’s nourishing without being heavy, flavorful without being complicated, and somehow it just gets better as it sits in your pot, with the flavors deepening and becoming more integrated.
The real magic happens when you realize that your family actually asks for it—not because you’re pushing them to eat something healthy, but because they genuinely want it. That’s when you know you’ve found something that works. Make this soup on a cool evening, serve it with crusty bread, and watch what happens. Chances are good you’ll be making it again sooner than you expect.