There’s something almost magical about the phrase “pan-seared scallops.” Those two words alone can transform an ordinary evening into something celebratory, romantic, and decidedly restaurant-quality—all without leaving your kitchen or wearing anything fancier than your favorite jeans. Yet despite their intimidating price tag and elegant reputation, scallops might be one of the easiest proteins you’ll ever cook at home. In fact, the entire dish—from pan to plate—takes just minutes to pull together, making it absolutely perfect for date nights when you want to impress without spending hours in the kitchen.
The beauty of pan-seared scallops lies in their delicate simplicity. These sweet, buttery mollusks don’t need much to shine—just high heat, proper technique, and a little restraint. The difference between tender, succulent scallops and rubbery, overcooked ones comes down to understanding a few key principles: knowing which scallops to buy, drying them thoroughly, using enough heat, and resisting the urge to move them around while they’re searing. Master these fundamentals, and you’ll have a dish that tastes like it came straight from a fine dining establishment, not your home stovetop.
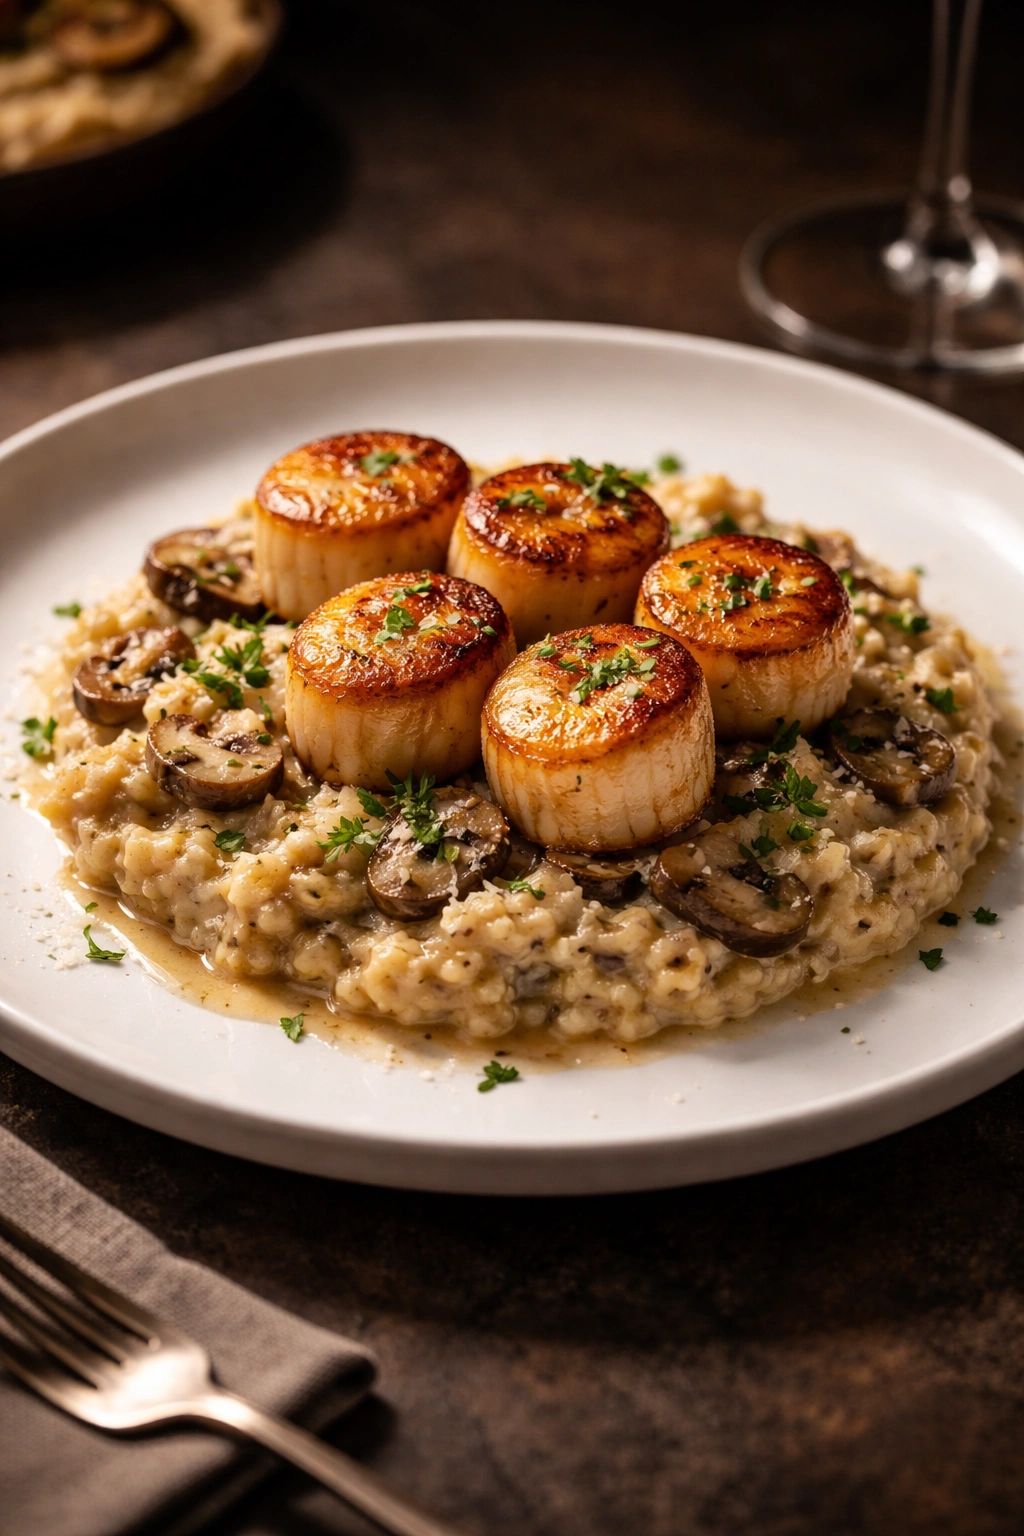
What makes this dish so special for a date night is the psychology of cooking it together. There’s something intimate about standing side by side, watching butter melt into a glossy pan sauce, smelling the garlic and lemon hitting the heat, knowing that in just a few minutes you’ll be sitting down to something genuinely luxurious. It’s the kind of meal that says “I put thought and effort into this” without requiring you to actually spend all day thinking and working. Serve it with the right sides—creamy risotto, buttery pasta, roasted asparagus—and you’ve got a complete, impressive dinner that’ll have your date wondering if you secretly trained as a chef.
Why Restaurant Chefs Make Scallops Look So Easy
Professional kitchens make pan-seared scallops seem almost effortless because they’ve removed all the variables that trip up home cooks. They buy the highest-quality, dry-packed sea scallops—the ones that are naturally moisture-free and ready to sear beautifully. They use industrial-strength burners that get screaming hot in seconds. They’ve practiced the technique hundreds of times, so their hand movements are automatic. And most importantly, they don’t overcook them, because they understand that scallops are forgiving only if you respect their delicate nature.
The good news is that you don’t need professional equipment to achieve the same results. What you need is knowledge and a tiny bit of confidence. Understanding why each step matters more than just following instructions. Knowing that paper towels are your best friend because moisture is the enemy of a good sear. Recognizing that the sizzle when the scallops hit the pan should be aggressive but not angry. Learning to read the visual and textural cues that tell you a scallop is perfectly done—that slight translucency in the center, that springy firmness when you press it gently.
This recipe walks you through exactly what restaurant chefs do, but explained for your home kitchen. There are no shortcuts that compromise quality, and there’s no unnecessary complexity. Just straightforward technique, ingredient quality, and timing that actually works.
Understanding the Difference Between Scallop Types
Before you even get to the cooking part, the most important decision you’ll make is choosing the right scallops. This single choice determines whether you’ll end up with that restaurant-quality golden crust or a pale, steamed-looking disc that tastes vaguely fishy. The difference comes down to two fundamental distinctions: the species and the preservation method.
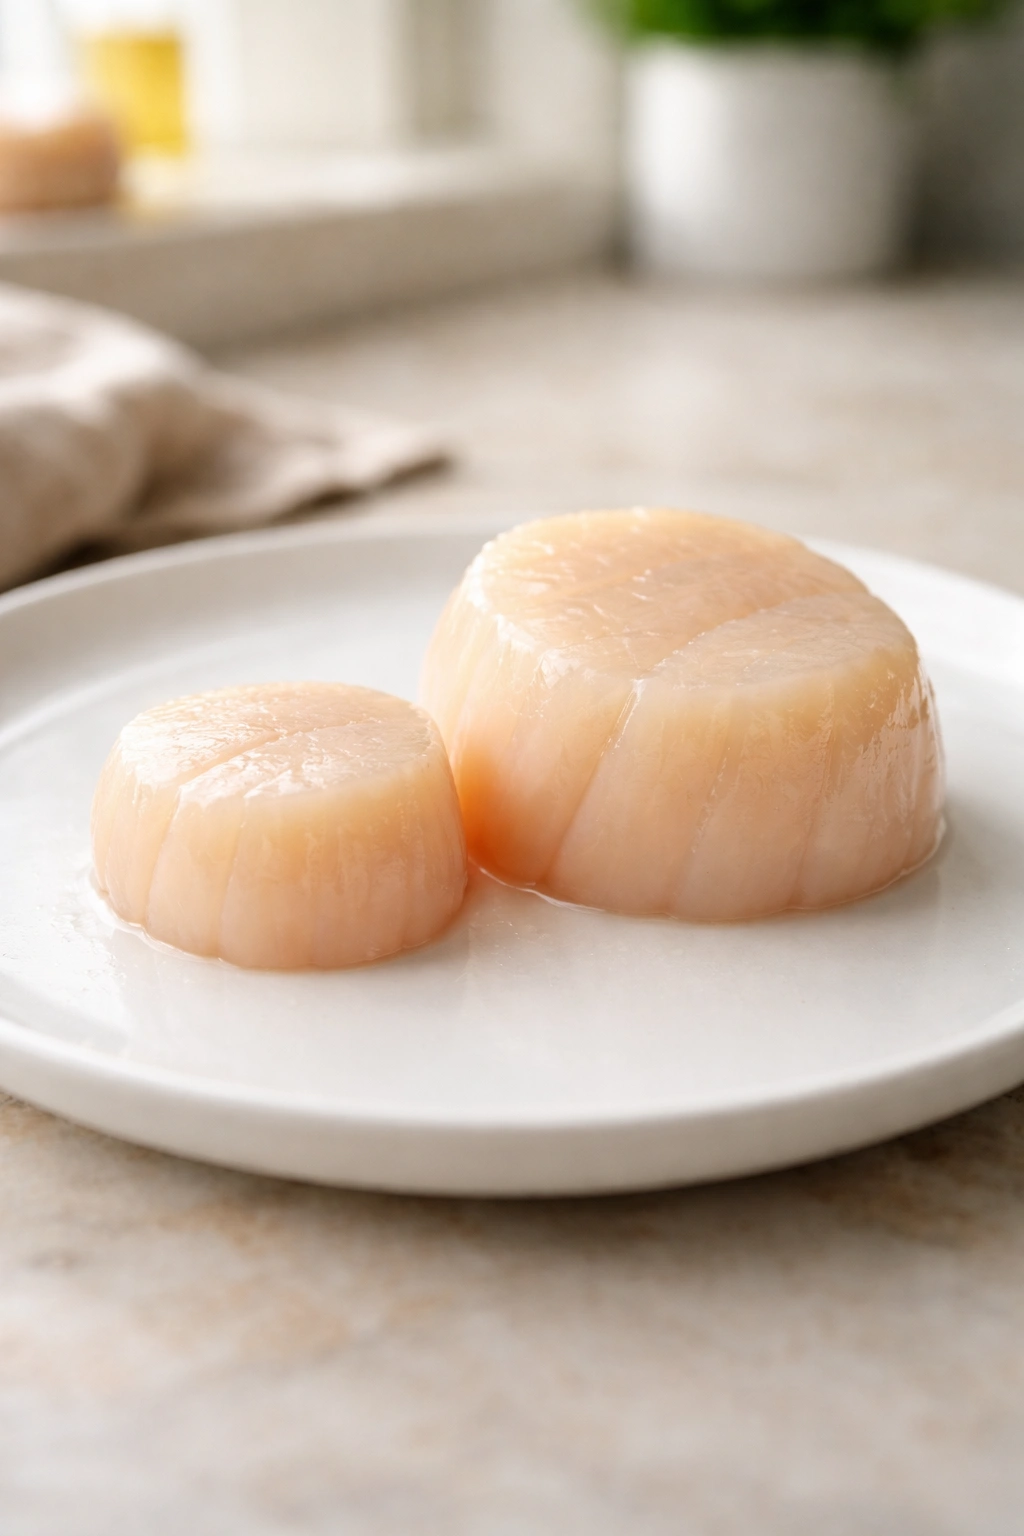
Sea scallops versus bay scallops is the first divide. Sea scallops are the large, premium option—the ones you see in upscale restaurants. They’re harvested from deep, cold ocean waters and typically measure one to two inches across. Bay scallops are smaller, sweeter, and come from shallow bay waters on the East Coast. For pan-searing, sea scallops are your go-to because their size means you’ll get a proper sear on both sides while the interior cooks through. You want to look for what’s called U-10 or U-12 scallops, which means there are under 10 or under 12 scallops per pound—in other words, each one is substantial and impressive on the plate.
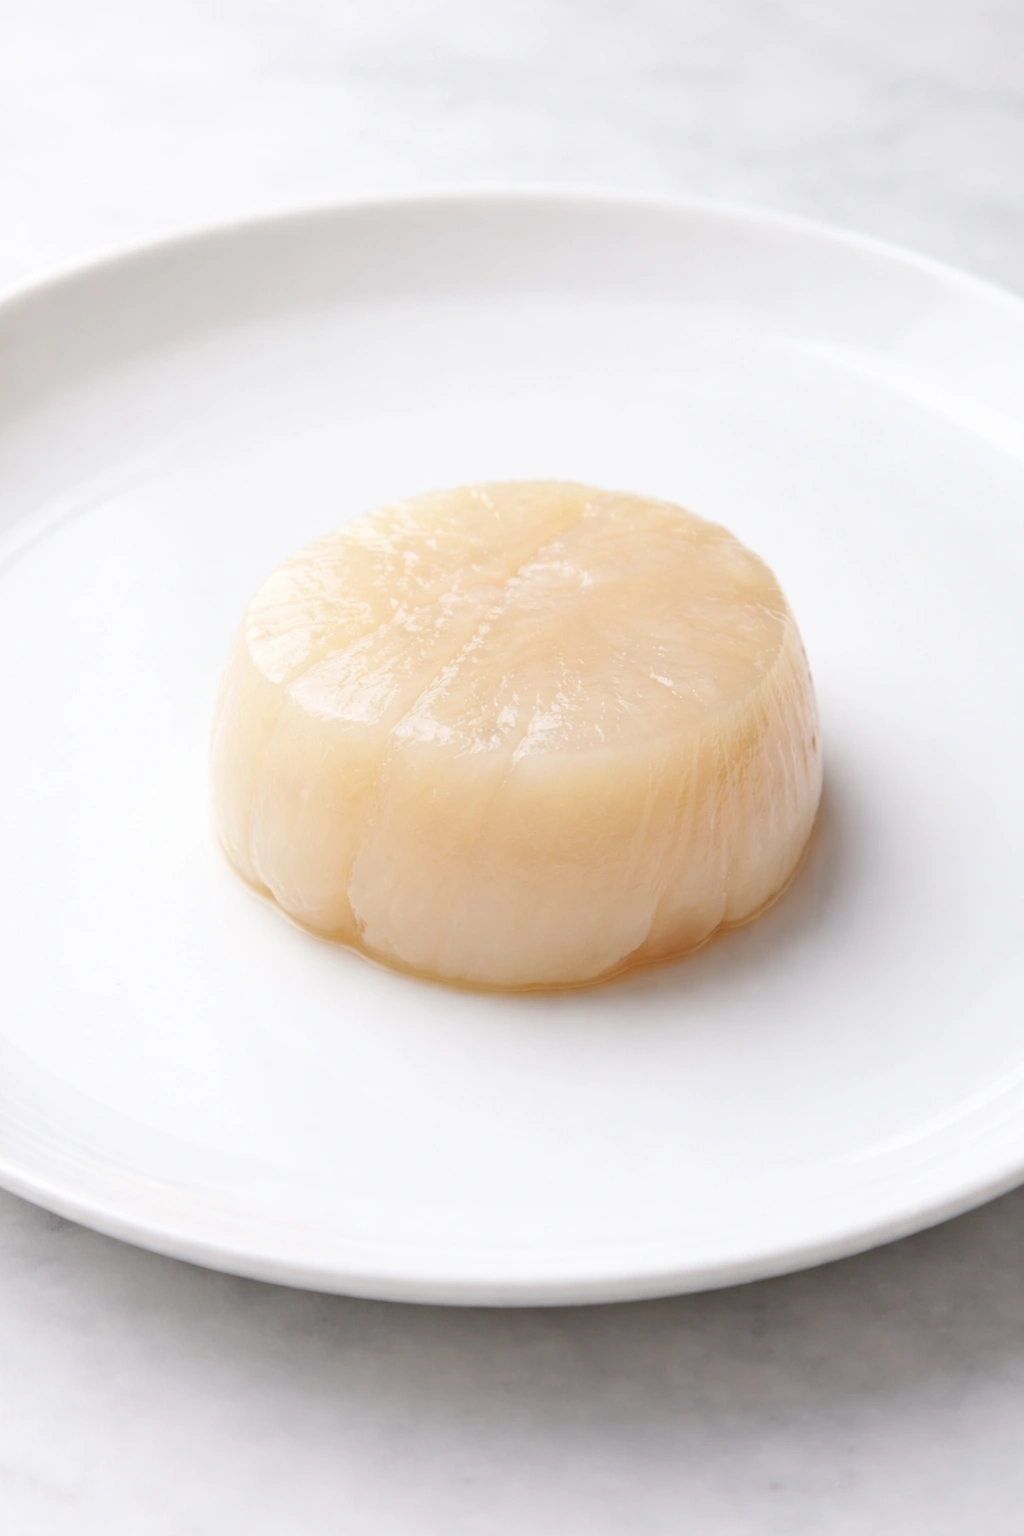
Dry scallops versus wet scallops is the second critical distinction, and this one truly makes or break the dish. Dry scallops are naturally dry (hence the name) with a creamy ivory to light tan color. Wet scallops have been soaked in a preservative solution containing sodium tripolyphosphate (STPP), which extends their shelf life but also traps moisture inside. When you cook wet scallops, that trapped water releases into the pan, causing the scallops to steam instead of sear. You’ll never get that beautiful golden crust, and the flavor suffers because the preservative liquid masks the natural sweetness.
Always ask your fishmonger if the scallops are dry-packed. If you’re buying from a grocery store seafood counter, check the label carefully. Dry scallops usually cost a bit more, but that extra money is genuinely worth it. The difference between a properly seared scallop and a rubbery, steamed one comes down to this single choice. If your store only has wet scallops, you can soak them in a mixture of cold water, lemon juice, and salt for 30 minutes to remove some of the excess liquid, but starting with dry scallops is always the better option.
The Critical Technique for Getting That Perfect Golden Crust
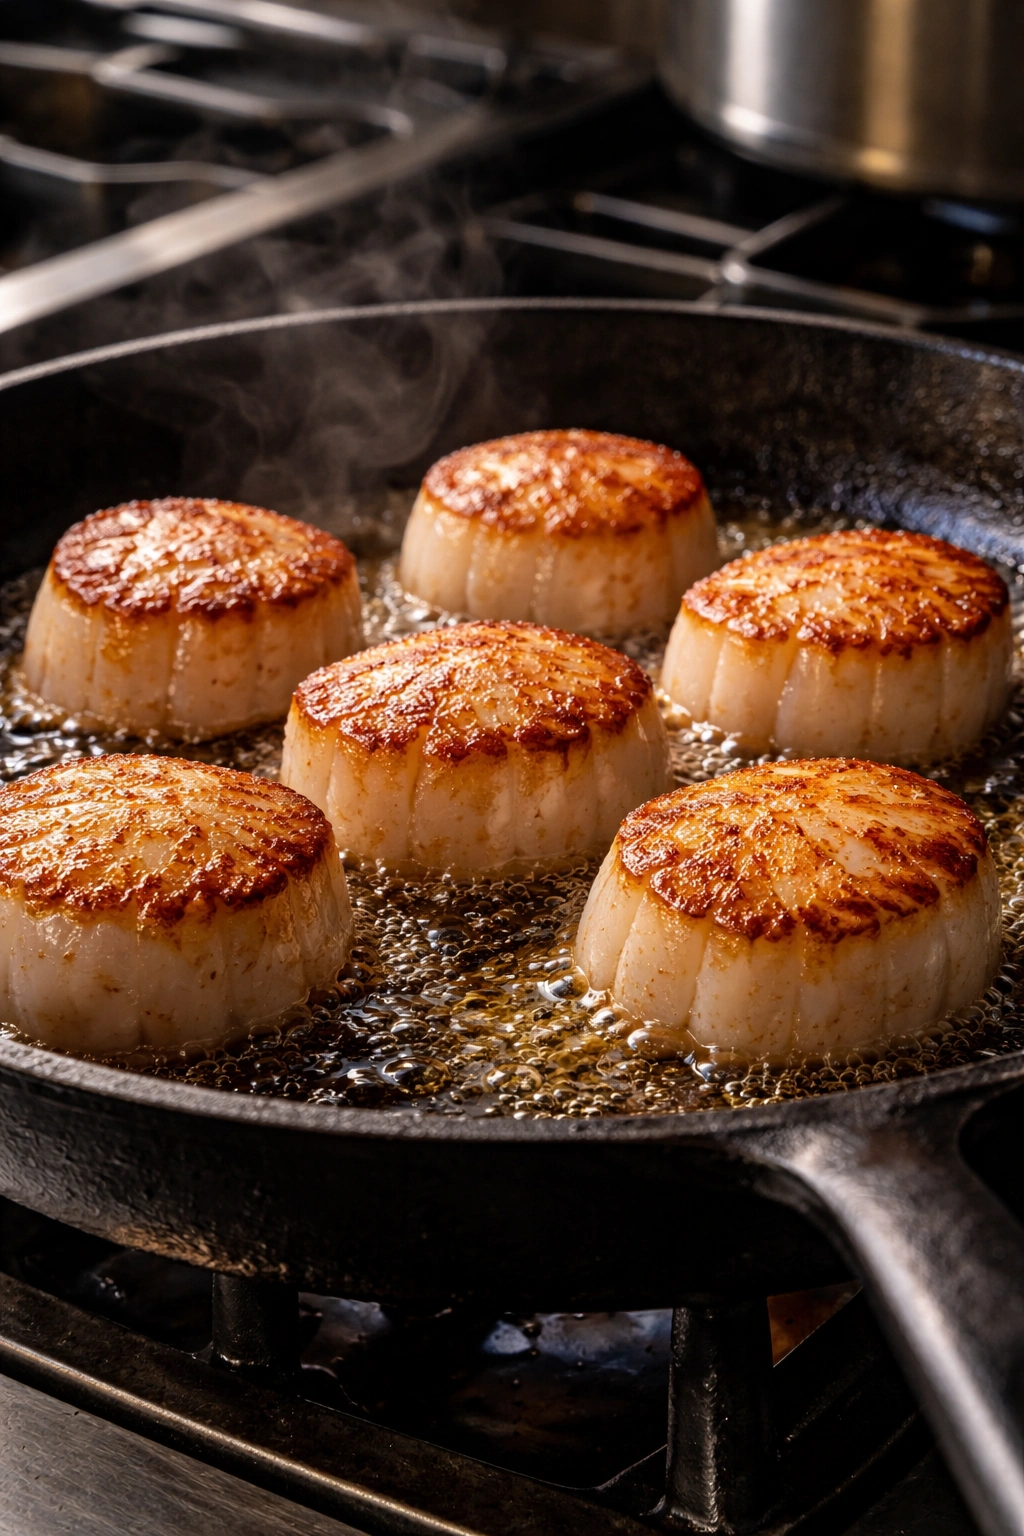
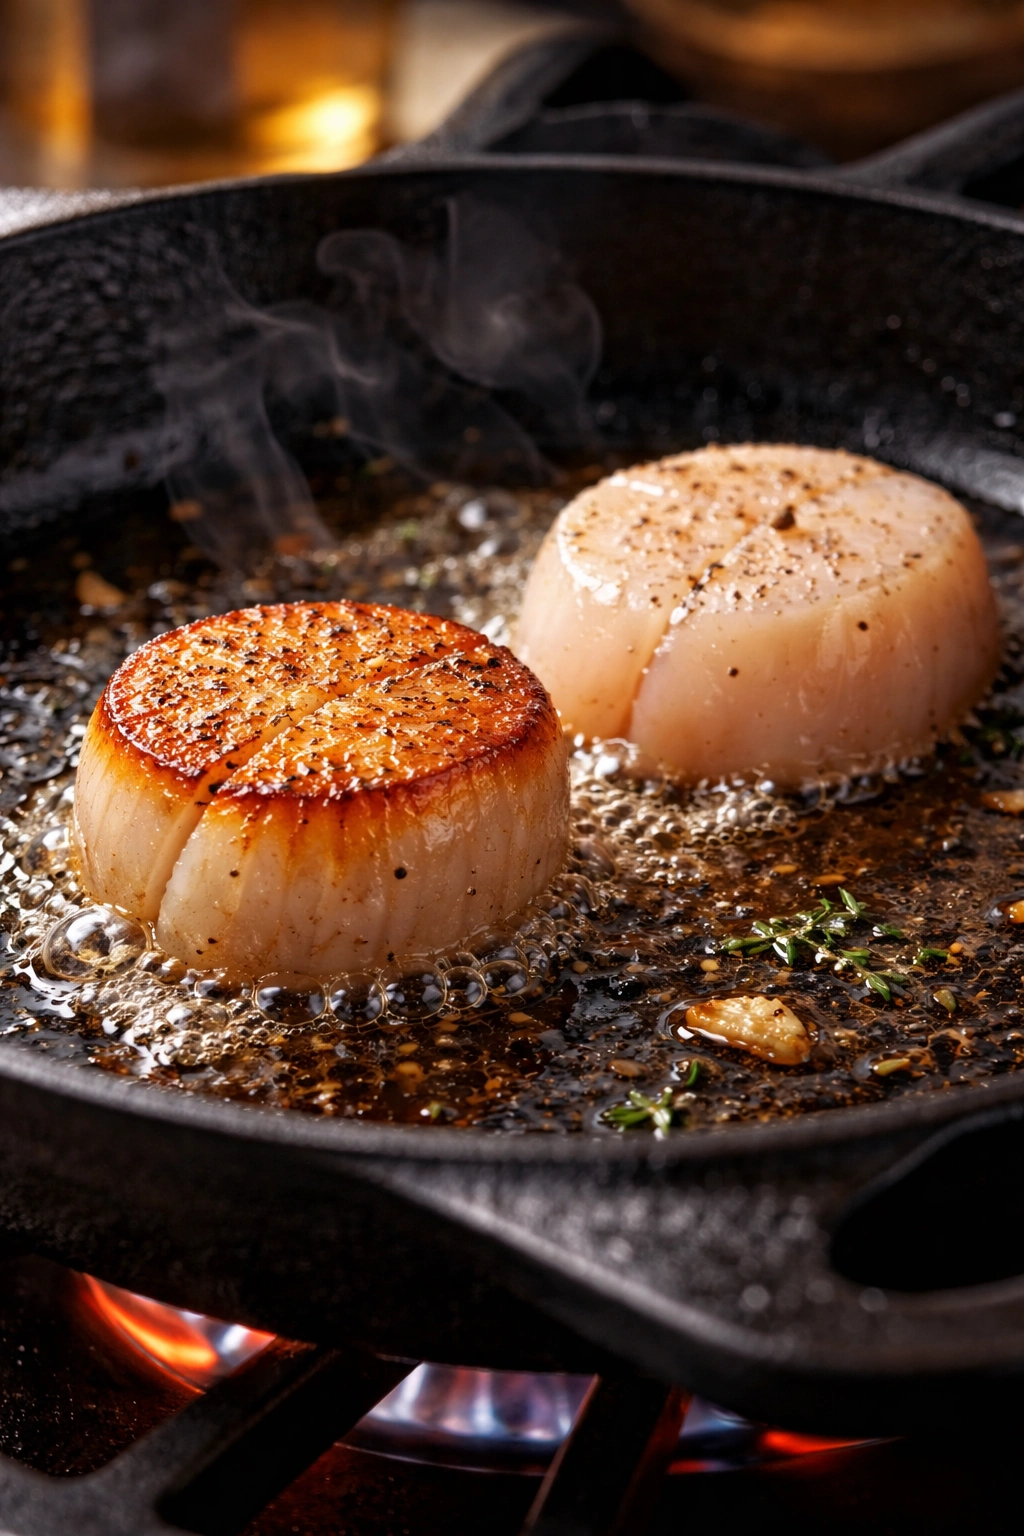
The sear is everything with scallops. A proper sear creates a caramelized crust that’s flavorful and beautiful, while the interior stays tender and just slightly translucent. The sear happens through something called the Maillard reaction—a chemical process where proteins and sugars interact under high heat to create new flavors and that appealing golden-brown color. But you can only get a Maillard reaction if the scallop is dry enough and the pan is hot enough.
This is where most home cooks run into trouble. They either don’t get the pan hot enough, or they put wet scallops into the pan. When scallops are wet, the water on the surface has to evaporate before any browning can happen, which means the scallop cooks through before it ever gets that crust. By the time it’s brown, it’s overcooked and rubbery. By keeping the scallops dry and the pan hot, you give yourself a narrow but definitely achievable window where the outside browns while the inside stays tender.
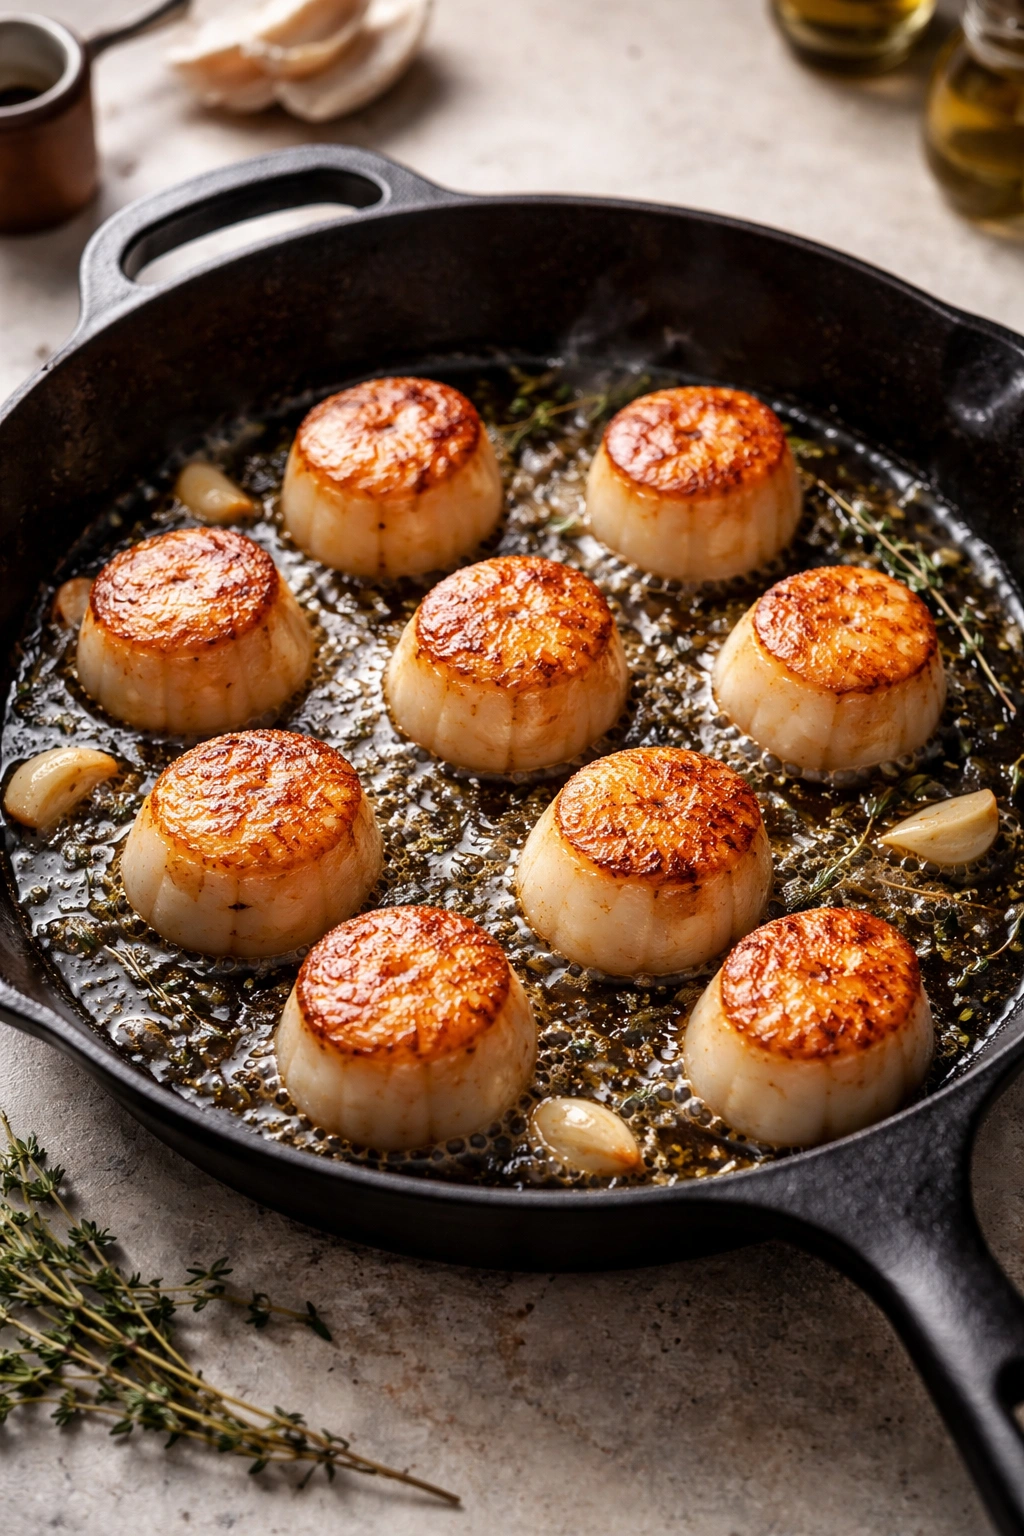
Pat your scallops completely dry with paper towels—and I mean dry, not just lightly dabbed. Some people let their scallops sit on paper towels for five or ten minutes before cooking to draw out every last bit of surface moisture. You should use a cast iron or stainless steel skillet because these pans retain heat better than non-stick, which means they actually sear instead of cook gently. Heat the pan until it’s genuinely hot—the kind of hot where a drop of water sizzles and disappears instantly. Add your oil and butter, and wait until the mixture is shimmering. When you place the scallops in that pan, they should sizzle immediately and aggressively.
Then comes the hard part: don’t touch them. Leave them absolutely still for two to three minutes. Don’t move them around, don’t flip them halfway through, don’t poke at them to see if they’re done. Let the heat do its work. After two to three minutes, flip them gently and cook the other side for another minute to two minutes. You’re looking for a golden-brown crust on both sides and a center that’s still slightly translucent when you look at the edge. The moment they’re done, remove them from the pan immediately. They’ll continue to cook even after you take them off the heat, a phenomenon called carryover cooking. This is why a tiny bit of translucency in the center is actually what you want—it gives you a safety margin.
Selecting and Preparing Your Ingredients
The ingredient list for pan-seared scallops is intentionally short because you want the scallops to be the star. Every other ingredient’s job is simply to enhance their natural sweetness and buttery flavor without overwhelming them.
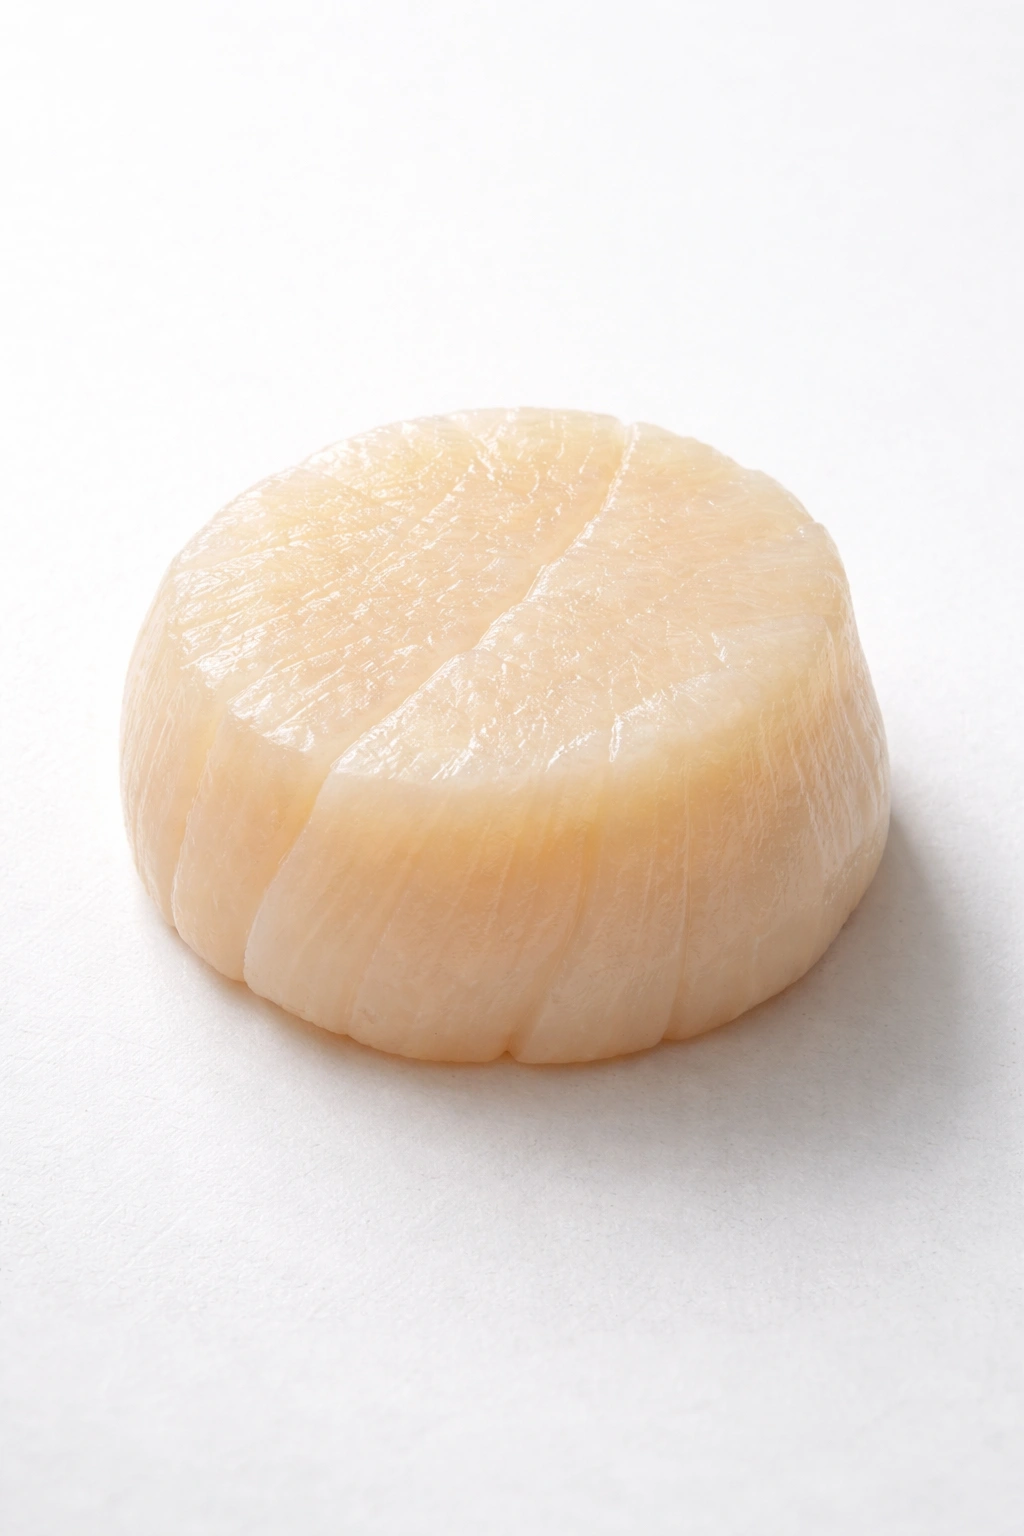
For the scallops themselves, buy the largest, freshest dry sea scallops you can find. Ideally, you want them from a reputable fishmonger rather than a grocery store seafood counter, though good grocery stores absolutely work. They should smell like the ocean—briny and clean—not fishy or chemical. They should be firm to the touch and creamy-looking, not slimy. If you find frozen scallops (which is what many of us have access to), that’s fine—just thaw them in the refrigerator overnight or in a sealed bag submerged in cold water for about 30 minutes. The key is thawing them properly, not quickly, so they don’t lose too much moisture.
Oil selection matters more than you might think because you need a fat that can handle high heat without smoking or burning. Avocado oil is excellent because it has a high smoke point of around 500°F. Grapeseed oil, peanut oil, and canola oil also work beautifully. Skip extra virgin olive oil, which burns at lower temperatures and will taste harsh if it smokes. A neutral vegetable oil works fine, though it doesn’t add flavor the way avocado oil does.
Butter is your richness and flavor component. Use unsalted butter so you can control how much salt goes into the dish. The butter will melt and foam up as the scallops sear, basting them in that golden, nutty, brown-butter flavor. Some recipes skip butter and use only oil, but butter is what transforms this from a seared scallop into something restaurant-quality and luxurious.
Salt and pepper are simple, but they matter enormously. Use fine sea salt or kosher salt (if you use Morton’s kosher salt instead of Diamond Crystal, reduce the amount by about a third because Morton’s is saltier by volume). Fresh, coarsely ground black pepper makes a real difference—pre-ground pepper tastes dusty by comparison.
For the sauce, you have options. A simple finish of fresh lemon juice, minced garlic, and maybe some fresh parsley brightens everything up. If you want something richer, deglaze the pan with dry white wine or vermouth, let it reduce, and finish with a splash of cream. The garlic butter sauce that develops from the drippings in the pan is genuinely incredible on its own, so don’t feel like you need to make something complicated.
Yield: Serves 2 as a main course | Serves 4 as an appetizer
Prep Time: 10 minutes
Cook Time: 10 minutes
Total Time: 20 minutes
Difficulty: Intermediate — The technique requires attention and practice, but the steps are straightforward once you understand the principles. The main challenge is resisting the urge to move the scallops while they sear and knowing when to remove them from the heat.
The Complete Ingredient List
For the Scallops:
- 1 pound large dry sea scallops (U-10 to U-12 count, approximately 12–16 scallops)
- 2 tablespoons high-heat oil (avocado, grapeseed, or canola oil)
- 2 tablespoons unsalted butter
- ½ teaspoon fine sea salt or Diamond Crystal kosher salt (reduce to ⅓ teaspoon if using Morton’s)
- ¼ teaspoon freshly ground black pepper
- Lemon wedges or slices for serving
For the Simple Lemon Garlic Butter Sauce (Optional):
- 2 tablespoons unsalted butter
- 3 cloves garlic, minced
- 2 tablespoons fresh lemon juice
- 1 tablespoon fresh parsley, finely chopped
- ¼ teaspoon fine sea salt
- Pinch of freshly ground black pepper
For a White Wine Butter Sauce (Alternative):
- 2 tablespoons unsalted butter
- 3 cloves garlic, minced
- ⅓ cup dry white wine or dry vermouth
- 2 tablespoons fresh lemon juice
- 1 tablespoon fresh parsley, finely chopped
- Salt and pepper to taste
How to Prepare and Cook Your Scallops
Prepare the Scallops and Pan:
-
Remove the scallops from the refrigerator and place them on a clean cutting board or plate lined with paper towels.
Advertisements -
Pat each scallop thoroughly dry on all sides using fresh paper towels, working gently so you don’t damage them. This is genuinely the most important step—moisture is the enemy of a good sear. If your scallops are particularly wet (especially if they were frozen), let them sit on the paper towels for 5–10 minutes to draw out additional surface moisture.
-
Check each scallop for the small side muscle, which looks like a little tough strip of tissue usually on the edge where the flat sides meet. Pull it off gently if it’s present—it’s chewy when cooked and not pleasant to eat. Not all scallops have a side muscle, so don’t worry if you can’t find one.
-
Sprinkle both sides of each scallop lightly and evenly with salt and pepper. Season them just before cooking, not earlier, because salt can draw out additional moisture if left sitting.
-
Place your cast iron or heavy-bottomed stainless steel skillet on the stove over medium-high to high heat. Let it preheat for 2–3 minutes. You want the pan genuinely hot—if you hold your hand about 4 inches above the surface, you should feel intense heat radiating upward.
-
Add the oil and butter to the hot pan. Swirl them together briefly. You want the mixture to be shimmering and just starting to smoke slightly—this indicates it’s hot enough. Do not add the scallops until the oil and butter are truly hot, or they’ll stick and won’t brown properly.
Sear the Scallops:
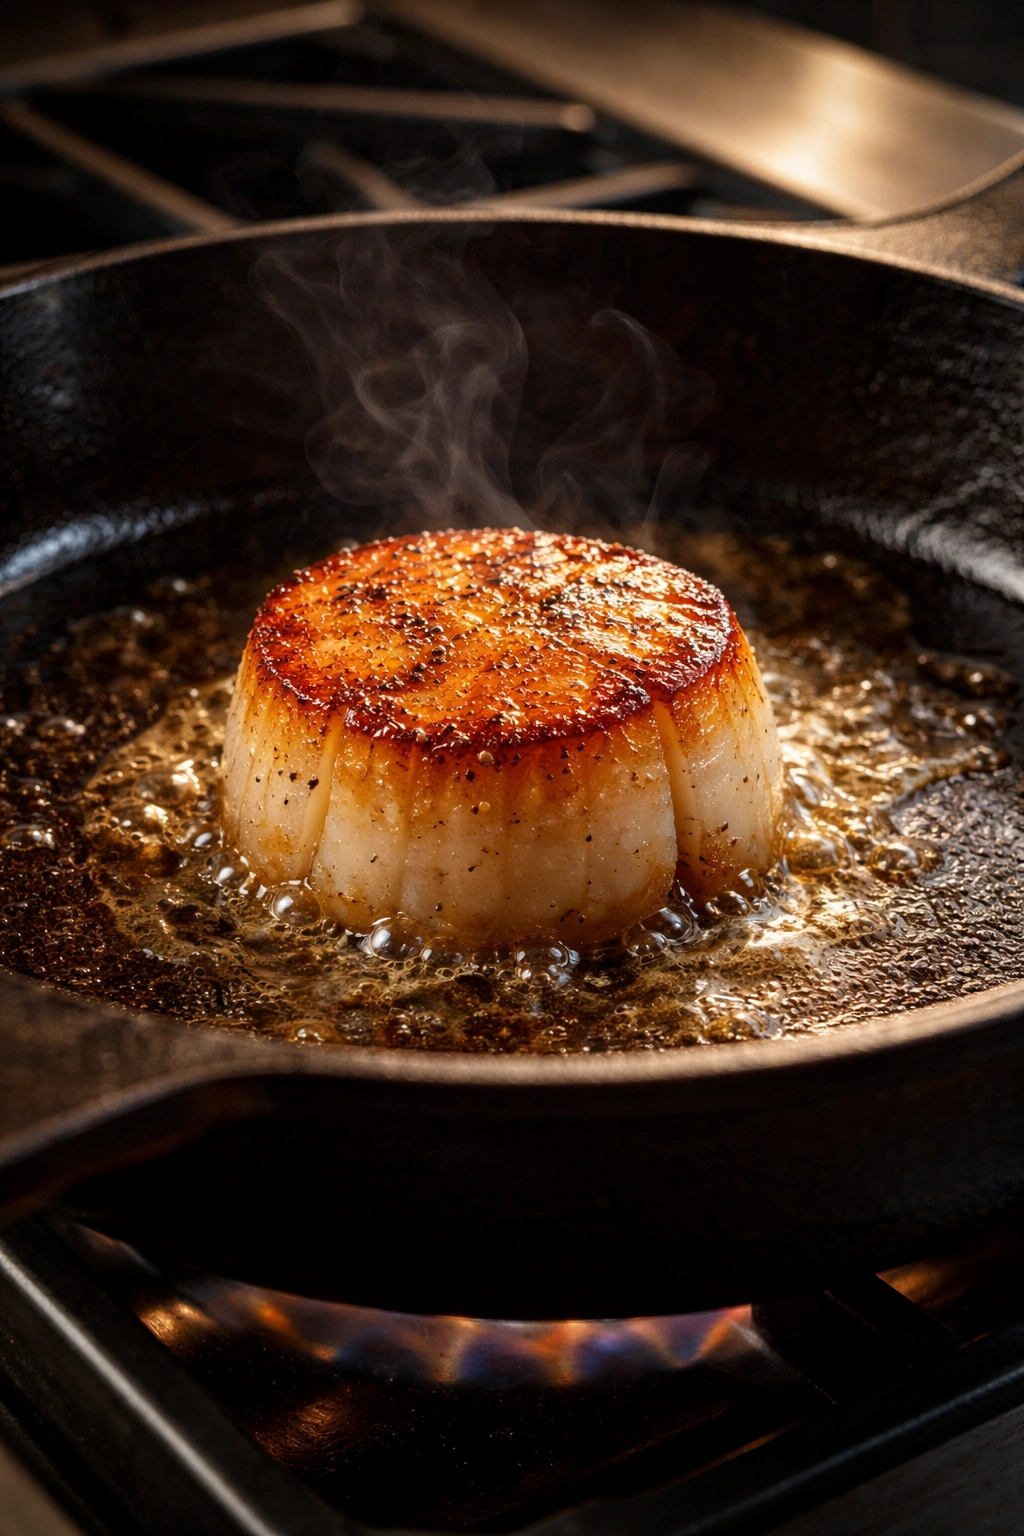
-
Carefully place the scallops in the pan in a single layer, making sure they’re not touching each other. They should sizzle immediately and aggressively when they hit the pan—if they don’t, your pan isn’t hot enough. Do not move them, shake the pan, or flip them. Leave them completely still. This is the hardest part, but it’s essential for getting that crust.
-
Sear without moving for 2–3 minutes, depending on how hot your pan is and how thick the scallops are. You’ll see the bottom of each scallop turn opaque and develop a golden-brown crust. You can peek at the bottom after 2 minutes to check progress, but try not to disturb them.
-
Using tongs, flip each scallop gently and carefully. If any stick slightly, wiggle them gently from side to side to release them rather than yanking.
-
Immediately reduce the heat to medium-high (you want to slow the cooking slightly now that you’ve got the crust on one side). Sear the second side for 1–2 minutes, until golden brown. Watch for the sides of the scallops to turn slightly opaque and lose that translucent look—that’s your signal they’re approaching doneness. The very center should remain just barely translucent.
Advertisements -
Remove the scallops from the pan immediately and transfer them to a serving platter. This is critical because they’ll continue cooking from residual heat. Leaving them in the hot pan even for another 30 seconds can push them from perfect to overcooked.
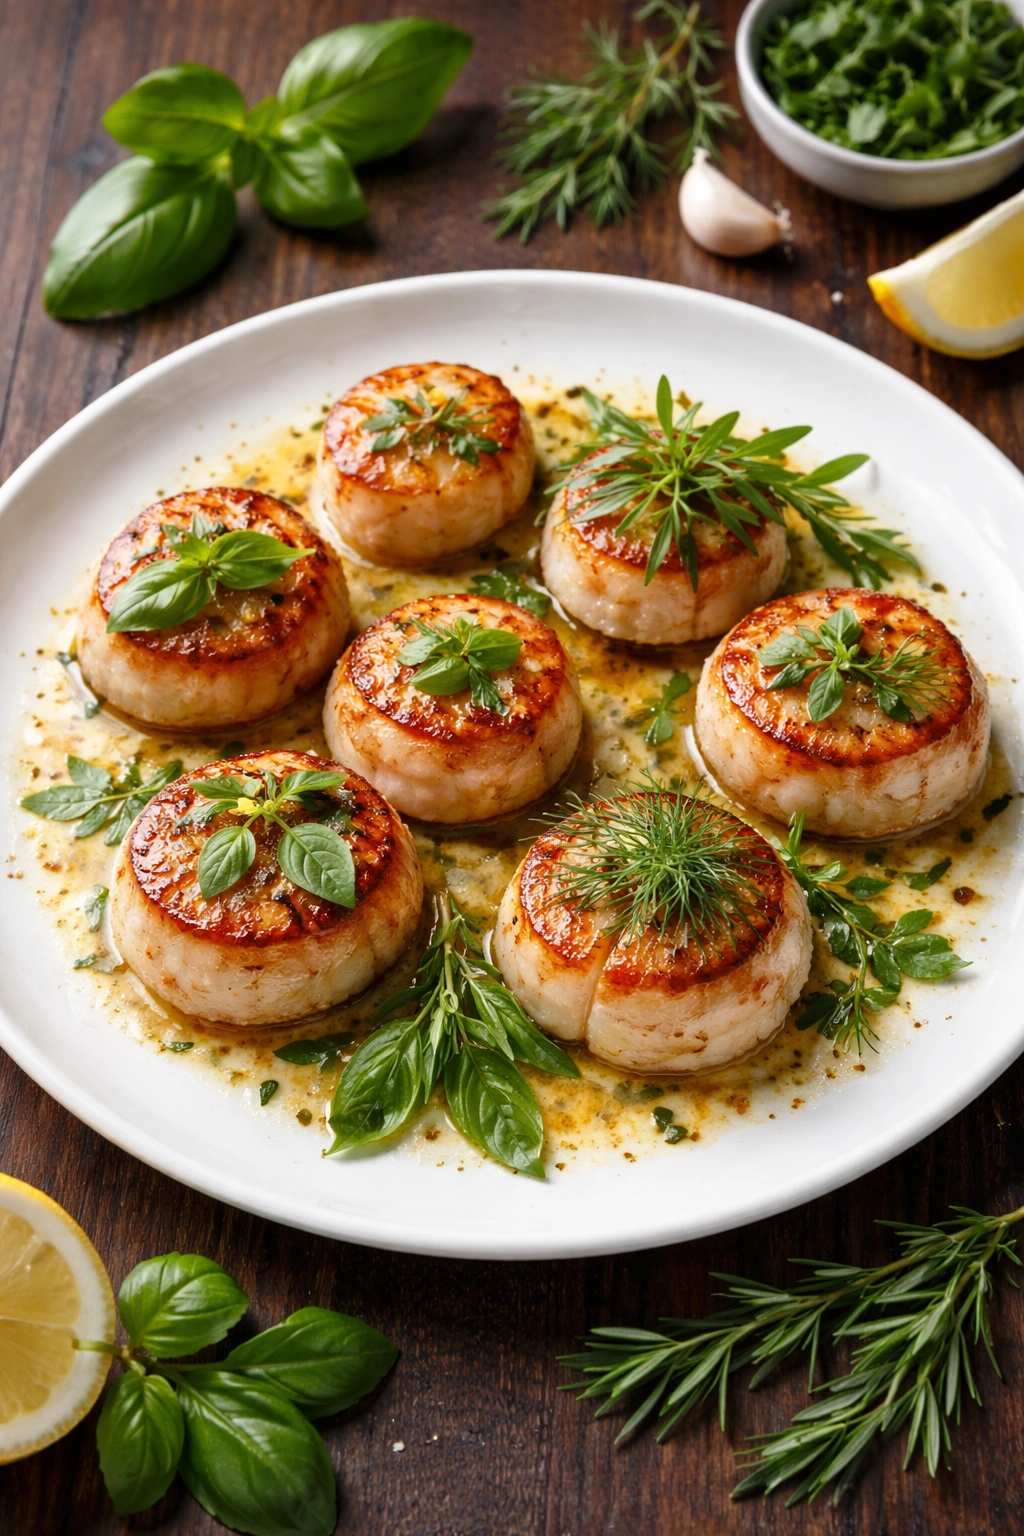
Make a Simple Pan Sauce (Optional but Highly Recommended):
-
If you want a simple finish, reduce the heat to medium. Add 2 tablespoons fresh butter to the pan, along with 3 minced garlic cloves. Let the garlic cook gently for about 30 seconds until fragrant—do not let it brown or it’ll taste bitter.
-
Remove the pan from the heat and stir in 2 tablespoons fresh lemon juice, 1 tablespoon fresh parsley, and a tiny pinch of salt and pepper to taste.
-
Spoon or drizzle this sauce over the scallops immediately. The residual heat from the pan will create a silky, buttery sauce that’s absolutely delicious.
For a Richer White Wine Sauce:
-
Reduce the heat to medium and add ⅓ cup dry white wine or dry vermouth to the pan, scraping the bottom with a wooden spoon to release all the caramelized bits and browned butter—these add incredible flavor to your sauce.
-
Let the wine reduce by about half, which takes 1–2 minutes. You’ll see the liquid reduce in volume and become slightly syrupy.
-
Add 2 tablespoons fresh lemon juice, then remove the pan from the heat and whisk in 2 tablespoons cold unsalted butter until the sauce becomes silky and emulsified. Stir in fresh parsley and taste for salt and pepper, adjusting as needed.
-
Pour or spoon the sauce over the scallops and serve immediately.
Advertisements
The Crucial Tips That Separate Perfect from Mediocre Scallops
Temperature control is everything. You need your pan hot enough to create a crust but not so hot that the outside burns while the inside is still translucent. If your burner is electric, it might not reach quite the same temperature as gas, so you may need to preheat a bit longer. Cast iron retains heat beautifully, so if you’re using it, you won’t need the heat quite as high as you would with stainless steel. If you’re using stainless steel, go with medium-high to high heat.
Don’t crowd the pan. Scallops need space between them so the heat can circulate and each one gets a proper sear. If they’re touching, they’ll steam instead of brown. If you’re cooking for two people and have a large skillet, you might fit all of them comfortably. If you’re making appetizers for four, cook them in two batches. It only takes another two minutes, and the results are infinitely better.
The side muscle removal is genuinely important. That little piece of connective tissue doesn’t cook the same way the scallop meat does and stays chewy and tough. It’s quick to remove—just pull it gently, and it comes right off. Some scallops don’t have one, so don’t tear your scallop apart looking for it, but if you see it, remove it.
A meat thermometer takes the guesswork out completely. If you’re nervous about doneness, use an instant-read thermometer. Scallops are done at an internal temperature of about 115–120°F at the center. This gives you a perfectly tender, just-cooked scallop that won’t be overcooked.
Undercooking is better than overcooking. Scallops will continue to cook from residual heat even after you remove them from the pan. If you’re unsure whether they’re done, pull them out early. You can always put them back in the pan for another 10 seconds, but you can’t un-cook them. When properly cooked, they should be firm with a little springy bounce when you press them gently with your finger—not hard and rubbery, not mushy and soft.
Reheating requires gentleness. If you happen to have leftovers (which is rare because these are so good), reheat them gently in a skillet over low heat with a little butter or oil, just until warmed through. The microwave will make them rubbery, so avoid it if you can. Better yet, eat them fresh right from the pan.
Variations and Flavor Adaptations
The beauty of this recipe is how easily it adapts to different flavor profiles while maintaining the technique that makes it work. You don’t have to stick with the simple garlic butter—you can play with herbs, wines, and aromatics to match your mood and what you have on hand.
Herb variations are my favorite way to personalize the dish. Fresh basil in place of parsley creates an Italian-inspired version that’s absolutely lovely. Fresh tarragon gives an almost French bistro vibe. Dill pairs beautifully with a touch of white wine and lemon. Thyme works wonderfully with garlic and a splash of white wine. Chives provide a mild, onion-like flavor that doesn’t overpower. You can use any combination of these—just remember to add delicate fresh herbs at the very end, after the pan comes off the heat, so they stay bright and don’t turn dark and bitter from the residual heat.
For a pan sauce with a touch of cream, make the white wine reduction as described, then whisk in 2–3 tablespoons of heavy cream along with the butter. This creates something closer to restaurant sauce—silky, rich, and indulgent. Vermouth works beautifully here because it has a slightly herbal, sophisticated flavor that complements scallops.
If you want something a little lighter, skip the wine entirely and just make the lemon-garlic butter sauce. Add extra fresh lemon zest (about 1 teaspoon) at the very end for brightness. You can also add a tiny splash of white wine vinegar instead of using wine, which gives acidity without the alcohol or the need to reduce anything.
For a more Asian-inspired version, finish with a drizzle of good soy sauce mixed with a little sesame oil, fresh ginger, and scallions. The umami from the soy works beautifully with scallops.
Compound butter is a clever make-ahead option. If you want to prepare something ahead of time, make a garlic herb butter by creaming softened butter with minced garlic, fresh herbs, lemon zest, and salt. Form it into a log, wrap it in plastic wrap, and refrigerate. When your scallops are done searing, place a slice of the compound butter on top of each one and let it melt. It looks fancy and tastes incredible, and you’ve done the work ahead of time.
Pairing Your Scallops for a Complete Date Night Dinner
Pan-seared scallops are wonderful on their own, but the right side dish transforms them into a complete, sophisticated meal that feels special and intentional. The best pairings are ones that can hang with the scallops without overpowering them—sides that either provide a contrasting texture or complement the buttery, briny flavors.
Risotto is probably the most popular restaurant pairing. Creamy risotto catches all that buttery pan sauce and creates a luxurious, cohesive plate. Mushroom risotto, particularly one with porcini or a mix of mushrooms, plays beautifully against the delicate scallop flavor. Leek risotto is lighter and more elegant. Saffron risotto, with its bright golden color and subtle floral notes, is absolutely stunning alongside scallops.
Creamy mashed potatoes or cauliflower mash provide that comfort element while staying sophisticated. Yukon Gold mashed potatoes with plenty of butter and cream are classic for a reason. If you want something lighter, mashed cauliflower with garlic butter is just as delicious and slightly less heavy after a rich meal.
Pasta with a light sauce is another excellent option. Linguine or angel hair with just butter, garlic, and parsley lets the scallops remain the star. Fresh tagliatelle with a touch of cream sauce works beautifully. You could also toss pasta with the pan sauce from the scallops, which distributes those incredible flavors throughout.
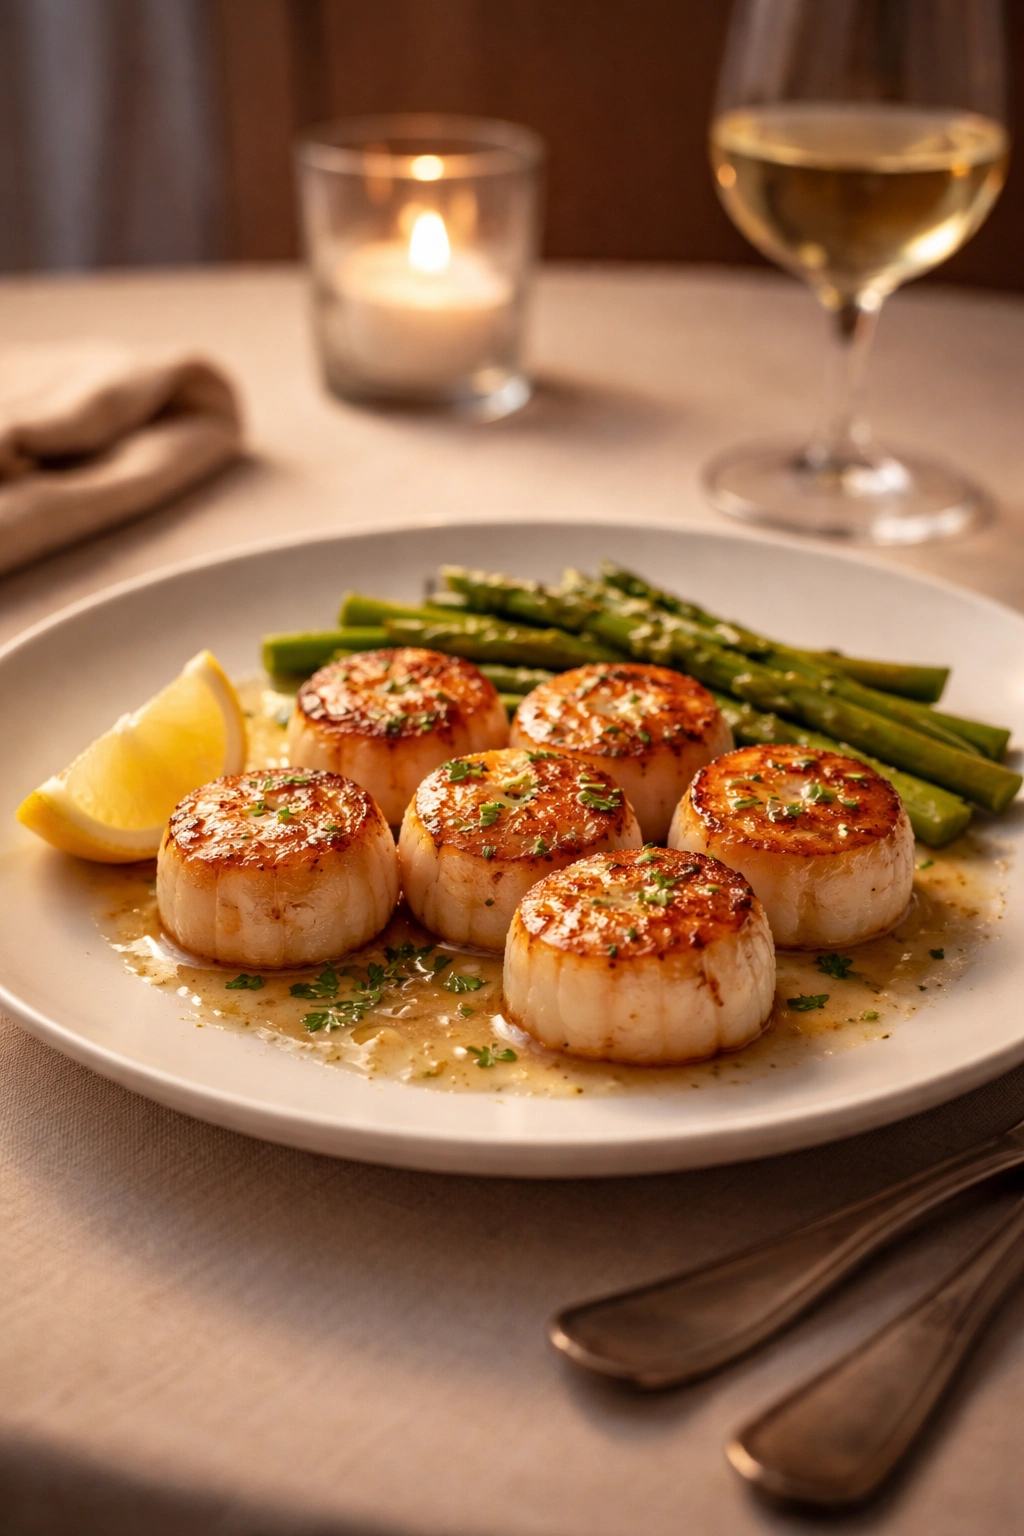
Roasted vegetables add a textural element that’s really nice. Asparagus spears roasted with olive oil, garlic, and lemon juice are elegant and simple. Baby bok choy roasted until the edges are crispy is wonderful. Green beans with a touch of garlic and butter. Broccolini with garlic. Even simple roasted zucchini or summer squash works if you’re cooking when they’re in season.
A bright, fresh salad can be the perfect contrast to the richness of the scallops and butter sauce. Arugula with a lemon vinaigrette is classic. A simple green salad with a Dijon vinaigrette. A Caprese salad with tomatoes, fresh mozzarella, and basil if tomatoes are available. The acidity and freshness cleanse the palate between bites and balance the richness of the main course.
Don’t forget about simple, elegant starches. Buttery polenta or creamy grits are luxurious without being difficult. A simple pilaf—whether rice, quinoa, or wild rice—provides textural interest. Buttered couscous can work if you want something that cooks incredibly fast.
For beverages, dry white wine is the obvious choice—a crisp Sauvignon Blanc, Pinot Grigio, or Chablis pairs beautifully with the lemon and garlic notes. If you’re not a white wine person, a light rosé works wonderfully. Even a dry sparkling wine like Prosecco or Champagne feels celebratory alongside scallops.
Storage, Reheating, and Make-Ahead Strategies
Scallops are genuinely best eaten immediately after cooking, when they’re at their most tender and the pan sauce is still warm. That said, life happens, and sometimes you end up with leftovers.
Store cooked scallops in an airtight container in the coldest part of your refrigerator (usually toward the back) for up to 2–3 days. They’ll start to develop a slightly rubbery texture after the first day, so eat them sooner rather than later if you can. Keep the sauce separate from the scallops if possible, as this prevents them from absorbing extra moisture.
Reheating requires care and gentleness. The microwave will make them tough and rubbery, so skip it. Instead, heat a skillet over low heat and add a small pat of butter or a drizzle of oil. Place the scallops in the pan and warm them through very gently for just 1–2 minutes per side, until they’re heated through. You’re not trying to cook them further; you’re just bringing them back to temperature. If you have sauce, reheat it separately in a small saucepan over low heat, stirring gently. If the sauce breaks (becomes grainy or separated), whisk in a small pat of cold butter until it emulsifies again.
Don’t freeze cooked scallops. The texture changes significantly, and they never quite regain their tender quality after thawing.
For make-ahead preparation, you can do several things the day before your dinner date. Make your compound butter if you’re using that. Prep your vegetables for roasting. Make your risotto or other side dish. Chop your garlic and parsley (store the parsley separately so it doesn’t oxidize). Set your table. The only thing you truly can’t do ahead is the actual searing of the scallops—that absolutely must happen right before you eat, or you’ll lose the delicate texture and the dish won’t be at its best.
Final Thoughts
Pan-seared scallops represent something really beautiful about cooking: the idea that elegance and simplicity aren’t mutually exclusive. You don’t need complicated techniques or a long list of ingredients to create something that feels special and celebratory. You just need good ingredients, proper heat, and an understanding of what’s actually happening in the pan.
The reason restaurants make scallops look so easy is because once you understand the principles—dry scallops, hot pan, don’t touch them, don’t overcook them—it is easy. It’s not mysterious. It’s not something that requires years of training. It’s something you can absolutely do tonight, this weekend, or whenever the mood strikes for a dinner that feels a little fancier than usual.
The real magic of serving scallops for a date night at home is what it communicates without words: that you care enough to cook something delicious, that you understand good food, that you’re not looking for an excuse to spend money on something you could make beautifully yourself. There’s intimacy in cooking together, in standing in your kitchen with soft lighting, in tasting something that turned out exactly right. Scallops do that. They take 15 minutes and transform an ordinary evening into something you’ll both remember.
So buy the good scallops. Get your pan hot. Dry those scallops thoroughly. And then just let the technique do what it does. You’ve got this.