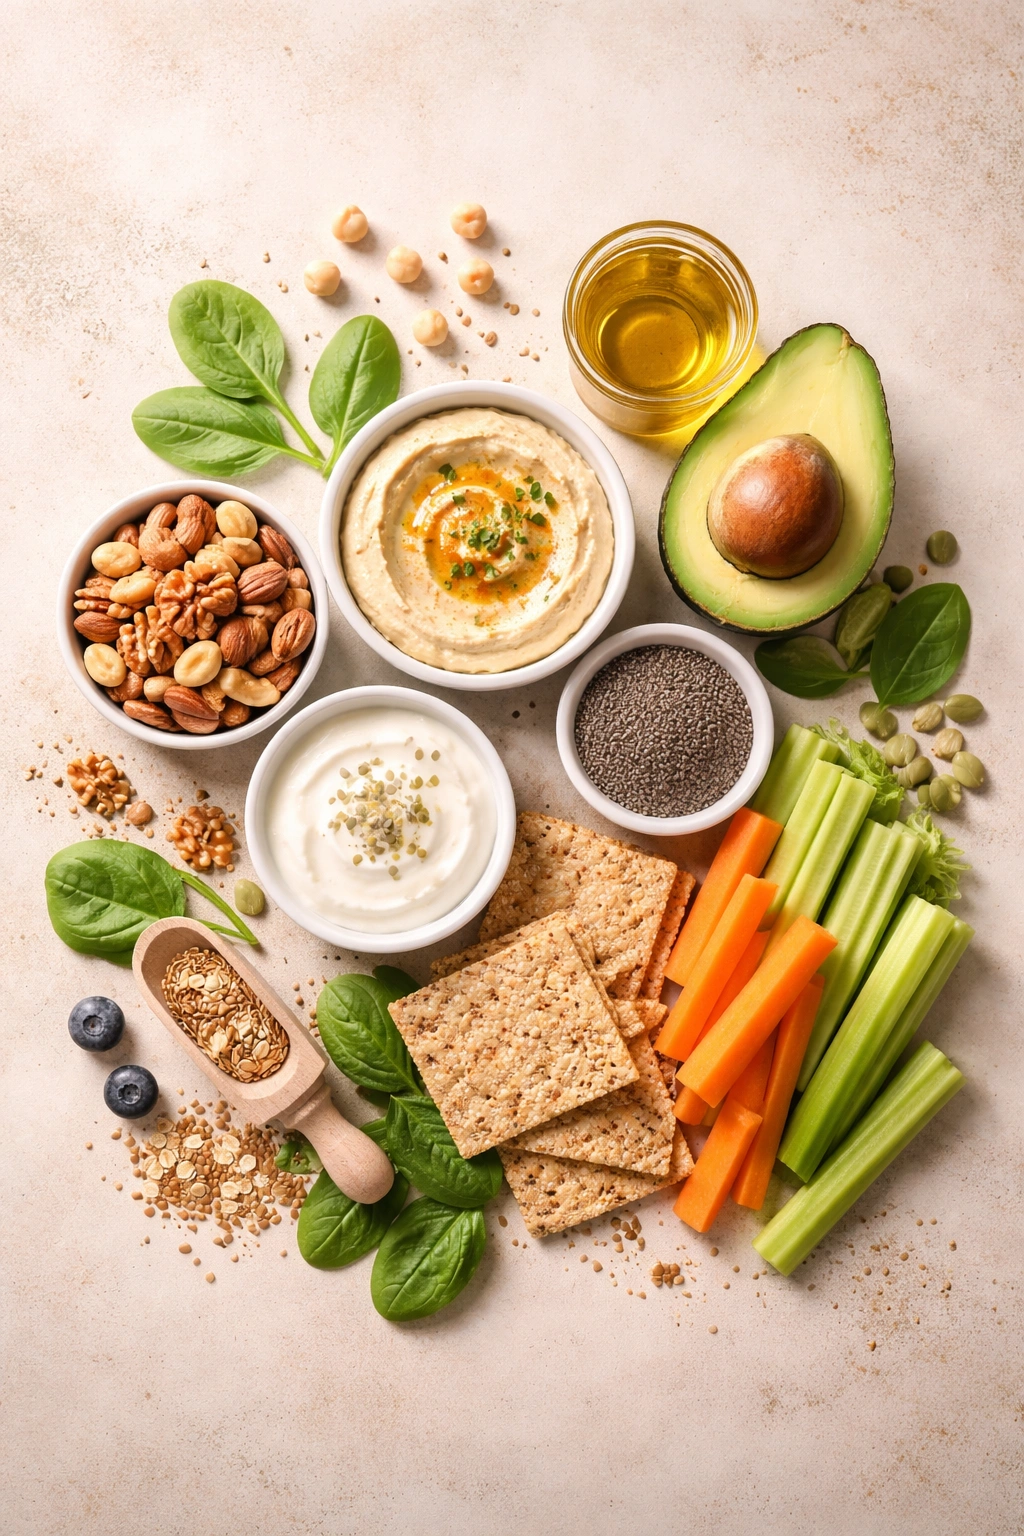
Making your own snacks at home gives you complete control over what goes into your body—especially sugar content. Store-bought snacks often hide sugar under innocent-sounding names like “natural sweetener” or “honey powder,” but when you’re the one chopping, mixing, and portioning, you know exactly what you’re eating. The best part? Homemade sugar-free snacks often taste better than packaged alternatives because you can dial in the flavors you actually want.
The snacks in this list aren’t about deprivation or choking down cardboard-textured protein bars. They’re real, satisfying, flavorful foods that happen to skip the sugar crash and leave you feeling genuinely full. Most of them come together in 15 minutes or less, store beautifully in the fridge or pantry, and cost a fraction of what you’d spend buying pre-made versions. Whether you’re managing blood sugar, losing weight, or just tired of the energy dip that comes from candy and refined snacks, these 10 homemade options are your new go-to arsenal.
These snacks work because they combine protein, healthy fats, and fiber—the three things that actually keep you satisfied between meals. You’ll notice you’re not hunting for something else to eat 30 minutes after snacking. That’s the real win of sugar-free snacking at home: it actually works.
1. Almond Butter Energy Balls
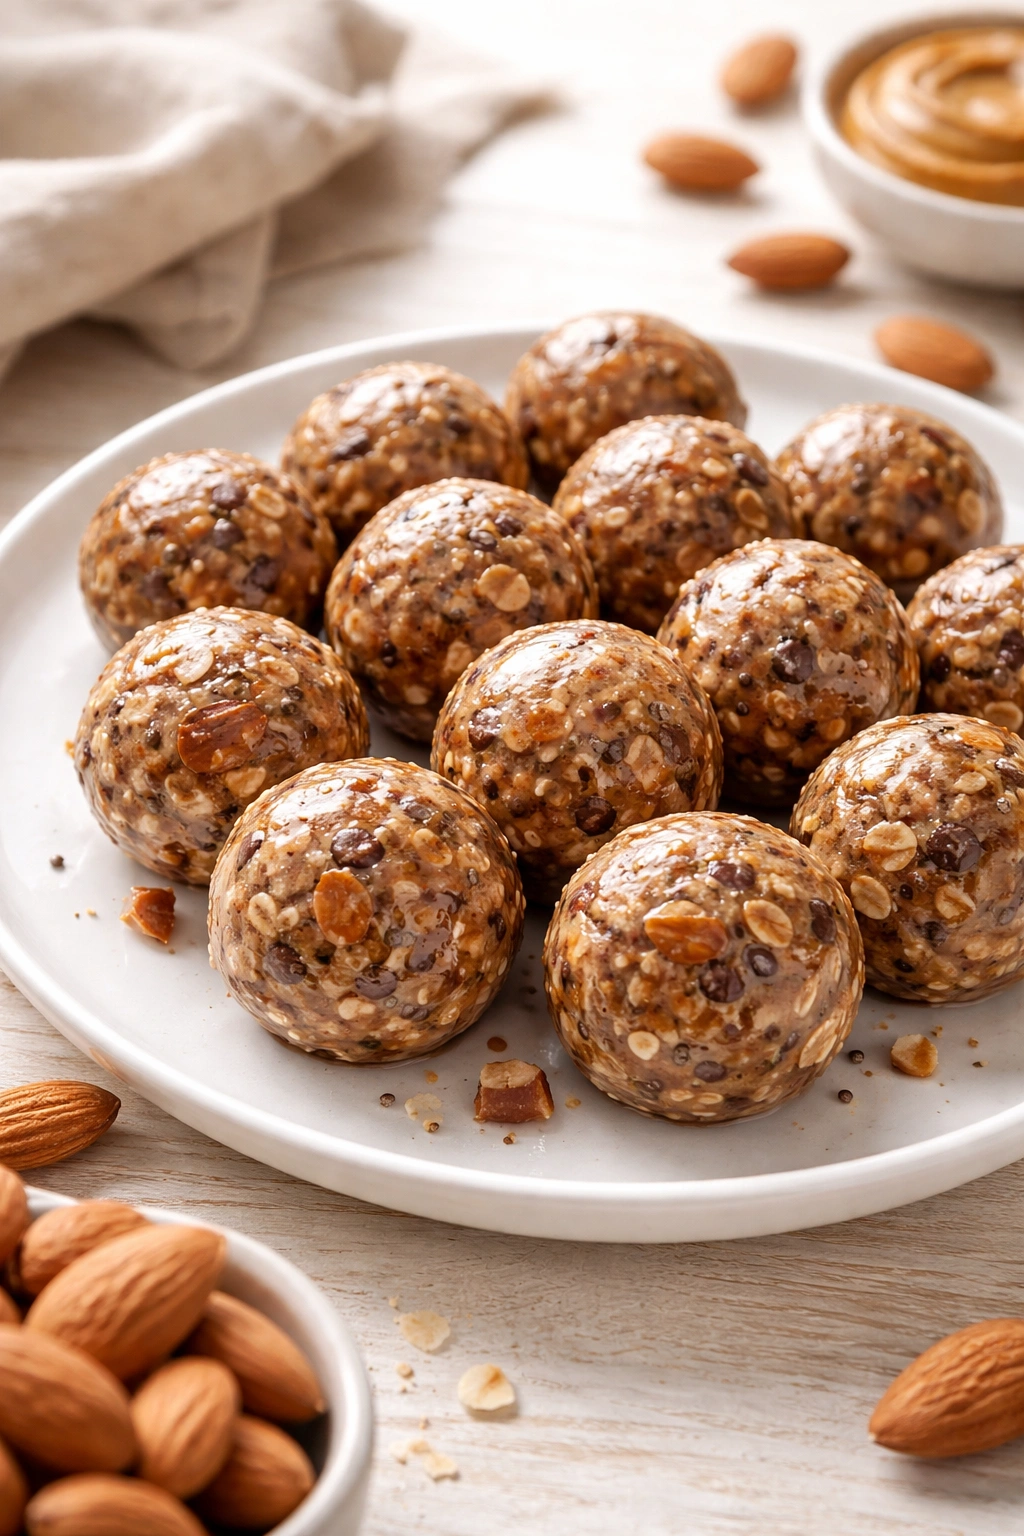
Almond butter energy balls are the easiest snack to batch-make on a Sunday afternoon and forget about until you need something fast. They’re basically no-bake bites that come together in 10 minutes and taste like a treat, even though they’re pure nutrition.
Why They Work So Well
Almond butter provides healthy monounsaturated fats that slow digestion and keep hunger at bay. The fat content combined with protein makes these balls stable snacks that won’t spike your blood sugar or leave you wanting more 20 minutes later. When you add cocoa powder, vanilla, and a touch of maple syrup or monk fruit sweetener, you get something that genuinely satisfies sweet cravings without the regret.
How to Make Them
- 1 cup natural almond butter (no added sugar)
- ¼ cup unsweetened cocoa powder
- ¼ cup coconut oil
- 2 tablespoons monk fruit sweetener or erythritol
- 1 teaspoon vanilla extract
- Pinch of fine sea salt
Mix almond butter, coconut oil, and sweetener in a bowl until smooth. Stir in cocoa powder, vanilla, and salt until the mixture is completely combined and has no visible cocoa streaks. Freeze for 30 minutes, then scoop into 1-inch balls using a small cookie scoop or spoon. Roll between your palms if the mixture is sticky. Refrigerate in an airtight container for up to 2 weeks.
Storage and Serving Tips
Keep these in the back of your fridge where they’ll stay firm but not rock-hard. They’re perfect eaten straight from the fridge as an afternoon pick-me-up. For a special texture, you can dip them in melted dark chocolate (sweetened only with monk fruit) and let it set, though this step is purely optional. A single energy ball paired with a cup of herbal tea makes a satisfying afternoon break.
Pro tip: If your almond butter is chunky, smooth it out first by quickly blending it with the coconut oil, which prevents lumpy texture in the finished balls.
2. Spiced Roasted Chickpeas
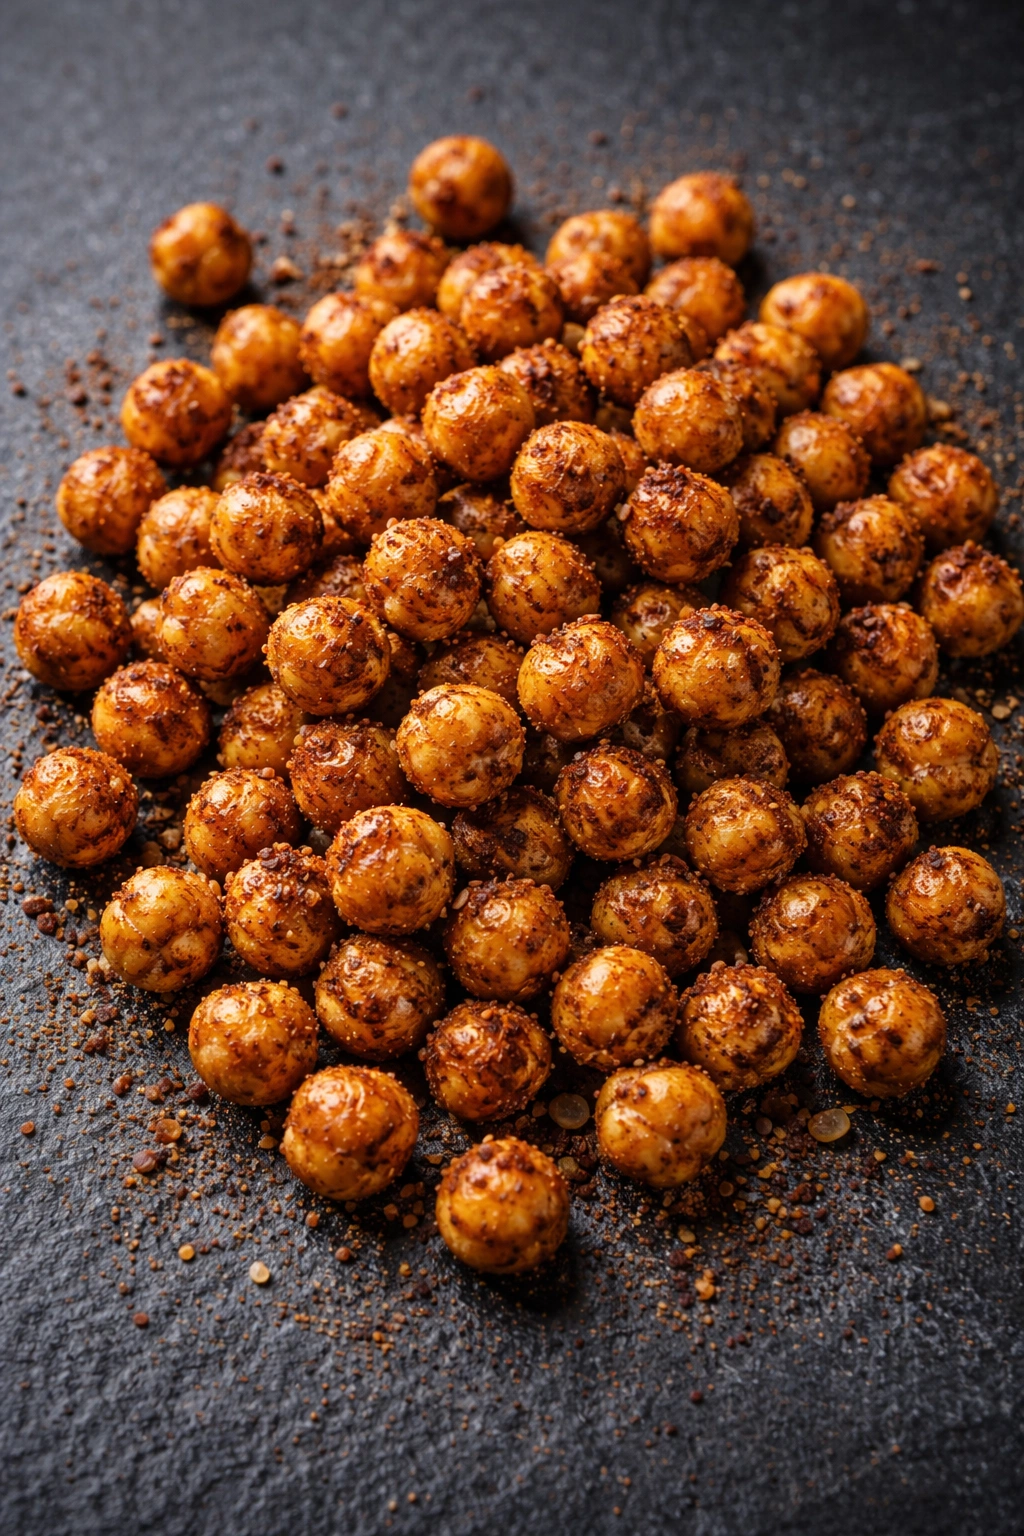
Roasted chickpeas are crunchy, savory, and entirely different from anything you’d buy at the store. They have a texture somewhere between a crispy pea and a toasted nut, and they’re addictively good when you get the seasoning right.
Why This Snack Stands Out
Chickpeas contain resistant starch, a type of carbohydrate that doesn’t spike blood sugar the way regular starch does. They’re also packed with plant-based protein and fiber, so a small handful actually fills you up. Roasting concentrates their flavor and creates a crispy exterior that makes the snack feel indulgent when it’s actually quite nutritious.
The Roasting Method
Start with one 15-ounce can of chickpeas, drained and completely dried on paper towels (this step is crucial for crispiness). Toss with 1 tablespoon olive oil, 1 teaspoon smoked paprika, ½ teaspoon garlic powder, ½ teaspoon cumin, ¼ teaspoon cayenne pepper, and ½ teaspoon fine sea salt.
Spread on a baking sheet in a single layer. Roast at 375°F for 25 to 30 minutes, shaking the pan halfway through. They’re done when they’re golden and sound crispy when you shake them. Let cool completely on the pan—they’ll continue crisping as they cool.
Storage and Flavor Variations
Keep them in an airtight container at room temperature for up to 5 days (though they’re best eaten within 3 days while still crispy). Try different spice blends: ranch seasoning, everything bagel seasoning, curry powder mixed with a pinch of coconut sugar, or simple salt and black pepper. The beauty of this snack is how quickly you can roast a fresh batch when you want a new flavor.
Worth knowing: Don’t skip the drying step. Any moisture on the chickpeas prevents them from crisping up properly, and you’ll end up with chewy rather than crunchy results.
3. Cottage Cheese Fruit Bowls
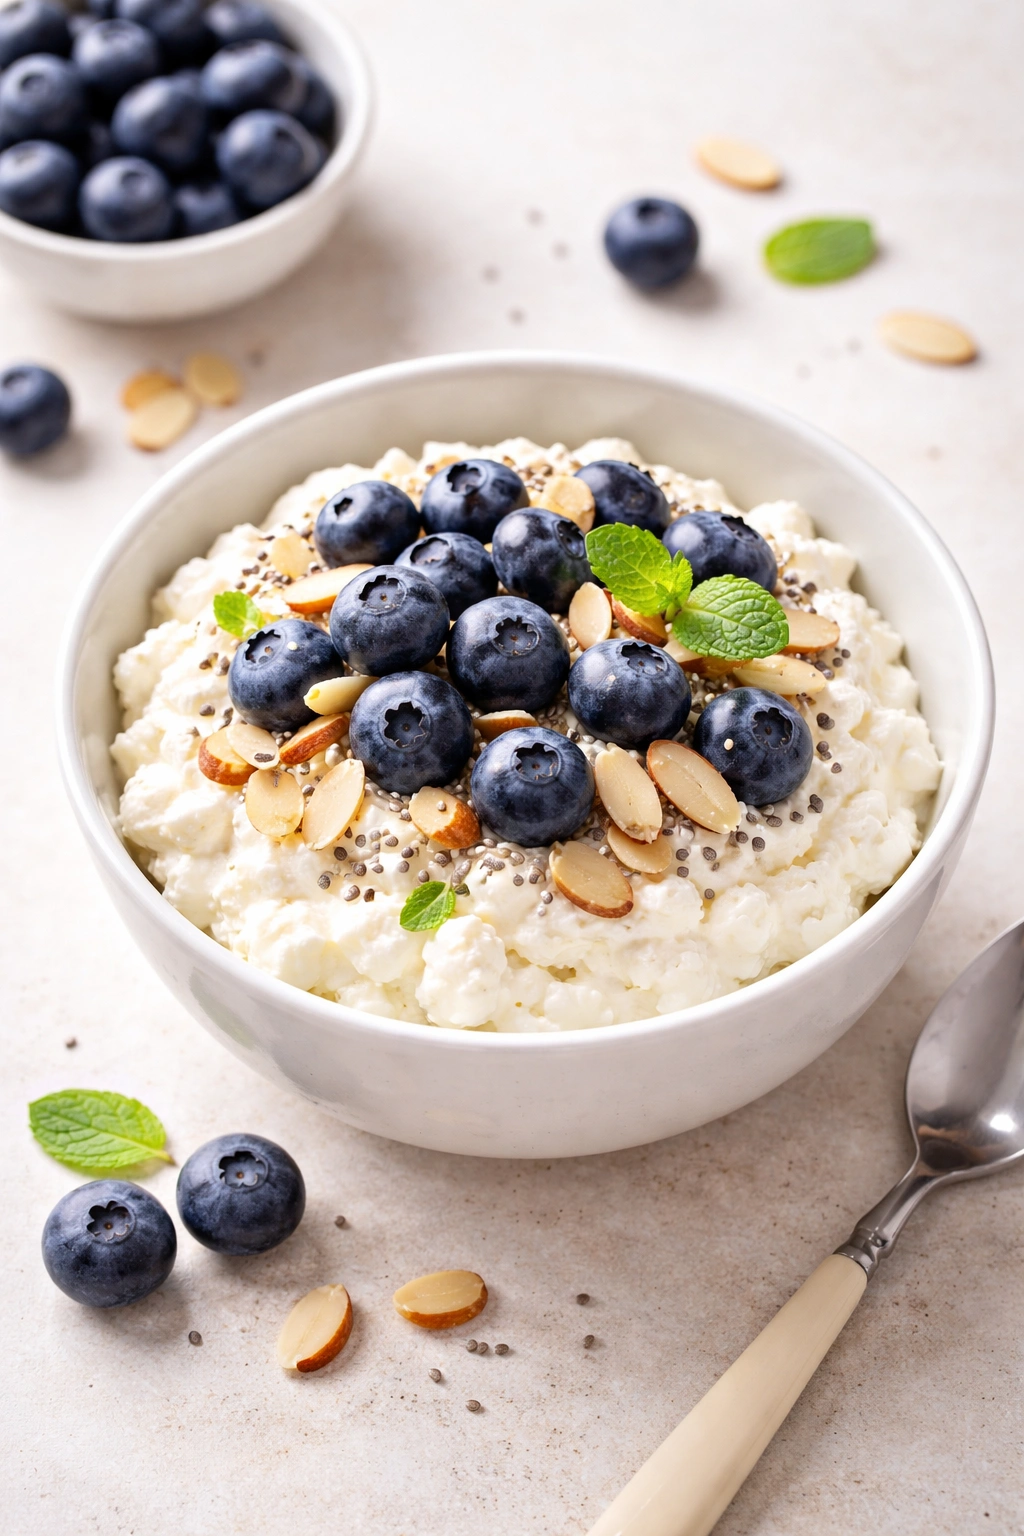
Cottage cheese gets a bad reputation from the 1980s, but it’s actually a protein powerhouse that’s come back strong. Paired with fresh fruit and a handful of nuts, it transforms into a snack that feels like dessert but delivers serious nutrition.
What Makes This Work
Cottage cheese contains casein, a slow-digesting protein that keeps you full for hours. The combination of protein and the natural sugars in fruit (with the fiber that comes with them) creates a snack with staying power. Unlike yogurt-based options, cottage cheese has a creamier, more substantial texture that makes the snack feel more satisfying.
Assembly Ideas
Mix ½ cup of full-fat cottage cheese with a tablespoon of raw almonds, ¼ cup fresh blueberries, and a drizzle of almond butter. Or try cottage cheese with raspberries, walnuts, and a teaspoon of vanilla extract stirred through. The combinations are endless—use whatever fresh fruit you have on hand.
The key is the ratio: enough cottage cheese to make it creamy and substantial, but fruit and nuts to add texture, natural sweetness, and flavor complexity. A pinch of ground cinnamon or a few cardamom seeds can elevate the whole bowl from simple to special.
Why This Matters
This snack works because cottage cheese is affordable and shelf-stable (you can keep it on hand) while being more interesting than eating it plain. The fruit provides natural sweetness and fiber, while the nuts add satisfaction. It’s genuinely filling enough to bridge the gap between meals without being heavy.
Insider note: Full-fat cottage cheese tastes significantly better than low-fat versions. The fat carries flavor, and the texture is creamier. If your regular grocery store doesn’t have it, check the specialty or organic section.
4. Cheesy Herb Roasted Almonds

Roasted almonds sound simple, but when you coat them with real cheese and herbs, they become something people actually crave. These are savory, umami-rich, and somehow feel more indulgent than their nutritional profile suggests.
Why Almonds Are Your Snacking Foundation
Almonds are calorie-dense but nutrient-rich—they contain vitamin E, magnesium, and manganese, plus fiber and plant-based protein. They digest slowly, which means a small handful (about 1 ounce) genuinely keeps you satisfied. The fat in almonds isn’t just empty calories; it’s the kind of fat that supports brain function and hormone production.
Making Them at Home
Toss 2 cups of raw almonds with 2 tablespoons of melted butter or coconut oil, 1 teaspoon fine sea salt, ¼ cup finely grated Parmesan cheese, 1 teaspoon garlic powder, 1 teaspoon dried oregano, and ½ teaspoon black pepper. Spread on a baking sheet and roast at 325°F for 12 to 15 minutes, stirring halfway through, until fragrant and lightly golden.
The lower temperature and shorter time preserve the almonds’ texture—too hot and they’ll brown too quickly on the outside while staying raw inside. As they cool, they’ll crisp up further.
Storage and Pairing
These keep in an airtight container at room temperature for up to 2 weeks. They’re perfect paired with a handful of berries for a quick snack, or alongside a piece of cheese and an apple for something more substantial. The cheese flavor is strong enough that you feel like you’re eating something special without any actual sugar involved.
Pro tip: Save your own Parmesan rinds to grate for this recipe. They add even more cheese flavor and are often stronger than pre-grated versions.
5. No-Bake Peanut Butter Cups
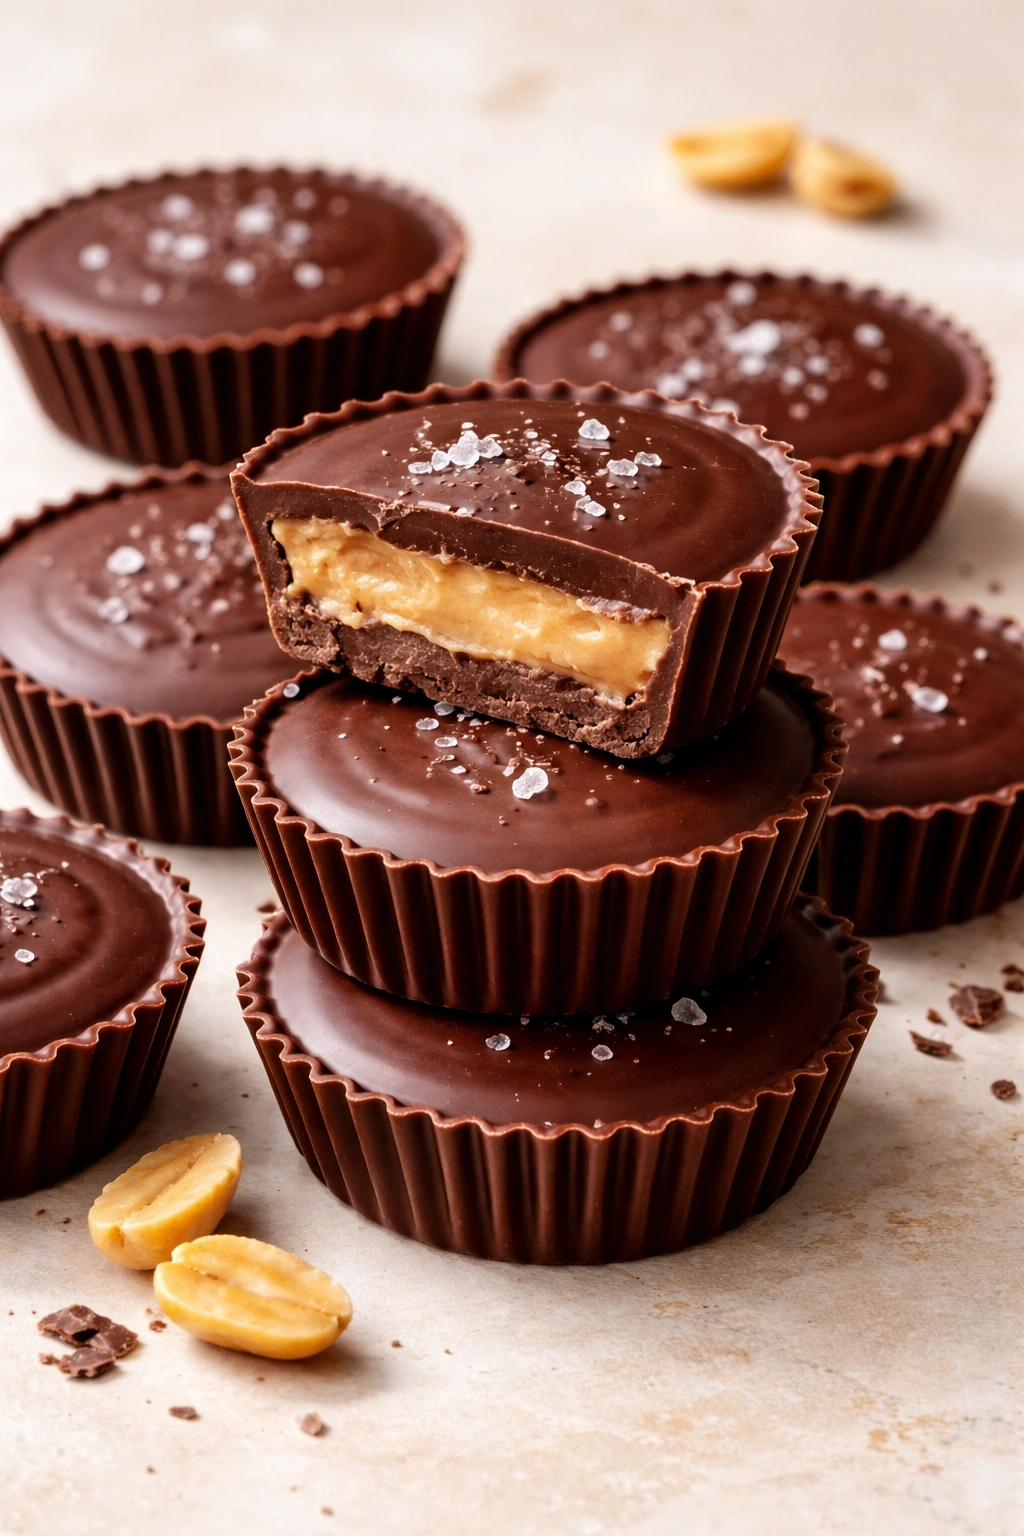
If you’re mourning the loss of commercial peanut butter cups, these no-bake versions hit that same nostalgic note while tasting infinitely better. They’re creamy, chocolate-forward, and genuinely satisfy without any refined sugar.
The Magic Combination
The recipe uses monk fruit or erythritol sweetened dark chocolate for the shell, natural peanut butter for the filling, and a tiny bit of coconut oil to make everything smooth and properly textured. The ratio matters here—too much sweetener and the filling becomes cloying; too little chocolate and the treat feels incomplete.
Making Them Step by Step
Line a muffin tin with paper liners. Melt 8 ounces of monk fruit or erythritol-sweetened dark chocolate (70% cacao or higher) with 1 tablespoon coconut oil. Spoon a thin layer of chocolate into each muffin liner and freeze for 10 minutes until set.
Meanwhile, mix ½ cup natural peanut butter with 2 tablespoons coconut oil and 1 tablespoon monk fruit sweetener. Once the chocolate layer is set, spoon the peanut butter mixture into each cup and freeze for 10 minutes again. Cover with a final layer of chocolate and freeze until completely solid, about 30 minutes.
Why This Works
Real peanut butter has protein and healthy fats that slow digestion. The dark chocolate provides antioxidants and that satisfying chocolate flavor. Together, they create something that feels indulgent enough to satisfy sweet cravings but stable enough that it won’t mess with your blood sugar or energy levels.
Worth knowing: Use natural peanut butter (just peanuts and salt, nothing else). Commercial peanut butter often contains added sugars and oils that change the texture and flavor of these cups. If your natural peanut butter is very oily, drain some of the excess before mixing.
6. Cucumber and Cream Cheese Bites
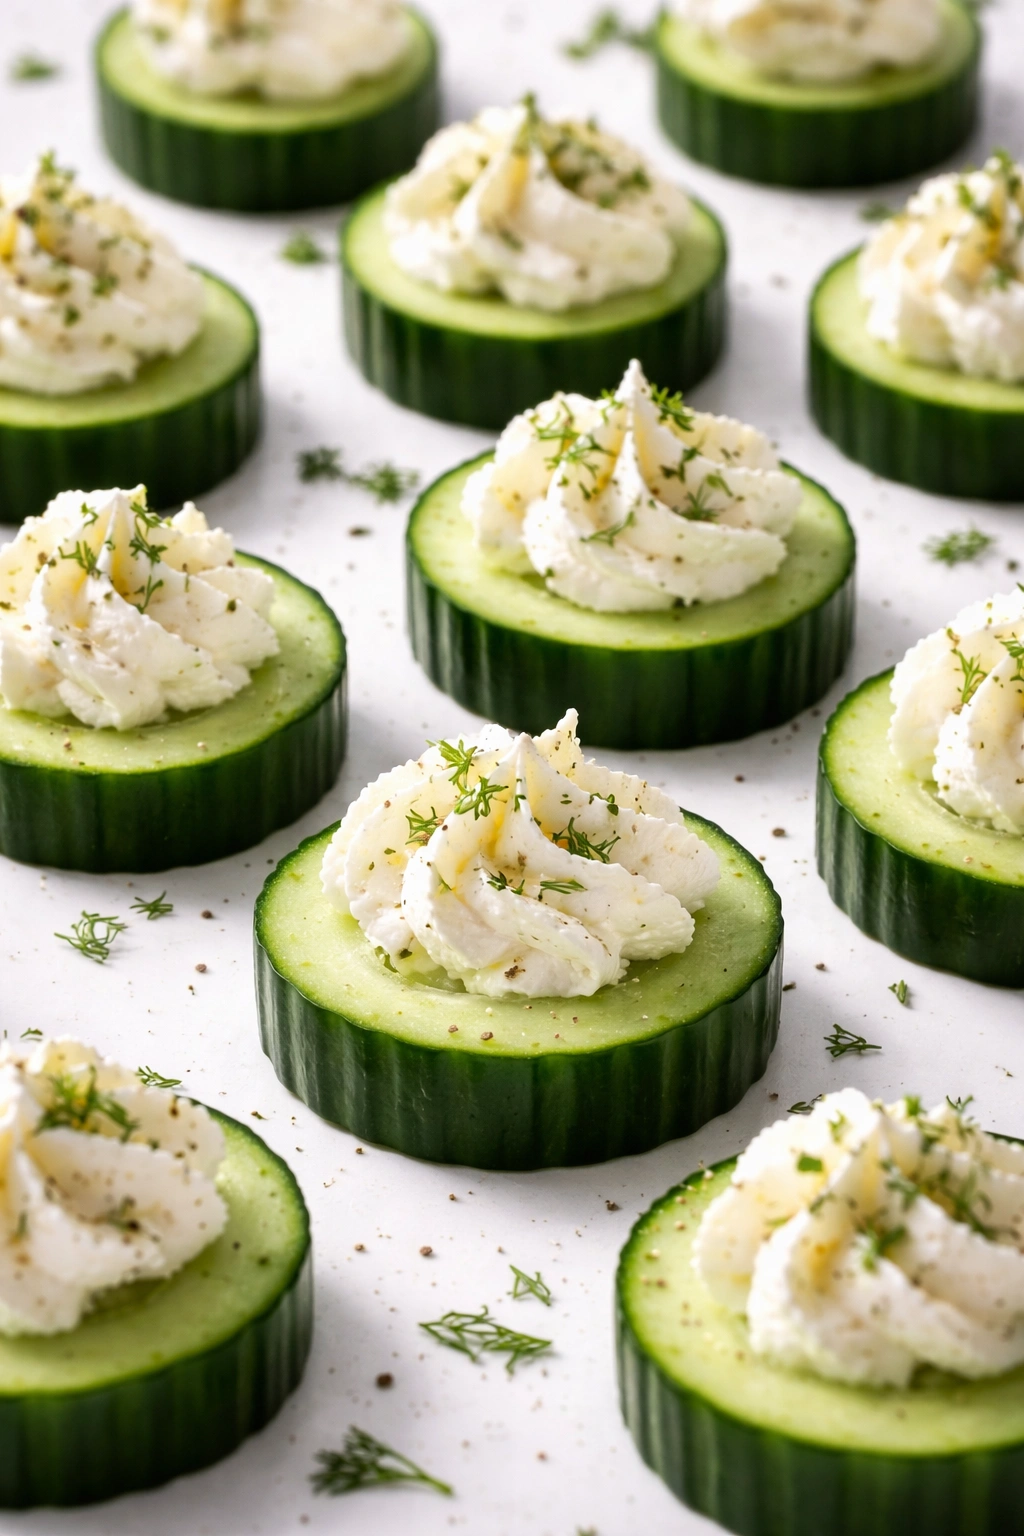
These are as simple as snacks come, yet they’re elegant enough to serve guests and satisfying enough for a quick work snack. They take 5 minutes to assemble and deliver protein, healthy fat, and fresh vegetable crunch in every bite.
What Makes Them Satisfying
Cucumber is mostly water and fiber, so it adds volume and crunch with minimal calories. Cream cheese brings protein, fat, and a rich, smooth texture that balances the vegetable’s lightness. The fat in cream cheese slows the absorption of cucumber’s carbohydrates, making this combination genuinely satiating despite being light.
Assembly and Flavor Options
Slice a cucumber lengthwise into ¼-inch thick planks (this gives you more surface area than round slices). Pat them dry with paper towels. Mix softened cream cheese with minced fresh dill, a pinch of garlic powder, fine sea salt, and black pepper. Spread a tablespoon of the mixture onto each cucumber plank and top with a piece of smoked salmon, a thin slice of prosciutto, or a sprinkle of everything bagel seasoning.
You could also mix cream cheese with sun-dried tomato and basil, or with hot sauce and a drizzle of sriracha for something spicy. The variations are limited only by what’s in your fridge.
Why This Works
The combination of cool, crisp cucumber with rich, creamy cheese and protein creates a snack that feels complete. It’s hydrating because of the cucumber, it keeps you full because of the protein and fat, and it takes almost no prep time. You can make a batch in the morning and graze throughout the day.
Pro tip: Slice your cucumber in advance and store the planks wrapped in a damp paper towel in the fridge. The moisture keeps them crisp. Assemble the bites just before eating to prevent them from becoming soggy.
7. Homemade Mixed Nut Clusters
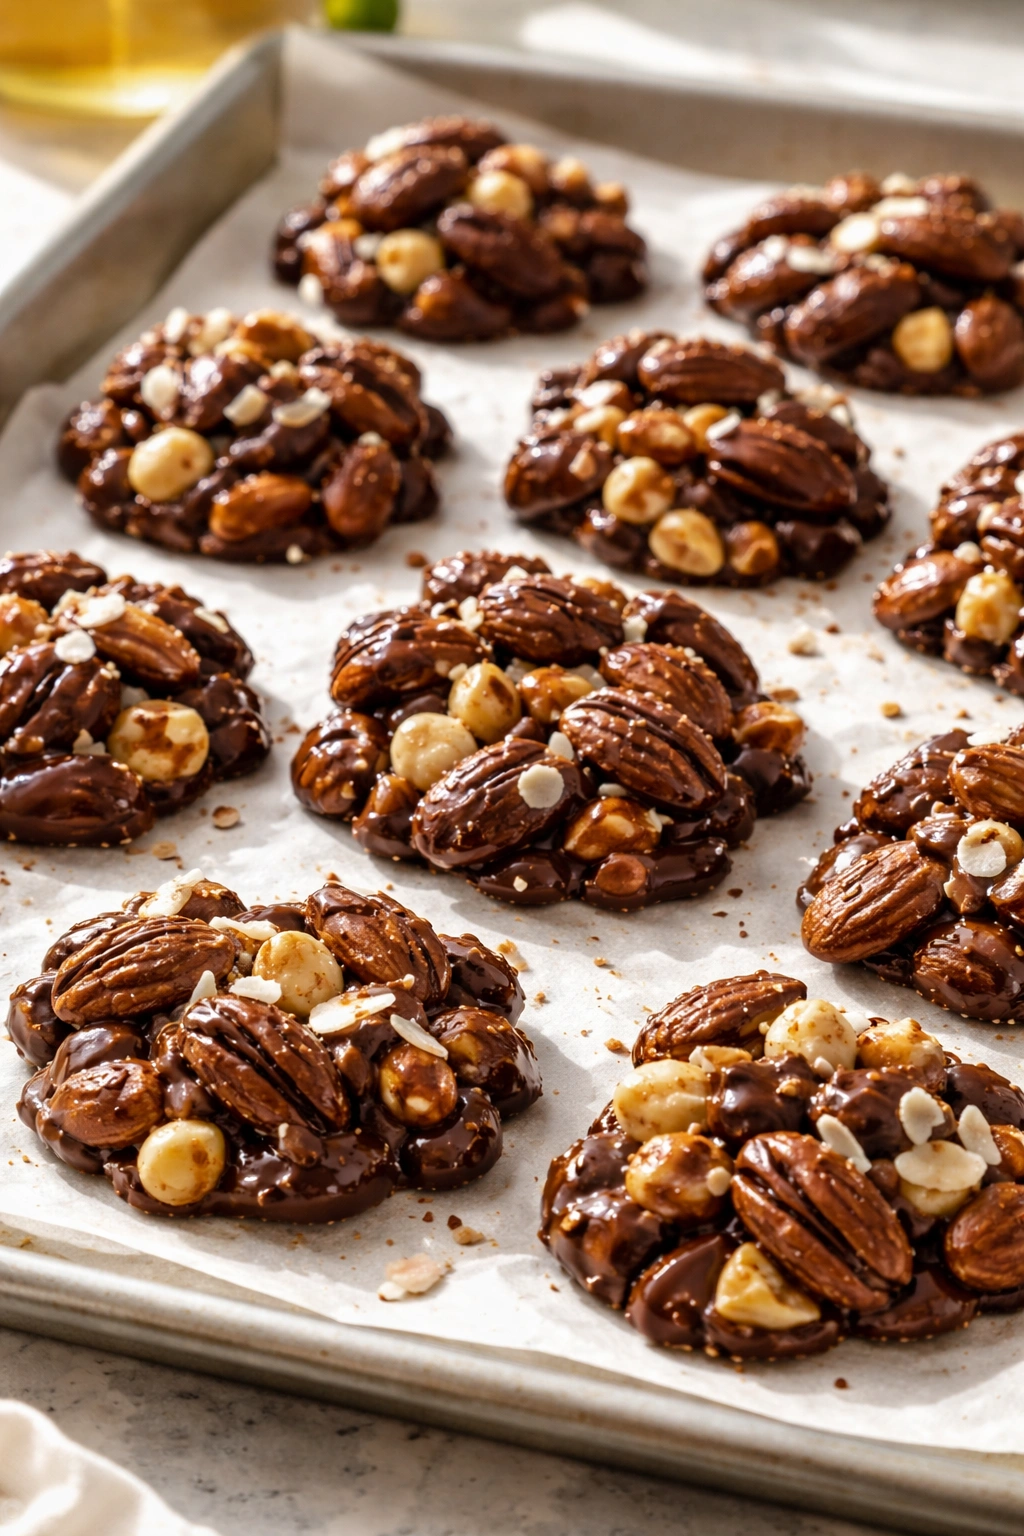
Nut clusters are candy-adjacent, but when you make them with monk fruit sweetener and quality nuts, they become a genuinely nutritious snack that tastes like you’re treating yourself.
Building the Perfect Cluster
Melt 4 ounces of monk fruit or erythritol-sweetened dark chocolate (70% cacao or higher) with 1 tablespoon coconut oil. Stir in 1 teaspoon vanilla extract. Add a mixture of 2 cups unsalted nuts (raw almonds, pecans, and macadamia nuts work beautifully together) and ½ cup unsweetened coconut flakes. Mix gently until everything is coated.
Drop spoonfuls onto a parchment-lined baking sheet and freeze for 1 hour until completely set. Store in an airtight container in the fridge or pantry.
Why Nut Clusters Outperform Candy
The combination of nuts, healthy fats from chocolate, and fiber from coconut flakes means these clusters actually sustain you. They’re not empty calories followed by a crash. The protein and fat create satiety, while the flavor complexity means you actually feel satisfied with a smaller portion than you would with conventional candy.
Flavor Variations That Work
Try adding a pinch of sea salt on top before they set (salt and dark chocolate are an iconic pairing). Or mix in ¼ teaspoon cayenne pepper for spicy chocolate clusters. For a nuttier flavor, use 1 teaspoon almond extract instead of vanilla, or add a tablespoon of natural almond butter to the chocolate mixture.
Worth knowing: Avoid letting the chocolate get too hot when melting it—low and slow prevents the cocoa butter from separating. If your chocolate seems grainy or separated, add a bit more coconut oil and stir gently until it smooths out.
8. Bell Pepper Hummus Dip with Veggies
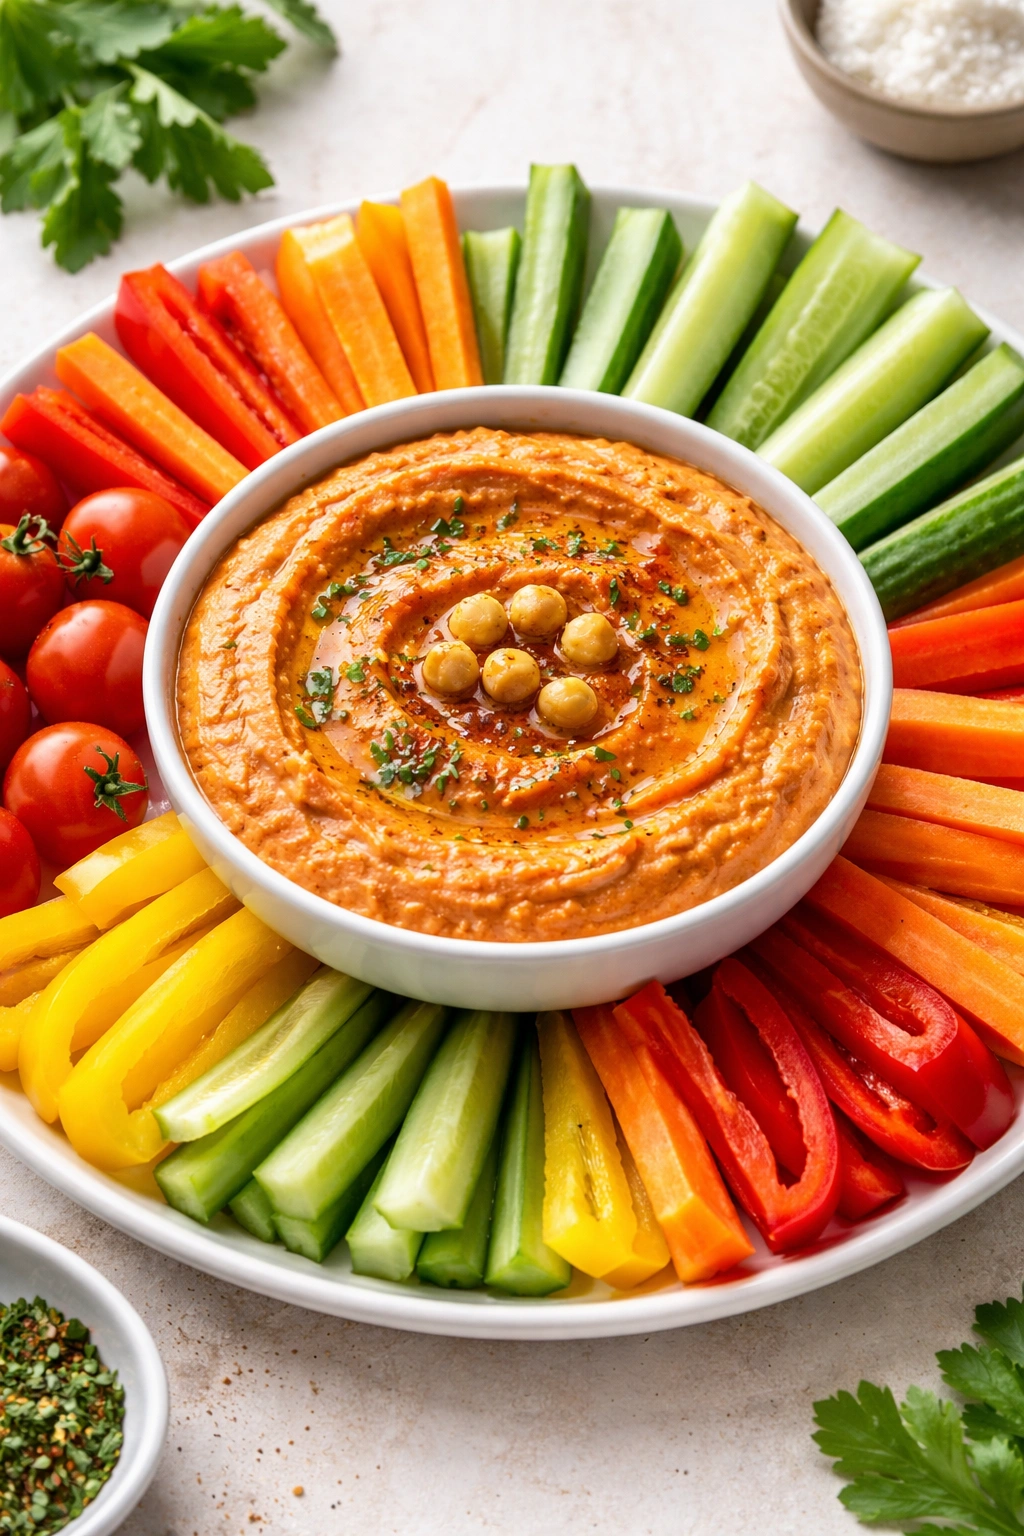
A proper hummus dip paired with fresh vegetables is a snack that feels light but actually fills you up. The hummus provides protein and healthy fats from tahini and olive oil, while the vegetables add fiber and volume without calories.
Making Hummus That Tastes Like More Than the Sum of Its Parts
Drain and rinse one 15-ounce can of chickpeas. Add them to a food processor with 3 tablespoons tahini, 2 cloves garlic, juice of 1 large lemon, 2 tablespoons extra virgin olive oil, 1 teaspoon ground cumin, ½ teaspoon fine sea salt, and 2 to 3 tablespoons ice water (add gradually to reach the right consistency).
Blend until completely smooth and creamy—this takes longer than most people expect, usually 3 to 5 minutes. Stop to scrape down the sides as needed. The hummus will be thick at first, then gradually smooth out as the food processor breaks down the chickpeas. The ice water loosens it to a dippable consistency.
Flavor Variations
Make roasted red pepper hummus by stirring in ½ cup roasted red peppers after the base hummus is done. For spicy hummus, add ½ teaspoon cayenne pepper and a tablespoon of sriracha. For something herby, mix in ¼ cup fresh herbs (parsley, cilantro, mint) at the very end.
Prepping Your Vegetables
Cut bell peppers (red, yellow, orange, or a mix) into thick strips. Add celery sticks, radish slices, cucumber planks, and cherry tomatoes. The variety of colors and textures makes the snack visually appealing and keeps it from feeling monotonous.
Pro tip: Make a big batch of hummus on the weekend and portion it into small containers. It keeps for 4 to 5 days in the fridge, so you have grab-and-go snacks ready all week.
9. Greek Yogurt Bark with Berries and Nuts
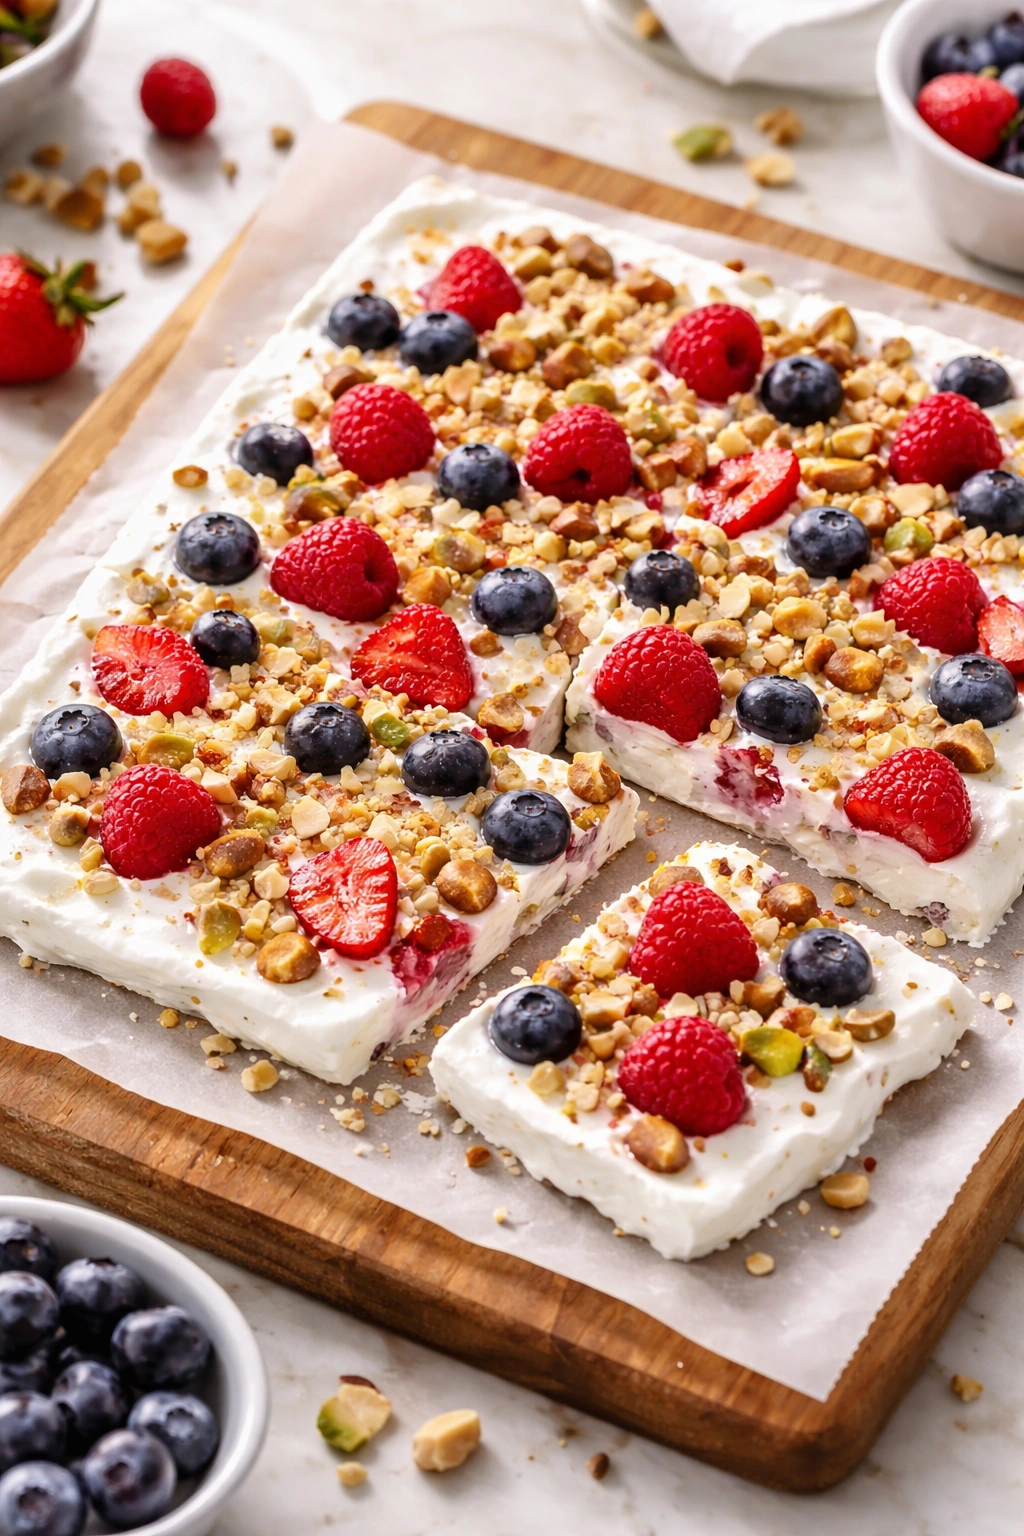
Yogurt bark is basically an adult version of frozen yogurt bites, except you make it yourself and control every ingredient. It’s crispy, creamy, fruity, and ridiculously easy to make.
Building Your Bark Base
Line a baking sheet with parchment paper. Spread 2 cups of full-fat, unsweetened Greek yogurt in a thin, even layer across the sheet (about ¼ inch thick). The thickness matters—too thin and it becomes brittle instead of creamy; too thick and it doesn’t freeze through properly.
Drizzle with 1 tablespoon monk fruit or erythritol sweetener mixed with ½ teaspoon vanilla extract. Scatter a cup of fresh berries (blueberries, raspberries, strawberry slices) across the top. Add a handful of chopped raw almonds, walnuts, or pecans. You could also sprinkle unsweetened coconut flakes, dark chocolate chips, or cacao nibs for extra flavor and crunch.
Freezing and Breaking Into Pieces
Freeze for at least 4 hours until completely solid. Break into irregular shards (this is half the fun—there’s something satisfying about breaking chocolate-style bark). Store in an airtight container in the freezer for up to 2 weeks.
Why This Works
Greek yogurt provides probiotics and protein, which support digestion and keep you full. The berries add natural sweetness, antioxidants, and fiber. The nuts provide healthy fats and crunch. The whole thing freezes solid, so you get that satisfying frozen-treat experience without it being ice cream loaded with sugar.
Worth knowing: Use full-fat Greek yogurt, not the low-fat version. The fat is what creates a creamy texture when frozen—low-fat versions become icy and unpleasant. Check your yogurt’s ingredient list to make sure it has no added sugar or sweetener already mixed in.
10. Cheese and Herb Crackers
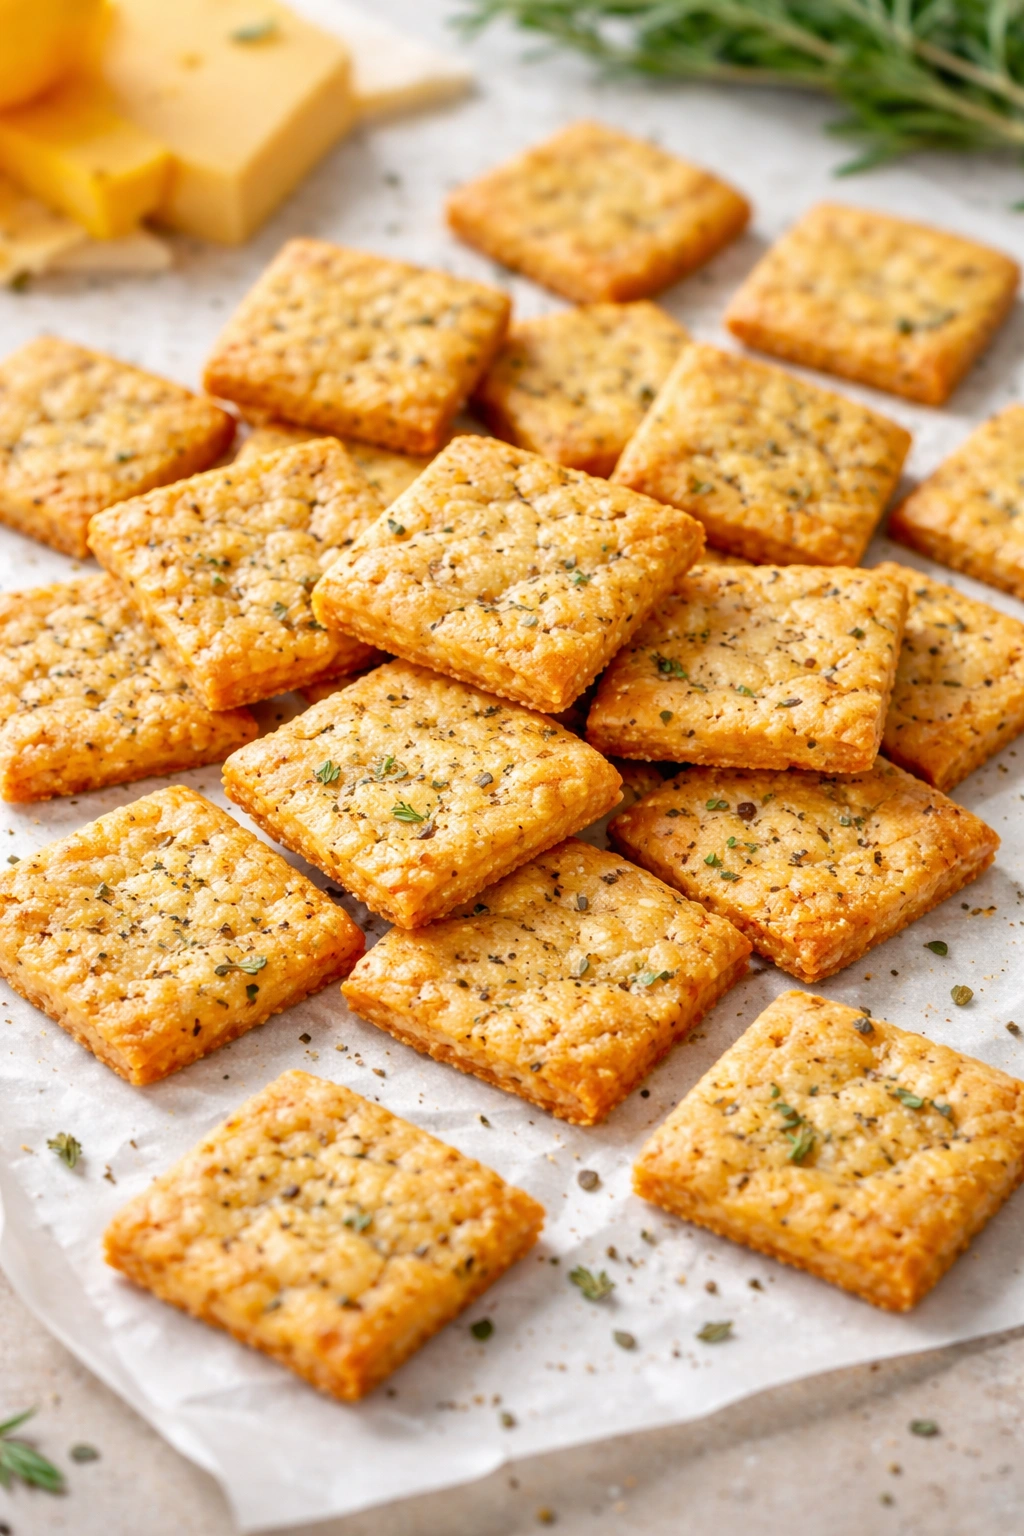
Homemade cheese crackers are crispy, savory, and so much more flavorful than store-bought versions. They’re also naturally sugar-free because the only sweetness comes from the cheese itself. They pair beautifully with cheese, hummus, or simply eaten by the handful.
The Dough Formula
Combine 1 cup shredded sharp cheddar cheese (room temperature works best), ½ cup softened butter, 1 cup blanched almond flour, ½ teaspoon fine sea salt, ¼ teaspoon black pepper, and ½ teaspoon garlic powder in a food processor. Pulse until the mixture comes together into a shaggy dough. If it’s too crumbly, add water 1 tablespoon at a time.
Shaping and Baking
Form the dough into a ball, then flatten it into a disk. Place between two pieces of parchment paper and roll out to about ⅛ inch thick (thin is important—thick crackers won’t be crispy). Remove the top parchment and use a knife or pizza cutter to cut into 1-inch squares or small triangles. Transfer to a baking sheet and bake at 350°F for 10 to 12 minutes until golden at the edges.
They’ll be soft when warm but crisp up completely as they cool. If any large crackers are still flexible after cooling, pop them back in the oven for 2 more minutes.
Flavor Variations and Storage
Try mixing in ½ teaspoon smoked paprika and ⅛ teaspoon cayenne for spicy crackers. Or add 1 tablespoon minced fresh rosemary or dried Italian herbs. Make them everything-seasoned with a tablespoon of everything bagel seasoning mixed into the dough.
Store completely cooled crackers in an airtight container at room temperature for up to 1 week. They also freeze beautifully for up to 3 months, so you can make a big batch and keep them on hand.
Pro tip: Cut your dough into uniform sizes so they bake evenly. If you have pieces that are much thinner than others, they’ll brown faster and potentially burn while the thicker pieces are still pale.
Key Takeaways
The common thread through all these snacks is that they combine protein, healthy fat, and fiber—the nutritional trifecta that actually keeps you satisfied. None of them rely on artificial sweeteners as a crutch, though many incorporate them appropriately. Each one tastes good enough that you won’t feel like you’re missing out, and each one genuinely keeps hunger at bay.
Making snacks at home also means you know exactly what’s going into your body. No mystery ingredients, no surprise sugar alcohols, no preservatives you can’t pronounce. You’re choosing whole foods and intentional sweeteners (or no sweetener at all) because that’s what works for your body and your goals.
Start with whichever snack sounds most appealing to you. Make a batch this weekend and notice how different you feel on days when you have satisfying, sugar-free snacks available versus days when you’re reaching for whatever’s convenient. The difference will surprise you—steadier energy, fewer cravings, and a genuine satisfaction that lasts hours instead of 30 minutes.