There’s something magical about the smell of pancakes sizzling on a hot griddle on a lazy morning. It’s the kind of aroma that pulls people out of bed and gathers them around the kitchen table — not because they have to be there, but because they want to be. Making pancakes from scratch might seem intimidating if you’ve only ever reached for a box mix, but the truth is that homemade pancakes are easier than you think, and the flavor difference is remarkable. Store-bought mixes often contain preservatives, emulsifiers, and that vaguely stale taste that comes from sitting on a shelf. When you make pancakes from scratch, you’re working with just a handful of basic ingredients that you probably already have on hand, and the results are fluffy, tender, and infinitely more satisfying.
The best part about pancake recipes is their flexibility. Once you understand the basic technique and proportions, you can adapt, twist, and personalize them in countless ways. Want to add chocolate chips? Done. Craving something with fruit? Easy. Looking for a protein boost or a way to sneak in whole grains? Pancakes handle that beautifully. This week, you have 10 completely different pancake recipes waiting for you — everything from a buttery classic that never goes out of style to creative variations that’ll make your weekday breakfasts feel special. Each one comes with detailed instructions, exact measurements, and the specific tips that’ll help you nail them on your first try.
Whether you’re looking to establish a new weekend tradition, impress guests who didn’t expect homemade pancakes, or simply want to move beyond the usual breakfast routine, these recipes will become part of your regular rotation. The nice thing about learning to make pancakes from scratch is that once you’ve mastered a couple of these, you’ll have the confidence to invent your own combinations. But first, let’s start with these 10 solid foundations.
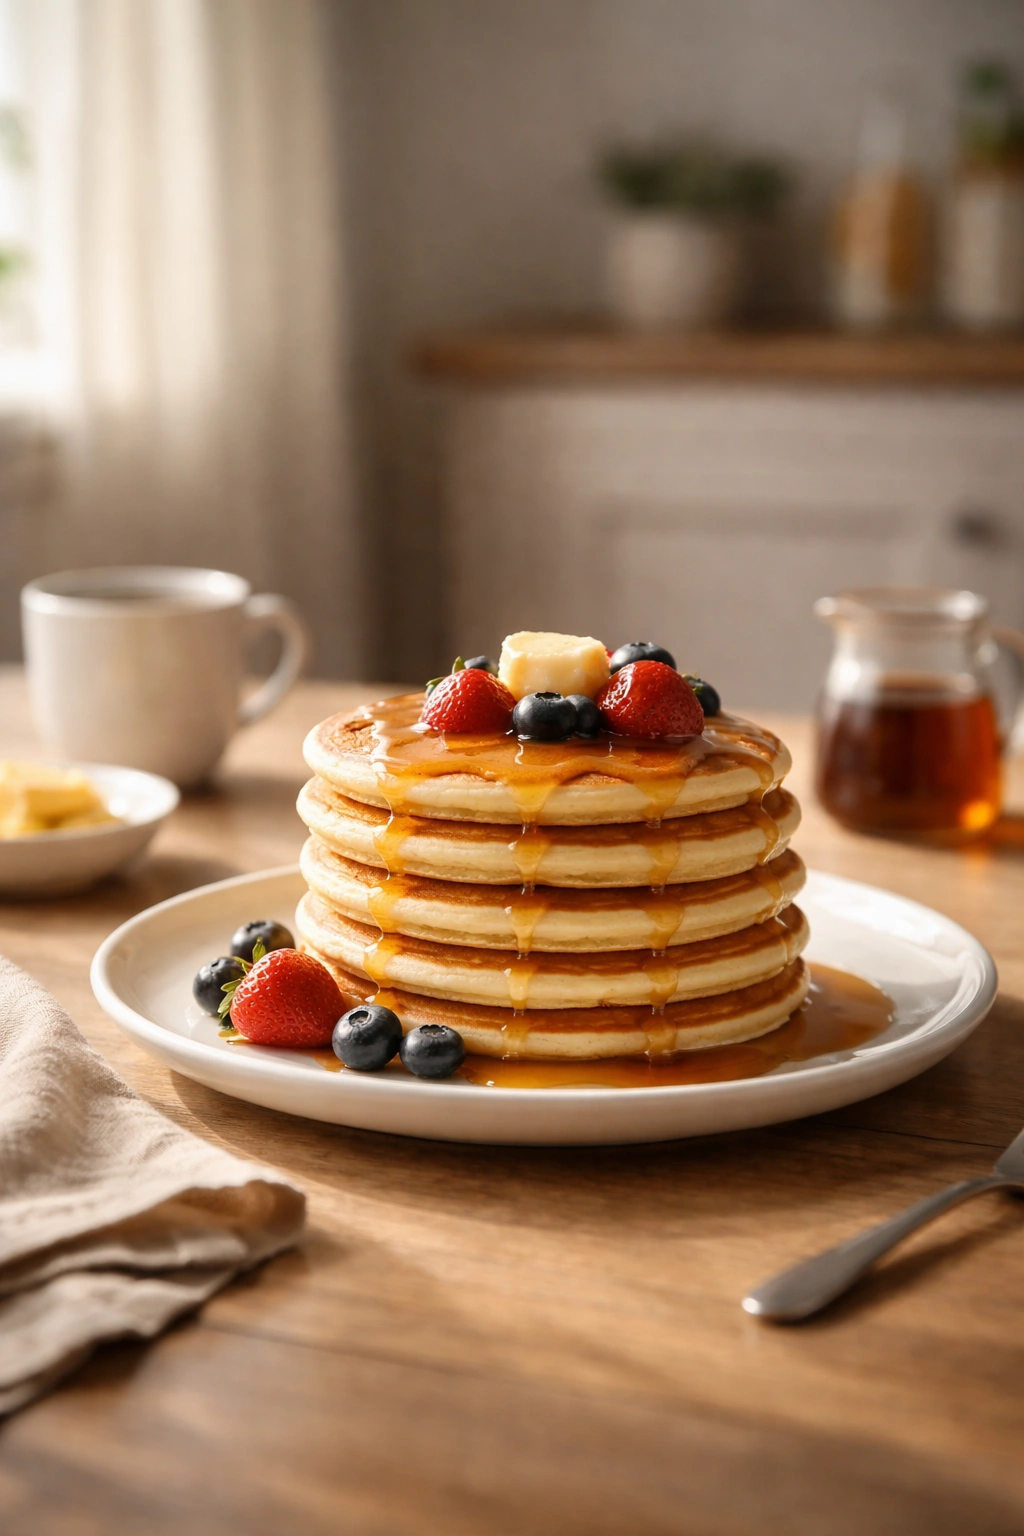
1. Classic Buttermilk Pancakes
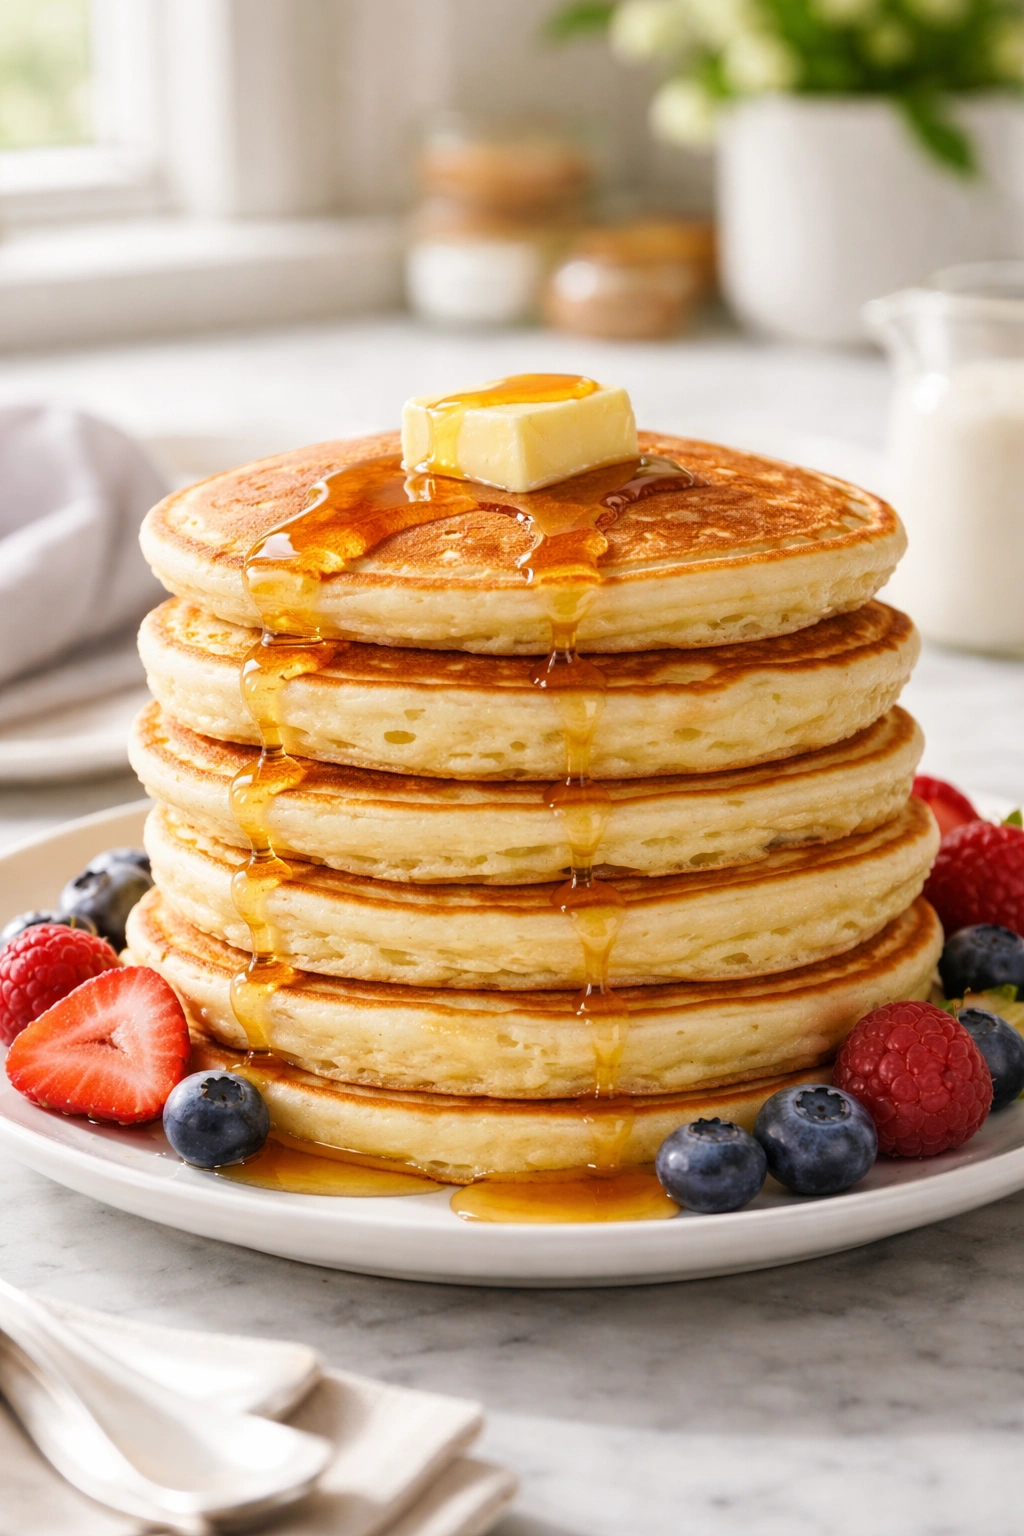
This is the pancake that taught the world what fluffy actually means. A properly made buttermilk pancake has a tender crumb, a delicate golden-brown exterior, and that tender interior that practically melts on your tongue. The buttermilk is the secret — its acidity reacts with baking soda to create lift and gives the batter a subtle tangy flavor that balances sweetness perfectly. These are the pancakes to master first because once you can make these, every other variation becomes an easy pivot.
Why They’re Worth Making
Buttermilk pancakes achieve their signature fluffiness through a chemical reaction between the acidic buttermilk and the baking soda. When these two ingredients combine, they create carbon dioxide bubbles instantly, which creates lift and gives you that cloud-like texture. The contrast between the crispy edges and the impossibly tender center is what separates homemade pancakes from sad, dense boxed-mix versions.
What Makes Them Stand Out
- Each pancake should be tall enough that you can see the rise when it cooks
- The buttermilk provides a subtle tang that keeps these from tasting one-dimensional or overly sweet
- They hold up beautifully to toppings — the structure is solid enough for syrup, fresh fruit, whipped cream, or anything else
- The recipe is forgiving enough for beginners but produces restaurant-quality results
Yield: Makes 12 to 16 pancakes | Prep Time: 10 minutes | Cook Time: 20 minutes | Total Time: 30 minutes | Difficulty: Beginner — This is the foundational recipe. No special equipment needed, and the steps are straightforward.
For the Pancakes:
- 2 cups all-purpose flour
- 2 tablespoons granulated sugar
- 2 teaspoons baking powder
- 1 teaspoon baking soda
- 1 teaspoon fine sea salt
- 2 cups whole buttermilk (do not use low-fat — you need the fat for flavor and texture)
- 2 large eggs, room temperature
- 3 tablespoons unsalted butter, melted, plus more for the griddle
- 1 teaspoon pure vanilla extract
- Optional toppings: fresh berries, sliced bananas, pure maple syrup, whipped cream, or a pinch of fleur de sel
Prepare Your Ingredients:
-
Set a griddle or large skillet over medium-high heat. If you’re using a non-stick surface, medium heat is sufficient. The pan is ready when a drop of water flicked onto the surface sizzles and evaporates immediately.
-
In a large mixing bowl, whisk together the flour, sugar, baking powder, baking soda, and salt. Make sure to break up any clumps of baking soda — it should be evenly distributed throughout the dry mixture, or you’ll end up with bitter-tasting spots in your pancakes.
Advertisements
Make the Batter:
-
In a separate medium bowl, whisk the buttermilk, eggs, melted butter, and vanilla until well combined. The mixture should be uniform with no streaks of egg white visible.
-
Pour the wet ingredients into the dry ingredients and stir gently with a spatula or wooden spoon until just combined. Do not overmix. It’s okay if you see small lumps in the batter — these will smooth out as the pancakes cook. Overmixing develops gluten and produces tough, dense pancakes. Stir only until you don’t see any streaks of dry flour.
-
Let the batter rest for 2 to 3 minutes. This allows the baking powder and baking soda to begin their work, and you’ll notice the batter getting slightly thicker and more voluminous.
Cook the Pancakes:
-
Lightly butter the griddle (even non-stick surfaces benefit from a thin layer of butter for flavor and browning). For each pancake, pour approximately 1/3 cup of batter onto the hot griddle. The batter should sizzle when it hits the surface.
-
Cook undisturbed for 2 to 3 minutes, until the edges look dry and set and you see bubbles forming across the surface of the batter. When bubbles begin to pop and stay open (rather than immediately filling back in), the bottom is set and ready to flip.
-
Flip carefully using a wide spatula and cook the second side for 1 to 2 minutes, until golden brown. The second side cooks faster than the first because the griddle is already at temperature and the pancake is thicker.
-
Transfer to a warm plate and repeat with the remaining batter. If you’re cooking for a crowd, keep finished pancakes warm in a 200°F oven while you finish the batch.
Pro tip: Don’t flip your pancakes multiple times or press down on them while they’re cooking. Each action releases steam and makes them denser. Flip once, and only once.
Storage and Serving: These are best served immediately with warm syrup and your choice of toppings, but they’ll keep in an airtight container in the refrigerator for up to 3 days. Reheat in a 350°F oven for about 8 minutes, or use a toaster to refresh them.
2. Chocolate Chip Pancakes
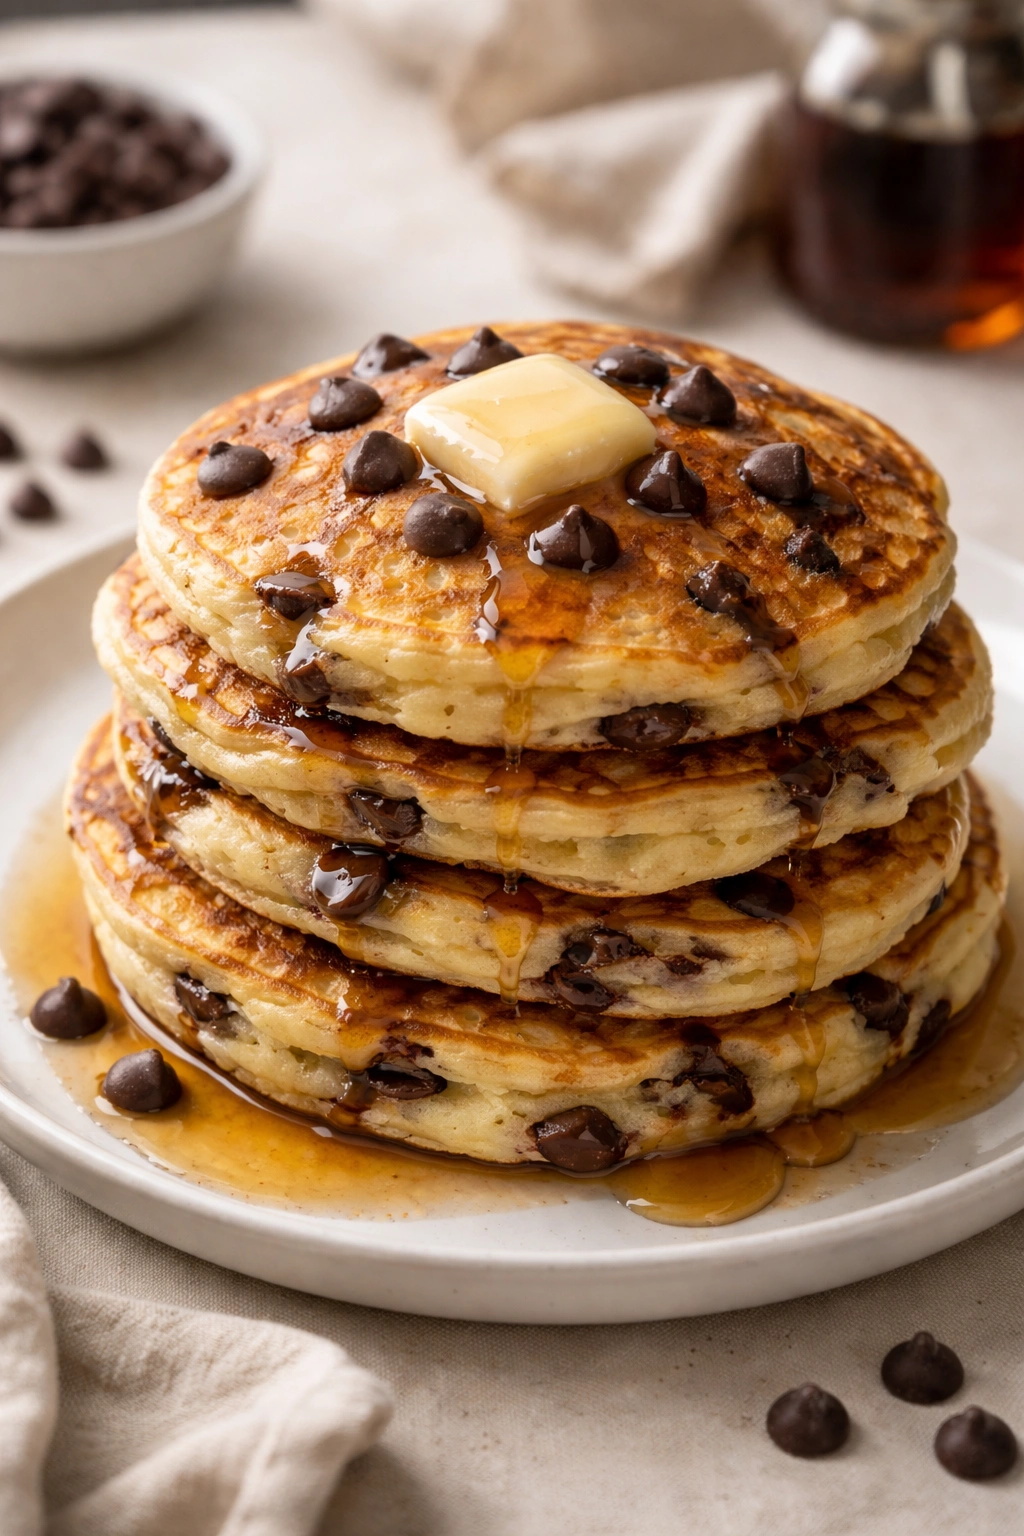
If you’ve only ever made chocolate chip pancakes using a mix, you’re in for a treat. From-scratch chocolate chip pancakes have a richer flavor, a more tender crumb, and the chocolate actually melts into the pancake rather than sitting as hard little pebbles. The key is using good-quality chocolate chips (not the waxy baking variety) and adding them after the batter is poured onto the griddle so they stay soft and gooey rather than melting into everything during mixing.
Why They Stand Out
Homemade chocolate chip pancakes deliver that perfect combination of fluffy pancake, melted chocolate, and the satisfaction of biting into something that actually tastes like real chocolate. The chocolate stays pliable rather than hardening, creating pockets of richness throughout each pancake. These aren’t a dessert masquerading as breakfast — they’re indulgent without being over the top.
What to Know Before You Make Them
- Use semi-sweet or dark chocolate chips, not milk chocolate (they’re less likely to seize or burn)
- Add the chips after pouring the batter so they melt into a soft texture
- These pair beautifully with sliced strawberries or a simple dusting of powdered sugar
- The chocolate makes these slightly more forgiving if your pancakes are a touch thicker than usual
Yield: Makes 12 to 14 pancakes | Prep Time: 10 minutes | Cook Time: 20 minutes | Total Time: 30 minutes | Difficulty: Beginner — Identical technique to classic buttermilk pancakes, just with chocolate chips added during cooking.
For the Pancakes:
- 2 cups all-purpose flour
- 2 tablespoons granulated sugar
- 2 teaspoons baking powder
- 1 teaspoon baking soda
- 1 teaspoon fine sea salt
- 2 cups whole buttermilk
- 2 large eggs, room temperature
- 3 tablespoons unsalted butter, melted, plus more for the griddle
- 1 teaspoon pure vanilla extract
- 1 cup semi-sweet or dark chocolate chips
- Optional topping: sliced fresh strawberries, whipped cream, or a drizzle of chocolate syrup
Make the Batter:
-
In a large mixing bowl, whisk together the flour, sugar, baking powder, baking soda, and salt until combined.
-
In a separate medium bowl, whisk the buttermilk, eggs, melted butter, and vanilla until uniform.
-
Pour the wet ingredients into the dry ingredients and stir gently with a spatula until just combined — small lumps are completely fine. Stir only until you see no dry flour.
-
Let the batter rest for 2 to 3 minutes.
Advertisements
Cook the Pancakes:
-
Heat a griddle or large skillet to medium-high (medium for non-stick) and lightly butter the surface.
-
Pour approximately 1/3 cup of batter onto the hot griddle for each pancake. Immediately sprinkle about 1 tablespoon of chocolate chips directly onto the top of each pancake, pressing them very lightly into the batter so they stay put while cooking.
-
Cook undisturbed for 2 to 3 minutes, until the edges look set and bubbles are forming and popping across the surface. When the bubbles stay open, flip.
-
Cook the second side for 1 to 2 minutes, until golden brown. The chocolate chips will have melted into the pancake, creating soft pockets of chocolate throughout.
-
Transfer to a warm plate and repeat with the remaining batter and chocolate chips.
Pro tip: If you prefer larger, more indulgent chocolate pockets, add the chips in two batches — some before flipping and some right after you flip, pressing them gently into the hot top surface of the pancake. They’ll melt into the warm pancake as you finish cooking.
Storage and Serving: Refrigerate in an airtight container for up to 3 days. Reheat gently in a 350°F oven to avoid hardening the chocolate. These are absolutely divine served warm with fresh strawberries and a dollop of whipped cream on the side.
3. Blueberry Pancakes
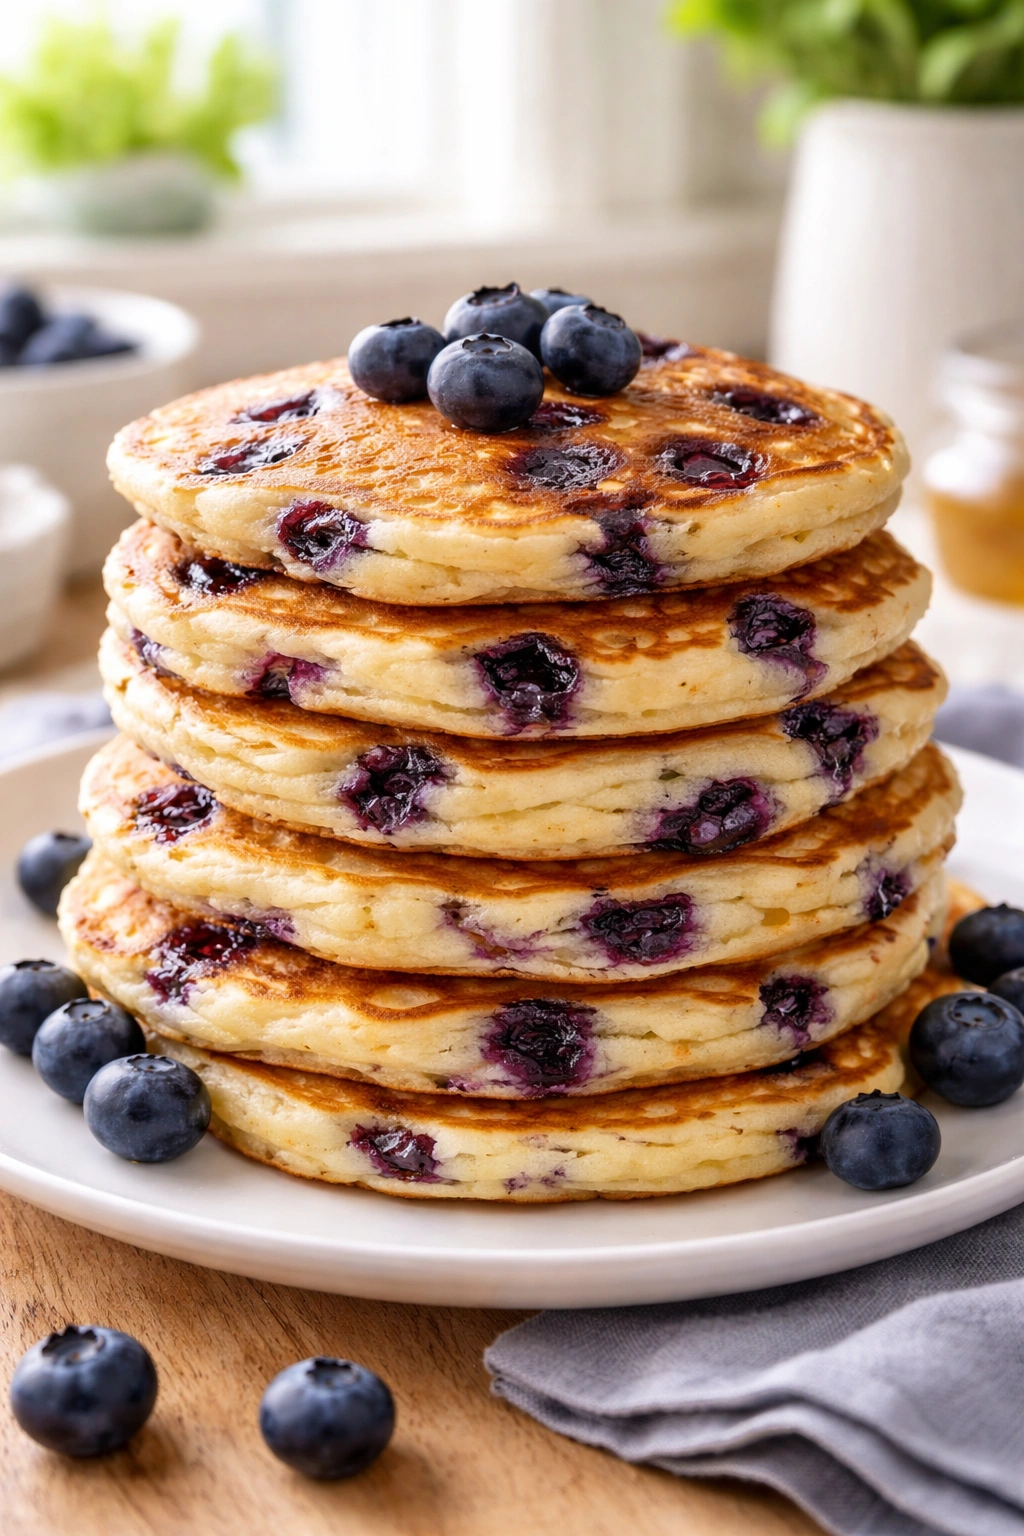
Blueberry pancakes occupy a special place in the pancake pantheon — they’re elegant enough for a weekend brunch but simple enough to throw together on a random Tuesday morning. Fresh blueberries (or frozen ones, if that’s what you have) burst during cooking, creating little pockets of tartness and sweetness that complement the mild sweetness of the pancake base. The key to avoiding pancakes that look like blueberry soup is using frozen blueberries and never thawing them.
Why They’re a Breakfast Winner
Fresh or frozen blueberries add natural sweetness and an antioxidant boost without any added sugar in the batter itself. When they burst during cooking, they create moisture and flavor throughout the pancake. The tartness of the berries balances beautifully with maple syrup or honey, making these feel fresher and more sophisticated than a plain pancake.
How to Get Perfect Results Every Time
- Use frozen blueberries straight from the freezer — they release their juice more slowly and won’t break apart as much
- If using fresh blueberries, toss them lightly in a teaspoon of cornstarch to help them stay intact
- Add berries right after pouring the batter onto the griddle, just like chocolate chips
- The batter itself is unsweetened to let the berry flavor shine
Yield: Makes 12 to 14 pancakes | Prep Time: 10 minutes | Cook Time: 20 minutes | Total Time: 30 minutes | Difficulty: Beginner — Uses the classic buttermilk batter with blueberries added during cooking.
For the Pancakes:
- 2 cups all-purpose flour
- 1 tablespoon granulated sugar (use less since the berries add natural sweetness)
- 2 teaspoons baking powder
- 1 teaspoon baking soda
- 1 teaspoon fine sea salt
- 2 cups whole buttermilk
- 2 large eggs, room temperature
- 3 tablespoons unsalted butter, melted, plus more for the griddle
- 1 teaspoon pure vanilla extract
- 1½ cups frozen blueberries (do not thaw)
- Optional toppings: pure maple syrup, fresh lemon zest, whipped cream, or a drizzle of honey
Mix Your Batter:
-
In a large bowl, whisk together the flour, sugar, baking powder, baking soda, and salt.
-
In a separate bowl, whisk the buttermilk, eggs, melted butter, and vanilla until combined.
-
Pour the wet mixture into the dry mixture and stir gently until just combined — you’re looking for no visible dry flour, but lumps are fine.
-
Let the batter rest for 2 to 3 minutes. The batter will thicken slightly as it sits.
Cook the Pancakes:
-
Heat your griddle or skillet to medium-high (medium for non-stick) and butter it lightly.
-
Pour approximately 1/3 cup of batter onto the hot griddle for each pancake. Immediately scatter about 1 tablespoon of frozen blueberries onto the top of each pancake, pressing them very gently into the batter.
Advertisements -
Cook undisturbed for 2 to 3 minutes, until the edges are set and bubbles are forming and popping across the surface. When the bubbles stay open instead of refilling, flip.
-
Cook the second side for 1 to 2 minutes, until the bottom is golden brown. The blueberries will have burst slightly, releasing their juice into the pancake and creating tender pockets of berry throughout.
-
Transfer to a warm plate and repeat with the remaining batter and berries.
Pro tip: If you have fresh lemon zest on hand, a tiny pinch sprinkled over the finished pancakes adds brightness and elegance. It’s not necessary, but it elevates these from good to memorable.
Storage and Serving: These keep in the fridge for up to 3 days in an airtight container. Warm them in a 350°F oven for about 8 minutes. They’re wonderful served warm with a drizzle of honey or real maple syrup and an optional dollop of whipped cream.
4. Banana Pancakes
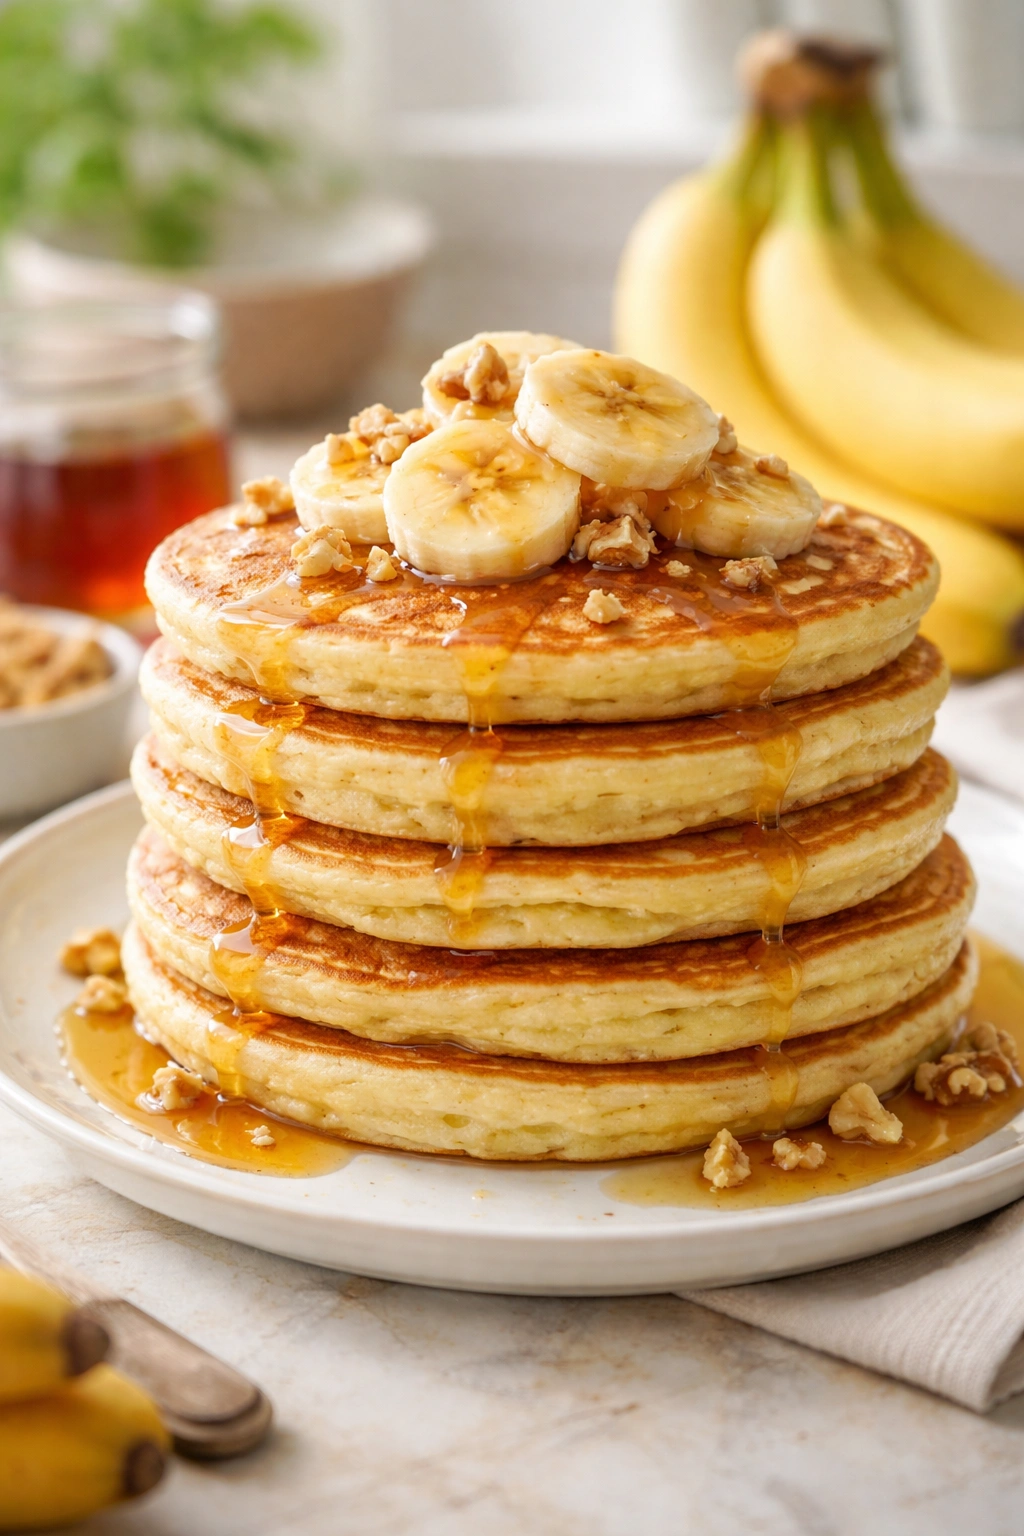
Banana pancakes walk a fine line between breakfast and dessert, but when done well, they’re simply sophisticated morning fare. Mashing ripe banana directly into the batter adds natural sweetness, moisture, and a subtle flavor that doesn’t overwhelm but rather enhances the pancake experience. The key is using truly ripe bananas — the kind with brown speckles on the skin — because that’s when the starches have converted to sugar and the flavor is most concentrated.
Why They Deserve a Spot in Your Rotation
Banana pancakes require slightly less sugar than plain pancakes because the banana brings its own sweetness. This makes them feel lighter and less cloying. The banana also adds moisture, which means you can often use slightly less liquid in the batter, resulting in a denser but still tender pancake. They’re a natural pairing with chocolate or pecans if you want to get fancy, but they’re equally lovely on their own.
Pro Tips for Perfect Results
- Use overripe bananas (with brown spots) for maximum sweetness and flavor
- Don’t overmix the batter — banana batter is thicker and benefits from gentle handling
- These pair beautifully with a touch of cinnamon or vanilla in the batter
- They’re wonderful topped with a drizzle of honey, sliced fresh banana, or a sprinkle of toasted nuts
Yield: Makes 10 to 12 pancakes (banana makes the batter slightly thicker) | Prep Time: 10 minutes | Cook Time: 20 minutes | Total Time: 30 minutes | Difficulty: Beginner — Simple technique, just with mashed banana incorporated into the batter.
For the Pancakes:
- 2 cups all-purpose flour
- 1 tablespoon granulated sugar
- 2 teaspoons baking powder
- 1 teaspoon baking soda
- 1 teaspoon fine sea salt
- ½ teaspoon ground cinnamon (optional, but recommended)
- 1¾ cups whole buttermilk
- 2 large eggs, room temperature
- 3 ripe bananas (with brown spots), mashed until smooth (you’ll have about ¾ cup of mashed banana)
- 3 tablespoons unsalted butter, melted, plus more for the griddle
- 1 teaspoon pure vanilla extract
- Optional toppings: honey, sliced fresh banana, toasted pecans or walnuts, a drizzle of almond butter, or whipped cream
Mix Your Batter:
-
In a large bowl, whisk together the flour, sugar, baking powder, baking soda, salt, and cinnamon if using.
-
In a separate bowl, mash the ripe bananas until smooth — a few tiny flecks are fine, but you want mostly a smooth purée. Add the buttermilk, eggs, melted butter, and vanilla to the bananas and whisk until completely combined.
-
Pour the wet mixture into the dry mixture and stir gently until just combined — you’re looking for no visible dry flour, but a few small lumps are perfectly fine and won’t be noticeable in the finished pancake.
-
Let the batter rest for 2 to 3 minutes. Banana batter is naturally thicker than buttermilk batter alone, so don’t be alarmed if it seems dense.
Cook the Pancakes:
-
Heat your griddle or large skillet to medium-high (medium if non-stick) and lightly butter the surface.
-
For each pancake, pour about 1/3 cup of batter onto the hot griddle. The batter is thicker, so you may need to coax it into shape with the back of a spoon, but don’t flatten it.
-
Cook undisturbed for 2 to 3 minutes, until the edges look dry and set and bubbles are forming and popping across the top surface. When the bubbles stay open, flip carefully.
-
Cook the second side for 1 to 2 minutes, until golden brown. Banana pancakes are slightly more delicate than buttermilk pancakes, so handle them gently.
-
Transfer to a warm plate and repeat with the remaining batter.
Advertisements
Pro tip: If you want extra indulgence, arrange thin slices of fresh banana on top of the pancake right after you flip it, pressing them gently into the warm surface so they heat through and soften.
Storage and Serving: These keep in the refrigerator for up to 2 days in an airtight container (the banana makes them slightly more prone to drying out). Reheat gently in a 350°F oven for about 8 minutes. They’re wonderful served warm with honey and sliced fresh banana, or with a small drizzle of almond butter.
5. Overnight Oats Pancakes
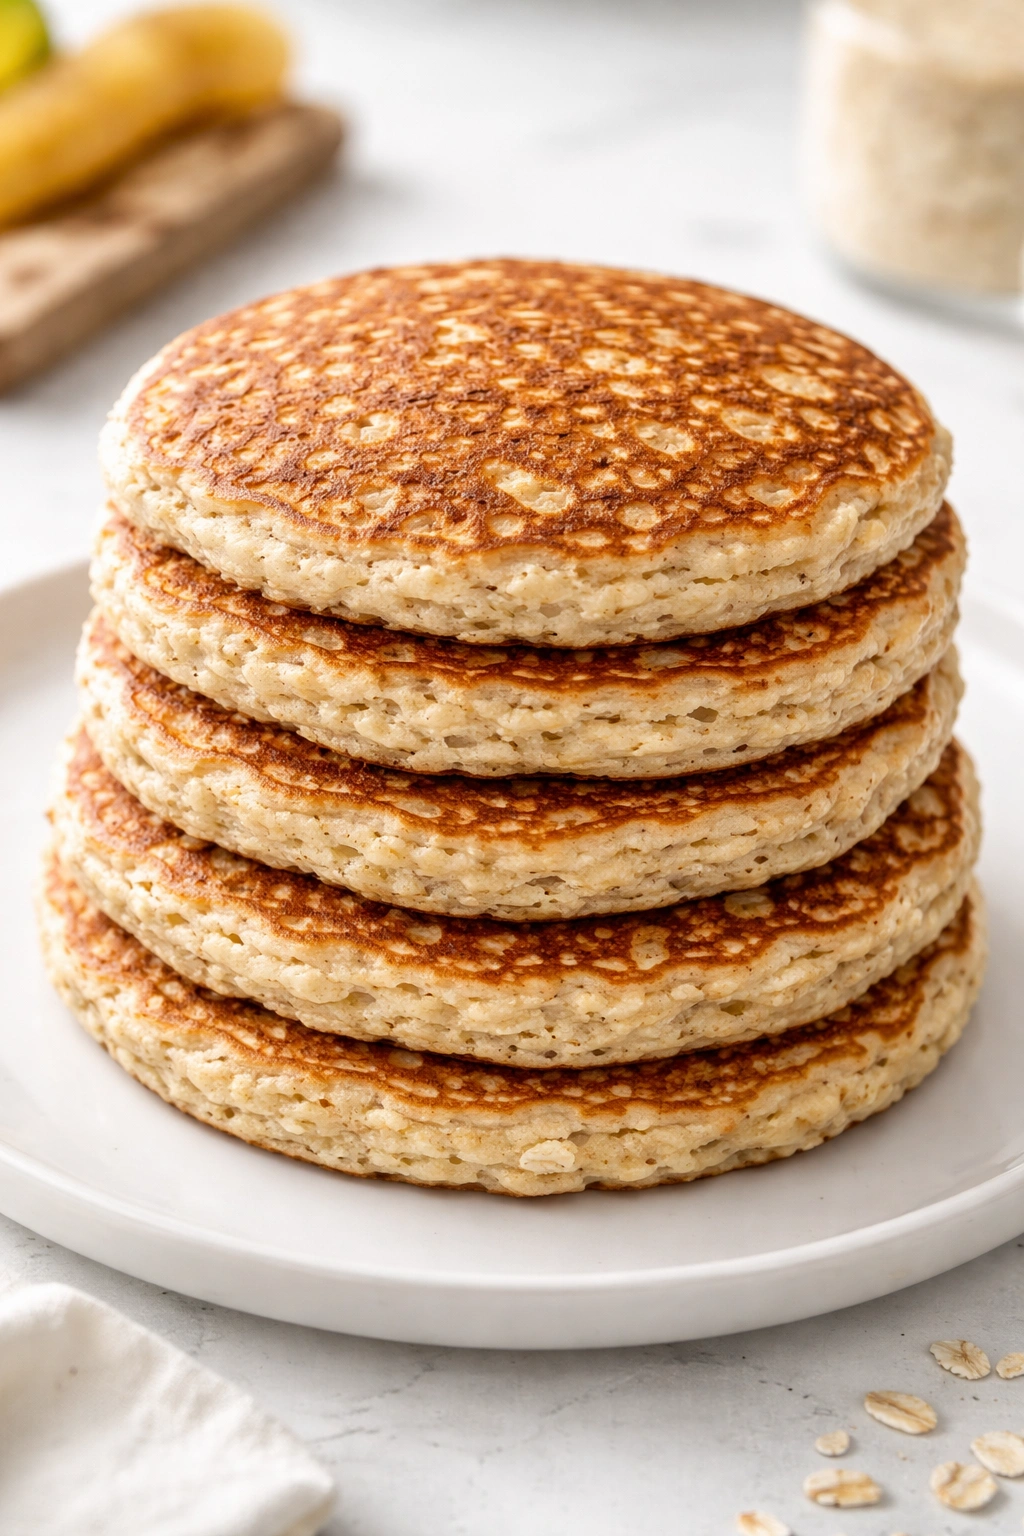
These pancakes are a breakfast hack that actually works. They combine the fiber and nutrition of overnight oats with the comfort and satisfaction of fluffy pancakes. The oats soften overnight (or even just while you’re prepping the other ingredients), creating a batter that’s hearty and filling but still surprisingly tender when cooked. These are perfect for mornings when you want something substantial enough to keep you satisfied for hours.
Why They’re Worth the Prep
Overnight oats pancakes deliver the nutritional benefits of whole oats without any of the gumminess you sometimes get from straight oatmeal. The structure of the pancake actually showcases the oats nicely, and you end up with a more interesting texture than a plain pancake. These are naturally nutty and satisfying, which means you’ll be fuller longer and less tempted to snack mid-morning.
What to Expect and How to Perfect Them
- These pancakes are slightly less fluffy than pure buttermilk pancakes, but they have more texture and body
- The oats should be rolled oats (old-fashioned style), not steel-cut or instant
- Soaking the oats overnight develops flavor and makes the final pancake more digestible
- These pair beautifully with fresh fruit, yogurt, or a drizzle of honey
Yield: Makes 10 to 12 pancakes | Prep Time: 10 minutes (plus 30 minutes to 1 hour soaking time, or overnight) | Cook Time: 20 minutes | Total Time: 50 minutes to 1 hour 10 minutes | Difficulty: Beginner — The only extra step is soaking the oats, which is truly passive.
For the Pancakes:
- 1 cup rolled oats (old-fashioned style, not instant)
- 1 cup whole buttermilk
- ½ cup whole milk
- 2 large eggs, room temperature
- 2 tablespoons unsalted butter, melted
- 1 tablespoon pure maple syrup (or honey)
- 1 teaspoon pure vanilla extract
- 1 cup all-purpose flour
- 1 tablespoon granulated sugar
- 1½ teaspoons baking powder
- ½ teaspoon baking soda
- ½ teaspoon fine sea salt
- Unsalted butter for the griddle
- Optional toppings: fresh berries, sliced banana, plain Greek yogurt, a drizzle of honey, or a sprinkle of cinnamon
Soak Your Oats:
- The night before (or at least 30 minutes before cooking), combine the rolled oats, buttermilk, milk, eggs, melted butter, maple syrup, and vanilla in a large bowl. Stir until the oats are evenly coated and there are no dry pieces. Cover and refrigerate overnight, or let sit at room temperature for at least 30 minutes. If you’re doing this overnight, you can prepare everything the night before and just cook in the morning.
Make Your Batter:
-
When you’re ready to cook, in a separate bowl whisk together the flour, sugar, baking powder, baking soda, and salt.
-
Pour the soaked oat mixture into the flour mixture and stir gently until just combined — you want no visible dry flour, but lumps are fine.
Advertisements -
Let the batter rest for 2 to 3 minutes before cooking.
Cook the Pancakes:
-
Heat your griddle or large skillet to medium-high (medium for non-stick) and lightly butter the surface.
-
Pour approximately 1/3 cup of batter onto the hot griddle for each pancake. The batter is thicker than plain buttermilk batter, so you may need to gently spread it with the back of a spoon.
-
Cook undisturbed for 2 to 3 minutes, until the edges are set and bubbles are forming and popping across the surface. When bubbles stay open, flip carefully.
-
Cook the second side for 1 to 2 minutes, until golden brown.
-
Transfer to a warm plate and repeat with the remaining batter.
Pro tip: These are even better with a small handful of fresh berries or a sliced banana mixed into the batter before cooking, or scattered on top right after you pour it onto the griddle.
Storage and Serving: These keep well in the fridge for up to 3 days. Reheat gently in a 350°F oven or in a toaster. They’re wonderful served warm with fresh berries and a dollop of Greek yogurt, or a light drizzle of honey.
6. Lemon Ricotta Pancakes
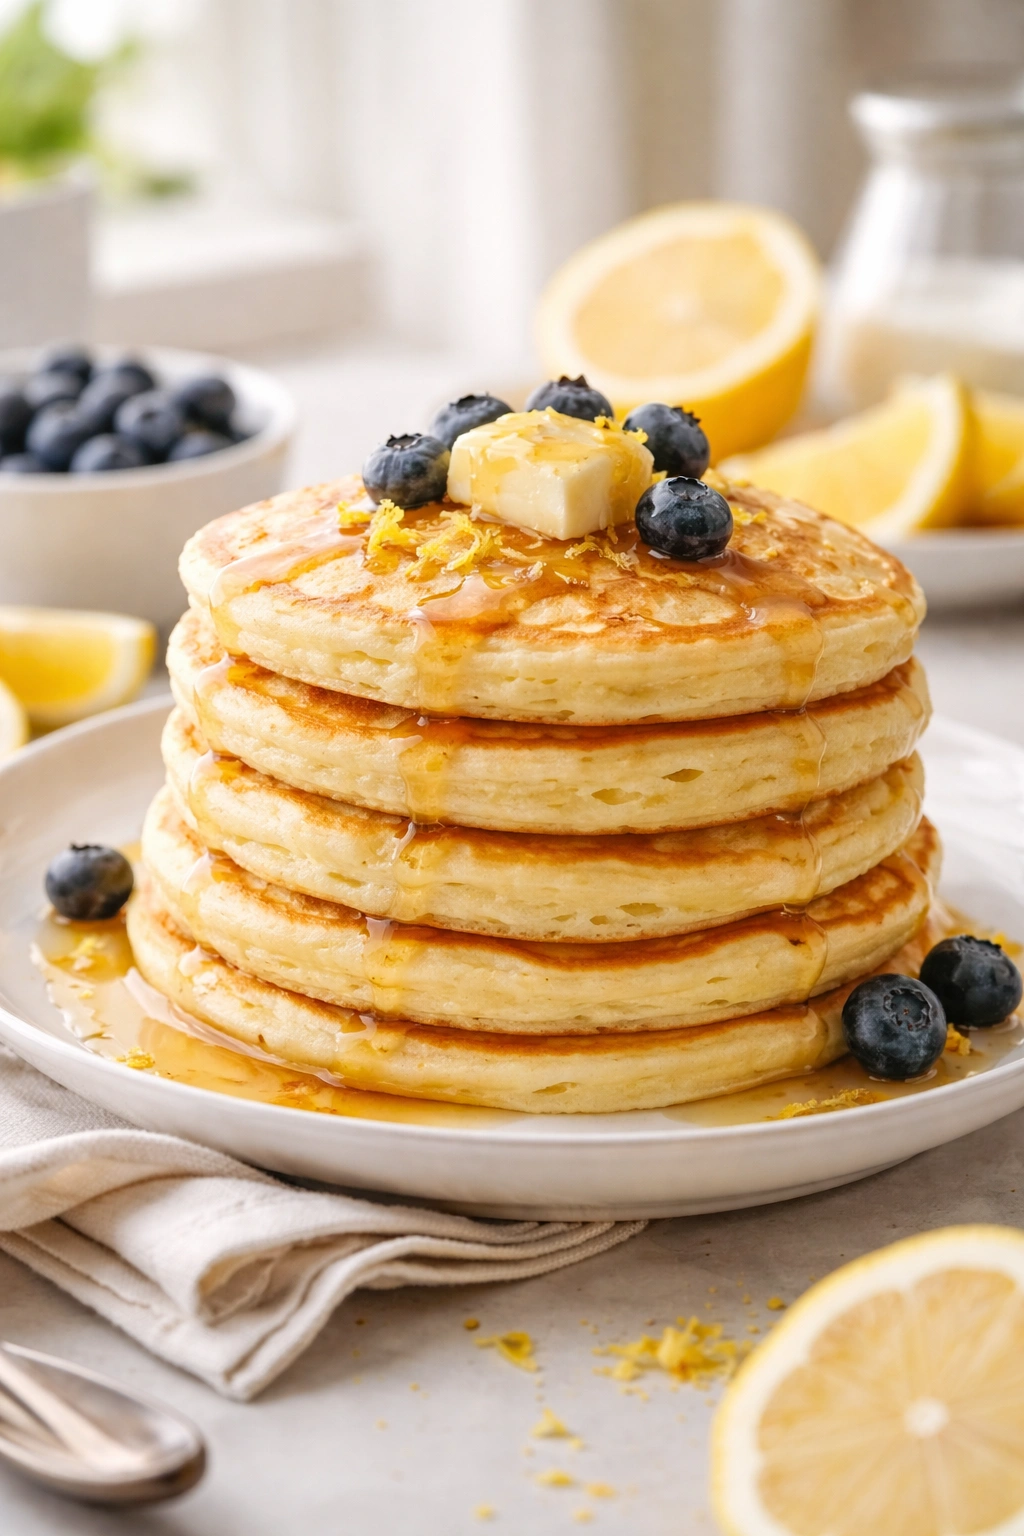
Lemon ricotta pancakes are for the mornings when you want something that feels a little special. Ricotta cheese in the batter creates an incredibly tender, almost fluffy crumb, and the bright lemon flavor cuts through any heaviness. These are sophisticated enough to serve at a brunch but casual enough for a solo Monday morning breakfast. The combination of tart lemon and rich ricotta is unexpectedly elegant.
Why They Stand Out
Ricotta adds protein and creates a texture that’s different from standard pancakes — more delicate and almost cloud-like. The lemon provides brightness and prevents the ricotta from making the pancakes feel heavy. These pancakes have a subtle elegance that makes them feel a bit indulgent, but they’re actually quite wholesome. They’re the kind of pancake that makes breakfast feel like a treat.
What You Should Know
- Make sure your ricotta is at room temperature for the smoothest batter
- Fresh lemon juice and zest are non-negotiable here — don’t use bottled lemon juice
- These are slightly more delicate than standard pancakes, so handle them gently when flipping
- They pair beautifully with fresh berries or a simple syrup
Yield: Makes 10 to 12 pancakes | Prep Time: 10 minutes | Cook Time: 20 minutes | Total Time: 30 minutes | Difficulty: Intermediate — The technique is the same, but handling the delicate batter requires a gentle touch.
For the Pancakes:
- 1 cup whole milk ricotta cheese (room temperature)
- ¾ cup all-purpose flour
- 2 tablespoons granulated sugar
- 1 tablespoon baking powder
- ½ teaspoon fine sea salt
- Zest of 2 large fresh lemons (about 1 tablespoon finely grated zest)
- Juice of 1 fresh lemon (about 3 tablespoons)
- 4 large eggs (separated into yolks and whites)
- 2 tablespoons unsalted butter, melted, plus more for the griddle
- 1 teaspoon pure vanilla extract
- Optional toppings: fresh berries, powdered sugar, a drizzle of honey, or whipped cream
Make Your Batter:
-
In a large bowl, combine the ricotta cheese, flour, sugar, baking powder, salt, lemon zest, and lemon juice. Stir until well combined — the mixture should be fairly thick and creamy.
-
Add the egg yolks, melted butter, and vanilla, and stir until everything is well incorporated and smooth.
-
In a separate spotlessly clean bowl, beat the egg whites on high speed with an electric mixer for 3 to 4 minutes, until they form stiff peaks. This step is important — whipped egg whites are what make these pancakes so incredibly fluffy and cloud-like.
-
Gently fold the whipped egg whites into the ricotta mixture in three additions, folding gently with a spatula until just combined. Don’t overmix — you want to keep as much air in the egg whites as possible. A few streaks of white are fine.
Cook the Pancakes:
-
Heat your griddle or large skillet to medium (not medium-high, because these delicate pancakes can brown too quickly) and lightly butter the surface.
Advertisements -
Pour approximately 1/3 cup of batter onto the hot griddle for each pancake. Be very gentle when flipping these pancakes — use a wide, thin spatula and flip with confidence rather than hesitation. Gentle hesitation can cause them to tear.
-
Cook for about 2 minutes on the first side, until the bottom is golden brown and the edges look set. Flip carefully.
-
Cook the second side for 1 to 2 minutes, until golden brown. These cook a bit faster than buttermilk pancakes because of the extra fat from the ricotta and eggs.
-
Transfer to a warm plate and repeat with the remaining batter.
Pro tip: A light dusting of powdered sugar and a few fresh raspberries or blueberries make these feel absolutely restaurant-worthy. They’re also lovely with a dollop of mascarpone or whipped cream and a thread of honey.
Storage and Serving: These are best served immediately while they’re at their fluffiest, but they’ll keep in the fridge for up to 2 days. Reheat gently in a 325°F oven for about 5 to 7 minutes — don’t use a toaster, which might dry them out. They’re wonderful served with fresh berries and a light dusting of powdered sugar.
7. Pumpkin Spice Pancakes
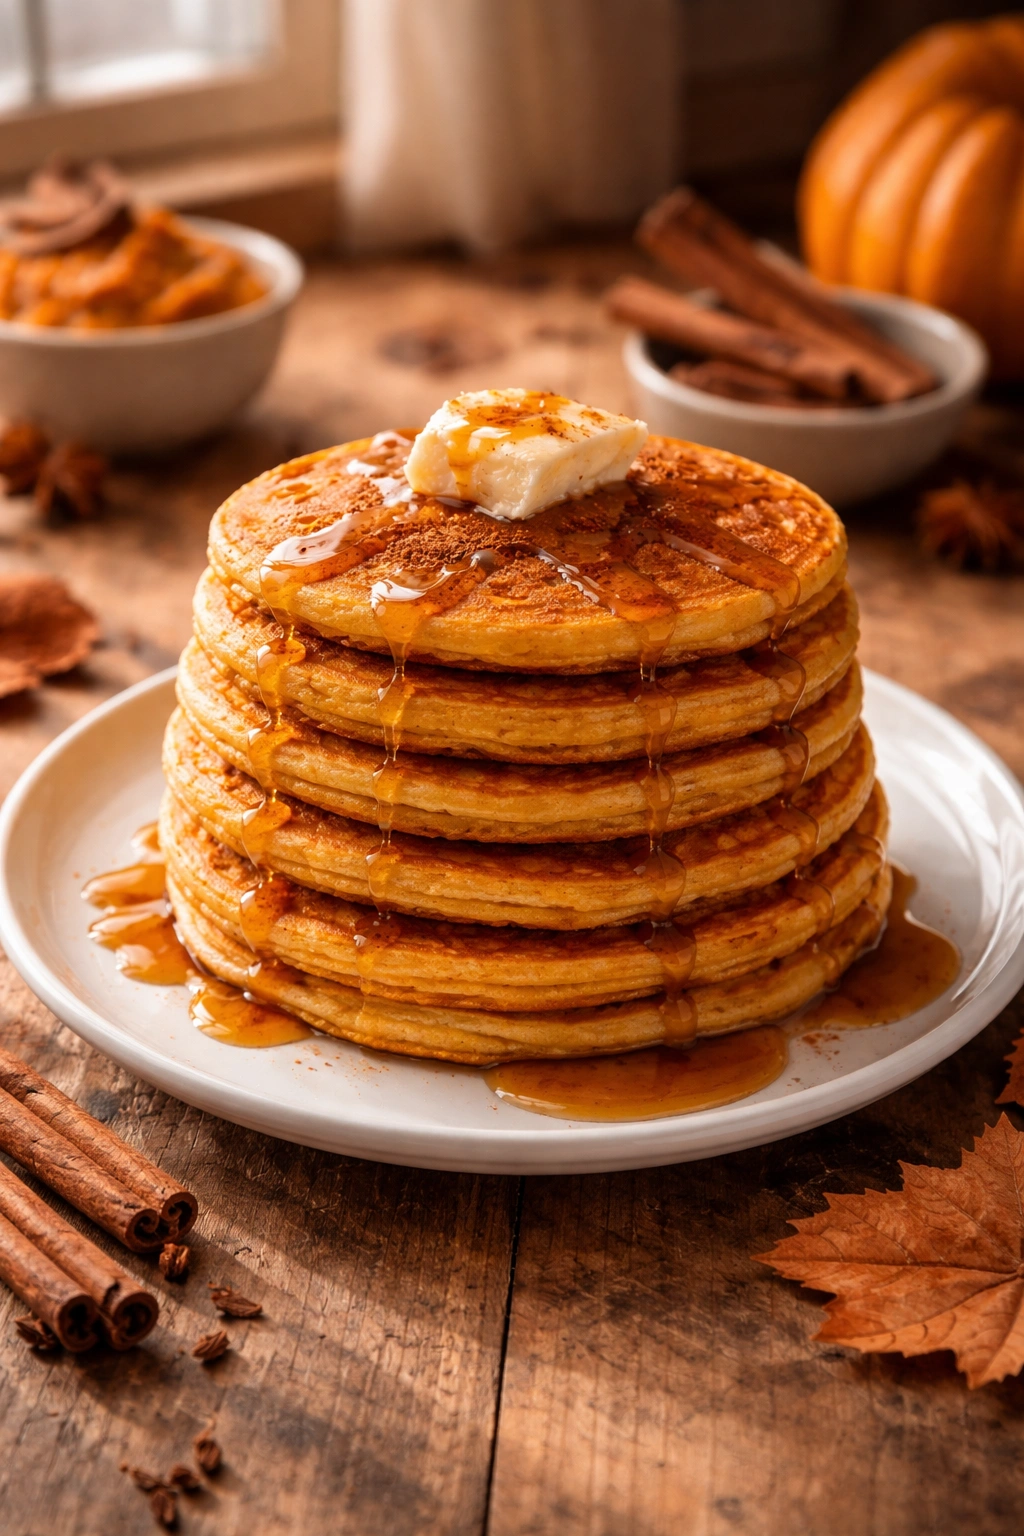
Pumpkin spice pancakes are beloved for a reason — there’s something deeply satisfying about the warm spices and subtle earthiness of pumpkin in a fluffy pancake. These taste like fall in pancake form, but they’re good enough to make year-round whenever you’re craving something cozy. The pumpkin purée adds moisture and a natural sweetness that means you can use less sugar than in a plain pancake.
Why They’re a Breakfast Favorite
Pumpkin adds nutrition, moisture, and a subtle sweetness that lets you reduce the sugar in the recipe. The warm spices — cinnamon, nutmeg, ginger, cloves — create depth and complexity without being heavy or overwhelming. These pancakes feel indulgent and autumnal, but they’re actually quite wholesome. The pumpkin also makes them slightly more filling than standard pancakes.
Important Details That Matter
- Use pure pumpkin purée, not pumpkin pie filling (which has added sugar and spices)
- The spices should be warm and fragrant — old spices won’t deliver the same impact
- These are slightly denser than buttermilk pancakes, but still tender
- They’re wonderful paired with maple syrup, whipped cream, or candied pecans
Yield: Makes 12 to 14 pancakes | Prep Time: 10 minutes | Cook Time: 20 minutes | Total Time: 30 minutes | Difficulty: Beginner — Same technique as buttermilk pancakes, just with pumpkin and spices added.
For the Pancakes:
- 2 cups all-purpose flour
- 2 tablespoons granulated sugar
- 1 tablespoon baking powder
- 1 teaspoon baking soda
- 1 teaspoon ground cinnamon
- ½ teaspoon ground ginger
- ¼ teaspoon freshly grated nutmeg
- Pinch of ground cloves
- 1 teaspoon fine sea salt
- 1 cup pure pumpkin purée (not pie filling)
- 1 cup whole buttermilk
- ½ cup whole milk
- 2 large eggs, room temperature
- 3 tablespoons unsalted butter, melted, plus more for the griddle
- 1 teaspoon pure vanilla extract
- Optional toppings: pure maple syrup, whipped cream, candied pecans, a drizzle of honey, or a sprinkle of cinnamon
Mix Your Batter:
-
In a large bowl, whisk together the flour, sugar, baking powder, baking soda, cinnamon, ginger, nutmeg, cloves, and salt. Make sure all the spices are evenly distributed — you don’t want one pancake to be heavily spiced and another to be bland.
-
In a separate bowl, whisk together the pumpkin purée, buttermilk, milk, eggs, melted butter, and vanilla until completely smooth and combined. The pumpkin should be fully incorporated with no lumps.
-
Pour the wet mixture into the dry mixture and stir gently until just combined — no visible dry flour, but lumps are fine.
-
Let the batter rest for 2 to 3 minutes before cooking.
Cook the Pancakes:
-
Heat your griddle or large skillet to medium-high (medium for non-stick) and lightly butter the surface.
-
Pour approximately 1/3 cup of batter onto the hot griddle for each pancake.
-
Cook undisturbed for 2 to 3 minutes, until the edges are set and bubbles are forming and popping across the surface. When bubbles stay open, flip.
-
Cook the second side for 1 to 2 minutes, until golden brown.
Advertisements -
Transfer to a warm plate and repeat with the remaining batter.
Pro tip: If you have candied pecans on hand, crumble a few on top of each pancake right after you pour the batter onto the griddle. They’ll soften slightly as the pancake cooks, creating pockets of sweet, spiced nuttiness.
Storage and Serving: These keep in the fridge for up to 3 days in an airtight container. Reheat in a 350°F oven for about 8 minutes. They’re wonderful served warm with whipped cream and a drizzle of pure maple syrup, or with candied pecans.
8. Cornmeal Pancakes
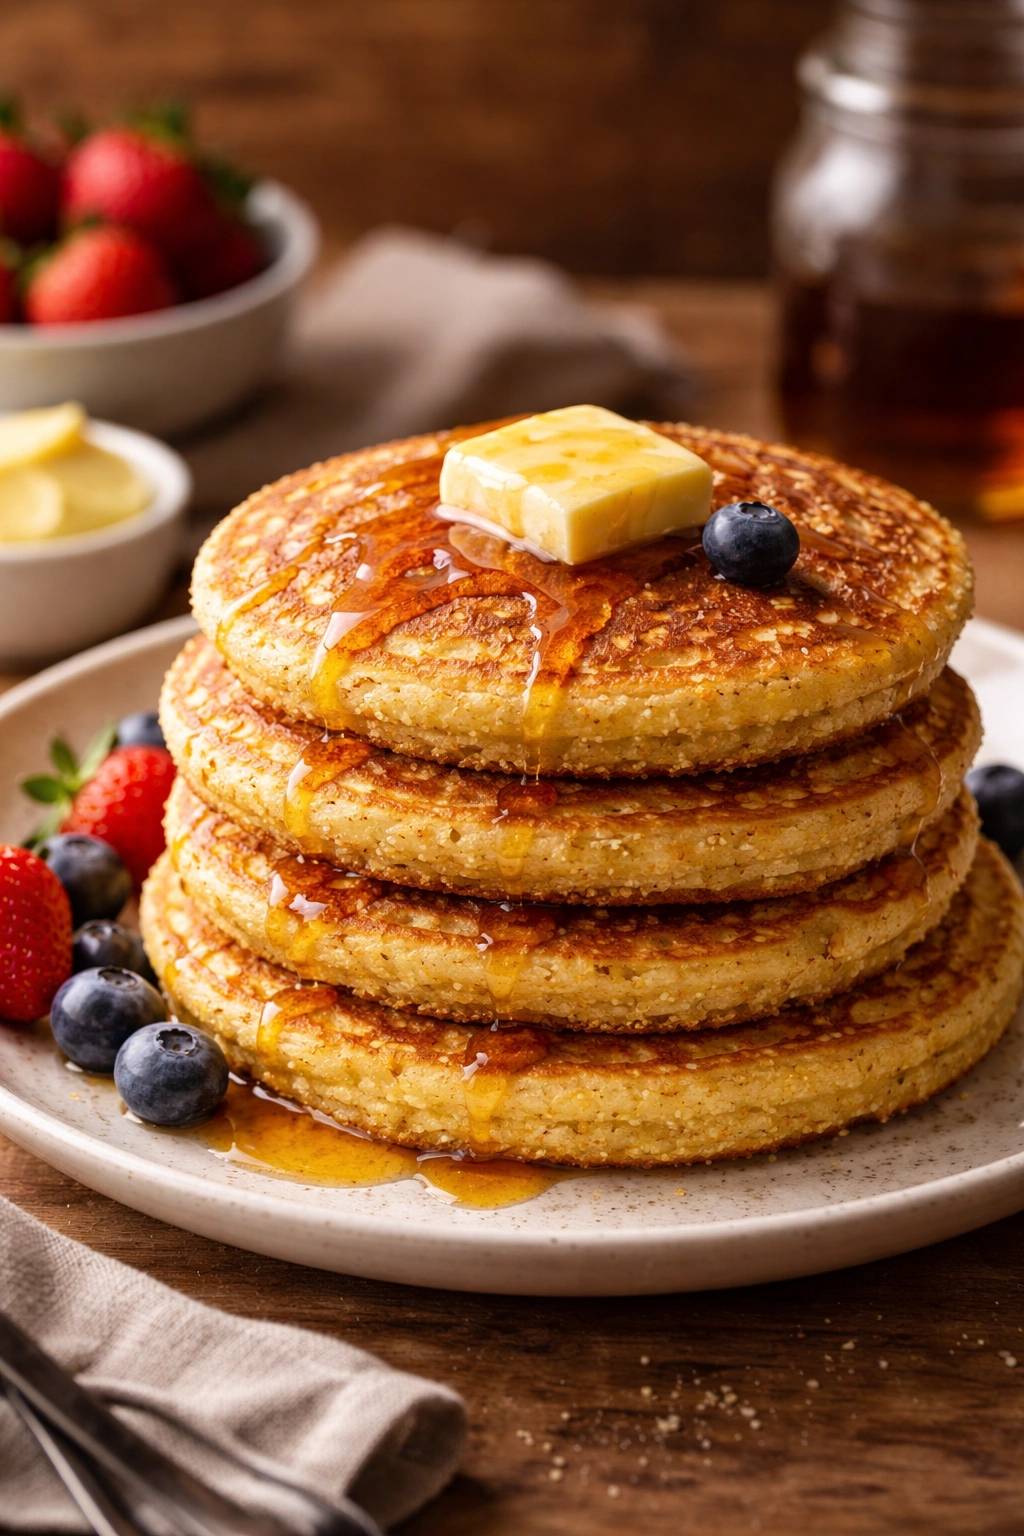
Cornmeal pancakes offer a completely different texture experience — they have a subtle grittiness that’s actually appealing, a natural sweetness, and a mild corn flavor that’s understated and sophisticated. These are a bit less fluffy than pure wheat flour pancakes, but the trade-off is a more interesting mouthfeel and a structure that stands up beautifully to toppings. They’re perfect for anyone who wants to venture slightly beyond standard pancake territory.
Why They’re Worth Trying
Cornmeal adds a different texture and subtle corn flavor that creates depth without being obvious or heavy. The slight grittiness is pleasant and interesting, not grainy or unpleasant. These pancakes feel more rustic and artisanal than standard pancakes, and they work beautifully with both savory and sweet toppings. They pair wonderfully with fresh fruit, honey, or even a simple pat of butter and a sprinkle of fleur de sel.
What to Expect
- These are slightly less fluffy than pure flour pancakes but more interesting in texture
- Cornmeal adds a subtle natural sweetness, so you can use slightly less sugar
- They pair beautifully with honey, fresh berries, or a touch of maple syrup
- The cornmeal should be fine cornmeal (polenta), not coarse cornmeal or cornflakes
Yield: Makes 12 to 14 pancakes | Prep Time: 10 minutes | Cook Time: 20 minutes | Total Time: 30 minutes | Difficulty: Beginner — Same basic technique as buttermilk pancakes, just with cornmeal added to the dry ingredients.
For the Pancakes:
- 1½ cups all-purpose flour
- ½ cup fine cornmeal (polenta)
- 1 tablespoon granulated sugar
- 2 teaspoons baking powder
- 1 teaspoon baking soda
- 1 teaspoon fine sea salt
- 2 cups whole buttermilk
- 2 large eggs, room temperature
- 3 tablespoons unsalted butter, melted, plus more for the griddle
- 1 teaspoon pure vanilla extract
- Optional toppings: fresh berries, honey, sliced peaches, whipped cream, or a pat of butter and fleur de sel
Mix Your Batter:
-
In a large bowl, whisk together the flour, cornmeal, sugar, baking powder, baking soda, and salt until evenly combined.
-
In a separate bowl, whisk the buttermilk, eggs, melted butter, and vanilla until well combined.
Advertisements -
Pour the wet mixture into the dry mixture and stir gently until just combined — you’re looking for no visible dry flour, but small lumps are fine.
-
Let the batter rest for 2 to 3 minutes. You’ll notice the cornmeal continues to absorb liquid and the batter will become slightly thicker.
Cook the Pancakes:
-
Heat your griddle or large skillet to medium-high (medium for non-stick) and lightly butter the surface.
-
Pour approximately 1/3 cup of batter onto the hot griddle for each pancake.
-
Cook undisturbed for 2 to 3 minutes, until the edges are set and bubbles are forming and popping across the surface. Flip when the bubbles stay open.
-
Cook the second side for 1 to 2 minutes, until golden brown.
-
Transfer to a warm plate and repeat with the remaining batter.
Pro tip: These are particularly lovely served with fresh berries and a drizzle of honey, or simply with a pat of good butter and a tiny sprinkle of fleur de sel for a more savory take.
Storage and Serving: These keep in the fridge for up to 3 days. Reheat in a 350°F oven for about 8 minutes. They’re particularly good the next day when the cornmeal has softened slightly and developed even more flavor.
9. Strawberry Shortcake Pancakes
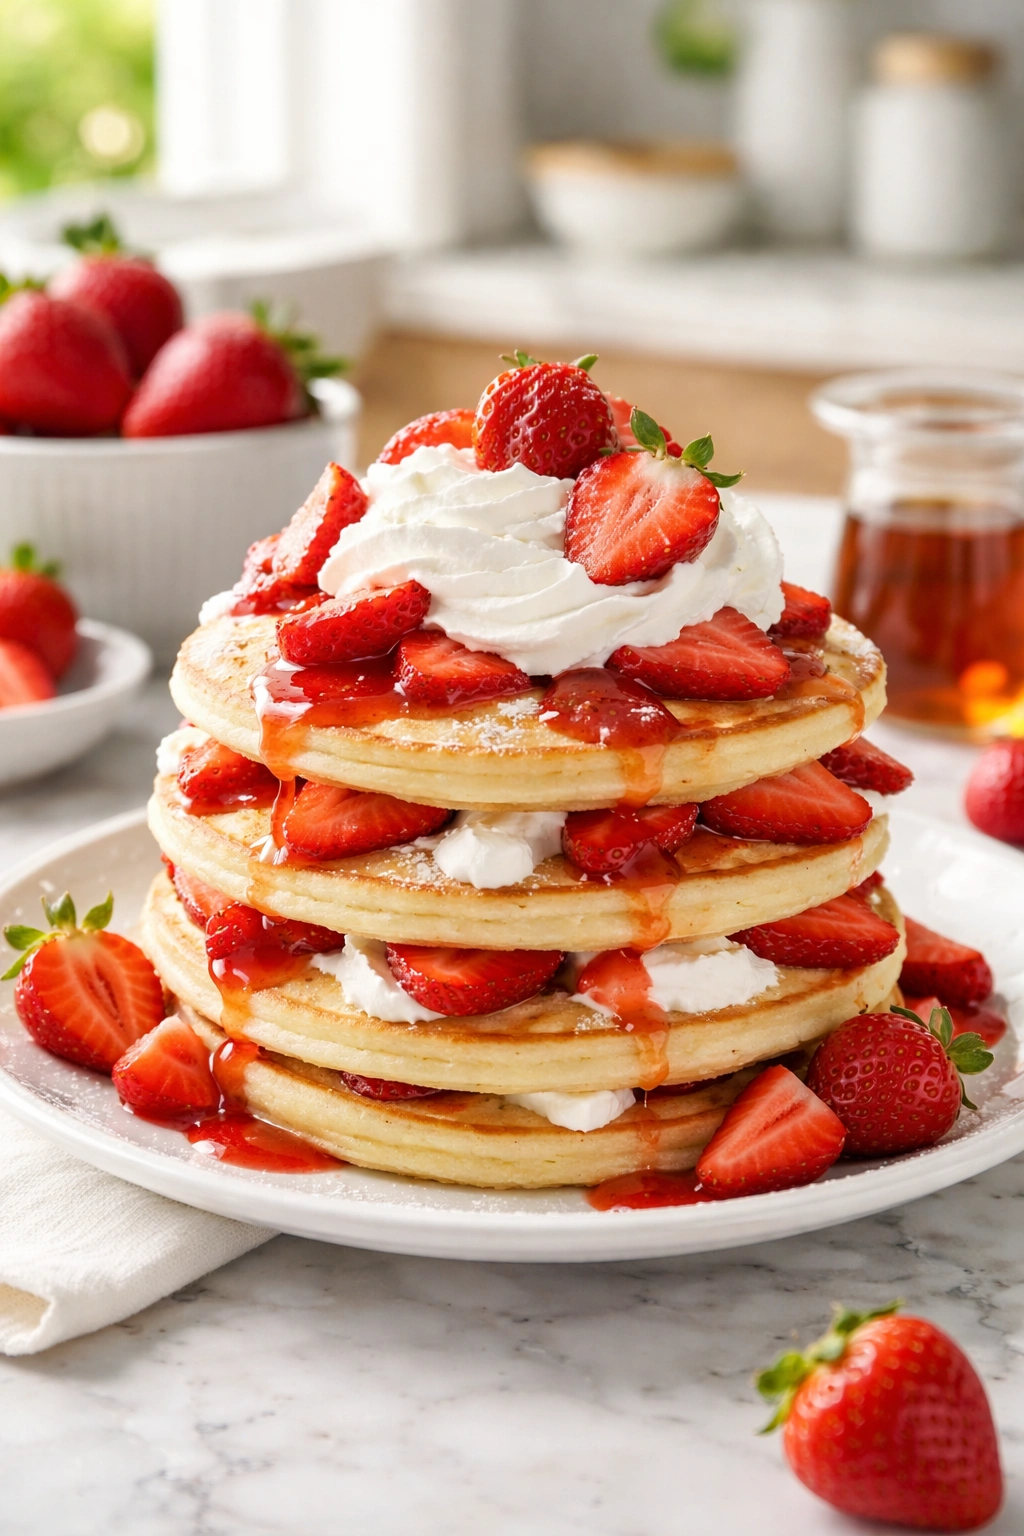
Strawberry shortcake pancakes are dessert disguised as breakfast — they combine fluffy pancakes, fresh strawberries, and whipped cream into one glorious stack. These use a slightly richer batter than basic buttermilk pancakes, which makes them feel more luxurious and gives them enough structure to handle generous toppings. They’re perfect for special mornings when you want breakfast to feel like a celebration.
Why They’re Special
These pancakes deliver the entire strawberry shortcake experience in a single plate. The pancakes themselves are rich and tender, the strawberries provide tartness and freshness, and the whipped cream adds luxury and balance. The combination is greater than the sum of its parts — you get the comfort of pancakes with the elegance of dessert. These are wonderful for hosting or for treating yourself on a special morning.
Key Details for Success
- The batter is richer than basic buttermilk pancakes (uses cream) so it handles generous toppings beautifully
- Fresh strawberries are essential — they should be ripe and juicy, not hard or flavorless
- The strawberries should be hulled and sliced, then tossed with a tiny bit of sugar to release their juice
- Fresh whipped cream (not canned) makes a significant difference
Yield: Makes 10 to 12 pancakes | Prep Time: 15 minutes (including prep of strawberries) | Cook Time: 20 minutes | Total Time: 35 minutes | Difficulty: Intermediate — The pancake technique is simple, but proper assembly with toppings requires some care.
For the Pancakes:
- 2 cups all-purpose flour
- 2 tablespoons granulated sugar
- 2 teaspoons baking powder
- 1 teaspoon baking soda
- 1 teaspoon fine sea salt
- 1½ cups whole buttermilk
- ½ cup heavy cream
- 2 large eggs, room temperature
- 3 tablespoons unsalted butter, melted, plus more for the griddle
- 1 teaspoon pure vanilla extract
For Assembly:
- 1½ pounds fresh strawberries, hulled and sliced (about 4 cups)
- 1 tablespoon granulated sugar
- 1 cup heavy cream, chilled
- 1 tablespoon powdered sugar
- ½ teaspoon pure vanilla extract
Prepare Your Strawberries:
-
About 15 minutes before you plan to cook, toss the sliced strawberries with the granulated sugar in a bowl. Let them sit at room temperature so they release their juice slightly — this creates a natural syrup.
-
About 10 minutes before serving, in a separate bowl, whip the chilled heavy cream with the powdered sugar and vanilla extract until stiff peaks form. Set aside.
Mix Your Batter:
-
In a large bowl, whisk together the flour, sugar, baking powder, baking soda, and salt.
Advertisements -
In a separate bowl, whisk the buttermilk, heavy cream, eggs, melted butter, and vanilla until well combined. The mixture should be smooth and uniform.
-
Pour the wet mixture into the dry mixture and stir gently until just combined — no visible dry flour, but lumps are fine.
-
Let the batter rest for 2 to 3 minutes.
Cook the Pancakes:
-
Heat your griddle or large skillet to medium-high (medium for non-stick) and lightly butter the surface.
-
Pour approximately 1/3 cup of batter onto the hot griddle for each pancake.
-
Cook undisturbed for 2 to 3 minutes, until the edges are set and bubbles are forming and popping across the surface. Flip when bubbles stay open.
-
Cook the second side for 1 to 2 minutes, until golden brown.
-
Transfer to a warm plate and repeat with the remaining batter.
Assemble and Serve:
- Stack 2 to 3 pancakes per serving. Top with a generous spoonful of the macerated strawberries and their juice, then a dollop of fresh whipped cream. Serve immediately while the pancakes are warm.
Pro tip: If you want to get fancy, reserve a few whole strawberries to garnish the top of each stack. It looks beautiful and tastes wonderful.
Storage and Serving: The pancakes keep in the fridge for up to 2 days, but strawberries and whipped cream are best assembled just before serving. Reheat pancakes in a 350°F oven for about 8 minutes before topping and serving.
10. Whole Wheat Honey Pancakes
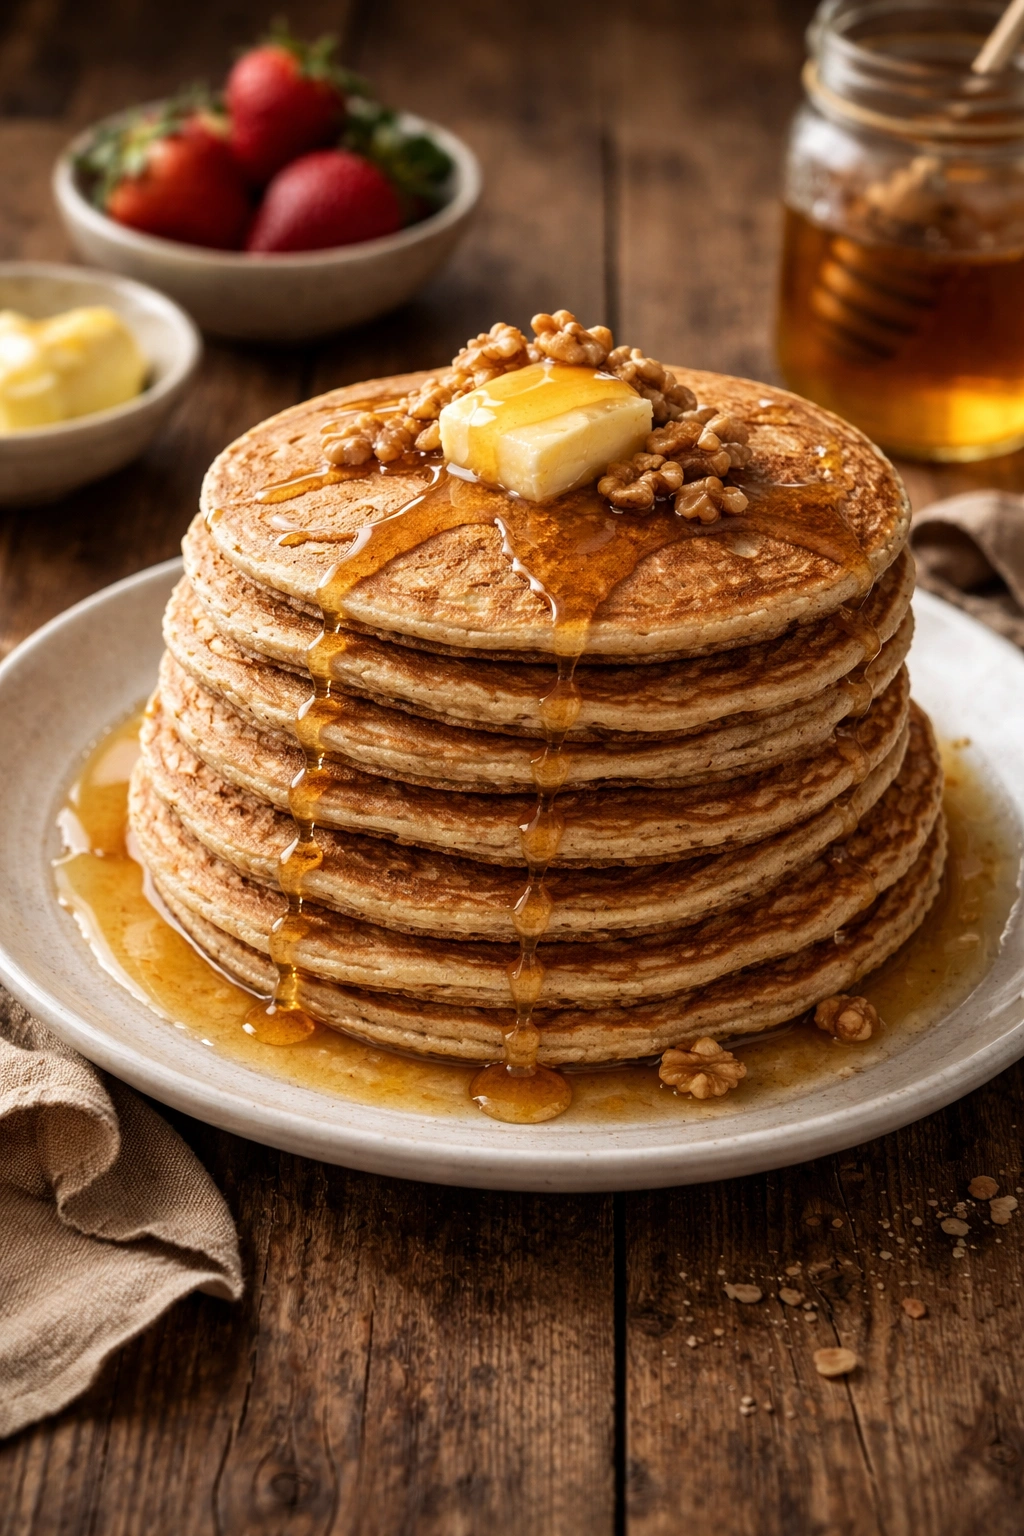
Whole wheat pancakes are for the mornings when you want something wholesome and satisfying that’ll keep you full until lunch. Whole wheat flour adds a subtle nuttiness and more texture than all-purpose flour, and honey provides a sophisticated sweetness that complements the earthiness of the grain. These are heartier and slightly denser than white-flour pancakes, but still genuinely fluffy and tender. They’re the kind of pancake you feel good about eating.
Why They’re Worth Your Time
Whole wheat pancakes deliver more fiber and nutrition than standard pancakes without sacrificing flavor or texture. The combination of whole wheat and honey creates a warm, sophisticated sweetness that’s more interesting than plain sugar. These pancakes are substantial enough to keep you satisfied for hours, making them perfect for active mornings. The nutty flavor is subtle but noticeable, and it actually pairs better with certain toppings (nuts, berries, plain yogurt) than lighter pancakes do.
Important Things to Know
- Use whole wheat pastry flour, not regular whole wheat flour — pastry flour is milled more finely and produces a more tender pancake
- Honey adds moisture and sweetness, so you don’t need much added sugar in the batter
- These pancakes are slightly denser than all-purpose flour pancakes, which is actually a feature, not a bug
- They pair beautifully with fresh berries, Greek yogurt, or a drizzle of honey
Yield: Makes 11 to 13 pancakes | Prep Time: 10 minutes | Cook Time: 20 minutes | Total Time: 30 minutes | Difficulty: Beginner — Same basic technique as buttermilk pancakes, just with whole wheat flour.
For the Pancakes:
- 1½ cups whole wheat pastry flour
- ½ cup all-purpose flour (or additional whole wheat pastry flour for a deeper wheat flavor)
- 1 tablespoon granulated sugar
- 2 teaspoons baking powder
- 1 teaspoon baking soda
- 1 teaspoon fine sea salt
- ½ teaspoon ground cinnamon (optional, but pairs beautifully with whole wheat)
- 2 cups whole buttermilk
- 2 large eggs, room temperature
- 2 tablespoons unsalted butter, melted
- 2 tablespoons pure honey, plus more for serving
- 1 teaspoon pure vanilla extract
- Unsalted butter for the griddle
- Optional toppings: fresh berries, sliced banana, plain Greek yogurt, toasted walnuts or pecans, or a drizzle of honey
Mix Your Batter:
-
In a large bowl, whisk together the whole wheat pastry flour, all-purpose flour, sugar, baking powder, baking soda, salt, and cinnamon if using.
-
In a separate bowl, whisk the buttermilk, eggs, melted butter, honey, and vanilla until well combined — the honey should be fully incorporated into the wet mixture with no visible streaks.
-
Pour the wet mixture into the dry mixture and stir gently until just combined. Whole wheat batter tends to be slightly thicker than all-purpose batter, and that’s completely normal — you’re looking for no visible dry flour, but lumps are fine.
Advertisements -
Let the batter rest for 2 to 3 minutes. Whole wheat flour absorbs liquid slightly more than white flour, so the batter will thicken a bit as it sits.
Cook the Pancakes:
-
Heat your griddle or large skillet to medium-high (medium for non-stick) and lightly butter the surface.
-
Pour approximately 1/3 cup of batter onto the hot griddle for each pancake. The batter is thicker, so you may need to gently coax it into shape with the back of a spoon, but don’t flatten it.
-
Cook undisturbed for 2 to 3 minutes, until the edges are set and bubbles are forming and popping across the surface. When bubbles stay open, flip.
-
Cook the second side for 1 to 2 minutes, until golden brown.
-
Transfer to a warm plate and repeat with the remaining batter.
Pro tip: These are particularly good with a dollop of plain Greek yogurt and fresh berries on the side, or topped with a small handful of toasted walnuts and a light drizzle of honey.
Storage and Serving: These keep well in the fridge for up to 3 days in an airtight container. Reheat gently in a 350°F oven for about 8 minutes. They’re wonderful served warm with your choice of toppings — Greek yogurt and berries, or a simple drizzle of honey and a sprinkle of cinnamon.
Final Thoughts
Learning to make 10 different pancakes from scratch is less about mastering 10 separate recipes and more about understanding one fundamental technique and then confidently spinning it in different directions. Once you’re comfortable with the basic buttermilk formula and the simple procedure of mixing, resting, and cooking, everything else becomes a creative variation. Chocolate chips, blueberries, banana, pumpkin, ricotta — they’re all just the same foundation with a different personality.
The real magic of making pancakes from scratch is that you end up with better-tasting breakfast every single time. The texture is fluffier, the flavor is cleaner, and the whole experience feels more intentional than reaching for a box mix ever could. Plus, when you can produce restaurant-quality pancakes on a random Tuesday morning, it changes how you think about breakfast entirely. It’s no longer something you’re rushing through; it becomes something you actually look forward to.
Pick one or two recipes from this list to start with — the Classic Buttermilk Pancakes are the perfect foundation, and then pick whichever variation sounds most appealing for your next batch. Make it, taste it, understand what worked well, and then the recipe becomes muscle memory. Before long, you won’t need to check measurements; you’ll just pour flour into a bowl and let your hands remember. That’s when pancake-making becomes truly joyful.