Nothing brings people together quite like brunch — that sweet spot between breakfast and lunch where the rules feel a little more relaxed and the food can lean either sweet or savory without apology. But when you’re hosting a small group, the pressure to impress shouldn’t mean spending your entire morning in the kitchen while your guests sit awkwardly in the living room.
The secret to successful small-group brunch hosting lies in choosing dishes that feel special and intentional without demanding split attention across five different cooking tasks simultaneously. You want recipes that can be prepped ahead, that come together with good timing, and that showcase genuine effort without requiring professional culinary training. More importantly, you want dishes that naturally encourage people to linger at the table, that spark conversation, and that feel too good to be true when you consider how simple they actually are to execute.
The eight recipes that follow are proven winners for groups of four to eight people — big enough to make hosting feel worthwhile, small enough that you can genuinely enjoy your guests instead of treating brunch prep like a military operation. Each recipe has been chosen for its balance of impressive presentation, flexible timing, and forgiving technique. Some can be fully assembled the night before; others require just minutes of active work at the last moment. All of them taste better than their actual difficulty level suggests — and that’s the real magic of a memorable brunch.
1. Shakshuka with Za’atar and Labneh
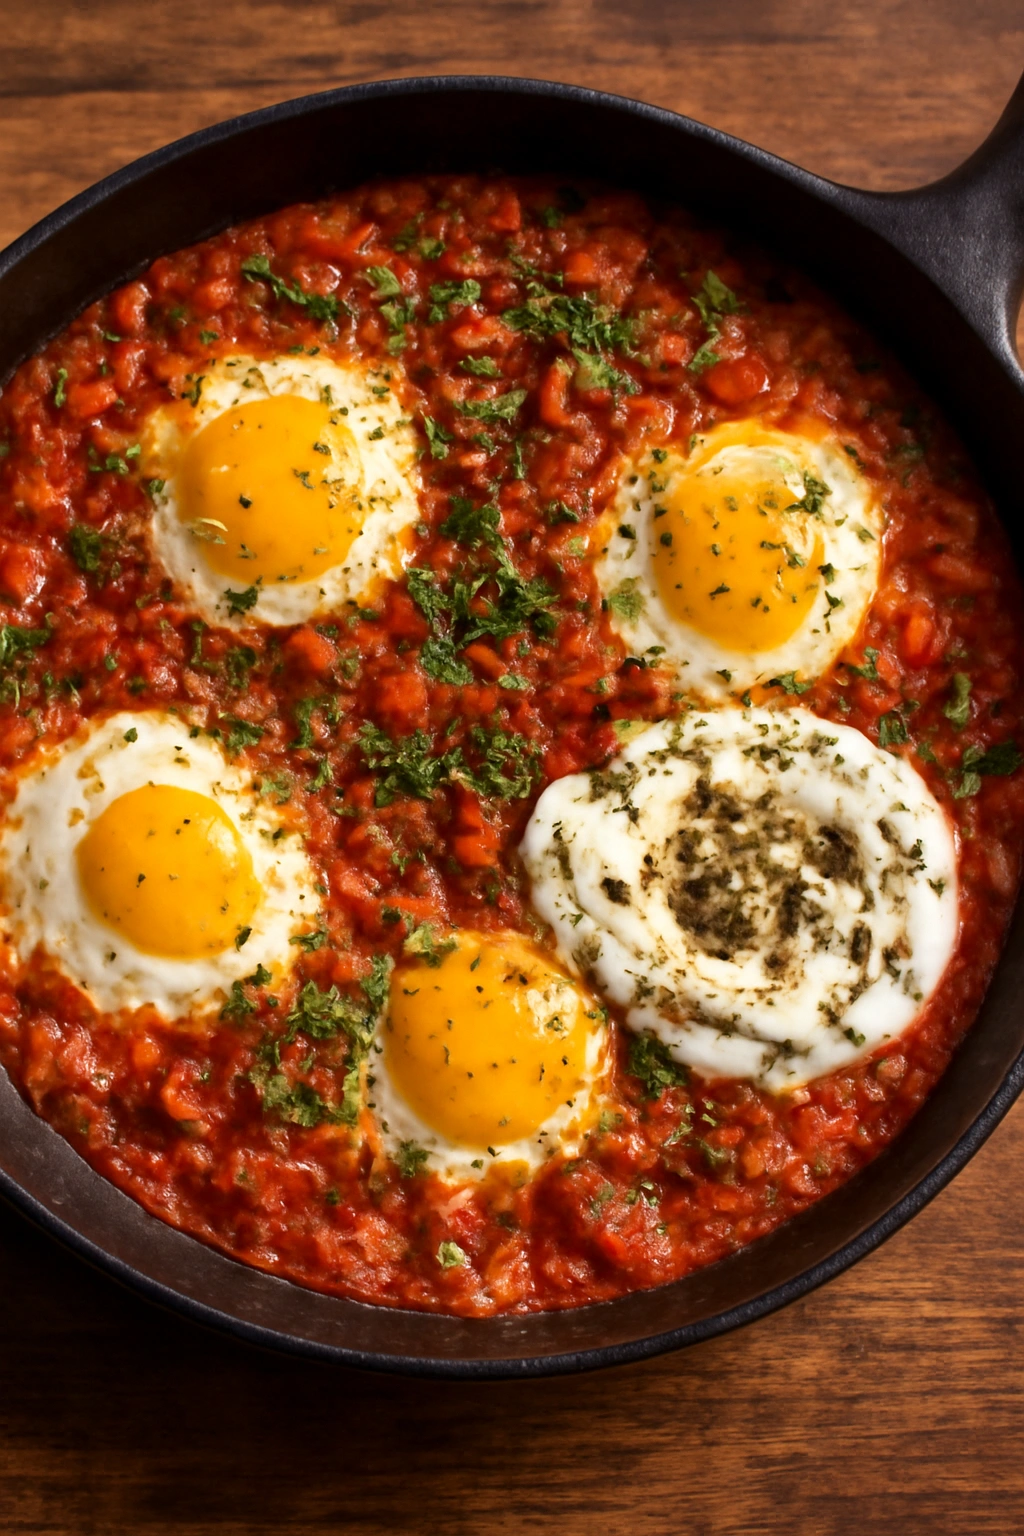
Shakshuka is the kind of dish that looks dramatically more complicated than it actually is, which makes it perfect for small gatherings where you want to seem effortlessly knowledgeable about international cuisine. This North African classic features eggs gently poached in a spiced tomato sauce, creating a dish that’s equal parts elegant and deeply comforting. For a small group, shakshuka becomes a centerpiece that naturally draws everyone to the table at once — there’s something about communal eating from the same pan that breaks down social awkwardness immediately.
The beauty of shakshuka for small-group hosting is that you can prepare the tomato sauce completely ahead of time, then simmer it gently while people arrive and settle in. Just before serving, you crack the eggs directly into the bubbling sauce and let them poach for five to seven minutes. The whole final assembly takes maybe ten minutes, which means you’re free to pour drinks and chat with your guests instead of being stuck plating individual components. The dish also feels naturally shareable — you set the whole pan in the center of the table with crusty bread for dipping and let people help themselves, creating an immediate sense of intimacy and ease.
Yield: Serves 4 to 6 as a main course
Prep Time: 20 minutes
Cook Time: 35 minutes
Total Time: 55 minutes
Difficulty: Beginner — the tomato sauce is simply onions and tomatoes simmered together, and poaching eggs requires only patience, not skill.
For the Shakshuka:
- 3 tablespoons olive oil
- 1 medium yellow onion, diced
- 4 cloves garlic, minced
- 1 red bell pepper, diced into ½-inch pieces
- 1 teaspoon ground cumin
- ½ teaspoon smoked paprika
- ¼ teaspoon cayenne pepper (adjust to taste)
- 1 can (28 ounces) crushed San Marzano tomatoes
- 1 teaspoon fine sea salt
- ½ teaspoon freshly cracked black pepper
- 6 to 8 large eggs
- ¼ cup fresh cilantro, roughly chopped
- ¼ cup fresh parsley, roughly chopped
- Crusty bread for serving
For Serving:
- ½ cup labneh or Greek yogurt
- 2 tablespoons za’atar spice blend
- Drizzle of extra-virgin olive oil
- Fleur de sel or finishing salt
Prepare the Sauce:
-
Heat the olive oil in a large, deep skillet (10 to 12 inches) over medium heat. Add the diced onion and cook for 4 to 5 minutes, stirring occasionally, until the onion becomes translucent and just starts to soften at the edges.
Advertisements -
Add the minced garlic and diced bell pepper, stirring to combine. Cook for another 2 to 3 minutes, until the garlic becomes fragrant and the pepper begins to release its moisture.
-
Sprinkle in the cumin, smoked paprika, and cayenne pepper, stirring constantly for 30 seconds to 1 minute. This brief moment of toasting the spices in the hot oil releases their full flavor potential — you’ll immediately notice the aroma intensify.
-
Pour in the crushed tomatoes along with their juice, then add the salt and black pepper. Stir well to combine, scraping up any browned bits from the bottom of the pan.
-
Reduce the heat to medium-low and let the sauce simmer, uncovered, for 15 to 20 minutes. The sauce will thicken slightly and the flavors will deepen noticeably. Taste and adjust the seasoning — you want a balance of the tomato’s natural sweetness, the spices’ warmth, and just enough salt to make everything sing. The sauce can be made up to 24 hours ahead and refrigerated; simply reheat gently before adding eggs.
Poach the Eggs:
-
When you’re ready to serve, bring the simmering sauce back to a gentle simmer if it has cooled. Using the back of a spoon, create six to eight small divots or wells in the surface of the sauce, spacing them evenly.
-
Crack one egg into each well, being gentle to keep the yolk intact. The eggs don’t need to be completely submerged — they’ll cook as the sauce bubbles gently around them.
-
Cover the skillet partially with a lid or a sheet of aluminum foil and let the eggs poach for 5 to 7 minutes, until the whites are set but the yolks still jiggle slightly when you gently shake the pan. The yolks will continue to cook slightly after you remove the pan from heat due to residual warmth.
-
Remove from heat and scatter the fresh cilantro and parsley over the top. Dollop generously with labneh or Greek yogurt, sprinkle the za’atar over the yogurt, and finish with a thin drizzle of extra-virgin olive oil and a pinch of fleur de sel.
Tips for Small Gatherings:
Make the sauce earlier in the day, even up to 24 hours ahead — this is one of those rare dishes where advance prep actually improves the flavor. The spices meld and deepen overnight, so don’t hesitate to make it the evening before. Simply reheat it gently over medium-low heat for 5 to 7 minutes before adding the eggs.
If your guests are arriving at different times, hold the sauce at a gentle simmer and add the eggs only when everyone is seated and ready to eat. This way, the dish comes to the table hot and at its very best.
Labneh and za’atar are both available at most grocery stores in the international section, or you can substitute full-fat Greek yogurt and a homemade blend of sumac, thyme, and sesame seeds. The flavors won’t be identical, but they’ll still be delicious.
Serve with crusty bread for dipping into both the sauce and the yogurt — this is not the time to be dainty about it.
2. Baked French Toast Casserole with Maple Bourbon Pecans
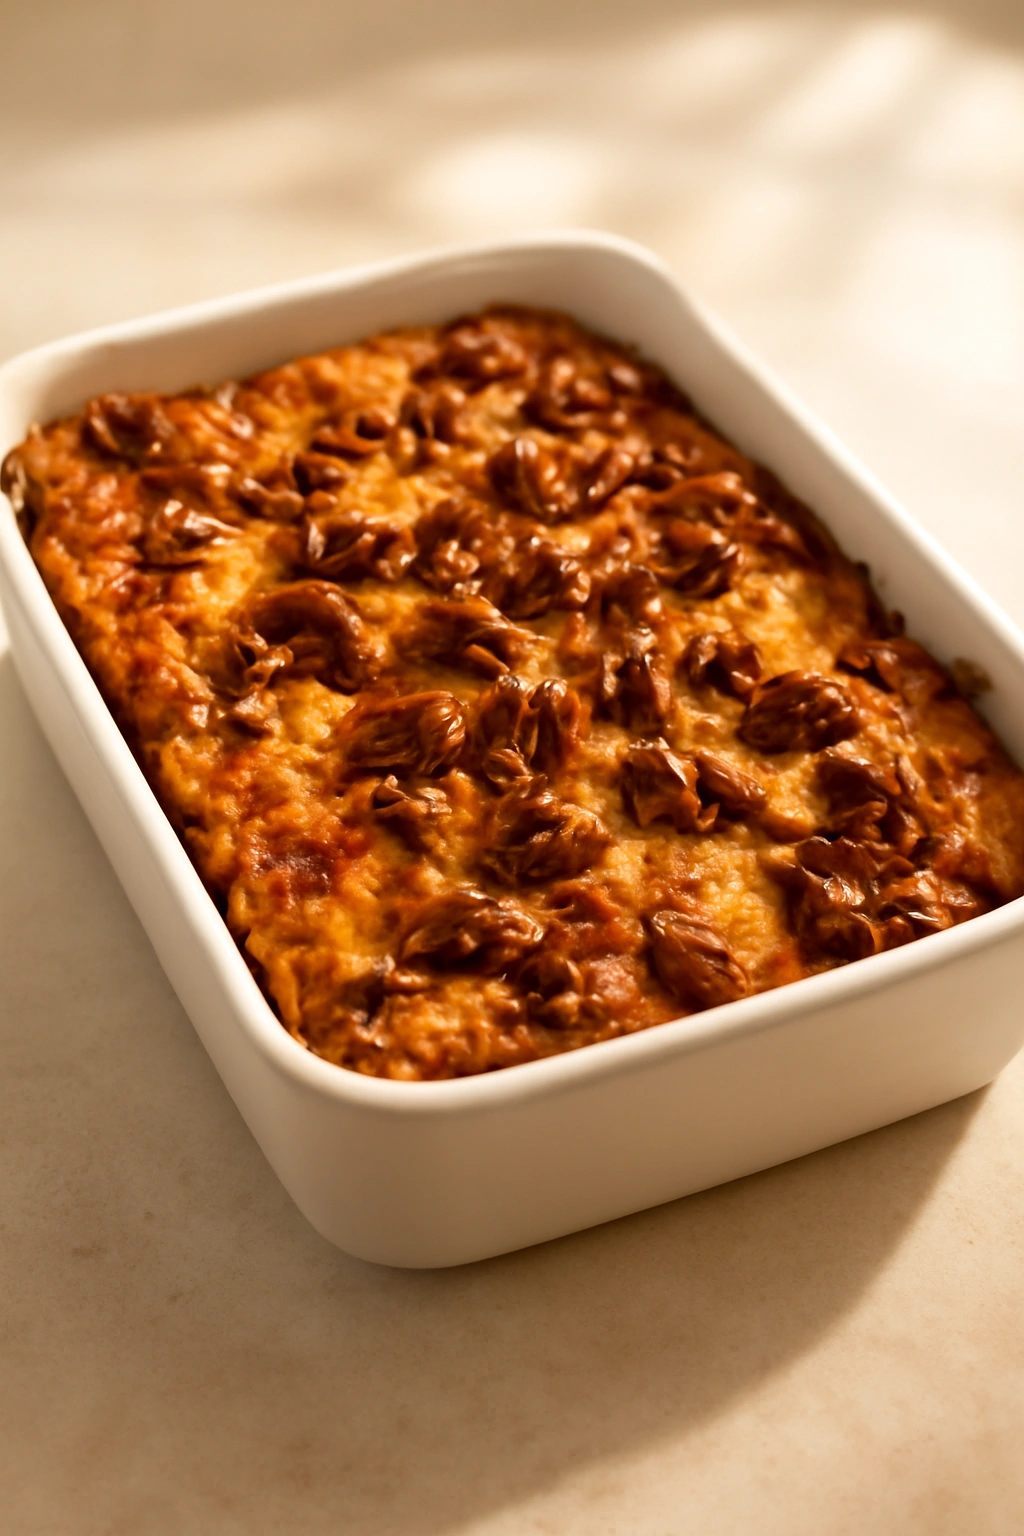
French toast casserole is a revelation for small-group brunch hosting because it’s a complete one-pan breakfast that you assemble the night before, then simply slide into the oven about 45 minutes before you want to eat. This isn’t the rushed stovetop version where you’re standing over individual slices — this is a generous, custardy casserole with the crispy edges everyone loves and a creamy, eggy center that feels impossibly luxurious. The real trick that elevates this from standard French toast to something worth serving to guests is the bourbon-spiked maple pecans that get scattered over the top just before baking, creating a combination of flavors that tastes far more sophisticated than the minimal effort required.
The casserole approach means you’re free from last-minute timing stress — everything is built and waiting in the refrigerator. You can be fully present with your guests right up until it’s time to pop the dish in the oven. The pecans provide both textural contrast and a warm spice note that makes people pause mid-bite and ask what that flavor is. Even better, this is the kind of dish that people go back to over and over throughout brunch; it’s comforting but not heavy, impressive but not intimidating.
Yield: Serves 4 to 6
Prep Time: 20 minutes + overnight chilling
Cook Time: 45 minutes
Total Time: 55 minutes active + overnight chilling required
Difficulty: Beginner — there’s no technique here, just assembly and baking.
For the Casserole:
- 1 loaf (about 1 pound) brioche or challah bread, cut into ¾-inch cubes (about 8 cups)
- 5 large eggs
- 1½ cups heavy cream
- 1 cup whole milk
- ¼ cup granulated sugar
- 2 tablespoons unsalted butter, melted
- 1 tablespoon pure vanilla extract
- ½ teaspoon ground cinnamon
- ¼ teaspoon freshly grated nutmeg
- Pinch of fine sea salt
For the Maple Bourbon Pecans:
- ¾ cup pecan halves
- 3 tablespoons unsalted butter
- ¼ cup pure maple syrup
- 2 tablespoons bourbon or brandy (or 1 tablespoon vanilla extract if you prefer to omit alcohol)
- 2 tablespoons light brown sugar
- ¼ teaspoon ground cinnamon
- Pinch of fine sea salt
For Assembly and Serving:
- Butter for greasing the baking dish
- Powdered sugar for dusting
- Extra maple syrup for serving
Prepare the Casserole:
-
Lightly butter a 9×13-inch baking dish. Spread the bread cubes evenly across the bottom of the dish. Don’t worry if there are gaps; the custard will flow into all of them as it sits.
-
In a large mixing bowl, whisk together the eggs, heavy cream, milk, granulated sugar, melted butter, vanilla extract, cinnamon, nutmeg, and salt. Whisk until well combined and the sugar has mostly dissolved — you’re aiming for a smooth, custard-like mixture.
-
Pour the egg custard over the bread cubes, making sure to distribute it evenly throughout. Gently press on the bread pieces with the back of a spoon to help them absorb the liquid — you want every piece to get thoroughly soaked.
-
Cover the dish with plastic wrap and refrigerate for at least 8 hours, or up to 24 hours. This overnight rest is not optional — it’s what transforms this into a creamy, custardy casserole instead of a dry, bread-heavy dish. The bread needs time to fully absorb the egg mixture.
Make the Maple Bourbon Pecans:
-
In a small skillet over medium heat, melt the butter. Add the pecans and toast for 2 to 3 minutes, stirring frequently, until they become fragrant and the edges darken slightly.
-
Add the maple syrup, bourbon (or vanilla), brown sugar, cinnamon, and salt. Stir constantly for 1 to 2 minutes until everything comes together into a glazed mixture and the pecans are evenly coated. The mixture should smell absolutely incredible at this point — dark, sweet, and aromatic. Transfer to a plate to cool slightly.
Bake:
-
Remove the casserole from the refrigerator about 30 minutes before you plan to bake it — this helps it bake more evenly. Preheat your oven to 350°F (175°C) and position the rack in the center.
Advertisements -
Scatter the cooled maple bourbon pecans over the top of the casserole. Bake for 40 to 50 minutes, until the edges are golden brown and puffy, but the center still has just a hint of jiggle when you gently shake the dish — it will continue to set as it cools slightly. The top should be golden and slightly firm to the touch, but not hard or crusty.
-
Let the casserole rest out of the oven for 5 minutes before serving. Dust generously with powdered sugar and serve with extra maple syrup on the side.
Tips for Small Gatherings:
This is the ultimate make-ahead dish. Assemble it completely the night before, cover it tightly, and refrigerate. In the morning, you simply take it out 30 minutes before baking and slide it in the oven. That’s genuinely it.
If you’re not fond of bourbon, substitute the same amount of cognac, brandy, or even a splash of orange liqueur. In a pinch, vanilla extract works perfectly well — use 1 tablespoon instead of 2 tablespoons bourbon, and reduce the brown sugar slightly to 1 tablespoon.
The casserole holds beautifully warm for about 15 to 20 minutes after coming out of the oven, so you can time it to emerge from the kitchen just as your guests are finishing coffee and settling in to eat.
Store leftovers in an airtight container in the refrigerator for up to 3 days. Reheat gently in a 300°F (150°C) oven for 10 to 15 minutes until warmed through — it won’t be quite as puffy as the first day, but it’s still delicious and a wonderful quick breakfast for anyone staying over.
3. Smoked Salmon and Herb Frittata with Crème Fraîche and Dill
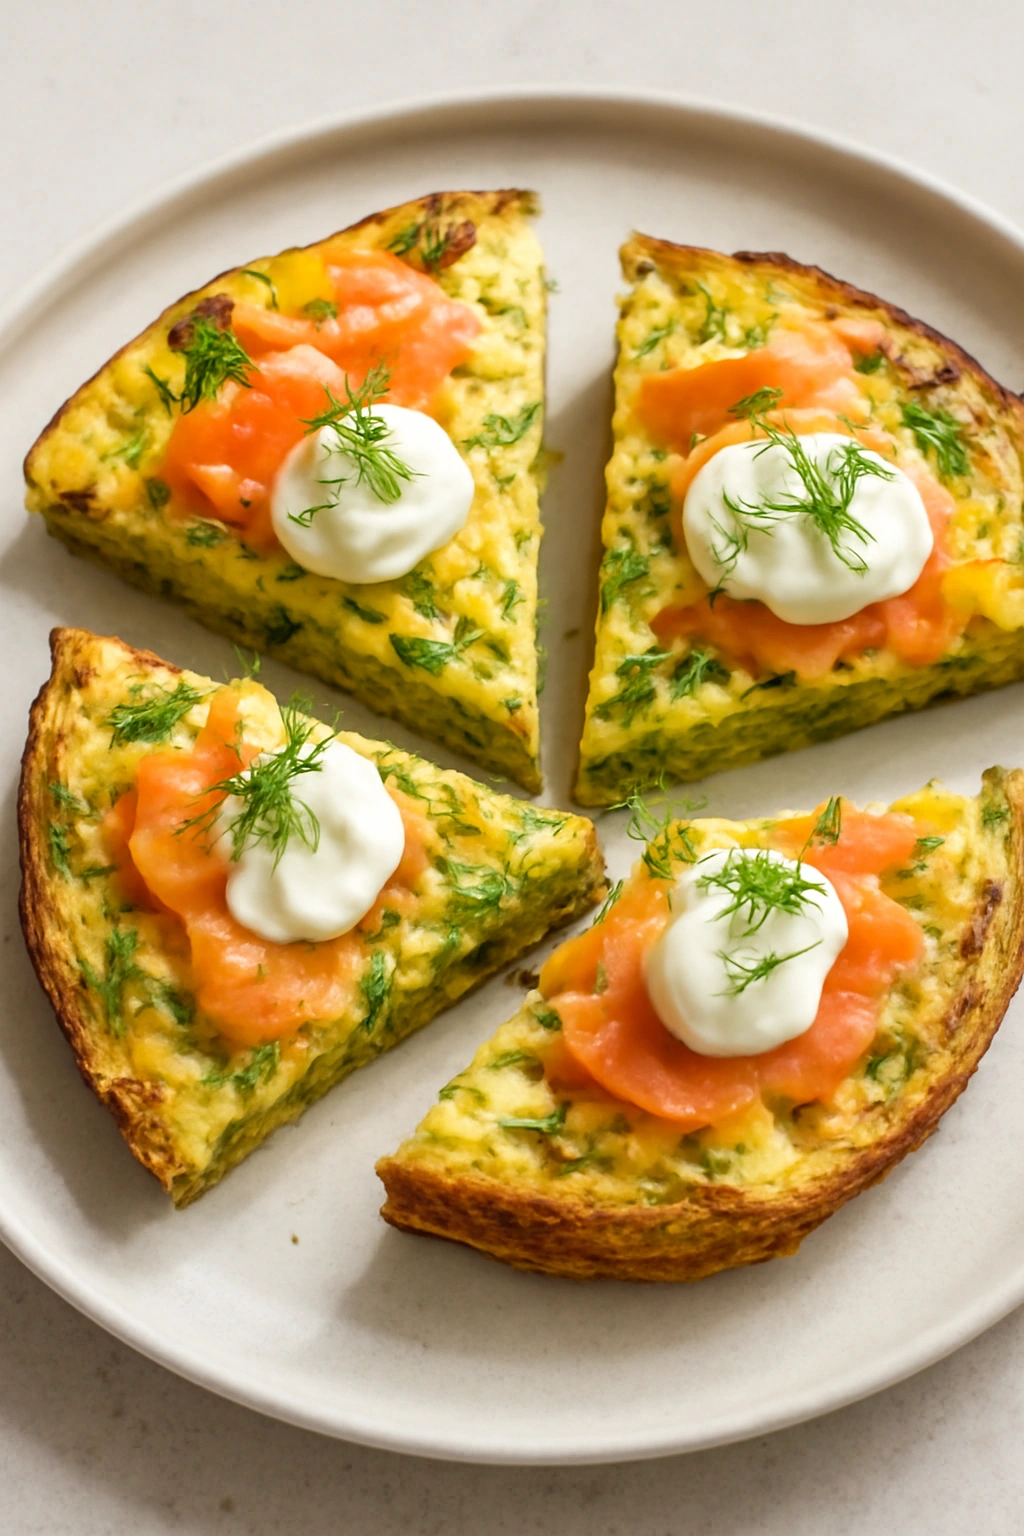
A frittata is brunch gold — it’s elegant, it’s flexible, it looks professionally done, and it’s genuinely forgiving. Unlike an omelet, which requires timing and finesse, a frittata is a one-pan affair that you mostly leave alone to work its magic. The smoked salmon and fresh herbs version has that special quality that makes people think you’re far more of a sophisticated home cook than you probably are. The beauty is that a frittata comes together in under 20 minutes of active cooking time, then you can slice it into neat wedges and serve it hot, warm, or at room temperature — which means you have built-in flexibility if your timeline gets a little wonky.
The combination of smoked salmon with fresh dill and chives feels immediately celebratory and elevated, but the ingredient list is impressively short. The crème fraîche and more dill stirred into the eggs just before baking adds a cool, tangy note that keeps each bite interesting. For small gatherings, a frittata is also naturally portion-friendly; you cut it into slices and everyone gets a piece that feels substantial but not overwhelmingly large.
Yield: Serves 4 to 6
Prep Time: 15 minutes
Cook Time: 18 minutes
Total Time: 33 minutes
Difficulty: Beginner — there’s no flipping or precision timing, just assembly and baking.
For the Frittata:
- 2 tablespoons unsalted butter, divided
- 1 medium shallot, thinly sliced
- 4 ounces smoked salmon, cut into bite-sized pieces or roughly torn
- 8 large eggs
- ¼ cup crème fraîche or sour cream
- ¼ cup whole milk
- 2 tablespoons fresh dill, finely chopped (plus extra for garnish)
- 2 tablespoons fresh chives, cut into ½-inch pieces
- 1 tablespoon fresh parsley, finely chopped
- ½ teaspoon fine sea salt
- ¼ teaspoon freshly cracked black pepper
- ½ cup grated Gruyère or sharp cheddar cheese (optional, but recommended)
For Serving:
- Extra crème fraîche
- Lemon wedges
- Fresh dill fronds
- Fleur de sel or finishing salt
- Crusty bread or a simple green salad
Prepare:
-
Preheat your oven to 400°F (200°C) and position the rack in the upper-middle area of the oven.
-
In a 10-inch ovenproof skillet (cast iron or stainless steel work beautifully), melt 1 tablespoon of the butter over medium heat. Add the thinly sliced shallot and cook for 3 to 4 minutes, stirring occasionally, until it becomes soft, translucent, and just barely beginning to caramelize at the edges. The shallot should smell sweet and oniony.
-
Scatter the smoked salmon pieces over the softened shallot. You’re not cooking the salmon — it’s already fully cured and ready to eat — you’re just distributing it throughout the pan so it’s evenly distributed in every bite of the finished frittata.
Make and Cook the Egg Mixture:
-
In a large mixing bowl, whisk together the eggs, crème fraîche, milk, dill, chives, parsley, salt, and pepper until well combined. The mixture should be light, uniform, and streaked with green from the fresh herbs. Stir in the grated cheese if using.
-
Add the remaining tablespoon of butter to the skillet with the salmon and shallots, tilting to coat evenly. Once the butter foams and is melted, pour the egg mixture directly into the pan, being gentle to distribute it evenly. The eggs should come up about halfway to two-thirds of the way up the sides of the skillet — if your pan is very deep, that’s fine; you’ll just end up with a thicker frittata.
-
Let the eggs cook undisturbed on the stovetop for 2 to 3 minutes, until you can see that the bottom is beginning to set and firm up slightly. You shouldn’t move it or stir it at this point — you want a slightly cooked bottom layer to form.
Advertisements -
Transfer the skillet to the oven and bake for 12 to 15 minutes, until the top is set and no longer jiggles when you gently shake the pan, but the very center still has just the slightest hint of softness. The top should look lightly golden and feel barely firm to the touch. Err on the side of slightly underbaked rather than overdone — the residual heat will continue to cook it gently as it cools.
-
Remove from the oven and let the frittata rest in the skillet for 2 to 3 minutes. Slide it onto a serving plate or cutting board. If it’s sticking to the pan, run a thin rubber spatula around the edges first.
-
Slice into wedges using a sharp knife (a warm knife works beautifully — just dip it in hot water and wipe it dry between cuts). Scatter extra fresh dill on top, add a generous dollop of crème fraîche to each plate, and serve with lemon wedges.
Tips for Small Gatherings:
A frittata is absolutely wonderful served at room temperature, which means you can cook it an hour or two ahead and slice it when you’re ready. This makes timing stress-free — just make sure to leave it in the skillet until close to serving time so the cut edges don’t dry out.
The smoked salmon quantity is intentionally generous — about ¼ pound total — because it’s the star ingredient here. Don’t skimp on quality. Good smoked salmon tastes like salmon, not just salt and smoke. Visit a quality fishmonger if you can.
If you have guests who don’t eat fish, make two separate frittatas — one with smoked salmon for the main group and a second one with something like roasted mushrooms and gruyère for others. A frittata is so quick to cook that running two pans simultaneously isn’t a burden.
Gruyère cheese adds a subtle nuttiness that pairs beautifully with smoked salmon, but sharp cheddar works wonderfully too. If you prefer to skip cheese, that’s fine — the frittata is still delicious without it.
4. Ricotta Pancakes with Whipped Mascarpone and Roasted Stone Fruit
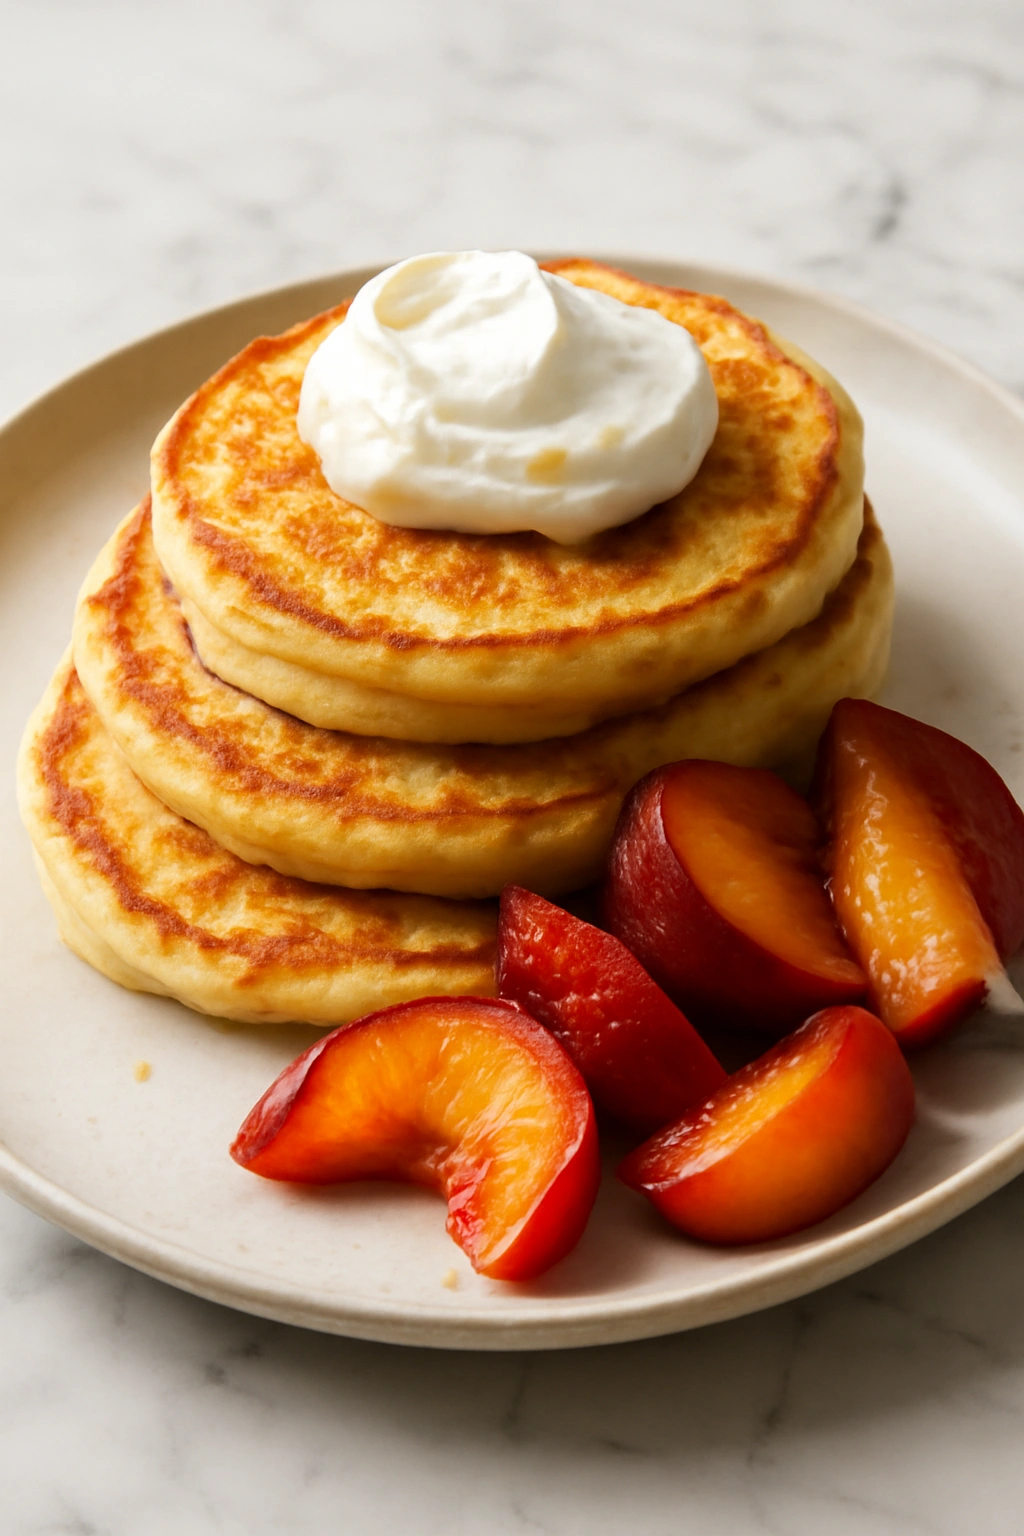
Ricotta pancakes represent a specific category of breakfast food that feels decadent but somehow lighter than traditional pancakes — they’re tender and almost cloud-like, with a subtle sweetness that lets the toppings shine. What makes these work beautifully for small-group brunch is that the pancakes can be made up to 30 minutes ahead and kept warm in a low oven, and the roasted stone fruit can be prepared completely ahead and simply warmed through before serving. You’re not standing at the griddle frantically cooking pancakes while your guests get cold, stale coffee.
The secret to ricotta pancakes is the ratio of ricotta to flour — there’s significantly more ricotta than you’d expect, which creates that tender, almost soufflé-like texture. The whipped mascarpone topping is just sweetened cream cheese whisked to airy lightness, and when you spoon warm roasted fruit over the top, the whole thing feels like a restaurant-quality dish that took minimal effort. The pancakes are naturally gluten-free (though not marked as such on the menu, which sometimes surprises people pleasantly), making them accessible to more guests.
Yield: Makes 12 to 16 pancakes, serving 4 to 6
Prep Time: 20 minutes (for pancakes) + 20 minutes (for roasted fruit)
Cook Time: 20 minutes (for fruit) + 15 minutes (for pancakes)
Total Time: 55 minutes (fruit and pancakes can be made separately and in advance)
Difficulty: Beginner to Intermediate — the batter is simple, but ricotta pancakes require slightly gentler handling than traditional pancakes.
For the Roasted Stone Fruit:
- 1½ pounds stone fruit (peaches, plums, nectarines, or a combination), halved and pitted
- 3 tablespoons unsalted butter
- 3 tablespoons light brown sugar
- ½ teaspoon vanilla extract
- ¼ teaspoon ground cinnamon
- Pinch of fine sea salt
- Juice of ½ lemon
For the Ricotta Pancakes:
- 1 cup whole milk ricotta (not the fat-free version — the full-fat version is essential for texture)
- 4 large eggs, separated into yolks and whites
- ¼ cup all-purpose flour
- 2 tablespoons granulated sugar
- 1 teaspoon vanilla extract
- ½ teaspoon baking powder
- ¼ teaspoon fine sea salt
- Zest of 1 lemon (optional but lovely)
- Unsalted butter for cooking the pancakes
For the Whipped Mascarpone:
- 8 ounces mascarpone cheese, at room temperature
- 2 to 3 tablespoons powdered sugar
- 1 teaspoon vanilla extract
- 2 to 3 tablespoons heavy cream or whole milk
For Serving:
- Fresh mint leaves
- Fleur de sel
- Honey or pure maple syrup (optional)
Prepare the Roasted Stone Fruit (Can be done up to 8 hours ahead):
-
Preheat your oven to 425°F (220°C) and position the rack in the upper-middle area. Line a baking sheet with parchment paper.
-
Arrange the halved stone fruit cut-side up on the prepared baking sheet. In a small bowl, whisk together the butter (melted), brown sugar, vanilla, cinnamon, and salt. Drizzle this mixture over the fruit, spreading it gently into the cavity of each half.
-
Roast for 18 to 25 minutes, depending on the size and ripeness of your fruit. You’re aiming for the fruit to be very tender and slightly collapsed, with caramelized edges. The juices should be bubbling and thickened slightly around the fruit. The fruit will continue to cook slightly as it cools, so remove it from the oven just before it’s completely soft.
-
Drizzle the lemon juice over the fruit and let cool. This fruit tastes even better the next day, so make it ahead if possible. Store in an airtight container in the refrigerator for up to 4 days. Reheat gently in a 300°F (150°C) oven for 8 to 10 minutes before serving.
Advertisements
Make the Whipped Mascarpone (Do this up to 2 hours ahead):
- Place the room-temperature mascarpone in a medium bowl. Whisk in the powdered sugar and vanilla extract until combined. Slowly add the heavy cream or milk, whisking gently, until the mascarpone reaches a light, whipped consistency — it should hold soft peaks and be spreadable but still have body. Do not over-whip, or it will become grainy. Cover and refrigerate until serving time.
Make the Pancake Batter:
-
In a large mixing bowl, combine the ricotta, egg yolks, flour, granulated sugar, vanilla, baking powder, salt, and lemon zest (if using). Stir until just combined — the batter should be thick and lumpy, not smooth. Do not overmix; some streaks of flour are completely fine and actually desirable here.
-
In a separate, very clean mixing bowl, whip the egg whites with an electric mixer (or by hand with a whisk) until they form stiff peaks — they should be glossy and completely white, with no yellow yolk streaks visible. This is important because whipped egg whites are what give ricotta pancakes their characteristic lightness.
-
Gently fold the whipped egg whites into the ricotta mixture in two additions. Use a rubber spatula and fold slowly and deliberately — you want to incorporate the egg whites without deflating them. The batter will be lighter and airier after you fold in the egg whites, and that’s exactly what you want. Some white streaks are okay; you’re just aiming to combine them without stirring vigorously.
Cook the Pancakes:
-
Heat a nonstick skillet or griddle over medium-low heat (yes, lower than you’d use for traditional pancakes — ricotta pancakes need a gentler heat). Lightly butter the surface.
-
For each pancake, drop a generous ¼-cup scoop of batter onto the skillet, gently flattening it slightly with the back of the scoop. Cook for 3 to 4 minutes without moving, until the bottom is set and golden brown and you can see the edges beginning to set. Ricotta pancakes are fragile, so resist the urge to press on them or move them around.
-
Very gently flip using a thin, flexible spatula, supporting the pancake as it turns. Cook for another 2 to 3 minutes on the second side until golden and cooked through. Transfer to a plate or baking sheet to cool slightly.
-
If making ahead: Keep warm pancakes in a 200°F (95°C) oven for up to 30 minutes. Place them in a single layer on a baking sheet loosely covered with foil so they don’t dry out.
Advertisements
To Assemble and Serve:
- Place 2 to 3 warm pancakes on each plate. Top each pancake with a generous dollop of whipped mascarpone, then spoon warm roasted stone fruit and some of its syrupy juices over the top. Scatter a few fresh mint leaves on top and finish with a tiny pinch of fleur de sel. The combination of sweet fruit, tart mascarpone, and that whisper of salt creates an incredible balance.
Tips for Small Gatherings:
The roasted stone fruit can be made a full day or two ahead, making this recipe incredibly flexible. Just reheat gently in a low oven while you’re cooking the pancakes.
Ricotta pancakes are more delicate than traditional ones — they benefit from a lower heat and less aggressive cooking. Be patient with them, and they’ll reward you with incredible texture.
The whipped mascarpone should be made no more than a couple of hours ahead. If you make it further in advance, it may start to separate slightly. Just give it a quick stir before serving if needed.
If mascarpone isn’t available, whipped full-fat cream cheese works as a substitute, though the flavor will be slightly different — less buttery, more tangy.
5. Asparagus and Gruyère Quiche with Thyme Crust

A quiche feels fancy, but it’s really just a savory custard pie — and once you understand that basic structure, you can make quiche that genuinely impresses without any special skills. The asparagus and Gruyère combination is classic for a reason; the nutty, subtle sweetness of Gruyère cheese pairs perfectly with the earthy, slightly bitter asparagus. For small-group brunch, a quiche is ideal because you make it completely ahead — the night before, in fact — and then you simply reheat it gently before serving. It comes to the table looking impressive and sliceable, serves everyone at once, and people can eat it hot, warm, or at room temperature without complaint.
The real secret to a better-than-average quiche is the crust. Many quiches suffer from soggy bottoms, which happens when you skip the initial blind baking step. This recipe walks you through it, and the minor extra effort results in a quiche with a genuinely crispy crust — the kind that makes people stop mid-conversation to comment on it. The addition of fresh thyme to the pastry dough elevates the crust from utilitarian to intentional, and it’s something most people don’t expect from what they assume is a basic pie crust.
Yield: Serves 6 to 8
Prep Time: 30 minutes (crust) + 20 minutes (filling)
Cook Time: 50 minutes
Total Time: 100 minutes + overnight chilling
Difficulty: Intermediate — involves making a pie crust and blind baking, but both steps are straightforward.
For the Thyme Pie Crust:
- 1¼ cups all-purpose flour
- ½ teaspoon fine sea salt
- 1 tablespoon fresh thyme leaves (or ½ teaspoon dried thyme)
- 6 tablespoons (¾ stick) cold unsalted butter, cut into ½-inch cubes
- 2 tablespoons cold vegetable shortening or additional cold butter
- 3 to 4 tablespoons ice water
- 1 tablespoon apple cider vinegar or white vinegar (optional but helpful)
For the Quiche Filling:
- 1 pound fresh asparagus, trimmed
- 1 tablespoon olive oil
- Fine sea salt and freshly cracked black pepper
- 4 large eggs
- 1 cup heavy cream
- ½ cup whole milk
- 1 teaspoon Dijon mustard
- ¼ teaspoon freshly grated nutmeg
- ¼ teaspoon fine sea salt (in addition to the salt from the crust)
- ⅛ teaspoon freshly cracked black pepper
- 1½ cups grated Gruyère cheese
- 2 tablespoons grated Parmesan cheese
- 2 tablespoons fresh thyme leaves (for garnish)
Make the Pie Crust:
-
In a large mixing bowl, whisk together the flour, salt, and fresh thyme leaves (if using dried, skip this step and add to the water later). The thyme should be evenly distributed throughout the flour.
-
Add the cold butter cubes and cold shortening to the flour. Using a pastry cutter, two knives, or your fingertips, work the butter and shortening into the flour until the mixture resembles coarse cornmeal with some pea-sized pieces of butter still visible. This is the texture you want — not a fine powder, and definitely not a smooth dough at this stage.
-
Add the ice water one tablespoon at a time, tossing gently with a fork after each addition, until the dough just barely comes together. You should be able to gather it into a ball without the dough falling apart, but it shouldn’t be wet or sticky. Add the vinegar if using (this adds flavor and helps with flakiness).
-
Form the dough into a disk, wrap in plastic wrap, and refrigerate for at least 30 minutes (or up to 24 hours — cold dough is easier to work with and results in a flakier crust).
-
Roll out the chilled dough on a lightly floured surface to a circle about 2 inches larger than your 9-inch pie dish. Transfer it to the dish, pressing gently into the corners and up the sides. Trim the overhang to about 1 inch, then fold the edges under and crimp decoratively with your fingertips. Refrigerate the crust for at least 15 minutes while you prepare the filling.
Blind Bake the Crust:
-
Preheat your oven to 425°F (220°C) and position the rack in the lower-middle area. Line the chilled pie crust with parchment paper and fill it with dried beans or pie weights (these prevent the crust from puffing up during baking).
-
Bake for 10 minutes, then carefully remove the parchment and beans. The crust should look pale and barely set, not brown. Return to the oven for another 3 to 4 minutes until it’s very lightly golden. Remove from the oven and set aside. Reduce the oven temperature to 350°F (175°C).
Advertisements
Prepare the Asparagus:
- While the crust is blind baking, trim the asparagus and cut it into 2-inch pieces, discarding the woody bottom inch. Toss with olive oil and a pinch of salt and pepper. Spread on a small baking sheet and roast at 400°F for 8 to 10 minutes, until just tender and very lightly browned in spots. This step is optional but highly recommended — roasting brings out the asparagus’s sweetness and prevents watery quiche filling.
Make the Custard and Assemble:
-
In a large mixing bowl, whisk together the eggs, heavy cream, milk, Dijon mustard, nutmeg, salt, and pepper. Stir in the grated Gruyère and Parmesan cheeses. Scatter the roasted asparagus pieces over the bottom of the prebaked pie crust.
-
Pour the custard mixture over the asparagus, filling the crust until it’s almost full. The filling should come up to about ½ inch below the rim of the crust. If there’s extra custard, save it to pour in after the quiche has baked for about 10 minutes and the edges have set slightly — this reduces the chance of spills.
-
Bake for 35 to 45 minutes, until the filling is set at the edges but the very center still has just the slightest jiggle when you gently shake the pan — about a 2-inch diameter circle in the dead center. The quiche will continue to cook after you remove it from the oven, so err on the side of slightly underbaked. The top should be lightly golden.
-
Remove from the oven and let cool for at least 10 minutes before slicing. Scatter the fresh thyme leaves over the top.
Serve:
- The quiche can be served hot, warm, or at room temperature. Cut into wedges and plate onto individual dishes or serve directly from the pie dish for a more casual presentation. It’s delicious with a simple green salad dressed in a light vinaigrette.
Tips for Small Gatherings:
Make the pie crust and blind-bake it the day before. Let it cool completely, then store it covered at room temperature. The next morning, simply add the custard and bake as directed.
The entire quiche can be assembled the morning of serving and baked a few hours ahead. It reheats beautifully — just cover it loosely with foil and warm in a 300°F (150°C) oven for about 15 minutes until heated through. Don’t reheat it to the point of being piping hot; warm is better because it preserves the tender texture of the custard.
If you’re not comfortable making a from-scratch pie crust, use a high-quality store-bought frozen pie crust. Blind bake it according to package directions, then proceed with the filling. No one will know, and it’s not worth the stress if pastry isn’t your thing.
Gruyère can be expensive — if you want to save money, Swiss or a good sharp cheddar works beautifully in its place.
6. Burrata and Heirloom Tomato Salad with Crispy Pancetta and Basil Oil
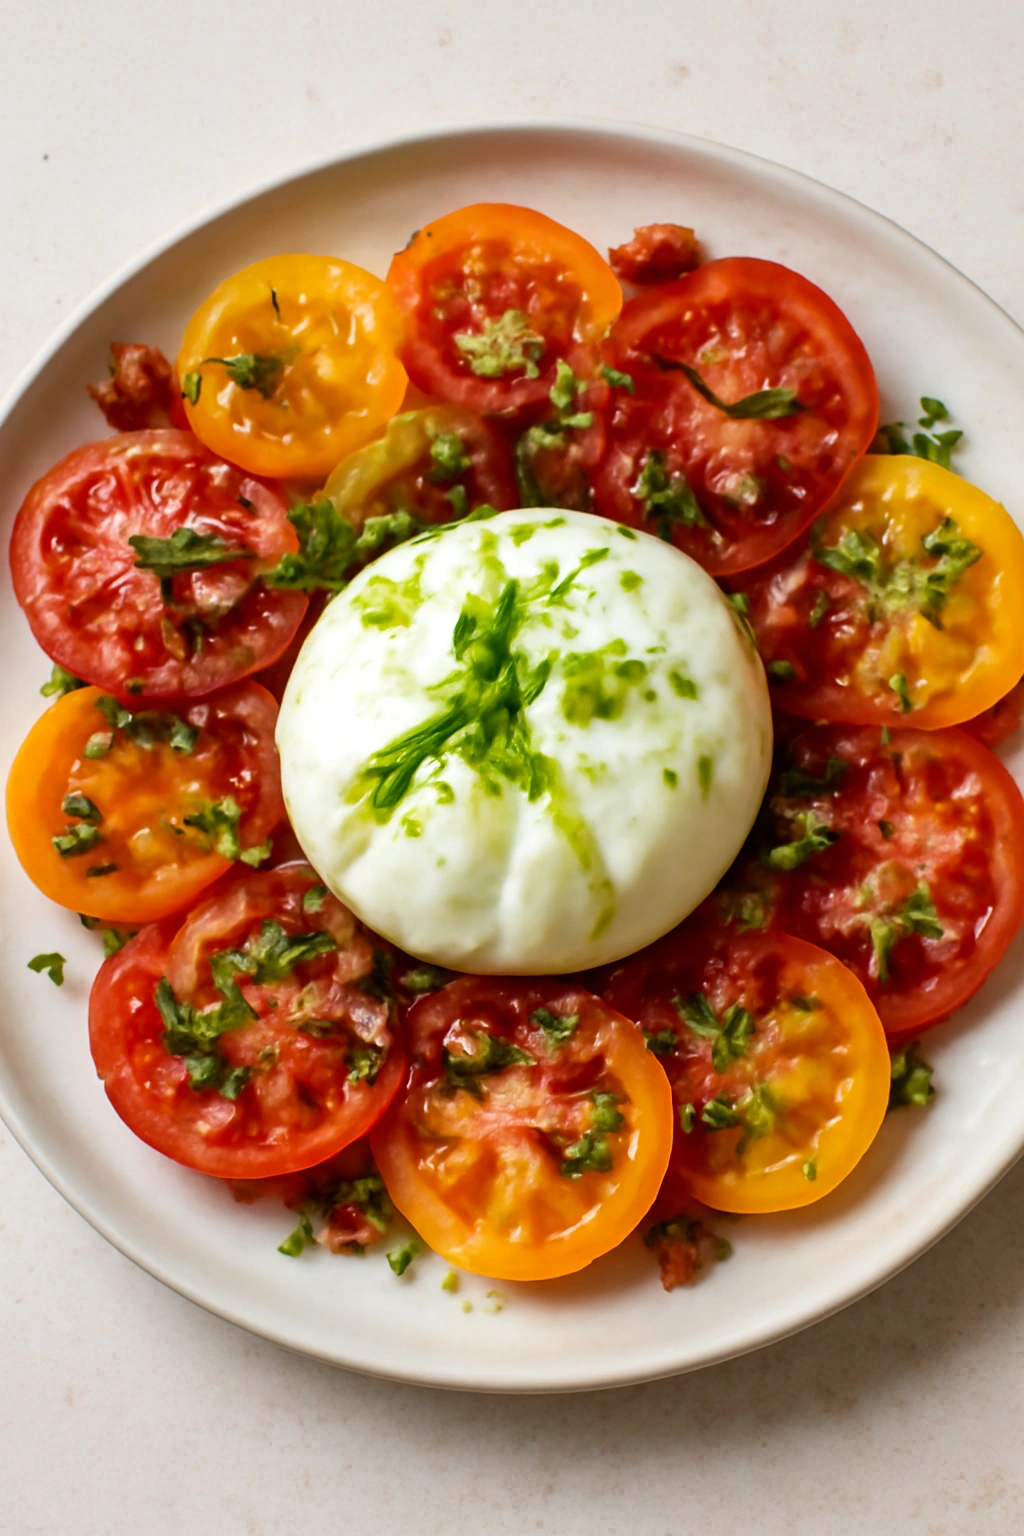
Sometimes brunch doesn’t have to be hot, and this salad proves that point beautifully. Fresh burrata cheese — that cloud-like fresh mozzarella with a creamy center — paired with ripe heirloom tomatoes and crispy pancetta feels like the kind of thing you’d eat at a sophisticated restaurant, but it’s genuinely one of the simplest dishes to prepare. What makes it feel special isn’t technique or complicated flavors, but rather the quality of the ingredients and the balance of textures: the cool, creamy cheese; the sweet-tart tomatoes; the salty, crispy pancetta; and the bright, herbaceous basil oil that ties everything together.
For small-group brunch, this salad is ideal because it requires absolutely no cooking skill and can be assembled just minutes before serving. Everything except the salad assembly can be prepared ahead — the pancetta can be cooked, the basil oil can be made, the tomatoes can be sliced — and then you simply bring everything together at the last moment. This is the kind of dish that works as a first course while you finish cooking other components, or as a lighter, vegetable-forward main for anyone who wants something fresher and less rich than egg-based dishes.
Yield: Serves 4 to 6 as a salad course or light main
Prep Time: 20 minutes (mostly for making basil oil and cooking pancetta)
Cook Time: 10 minutes (pancetta)
Total Time: 30 minutes (can be done in stages throughout the morning)
Difficulty: Beginner — no cooking technique, just assembly.
For the Crispy Pancetta:
- 8 ounces pancetta, cut into thin strips or small cubes
- Freshly cracked black pepper
For the Basil Oil:
- 1 cup fresh basil leaves, loosely packed
- ½ cup extra-virgin olive oil
- 2 cloves garlic, minced or pressed
- 1 tablespoon fresh lemon juice
- ¼ teaspoon fine sea salt
- Pinch of red pepper flakes (optional)
For the Salad:
- 1½ to 2 pounds heirloom tomatoes (a mix of colors and varieties if possible), sliced into ¼-inch-thick rounds or chunked
- Fine sea salt and freshly cracked black pepper
- 8 to 12 ounces fresh burrata cheese (2 to 3 balls, depending on size)
- Fresh basil leaves for garnish
- Fleur de sel for finishing
- Crusty bread for serving
Cook the Pancetta:
-
In a large skillet over medium heat, cook the pancetta strips, stirring occasionally, for 8 to 10 minutes until they’re rendered and crispy. The fat should be translucent and the meat should be browned and curled up slightly at the edges. You’re looking for genuine crispness here — not just cooked through.
Advertisements -
Transfer the cooked pancetta to a paper towel-lined plate to drain and cool slightly. Once completely cooled, it can be stored in an airtight container for up to 4 days.
Make the Basil Oil:
-
Bring a small pot of water to a boil and fill a bowl with ice water. Add the basil leaves to the boiling water for just 10 to 15 seconds, then immediately transfer them to the ice water. This brief blanch sets the green color and prevents the basil from oxidizing and turning brown. Drain well and pat completely dry on paper towels.
-
In a blender or food processor, combine the blanched basil, olive oil, garlic, lemon juice, salt, and red pepper flakes (if using). Pulse until you have a smooth, vibrant green oil. Do not over-blend; you want a pourable oil, not a thick purée. Strain through a fine-mesh sieve if you prefer an oil without flecks, or leave the flecks for a more rustic presentation.
-
The basil oil can be made up to 8 hours ahead. Store it in a covered container at room temperature.
Prepare the Tomatoes:
- Arrange the sliced tomatoes on a serving platter or individual plates. Season generously with fine sea salt and freshly cracked black pepper. Let the tomatoes sit for a few minutes to release their juices slightly — these juices are flavorful and will mingle beautifully with the other elements.
Assemble:
-
Just before serving, gently place the burrata balls on top of or among the tomato slices, aiming for a rustic, casual arrangement rather than something overly designed.
-
Drizzle the basil oil over the entire salad, hitting both the tomatoes and the cheese. Scatter the crispy pancetta pieces generously over the top.
-
Tear a few fresh basil leaves and scatter them across the salad. Add a final pinch or two of fleur de sel and a grind of black pepper.
Advertisements -
Serve immediately with crusty bread alongside for soaking up the delicious juice that accumulates on the plate.
Tips for Small Gatherings:
Quality burrata should be cold but not icy when you serve it. Remove it from the refrigerator about 10 minutes before serving so it’s at its creamiest.
The beauty of heirloom tomatoes is their variety — choose 2 to 3 different varieties in different colors if you can find them. A mix of colors looks more vibrant and interesting on the plate.
If fresh basil isn’t available or is prohibitively expensive, you can substitute fresh mint or parsley, though the flavor profile will shift slightly. A simple drizzle of good extra-virgin olive oil mixed with a tiny bit of lemon juice works too.
This salad is best served immediately after assembly, before the basil oil has time to wilt the tomato leaves and before the burrata begins to warm up.
7. Mediterranean Savory Crepes with Spinach, Feta, and Roasted Red Peppers
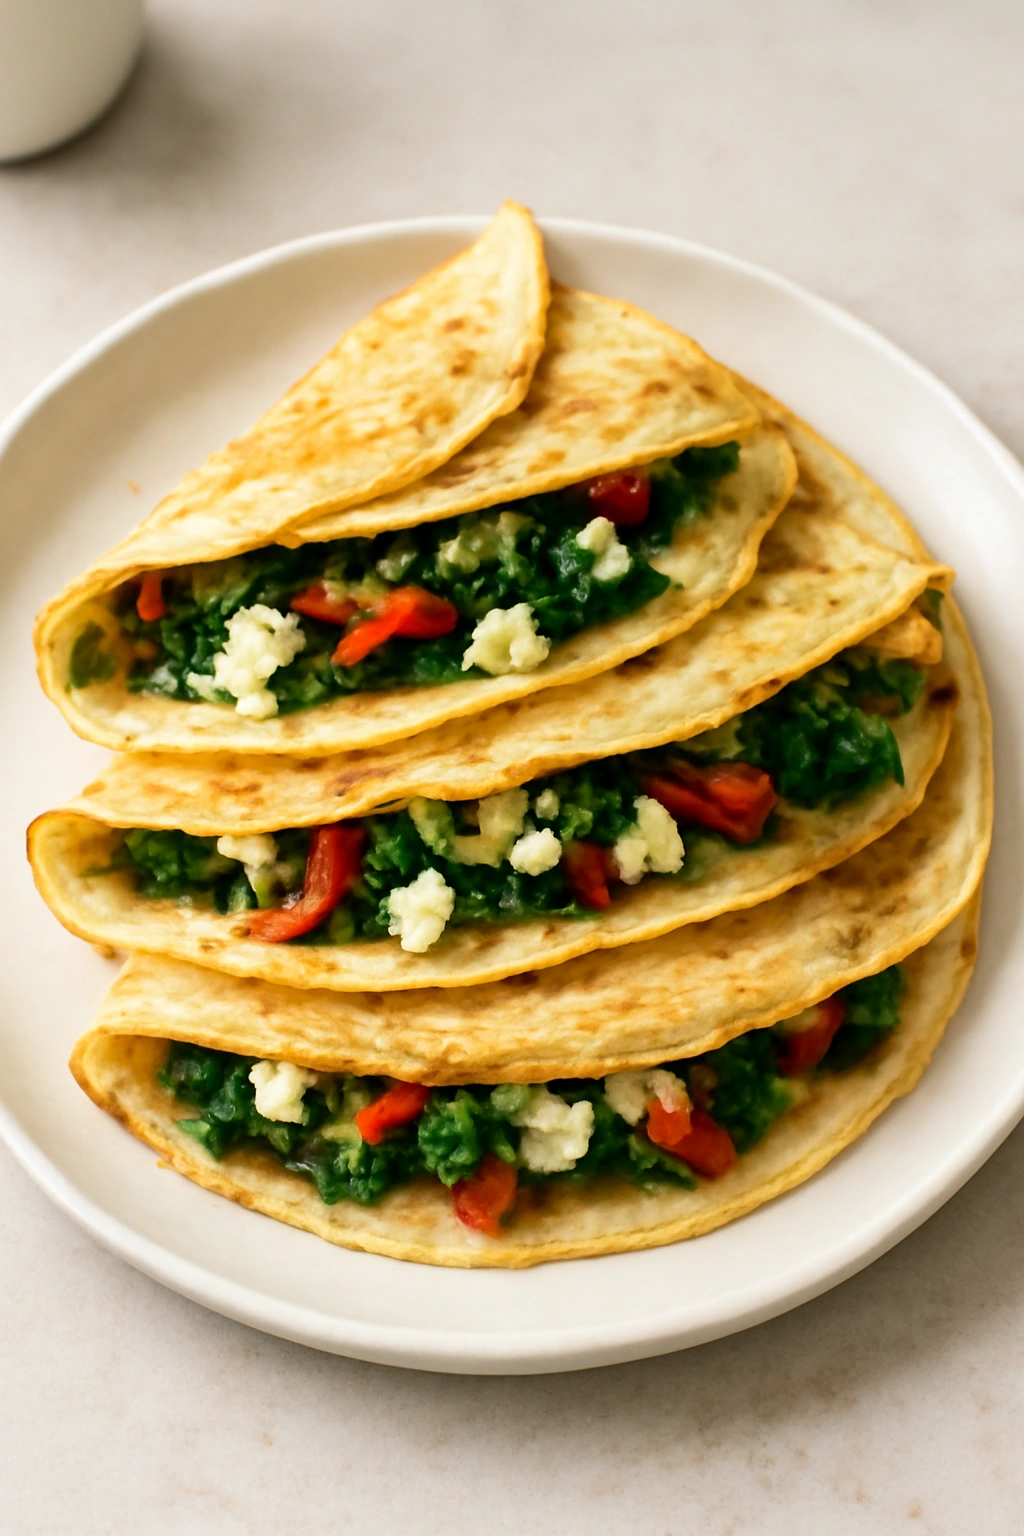
Crepes are one of those dishes that seem intimidating until you make them once and realize they’re actually simpler than they seem. The batter is just a thin custard, and the cooking is just a matter of tilting a hot pan around to create a thin, even layer. For brunch, savory crepes are elegant, versatile, and make excellent candidates for advance preparation — you can make the crepes and the fillings completely ahead, then simply warm and fill them when your guests arrive.
This Mediterranean version uses a simple spinach and feta filling with roasted red peppers, which comes together in minutes and tastes like you spent way more time than you actually did. The crêpes themselves can be made a full day ahead and stored in the refrigerator with parchment between each one. Filling and warming them takes maybe ten minutes total, which means you can be talking with guests instead of standing over the stove.
Yield: Makes 8 to 12 crepes, serving 4 to 6
Prep Time: 20 minutes (crepe batter) + 20 minutes (filling)
Cook Time: 15 minutes (crepes) + 10 minutes (warming)
Total Time: 65 minutes (crepes can be made ahead)
Difficulty: Beginner to Intermediate — crepe-making requires a bit of practice, but the first batch is forgiving.
For the Crepe Batter:
- 1 cup all-purpose flour
- 2 large eggs
- ½ cup whole milk
- ½ cup water
- ¼ teaspoon fine sea salt
- 2 tablespoons unsalted butter, melted
- 1 tablespoon fresh lemon juice
For the Spinach and Feta Filling:
- 2 tablespoons olive oil
- 1 medium shallot, minced
- 3 cloves garlic, minced
- 8 ounces fresh spinach (or 1 cup frozen spinach, thawed and squeezed dry)
- ½ teaspoon ground cumin
- Pinch of red pepper flakes
- Fine sea salt and freshly cracked black pepper to taste
- 8 ounces crumbled feta cheese
- 1 jar (12 ounces) roasted red peppers, drained and sliced
- 2 tablespoons fresh dill, chopped
- Zest of ½ lemon
For Serving:
- Extra olive oil for drizzling
- Fresh dill for garnish
- Lemon wedges
- Greek yogurt or sour cream (optional)
Make the Crepe Batter:
-
In a blender, combine the flour, eggs, milk, water, salt, melted butter, and lemon juice. Blend on high speed for about 1 minute until smooth. The batter should be the consistency of thin pancake batter, pourable but not watery.
-
Let the batter rest for at least 30 minutes at room temperature (or up to 4 hours refrigerated). This rest allows the gluten to relax and the flour to fully hydrate, resulting in crepes that are tender rather than tough. The batter will thicken slightly as it sits; if it becomes too thick, thin it with a tablespoon of water at a time.
Cook the Crepes:
-
Heat a nonstick skillet or crepe pan (8 to 10 inches) over medium-high heat. Lightly butter the surface.
-
Pour ¼ cup of batter into the center of the hot pan. Immediately tilt and rotate the pan to spread the batter thinly and evenly across the entire surface. You’re aiming for a thin, lacy crepe — almost transparent in spots. This should take only a few seconds of tilting.
-
Cook for about 1 minute until the bottom is very lightly golden and the edges begin to pull away from the sides of the pan. Use a thin rubber spatula to gently loosen the edges, then flip the crepe and cook the second side for just 20 to 30 seconds until set. The second side doesn’t need to brown as much as the first.
-
Transfer to a plate. Repeat with the remaining batter, lightly buttering the pan between crepes as needed. Crepes can be made up to 24 hours ahead. Layer them between parchment paper and store in an airtight container in the refrigerator.
Advertisements
Make the Filling:
-
Heat the olive oil in a large skillet over medium heat. Add the minced shallot and cook for 2 to 3 minutes until softened. Add the minced garlic and cook for another 30 seconds until fragrant.
-
Add the fresh spinach (or thawed frozen spinach) along with the cumin and red pepper flakes. Cook, stirring frequently, for 3 to 4 minutes until any excess moisture has evaporated and the spinach is completely wilted. The mixture should look relatively dry, not wet.
-
Remove from heat and stir in the crumbled feta, roasted red peppers, fresh dill, and lemon zest. Season with salt and pepper to taste. Remember that feta is already quite salty, so taste before adding more salt. This filling can be made up to 8 hours ahead. Store it in an airtight container in the refrigerator and bring it to room temperature before using, or warm it gently in the skillet.
Assemble:
-
Lay a crepe flat on a cutting board or plate. Add about 3 to 4 tablespoons of the spinach and feta filling to the center of the crepe, leaving about an inch of space on all sides.
-
Fold the crepe in half, then in half again to form a triangle, or roll it into a cylinder — whichever you prefer. Transfer to a serving plate or baking dish.
-
To serve warm: Arrange the filled crepes on a baking sheet, drizzle lightly with olive oil, and warm in a 300°F (150°C) oven for about 8 to 10 minutes until heated through. Alternatively, warm them individually in a nonstick skillet over medium-low heat for 1 to 2 minutes per side until just heated through.
-
Drizzle with extra olive oil, scatter fresh dill over the top, and serve with lemon wedges and Greek yogurt on the side if desired.
Tips for Small Gatherings:
Crepe-making has a minor learning curve, but it’s forgiving. Your first crepe is often not perfect — don’t worry. By the second or third, your hands will understand the tilting motion and you’ll be making beautiful crepes.
If you’re nervous about making crepes, you can use store-bought crepes (many grocery stores sell them in the bakery section), which will save time and give you one less thing to worry about.
The filling is flexible. Substitute roasted mushrooms, caramelized onions, sun-dried tomatoes, or olives, depending on what you have available and what your guests prefer.
Crepes can be warmed ahead of time and kept warm in a 200°F (95°C) oven for up to 20 minutes, loosely covered with foil.
8. Smoked Trout Breakfast Bowls with Poached Eggs, Crispy Potatoes, and Horseradish Cream
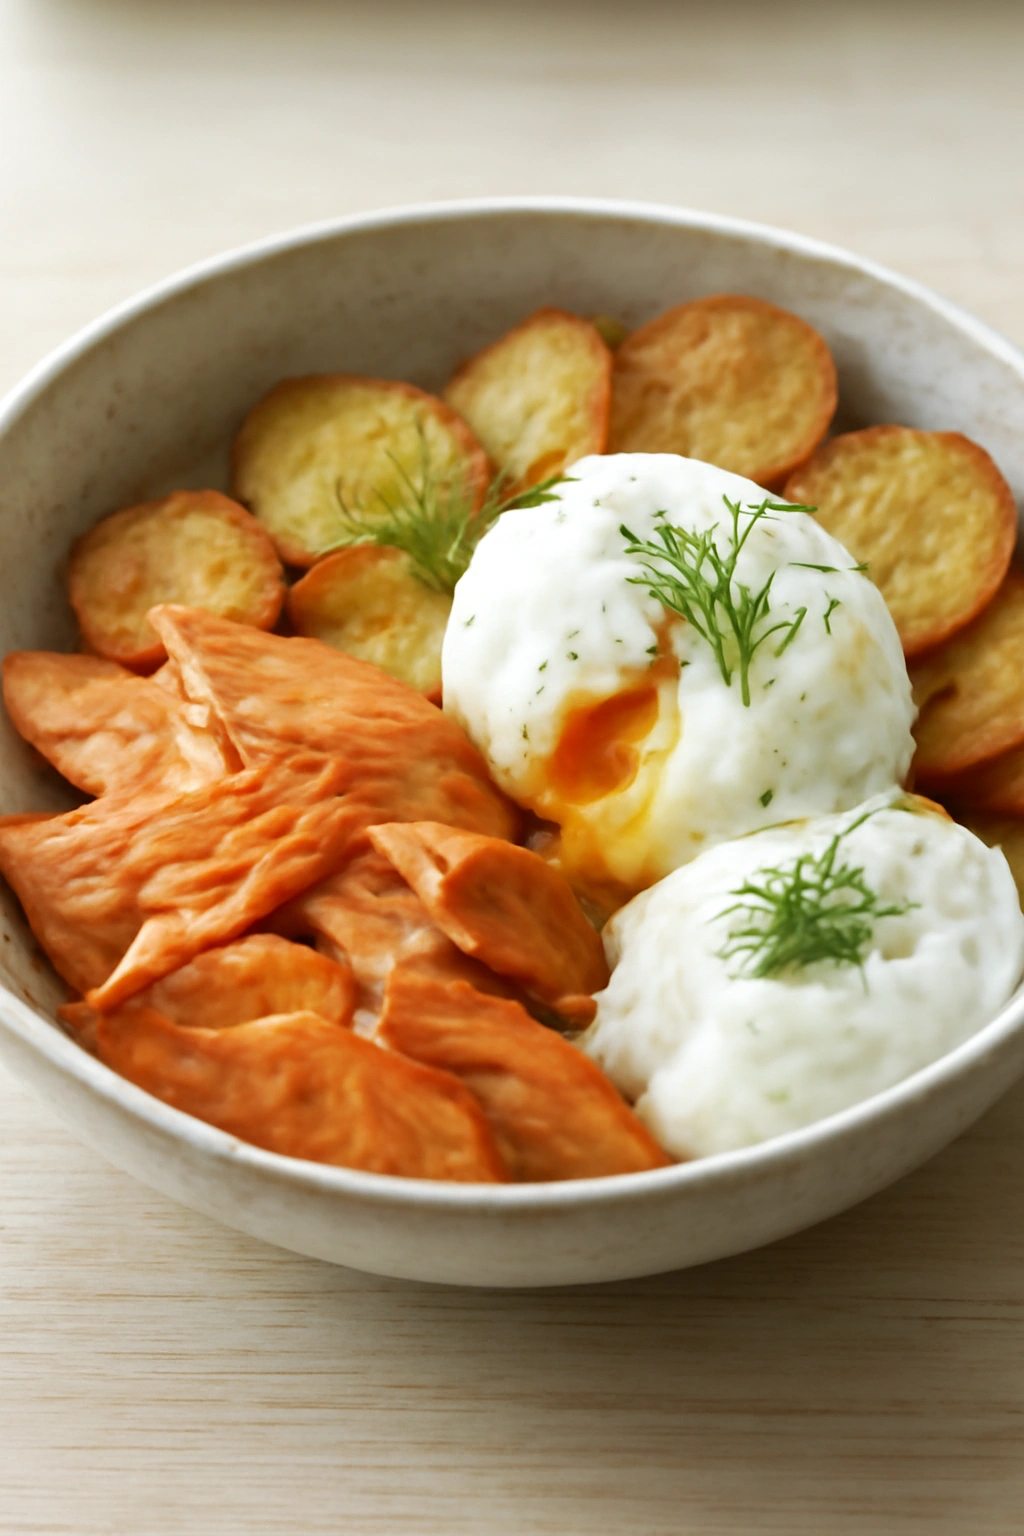
A breakfast bowl brings together multiple components — crispy potatoes, a perfectly poached egg, rich smoked fish, and creamy horseradish sauce — into one cohesive, satisfying dish. What makes this work beautifully for small gatherings is that each component can be prepared ahead and brought together just minutes before serving. The crispy potatoes can be cooked an hour or two in advance and simply warmed through in a hot oven. The horseradish cream can be made completely ahead. The only component that really needs to be made to-order is the poached eggs, and poaching eggs for four to six people simultaneously is absolutely doable.
The combination of flavors is inspired by Scandinavian breakfast traditions — smoked trout, crispy potatoes, fresh dill, and that punchy horseradish cream create a profile that’s sophisticated and deeply savory without being heavy. The horseradish cream adds a brightness and a subtle heat that keeps the dish interesting from first bite to last. Each component is excellent on its own, but together they create something that feels both modern and comforting.
Yield: Serves 4 to 6
Prep Time: 30 minutes (potatoes and horseradish cream)
Cook Time: 25 minutes (potatoes) + 5 minutes (poached eggs)
Total Time: 60 minutes (potatoes can be made ahead)
Difficulty: Intermediate — requires poaching eggs, which isn’t difficult but does require confidence.
For the Crispy Potatoes:
- 1½ pounds small waxy potatoes (like Yukon gold or red potatoes), cut into ½-inch cubes
- 3 tablespoons olive oil
- 1 medium shallot, minced
- 2 cloves garlic, minced
- 1 teaspoon fresh thyme leaves (or ½ teaspoon dried)
- Fine sea salt and freshly cracked black pepper
- 1 tablespoon fresh parsley, chopped
For the Horseradish Cream:
- ½ cup sour cream or crème fraîche
- ¼ cup heavy cream
- 2 to 3 tablespoons prepared horseradish (or freshly grated if you can find it)
- 1 tablespoon apple cider vinegar
- 1 tablespoon fresh dill, finely chopped
- ½ teaspoon Dijon mustard
- Fine sea salt and freshly cracked black pepper to taste
For the Bowls:
- 8 ounces smoked trout, broken into bite-sized pieces
- 4 to 6 large eggs (for poaching)
- 2 cups fresh arugula or other tender greens
- 2 tablespoons olive oil
- 1 tablespoon fresh lemon juice
- Fine sea salt and freshly cracked black pepper
- Fresh dill fronds for garnish
- Thinly sliced radishes (optional, for crunch)
- Fleur de sel for finishing
Make the Crispy Potatoes:
-
Preheat your oven to 425°F (220°C). Toss the cubed potatoes with the olive oil, shallot, garlic, thyme, salt, and pepper. Spread in a single layer on a baking sheet.
-
Roast for 20 to 25 minutes, stirring halfway through, until the potatoes are golden brown and crispy on the outside and completely tender inside. They should have caramelized, brown spots.
-
Toss with fresh parsley. The potatoes can be made up to 2 hours ahead. Reheat in a 350°F (175°C) oven for 5 to 7 minutes until warmed through and crispy again, just before serving.
Make the Horseradish Cream:
- In a small mixing bowl, whisk together the sour cream, heavy cream, horseradish, apple cider vinegar, fresh dill, and Dijon mustard until smooth and well combined. Season with salt and pepper to taste. The horseradish cream can be made up to 8 hours ahead. Store it in the refrigerator in a covered container.
Prepare the Greens:
- In a small bowl, toss the arugula with the olive oil, lemon juice, salt, and pepper. Set aside.
Poach the Eggs:
-
Bring a large, shallow pot or skillet of water to a bare simmer — the water should be just barely moving, with only occasional small bubbles rising from the bottom. Add a pinch of salt and a splash of vinegar to the water.
-
Crack one egg into a small cup or bowl. Gently tip the egg into the simmering water, trying to keep the white and yolk together. Repeat with the remaining eggs, spacing them out in the water so they don’t touch.
-
Let the eggs poach for 3 to 4 minutes, until the whites are set but the yolk still jiggle slightly when you gently move the egg with a spoon. The poached eggs should be tender, not rubbery. Use a slotted spoon to lift the eggs from the water and onto a paper towel briefly to drain any excess water.
Advertisements
Assemble the Bowls:
-
Divide the warm crispy potatoes among serving bowls, creating a base. Top each bowl with a handful of the dressed arugula.
-
Place a poached egg in the center of each bowl. Scatter pieces of smoked trout around the bowl. Add a few slices of fresh radish if using.
-
Dollop a generous spoonful of horseradish cream on the side. Scatter fresh dill fronds over everything and finish with a pinch of fleur de sel and a crack of black pepper.
-
Serve immediately while the potatoes and eggs are still warm.
Tips for Small Gatherings:
The beauty of this dish is in the timing — you can have everything completely prepared except the poached eggs, then cook the eggs just minutes before serving.
If poaching eggs makes you nervous, you can substitute soft-boiled or baked eggs instead. Soft-boiled eggs can be made ahead and kept warm in a warm water bath; baked eggs in a muffin tin take about 13 minutes in a 350°F (175°C) oven.
Smoked trout can be substituted with smoked salmon, smoked mackerel, or even canned smoked fish if you can’t find fresh smoked trout at your grocery store.
The horseradish cream is the star here — if you can only find prepared horseradish at the grocery store (which is perfectly fine), use it. Freshly grated horseradish from the produce section is more intense and has a shorter shelf life, but it’s wonderful if you can find it.
Final Thoughts

Small-group brunch hosting succeeds when you choose recipes that play to your strengths and that allow you to spend actual time with your guests instead of disappearing into the kitchen for hours. Each of the eight recipes above can be prepared in stages, with significant components made ahead, so that the final assembly feels manageable and even enjoyable rather than stressful.
The real secret to any successful brunch is choosing dishes that genuinely excite you to cook and that you’ve made at least once before the event itself. Nothing guarantees confidence in the kitchen like prior practice — it calms your nervous system and allows the actual cooking to feel like second nature instead of performing under pressure. Pick one or two of these recipes that genuinely appeal to you, give them a trial run before your guests arrive, and you’ll find yourself approaching the brunch date with calm enthusiasm instead of anxiety.
Pay attention to the timing rhythms as well. Some dishes, like the French toast casserole and quiche, benefit from being made completely the day before. Others, like the shakshuka and frittata, come together in under 30 minutes of active cooking. The smoked trout bowl is a component-based dish where you can have everything ready except the poached eggs. Building your menu with a mix of these timing profiles means you’re never overwhelmed at the last moment. Serve one make-ahead item, one quick-cooking item, and one that can be prepped but assembled at the last moment, and you’ve got a well-balanced brunch that shows genuine care without requiring heroic effort.
The goal of any brunch, fundamentally, is to create a moment where the food is good enough to be memorable, but not so complicated that it overshadows the real point — which is spending unhurried time with people you enjoy. These recipes trust that quality ingredients and thoughtful technique can do the heavy lifting, leaving you free to be present and to enjoy the company as much as you enjoy the cooking.