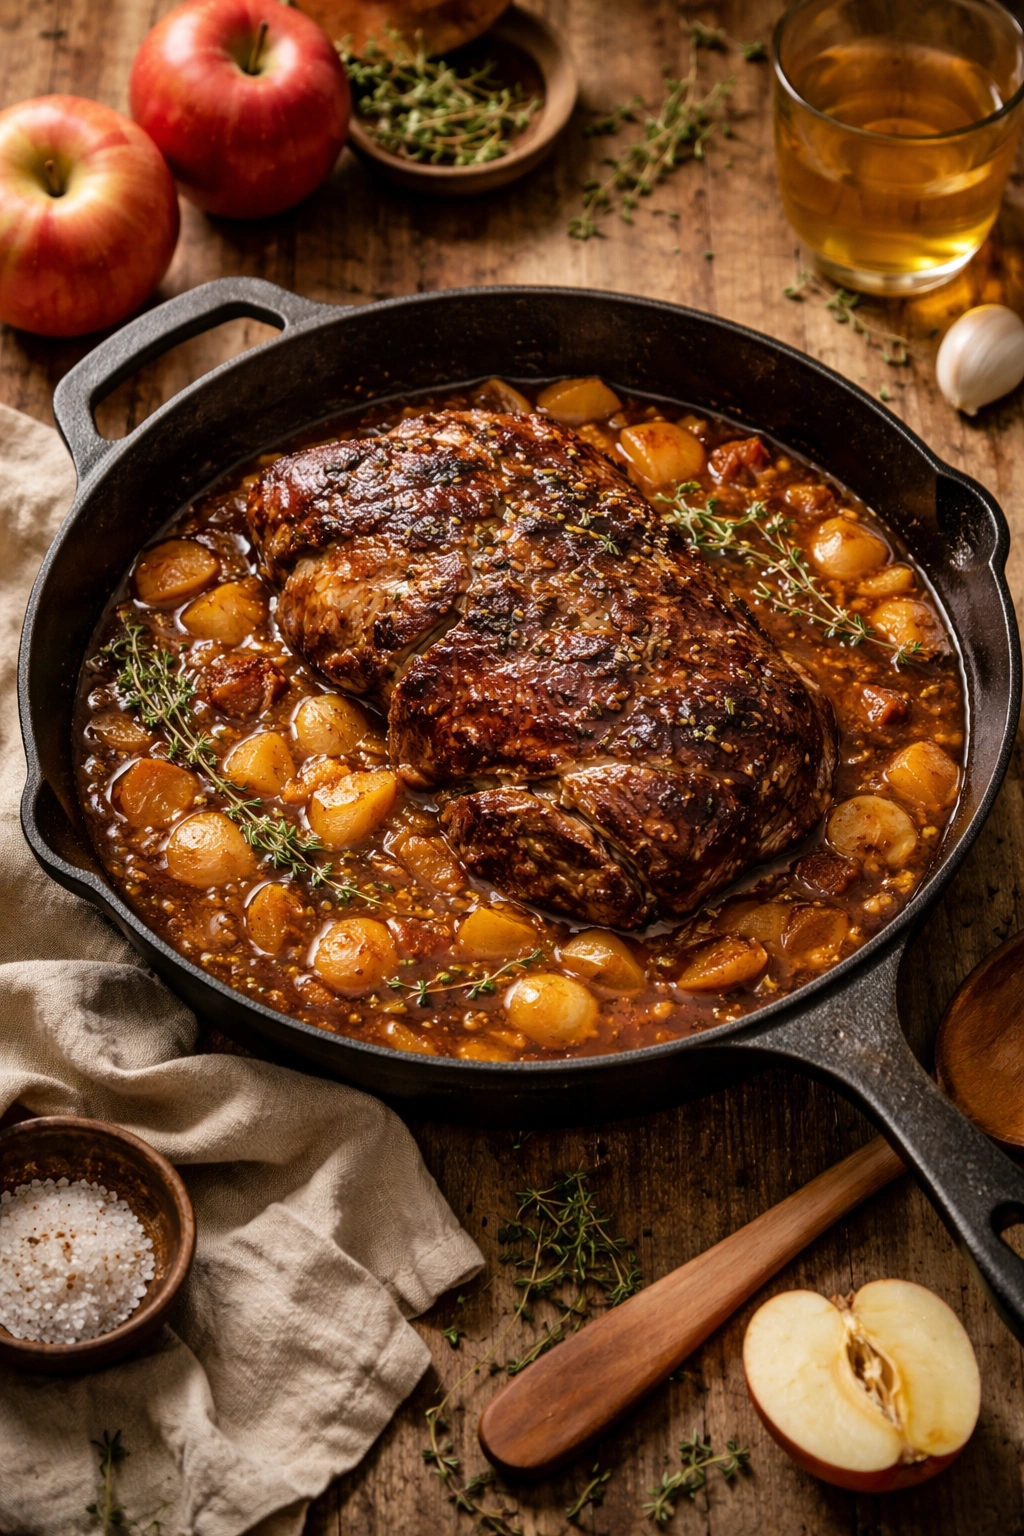
When autumn arrives, there’s one meal that captures everything cozy about the season—apple cider braised pork shoulder. This is the dish that transforms your kitchen into a warm, inviting space, filling it with the unmistakable aroma of slow-simmered apples, savory herbs, and tender meat. What makes this meal so special isn’t just the incredible flavor; it’s the simplicity of throwing everything into a pot and letting time and low heat do the heavy lifting while you go about your day. The pork emerges from the oven fall-apart tender, swimming in a rich, tangy-sweet sauce infused with the essence of fresh apple cider and aromatic herbs.
The beauty of braised pork lies in the contrast—rich, juicy meat paired with bright apple cider creates a flavor profile that feels both deeply satisfying and refreshingly balanced. Unlike quick weeknight dinners, this is the kind of meal you plan for, the kind you look forward to, the kind that makes people around your table pause mid-bite and say, “This is incredible.” Whether you’re cooking for a special occasion, hosting friends for a casual gathering, or simply craving something that tastes like autumn on a plate, apple cider braised pork delivers.
The magic here isn’t in complicated techniques or exotic ingredients. It’s in understanding how time, temperature, and the right combination of flavors work together to turn an economical cut of meat into something restaurant-worthy. Pork shoulder—sometimes called pork butt or Boston butt—is naturally tough when raw, but it’s precisely that toughness that makes it perfect for braising. The long, moist cooking process breaks down the muscle fibers and connective tissue, rendering them into silky tenderness while infusing every fiber with flavor.
This guide walks you through everything you need to know to make apple cider braised pork that impresses everyone at your table. You’ll learn how to select the right cut, build layers of flavor, troubleshoot common issues, and transform leftovers into entirely new meals. More importantly, you’ll understand why each step matters so you can adapt the recipe with confidence and make it your own.
Why Apple Cider Braised Pork Deserves a Spot on Your Fall Table
There’s a reason apple and pork is one of the most classic flavor pairings in cooking—they were made for each other. Apple cider adds brightness, complexity, and a subtle sweetness that cuts through the richness of pork shoulder without overwhelming it. When you braise pork in cider for hours, something magical happens: the cider reduces and concentrates, the natural sugars caramelize slightly, and the acidity tenderizes the meat while balancing the savory notes.
This dish also represents the ultimate in weeknight entertaining. You do the work upfront, then the oven does the rest. Most of your active time happens in the first thirty minutes—searing the pork, sautéing aromatics, whisking together the braising liquid. After that, the pot goes into the oven for two to three hours, during which you’re completely free to set the table, make side dishes, pour a glass of wine, or simply relax. When guests arrive, your home smells like you’ve been cooking all day, even though you’ve barely lifted a finger since morning.
Economically, this meal makes sense too. Pork shoulder is one of the most affordable cuts available, often significantly cheaper than pork tenderloin or pork chops. Yet when braised properly, it yields more flavor and tenderness than cuts that cost twice as much. This is a dish where investing a little time pays enormous dividends in both flavor and value.
The leftovers are genuinely worth planning for. Braised pork is exceptionally versatile—you can serve it over mashed potatoes one night, pile it onto sandwiches the next day, toss it with egg noodles, or spoon it over rice or polenta. The braising liquid transforms into the most incredible sauce, one that restaurants would serve with pride.
Understanding Braising: The Slow-Cooking Method That Transforms Tough Cuts
If you’ve never braised anything before, this is the perfect recipe to start with. Braising is simply a two-step cooking method that combines dry and wet heat to turn tough cuts into tender masterpieces. The first step is searing—browning the meat in a hot pan with fat to create a flavorful crust. The second step is moist cooking—simmering the seared meat in liquid in a covered pot at low temperature for an extended period.
This method works because of what happens chemically to the meat over time. Pork shoulder contains lots of collagen—a connective tissue that makes the raw meat tough and chewy. When exposed to moist heat for several hours, this collagen slowly converts to gelatin, which dissolves into the braising liquid and gives the sauce its silky body while making the meat incredibly tender. This process can’t be rushed; it requires time. You need at least two to three hours of slow braising for pork shoulder to reach that ideal fall-apart texture.
The searing step—often called “browning”—is where deep flavor comes from. When meat browns at high heat, a chemical reaction called the Maillard reaction occurs, creating hundreds of new flavor compounds that don’t exist in raw meat. These browned bits stuck to the bottom of the pan (called fond) are flavor concentrate. When you pour liquid into the pan and scrape with a wooden spoon, all that fond dissolves into the braising liquid, creating a sauce with incredible depth and richness.
Braising differs from stewing in one key way: braising requires the meat to be only partially submerged in liquid, while stewing uses enough liquid to nearly cover the food. With braising, the top of the meat sits above the liquid line, allowing it to brown slightly as it cooks. This creates two different textures—the braised bottom is incredibly tender and infused with sauce, while the exposed top gets slightly caramelized and texturally interesting.
Choosing the Perfect Pork Shoulder for Braising
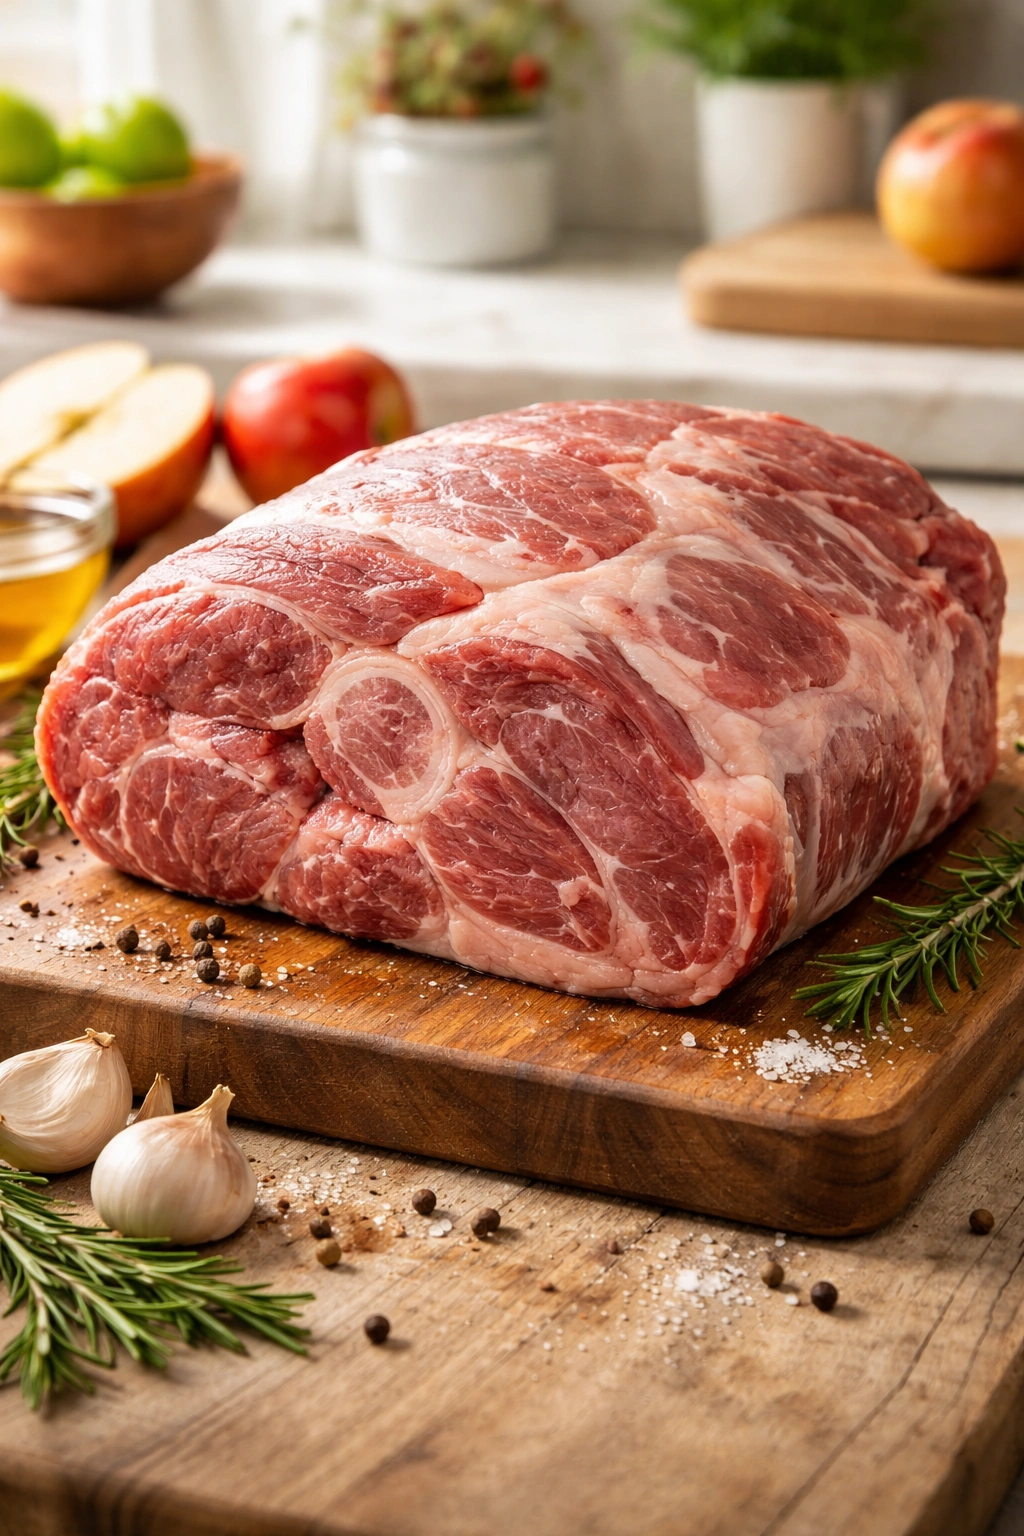
The type of pork shoulder you select makes a genuine difference in your finished dish. Pork shoulder comes in two forms: bone-in and boneless. Bone-in cuts are often less expensive and produce slightly richer, more deeply flavored results because the bone adds both flavor and gelatin to the braising liquid. However, bone-in cuts take slightly longer to braise—plan for an additional 30 to 45 minutes of cooking time. Boneless pork shoulder is more convenient to sear and shred, making it a good choice if you’re prioritizing ease.
When shopping, look for well-marbled meat with visible white fat running through the pink muscle tissue. This marbling is your insurance policy for tenderness. As the pork braises, this intramuscular fat renders—melts and disperses—throughout the meat, keeping every fiber moist and flavorful. A pork shoulder that looks lean might cook faster but will end up drier, no matter how long you braise it.
Size matters for even cooking. A pork shoulder between 3 and 5 pounds is ideal for braising. Anything much larger than 5 pounds will take considerably longer to cook through. If your market only has massive bone-in shoulders, ask the butcher to cut it in half—you’ll get faster, more even cooking and can freeze the second piece for another meal. Some cooks cut the shoulder into two or three large pieces before braising, which is absolutely fine. It actually reduces the total cooking time and ensures the braising liquid reaches all surfaces of the meat.
The fat cap—the thick layer of fat on the outside of the shoulder—requires attention. Some fat is necessary and flavorful, but excess fat makes the finished sauce greasy. Use a sharp knife to carefully trim away very thick areas of external fat, leaving about ¼ inch. Don’t remove it all; that thin layer protects the meat as it cooks and contributes to browning.
The Magic of Apple Cider in Your Braising Liquid
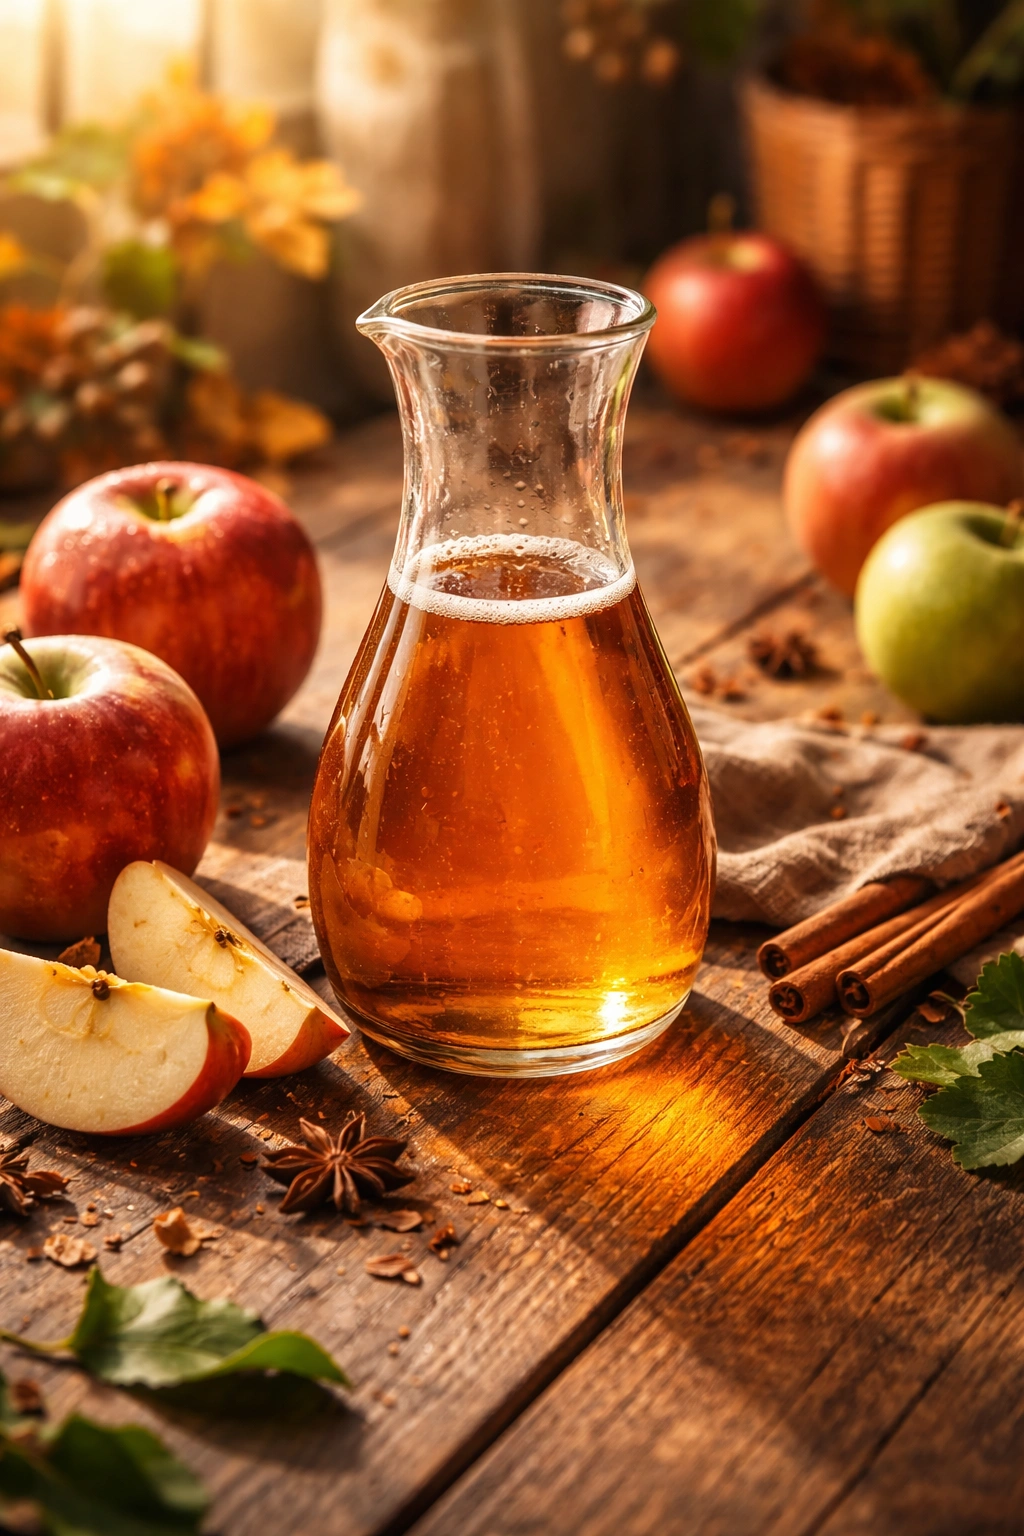
The difference between apple cider and apple juice confuses many home cooks, and it matters. Apple cider is unfiltered apple juice made from pressed apples, while apple juice is filtered, pasteurized, and often more processed. True apple cider—the kind you buy fresh from orchards or farmers’ markets during fall—contains pulp, tannins, and complex flavors that apple juice lacks. When cider braises with pork for hours, it caramelizes slightly, and its tannins mellow, creating a sauce with remarkable depth.
If you can’t find fresh apple cider, look for bottles labeled as 100% apple juice with “no added sugar”—brands like Simply Apple or Nature’s Nectar work well. Avoid the clear, translucent apple juices sold year-round; they’re typically too diluted and sweet. Hard cider (alcoholic cider) is not appropriate for this recipe—the alcohol won’t fully cook off and will overpower the other flavors.
The acidity in apple cider serves multiple purposes in this braise. It tenderizes the meat by breaking down proteins, brightens the braising liquid so it doesn’t taste one-dimensional, and balances the richness of the pork. Many home cooks worry that braised pork will be too heavy or one-note, but properly balanced braising liquid should taste sweet but not cloying, savory but not salty, rich but not overwhelming. That balance comes from apple cider’s natural acidity combined with a splash of apple cider vinegar and the umami depth of mustard and stock.
The amount of cider matters. Too little, and the sauce becomes thick and overly concentrated; too much, and the pork flavor gets diluted. The liquid should come up about halfway or three-quarters of the way up the sides of the pork. This ensures the bottom half braises while the top half roasts slightly, creating textural contrast.
Essential Ingredients and Flavor Builders
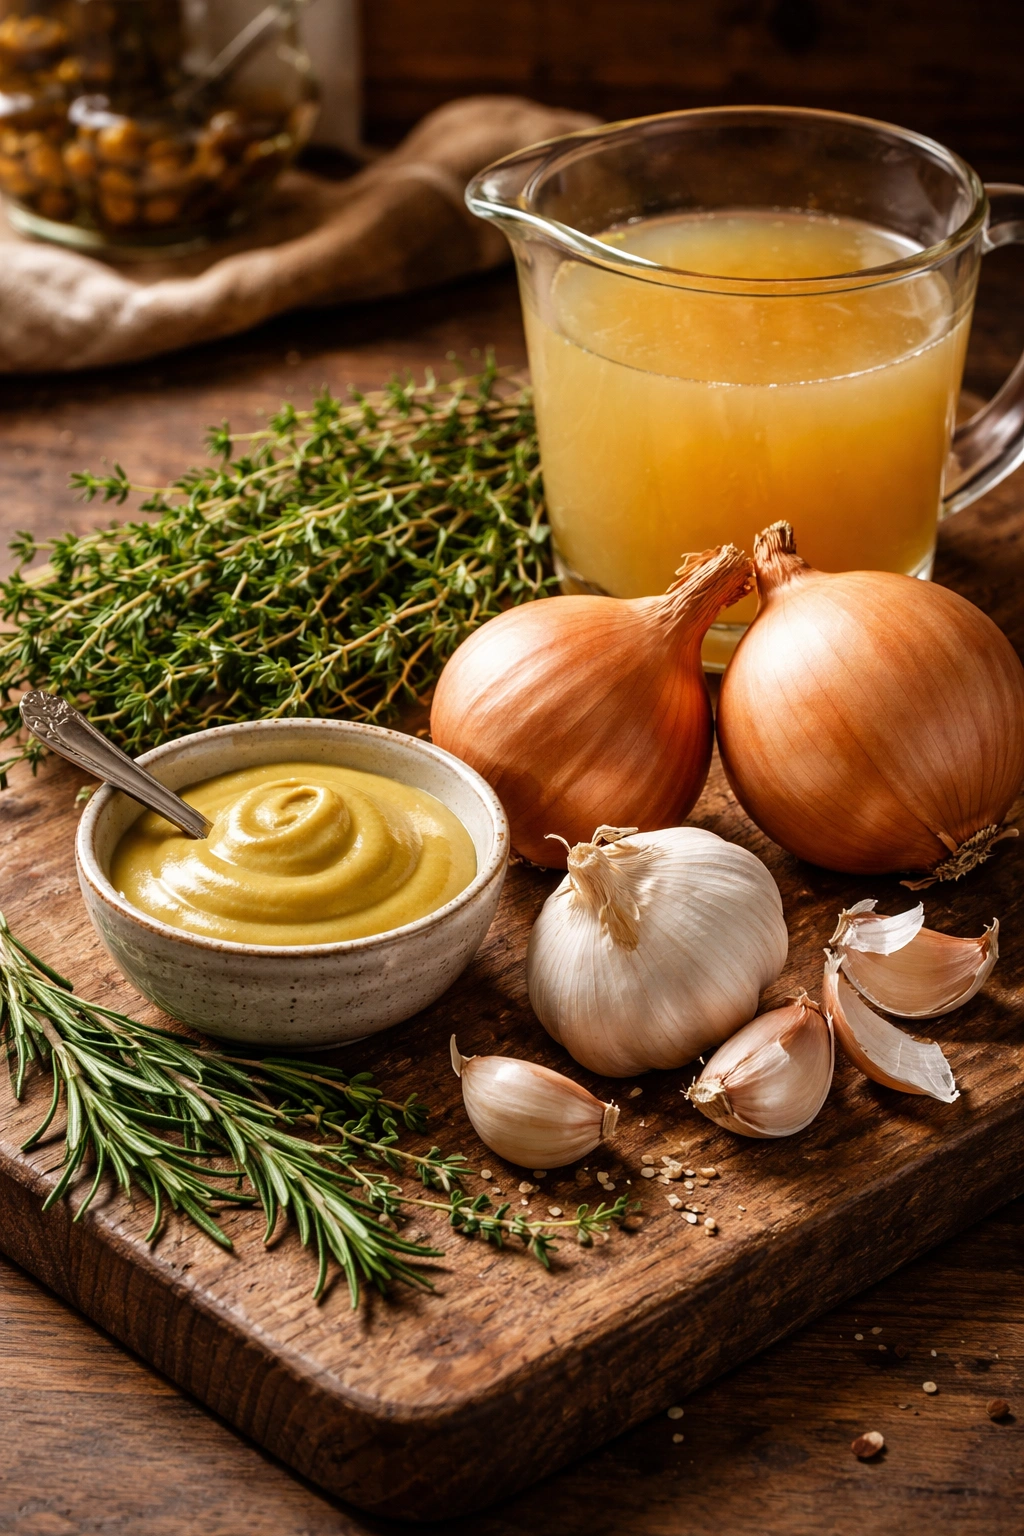
Beyond pork and apple cider, the supporting cast of ingredients creates the complex braising liquid that makes this dish sing. Dijon mustard adds pungent, slightly spicy depth that plays beautifully with apples—just two tablespoons is enough to transform the flavor profile without tasting mustardy. Fresh herbs—thyme and rosemary are traditional, but sage works wonderfully too—infuse the liquid with aromatic, earthy notes that ground the sweetness of the cider.
Garlic and onions are non-negotiable. Both caramelize as the pork braises, adding body and sweetness to the sauce while becoming soft and silky themselves. Don’t skip the step of sautéing the onions until golden before adding the braising liquid—this builds flavor rather than just adding them raw. Rough-chopped garlic cloves mellow as they cook for hours, becoming almost buttery and subtle.
Stock—chicken or beef—adds umami depth that prevents the sauce from tasting thin or one-dimensional. Beef stock produces a richer, deeper sauce, while chicken stock is lighter and allows the apple cider to shine more prominently. Either works beautifully, so choose based on how you want the final flavor to lean. A splash of apple cider vinegar—just one to two tablespoons—adds brightness and prevents the sauce from tasting flat or overly sweet, even if you didn’t catch the exact moment to remove it from heat.
Fresh apples added near the end of cooking provide sweetness, texture contrast, and visual appeal. Choose a firm apple variety like Granny Smith, Honeycrisp, or Pink Lady. These hold their shape better than soft, mealy apples. Quarter or thickly slice them; thin slices tend to disintegrate into the sauce. Add them only in the final 30 to 45 minutes of cooking so they soften to jammy tenderness without falling apart entirely.
Yield: Serves 6 to 8 | Makes approximately 4 pounds finished pork
Prep Time: 25 minutes
Cook Time: 2 hours 45 minutes to 3 hours 15 minutes (mostly inactive)
Total Time: 3 hours 15 minutes to 3 hours 45 minutes
Difficulty: Intermediate — The technique itself is straightforward, but it requires planning and patience for the long braise. No special skills needed; this is one of the most forgiving dishes to cook.
Ingredients for Apple Cider Braised Pork
For the Pork and Braising Liquid:
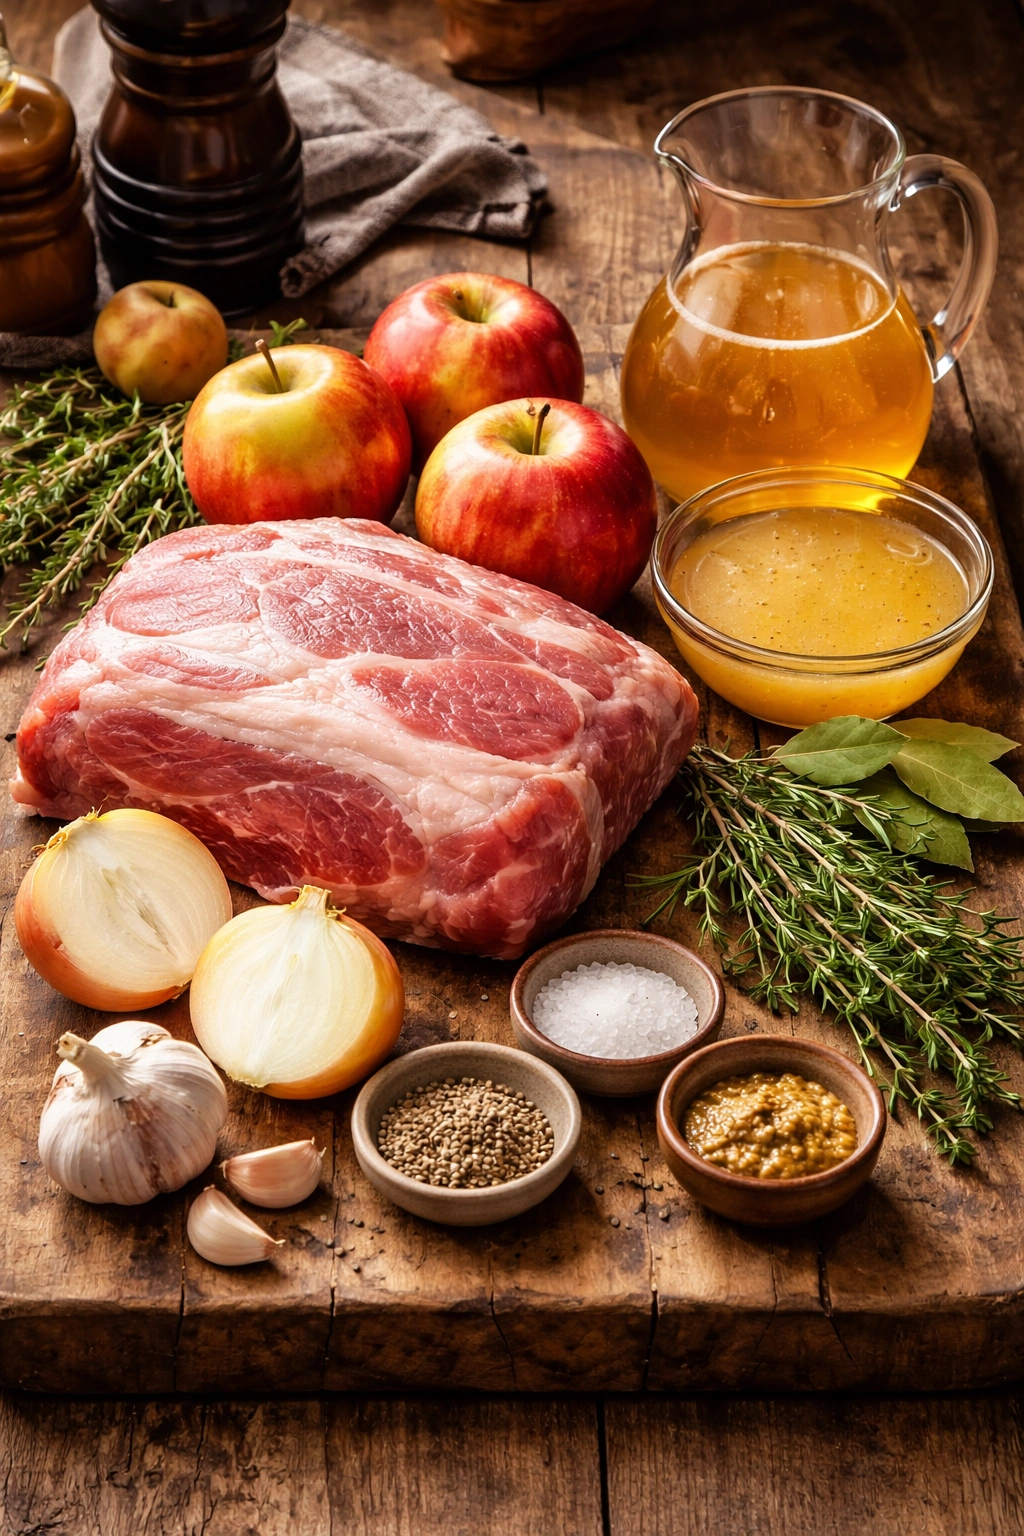
- 4 pounds boneless pork shoulder (or 5 pounds bone-in), trimmed of excess external fat
- 2 teaspoons kosher salt, plus more to taste
- 1 teaspoon freshly ground black pepper, plus more to taste
- 3 tablespoons extra-virgin olive oil (divided)
- 3 to 4 large yellow onions, thinly sliced (about 4 cups)
- 6 to 8 garlic cloves, roughly chopped
- 2 tablespoons Dijon mustard
- 2 cups fresh apple cider (not apple juice or hard cider)
- 1½ cups chicken or beef stock (homemade or store-bought)
- 1 tablespoon apple cider vinegar
- 4 to 5 sprigs fresh thyme (or 1½ teaspoons dried thyme)
- 3 to 4 sprigs fresh rosemary (or 1 teaspoon dried rosemary, crumbled)
- 2 bay leaves
- ½ teaspoon smoked paprika (optional but recommended)
For the Apples:
- 3 medium apples (Granny Smith, Honeycrisp, or Pink Lady), cored and quartered (no need to peel)
For Finishing:
- 2 tablespoons fresh flat-leaf parsley or chives, finely chopped
- Additional kosher salt and black pepper to taste
Preparing to Braise: Setup and Planning
Before you begin cooking, read through all the instructions once—this takes five minutes and prevents surprises. Gather all your ingredients on the counter, measured and prepped. Professional cooks call this mise en place (everything in its place), and it’s not just a fancy term—it genuinely prevents mistakes and keeps cooking flowing smoothly.
Position your oven rack in the center of your oven and preheat to 325°F. This lower-than-usual temperature is crucial for braising. High oven heat would cause the braising liquid to boil rather than gently simmer, resulting in tough, stringy meat and a sauce that reduces too quickly. At 325°F, everything cooks at an even, controlled pace.
Pat the pork completely dry using paper towels. Moisture on the surface prevents browning, so this step genuinely matters. Season the pork generously on all sides with kosher salt and black pepper—be liberal here, not timid. The salt seasons not just the exterior but penetrates into the meat as it cooks.
Step-by-Step Instructions for Perfect Braised Pork

Searing and Building Flavor:
-
Heat 2 tablespoons of the olive oil in a large Dutch oven (7-quart capacity minimum) or heavy-bottomed pot with a tight-fitting lid over medium-high heat. The oil should shimmer and ripple when you tilt the pan.
-
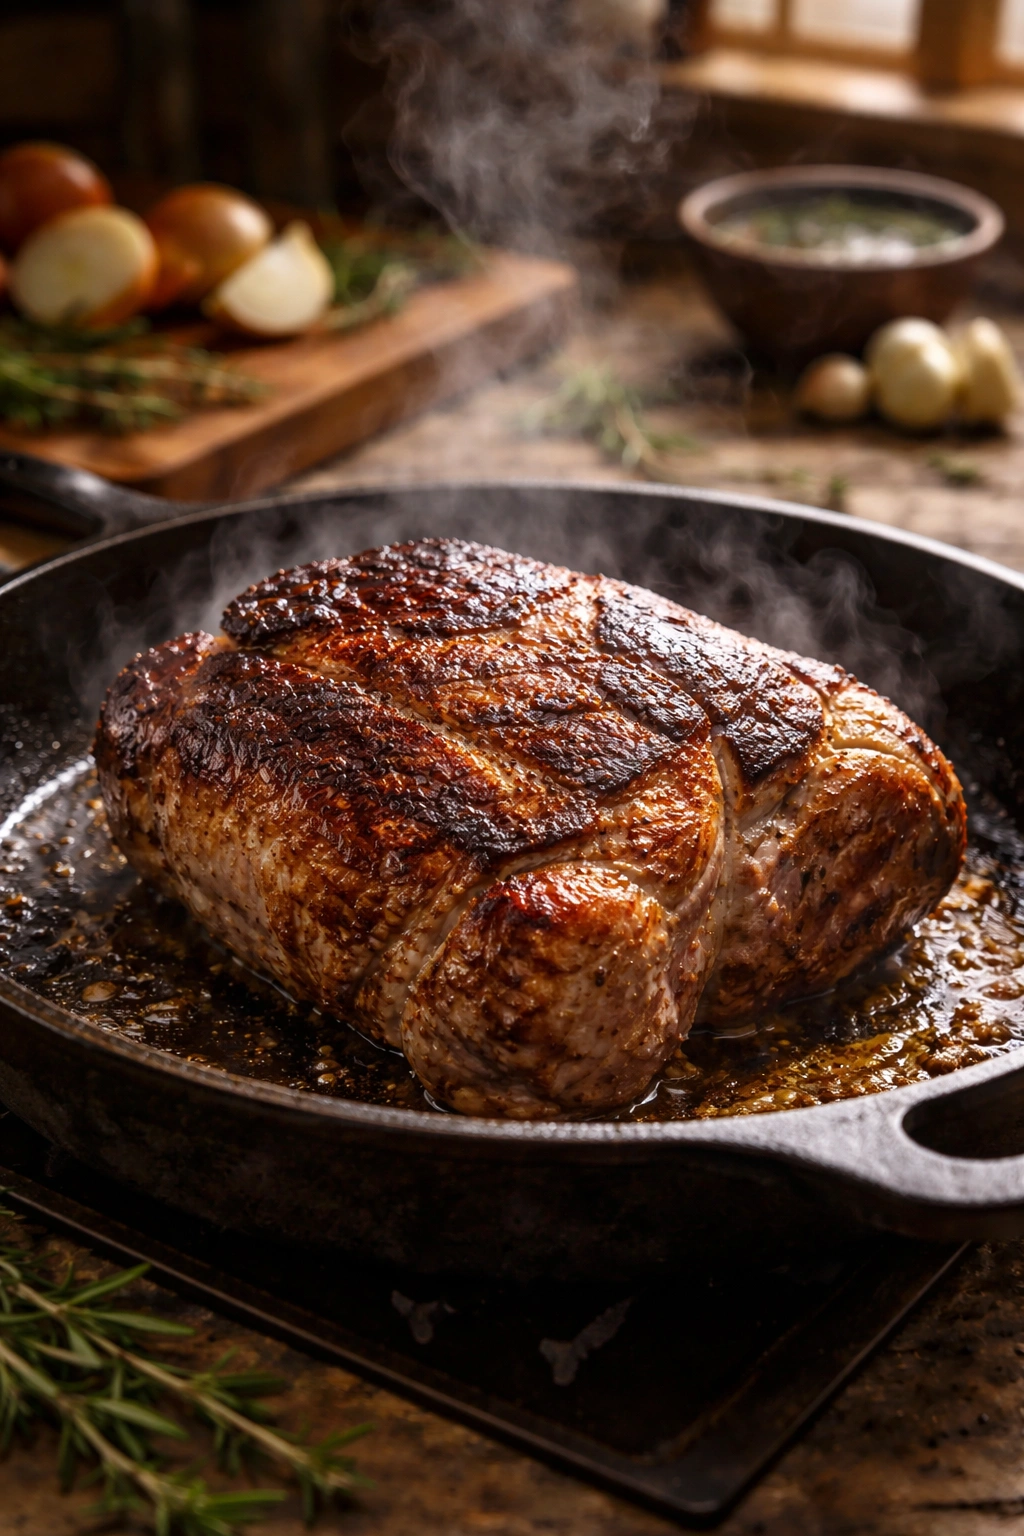
Carefully place the pork shoulder into the hot oil. Do not move it for at least 3 to 4 minutes. This undisturbed time allows the bottom to develop a deep golden-brown crust through the Maillard reaction. You’ll know it’s ready to move when the meat releases naturally from the pan and the underside looks richly caramelized.
-
Using tongs, turn the pork and brown the second side for another 3 to 4 minutes. Continue turning and browning all exposed sides until the entire exterior has a dark mahogany crust—this typically takes 12 to 16 minutes total depending on the size and shape of your pork.
-
Transfer the browned pork to a large plate or cutting board and set aside.
Advertisements
Building the Braising Liquid:
-
Add the remaining 1 tablespoon of olive oil to the pot (there will likely be rendered fat already in the pan, so you may not need much additional oil). Add the sliced onions directly to the hot pan.
-
Cook the onions over medium heat, stirring occasionally, for about 5 to 6 minutes. You’re looking for them to become translucent and beginning to turn golden at the edges. They’ll release their own moisture and start to caramelize.
-
Add the roughly chopped garlic cloves and cook, stirring constantly, for exactly 1 minute. You’ll smell the garlic become fragrant—do not cook it longer than a minute or it will burn and turn bitter.
-
Pour the apple cider into the pot and use a wooden spoon to scrape the bottom, loosening all the browned bits (the fond) stuck to the surface. These flecks are pure flavor and should dissolve into the liquid.
-
In a small bowl, whisk together the Dijon mustard, apple cider vinegar, and stock until smooth. Pour this mixture into the pot with the cider.
-
Stir in the smoked paprika if using. Taste the braising liquid and adjust seasoning—it should taste pleasantly salty, slightly sharp from the vinegar, subtly sweet from the cider, and savory from the stock. Add a pinch more salt or vinegar if needed before the pork goes back in.
Braising the Pork:
-
Nestle the seared pork back into the pot among the onions. The liquid should come up about halfway or three-quarters of the way up the sides of the meat. If it seems too low, add a bit more stock or cider.
-
Arrange the fresh thyme and rosemary sprigs around and partially under the pork, along with the bay leaves. Fresh herbs will float, so gently push them under the liquid.
Advertisements -
Bring the braising liquid to a gentle simmer over medium-high heat on the stovetop—you should see small bubbles steadily breaking the surface.
-
Cover the pot with its lid (or heavy-duty foil if you don’t have a fitted lid) and carefully transfer it to the preheated 325°F oven. The transition from stovetop to oven is hot—use both hands and be careful.
-
Braise for 2 hours 30 minutes for boneless pork, or 3 hours for bone-in pork. Do not open the lid or check on the pork during this time. Every time you lift the lid, you release heat and extend the cooking time. Trust the process.
Adding the Apples and Final Cooking:
-
After the initial braising time, carefully remove the pot from the oven (it’s very hot). Use an oven mitt to remove the lid, as steam will escape. The pork should be quite tender already, though not quite fall-apart stage.
-
Quarter the apples and gently nestle them into the braising liquid around the pork, pushing them partially under the liquid so they cook evenly. Don’t worry if some sit above the surface—they’ll soften either way.
-
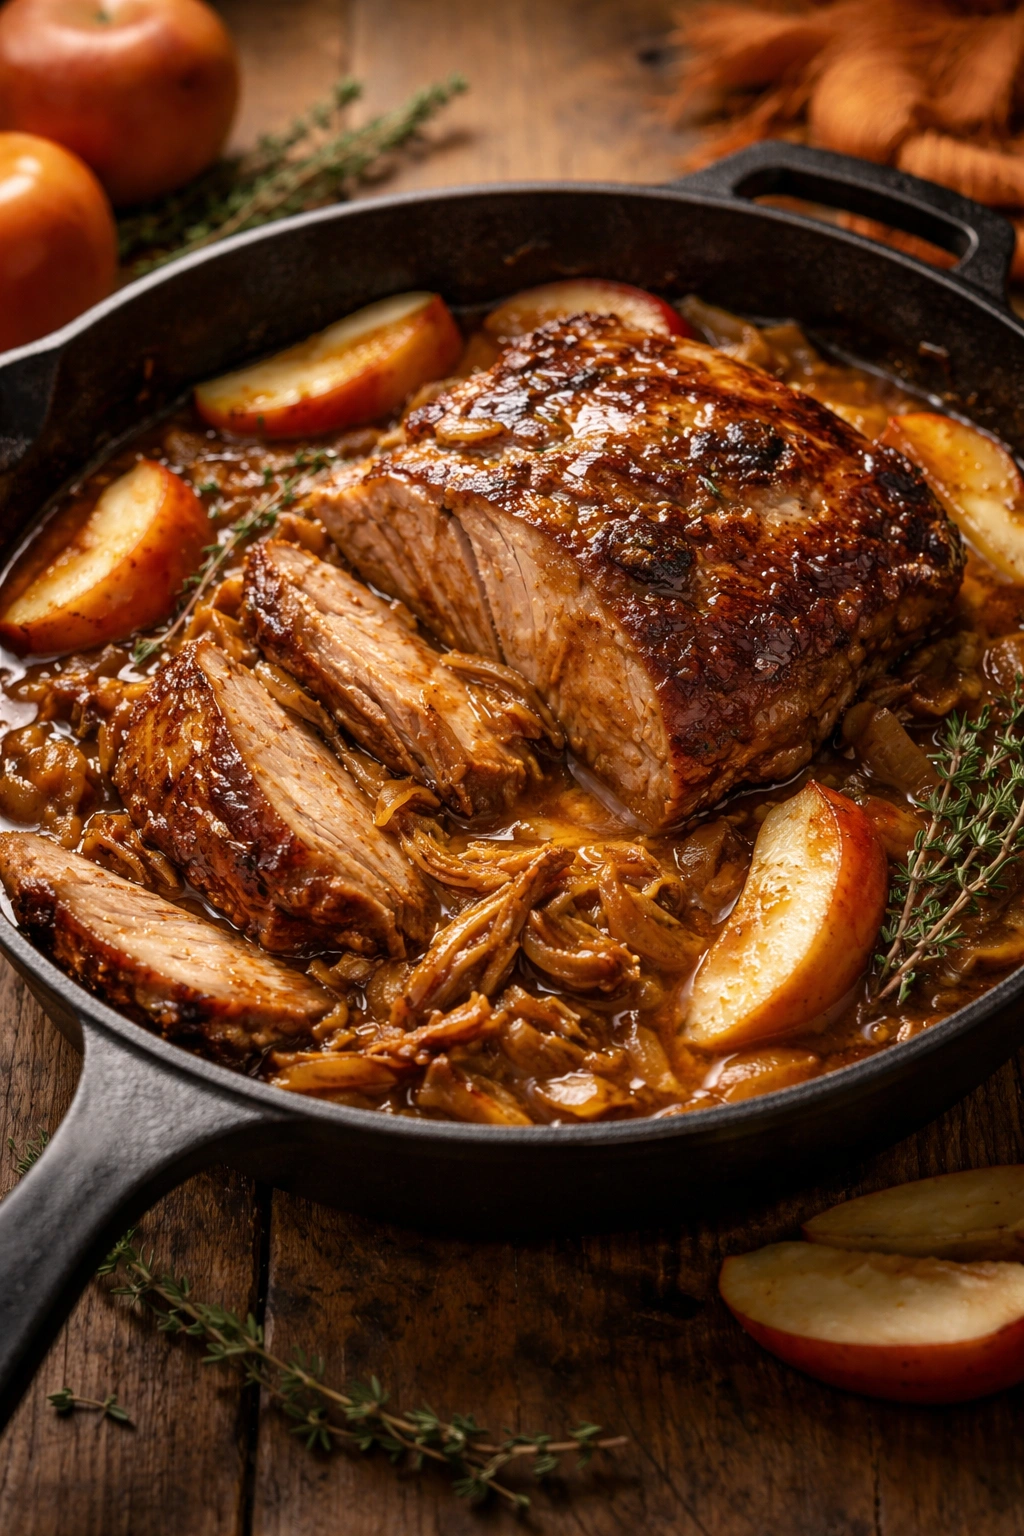
Cover the pot again and return it to the oven for another 30 to 45 minutes. The pork will reach complete fall-apart tenderness, and the apples will become soft and jammy.
-
Remove the pot from the oven. The pork is done when a fork easily pierces the meat and it shreds with minimal resistance. If it still seems tough, return it to the oven for another 15 minutes.
Finishing the Dish:
-
Using tongs or a slotted spoon, carefully transfer the pork to a cutting board. Let it rest for at least 10 minutes before shredding or slicing. During resting, the juices redistribute throughout the meat, resulting in a juicier finished dish.
Advertisements -
While the pork rests, fish out and discard the herb sprigs and bay leaves from the braising liquid. Leave the onions and apples—they’re delicious.
-
Optional (but recommended): For a thicker, more concentrated sauce, carefully transfer the braising liquid (without the meat) to a wide saucepan and simmer over medium-high heat for 5 to 8 minutes. This reduces the liquid slightly and intensifies flavors. Watch carefully, as the liquid can reduce quickly. You can also skim away excess fat from the surface using a shallow spoon if you prefer a lighter sauce.
-
Shred the rested pork using two forks or your hands (once it’s cool enough to handle), pulling it into bite-sized pieces. Discard any bones if using bone-in pork.
-
Return the shredded pork to the pot with the braising liquid and apples, or keep them separate if you prefer (some people like to control the ratio of meat to sauce when serving).
-
Taste and adjust seasoning with additional salt, pepper, or apple cider vinegar as needed. Garnish with fresh chopped parsley or chives just before serving.
Practical Tips to Ensure Perfect Results Every Time
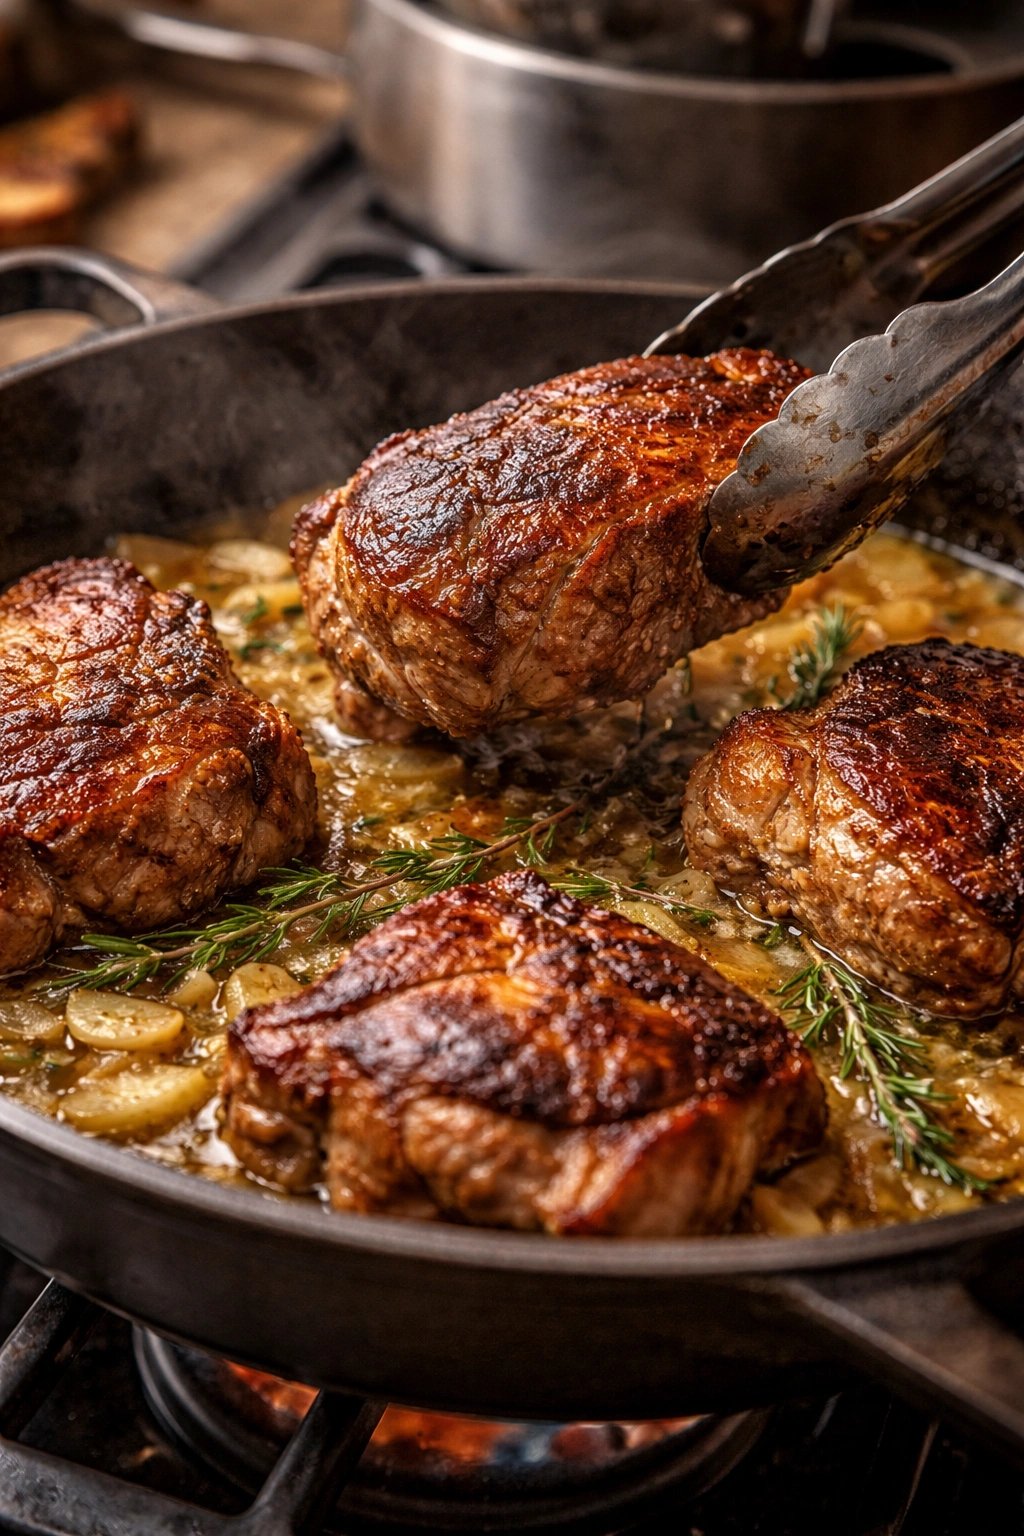
Searing is not optional. This is the single most important step for flavor development. Don’t rush it, don’t skip it, and don’t crowd the pan. Some cooks prefer to sear the pork in batches to ensure even browning, especially if the pieces are large. An underbrown crust means a flat-tasting sauce, no matter what else you do.
The liquid level matters tremendously. Too little liquid means the top of the pork dries out and the sauce becomes too thick and concentrated. Too much liquid means the pork steams rather than braises, and the sauce tastes watery. The halfway-to-three-quarters mark is the sweet spot. If your pot is slightly smaller or your pork slightly larger than expected, add more liquid rather than less.
Resist the urge to open the lid. Every time you peek, heat escapes and the cooking time extends. Braising is a process that requires patience and trust. Your oven’s temperature is doing the work; checking on the pork disrupts that process.
Fresh herbs truly are superior to dried. Dried herbs can taste dusty and flat, while fresh herbs contribute bright, vital flavor. If you must use dried herbs, use about one-third the amount of fresh—so 1 tablespoon fresh becomes 1 teaspoon dried. Omit the fresh herb sprigs at the end if using dried; they won’t soften and will just get stuck between teeth.
Apple choice affects the final dish. Granny Smith apples provide tartness that balances richness beautifully. Honeycrisp and Pink Lady apples are sweeter and create a more dessert-like finish. You can use a combination—half Granny Smith, half sweet apple—for the most complex flavor.
Bone-in pork takes longer but yields richer sauce. The bone adds gelatin and flavor to the braising liquid, creating a silkier sauce. If using bone-in pork, budget an extra 30 to 45 minutes of braising time. The meat is done when it literally falls off the bone with the slightest pressure.
Common Mistakes and How to Avoid Them
Underbrowned pork: This results in a flat-tasting sauce and less-developed flavors overall. If your pork isn’t significantly darker than the original color when you finish searing, increase the heat slightly and sear longer. The goal is a mahogany or deep chestnut color.
Braising liquid that’s too thin: This usually happens when you use too much liquid or simmer it too gently. Remember: braising liquid should reduce and concentrate as the pork cooks. If your finished sauce looks watery, simmer it on the stovetop for a few minutes to reduce and intensify flavors.
Pork that tastes one-dimensional: This indicates the braising liquid lacks balance. Always taste your liquid before the pork goes in. It should have sweet, savory, salty, and slightly sour (acidic) notes all present. If it tastes too sweet, add a touch more vinegar. Too savory? Add a pinch more cider. Too salty? Add a splash more stock.
Apples that completely disintegrate: You added them too early or sliced them too thin. Apples should be quartered or thickly sliced, and they should be added only in the final 30 to 45 minutes. If your apples turn to mush, it’s not a disaster—the sauce becomes slightly thicker and more apple-flavored, which is still delicious.
Tough or stringy pork: This usually means the braising temperature was too high (the liquid was boiling rather than gently simmering), or the pork wasn’t braised long enough. Make absolutely sure your oven is at 325°F, not 350°F or higher. Use an oven thermometer to verify. For the time, a large pork shoulder simply needs those hours to break down properly.
Sauce that separates: This happens when fat rises to the surface and looks greasy. This is cosmetic—the sauce is still delicious. Simply skim the surface fat with a shallow spoon before serving, or chill the leftovers in the fridge. The fat solidifies on top and lifts off easily.
Variations and Flavor Twists You Can Try
Once you’ve mastered the basic recipe, this dish invites creativity. For deeper, earthier flavors, replace half the apple cider with red wine. Red wine adds tannins and complexity that play beautifully with pork and apples. The braising time remains the same; only the flavor profile shifts.
To add heat and smokiness, increase the paprika to 1 teaspoon and add ½ teaspoon cayenne pepper. This creates a spicy, warming version that’s wonderful for cooler evenings. Alternatively, add fresh thyme and a tablespoon of pure maple syrup to the braising liquid for a sweeter, more autumnal version.
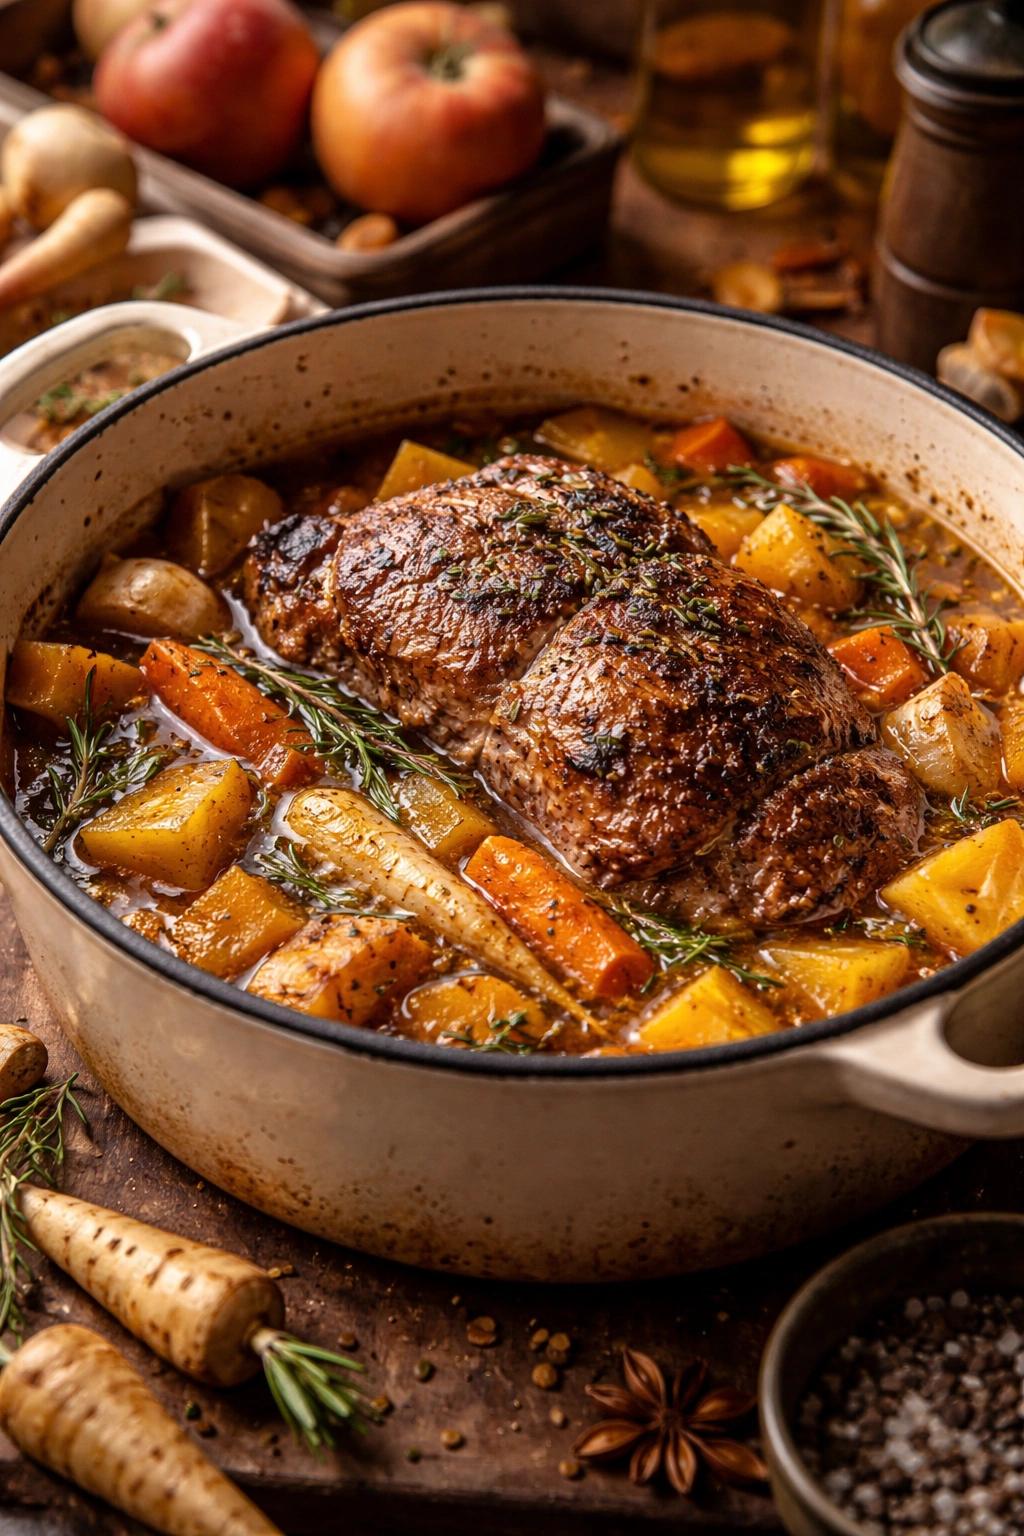
Vegetable additions make the dish more complete. Add diced parsnips, carrots, or cubed butternut squash to the pot during the final 45 minutes of cooking. These vegetables braise alongside the pork and absorb the flavorful liquid. Root vegetables become silky and almost caramel-like after hours of braising.
For a lighter version, replace half the pork shoulder with cubed pork butt and reduce the cooking time to 1.5 to 2 hours. Smaller pieces braise faster while still becoming tender. This works beautifully if you prefer quicker cooking or smaller portions.
To make it slow-cooker friendly, sear the pork and onions on the stovetop as directed, then transfer everything—pork, liquid, herbs, and aromatics—to a slow cooker. Cook on low for 7 to 8 hours or on high for 4 to 5 hours. Add apples in the last 30 to 45 minutes. The result is slightly less concentrated sauce than oven braising, but the flavor is genuinely wonderful.
For a Dijon-forward version that tastes slightly French, increase the mustard to 3 tablespoons and add a cup of white wine to the braising liquid, reducing the cider to 1 cup. Add fresh tarragon instead of rosemary. This creates a more sophisticated flavor profile perfect for dinner parties.
Storage, Reheating, and Make-Ahead Strategies
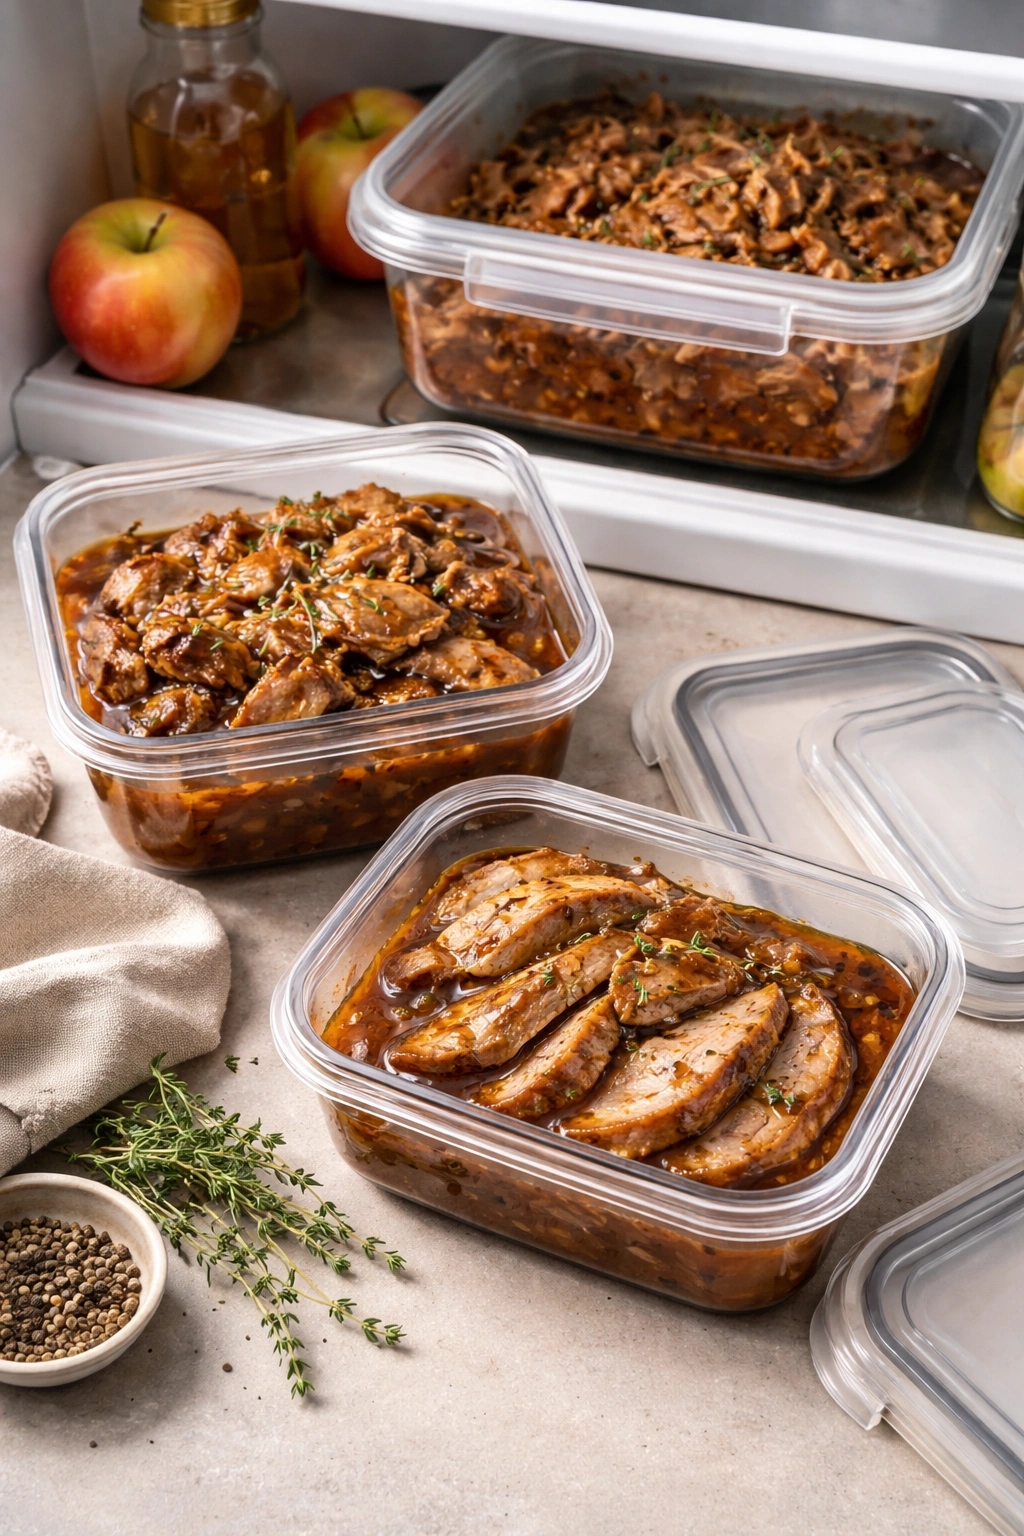
Braised pork actually improves overnight, as flavors continue to meld and deepen. Allow it to cool completely, then transfer the pork and braising liquid to airtight containers. Refrigerate for up to 4 days. The fat will solidify on top as the sauce cools—you can leave it (it protects the meat and adds flavor) or remove it before reheating if you prefer a lighter result.
To reheat, thaw overnight in the refrigerator if frozen, then warm gently on the stovetop over low heat with a splash of broth or apple cider to restore moisture. Never boil the braising liquid violently, as this can make the pork stringy. Microwave reheating is fine for individual portions but tends to dry out larger quantities.
The pork freezes beautifully for up to 3 months. Divide it into portions in freezer-safe containers with enough braising liquid to keep the meat moist. Label with the date and contents. Thaw overnight in the refrigerator before reheating.
Make this dish the day before you plan to serve it. This is genuinely ideal. You finish most of the work, refrigerate everything overnight, and then simply reheat gently the next day. The flavors deepen, and you avoid end-of-day stress. Many home cooks actually find that braised dishes taste better after sitting overnight—the liquid penetrates more thoroughly, and all the flavors integrate.
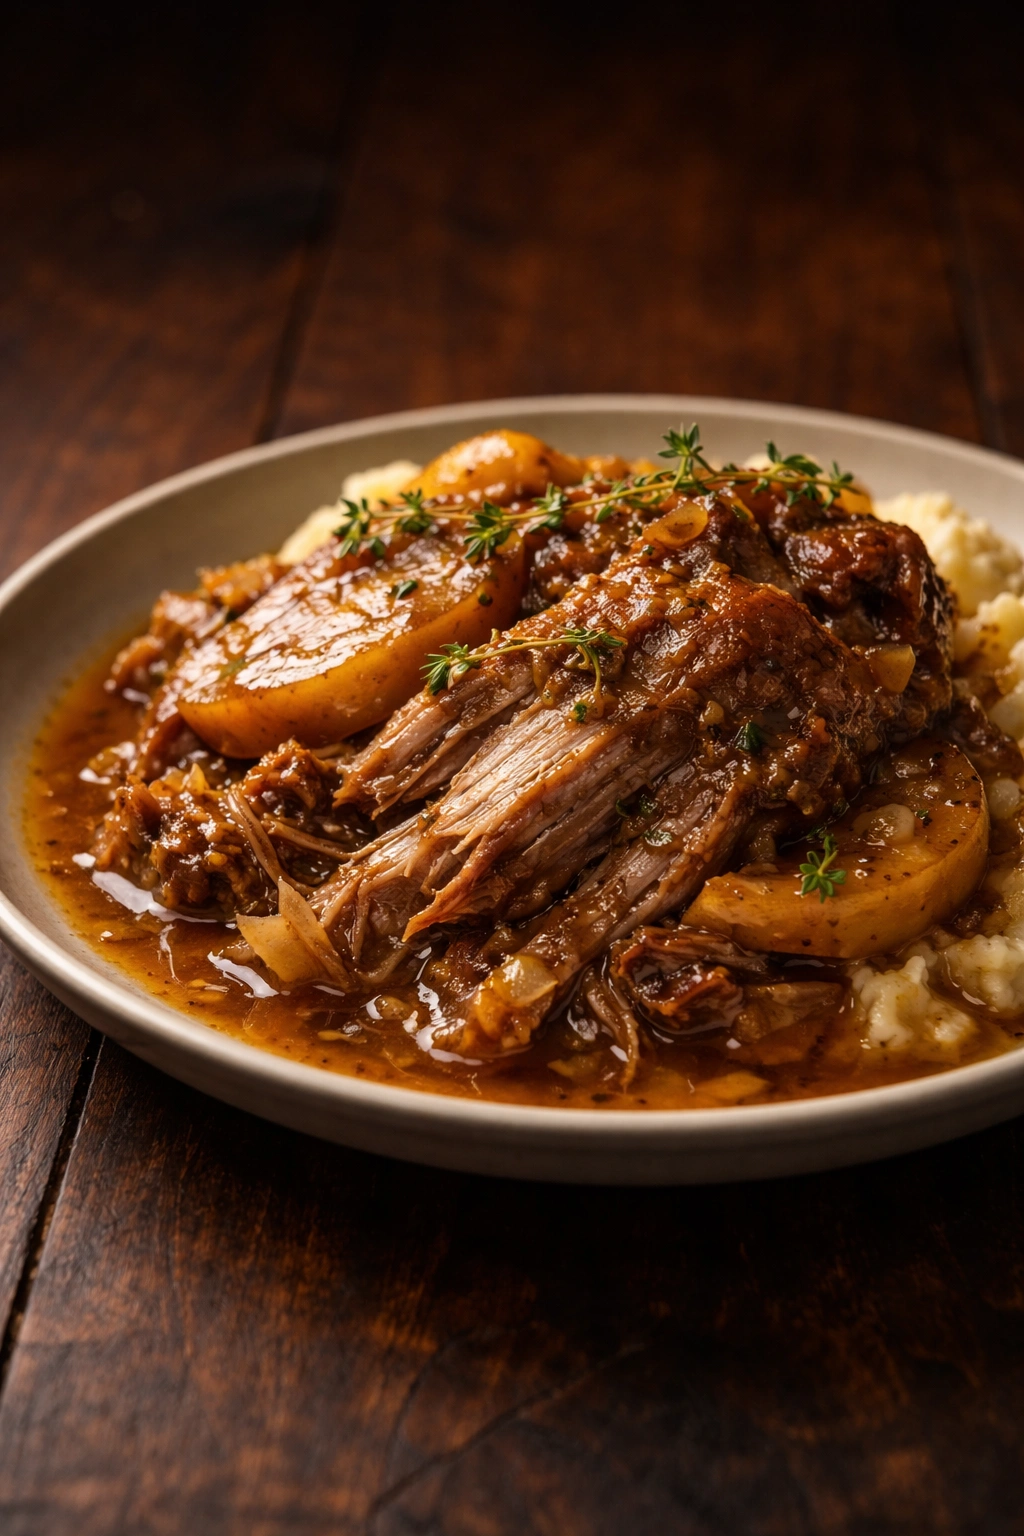
Serving Suggestions and Perfect Side Pairings

The pork itself is rich and flavorful, so it pairs beautifully with creamy, neutral sides that provide contrast. Mashed potatoes are the classic choice—their starchy sweetness and buttery richness complement the tangy-savory pork. Whipped cauliflower offers a lighter option with similar texture. Creamy polenta or buttered egg noodles soak up the braising liquid luxuriously.
Fresh, acidic vegetables provide brightness that cuts the richness. Sautéed broccolini with garlic, blanched green beans tossed with butter and lemon, or a crisp arugula salad dressed with a sharp vinaigrette all work beautifully. These vegetables shouldn’t be heavy or creamy—you want them to feel fresh and alive as a counterpoint to the rich braised pork.
For a lighter meal, serve the pork over rice or quinoa. Brown rice has enough texture and earthy flavor to stand up to the braising liquid without feeling heavy. Quinoa, with its slightly nutty taste, is wonderful and adds protein for a more complete meal.
Crusty bread is absolutely essential for soaking up every last drop of braising liquid. A sturdy sourdough or hearty whole grain bread means your guests can wipe their plates clean with grace. Some people crumble bread into the sauce itself, which is delicious if unconventional.
For entertaining, plate it like a restaurant would: Spoon a mound of mashed potatoes or polenta into the center of the plate, lean a slice or pile of shredded pork against it, and spoon the braising liquid and apples around everything. Garnish with fresh herbs and a sprinkle of fleur de sel (fancy finishing salt) for visual appeal.
Wine pairing matters. Serve the same apple cider you used in the braise, chilled, for a fun callback to the dish. A dry Riesling echoes the sweetness of the cider while its acidity cuts through richness. A Pinot Noir from a cooler climate, with its earthy undertones and bright cherry notes, is sublime. Even a full-bodied amber ale or cider-based beer works beautifully if you prefer beer to wine.
Final Thoughts
Apple cider braised pork represents everything wonderful about slow cooking: minimal active effort, maximum flavor, the unmistakable aroma of home cooking filling your kitchen, and the absolute certainty that your guests or family will find it impressive. This is not a dish that requires special skills or exotic ingredients. It requires only time, patience, and understanding of how low, slow heat transforms tough cuts into silky tenderness.
The recipe gives you a framework, but your own intuition matters. Taste the braising liquid and adjust seasoning before the pork goes in. Add extra apple cider if you want more sweetness, extra vinegar if you want more brightness, extra mustard if you want more complexity. These small adjustments make the dish yours.
Once you’ve made this once, you’ll find yourself returning to it repeatedly throughout cooler months. It’s comforting without being boring, elegant without being fussy, and absolutely foolproof if you follow the basic principles. Most importantly, it’s the kind of food that brings people to the table and makes them linger long after dessert, talking and enjoying each other’s company—which is really what good cooking is all about.