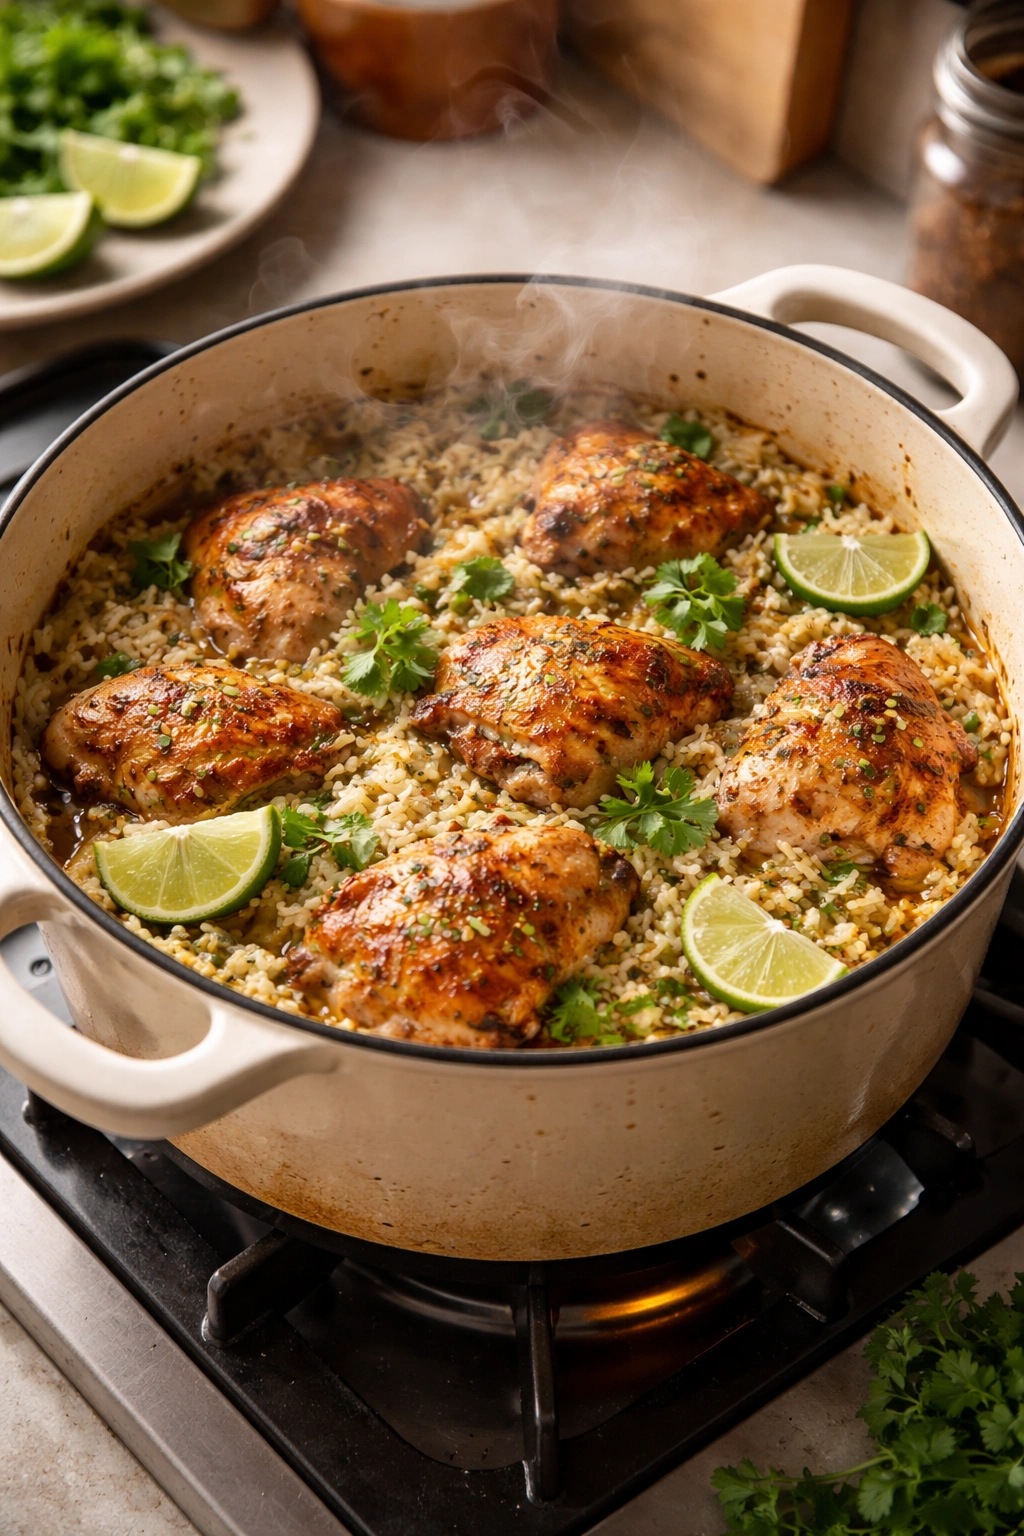
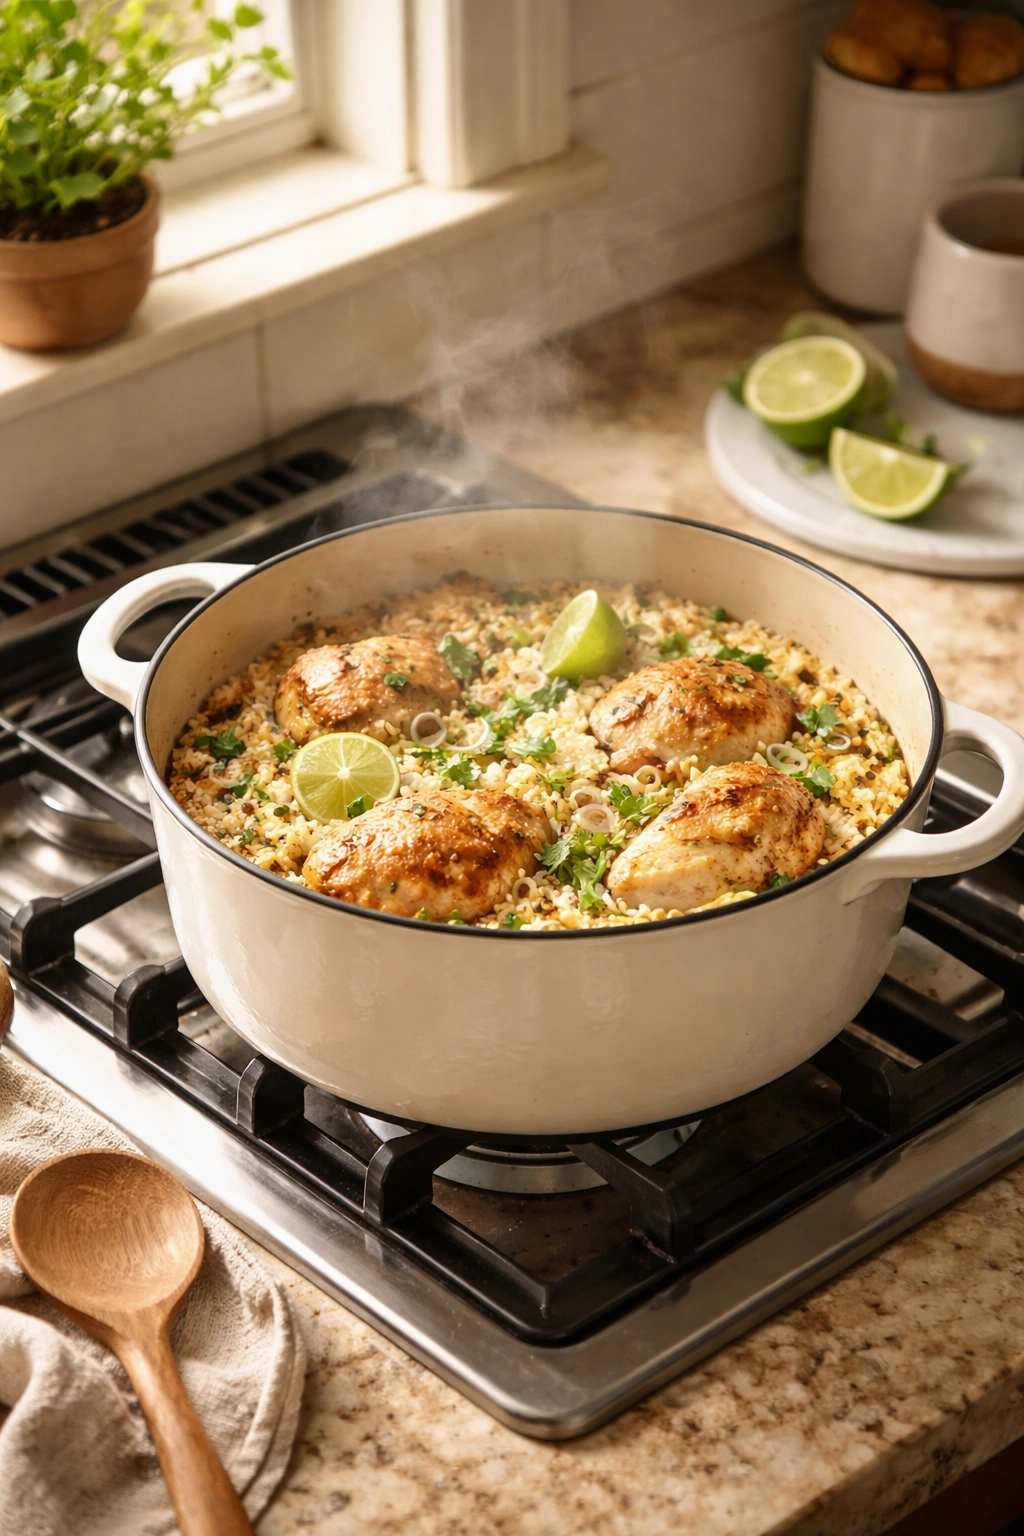
There’s something magical about watching a one-pot dinner come together — aromatic steam rising from a single Dutch oven, tender chicken nestling into fluffy rice, the kitchen filling with the intoxicating scent of lime zest, ginger, and coconut. That’s exactly what happens when you make coconut lime chicken and rice, a dish that tastes far more complicated than it actually is. The beauty of this recipe is that everything cooks simultaneously in one pot, transforming simple ingredients into a restaurant-quality meal that rivals any takeout order. What makes this approach so brilliant is that the chicken releases its own flavorful juices, which the rice absorbs as it cooks — creating layers of flavor you simply can’t achieve by cooking them separately.
This isn’t your grandmother’s plain chicken and rice. The combination of creamy coconut milk, bright citrus, warming spices, and fresh aromatics creates a dish that’s simultaneously comforting and crave-worthy. Whether you’re a weeknight cook desperate for something that tastes impressive without demanding hours in the kitchen, or someone who wants to nail a dinner-party-worthy meal that requires minimal cleanup, this recipe delivers on every front. The technique works whether you’re cooking in a traditional Dutch oven in your conventional oven, using a stovetop simmer, or taking advantage of an Instant Pot. You’ll find detailed instructions for all three methods below because the goal isn’t to complicate your life — it’s to give you options that fit your kitchen and your schedule.
Why This One-Pot Approach Actually Works
The genius of one-pot cooking isn’t just about convenience, though that’s certainly part of it. When chicken thighs cook directly in the same pot as the rice, they impart their rendered fat and savory juices into the cooking liquid. As the rice absorbs this flavorful broth, every grain becomes deeply seasoned from the inside out — something that never happens when you cook them in separate vessels. You’re not just saving yourself from washing multiple pans; you’re actually creating more flavorful food through smart, integrated cooking.
The chicken itself stays remarkably juicy in this method because it’s constantly surrounded by cooking liquid and steam. Bone-in thighs are especially ideal because their higher fat content and collagen content make them nearly impossible to overcook. Even if the cooking time stretches a bit longer than intended, the meat remains tender and succulent. The skin, when positioned skin-side up during the final phase, achieves a golden, lightly crisped exterior while the meat underneath stays moist — a result that requires virtually no extra effort on your part.
Another reason this works so well is the flavor balance that develops naturally. The rice cooks in a mixture of chicken broth and coconut milk, which means it benefits from both savory and creamy elements simultaneously. Add turmeric for earthiness, ginger and garlic for aromatic depth, and fresh lime juice for brightness, and you’ve got a complete flavor story that unfolds with every bite. This isn’t a situation where you taste the chicken, then separately taste the rice. The two components are fundamentally intertwined, each enhancing and supporting the other.
The Science Behind Creamy Coconut Rice
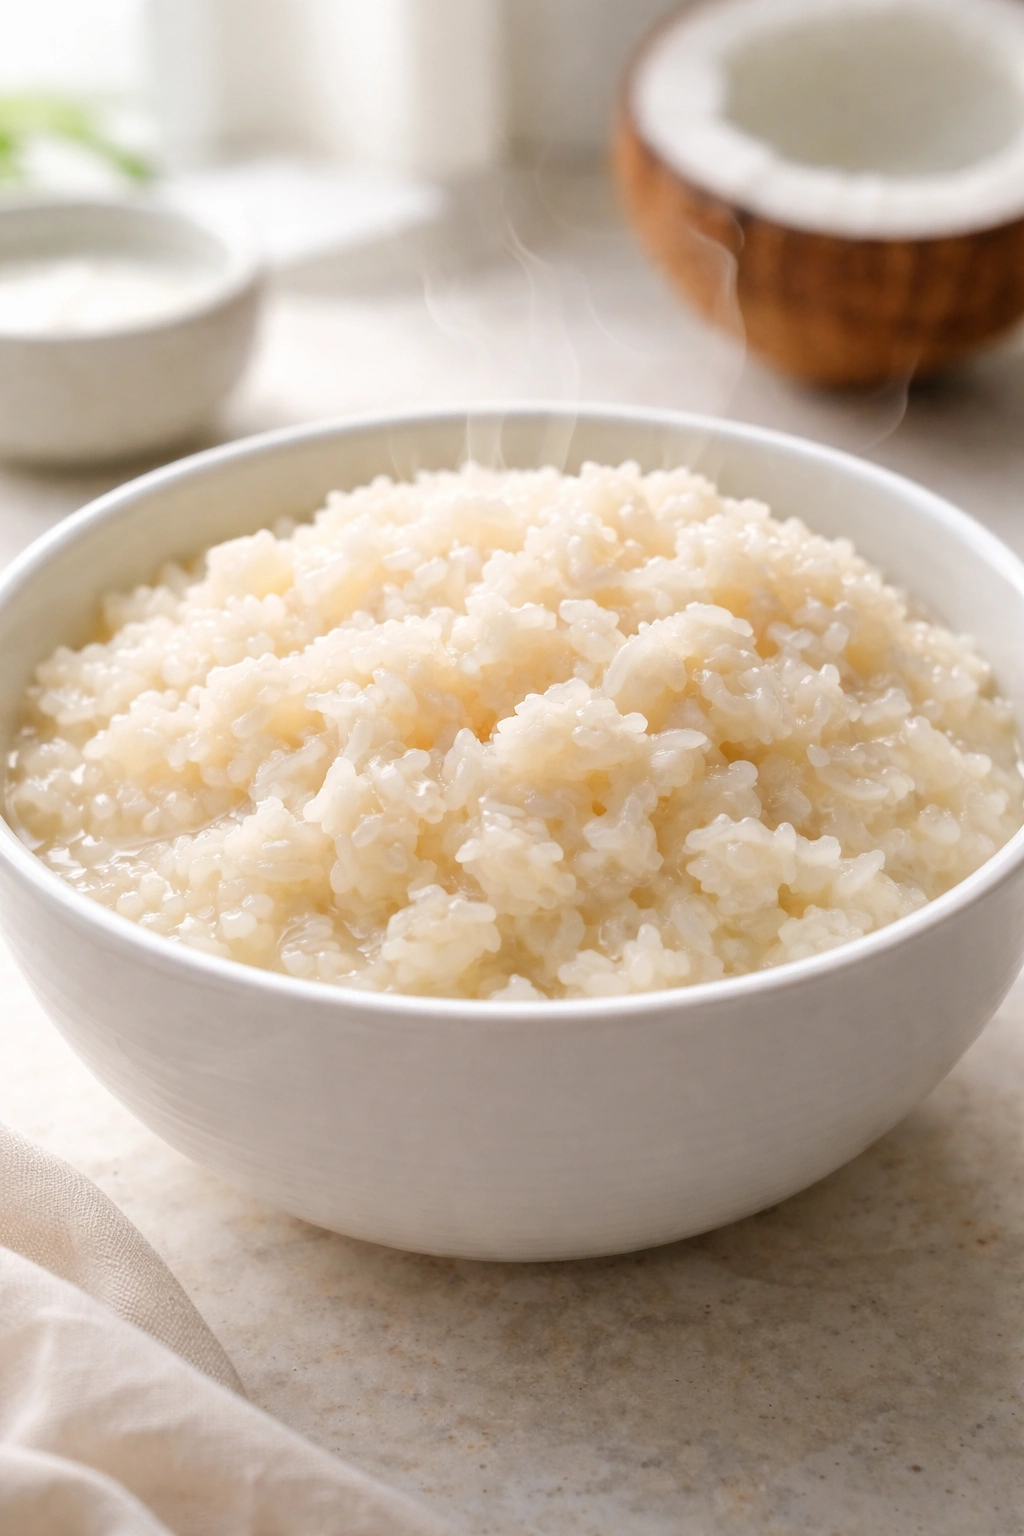
Understanding what’s happening at the molecular level helps explain why this rice turns out so incredibly good. Full-fat coconut milk contains fat-soluble compounds that carry flavor intensely — the same reason a pat of butter makes everything taste better. When you cook rice in a mixture that’s roughly half coconut milk and half broth, those fat molecules distribute throughout the pot. They get absorbed into the rice grains alongside the savory, umami-rich liquid from the broth. The result is rice that’s genuinely creamy without feeling heavy, with subtle sweetness from the coconut balanced perfectly by savory chicken and bright citrus.
The starches in the rice also play a role here. As the rice cooks and absorbs liquid, those starches gelatinize and swell, which creates that creamy, unified texture where the rice holds together without being mushy. The key is matching your liquid-to-rice ratio correctly — something we’ll cover in detail in the ingredient section — and resisting the urge to stir constantly. Hands-off cooking is actually the secret to perfectly cooked rice. Once you’ve brought the liquid to a boil and covered the pot, your job is done. The gentle, even heat does all the work.
Selecting Your Chicken: Thighs vs. Breast
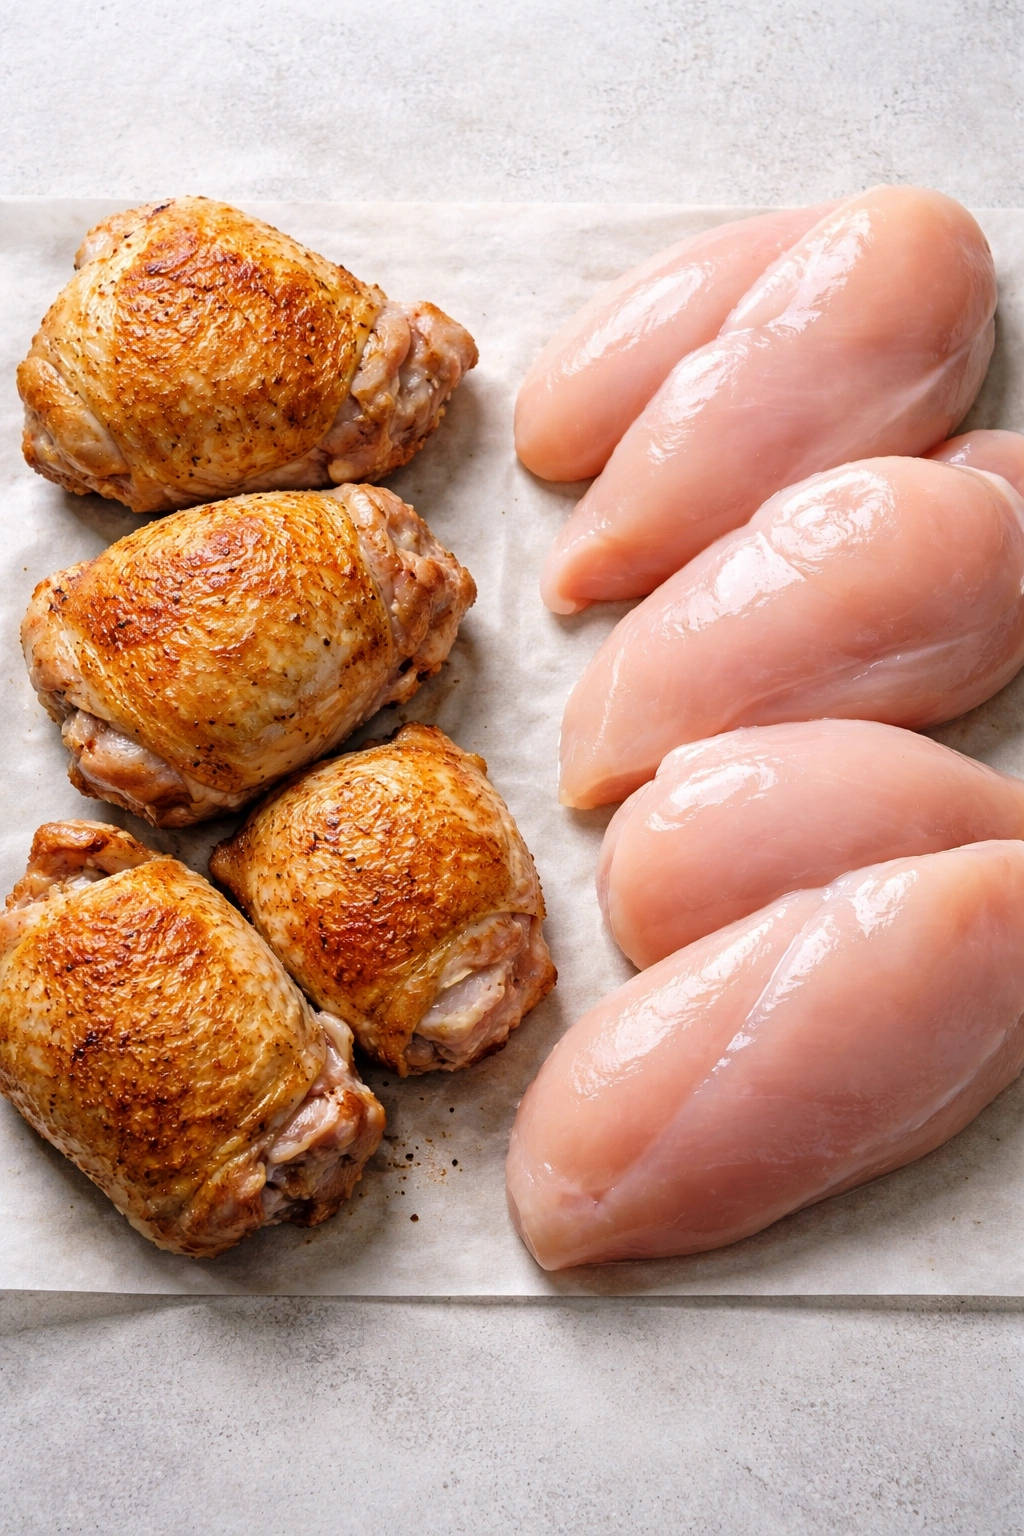
This recipe can technically be made with either chicken thighs or chicken breasts, but the results differ noticeably. Bone-in, skin-on chicken thighs are the gold standard for this dish. They contain more intramuscular fat and connective tissue, which means they stay moist even if cooking extends past the target time. The bone-in approach also contributes deep, savory flavor to the broth as the chicken cooks. When seared skin-side down initially and then positioned skin-side up for the oven phase, they develop that desirable golden, crispy exterior that adds textural contrast.
Chicken breasts, if you prefer them, will work but require slightly different handling. Use boneless, skinless breasts and cut them into bite-sized cubes or slice them into strips after cooking, which distributes the chicken throughout the rice more evenly. The meat will be leaner, which some people prefer, but it lacks the inherent juiciness that thighs provide. If using breasts, reduce the cooking time slightly — they cook faster than thighs — and watch carefully to avoid drying them out. Many cooks find that breasts benefit from a quick marinade (15-20 minutes) in part of the coconut milk mixture before the rice is added, which helps them stay moist.
Understanding the Three Cooking Methods
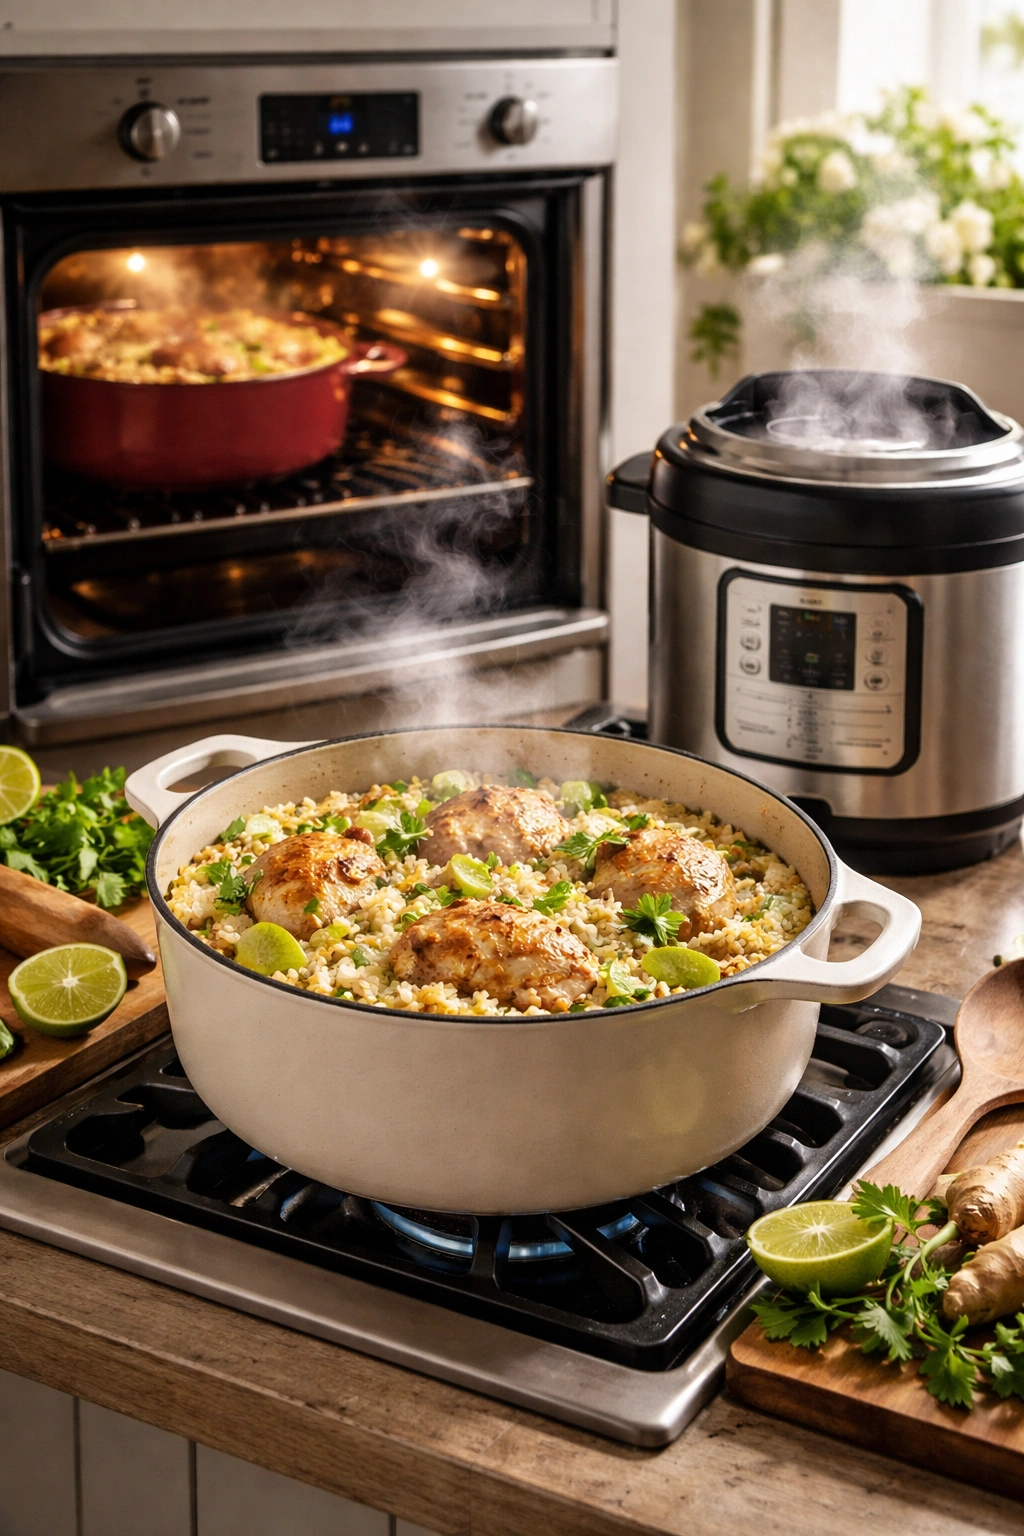
Oven Method (Dutch Oven or Large Oven-Safe Skillet): This is the most traditional approach and offers excellent control. You sear the chicken on the stovetop, build your flavor base with aromatics, add the rice and liquid, then transfer everything to a 375°F oven where both chicken and rice cook together in about 30 minutes. The dry, even heat of the oven creates ideal conditions for the rice to absorb liquid evenly, and the chicken comes out perfectly cooked without any risk of scorching the bottom of the pot.
Stovetop Method: Using a heavy-bottomed pot on the stovetop offers flexibility and real-time monitoring. You follow the same sequence — sear chicken, build the flavor base, add rice and liquid, then cover and reduce heat to low. Cooking time is similar to the oven method (25-35 minutes depending on your stove’s heat distribution), but you have more control over temperature and can check progress by lifting the lid briefly if you’re uncertain about doneness. The downside is that stovetop heat distribution can be less even than an oven, so there’s slightly more risk of rice sticking to the bottom if your heat is too high.
Instant Pot Method: This pressure-cooking approach is fastest, taking about 15 minutes of pressurized cooking plus natural pressure release time, for a total of roughly 45 minutes including prep. The technique is different — you typically don’t sear the chicken first, instead marinating it in the coconut lime mixture and then pressure cooking everything together, often using the pot-in-pot method with rice cooking in a separate container suspended above the chicken. This method works beautifully and is perfect if you own a pressure cooker and want maximum speed, though some cooks feel it sacrifices a bit of the textural complexity from the searing step.
Building Deep, Balanced Flavor
The aromatics form the foundation of everything that makes this dish delicious. A combination of diced onion, minced fresh ginger, and minced garlic creates what’s often called the flavor base or soffritto of the dish. These three ingredients, when cooked gently in oil until soft and fragrant, develop complex compounds that form the savory backbone. The onion sweetens slightly and becomes mellow, the ginger releases its warm, peppery spice, and the garlic becomes mild and nutty rather than sharp.
Turmeric and other warm spices add earthiness and golden color. This isn’t about heat or intense flavor; it’s about building depth. Turmeric pairs especially well with coconut and lime because its earthy, slightly bitter notes complement the sweetness and acidity perfectly. A little goes a long way — typically just 1/2 to 1 teaspoon per recipe for 4-6 people. Red pepper flakes or fresh chili add a gentle hum of spice that should linger at the back of your palate, not dominate the dish. You’re aiming for balance where the heat enhances rather than overwhelms.
The lime is your brightness and vitality. Both zest and juice are used at different points. The zest — those fragrant oils from the skin — is added early and toasted with the aromatics, which mellows and deepens its citrus character. The juice comes in two portions: some mixed into the cooking liquid for background brightness, and the remainder squeezed over the finished dish just before serving. The final squeeze of fresh lime juice reawakens all the flavors and prevents the dish from tasting flat or coconut-heavy. It’s tempting to skip it, but don’t.
Fresh cilantro serves a similar purpose to lime — it’s fresh, bright, and cuts through richness. Some cilantro gets stirred into the rice during cooking, where it becomes integrated and subtle. More is reserved for garnish, scattered over the top of the finished dish where its herbal flavor registers immediately on your palate. If you despise cilantro (and plenty of people do due to genetic factors that make it taste like soap), fresh parsley or basil work as substitutes.
Yield: Serves 4 to 6 people | Serves 2 with substantial leftovers
Prep Time: 20 minutes (includes chopping aromatics, zesting limes, measuring ingredients)
Cook Time: 30-35 minutes (oven method) | 25-30 minutes (stovetop method) | 15 minutes pressurized + 10 minutes natural release (Instant Pot method)
Total Time: 50-55 minutes (oven) | 45-50 minutes (stovetop) | 45 minutes (Instant Pot)
Difficulty: Intermediate — The technique involves multiple steps and requires attention to building flavors, but nothing is technically challenging. The recipe is forgiving; small variations in timing or ingredient amounts won’t derail you.
The Complete Ingredient List
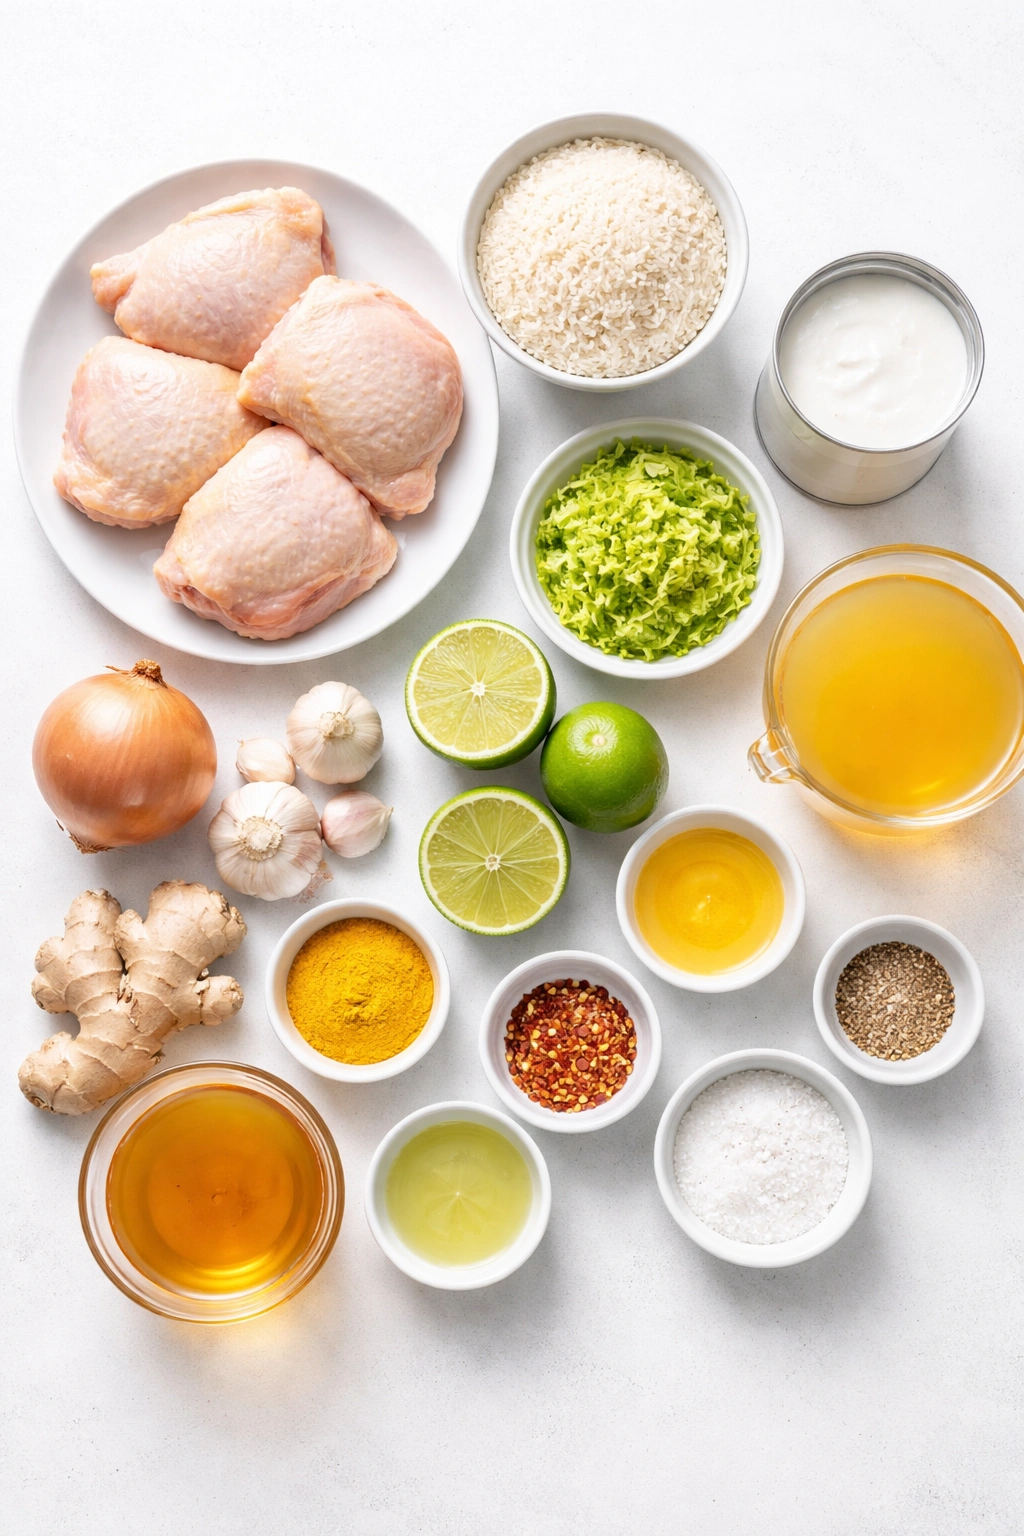
For the Chicken:
- 6-8 bone-in, skin-on chicken thighs (about 2-2.5 pounds), neatly trimmed of excess skin and patted dry
- 1 teaspoon kosher salt
- 1/2 teaspoon freshly ground black pepper
- 1 tablespoon cooking oil (avocado, light olive, or canola oil all work well)
For the Flavor Base:
- 1 large yellow or white onion, finely diced (about 1.5 cups)
- 4 large garlic cloves, minced (about 1.5 tablespoons)
- 1.5-inch piece of fresh ginger root, peeled and finely minced (about 1.5 tablespoons)
- Zest of 2 limes (save the limes for juicing later)
- 1/2 teaspoon ground turmeric
- 1/2 teaspoon crushed red pepper flakes (adjust up or down based on your heat preference)
For the Rice and Liquid:
- 8 ounces dry basmati or jasmine rice (measured as 1.5 cups uncooked), rinsed under cold water until the water runs clear
- 1 cup full-fat unsweetened coconut milk (shake the can well before opening to incorporate the cream)
- 1.75 cups chicken broth (low-sodium preferred so you can control saltiness)
- 1 tablespoon honey or coconut sugar
- 1/2 teaspoon kosher salt (adjust to taste depending on your broth’s sodium level)
- 1/8 teaspoon freshly ground black pepper
For Finishing:
- Juice of 2 limes (about 4 tablespoons), divided — roughly half goes into cooking liquid, half reserved for finishing
- 1/2 cup fresh cilantro leaves, roughly chopped, divided between cooking and garnish
- Additional flaky sea salt and lime wedges for serving
Optional Additions:
- 1 Thai chili or serrano pepper, thinly sliced (for more pronounced heat and color)
- 2 green onions, sliced (adds freshness and a subtle onion bite)
- 1/4 cup shredded unsweetened coconut (toasted in a dry pan for 2-3 minutes, adds textural contrast)
- Plain yogurt or Greek yogurt (for serving alongside, adds cooling creaminess)
- Mango chutney (complements the coconut and lime beautifully)
Step-by-Step Cooking Instructions
Prepare Your Ingredients (Do This First)
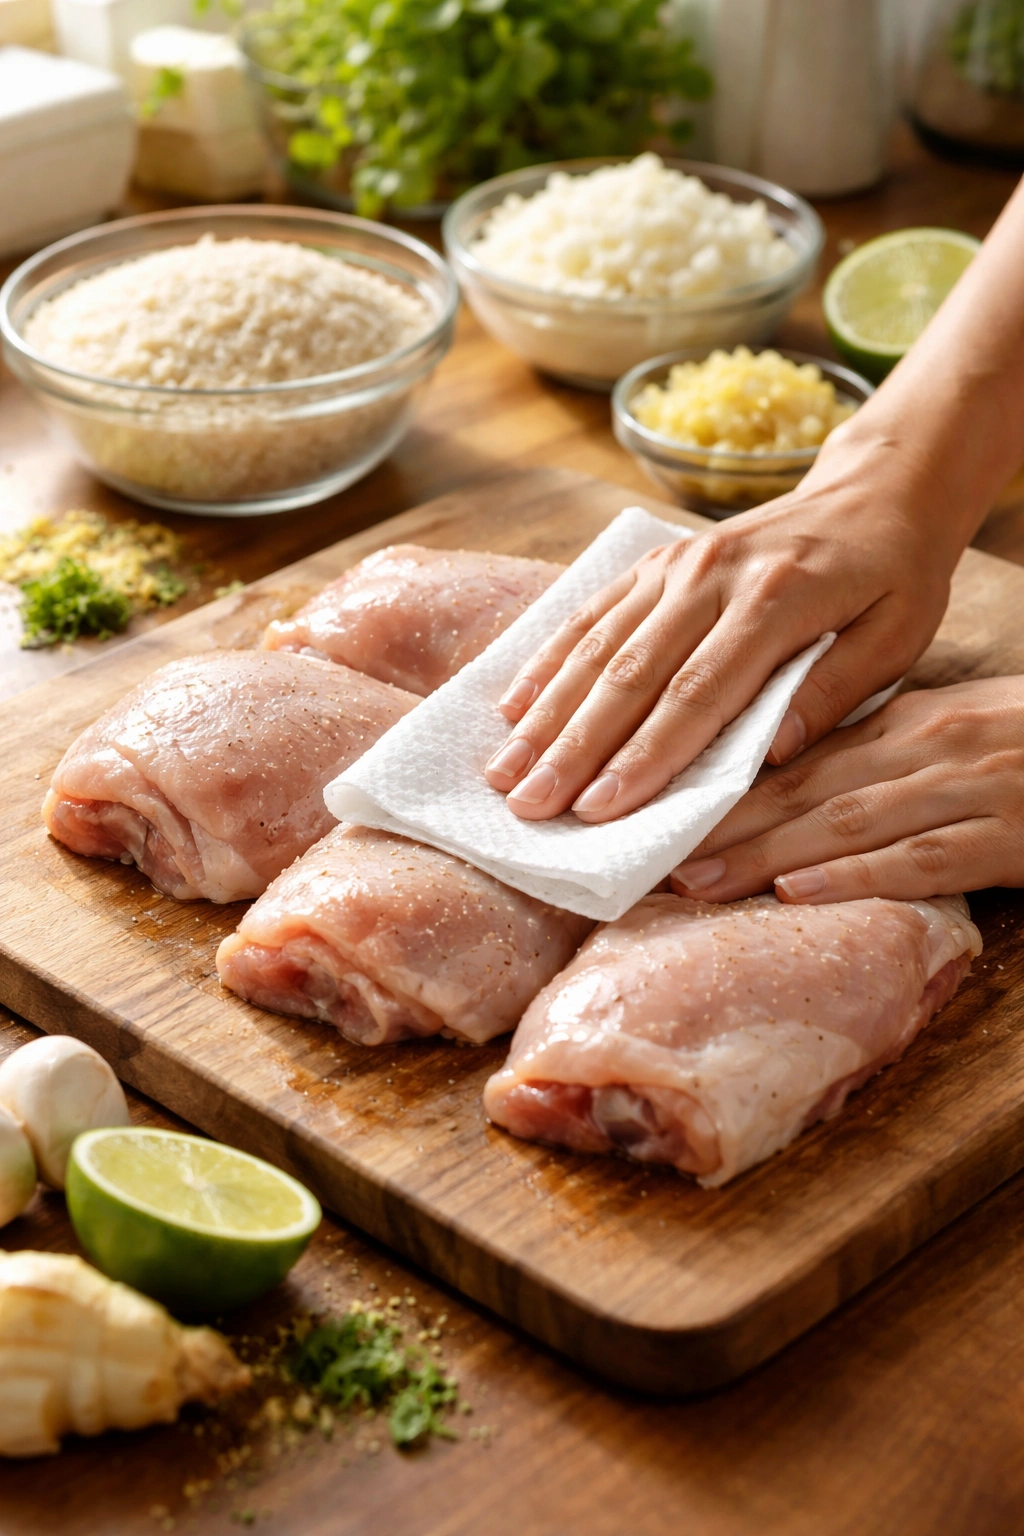
This recipe moves quickly once you begin cooking, so mise en place — having everything prepped and ready — prevents scrambling later. Rinse your rice under cold running water using a fine-mesh strainer, stirring gently with your fingers until the water running through is mostly clear rather than cloudy. This removes excess starch that would otherwise make the rice sticky or more prone to burning. Pat your chicken thighs dry with paper towels; any excess surface moisture will interfere with browning. Dice your onion into roughly 1/4-inch pieces. Mince your garlic finely — you want small pieces that distribute throughout the dish. Peel your ginger with a small spoon (easier than peeling with a knife) and mince it finely as well. Zest your limes and juice them, keeping the zest and juice separate. Chop your cilantro and set aside.
STOVETOP/OVEN METHOD (Most Traditional)
Prep and Initial Searing:
-
Preheat your oven to 375°F (190°C) and position the rack in the center. If using purely stovetop, skip this step.
-
Pat the chicken thighs dry with paper towels and season both sides generously with the teaspoon of kosher salt and 1/2 teaspoon black pepper. Don’t be shy with seasoning — this is your primary opportunity to season the chicken itself; the rice will get its flavor from the cooking liquid.
Advertisements -
Heat 1 tablespoon of oil in a large Dutch oven or oven-safe skillet (at least 5-quart capacity, 12 inches in diameter ideally) over medium-high heat. The oil should shimmer and move easily around the pan when tilted — this indicates it’s hot enough.
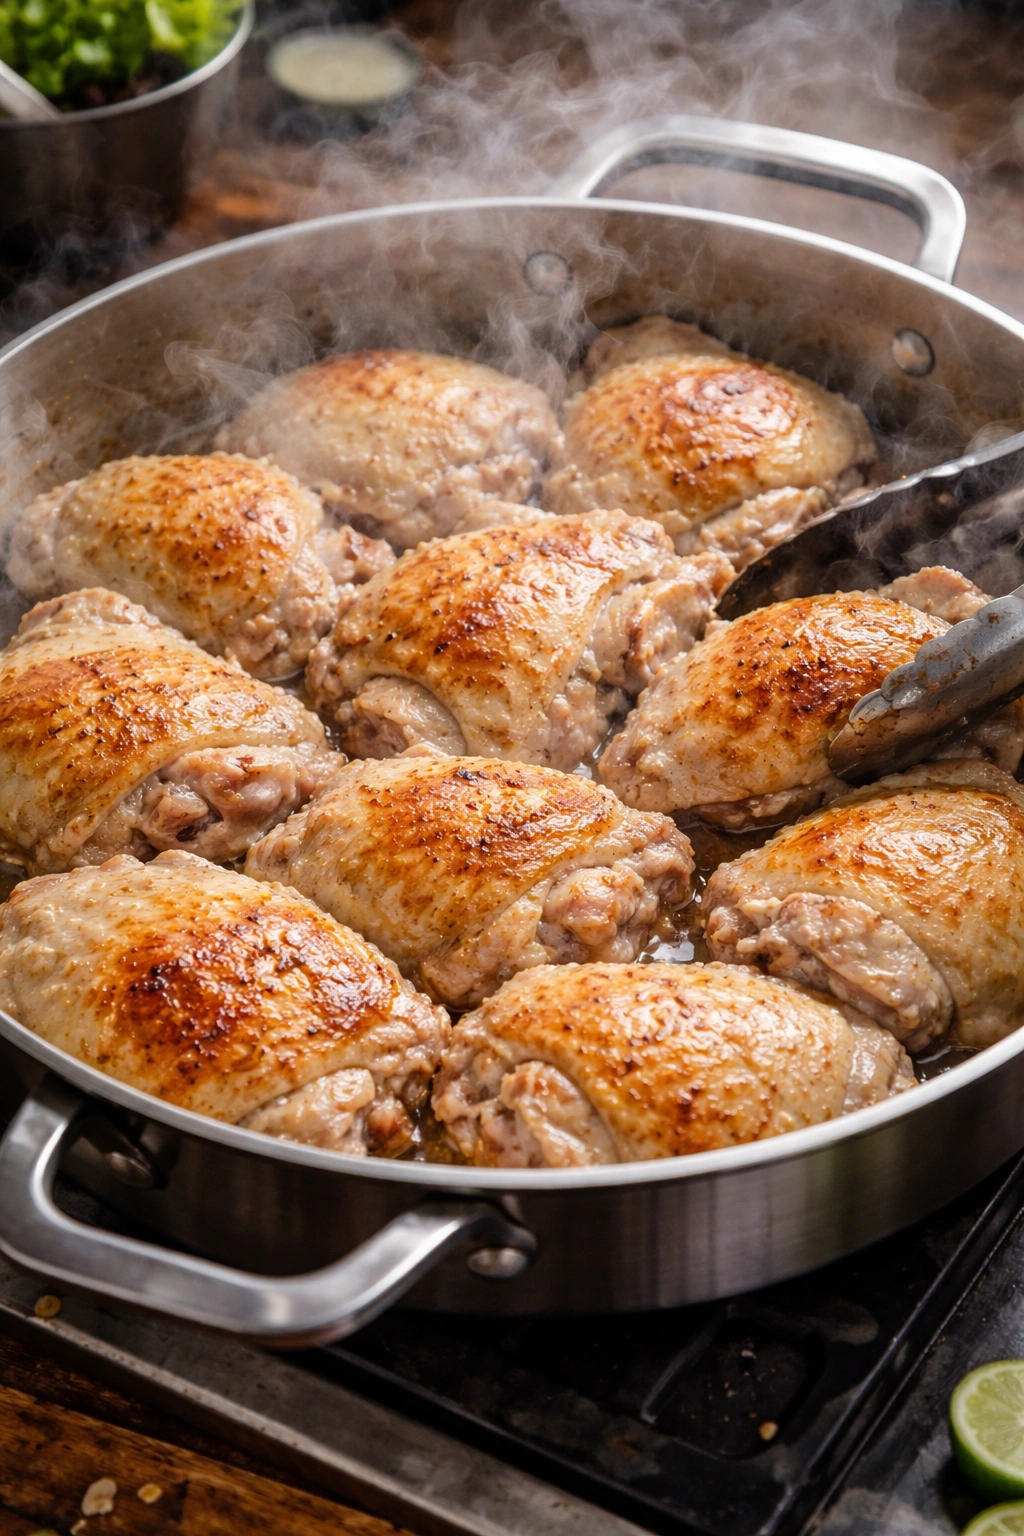
-
Working in batches if necessary to avoid crowding the pan, place the chicken thighs skin-side down in the hot oil. Do not move them for the first 2-3 minutes. This stationary cooking is what creates crispy, golden skin. You’ll hear gentle sizzling; that’s the sound of browning happening. After 2-3 minutes, flip each thigh and cook the other side for 1-2 minutes until lightly browned (the skin side will be darker and more deeply browned than the flesh side, and that’s perfect).
-
Transfer the browned chicken to a clean plate and set aside. Don’t worry that the chicken isn’t fully cooked; it will finish cooking in the oven or on the stovetop later.
Building the Flavor Base:
-
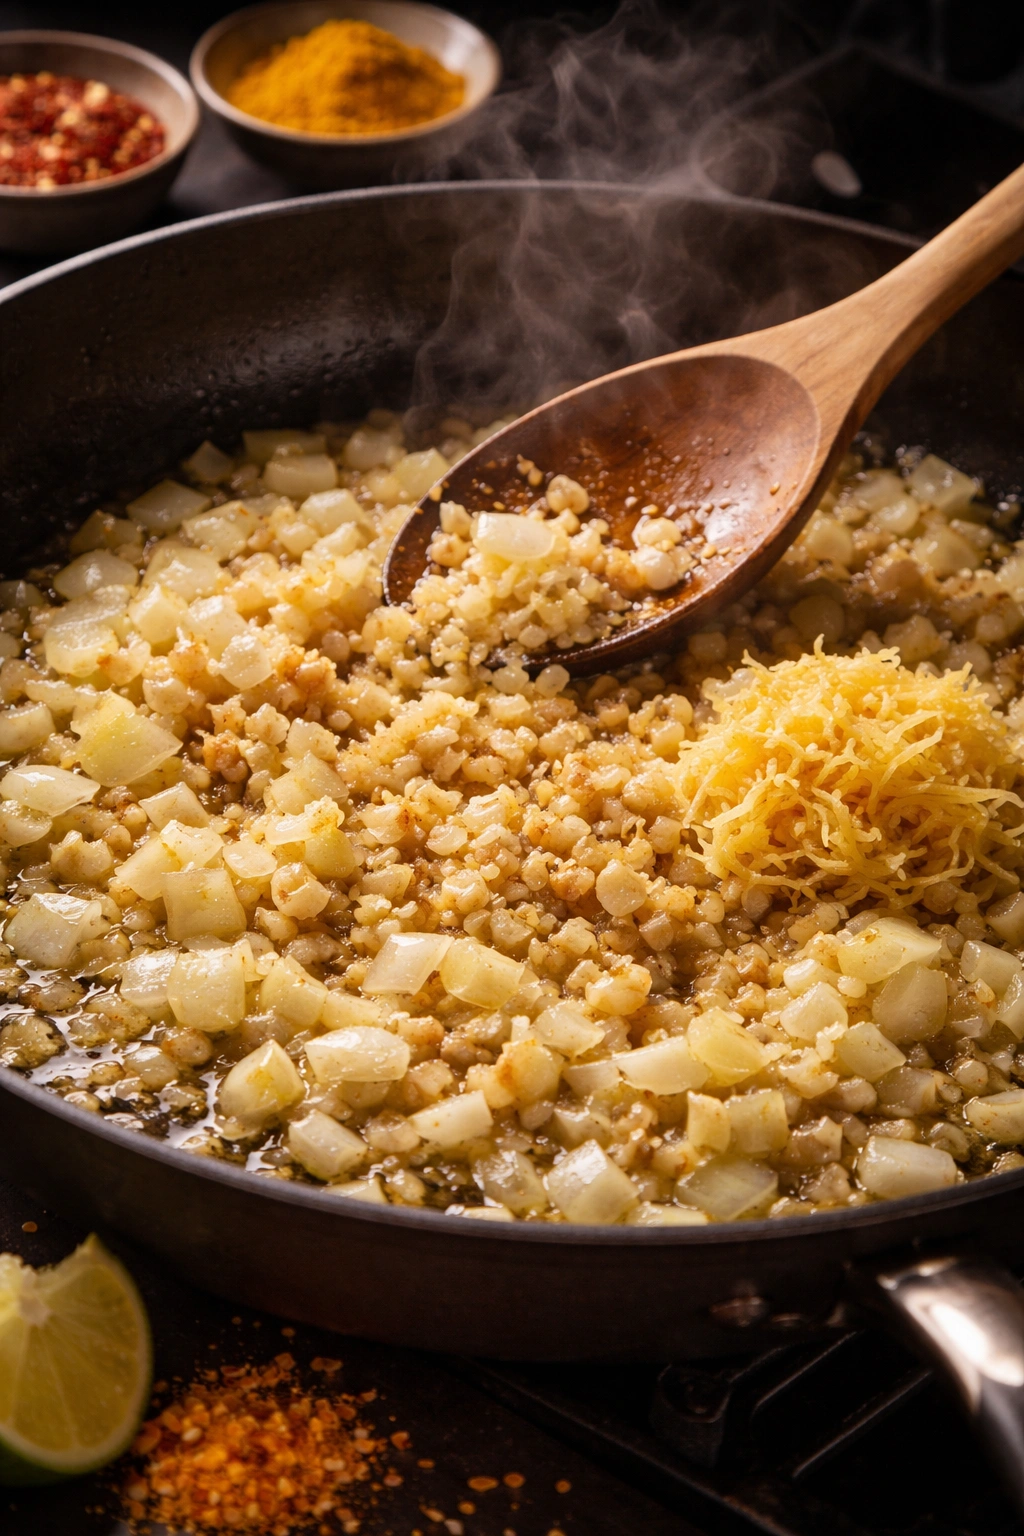
Reduce the heat to medium. Add the diced onion to the same pot (there will be flavorful browned bits stuck to the bottom — this is called fond, and it’s liquid gold for flavor). Stir occasionally and cook for 4-5 minutes until the onion softens and becomes translucent. You should see the onion releasing its natural moisture and beginning to stick slightly to the pot.
-
Add the minced ginger, minced garlic, turmeric, and red pepper flakes. Stir constantly for 1-2 minutes until fragrant. This brief cooking mellows the raw bite of the garlic and ginger while allowing the turmeric to bloom in the oil, which intensifies its flavor and color. Your kitchen should smell incredible at this point.
-
Add the rinsed rice to the pot and stir everything together for 2-3 minutes. The rice grains should become coated with the spiced oil, and you should hear a gentle toasting sound as the rice moves through the pot. This toasting step adds depth and prevents the rice from tasting bland.
Combining Liquids and Bringing to a Boil:
-
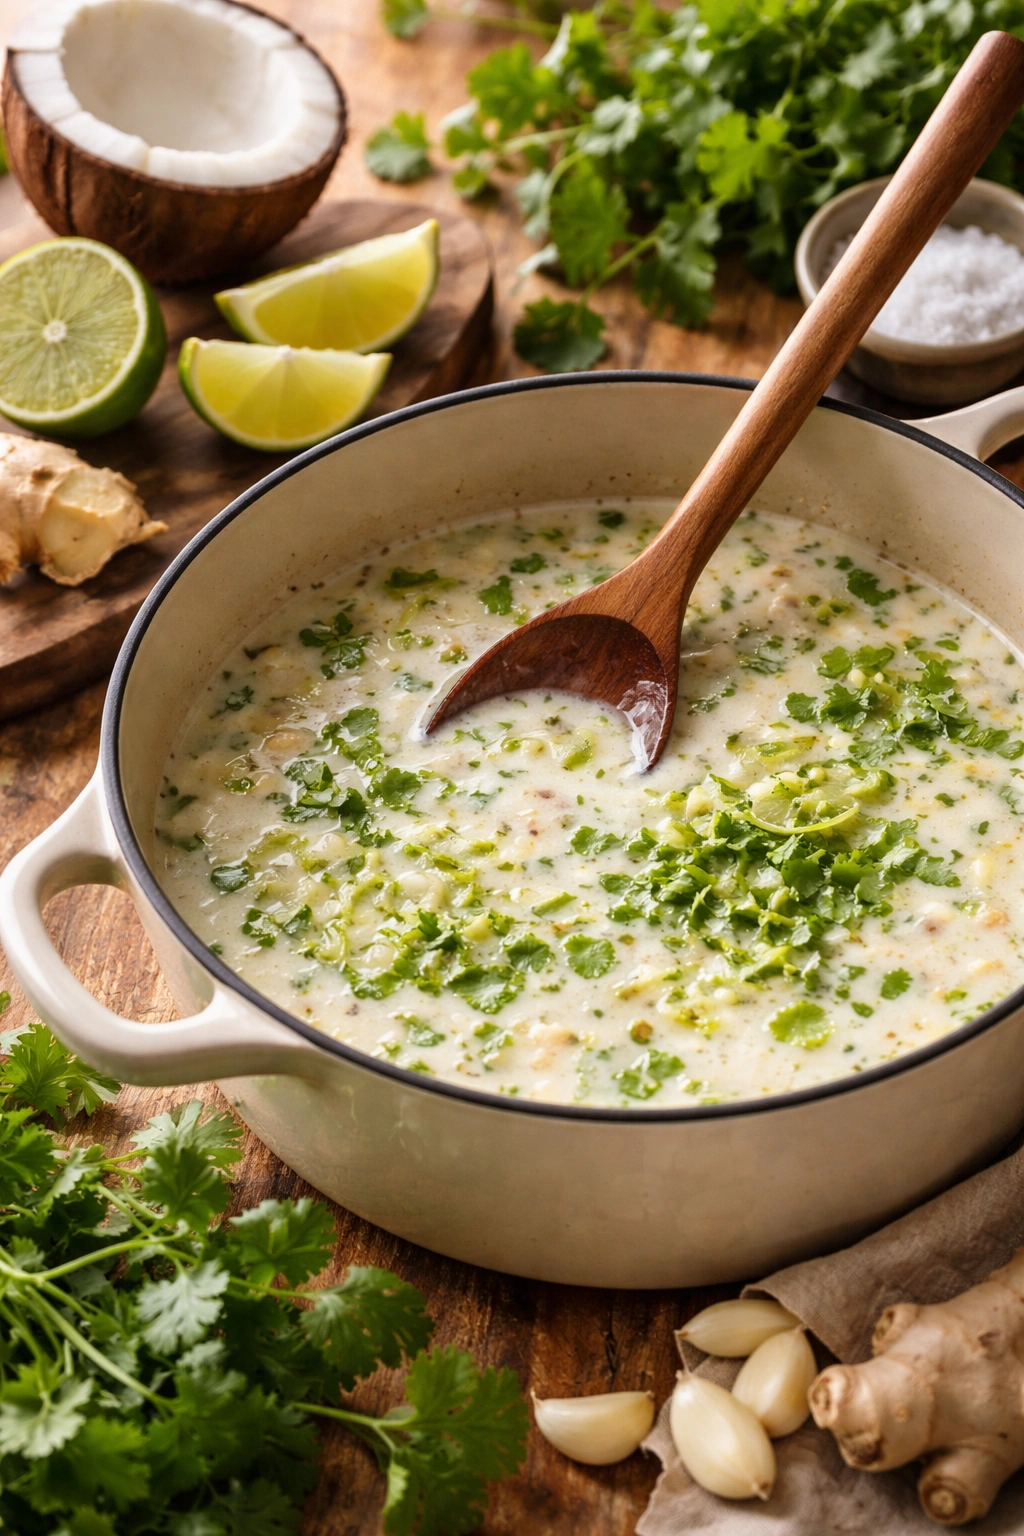
Pour in the coconut milk, chicken broth, honey, salt, pepper, lime zest, and half the lime juice (about 2 tablespoons). Stir well, making sure to scrape the bottom of the pot with a wooden spoon to incorporate any browned bits. This deglazing step is important — those caramelized bits dissolve into the liquid and add savory depth.
-
Increase the heat to medium-high and bring the mixture to a boil, stirring occasionally. You’ll see steam rising and the liquid will bubble actively. This should take 3-4 minutes.
Advertisements -
Once boiling, turn off the heat (if using oven method) or reduce to low (if using stovetop method). Nestle the browned chicken thighs into the rice mixture, positioning them skin-side up. The rice should come up about halfway on the sides of the chicken; this is correct and allows steam to help cook the chicken while keeping the skin exposed to dry heat.
-
Scatter half the chopped cilantro over the top.
Oven Method — Final Cooking:
-
Cover the pot with a tight-fitting lid or foil and transfer to the preheated 375°F oven. Bake uncovered for 30-35 minutes. The chicken is done when the thickest part of the thigh (near the bone) reaches 165°F on an instant-read thermometer, and the rice has absorbed all the liquid.
-
Remove the pot from the oven carefully — the handle will be very hot — and let it rest, covered, for 10 minutes. This resting step is crucial. During those 10 minutes, carryover heat gently finishes cooking the rice, and steam continues to soften and fluff the grains. Don’t skip this; it transforms the texture of your rice.
-
Uncover the pot and drizzle the remaining lime juice (about 2 tablespoons) over the chicken and rice. Scatter the remaining chopped cilantro over the top. Taste and adjust seasoning, adding more salt or lime juice as needed.
Stovetop Method — Final Cooking:
-
(Stovetop only) Cover the pot with a tight-fitting lid and reduce the heat to low. Cook for 25-30 minutes without lifting the lid. Check doneness at the 25-minute mark by carefully lifting the lid (be cautious of the steam) and checking that all liquid is absorbed and the chicken has reached 165°F internally.
-
Once done, remove from heat and let rest, covered, for 10 minutes. This resting period is just as important on the stovetop as in the oven.
-
Uncover, drizzle with remaining lime juice, scatter remaining cilantro, taste, and adjust seasoning.
Advertisements
INSTANT POT METHOD (Fastest)
-
Combine the marinade: In a small bowl, whisk together 1 cup of the coconut milk, minced garlic, minced ginger, lime zest, turmeric, red pepper flakes, salt, pepper, and half the lime juice. This becomes your marinade for the chicken.
-
Marinate the chicken: Place the chicken thighs in this marinade, tossing to coat all sides evenly. Refrigerate for 15-20 minutes, or up to 2 hours. (You can skip this if you’re short on time, but marinating helps flavor the chicken more thoroughly.)
-
Prepare the rice (if making rice via pot-in-pot): Rinse your rice until the water runs clear, then soak for 15 minutes. Drain. In a small oven-safe bowl (one that fits inside your Instant Pot), combine the drained rice, remaining 3/4 cup coconut milk, 1.75 cups chicken broth, 1/2 teaspoon salt, and honey. Set aside.
-
Add chicken to the Instant Pot: Pour the marinated chicken and all its marinade into the inner pot of your Instant Pot. Do not sauté first; the chicken goes straight in. Add the remaining onion, finely diced.
-
Place the rice container: Set the metal trivet (that comes with the Instant Pot) in the center of the pot, over the chicken. Carefully place the bowl of rice on top of the trivet. The rice container should be elevated above the chicken.
-
Pressure cook: Close the lid and set the valve to “Sealing.” Set to Manual or Pressure Cook mode for 8 minutes at high pressure (use 10 minutes if your chicken breasts are thicker than 1 inch).
-
Natural release: When the cooking time completes, do not quick-release. Instead, let the pot naturally release pressure for 10 minutes. This prevents the rice from becoming mushy or sticking to the bottom of the bowl. After 10 minutes, carefully switch the valve to “Venting” to release any remaining pressure.
-
Remove and finish: Carefully lift off the rice bowl and fluff the rice with a fork. Remove the chicken thighs and let rest for 5 minutes, then return to the pot or serve separately. Drizzle the remaining lime juice over everything and scatter the reserved cilantro. Taste and add more lime or salt as needed.
Mastering the Flavor Balance
The magic of this dish lies in how different elements come together to create something greater than the sum of its parts. Coconut milk brings richness and subtle sweetness, but it can feel heavy or cloying if left unchecked. That’s where lime comes in — its bright acidity cuts through the richness and prevents the dish from feeling one-dimensional. Ginger and garlic add savory, aromatic depth that makes you crave another spoonful. Cilantro adds freshness and herbaceous notes that tie everything together.
If your finished dish tastes flat or overly coconut-forward, the solution is almost always more lime juice. Many cooks make the mistake of squeezing in the lime juice at the beginning and then wondering why the finished dish tastes dull. The final squeeze of fresh lime juice right before serving is non-negotiable — it reawakens all the other flavors and gives the dish brightness that keeps you coming back for another bite.
Similarly, salt is your friend here. Salt doesn’t make food taste salty; it enhances the flavors you’ve already built. If the dish seems like it needs something but you can’t identify what, taste it carefully and try adding just 1/4 teaspoon more salt. Chances are that’s what it needed. This is especially true if you used low-sodium broth; you’ll need to add more salt than the recipe specifies.
The ratio of rice to liquid is critical for success. Too much liquid and your rice becomes mushy and sodden. Too little and you’ll end up with crunchy, undercooked rice. A general rule for rice cooking is a 1:2 ratio of rice to liquid (1 cup rice to 2 cups liquid), but coconut milk is richer and more viscous than water, so this recipe uses slightly less liquid. The specific amounts given in the ingredient list have been tested extensively and work consistently.
Common Mistakes and How to Avoid Them
Crowding the chicken when searing: If you cram all your chicken into the pan at once, the temperature drops, and instead of browning, the chicken steams. Work in batches if necessary. Patience here pays dividends in flavor.
Skipping the resting period: This is where many cooks go wrong. After cooking, resist the urge to dive in immediately. Those 10 minutes of resting allow the residual heat to gently finish cooking the rice and let the starches set slightly, which improves the texture immensely.
Not using full-fat coconut milk: Light or reduced-fat coconut milk has less fat and more water, which throws off the liquid ratio. You’ll end up with soupy rice and less creamy flavor. Stick with full-fat.
Using old ginger or pre-minced garlic from a jar: Fresh aromatics matter enormously in this dish. Bottled or jarred garlic and ginger taste stale and muddled compared to fresh. Yes, fresh requires peeling and mincing, but the flavor difference is significant.
Not rinsing the rice: Unwashed rice releases excess starch that makes it sticky and prone to burning on the bottom of the pot. Rinse until the water runs clear — this takes 2-3 rinses.
Cooking the rice without putting a lid on the pot: Once you’ve brought the liquid to a boil, the pot must be covered. Uncovered cooking allows steam to escape, liquid evaporates too quickly, and the rice won’t cook evenly. Keep that lid on for the entire cooking period.
Lifting the lid constantly to check progress: Every time you lift the lid, you release steam and disrupt the cooking process. Trust the timing. If you absolutely must check, do it once, quickly, near the end of the cooking time.
Using chicken breast without adjusting cooking time: Breasts cook noticeably faster than thighs. If substituting, reduce cooking time by 5-10 minutes and check internal temperature at 20 minutes rather than waiting the full 30.
Variations and Adaptations
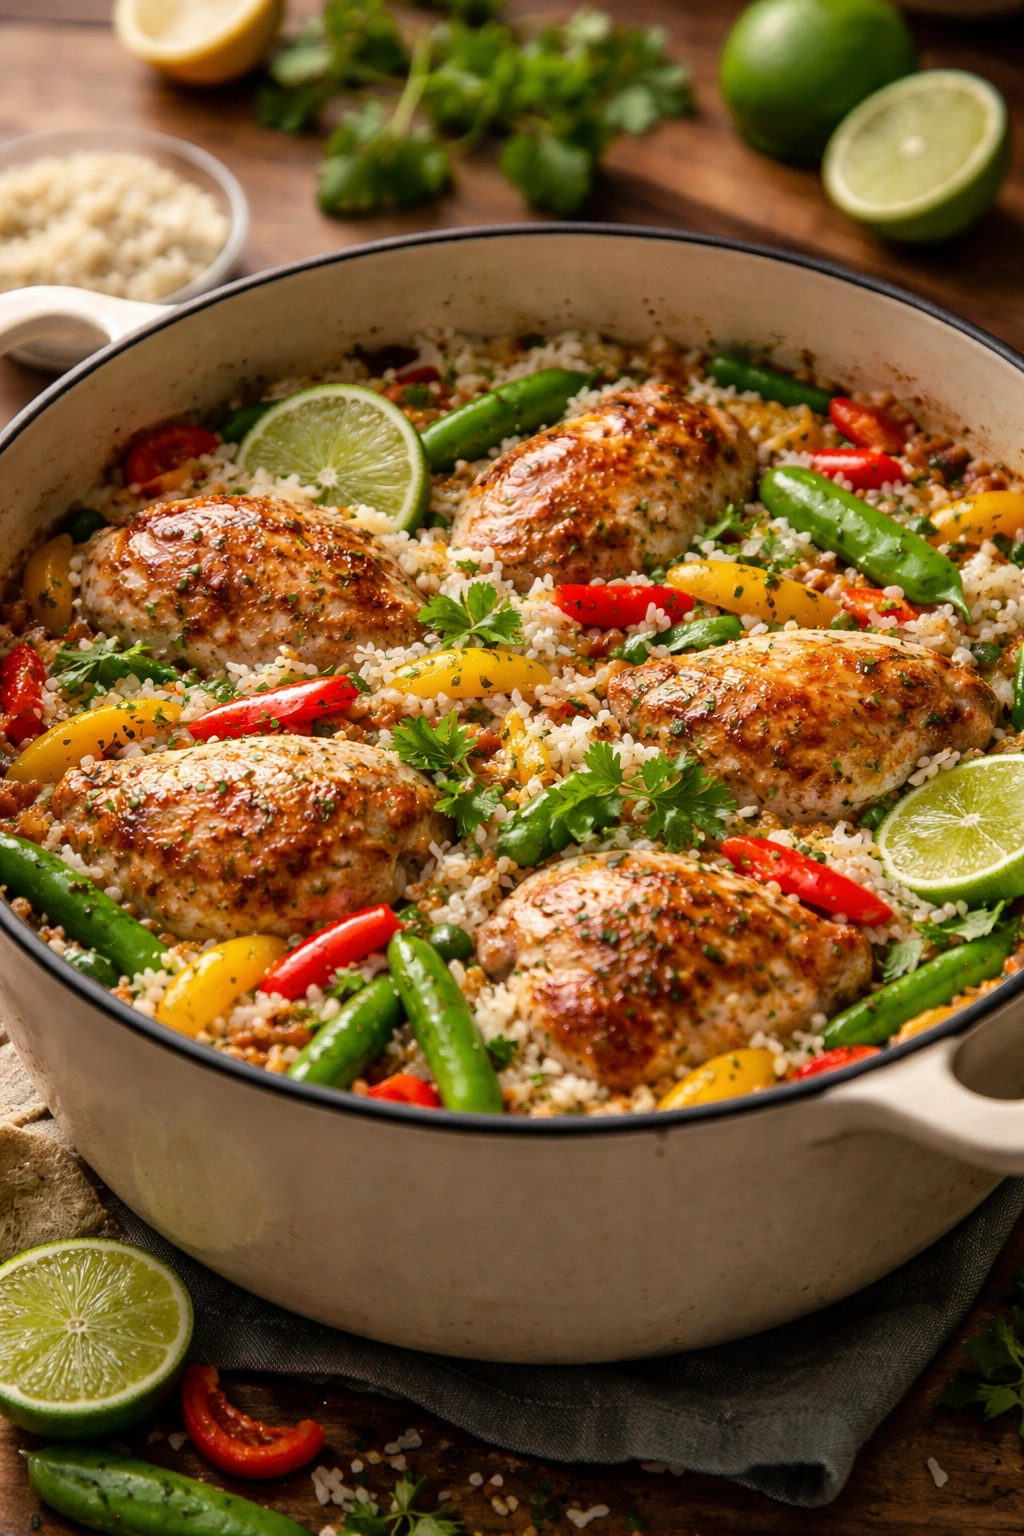
Adding vegetables: This dish is flexible. You can add bell peppers, snap peas, mushrooms, or asparagus. For vegetables that take longer to cook (like carrots or broccoli), add them with the rice at the beginning. For delicate vegetables like snap peas or zucchini, stir them in during the last 5-10 minutes of cooking so they retain some texture.
Spice level adjustments: If you like more heat, increase the red pepper flakes to 1 full teaspoon, add a sliced fresh Thai chili or serrano pepper, or both. If you prefer milder, reduce the pepper flakes to 1/4 teaspoon and skip the fresh chili entirely.
Swapping the rice: Jasmine rice works just as beautifully as basmati. They have slightly different aromatics (jasmine is floral, basmati is nutty), but both absorb coconut milk beautifully. Brown rice or wild rice can work but require slightly more liquid and longer cooking time.
Using chicken breast instead of thighs: As mentioned, this works but requires careful timing. Cut breasts into thick strips or bite-sized cubes for more even cooking. A quick marinade in some of the coconut milk helps keep them moist.
Making it dairy-free or vegan: This recipe is already naturally dairy-free if you use standard full-fat coconut milk. To make it fully vegan, substitute chicken with cubed extra-firm tofu or hearty vegetables like cubed sweet potatoes or cauliflower. Follow the same cooking method; tofu and vegetables will cook perfectly in the same timeframe as chicken.
Pressure cooker version: If you have a traditional pressure cooker rather than an Instant Pot, the method is similar. Sear the chicken, build your flavor base, add rice and liquid, then pressure cook for 15 minutes at high pressure. Allow natural pressure release for 10 minutes before opening.
Slow cooker adaptation: Brown the chicken first, build the flavor base, combine everything in the slow cooker, and cook on low for 4-5 hours. Rice cooked in a slow cooker tends to be softer than with other methods, so reduce the liquid slightly (use 1.5 cups broth instead of 1.75 cups).
Storage, Make-Ahead Strategy, and Reheating
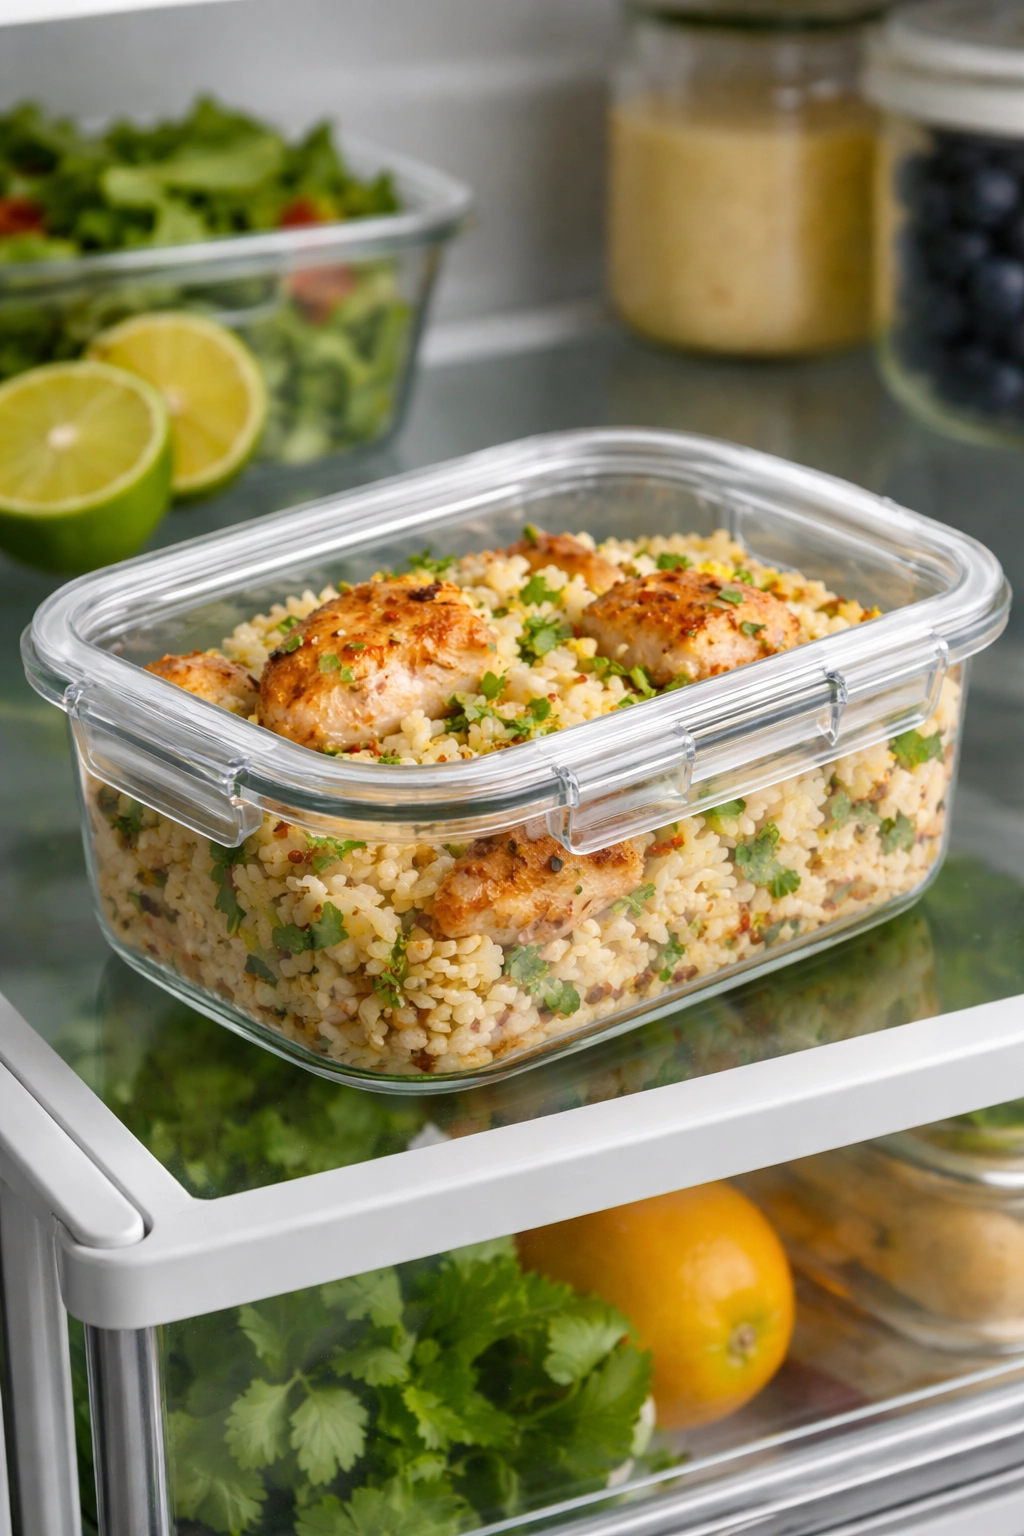
This dish improves overnight as the flavors continue to meld and develop. You can make it up to 3 days in advance, storing it in an airtight container in the refrigerator. Some cooks even argue it tastes better on day two than the day it’s made. The rice absorbs more of the coconut-lime flavor, and the chicken becomes even more tender.
For freezing, let the dish cool to room temperature before transferring to a freezer-safe container or heavy-duty freezer bag. It keeps well for up to 3 months frozen. Thaw overnight in the refrigerator before reheating, or reheat from frozen by placing in an oven-safe dish, covering with foil, and warming at 325°F for 30-40 minutes until heated through.
To reheat, your best option is the stovetop or oven rather than the microwave, which can dry out the rice. Transfer leftovers to a pot, add 2-3 tablespoons of water or broth (not too much — you don’t want it to become soupy), cover, and warm over medium-low heat for 5-10 minutes, stirring occasionally. Alternatively, spread leftovers in an oven-safe dish, cover with foil, and reheat at 350°F for 15-20 minutes. Once heated through, squeeze fresh lime juice over the top to brighten the flavors, which tend to mellow during storage.
You can also prepare components in advance for a quick final assembly. The flavor base (onion, ginger, garlic, spices) can be prepared up to 2 days ahead and stored in a container in the fridge. The chicken can be seasoned and stored separately. On cooking day, you simply combine everything and proceed with cooking, cutting your active prep time to just 5-10 minutes.
What to Serve Alongside
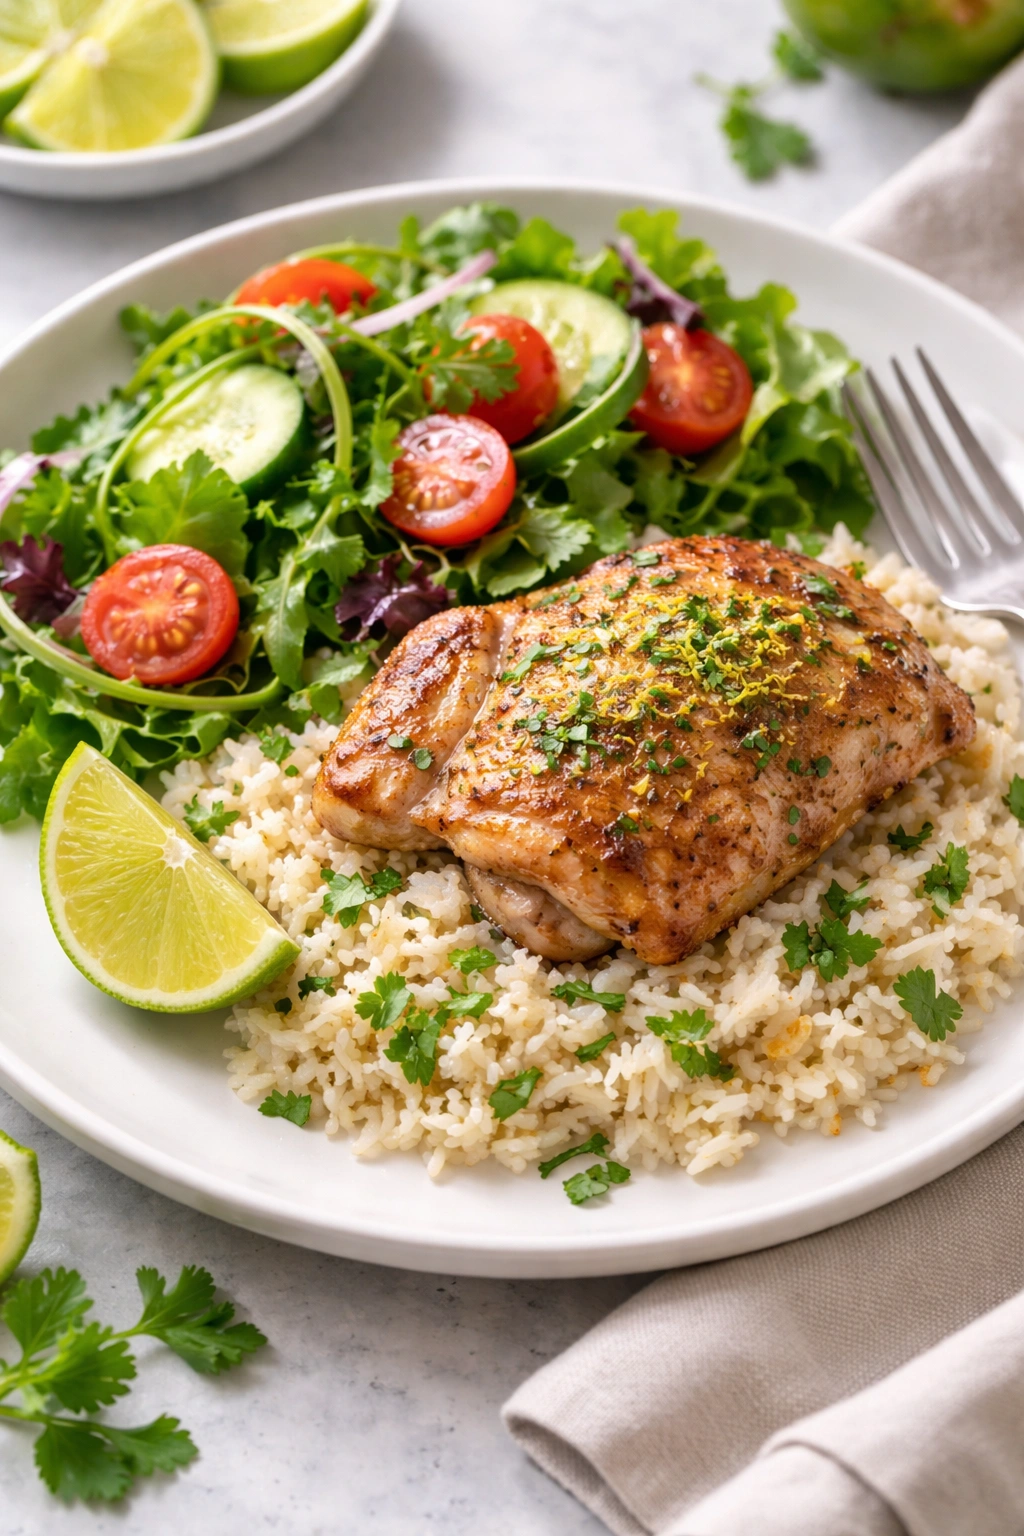
While this dish is quite complete on its own, offering a protein, starch, and fragrant sauce all in one pot, many people like to add a simple vegetable or salad for color, texture, and nutritional balance.
Light and Fresh Options: A simple butter lettuce salad dressed with a citrus-honey vinaigrette cuts through the richness beautifully. Or try a kale salad with lemon-tahini dressing for more substance. A simple cucumber salad with rice vinegar, lime juice, and a tiny pinch of salt provides cooling crispness.
Cooked Vegetable Sides: Sautéed spinach with a touch of garlic takes just 5 minutes. Steamed green beans or asparagus drizzled with olive oil and sea salt provides delicate texture. Roasted broccoli or cauliflower adds heartiness if you want a more substantial meal.
Condiments Worth Serving: Plain yogurt (Greek or regular) provides cooling creaminess and complements the spices beautifully. Mango chutney adds sweetness and spice complexity. A small bowl of extra lime wedges lets people adjust brightness to their preference.
Beverages That Pair Well: This dish pairs beautifully with crisp white wines like Sauvignon Blanc or Pinot Grigio, which echo the lime brightness. For non-alcoholic options, jasmine tea serves as a sophisticated, complementary choice. Sparkling water with a lime wedge is always welcome.
The key to sides is not to overwhelm the main dish. You’ve spent time building beautiful, balanced flavors in that one pot; your sides should support rather than compete.
Achieving Perfect Results Every Time

The most important principle for success is mise en place and respect for timing. Have every ingredient measured, chopped, and ready before you heat the pan. Read through the entire recipe once before starting so there are no surprises mid-cooking. Follow the liquid ratios exactly as specified — this isn’t a dish where you can fudge the measurements without consequences. Use the thermometer to check chicken doneness rather than guessing; the meat should register 165°F in the thickest part of the thigh.
The second principle is trusting the process once it’s in the oven or simmering. Don’t constantly lift the lid to peek. Don’t stir the rice. Resist the urge to add more liquid thinking it needs it. These impulses come from anxiety, but they actively prevent success. Once you’ve brought the liquid to a boil and covered the pot, you’ve done everything required. Let the heat do the work. The 10-minute rest afterward is where the magic truly happens.
The third principle is tasting and adjusting at the end. Everyone’s palate is different, and different broths have different sodium levels. After cooking, taste carefully. Does it need more salt? Add a pinch at a time. Does it taste flat? Squeeze in more lime juice. These final adjustments take 30 seconds and transform the dish from good to absolutely crave-worthy.
Final Thoughts
Coconut lime chicken and rice is a gateway dish — once you’ve made it successfully once, you realize how simple truly delicious one-pot meals can be. The technique translates to countless other dishes: you can follow this same method with different aromatics, different proteins, different rice varieties. You’re not memorizing a rigid recipe; you’re learning a flexible framework that becomes second nature.
What makes this particular combination so special is that it requires no exotic ingredients you can’t find at a regular grocery store, it’s naturally adaptable to dietary preferences, and it genuinely tastes better than restaurant versions because you control the balance of flavors. The chicken is more tender, the rice is more flavorful, and the whole meal comes together without the chaos of managing multiple pans.
Make this dish when you want to impress someone without stress. Make it when you’re feeding your own family on a busy weeknight. Make it for meal prep, knowing it reheats beautifully and tastes even better the next day. Every time you make it, you’ll understand just a little bit more about what makes food taste good, and you’ll develop your own small adjustments that make it perfectly suited to your palate. That’s when cooking stops being a chore and starts being genuinely enjoyable.