If you’ve been ordering coconut curry chicken from takeout restaurants because you thought it was too complicated to make at home, I’m here to tell you that you’ve been missing out on something wonderful. This creamy, aromatic dish is actually one of the easiest curries you can make from scratch, and it tastes like it’s been simmering all day in someone’s home kitchen. The secret? A few quality pantry staples, fresh aromatics, and about 30 minutes of your time. That’s it.
There’s something almost magical about how coconut milk transforms simple chicken and spices into a deeply satisfying sauce that tastes nothing short of restaurant-quality. The warm spices bloom into the oil, creating a fragrant base that pulls everything together. Then the coconut milk arrives—rich, creamy, and naturally sweet—coating every piece of tender chicken in its luxurious embrace. It’s comfort food that also happens to be approachable for any skill level, from complete beginners to experienced home cooks looking for a reliable weeknight formula.
What makes this dish particularly special is its flexibility. You can serve it over fluffy jasmine rice to soak up every last drop of sauce, pair it with naan bread for a more substantial meal, or even spoon it over cauliflower rice if you’re going low-carb. The curry itself tastes equally good reheated the next day, which means it doubles perfectly as a make-ahead lunch or a quick dinner when you’re pressed for time. Once you master this basic version, you’ll find yourself adapting it endlessly—adding different vegetables, adjusting the heat level, or tweaking the spices to match your family’s preferences.
The beauty of coconut curry chicken lies in its balance. It’s not aggressively spicy (unless you want it to be), but it’s absolutely packed with flavor. The coconut milk tempers the heat of the curry powder and other warm spices, creating something that appeals to adventurous eaters and cautious palates alike. Families with varying spice tolerances can eat around the same table because you can serve sriracha or hot sauce on the side for those who want more heat, while others happily enjoy it exactly as it comes.
Why This Coconut Curry Chicken Works So Well
The magic of this dish starts with understanding how the flavors build. Most people assume that curry is complicated because it requires a massive list of individual spices that need to be balanced perfectly. But here’s the reality: curry powder does most of the heavy lifting for you. It’s already a carefully blended mixture of cumin, coriander, turmeric, fenugreek, and other warming spices. When you combine quality curry powder with fresh garlic, ginger, and onions, you’re creating an incredibly flavorful base that tastes like you spent hours developing it.
The coconut milk serves multiple purposes at once. It adds creaminess and richness that makes the sauce feel luxurious and comforting. It also provides natural sweetness that balances the earthiness of the curry spices and the acidity of tomatoes (if you’re including them). Most importantly, it mellows the intensity of the spices just enough so that the curry remains mild and approachable while still tasting genuinely complex and interesting.
Cooking chicken in this sauce, rather than pre-cooking it separately, means the poultry absorbs all those beautiful flavors as it simmers. You’ll end up with chicken that’s so tender and flavorful it practically melts in your mouth. The chicken also releases its own gelatin and juices into the sauce, which naturally thickens it and makes it taste even more developed.
The Aromatics Make the Difference
Onions, garlic, and ginger aren’t just supporting players here—they’re essential to the entire dish. When you cook these three ingredients together in oil before adding anything else, something extraordinary happens. The onions soften and release their natural sugars, creating a sweet undertone. The garlic becomes mellow and almost nutty. The ginger adds warmth and a subtle spice that complements the curry powder beautifully.
Why Full-Fat Coconut Milk Matters
You’ll notice the recipe specifically calls for full-fat coconut milk, not the lite version. This isn’t snobbery—it’s actually important for the final result. Full-fat coconut milk has a richer flavor and better texture. Lite coconut milk has much of the fat removed, which means you lose some of that creamy mouthfeel and the sauce won’t thicken as nicely. If you only have lite coconut milk available, you can make it work by adding a cornstarch slurry near the end to thicken the sauce, but full-fat really is the better choice here.
The Seasoning Sweet Spot
This recipe uses a relatively modest amount of curry powder—just enough to create complex, warm flavor without overwhelming anyone at the table. If your family loves heat, you’ll definitely want to increase the curry powder or add cayenne pepper or red pepper flakes. But if you’re serving people with varying spice tolerances, this base recipe hits that sweet spot where everyone feels welcome. You can always pass hot sauce at the table for those who want to customize their heat level.
Yield: Serves 4 to 6 | Makes approximately 8 cups of curry with chicken
Prep Time: 15 minutes
Cook Time: 25 minutes
Total Time: 40 minutes
Difficulty: Beginner — No special cooking techniques required, straightforward stovetop method, and forgiving if you’re new to making curry.
Ingredients You’ll Need
For the Curry:
- 2 tablespoons coconut oil or vegetable oil
- 1 medium yellow onion, finely diced (about 1 cup)
- 4 cloves garlic, minced (about 2 teaspoons)
- 1 tablespoon fresh ginger, finely minced from a 1½-inch piece, or 1 teaspoon ground ginger
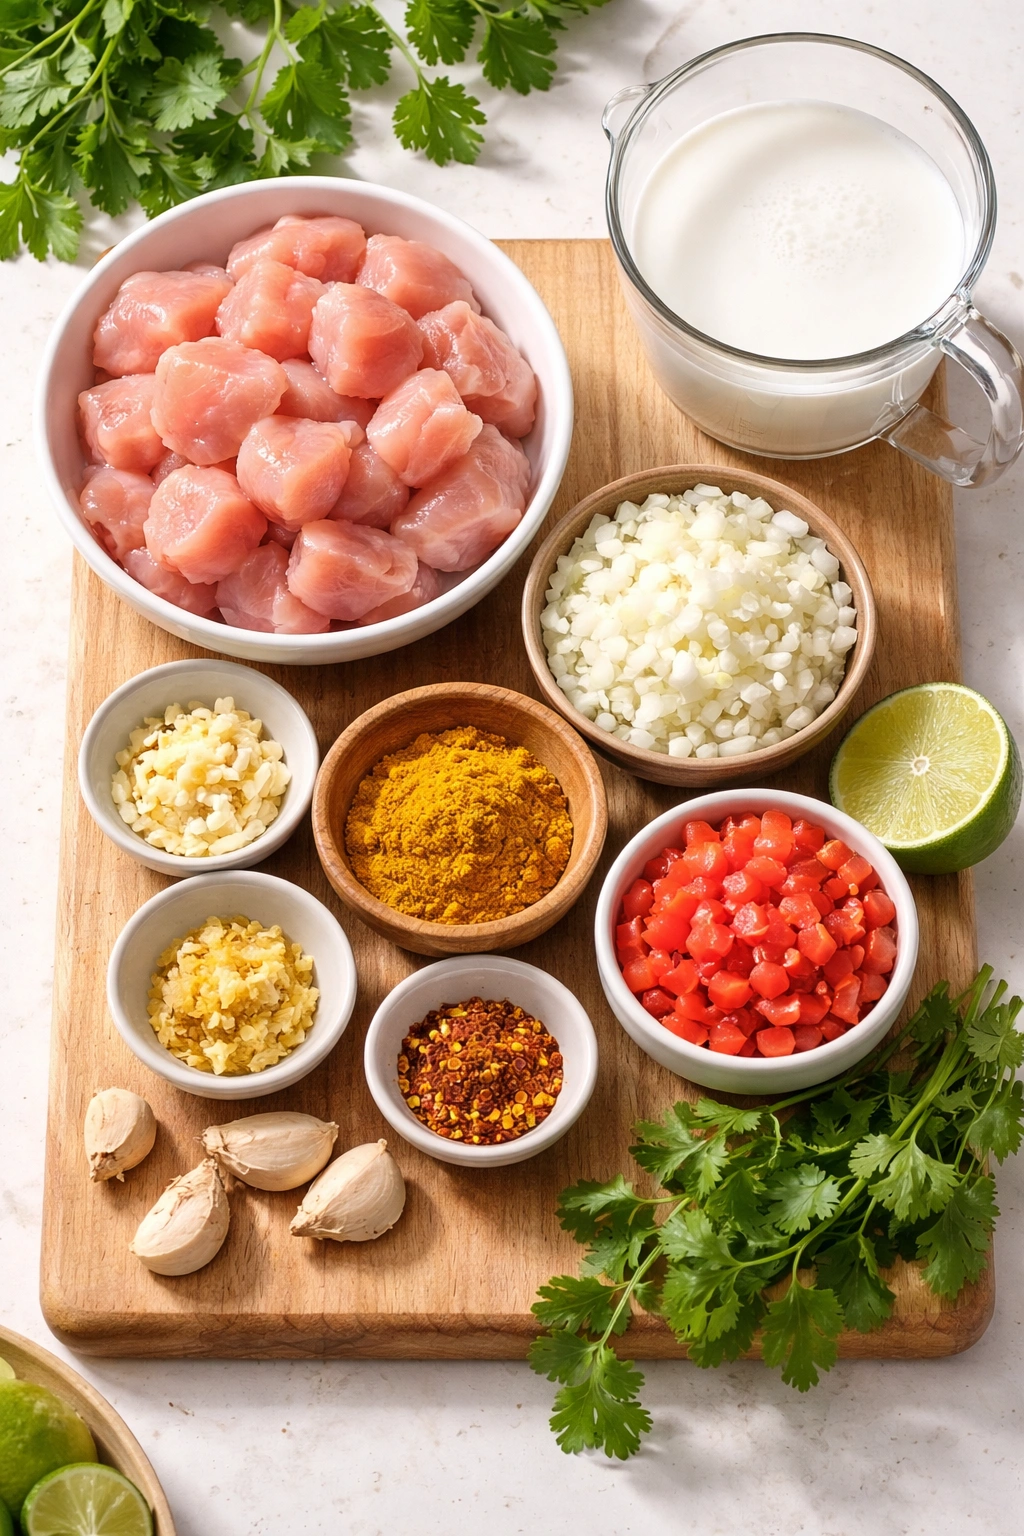
- 2 pounds boneless, skinless chicken breasts, cut into 1-inch cubes
- 2 tablespoons curry powder (use mild or regular, not hot, unless you prefer heat)
- 1 teaspoon ground turmeric
- 1 teaspoon ground coriander
- ½ teaspoon kosher salt, plus more to taste
- ¼ teaspoon ground black pepper
- 1 (14-ounce) can full-fat coconut milk (not lite)
- 1 (14.5-ounce) can diced tomatoes (fire-roasted tomatoes add extra depth, but regular diced tomatoes work perfectly)
- 1 tablespoon tomato paste
- 1 cup chicken broth or vegetable broth (low sodium)
- 1 tablespoon brown sugar or coconut sugar (or white sugar)
- Juice of 1 lime (about 2 tablespoons fresh lime juice)
- ¼ cup fresh cilantro, roughly chopped
- Lime wedges for serving
For Serving:
- 3 to 4 cups cooked jasmine rice, basmati rice, or cauliflower rice
- Additional fresh cilantro for garnish
- Lime wedges
- Optional: red pepper flakes, sriracha, or hot sauce for those who want extra heat
Step-by-Step Instructions
Prepare Your Ingredients:
-
Cut the chicken breasts into 1-inch cubes—this size is important because it allows the chicken to cook through evenly while absorbing the curry flavors. Dry the chicken pieces with paper towels; this helps them brown better and cook more evenly.
-
Dice the onion into fine, small pieces (about ¼-inch dice). Finely minced onions will soften completely and help thicken the sauce naturally. If you have a food processor, you can pulse the onion a few times to speed this up, being careful not to over-process it into a paste.
Advertisements -
Mince the garlic and ginger finely so no one bites into a large chunk. You want these to distribute evenly throughout the sauce and mellow into the background flavor.
-
Open your can of coconut milk and give it a good shake or stir—the coconut fat often separates and rises to the top during storage, and you want it distributed evenly for a balanced sauce.
Build the Flavor Base:
-
Heat the coconut oil in a large, deep skillet or Dutch oven over medium-high heat. Let it get shimmering—this takes about 1 minute. You’ll know it’s ready when a drop of water sizzles on contact.
-
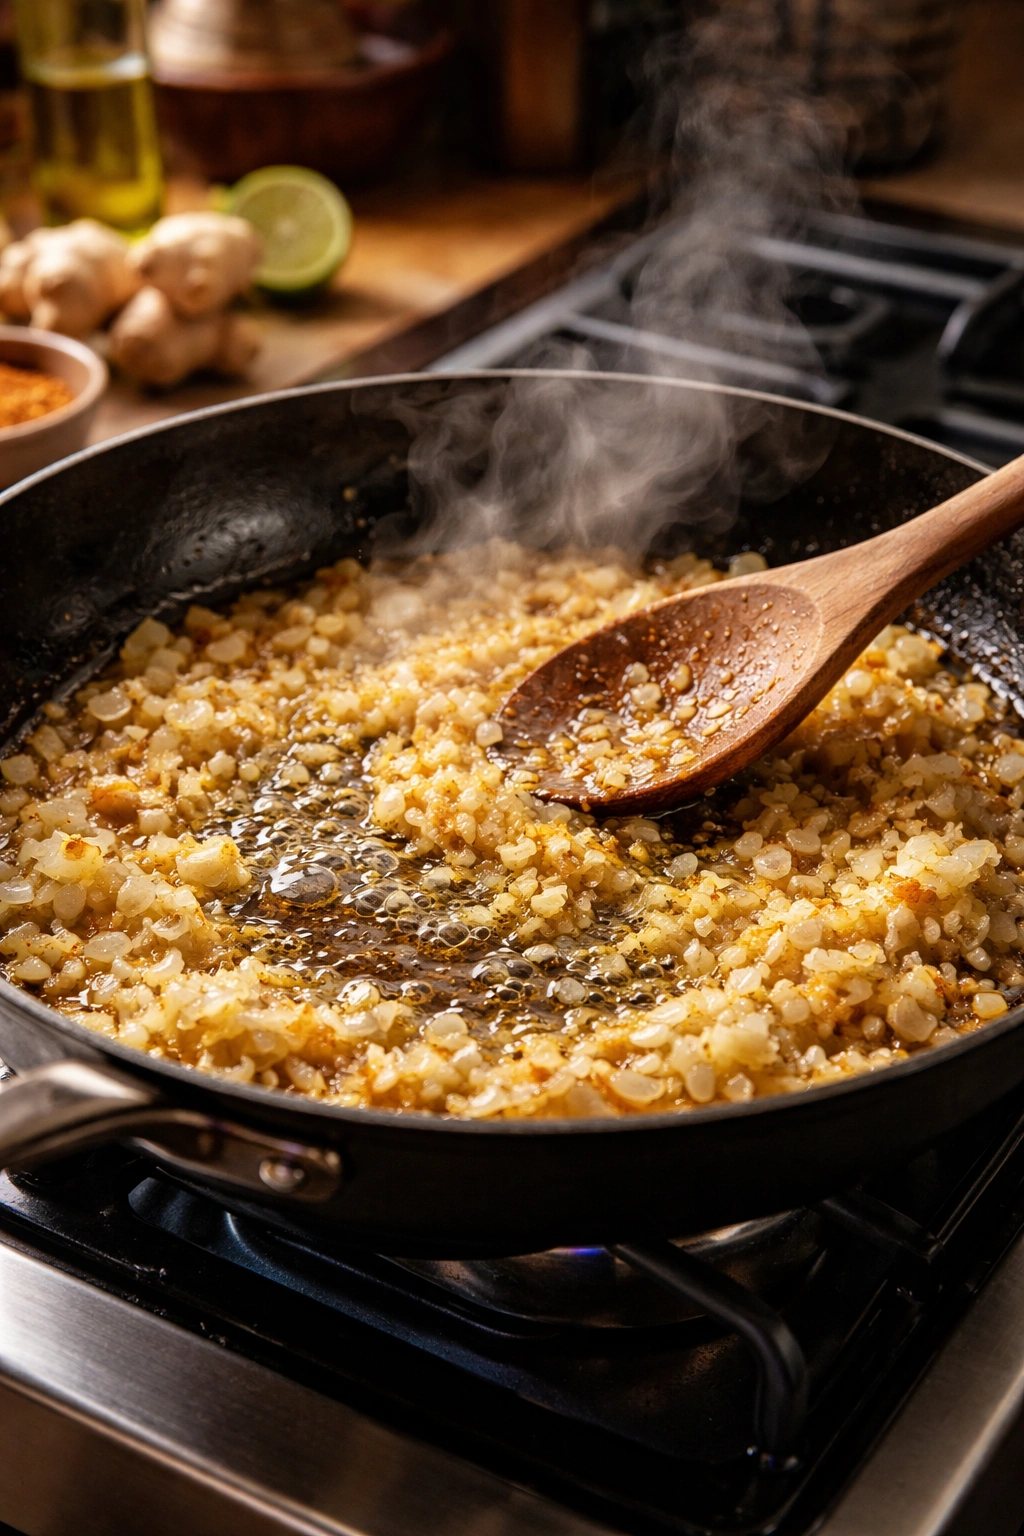
Add the diced onion and cook, stirring occasionally, for 3 to 4 minutes until the onion begins to soften and turn translucent at the edges. You’re looking for the raw, harsh onion flavor to mellow out. Don’t rush this step—the time spent here builds a better foundation for everything that follows.
-
Add the minced garlic and ginger to the onion. Stir constantly for about 1 minute until the mixture becomes fragrant and you can smell the ginger and garlic warming in the oil. This is the moment when the raw, sharp edge of the garlic and ginger softens, so don’t skip it. If the mixture looks dry, add another tablespoon of oil.
Bloom the Spices (This Makes a Real Difference):
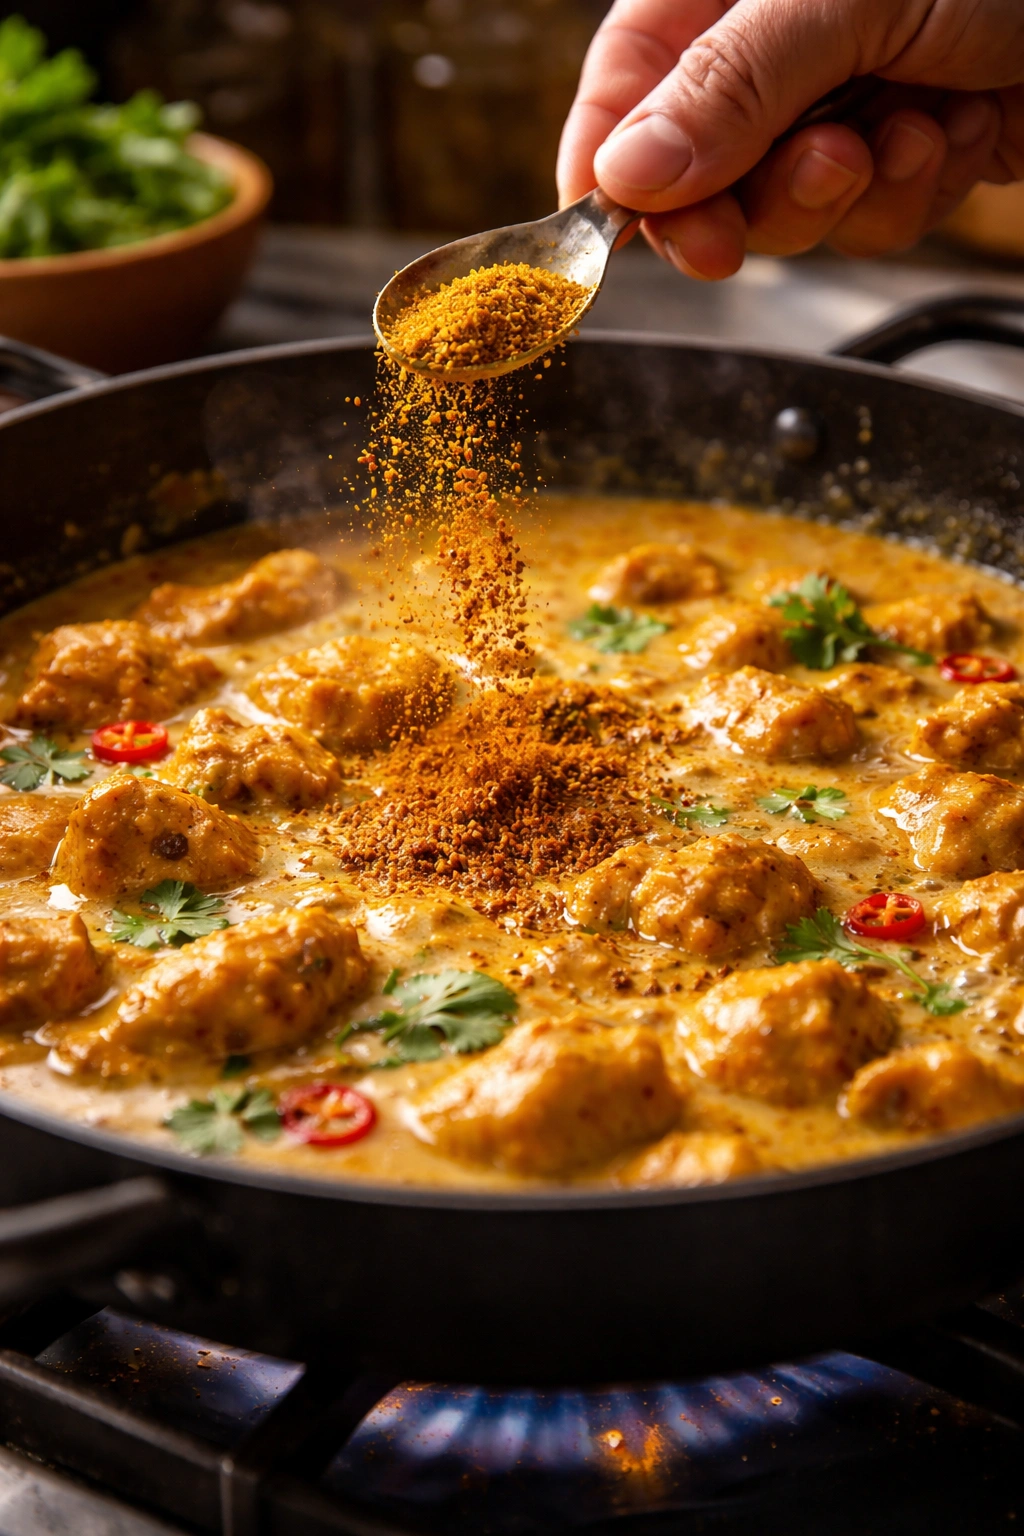
- Sprinkle the curry powder, ground turmeric, and ground coriander over the onion-garlic-ginger mixture. Stir continuously for 1 to 2 minutes while the spices toast in the oil. This step, called blooming, is what transforms powdered spices into deep, complex flavors. You’ll smell the spices become more fragrant and intense—that’s exactly what you’re aiming for. The mixture should look slightly darker and smell absolutely amazing.
Cook the Chicken:
-
Add the cubed chicken to the pan, spreading it out in a mostly single layer. Sprinkle the salt and black pepper over the chicken, then stir everything together so the chicken gets coated with the spiced oil. Don’t skip stirring—this coating is crucial for even browning and flavor distribution.
-
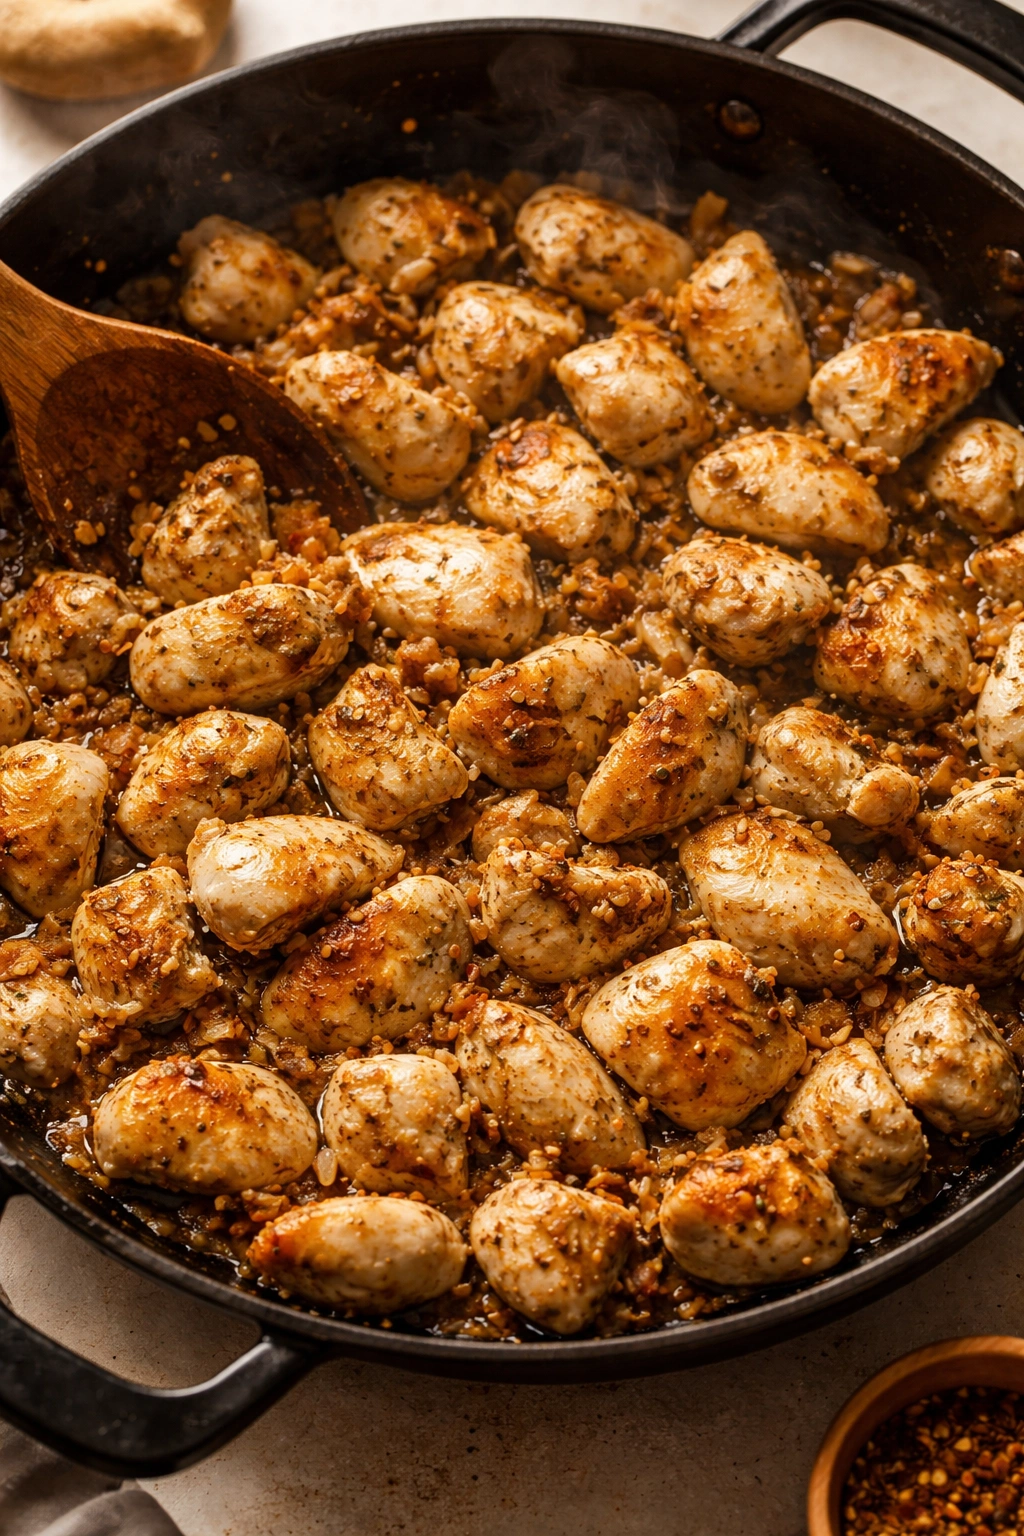
Let the chicken cook without stirring for about 2 minutes. This allows the bottom of the pieces to brown slightly, which adds depth to the final sauce. After 2 minutes, stir the chicken and let it cook for another 3 to 5 minutes, stirring occasionally, until the exterior of the chicken pieces has turned opaque and the pieces are mostly white on the outside (they won’t be cooked through yet, and that’s fine).
Advertisements
Build the Sauce:
-
Pour in the can of diced tomatoes along with all their juices. Add the tomato paste, stirring it in so it’s evenly distributed throughout the mixture. Stir for about 1 minute, letting the tomato paste cook slightly and deepen in color.
-
Pour in the chicken broth slowly while stirring constantly. Then, gradually pour in the coconut milk while continuing to stir. Stirring while you add the coconut milk helps prevent the sauce from looking grainy or separated. The mixture should look creamy and aromatic.
-
Add the brown sugar and lime juice, stirring everything together until combined. Taste the sauce at this point—adjust salt and pepper if needed. Remember that the flavors will concentrate slightly as the mixture simmers, so don’t over-salt now.
Simmer Until Chicken Is Tender:
-
Reduce the heat to medium and let the curry come to a gentle simmer. You should see small bubbles breaking the surface consistently, but not a rolling boil. Cover the skillet partially with a lid (or leave it uncovered if you prefer a thicker sauce that reduces faster).
-
Simmer for 15 to 20 minutes, stirring occasionally, until the chicken is cooked through completely (the internal temperature should reach 165°F / 74°C when measured with an instant-read thermometer in the thickest piece), and the sauce has thickened slightly and become more concentrated in flavor. The longer it simmers, the more the flavors will meld and deepen.
-
Taste the curry one more time and adjust seasonings as needed. If it tastes a bit flat, add more salt—curry powder blends vary in saltiness by brand, so this step is really important. If you want more heat, add a pinch of cayenne pepper or red pepper flakes. If it tastes a bit thin, you can simmer uncovered for another few minutes to reduce further.
Finish and Serve:
-
Stir in the fresh cilantro just before serving. The cilantro should stay bright green and fresh, so don’t cook it into the curry—just fold it in at the very end.
Advertisements -
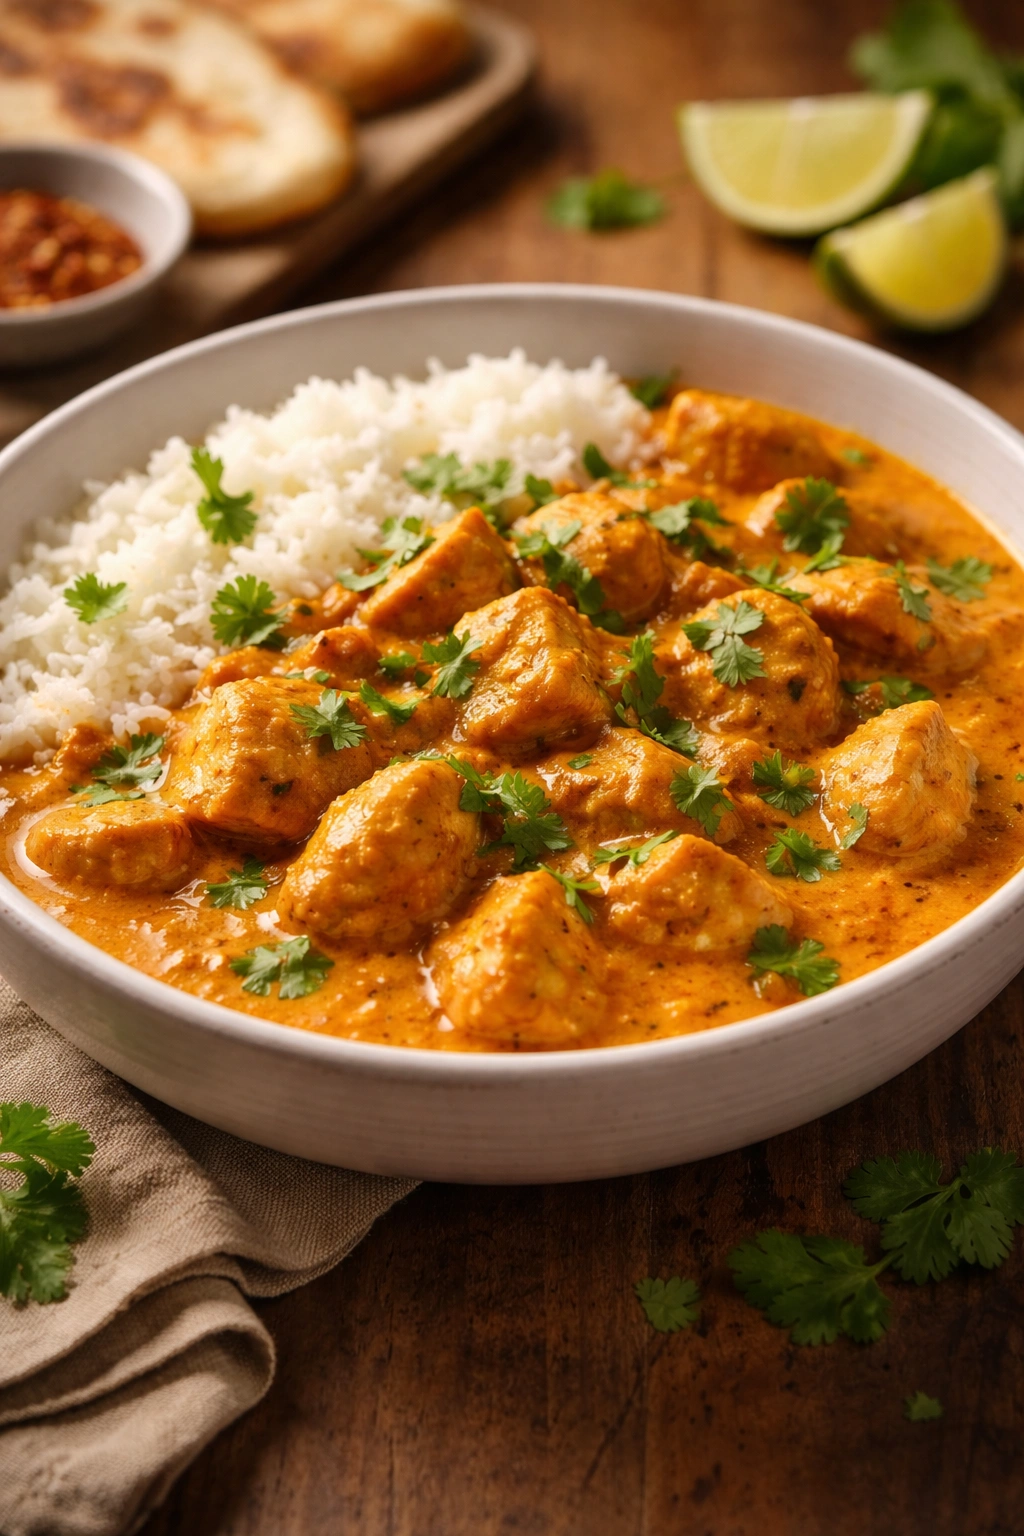
Serve the curry over cooked jasmine or basmati rice (or cauliflower rice for a low-carb option), with lime wedges on the side for squeezing over the top. The lime juice brightens all the warm spices and adds a fresh note that makes the curry taste more vibrant.
Tips for the Best Possible Coconut Curry Chicken
The most important lesson I’ve learned from making this curry repeatedly is that the quality of your curry powder makes a noticeable difference. Different brands vary quite a bit in flavor intensity, heat level, and spice blend composition. If you find a brand you really love, stick with it. McCormick, Simply Organic, and Thai Kitchen are all reliable choices that work beautifully in this recipe. If you’ve never used a particular brand before, start with 1½ tablespoons of curry powder instead of the full 2 tablespoons, then taste and add more if you want deeper flavor.
Salt is your best seasoning friend in curry. Contrary to what many recipes suggest, don’t be afraid of it. A properly seasoned curry tastes vibrant and alive; an under-salted curry tastes dull and flat, even if all the other ingredients are perfect. Taste your curry multiple times during cooking and add salt gradually—you can always add more, but you can’t take it out. I usually find myself adding at least ¼ to ½ teaspoon more salt beyond what the recipe calls for, depending on my brand of curry powder.
Thickening the Sauce
If your finished curry looks too thin and watery, you have a couple of options. The easiest is to simply simmer it uncovered for another 5 to 10 minutes to let some of the liquid evaporate. The sauce will naturally concentrate and thicken. If you’re in a time crunch, mix 1 tablespoon of cornstarch with 2 tablespoons of cold water (or broth) in a small bowl, whisking until smooth. Pour this mixture into the simmering curry while stirring constantly. The curry will thicken noticeably within a minute or two. Stir constantly while adding the cornstarch slurry—if you pour it in without stirring, you’ll get lumps.
Making It Spicier
This recipe as written is mild, which makes it family-friendly and accessible. But if you love heat, here are several ways to turn up the intensity. You can increase the curry powder to 3 tablespoons. You can add ¼ to ½ teaspoon of cayenne pepper or ground chili powder to the spice mixture when you bloom the spices. You can substitute hot curry powder for regular. Or you can serve sriracha, sambal oelek, or your favorite hot sauce on the side and let people customize their own heat level. A squeeze of lime juice actually helps hot spices feel less aggressive on the palate, so if you’re going spicy, encourage lime as well.
Variations on the Vegetable Situation
The version with diced tomatoes is delicious as-is, but you have flexibility here. Some of the best versions I’ve made add extra vegetables simmered right into the curry. Bell peppers (red, orange, or yellow add sweetness; green add a bit of bite) can be diced and added when you add the tomatoes. They’ll soften in about 10 minutes of simmering. Broccoli florets work wonderfully—add them about 5 minutes before the curry is done so they stay tender-crisp. Fresh spinach can be stirred in at the very end and will wilt in the residual heat. Potatoes need to be cut very small (¼-inch dice) and added right at the beginning so they have time to cook through.
The Ginger Question
I really prefer fresh ginger in this recipe because it adds a brightness that ground ginger can’t quite match. But fresh ginger can sometimes be hard to find or might feel like extra effort. Ground ginger works—use 1 teaspoon in place of the 1 tablespoon fresh. It won’t taste exactly the same (ground ginger has a more muted, almost sweet quality), but it’s still delicious.
Why You Might Add Tomato Paste
Some versions of this curry skip the tomatoes entirely and just use coconut milk with broth. Both approaches work, but I prefer including the tomatoes because they add acidity that brightens the sauce and provides natural thickening. The tomato paste in particular adds umami depth and helps develop a richer color. If you want a cleaner, simpler coconut curry without tomato, simply omit the diced tomatoes and tomato paste, and use 1½ cups of chicken broth instead of 1 cup. The curry will be thinner and lighter in color, but still absolutely delicious.
How to Customize This Curry to Your Taste
Once you’ve made this recipe once or twice and understand how it works, you’ll start seeing it as a template you can adapt endlessly.
For a Creamier, Richer Curry
Use a full 14-ounce can of coconut milk plus an additional ½ cup. Alternatively, replace half of the broth with coconut milk. The sauce will be thicker and more luxurious. You might need to simmer a bit longer for the flavors to concentrate since there’s more liquid.
For a Brothier, Lighter Curry
Use less coconut milk (start with ¾ cup instead of a full can) and increase the broth to 1½ cups. This creates a more soupy curry that’s delicious served in bowls with lots of rice. This version also reheats beautifully because the extra liquid means it won’t dry out.
With Different Proteins
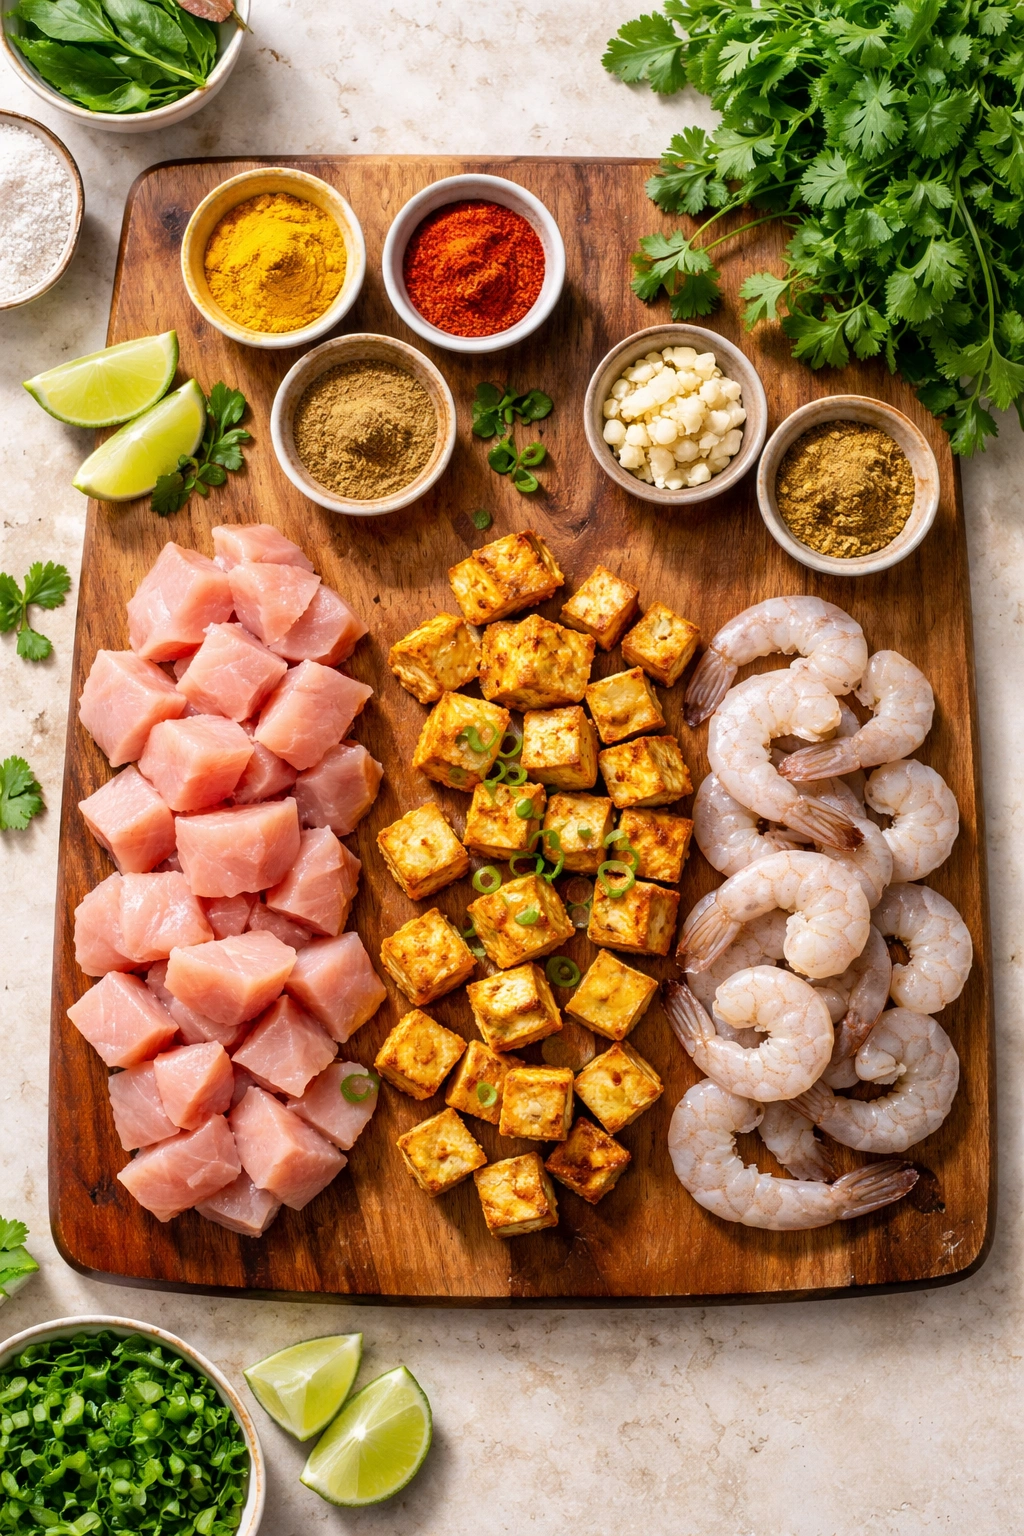
This curry works beautifully with chicken thighs instead of breasts—in fact, thighs stay moister during the long simmer. You can also make it with shrimp (add them in the last 3 to 5 minutes of cooking so they don’t overcook), white fish (same timing as shrimp), beef (use a tender cut like sirloin, diced small), or lamb (which pairs especially well with the warm spices). For a vegetarian version, substitute cubed tofu or chickpeas, or use a mix of vegetables.
With Interesting Garnishes
Fresh cilantro is wonderful, but you could also use fresh basil, mint, or a combination. A sprinkle of toasted coconut flakes adds textural contrast and reinforces the coconut flavor. Chopped roasted peanuts or cashews add crunch and richness. A drizzle of sriracha or chili oil adds visual interest and heat. Crispy fried onions work surprisingly well. Sesame seeds add nuttiness.
Storage and Make-Ahead Guidance
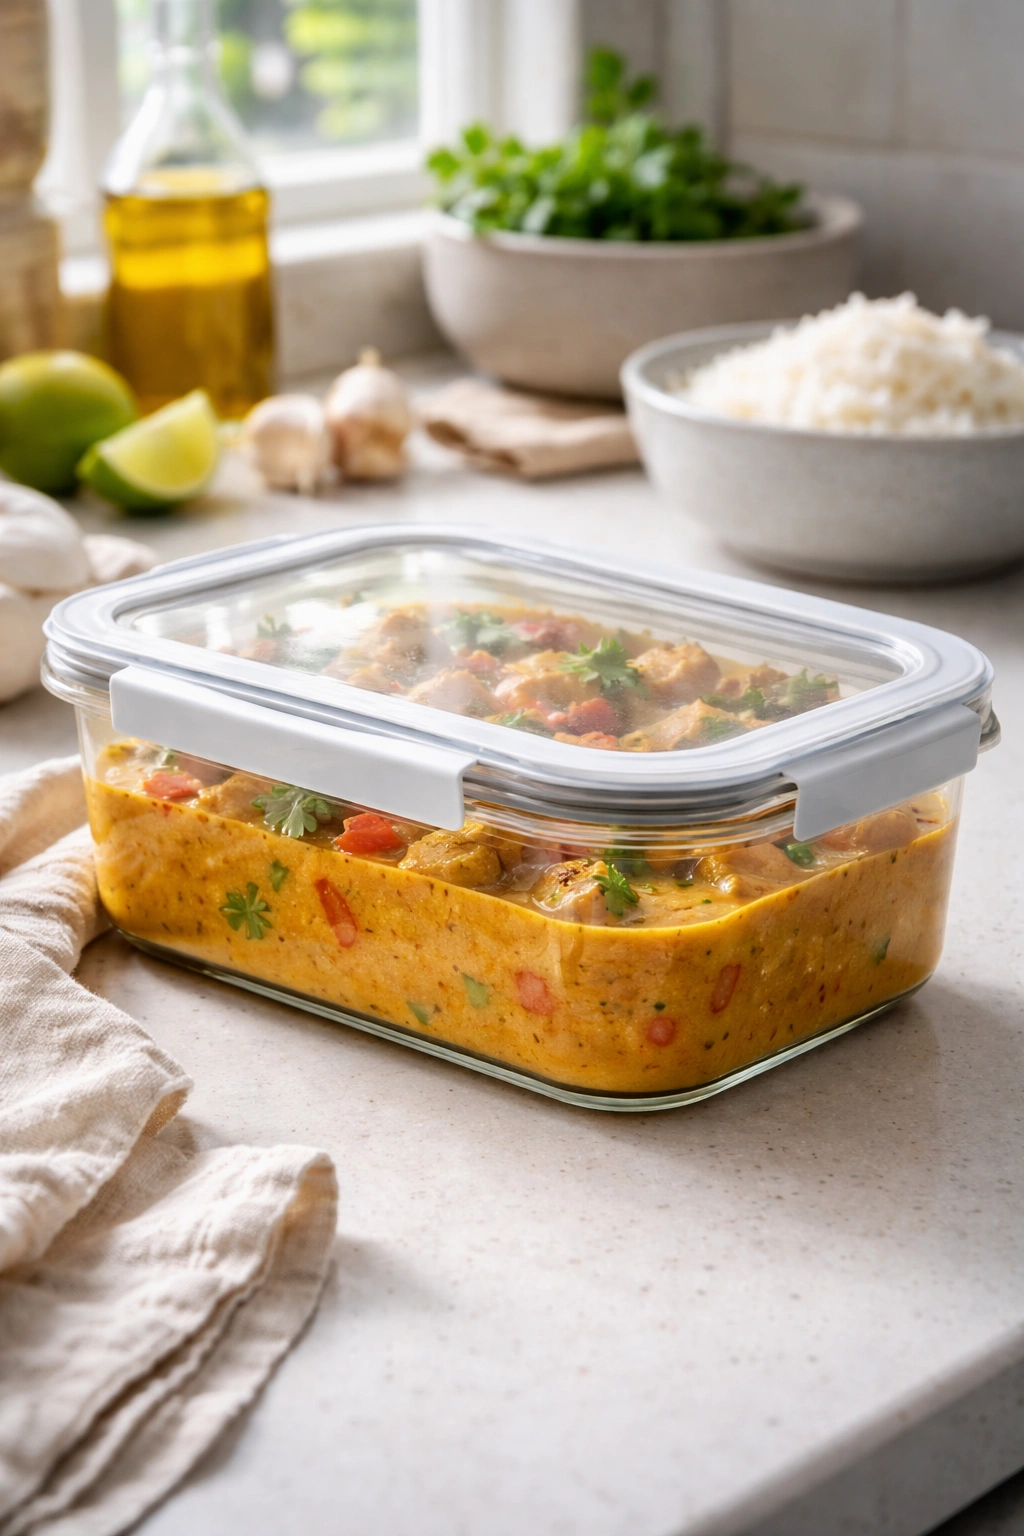
This curry tastes great fresh, but it also improves as it sits. The flavors continue to develop and meld together, so leftovers are often more delicious than the original batch. Once the curry cools completely, transfer it to an airtight container and refrigerate for up to 4 days. The sauce may thicken quite a bit in the fridge, which is completely normal—the coconut milk solidifies slightly when cold. Simply reheat on the stovetop over medium heat, stirring occasionally, and add a splash of broth or coconut milk to loosen it back to your preferred consistency.
You can also freeze this curry beautifully. Let it cool completely first, then transfer it to freezer-safe containers (shallow containers freeze more evenly than deep ones). It keeps well in the freezer for up to 3 months. Thaw it overnight in the refrigerator, then reheat gently on the stovetop or in the microwave. The chicken may break apart slightly after freezing and thawing, but it still tastes wonderful.
For make-ahead meals, you have two strategies. You can make the entire curry in advance, cool it, and refrigerate or freeze it, then reheat it when you’re ready to serve. Or you can make just the sauce base (everything through step 13, without the chicken) and refrigerate it for up to 2 days. When you’re ready to eat, reheat the sauce, add fresh diced chicken, and simmer for 20 minutes until the chicken cooks through. This approach guarantees the chicken will be perfectly cooked and tender.
What to Serve Alongside Coconut Curry Chicken
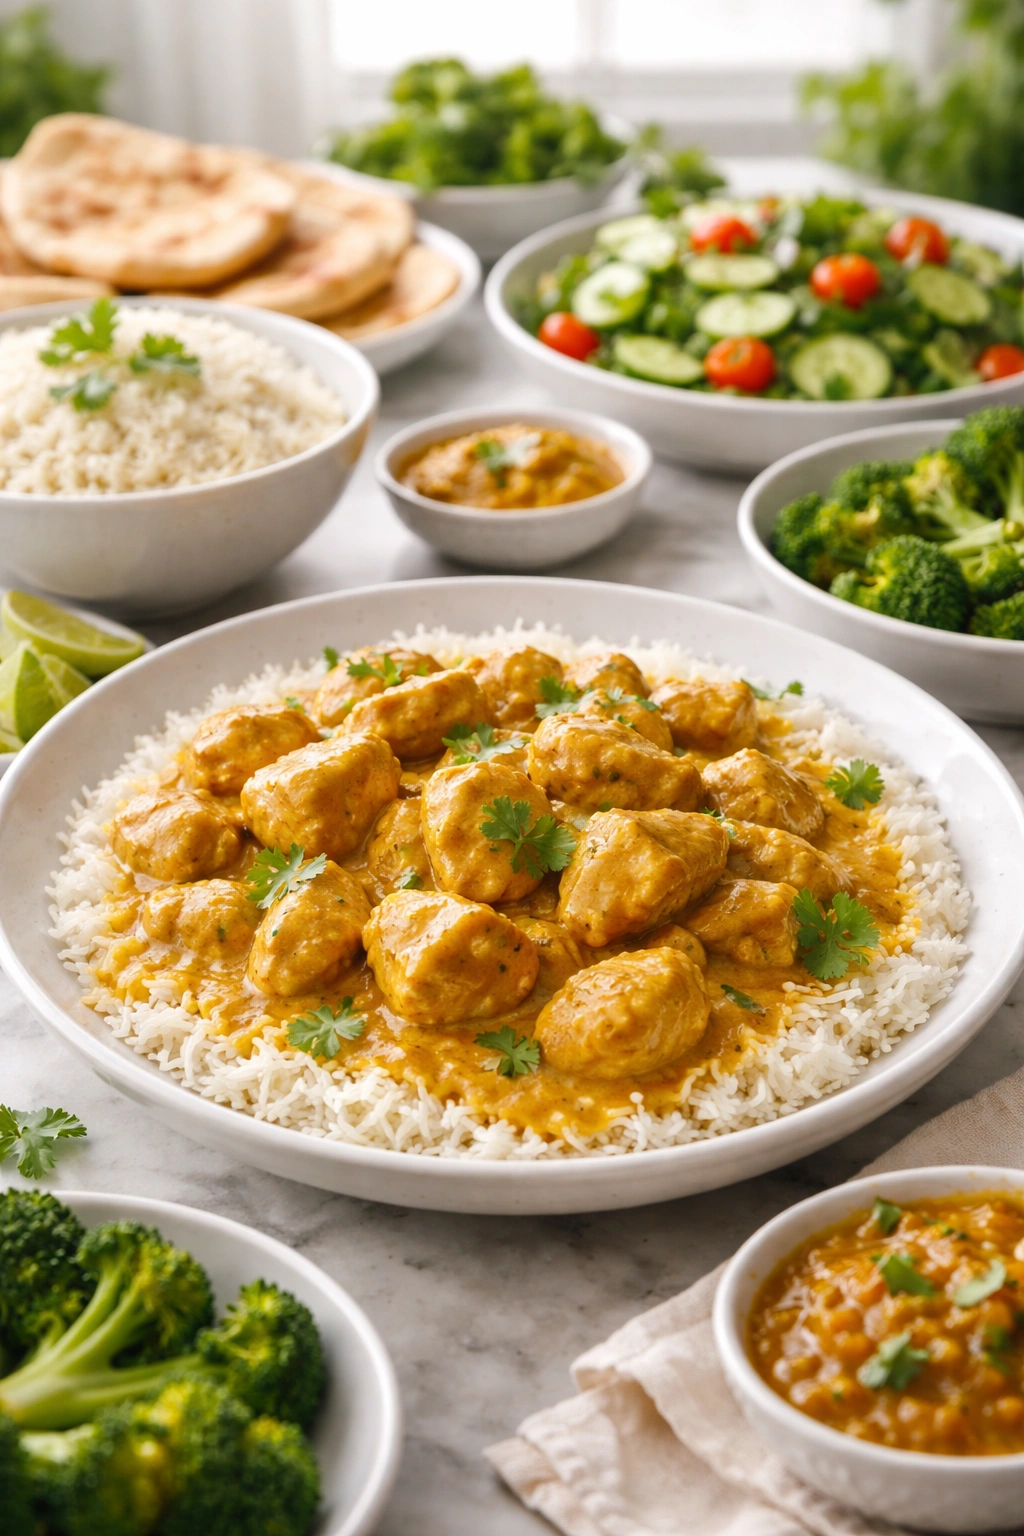
The most obvious pairing is rice. Jasmine rice, with its delicate floral aroma, is my favorite choice—it doesn’t compete with the curry but rather complements it. Basmati rice works equally well. Brown basmati rice adds a nuttier flavor that’s particularly delicious with curry. If you’re looking for a lower-carb option, cauliflower rice soaks up the sauce beautifully and stretches the recipe further.
Flatbreads are another excellent choice. Traditional naan is wonderful if you have access to it or the time to make it. But even simpler breads work—warm pita bread, soft flour tortillas, or store-bought garlic naan all pair nicely. Flatbread serves the practical purpose of helping you scoop up every bit of that precious sauce.
For vegetables, you want something fresh and cool to contrast with the warm, rich curry. A simple cucumber salad with lime juice and a pinch of salt is refreshing. Steamed broccoli or roasted green beans add nutrition and color without overwhelming the palate. A fresh green salad with a light vinaigrette cuts through the richness beautifully. Some people love serving this curry with roasted sweet potatoes, which adds sweetness that echoes the coconut milk.
If you want to make it a more substantial meal, add a simple vegetable side. Steamed bok choy is traditional and takes only 5 minutes. Roasted carrots are slightly sweet and caramelized. Sautéed spinach with garlic is quick and nutritious. Even a bowl of steamed edamame works as a protein boost if you want one.
Common Mistakes to Avoid
Don’t skip blooming the spices. I know it seems like an extra step, but cooking the curry powder in oil for a minute or two completely transforms the flavor from flat and powdery to deep and aromatic. It’s the difference between an okay curry and an exceptional one.
Don’t overcrowd the pan when cooking the chicken. If you pile all the chicken in at once and don’t stir it, you’ll end up with a stewed, pale mess instead of nicely browned pieces. Spread it out, let it brown slightly, then stir.
Don’t cook the chicken all the way through before adding the sauce. The chicken will continue cooking in the simmering sauce, so you want it still slightly pink in the center when you add the liquid. This prevents the chicken from becoming tough and rubbery.
Don’t use lite coconut milk. I know it’s tempting because it’s fewer calories, but the difference in the final dish is noticeable. Lite coconut milk has much of the fat removed, which means less flavor and a thinner, grainier sauce.
Don’t skip tasting and adjusting the seasonings. Every brand of curry powder is slightly different, so what tastes perfect in one kitchen might need tweaking in yours. This is normal and expected. Taste multiple times during cooking and adjust salt, spice, and lime juice until the flavors make you happy.
Don’t forget the lime juice at the end. It seems like a small addition, but lime juice is what transforms this from a one-note warm curry into something bright, balanced, and exciting. It also helps mellow any heat if you’ve gone spicy.
Final Thoughts

Easy coconut curry chicken proves that you don’t need to order takeout or spend hours in the kitchen to eat restaurant-quality food. With just a few key ingredients and about 40 minutes of total time, you can have a deeply satisfying, beautifully flavored meal on the table that feels like a real celebration. The chicken is tender, the sauce is creamy and complex, and the warm spices taste like they’ve been building flavor all day, even though you’ve been cooking for less than an hour.
What I love most about this recipe is how forgiving it is. You don’t need special equipment or advanced cooking techniques. There’s no precise timing that will ruin everything if you’re off by a minute. The flavors are built in stages, so you can taste and adjust as you go. It’s genuinely beginner-friendly, which means you can confidently make it even if you’ve never cooked curry before—and you’ll end up with something delicious enough to serve to guests.
Once you master the basic version, you’ll find yourself making this on repeat, adapting it to whatever’s in your fridge, adjusting the spice level to match your mood, and serving it over different bases depending on what sounds good that night. It becomes a reliable formula that builds confidence in the kitchen. And isn’t that the best kind of recipe—one that starts as something you follow carefully and eventually becomes something you know so well you can make it with your eyes closed, adjusting on the fly and trusting that it will turn out beautifully?