There’s a certain magic that happens when a tuna steak hits a screaming-hot cast iron skillet. The exterior develops a deeply caramelized, crispy crust within seconds, while the interior stays tender, buttery, and nearly raw—a textural contrast that tastes nothing like the canned tuna most people grew up with. Pan-seared tuna has become a restaurant darling precisely because it’s impossibly quick, impressively elegant, and somehow tastes like you’ve been cooking all day when you’ve actually spent less time at the stove than it takes to order takeout.
Here’s what makes this dish such a game-changer for busy weeknight dinners: a quality tuna steak needs just 3 to 5 minutes of active cooking time, which means you can have a restaurant-quality protein on the plate in under 20 minutes from start to finish. It’s the kind of meal that works equally well for a rushed Tuesday night or when you’re trying to impress guests without showing stress in the kitchen. Unlike chicken or most fish, tuna doesn’t dry out when seared at high heat—in fact, the quick sear is exactly what preserves its distinctive buttery texture and mild, meaty flavor.
What you’re about to discover isn’t just a recipe, but a technique that opens up endless possibilities. Once you understand the fundamental principles of searing tuna, you can apply this method to create dozens of different dinners simply by changing marinades, seasonings, and side dishes. The core skill remains the same: get your pan hot enough, sear briefly, and step back. That’s genuinely all it takes.
Why Pan-Seared Tuna Is Perfect for Quick Dinners
When you’re searching for a protein that tastes gourmet but cooks faster than pasta, tuna steaks are your answer. Unlike salmon or other fish that benefit from longer cooking times, tuna actually improves when seared quickly over high heat. The exterior develops flavor and texture while the interior remains tender and moist—if you cooked it any longer, you’d lose that signature quality.
The speed factor can’t be overstated. You’re looking at roughly 50 seconds to 2 minutes per side, depending on the thickness of your steak and how rare you prefer it. That means prep time is genuinely the longest part of the process. Pat your tuna dry, apply seasonings or a marinade, heat your pan, and you’re cooking before most people would have finished chopping vegetables for a stir-fry.
Another reason pan-seared tuna works beautifully for dinner is its nutritional profile. Tuna is packed with high-quality protein, omega-3 fatty acids that support heart and brain health, and essential B vitamins including B12 and niacin. You’re getting a genuinely nutritious meal without the guilt or the feeling that you’re compromising on flavor. It’s the rare dish that’s healthy, fast, and delicious all at the same time.
The elegance factor matters too. Seared tuna looks like something a trained chef made, which means you can serve it to company without apology. The beautifully caramelized exterior, the jewel-like rare or medium-rare interior, the simple slicing—all of it photographs well and presents as something special, even though the technique is straightforward enough for a complete beginner to execute successfully.
Understanding Different Types of Tuna Steaks
Not all tuna is created equal, and knowing which type you’re buying makes a real difference in how your finished dish will taste and perform. The tuna world can seem confusing at first, but there are really just a handful of types you’ll encounter at your local fish counter, and each has its own character.
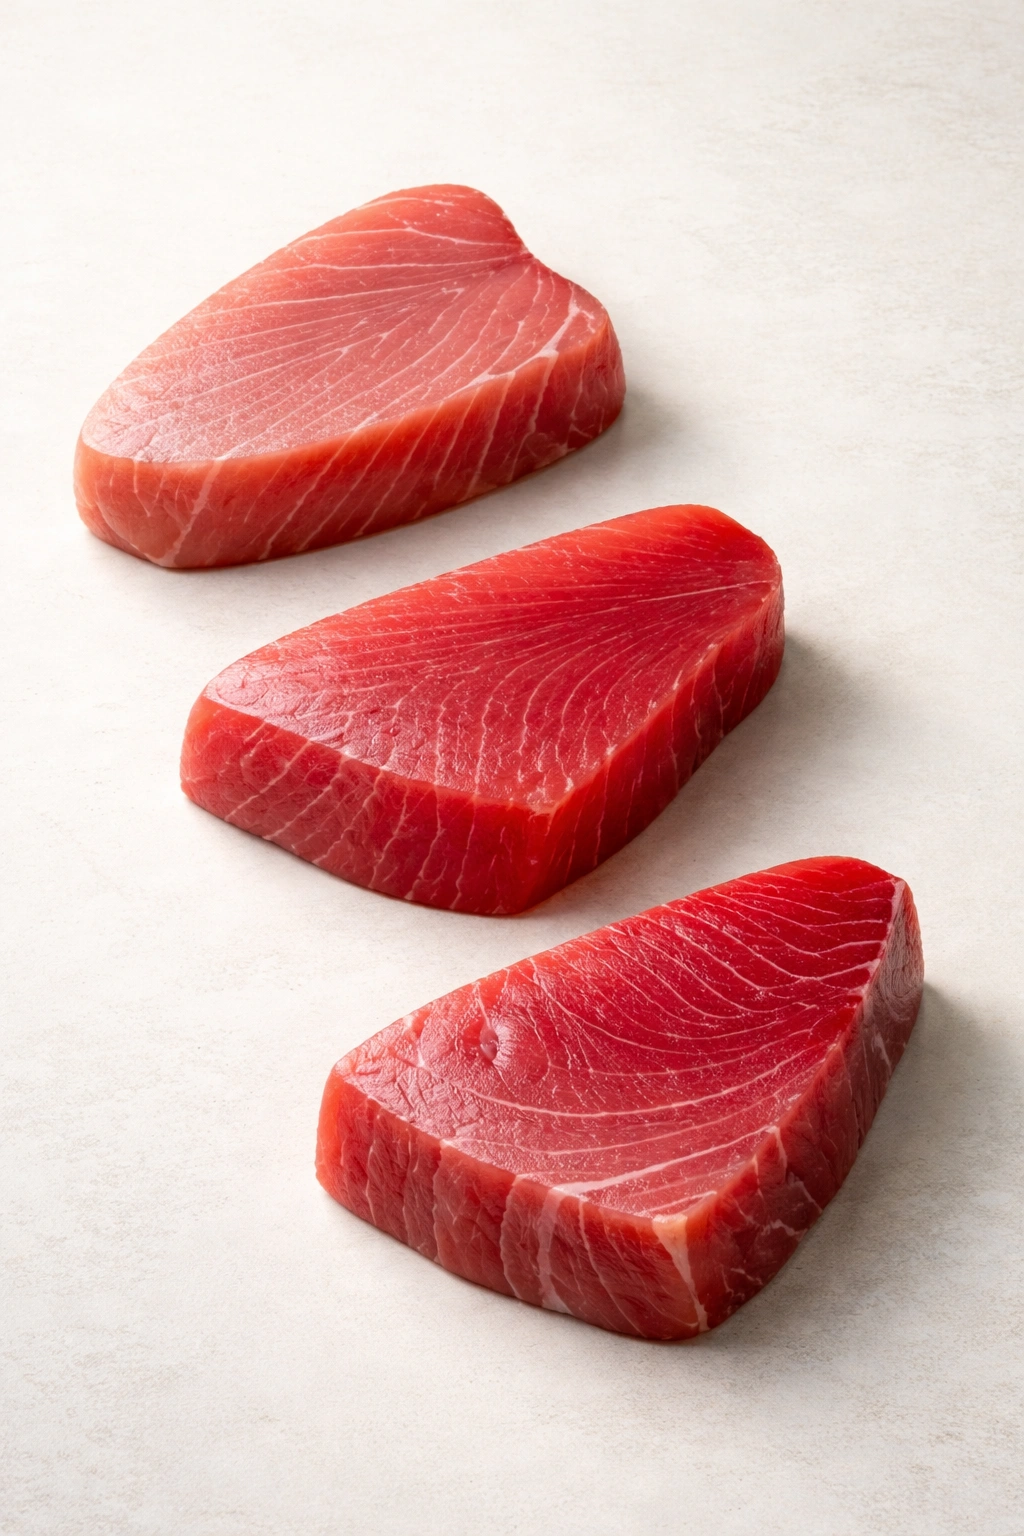
Yellowfin tuna, also called ahi tuna, is probably the most common type you’ll find for searing at regular grocery stores. It has a deep pink to red color, firm texture, and a mild flavor that’s distinct but not overpowering. Yellowfin holds up beautifully to high-heat searing and develops that gorgeous crust while staying tender inside. This is the variety most commonly used in sushi restaurants, which tells you something about its quality and versatility. It’s also typically more affordable than bluefin, making it accessible for weeknight cooking.
Bigeye tuna is similar to yellowfin and is often grouped together with yellowfin under the label “ahi tuna” at the market. It tends to have a slightly darker color and a bit higher fat content, which means it can have a richer, slightly more buttery flavor. Some people prefer it for this reason, though the cooking method remains identical.
Bluefin tuna is the premium option—the kind of fish that sushi restaurants charge serious money for and that command premium prices at specialty fish markets. It’s fattier and more richly flavored than yellowfin, with exceptional marbling that creates an almost luxurious mouthfeel. If you can find it and afford it, bluefin is spectacular for searing, but yellowfin and bigeye will give you excellent results and are far more practical for regular weeknight cooking.
Albacore tuna, sometimes called white tuna, is milder and lighter in color than yellowfin. It’s often found canned, but you can source fresh albacore steaks as well. If you prefer a more delicate flavor, albacore works for searing, though it’s less commonly used for this preparation than yellowfin.
The key takeaway: yellowfin (ahi) tuna is your best bet for this recipe—it’s easy to find, reasonably priced, and performs beautifully when seared.
How to Select the Freshest Tuna at Your Fish Counter
Walking up to the fish counter can feel intimidating if you’re not sure what you’re looking for, but tuna gives you clear visual and olfactory signals about its quality. The better you get at reading these signs, the better your finished dish will be.
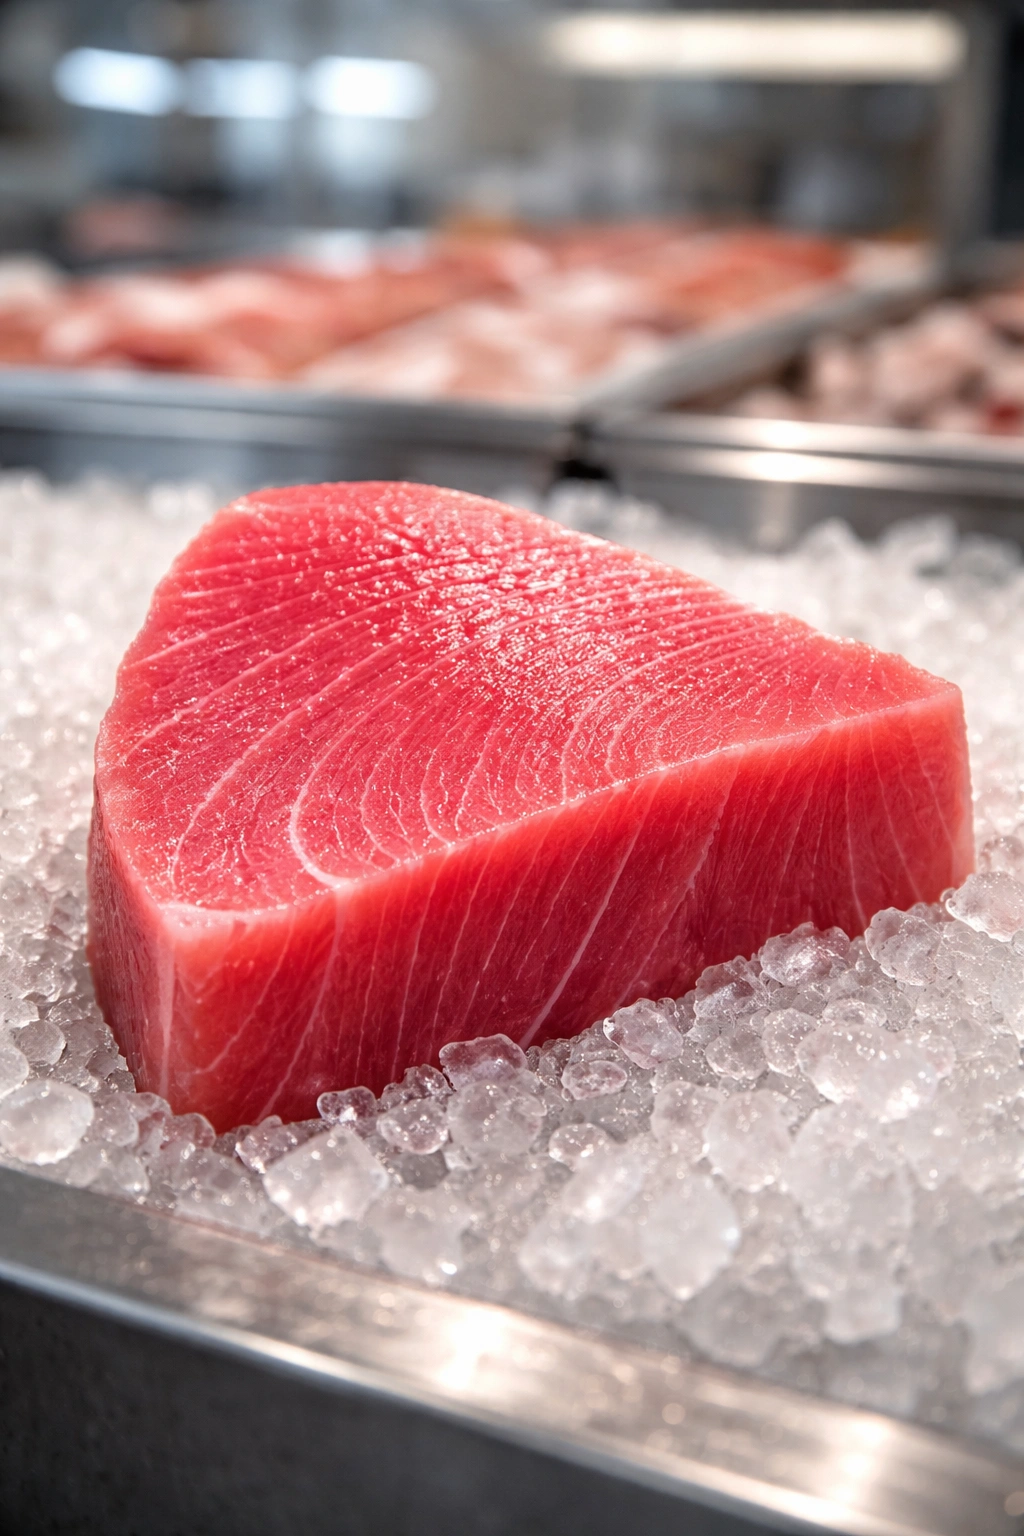
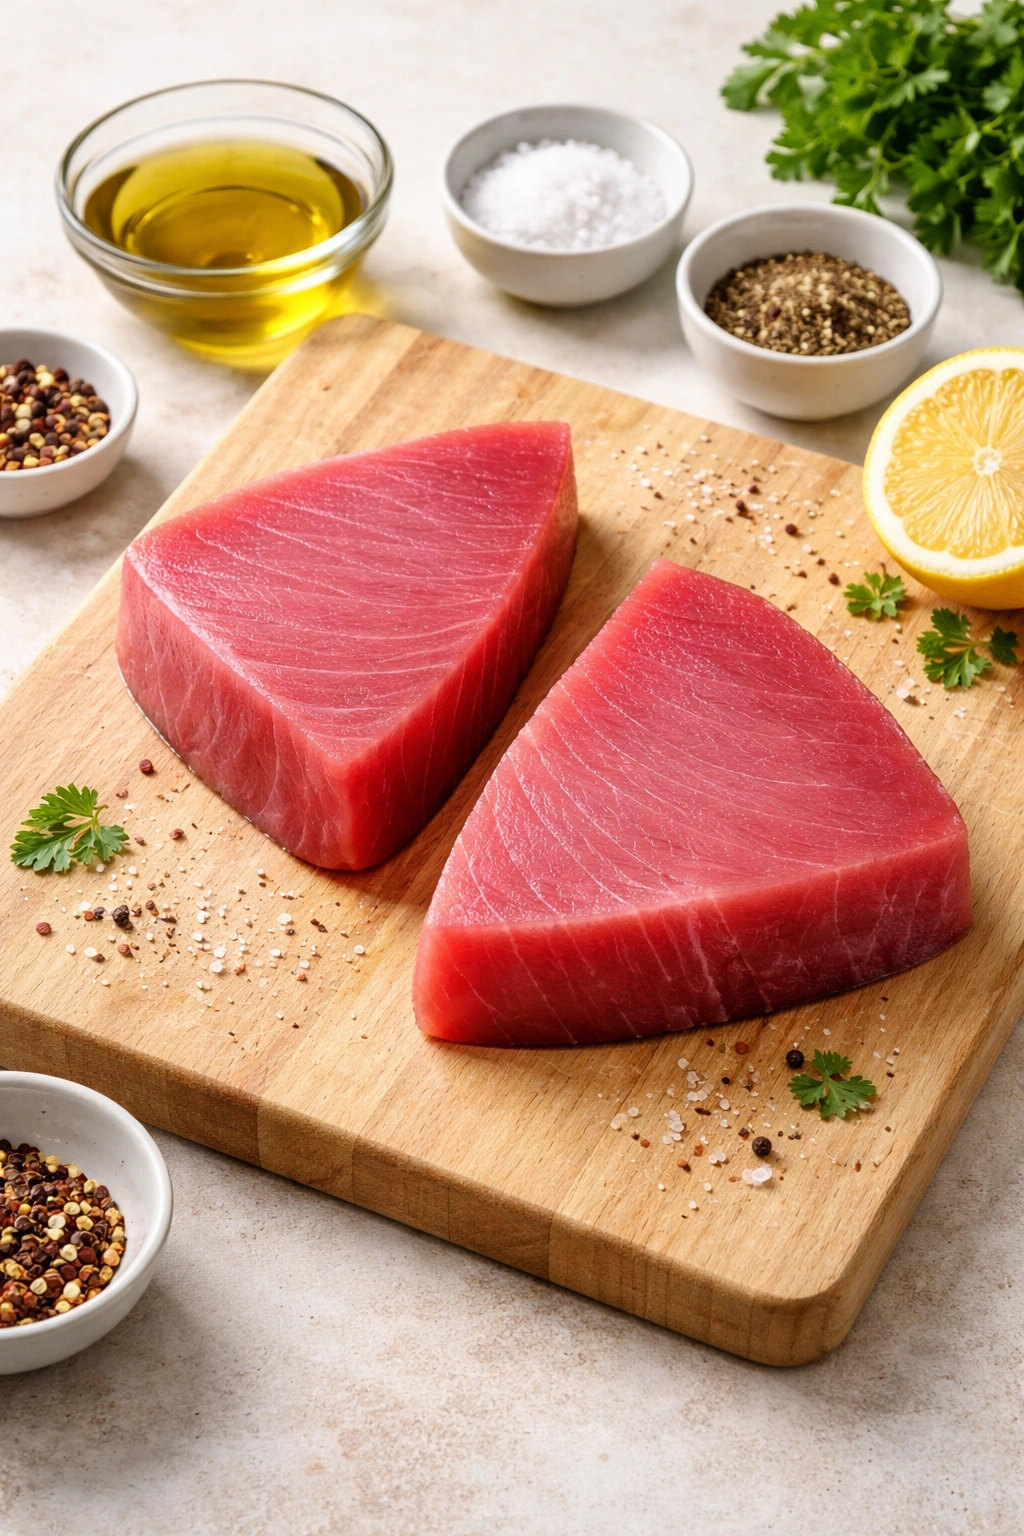
Start with color and appearance. Fresh tuna should have a vibrant, deep red or pink color—the deeper and more vivid the red, the fresher the fish. Avoid steaks with brown or dull gray spots, which indicate oxidation and aging. The flesh should look moist and firm, with no visible signs of drying or discoloration. If you notice any browning at the edges or the color is starting to fade to a brownish tone, that tuna has been sitting around longer than you want.
Texture matters tremendously. Gently press your finger against the tuna flesh—it should spring back and feel firm to the touch. If it feels soft, mushy, or doesn’t bounce back, the fish is past its prime and won’t develop that perfect crust or tender interior you’re after. A very fresh tuna steak should feel almost like a piece of rare beef in terms of firmness.
Smell is your most reliable indicator. Fresh tuna should have a clean, oceanic smell—fresh and briny, nothing more. If you detect any ammonia-like odor or anything distinctly “fishy” in a bad way, walk away. Fresh fish shouldn’t smell particularly strong at all. If the fishmonger seems defensive about you smelling the fish, that’s a red flag.
Thickness and cut matter for even cooking. Look for tuna steaks that are uniform in thickness—ideally between 1 and 1½ inches thick. Uneven thickness means some parts will overcook while others remain too rare. Uniform thickness ensures that the exterior gets that gorgeous sear at the exact same time the interior reaches your preferred doneness.
Ask questions. Don’t hesitate to ask your fishmonger when the tuna came in, where it was sourced, and how it’s been handled. Good fish markets are happy to discuss this, and the information helps you make an informed decision. Ask for sushi-grade tuna if you plan to serve it quite rare—this designation means the fish has been handled and frozen in a way that kills any potential parasites, making it safe for raw or nearly-raw consumption.
If fresh isn’t available, frozen is fine. Quality frozen tuna that’s been properly vacuum-sealed often outperforms “fresh” tuna that’s been sitting in the case for days. Look for packages with no ice crystals or freezer burn. Thaw it in the refrigerator overnight before cooking, and pat it completely dry before searing.
Essential Equipment for Perfect Searing
You don’t need much to sear tuna beautifully, but what you do use matters significantly. The right equipment gives you control and helps you achieve that perfect crust every single time.
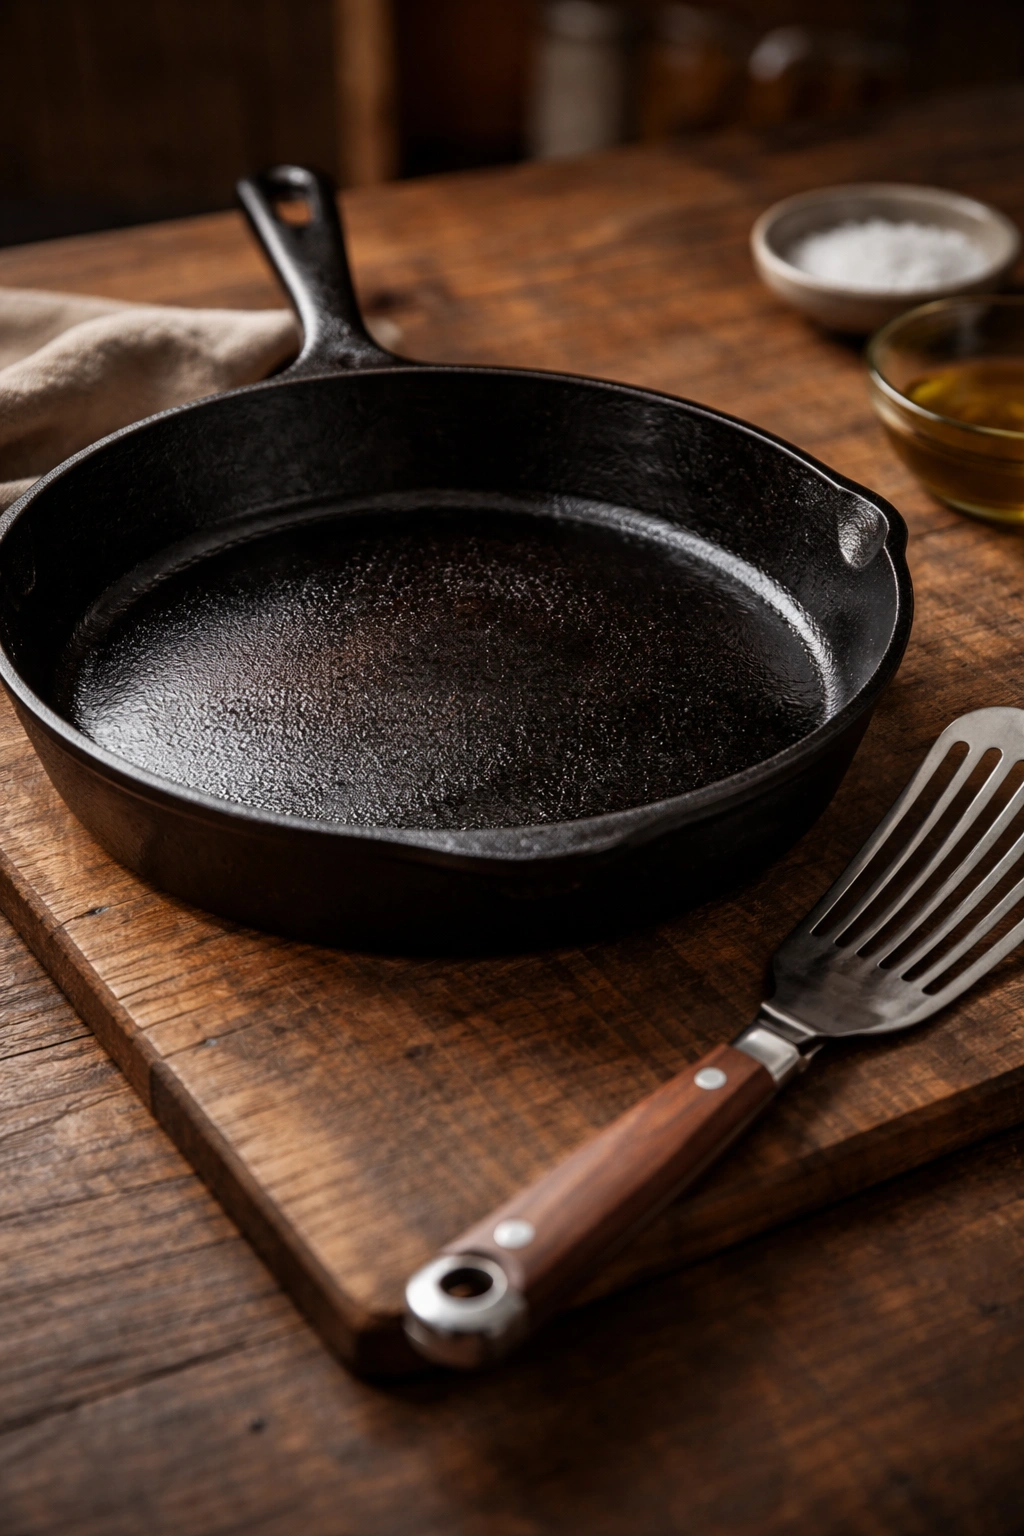
A heavy-bottomed skillet is non-negotiable. Cast iron is ideal because it retains and distributes heat evenly, reaching the extremely high temperatures needed for proper searing without hot spots that burn your food. A well-seasoned cast iron skillet is genuinely better than nonstick for this application—the tuna won’t stick if your pan is hot enough, and cast iron gives you superior browning. If you don’t have cast iron, a heavy stainless steel skillet works well too. Skip the nonstick pans for this; they can’t handle the high heat required, and nonstick coatings break down at the temperatures you need for a proper sear.
Your skillet should be large enough that the tuna steaks don’t touch each other if you’re cooking multiple steaks. A 10 to 12-inch diameter skillet gives the fish room to breathe and promotes even cooking and browning.
A metal fish spatula is genuinely useful here. It’s thinner and more precise than a regular spatula, allowing you to flip the tuna gently without damaging the crust you’ve worked to build. Metal tongs are also essential for rotating the tuna to sear the edges.
Paper towels or a clean cloth are crucial for patting the tuna completely dry before it hits the pan. Any moisture on the surface prevents proper browning and causes splattering.
A sharp knife is essential for slicing. Tuna flesh is delicate, and a dull knife will tear and shred the meat instead of creating clean slices. Invest in a good knife or sharpen yours before you cook.
An oil with a high smoke point is necessary. Avocado oil, peanut oil, refined safflower oil, canola oil, and grapeseed oil all work beautifully and can handle the high heat. Skip olive oil, which has a lower smoke point and will smoke excessively before your pan reaches searing temperature.
Optional but genuinely helpful: an instant-read thermometer takes the guesswork out of doneness. Medium-rare tuna registers at 130 to 135°F internally, which is the sweet spot for optimal texture.
The Science Behind Getting That Perfect Crust

Understanding what’s happening chemically when you sear tuna helps you troubleshoot problems and dial in the technique. The magic comes down to a few key principles working in concert.
The Maillard reaction is what creates that beautiful, caramelized brown crust that tastes incredible. This chemical reaction happens when amino acids and sugars in the fish’s protein react at temperatures above 300°F, creating hundreds of new flavor compounds and that rich, savory depth. The higher the temperature, the more rapidly the Maillard reaction occurs, which is why an extremely hot pan is so important. If your pan isn’t hot enough, the tuna will steam rather than sear, and you’ll never develop that flavorful crust.
Moisture is the enemy of browning. Any water on the surface of your tuna absorbs heat energy as it evaporates, which lowers the surface temperature below what’s needed for the Maillard reaction. This is why patting the tuna completely dry with paper towels is non-negotiable. Some recipes suggest letting the tuna air-dry briefly on a plate before cooking—this ensures the surface is absolutely dry.
Oil temperature matters more than you might think. When oil reaches its smoke point, it’s starting to break down, but more importantly for searing, it’s hot enough to transfer heat efficiently to the fish’s surface. You’re looking for the oil to shimmer and just begin to smoke when the tuna goes in—that’s your signal that it’s hot enough.
Carryover cooking continues after you remove the fish from heat. The internal temperature will rise 5 to 10 degrees after you take the tuna off the heat, which is why timing is tricky. A tuna steak that reads 120°F (rare) when it comes off the pan will be closer to 125 to 130°F (medium-rare) after it rests for a few minutes. This is actually desirable because it moves the center from very cold to perfectly warm without overcooking it.
Pressure and contact matter. Gently pressing the seared tuna against the hot pan with a spatula increases contact between the fish and the heat source, promoting more efficient browning. You’re not smashing it, just ensuring good contact without any air gaps.
Yield: Serves 2 | Makes 2 tuna steaks
Prep Time: 10 minutes
Cook Time: 5 minutes
Total Time: 15 minutes
Difficulty: Beginner — The technique is straightforward, the cooking time is brief, and there’s little that can go wrong if your pan is hot enough and you don’t overcook the fish.
For the Tuna and Basic Searing:
- 2 tuna steaks (yellowfin or bigeye ahi), approximately 6 to 8 ounces each and 1 to 1½ inches thick, sushi-grade quality
- 2 tablespoons neutral oil with a high smoke point, such as avocado oil, peanut oil, canola oil, or refined safflower oil
- 1 teaspoon kosher salt
- ½ teaspoon freshly ground black pepper
For the Sesame Crust (Optional but Highly Recommended):
- 3 tablespoons sesame seeds (black, white, or a combination for visual appeal)
- 1 teaspoon granulated garlic or onion powder
- ¾ teaspoon kosher salt (reduce if using the basic salt and pepper seasoning above)
- 1 teaspoon freshly cracked black pepper
- 1 teaspoon granulated sugar (this helps the crust caramelize beautifully and turn golden)
- 1 teaspoon dried thyme or Italian herb seasoning (optional but adds subtle depth)
For the Asian-Inspired Marinade (Alternative Seasoning Method):

- 3 tablespoons soy sauce, preferably low-sodium
- 1 tablespoon toasted sesame oil
- 1 tablespoon honey or molasses
- 2 cloves garlic, minced
- 1 teaspoon fresh ginger, minced
- ½ teaspoon cayenne pepper (optional, for gentle heat)
- 1 tablespoon fresh lime or lemon juice
For Serving:

- Fresh lemon or lime wedges
- Flaky sea salt such as Maldon salt (for finishing)
- Toasted sesame seeds (optional garnish)
- Sliced green onions (optional garnish)
- Extra olive oil, for drizzling
Searing the Tuna:
Prepare the Tuna:
-
Remove the tuna steaks from the refrigerator and unwrap them. If you’re using frozen tuna, thaw it completely in the refrigerator overnight before cooking. Place the steaks on a clean plate and pat them thoroughly dry with paper towels—this step is absolutely critical for achieving a proper sear and is not optional.
-
If using the basic salt and pepper method: sprinkle both sides of each tuna steak generously with kosher salt and freshly ground black pepper, rubbing it gently into the flesh so it adheres. If using the sesame crust: lightly coat each steak with a thin layer of soy sauce (about ½ teaspoon per side), then generously sprinkle the sesame seed mixture onto both sides, pressing gently so the seeds and spices stick to the moist surface. Make sure to coat the edges and all sides.
-
If using the Asian marinade: place the tuna steaks in a shallow dish or resealable plastic bag. Combine the soy sauce, sesame oil, honey, garlic, ginger, cayenne (if using), and lime juice in a small bowl, stirring until the honey dissolves completely. Pour this mixture over the tuna steaks, turning them several times to coat all surfaces evenly. You can sear the steaks immediately, or let them marinate at room temperature for 10 to 20 minutes (or cover and refrigerate for up to 8 hours if preparing ahead). If marinating longer than 20 minutes, bring the steaks back to room temperature for 10 to 15 minutes before searing.
Heat the Pan:
-
Place a large, heavy-bottomed cast iron skillet or heavy stainless steel skillet on the stovetop over medium-high to high heat. Let it preheat for 3 to 5 minutes—the pan needs to be extremely hot to achieve proper searing. You’ll know it’s ready when a single drop of water flicked onto the surface sizzles loudly and evaporates instantly.
-
If you have a range hood or exhaust fan, turn it on now. Searing tuna at high heat will produce smoke, and you want ventilation. If you’re concerned about smoke, you can partially cover the pan with a splatter guard or the lid of a large pot tilted at an angle.
Sear the First Side:
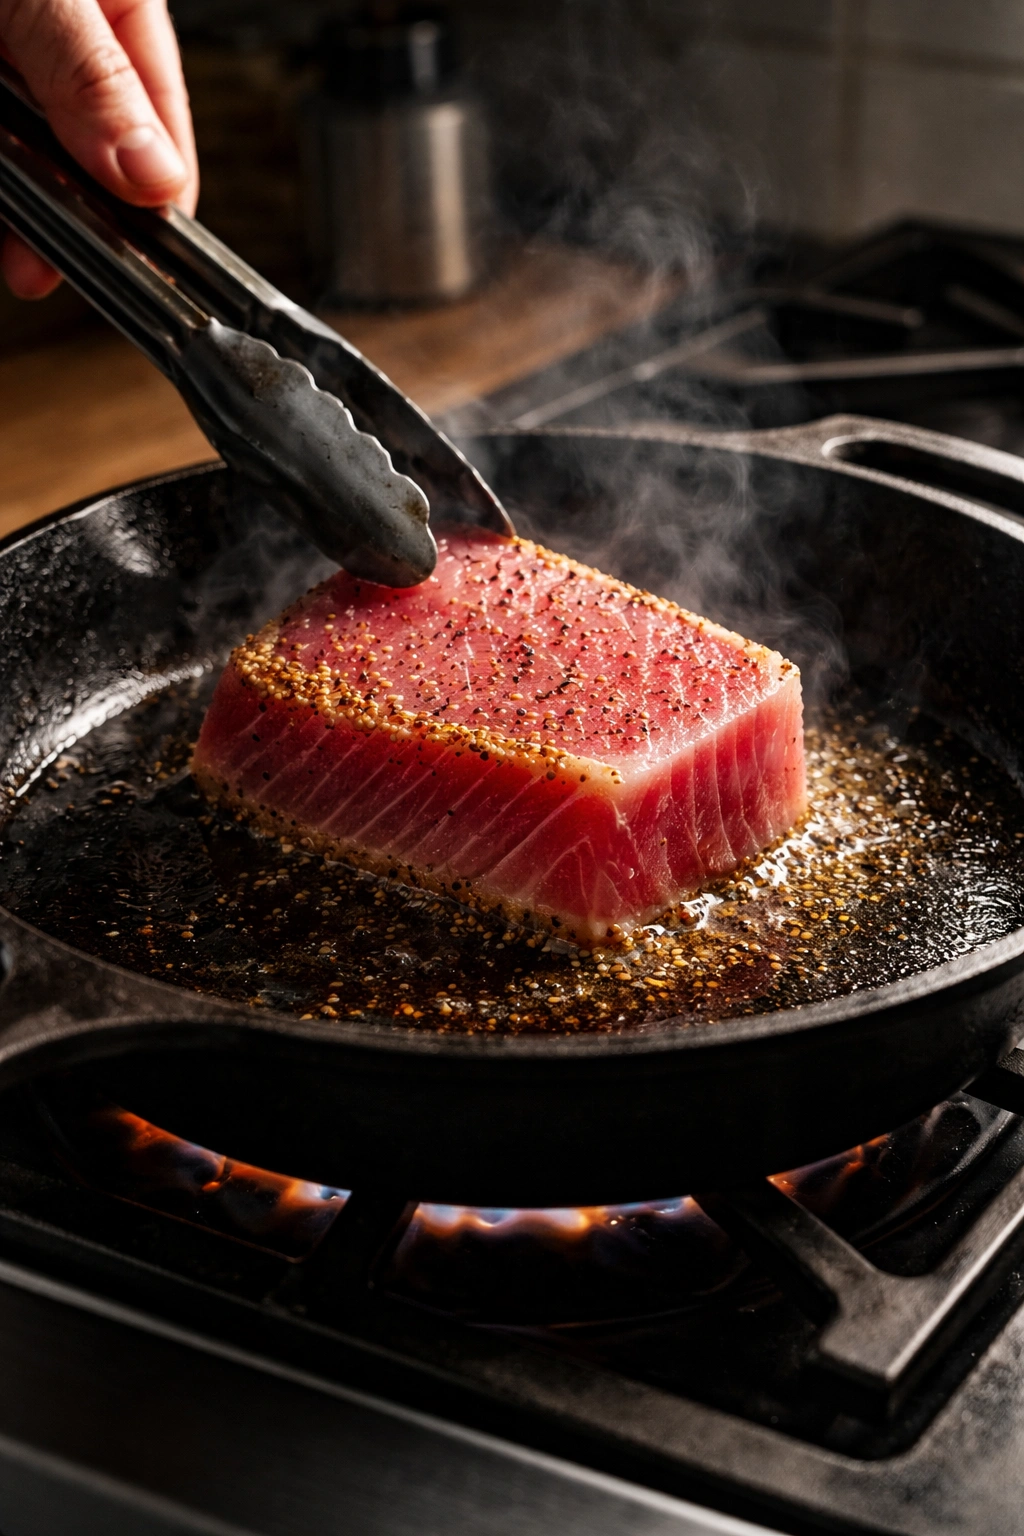
-
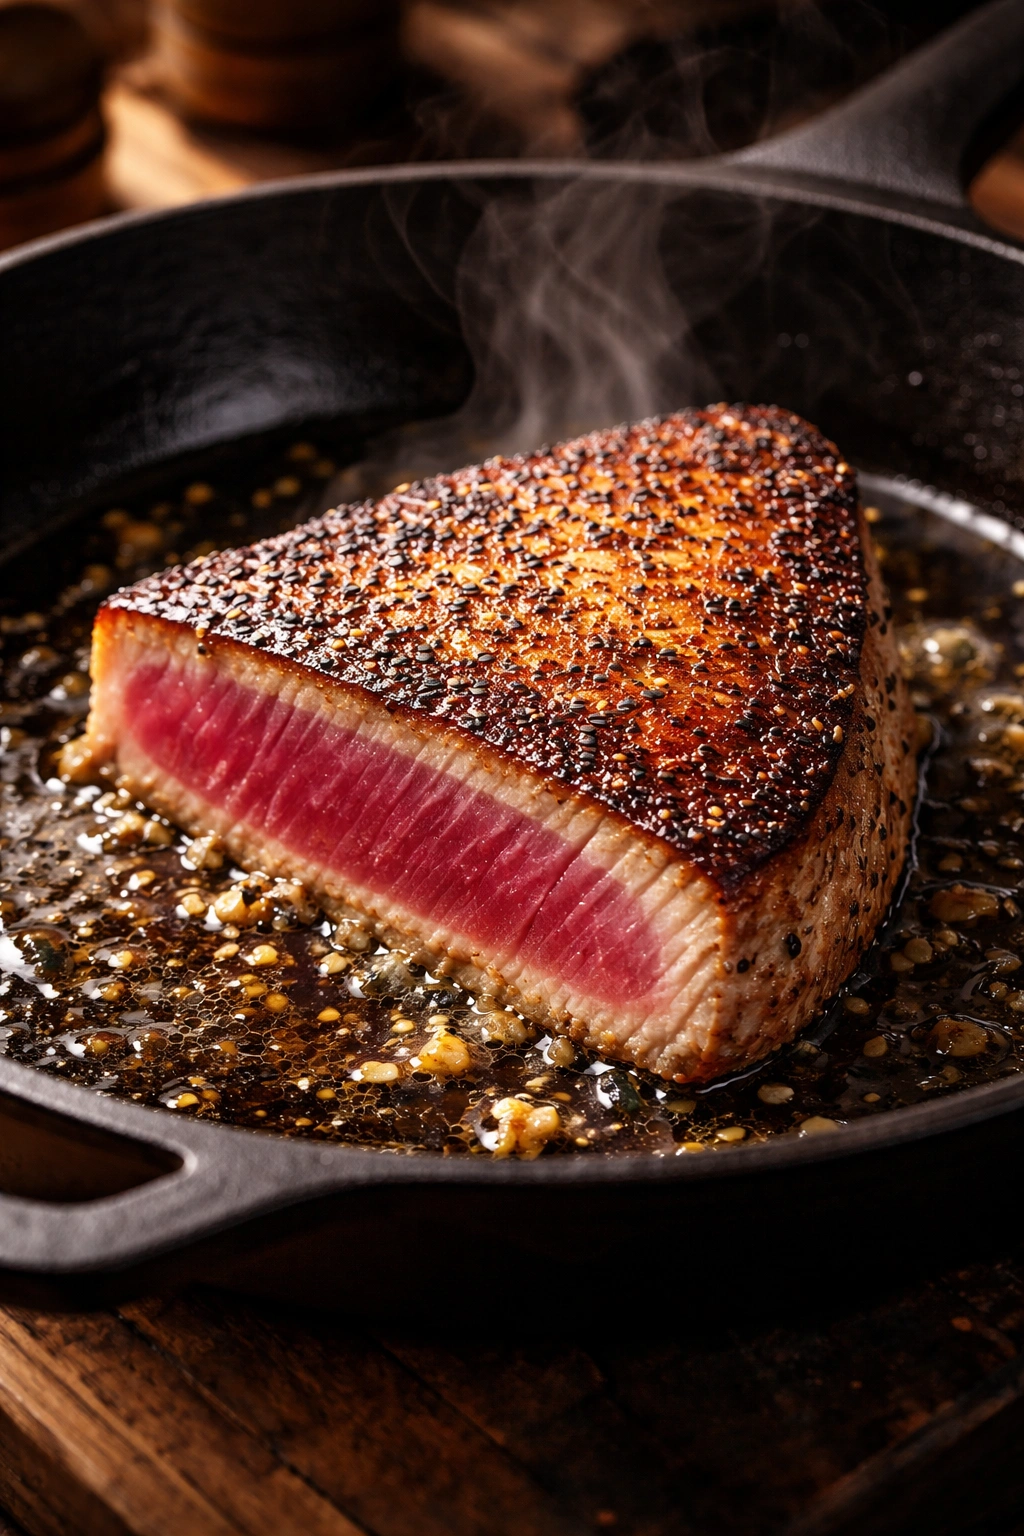
When the pan is smoking hot, add the oil to the skillet and let it heat for just 5 to 10 seconds—you want it shimmering and nearly smoking. Carefully place the first tuna steak into the pan, laying it away from you to minimize oil splattering. Do not move it or press it around. Let it sear undisturbed for 45 seconds to 1 minute (or up to 2 minutes if you prefer it more cooked in the center). You’re aiming for a beautiful golden-brown crust to form on the bottom.
-
Check the crust by carefully lifting one corner of the steak with your metal spatula—if it’s golden and releases easily from the pan, you’re ready to flip. If it’s still pale, give it another 15 to 30 seconds. The crust should be dark golden, not black—if it’s black, your heat was too high.
Sear the Second Side:
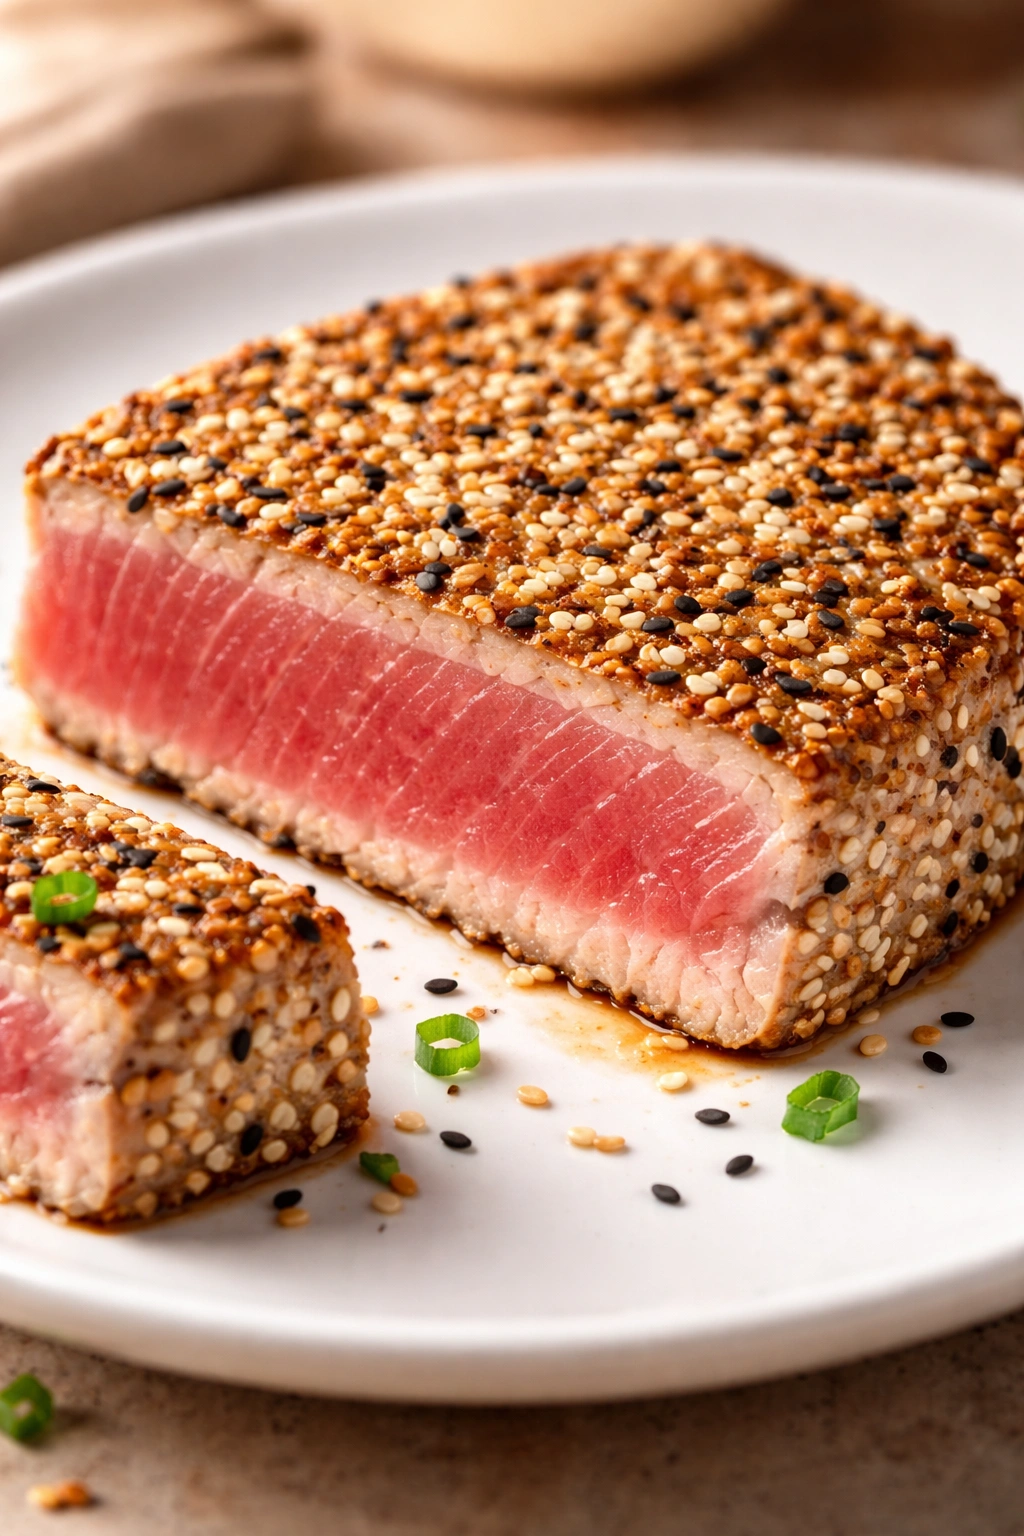
- Using your metal spatula and tongs, carefully flip the tuna steak to the other side. Sear for another 45 seconds to 1 minute (or 60 to 90 seconds for slightly more cooking in the center). Again, you’re looking for a golden-brown crust on this side. The total cooking time across both sides is typically 1.5 to 2 minutes for a rare center, 2 to 3 minutes for medium-rare, and 3 to 4 minutes for medium.
Sear the Edges:
-
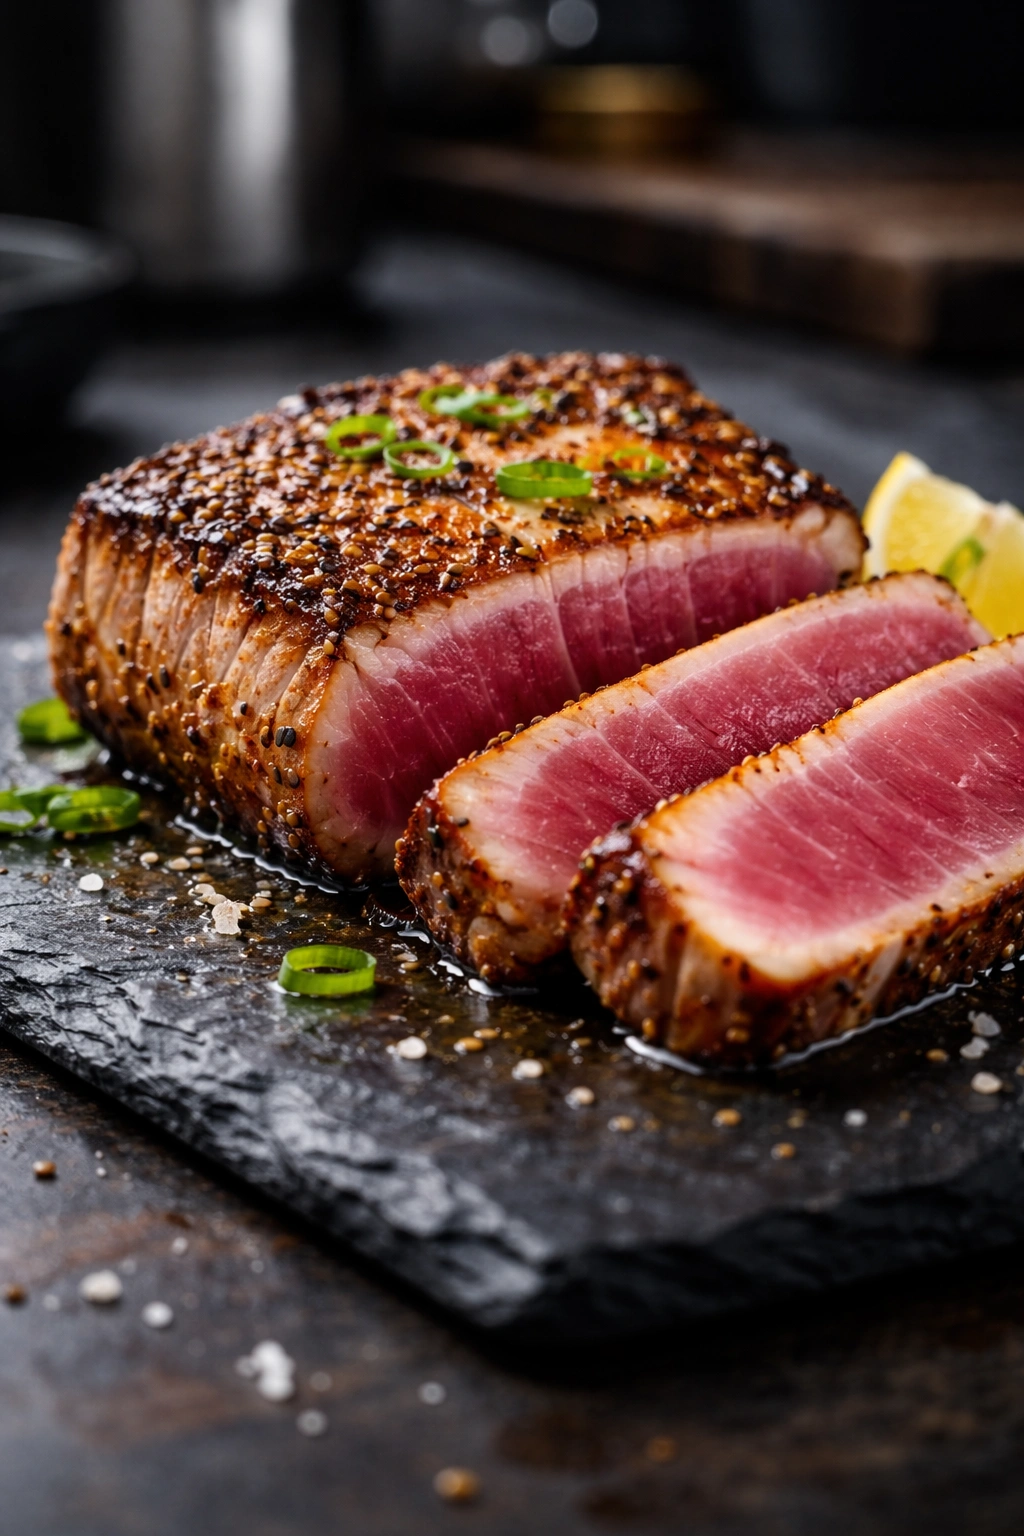
Using tongs, carefully hold the tuna steak upright so the thin edge is in contact with the hot pan. Sear the edges for about 20 to 30 seconds each, rotating the steak to expose all four thin edges to the heat. This creates a beautiful presentation when you slice and serves the secondary purpose of sealing the exterior completely.
-
As soon as the exterior is seared to your liking, remove the tuna from the pan immediately. Do not leave it in the pan even an extra 10 seconds—carryover heat will continue to cook it. Place the seared steaks on a clean cutting board or plate.
Rest and Slice:
-
Let the tuna rest for 3 to 5 minutes, loosely tented with foil. During this resting period, the internal temperature will rise slightly (the carryover cooking mentioned earlier), and the muscle fibers will relax, resulting in a more tender final bite. Resting also makes slicing easier because the flesh firms up slightly.
-
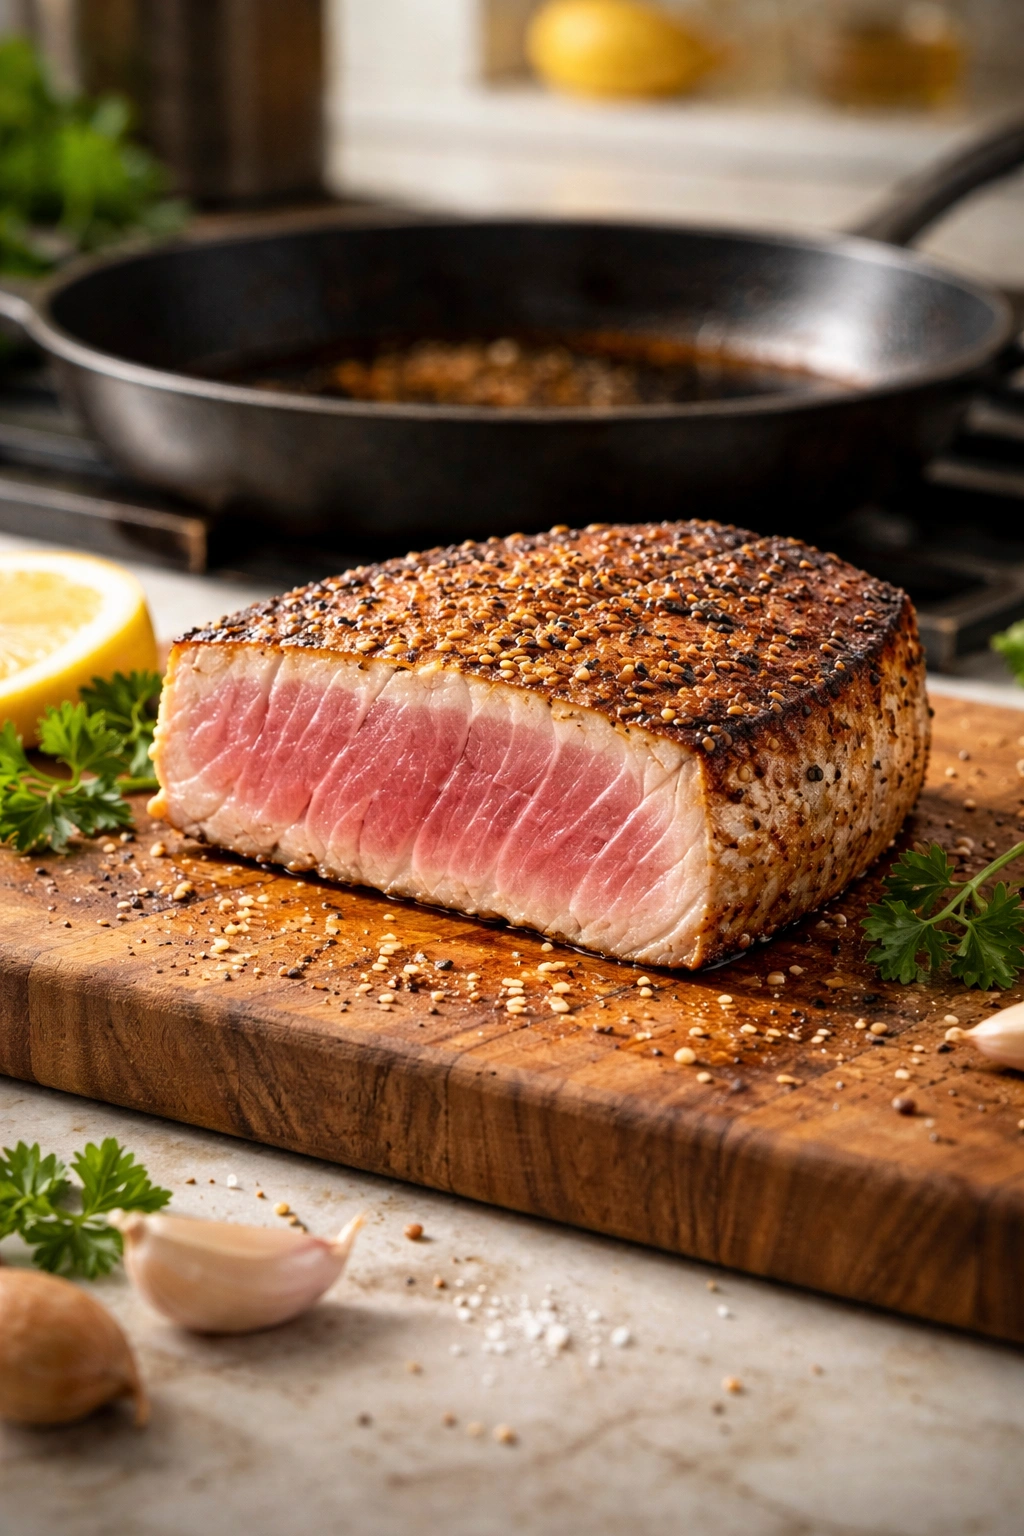
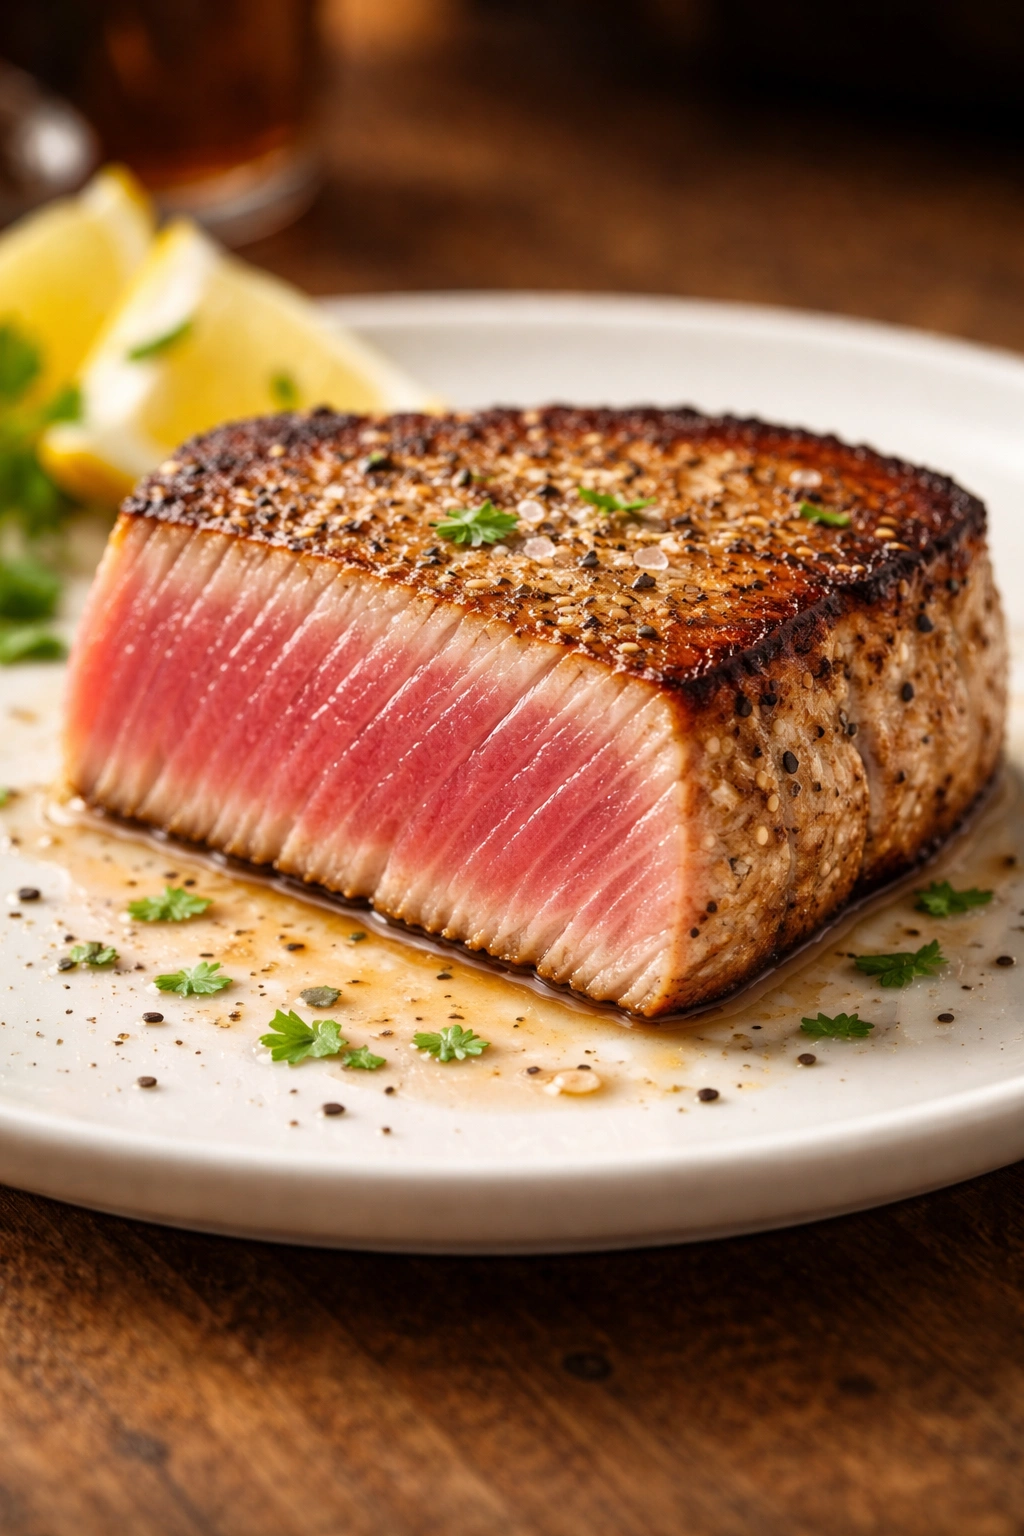
Using a very sharp knife, slice the tuna against the grain into ½-inch thick slices. Cut with smooth, decisive strokes rather than sawing motions—this preserves the delicate structure of the flesh and creates beautiful, intact slices. The edges should be beautifully caramelized, and the center should be deep pink to red, depending on your preferred doneness.
Serve:
- Arrange the sliced tuna on a serving plate. Sprinkle with flaky sea salt, a grind of fresh black pepper, and a generous squeeze of fresh lemon or lime juice. Drizzle with a small amount of high-quality olive oil, and garnish with toasted sesame seeds and sliced green onions if desired. Serve immediately while warm.
Pro Tips for Restaurant-Quality Results
The difference between mediocre seared tuna and exceptional seared tuna often comes down to small details that compound. These tips come from repeated testing and represent the knowledge that only comes from making this dish many times over.
Temperature control is everything. Your pan must be screaming hot—hotter than you probably think it needs to be. If you’re worried about it being too hot, it’s probably not hot enough yet. A properly hot pan will have a thin layer of smoke visible above the surface. If you have access to an infrared thermometer, you’re aiming for at least 450°F on the pan surface. If you’re cooking with cast iron, preheating for 5 to 7 minutes is not excessive.
Pat your tuna completely dry. I’m emphasizing this again because it’s genuinely that important. Moisture on the surface prevents browning and causes splattering. Use paper towels and don’t be shy about drying thoroughly—you want the surface of the fish to be bone dry.
Keep your tuna cold until the moment you cook it. Remove it from the refrigerator no more than 5 minutes before searing. A cold tuna steak in a very hot pan creates the ideal scenario: the exterior sears rapidly while the center stays rare and cold (if that’s what you want), and the temperature differential prevents heat from penetrating too deeply into the fish.
Don’t overcrowd the pan. If you’re cooking two steaks, make sure they don’t touch. If they’re touching, they steam each other instead of searing. If you need to cook more tuna than fits comfortably with space between steaks, cook them in batches.
Resist the urge to move it. Once the tuna hits the pan, leave it alone. Don’t poke it, don’t flip it early, don’t move it around to check how it’s browning. You’re disrupting the contact between the fish and the pan, which interrupts the Maillard reaction. Let it sit undisturbed until it releases easily from the pan—that’s your signal that a crust has formed and it’s ready to flip.
Use the absolute sharpest knife you own for slicing. A dull knife tears the delicate fish. A sharp knife creates clean slices that look beautiful and feel better to eat. If your knife isn’t sharp enough to shave the hair on your arm, sharpen it before you cook.
Add oil to a hot pan, not cold oil to heat. Put your oil in the pan after it’s already hot, not before. Cold oil in a cold pan heats slowly and doesn’t get quite as hot. Hot pan + oil added just before cooking = maximum heat for searing.
Don’t be afraid of the smoke. The smoke you see is a sign that everything is working as it should be. It’s not dangerous, and it’s definitely not a sign that something is burning. That smoke clears quickly once the tuna hits the pan.
Common Mistakes and How to Avoid Them
Most of the problems that arise when searing tuna fall into just a handful of categories, and understanding what’s going wrong allows you to fix it.
Overcooking is the most common mistake, and it’s also the easiest to prevent. Tuna cooks incredibly fast, and it goes from perfectly rare to dry and rubbery in a matter of seconds. Set a timer on your phone, and don’t guess about timing. 45 seconds to 1 minute per side is the target for rare tuna about 1 inch thick—adjust slightly if your steaks are thicker or thinner. Check the interior color by looking at a thin slice or by pressing gently and feeling the texture. With practice, you’ll develop an instinct for doneness, but a meat thermometer (125 to 130°F for medium-rare) removes all guesswork.
A pan that’s not hot enough is the second most common problem. If your tuna is pale instead of golden-brown, if it’s sticking to the pan, or if the edges look steamed rather than seared, your pan wasn’t hot enough. There’s no shame in reheating and trying again—actually, tuna is forgiving enough that you can do this. Remove the fish, let the pan reheat for another minute or two until it’s smoking, then sear again briefly to fix the crust.
Wet tuna that sticks to the pan signals that the surface wasn’t dry enough. Pat it completely dry next time, and wait an extra 30 seconds or so after patting to let any residual moisture evaporate.
Steak that’s stuck to the pan usually means either the pan wasn’t hot enough (heat = non-stick on its own) or you tried to flip it too early before a crust had formed. Give it the full time on the first side before attempting to move it. If it seems stuck, wait another 10 seconds and try again—it will release when it’s ready.
An interior that’s too cold to enjoy, even when you want it rare, happens when you cook tuna that came straight from the fridge without letting it come closer to room temperature. The center will be almost ice-cold inside, which some people love but others find unpleasant. Let the tuna sit on the counter for 5 to 10 minutes after removing it from the refrigerator, or plan ahead and move it to the fridge-to-counter transition an hour before cooking.
Uneven cooking where one end is more cooked than the other usually means uneven thickness in the steak itself. Buy steaks that are uniform in thickness, or use a meat mallet (gently) to even out any thick and thin spots before cooking.
Flavor Variations to Try
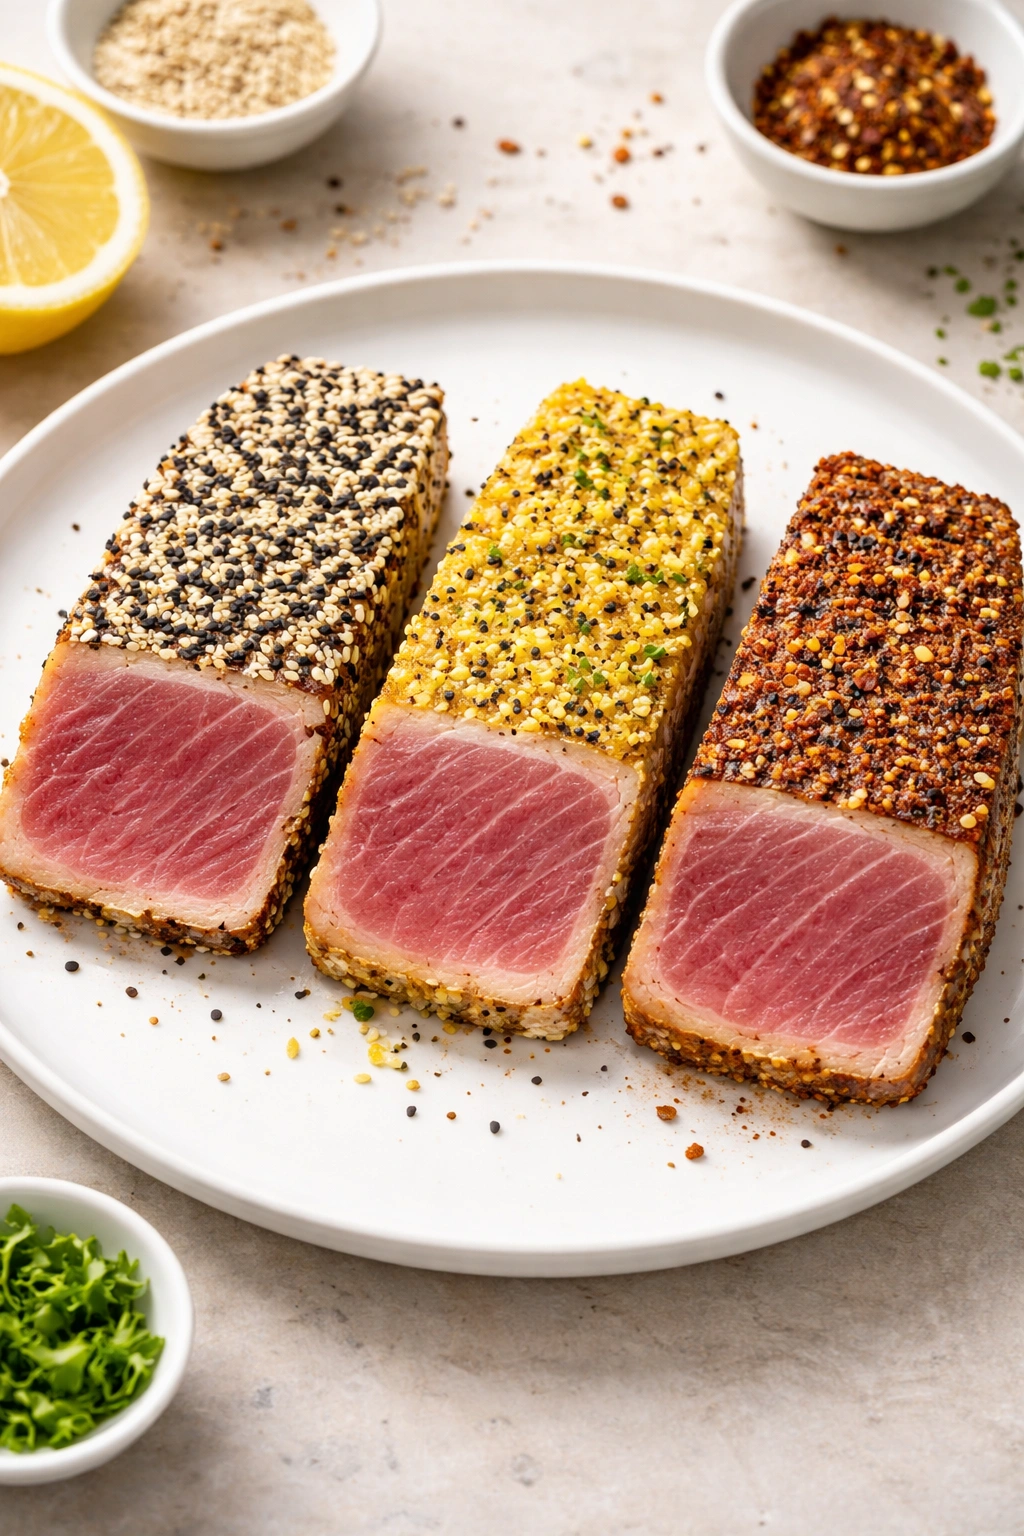
The basic seared tuna technique is your foundation, and once you master it, you can apply it to create dozens of different dishes by changing seasonings and accompaniments.
The Sesame Crust, described in the ingredient list above, is classic and restaurant-standard. The nuttiness of sesame seed complements tuna beautifully, and the seeds add texture. Toast the sesame seeds in a dry skillet for a minute or two before mixing them with the other seasonings if you want even more intensified flavor.
Lemon Pepper Crust is bright and Mediterranean. Skip the sesame seeds and instead mix together 1½ tablespoons cracked black pepper, 2 teaspoons lemon zest, 1 teaspoon kosher salt, and ½ teaspoon granulated garlic. The lemon zest adds brightness that cuts through the richness of the seared tuna beautifully. This version pairs wonderfully with lemon butter sauce or simply with fresh lemon juice squeezed over the top.
Spice-Crusted Tuna brings heat and depth. Mix together 1 tablespoon smoked paprika, 2 teaspoons cayenne pepper (adjust to your heat tolerance), 1 teaspoon ground cumin, 1 teaspoon kosher salt, ½ teaspoon garlic powder, and ¼ teaspoon black pepper. This works beautifully with a lime squeeze and cilantro for garnish.
Soy-Ginger Marinade is umami-packed. Whisk together ¼ cup soy sauce, 2 tablespoons rice vinegar, 1 tablespoon sesame oil, 1 tablespoon honey, 2 minced garlic cloves, 1 tablespoon grated fresh ginger, and ¼ teaspoon red pepper flakes. Marinate the tuna for 15 to 30 minutes, then sear as directed. Serve with green onions and sesame seeds.
Blackening Spice gives it New Orleans energy. Mix together 2 teaspoons paprika, 1 teaspoon cayenne, 1 teaspoon garlic powder, 1 teaspoon onion powder, 1 teaspoon black pepper, ½ teaspoon dried oregano, ½ teaspoon dried thyme, and 1 teaspoon salt. The spices will char slightly on the surface, creating an incredible crust.
Mediterranean with Herbs features fresh flavors. Finely mince fresh basil, oregano, and parsley, then mix with minced garlic, lemon zest, kosher salt, and black pepper. Pat the tuna dry, coat with a bit of olive oil, then press the fresh herb mixture onto both sides. Sear immediately—the fresh herbs will cook slightly, creating a flavorful crust.
Horseradish Crust adds pungency and heat. Mix together 2 tablespoons prepared horseradish (drained well), ½ cup panko breadcrumbs, 1 teaspoon kosher salt, ½ teaspoon black pepper, and 1 minced garlic clove. Pat the tuna dry, coat with a bit of olive oil or melted butter, then press the horseradish mixture onto both sides. Sear as directed.
Honey Dijon creates a sweet-savory balance. Brush tuna steaks with a mixture of 3 tablespoons Dijon mustard mixed with 1 tablespoon honey before searing. The mustard will brown slightly and create a flavorful crust, and the residual sweetness from the honey complements the tuna beautifully.
Storage, Reheating, and Make-Ahead Strategies
Unlike some proteins, cooked tuna has a limited shelf life, but there are smart ways to maximize it and prepare ahead without sacrificing quality.
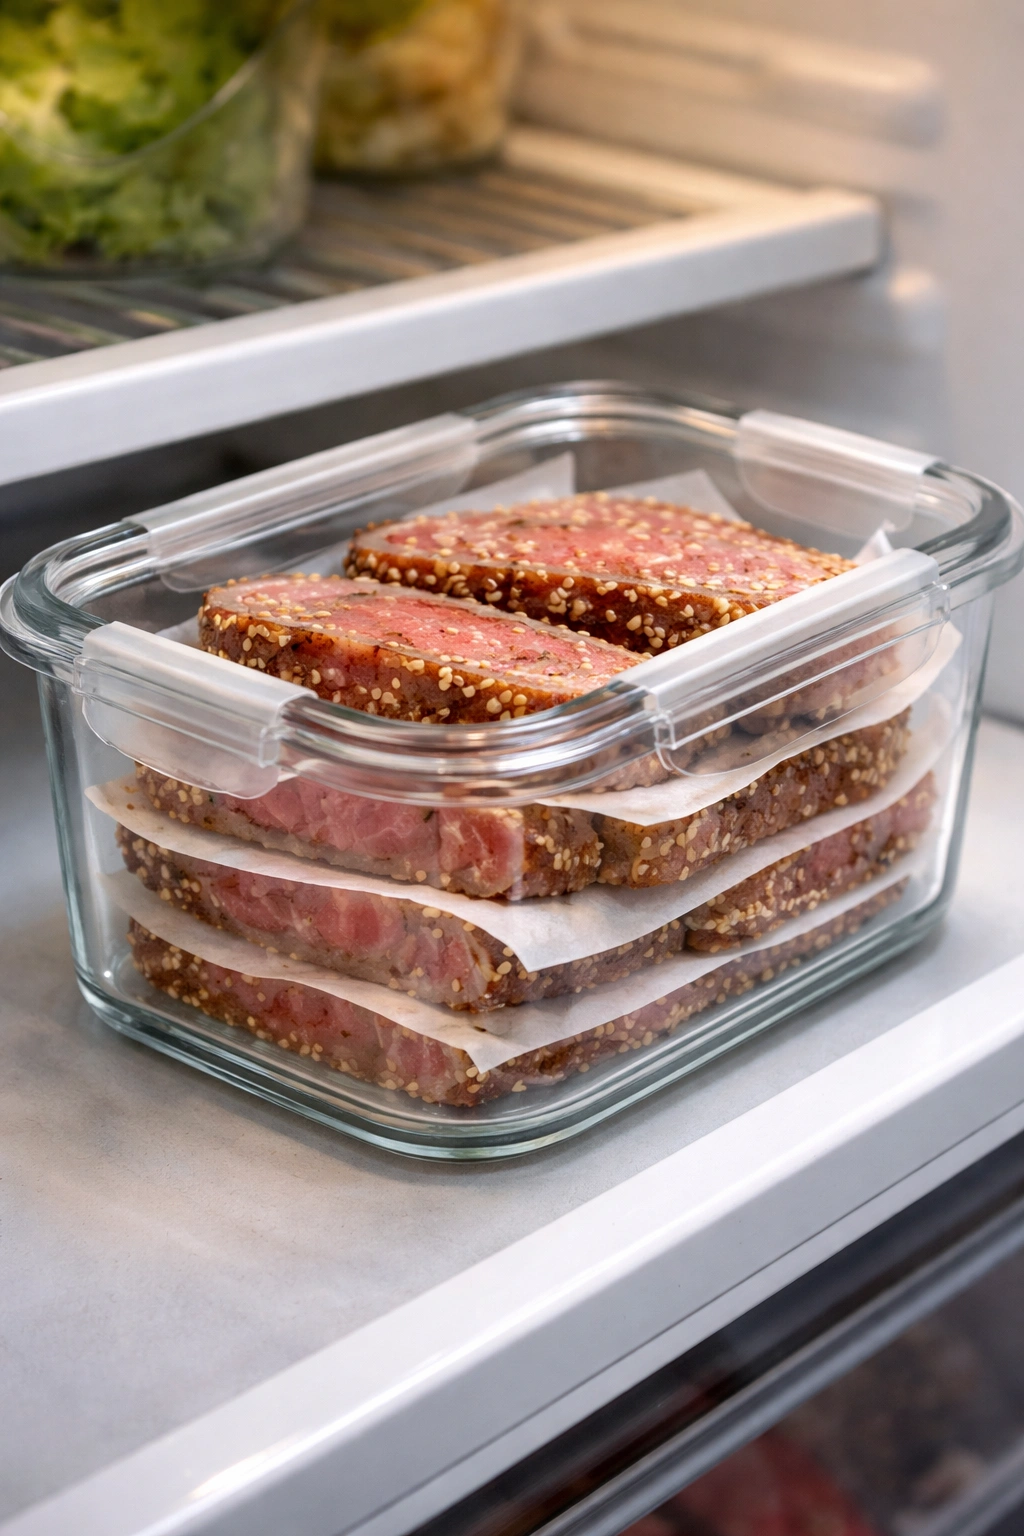
Refrigerator storage works well for up to 3 days. Store leftover sliced tuna in an airtight container, preferably with parchment paper between layers to prevent sticking. The tuna will remain safe to eat for this duration, though it’s best enjoyed within the first 24 hours when the texture is at its most tender. If you’ve made a whole seared steak that you haven’t sliced yet, wrap it tightly in plastic wrap or store it in an airtight container.
Freezing is possible but comes with a texture trade-off. Cooked tuna can be frozen for up to 3 months in an airtight, freezer-safe container or wrapped tightly in plastic wrap and placed in a freezer bag. However, the freezing and thawing process can make the texture slightly drier than fresh-seared tuna. It’s still good and still safe to eat, but if texture matters to you, plan on eating it fresh rather than freezing.
Reheating leftover seared tuna requires a gentle touch. The goal is warming it through without overcooking it further. The best method is a hot skillet over medium heat for just 1 to 2 minutes per side, until warmed through. You can also warm it in a low oven (300°F) for about 5 minutes. Avoid the microwave if possible, as it tends to overdry the tuna. Some people prefer to serve leftover seared tuna cold, sliced thin and served over a salad or in a rice bowl with other components—this avoids any reheating and lets you enjoy the original texture.
Make-ahead strategy: You can prepare the marinade and season the tuna up to 24 hours in advance. Keep the seasoned tuna in the refrigerator in an airtight container, and sear it just before you’re ready to eat. This way, you get the benefit of advance planning without any texture compromise. If you’re using a marinade, you can even marinate overnight for deeper flavor development.
Serving at different temperatures: Seared tuna is excellent served hot immediately after searing, warm after a 5-minute rest, and also at room temperature 30 to 60 minutes after cooking. Some people find room-temperature seared tuna is actually more tender because the muscle fibers relax as it cools. You have flexibility here—serve it however you prefer.
If you’ve overcooked it by accident: Don’t throw it away. Overcooked tuna is drier but still has a pleasant texture if you slice it thin and serve it with a sauce or over something moist like rice or a salad. Think of it as a soft steak that just needs a liquid component to bring back moisture.
Serving Suggestions and Ideal Pairings
The beauty of seared tuna is its versatility—it works beautifully as a standalone protein or as part of a larger composed dish. Here are the most successful pairing strategies.
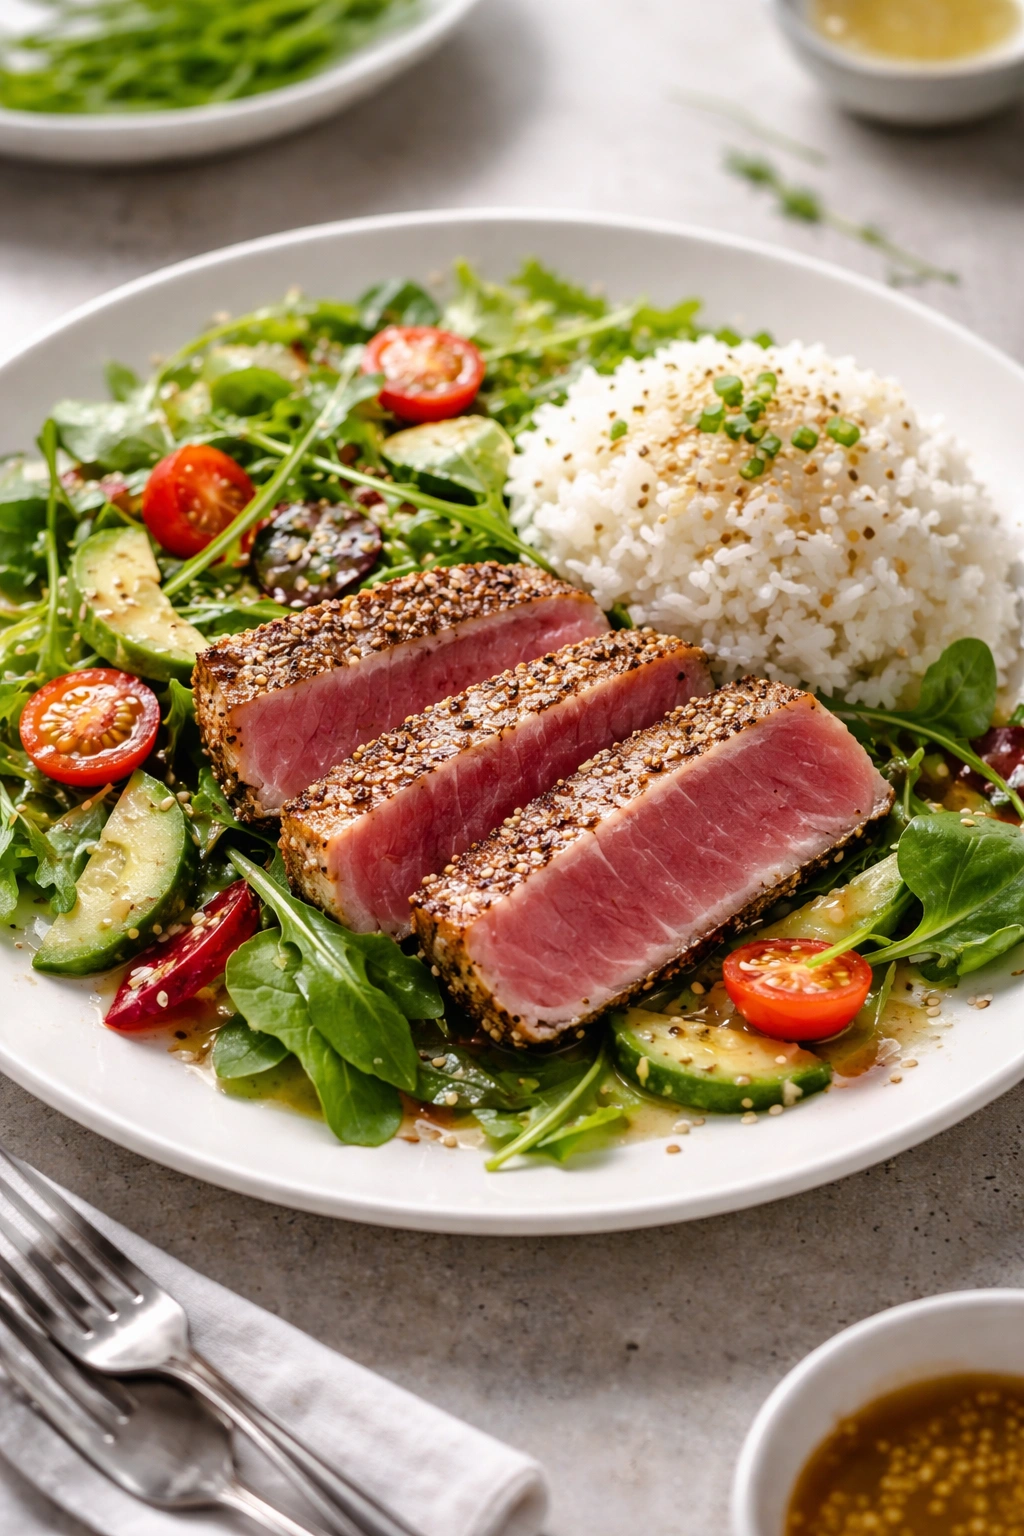
Tuna over a bed of greens is probably the most common presentation. Make a simple salad with mixed greens or baby spinach, toss it with a light vinaigrette (lemon-based or Asian-style ginger dressing), and arrange thin slices of warm or room-temperature seared tuna on top. Add edamame, sliced cucumber, shredded carrots, or avocado. Finish with sesame seeds and a squeeze of lime. This works for lunch or dinner and is genuinely satisfying.
Served with white or jasmine rice and Asian sides is classic. Place a mound of steamed rice on a plate, top it with sliced tuna, and garnish with thinly sliced green onions, toasted sesame seeds, and a small drizzle of sesame oil. Serve with a small bowl of soy sauce for dipping, and perhaps a side of lightly blanched or steamed bok choy or broccoli.
Rice bowl format is essentially the above but deconstructed into a bowl. Layer rice, vegetables (cucumber, avocado, radish sprouts, edamame), and sliced tuna in a bowl, and serve with an Asian-style dressing drizzled on top. This is also called a poke bowl format, and it’s visually stunning and easy to eat.
With roasted vegetables creates a more composed dinner plate. Serve the sliced tuna alongside roasted asparagus, broccolini, or root vegetables like beets or carrots. A drizzle of soy sauce or a squeeze of lemon ties everything together. This works especially well if you’ve used an herb-based seasoning on the tuna.
With fingerling potatoes makes for elegant restaurant plating. Roast small fingerling potatoes until they’re golden and crispy, season them lightly with flaky sea salt, and serve alongside the tuna. A simple green salad with vinaigrette, a sautéed spinach, or some quickly sautéed green beans complete the plate. This feels like fine dining without being complicated.
In a taco format is unexpectedly delicious. Place thin slices of warm tuna in small corn or flour tortillas, top with shredded cabbage, avocado slices, cilantro, and a drizzle of lime crema or spicy mayo. Add a diced mango salsa or pico de gallo for brightness. These make incredible appetizers or casual meals.
Over avocado toast brings together luxe ingredients in an easy package. Toast good bread, spread it with mashed avocado seasoned with salt, pepper, and lemon juice, and top with thin slices of seared tuna. Sprinkle with microgreens and finish with a squeeze of lime and a drizzle of olive oil.
As part of a sushi-inspired board pairs beautifully with other raw and cooked components. Arrange sliced tuna alongside sushi rice, cucumber ribbons, avocado, radish sprouts, seaweed salad, and edamame. Add a small bowl of soy sauce for dipping and wasabi on the side. This works beautifully for entertaining.
With a bright sauce elevates even simple presentations. A lemon butter sauce, salsa verde, Mediterranean salmoriglio, Asian ginger-soy sauce, or even a simple beurre blanc complements tuna beautifully. The sauce adds moisture and acidity that cuts through the richness of the fish.
Beverage pairings matter more than you might think. Seared tuna pairs beautifully with crisp white wines like Sauvignon Blanc, Pinot Grigio, or a chilled barrel-fermented Chardonnay. It also works with lighter reds like Pinot Noir. If you prefer beer, a pale ale or wheat beer complements it well. For non-alcoholic options, sparkling water with lemon or a crisp iced green tea are refreshing choices.
Final Thoughts
Pan-seared tuna represents something rare: a dish that’s genuinely impressive, surprisingly simple, and accessible to anyone willing to follow a straightforward technique. There’s no long ingredient list, no complicated steps, and no equipment you don’t already have in your kitchen. What you get in return is a restaurant-quality protein that tastes like you spent hours cooking when you’ve actually invested less than 20 minutes from start to finish.
The key to success is respecting the few rules that matter: get your pan hot, keep your tuna cold and dry, sear it briefly, and don’t overcook it. Everything else—the specific seasonings, the side dishes, the sauces—is flexible and adaptable to whatever flavors you’re craving or ingredients you have on hand. Once you’ve made this dish two or three times and developed an instinct for when the pan is hot enough and how long each side needs, you’ll find yourself making it regularly. It becomes the go-to solution for nights when you want something elegant, nutritious, and genuinely delicious without the stress.
Whether you’re cooking for yourself on a busy weeknight or preparing something special for guests, pan-seared tuna delivers every time. The beautiful caramelized crust, the buttery tender interior, the jewel-like pink center—it all comes together in minutes and creates a meal that feels like a celebration. Start with the basic technique and a simple seasoning, get comfortable with the method, and then explore the variations that appeal to you. This is the kind of dish that rewards practice, gives you consistent results, and never gets old.