Pork tenderloin is the weeknight dinner that actually looks impressive when you set it on the table, yet it takes less than 40 minutes from pan to plate. This is the cut that lets you look like you’ve been cooking all day when really you’ve been sipping a glass of wine and watching the oven do all the work. The magic? Pork tenderloin is naturally lean and mild—which means it’s forgiving to cook, accepts bold flavors beautifully, and costs a fraction of what you’d pay for beef tenderloin at a nice restaurant.
The real secret here isn’t complicated technique or exotic ingredients. It’s understanding that pork tenderloin responds beautifully to high heat, a simple seasoning strategy, and the kind of attention that takes maybe 15 minutes of active work. Get those three things right, and you’ll end up with meat that’s perfectly pink in the center, crust-seared golden on the outside, and genuinely tender every single time. Even the leanness that intimidates people—the quality that makes people worry about dryness—becomes an asset once you know the one thing that changes everything.
This is the kind of recipe that lives in the rotation of anyone who cares about eating well but doesn’t have hours to spend cooking. It works for a casual Tuesday night with family, a low-stress dinner party where you want to look organized, or that moment when you’ve suddenly got guests arriving and you need something that feels special without demanding your full attention. Once you nail this, you’ll be making it constantly.
Why Pork Tenderloin Is Your Secret Dinner Weapon
Pork tenderloin sits in this perfect spot between speed and sophistication that few proteins can match. It’s one of the quickest-cooking cuts in the meat case—even whole, it’s done in 25 to 35 minutes depending on thickness and oven temperature. Beef tenderloin requires careful sourcing and a premium price tag; chicken breast is good but can feel everyday; pork tenderloin gives you elegance on a weeknight budget.
The tenderloin comes from the loin of the pig, which barely works at all, which is exactly why the meat is so tender and mild-flavored. Unlike tougher, more flavorful cuts that need hours of braising or slow-cooking to become palatable, this meat is ready to eat quickly. That mildness also means it accepts bold seasoning gracefully—garlic, herbs, mustard, soy, citrus, whatever direction you want to take the flavor, the meat gets on board.
Here’s what makes it truly special though: pork tenderloin is almost impossible to overcook when you use the right method. Most people’s fear comes from cooking it too long at low heat, where it dries out and turns gray. Oven-roasting at high temperature sears the outside quickly, seals in juices, and cooks the center to a safe temperature before the heat has time to penetrate too deeply. This isn’t luck—it’s how the physics of meat cooking work, and understanding that gives you confidence.
A whole tenderloin (they typically weigh 1.5 to 2.5 pounds) is also the right size for feeding four to six people without much fuss. It’s not so small that it’s fussy, and it’s not so massive that it requires special equipment or complicated timing. You can serve it for a simple family dinner, slice it for a dinner party, make it ahead and use it for multiple meals, or even shred it for other applications.
How to Choose and Prepare Your Pork Tenderloin
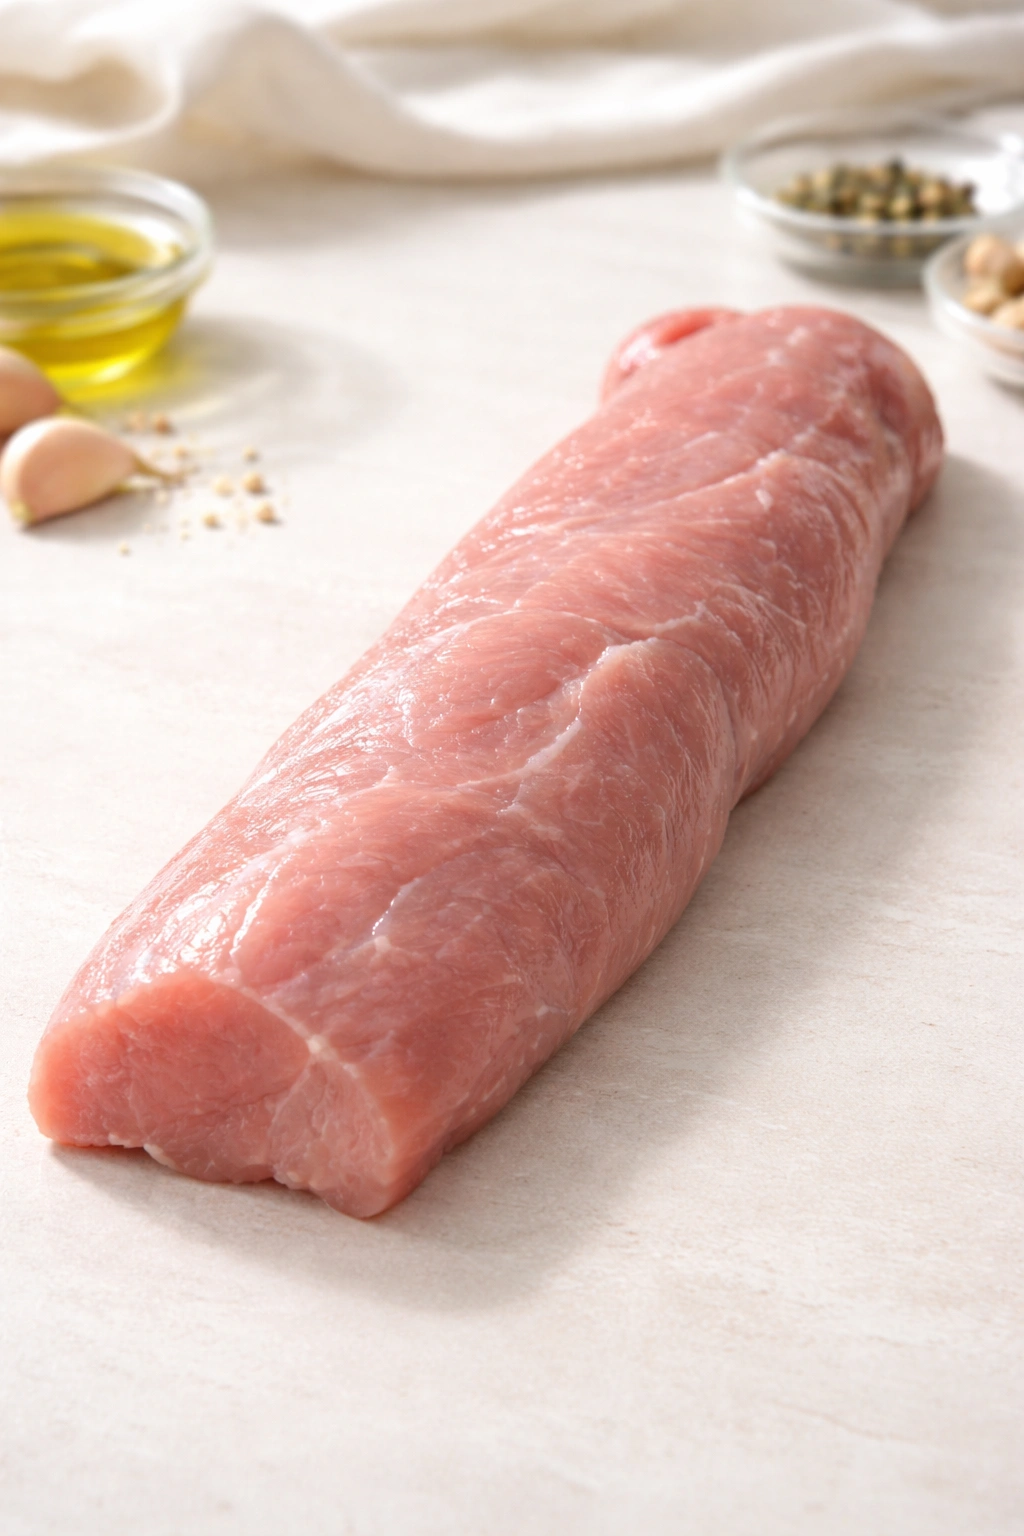
The quality of your finished dish starts with selecting the right piece of meat. Look for a tenderloin that’s pale pink (not bright red, which suggests it’s too fresh and won’t have developed good flavor; not gray, which means it’s old). The surface should be dry or lightly moist, never slick or sticky. If you’re at a butcher counter, ask them to trim any thin silverskin (the translucent membrane) from the surface—this saves you work and ensures even cooking.
One whole tenderloin is ideal, but you might also find them butterflied or cut into steaks at the market. A whole piece gives you the most control over doneness and the chance to develop a golden crust on all sides. If it’s wrapped in plastic, unwrap it and let it sit on a plate in the refrigerator for a few hours or overnight if you’re not cooking it immediately. This drying action on the surface is what creates that gorgeous crust in the oven.
Before cooking, pull the tenderloin from the cold storage about 30 minutes before it goes in the oven. Room-temperature meat cooks more evenly than cold meat—the outside won’t have time to overcook while the inside comes up to temperature. This is one of those small steps that genuinely matters and separates competent cooking from great cooking. While it’s coming to room temperature, prep your seasonings and get your baking pan ready.
Trim any remaining silverskin yourself if your butcher didn’t do it—just a sharp knife at a shallow angle. Pat the surface completely dry with paper towels. Dryness on the surface = better browning. Moisture = steam = no crust. Dry it aggressively, and don’t be shy about it.
Setting Up for Success: Seasoning the Right Way
The tenderloin’s mild flavor means seasoning isn’t optional—it’s essential. The best approach is simple salt, ground black pepper, and garlic at a minimum, with room to add herbs or other flavors depending on your mood. But the magic is in the salt timing. Salting the meat 40 minutes to 24 hours before cooking is infinitely better than salting it right before it goes in the oven.
When you salt meat early, the salt dissolves into the surface moisture, which then gets reabsorbed through osmosis, penetrating the meat itself. This seasons the meat from the inside out, not just on the surface. If you salt too close to cooking (within 15 minutes), the salt just sits on top and you get uneven seasoning. Wait at least 40 minutes, and the difference is obvious.
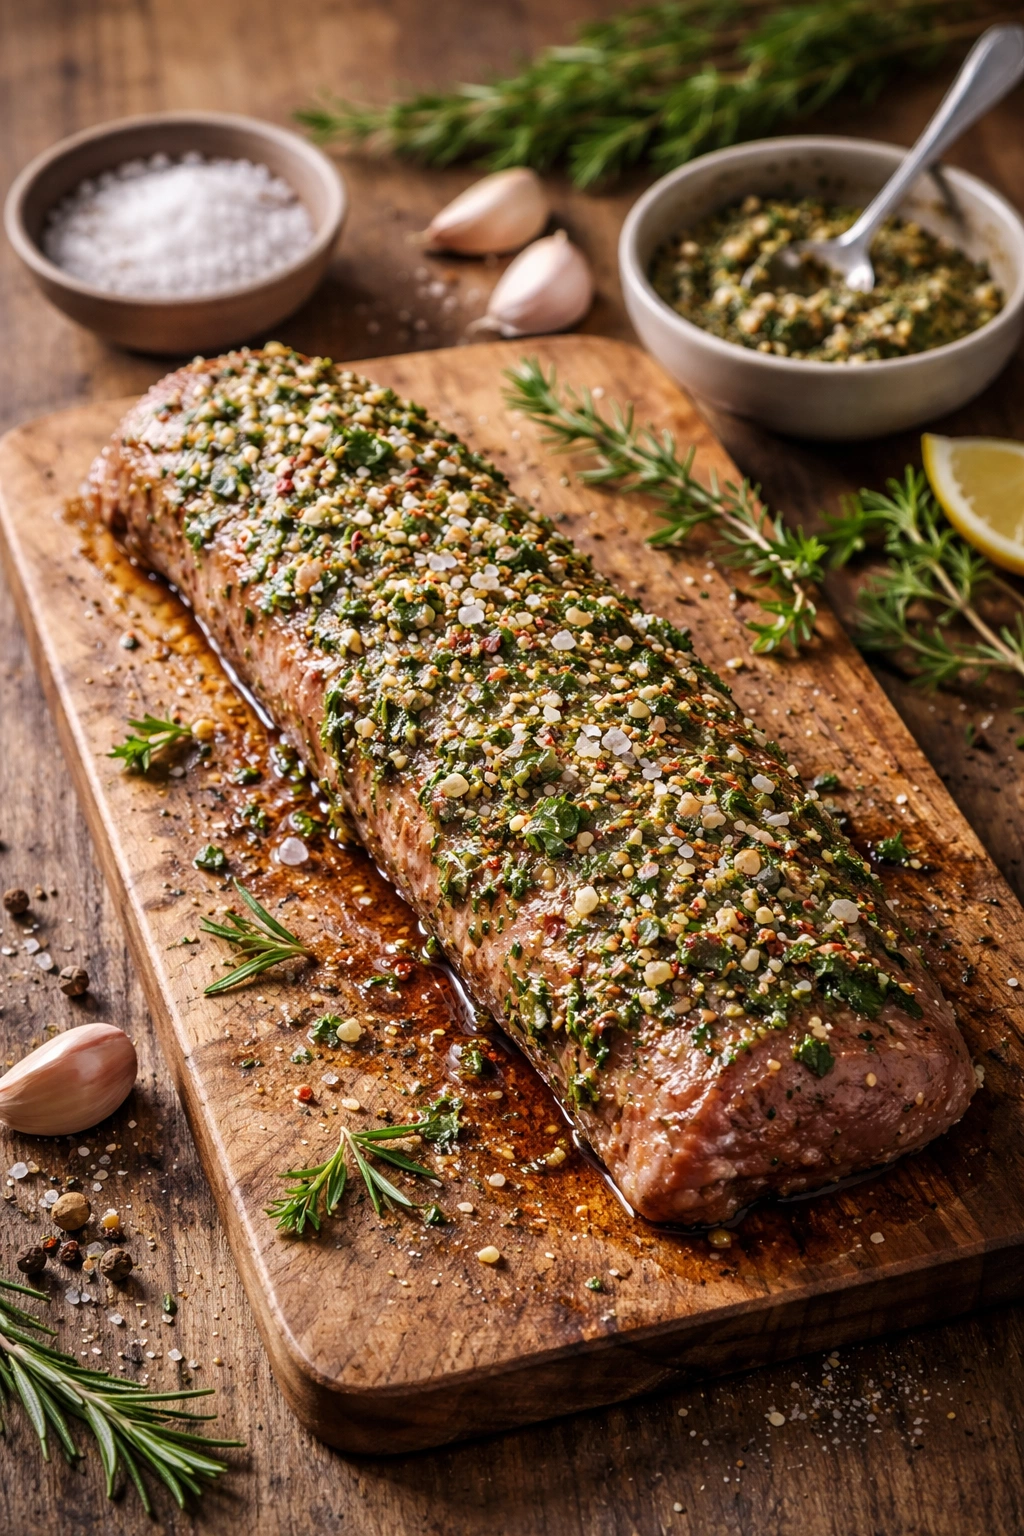
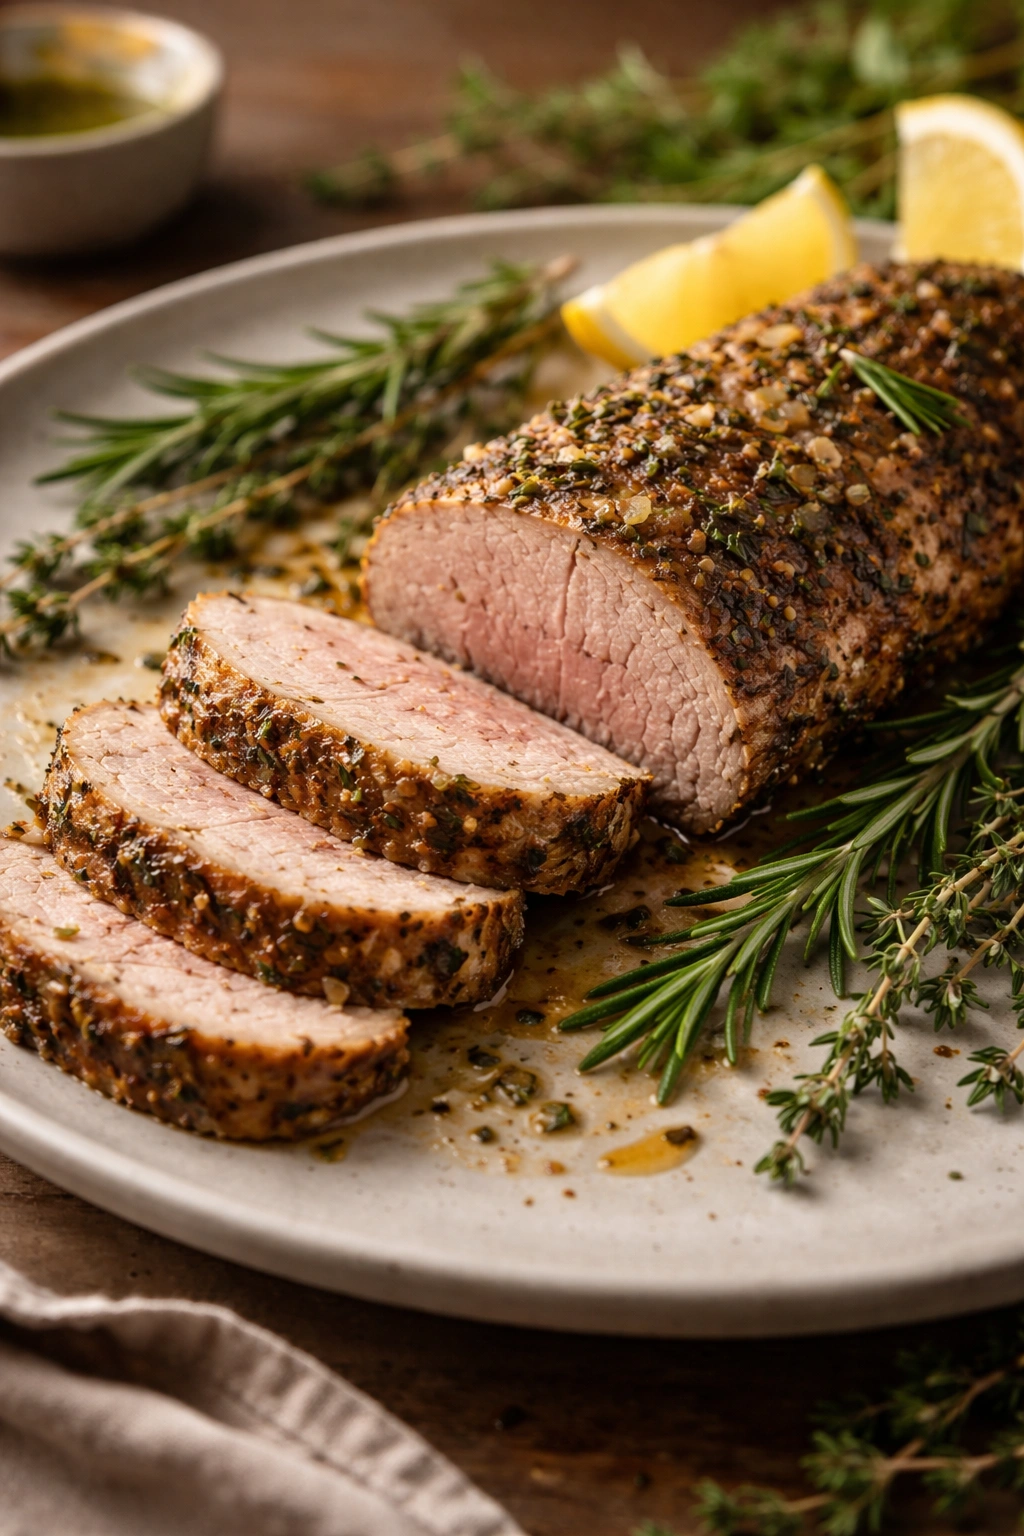
For a 1.5 to 2-pound tenderloin, use about 1.5 teaspoons of kosher salt and a teaspoon of fresh-cracked black pepper. Add minced garlic (4 to 6 cloves), fresh or dried herbs (rosemary, thyme, and oregano are all excellent with pork), a pinch of red pepper flakes if you like heat, and a teaspoon of Dijon mustard if you want a subtle tangy undertone. Mix these into a rough paste with a tablespoon of good olive oil, and rub it all over the meat, getting into every crevice.
Let this sit uncovered on a plate in the refrigerator. When it’s time to cook, pull it out to bring it to room temperature, and the exterior will dry slightly as it warms—perfect for browning. The flavors will have already started penetrating the meat, so you’re not just coating the surface with taste; you’re infusing the entire piece.
The Secret to Getting a Perfect Golden Crust
This is where oven-roasting at high temperature becomes your secret weapon. Preheat your oven to 425°F (220°C) and let it sit for at least 15 minutes so it’s fully preheated and holding steady temperature. Position the rack in the middle of the oven so the tenderloin cooks evenly without getting too close to the heat source.
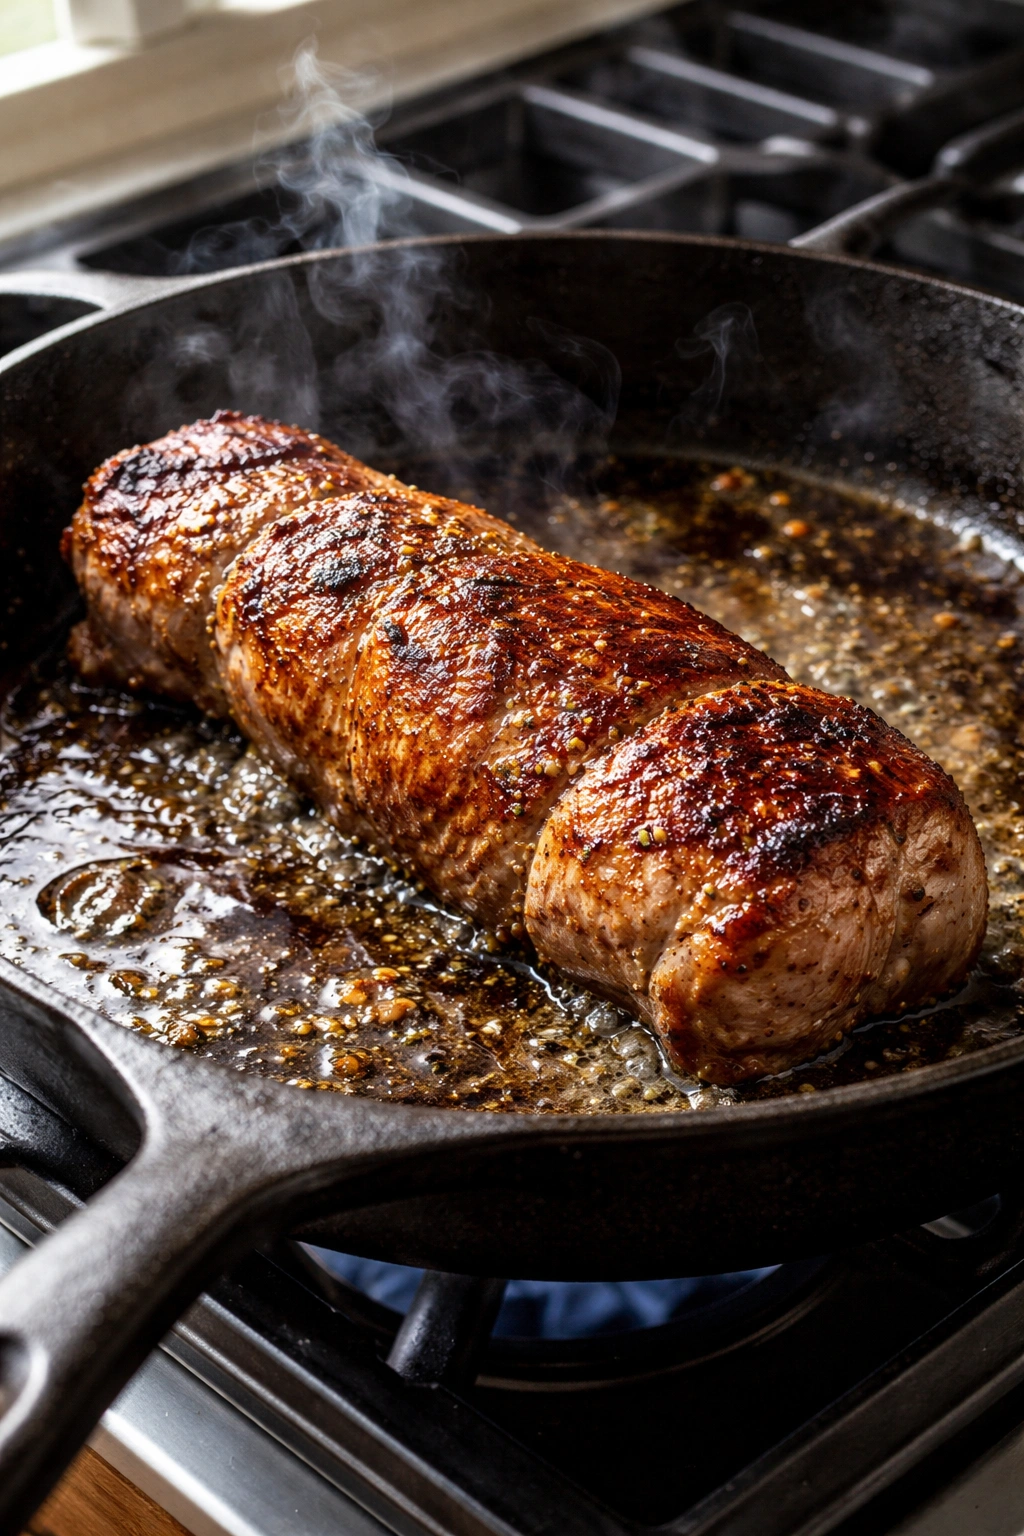
Heat an oven-safe skillet (cast iron or stainless steel; not nonstick, which won’t develop enough crust) over medium-high heat on your stovetop for about 2 minutes. You want it seriously hot—a drop of water should sizzle and evaporate instantly. Add a tablespoon of high-heat oil like avocado oil or refined coconut oil (olive oil has a lower smoke point and isn’t ideal here).
Place the tenderloin in the hot skillet and don’t move it for 90 seconds to 2 minutes. Leave it alone. Let the first side develop a deep brown crust without fussing or flipping. Flip it and sear the second side for 90 seconds to 2 minutes. You’re not cooking it through at this stage—you’re just building flavor through the Maillard reaction (the chemical process that creates that delicious brown crust).
Once both main sides are seared, quickly sear the thin ends for about 30 seconds each if they’re exposed. The entire searing process takes about 5 minutes. Then it’s straight into the preheated oven in the same hot skillet, no need to transfer it. The skillet will continue to conduct heat from below, and the oven will finish the cooking from all sides. The whole tenderloin is now in motion toward being perfectly cooked through.
Yield: Serves 4 to 6 | 2 to 4 slices per person with sides Prep Time: 15 minutes (plus 40 minutes to 24 hours for seasoning beforehand) Cook Time: 25 to 35 minutes depending on thickness and oven accuracy Total Time: 50 to 55 minutes active time (not including advance seasoning) Difficulty: Beginner — The technique is straightforward, the ingredient list is simple, and there’s very little that can go wrong once you understand the basic principle of searing then roasting.
Complete Ingredient List
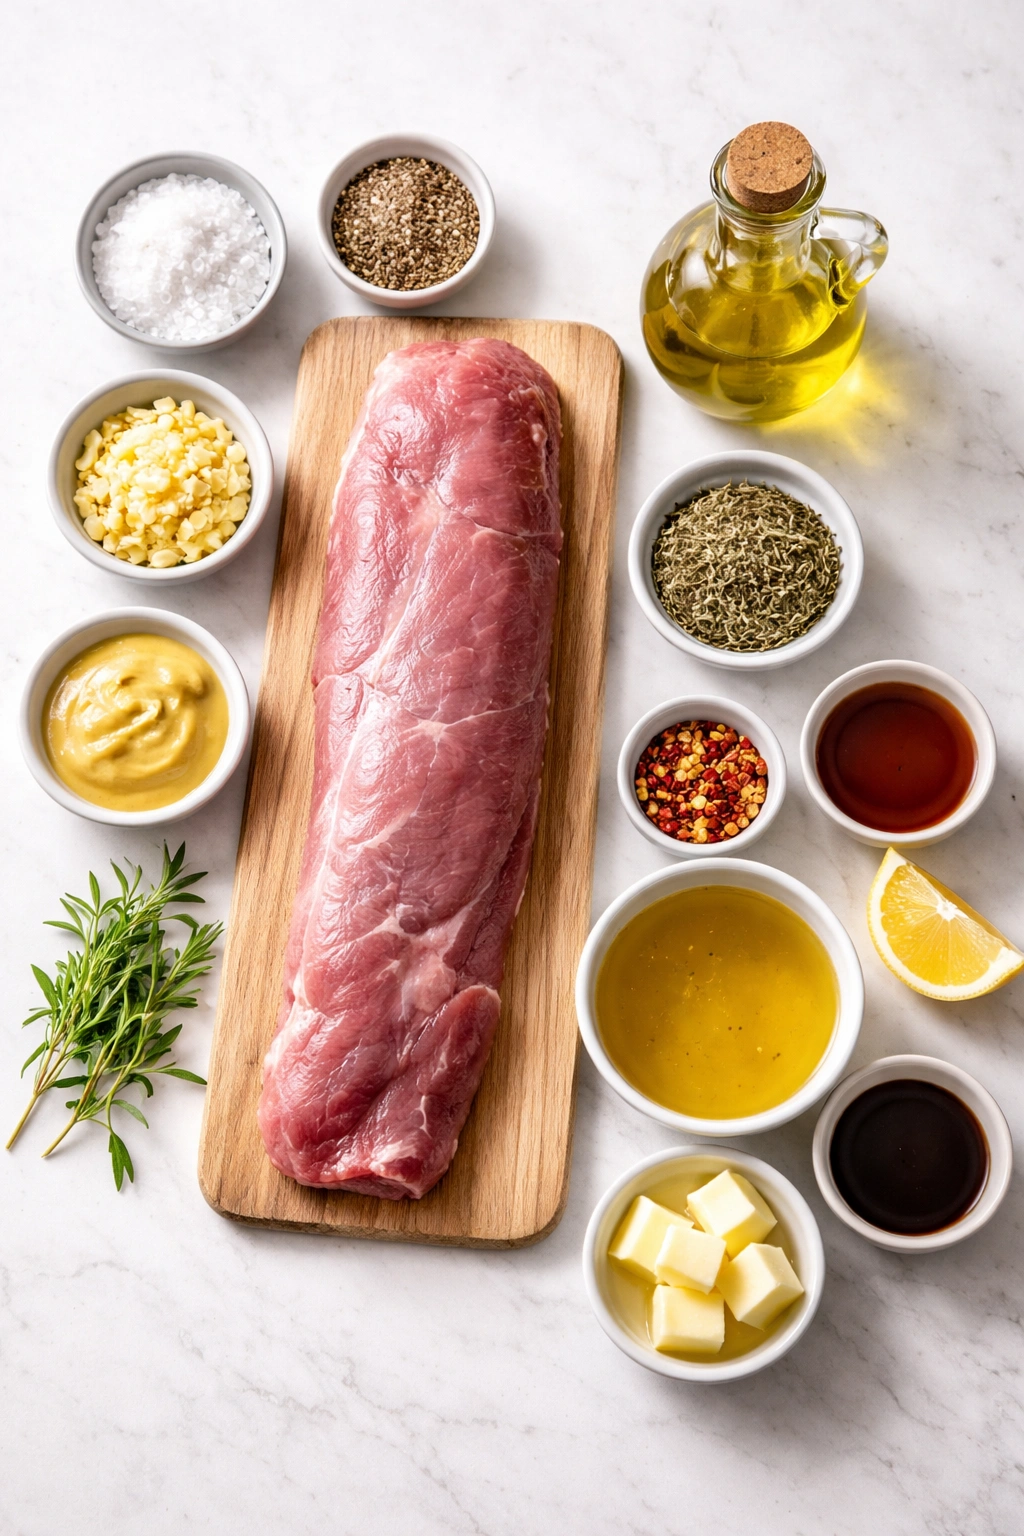
For the Roasted Pork Tenderloin:
- 1 whole pork tenderloin, 1.5 to 2.5 pounds, trimmed of silverskin
- 1.5 teaspoons kosher salt (Diamond Crystal; use 1 teaspoon if using table salt, which is denser)
- 1 teaspoon freshly cracked black pepper
- 4 to 6 garlic cloves, minced into a paste
- 1 teaspoon Dijon mustard
- 1 tablespoon extra-virgin olive oil, plus 1 tablespoon neutral high-heat oil (avocado, refined coconut, or light olive oil) for searing
- 1 teaspoon dried thyme or oregano (or ½ teaspoon each), or 1 tablespoon fresh herbs if available
- Pinch of red pepper flakes, optional
For the Pan Sauce (Optional but Recommended):
- ½ cup dry white wine, chicken broth, or beef broth
- 2 tablespoons unsalted butter
- 1 tablespoon whole-grain mustard
- 1 teaspoon honey or maple syrup
- ½ teaspoon fresh thyme or rosemary
- Salt and pepper to taste
Detailed Step-by-Step Instructions
Prepare the Meat (40 Minutes to 24 Hours Before Cooking):
-
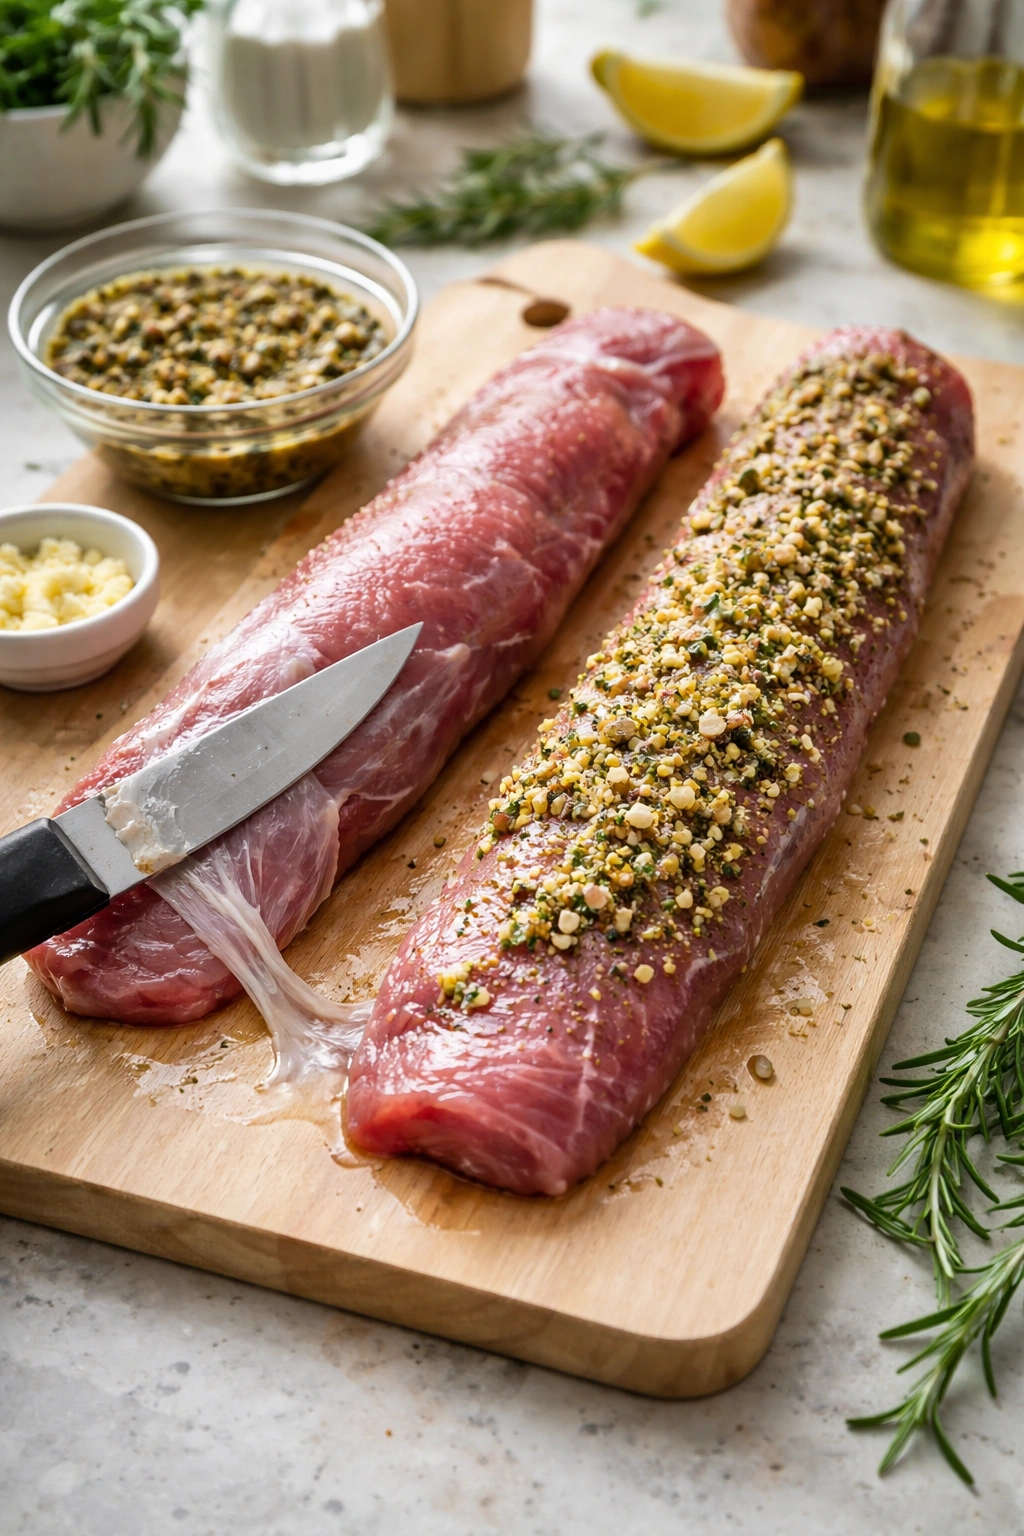
Remove the pork tenderloin from the butcher’s paper or packaging. Place it on a cutting board and inspect both sides for any remaining silverskin (a thin, translucent membrane). Using a sharp knife held at a shallow angle, carefully slide the blade under the silverskin and lift it away, working in sections along the length of the meat. Don’t panic if you leave tiny bits—it’s not a problem, just get the bulk of it.
-
Pat the entire surface of the tenderloin completely dry with paper towels. Dry it more aggressively than feels necessary—you want the surface bone-dry. Set it on a clean plate.
-
In a small bowl, combine the kosher salt, black pepper, minced garlic, Dijon mustard, 1 tablespoon olive oil, dried herbs, and red pepper flakes. Stir until you have a rough paste with visible garlic pieces throughout. Taste it—it should be flavorful and taste seasoned.
-
Spread this seasoning mixture all over the tenderloin, working it into every surface and crevice. Don’t be timid; use all of it. Cover the top, bottom, and sides thoroughly. The meat should look noticeably coated, not lightly dusted.
-
Place the seasoned tenderloin on a clean plate and refrigerate it uncovered. This is crucial: leaving it uncovered allows the surface to dry slightly, which will help create that golden crust, and the salt penetrates deep into the meat. Leave it for at least 40 minutes, but ideally 6 to 24 hours. If you’re only doing 40 minutes, let it come to room temperature on the counter before cooking (see step 7 below). If it’s been refrigerated longer, pull it out 30 to 40 minutes before cooking.
Prepare to Cook (30 Minutes Before Cooking):
- Remove the pork tenderloin from the refrigerator and set it on a clean plate on your kitchen counter. Let it sit uncovered for 30 to 40 minutes, bringing it gradually to room temperature. This ensures even cooking throughout the meat. While you’re waiting, move your oven rack to the middle position and preheat the oven to 425°F (220°C). Let it preheat for at least 15 minutes—you want it holding steady heat.
Sear the Tenderloin:
-
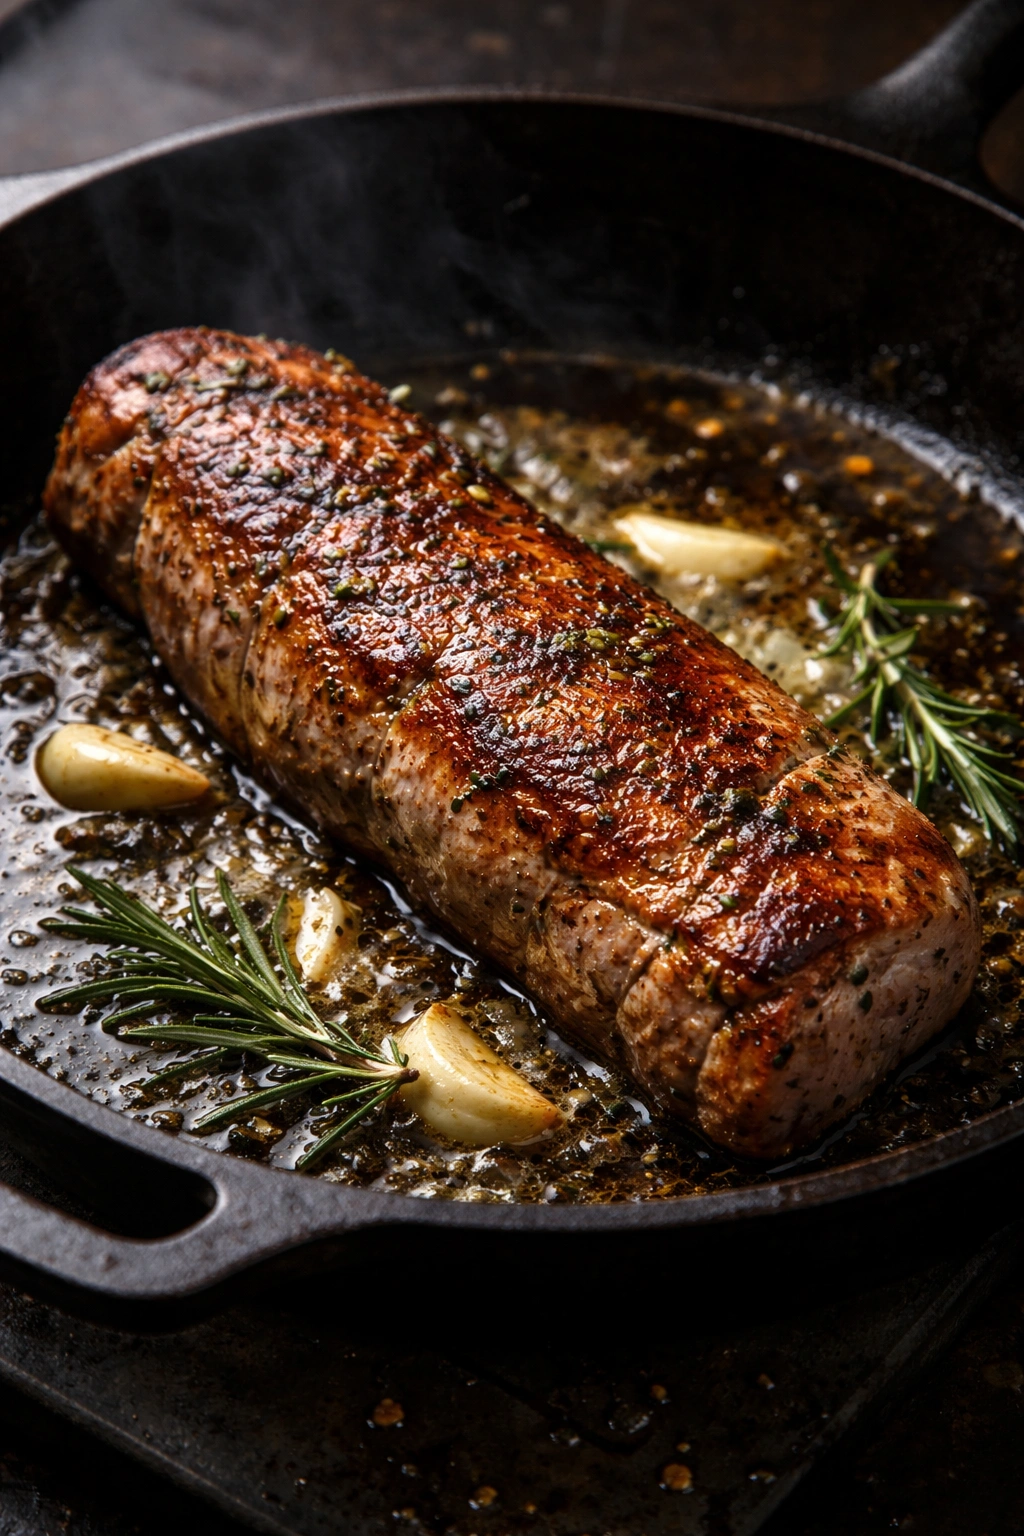
Set an oven-safe skillet (cast iron or stainless steel, 10 to 12 inches) over medium-high heat on your stovetop. Let it heat for about 2 full minutes. You want it seriously hot—if you flick a drop of water into the pan, it should sizzle and evaporate almost immediately. Add 1 tablespoon of neutral high-heat oil to the hot pan and swirl it around to coat the bottom.
-
Carefully place the pork tenderloin into the hot skillet. You’ll hear it sizzle—that’s exactly what you want. Do not move the meat. Leave it completely untouched for 90 seconds to 2 minutes. This creates a golden-brown crust through the Maillard reaction. Seriously, don’t flip it early; let that crust develop.
-
Using tongs, flip the tenderloin to its opposite main side and let it sear for another 90 seconds to 2 minutes without moving. Again, the goal is a deep golden-brown crust, not cooking it through.
-
Flip the meat again and quickly sear the two thinner ends for about 30 seconds each, rotating the meat with the tongs to get brief contact with the hot pan. The whole searing process should take about 5 minutes total. At this point, the outside of the tenderloin should be noticeably golden and caramelized on all sides.
Finish in the Oven:
-
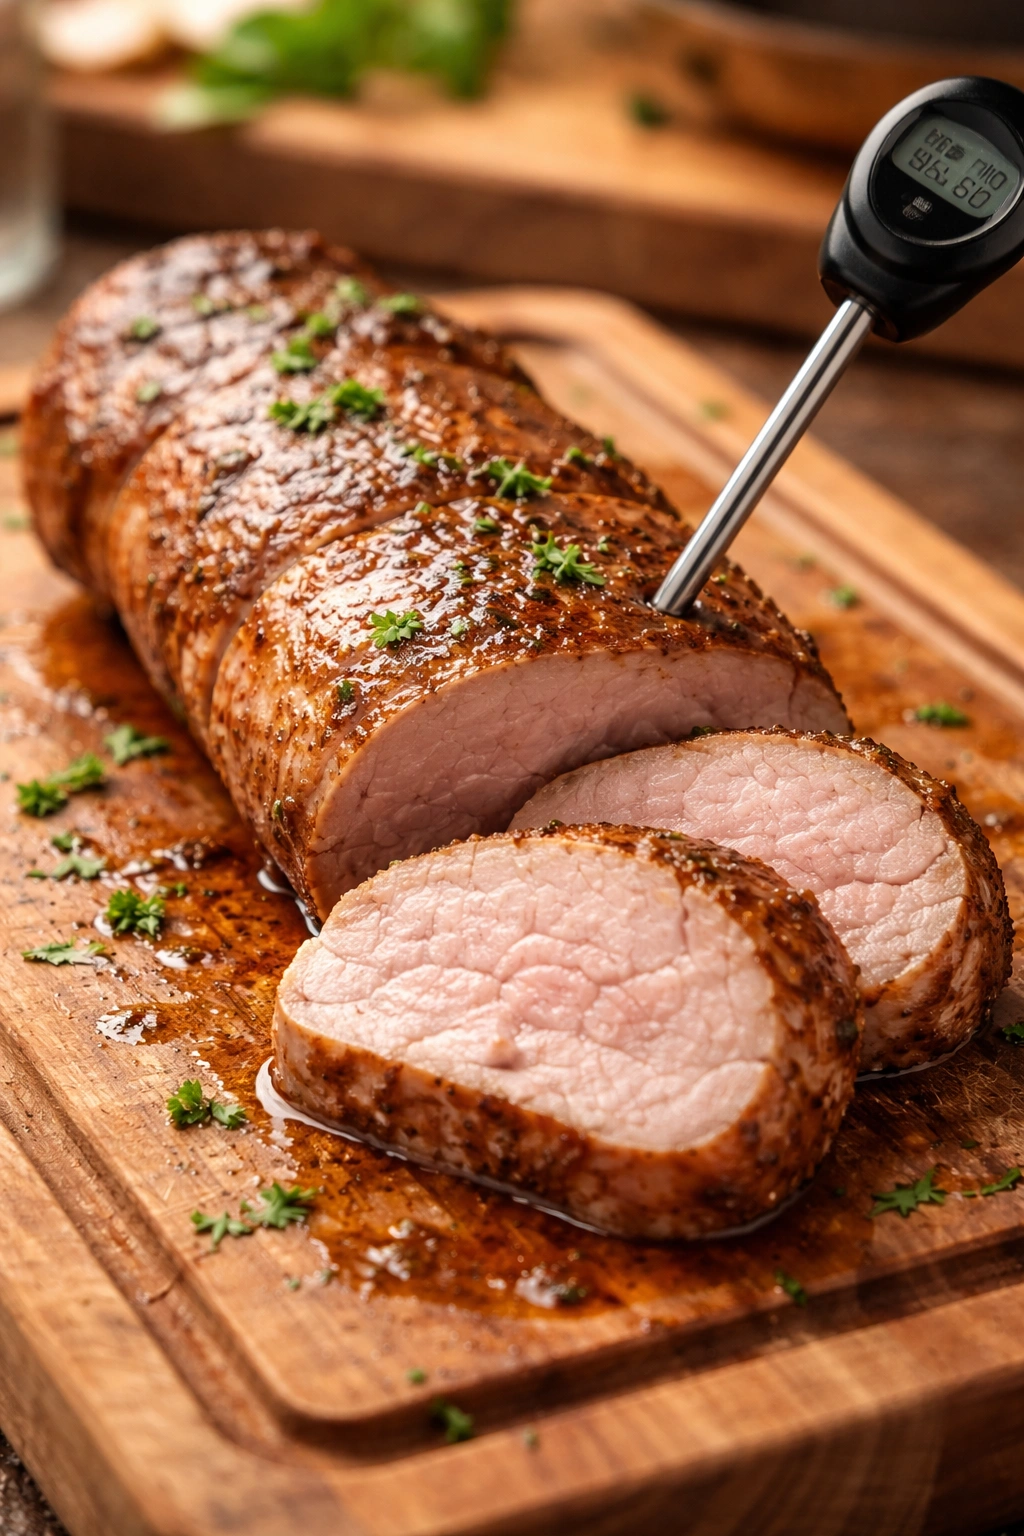
Transfer the entire skillet (with the seared tenderloin still inside) to your preheated oven. Do not remove the tenderloin from the skillet. The skillet will continue to conduct heat from the bottom while the oven cooks it from all sides, which ensures even doneness and keeps the exterior crust from overcoooking while the center finishes. Place an instant-read meat thermometer into the thickest part of the tenderloin without touching bone (it shouldn’t touch the pan either).
-
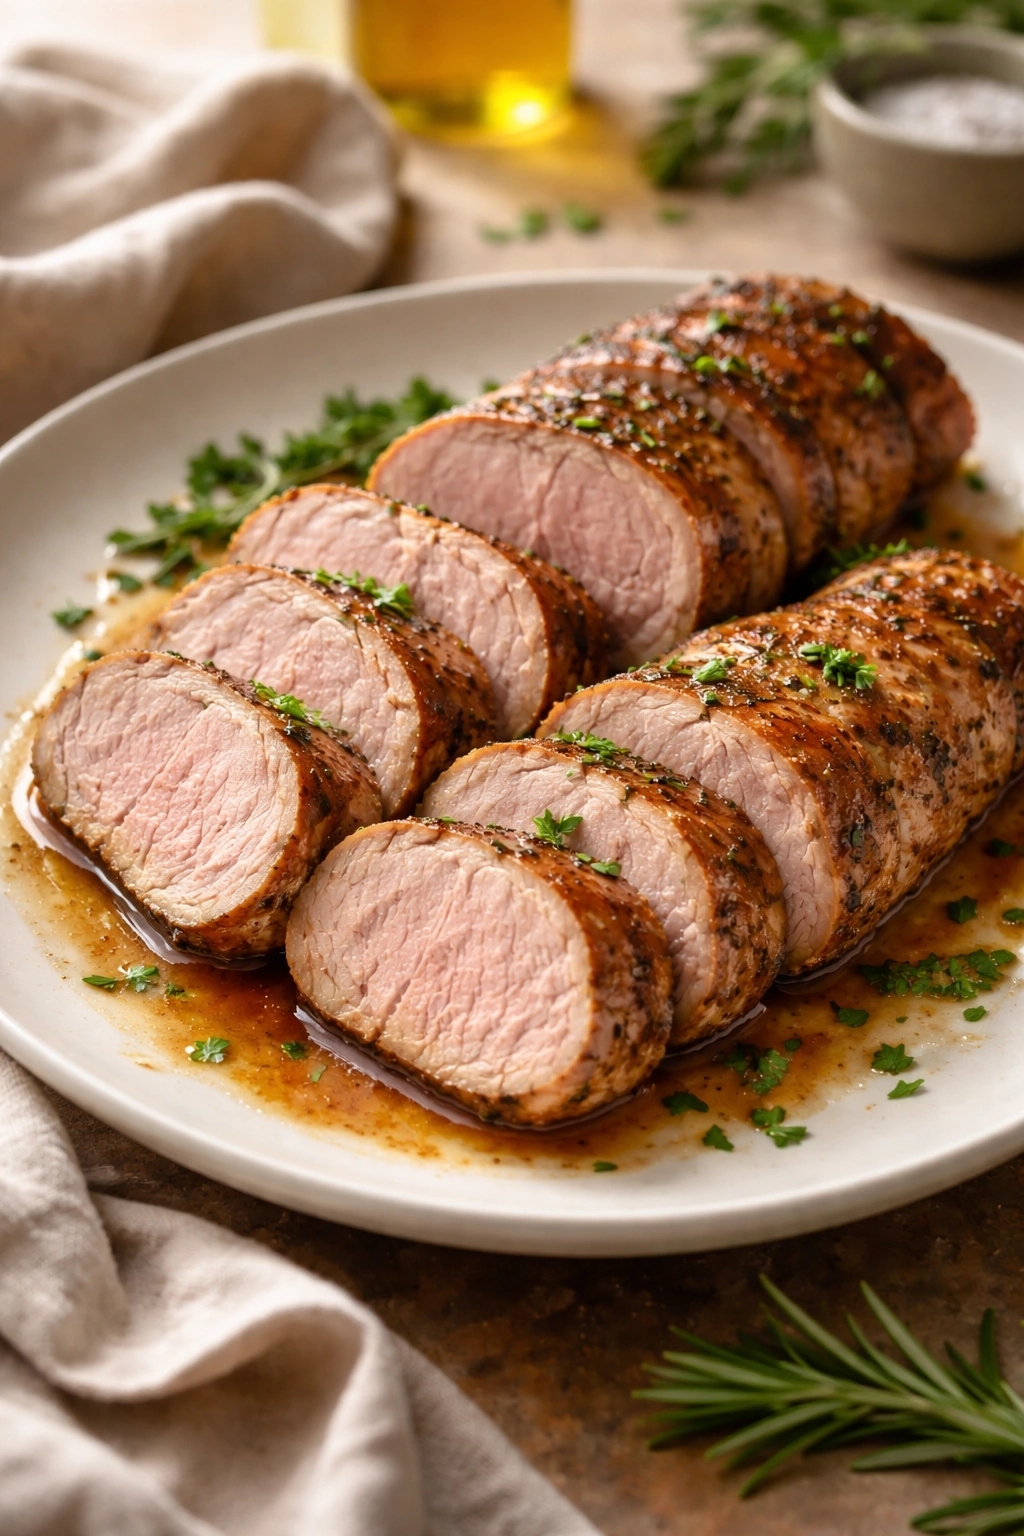
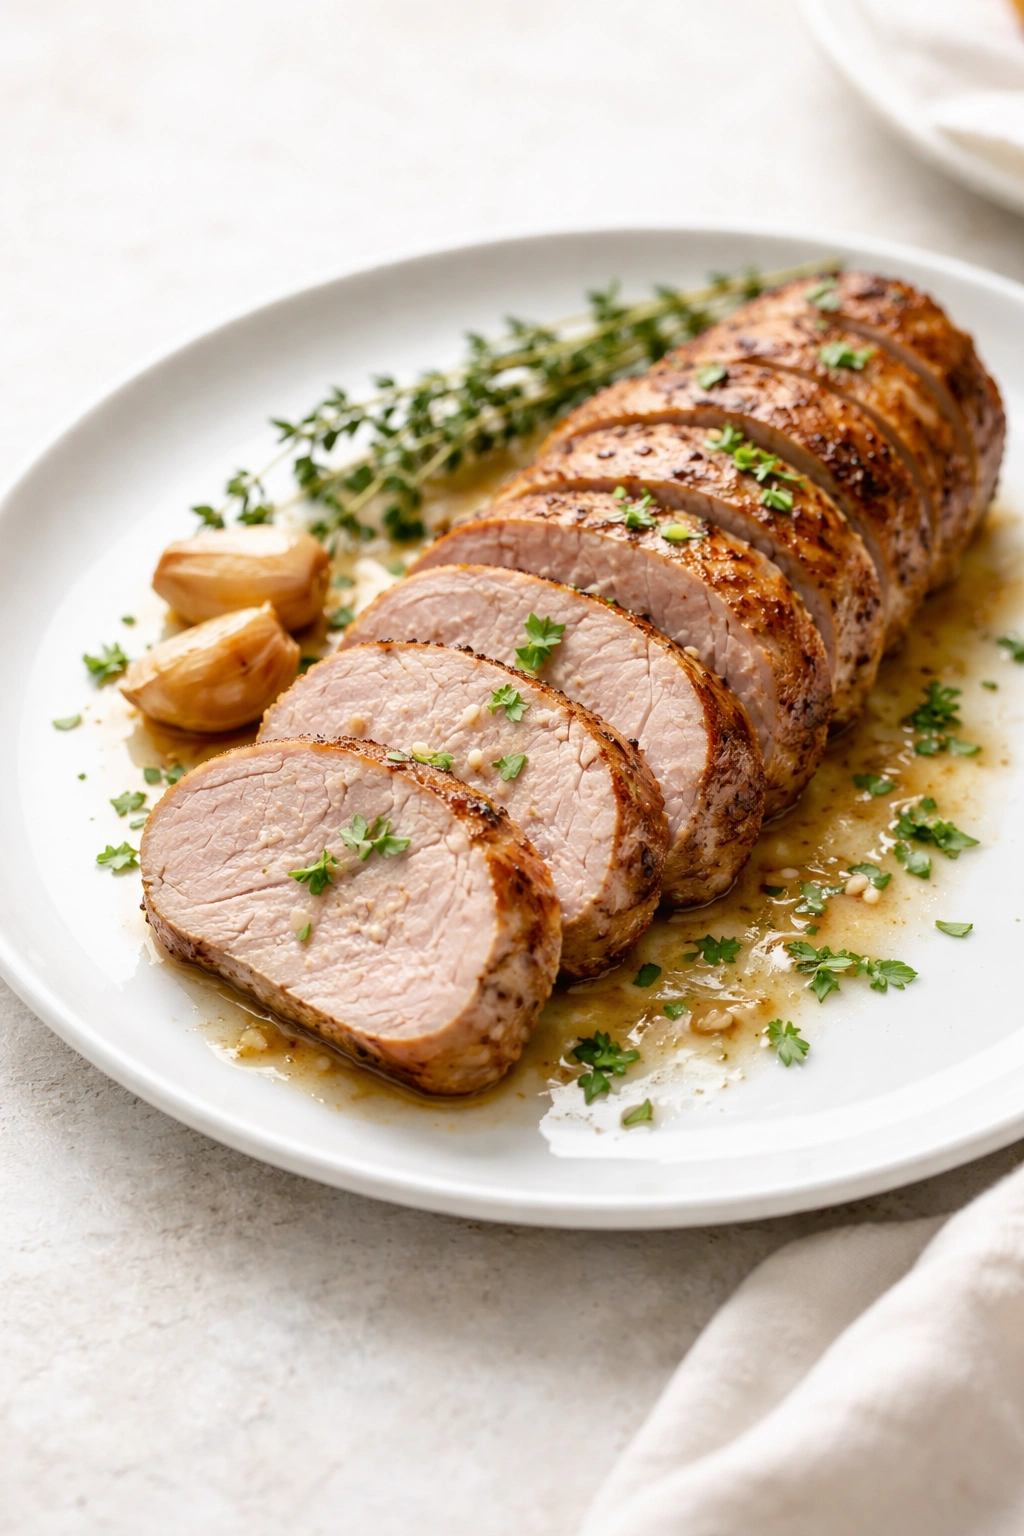
Roast the tenderloin in the oven for 20 to 35 minutes, depending on the thickness of your piece and the accuracy of your oven. A thinner tenderloin (1.5 pounds) will be done in 20 to 25 minutes; a thicker one (2 to 2.5 pounds) may take 30 to 35 minutes. The tenderloin is done when the internal temperature reaches 140 to 145°F (60 to 63°C) on an instant-read thermometer inserted into the thickest part. This gives you medium-rare meat—still slightly pink in the center, which is safe for pork and keeps it juicy. If you prefer medium, go to 150°F (65°C). Never let it reach 160°F (71°C), which is the old recommendation for pork—modern pork is bred to be much leaner and safer, and that temperature will dry it out.
Rest the Meat (Critical Step):
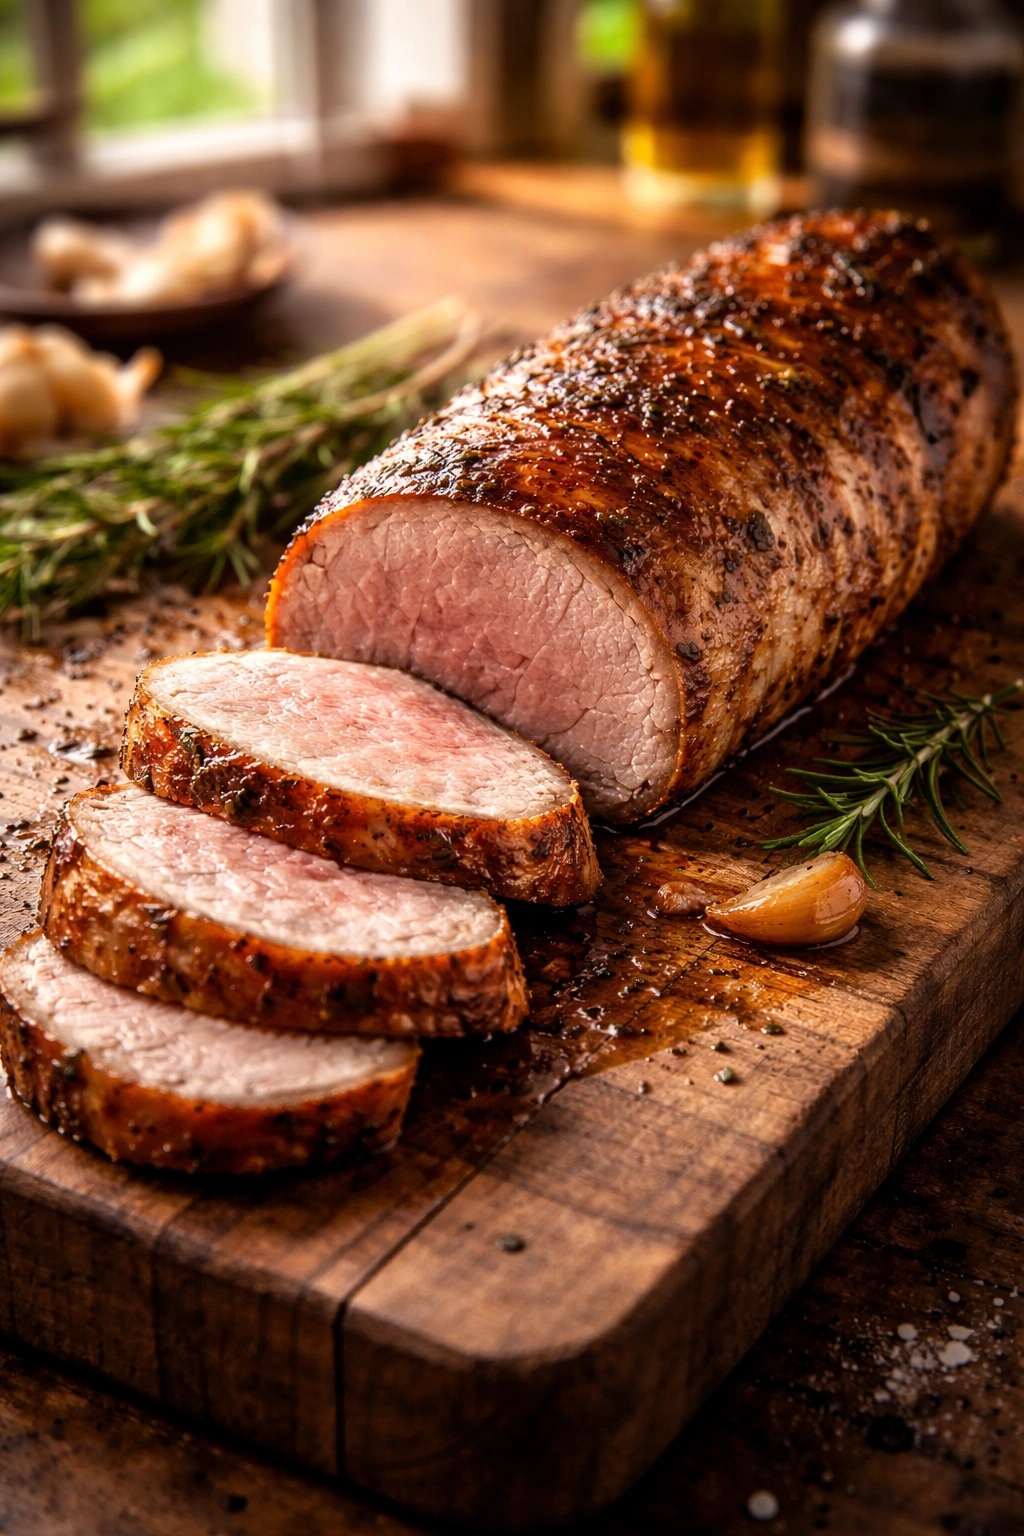
- Remove the skillet from the oven and set it on a heat-safe surface (a trivet or folded towel on your countertop). Do not cut into the meat yet. Let it rest on the cutting board for 5 to 10 minutes. This is not optional. During this rest, the meat’s fibers relax and the juices redistribute throughout the meat instead of running out onto your cutting board when you slice it. If you skip this, you’ll have delicious meat that bleeds onto the plate. With the rest, you’ll have juicy, tender slices that look beautiful.
Make the Pan Sauce (Optional):
-
While the meat is resting, you can make a quick pan sauce if you’d like. Place the skillet (careful—it’s hot!) over medium heat on the stovetop. Pour ½ cup of white wine, chicken broth, or beef broth into the hot pan. The liquid will sizzle and begin to dissolve all the caramelized bits stuck to the bottom—this is called deglazing, and it’s liquid gold for flavor.
Advertisements -
Use a wooden spoon or spatula to scrape and stir, dissolving as much of the browned bits as possible. Let the liquid reduce over medium heat for about 3 to 4 minutes, until it’s reduced by about half in volume. Remove the pan from the heat and stir in 2 tablespoons of cold unsalted butter, 1 tablespoon of whole-grain mustard, and 1 teaspoon of honey or maple syrup. The butter will melt into the liquid and create a glossy, rich sauce. Taste it and adjust with fresh thyme, salt, and pepper.
Slice and Serve:
- Transfer the rested tenderloin to a cutting board. Using a sharp knife, slice it into ½-inch-thick slices, cutting against the grain (perpendicular to the long direction of the muscle fibers). Each slice should be a beautiful rosy-pink color inside with a golden crust on the outside. Arrange the slices on a serving platter and drizzle with the pan sauce if you made it. Serve immediately.
How Long to Cook It for Juicy, Tender Results
The cooking time for a pork tenderloin depends on its thickness and your oven’s accuracy, but the thermometer is your real guide—not the clock. Thin tenderloins (1.5 pounds or less) typically need 20 to 25 minutes in a 425°F oven. Thicker ones (2 to 2.5 pounds) might need 30 to 35 minutes. But ovens vary widely, so getting an instant-read meat thermometer into the thickest part is the only reliable way to know when it’s truly done.
The target temperature is 140 to 145°F (60 to 63°C) for medium-rare pork, which is both perfectly safe (modern pork is far cleaner than the heavily-contaminated pork of decades past) and the absolute sweet spot for tenderness and juiciness. This temperature gives you that subtle pink blush in the center and meat that’s actually tender to eat. If you go above 150°F, you’re starting to dry it out, and at 160°F, you’ve essentially guaranteed a dry dinner.
Here’s the thing that catches people: pork tenderloin will continue to cook slightly after you remove it from the oven (this is called carryover cooking). So pull it out when it hits 138 to 140°F, and by the time it rests for 5 to 10 minutes, it’ll creep up to the perfect 140 to 145°F. This is actually a more reliable way to hit your target temperature than pulling it out when it’s already at 145°F (which could rise to 150°F or higher during resting).
Common Mistakes That Dry Out Your Tenderloin
The number one way people ruin pork tenderloin is overcooking it. This happens when someone relies on time instead of temperature, when the oven temperature is set too low (which extends cooking time), or when they don’t account for carryover cooking. The second most common mistake is skipping the searing step or not getting the pan hot enough. Without a proper golden crust, you lose a huge amount of flavor and the meat feels less luxurious.
Another trap is not bringing the meat to room temperature before cooking. Cold meat from the refrigerator takes longer to cook through, which means the outside has more time to overcook before the center is done. You end up with a tenderloin that’s golden on the outside but the heat has penetrated too deeply, drying out the whole thing. This is easily avoided by pulling it out 30 to 40 minutes before you plan to cook.
Not resting the meat after cooking is the third-biggest mistake. People want to slice it right away, but when you do, all those juices run right out onto the cutting board instead of staying in the meat. Serve the slices on a pool of their own juice instead of a dry plate. That five-minute rest (or ten minutes if you have the time) is literally the difference between restaurants and home cooking.
Finally, cooking with oil that has a low smoke point (like extra-virgin olive oil) for the searing step means the oil breaks down at high heat, you don’t get a proper sear, and you fill your kitchen with smoke. Use avocado oil, refined coconut oil, or vegetable oil for searing. Save the good olive oil for finishing or for the seasoning paste.
Making It Ahead and Reheating Without Losing Flavor
The tenderloin is one of the easiest proteins to make ahead, which is a huge advantage if you’re meal-planning. Season it the night before and keep it in the refrigerator uncovered. Sear it and roast it the day you’re going to eat it, or roast it completely, cool it, wrap it, and refrigerate it for up to four days. This fully-cooked, sliced tenderloin is excellent in salads, on sandwiches, in grain bowls, or reheated gently for dinner.
To reheat cooked tenderloin slices, do not use the microwave—this will dry them out mercilessly. Instead, wrap the slices loosely in foil and place them in a 300°F (150°C) oven for about 10 to 15 minutes, until warmed through but not hot (you’re aiming for warm, not steaming hot). The gentle, indirect heat preserves the tenderness. Alternatively, you can quickly reheat individual slices in a warm skillet over medium heat for just 30 seconds to 1 minute per side, which is actually ideal if you’re reheating just a few slices.
The raw seasoned tenderloin (step 5 in the instructions) can stay in the refrigerator for up to 24 hours. If you’re planning to cook it more than 24 hours later, wrap it well (the seasoning doesn’t go bad, but the meat’s texture starts to deteriorate slightly after a day or two). You can also freeze a seasoned-but-uncooked tenderloin for up to three months. Thaw it in the refrigerator overnight before cooking—don’t skip the thawing or you’ll have trouble getting an even cook.
A completely cooked tenderloin freezes beautifully for up to three months, either whole or sliced. Wrap it tightly in plastic wrap, then foil, to prevent freezer burn. Thaw it overnight in the refrigerator before reheating. The texture won’t be quite as tender as freshly cooked, but it’ll still be delicious, especially if you slice it and gently reheat it rather than trying to reheat it whole.
Flavor Variations That Keep Dinner Interesting
Once you’ve made the basic version a few times and it’s muscle memory, it’s fun to play with flavors. The tenderloin is such a versatile base that it accepts almost any flavor profile you throw at it. For an Italian direction, replace the dried herbs with fresh rosemary and thyme, add a tablespoon of balsamic vinegar to the seasoning paste, and finish with a squeeze of lemon juice. For an Asian-inspired version, use ginger, soy sauce, and a touch of sesame oil in the seasoning, then serve with a quick pan sauce made with soy, rice vinegar, and a bit of honey.
A Dijon-crusted version is as simple as increasing the mustard to 2 or 3 tablespoons in the seasoning paste and adding panko breadcrumbs to create a light crust. A Mediterranean version uses fresh herbs (parsley, oregano), lemon zest, minced shallots, and a touch of capers in the paste. For a French bistro vibe, coat the seared tenderloin lightly with Dijon mustard mixed with whole-grain mustard, press crumbled fresh thyme into it, and finish with a pan sauce made with dry white wine, cream, and a touch of Dijon.
The beauty is that whatever flavor direction you choose, the cooking method stays identical. You season, you sear, you roast, you rest. The only thing that changes is what you put in that seasoning paste. Try making it four different ways over a month—one classic version, one with Asian flavors, one with Italian herbs and balsamic, and one with a mustard crust. You’ll be amazed at how different the same cut of meat can taste.
For people following specific diets, the tenderloin is naturally gluten-free, dairy-free, whole30-compliant, paleo, and keto-friendly. The only change you might make is swapping butter in the optional pan sauce for ghee or olive oil. The meat itself has no restrictions.
The Best Side Dishes and Wine Pairings
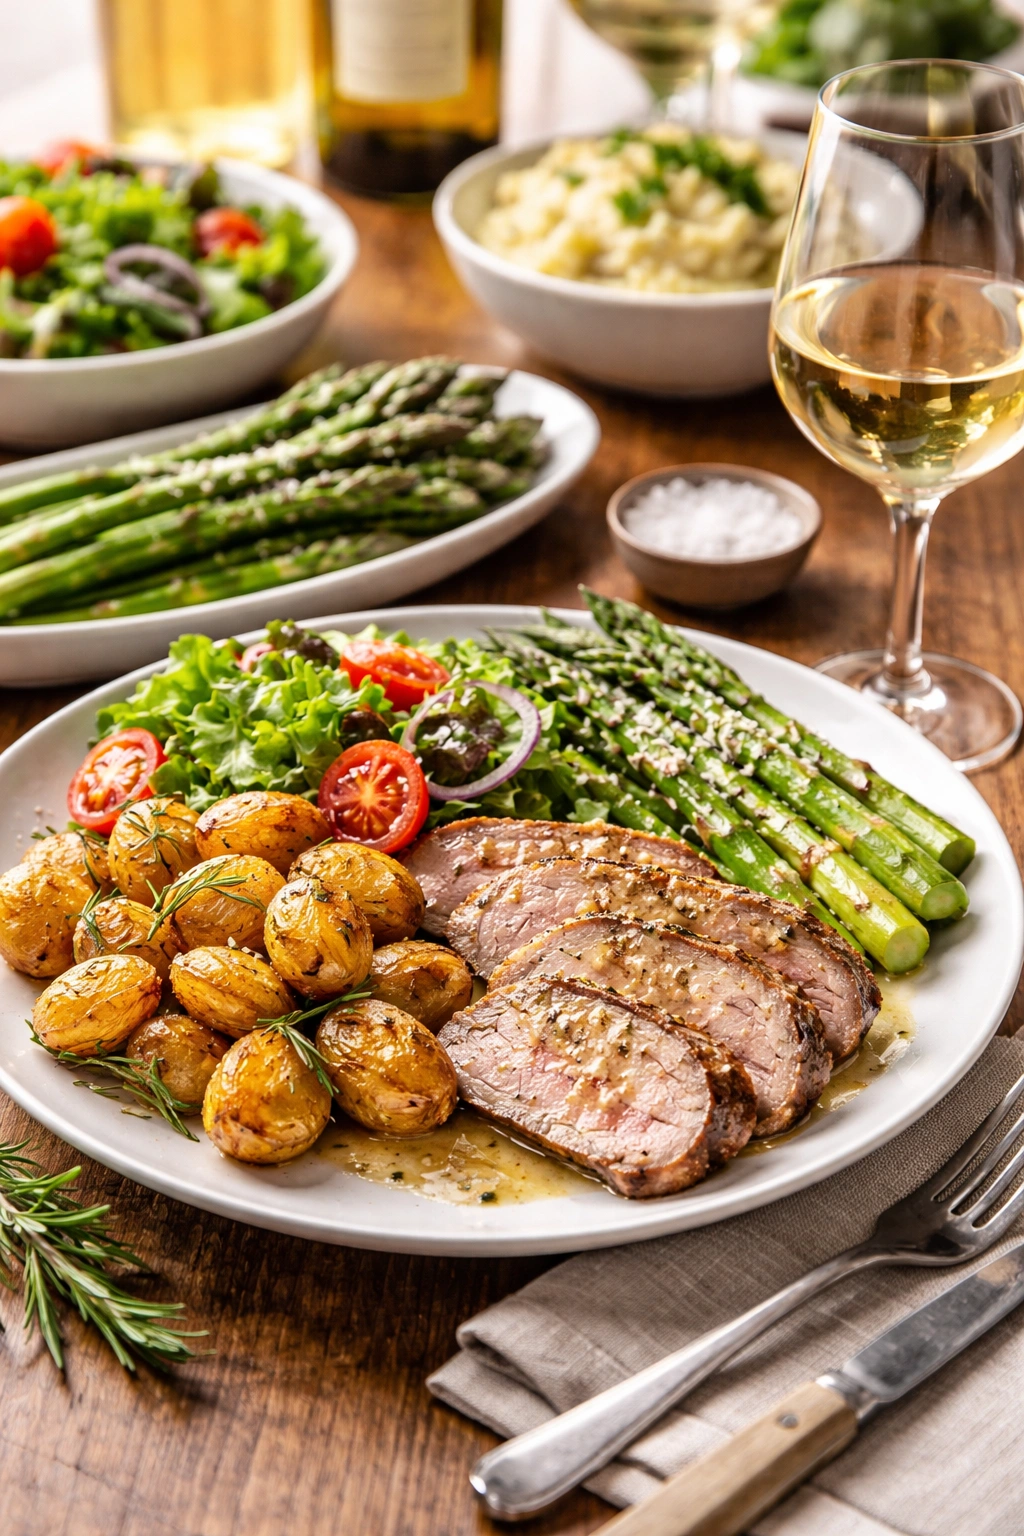
Pork tenderloin is elegant enough for a dinner party but casual enough for a family dinner, which means it pairs beautifully with both simple and sophisticated sides. Roasted potatoes (especially fingerlings or baby potatoes with rosemary and garlic) are the obvious pairing—they’re starchy, buttery, and comfort-food-perfect. Mashed potatoes with Dijon mustard stirred in are also excellent, echoing the flavors in the meat itself.
For a lighter side, a simple green salad with mustard vinaigrette or a arugula salad with lemon and Parmesan works beautifully. Roasted asparagus, especially with garlic and a squeeze of lemon, feels restaurant-quality and pairs perfectly with the tenderness of the meat. Brussels sprouts roasted until crispy with bacon are another excellent choice. Creamed spinach or sautéed mushrooms in butter and thyme complement the meat beautifully without feeling heavy.
If you made a pan sauce, you want a starchy side that can soak it up—bread, potatoes, or polenta all work wonderfully. The sauce is too good to leave on the plate, so make sure you’re serving something that will catch every drop.
For wine pairings, lean toward lighter reds and fuller whites. Pinot noir is probably the obvious choice and it’s absolutely correct—the acidity and moderate tannins match the meat beautifully. Grenache or other lighter reds also work well. On the white side, a dry Riesling, Sauvignon Blanc, or unoaked Chardonnay all pair nicely, especially if you’ve made a Dijon sauce with the pan drippings. If you’re not sure what you have in your wine rack, a crisp rosé is almost impossible to go wrong with.
Final Thoughts
Oven-roasted pork tenderloin is one of those dishes that appears more impressive than it actually is to execute, which is exactly what you want in weeknight cooking. The technique—sear, roast, rest—is so simple that you’ll remember it after making it once. The ingredient list is five things if you’re being minimal, ten if you’re being fancy. The timing is predictable. And somehow, the result feels like you’ve accomplished something significant.
This is the recipe you make when you want dinner to feel special without spending hours in the kitchen. It’s the one you turn to when you have company coming over and want to feed them well without stress. It’s the version you make on a Tuesday night when you’re tired and you want something good. Once you’ve made it a few times, it becomes almost automatic—you season it ahead, you come home, and dinner is genuinely excellent without any fuss.
The key is understanding why each step matters, not just going through the motions. The early salting penetrates the meat. The hot searing creates flavor. The high-heat oven finishes it quickly. The rest keeps it juicy. Every step has a purpose, and when you get them all right, something genuinely delicious happens. That’s what separates weeknight cooking from restaurant cooking—not complexity, but understanding how the fundamentals work and executing them with intention.