There’s something magical that happens when you tell your family or friends that pizza night is happening, and it’s homemade. The excitement is immediate. Unlike ordering delivery, making pizza at home transforms what could be a routine meal into an event—one where everyone gathers around, customizes their own toppings, and walks away with the satisfaction of eating something they created themselves.
The best part? It doesn’t have to be complicated. You don’t need special equipment, professional training, or hours of advance planning. With a simple, no-fuss dough recipe and the right approach, you can have homemade pizza on the table in about an hour, or make the dough ahead and bake whenever the craving strikes. This isn’t about recreating a Neapolitan pizzeria in your kitchen—it’s about making the kind of pizza that tastes better than delivery, costs less, and fills your house with that incredible aroma of baking dough and melting cheese.
What makes this possible is understanding that pizza dough doesn’t need to be intimidating. The formula is beautifully simple: flour, water, salt, yeast, and a little oil. Mix those five things together, let time do the work, and you’ve got everything you need. No kneading machines, no special techniques, no 48-hour fermentation schedules required—though those are wonderful if you have the time. This guide walks you through making the kind of pizza dough that works with your life, whether you want pizza in an hour or you’re planning ahead and want to pull dough from the freezer on a random Tuesday.
Why Pizza Night Matters More Than You Think
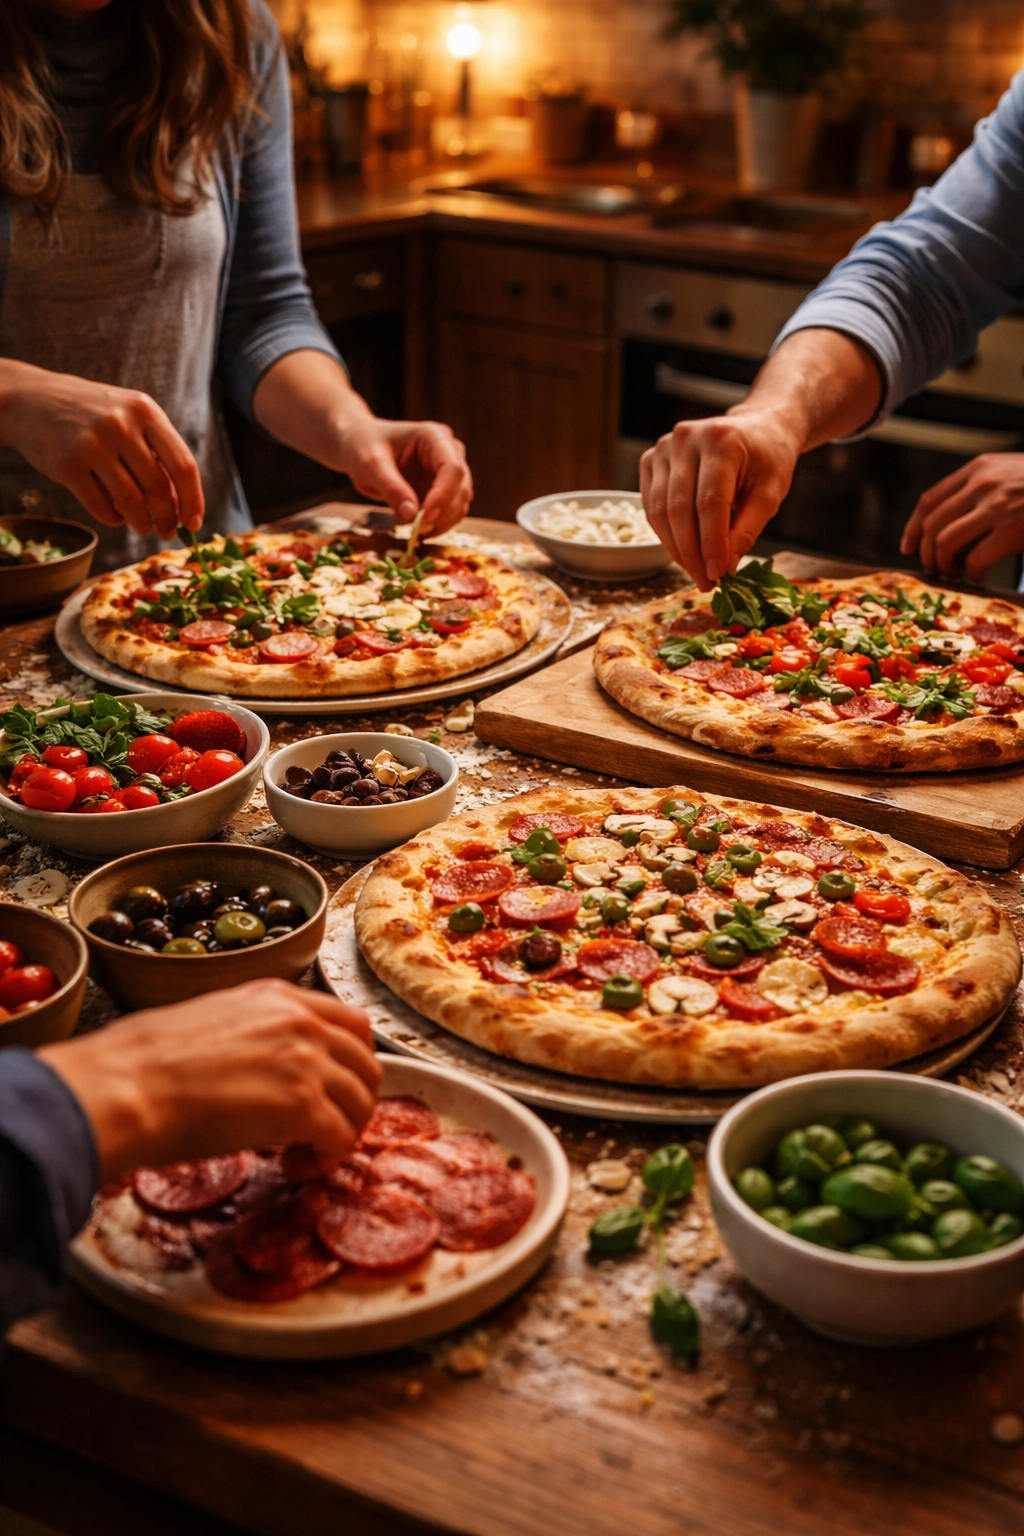
Pizza night stops being just about food the moment you decide to make it at home. It becomes a ritual, a way to gather people around a table doing something with their hands and their taste buds. Kids love the interactive nature of it—choosing their own toppings, spreading sauce, sprinkling cheese exactly how they like it. Adults appreciate the control, the ability to customize to dietary preferences, and honestly, the pride in serving something homemade.
The financial reality is also compelling. A single delivery pizza with decent toppings costs more than enough flour, yeast, and cheese to make three homemade pizzas. When you add the delivery fee and tip, you’re looking at $20 to $30 for one pizza. Make your own, and you’re spending maybe $4 to $5 total, even accounting for high-quality ingredients. Do that twice a month and you’ve saved hundreds by year-end.
Beyond economics, there’s the flavor advantage. Homemade pizza tastes fundamentally different because it is fundamentally different. You control the salt level, the oil quality, the rise time, the toppings combinations—everything that makes a pizza taste the way it does. You’re not constrained by what a chain restaurant thinks will appeal to the widest possible audience. You make exactly what you want.
The Magic of No-Fuss Pizza Dough
The anxiety many people feel about pizza dough comes from a misunderstanding about what needs to happen. There’s an assumption that yeast is temperamental, that you need fancy equipment, that everything has to be precisely timed. None of that is true. Yeast is actually incredibly forgiving, and it rewards patience more than precision.
A no-fuss dough is one that doesn’t require kneading for extended periods, doesn’t need multiple rises, and doesn’t demand that you baby it at every step. The philosophy is that time and temperature do most of the heavy lifting. You mix your ingredients, give it time to develop, shape it when you’re ready, and bake. That’s genuinely all that’s required.
The doughs featured in this guide fall into several categories. Some are designed for speed—you can have pizza on the table in under an hour. Others benefit from an overnight rise in the refrigerator, during which the dough develops more complex flavor and becomes easier to stretch. Some use techniques from professional pizza makers but adapted to work in a home kitchen and oven. All of them share one quality: they produce genuinely excellent pizza without requiring you to become an expert baker.
Understanding Your Flour and Ingredients
Not all flour is created equal, and what you choose affects your pizza more than you might expect. All-purpose flour is the workhorse—it works for almost everything and is what most home bakers have on hand. It typically contains about 11 to 12% protein, which is enough to develop the gluten structure that gives pizza dough its characteristic chew and elasticity.
Bread flour is a step up, containing 12 to 14% protein. It absorbs slightly more water, which means your dough stays a bit stiffer and handles more predictably, especially if you live in a humid climate. Many experienced pizza makers prefer it because it produces a slightly more open crumb structure—those desirable air pockets that make pizza texture so satisfying. If you can find it and want to try it, bread flour isn’t expensive and it does make a noticeable difference.
Whole wheat flour adds nutrition and flavor, but it absorbs water differently than white flour and can produce a denser crumb if used alone. The sweet spot is usually a blend—maybe 25 to 50% whole wheat mixed with all-purpose flour—which gives you the nutritional benefit and nutty flavor without sacrificing the texture you want. If you go this route, you might need slightly more water since whole wheat absorbs more, so add it gradually.
Type 00 flour (doppio zero) is the traditional flour for Neapolitan pizza. It’s ground incredibly fine, which creates a beautifully extensible dough that’s fun to work with. The trade-off is that it absorbs water differently than American flours, and results in a home oven sometimes aren’t as dramatic as the flour’s reputation suggests. It’s worth trying if you’re curious, but it’s not necessary.
The water you use should be warm to the touch—around 110 to 120°F (43 to 49°C). This activates the yeast quickly without killing it. You can use tap water unless yours is heavily chlorinated or you have strong preferences for filtered water. Salt strengthens gluten and controls fermentation, so don’t skip it or reduce it in hopes of lowering sodium—the amount in pizza dough is minimal when divided among multiple slices.
Olive oil is traditional, but honestly, any neutral oil works. Some people use avocado oil or vegetable oil. Olive oil adds subtle flavor and helps create that golden, slightly crispy exterior. Kosher salt or fine sea salt both dissolve well—avoid table salt if possible because the additives can sometimes make the dough taste slightly off.
Yeast: The Secret Ingredient That Makes Everything Happen

Yeast is a living organism, and understanding what it does helps demystify pizza dough entirely. When you mix yeast with warm water and flour, it starts eating the starches and sugars present in the flour, producing carbon dioxide gas and alcohol as byproducts. Those gas bubbles are what makes dough rise and gives pizza its desirable texture.
There are three main types of yeast available to home bakers: active dry yeast, instant yeast (also called rapid-rise or bread machine yeast), and fresh yeast. Active dry yeast has slightly larger particles and takes marginally longer to activate—dissolve it in warm water for about 5 minutes until it gets foamy before mixing with other ingredients. Instant yeast particles are smaller, so it activates faster and you can technically mix it directly with flour, though proofing it first is still a good habit because it confirms the yeast is alive.
Fresh yeast is wonderful if you can find it at a bakery supply store, but it’s perishable and less convenient than dried yeast. For home cooking, active dry or instant yeast are both excellent choices. One package of either type (which is about 2¼ teaspoons or 7 grams) is enough to raise about 3 to 4 cups of flour. The key is checking the expiration date on your yeast—expired yeast won’t rise, no matter how perfect your technique is.
Cold fermentation—letting dough rise slowly in the refrigerator instead of at room temperature—is one of the biggest advantages you can give your pizza. During those hours in the cold, enzymes break down starches into simpler sugars, creating better flavor and browning. The gluten also relaxes, making the dough easier to stretch. If you have overnight or even 2 to 3 days, refrigerating your dough makes a noticeable difference in final results.
Why High Hydration Dough Works Better in Home Ovens
There’s a relationship between oven temperature and dough hydration that matters when you’re baking at home. Professional pizza ovens reach 800 to 900°F, cooking pizza in 60 to 90 seconds. Neapolitan pizza dough is designed for those extreme temperatures—it typically uses 60 to 65% hydration (water relative to flour), and it emerges from the oven with a soft, sometimes almost wet center.
Your home oven maxes out around 500 to 550°F, which means pizza bakes for 10 to 15 minutes instead of seconds. During that longer bake, a lot of water evaporates from the dough, which is why low-hydration doughs end up dry and tough. Higher hydration dough—75 to 85%—starts with more water, so by the time it’s done baking, it’s still moist with those gorgeous air pockets you want.
The catch is that high-hydration dough is stickier and requires a gentler touch. You can’t manhandle it or you’ll lose those air bubbles. But this isn’t actually a problem—it’s just a different technique. Use lightly floured hands, work gently, and let gravity and your fingertips do the stretching rather than aggressively fighting the dough.
Yield: Makes 2 large (12-inch) pizzas or 4 personal pizzas
Prep Time: 15 minutes
Cook Time: 12-15 minutes per pizza
Total Time: 1 hour 15 minutes (same-day method) or overnight plus 1 hour (cold fermentation method)
Difficulty: Beginner — yeast is more forgiving than most people think, and this dough requires minimal hands-on technique. If you can stir ingredients in a bowl and wait, you can make this.
Complete Ingredient List for Simple Pizza Dough
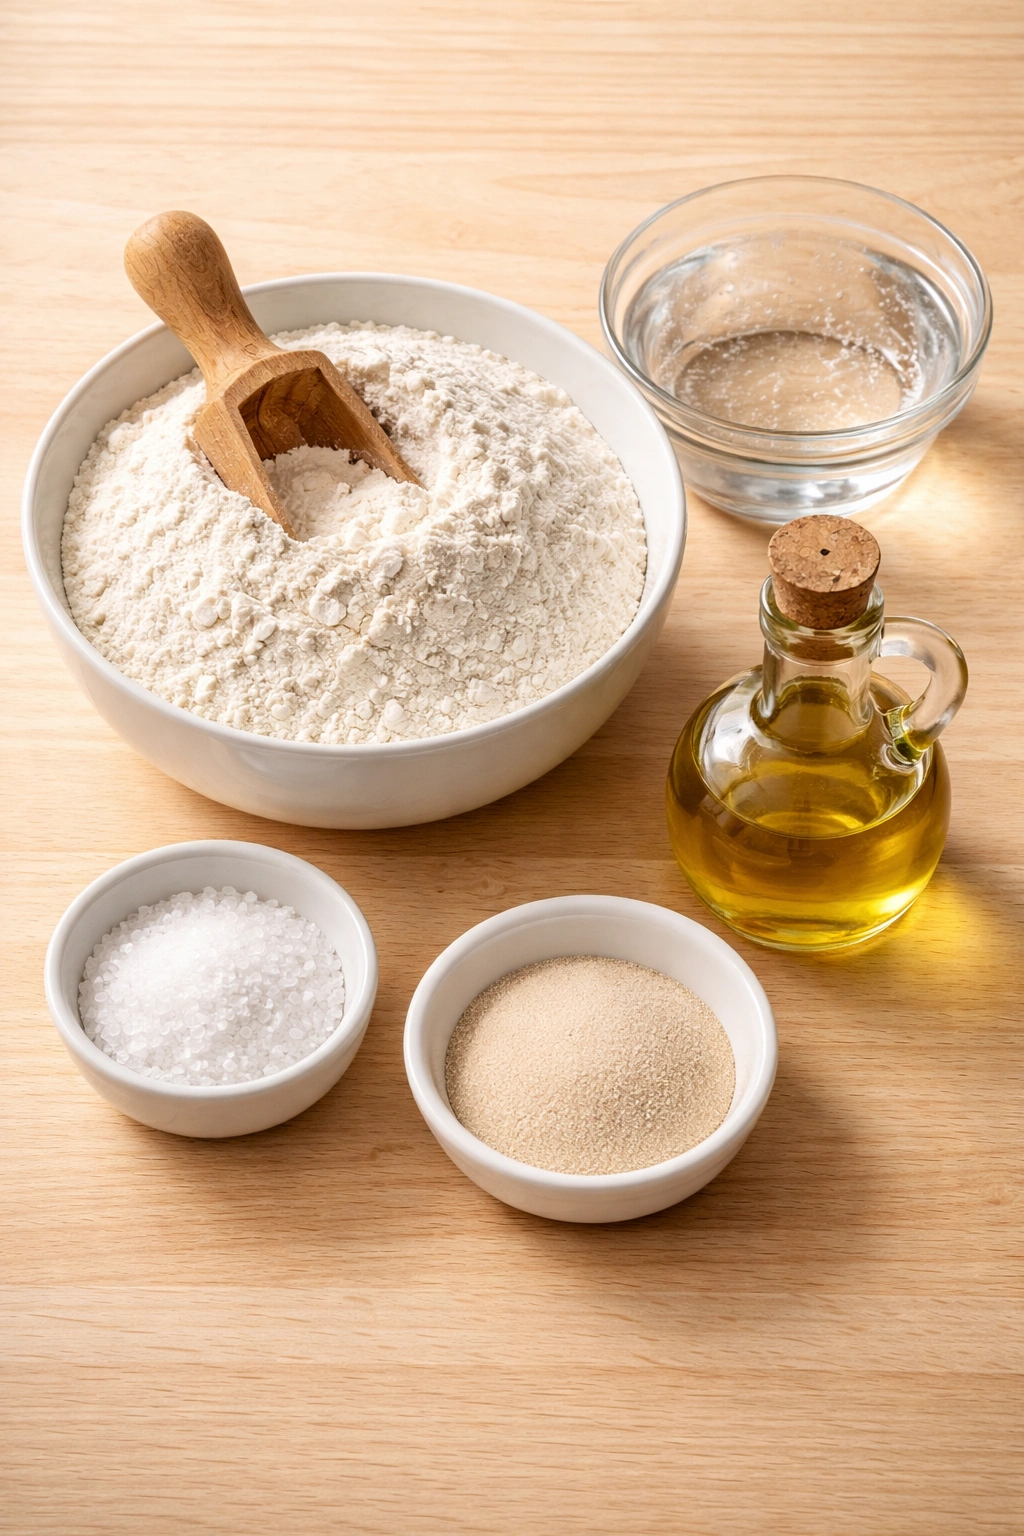
For the Dough:
- 3 cups (375 grams) all-purpose flour or bread flour, plus extra for dusting and shaping
- 1¼ teaspoons fine sea salt or kosher salt
- 1 packet (2¼ teaspoons or 7 grams) instant yeast or active dry yeast
- 1¼ cups (300 milliliters) warm water (around 110–120°F / 43–49°C, warm to the touch but not uncomfortable)
- 2 tablespoons olive oil, plus more for greasing and brushing
Optional Flavor Additions (use one or none):
- 2 teaspoons honey or granulated sugar (feeds the yeast, results in slightly faster rise and better browning)
- 1 teaspoon garlic powder mixed into the dry ingredients
- 1 teaspoon dried Italian seasoning (oregano, basil, thyme) mixed into the dry ingredients
- ½ teaspoon freshly ground black pepper mixed into the dry ingredients
For Baking and Toppings:
- Cornmeal or semolina flour for dusting the pizza peel or pan
- Pizza sauce or your sauce of choice (see variations section below)
- Shredded mozzarella cheese (about 1½ cups total for two pizzas)
- Fresh basil, if making Margherita pizza
- Your choice of toppings (suggestions follow in the serving section)
Step-by-Step Instructions for No-Fuss Pizza Dough
Prepare Your Workspace and Ingredients:
-
If using active dry yeast (not instant), place the warm water in a medium mixing bowl and sprinkle the yeast over it. Let it sit for 5 minutes until the top is foamy and smells pleasantly yeasty—this confirms the yeast is alive and ready to work. Skip this step if using instant yeast; you can mix it directly with flour.
-
If you used active dry yeast, add the olive oil, salt, and flour to the bowl with the yeast mixture. If using instant yeast, combine the flour and salt in a large mixing bowl, make a well in the center, and pour in the warm water and olive oil.
-
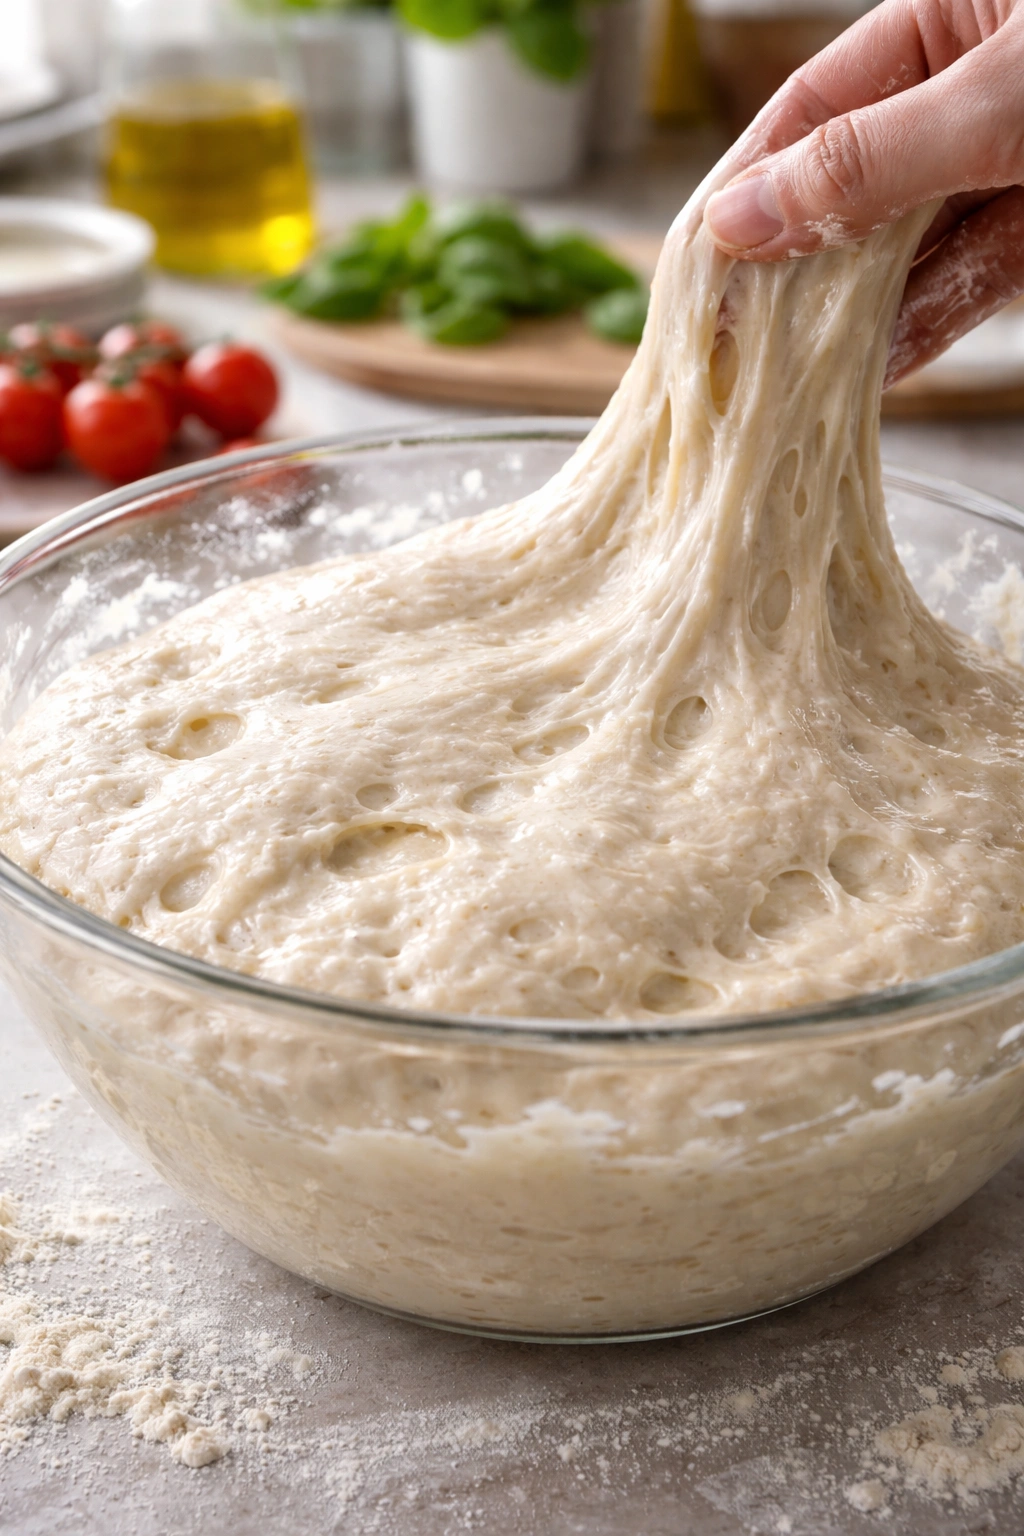
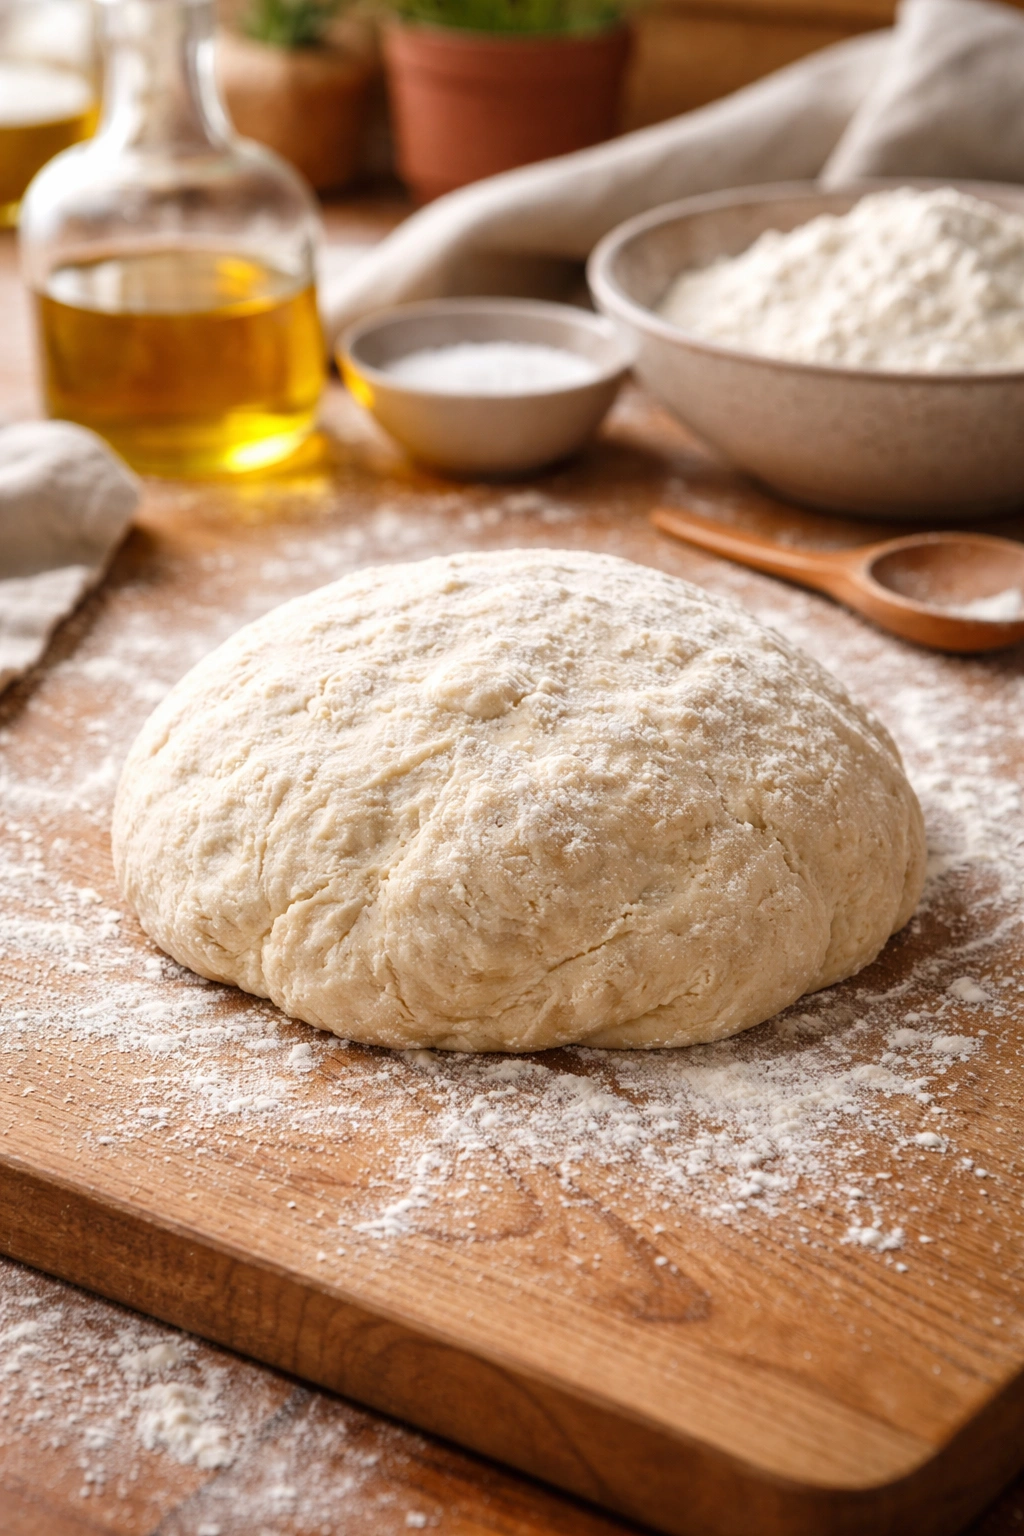
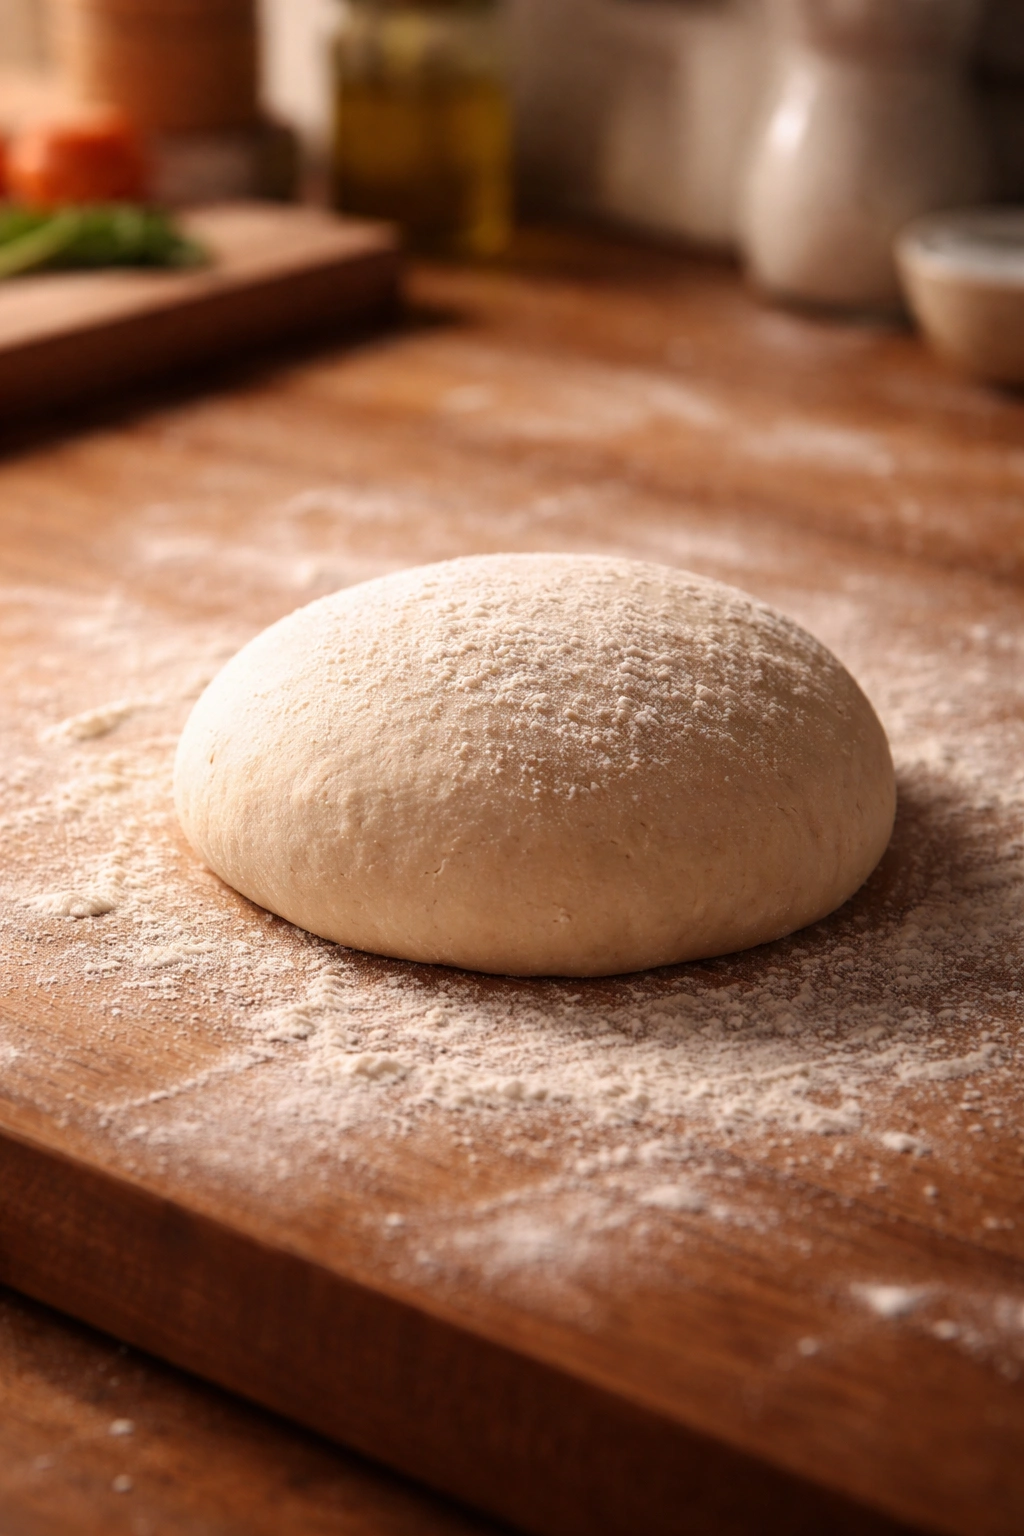
Using a wooden spoon or a sturdy rubber spatula, stir everything together until the dry flour is completely incorporated and a rough, shaggy dough forms. At this stage, the dough will look messy and torn—that’s exactly right. You’re not looking for a smooth ball yet.
Knead the Dough (Optional but Recommended):
-
If you have a stand mixer with a dough hook attachment, place the dough in the mixer bowl and knead on low speed for 5 to 6 minutes until the dough becomes smooth, elastic, and springs back slightly when poked. If kneading by hand, turn the dough out onto a lightly floured work surface and knead for 8 to 10 minutes, using the heel of your hand to push the dough away from you, then folding it back over itself. The dough will go from sticky and shaggy to smooth and soft—don’t add extra flour unless absolutely necessary; trust that the dough will become less sticky as you knead.
-
Once kneaded, the dough should feel soft and supple, almost like a baby’s skin. When you poke it gently with a finger, it should spring back partially but hold a slight indentation. This texture is the goal—if it’s still very sticky and can’t hold shape, knead for another minute or two.
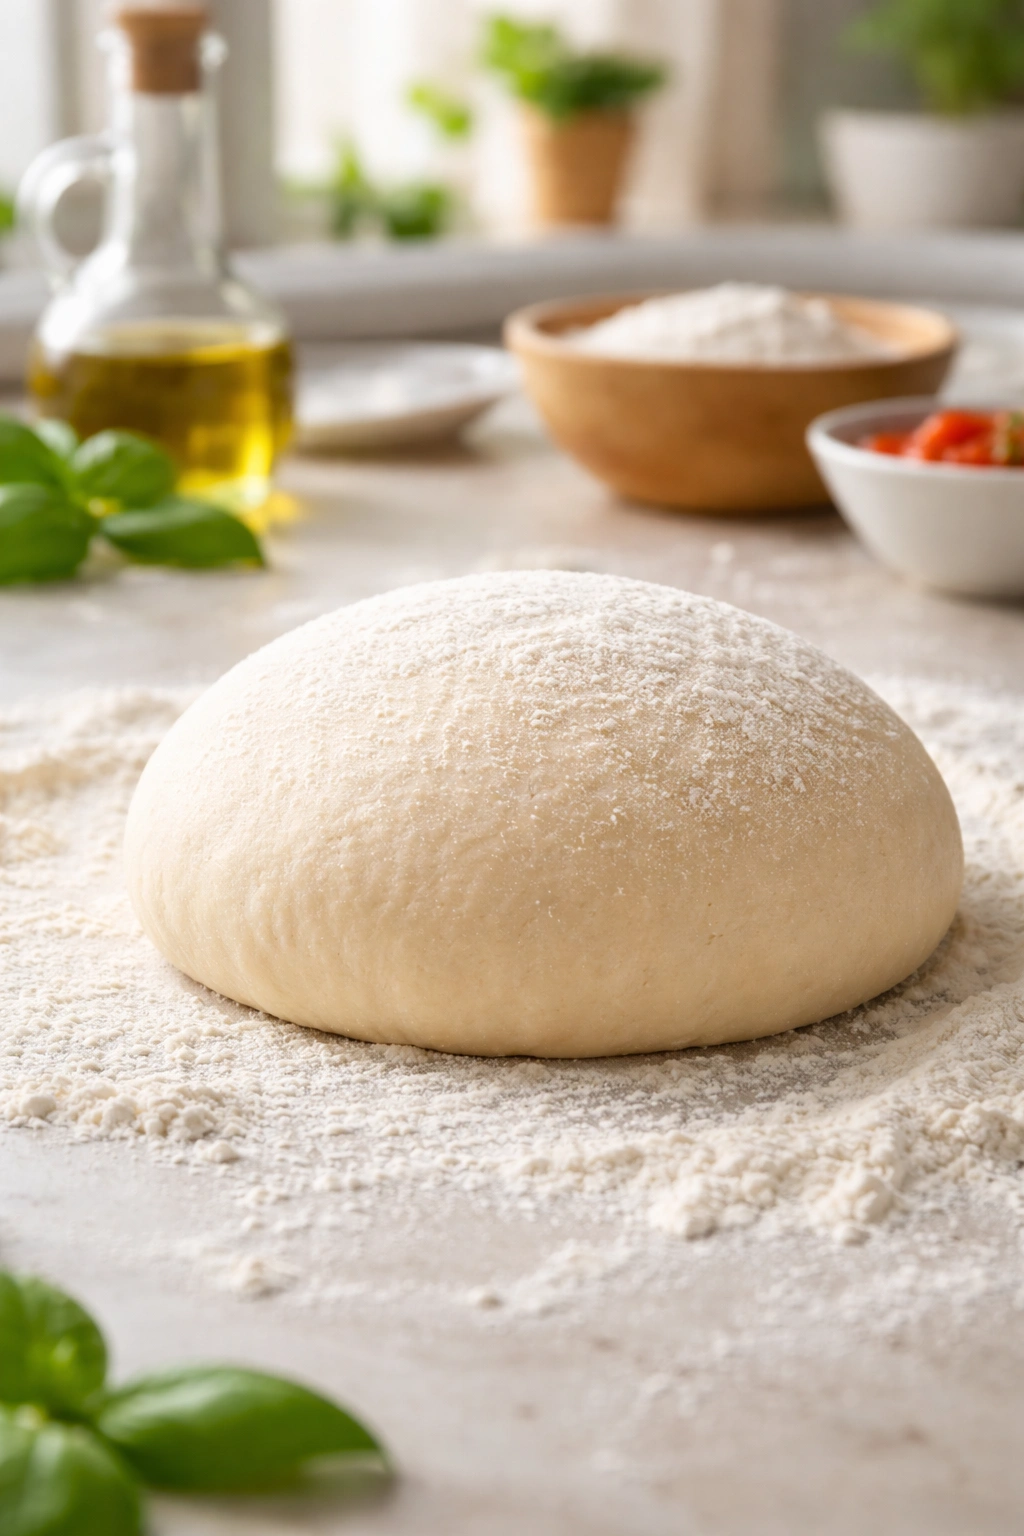
First Rise:
-
Lightly coat the inside of a mixing bowl with a drop of olive oil, just enough to prevent sticking. Place the dough in the bowl and turn it once so the top is lightly coated with oil. This prevents a dry skin from forming on the surface.
-
Cover the bowl with a damp kitchen towel or plastic wrap. Place it in a warm spot—a turned-off oven with just the light on, a warm kitchen corner, or near (but not touching) a heating vent. Let the dough rise for 45 minutes to 1 hour, or until it’s increased noticeably in bulk and feels puffy when you gently poke it. The exact time depends on how warm your kitchen is; a cooler kitchen takes longer, a warmer one rises faster.
Advertisements -
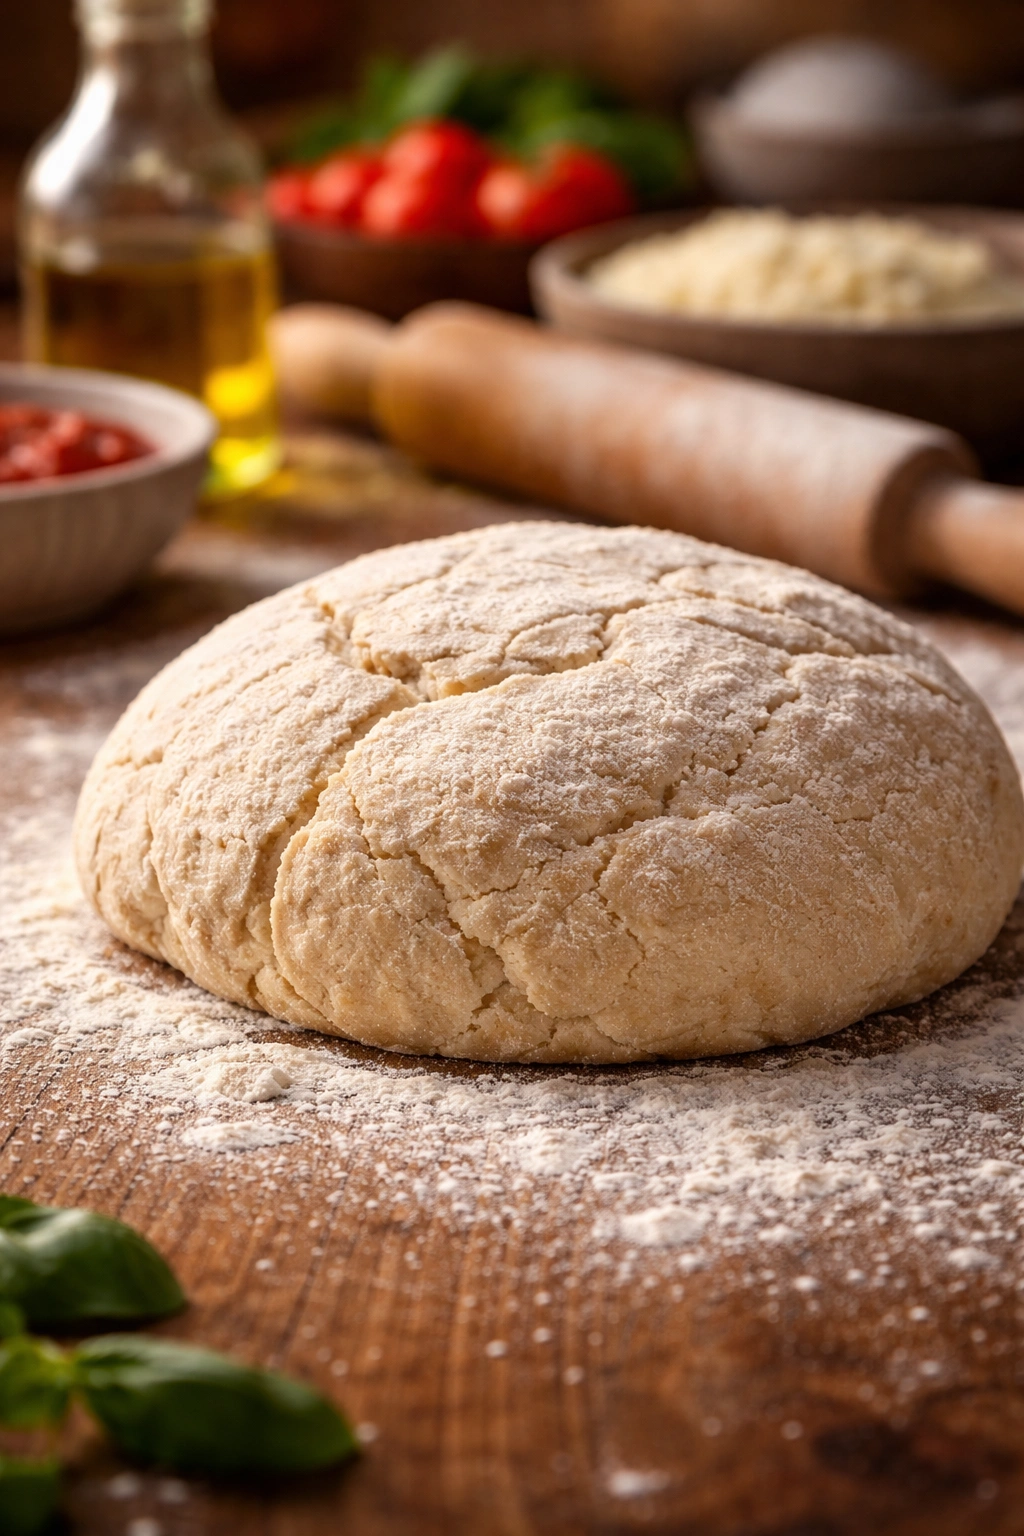
Alternatively, if you prefer more flavor development and a more relaxed schedule, place the covered dough in the refrigerator immediately after kneading and let it rise overnight (12 to 24 hours, or even up to 3 days). Cold fermentation actually produces better flavor and makes the dough easier to shape, so this is worth doing if you have the time. Remove it from the fridge about 1 hour before you plan to shape and bake, letting it come to room temperature.
Shape the Dough:
-
Turn the risen dough out onto a lightly floured work surface. Gently deflate it with your fingertips—you’re not punching it aggressively, just pressing out some of the largest air bubbles. Divide it into two equal portions (or four if making personal pizzas) using a bench scraper or large knife.
-
Working with one portion at a time, gently shape it into a rough ball by pulling the sides underneath and pinching them together at the bottom. Don’t overwork it; this takes about 30 seconds. If you’re using dough that’s been cold-fermented, let these balls rest on the floured work surface for 10 to 15 minutes before stretching—this allows the gluten to relax, making shaping much easier.
Shape Into Pizza Rounds:
-
Preheat your oven to 500°F (260°C) if baking immediately on a pizza stone or steel (or to 450°F/232°C if using a regular baking sheet). If using a pizza stone or steel, place it in the oven now to preheat for at least 30 minutes.
-
Place one dough ball on a lightly floured surface. Press it down gently with your fingertips all over, working from the center outward, until it’s roughly 4 to 5 inches across and about ½ inch thick. You’re not rolling it with a pin; you’re using your hands and gravity.
-
Once it’s flattened, gently pick up the dough and let gravity do the work—hold it up with your hands underneath (not pinching from the top), letting it stretch under its own weight. Rotate it as you go, working your way around. If the dough springs back and resists stretching, rest it for 3 to 5 minutes and try again—the gluten just needs to relax. Continue until the dough is roughly 10 to 12 inches across and about ¼ inch thick. Some unevenness is fine and actually desirable; it creates a rustic appearance.
Prepare for Baking:
-
If using a pizza peel: lightly dust it with cornmeal or semolina flour (this helps the dough slide off onto the hot surface). Place the stretched dough on the peel. If using a regular baking sheet: lightly oil it or line it with parchment paper, then place the dough on it.
Advertisements -
Working quickly so the dough doesn’t stick or dry out, spread your pizza sauce over the dough, leaving about a ½-inch border around the edge. Don’t use too much sauce—about 3 to 4 ounces (roughly ⅓ to ½ cup) per pizza is ideal. Excessive sauce makes the crust soggy.
-
Distribute cheese and toppings evenly over the sauce. Don’t overload it—a single layer of toppings is all you need. Too many toppings weigh the dough down and prevent it from cooking evenly.
Bake the Pizza:
-
Carefully transfer the pizza to the preheated stone or baking sheet. If using a peel with a stone, pull the oven rack out slightly, position the peel, and gently shimmy the pizza onto the hot surface. Be careful of the hot stone—it’s extremely hot and can cause serious burns if you touch it. If using a baking sheet, simply place it in the oven.
-
Bake for 12 to 15 minutes, until the crust is golden brown and the cheese is bubbly and starting to char at the edges. Don’t open the oven door frequently—this lets heat escape and slows cooking. After about 8 minutes, you can take a peek to check progress, but minimize door openings.
-
Remove from the oven using an oven mitt or pizza peel (if it slides easily, the peel works great; if it’s stuck, use a large spatula). Let the pizza rest for 1 to 2 minutes on a cutting board—this allows the cheese to set slightly and makes cutting cleaner.
-
Repeat steps 9–19 with the second dough portion. Slice with a sharp knife or pizza cutter and serve immediately while hot.
Secrets to Perfect Crispy Crust
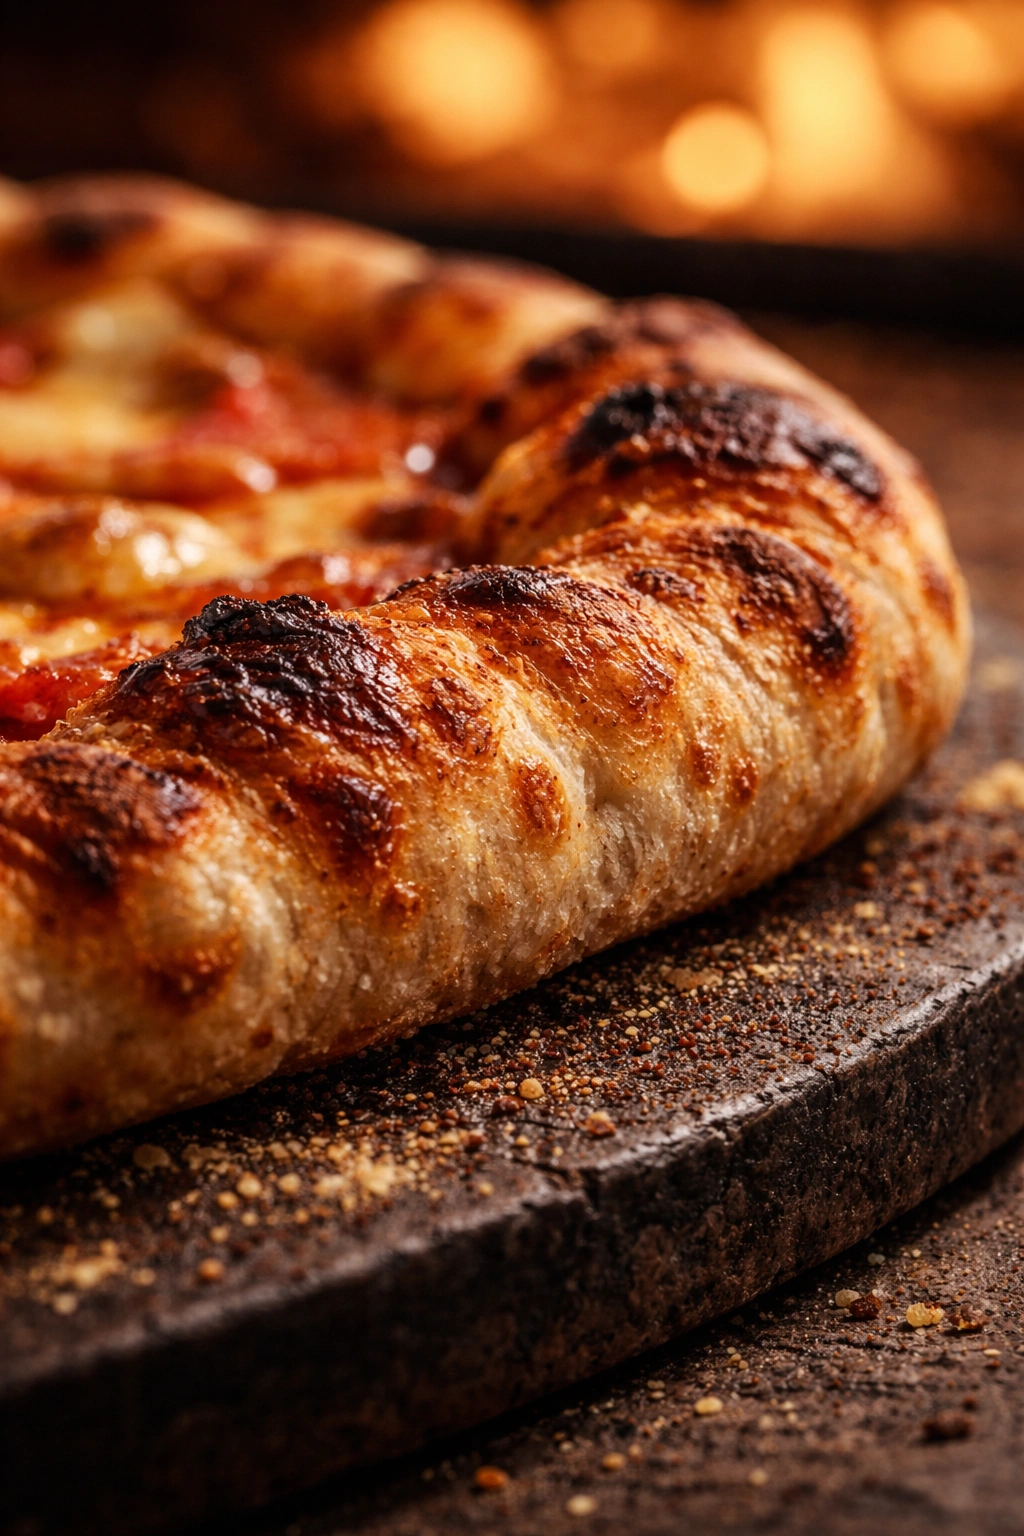
A truly excellent pizza crust has two things working in harmony: a crispy, slightly charred exterior and a chewy, light interior. Achieving this is about understanding how heat works and how to set up your oven for success.
The pizza stone or steel is genuinely the single best investment you can make. These conduct heat far more efficiently than a regular baking sheet. Stone is cheaper; steel is faster and more durable. Either one makes a dramatic difference in crust quality because the bottom of the pizza gets direct, intense heat that creates that crucial browning and crispness. If you don’t have one, a regular baking sheet still works—you just won’t get quite as crispy a bottom, though an oiled sheet produces results closer to what you want than an unoiled one.
Preheat your stone or steel for at least 30 minutes. This isn’t arbitrary—it ensures the entire surface is evenly hot, so your pizza cooks uniformly. If you put cold dough on a warm stone, the bottom stays pale and soft. A fully preheated surface creates that immediate sizzle and browning that’s so desirable.
The moisture in your dough actually helps create a crispy crust, which might sound counterintuitive. High-hydration dough releases steam as it bakes, which creates the proper environment for the crust to set and brown rather than just drying out. This is why the wetter, stickier dough actually produces better results than drier, easier-to-handle dough.
Dusting your peel with cornmeal or semolina flour serves two purposes: it prevents sticking and it creates a slightly gritty bottom texture that’s genuinely delicious. Some people use a combination of oil and flour on their peel, which also works well. The key is having some kind of release agent so the dough slides smoothly onto the hot surface.
Don’t use a rolling pin to flatten your dough if you can help it. Rolling compresses the air you’ve spent time developing, resulting in a denser crust. Hand-stretching preserves those bubbles and creates a lighter, airier final product. If you find yourself struggling with hand-stretching, that’s actually a sign you need to let the dough rest longer, not that you need to force it with a pin.
Common Pizza Dough Mistakes and How to Avoid Them
Dough that won’t rise: This is almost always about temperature or yeast age. Yeast is alive and has an expiration date—check yours. If you’re in a cold kitchen, your dough rises slowly. Speed it up by placing it in a warmed oven with just the light on, or next to a heat source. Conversely, if your kitchen is very warm (above 75°F), dough rises faster, so keep an eye on it to prevent over-rising.
Dough that’s sticky and impossible to work with: This is actually high-quality, high-hydration dough. Don’t panic and add more flour. Instead, flour your hands instead of the dough, work on a floured surface, and embrace the stickiness—it’s going to produce a better pizza. If it’s truly unusable, reduce water slightly next time, but resist the urge to over-correct.
Crust that’s tough and chewy: You’ve likely over-kneaded or are using too little water. Under-kneaded dough also produces this result. Knead until the dough is smooth and elastic, not rock-hard. For future batches, add a tiny bit more water (start with an extra tablespoon).
Crust that’s dense with no air pockets: You either over-kneaded (yes, this matters), over-toppings (weight compressed the bubbles), didn’t let it rise long enough, or shook the dough too aggressively when shaping and transferred out the bubbles. Handle it gently, let it rise until puffy, and knead until smooth but not past that point.
Pizza that’s soggy in the center: Too much sauce, too many toppings, or an oven that’s not hot enough. Use less sauce (the pizza below should still be somewhat visible), layer cheese before sauce to create a slight barrier, and ensure your oven is fully preheated. A baking steel helps significantly here because it transfers heat directly to the crust bottom.
Crust that’s pale and doesn’t brown: Your oven isn’t hot enough, or the stone/steel isn’t fully preheated. Turn your oven to its absolute maximum temperature, ensure the stone has been in there at least 30 minutes, and bake longer if necessary. Pale crusts often taste good but visually don’t look as appetizing.
Dough that rises too fast and then collapses: Your kitchen is too warm, or you’ve used too much yeast. Check your room temperature; aim for around 70 to 75°F for comfortable rising. Use one standard packet of yeast per 3 to 4 cups of flour—don’t increase thinking it’ll be better.
Dough that won’t stretch without shrinking back: The gluten needs rest. Cover it with a bowl and let it sit for 10 minutes, then try again. If still resisting, repeat. This is patience rewarding you with cooperation.
Topping Ideas That Go Beyond Basic Cheese
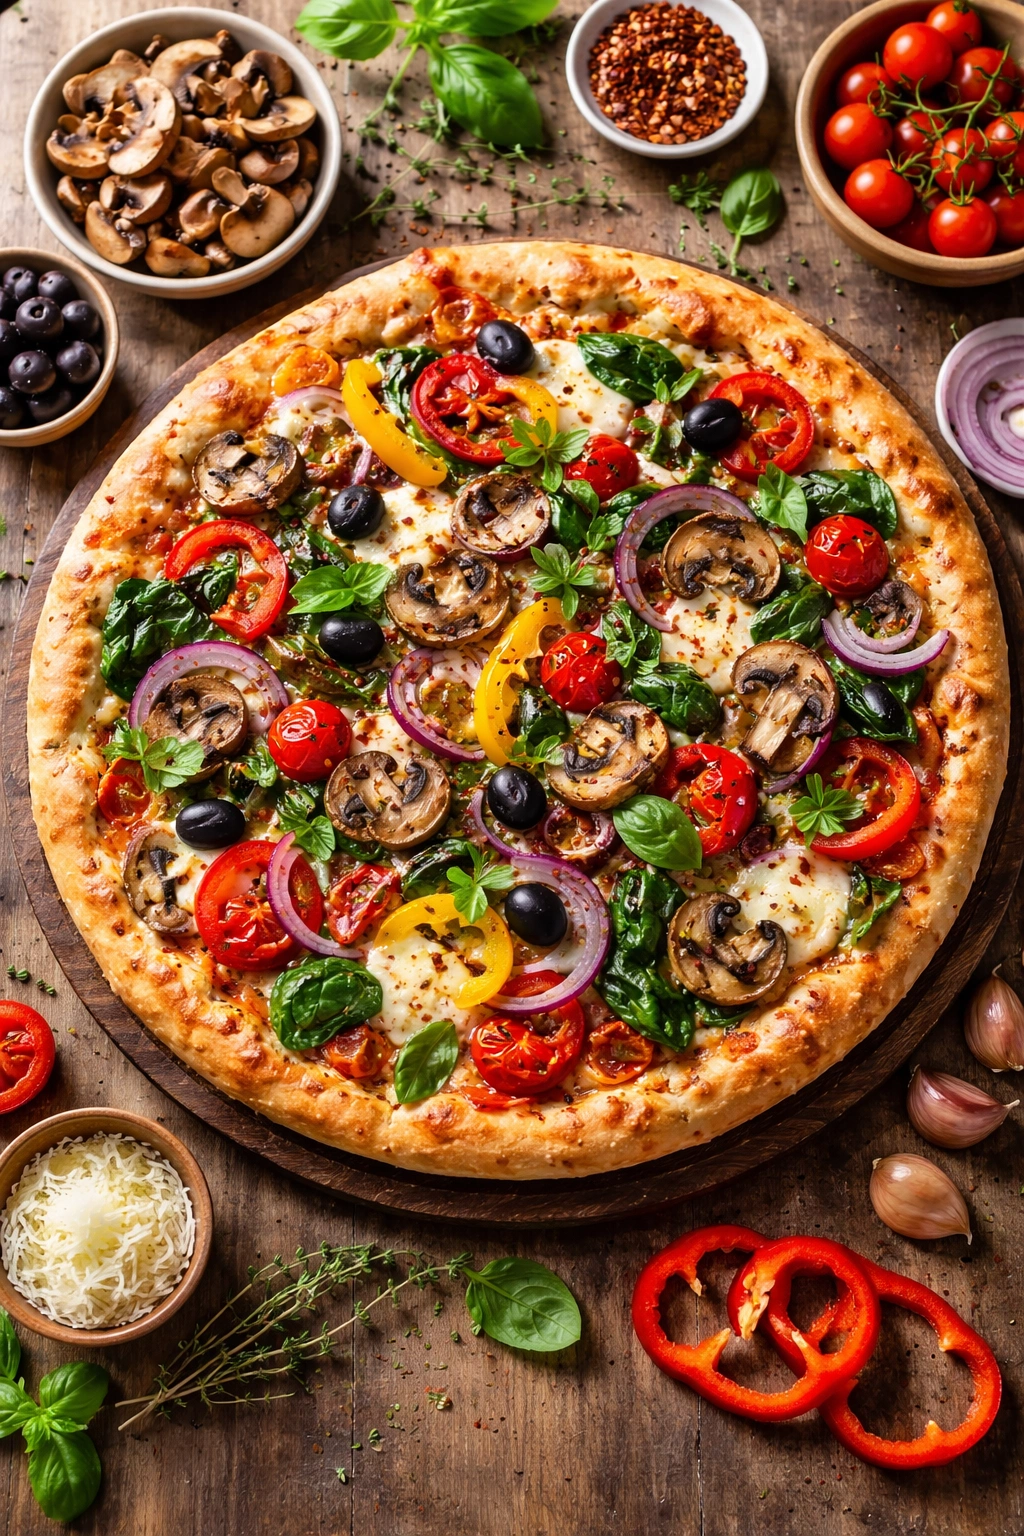
The magic of homemade pizza is absolute freedom. Forget the limitations of what delivery places offer—you can put literally any combination of ingredients on your pizza. The only rule is that your pizza should taste good, which is a delightfully low bar.
Classic Margherita is exactly what it sounds like: sauce, fresh mozzarella (torn into chunks, not shredded), fresh basil added after baking, a drizzle of good olive oil, and salt. It’s minimal, it’s perfect, and it lets the quality of your dough shine.
Mushroom and Thyme uses sautéed sliced mushrooms (any variety, though cremini or shiitake are wonderful), caramelized shallots if you have time, mozzarella, a sprinkle of fresh thyme, and a grind of black pepper. Drizzle with truffle oil if you’re feeling fancy.
Roasted Vegetable combines whatever vegetables you have: zucchini, bell peppers, red onions, asparagus, broccoli. Toss them with olive oil and roast at 400°F for 10 to 15 minutes until slightly caramelized, then distribute over sauce and cheese. The roasting concentrates flavors and removes excess moisture so they don’t make the crust soggy.
Meat Lovers (though you don’t need to be a meat lover to enjoy it) might include cooked crumbled sausage, bacon bits, pepperoni, and ham. Layer it all under the cheese to keep it moist and prevent it from drying out too much.
Bianca (white pizza) skips red sauce entirely and uses ricotta instead. Spread a thin layer of ricotta over the dough, add mozzarella, scatter fresh herbs and garlic, drizzle with olive oil, and bake. It’s rich, creamy, and totally different from tomato-based pizza.
Caramelized Onion and Goat Cheese uses onions cooked low and slow until deeply golden and sweet, crumbled goat cheese, maybe some arugula added after baking, and a splash of balsamic vinegar. It’s sophisticated but honestly easy to make.
Buffalo Chicken uses shredded cooked chicken tossed in buffalo sauce (or plain hot sauce), mozzarella, and a drizzle of ranch or blue cheese dressing after baking. Add celery leaves for freshness if you have them.
Breakfast Pizza is surprisingly good: spread partially cooked scrambled eggs on the dough (they’ll finish cooking in the oven), add crumbled sausage or bacon, cheese, and maybe some sautéed peppers. It blurs the line between pizza and breakfast in the best way.
The most important thing about toppings: don’t overload. One or two proteins, maybe two vegetables, cheese, and that’s it. More toppings don’t make better pizza; they make soggy pizza. Thin, strategic distribution beats piled high every time.
Creative Sauce Options Beyond Traditional Red
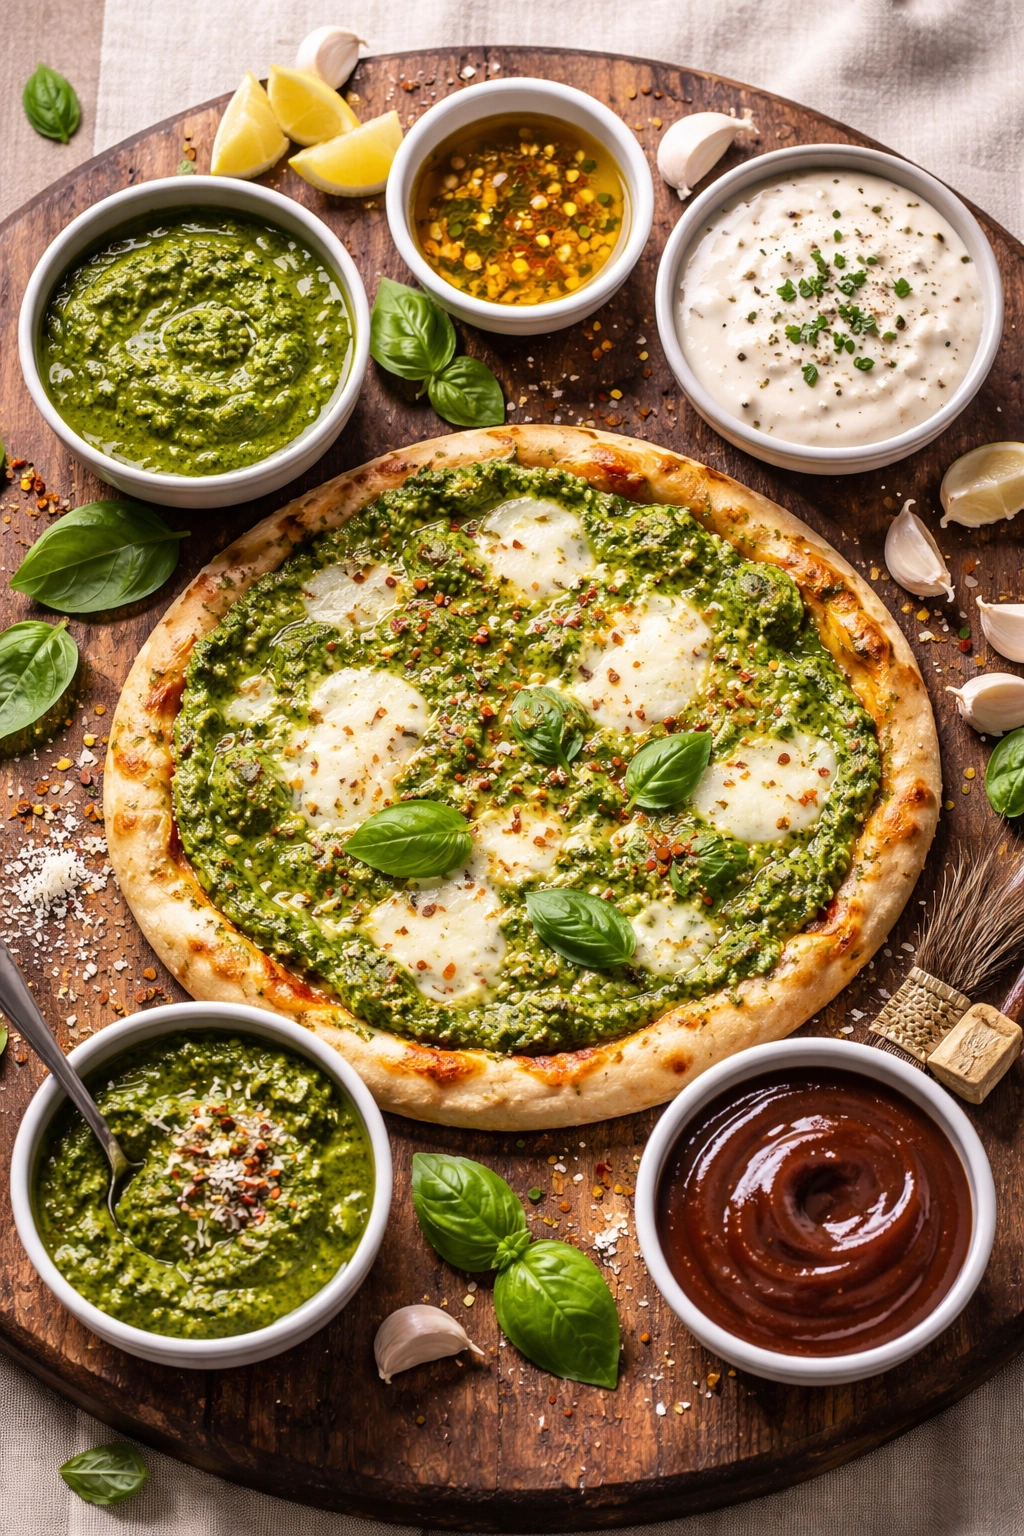
Red sauce (tomato-based) is traditional for good reason—it’s delicious and versatile. But you’re not limited to it, and honestly, some of the best pizzas use something else entirely.
Simple Tomato Sauce is just crushed or canned tomatoes, salt, pepper, garlic, and optionally a tiny bit of olive oil and dried oregano. Cook it for 15 to 20 minutes while your dough rises, or use store-bought sauce. A pinch of sugar balances acidity if your tomatoes are sharp.
Garlic and Oil (Aglio e Olio) is just minced fresh garlic, red pepper flakes, and good olive oil brushed on the dough. Add cheese and toppings, and bake. It’s minimalist and delicious—let the quality of your oil shine here.
Pesto made from basil, garlic, nuts, cheese, and oil is creamy and fragrant. Spread it thinly (a little goes a long way), add mozzarella, and maybe some sun-dried tomatoes or fresh tomato slices.
Alfredo made from butter, cream, garlic, and Parmesan cheese is rich and luxurious. Use it under chicken and broccoli, or with bacon and fresh herbs.
Barbecue Sauce is excellent under pulled pork or chicken. Drizzle it on the dough, add the meat, mozzarella, and red onions. Finish with cilantro if you like.
Hummus as a pizza base sounds odd but genuinely works. Spread it on dough, top with roasted vegetables, crumbled feta, and maybe some chickpeas. Drizzle with tahini sauce after baking.
Pumpkin or Butternut Squash Purée roasted and spread on dough creates an autumn pizza base. Top with sage brown butter, mozzarella, and crispy bacon. It’s seasonal and sophisticated.
Ricotta and Herbs mixed together create a creamy base. Spread it thin, add mozzarella, maybe some spinach, and finish with lemon zest and fresh herbs after baking.
The key with any non-tomato sauce: less is more. These sauces are richer or more intensely flavored than tomato sauce, so you need less of them. A thin, even distribution tastes better than a thick, heavy layer.
Storage, Make-Ahead, and Freezing Your Dough
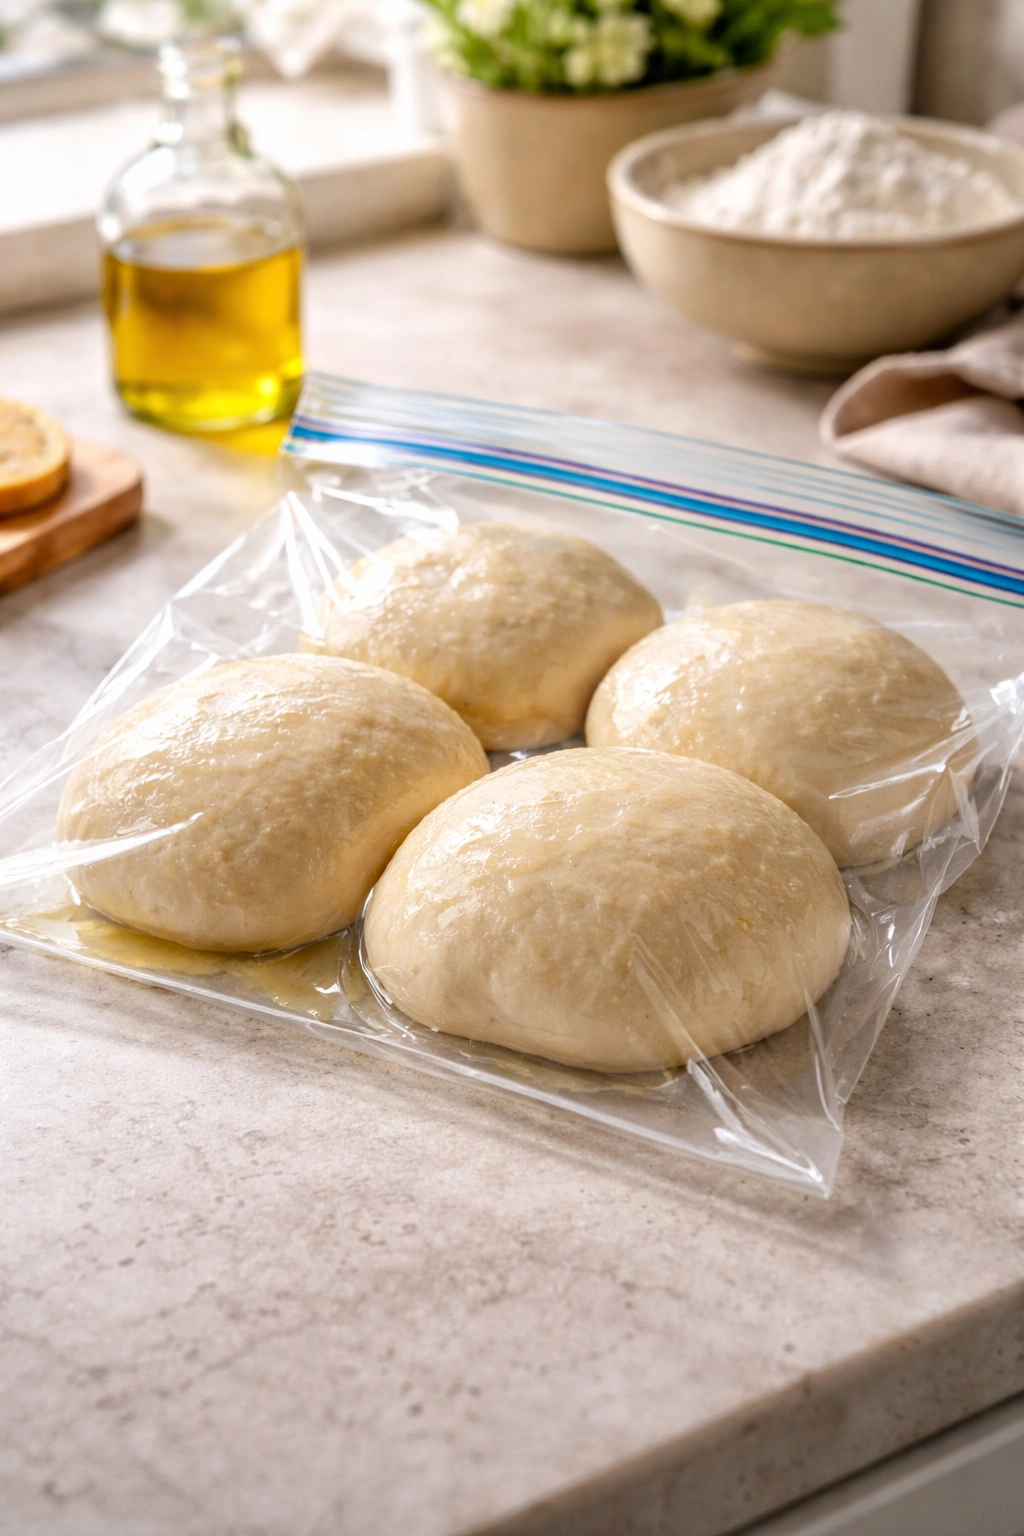
One of the biggest advantages of homemade pizza dough is that it’s incredibly freezer-friendly. This transforms pizza from something you have to plan for into something you can have spontaneously.
Refrigerating dough is perfect if you want to bake within 2 to 3 days. After kneading, divide the dough into portions (two portions for two pizzas is standard), lightly coat each in olive oil, and place in an airtight container or wrap tightly in plastic wrap. Refrigerate it. When you want pizza, pull it out 1 to 2 hours before you plan to shape and bake, letting it come to room temperature and proof slightly. This gives you flexibility—you can make dough on a lazy Sunday evening and have pizza ready on any night through Wednesday.
Freezing dough works perfectly and preserves it for weeks. After the dough has been kneaded and has gone through its first rise (about 1 hour), divide it into portions. Lightly coat each in olive oil, wrap it tightly in plastic wrap, then place all portions in a freezer-safe bag with as much air removed as possible. Label it with the date. The dough keeps frozen for up to 3 months, though it’s best within the first month.
To use frozen dough, transfer a portion to the refrigerator the night before you want to use it. It will thaw and begin a slow rise in the cold. Remove it from the fridge about 1 hour before you plan to bake, letting it come to room temperature and finish proofing. The slow thaw actually improves flavor through continued fermentation, so this is genuinely worth doing rather than rushing it at room temperature.
If you forgot to thaw it ahead, you can defrost dough at room temperature in about 2 to 3 hours (keep it in a closed container or loosely covered so it doesn’t dry out). Just monitor it to ensure it doesn’t over-proof while thawing.
Baked pizza stores well too. Cool leftovers completely, then store in an airtight container in the refrigerator for up to 3 days. Reheat in a 350°F oven for about 5 minutes until the cheese is melted again—this keeps the crust crispy. Don’t use a microwave if you can help it; microwave reheating makes crust chewy and rubbery. A toaster oven or regular oven gives much better results.
You can also freeze baked pizza, though it’s not quite as good as fresh. Cool it completely, wrap individual slices tightly in plastic wrap, then foil, then place in a freezer bag. It keeps for about a month. Reheat from frozen at 350°F for about 10 to 15 minutes.
Variations and Adaptations of This Dough
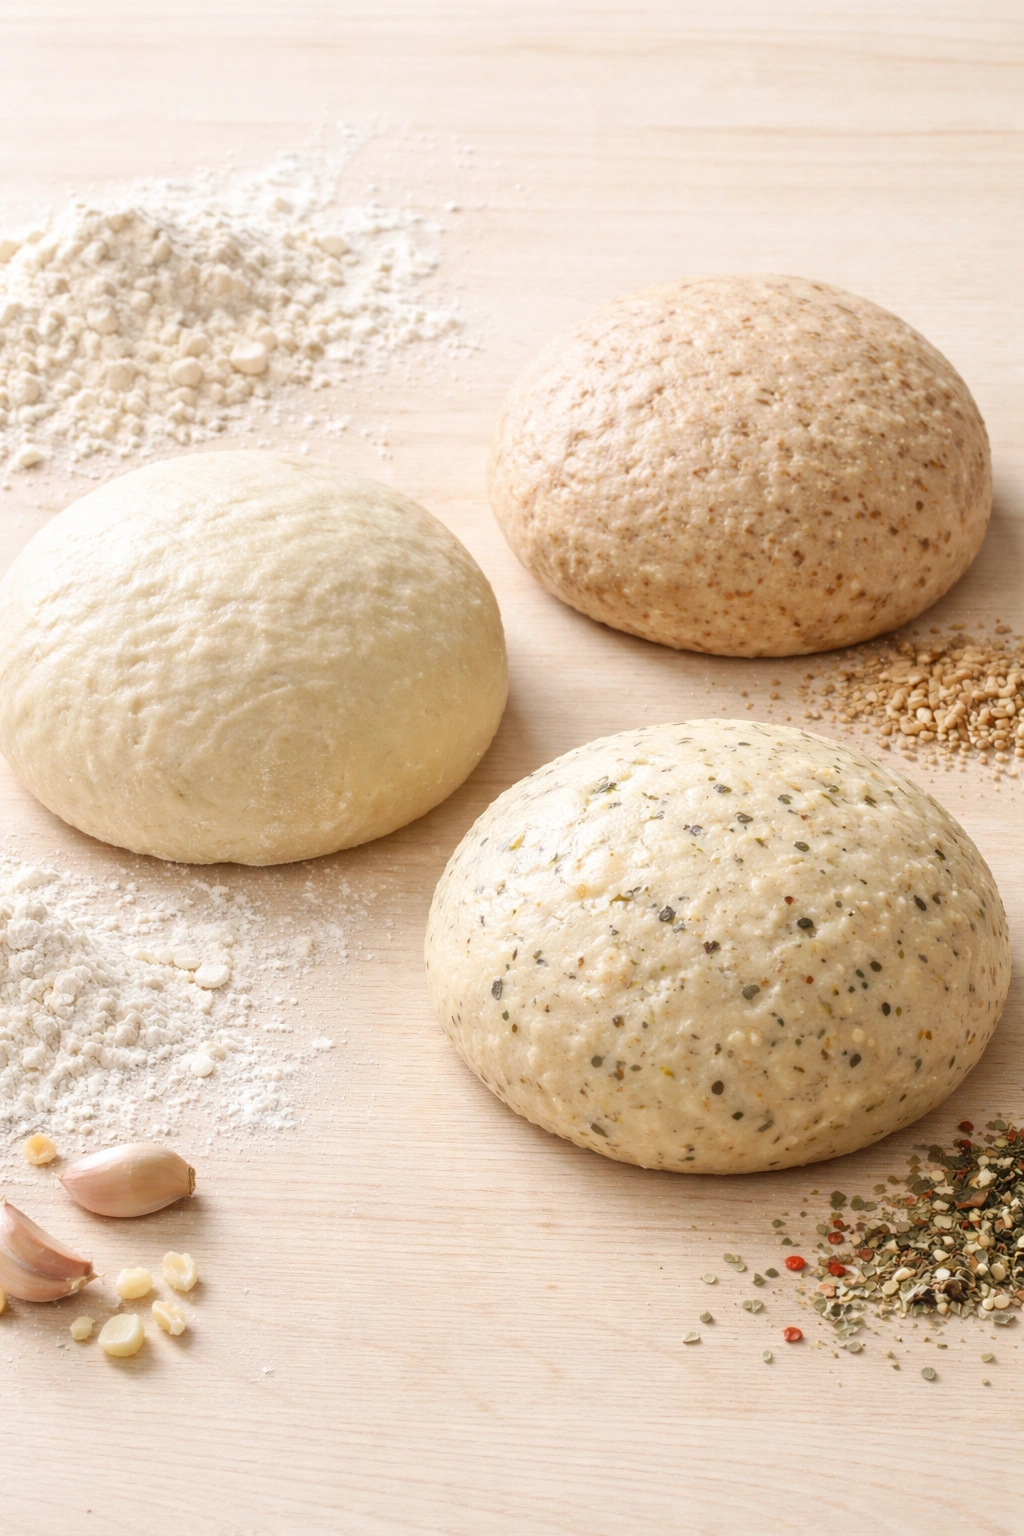
This basic dough is endlessly adaptable. You can customize it at the dough level to change flavor and texture, giving you variety without learning multiple recipes.
Whole Wheat Pizza Dough replaces up to half the all-purpose flour with whole wheat flour. It creates a nuttier flavor and heartier texture. Increase water slightly (add an extra 2 to 3 tablespoons) because whole wheat absorbs more. Whole wheat dough needs the same rise time, maybe slightly longer in some cases.
Herb-Infused Dough adds dried herbs directly to the flour: 1 to 2 teaspoons of Italian seasoning, oregano, or herbes de Provence mixed into the dry ingredients. Or add minced fresh rosemary (about 1 teaspoon) mixed with a little olive oil and worked into the dough after initial mixing.
Garlic Dough combines 2 to 3 teaspoons of minced fresh garlic or ½ to 1 teaspoon of garlic powder mixed into the dry ingredients. This flavors every bite of the crust.
Spicy Dough adds ¼ to ½ teaspoon of red pepper flakes mixed into the dry ingredients. It creates a subtle heat that builds with each bite.
Honey or Sugar Dough adds 1 to 2 teaspoons of honey or granulated sugar to the water before mixing. This feeds the yeast slightly more and produces a crust that browns more easily and has a subtle sweetness that actually complements savory toppings.
Stuffed Crust happens during shaping: once you’ve stretched your dough to roughly 10 inches, stretch it a bit more and create a thicker border around the edge (about ½ inch wider than the rest). Fill that border with mozzarella cheese or even cooked sausage and cheese. Fold the edge up and over to seal, creating a pocket that becomes a cheesy crust as it bakes.
Thicker, Focaccia-Style Crust happens through adjusting your rising time and toppings. Let the dough rise longer (1.5 to 2 hours instead of 45 to 60 minutes) so it’s extra puffy. Shape it into a larger pan, dimple the top with your fingertips, drizzle generously with olive oil, and scatter salt and herbs over the top before baking.
Baking Methods: Stone vs Skillet vs Pan

Your choice of baking vessel affects final texture significantly. Different methods shine for different situations, and it’s worth understanding your options.
Pizza Stone or Steel (Traditional Method): This is what most people think of as “pizza.” Preheat the stone or steel in a hot oven (500°F / 260°C) for at least 30 minutes. Transfer your dough using a peel, dusting the peel with cornmeal or semolina to prevent sticking. Bake for 12 to 15 minutes until the crust is golden and crispy, especially on the bottom. The advantage: you get that authentic pizzeria crust with a crispy bottom and chewy interior. The disadvantage: requires a pizza peel and careful transferring to avoid burning yourself.
Cast Iron Skillet (Pan Pizza): Heat about ¼ cup olive oil in a 10 to 12-inch cast iron skillet over medium-high heat. Place your shaped dough in the hot oil (it will sizzle) and cook for about 3 minutes until the bottom is starting to set and brown slightly. Add your toppings. Then transfer the skillet to a preheated 450°F oven and bake for 10 to 12 minutes until the cheese is bubbly and the edges are golden. The advantage: incredible crispy-fried bottom that’s incredibly satisfying, plus you only need a skillet you probably already own. The disadvantage: the amount of oil required is more than traditional pizza, making it richer.
Regular Baking Sheet: Oil your sheet generously or line it with parchment paper. Shape dough directly on the sheet. Bake at 450°F for 12 to 15 minutes until golden. The advantage: familiar, no special equipment needed. The disadvantage: bottom won’t be quite as crispy as a stone or skillet, producing a more bread-like texture—which some people actually prefer.
Baking Sheet Inverted (Budget Stone Alternative): Invert a sturdy baking sheet (turn it upside down so the flat side is up) and preheat it in your oven just like you would a pizza stone. Transfer your dough-topped peel onto the flat side. This is honestly nearly as effective as a stone and costs nothing if you already own a baking sheet. It doesn’t conduct heat quite as well as a real stone, but it’s surprisingly effective.
Choose based on what you have and what texture appeals to you. None of these methods is wrong—they just produce slightly different results, and it’s fun to experiment across methods to see what you prefer.
Serving and Pairing Your Homemade Pizza
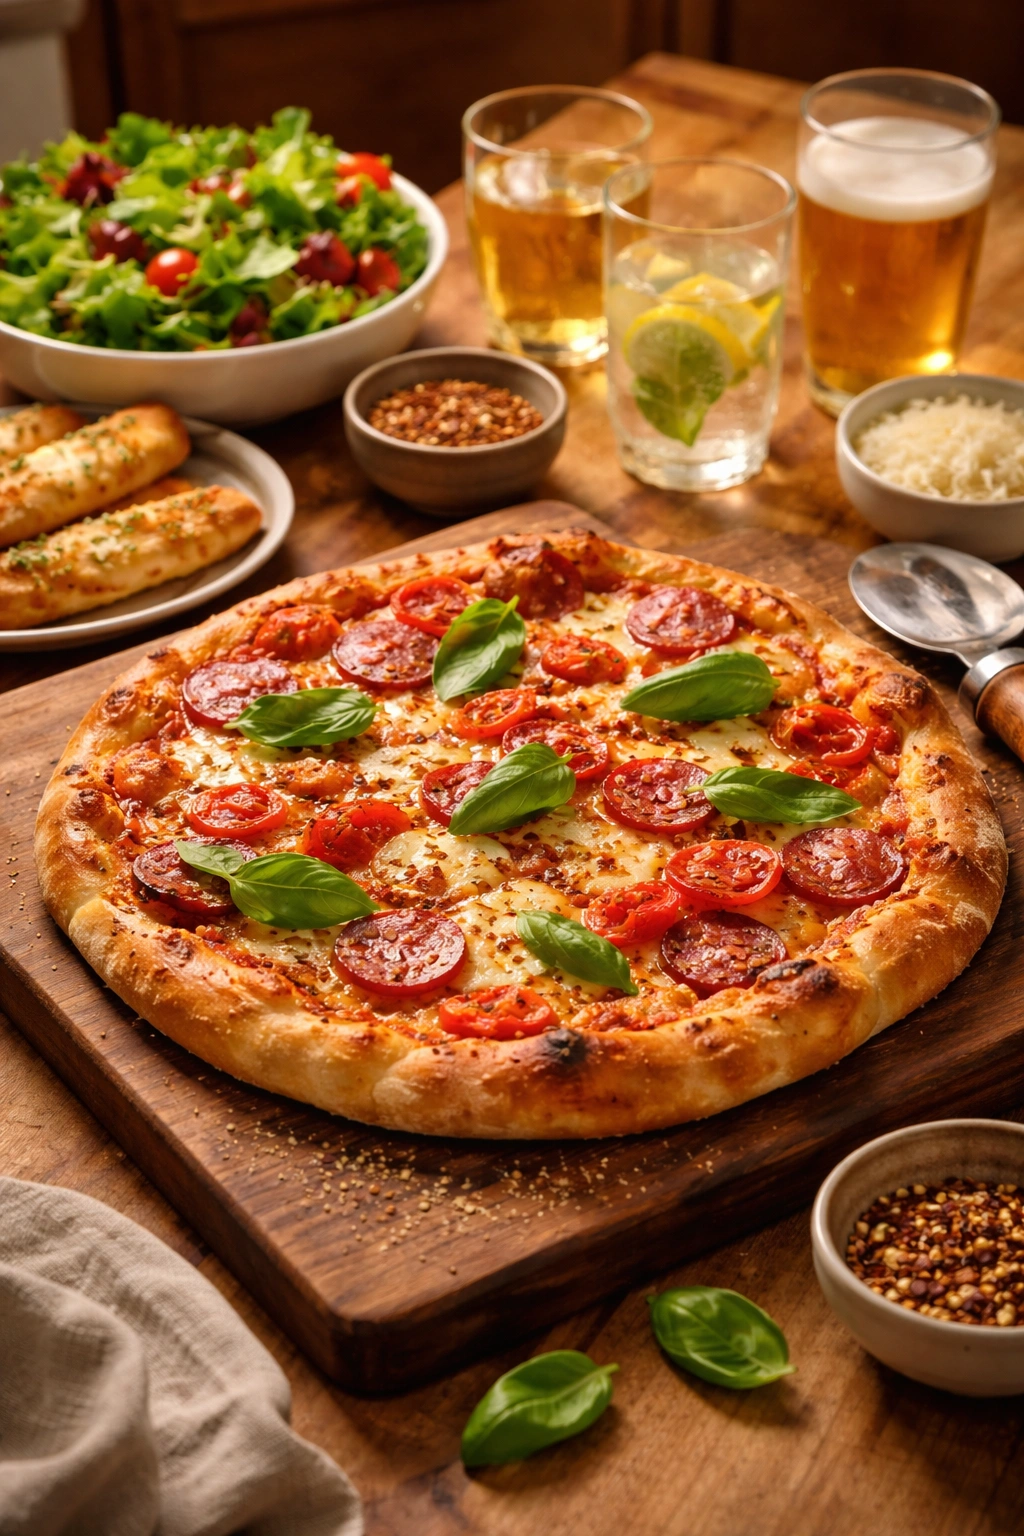
The pizza itself is the star, but what you serve alongside matters. Simple green salad dressed with lemon vinaigrette or red wine vinegar brightens a heavy, rich pizza. Let the salad provide contrast to the richness of cheese and toppings.
Roasted vegetables on the side—maybe broccoli or Brussels sprouts tossed with olive oil and roasted until crispy—add nutrition and another dimension of flavor. They don’t compete with the pizza; they complement it.
Garlic bread or breadsticks made from leftover pizza dough (brush with olive oil, garlic, and herbs, then bake) is indulgent and turns a pizza dinner into a full meal situation.
Chilled drinks work well: sparkling water with lemon, cold beer if you drink alcohol, or iced tea. The carbonation or coolness cuts through the richness and cleanses the palate between bites.
Hot sauce, crushed red pepper, or chili oil on the side lets people customize heat levels. Some people love spicy; others don’t. Having it available means everyone’s happy.
Dipping sauce for the crust: garlic butter, ranch, or even warm marinara sauce for dipping makes use of that excellent crust you made.
Serve pizza immediately while it’s hot and the cheese is still melted and gooey. Let it cool just 1 to 2 minutes—long enough that it won’t burn the roof of your mouth but not so long that it becomes merely warm. Bring your family or friends to the table, let everyone grab a slice, and enjoy the satisfaction of eating something you made together.
Final Thoughts
Homemade pizza is genuinely one of the easiest, most rewarding things you can make. It looks impressive and tastes better than what you can order, yet it requires only basic ingredients, a mixing bowl, and time. No fancy equipment, no special skills, no intimidation necessary.
The beauty of this approach is that it works with your life. Make dough in the morning and bake in the evening. Make it a week ahead and freeze it. Need dinner in an hour? You have it. Prefer to plan ahead? Even better—your cold-fermented dough will be more flavorful and easier to work with.
Once you make pizza this way a few times, it becomes automatic. You’ll stop thinking of it as cooking and start thinking of it as gathering—pizza night becomes the ritual your family looks forward to. The kitchen smells incredible, everyone participates in customizing their slice, and somehow homemade pizza tastes so much better than delivery, even though the fundamental ingredients are the same.
Start with this simple dough. Try it the quick way first, see if you like the results. Then experiment: make it ahead, try different toppings, maybe use a different baking method. There’s no failure here, only learning. Even a slightly imperfect homemade pizza is a triumph over ordering out, and you’ll taste the difference.