A whole roasted chicken is one of those dishes that looks deceptively simple but tastes like you’ve been cooking all day. The golden, crackled skin. The juices that pool when you carve into the thigh. The way a single bird fills your kitchen with an aroma that makes everyone walk through the door and immediately ask what you’re making. Yet somewhere along the way, roasting a whole chicken became something people talked themselves out of—too fussy, too time-consuming, too risky. The truth is far different. A whole roasted chicken is actually one of the most forgiving, reliable dishes you can make, and it genuinely tastes better than the sum of its parts.
What makes a roasted chicken worth that Sunday effort—or any effort—is efficiency disguised as elegance. You’re not juggling multiple pans or complicated techniques. You’re placing a single seasoned bird in a hot oven and letting time and heat do almost all the work. By the time an hour passes, you’ve got dinner ready, leftover meat for the week ahead, and the foundation for incredible stock that transforms ordinary weeknight soups into something special. That’s not busy work—that’s smart cooking.
Why Whole Chicken Belongs in Your Regular Rotation
Roasting a whole chicken is genuinely one of the most practical things you can do in a kitchen, especially if you’re trying to eat well without spending your evenings cooking. A single three-to-four-pound bird feeds four people generously, with enough meat left over for sandwiches, salads, quesadillas, or whatever you throw together during the week. From a purely financial standpoint, buying a whole chicken costs significantly less per pound than buying breasts or thighs separately. You get the bonus of bones for stock, which transforms into soups, risottos, and sauces that taste homemade in a way that boxed broth never quite achieves.
Beyond the practical advantages, a roasted chicken actually tastes remarkable. When you roast the bird whole instead of breaking it into parts, the thighs and legs stay moister while the white meat cooks to tender doneness. The skin becomes a crispy, savory shell that you’ll fight over at the table. The flavor develops differently too—the bird self-bastes as it roasts, with rendered fat and juices constantly circulating. That’s something you don’t get from cooking individual parts, where dry white meat is a constant risk unless you’re paying close attention.
The Method That Changes Everything
There’s no single “right” way to roast a chicken, but there is an approach that makes the process nearly foolproof and produces consistently beautiful results. It starts with respecting temperature—not the confusing question of whether you roast at 450°F or 375°F, but understanding that starting hot and finishing moderate is a reliable formula. The high heat crisps the skin and kickstarts browning through the Maillard reaction, the chemical process that creates that deep, savory flavor. The gentler finish heat ensures the thighs reach full doneness without overdrying the white meat.
Seasoning inside and out matters more than most home cooks realize. The cavity of the bird—that empty space nobody thinks about—is prime real estate for flavor. Filling it with aromatics like lemon, garlic, and fresh herbs means those flavors infuse the meat from the inside while the bird roasts. Outside seasoning with salt, pepper, and dried herbs creates that flavorful crust. Butter under the skin (it sounds fancy; it isn’t) protects the delicate white meat from drying out while adding richness and flavor.
The real game-changer is allowing the bird to rest after roasting. This isn’t optional; it’s the difference between meat that shreds apart and meat that stays juicy and tender. Resting allows the muscle fibers to relax and reabsorb the juices that cooking forced to the surface. Carving into a chicken straight from the oven is like carving into a spring—all that moisture rushes out onto the cutting board instead of staying in the meat. A fifteen-minute rest means that juice stays where it belongs.
Choosing the Right Bird Matters More Than You’d Think
Not all chickens are created equal, and the one you start with has a genuine impact on results. Size is the first consideration—aim for a bird between three and a half and four and a half pounds. Anything significantly smaller won’t feed four people adequately, and anything larger takes substantially longer to cook, risking overcooked white meat before the dark meat is done. That sweet-spot size is what you’ll find most readily available at any grocery store.
The second consideration is freshness versus frozen. A fresh chicken roasts in about an hour to an hour and fifteen minutes. A frozen chicken requires advance thawing—ideally in the refrigerator over one to two days—and takes longer to cook. There’s no quality difference between a properly thawed frozen chicken and one that was always fresh, so buy whatever is available and fits your timeline. Just don’t buy what’s labeled as “previously frozen” and try to roast it still-frozen in a desperate time crunch.
If you can find pastured or heritage breed chickens, the flavor difference is noticeable. These birds have yellower skin and more texture in the meat because they’ve had room to move and more time to develop muscle. They cost more, but the taste is genuinely better—richer, less watery, with a more complex chicken flavor. That said, an ordinary supermarket chicken roasted well will be delicious too. Don’t let the perfect be the enemy of the good; work with what you have available and can afford.
Setting Up Your Kitchen for Success
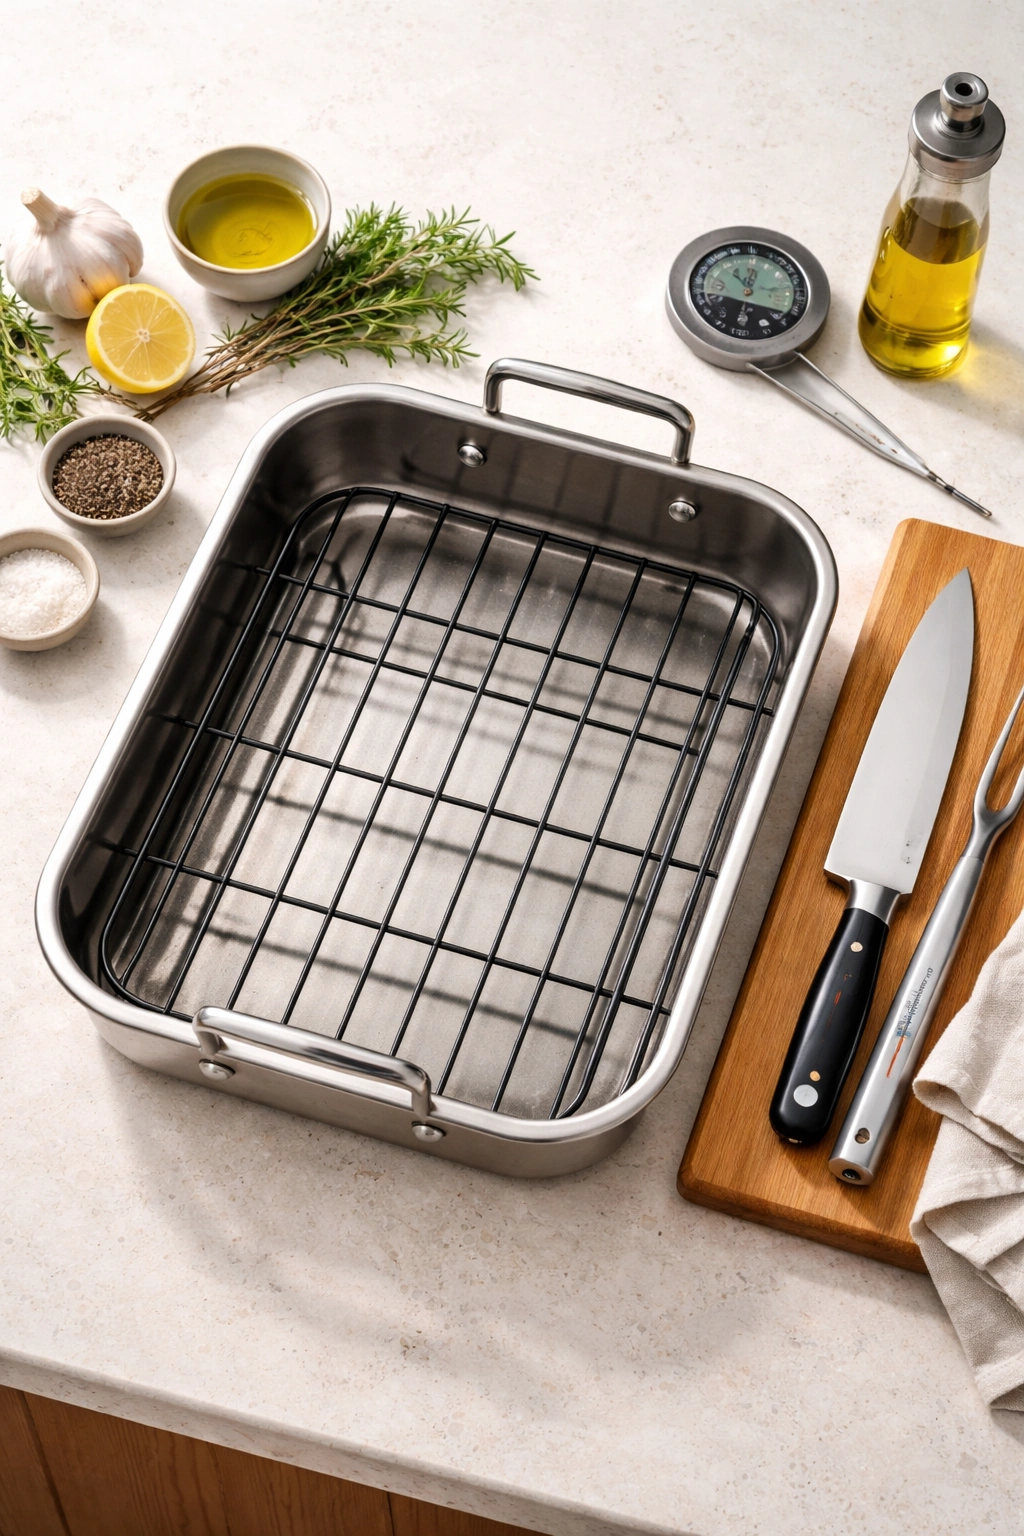
You don’t need fancy equipment to roast a chicken, but you do need a few basics arranged properly. A roasting pan is the first—something with sides high enough to contain splatters but low enough that air circulates around the bird. Stainless steel, cast iron, or ceramic all work fine. You want something at least sixteen to eighteen inches long so the chicken has space and isn’t crowded. Crowding the pan traps steam, which prevents browning and can make the skin soggy instead of crispy.
A meat thermometer is genuinely valuable. You can roast by time and experience, but a thermometer removes the guesswork. You’re looking for 165°F in the thickest part of the thigh (without touching bone, which reads hotter). An instant-read digital thermometer costs ten to fifteen dollars and pays for itself the first time it prevents an overcooked or undercooked bird. A simple kitchen timer is essential too, so you don’t forget the bird is in the oven—though most modern ovens have timers built in.
A sturdy pair of tongs or a carving fork helps when positioning the bird and flipping it if you choose to do that. A carving knife and fork make the job of portioning the cooked bird significantly easier. A cutting board large enough to catch juices as you carve is important so those flavorful juices don’t end up on your counter. None of this is expensive or specialized equipment—these are basics that any kitchen should have.
Serving Size, Timing, and Difficulty
Yield: Serves 4 generously, with leftovers for another meal or two
Prep Time: 15 minutes
Cook Time: 1 hour to 1 hour 15 minutes (depending on size)
Total Time: 1 hour 30 minutes to 1 hour 45 minutes (including a 15-minute rest)
Difficulty: Beginner — This involves no special technique beyond following the instructions. The oven does the hard work; you’re mostly just supervising.
Ingredients for a Classic Roasted Chicken

For the Chicken:
- 1 whole chicken (3½ to 4½ pounds), patted dry with paper towels
- 3 tablespoons unsalted butter, softened to room temperature
- 2 teaspoons fine sea salt, divided
- 1 teaspoon freshly ground black pepper, divided
- 1 teaspoon dried thyme (or 1 tablespoon fresh thyme leaves)
- ½ teaspoon dried rosemary (or 1 teaspoon fresh rosemary leaves)
- ½ teaspoon garlic powder
- ¼ teaspoon paprika (optional, adds color)
For the Cavity:
- 1 medium lemon, halved
- 4 to 5 fresh thyme sprigs (or additional dried thyme)
- 3 to 4 garlic cloves, smashed or halved
- Small handful of fresh parsley (optional)
For the Pan:
- 1 cup chicken broth or water
- 2 to 3 medium yellow onions, roughly quartered (optional but recommended)
- 4 to 5 medium carrots, cut into 2-inch pieces (optional but recommended)
- 2 tablespoons olive oil or additional melted butter
Step-by-Step Instructions for a Perfect Roasted Chicken
Prepare and Position:
-
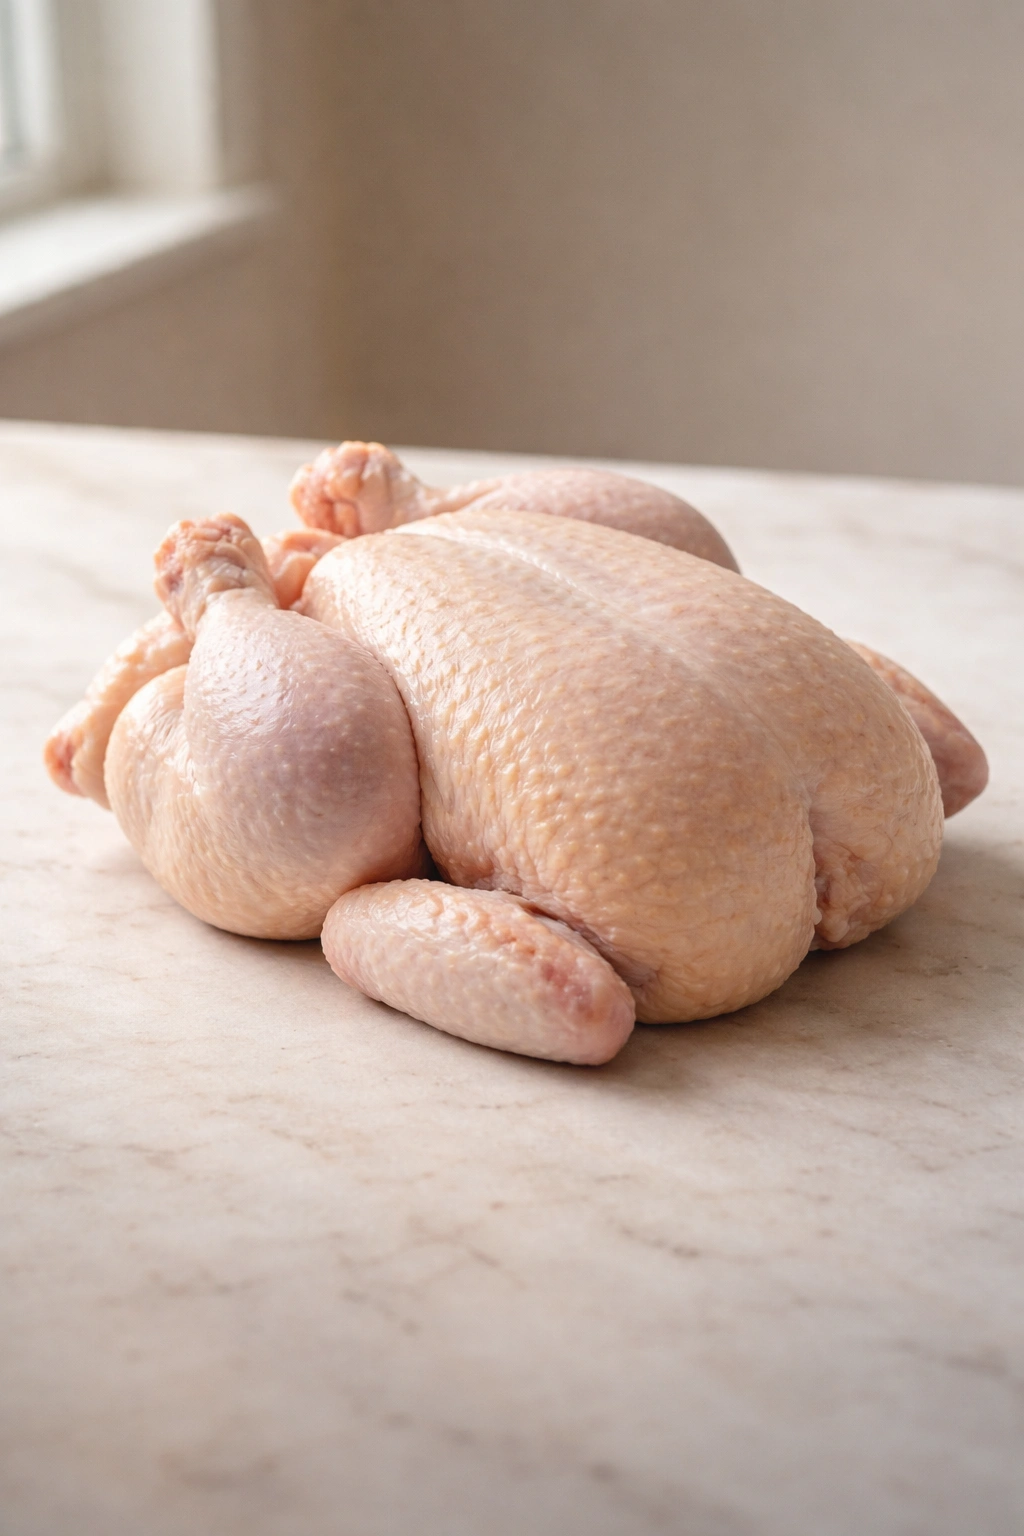
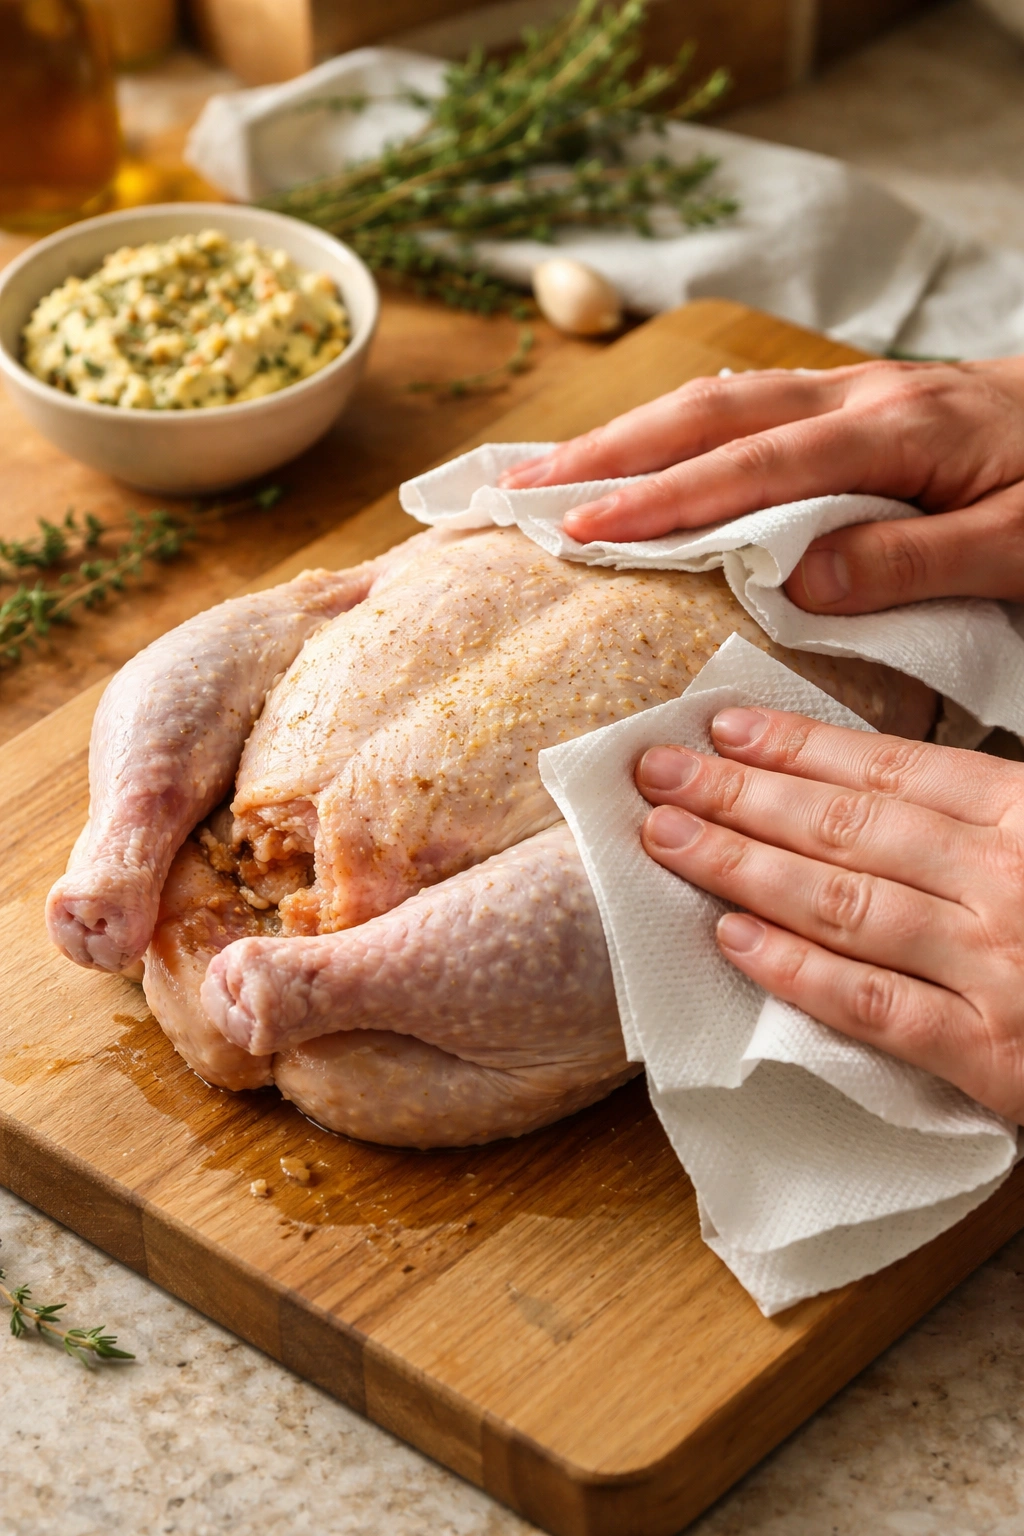
Remove the chicken from the refrigerator 30 to 45 minutes before roasting so it comes to closer to room temperature — this helps it cook more evenly. Pat it completely dry with paper towels, getting inside the cavity too. Moisture on the skin will steam rather than crisp, so don’t skip this step.
-
Preheat your oven to 450°F (230°C) and position the rack in the center of the oven. Set a roasting pan on the stovetop or a lower shelf to warm while the oven preheats — a warm pan helps the bottom of the chicken brown immediately instead of steaming initially.
Advertisements -
While the oven preheats, combine the softened butter with 1 teaspoon of salt, ½ teaspoon of black pepper, thyme, rosemary, garlic powder, and paprika in a small bowl. Mix with a fork until well combined. This herb butter is what makes the skin flavorful and golden.
Season and Stuff:
-
Place the dried chicken on a clean cutting board or your work surface. Using your fingers and working gently, separate the skin from the breast meat by sliding your hand under the skin on either side of the breastbone — be careful not to tear the skin. Rub about half of the herb butter under the skin, spreading it evenly over both breasts and working it down as far as your hand reaches. This protects the white meat and seasons it from within.
-
Rub the remaining herb butter all over the exterior of the bird, paying special attention to the thighs and legs. Season the outside with the remaining 1 teaspoon of salt and ½ teaspoon of pepper, and massage everything together. The bird should be well covered but not drenched.
-
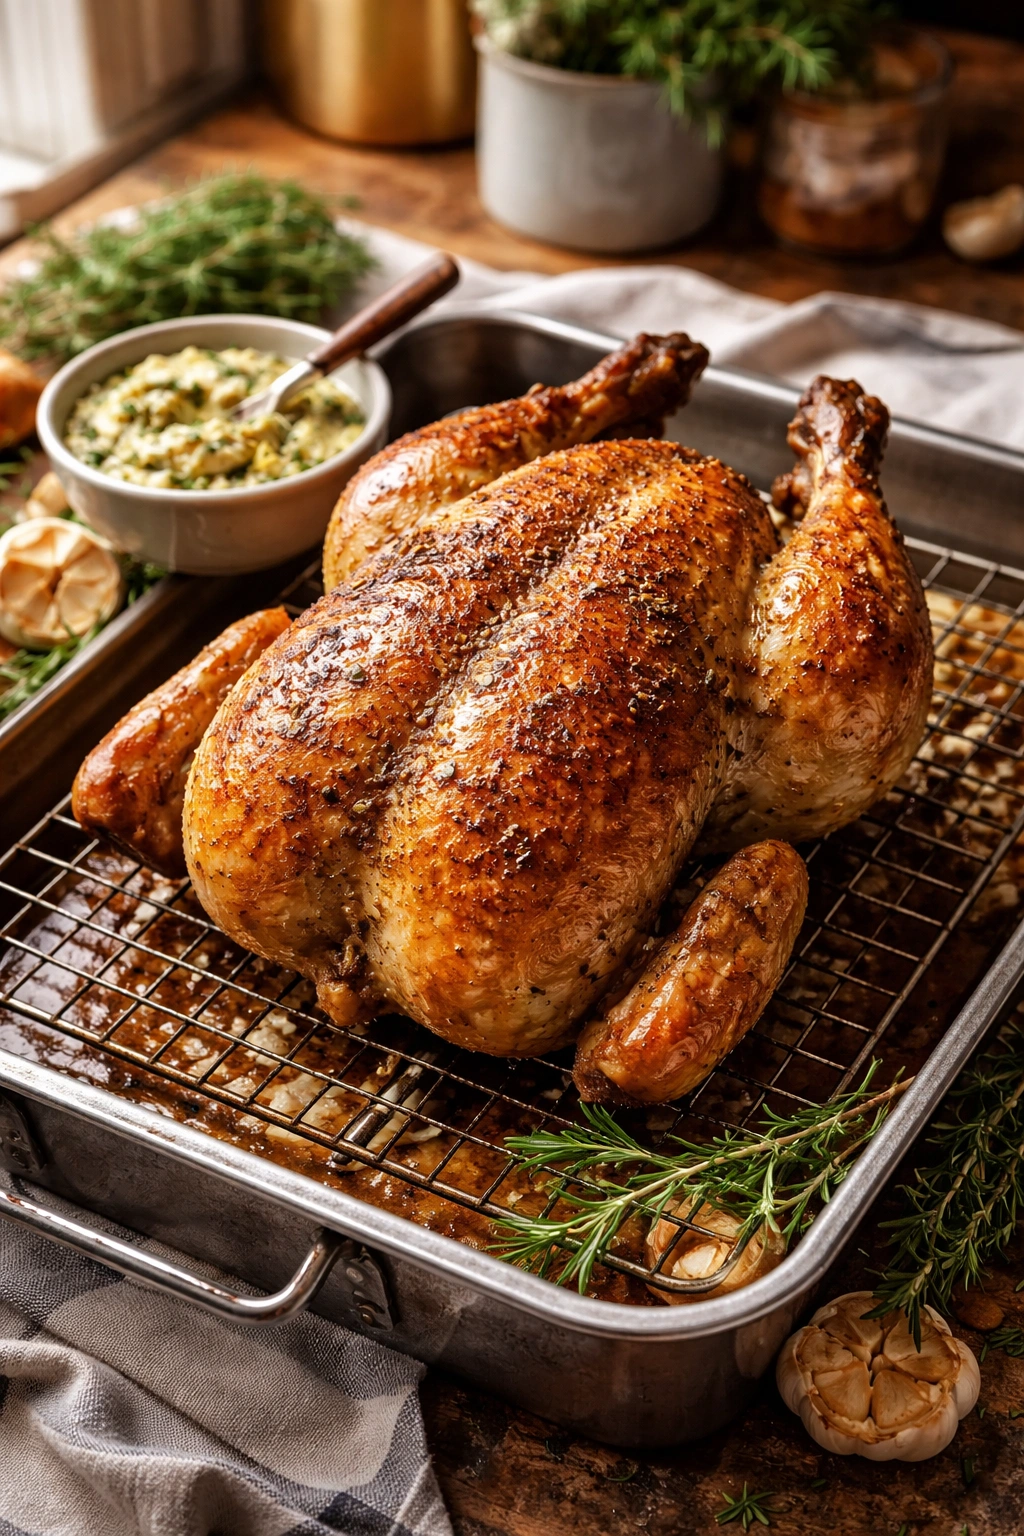
Stuff the cavity loosely with the lemon halves, thyme sprigs, garlic cloves, and parsley if using. Tuck the wing tips under the body of the chicken, which prevents them from burning and gives you a more compact, evenly shaped bird that roasts faster. Tie the legs together with kitchen twine just to keep the cavity closed and give the bird a neater shape — this is optional but makes carving easier later.
Roast:
-
Arrange the quartered onions and cut carrots (if using) in the bottom of the preheated roasting pan, spreading them in a single layer. These vegetables will roast alongside the chicken, absorbing the flavorful drippings and becoming caramelized and sweet. Drizzle them lightly with olive oil or melted butter.
-
Place the seasoned chicken breast-side up on top of the vegetables. Pour the broth or water around the bird (not over it, which will wash away seasoning), ensuring about ½ inch of liquid covers the bottom of the pan. This liquid will prevent drippings from burning and provides the foundation for gravy.
-
Roast at 450°F (230°C) for 20 minutes to crisp and brown the skin. Do not open the oven door during this time — every time you do, heat escapes and the cooking time extends.
-
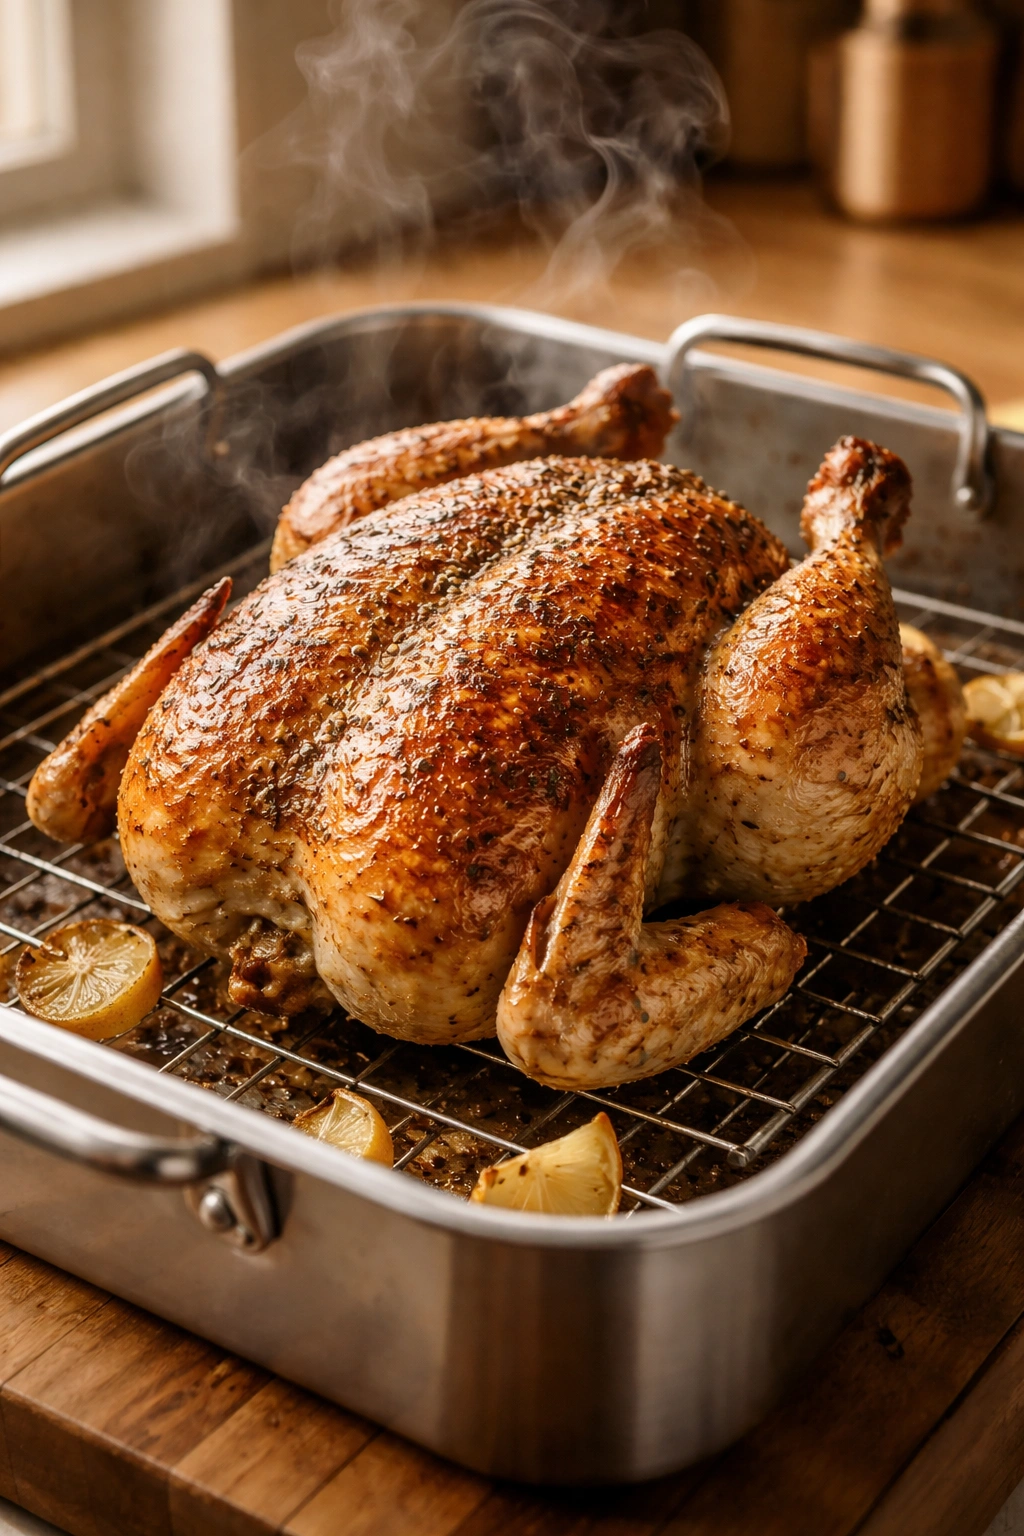
Reduce the heat to 375°F (190°C) and continue roasting for another 40 to 55 minutes, depending on the exact size of the bird. There’s no need to flip or baste during this time, though if you’d like to baste every 20 minutes with the pan juices, it won’t hurt (and some swear it creates even richer flavor). The chicken is done when an instant-read thermometer inserted into the thickest part of the thigh reads 165°F — insert it from the side, tilting toward the thigh but not touching the thigh bone, which reads hotter.
Advertisements -
When the chicken is fully cooked, carefully remove the roasting pan from the oven — the pan and any residual liquid inside are extremely hot. Transfer the chicken to a clean cutting board or serving platter and let it rest for 15 minutes before carving. Do not skip this rest; it’s crucial. While the chicken rests, the residual heat continues gentle cooking, the muscle fibers relax, and the juices settle back into the meat instead of running out onto your cutting board.
Finish and Serve:
-
If you’d like to make a quick pan sauce or gravy, return the roasting pan to the stovetop over medium heat. The vegetables and pan drippings are now concentrated flavor. Scrape any browned bits from the bottom of the pan with a wooden spoon. If you want a thickened gravy, you can sprinkle 1 to 2 tablespoons of flour over the vegetables and juices, stir to combine, then simmer for 2 to 3 minutes. Strain through a fine-mesh sieve into a saucepan if you want a smooth gravy, or simply strain into a serving bowl for a chunky vegetable-studded sauce. Season with additional salt and pepper to taste.
-
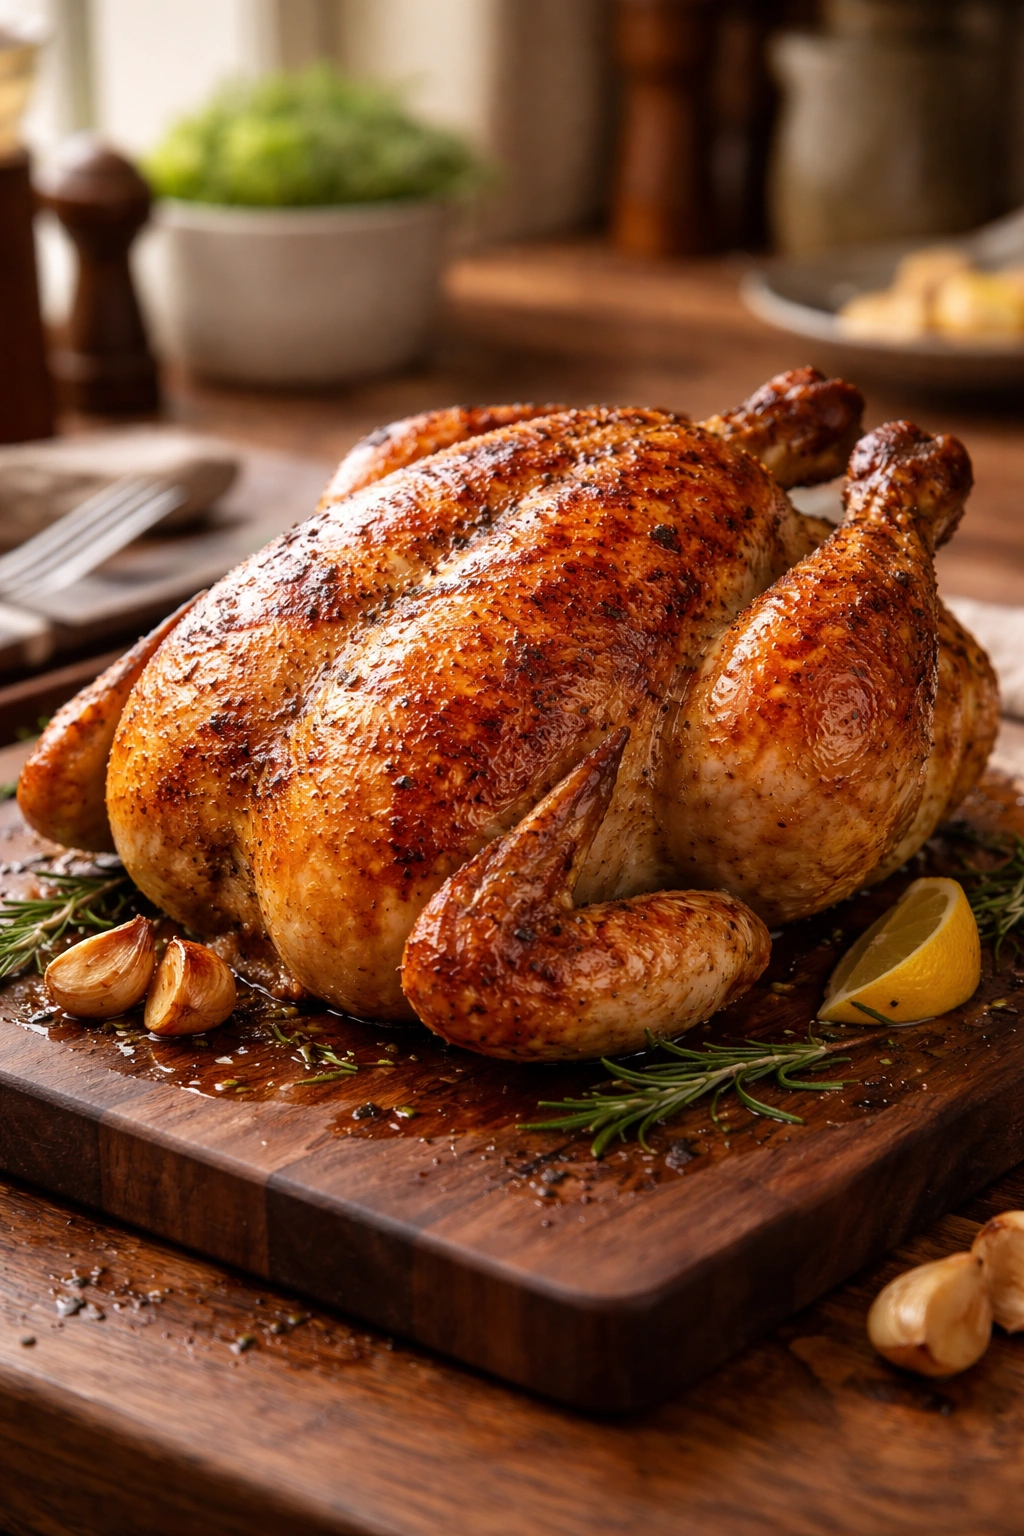
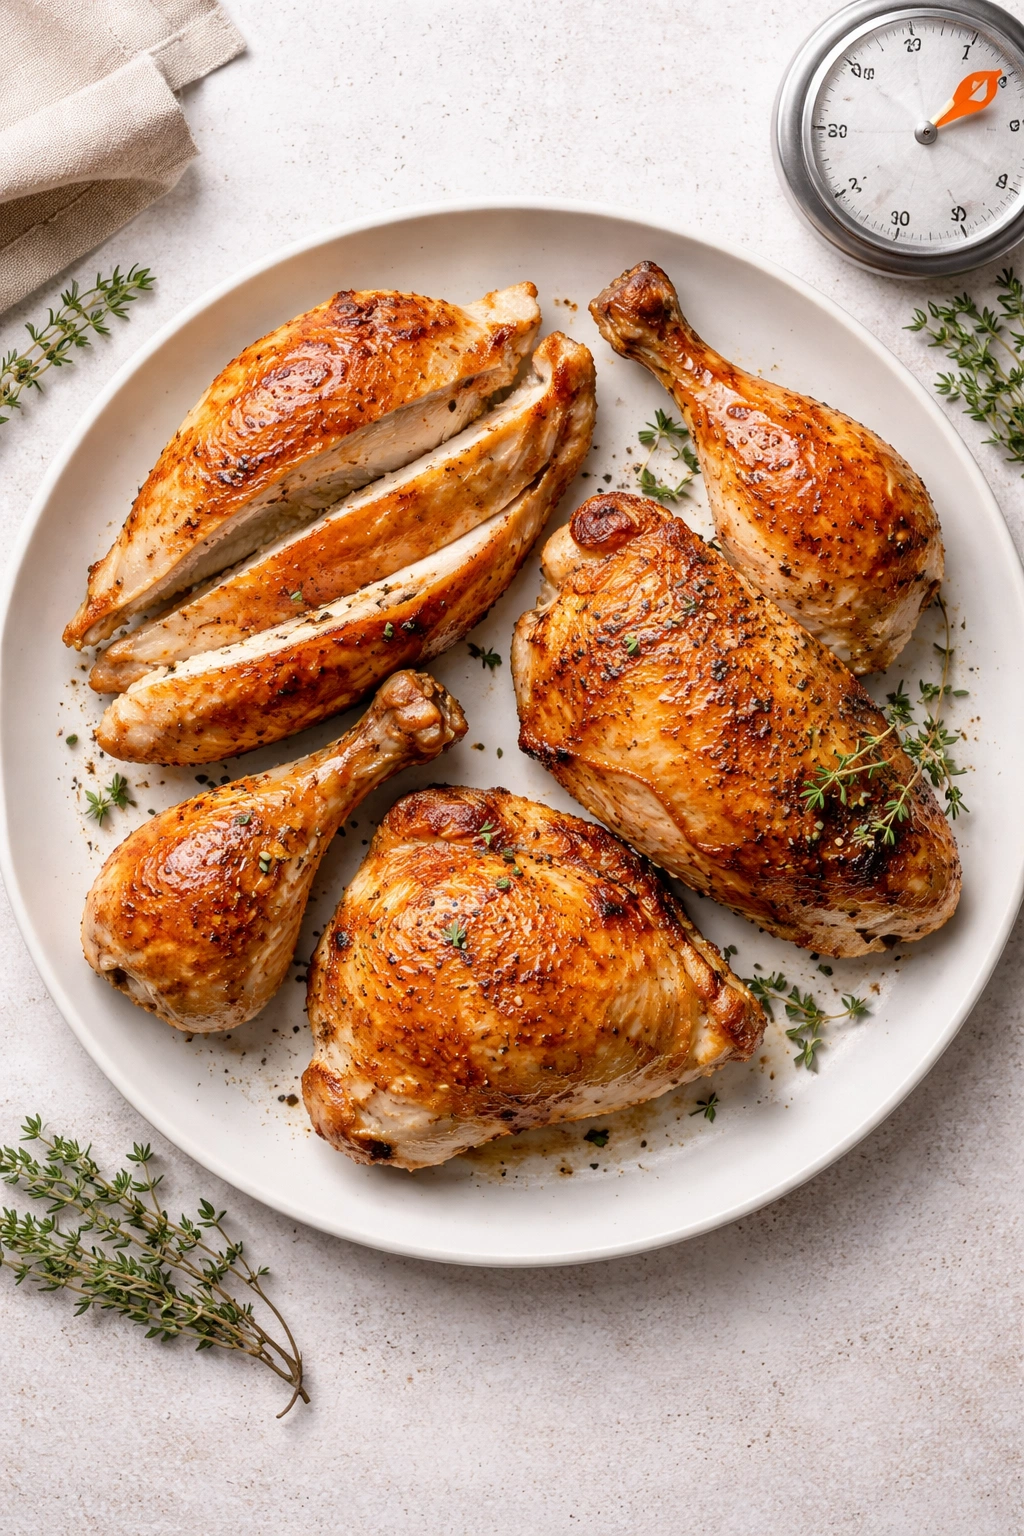
Carve the rested chicken by first removing the legs and thighs — pull a leg away from the body and slice between the thigh and the breast to separate it completely. Cut between the thigh and drumstick to separate those two pieces. Repeat on the other side. Then carve the breasts by making angled cuts parallel to the breastbone, cutting away one breast half at a time. Transfer carved meat to a serving platter, pour some of those pan juices over everything, and serve while warm.
Techniques That Create Noticeably Better Results
The quality difference between an okay roasted chicken and an exceptional one comes down to a few small techniques that compound. Starting with a dry bird is the foundation—moisture on the skin prevents browning and creates steam instead of that crispy, golden exterior everyone loves. Pat your chicken thoroughly with paper towels before roasting, even if it’s already been wrapped in plastic. That extra minute matters.
The herb butter under the skin is genuinely transformative. It’s not a fancy technique; it’s simply rubbing seasoned fat between the skin and the meat. This protects the lean breast meat from drying out while it cooks, seasons the meat from the inside out, and creates a more flavorful skin as the butter melts and browns. This single step is why restaurant roasted chickens often taste better than home versions.
Allowing the bird to rest after roasting cannot be overstated. Those fifteen minutes might feel long when you’re hungry and the chicken smells incredible, but they’re the difference between meat that stays juicy and tender versus meat that shreds with all its flavorful juices running onto your cutting board. The residual heat continues cooking during the rest, so the internal temperature may actually rise a few degrees. The muscle fibers relax, allowing the moisture they expelled during cooking to be reabsorbed.
Using a meat thermometer removes the guesswork entirely. Cooking time varies based on the exact size of the bird, the starting temperature, and your oven’s personality. Some ovens run hot; others run cold. A thermometer tells you exactly when the chicken is done—not overcooked, not undercooked. You’re looking for 165°F in the thickest part of the thigh, which is the part that takes the longest to cook. The white meat will be well above that by then, which is fine.
Common Mistakes That Diminish Your Results

The single most common mistake is skipping the rest period. Cooks rush to carve the bird while it’s still steaming from the oven because it looks done and smells incredible. That impatience costs you—the meat will be dry and the juices will end up wasted on the cutting board instead of in the meat where they belong. Build in that fifteen-minute rest as part of your timing, and protect the cooked bird by tenting it loosely with foil if you’re worried about it cooling too quickly (which is not really a concern for a properly cooked chicken).
Roasting at one temperature instead of using the two-temperature approach is another issue. If you roast at high heat the entire time, the skin over the thighs and legs can burn before the thighs reach 165°F internally. If you roast at low heat the entire time, the skin never browns properly and ends up pale and rubbery instead of crispy and golden. Starting hot to crisp the skin, then reducing heat to finish cooking the meat through, is the formula that works every time.
Wet skin before roasting will almost always disappoint. Moisture prevents browning; it steams instead. This is why patting the chicken dry is non-negotiable. Get inside the cavity too—water in there steams the interior and prevents it from cooking evenly. If your chicken is packaged in those absorption pads, remove those pads, discard them, and pat everything dry.
Skipping vegetables in the bottom of the pan means you’re missing out on two things: flavor and richness. Those roasted vegetables catch the flavorful drippings, develop their own caramelized sweetness, and create the foundation for pan sauce or gravy. They’re not required, but they genuinely improve the final dish and give you a vegetable component that requires no additional effort.
Overcrowding the pan or positioning the bird too close to the oven walls prevents proper air circulation and can result in uneven browning—one side dark, the other pale. Ensure the roasting pan is large enough that the bird has at least an inch of space on all sides. If your kitchen tends toward smaller equipment, that’s fine; just use a larger roasting pan instead.
Variations That Adapt to Your Preferences and Dietary Needs
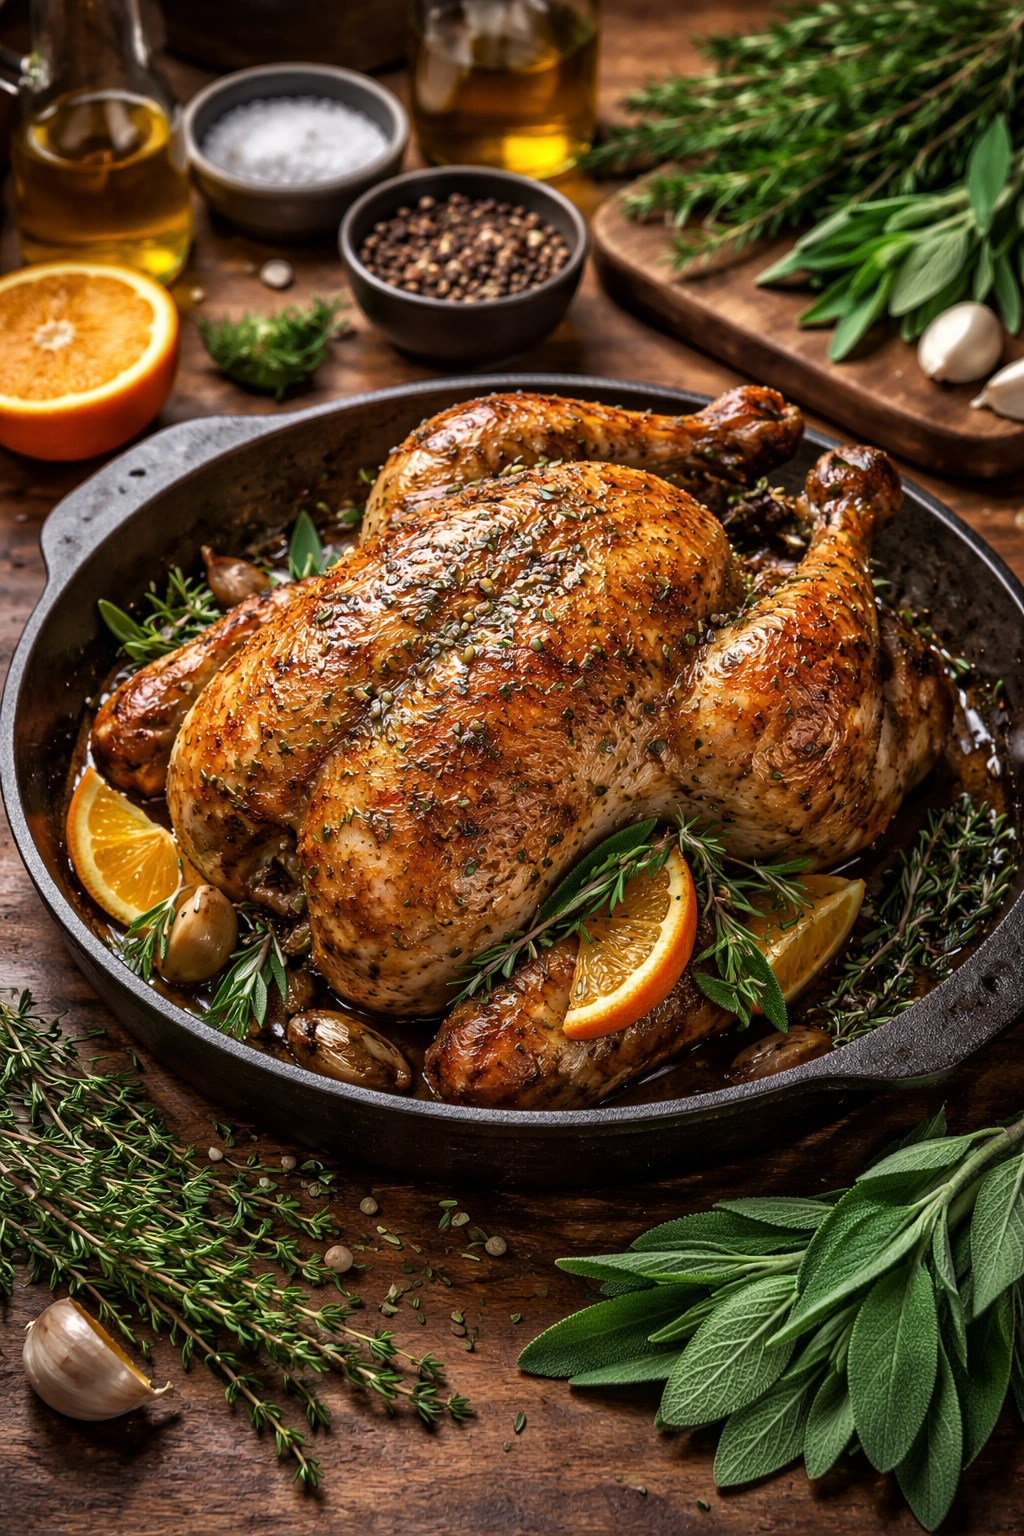
A roasted chicken is a versatile template. The herb combination is endlessly adaptable—swap thyme and rosemary for Italian seasoning, herbes de Provence, Za’atar spice blend, or even a straightforward garlic and paprika combination. Whatever fresh or dried herbs you have on hand will work. The cavity fillings are similarly flexible. Instead of lemon and garlic, try orange and sage. Try white wine splashed in the pan instead of broth. Add sliced garlic cloves and whole peeled shallots to the roasting vegetables.
For a Mediterranean version, make the herb butter with oregano, thyme, and minced garlic instead of the rosemary combination, and fill the cavity with lemon and fresh oregano. Drizzle the finished bird with good olive oil before serving, and serve with roasted potatoes and a bright green salad. For an Asian-inspired approach, make the herb butter with ginger, soy sauce, and sesame oil instead of traditional herbs, and fill the cavity with fresh ginger slices, green onions, and a star anise or two.
A Moroccan variation uses ground cumin, cinnamon, and a touch of ginger in the herb butter, with dried apricots and sliced onions in the cavity. Serve with couscous and a yogurt-based sauce. A French bistro approach keeps the herbs traditional but finishes the pan sauce with cream and a touch of Dijon mustard—it transforms simple pan drippings into something rich and elegant.
If you’re feeding vegetarians alongside omnivores, simply serve portions of the roasted vegetables with a vegetarian sauce while everyone else enjoys the chicken. The vegetables have absorbed so much flavor from roasting alongside the bird that they’re genuinely satisfying on their own. A dairy-free version simply omits the butter under the skin—the bird will still brown beautifully, though slightly less dramatically. An oil-based herb mixture works just as well, and you can finish with a squeeze of fresh lemon juice for brightness.
Storage and Reheating So Nothing Goes to Waste
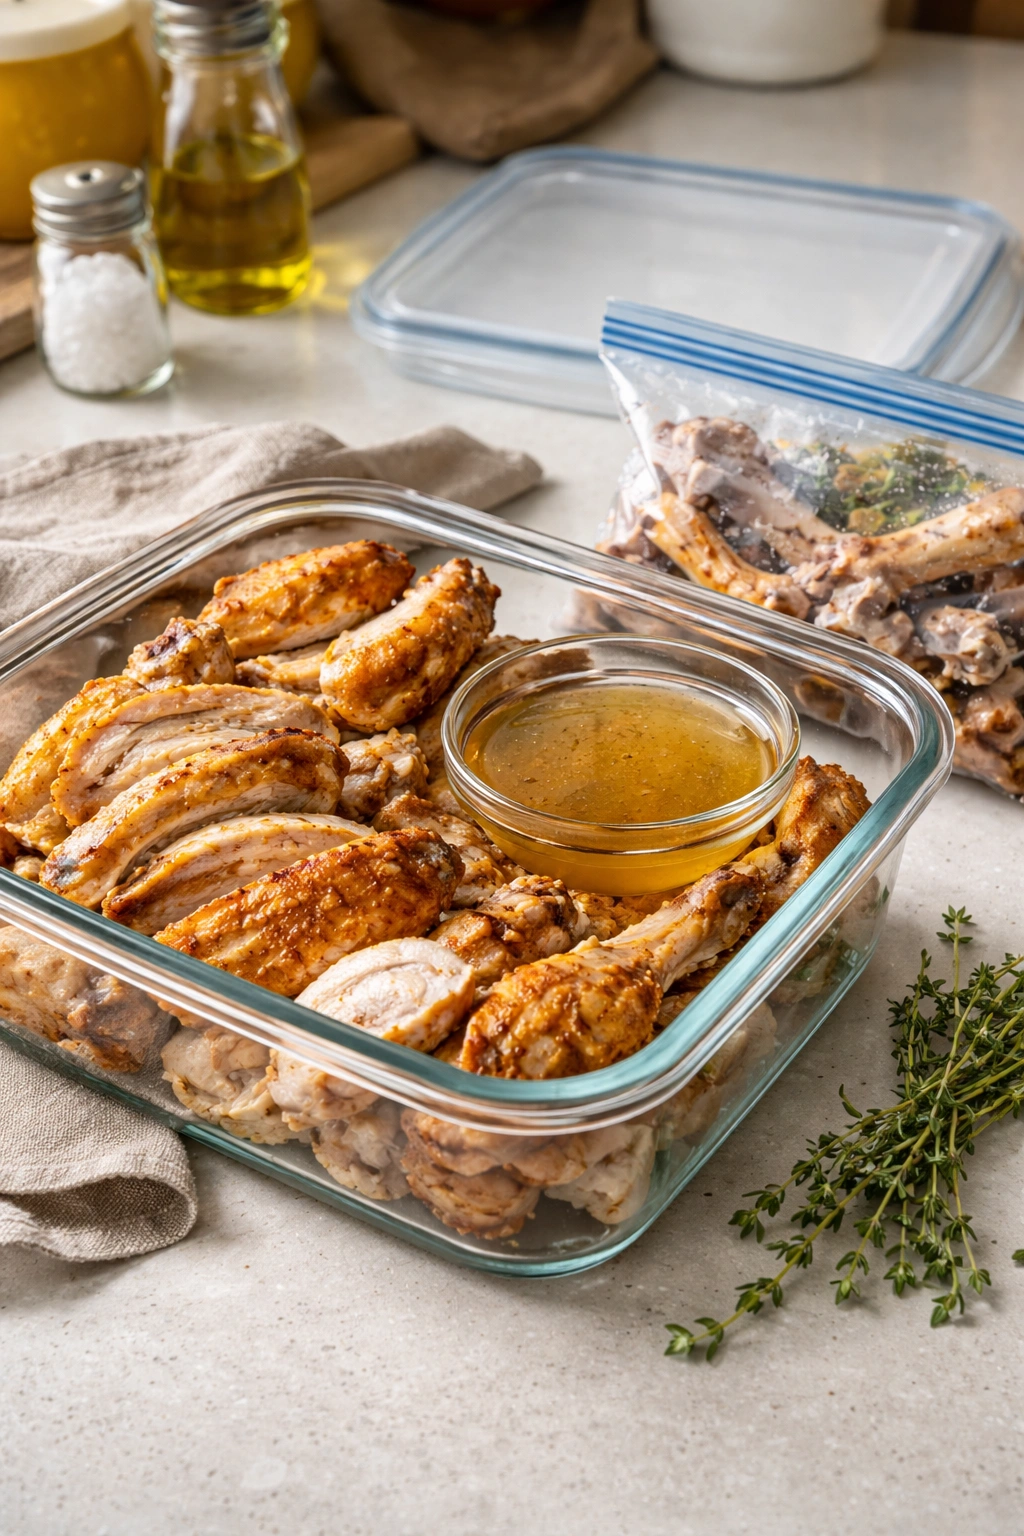
A roasted chicken keeps beautifully, which is much of its value. Shred or cut the meat from the bones, store it in an airtight container, and it lasts three to four days in the refrigerator. The bones and any chicken skin should go directly into a bag or container for the freezer—you’ll use those for stock. That stock, simmered for six to eight hours, transforms into something incomparably richer than anything you can buy.
Reheating leftover chicken properly means you don’t end up with dry, stringy meat. The gentlest approach is to slice or shred the meat, spread it in a covered baking dish with a splash of broth or water, and warm it in a 325°F oven for about fifteen minutes. The broth keeps the meat moist as it warms through. Microwaving works if you’re in a hurry—place the meat in a covered microwave-safe container with a touch of broth, microwave at 50% power for two to three minutes, stirring halfway through. Full power tends to toughen the meat.
The roasted vegetables can be eaten cold in salads, tossed with pasta, or stirred into soups. They actually develop deeper flavor as they sit and cool. Pan sauce or gravy keeps for about five days and can be reheated gently on the stovetop. Those drippings and any rendered fat at the top can be strained, stored separately, and used for cooking vegetables or making the most flavorful hash imaginable.
The bones, skin, and any trimmings should be frozen in a sturdy freezer bag or container. When you’ve accumulated bones from one or two chickens (they don’t need to be from the same day), you have the foundation for a pot of stock that will taste infinitely better than store-bought. Simply cover the bones with cold water by an inch, bring to a gentle simmer, and let them cook partially covered for six to eight hours. The longer, gentler simmer extracts collagen and creates that silky, rich mouthfeel that makes homemade stock remarkable.
Serving Suggestions and Perfect Pairings
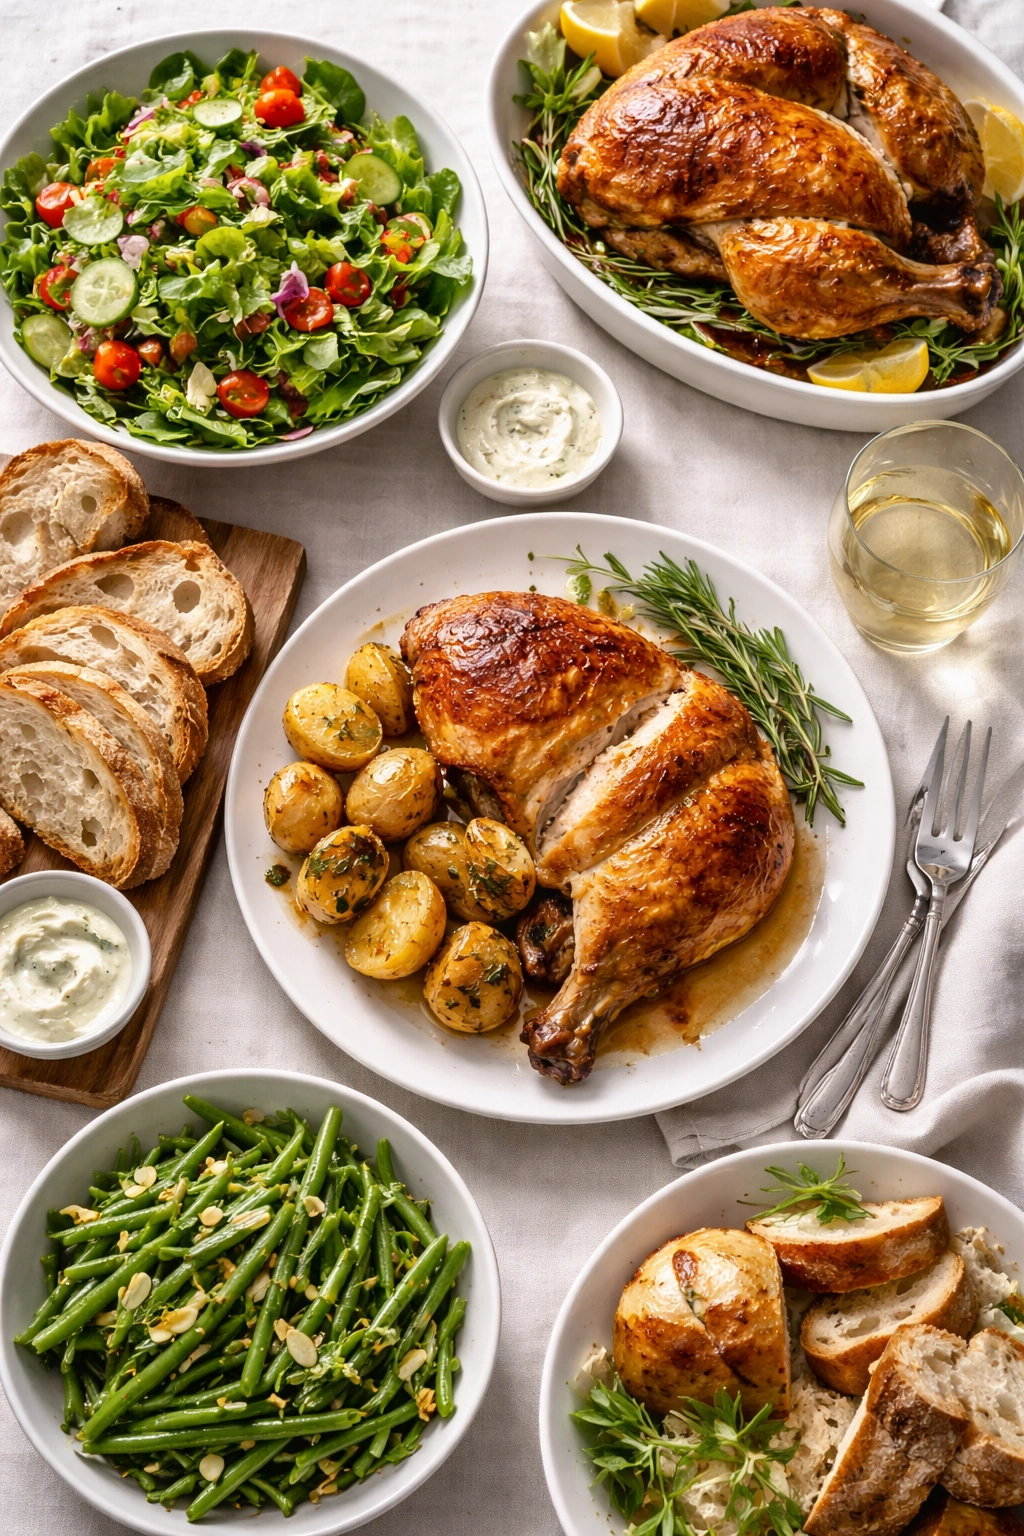
A whole roasted chicken is magnificent with almost anything, but certain sides let it shine. Simple roasted potatoes, tossed with fleur de sel and fresh thyme, need no competing flavors—let the chicken be the star. Bright, acidic sides balance the richness of the meat; a big green salad with lemon vinaigrette, shredded cabbage slaw with a tangy dressing, or roasted vegetables tossed with sharp vinegar all work beautifully. Creamy sides—buttered egg noodles, mashed potatoes with plenty of butter, or silky polenta—turn the meal into genuine comfort food.
Rice pilaf soaks up the pan juices and adds substance without competing. Crusty bread is essential; you’ll want something to soak up every drop of those pan juices and herb butter. A simple tomato salad with basil and good olive oil provides freshness that cuts through the richness. Roasted carrots, parsnips, or beets develop sweetness in the oven and pair beautifully with chicken.
Wine pairings are straightforward. A medium-bodied white wine—an unoaked Chardonnay, Sauvignon Blanc, or Pinot Grigio—complements roasted chicken perfectly. If you prefer red wine, Pinot Noir is classically wonderful; the wine’s acidity and slight earthiness match the herb-seasoned bird without overwhelming it. A rosé wine bridges both worlds and is particularly nice with Mediterranean or Asian variations.
The leftovers are perhaps even more valuable than the original meal. Shredded chicken makes exceptional sandwiches with good bread, a touch of mayo, and crispy lettuce. It transforms into salads when tossed with fresh herbs, crispy vegetables, and a vinaigrette. Quesadillas become simple weeknight dinners when you fill them with chicken, cheese, and roasted vegetables from last Sunday. That stock you’ve made from the bones will be the foundation for soups, risottos, and sauces for weeks.
Final Thoughts

A whole roasted chicken isn’t complicated—it’s genuinely one of the most straightforward dishes you can make. You season it, you set it in the oven, and you mostly walk away and let time and heat do the work. What emerges is something that tastes like you spent all afternoon cooking, something that feeds four people with beautiful leftovers, and something that costs far less than buying individual chicken parts. The effort involved is minimal, and the reward is completely out of proportion to the work required.
The real magic is that a properly roasted chicken tastes phenomenally good. The skin is crispy and golden, the white meat stays tender and juicy, the dark meat is rich and succulent, and the flavor is complex and deeply satisfying. It’s one of those dishes that tastes better than it has any right to taste given how simple it actually is. Once you’ve made one, you’ll understand why roasted chicken has been a centerpiece meal in cultures around the world for generations.
Start with a good three-to-four-pound bird, season it well inside and out, roast it using the two-temperature method, and let it rest before carving. That’s the formula. The specifics—which herbs, what vegetables in the pan, how you finish the sauce—those can change every time you roast a chicken. The core technique remains reliable and forgiving. You’ll make a genuinely excellent roasted chicken, and you’ll understand why this dish is worth the Sunday effort.